Enable TLS on your Windows 11 for secure internet connections
by Vladimir Popescu
Being an artist his entire life while also playing handball at a professional level, Vladimir has also developed a passion for all things computer-related. With an innate fascination… read more
Updated on
- The TLS protocol is an important part of the security features that help protect your data on the Internet.
- Although there have been upgrades, the two older versions of TLS are still used today and are supported by most modern browsers and servers.
- Free VPN service that is available for Opera One browser users
- Supports Windows, macOS, iOS, and Android devices
- Browse the internet securely and privately by encrypting your connection and masking your IP address
- New AI Service integrated
- ⇒ Get Opera One
TLS 1.0 and TLS 1.1 are the two most popular versions of the Transport Layer Security (TLS) protocol, which provides security for Internet communications such as Web browsing, email, and instant messaging.
Given that attackers are constantly developing new methods of attack, there have been some vulnerabilities found in earlier versions of TLS which can allow attackers to decrypt your data. Nevertheless, here’s how you can enable either in Windows 11.
How we test, review and rate?
We have worked for the past 6 months on building a new review system on how we produce content. Using it, we have subsequently redone most of our articles to provide actual hands-on expertise on the guides we made.
For more details you can read how we test, review, and rate at WindowsReport.
What’s the difference between TLS 1.0 and 1.1?
TLS 1.0 and TLS 1.1 are the two most widely used versions of the Transport Layer Security (TLS) protocol. Both versions offer a similar level of security and encryption. However, there are some differences that users should be aware of when choosing between them:
- Security – In terms of security, there is little difference between these two protocols: both are still considered secure, though some may consider them obsolete and prefer newer versions such as TLS 1.2 or even 1.3 (which isn’t supported by many browsers yet).
- Speed – TLS 1.1 is faster than TLS 1.0 because it uses fewer CPU cycles during processing.
- Difficulty in upgrading – Some older client applications may not be able to support newer versions of the protocol due to a lack of resources or compatibility issues with their operating systems.
How do I enable TLS 1.0 and TLS 1.1 in Windows 11?
1. Enable TLS 1.0
1.1 Use the Control Panel
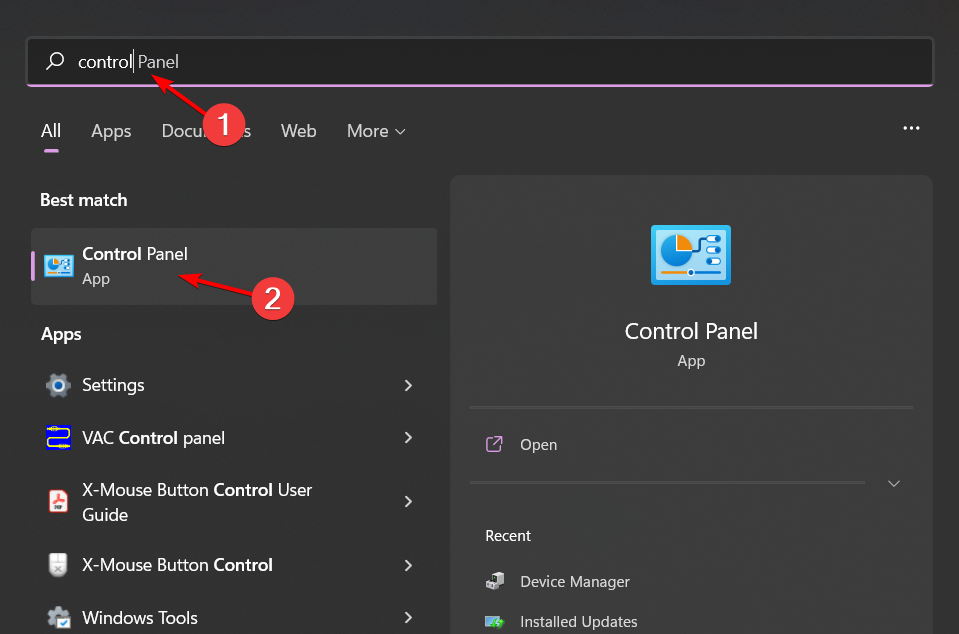
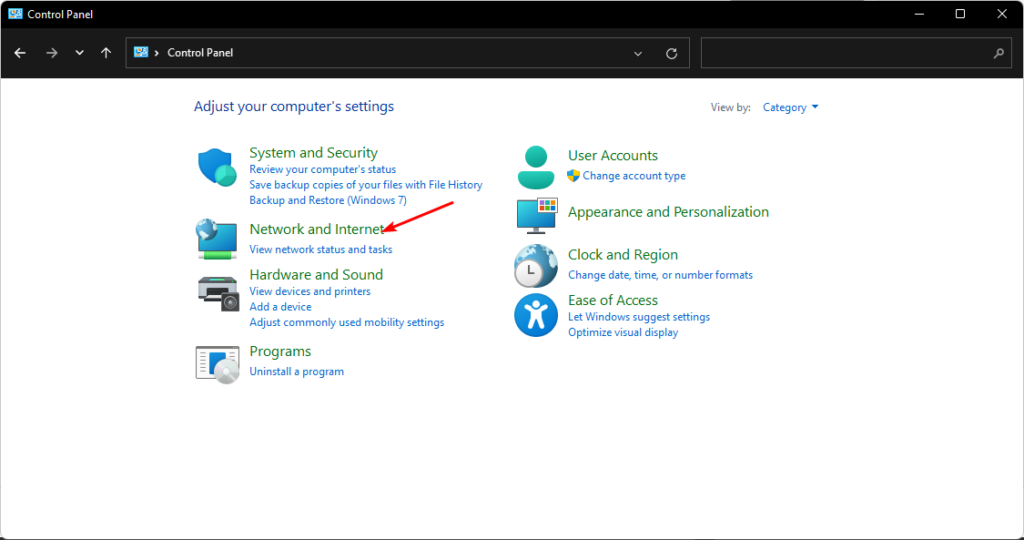
- Hit the Windows key, type Control Panel in the search bar and click Open.

- Select Network and Internet.

- Click on Internet Options.
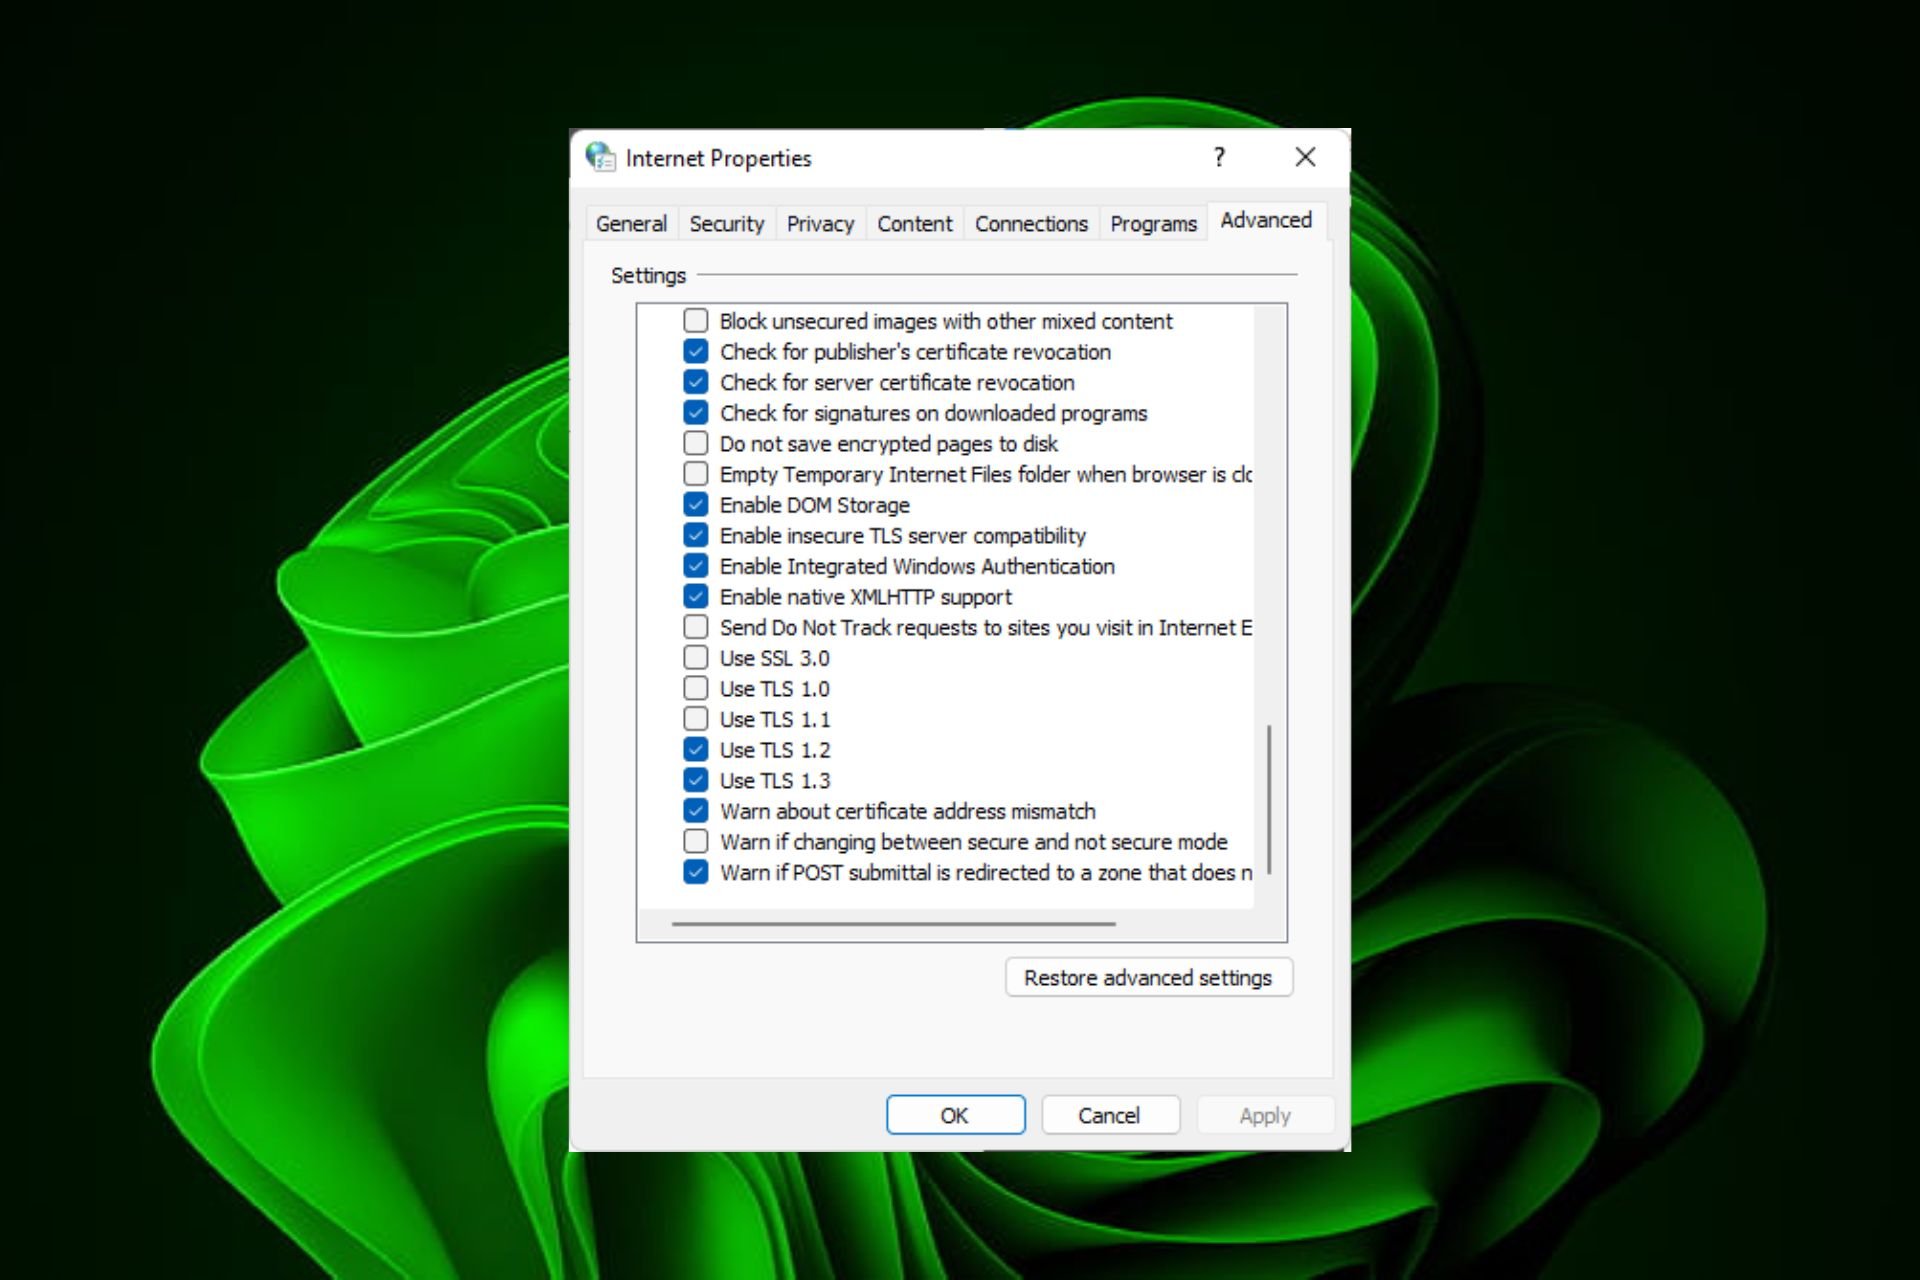
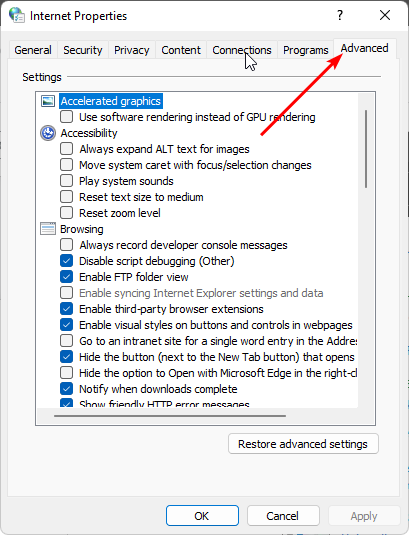
- In the Internet Properties dialog box that pops up, navigate to the Advanced tab.

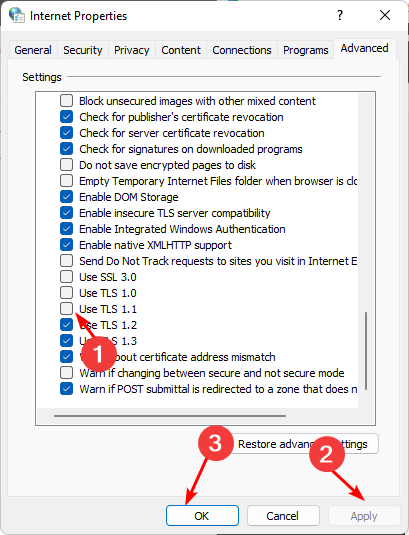
- Scroll down and under Settings, check the box next to Use TLS 1.0, then hit the Apply and OK buttons to save changes.


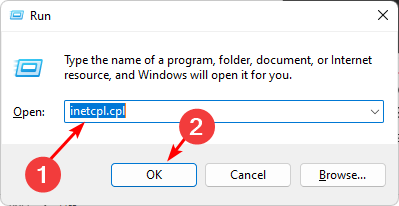
1.2 Use the Run command
- Hit the Windows + R keys to open the Run command.
- Type inetcpl.cpl in the dialog box and hit Enter.

- Navigate to the Advanced tab in the Internet Properties window that pops up.
- Scroll down and under Settings, check the box next to Use TLS 1.0 then hit the Apply and OK buttons to save changes.

2. Enable TLS 1.1
2.1 Use the Control Panel
- Hit the Windows key, type Control Panel in the search bar and click Open.
- Select Network and Internet.
- Click on Internet Options.
- In the Internet Properties dialog box that pops up, navigate to the Advanced tab.
- Scroll down and under Settings, check the box next to Use TLS 1.1, then hit the Apply and OK buttons to save changes.
2.2 Use the Run command
- Hit the Windows + R keys to open the Run command.
- Type inetcpl.cpl in the dialog box and hit Enter.
- Navigate to the Advanced tab in the Internet Properties window that pops up.
- Scroll down and under Settings, check the box next to Use TLS 1.1, then hit the Apply and OK buttons to save changes.
Although you can still enable the TLS 1.0 and 1.1 protocols, it is important to note that they are no longer supported by most browsers and cannot be trusted to provide secure connections.
- Fix: Set Time Zone Automatically Defaults to Wrong Time Zone
- Is Windows 11 Faster Than Windows 10?
- Fix: Internet Keeps Disconnecting When Playing Games on Windows 11
- Fix: Can’t Disable Background Blur on Windows 11
- Are Windows 11 Product Keys Backward Compatible?
You can also enable TLS support depending on the browser you’re using. To that effect, we have a list of browsers that support the latest TLS versions. If you experience the TLS error, we also have an article detailing how to bypass it.
Tell us which TLS protocol you prefer in the comment section below.
![]()
Только при необходимости вы можете использовать эти инструкции для повторного включения TLS версий 1.0 и 1.1 для восстановления совместимости подключений в Windows 11.

В Windows 11, несмотря на то, что это не рекомендуется, вы можете снова включить протокол TLS версий 1.0 и 1.1, и в этом руководстве вы узнаете, как это сделать.
TLS — это протокол шифрования, который обеспечивает безопасность связи по сети между клиентом и сервером, и он широко доступен в таких приложениях, как электронная почта, обмен мгновенными сообщениями и IP-передача голоса по IP. Протокол существует с 1999 года, и с тех пор было обнаружено несколько слабых мест в системе безопасности. TLS 1.1 был опубликован в 2006 году и внес некоторые улучшения в безопасность, но так и не стал популярным.
TLS версий 1.0 и 1.1 уже давно превзойден TLS 1.2 и 1.3, и реализации протокола теперь пытаются согласовывать соединения, используя самую высокую доступную версию протокола.
Поскольку использование старых версий протокола невелико, Microsoft решила отключить их в Windows 11. Единственная проблема заключается в том, что это изменение по-прежнему повлияет на тех, кто использует приложения, использующие TLS версий 1.0 и 1.1, такие как Microsoft SQL Server 2012, 2014 и 2016, Office 2008 Professional и другие.
Однако, если у вас есть веская причина или вы заметили «Event 36871» в журнале событий Windows, например, «Произошла неустранимая ошибка при создании учетных данных TLS <клиент/сервер>. Состояние внутренней ошибки — 10013. Клиентский процесс SSPI — это <идентификатор процесса>», можно включить TLS версий 1.0 и 1.1 в Windows 11, но вам придется изменить реестр.
В этом руководстве вы узнаете, как включить старые версии TLS в Windows 11.
Предупреждение: Очень важно отметить, что изменение реестра Windows может вызвать серьезные проблемы, если оно не используется должным образом. Предполагается, что вы знаете, что делаете, и что вы создали полную резервную копию своей системы, прежде чем продолжить.
Чтобы включить TLS 1.0 и 1.1 в Windows 11, выполните следующие действия:
- Откройте «Пуск» в Windows 11.
- Найдите regedit и щелкните верхний результат, чтобы открыть приложение.
- Перейдите по следующему пути:
HKLM\SYSTEM\CurrentControlSet\Control\SecurityProviders\SCHANNEL\Protocols\TLS 1.0\Client - Щелкните правой кнопкой мыши клавишу клиента, выберите «Создать» и выберите «Значение DWORD (32-разрядная)».

- Установите положение Enabled и нажмите Enter.
- Дважды щелкните только что созданный DWORD и измените его значение с 0 на 1.

- Нажмите кнопку ОК.
- Перейдите по следующему пути:
HKLM\SYSTEM\CurrentControlSet\Control\SecurityProviders\SCHANNEL\Protocols\TLS 1.0\Server - Щелкните правой кнопкой мыши клавишу клиента, выберите «Создать» и выберите «Значение DWORD (32-разрядная)».
- Назовите клавишу Enabled и нажмите Enter.
- Дважды щелкните только что созданный DWORD и измените его значение с 0 на 1.

- Нажмите кнопку ОК.
После того, как вы выполните эти шаги, старые версии протокола Transport Layer Security будут включены в Windows 11.
В этой статье мы рассмотрим, как включить протокол Transport Layer Securit (TLS 1.2) в различных версиях Windows, в том числе для приложений .Net и WinHTTP. Протоколы TLS 1.0 и TLS 1.1 являются устаревшими, и если вы мигрировали все ваши сервисы на TLS 1.2 или TLS 1.3, вы можете отключить поддержку старых версий протоколов на клиентах и серверах Windows (Отключение TLS 1.0 и TLS 1.1 с помощью групповых политик). Но перед этим, вам нужно убедиться, что на всех ваших клиентах поддерживается протокол TLS 1.2.
В современных версиях Windows (Windows 11/10/8.1 и Windows Server 2022/2019/2016/2012R2) протокол TLS 1.2 включен по-умолчанию. А вот в предыдущих версиях Windows (Windows 7, Windows Server 2008R2/2012), чтобы включить TLS 1.2, придется выполнить ряд предварительных настроек.
Windows XP и Vista не поддерживают TLS 1.2.
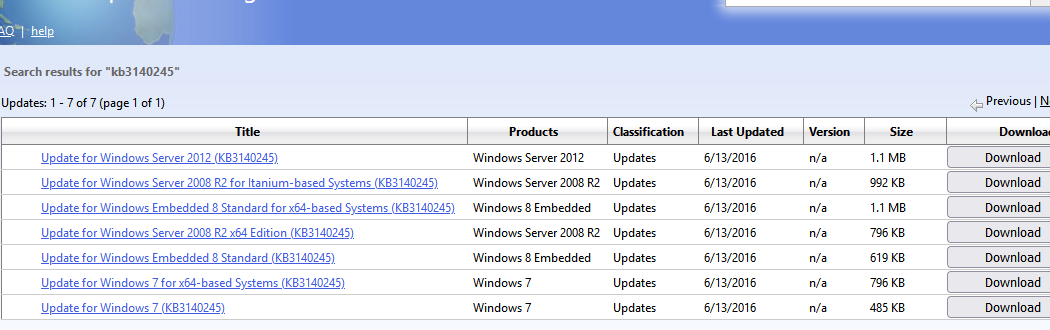
Например, чтобы включить TLS 1.2 в Windows 7 нужно:
- Убедится, что у вас установлен Windows 7 SP1;
- Скачать и вручную установить MSU обновление KB3140245 из Microsoft Update Catalog (https://www.catalog.update.microsoft.com/search.aspx?q=kb3140245);

- Далее нужно скачать и установить патч MicrosoftEasyFix51044.msi (патч добавляет в реестр параметры, которые обеспечивают поддержку TLS 1.2 в Windows 7/2008R2/2012);
- Перезагрузите компьютер.
Эти параметры реестра описаны в статье Update to enable TLS 1.1 and TLS 1.2 as default secure protocols in WinHTTP in Windows (https://support.microsoft.com/en-us/topic/update-to-enable-tls-1-1-and-tls-1-2-as-default-secure-protocols-in-winhttp-in-windows-c4bd73d2-31d7-761e-0178-11268bb10392).
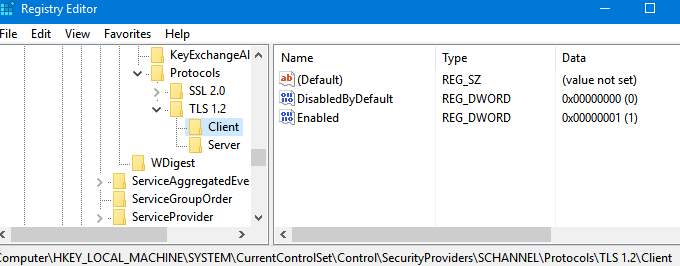
На компьютере появятся следующие REG_DWORD параметры реестра в ветке
HKLM\SYSTEM\CurrentControlSet\Control\SecurityProviders\SCHANNEL\Protocols\TLS 1.2\Client\
и
HKLM\...Protocols\TLS 1.2\Servers
:
- DisabledByDefault = 0
- Enabled = 1
Чтобы протокол TLS 1.2 использовался по-умолчанию для приложений на WinHttp API, нужно добавить REG_DWORD параметр
DefaultSecureProtocols = 0x00000A00
в ветку HKEY_LOCAL_MACHINE\SOFTWARE\Microsoft\Windows\CurrentVersion\Internet Settings\WinHttp (на 64 битной версии Windows в ветке HKEY_LOCAL_MACHINE\SOFTWARE\Wow6432Node\Microsoft\Windows\CurrentVersion\Internet Settings\WinHttp).
Возможные значения параметра DefaultSecureProtocols, который определяет разрешенные протоколы для WinHTTP подключений:
- 0x00000A0 – значение по умолчанию, которое разрешает только SSL 3.0 и TLS 1.0 для WinHTTP;
- 0x0000AA0 — разрешить использовать TLS 1.1 и TLS 1.2 в дополнении к SSL 3.0 и TLS 1.0;
- 0x00000A00 – разрешить только TLS 1.1 и TLS 1.2;
- 0x00000800 – разрешить только TLS 1.2.
Начиная с Windows 10 и Windows Server 2016, все версии Windows поддерживают TLS 1.2 для коммуникаций через WinHTTP.
Вы можете использовать следующий PowerShell скрипт чтобы создать эти параметры реестра:
$reg32bWinHttp = "HKLM:\SOFTWARE\Microsoft\Windows\CurrentVersion\Internet Settings\WinHttp"
$reg64bWinHttp = "HKLM:\SOFTWARE\Wow6432Node\Microsoft\Windows\CurrentVersion\Internet Settings\WinHttp"
$regWinHttpDefault = "DefaultSecureProtocols"
$regWinHttpValue = "0x00000800"
$regTLS12Client = "HKLM:\SYSTEM\CurrentControlSet\Control\SecurityProviders\SCHANNEL\Protocols\TLS 1.2\Client"
$regTLS12Server = "HKLM:\SYSTEM\CurrentControlSet\Control\SecurityProviders\SCHANNEL\Protocols\TLS 1.2\Server"
$regTLSDefault = "DisabledByDefault"
$regTLSValue = "0x00000000"
 $regTLSEnabled = "Enabled"
$regTLSEnableValue = "0x00000001"
# Для Windows x86
$test = test-path -path $reg32bWinHttp
if(-not($test)){
New-Item -Path $reg32bWinHttp
}
New-ItemProperty -Path $reg32bWinHttp -Name $regWinHttpDefault -Value $regWinHttpValue -PropertyType DWORD
# Для Windows x64
$test = test-path -path $reg64bWinHttp
if(-not($test)){
New-Item -Path $reg64bWinHttp
}
New-ItemProperty -Path $reg64bWinHttp -Name $regWinHttpDefault -Value $regWinHttpValue -PropertyType DWORD
New-Item -Path "HKLM:\SYSTEM\CurrentControlSet\Control\SecurityProviders\SCHANNEL\Protocols\TLS 1.2”
New-Item -Path $regTLS12Client
New-Item -Path $regTLS12Server
New-ItemProperty -Path $regTLS12Client -Name $regTLSDefault -Value $regTLSValue -PropertyType DWORD
New-ItemProperty -Path $regTLS12Client -Name $regTLSEnabled -Value $regTLSEnableValue -PropertyType DWORD
New-ItemProperty -Path $regTLS12Server -Name $regTLSDefault -Value $regTLSValue -PropertyType DWORD
New-ItemProperty -Path $regTLS12Server -Name $regTLSEnabled -Value $regTLSEnableValue -PropertyType DWORD
Перезагрузите компьютер:
Restart-Computer
Осталось включить поддержку TLS 1.2 для приложений .NET Framework. Для этого нужно в реестре включить принудительное использование системных протоколов шифрования для приложений .NET 3.5 и 4.x. Если вы используете старые версии NET Framework 4.5.1 или 4.5.2 на Windows Server 2012 R2/2012 или Windows 8.1, сначала установите последние обновления для .Net Framework 4.5.1 (они добавят поддержку TLS 1.2 в .Net).
Ниже указаны параметры реестра, которые нужно настроить для различных версий .Net:
для .Net 3.5 и 2.0
[HKEY_LOCAL_MACHINE\SOFTWARE\Microsoft\.NETFramework\v2.0.50727]
"SystemDefaultTlsVersions"=dword:00000001
[HKEY_LOCAL_MACHINE\SOFTWARE\Wow6432Node\Microsoft\.NETFramework\v2.0.50727]
"SystemDefaultTlsVersions"=dword:00000001
[HKEY_LOCAL_MACHINE\SOFTWARE\Microsoft\.NETFramework\v2.0.50727]
"SchUseStrongCrypto"=dword:00000001
[HKEY_LOCAL_MACHINE\SOFTWARE\Wow6432Node\Microsoft\.NETFramework\v2.0.50727]
"SchUseStrongCrypto"=dword:00000001
для .Net 4.х
[HKEY_LOCAL_MACHINE\SOFTWARE\Microsoft\.NETFramework\v4.0.30319]
"SystemDefaultTlsVersions"=dword:00000001
[HKEY_LOCAL_MACHINE\SOFTWARE\Wow6432Node\Microsoft\.NETFramework\v4.0.30319]
"SystemDefaultTlsVersions"=dword:00000001
для .Net 4.6
[HKEY_LOCAL_MACHINE\SOFTWARE\Microsoft\.NETFramework\v4.0.30319]
"SchUseStrongCrypto"=dword:00000001
[HKEY_LOCAL_MACHINE\SOFTWARE\Wow6432Node\Microsoft\.NETFramework\v4.0.30319]
"SchUseStrongCrypto"=dword:00000001
Например, без этих параметров вы не сможете подключиться к репозиториям PSGallery из консоли PowerShell на Windows Server 2012 R2 с ошибками:
- Install-Module: Unable to download from URI
- Unable to resolve package source
Проблема тут в в том, что по-умолчанию PowerShell пытается использовать протокол TLS 1.0 для подключения к PSGallery. С апреля 2020 года PowerShell Gallery разрешает подключение к NuGet провайдеру только с помощью TLS 1.2.
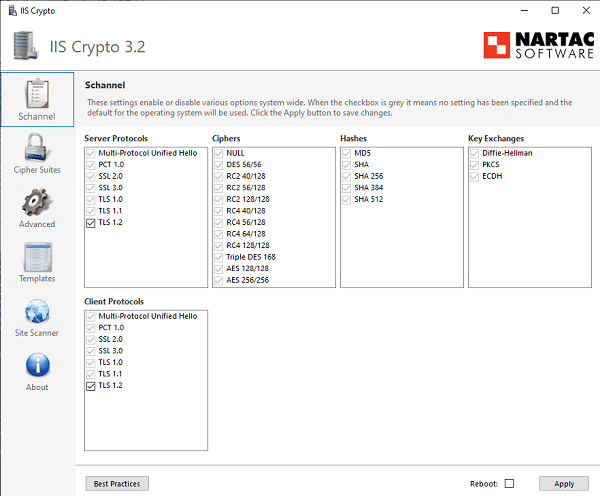
Также существует бесплатная утилита IISCrypto, которая позволяет включить/выключить различные протоколы TLS/SSL и настройки Schannel через графический интерфейс (https://www.nartac.com/Products/IISCrypto/). Здесь вы можете выбрать какие версии протоколов TLS хотите настроить. Если все галки напротив протоколов Schannel серые, значит в Windows используются стандартные настройки. В моем примере я включил протокол TLS 1.2 для клиента и сервера с помощью PowerShell скрипта, рассмотренного ранее. Утилита IISCrypto теперь показывает, что протокол TLS 1.2 включен вручную.
IISCrypto не позволяет изменить настройки TLS для .NET и WinHTTP.
TLS is a security technology that lets you secure computer networking by protecting data privacy and security. It superseded SSL in prior Windows versions and authenticates and encrypts data transferred over HTTPS via a TLS handshake.
The TLS protocol is critical for ensuring the security of your online activities, and enabling new TLS versions such as TLS 1.3 on your Windows 11 PC is required. Because older TLS protocols, such as TLS 1.0 and TLS 1.1, are less trustworthy, you may need to disable them, especially if you are enabling the most recent protocols. This article will demonstrate how to enable or disable TLS settings on Windows 11.
The Transport Layer Security (TLS) protocol, which offers security for Internet communications such as Web browsing, email, and instant messaging, is available in two versions: TLS 1.0 and TLS 1.1.
Given that attackers are always discovering new methods of attack, various vulnerabilities in earlier versions of TLS have been discovered that can allow attackers to decrypt your data. However, here’s how to activate either in Windows 11.
Recommended Post:- Fixed: The Network Security Key isn’t Correct on Windows
What is the Distinction Between TLS 1.0 and 1.1?
The two most extensively used versions of the Transport Layer Security (TLS) protocol are TLS 1.0 and TLS 1.1. Both versions provide a comparable level of security and encryption. However, there are certain distinctions between them that customers should be aware of while deciding between them:

- Security: There is minimal difference between these two protocols in terms of security: both are still deemed secure, but some may consider them obsolete and favor newer versions such as TLS 1.2 or even 1.3 (which is not yet supported by many browsers).
- Speed: TLS 1.1 is faster than TLS 1.0 because it requires fewer CPU cycles to process.
- Difficulty in upgrading: Due to a lack of resources or compatibility difficulties with their operating systems, certain older client programmes may be unable to handle newer versions of the protocol.
Difference Between SSL and TLS
SSL is an abbreviation for Secure Socket Layer, whereas TLS is an abbreviation for Transport Layer Security. The protocols used to ensure security between web browsers and web servers are Secure Socket Layer and Transport Layer Security.
The primary distinction between Secure Socket Layer and Transport Layer Security is that in an SSL (Secure Socket Layer), the message digest is utilized to generate a master secret, and it provides the core security services of authentication and confidentiality. TLS (Transport Layer Security) uses a pseudo-random method to generate a master secret.
SSL and TLS are cryptographic protocols used for authentication and data encryption between networked servers, computers, and devices. SSL has been around for 25 years. Netscape created the initial version of SSL (version 1.0) in 1995, however, it was never published due to serious security flaws. SSL 2.0 was a failure, and SSL 3.0 was released slightly over a year later. People contributed to the development of TLS 1.0 in unison. TLS 1.0 is fairly similar to SSL 3.0, but there are enough differences to classify it as SSL 3.0 ahead of time.
The fundamental distinctions between SSL and TLS will be discussed in this section.
- SSL stands for secure socket layer, whereas TSL stands for transportation layer protection.
- The cryptographic protocols SSL and TLS authenticate server-to-device data exchanges. A cryptographic protocol, for example, encrypts data transmitted between a Web server and a user.
- To encrypt the data from both ends, a secure framework is required. This is supported with an SSL/TLS certificate. It acts as an encryption portal for encrypting data, preventing hackers from gaining illegal access.
- Even though the TLS model relies on the authentication code for the HMAC hash, key information and configuration data are required on an ad hoc basis for SSL message authentication.
- SSL was a groundbreaking cryptographic protocol. TLS, on the other hand, was the most recently modified SSL version.
Let’s take a closer look at how to enable TLS 1.0 and TLS 1.1 on your Windows 11 PC.
Solution 1: Enabling TLS 1.0 in the System
1. Use the Control Panel to enable TLS 1.0 1.1
- Step 1: Press the Windows key, type Control Panel into the search field, and then press the Open button.
- Step 2: Navigate to Network and Internet.
- Step 3: Select Internet Options.
- Step 4: In the resulting Internet Properties dialogue box, select the Advanced tab.
- Step 5: Scroll down and select the box next to Use TLS 1.0 under Settings, then click the Apply and OK buttons to save your changes.

1.2 Execute the Run command.
- Step 1: Press the Windows + R keys together to launch the Run command.
- Step 2: In the dialogue box, type inetcpl.cpl and press Enter.
- Step 3: In the Internet Properties box that appears, navigate to the Advanced tab.
- Step 4: Scroll down to Settings and select the box next to Use TLS 1.0 before clicking the Apply and OK buttons to save your changes.
Solution 2: Enabling TLS 1.1 in the System
2.1 Make use of the Control Panel
- Step 1: Press the Windows key, type Control Panel into the search field, and then press the Open button.
- Step 2: Navigate to Network and Internet.
- Step 3: Select Internet Options.
- Step 4: In the resulting Internet Properties dialogue box, select the Advanced tab.
- Step 5: Scroll down and select the box next to Use TLS 1.1 under Settings, then click the Apply and OK buttons to save your changes.
1.2 Execute the Run command.
- Step 1: Press the Windows + R keys together to launch the Run command.
- Step 2: In the dialogue box, type inetcpl.cpl and press Enter.
- Step 3: In the Internet Properties box that appears, navigate to the Advanced tab.
- Step 4: Scroll down and select the box next to Use TLS 1.1 under Settings, then click the Apply and OK buttons to save your changes.

Conclusion
Although the TLS 1.0 and 1.1 protocols can still be enabled, it is crucial to highlight that they are no longer supported by most browsers and cannot be trusted to deliver secure communications.
Depending on the browser you’re running, you can also activate TLS support. To that end, we’ve compiled a list of browsers that support the most recent TLS versions. If you encounter a TLS error, get connected with the Microsoft support team.
TLS helps safeguard your data and prevents unauthorized third parties from accessing it. This security is, however, more ensured in the newer TLS 1.3 than in the earlier TLS 1.0. TLS 1.3 should be enabled and TLS 1.0 should be disabled on your Windows 11 PC.
На чтение 5 мин. Просмотров 332 Опубликовано

TLS (Transport Layer Security) 1.2 — это протокол безопасности в Интернете, обычно предназначенный для защиты данных пользователя при передаче по сети. Он обеспечивает безопасность информации и данных между клиентами и сервером. Это поможет вам защититься от различных вредоносных программ, шпионских программ и вирусов в Интернете.
Вы можете включить TLS 1.2 в несколько шагов на своем компьютере под управлением Windows. Однако прежде чем включить эту функцию, необходимо проверить, какая версия TLS установлена в вашей Windows. В этой статье мы расскажем вам о полном процессе проверки и включения TLS 1.2 в каждой версии Windows, например, Windows 11, 10, 7, 8 Server 2019 и Server 2016.
Содержание
- Проверка версии TLS, используемой в Windows
- Способы включения TLS 1.2 в разных Windows
- 1. Для Windows 11
- 2. Для Windows 10
- 3. Для Windows 7
- 4. Windows Server 2019
- 5. Windows Server 2016
- Заключение
Проверка версии TLS, используемой в Windows
Пользователь также может проверить, какой протокол TLS используется в его системе. Для этого необходимо выполнить следующие действия.
- Нажмите клавишу Windows на клавиатуре, найдите Свойства Интернета и откройте их.
- Здесь нажмите на кнопку Дополнительно.
- Проверьте, какой протокол TLS используется, по флажкам, прокручивающимся вниз в этом окне.

Способы включения TLS 1.2 в разных Windows
Процесс включения TLS 1.2 может отличаться для различных версий Windows. Давайте обсудим, как можно включить TLS 1.2 в Windows 11, 10, 7 и других версиях.
1. Для Windows 11
Чтобы включить TLS 1.2 в Windows 11, выполните следующие действия.
- Откройте меню «Пуск», найдите «Параметры Интернета» и откройте его.
- Перейдите на вкладку «Дополнительно» и найдите пункт TLS. Установите флажок напротив TLS 1.2.
- Нажмите кнопку Применить, а затем нажмите кнопку OK, чтобы сохранить изменения.
- Теперь перезапустите браузер, и TLS 1.2 будет включен.


2. Для Windows 10
Чтобы включить версию TLS 1.2 в Windows 10, выполните следующие действия.
- Запустите Google Chrome на вашем компьютере.
- Нажмите на три точки в правом верхнем углу и выберите пункт Настройки.
- Здесь нажмите на опцию Дополнительно. Затем прокрутите вниз и выберите опцию Система.
- Затем выберите опцию Открыть настройки прокси-сервера вашего компьютера и нажмите на опции Интернет.
- На вкладке Дополнительно выберите опцию Безопасность.
- Теперь установите флажок Использовать TLS 1.2.
- Нажмите кнопку Применить, а затем кнопку OK.
- После этого перезапустите браузер Google Chrome, и проблема будет устранена.


3. Для Windows 7
Ниже описаны шаги по включению TLS 1.2 на Windows 7. Прежде чем приступить к выполнению этих действий, сделайте резервную копию реестра.
- Нажмите клавишу Windows, найдите «Редактор реестра» и откройте его.
- Перейдите по следующему адресу-.
-
HKEY_LOCAL_MACHINESYSTEMCurrentControlSetControlSecurityProvidersSCHANNELProtocols
-
- На левой боковой панели щелкните правой кнопкой мыши на Protocols, нажмите на New и выберите опцию Key.
- Переименуйте созданный ключ в TLS 1.2.
- Теперь щелкните правой кнопкой мыши на TLS 1.2, нажмите на New, а затем на Key.
- Переименуйте созданный ключ в Client.
- Щелкните правой кнопкой мыши на Client, выберите New, а затем DWORD (32-bit) Value.
- Измените имя нового значения DWORD на Disablebydefault.
- После этого закройте редактор реестра и перезагрузите компьютер.


4. Windows Server 2019
Чтобы включить TLS 1.2 на Windows server 2019, выполните следующие действия.
- Нажмите комбинацию клавиш Windows + R, введите Regedit и нажмите Enter.
- Перейдите по следующему адресу -.
-
ComputerHKEY_LOCAL_MACHINESYSTEMCurrentControlSetControlSecurityProvidersSCHANNEL
-
- Затем щелкните правой кнопкой мыши на правой панели, выберите опцию New и нажмите на Key.
- Переименуйте новый ключ в TLS 1.2
- Щелкните правой кнопкой мыши на TLS 1.2, затем на New, а затем выберите Key. Назовите ключ Client
- Затем щелкните правой кнопкой мыши на Client, выберите опцию New и щелкните на DWORD(32-bit) Value.
- Задайте DisableByDefault в качестве имени DWORD.
- Дважды щелкните на созданном DWORD, чтобы отредактировать его.
- Здесь установите основание как Hexadecimal и измените Value Data на 0.
- Снова щелкните правой кнопкой мыши на Client, выберите New, а затем DWORD (32-bit) Value. Задайте его имя как enabled.
- Дважды щелкните на нем, чтобы отредактировать его. Там убедитесь, что основание установлено как шестнадцатеричное, присвойте Value Data значение 1 и нажмите OK.
- Сделайте то же самое для ключа сервера.
- Наконец, закройте редактор реестра и перезагрузите компьютер.
5. Windows Server 2016
Для включения TLS 1.2 на Windows server 2016 выполните следующие действия.
- Сначала откройте редактор реестра на вашем компьютере.
- Перейдите по следующему адресу-.
-
ComputerHKEY_LOCAL_MACHINESYSTEMCurrentControlSetControlSecurityProvidersSCHANNELProtocols
-
- Там щелкните правой кнопкой мыши на правой панели. В открывшемся меню нажмите на опцию New (Новый), а затем нажмите на Key (Ключ).
- Переименуйте этот новый ключ в TLS 1.2.
- Затем снова щелкните правой кнопкой мыши на пустой правой панели и, на этот раз, создайте два новых ключа. Назовите один из них Client, а другой — Server.
- Щелкните правой кнопкой мыши на ключе Client, нажмите New и выберите опцию DWORD(32-bit) value.
- Переименуйте значение DWORD в DisabledByDefault.
- Double-dir. Там убедитесь, что основание установлено в шестнадцатеричное значение, а значение равно нулю.
- После этого создайте еще один файл DWORD и переименуйте его в Enabled.
- Убедитесь, что основание шестнадцатеричное, а значение равно 1.
- Для Server Key повторите описанные выше шаги и присвойте те же значения.
- Теперь перезагрузите компьютер, и TLS 1.2 должен быть включен.
Заключение
Это были все способы включения TLS 1.2 на всех версиях windows, таких как Windows 11, 10, 7, Server 2019, Server 2016 и т.д. Более того, мы также рассказали, как можно проверить, какая версия TLS поддерживается на вашем ПК.