Purpose of this troubleshooting page
This page is specifically about attempting to find and resolve problems with an OpenVPN client program failing to connect to an OpenVPN Access Server. It does not deal with problems in reaching a target system over the established VPN tunnel once the VPN tunnel is already working. That is handled in a separate page: troubleshooting reaching systems over the VPN tunnel.
So if for example you start the OpenVPN client connection and it issues an error and disconnects you, then the information here should help you in determining a possible cause and solution. If not, reach out to us on the support ticket system and provide as much detail as you can.
Locating the server log files
To diagnose problems with an OpenVPN server or client, it is helpful to look at the log files. The log files are located in specific areas on your computer systems, and the following is a general guide on how to find them and how to get the best information out of them. Log files are the place to check whenever you’re having any problems making a connection with an OpenVPN client program to the OpenVPN Access Server, they the information needed to ascertain what’s going wrong.
On the OpenVPN Access Server there is the server side log:
/var/log/openvpnas.log /var/log/openvpnas.node.log (in case of a failover setup)
In the event that you are having problems with starting the Access Server or certain portions of it, for example the web services, then it may be useful to stop the Access Server service, move the log file aside, then start the Access Server service, and stop it again immediately. This creates a new clean log file that contains the startup and shutdown sequence of the Access Server and no other extraneous information. This makes analysis of the log file much easier. To do so use these commands in order:
service openvpnas stop
mv /var/log/openvpnas.log /var/log/openvpnas.log.old
service openvpnas start
service openvpnas stop
You can then grab the /var/log/openvpnas.log file for analysis and start the Access Server again:
service openvpnas start
Locating the client log files
Log file location for the OpenVPN Connect Client for Windows:
C:\Program Files (x86)\OpenVPN Technologies\OpenVPN Client\etc\log\openvpn_(unique_name).log
The OpenVPN Connect Client for Mac:
/Library/Application Support/OpenVPN/log/openvpn_(unique_name).log
Macintosh may not show you this folder in finder as it only shows you certain things and hides others. So to get to the /Library folder, open Finder and in the menu at the top choose Go followed by Go to folder and then enter the path /Library to get into that directory. You can then go to the correct folder and look up the log file. Please also note that the OpenVPN Connect Client for Macintosh will have permissions set on the log file so that you cannot normally open it. To bypass this, right click the log file and choose the Get info option in the menu. Then at the bottom, under Sharing & Permissions, you will be able to use the yellow padlock icon to unlock the settings and to give everyone read access. Then you will be able to open the log file with a right click and selecting Open with and then choosing something like Text editor to view the contents of the log file.
Known error messages and possible solutions
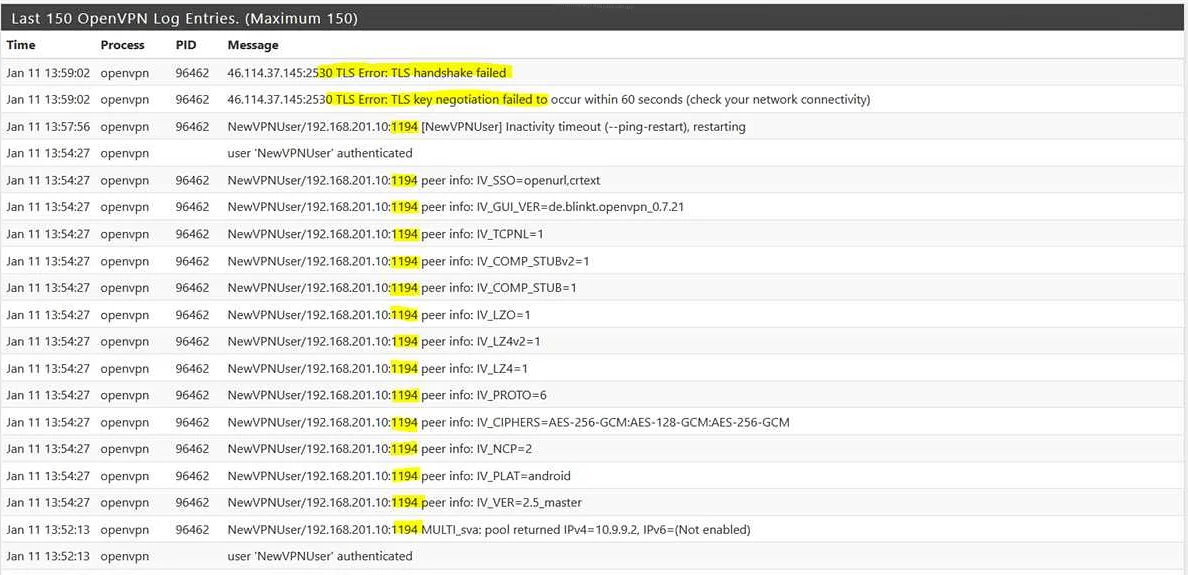
TLS Error: TLS key negotiation failed to occur within 60 seconds (check your network connectivity)
This particular error can have multiple different causes as it is a fairly generic error message.
A possible explanation is that the client program is old and supports only TLS 1.0, but the server is expecting TLS level 1.1 or higher. To see if this is the case log on to the server and check the server side log file. The chances are high that your client program is an older version, like version 2.2 or older, and that it doesn’t know how to handle a modern TLS minimum level requirement, when you see messages that look like this on the server side:
OpenSSL: error:140760FC:SSL routines:SSL23_GET_CLIENT_HELLO:unknown protocol'
TLS_ERROR: BIO read tls_read_plaintext error'
TLS Error: TLS object -> incoming plaintext read error'
TLS Error: TLS handshake failed'
SIGUSR1[soft,tls-error] received, client-instance restarting'
The solution to this particular problem is to upgrade the client software to the latest version.
Another possible explanation is that the settings regarding TLS minimum requirement level have been altered but the OpenVPN client is using an older copy of the connection profile which has incorrect instructions. The settings on the client and the server must match for the connection to be successful. In this situation installing a new copy of the configuration profile will solve the issue. A complete uninstall, redownload, and reinstall of the OpenVPN Connect Client should take care of that for you.
And yet another possible explanation is that there is a blockade in place in a firewall or at the Internet service provider that is blocking or interfering with the TLS handshake in some way.
TLS Error: local/remote TLS keys are out of sync
For some reason the negotiated TLS key to be used on the client side for TLS encryption/decryption is different from the one used on the server side. That should never happen. When the client and server are talking to one another they agree upon a TLS key to be used for encrypting and decrypting traffic. By default in Access Server such a key is valid for 6 hours, and after those 6 hours, automatically the TLS refresh kicks in and they will agree upon a new key. There is a short overlap where both the old and new key are accepted, until the old key is expired and the new key must be used. If for some reason one side doesn’t do this, you see this error message.
A possible cause is a bug in the OpenVPN protocol with the version used in OpenVPN Connect Client which was resolved, where the automatic TLS key refresh would fail because the client and server couldn’t agree properly on the encryption cipher to use. So if you encounter this particular problem and you are using an OpenVPN3 based client like OpenVPN Connect Client 2.*, then consider updating to the latest version. You can do so for example per computer by downloading OpenVPN Connect Client for Windows or OpenVPN Connect Client for macOS from our website, and installing it. However a better solution would be to update your Access Server to the latest version so that you get the updated Connect Client embedded in there, and then downloading and installing the latest version of OpenVPN Connect Client from your Access Server. If you use other client software and it shows problems, try finding a newer version for it. Worst case scenario, you could also consider changing the TLS key refresh to something larger in the Advanced VPN page of the Admin UI, to avoid triggering the issue. This does of course lower security somewhat.
Server poll timeout
One of the very first steps that an OpenVPN client program will do when trying to connect to an OpenVPN Access Server is to simply send out a message requesting for a reply. So basically a «hello are you there?» message. The server is then supposed to respond and then a connection is started. However if you see a server poll timeout error message then the server could not be reached at the specified port. Why this is not possible is another question entirely, but the error message is very clear: there is simply no response at all on that address and port. So when you see this message it would be good to check if the port is actually open, if the port is correct, if the address you’re trying to reach can actually be reached from the Internet, and isn’t a private IP address only, and other such checks to confirm basic connectivity to the server. At this point you’re not even looking at a problem that has anything to do with the OpenVPN protocol itself. This is a most basic «this server cannot be reached» message.
A common mistake that is made is that people set up the Access Server on a private IP address but neglect to set up a proper FQDN DNS name for it, and configure that FQDN DNS name in the Admin UI under Server Network Settings in the Host name or IP address field. It is that field value that connection profiles generated and provisioned to the OpenVPN clients will be using to start a connection to. So if this is set to an internal private IP address that the Access Server was installed on, then the connection profiles will try to connect to that private IP address, which is unlikely to be reachable from anywhere else but the internal network that the Access Server itself is on. The solution is to set up a proper DNS name and configure that and save settings. Then uninstall, redownload, and reinstall the connection profile or OpenVPN Connect Client program and to try again.
Another common mistake is to forget to open the 3 ports required for OpenVPN Access Server to be reachable properly. By default these are TCP 443, TCP 943, and UDP 1194.
SESSION_ID only allowed to be used by client IP address that created it
OpenVPN Access Server uses a session-based-token system for server-locked and user-locked profiles. Auto-login type profiles don’t. What this means is that after a user authenticates successfully, they are given a session token to identify themselves with. Compare it to going to a party and you show up and pay your entry fees, and if you need to go out for a little bit, they give you a stamp on the back of your hand, or put a paper/plastic strip around your wrist, so that you can show up again later and be admitted access again. That’s a very simplified explanation. With a session token, each token is unique and uniquely identifies you. This avoids having to store your credentials in memory or bothering the user to reauthenticate when you temporarily lose contact with the server and reconnect again, so it’s safer and more convenient. The session token is locked to the IP address that the original authentication attempt was made from, this is a security feature. When you see this message it means the session token your client program offered to the server was generated originally from another IP address. This can happen for example if you switch Internet connection, like logging in at work, then moving your laptop home and it tries to reconnect automatically with the session token. This session token IP lock is a security feature that can be disabled to allow such automatic reconnects to occur without this error message.
Authentication Error: Session: your session has expired, please reauthenticate
The OpenVPN Access Server works with a session token based authentication system when you are using a server-locked or user-locked profile. When you authenticate successfully, you are given a session token instead. The session token identifies you now from that moment onward. By default the session token expires after 5 minutes of inactivity as in not being connected to the server, and it also expires after 24 hours by default. Furthermore, when the session token is generated on the server, it gets locked to the VPN client’s connecting IP address. This session IP lock can be disabled, and the timeout for session inactivity and the timeout for total session duration mentioned can also be adjusted. If for example you are on your phone and you are connected through WiFi, and you walk out of range of WiFi, and it switches to another Internet connection like 3G/4G or something, then your VPN client will disconnect but attempt to reconnect automatically. Your IP will now be different and as such the session token is not valid anymore. You will see an error like in the previous section in the server side log file (SESSION_ID only allowed to be used by client IP address that created it). And if your connection has lasted 24 hours in total, then it will also disconnect you if you’re on a session-based connection with server-locked or user-locked profile. The solution is to either use an auto-login type profile or to increase the session token duration.
unable to obtain session ID from vpn.yourserver.com, ports=443: (error description here)
This error message can be found in the capi.log file and also shown in the popup message in Windows or macOS when you use OpenVPN Connect Client for Windows or macOS. This error message indicates that a server-locked connection profile is being used, which is the default on OpenVPN Access Server when you download and install the OpenVPN Connect Client. A server-locked connection profile is designed to be user-agnostic, meaning it doesn’t carry any user-identifiable information in it, and is a sort of universal profile. This allows any valid user accounts to start a connection with this OpenVPN Connect Client. The credentials are passed over a secure HTTPS channel to the XML-RPC services of the Access Server for verification, and if approved, the client will receive a copy of the user-locked profile for this user, and a session token. Those will be used to start the OpenVPN tunnel. After the tunnel is disconnected, the user-locked profile and session token are deleted. But for this to work, there must be a working HTTPS connection to the web services of the Access Server.
unable to obtain session ID from vpn.yourserver.com, ports=443:
Other SSL errors:[(‘SSLroutines’,’SSL23_READ’,’ssl handshake failure’)]
This could indicate that the Connect Client was able to reach some service, but it does not appear to be the Access Server web services, or perhaps the traffic is mangled by some firewall or proxy solution. For example we have seen situations where OpenVPN Access Server was installed with default settings, and OpenVPN Connect Client was installed and working, and then the port was changed on the server side from TCP 443, to TCP 444 for example, and then a web server was setup on that same server system, with an HTTPS website running on it on port TCP 443. The OpenVPN Connect Client won’t have received an update to the new port setting for the Access Server web services, and so it tries to talk to the old port, where now a web server runs. This causes an unexpected problem that can result in this type of error. If you encounter this problem you should investigate if the port that the client is trying to reach is actually reachable by this client, and to try to determine if there really is an Access Server web service running there. If you changed the ports on the server you need to reinstall this client so it updates the settings.
unable to obtain session ID from vpn.yourserver.com, ports=443:
ConnectionRefusedError: 10061: No connection could be made because the target machine actively refused it
This is a very clear indication that the address and port that the OpenVPN Connect Client is trying to reach, does not have an Access Server web service running there. For example if you install OpenVPN Connect Client on a client computer, and then you go to the Access Server and change the ports that it listens to, then the client will still be trying to connect to the old ports that were originally configured. This can also sometimes occur if the address of your server is simply misconfigured. The solution is making sure that in the Admin UI in the Network Settings page you have set the address that your server can be reached at correctly (it is best to do a DNS name instead of an IP) and that the ports are how you want them, and then after that’s set up, to download and install the OpenVPN Connect Client on your client computers.
unable to obtain session ID from vpn.yourserver.com, ports=443:
XML-RPC: TimeoutError
This indicates that the Access Server web interface’s XML-RPC interface is unreachable. The OpenVPN Connect Client uses this interface to obtain the necessary certificates and configuration to start the OpenVPN connection when you are using a server-locked profile. You will not be needing the XML-RPC interface when you use user-locked and auto-login profiles. The advantage of server-locked profiles is that they are universal — any valid user at the Access Server can log in and connect. The timeout error just means the connection timed out, usually a firewall or such is blocking the connection. The solution is to ensure that the web interface is reachable from this OpenVPN client, or instead use a user-locked or auto-login type profile.
unable to obtain session ID from vpn.yourserver.com, ports=443:
XML-RPC function GetSession with 1 arguments may not be called at the configured relay level
The OpenVPN Connect Client program for Windows and macOS by default uses server-locked profiles. These contain only the information necessary to talk to the XML-RPC web interface of the Access Server for the purpose of authenticating a user and obtaining the required certificates and connection information to start the OpenVPN tunnel. This is done so this client is universal. It will work for all valid users on the server and isn’t locked to a specific user. This does require that the web interface is reachable and that under client settings in the Admin UI the XML-RPC function is set to at least limited functionality. Full functionality also works, but when you set this to disabled, then you will get this error. The solution is to either stop using server-locked profiles and switch to user-locked or auto-login profiles, or to enable at least limited functionality for XML-RPC calls. The default is limited functionality and that is sufficient for OpenVPN Connect Client and server-locked profiles.
See the logfile ‘C:\Program Files (x86)\OpenVPN Technologies\OpenVPN Client\core\ovpntray.exe.log’ for details
If you see this error message while launching the OpenVPN Connect Client, and it fails to launch, you may be missing specific Microsoft Visual C++ Redistributable DLL library files. This issue was resolved in OpenVPN Connect Client for Windows version 2.5.0.136 by adding specific required library files into the OpenVPN Connect Client program directories. You should ensure you use up-to-date software to resolve this issue. You can upgrade your Access Server to the latest version so that it offers updated OpenVPN Connect Client software, or you can separately download the OpenVPN Connect Client for Windows from our website, to upgrade your existing Connect Client version.
Serial number not found in DB
OpenVPN Access Server by default comes with an internal PKI structure, which means a self-signed root certificate with unique certificates generated for each OpenVPN client for that server. These are all unique and tied together. This is part of the strength of OpenVPN, the identity of a VPN client and a VPN server are verified in both directions when a connection is made. The client verifies the server, and the server verifies the client. So for each user account you add to the Access Server, a unique certificate is generated. The certificate is bound to the user account name, so you can’t log in with the credentials for user bob with the certificates for user billy. Each certificate also has a serial number, a unique number identifying the certificate. If you see the error that the serial number is not found in the database, that means this certificate is not known to this server. Even if you revoke a certificate, it is still known to the server, and will not produce this particular error. So you may be using a certificate from a completely different Access Server by mistake, or maybe you started with a new setup of Access Server on your server and the certificates are wiped and new ones generated for the new setup, while you’re still using old certificates from the previous installation. To resolve this problem, make sure to delete the wrong connection profile from your client computer and obtain a new one from your current Access Server installation and use that to connect.
Open TAP device «» PATH=»» FAILED TUN Error: cannot acquire TAP handle EVENT: TUN_IFACE_CREATE cannot acquire TAP handle [FATAL-ERR] 2021 EVENT: DISCONNECTED Client exception in transport_recv: tun_exception: not connected
You may receive this error message when the OpenVPN Connect 3.x service stops or does not resume when you sign back into the computer. The issue is likely caused by an antivirus program. Specifically, we’ve seen this with ESET Antivirus. You can reconnect by restarting the service manually, but the automatic connection may still encounter the issue. To test, turn off ESET. If that resolves the issue, then you may want to open a support ticket with ESET.
See also the topic authentication problems for more possible error messages and solutions regarding authentication issues.

If you are facing “OpenVPN TLS handshake failed” Error on computer while attempting to setting up “OpenVPN”, then you are in right place. Here, we are discussing about this problem in details and providing some recommended methods/procedures to fix this error. Let’s take have a look at error message and then starts the discussion.
“Sun May 13 19:39:51 2018 TLS Error: TLS key negotiation failed to occur within 60 seconds (check your network connectivity) Sun May 13 19:39:51 2018 TLS Error: TLS handshake failed”
About OpenVPN
“OpenVPN” is open-source commercial software that implements virtual private network techniques to create secure point-to-point or site-to-site connections in routed or bridged configurations and remote access faculties. It is available in free for charge. With the digital privacy and online security continuing to be major concerns, more people are interested in “VPNs (Virtual Private Networks)” than ever before.
Pros:
- Free, open-source VPN
- Booted Privacy and Secure browsing
- Supported by developer community
Cons:
- Can lead to poor speeds when is use
- Too technical and complex for first use-timers
- Can be blocked by business proxies
However, it is important to remember that “OpenVPN” is not VPN Provide and it doesn’t add a piece of software to your desktop or simple plug-in to your browser that you click once to connect. “OpenVPN” is encryption protocol that can connect your VPN which means you will need to know exactly how to configure it to your specific server.
What is “OpenVPN TLS handshake failed” Error?
It is common TLS error that is appears while trying to connect to OpenVPN. This error message usually appears on Android, iOS, Windows, Mac and Linux OS based device. “HandShake” word refers to negotiation between two ends just like meeting between two different people for any propose, then shake hands at first, then go ahead with anything else. In this case, “handShake” refers to negotiations between two servers.
On other hand, “TLS (Transport Layer Security)” is used every time when you access a website or application over HTTPS, access emails, messages, and VOIP (Voice over Internet Protocol). In simple word, we can say that HTTPs is implementation of TLS encryption.
Now comes to matter “OpenVPN TLS handshake Failed” Error, it is one of the most common problems in setting up OpenVPN that is occurs due to several reasons. Some user reported that this error appears usually on Windows/Mac/iOS/Linux/Android OS based devices when Windows Firewall is blocking access for the “openvpn.exe”.
“TLS Error: TLS key negotiation failed to occur within 60 seconds (check your network connectivity)”
Reasons behind OpenVPN TLS handshake failed issues
- Incorrect Client Configuration: The “OpenVPN” client config does not have the correct server address in its config file. The remote directive in the client config must point to either the server itself or the public IP address of the server network’s gateway.
- OpenVPN packets: A perimeter Firewall on server’s network is filtering out incoming OpenVPN packets. By Default OpenVPN uses UDP or TCP port number 1194.
- NAT/PAT: A NAT Gateway on the server’s network does not have a port forward rule for TCP/UDP 1194 to internal address of OpenVPN server machine.
- Firewall/routing blocking port: Windows Firewall is blocking access for the “openvpn.exe” binary.
- OSes block incoming connections: A software firewall running on the OpenVPN server machine itself is filtering incoming connections on port 1194. Be aware that many OSes will block incoming connections by default unless configured otherwise.
[Tips & Tricks] How to Fix OpenVPN TLS handshake failed error on Windows 10?
Procedure 1: Change “TLS” protocol in Windows
Windows 10 and earlier versions of Windows centralize the protocol settings in the System. To fix “OpenVPN TLS handshake failed” Error, you can change TLS version via the steps below:
Step 1: Press “Windows + R” key from keyboard to open “Run Dialog Box”
Step 2: In the opened “Run Dialog Box”, type “inetcpl.cpl” and hit “Ok” button
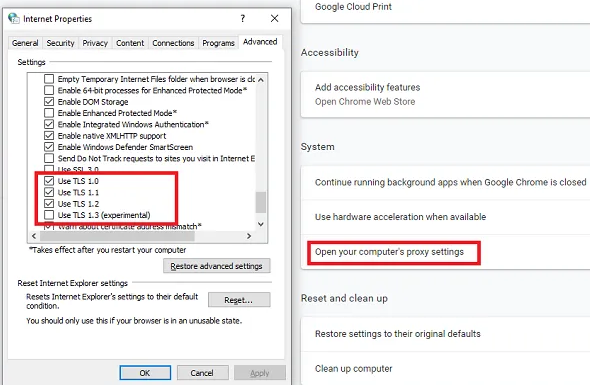
Step 3: In the opened “Internet Properties” window, click on “Advanced” tab
Step 4: Find “Security” section and here, you can add or remove TLS
Step 5: If the website is looking for TLS 1.2 and it is not checked, you need to check it. Similarly, if someone is experimenting with TLS 1.3, you need to check it
Step 6: Finally, click on “Apply” and “Ok” to save the changes. Once done, try opening the same website again
Procedure 2: Change TLS protocol in Firefox

Step 1: Open “Firefox” browser and type “about:config” in address bar and then hit “Enter” key
Step 2: Now, type “TLS” in search box and locate “security.tls.version.min”
Step 3: You can change it to “1 and 2 to force TLS 1 and 1.1”, “3 to force TLS 1.2”, “4 to force maximum protocol of TLS 1.3”
Procedure 3: Delete Browser profile or certificate database
Every browser maintains a database for certificates. For example, every Firefox profile has Cert8.db file. In case if delete that file, and restart fixes it, then the problem is related to the local certificate database.
In Windows 10 or other Windows OS based device, when you are using Internet Explorer or Edge browser, the Certificate Manager is responsible, or you can go to the edge://settings/privacy and click on Manage HTTPS/SSL certificates and settings. Delete the certificates and try again.
Procedure 4: Reset web browser
To reset Google Chrome settings, follow the steps below:
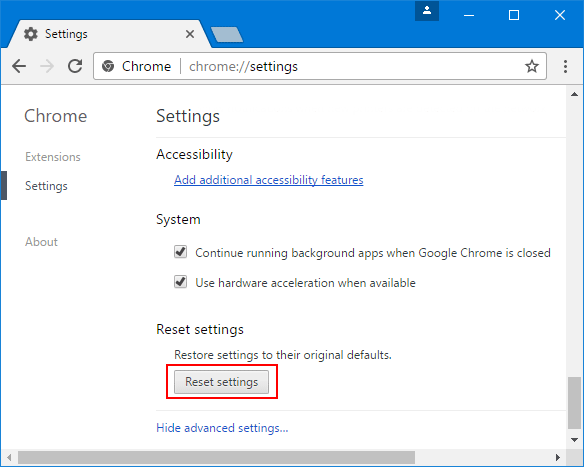
Step 1: Open Google Chrome browser and type “Chrome://Settings” in address bar and then hit “Enter” key
Step 2: Scroll towards end and click on “Advance settings”
Step 3: You will see the “Reset Browser Settings” button
Step 4: When you use this option, it will reset your profile to the post-fresh-install state
Step 5: This process will reset search engine, homepage, new tab page and pinned tabs to default. Extensions, add-ons and themes will be disabled and Content Settings will be reset. Cookies, Cache and Site data will be deleted.
Step 6: Once done, restart your browser and please check if “OpenVPN TLS handshake failed” Error is resolved.
To reset Microsoft Edge Chromium browser, follow the steps below:
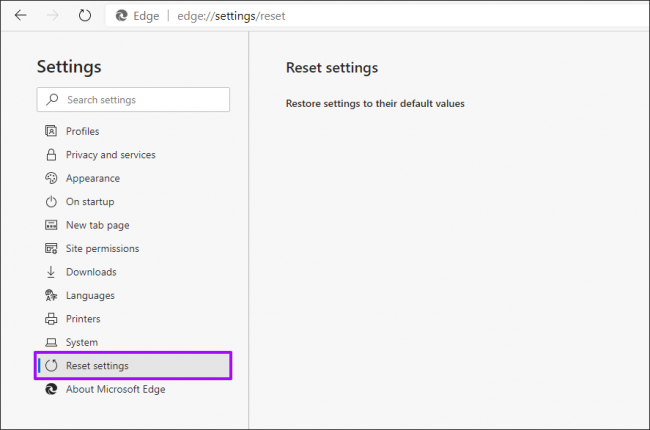
Step 1: Open Microsoft Edge browser
Step 2: Click on Open Settings
Step 3: Navigate to “Reset Settings”
Step 4: Click on “Restore Settings” to their default values.
Step 5: This process will reset your Startup page, new tab page, search engine and pinned tabs, disable all extensions and clear temporary data like cookies, and favourites, history and saved passwords will not be cleared.
Step 6: Once done, restart your browser and please check if the error is resolved.
To reset Firefox settings, follow the steps below:
Step 1: Open “Firefox browser”
Step 2: Go to “Settings > Help > Troubleshooting information”
Step 3: Click on “Reset Firefox” button.
Step 4: This process will reset search engine and homepage to default. Your extensions, sync settings, open tabs, tab groups, themes and toolbars will be removed. However, your passwords, from data, browsing history, favourites or bookmarks, cookies and plug-ins will not be removed. They will instead be moved to new profile.
Procedure 5: Ensuring the correct System time

Step 1: Press “Windows + I” keys together from keyboard to open “Settings App”
Step 2: In the “Settings App”, select “Time & Language”
Step 3: Go to the right pane, then toggle the switch under “Set Time Automatically” to “ON”
Step 4: After that, restart your computer and try visiting the website again to see if TLS handshake error is gone.
Conclusion
I am sure this article helped you to “Fix OpenVPN TLS handshake failed on Windows 10” with several easy methods/procedures. You can choose/follow either one or all procedures to fix this issue.
If you are unable to fix OpenVPN TLS handshake failed problem with the solutions mentioned above, then it might possible that your System has infected with malware or viruses. According to security researchers, malware or viruses cause several damages in your computer.
In this case, you can scan your computer with powerful antivirus software that has the ability to delete all types of malware or viruses from System.
You can also try another possible solution to fix this issue. We recommended you to Repair your PCs/laptops with powerful PC Repair Tools/Software that has the ability to remove all the faculty software, clean System registry, remove all types of malware or viruses, fix all types of bugs or errors and improves System performance as well. You can download powerful PC Repair Tool/Software via “Download” link below.
Is Your PC Behaving Abnormal & Needs Instant Optimization?
We recommend you to choose Advanced System Repair Suite which is dedicated to offer complete options to optimize a PC, fix any Windows error, and remove malware threats in easy. The software is award winning and suggested as the best malware fix application supporting all Windows versions including XP/Vista/7/8/8.1/10. Just 3 steps to avail error free PC.
![]()
- Download Advanced System Repair and install on your PC. (Follow all on screen instructions when installer is executed)
- Click “Scan Your PC” button to scan all present issues, errors, junk files, and malware threats.
- Finally, click “Start Repair” to fix all detected problems in next few minutes.
Содержимое
- 1 Ошибка TLS handshake failed в OpenVPN: причины возникновения и методы решения
- 1.1 Что такое «tls handshake failed» и почему это происходит
- 1.2 Как проверить, что «tls handshake failed» вызвало отключение
- 1.3 Как исправить ошибку «tls handshake failed» в OpenVPN
- 1.4 Шаг 1: Проверьте корректность конфигурационного файла
- 1.5 Шаг 2: Проверьте соединение с сервером OpenVPN
- 1.6 Шаг 3: Проверьте настройки системного времени
- 1.7 Шаг 4: Проверьте, используете ли вы правильную версию OpenVPN
- 1.8 Шаг 5: Проверьте настройки брандмауэра и антивирусного ПО
- 1.9 Шаг 6: Попробуйте использовать другой порт
- 1.10 Шаг 7: Обратитесь за помощью к провайдеру VPN или техподдержке OpenVPN
- 1.11 Итоги
- 1.12 Вопрос-ответ:
-
- 1.12.0.1 Что означает ошибка «tls handshake failed» в OpenVPN?
- 1.12.0.2 Какие могут быть причины ошибки «tls handshake failed» в OpenVPN?
- 1.12.0.3 Как исправить ошибку «tls handshake failed» в OpenVPN?
- 1.12.0.4 Как проверить, не заблокирован ли порт, необходимый для OpenVPN?
- 1.12.0.5 Как проверить настройки сети, вызывающие ошибку «tls handshake failed» в OpenVPN?
- 1.12.0.6 Как обновить сертификаты в OpenVPN?
- 1.12.0.7 Как установить новую версию OpenVPN?
-
- 1.13 Видео по теме:
Узнайте, что делать, если вы столкнулись с ошибкой TLS handshake failed в OpenVPN. С помощью нашей инструкции вы быстро решите проблему и сможете продолжить связь с сервером VPN без проблем.
OpenVPN — это открытое программное обеспечение для создания виртуальной частной сети (VPN). Он позволяет пользователям безопасно и надежно обмениваться данными через незащищенные сети. Однако, при использовании OpenVPN, пользователи могут столкнуться с ошибкой «tls handshake failed», которая может негативно повлиять на их опыт использования VPN.
Одной из причин возникновения этой ошибки является неправильная конфигурация OpenVPN. Ошибка может также возникнуть, если SSL-сертификат, используемый для установки защищенного соединения, недействителен или имеет проблемы.
Чтобы решить эту проблему, необходимо выполнить ряд шагов. В этой статье мы предоставим подробную инструкцию для пользователей, которые столкнулись с ошибкой «tls handshake failed» в OpenVPN. Следуя нашим рекомендациям, вы сможете исправить эту проблему и снова наслаждаться безопасностью и надежностью OpenVPN.
Что такое «tls handshake failed» и почему это происходит
«tls handshake failed» — это сообщение об ошибке, которое может возникать при подключении к VPN-серверу с помощью протокола OpenVPN. Эта ошибка указывает на то, что на этапе установки защищенного соединения между клиентом и сервером произошла ошибка, что приводит к отключению от VPN-сервера.
При установлении соединения между клиентом и сервером сначала происходит «рукопожатие» (handshake) на основе протокола TLS (Transport Layer Security), который обеспечивает защиту передаваемых данных. Если на этом этапе происходят сбои, то возникает ошибка «tls handshake failed».
Причины возникновения ошибки могут быть разными, например:
- Неправильно настроенные сертификаты;
- Несоответствие версий протокола TLS на клиенте и сервере;
- Проблемы с передачей данных, вызванные проблемами с интернет-соединением или оборудованием.
Для решения ошибки можно предпринять несколько действий, например:
- Проверить правильность установки сертификатов и конфигурацию соединения;
- Обновить версию протокола TLS на клиенте и сервере;
- Отключить антивирус или файрвол на временный период;
- Проверить соединение с Интернетом;
- Связаться с технической поддержкой провайдера VPN-сервиса.
Как проверить, что «tls handshake failed» вызвало отключение
Если вы столкнулись с ошибкой «tls handshake failed» при использовании OpenVPN, то возможно вы были отключены от сервера. В этом случае, чтобы убедиться в том, что именно эта ошибка вызвала отключение, вам необходимо проверить журналы сервера и клиента.
В журналах сервера поищите строки, в которых упоминается ваш IP-адрес или клиентское имя. Если вы найдете такую строку и ее уровень достаточно критичен, это может означать, что именно эта ошибка привела к отключению.
Чтобы убедиться в том, что реально произошло отключение, поищите соответствующие строки в журналах клиента. Возможно, вы найдете строки, которые указывают на то, что соединение было разорвано с ошибкой «tls handshake failed».
Если вам не удается проанализировать журналы самостоятельно, вы можете обратиться за помощью к специалистам технической поддержки OpenVPN.
Как исправить ошибку «tls handshake failed» в OpenVPN
Ошибка «tls handshake failed» в OpenVPN может возникать по многим причинам: от неправильно настроенных сертификатов до проблем с обновлением операционной системы. Несмотря на то, что эта ошибка может быть вызвана многими факторами, существует несколько шагов, которые можно предпринять, чтобы ее исправить.
- Проверьте логи OpenVPN. Первым шагом в диагностике ошибки «tls handshake failed» должно быть изучение логов OpenVPN. В логах может быть указана конкретная причина ошибки, которую можно попробовать решить.
- Убедитесь, что сертификаты правильно настроены. Ошибка «tls handshake failed» может возникнуть, если сертификаты не были правильно настроены. Убедитесь, что сертификаты настроены с правильными значениями и что они находятся в нужном местоположении.
- Обновите OpenVPN. В случае если все настроено правильно, попробуйте обновить OpenVPN до последней версии. Некоторые ошибки могут возникать из-за устаревшей версии OpenVPN.
- Отключите брандмауэр или антивирус. Брандмауэры и антивирусы могут блокировать OpenVPN или его соединения. Попробуйте временно отключить брандмауэр или антивирус, чтобы проверить, не блокируют ли они OpenVPN.
- Свяжитесь с технической поддержкой. Если все вышеперечисленные шаги не помогли, то свяжитесь с технической поддержкой. Они могут помочь выявить причину ошибки и предложить решение.
Шаг 1: Проверьте корректность конфигурационного файла
Первое, что необходимо проверить при возникновении ошибки «tls handshake failed» в OpenVPN — это корректность конфигурационного файла. Если в файле содержится ошибка, то при попытке подключения к серверу OpenVPN произойдет сбой.
Чтобы убедиться, что ваш конфигурационный файл настроен правильно, проверьте соответствие параметров конфигурации вашему сертификату. Убедитесь, что все пути к файлам сертификата настроены правильно и что сам сертификат действителен.
Также убедитесь, что вы используете актуальную версию OpenVPN, которая соответствует требованиям вашего сервера. Если ваша версия OpenVPN несовместима с сервером, это может вызвать ошибку «tls handshake failed».
Если вы уверены, что ваш конфигурационный файл правильно настроен и соответствует вашему сертификату, попробуйте подключиться к другому серверу OpenVPN, чтобы убедиться, что проблема не связана с сервером.
Если после проверки конфигурационного файла и подключения к другому серверу проблема все еще не исчезла, перейдите к следующему шагу.
Шаг 2: Проверьте соединение с сервером OpenVPN
После того, как вы настроили OpenVPN, необходимо проверить соединение с сервером. Для этого выполните следующие действия:
- Запустите клиентскую программу OpenVPN на вашем компьютере.
- Введите свои учетные данные для подключения к серверу.
- Нажмите на кнопку «Подключиться».
- Проверьте лог-файлы, чтобы убедиться, что соединение было успешно установлено.
Если соединение не устанавливается, возможно, вы ввели неправильные учетные данные или сервер недоступен. Убедитесь, что вы вводите правильные данные, и проверьте связь со своим администратором для поддержки OpenVPN.
При успешной установке соединения вы можете успешно использовать OpenVPN для безопасного доступа к своим ресурсам на сервере.
Шаг 3: Проверьте настройки системного времени
Если при установке соединения через OpenVPN возникла ошибка «tls handshake failed», это может быть вызвано нарушением синхронизации системного времени на клиентском или серверном компьютере. Следующим шагом по исправлению проблемы является проверка настроек системного времени.
На Windows-машине для открытия окна настроек даты и времени нужно щелкнуть по значку «Часы» в правом нижнем углу экрана, затем выбрать пункт «Дата и время». Необходимо проверить, правильно ли установлена текущая дата и время, а также часовой пояс.
Если вы используете Linux, то настройки системного времени проверяются командой «timedatectl status», которую следует выполнить в терминале. Если время актуально, сообщение будет содержать слова «System clock synchronized». Если же время отрегулировать не удалось, то требуется установка и синхронизация NTP-сервера.
Если системное время было неправильно установлено, то следует поправить его вручную или установить NTP-сервер для автоматической синхронизации времени. После этого необходимо перезапустить клиентское и серверное приложение OpenVPN.
Шаг 4: Проверьте, используете ли вы правильную версию OpenVPN

Ошибка «tls handshake failed» может возникать, если вы используете несовместимые версии OpenVPN и OpenSSL. Проверьте, используете ли вы правильную версию OpenVPN.
Для работы OpenVPN требуется OpenSSL, и версии этих двух программ должны быть совместимыми. Например, если вы используете OpenVPN версии 2.4.x, то для него подойдет OpenSSL версии 1.0.2 или 1.1.0. Если же вы используете OpenVPN версии 2.5.x, то рекомендуется использовать OpenSSL версии 1.1.1 или более поздней.
Убедитесь, что у вас установлена соответствующая версия OpenSSL и OpenVPN, и что они оба правильно настроены.
Если вы не уверены, какую версию использовать или как правильно настроить программы, обратитесь к документации или к специалистам.
Шаг 5: Проверьте настройки брандмауэра и антивирусного ПО
Если первые четыре меры не помогли, возможно, проблема связана с брандмауэром или антивирусным ПО на вашем компьютере. Эти программы могут блокировать трафик OpenVPN и вызывать ошибку «tls handshake failed».
Вам необходимо проверить настройки брандмауэра и антивирусного ПО, чтобы убедиться, что они не блокируют OpenVPN. В некоторых случаях вы можете временно отключить эти программы и попробовать подключиться к OpenVPN снова.
Если отключение брандмауэра или антивирусного ПО решает проблему, вам необходимо настроить эти программы так, чтобы они не блокировали OpenVPN в будущем.
Если вы не уверены, как настроить брандмауэр или антивирусное ПО, обратитесь за помощью к своему IT-специалисту или поставщику этого ПО.
Шаг 6: Попробуйте использовать другой порт
Если ранее упомянутые шаги не помогли, возможно проблема заключается в заблокированном порте. Обращайте внимание, что на некоторых общественных Wi-Fi сетях, учебных заведениях и работе порты VPN могут быть заблокированы. Также, возможно, ваш провайдер блокирует порты VPN. Один из способов решения этой проблемы — попробовать использовать другой порт. Если вы используете клиент OpenVPN, вам нужно будет изменить порт в файле конфигурации. Обычно порты с цифрами 1194, 80 или 443 часто используются для OpenVPN. Вы можете попробовать использовать один из этих портов или, если они заблокированы, выбрать другой порт, например, 8080 или 9201.
Чтобы изменить порт в клиенте OpenVPN, выполните следующие шаги:
- Откройте файл конфигурации клиента OpenVPN. Обычно он находится в папке config.
- Найдите строку, содержащую порт, обычно это looks like «port 1194», «proto udp», or «proto tcp»
- Замените номер порта на номер желаемого порта, например, «port 8080». Если вы не знаете, какой порт использовать, обратитесь к своему провайдеру VPN.
- Сохраните файл.
- Запустите OpenVPN клиент с новым файлом конфигурации.
Если изменение порта не помогло, попробуйте обратиться к вашему провайдеру VPN для получения дополнительной помощи.
Шаг 7: Обратитесь за помощью к провайдеру VPN или техподдержке OpenVPN
Если вы уже попробовали все вышеперечисленные способы, но проблема с ошибкой «tls handshake failed» все еще не решена, настоятельно рекомендуется обратиться к провайдеру VPN или техподдержке OpenVPN. Это можно сделать через специальную форму обратной связи на сайте провайдера или написав на электронную почту техподдержки OpenVPN.
Перед этим стоит убедиться, что у вас есть все необходимые данные для обращения: имя пользователя, пароль, настройки протокола OpenVPN и другие пользовательские настройки. Вы также можете приложить скриншот ошибки «tls handshake failed», чтобы техподдержка могла быстрее понять суть проблемы и дать рекомендации по ее решению.
В большинстве случаев специалисты помогут быстро решить проблему с ошибкой «tls handshake failed» и настроить VPN-соединение, чтобы вы смогли без проблем пользоваться интернетом и защищать свои данные в сети.
Не стоит забывать, что своевременное обращение за помощью позволяет сократить время, затраченное на исправление проблемы, и избежать возможных последствий, связанных с уязвимостью вашего интернет-соединения.
Итоги
- Ошибка «tls handshake failed» – одна из самых распространенных в OpenVPN.
- Она возникает из-за неправильной конфигурации соединения между клиентом и сервером.
- Чтобы исправить ошибку, необходимо проанализировать логи OpenVPN и найти причину ее возникновения.
- Решить проблему можно путем проверки конфигурационных файлов, перезагрузки сервера, обновления версии OpenSSL и других действий, описанных в данной инструкции.
- Важно помнить, что в большинстве случаев проблема может быть решена при условии тщательного анализа логов и их правильной интерпретации.
Вопрос-ответ:
Что означает ошибка «tls handshake failed» в OpenVPN?
Ошибка «tls handshake failed» означает неудачную попытку установления безопасного соединения между клиентом и сервером по протоколу TLS.
Какие могут быть причины ошибки «tls handshake failed» в OpenVPN?
Ошибка «tls handshake failed» может быть вызвана проблемами с сертификатами, настройками сети, блокировкой портов, неправильными настройками OpenVPN и многими другими причинами.
Как исправить ошибку «tls handshake failed» в OpenVPN?
Существует несколько методов исправления ошибки «tls handshake failed» в OpenVPN, включая проверку настроек сети, обновление сертификатов, проверку блокировки портов, установку новой версии OpenVPN и т.д.
Как проверить, не заблокирован ли порт, необходимый для OpenVPN?
Вы можете использовать утилиту telnet для проверки доступности порта. Например, если порт OpenVPN равен 1194, выполните команду «telnet [IP адрес сервера] 1194». Если соединение не установлено, порт может быть заблокирован.
Как проверить настройки сети, вызывающие ошибку «tls handshake failed» в OpenVPN?
Вы можете проверить настройки сети, используя утилиты ping, traceroute и nslookup. Например, выполните команду «ping [IP адрес сервера]» для проверки соединения. Если соединение не установлено, может быть проблема с настройками сети.
Как обновить сертификаты в OpenVPN?
Вы можете обновить сертификаты, перегенерировав их из серверной конфигурации OpenVPN. Для этого выполните команду «easyrsa build-server-full [имя-сертификата]».
Как установить новую версию OpenVPN?
Вы можете установить новую версию OpenVPN, загрузив ее с официального сайта и следуя инструкциям по установке для вашей операционной системы.
Видео по теме:
Microsoft has addressed a known issue with TLS handshake failures in Windows 11 systems. This problem, caused by Windows security updates released during the recent Patch Tuesday on October 11th, has been resolved with the release of the KB5018496 preview cumulative update. Users on affected Windows 11 devices may have encountered SEC_E_ILLEGAL_MESSAGE errors in applications when connecting to servers. These errors indicate failed SSL/TLS handshake connections.
To address this issue, Microsoft has specifically targeted the affected connections that might experience handshake failures during SSL and TLS communication. Developers may notice that these connections receive one or more records followed by a partial record with a size of lesser than 5 bytes within a single input buffer.
It is crucial to have a secure connection between the user system, server, and website to prevent potential damage or corruption. When attempting to establish a connection with an insecure website, users may encounter the TLS handshake failed message, often accompanied by error codes like 501 or 525. This failure indicates that the TLS and the visitor’s browser were unable to establish a secure connection, posing a risk to the website.
For users facing this issue, it can be frustrating and confusing. However, there are several fixes available to address the problem. In this post, we have gathered relevant information and solutions to assist users experiencing TLS handshake errors in Windows 11. By following the provided guidance, users can navigate and resolve these connection issues, ensuring secure and uninterrupted browsing experiences.

To fix TLS handshake errors in Windows 11, you can try the following solutions:
1. Update Windows:
Ensure that your Windows 11 system is up to date with the latest patches and updates. Microsoft often releases fixes for known issues, including TLS handshake errors, through Windows updates. Here is how you are going to do it:
- Click on the Start button and select Settings (the gear icon).
- In the Settings window, click on Windows Update from the list.
- Click on Check for updates and let Windows search for the latest updates.
- If updates are available, click on Download and wait for the process to complete.
- Restart your computer if prompted.
2. Install KB5018496 Preview Cumulative Update Manually:
If you haven’t already, install the KB5018496 preview cumulative update. This update addresses the TLS handshake failure issue specifically on Windows 11 systems.
- Open the Microsoft Update Catalog website in your web browser.
- Search for “KB5018496” using the search bar on the website.
- Locate the preview cumulative update for Windows 11 that matches your system architecture (e.g., 64-bit or 32-bit).
- Click on the download link next to the update to start downloading the update file.
- Once the download is complete, double-click on the downloaded file to install the update.
- Follow the on-screen instructions to complete the installation process.
- Restart your computer after the update installation is finished.
If you have already installed the latest update and still experience the TLS Handshake error on Windows 11 then use the other methods given.
3. Check Date and Time Settings:
Incorrect date and time settings can cause TLS handshake errors. Verify that your system’s date, time, and time zone settings are accurate.
- Right-click on the clock in the taskbar.
- Select Adjust date/time from the menu.
- In the Date & Time settings window, ensure that the Set time automatically and Set time zone automatically options are turned on.
- If the settings are already enabled, toggle them off and then back on to refresh the settings.
- Verify that the date, time, and time zone displayed are correct for your location.
- If any changes were made, restart your computer to apply the new settings.
This is a simple yet effective way to fix the TLS error on Windows 11.
4. Disable Antivirus/Firewall:
Temporarily disable your antivirus software or firewall to check if they are causing conflicts with the TLS handshake process. If the error disappears after disabling them, consider adjusting the settings or contacting the software vendor for further assistance.
- Locate the antivirus or firewall software icon in the system tray or notification area.
- Right-click on the icon and look for an option to disable or pause the protection temporarily.
- Select the appropriate option to disable the antivirus or firewall software.
- Attempt to establish the TLS handshake connection again and see if the error persists.
- After troubleshooting, remember to enable the antivirus or firewall software to restore your system’s protection.
5. Clear SSL/TLS Cache:
Clearing the SSL/TLS cache can resolve potential conflicts or corrupted data that may be causing the handshake error. Open the Command Prompt as an administrator and run the following command: “ipconfig /flushdns”.
- Press the Windows key + R on your keyboard to open the Run dialog box.
- Type “cmd” and press Enter to open the Command Prompt.
- In the Command Prompt window, type the following command and press Enter: “ipconfig /flushdns“
- Wait for the command to execute and clear the DNS cache.
- Close the Command Prompt window.
Check if the error is fixed or not. Users who are still experiencing the issue should use the next method.
6. Reset Internet Options:
Resetting Internet Options to their default settings can help resolve the error.
- Press the Windows key + R on your keyboard to open the Run dialog box.
- Type “inetcpl.cpl” and press Enter to open the Internet Properties window.
- In the Internet Properties window, go to the Advanced tab.
- Click on the Reset button under the Reset Internet Explorer settings section.
- Check the box that says Delete personal settings and click on the Reset button.
- Wait for the process to complete and then click on Close.
Restart your computer to apply the changes.
7. Check Proxy Settings:
If you are using a proxy server, ensure that the settings are configured correctly. Incorrect proxy settings can interfere with TLS handshake connections. Disable the proxy temporarily to see if it resolves the issue.
- Press the Windows key + R on your keyboard to open the Run dialog box.
- Type “inetcpl.cpl” and press Enter to open the Internet Properties window.
- In the Internet Properties window, go to the Connections tab and click on the LAN settings button.
- In the LAN Settings window, ensure that the Automatically detect settings option is checked.
- If you are using a proxy server, ensure the proxy server address and port are entered correctly.
- If you need to make changes, modify the proxy server settings as required.
- Click on OK to save the changes.
- After verifying or adjusting the proxy settings, close the Internet Properties window.
- Attempt to establish the TLS handshake connection again and check if the error persists.
If you are still experiencing the TLS handshake error, you may consider contacting your network administrator or internet service provider for further assistance. They can provide specific guidance based on your network configuration.
Additionally, you can search online for the specific error message or error code you are encountering. Often, there are community forums or knowledge-based articles that provide solutions or workarounds for common TLS handshake errors.
8. Disable Non-Essential Services:
NOTE: Remember to exercise caution and create backups of your important data before making any significant changes to your system.
Some background services or processes may interfere with the TLS handshake. Use the Windows Task Manager to identify non-essential services or processes consuming excessive resources and temporarily disable them to troubleshoot the issue.
Here are the steps to disable non-essential services in Windows 11 to troubleshoot TLS handshake errors:
- Press the Ctrl+Shift+Esc keys together on your keyboard to open the Task Manager. Alternatively, you can right-click on the taskbar and select Task Manager from the menu.
- In the Task Manager window, click on the More Details option at the bottom-left corner of the window. This will expand the Task Manager and show additional details.
- Click on the Services tab at the top of the Task Manager window. This will display a list of services running on your system.
- By default, the services are listed alphabetically. Look through the list of services and identify any non-essential services that may be consuming excessive resources.
To determine if a service is non-essential, you can perform a quick internet search using the service name as a keyword. This will help you find information about the service and whether it is safe to temporarily disable it.
- Once you have identified a non-essential service that you want to disable, right-click on the service in the list and select Stop from the context menu. This will stop the service from running.
- If prompted with a warning message about stopping a service, carefully review the message to ensure that you are stopping the correct service. Click on Yes to confirm the action.
- Use the same method to disable any other non-essential services you want to disable.
After disabling the non-essential services, attempt to establish the TLS handshake connection again and check if the error persists.
If disabling a particular service resolves the TLS handshake error, it indicates that the service was causing a conflict. In this case, you may want to investigate further or contact the service provider for guidance on how to configure the service to work properly without causing the error.
If needed, you can re-enable the disabled services by restarting your computer. This will allow the services to start running again.
Please note that when disabling services, exercise caution and only disable services that you are confident are non-essential and safe to disable temporarily. Disabling critical system services can potentially impact the functionality of your Windows 11 system. And these were methods to fix TLS errors on Windows 11.
I am configuring OpenVPN 2.3.6-1 on my Arch Linux server in order to encrypt SMB traffic over the public Internet. When I test the setup on one of my Linux virtual machine clients, I get the error: TLS Error: TLS handshake failed.
I quickly read (OpenVPN on OpenVZ TLS Error: TLS handshake failed (google suggested solutions not helping)) and tried to switch from the default UDP to TCP, but that only caused the client to repeatedly report that the connection timed out. I also tried disabling the cipher and TLS authentication, but that caused the server to fail with Assertion failed at crypto_openssl.c:523. In both instances, the required changes were made to both the client and server configurations.
I have been following the instructions at (https://wiki.archlinux.org/index.php/OpenVPN) to set up OpenVPN and the instructions at (https://wiki.archlinux.org/index.php/Create_a_Public_Key_Infrastructure_Using_the_easy-rsa_Scripts) to create the keys and certificates. The only deviations I have made from these instructions have been specifying my own computers’ names and their corresponding key/certificate file names.
See also my original question about securing SMB traffic over the Internet: (Simple encryption for Samba shares)
Can anybody explain how I can solve this issue?
Details:
Server: Arch Linux (up to date) connected directly to gateway via ethernet cable. No iptables.
Client: Arch Linux (up to date) virtual machine on VirtualBox 4.3.28r100309 Windows 8.1 host, bridged network adapter. No iptables. Windows Firewall disabled.
Gateway: Port forwarding for port 1194 enabled, no firewall restrictions.
Here are the configuration files on the server and client, respectively. I created these according to the instructions on the Arch Wiki.
/etc/openvpn/server.conf (Non-comment lines only):
port 1194
proto udp
dev tun
ca /etc/openvpn/ca.crt
cert /etc/openvpn/server-name.crt
key /etc/openvpn/server-name.key
dh /etc/openvpn/dh2048.pem
server 10.8.0.0 255.255.255.0
ifconfig-pool-persist ipp.txt
keepalive 10 120
tls-auth /etc/openvpn/ta.key 0
comp-lzo
user nobody
group nobody
persist-key
persist-tun
status openvpn-status.log
verb 3
/etc/openvpn/client.conf (Non-comment lines only):
client
dev tun
proto udp
remote [my public IP here] 1194
resolv-retry infinite
nobind
user nobody
group nobody
persist-key
persist-tun
ca /etc/openvpn/ca.crt
cert /etc/openvpn/client-name.crt
key /etc/openvpn/client-name.key
remote-cert-tls server
tls-auth /etc/openvpn/ta.key 1
comp-lzo
verb 3
Here are the outputs of running openvpn on the machines with the above configurations. I started the server first, then the client.
The output of openvpn /etc/openvpn/server.conf on the server:
Thu Jul 30 17:02:53 2015 OpenVPN 2.3.6 x86_64-unknown-linux-gnu [SSL (OpenSSL)] [LZO] [EPOLL] [MH] [IPv6] built on Dec  2 2014
Thu Jul 30 17:02:53 2015 library versions: OpenSSL 1.0.2d 9 Jul 2015, LZO 2.09
Thu Jul 30 17:02:53 2015 NOTE: your local LAN uses the extremely common subnet address 192.168.0.x or 192.168.1.x.  Be aware that this might create routing conflicts if you connect to the VPN server from public locations such as internet cafes that use the same subnet.
Thu Jul 30 17:02:53 2015 Diffie-Hellman initialized with 2048 bit key
Thu Jul 30 17:02:53 2015 Control Channel Authentication: using '/etc/openvpn/ta.key' as a OpenVPN static key file
Thu Jul 30 17:02:53 2015 Outgoing Control Channel Authentication: Using 160 bit message hash 'SHA1' for HMAC authentication
Thu Jul 30 17:02:53 2015 Incoming Control Channel Authentication: Using 160 bit message hash 'SHA1' for HMAC authentication
Thu Jul 30 17:02:53 2015 Socket Buffers: R=[212992->131072] S=[212992->131072]
Thu Jul 30 17:02:53 2015 ROUTE_GATEWAY 192.168.0.1/255.255.255.0 IFACE=enp5s0 HWADDR=##:##:##:##:##:##
Thu Jul 30 17:02:53 2015 TUN/TAP device tun0 opened
Thu Jul 30 17:02:53 2015 TUN/TAP TX queue length set to 100
Thu Jul 30 17:02:53 2015 do_ifconfig, tt->ipv6=0, tt->did_ifconfig_ipv6_setup=0
Thu Jul 30 17:02:53 2015 /usr/bin/ip link set dev tun0 up mtu 1500
Thu Jul 30 17:02:53 2015 /usr/bin/ip addr add dev tun0 local 10.8.0.1 peer 10.8.0.2
Thu Jul 30 17:02:53 2015 /usr/bin/ip route add 10.8.0.0/24 via 10.8.0.2
Thu Jul 30 17:02:53 2015 GID set to nobody
Thu Jul 30 17:02:53 2015 UID set to nobody
Thu Jul 30 17:02:53 2015 UDPv4 link local (bound): [undef]
Thu Jul 30 17:02:53 2015 UDPv4 link remote: [undef]
Thu Jul 30 17:02:53 2015 MULTI: multi_init called, r=256 v=256
Thu Jul 30 17:02:53 2015 IFCONFIG POOL: base=10.8.0.4 size=62, ipv6=0
Thu Jul 30 17:02:53 2015 IFCONFIG POOL LIST
Thu Jul 30 17:02:53 2015 Initialization Sequence Completed
The output of openvpn /etc/openvpn/client.conf on the client:
Thu Jul 30 21:03:02 2015 OpenVPN 2.3.6 x86_64-unknown-linux-gnu [SSL (OpenSSL)] [LZO] [EPOLL] [MH] [IPv6] built on Dec  2 2014
Thu Jul 30 21:03:02 2015 library versions: OpenSSL 1.0.2d 9 Jul 2015, LZO 2.09
Thu Jul 30 21:03:02 2015 WARNING: file '/etc/openvpn/client-name.key' is group or others accessible
Thu Jul 30 21:03:02 2015 WARNING: file '/etc/openvpn/ta.key' is group or others accessible
Thu Jul 30 21:03:02 2015 Control Channel Authentication: using '/etc/openvpn/ta.key' as a OpenVPN static key file
Thu Jul 30 21:03:02 2015 Outgoing Control Channel Authentication: Using 160 bit message hash 'SHA1' for HMAC authentication
Thu Jul 30 21:03:02 2015 Incoming Control Channel Authentication: Using 160 bit message hash 'SHA1' for HMAC authentication
Thu Jul 30 21:03:02 2015 Socket Buffers: R=[212992->131072] S=[212992->131072]
Thu Jul 30 21:03:02 2015 NOTE: UID/GID downgrade will be delayed because of --client, --pull, or --up-delay
Thu Jul 30 21:03:02 2015 UDPv4 link local: [undef]
Thu Jul 30 21:03:02 2015 UDPv4 link remote: [AF_INET][my public IP here]:1194
Thu Jul 30 21:04:02 2015 TLS Error: TLS key negotiation failed to occur within 60 seconds (check your network connectivity)
Thu Jul 30 21:04:02 2015 TLS Error: TLS handshake failed
Thu Jul 30 21:04:02 2015 SIGUSR1[soft,tls-error] received, process restarting
Thu Jul 30 21:04:02 2015 Restart pause, 2 second(s)