- Remove From My Forums
-
Question
-
I am currently working in a scenario where static routes and UDP 123 port openings to time.windows.com have needed to be made to allow the PDC to sync it’s time successfully.
The problem I have is that the IP addresses for the NTP servers behind ‘time.windows.com’ are not accurately documented anywhere.
We currently have static routes and UDP 123 port openings set up for the following IP addresses I have been able to resolve to time.windows.com:
23.101.187.68
104.209.134.106
Yesterday I noticed that the PDC had started resolving time.windows.com to:
104.41.150.68
This meant it could not sync as there were no static routes or port exceptions created for this IP.
So I am not continuously chasing my tail whenever DNS selects a new IP for time.windows.com, can someone please point me to an a official location where all IPs associated with time.windows.com
are published? There is a similar location for 0365 but I cannot find anything anywhere for Time.Any help would be greatly appreciated.
Answers
-
The public IP address changes regularly and I am not aware about an IP range that has been announced by Microsoft to be the one for time.windows.com. Either you open the traffic to all public IPs for port 123 UDP or try to use another NTP server with a
static IP address: http://serverfault.com/questions/424767/access-to-ntp-via-ip-which-doesnt-change-often
-
Proposed as answer by
Monday, June 22, 2015 12:04 AM
-
Marked as answer by
Vivian_Wang
Monday, July 6, 2015 5:38 AM
-
Proposed as answer by
Начиная с Windows 2000 все операционные системы Windows включают в себя службу времени W32Time. Эта служба предназначена для синхронизации времени в пределах организации. W32Time отвечает за работу как клиентской, так и серверной части службы времени, причем один и тот же компьютер может быть одновременно и клиентом и сервером NTP (Network Time Protocol).
По умолчанию служба времени в Windows сконфигурирована следующим образом:
• При установке операционной системы Windows запускает клиента NTP и синхронизируется с внешним источником времени;
• При добавлении компьютера в домен тип синхронизации меняется. Все клиентские компьютеры и рядовые сервера в домене используют для синхронизации времени контроллер домена, проверяющий их подлинность;
• При повышении рядового сервера до контроллера домена на нем запускается NTP-сервер, который в качестве источника времени использует контроллер с ролью PDC-эмулятор;
• PDC-эмулятор, расположенный в корневом домене леса, является основным сервером времени для всей организации. При этом сам он также синхронизируется с внешним источником времени.
Такая схема работает в большинстве случаев и не требует вмешательства. Однако структура сервиса времени в Windows может и не следовать доменной иерархии, и надежным источником времени можно назначить любой компьютер. В качестве примера я опишу настройку NTP-сервера в Windows Server 2008 R2, хотя со времен Windows 2000 процедура не особо изменилась.
Запуск NTP сервера
Сразу отмечу, что служба времени в Windows Server (начиная с 2000 и заканчивая 2012) не имеет графического интерфейса и настраивается либо из командной строки, либо путем прямой правки системного реестра. Лично мне ближе второй способ, поэтому идем в реестр.
Итак, первым делом нам надо запустить сервер NTP. Открываем ветку реестра
HKLM\System\CurrentControlSet\services\W32Time\TimeProviders\NtpServer.
Здесь для включения сервера NTP параметру Enabled надо установить значение 1.

Затем перезапускаем службу времени командой net stop w32time && net start w32time

После перезапуска службы NTP сервер уже активен и может обслуживать клиентов. Убедиться в этом можно с помощью команды w32tm /query /configuration. Эта команда выводит полный список параметров службы. Если раздел NtpServer содержит строку Enabled :1 , то все в порядке, сервер времени работает.

Для того, чтобы NTP-сервер мог обслуживать клиентов, не забудьте на файерволле открыть UDP порт 123 для входящего и исходящего траффика.
Основные настройки NTP сервера
NTP сервер включили, теперь надо его настроить. Открываем ветку реестра HKLM\System\CurrentControlSet\services\W32Time\Parameters. Здесь в первую очередь нас интересует параметр Type, который задает тип синхронизации. Он может принимать следующие значения:
NoSync — NTP-сервер не синхронизируется с каким либо внешним источником времени. Используются часы, встроенные в микросхему CMOS самого сервера;
NTP — NTP-сервер синхронизируется с внешними серверами времени, которые указаны в параметре реестра NtpServer;
NT5DS — NTP-сервер производит синхронизацию согласно доменной иерархии;
AllSync — NTP-сервер использует для синхронизации все доступные источники.
Значение по умолчанию для компьютера, входящего в домен — NT5DS, для отдельно стоящего компьютера — NTP.
И параметр NtpServer, в котором указываются NTP-сервера, с которыми будет синхронизировать время данный сервер. По умолчанию в этом параметре прописан NTP-сервер Microsoft (time.windows.com, 0x1), при необходимости можно добавить еще несколько NTP-серверов, введя их DNS имена или IP адреса через пробел. Список доступных серверов времени можно посмотреть например здесь.
В конце каждого имени можно добавлять флаг (напр. ,0x1) который определяет режим для синхронизации с сервером времени. Допускаются следующие значения:
0x1 – SpecialInterval, использование специального интервала опроса ;
0x2 – режим UseAsFallbackOnly;
0x4 – SymmetricActive, симметричный активный режим;
0x8 – Client, отправка запроса в клиентском режиме.
При использовании флага SpecialInterval, необходимо установленное значение интервала в ключе SpecialPollInterval. При значении флага UseAsFallbackOnly службе времени сообщается, что данный сервер будет использоваться как резервный и перед синхронизацией с ним будут выполнятся обращения к другим серверам списка. Симметричный активный режим используется NTP-серверами по умолчанию, а клиентский режим можно задействовать в случае проблем с синхронизацией. Подробнее о режимах синхронизации можно посмотреть здесь, либо не морочиться и просто ставить везде ,0x1 (как советует Microsoft).

Еще один важный параметр AnnounceFlags находится в разделе реестра HKLM\System\CurrentControlSet\services\W32Time\Config. Он отвечает за то, как о себе заявляет NTP-сервер и может принимать следующие значения:
0x0 (Not a time server) — сервер не объявляет себя через NetLogon, как источник времени. Он может отвечать на NTP запросы, но соседи не смогут распознать его, как источник времени;
0x1 (Always time server) — сервер будет всегда объявлять о себе вне зависимости от статуса;
0x2 (Automatic time server) — сервер будет объявлять о себе только, если он получает надежное время от другого соседа (NTP или NT5DS);
0x4 (Always reliable time server) — сервер будет всегда заявлять себя, как надежный источник времени;
0x8 (Automatic reliable time server) — контроллер домена автоматически объявляется надежным если он PDC-эмулятор корневого домена леса. Этот флаг позволяет главному PDC леса заявить о себе как об авторизованном источнике времени для всего леса даже при отсутствии связи с вышестоящими NTP-серверами. Ни один другой контроллер или рядовой сервер (имеющие по умолчанию флаг 0x2) не может заявить о себе, как надежном источнике времени, если он не может найти источник времени для себя.
Значение AnnounceFlags составляет сумму составляющих его флагов, например:
10=2+8 — NTP-сервер заявляет о себе как о надежном источнике времени при условии, что сам получает время из надежного источника либо является PDC корневого домена. Флаг 10 задается по умолчанию как для членов домена, так и для отдельно стоящих серверов.
5=1+4 — NTP-сервер всегда заявляет о себе как о надежном источнике времени. Например, чтобы заявить рядовой сервер (не домен-контроллер) как надежный источник времени, нужен флаг 5.

Ну и настроим интервал между обновлениями. За него отвечает уже упоминавшийся выше ключ SpecialPollInterval, находящийся в ветке реестра HKLM\System\CurrentControlSet\services\W32Time\TimeProviders\NtpClient. Он задается в секундах и по умолчанию его значение равно 604800, что составляет 1 неделю. Это очень много, поэтому стоит уменьшить значение SpecialPollInterval до разумного значения, скажем до 1 часа (3600).

После настройки необходимо обновить конфигурацию сервиса. Сделать это можно командой w32tm /config /update. И еще несколько команд для настройки, мониторинга и диагностики службы времени:
w32tm /monitor – при помощи этой опции можно узнать, насколько системное время данного компьютера отличается от времени на контроллере домена или других компьютерах. Например: w32tm /monitor /computers:time.nist.gov
w32tm /resync – при помощи этой команды можно заставить компьютер синхронизироваться с используемым им сервером времени.
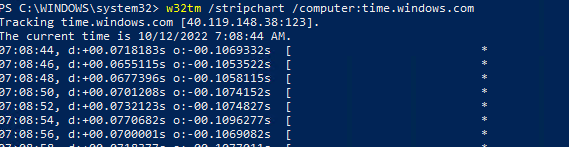
w32tm /stripchart– показывает разницу во времени между текущим и удаленным компьютером, причем может выводить результат в графическом виде. Например, команда w32tm /stripchart /computer:time.nist.gov /samples:5 /dataonly произведет 5 сравнений с указанным источником и выведет результат в текстовом виде.
w32tm /config – это основная команда, используемая для конфигурирования службы NTP. С ее помощью можно задать список используемых серверов времени, тип синхронизации и многое другое. Например, переопределить значения по умолчанию и настроить синхронизацию времени с внешним источником, можно командой w32tm /config /syncfromflags:manual /manualpeerlist:time.nist.gov /update
w32tm /query — показывает текущие настройки службы. Например команда w32tm /query /source покажет текущий источник времени, а w32tm /query /configuration выведет все параметры службы.
Ну и на крайний случай 🙁
w32tm /unregister — удаляет службу времени с компьютера.
w32tm /register – регистрирует службу времени на компьютере. При этом создается заново вся ветка параметров в реестре.
Вы можете столкнуться с ошибкой синхронизации времени в Windows, когда ваш компьютер не может автоматически синхронизировать свое время с серверами времени time.microsoft.com в Интернете. Из-за некорректного времени на компьютере у вас может возникать ошибка «
Your clock is ahead/ Ваши Часы спешат (отстают)
» при открытии HTTPS сайтов Chrome (и в других браузерах), не корректно работать сторонние программы, и появляться различные другие неприятности.
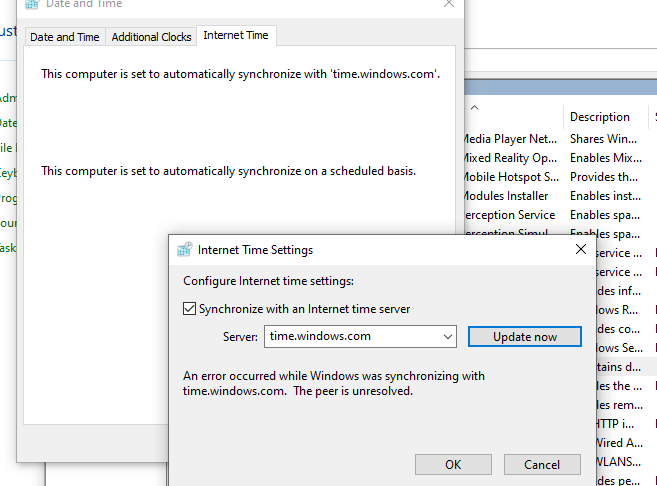
Если попытаться вручную выполнить синхронизацию времени из панели управления Windows (Control Panel -> Date and Time -> Internet Time -> Change Settings -> Update now), появляется ошибка:
An error occurred while windows was synchronizing with time.windows.com. The peer is unreachable.
Также здесь может быть ошибка:
The peer is unresolved.
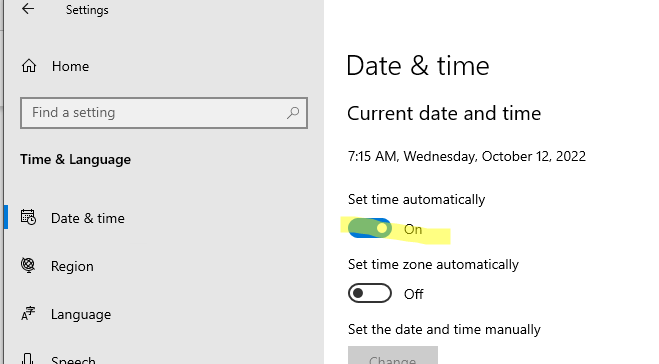
Проверьте, что у вас настроена автоматическая синхронизация времени с NTP серверами в Интернете. Перейдите в раздел Settings -> Time and Language -> Date and Time (можно перейти в этот раздел с помощью команды быстрого доступа по URI:
ms-settings:dateandtime
). Проверьте, что здесь включена опцию Set time automatically и выполните синхронизацию, нажав кнопку Sync now в разделе Additional settings.
Если синхронизация времени с Интернетом не работает, проверьте, с какого внешнего NTP сервера должен получить время ваш компьютер. Выполните команду:
w32tm /query /peers
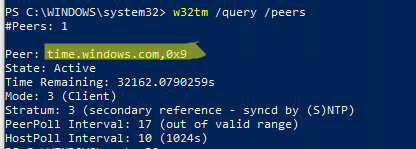
По умолчанию компьютеры в рабочих группах (не присоединенные к домену Active Directory) настроены на получение времени с серверов time.windows.com.
Если при запуске этой команды появилась ошибка “The following error occurred: The service has not been started. (0x80070426)”, проверьте состояние службы Windows Time. Она должна быть настроена на автоматический или ручной запуск. Можете проверить состояние службы с помощью PowerShell или консоли services.msc:
Get-Service w32time| Select DisplayName,Status, ServiceName,StartType
Перезапустите службу:
Restart-Service -Name w32time
Если служба отключена, включите ее.

Проверьте, что с вашего компьютера доступен хост time.microsoft.com.
Сначала проверьте, что ваш компьютер может разрешить это имя в IP адрес:
nslookup time.windows.com
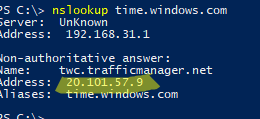
Если ваш компьютер не может отрезолвить это имя в IP адрес (ошибка синхронизации времени The peer is unresolved), значит в настройках сетевого адаптера вашего компьютера указан DNS сервер, который не доступен, или изолирован от интернета. Попробуйте сменить адрес первичного DNS сервера на DNS сервер Google (8.8.8.8). Можно изменить настройки DNS для сетевого адаптера в Windows с помощью PowerShell.
Вывести список сетевых интерфейсов:
Get-NetAdapter

Изменить настройки DNS для сетевого адаптера с ifIndex 10:
Set-DNSClientServerAddress –InterfaceIndex 10 –ServerAddresses 8.8.8.8
Проверьте доступность сервера с помощью ping:
ping time.windows.com
И затем проверьте, что сервер времени Microsoft доступен по порту NTP (UDP 123). Для проверки доступности UDP порта можно использовать утилиту portquery или можно напрямую обратиться к серверу и запросить у него текущее время:
w32tm /stripchart /computer:time.windows.com
Если команда вернет ошибку error: 0x800705B4, значить указанный NTP сервер не доступен. Проверьте, что в Windows открыт исходящий порт UDP/123 для протокола NTP (по умолчанию порт должен быть открыт). Вы можете принудительно открыть порт в Windows Defender Firewall с помощью PowerShell:
New-NetFirewallRule -DisplayName "AllowOutNTP" -Direction Outbound -Protocol UDP -RemotePort 123 -Action Allow
Enable-NetFirewallRule -DisplayName AllowOutNTP
Также убедитесь, что исходящий NTP трафик не блокируется на сетевом уровне (провайдера, вашего файервола или другими сетевыми устройствами).
Если этот NTP сервер не доступен, вы можете использовать другой NTP сервер.
Можно указать
time.nist.gov
или ближайший к вам NTP сервер, который можно получить на сайте
https://www.ntppool.org
.
Можно изменить адрес вашего NTP сервера с помощью командной строки:
w32tm /config /manualpeerlist:time.nist.gov,0x1 /syncfromflags:manual /reliable:yes /update
Перезапустите службу времени (в данном примере вы запустим несколько команд в одну строку):
net stop w32time && net start w32time
Затем выполните синхронизацию времени:
w32tm /config /update
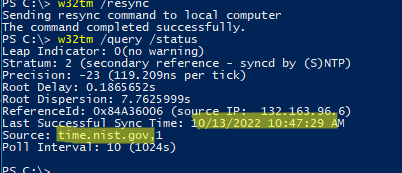
w32tm /resync
Проверьте, что ваш компьютер успешно получил время с нового источника времени (NTP сервера):
w32tm /query /status
Если ничего не помогло, попробуйте полностью сбросить настройки службы Windows Time:
net stop w32time
w32tm /unregister
w32tm /register
net start w32time
Выполните синхронизацию времени:
w32tm /resync
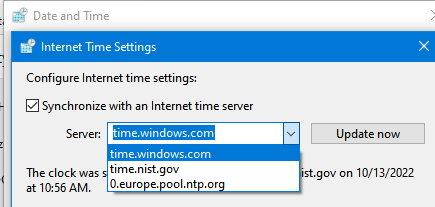
Также вы можете добавить NTP сервер в список серверов времени и выполнить синхронизацию из панели управления Windows. Перейдите в Settings -> Time & language -> Date & time -> Additional clocks –> Internet Time
Убедитесь, что включена опцию Synchronize with an Internet time, добавьте новый сервер time.nist.gov и нажмите кнопку Update Now.
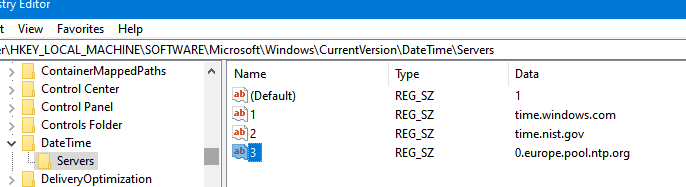
Вы можете добавить NTP сервера в этот список через реестр HKEY_LOCAL_MACHINE\SOFTWARE\Microsoft\Windows\CurrentVersion\DateTime\Servers.
Для автоматической синхронизации времени в Windows используется отдельно задание в планировщике Task Scheduler. Запустите консоль taskschd.msc и перейдите в раздел Task Scheduler (Local) -> Task Scheduler Library -> Microsoft -> Windows -> Time Synchronization. Проверьте, что задание SynchronizeTime включено.
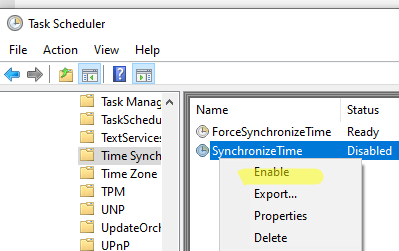
Также вы можете проверить состояние задания Task Scheduler с помощью PowerShell:
Get-ScheduledTask SynchronizeTime
Чтобы включить его:
Get-ScheduledTask SynchronizeTime|Enable-ScheduledTask
New issue
Have a question about this project? Sign up for a free GitHub account to open an issue and contact its maintainers and the community.
By clicking “Sign up for GitHub”, you agree to our terms of service and
privacy statement. We’ll occasionally send you account related emails.
Already on GitHub?
Sign in
to your account
Assignees
![]()
Comments
![]()
![]()
The article states Allow access to all hosts via port 80 (HTTP), 443 (HTTPS), and 123 (UDP/NTP) I believe the only one that requires 123 is time.windows.com not all hosts.
Document Details
⚠ Do not edit this section. It is required for docs.microsoft.com ➟ GitHub issue linking.
- ID: 1aafc065-6ee6-e3cf-31ba-ab3dd277fb23
- Version Independent ID: 35d3102e-4ff7-9408-8dbd-513b7dfff5c0
- Content: Windows Autopilot requirements
- Content Source: windows/deployment/windows-autopilot/windows-autopilot-requirements.md
- Product: w10
- Technology: windows
- GitHub Login: @greg-lindsay
- Microsoft Alias: greglin
![]()
![]()
![]()
@greg-lindsay Would it be feasible to state in the document to limit allow access to 123 (UDP/NTP) only for a single domain (time.windows.com) as suggested? We would like to aid with relevant content updates if necessary. Thanks.
![]()
Maybe the proposed change is appropriate for Windows Autopilot and American or western countries with large enterprise deployments. To me, it looks slightly different, because I don’t use Windows Autopilot and I also only manage a small business amount of computers. My specific case is for all the computers I manage, I quickly change time.windows.com to my local national (and trustworthy) NTP servers, like ntp.online.no in Oslo, Norway (and maybe no.pool.ntp.org). That makes it practical for me to allow more than 1 NTP server to pass the firewall (likely something like 5). In my own network, the NTP and SNTP ports are open for traffic in general, so any NTP server will work. On the other hand, allowing all addresses has caused some minor attack attempts to be reported in the firewall, from Chinese or Russian NTP servers.
![]()
The article states Allow access to all hosts via port 80 (HTTP), 443 (HTTPS), and 123 (UDP/NTP) I believe the only one that requires 123 is time.windows.com not all hosts.
I wonder if this is an indirect suggestion that the document phrasing seems to be too liberal. What @Rkendall75 also said, is that in his opinion, only one address is needed for the NTP port (UDP/NTP 123), but that seems to be too strict in my opinion. Since I don’t have personal experience with Filtering or Firewall rules to allow only a small number of addresses, I don’t have a useful suggestion for what would be a middle ground between those two opposite points. I also presume it is quite difficult to predict a reduced number of addresses to allow through the Firewall, even more so when it comes to determining what is a good solution for Windows Autopilot. Knowing that it is close to unpredictable which addresses (IP or DNS) will be preferred in environments beyond the United States, also taking into account that NTP server names might change over time, I don’t know what could be a practical solution to implement for a change in the current document («Your Mileage May Vary»).
![]()
Exactly my comment was that the only host that needs 123 is whatever your time server is none of the other endpoints need that port opened.
Thanks
Robert
Sent from Mail<https://go.microsoft.com/fwlink/?LinkId=550986> for Windows 10
From: Trond B. Krokli<mailto:notifications@github.com>
Sent: Tuesday, June 9, 2020 10:14 AM
To: MicrosoftDocs/windows-itpro-docs<mailto:windows-itpro-docs@noreply.github.com>
Cc: Rkendall75<mailto:robertjkendall@hotmail.com>; Mention<mailto:mention@noreply.github.com>
Subject: Re: [MicrosoftDocs/windows-itpro-docs] Time.windows.com (#5143)
The article states Allow access to all hosts via port 80 (HTTP), 443 (HTTPS), and 123 (UDP/NTP) I believe the only one that requires 123 is time.windows.com not all hosts.
I wonder if this is an indirect suggestion that the document phrasing seems to be too liberal. What @Rkendall75<https://nam05.safelinks.protection.outlook.com/?url=https%3A%2F%2Fgithub.com%2FRkendall75&data=02%7C01%7C%7Cf52a8877876744b7e6f908d80c9884d7%7C84df9e7fe9f640afb435aaaaaaaaaaaa%7C1%7C0%7C637273196479765435&sdata=XlRafX5WvctvXLPfuKam255U1JFFafgeXRgfrxORnPQ%3D&reserved=0> also said, is that in his opinion, only one address is needed for the NTP port (UDP/NTP 123), but that seems to be too strict in my opinion. Since I don’t have personal experience with Filtering or Firewall rules to allow only a small number of addresses, I don’t have a useful suggestion for what would be a middle ground between those two opposite points. I also presume it is quite difficult to predict a reduced number of addresses to allow through the Firewall, even more so when it comes to determining what is a good solution for Windows Autopilot. Knowing that it is close to unpredictable which addresses (IP or DNS) will be preferred in environments beyond the United States, also taking into account that NTP server names might change over time, I don’t know what could be a practical solution to implement for a change in the current document («Your Mileage May Vary»).
—
You are receiving this because you were mentioned.
Reply to this email directly, view it on GitHub<https://nam05.safelinks.protection.outlook.com/?url=https%3A%2F%2Fgithub.com%2FMicrosoftDocs%2Fwindows-itpro-docs%2Fissues%2F5143%23issuecomment-641455574&data=02%7C01%7C%7Cf52a8877876744b7e6f908d80c9884d7%7C84df9e7fe9f640afb435aaaaaaaaaaaa%7C1%7C0%7C637273196479775430&sdata=0GQUcK0qnb19CLQtUo2JQgsdS3yX4rqNBxQwSf%2FN6u4%3D&reserved=0>, or unsubscribe<https://nam05.safelinks.protection.outlook.com/?url=https%3A%2F%2Fgithub.com%2Fnotifications%2Funsubscribe-auth%2FAJXJIXVX2DMSR2TBP7PJA33RVZUV5ANCNFSM4I7EEBIA&data=02%7C01%7C%7Cf52a8877876744b7e6f908d80c9884d7%7C84df9e7fe9f640afb435aaaaaaaaaaaa%7C1%7C0%7C637273196479785420&sdata=QlglnhKIvFKGBXqVFMImh0kuwN0eMe0nkZA5l7zfTzA%3D&reserved=0>.
![]()
@e0i : Should we ask the document author for a final comment on this, whether it should be updated or not?
![]()
We haven’t got feedback from Greg as commented above. The best way to get relevant feedback, in this case, is to come up with a PR with mentioned suggestions so I’m passing this to a contributor for that. Thank you for the discussion.
![]()
@Rkendall75 @illfated In my opinion this is addressed a bit further in the article:
In environments that have more restrictive Internet access, or for those that require authentication before internet access can be obtained, additional configuration may be required to allow access to the required services

The sentence you are referring to in the beginning of the article refers to a less restrictive environment (which also exists), and then it goes further to talk about what you need to do for more restrictive environments. If you find that this is not explicit enough, what wording would you see appropriate for the first sentence?
Allow access to all hosts via port 80 (HTTP), 443 (HTTPS), and 123 (UDP/NTP).
![]()
@VLG17 : Thank you for the practical feedback. Good & fair point.
I think the current phrasing/wording is OK as it is, based on your summary of what is actually already present in the document page. Giving access to only 1 NTP host (time.windows.com) on restricted networks, or access to all NTP hosts (UDP/123 completely open) on non-restricted networks. In my opinion, it is very difficult to find a middle ground between those two, because everyone and their mother has an opinion on how many and which NTP servers to allow.
![]()
@VLG17 Right to the point!. Thank you for providing this detail that is too easy to look over.
dstrome
pushed a commit
that referenced
this issue
May 6, 2021
![]()
A Time Server or NTP Server is used to synchronize the time across devices in a network. For example, in Windows, your time automatically get synchronized with time.windows.com. The time.windows.com is the time server or NTP server created by Microsoft. Similarly, you can also make your computer a time server or NTP server. And then, you can synchronize the time of all devices in your local (LAN) network with your PC.
In this tutorial, we are going to show you how to make your computer an NTP or Time Server. And, you don’t need to install any software for doing this. We will be using Windows Registry Editor for turning your computer into Time Server.
SEE ALSO: How to Make your Computer a Web Server?
Follow these steps to configure your Windows 10 or Windows 11 PC as a Time Server.
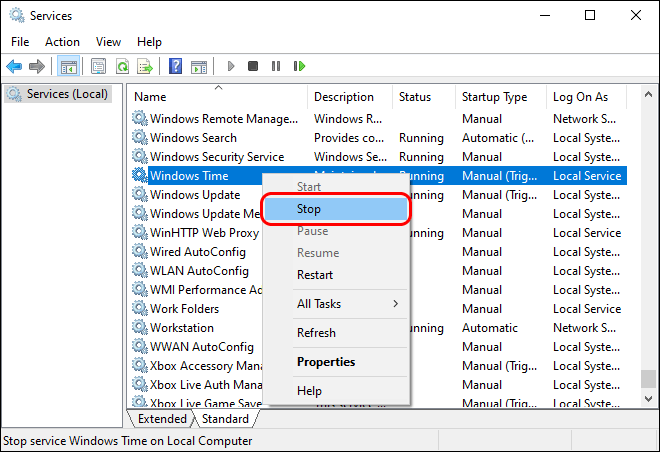
Step 1: Open Services and Stop Windows Time Service
In order to make your computer a time server, we will need to make some changes to Windows Time Service. So, first of all, we will need to stop the Windows Time service in the Windows services console.
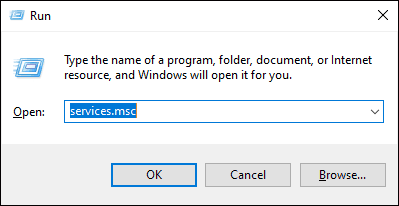
Go to Start > Control Panel > System & Security > Administrative Tools > Services to open Windows Services console. Alternatively, you can type services.msc in RUN and press ENTER.
Now, the Windows Services console will open. Here, look for the ‘Windows Time‘ service. After that, right-click on Windows Time service and select Stop to stop this service. But if the service is already stopped, you can move to the next step.
Step 2: Open Registry Editor and Create LocalNTP DWORD
Now, open Registry Editor. Go to RUN, type regedit , and press Enter button to launch Registry Editor.
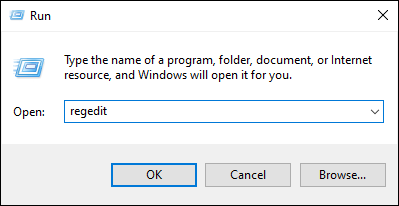
You may see UAC Prompt, click on Yes to continue. Registry Editor will open. In Registry Editor, go to the following registry key:
HKEY_LOCAL_MACHINE\SYSTEM\CurrentControlSet\Services\W32Time\Parameters
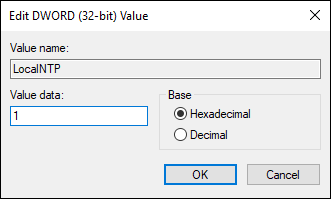
If you don’t see ‘LocalNTP’ DWORD on the right side, you will have to create it to make your computer a time server. So, to create the DWORD, right-click in blank space and select New > DWORD (32-bit) Value.
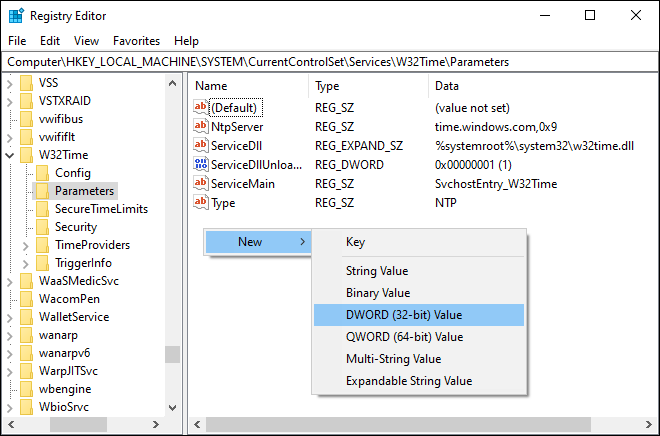
Now, type the name of the new DWORD as LocalNTP (case sensitive).

After creating the DWORD, double-click on it to modify its value. Then set the DWORD value to “1” (Hexadecimal).
Step 3: Enable NTP Server in Windows
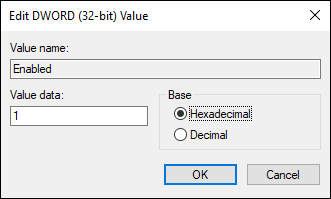
This is one of the most important steps to make your PC an NTP server. Do not close the Registry Editor yet, go to the following key in the Registry Editor.
HKEY_LOCAL_MACHINE\SYSTEM\CurrentControlSet\services\W32Time\TimeProviders\NtpServer
Here, on the right side, you will find a DWORD named Enabled. Right-click and select Modify to change its value.

Now, set the value data of Enabled DWORD to “1” (Hexadecimal).
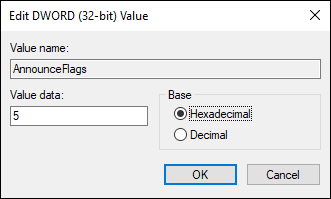
Step 4: Set Announce Flags
Now, go to the following key in Registry Editor.
HKEY_LOCAL_MACHINE\SYSTEM\CurrentControlSet\services\W32Time\Config
Here, we will change the value of AnnounceFlags DWORD. So, right-click on it and select Modify.
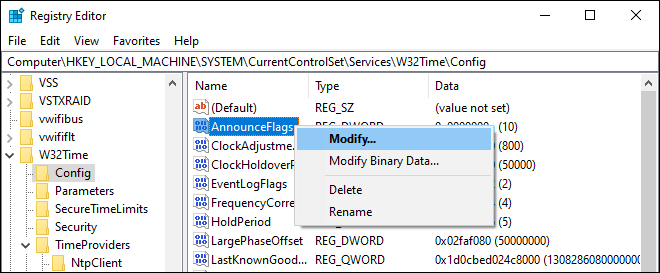
Now, set the value of AnnounceFlags DWORD to “5” (Hexadecimal). Now, your PC will advertise itself as an NTP server.
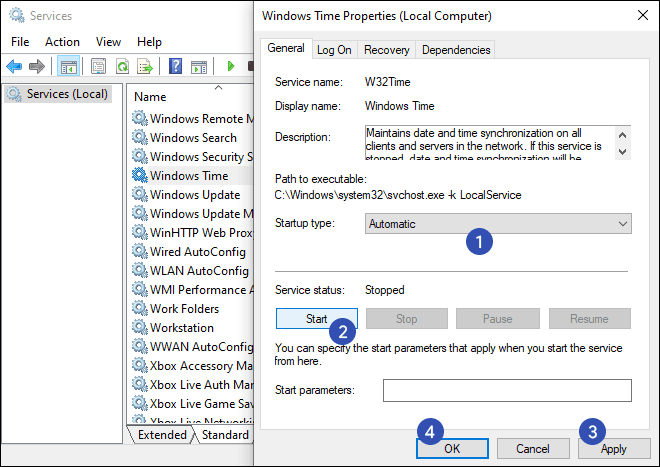
Step 5: Start Windows Time Service
Go to Start > Control Panel > System and Security > Administrative Tools > Services again. Now, double-click on the “Windows Time” service to open its Properties. Here, set Startup type to Automatic, start the service, and then click OK.
Now, you can use your computer as an NTP server. You can now synchronize the time of other computers in your LAN/Local network with your PC.
SEE ALSO: Check these 10 Cool Command Prompt Tricks for you.
Step 6: Synchronize Time with NTP Server
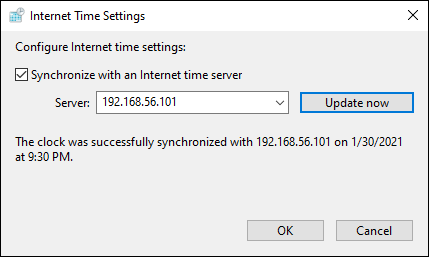
Let’s see how to synchronize the time of any other PC using this newly created NTP Server. First, you need to find the IP address of your PC. You can check your IP in Network Settings or via Command prompt using the ipconfig command. In this tutorial, the IP address of our PC is 192.168.56.101. This is just an example, it may be different for you.
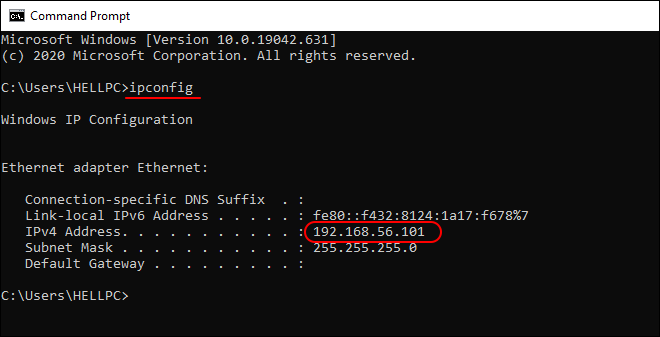
ipconfig command to find the IP Address of Your PC
Now, go to another computer whose time you want to synchronize. Open Control Panel and search for date time and click on Set the time and date link from search results.
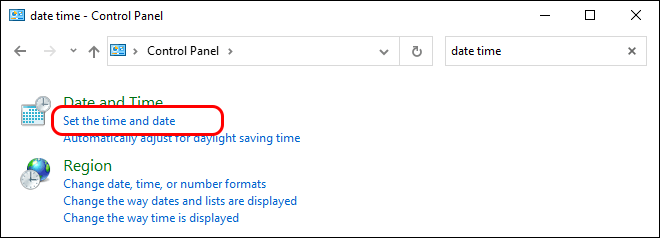
Date and Time settings will open. Go to the Internet Time tab and click on Change Settings.
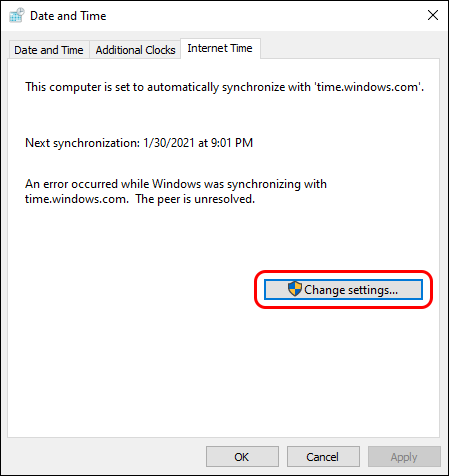
A small Internet Time Settings window will open. Here, enter the IP address of your NTP server (192.168.56.101 in our case) in the box and click on Update Now to synchronize time. It may give you an error on the first attempt. Click on Update Now again and your time will be synchronized successfully. Now, you can click OK to close the time settings window.
SEE ALSO: How to Set up Minecraft Server on Android Phone?
Turn your PC into NTP Server without Any Software
Now, you have successfully turned your computer into an NTP or Time Server without any software. You can synchronize the time of every device on your network using this NTP server. You can also synchronize the time of any remote device using this NTP server by forwarding the NTP port on your router. NTP port is “123” by default. The process of forwarding a port in your router depends on the type of router you use. You can check your router’s manual for more details.
Hope you liked this tutorial. In case you have any problems, feel free to write them down in the comment section below. Feel free to subscribe to our newsletter to get the latest tutorials directly into your inbox.