Installing Windows 11 on a device that does not meet Windows 11 minimum system requirements is not recommended. If you choose to install Windows 11 on ineligible hardware, you should be comfortable assuming the risk of running into compatibility issues.
Your device might malfunction due to these compatibility or other issues. Devices that do not meet these system requirements will no longer be guaranteed to receive updates, including but not limited to security updates.
The following disclaimer applies if you install Windows 11 on a device that doesn’t meet the minimum system requirements:
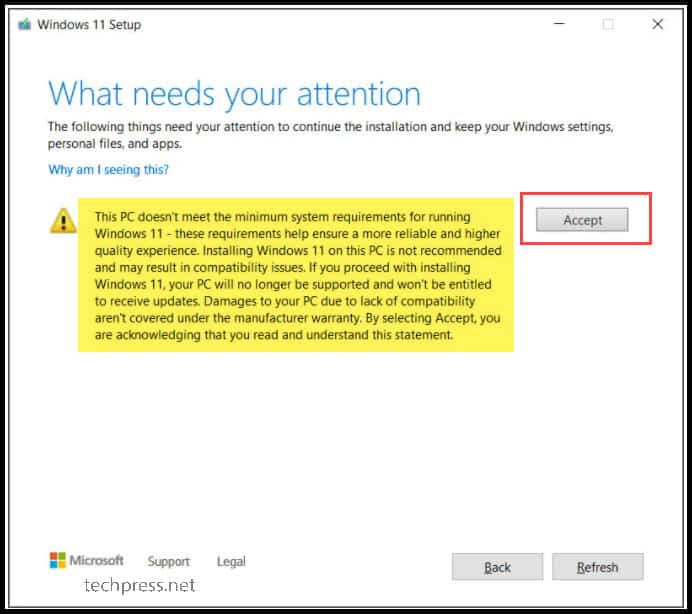
This PC doesn’t meet the minimum system requirements for running Windows 11 — these requirements help ensure a more reliable and higher quality experience. Installing Windows 11 on this PC is not recommended and may result in compatibility issues. If you proceed with installing Windows 11, your PC will no longer be supported and won’t be entitled to receive updates. Damages to your PC due to lack of compatibility aren’t covered under the manufacturer warranty.
Before you install Windows 11
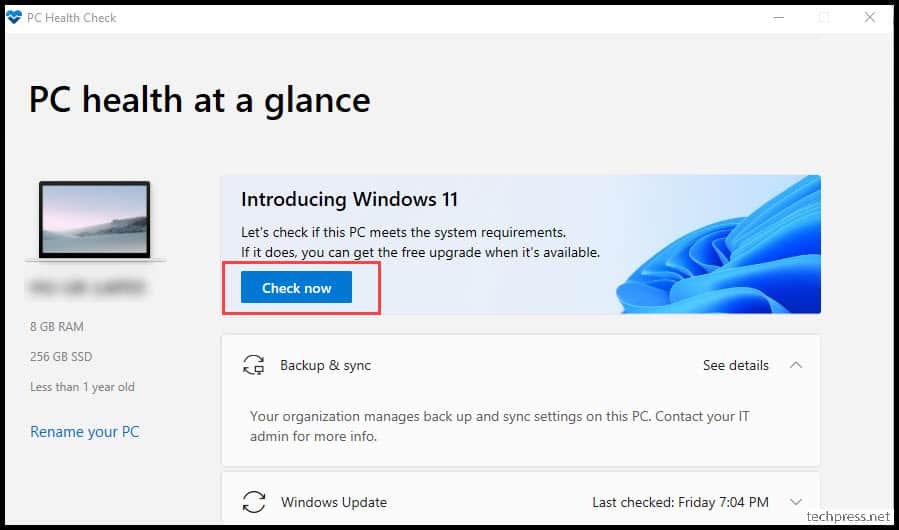
If you are unsure if your device meets the Windows 11 minimum system requirements and have Windows 10 already installed, you can download the PC Health Check app, which will assess eligibility and identify components of your device that don’t meet the minimum requirements. The app will also link to info that details steps you can take to make your device meet the minimum system requirements. To learn more, download and install PC Health Check app.
After you install Windows 11
When Windows 11 is installed on a device that does not meet the minimum system requirements, we’ll notify you using a watermark on your Windows 11 desktop. You might also see a notification in Settings to let you know the requirements are not met.
If you’re experiencing issues after upgrading to Windows 11 and your device does not meet the minimum system requirements, we recommend you go back to Windows 10.
To go back to Windows 10, select Start > Settings > System > Recovery > Go back .
This option is only available for 10 days following your upgrade, after which time the files needed to perform this function will be removed to free up disk space on your device.
Related articles
Upgrade to Windows 11: FAQ
Getting ready for the Windows 11 upgrade
Ways to install Windows 11
Managing Windows 11 “System requirements not met” message in your organization
Need more help?
Want more options?
Explore subscription benefits, browse training courses, learn how to secure your device, and more.
Communities help you ask and answer questions, give feedback, and hear from experts with rich knowledge.
Решение проблемы, когда при установке Windows 11 вы получаете сообщение о ошибке “This PC doesn’t meet the minimum system requirements to install this version of Windows. For more information, visit https://aka.ms/WindowsSysReq“ или (Запуск Windows 11 на этом компьютере не возможен. Этот компьютер не соответствует минимальным требованиям к системе для установки этой версии Windows. Дополнительные сведения см. на сайте aka.ms/WindowsSysReq), говорит о том, что Этот компьютер не соответствует минимальным системным требованиям для установки этой версии Windows.
Мы уже рассказывали ранее, как решить похожую ошибку «Запуск Windows 11 на этом компьютере невозможен» — эта проблема обычно возникает, когда на вашем компьютере нет современного процессора, чипа TPM 2.0 или достаточного объема оперативной памяти.
Способ по ссылке предполагает определённых действий в настройках действующей системы и BIOS, но в этом руководстве мы расскажем вам, как обойти/исправить ошибку через реестр не прерывая установку Windows 11.
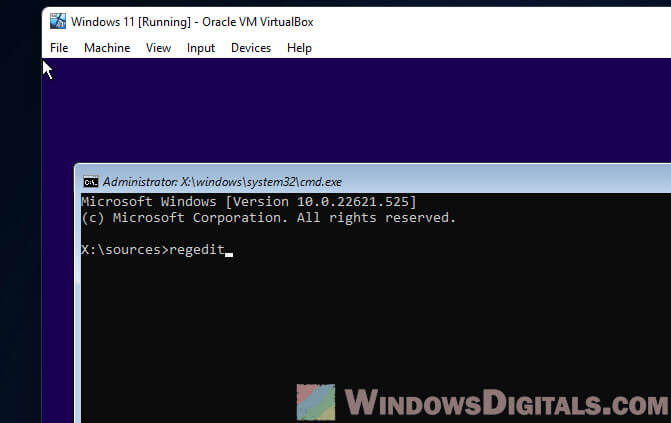
1. Когда во время установки вы увидите сообщение об ошибке “This PC doesn’t meet the minimum system requirements to install this version of Windows. For more information…”, нажмите сочетание клавиш Shift + F10, чтобы открыть окно командной строки. Если командная строка не открылась — возможно у вас есть клавиша Fn, которую надо дополнительно использовать для комбинации клавиш Shift + F10.
2. В командной строке введите команду запуска редактора реестра и нажмите клавишу Enter:
regedit
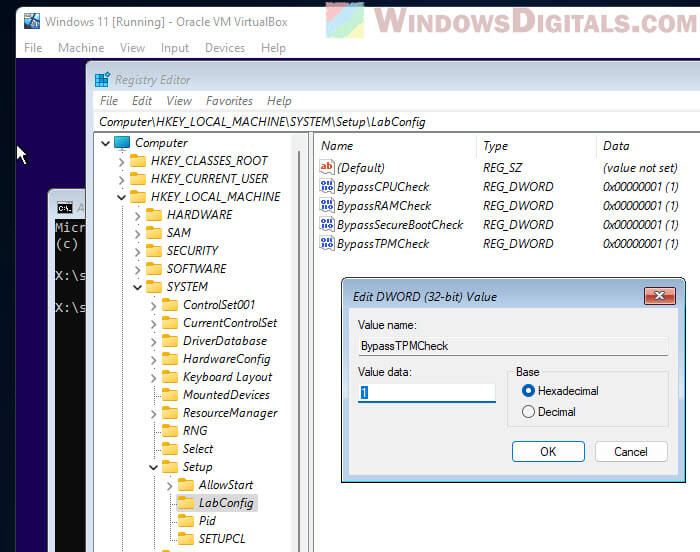
3. В открывшемся окне реестра перейдите в директорию:
HKEY_LOCAL_MACHINE\SYSTEM\Setup.
Щелкните правой кнопкой мыши на ключе настройки и выберите Создать -> Раздел -> Имя раздела: LabConfig.
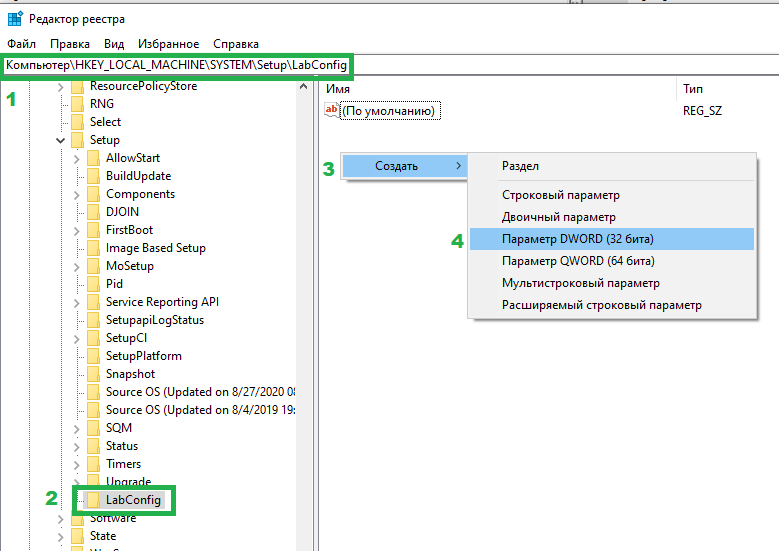
4. После создания раздела «LabConfig» в ветке реестра вы увидите соответствующую директорию.
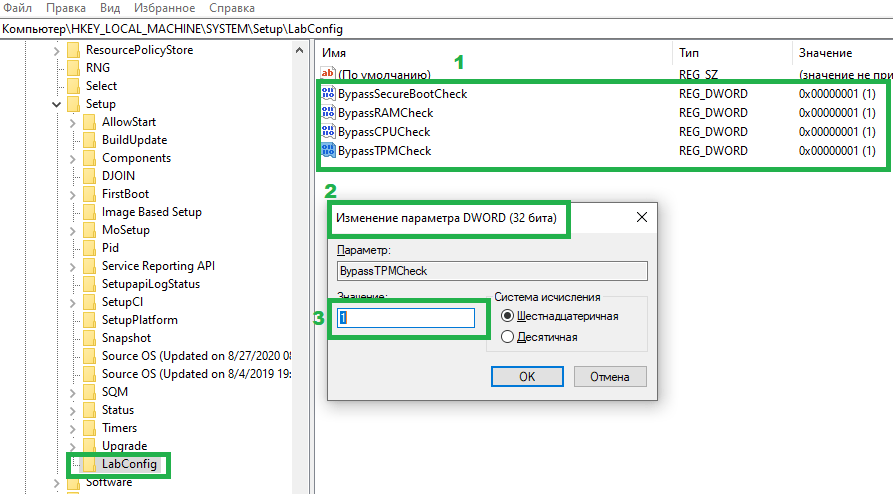
В ней создаем 4 (четыре) «Параметр DWORD (32 бита)» с именами BypassTPMCheck, BypassSecureBootCheck, BypassRAMCheck, BypassCPUCheck со значением 1.
5. Закрываем редактор реестра и окно установщика Windows 11 c ошибкой — возвращаемся к первому окну установщика и повторяем заново.
6. Пишите комментарий, работает способ?
Способ с удалением проверочного файла из установочной флешки Windows 11.
Этот способ исключает какую-либо проверку системы на соответствие Windows 11 совсем. Инструкция следующая:
1. Загружаем iso с сайта Microsoft.
2. Распаковываем содержимое iso в любую папку.
3. Переходим в [ваша папка] -> sources и удаляем файл appraiserres.dll.
4. Отключаем Интернет.
5. Запускаем setup.exe для установки Windows 11.
Please note there are below requirements before starting the installation / upgrade to Windows 11:
| Processor | 1 gigahertz (GHz) or faster with 2 or more cores on a compatible 64-bit processor or System on a Chip (SoC). |
| RAM | 4 gigabyte (GB). |
| Storage | 64 GB or larger storage device Note: See below under “More information on storage space to keep Windows 11 up-to-date” for more details. |
| System firmware | UEFI, Secure Boot capable. Check here for information on how your PC might be able to meet this requirement. |
| TPM | Trusted Platform Module (TPM) version 2.0. Check here for instructions on how your PC might be enabled to meet this requirement. |
| Graphics card | Compatible with DirectX 12 or later with WDDM 2.0 driver. |
| Display | High definition (720p) display that is greater than 9” diagonally, 8 bits per colour channel. |
| Source:Microsoft |
To check if you are meeting all the requirements for Windows 11 installation, Download and Install PC Health Check App and click on Check now button. If you are meeting all the requirements that’s great, you can start the upgrade process.
But as we know there are a lot of systems which are not meeting the CPU or TPM requirements, you can follow the steps as given in the next sections of this article to bypass this requirement.
Also, If you have TPM 1.2 and your laptop is compatible with TPM 2.0 then you can upgrade it using BIOS security settings. Please check the next section on how to upgrade it. If Secure Boot is disabled on your system, you can enable it via BIOS.
Upgrade TPM level from TPM 1.2 to TPM 2.0 and enable secure boot
If you are using TPM (Trusted Module Platform) 1.2 and want to upgrade it to TPM level from 1.2 o 2.0. First you need to check if your laptop / desktop is compatible with TPM 2.0.
If yes, then you can change BIOS security settings from TPM 1.2 to TPM 2.0. If your local drives are encrypted with Bitlocker, disable bitlocker and decrypt your drive before the upgrade. Also, make sure to take a backup copy of all your data before taking this action.
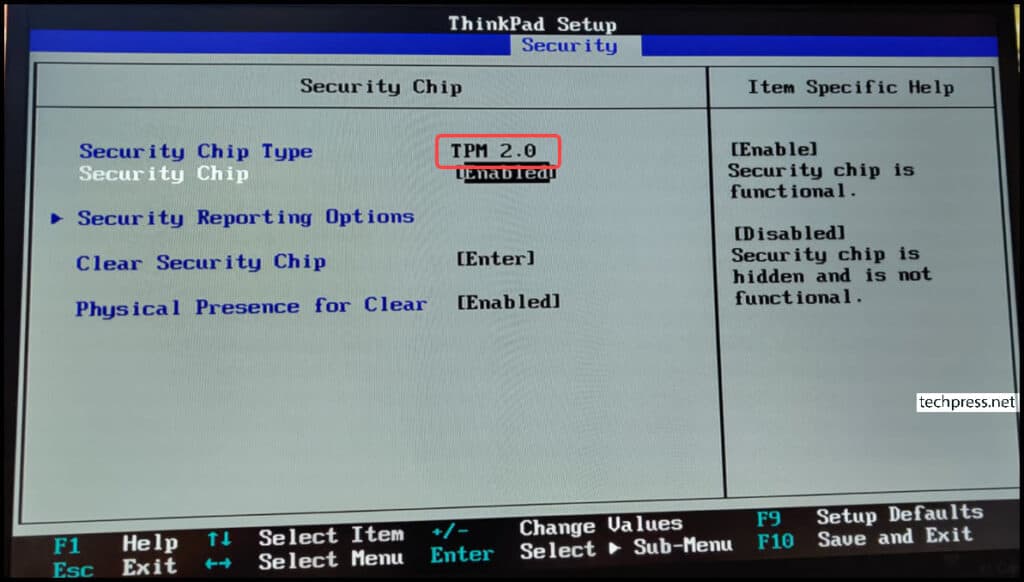
- Restart the machine and press F1 to enter into the BIOS mode. Go to Security tab and using your keyboard select Security Chip and Press Enter.
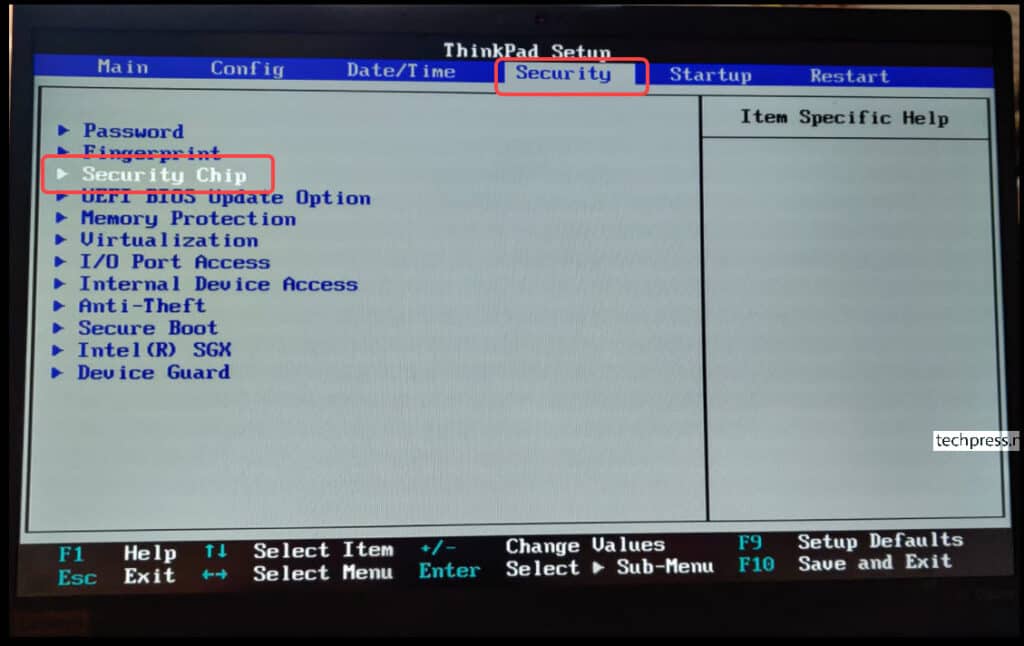
- Check the Security Chip Type to see if you can change the TPM level from 1.2 to TPM 2.0. On my laptop it was set to TPM 1.2 which i updated it to TPM 2.0.
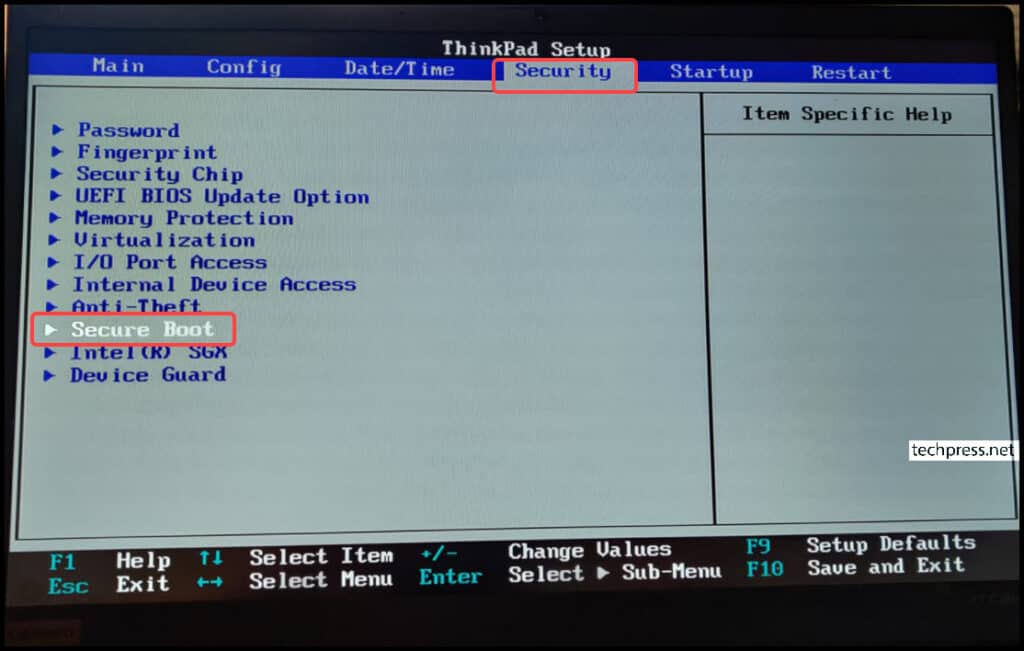
- To check the Secure Boot, Go to Security tab -> select Secure Boot and press Enter.
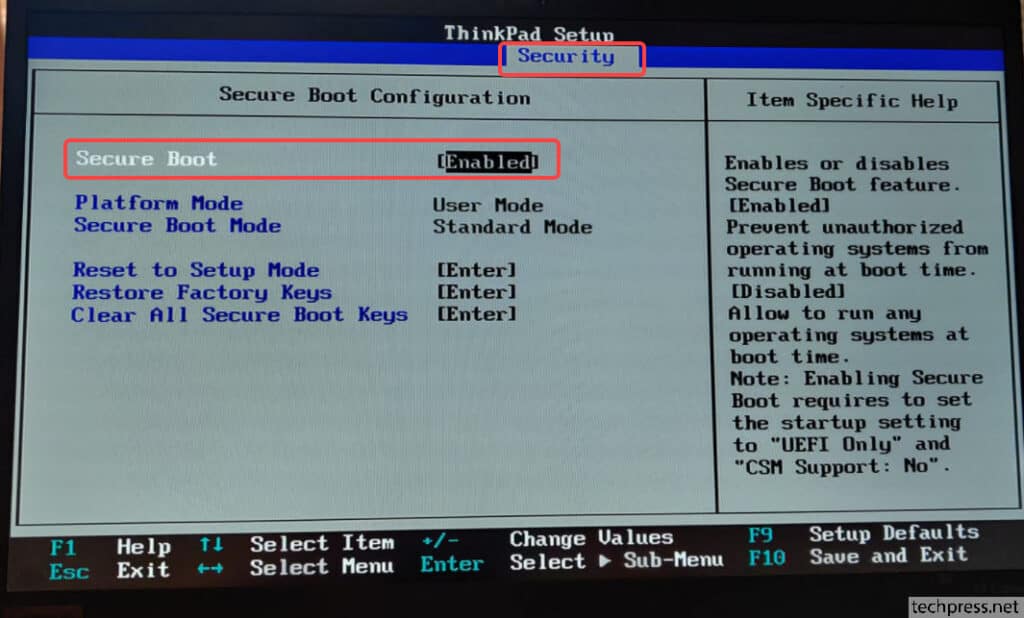
- Make sure Secure Boot is Enabled.
If you are not meeting the TPM 2.0 or CPU requirements then below registry entry needs to be created to bypass the TPM or CPU checks. You will still require TPM 1.2 at least to proceed with the installation. During Windows 11 setup process, a warning message will be shown, click on Accept to continue with the installation process.
Steps to create registry entry (Please note that you will require administrator rights on the PC to make changes in the registry and your system will require a reboot after the registry entry is created)
- Click on Start and search for Registry Editor.
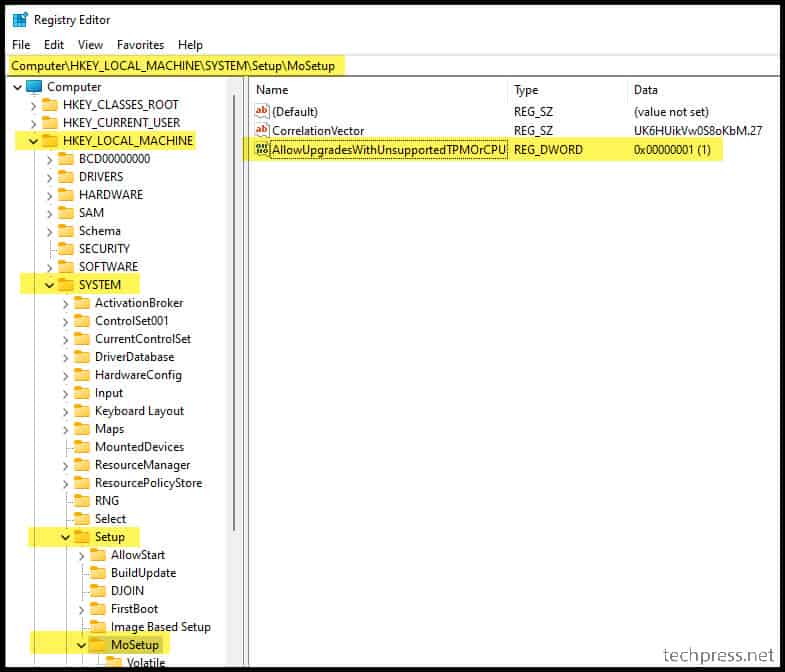
- Navigate to HKEY_LOCAL_MACHINE\SYSTEM\Setup\MoSetup.
- Create a REG_DWORD registry entry
AllowUpgradesWithUnsupportedTPMOrCPUand set its value to 1.
Once the registry entry is created and you start the setup process to install windows 11, you will receive below Warning message to state that your PC doesn’t meet the minimum system requirements for running Windows 11. Click on Accept and then click on Refresh to proceed with the installation of Windows 11.

Conclusion
- Make sure to use PC Health Check App to check if your device is compatible before upgrade to Windows 11.
- If Device is not compatible w.r.t. TPM or CPU then create a reg key as I had mentioned earlier in this post. This will bypass TPM and CPU checks.
- Fix for 0x800F0830 – 0x2003 – The Installation failed in the SAFE_OS phase with an error during INSTALL_UPDATES operation.
Windows 11 has raised the bar for minimum system requirements compared to its predecessor, Windows 10. This has led to many users encountering the error message “This PC can’t run Windows 11 – This PC doesn’t meet the minimum system requirements to install this version of Windows” when trying to install it on a virtual machine (VM) using VirtualBox or other VM software such as VMware. In this comprehensive guide, we will delve deeper into the issue and provide an effective solution to bypass the requirement check.
Also see: We couldn’t install Windows 11: Safe_OS with boot operation
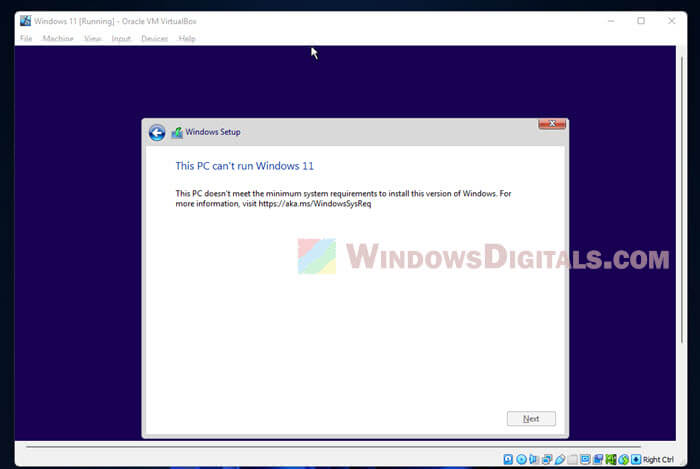
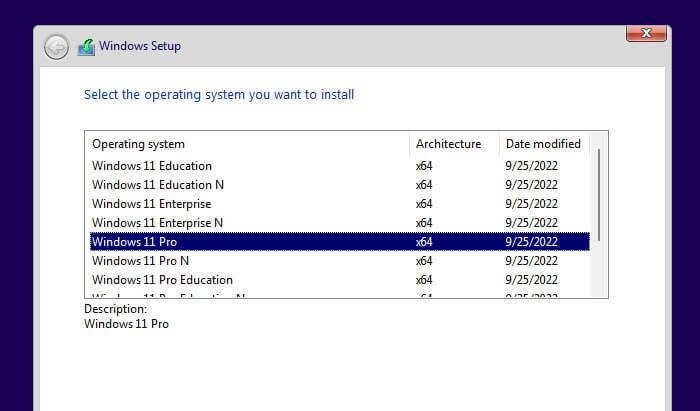
This error occurs right after the “Select the operating system you want to install” screen, for example, when you select Windows 11 Pro and clicks Next. If the PC doesn’t meet the minimum requirements, the error will pop up, preventing you from proceeding with the installation.
Understanding Windows 11 minimum system requirements
Before we proceed with the solution, it’s essential to understand the minimum system requirements for Windows 11. These requirements ensure that your system can run the new OS smoothly and securely. The minimum system requirements include:
- A compatible 64-bit processor with at least 1 GHz clock speed and 2 or more cores
- 4 GB of RAM or more
- 64 GB of storage or more
- DirectX 12 compatible graphics with a WDDM 2.0 driver
- A display with at least 720p resolution and 9″ or larger diagonal screen size
- UEFI firmware with Secure Boot capability
- TPM version 2.0
While these requirements may seem demanding, they serve to provide an optimal user experience with Windows 11. However, they can cause problems when trying to install the OS on a virtual machine using software like VirtualBox or VMware.
Recommended guide: How to Install Windows 11/10 with Digital License from USB
Bypassing the requirement check
The solution we provide in this guide allows you to bypass the minimum system requirements check by creating registry values in the Windows Registry Editor. This method is particularly useful for testing and evaluation purposes. However, it is essential to note that using this method may result in a suboptimal experience, and it may not be suitable for production environments.
Follow the steps below to bypass the system requirements check:
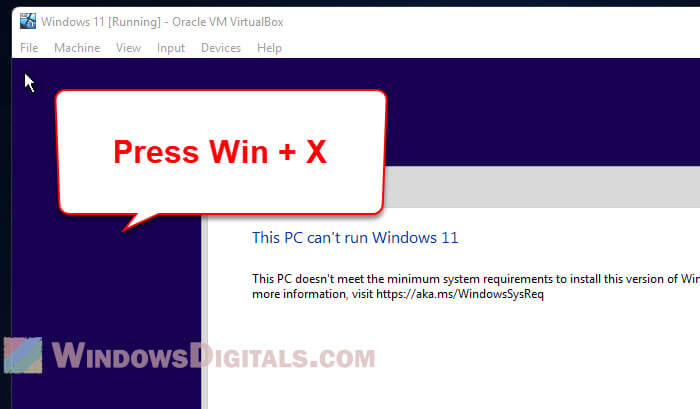
Step 1: Access the Command Prompt on the Windows installation screen
When you encounter the error message, press Win + X on your keyboard. This key combination will open the command prompt, allowing you to access the Registry Editor.
Step 2: Open the Registry Editor
In the command prompt, type regedit and press Enter. The Registry Editor will open, allowing you to modify the registry values.
Step 3: Navigate to the Setup key
Using the left pane of the Registry Editor, navigate to the following location:
Computer\HKEY_LOCAL_MACHINE\SYSTEM\Setup
Step 4: Create the LabConfig key
Right-click the Setup key in the left pane and select New > Key. Name this new key LabConfig.
Step 5: Create the BypassCPUCheck DWORD value
Select the LabConfig key you just created. In the right pane, right-click and choose New > DWORD (32-bit) Value. Name this new value BypassCPUCheck. Double-click the newly created value, set its value data to 1, and click OK.
Step 6: Create additional bypass values
Following the same process as in Step 5, create the following DWORD (32-bit) Values:
BypassRAMCheckBypassSecureBootCheckBypassTPMCheck
For each value, set the value data to 1 and click OK.
Step 7: Close the Registry Editor and Command Prompt
After creating all the necessary values, close the Registry Editor and the command prompt by clicking the X in the top right corner of each window.
You can now proceed with the Windows 11 installation without encountering the error message. The registry values you created will bypass the system requirements check, allowing you to install Windows 11 on your VM via VirtualBox or other VM software.
Related resource: How to Open VMDK File in Windows 11

Potential risks and limitations
While the method described above can help bypass the minimum system requirements check for Windows 11, it is crucial to understand the potential risks and limitations associated with this approach:
- Performance Issues: Bypassing the minimum system requirements may lead to performance issues when running Windows 11 on your VM. The OS may run slower or encounter problems when using specific features or applications.
- Security Vulnerabilities: Some of the minimum system requirements, such as TPM and Secure Boot, are designed to enhance security. Bypassing these checks may expose your VM to potential security risks.
- Limited Support: As this method is not officially supported by Microsoft, you may not receive assistance or updates if you encounter issues while running Windows 11 on your VM.
Please consider these risks and limitations before deciding to bypass the minimum system requirements for Windows 11.
Linked issue: This host supports Intel VT-x, but Intel VT-x is disabled
Summary
Windows 11 has introduced higher minimum system requirements to ensure an optimal user experience. However, these requirements can cause issues for users who wish to install the OS on a virtual machine using VM software such as VirtualBox or VMware. By following the steps outlined in this guide, you can bypass the system requirements check and install Windows 11 on your VM. Remember that this method is intended for testing and evaluation purposes and may result in a suboptimal experience or potential security risks. Always consider the potential risks and limitations before proceeding with this approach.
Несколько дней назад, в сети Интернет появился установочный ISO файл, с новой операционной системой Windows 11 64 бит en-US.
Понятно, что это какая-то тестовая версия операционной системы и окончательный вариант, возможно будет, довольно сильно отличатся, но появившееся у меня желание, за неделю до официального представления Windows 11, «покрутить, повертеть» заставило меня скачать и установить эту версию.
Образ операционной системы Windows 11 скачен, для переноса установочного образа на USB-носитель, я использовал программу Rufus. Мой довольно старый ноутбук не поддерживает схему раздела GPT, поэтому при переносе образа я указал MBR, затем выбрал скаченный образ и запустил программу на выполнение.
Предварительно выставив в БИОС приоритет загрузки с USB-носителя, я начал установку новой операционной системы Windows 11. Начало установки ничем не отличается от Windows 10. Сначала стандартное окно, выбора языка, даты и метода ввода, затем версии операционной системы. А вот дальше, меня ждал не приятный сюрприз.
Программа установки сообщила, что на этом компьютере Windows 11 не может быть запущена, так как минимальные системные требования этого компьютера не соответствуют этой версии Windows.
This PC can’t run windows 11 — This PC doesn’t meet the minimum system requirements to install this version of Windows. For more information, visit https://aka.ms/WindowsSysReq

Разочарованный я прекратил установку, но на всякий случай решил проверить может есть какое-нибудь решение этой проблемы в сети Интернет, которое позволит обойти минимальные системные требования. И решение проблемы нашлось в англоязычном Интернете, которым я и делюсь с Вами.
Простая замена файлов
Решение оказалось простым, необходимо заменить все файлы папки “sources” на созданной вами USB-носителе (Флешка), на такие же файлы из той же папки, но только Windows 10, единственный файл, который не копируется это файл “install.wim” или “install.esd”.
1. Скачайте загрузочный ISO файл Windows 10 64 бит en-US и смонтируйте с помощью проводника или сторонней программы.
Чтобы не скачивать весь загрузочный дистрибутив, скачайте только папку “sources” Windows 10, уже без файла install.wim.
2. Перейдите в папку “sources” и выделите все файлы и папки кроме “install.wim” или “install.esd”, а затем нажмите “Копировать”.
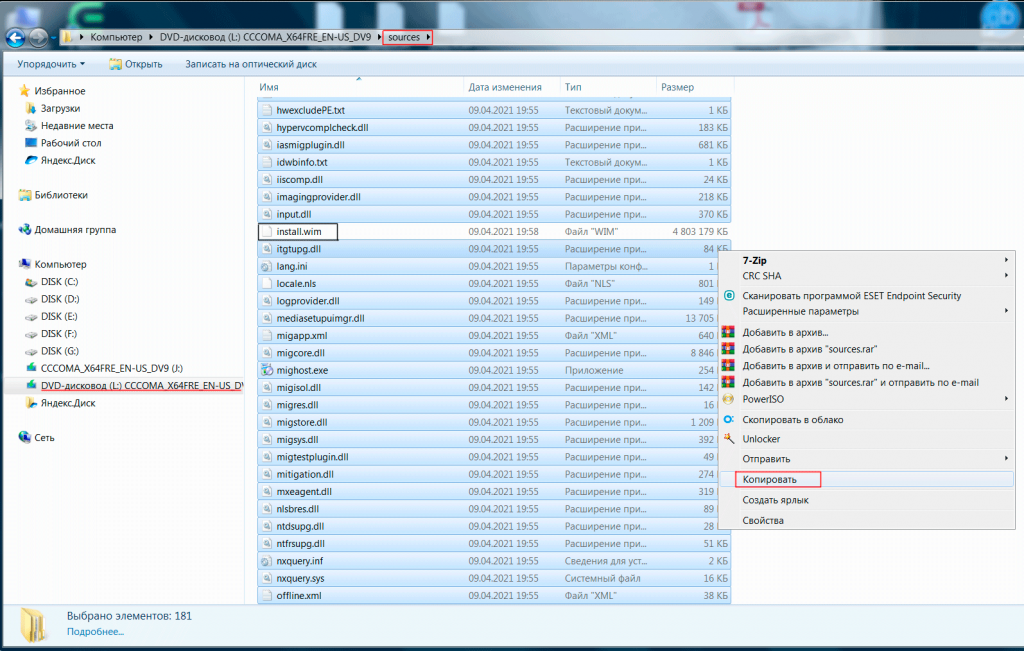
3. Перейдите в папку “sources” на созданном вами USB-носителе с Windows 11 и нажмите “Вставить”.

4. Подтвердите “Копировать с заменой” и установите галку “Сделать это для следующих 170 конфликтов”, затем установите галку “Выполнять это действие для всех текущих объектов” и нажмите кнопку “Да”, дождитесь завершения копирования.

Теперь, проблема c минимальными системными требованиями при установке Windows 11 должна быть решена.
P.S Если у Вас несколько операционных систем, то в загрузочном меню будет написано Windows 10, вероятно это из-за замены установочных файлов.
Хочу предупредить, что распространяемый в сети Интернет дистрибутив Windows 11, Вы скачиваете и устанавливаете на свой страх и риск!
Автор: Ruterk
19 июня 2021 г.