
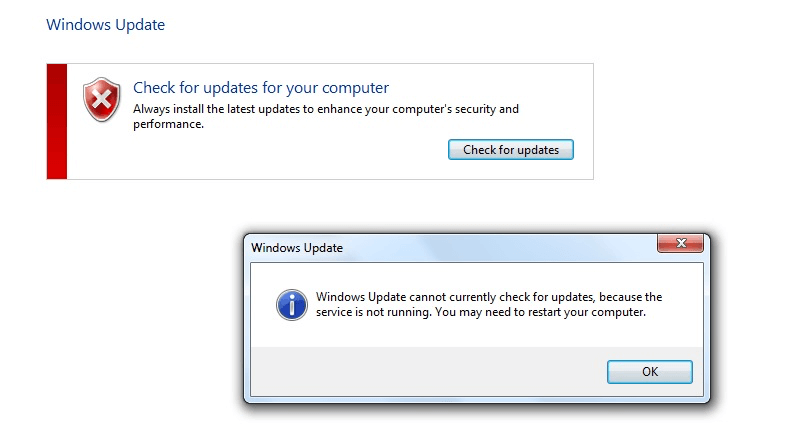
Many Windows users are having an issue with their Windows Update. If they check for updates on their Windows system, they get an error that says “Windows Update cannot currently check for updates, because the service is not running“. And they can’t install updates for their system.
This is an annoying issue. And trying to fix it is just as annoying, because you’ll spend a lot of time reading suggestions on the Internet, and most won’t work.
But don’t worry. The following are some methods that have helped many Windows users fix their error.
Try these fixes
You don’t have to try them all; just work your way down the list until you find the one that works for you.
- Run Windows Update troubleshooter
- Check for malicious software
- Restart your Windows Update associated services
- Clear the SoftwareDistribution folder
- Update your device drivers
Method 1: Run Windows Update troubleshooter
Windows has a built-in troubleshooter that can check and fix issues with Windows Update. You should run it when an error occurs on your Windows Update. To do so:
1) Click the Start button in the lower left corner of your screen, type “troubleshoot” and click Troubleshooting in the result.
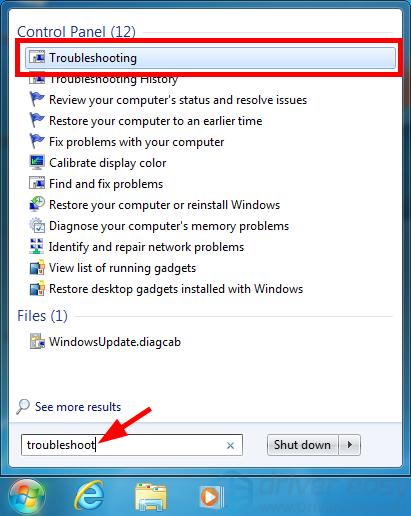
2) Click Fix problems with Windows Update.
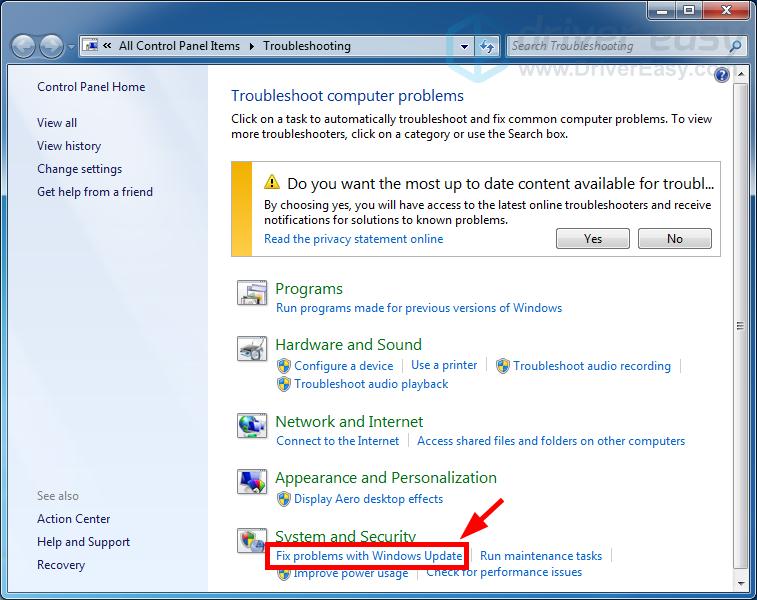
3) Follow the on-screen instructions to complete the troubleshooting process.
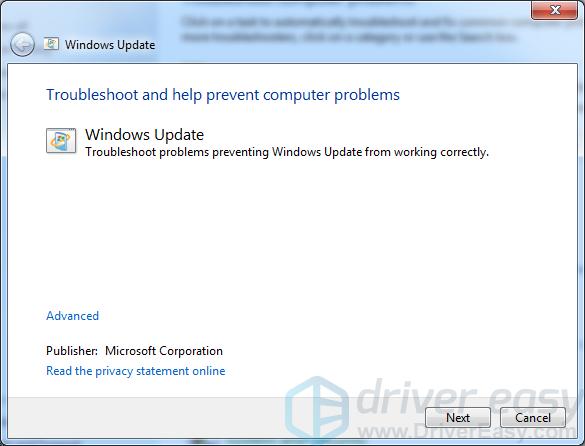
4) Run your Windows Update again and see if your error is fixed.
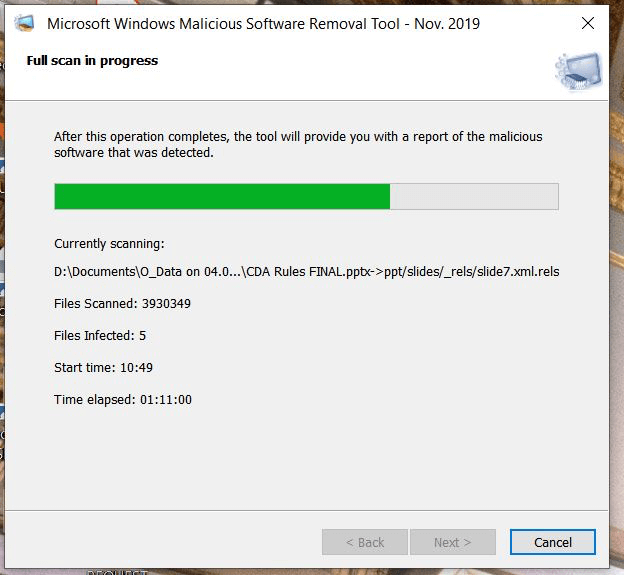
Method 2: Check for malicious software
Your error may occur because of interference from malicious software. You should run a scan on your computer for any malicious program.
You can use the Malicious Software Removal Tool released by Microsoft. Download the tool and run it on your computer. Then follow its instructions to complete the scanning process. If this method works for you, you won’t see the error on your Windows Update again.
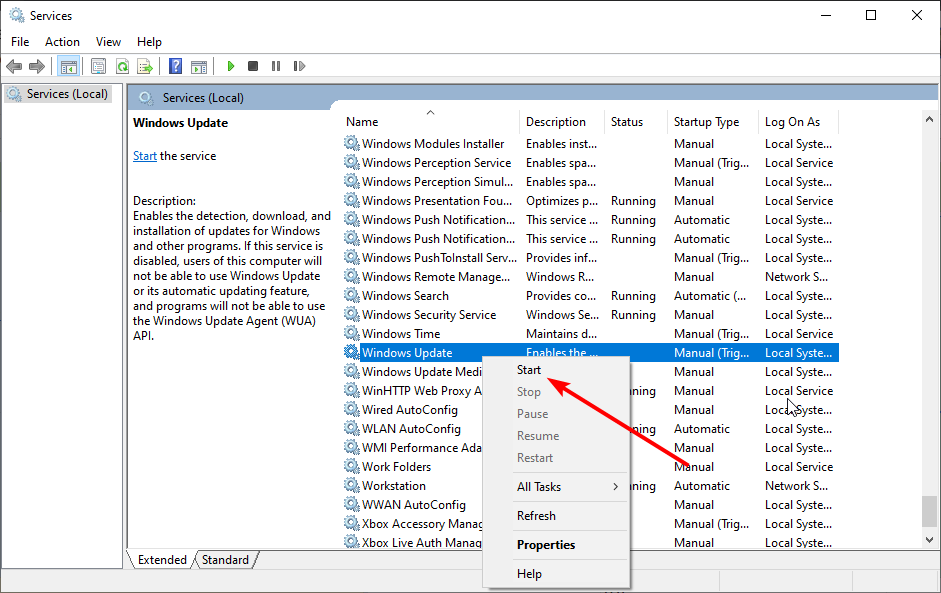
Method 3: Restart your Windows Update associated services
You may get the service not running error because the services associated with your Windows Update are disabled. You should restart those services and see if this fixes your error. To do so:
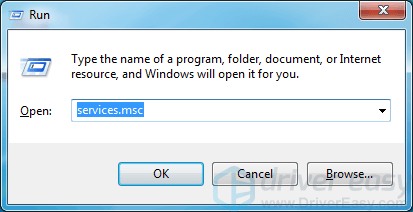
1) Press the Windows logo key and R on your keyboard to invoke the Run box.
2) Type “services.msc” and click OK to open the Services snap-in.
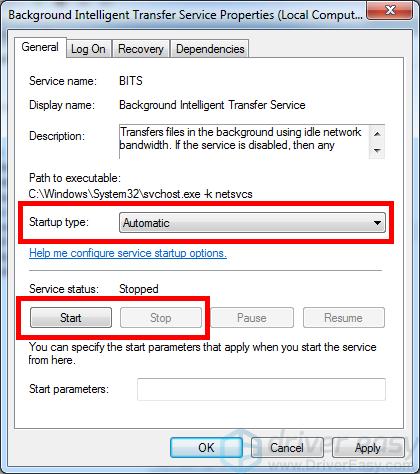
3) Double click Background Intelligent Transfer Service.
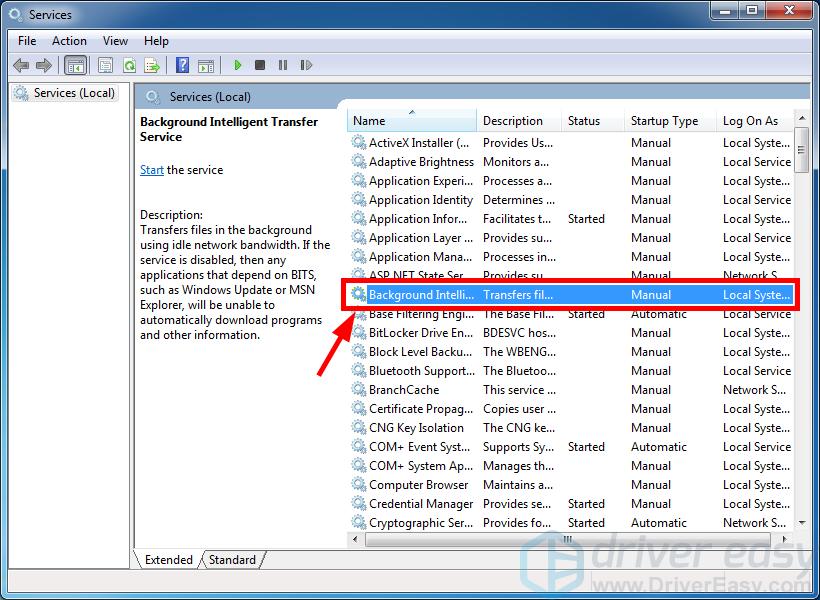
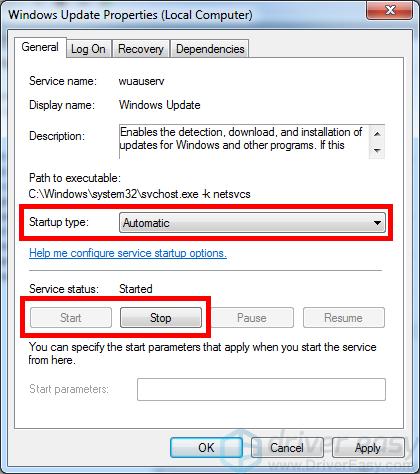
4) Make sure the startup type is set to Automatic. Then click the Start button (if the Start button is in gray, click the Stop button and then click the Start button). Then click OK to close the window.
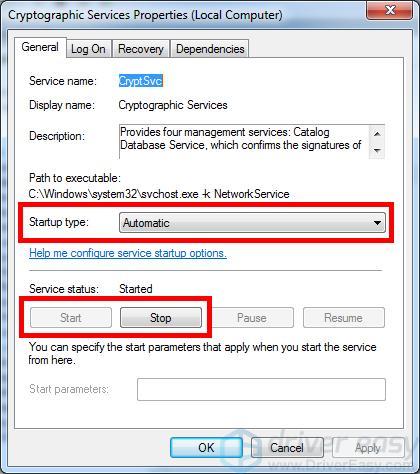
5) Double click Cryptographic Services.
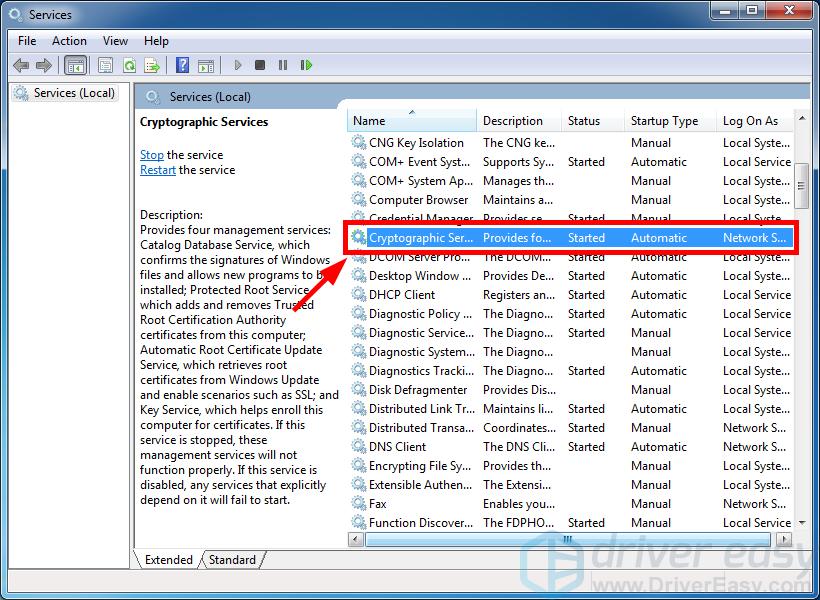
6) Make sure the startup type is set to Automatic. Then click the Start button (if the Start button is in gray, click the Stop button and then click the Start button). Then click OK to close the window.
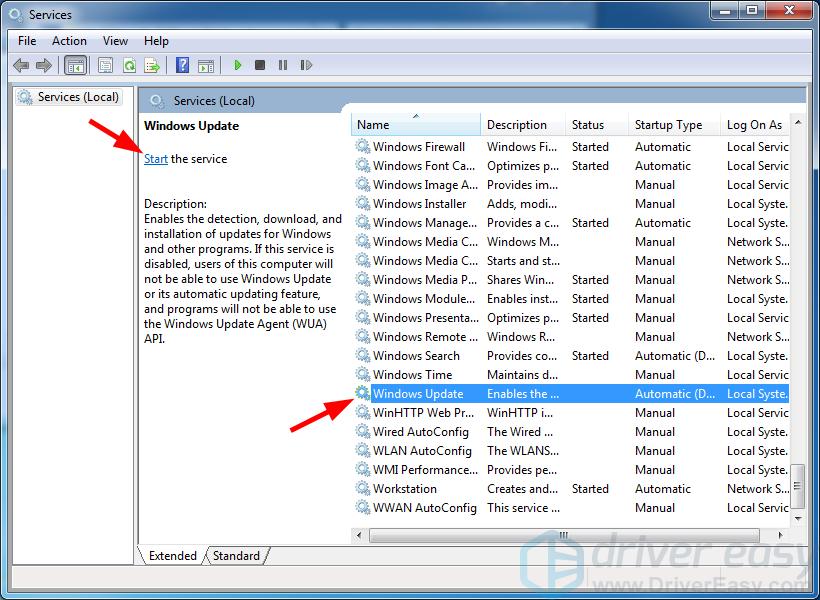
7) Double click Windows Update.
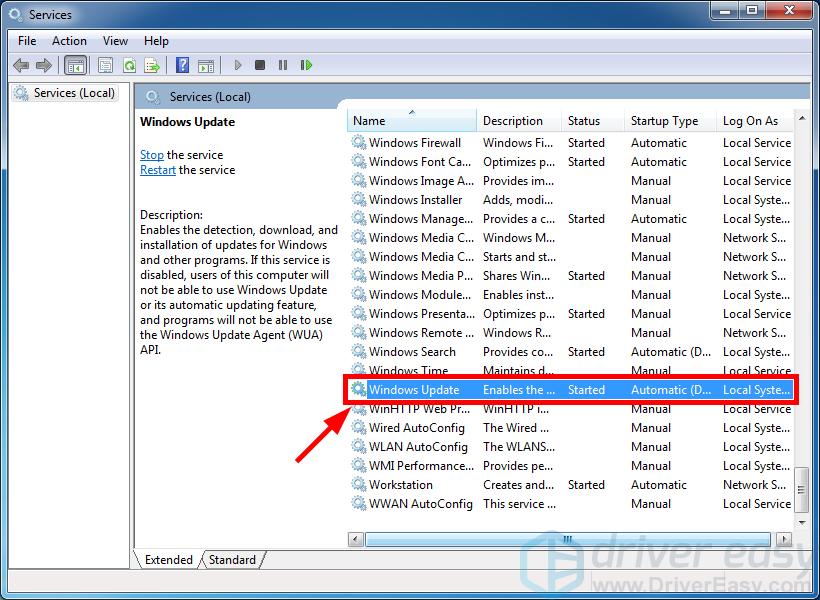
6) Make sure the startup type is set to Automatic. Then click the Start button (if the Start button is in gray, click the Stop button and then click the Start button). Then click OK to close the window.
7) Close the Services snap-in and restart your computer. Then check to see if this resolves your problem.
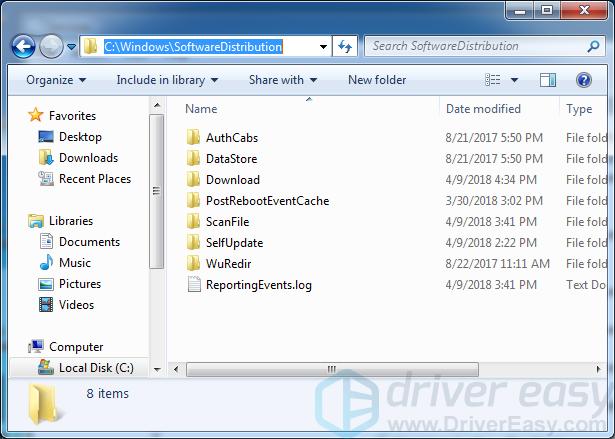
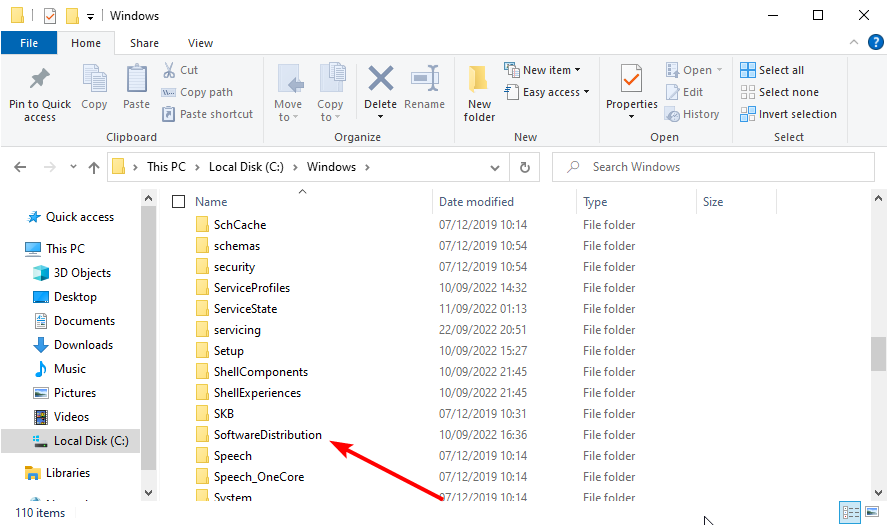
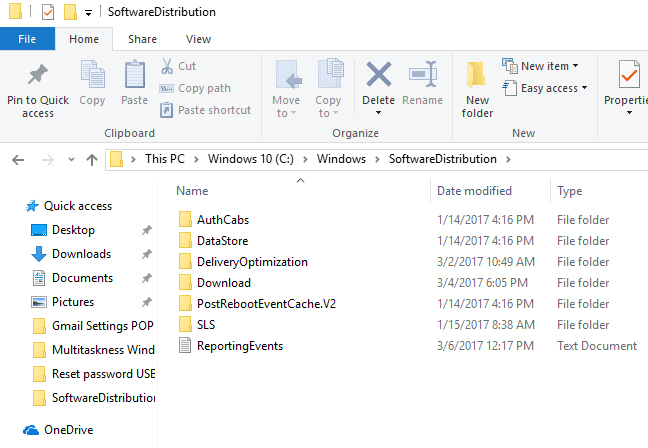
Method 4: Clear the SoftwareDistribution folder
The SoftwareDistribution folder stores temporary files for Windows Update. You may get the error due to corruption issues with these files. To see if these files are the cause, you should remove all the content of this folder.
1) Press the Windows logo key and R on your keyboard to invoke the Run box.
2) Type “services.msc” and click OK to open the Services snap-in.
3) Click Windows Update and then click Stop (the service).

4) Open File Explorer (press the Windows logo key and E on your keyboard at the same time), then go to C:\Windows\SoftwareDistribution and delete all the files and folders there.
5) Restore the Services snap-in. Then click Windows Update and click Start (the service).
6) Restart your computer. Then run Windows Update see if this helps you get rid of the Windows Update service not running error.
Method 5: Update your device drivers
Your error may occur because you’re using a wrong device driver or it’s out of date. To see if that’s the case for you, you should check your computer and update all those outdated or wrong drivers.
Updating drivers can consume a lot of time. But if you want to do it easily and quickly, you can use Driver Easy.
Driver Easy will automatically recognize your system and find the correct drivers for it. You don’t need to know exactly what system your computer is running, you don’t need to risk downloading and installing the wrong driver, and you don’t need to worry about making a mistake when installing.
You can download and install your drivers by using either Free or Pro version of Driver Easy. But with the Pro version it takes only 2 clicks (and you get full support and a 30-day money back guarantee):
1) Download and install Driver Easy.
2) Run Driver Easy and click the Scan Now button. Driver Easy will then scan your computer and detect any problem drivers.

3) Click the Update button next to your each of your devices to download the latest and correct driver for it. You can also click the Update All button at the bottom right to automatically update all outdated or missing drivers on your computer (this requires the Pro version — you will be prompted to upgrade when you click Update All).
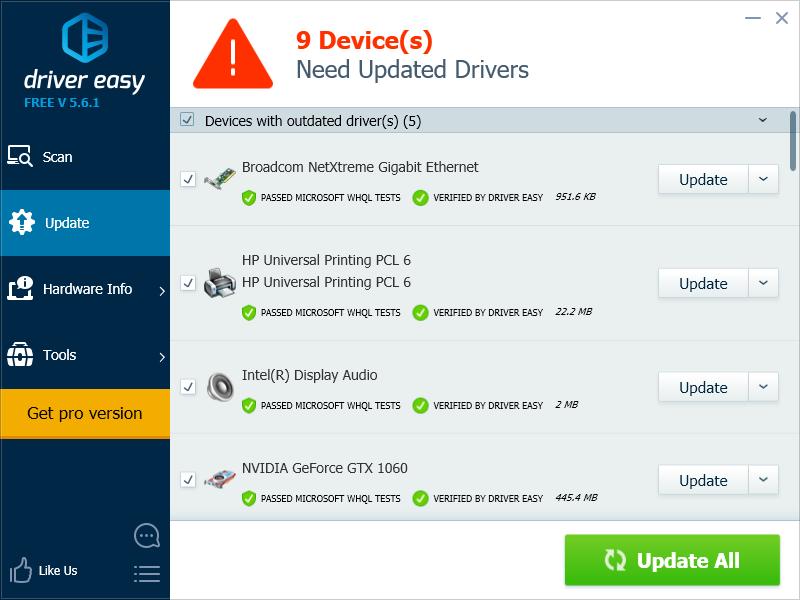
4) Restart your computer. Then run you Windows Update to see if this resolves your problem.
85
85 people found this helpful
If you got an error message saying, “Windows could not start the Windows Update service on Local Computer, Error 87. The parameter is incorrect” while you were trying to start the Windows update service on your computer, then this post could help you resolve the problem. Along with this error, you might also get any of these error codes such as 0x80240034, 0x80244019, 0x80070643, and so on. Aside from these error codes, you will also notice that the Windows Update service has been stopped.
To fix this issue, here are a couple of suggestions that might help but before you go on, you need to create a System Restore point first.
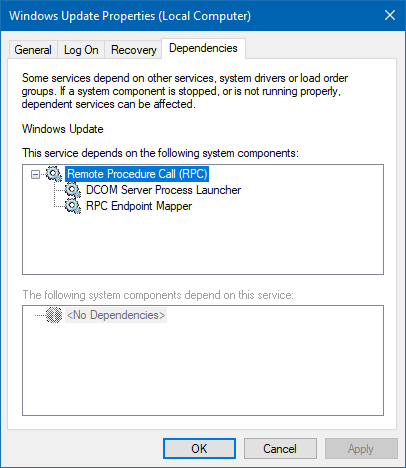
Option 1 – Try checking Services Dependencies
Dependencies of a Windows Service in Windows 10 are when windows services depend on other services. Such is the case with the Windows Update service – it also depends on three different services such as the Remote Procedure Call or RPC service, DCOM Server Process Launcher, and the RPC Endpoint Mapper. Meaning to say, if two of these services are not working as expected, then the dependant service will also be affected. This could be the reason why the Windows Update service could not start.
- Tap the Win + R keys to open the Run dialog box.
- Next, type “services.msc” in the field and hit Enter to open Windows Services.
- From the list of Services, look for the following services:
- Remote Procedure Call (RPC) Service
- DCOM Server Process Launcher
- RPC Endpoint Mapper
- After you find these services, double click on each one of them and check whether the Startup type for all is set to Automatic and the Service status is set to Running or not.
- If the service status is not running, then click the Start button. Afterward, check if you can now run the Windows Update service.
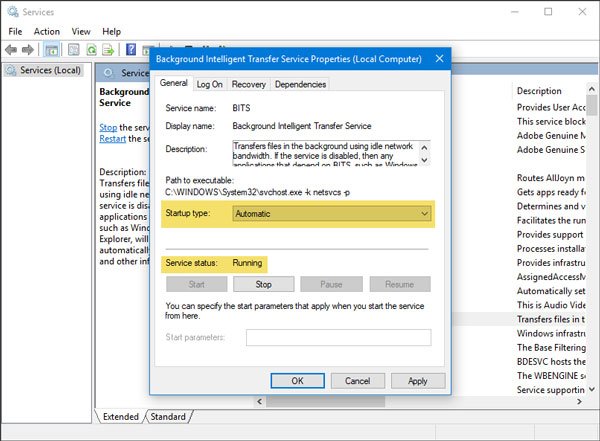
Option 2 – Check the Background Intelligent Service and the Cryptographic Service
- Tap the Win + R keys to open the Run dialog box.
- Next, type “services.msc” in the field and hit Enter or click OK to open Services.
- From the list of Services, look for the following services and make sure that their Startup type is as follows:
- Background Intelligent Transfer Service – Manual
- Cryptographic Service – Automatic
- After that, check if the Service status of the listed services above is set to Running. If they’re not, click on the Start button to start these services and then check if you can now enable the Windows Update service or not.
Option 3 – Reset Windows Update components
If the first two options did not work then you might want to reset the Windows Update components manually. Follow the steps below to reset them.
- Open Command Prompt with admin privileges.
- After that, type each one of the following commands and hit Enter after you key in one after the other.
- net stop wuauserv
- net stop cryptsvc
- net stop bits
- net stop msiserver
Note: The commands you entered will stop the Windows Update components such as Windows Update service, Cryptographic services, BITS, and MSI Installer.
- After disabling WU components, you need to rename both the SoftwareDistribution and Catroot2 folders. To do that, type each one of the following commands below, and don’t forget to hit Enter after you type one command after the other.
- ren C:WindowsSoftwareDistribution SoftwareDistribution.old
- ren C:WindowsSystem32catroot2 Catroot2.old
- Next, restart the services you’ve stopped by entering another series of commands. Don’t forget to hit Enter after you key in one command after the other.
- net start wuauserv
- net start cryptsvc
- net start bits
- net start msiserver
- Close Command Prompt and reboot your PC.
Option 4 – Run the Windows Update Troubleshooter
If resetting the Windows Update components didn’t work, you could also try running the Windows Update Troubleshooter as it could also help in fixing any issues related to Windows Update including this one. To run it, go to Settings and then select Troubleshoot from the options. From there, click on Windows Update and then click the “Run the troubleshooter” button. After that, follow the next on-screen instructions and you should be good to go.
Option 5 – Try removing a value from the Windows Registry
If running the Windows Update troubleshooter didn’t help and you receive a message instead saying, “Service Registration is Missing or Corrupt”, you can try to remove a value from the Windows Registry.
- Tap the Win + R keys to open the Run dialog box.
- Then type “Regedit” in the field and hit Enter to open the Windows Registry.
- Next, navigate to this path: HKEY_LOCAL_MACHINESOFTWAREMicrosoftWindowsSelfHostApplicability
- From this path, look for a value named “ThresholdOptedIn” and if you find it, delete it.
- Exit the Registry Editor and see if you can now enable the Windows Update service.
Do You Need Help with Your Device?
Our Team of Experts May Help

Troubleshoot.Tech Experts are There for You!
GET HELP
Troubleshoot.Tech experts work with all versions of Microsoft Windows including Windows 11, with Android, Mac, and more.
Share this article:
You might also like
A surprisingly large amount of things present at your home can and do interfere with your wi-fi signal making it weak so devices are dropping it, having trouble connecting, or being slow.
Hello and welcome to our latest article where we will take a look at all things that are present in a lot of homes but are very bad for your WI-Fi signal.

Bad router placement
Having a router in a bad position can have some really large effects on WI-Fi signal strength and its availability. Usually, we do not give great attention to where we are placing our router but it has been proved over and over again that being close to certain objects does indeed have a great influence on the wireless signal strength and performance.
So, what are these objects and bad positions where we could place the router and effectively kill his Wi-Fi capabilities?
Fish Tanks
Water will block all radio waves including Wi-FI signals and waves themselves, so having a router next to the aquarium or any large source of water is a bad idea. You should always look at water as something bad for your Wi-Fi and move your router away from it as far as possible.
Bookshelves
Paper is another story and example of the dampening effect on radio waves. Did you know that various patterns of paper are used in silent rooms and recording studios in order to eliminate sound reflection from surfaces? Well besides absorbing sound waves, the paper also absorbs Wi-Fi signals and if you have a large bookshelf with a lot of books packed one beside another you just have a great wall of signal absorbing.
Mirrors
The problem with mirrors is in their coating that goes over the glass in order to turn it into the mirror, that coating is metal and as such, it is absorbing signals in large amounts. If you have an old or high-quality mirror that has a silver coating things are even worse since silver will absorb even more waves than modern cheap ones.
TV
Yup, TV is also on this list and for a similar reason as a mirror, although TV does not have coatings of metal, they have something even worse: a large metal plating on the back. Metal plating is there to produce structural integrity of the TV set and provide it with shielding from electromagnetic waves and as such it will prevent Wi-Fi waves as well. Do not place the router behind your TV.
Things that influence signals in homes
Any kind of metal decoration
Now when we covered mirrors and TV because of the metal they have, we must take a look at the metal itself. Any kind of metal stuff that you might have like baskets, figures, statues, frames, etc will effectively block your signal.
Kitchen appliances and Home utilities
Kitchen appliances like refrigerators, microwaves, ovens, stoves, etc. along with home appliances and utilities like dishwashers, washing machines, dryers, etc are large metal objects enclosed in a metal cage that will block signals from spreading further and it is no secret that most kitchens have weaker Wi-Fi because of this reason.
Home gyms
This is a logical conclusion as to everything explained so far if you have a workout room or small gym at home it is probably filled with weights that are metal and have mirrors inside, all of that will interfere and block signals.
Things blocking your Wi-Fi that you have no easy control over
Walls
Thick walls will dampen signals, thick walls from bricks will dampen even more and concrete walls will kill it almost completely. Any kind of metal reinforcement wiring inside walls will reduce and kill signals as well.
Floors and ceiling
This is somewhat important if you have a floor beneath or under the room where is your router located, but for the same reason how walls are blocking your signal floor and ceiling can do it as well, especially since most of the time they are made of some stronger material like concrete with metal fence inside.
Heating systems
If you have a heating system that is composed of metal radiators with water inside, then in terms of Wi-Fi signal strength you have an aquarium but in a metal box, and as such it will greatly reduce signal strength.
Read More
Windows 7 was an operating system that had one thing which no other Windows had, even today. Official Microsoft desktop widgets.
With an attractive design, users loved to exploit the adequacy and neatness of these gadgets. However, Microsoft had to discontinue these gadgets as they posed a serious security threat to the Operating System. It was believed that a potential attacker could even use a gadget to take complete control of your PC.
With Windows 10, things have changed big time. You have all the fantastic apps and live tiles at your disposal providing a more native experience.
Despite all this, if you still have a fondness for fancy gadgets, we have just the right tool for you to get started with similar “Widgets” on Windows 10. Win10 Widgets is a tool that places the most important information right in front of you, on your desktop.
Win10 Widgets
Win10 Widgets is a desktop app package provided by Rainmeter which is an effective system customization engine for Windows. It brings some informative widgets to Windows 10 which look almost native with their intuitive and sleek design. You can pin them on your desktop to keep an eye on various system figures like CPU usage, data storage, battery usage, detailed computer performance, etc.
Native looking Widgets for Windows 10
These widgets are designed in such a way that it looks totally indigenous to the Windows 10 UI. With a similar design language, visual style, accent color, and even font settings, these widgets almost look like an inseparable system component.
You can choose between different size variants to pin on your desktop and arrange them in an orderly fashion to make the most of it.
Highly customizable desktop gadgets
Apart from the default size variants, you can configure several other parameters pertaining to the look and appearance of any widget. As Rainmeter is an open-source program, you are provided with the .ini configuration files which you can customize as per your wish. You can make adjustments to the widget coordinates, position and transparency as well. You can even create your own skins (.rmskin package) using the built-in Skin Packager and publish them for general usage through Rainmeter.
Illustro Skins
Over and above the cool widgets, Rainmeter also contains Illustro, a simple collection of skins that shows the range of Rainmeter’s capabilities. You can load the skins on your desktop for a brief look at your system internals. You can also start editing these skins to make them yours by taking advantage of the Rainmeter manual and forum link provided on the Welcome screen.
Win10 Widgets is a great tool if you like widgets or gadgets on your Desktop. It blends into the background and puts the important piece of information right on your desktop without you having to look somewhere else. If you already have the Rainmeter application, you can download the Win10 Widgets .rmskin file from here, else you can download the combined bundle for both Rainmeter and Win10 Widgets from here.
Read More
Internal Error 2503 — What is it?
Internal Error 2503 mostly pops up on Windows 8. It occurs when you try to uninstall or install software on Windows 8. The error code message may vary and displayed in different formats such as:
The installer has encountered an unexpected error installing this package. This may indicate a problem with this package. The error code is 2503.
Called RunScript when not marked in progress
The installer has encountered an unexpected error installing this package. This may indicate a problem with this package. The error code is 2503.
Called Install Finalize when no installation is in progress
Solution
 Error Causes
 Error Causes
Some of the most common causes for internal error 2503 are:
- Permission not granted to access the Windows Installer Folder
- Viruses
- Problems with Windows Installer
Further Information and Manual Repair
To repair this issue on your PC without any professional assistance, try the DIY methods given below:
Method 1
Internal error 2503 may occur when your account has limited privileges. You don’t have the privilege to use or access the Windows Installer folder.
Your inability to access this folder hampers you from successfully install or uninstall the desired program on your PC. To gain access, you need to ensure you have permission.
- For this navigate to the C:\windows folder. Here find the installer folder and then right-click and choose properties.
- After that click on the security tab and check if the System and Administrator account has Full access permission.
- For that make sure the system group option has ‘all’ selected to allow you full permission.
Method 2 — Re-register Windows Installer
Another alternative to resolve internal error 2503 is to re-register Windows Installer.
- To do this, go to Start and click Run. Now type ‘msiexec /unreg’ in the Run box and then press enter.
- Follow the same steps and now type ‘msiexec /regserver’ in the box and then press enter. This will resolve the issue.
Method 3 — Remove Viruses
If internal error 2503 is triggered by a viral infection on your PC, then it is advisable to download an antivirus and scan your entire system.
Viruses are notorious for system failures and pose data security threats. If not removed timely, these malicious programs can damage your PC.
To remove all viruses on your system, run an antivirus. An antivirus detects all malicious software programs including viruses, malware, adware, and spyware. Delete all the malicious files found right away.
This will help resolve internal error 2503.
Read More
Error code 0Xc004F074 — What is it?
Did you previously use Windows 7 or 8 but decided to run with the latest Windows 0S, Windows 10? An early error message encountered was activation error code 0Xc004F074. Error code 0Xc004F074 is manifested when the user fails to activate Windows directly after the installation of Windows 10. This occurs if the previous operating system on your computer was Key Management Service (KMS) activated.
The KMT provides a more seamless operation when users are activating volume license editions of Microsoft Windows and Office. This process tends to be clear to end-users of the system.
Symptoms of error code 0Xc004F074 include:
- Windows is unable to reach your company’s activation service.
- The Key Management Service is unavailable.
Solution
Error Causes
Various factors might incite error code 0Xc004F074. A primary cause is a discrepancy or difference between the KMS client and the KMS host machine. The host computer could possibly be operating a Windows Server 2003 or Windows Server 2008, while the client runs on OS Windows 7 or Windows Server 2008 R2. To supplement, the computer’s time might be a contributing factor. The time on the host machine and client might show a difference (Usually the host time exceeds 4 hours).
Further Information and Manual Repair
To rectify error code 0Xc004F074, users are advised to try various methods. These methods include:
-
Method 1: Update Your KMS Host 9 (Windows Server 2003)
Are you running later versions of Windows Server? Use an update that fixes or installs KMS on your computer. The update is available on Microsoft’s website. Keep clearly in mind that the update is only for Windows Server 2013 Service Pack 1 and later versions of Windows Server 2003.
-
Method 2: Update Your KMS Host 9 (Windows Server 2008)
This step is similar to the aforementioned. However, it applies to Windows Vista and Windows Server 2008. This ensures the service is extended to Windows 7 and Windows Server 2008 R2.
-
Method 3: Update the Time
It was previously mentioned that the time reflected on the KMS host and client might cause error code 0Xc004F074 to manifest. A simple fix to adhere to is to always ensure that the time between both is updated. To Resync the time on the client, execute the following command.
w32tm /resync
-
Method 4: Uninstall the Existing KMS
For this method to be successfully deployed, you’ll need to have in your possession an activation key or KMSpico Key. As you cannot apply the new key with the existing one, remove or uninstall the initial key. To perform this step, open the command prompt. This should be done while the computer is in admin mode. Then, run the command
(slmgr.vbs /dlv)
It should be executed without the brackets and before you have removed the existing key.
After executing the command, you’ll encounter the description:
Windows(R) Operating System, VOLUME_KMS_WS12_R2 channel
Move along with the process by applying the slmgr.vbs /upk to uninstall the existing KMS key.
After the old key is uninstalled, you’re ready to apply the following:
slmgr.vbs /ipk <NewKMSProductKey>
To check if things are in place and complete the process, follow the steps below: PC Settings >Update and Security > Activation
-
Method 5: Download an Automated Tool
If you wish to always have at your disposal a utility tool to fix these Windows 8 and other related issues when they do arise, download and install a powerful automated tool.
Read More
In case you don’t know, Windows 10 now allows users to check the Bluetooth battery level of devices. More often than not, the accessories or peripherals users use for their Windows 10 devices are connected to it using Bluetooth technology. This high-speed low-powered wireless technology is designed to link mobile devices, computers, and other network devices over a short distance wirelessly.
Monitoring the battery level of a device where Bluetooth is enabled isn’t an easy task as most of these devices do not support the Bluetooth battery monitor or the battery level display. And even when on devices that do, you still have to install additional software to find it. However, Windows 10 eliminates this requirement and all you have to do is add a Bluetooth device and connect that Bluetooth device. How? Follow the instructions provided below.
Step 1: Adding a Bluetooth Device
The easiest way to get your Bluetooth device battery to be displayed on your Windows 10 screen is to simply add a Bluetooth device. To do so, follow these sub-steps:
- First, turn on the Bluetooth mode on your device.
- Next, go to Windows Settings > Devices > Bluetooth & other devices.
- From there, click on the “+” button next to the ‘Add Bluetooth or other devices” option and select the type of device you want to add.
Step 2: Connecting the Bluetooth Device
Once you’ve added the device, it will be visible under the “Add a device” screen.
- Now select the newly added Bluetooth device and click the “Done” button.
- After that, it will now be connected. Go back to the “Bluetooth & other devices” window and scroll down to the section of “Mouse, Keyboard, and Pen”.
- From there, move the cursor alongside the connected device to display its battery level.
Keep in mind that there are several ways in which you can display the battery information of the Bluetooth device. However, Windows 10 understands only one of them per se. So if your device is not a Bluetooth Low Energy device, Windows 10 won’t be able to show its battery information and won’t display its battery level.
Read More
Windows 10 has a Cloud Clipboard feature that allows users to have a list of multiple copied text in place so that they can reuse it. And each time the computer restarts, the Clipboard Data is cleared. However, you can actually do it manually. How? Read on as this post will walk you through how you can turn on or off as well as clear the Clipboard history in Windows 10. This kind of feature is already available in Windows 10 v1903.
In the previous versions of Windows, there was no feature to turn off history in the clipboard and users have to use other ways to clear the clipboard history. And now it seems that Microsoft has put an end to this dilemma as it now allows users to clear the clipboard history.
To turn on or off or clear the Clipboard history, here are some instructions you need to follow:
Step 1: Tap the Win + X keys to open the power menu and select Settings.
Step 2: After that, navigate to Settings > System > Clipboard.
Step 3: From there, turn off the toggle button under the Clipboard history section. This will turn off the Cloud Clipboard feature. As a result, the default clipboard will hold one last item and will not display the data on the clipboard.
Note: When you tap the Win + V keys to invoke the clipboard manager, you will see a prompt that says, “Can’t show history, See all copied items in place, Turn on clipboard history”. You have the option to turn it back on by simply clicking on the available button. Doing so would only hide the existing data and makes sure that no copy of the data is kept.
Conclusion
On the other hand, if you want to clear the clipboard without affecting its history data, you have to make sure to pin the items on the clipboard that you want to stay. After that, click on the three-dotted icon for the menu and click on the “clear all” option. This will delete all the entries but will keep the pinned items on your clipboard.
Read More
When you update or upgrade your computer to Windows 10, the setup will look for the compatibility of both the hardware and software. And in this process, if suddenly got an error message saying, “Some apps need to be uninstalled” or “You need to uninstall a program in order to continue”, you have to look for the program(s) that might be causing the compatibility issues. But worry not as this post will help you resolve the issue. Simply follow the given suggestions below.
Option 1 – Look for the incompatible programs
There are times when Windows 10 will point out the programs that are incompatible with Windows 10. In this situation, just click on the Uninstall and continue button and then wait for the process to be completed.
For more information, you can check out the official site Ready for Windows by Microsoft. This site can help you determine which software versions are compatible with Windows 10 and which ones are not. All you have to do is select the Windows 10 version and type your App name, after that, you will see the results about its compatibility. Thus, it’s now easier for you to figure out which software is causing an issue and if there is a new updated version available that you can install instead.
Option 2 – Try to install the Windows Update in a Clean Boot State
Putting your PC in a Clean Boot state can also help you install Windows Updates or Upgrades without any trouble because, during this state, you can start the system with a minimum number of drivers and startup programs that will surely help you in isolating the root cause of the issue.
- Log onto your PC as an administrator.
- Type in MSConfig in the Start Search to open the System Configuration utility.
- From there, go to the General tab and click “Selective startup”.
- Clear the “Load Startup items” checkbox and make sure that the “Load System Services” and “Use Original boot configuration” options are checked.
- Next, click the Services tab and select the “Hide All Microsoft Services” check box.
- Click Disable all.
- Click on Apply/OK and restart your PC. (This will put your PC into a Clean Boot State. And configure Windows to use the usual startup, just simply undo the changes.)
- After that, try to install the Windows Updates or upgrade again.
Option 3 – Try creating a new user account
Creating a new user account can resolve the “Some apps need to be uninstalled” error when upgrading or updating your Windows 10 PC. All you have to do is create a new admin account and initiate the setup. And this is a new user account, there will be no third-party applications installed on your computer. Thus, the installation should go through without any trouble. And in case you’ve already installed programs for that user, you just have to uninstall them all and then re-run the setup.
Option 4 – Perform a clean install
If none of the options worked, you can try to clean install Windows 10. Just make sure that you have the ISO from the official Microsoft Website and then a bootable USB drive to install Windows 10 again. Take note that this will delete all the data from your drive where Windows 10 was installed previously.
Read More
Socket Error 10060 — What is it?
Socket Error 10060 is basically a connection time-out error. This error occurs when the remote FTP server does not respond to CuteFTP.
This time-out error occurs after an FTP session is established but even the server doesn’t respond. The error message is displayed in the following format:
‘Connection timed out. A connection attempt failed because the connected party did not properly respond after a period of time, or established connection failed because connected host failed to respond.’
Solution
Error Causes
Socket Error 10060 may occur due to multiple reasons including:
- Blocked port
- Data connection incorrect settings
- When the web proxy connection setting does not allow enough time to receive a response from the destination website and therefore the connection is timed-out.
- Registry issues
- Viral infection
Further Information and Manual Repair
Here are some of the best and quick DIY methods to resolve Socket Error 10060 on your PC.
Method 1: Troubleshoot the Web Proxy Connection
This method is workable and effective if Socket Error 10060 occurs only when the web proxy service is used. To execute it, here’s what you need to do: install the Winsock Proxy Client on your PC.
Disable the web proxy settings under the LAN settings on the Connections tab of the internet options. Once you disable the settings, then try to go to the website that you giving you the error. If the site is accessible, the error is resolved.
Method 2: Increase Web Proxy Time out Settings
If disabling the web proxy settings doesn’t work, then try increasing time-out settings. To do so, you will also have to modify the registry.
Remember serious problems may occur if you modify the registry incorrectly.
- Here’s what you need to do, click start, run and then type Regedit in the dialogue box.
- Navigate to the following registry subkey: HKEY_LOCAL_MACHINESYSTEMCurrentControlSetServicesW3ProxyParameters.
- On the right side of the Registry Editor, right-click Request TimeoutSecs and then click Modify.
- Click decimal, they type the number of seconds that you want the proxy service to wait until the session times out.
- To confirm changes, click OK.
- Now restart WWW publishing service by going to start, run and type cmd. Click OK to continue.
- Type net stop iisadmin/y and then press enter. After that type net start iisadmin /y and then press enter. Test the new settings by going to the website that displayed the Socket Error 10060 message.
Method 3: Switch from Passive Mode to Active Port Mode
This method is effective if the error occurs due to incorrect data connection settings.
CuteFTP uses passive mode by default so to ensure the error is resolved, you may have to switch from passive mode to active port mode. To make this switch, open the site manager and then click once on the name of the problem website.
Now on the Type tab change the data connection type to use the port.
Method 4: Configure Firewall Settings
Sometimes the error may also occur due to Firewall. To resolve, configure Firewall settings to allow FTP protocol.
Method 5: Download Restoro
Whether the error occurs due to viral infection or registry issues, it is advisable to download Restoro.
This is an advanced and multi-functional PC fixer embedded with multiple utilities like antivirus and a registry cleaner. The registry cleaning utility removes junk files, cookies, and invalid entries damaging the registry.
It cleans, repairs, and restores the registry while the antivirus removes all types of viruses like spyware and Trojans in seconds thereby resolving socket error code 10060.
It is safe, user-friendly, and compatible with all Windows versions. Click here to download Restoro today.
Read More
Error 0x80070003 — What is it?
Error 0x80070003 is a type of Windows file backup and restore error code. This error occurs when you copy files or try to create backup and restore files and folders by using Windows Backup and Restore.
This error stops you from using browse for files or folders. It hampers your ability to browse and restore files in the File Restore Wizard on your PC.
Solution
Error Causes
Error 0x80070003 may occur due to numerous reasons such as:
- Registry files are corrupted and damaged
- Missing directories
- Boot sector corrupted
- Outdated drivers
- Faulty software installation
- Malware infection
- Improper maintenance and incomplete installation
Further Information and Manual Repair
Here are some manual and easy do-it-yourself methods that you can try at home and resolve the issue on your own and save hundreds of dollars that you would be otherwise spending to hire a professional for the job.
Method 1 — Use Search Functionality in the File Restore Wizard to restore files
To work out and resolve error 0x80070003 on your system simply use the search functionality in the File Restore Wizard to locate and restore the files. This can be done by going to the start menu and then click on search.
Now enter the keywords in the search for box and then click search again. Click to select the files that you want to restore from the list and then click OK. This will help you restore the files and resolve the issue.
Method 2 — Recreate the Missing Directory
If the re-parse point is deleted, then you will have to recreate the missing directory.
The deletion of the re-parse point can be identified if the error code is displayed in this format ‘Filename: C:\Myfolder\11111.txt, Error: the system cannot find the path specified (0x80070003)’.
To resolve, simply follow the path that is pointed out in the error and create the corresponding folder. Create the folder Myfolder in Drive C.
Then try the restore operation again. Now click to clear the Restore the files to their original subfolders check box and then run the File Restore Wizard. This is most likely going to resolve the issue.
Method 3 — Scan for Viruses
Sometimes error 0x80070003 may occur due to malware. This stops you from creating file backup and restore files. If this is the cause then simply download and run an antivirus to remove malware programs on your PC.
Method 4 — Clean and Repair the Corrupted Registry
Error 0x80070003 can be triggered due to registry corruption. If this is the cause then simply download Restoro. This is a user-friendly and powerful multi-functional PC Fixer integrated with a registry cleaner.
The registry cleaner scans for all registry-related errors, wipe out all unnecessary and junk files, and also cleans and repairs the damaged registry in seconds.
Click here to download Restoro and resolve error 0x80070003 today!
Read More
CyboScan PC Optimizer is promoted as a useful program that helps you clean unnecessary files and registry entries on the Windows Operating System. When installed CyboScan PC Optimizer will automatically scan your computer for issues. Upon reviewing the scan results, it was discovered that most, if not all of these issues were exaggerated, and removing them will not give the promised speed boost. The CyboScan PC Optimizer program appears to scan the Registry for installed anti-virus and anti-spyware shields and may recommend users to install products from partners. This Potentially Unwanted Program comes bundled with other Potentially Unwanted Applications that may harm your Operating System or lead to information compromise.
CyboScan PC Optimizer is also known as MySoftScans PC Cleaner, none of these offer any details about the development company and users will end up paying a fee of up to 99.95USD every 3 months for using the program.
About Potentially Unwanted Applications
You have encountered it – you download a free application, then you discover some unwanted applications on your computer or discover a strange toolbar has been added to your web browser. You did not install them, so how did they appear? These unwanted programs, which are called Potentially Unwanted Programs, or PUPs in short, typically tag along as a software bundle when downloading the application and can result in major problems for computer users.
The idea of PUP was actually coined to outline this crapware as something other than malicious software. This is because, the majority of PUPs get into a computer not because they slip via the security holes, for instance, but mainly because the users have installed them themselves – 100 % unintentionally needless to say. Even though a PUP isn’t really malware by definition, it could nevertheless be dangerous software that puts the computer at risk exactly the same way a virus does.
Exactly how do unwanted programs look like?
Unwanted programs can be found in many forms. Typically, they could be found in adware bundlers which are known to utilize aggressive and misleading advertising. The majority of bundlers install many adware applications from several companies, each of which has its own EULA policy. Safebytes Anti-malware completely eliminates this threat and protects your machine against PUP or adware infection. Also, the majority of free programs nowadays come with a few unwanted add-ons; in most cases a web browser toolbar or browser modification such as a homepage hijacker. They may track your online routines, redirect your search results to unsafe websites where viruses can be downloaded and installed, hijack your search page, and slow your browser down to a crawl.
PUPs lie inside the gray part of the software spectrum. Some PUPs contain keyloggers, dialers, and other software to gather your individual information which often can lead to identity theft. These are software programs that don’t really do anything useful to you; in addition to taking over space on the hard disk, they also slow down your computer, often alter settings without your permission, and the list of bothersome features goes on and on.
How one can prevent PUPs
• Read carefully before agreeing to the license agreement as it might possess a clause about PUPs.
• Always pick the custom if you’re provided a choice between Recommended and Custom Installations – never click Next, Next, Next blindly.
• Install reputable antivirus software, just like Safebytes Anti-malware that offers real-time protection against PUPs.
• Do not download free applications or shareware unless you actually need it. Disable or remove toolbars and browser extensions you don’t actually need.
• Always download software from the original site. The majority of PUPs find their way onto your PC is via download portals, so steer clear of it entirely.
Remember that although PUPs can cause damage and hinder the proper functioning of your computer, they can’t enter into your computer without your permission, so be watchful not to give it to them.
Malware Blocking Internet And All Anti-Malware Software? Do This!
Malware can cause all kinds of damage when they invade your system, starting from stealing sensitive details to erasing files on your computer. Some malware variants modify web browser settings by adding a proxy server or modify the computer’s DNS settings. In such cases, you will be unable to visit some or all of the internet sites, and therefore unable to download or install the necessary security software to get rid of the computer virus. If you’re reading this article, odds are you’re stuck with a virus infection that is preventing you to download and/or install the Safebytes Anti-Malware program on your PC. There are a few options you can try to get around with this issue.
Make use of Safe Mode to resolve the issue
Safe Mode is a unique, simplified version of Windows in which just essential services are loaded to stop malware and also other problematic applications from loading. In the event, the malware is set to load automatically when the computer boots, switching to this particular mode may well prevent it from doing so. To start the computer into Safe Mode, hit the “F8” key on your keyboard right before the Windows logo screen shows up; Or after normal Windows boot up, run MSConfig, check “Safe Boot” under Boot tab, and then click Apply. Once you’re in Safe Mode, you can try to download and install your antivirus software application without the hindrance of the malicious software. Right after installation, run the malware scanner to remove most standard infections.
Utilize an alternate internet browser to download antivirus software
Some malware only targets certain browsers. If this is your case, use another internet browser as it may circumvent the virus. If you’re not able to download the antivirus application using Internet Explorer, it means malware may be targeting IE’s vulnerabilities. Here, you should switch to an alternate web browser like Firefox or Chrome to download Safebytes software.
Create a portable antivirus for removing malware
Here’s another solution which is using portable USB anti-malware software that can scan your system for viruses without the need for installation. Abide by these steps to run the anti-virus on the affected computer system.
1) On a virus-free computer, install Safebytes Anti-Malware.
2) Plug the Flash drive into the uninfected computer.
3) Double click on the executable file to run the installation wizard.
4) Choose the USB stick as the location for saving the file. Follow activation instructions.
5) Transfer the thumb drive from the uninfected computer to the infected PC.
6) Run the Safebytes Anti-malware directly from the USB drive by double-clicking the icon.
7) Click on “Scan Now” to run a scan on the infected computer for malware.
Protect Your Personal Computer From Viruses and Malware With SafeBytes Security Suite
If you’re looking to install an anti-malware program for your computer, there are various tools on the market to consider but you should not trust blindly anyone, irrespective of whether it is a free or paid program. Some of them do a great job in eliminating threats while some will ruin your PC themselves. When searching for an antivirus program, pick one that provides solid, efficient, and comprehensive protection against all known viruses and malware. On the list of highly recommended software by industry leaders is SafeBytes Anti-Malware, popular security software for Windows computers.
Safebytes is among the well-established PC solutions companies, which provide this all-inclusive anti-malware software program. With its most advanced virus detection and repair technology, this software will help you protect your PC against infections caused by different kinds of malware and other internet threats, including spyware, adware, viruses, worms, trojans, keyloggers, potentially unwanted program (PUPs), and ransomware.
SafeBytes anti-malware provides an array of enhanced features that sets it apart from all others. Here are some of the good ones:
Real-time Active Protection: SafeBytes gives complete and real-time security for your personal machine. It will constantly monitor your pc for hacker activity and also gives users superior firewall protection.
Antimalware Protection: This deep-cleaning antimalware software program goes much deeper than most antivirus tools to clean out your computer. Its critically acclaimed virus engine detects and disables hard-to-remove malware that hides deep within your PC.
Web Security: Safebytes allots all sites a unique safety ranking that helps you to get an idea of whether the webpage you’re going to visit is safe to view or known to be a phishing site.
Extremely Speed Scanning: This software has got one of the quickest and most powerful virus scanning engines in the industry. The scans are extremely accurate and take a short amount of time to complete.
Lightweight: SafeBytes is a lightweight and easy-to-use anti-virus and anti-malware solution. Since it utilizes low computer resources, this program leaves the computer power exactly where it belongs: with you.
24/7 Guidance: You can get 24/7 technical assistance to promptly resolve any concern with your security tool.
On the whole, SafeBytes Anti-Malware is a solid program as it has lots of features and can detect and eliminate any potential threats. Once you have downloaded and installed this software, you will no longer have to worry about malware or any other security worries. If you need sophisticated forms of protection features & threat detections, buying SafeBytes Anti-Malware could be worth the dollars!
Technical Details and Manual Removal (Advanced Users)
If you wish to manually get rid of CyboScan PC Optimizer without the use of an automated tool, it might be possible to do so by removing the application from the Windows Add/Remove Programs menu, or in cases of browser plug-ins, going to the browsers AddOn/Extension manager and removing it. You will likely also want to reset your internet browser.
In order to ensure the complete removal, manually check your hard disk and computer registry for all of the following and remove or reset the values accordingly. Having said that, editing the registry is actually a difficult task that only advanced users and professionals should try to fix the problem. Furthermore, certain malware keeps replicating which makes it tough to remove. You’re suggested to do this procedure in Safe Mode.
Files:
%APPDATA%\Microsoft\Windows\Start Menu\Programs\Cyboscan PC Optimizer
%ALLUSERSPROFILE%\Start Menu\Programs\Cyboscan PC Optimizer
%PROGRAMFILES(x86)%\Cyboscan\Cyboscan PC Optimizer
Registry:
HKEY_LOCAL_MACHINE\Software\[APPLICATION]\Microsoft\Windows\CurrentVersion\Uninstall..Uninstaller
E55FEFEA-F506-47DC-A76E-9F7668D6E5C9
Read More
![]()
Copyright © 2023, ErrorTools. All Rights Reserved
Trademark: Microsoft Windows logos are registered trademarks of Microsoft. Disclaimer: ErrorTools.com is not affiliated with Microsoft, nor claims direct affiliation.
The information on this page is provided for information purposes only.
![]()
Clearing the Windows update history can fix this issue quickly
by Milan Stanojevic
Milan has been enthusiastic about technology ever since his childhood days, and this led him to take interest in all PC-related technologies. He’s a PC enthusiast and he… read more
Updated on
- If you are facing the Windows update service not running issue, it might be because of a faulty service on your PC.
- One effective and quick solution to this issue is to run the Windows update troubleshooter.
- Another excellent fix is to perform a clean boot and remove any problematic program.
XINSTALL BY CLICKING THE DOWNLOAD
FILE
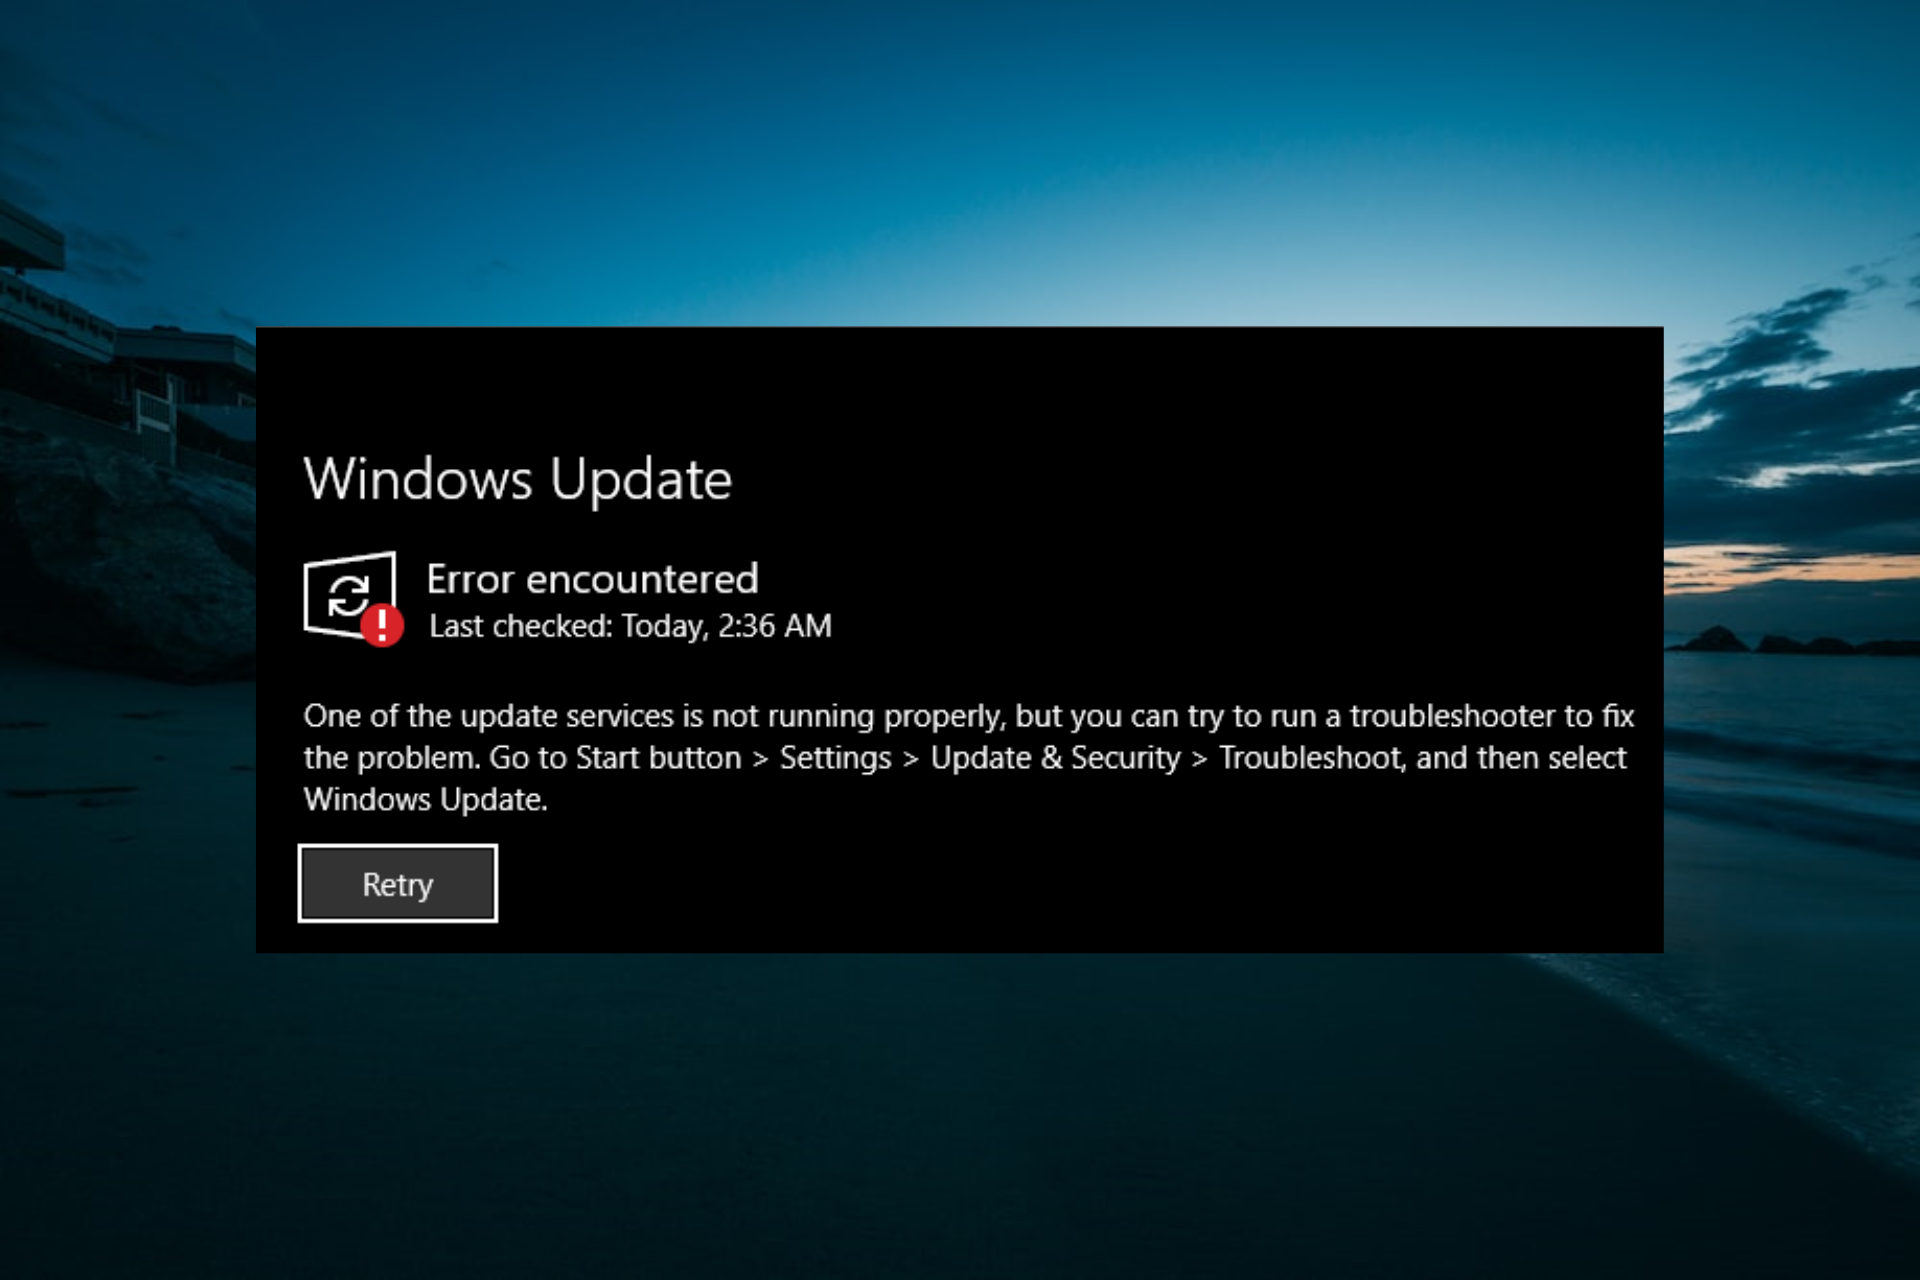
Windows updates are important for the smooth running and security of your PC. However, there are times when the Windows update won’t work with a prompt saying that the service is not running.
The full error message states: Windows Update cannot currently check for updates, because the service is not running. You may need to restart your computer.
This can prevent you from installing important updates and make your PC vulnerable. Fortunately, it is an issue with known solutions, and we will show you what to do when the Windows Update service is not running in this guide.
How can I fix the Windows Update service not running issue?
- How can I fix the Windows Update service not running issue?
- 1. Run the Windows update troubleshooter
- 2. Disable or remove problematic services
- 2.1. Enable Clean boot
- 2.2. Disable or remove faulty service
- 3. Clear the update cache
- Why is the Windows Update service stopped?
Before exploring the sophisticated fixes in this section to make the Windows Update service run, below are some general troubleshooting steps you should try:
How we test, review and rate?
We have worked for the past 6 months on building a new review system on how we produce content. Using it, we have subsequently redone most of our articles to provide actual hands-on expertise on the guides we made.
For more details you can read how we test, review, and rate at WindowsReport.
- Restart your PC. Read our guide to learn what you can do if Windows won’t restart.
- Disable or remove the third-party antivirus software.
1. Run the Windows update troubleshooter
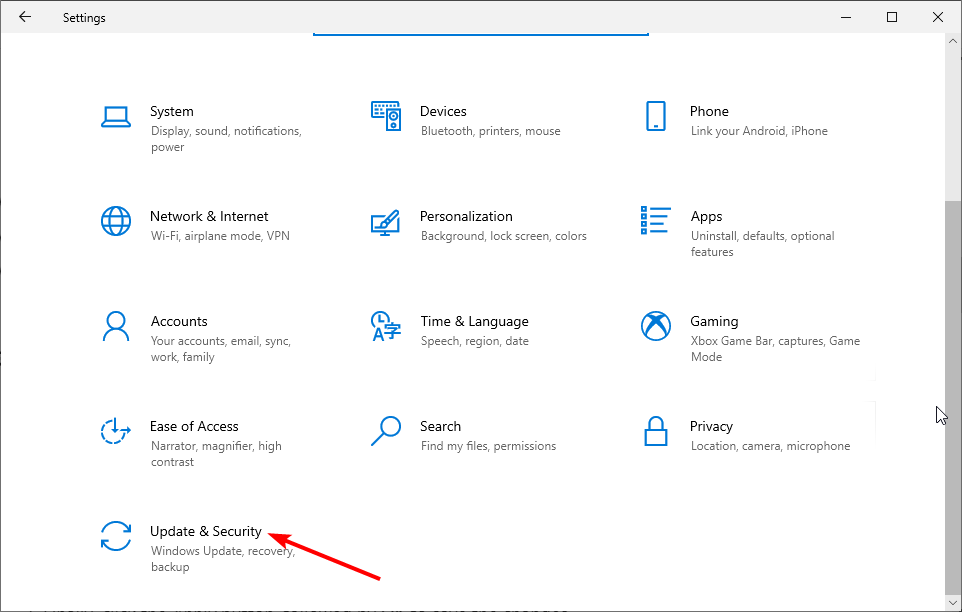
- Press the Windows key + I to open the Settings app, and select Update & Security.

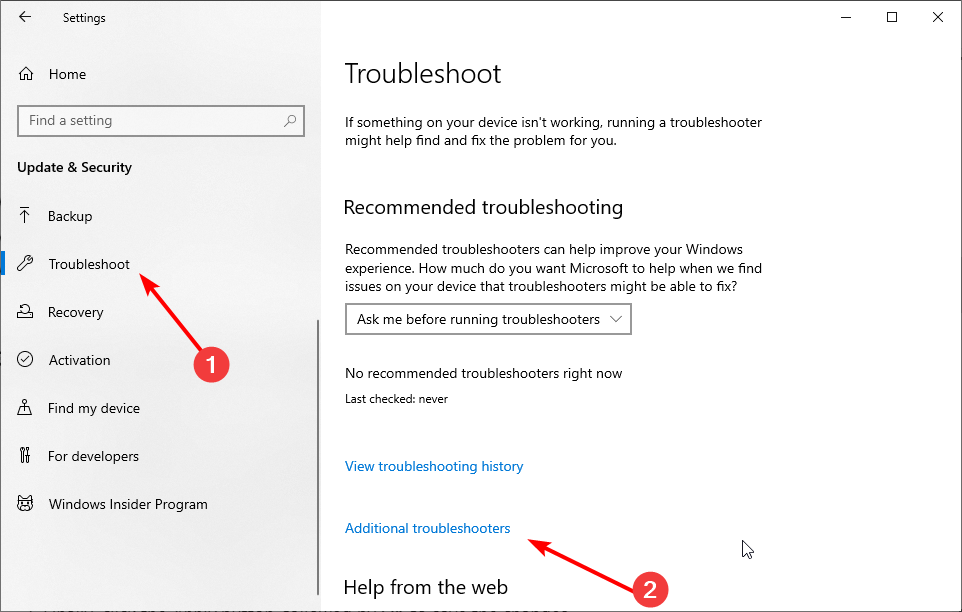
- Select Troubleshoot in the left pane and click Additional troubleshooters.
- Now, select Windows Update and click Run the troubleshooter.

- Finally, apply any recommended troubleshooting steps.
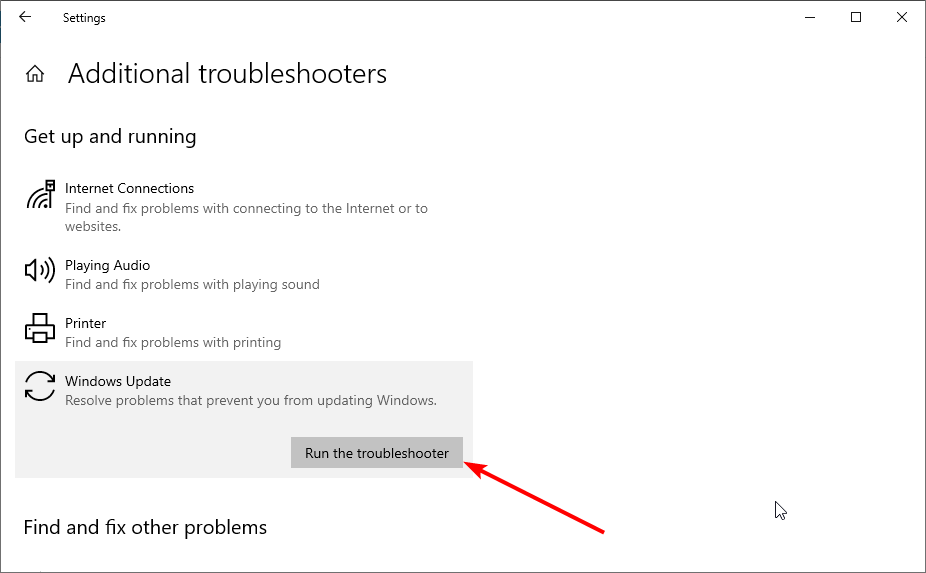
The Windows Update troubleshooter is one of the best tools for fixing update issues, including the service not running error. After running the troubleshooter, try checking and installing updates again.
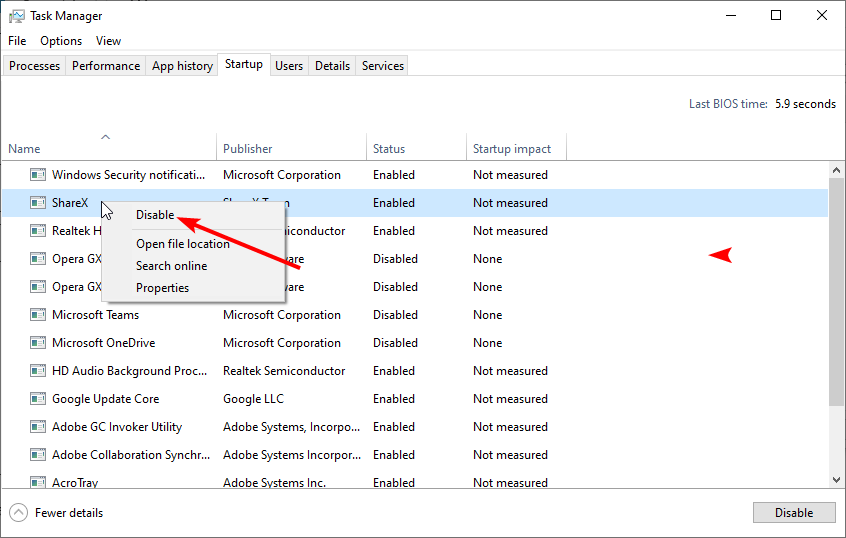
2. Disable or remove problematic services
2.1. Enable Clean boot
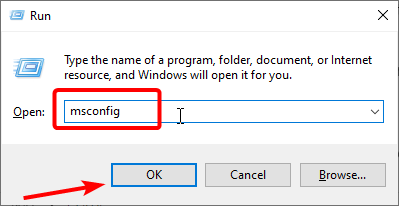
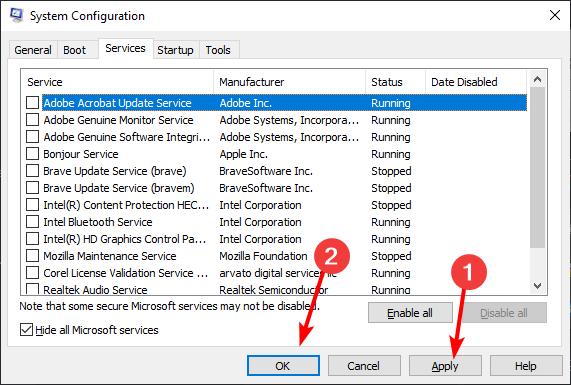
- Press the Windows key + R, type msconfig, and click OK.

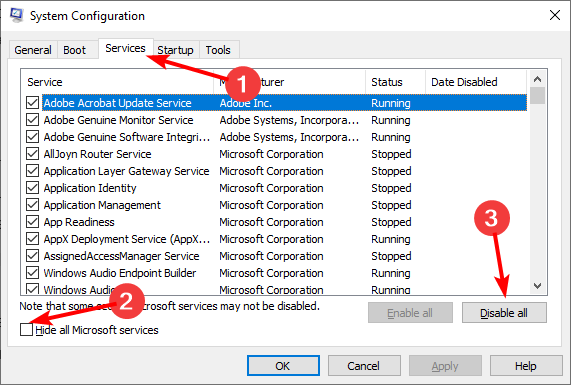
- Click the Services tab at the top, check the Hide all Microsoft services box, and click Disable all.

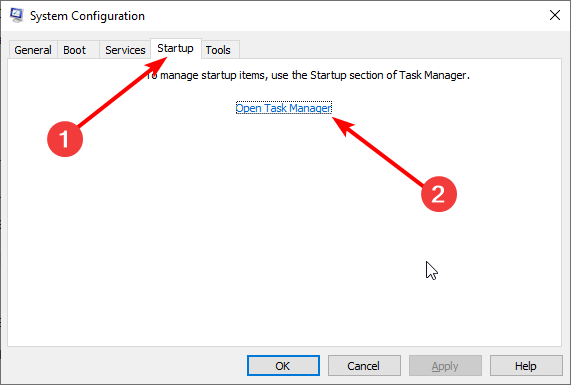
- Now, choose the Startup tab at the top and click Open Task Manager.
- Right-click each service there and select the Disable option.

- Go back to the System Configuration window, click the Apply button, followed by OK, and restart your PC.
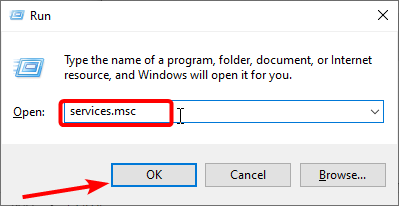
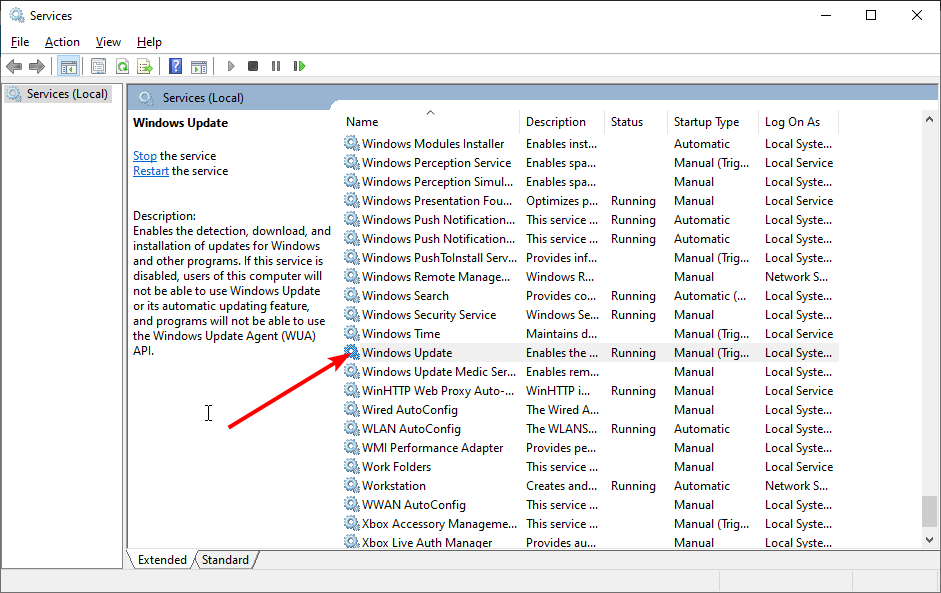
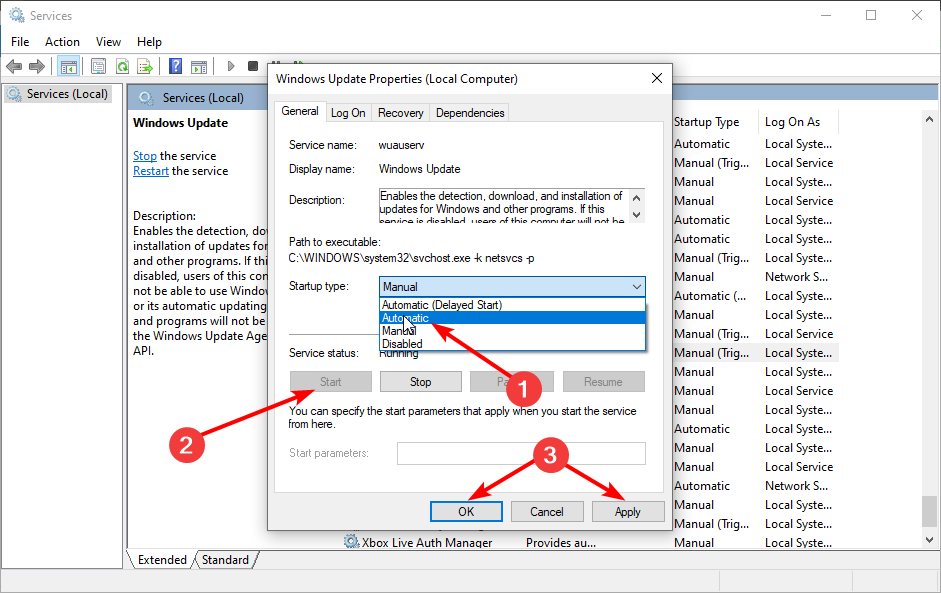
- Now, press the Windows key + R, type service.msc, and click OK.
- Double-click the Windows Update service to open its properties.

- Finally, set its Startup type to Automatic, choose the Start option, and click the Apply button, followed by OK.
The first step to disabling any problematic app or process that could be causing the Windows update service not running issue is to clean boot your PC. If the issue is fixed after restarting your PC, you need to find the service or app that could be causing the problem.
You can do this by enabling the disabled services in batches. One service that users have found to cause this issue is the StopUpdates10Guard service. Below are the steps to follow to disable or remove it.
2.2. Disable or remove faulty service
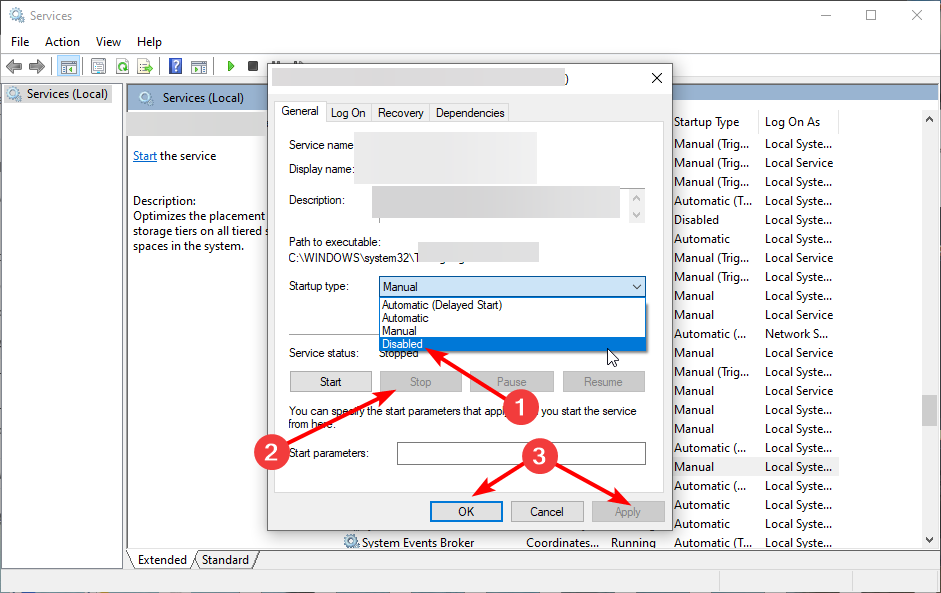
- Press the Windows key + R, type services, and click OK.
- Double-click the StopUpdates10Guard service to open its properties.
- Now, set its Startup type to Disabled and click the Stop button.
- From here, click the Apply button, followed by OK.
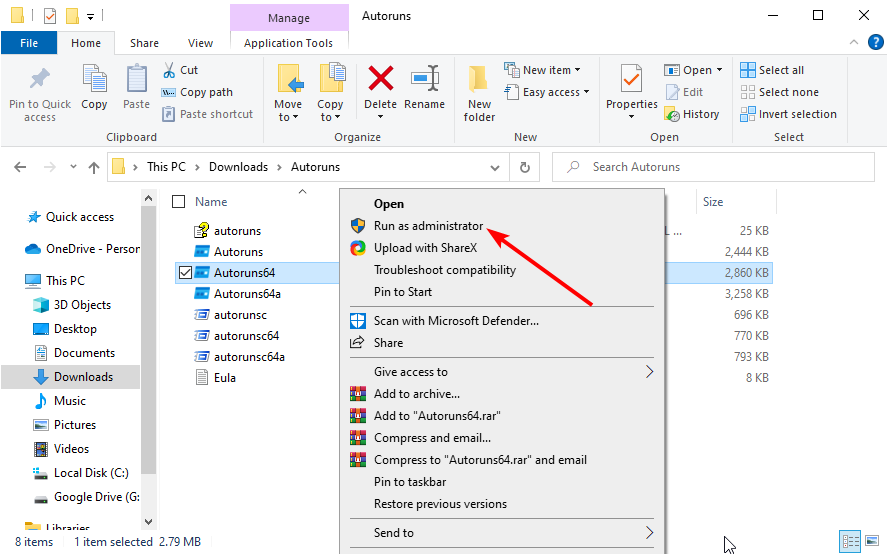
- To remove the service completely, download the Autorun tool.

- Unzip the file, right-click the Autorun 64-bit (for 64-bit system) option, and select Run as administrator.

- Finally, look for any reference to the StopUpdates10Guard service, right-click it, and select Delete.

With this, you should be able to fix the Windows update service not running issue.
- Windows 11 23H2: How to Download the Official ISO
- A 64-bit Windows 12 ISO is out, theoretically. Here’s all you need to know
- Dev Build 23550 comes with a huge undocumented improvement
3. Clear the update cache
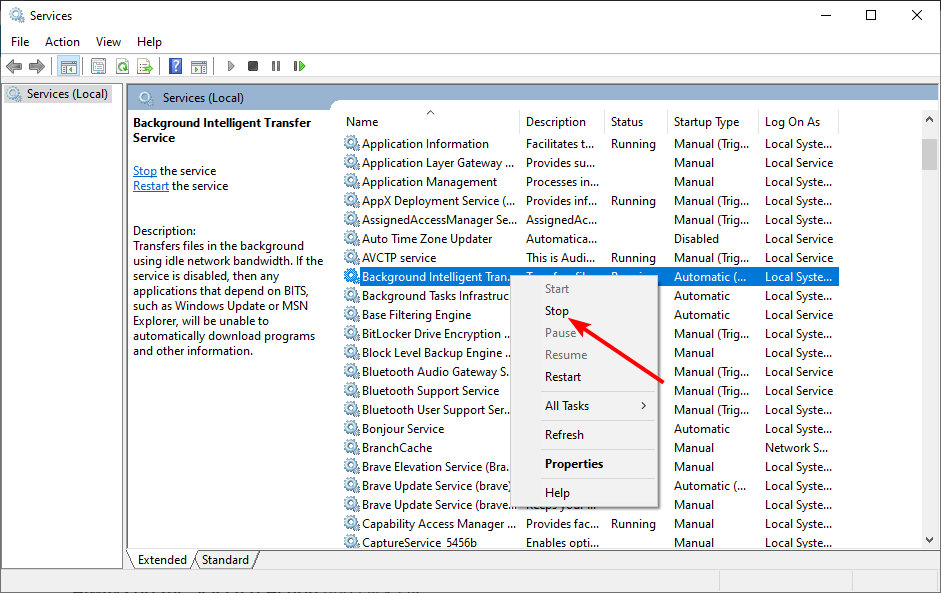
- Press the Windows key + R, type services.msc, and click OK.
- Right-click the Background Intelligence Transfer Service and select the Stop option.
- Now, right-click on Windows Update and then click Stop.
- Press the Windows key + E to open File Explorer and navigate to the path below:
C:/Windows/SoftwareDistribution
- Now, delete the contents of the SoftwareDistribution folder.
- Finally, go back to the Services app, right-click the BITS and Windows Update services, and select Start.

Restart your PC after applying the steps above. You can now check if you are still getting the Windows service not running error.
- Windows 11 23H2: How to Download the Official ISO
- A 64-bit Windows 12 ISO is out, theoretically. Here’s all you need to know
- Dev Build 23550 comes with a huge undocumented improvement
- How to enable automatic optional updates in Windows 11
- Windows 11’s next major update after 23H2 could arrive 24 Feb 2024
Why is the Windows Update service stopped?
Below are some of the factors that can cause the Windows update service not running error:
- Faulty apps and services: One of the main causes of Windows could not start the Windows Update service on the Local Computer prompt is problematic apps. In some cases, it might be your third-party antivirus or service that is running in the background. The solution is to disable or remove the program using one of the best uninstaller software.
- Corrupt update cache: If you get the Access denied prompt while trying to install a Windows update or restart the service, it might be down to a corrupt cache. You need to clear the update cache and restart the needed services again to fix this.
With this, we have come to the end of this guide. You now have everything to fix the Windows update service not running error on your PC. All you need to do is follow the detailed instructions, and everything should be back to normal.
If you are facing other issues like Windows update not showing, check our detailed guide to restore it.
Feel free to let us know the solution that helped you solve the problem in the comments below.
![]()
Download Windows Speedup Tool to fix errors and make PC run faster
If you are trying to start the Windows Update service, but you see an error message Windows could not start the Windows Update service on Local Computer, Error 87, The parameter is incorrect, here are some solutions you can try.

While trying to use Windows 11/10 Update, you can receive several error codes like 0x80070643, 80244019, 0x80240034, etc. Apart from that, if you find that the Windows Update service has been stopped, and you try unsuccessfully to start it, then here is what you can do.
To fix this problem, you can follow these suggestions-
- Check Service Dependencies
- Start Background Intelligent Transfer Service and Cryptographic Services
- Reset Windows Update component
- Run Windows Update Troubleshooter
- Edit Windows Registry.
Error 87, The parameter is incorrect
1] Check Service Dependencies
A Windows service depends on other services, and that is called Dependencies of a Windows Service. The Windows Update service also depends on three different services called – Remote Procedure Call (RPC) Service, DCOM Server Process Launcher and RPC Endpoint Mapper. This means that if those two Services are not working properly, then the dependant Service also will not start.
Open the Services Manager and locate these-
- Remote Procedure Call (RPC) Service
- DCOM Server Process Launcher
- RPC Endpoint Mapper
Double-click on each service and verify whether the Startup type for all is set to Automatic and the Service status is set to Running or not. If not, then click on the Start button. You need to use that option to run the service. After doing that, check if you can enable the Windows Update service or not.
2] Start Background Intelligent Transfer & Cryptographic Services
Both these Services too need to be working normally for Windows Update:
- Background Intelligent Transfer Service – Manual
- Cryptographic Services – Automatic
To locate them and make sure the Startup type is as mentioned above, and the Service status is set to Running. If not, then click on the Start button to start the Service.
Check if you can enable the Windows Update service or not.
Related: One of the update services is not running properly in Windows 11/10.
3] Reset Windows Update component
If the problem continues then, you may need to reset each Windows Update component manually. This becomes mandatory when you have made a lot of changes regarding Windows Update, and the update service has stopped due to unknown reasons.
Read: Windows could not start the Windows Store Service (WSService).
4] Run Windows Update Troubleshooter
The Windows Update Troubleshooter is probably the best option for you when nothing is working for your benefit. You can run Troubleshooter in Windows from Windows Settings > Update & Security > Troubleshoot. Here you should find an option called Windows Update. Click this option and click the Run the troubleshooter button. After that, you need to follow the screen options.
5] Remove a value from Registry
If the Troubleshooter fails and you receive a message Service Registration is Missing or Corrupt, then open the Registry Editor and navigate to this path-
HKEY_LOCAL_MACHINE\SOFTWARE\Microsoft\WindowsSelfHost\Applicability
If you can find a value called ThresholdOptedIn on your right-hand side, delete it.
I hope something helps!
TIP: More generic suggestions to troubleshoot Windows Services will not start issues.
Anand Khanse is the Admin of TheWindowsClub.com, a 10-year Microsoft MVP (2006-16) & a Windows Insider MVP (2016-2022). Please read the entire post & the comments first, create a System Restore Point before making any changes to your system & be careful about any 3rd-party offers while installing freeware.
Windows Update is a Microsoft service for the Windows family of operating systems that automates downloading and installing Windows updates over the internet. The service will check for updates for Windows as well as other critical updates such as antivirus products.
Many users have reported problems with this service. When Windows Update runs, users are receiving an error message that says, «Windows Update cannot currently check for updates because the service is not running.» Since it is not running properly, users are unable to check for updates and install the required updates.
If the Windows update service is not running properly this can present major problems because it can expose your laptop or computer to potentially harmful viruses or prevent your operating system from functioning optimally. Thankfully, you should be able to find a simple solution to fix the problem. Just follow the steps below to find the right solution if you find your Windows Update stuck.
How to Fix Windows Update Service Not Running
Follow the steps below for each solution in order until you find the solution that works for your device.
- Run Windows Update Troubleshooter
- Check for malware
- Check associated services
- Restart Windows Update
- Clear Windows SoftwareDistribution Folder
- Upgrade device drivers
Method 1 — Run Update Troubleshooter
Windows has a built-in troubleshooter that can run a diagnostic and help you fix issues with service. This should be your first option if you encounter issues including problems with Windows 10 update. If you choose this option, just follow the steps below to attempt the solution.
- Type troubleshoot in the Windows Search bar and click on the Troubleshooting option.
- Press Fix problems with Windows Update and then Next.
- Restart your computer and run the service again to see if the problem has been fixed.
Method 2 — Check for malware
It is possible that you are running into problems due to malicious software on your device. If that is the case, then the solution is to run a scan on your device to detect malware and delete it.
Microsoft offers a Malicious Software Removal Tool that you can download and run on your own device. Once you have downloaded and run the tool on your computer, try to run the program again and see if the problem is fixed.
Method 3 — Check associated services
The problem might be due to the fact that associated services are not running. You will need to restart those services to fix the problem by following the steps below.
- Type Windows Update in the search bar then choose Change Settings.
- Under Important updates, click on Never check for updates.
- Go to the settings window again and select Install updates automatically and click OK.
Following this procedure should allow you to restart the program and correct the error. We note that the procedure for solving the Windows Update problem may vary slightly from above for different versions of Windows.
Method 5 — Clear Windows SoftwareDistribution Folder
The Software Distribution folder stores temporary files that can potentially prevent the service from running properly if those files are corrupted. You can delete the corrupted files to correct this problem.
- Enter Windows logo key and R on your keyboard to run the command box.
- Enter services.msc and click OK.
- Right-click on Windows Update and select Stop.
- Open Windows Explorer and navigate to C: Windows folder.
- Find and delete the Software Distribution folder.
- Return to Control Panel, right-click on Windows Update service and enter Start.
- Restart your computer.
Method 6 — Upgrade your drivers
The error may be occurring due to the use of an incorrect or outdated device driver. Simply check for the latest device driver and install them on your device to fix this error.
If you’re looking for a software company you can trust for its integrity and honest business practices, look no further than SoftwareKeep. We are a Microsoft Certified Partner and a BBB Accredited Business that cares about bringing our customers a reliable, satisfying experience on the software products they need. We will be with you before, during, and after all the sales.
Final thoughts
We hope that the methods above were able to guide you in successfully resolving this common problem, and prevent it from happening again in the future.
Visit our Help Center to get access to hundreds of articles covering hundreds of topics, and with tips on how to get the most out of your system. Want more? Sign up for our newsletter to get promotions, deals, and discounts from us right in your inbox. Subscribe with your email address below.
You May Also Like
» How To Fix Windows 10 Update Status Stuck on Pending
» What to Do When Windows Update Keeps Failing on Windows 10
» Fixed: Potential Windows Update Database Error Detected