Quick fix: Use SFC to fix the system cannot find the file specified error
In Command Prompt, type the following command: sfc /scannow. Now press Enter.
After scanning and correcting errors, restart the computer and check if the «the system cannot find the file specified» error is fixed.
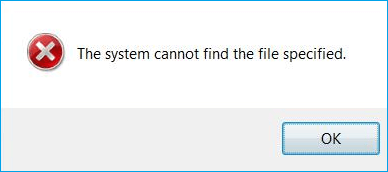
«The system cannot find the file specified»
«The system cannot find the file specified» is an error that may happen on Windows 10 or earlier versions and usually indicates an Error Code 0x80070002. The error may also occur under various conditions, but most people receive this prompt when they:
- Access a local hard drive, external hard drive, USB, and more in Disk Management
- Access files and folders on your computer
- Launch a program
- Install Driver
- Back up system
How to Fix «The system cannot find the file specified»
Depending on your situation, the solutions to the problem «The system cannot find the file specified» vary. Identify your situation and find the corresponding solutions below.
| Workable Solutions | Step-by-step Troubleshooting |
|---|---|
| Case 1. Error while accessing the drive | Recover data from the hard drive > fix the hard drive via Diskpart…Full steps |
| Case 2. Error while accessing folders | Check the system log file > look for files via Regedit > check for RTHDCPL in Registry key…Full steps |
| Case 3. Error while launching programs | Click open EaseUS DriverHandy and click «Scan» to find all the outdated drivers…Full steps |
| Case 4. Error while installing drivers | Look for files via Regedit > check for RTHDCPL in the Registry key…Full steps |
| Case 5. Error while backing up system | Install the latest Windows updates > check Services settings…Full steps |
Situation 1. Receive «The system cannot find the file specified» While Accessing a Hard Drive
Most people encounter the «the system cannot find the specified file» error when trying to access or back up some data. This is because the file system of the target device is corrupted or damaged, making your hard drive, USB, or external hard drive inaccessible. To fix this error, you need to run the chkdsk command to repair the corrupted file system, using reliable data recovery software to return all lost data. Then, clean and re-partition the hard drive using the diskpart command in CMD.
First. Run CHKDSK Command to Fix «System Cannot Find File Specified» Device
- Right-click the Start button, type cmd in the Search, and select Command Prompt (Admin).
- Type chkdsk x: /f /r (x represents your target drive) into the Command Prompt window and press Enter Wait while chkdsk tries to repair the corrupted file systems.
- Type exit and press Enter to leave this command.
After this, you can try to re-open the drive to find your saved files. If files are missing or not showing up, move to the following tutorial to recover data from your storage device using reliable data recovery software
Next. Recover Data from Problematic Hard Drive or Device
Whether it’s an external storage device or a local hard drive, you can use EaseUS Data Recovery Wizard to recover data from the device. It can retrieve deleted/formatted/lost files and get back data from formatted or inaccessible hard drives. To regain access to your precious files:
Step 1. Run EaseUS Data Recovery Wizard. Choose the drive where you lost files and start scanning. This software allows you to recover lost data from all devices, including HDD, SSD, USB drive, SD card, pen drive, camera, etc.
Step 2. Browse the full scan results. You can choose the file type you need by clicking on the file type filter. EaseUS data recovery software supports 1000+ file types like photos, videos, documents, emails, audio files, and many more.
Step 3. Select the files you want to preview. Click «Recover» and set a storage location to save the recovered data.
Last. Fix the Hard Drive via Disk Clean Diskpart
Now that you have kept your files safe, but the device is still not accessible, you can follow the steps below to fix the device without any worries.
Step 1. Run Command Prompt as an administrator.
Step 2. Enter diskpart and click «Yes» to allow this app to make changes on the computer.
Step 3. Enter the following commands one by one:
- list disk
- select disk 1 (Replace «1» with the number of your problematic disk)
- list disk (Now you will see a star in front of the disk you selected)
- clean (Then you will receive a notification asking you to insert a disk. Click «Cancel». Repeat the «clean» command until you succeed.)
Step 4. If you have successfully cleaned your disk, enter the following commands in order:
- list disk
- select disk X
- create partition primary
- select partition 1
- active
- format fs=fat32 quick («fs» means the file system you want to assign to the partition, be it FAT32, NTFS, or exFAT. «quick» indicates «quick format».)
If the process goes smoothly, you can now access your hard drive or USB drive and use it for data storage again.
Situation 2. Get the Prompt «The system cannot find the file specified» While Accessing Files/Folders
You will also see the error message when you try to open a folder or file by double-clicking it. There are three solutions to this situation.
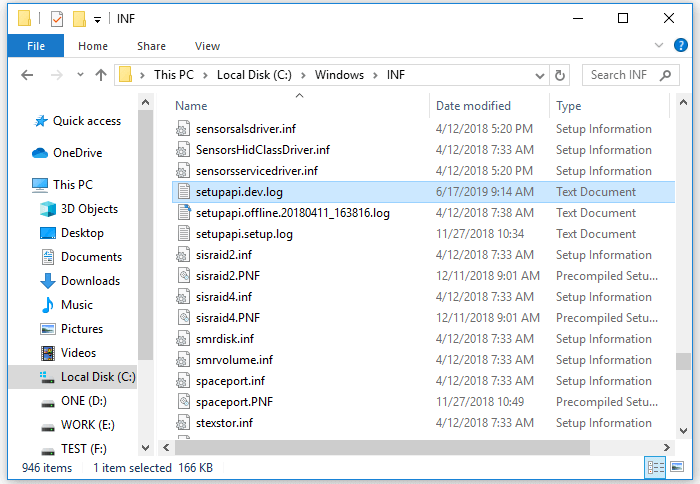
Method 1. Check the System Log File
Step 1. Navigate to the C:/Windows/inf directory and open the Inf folder.
Step 2. Locate the setupapi.dev or setupapi.dev.log file and open it.
Step 3. Press «Ctrl + F» hotkey and type cannot find the file in the search.
Step 4. Press «Enter» to run the search. You should get the missing file.
Step 5. Copy and paste it into the Windows/inf folder.
Step 6. Reinstall the hard disk driver and reboot the system.
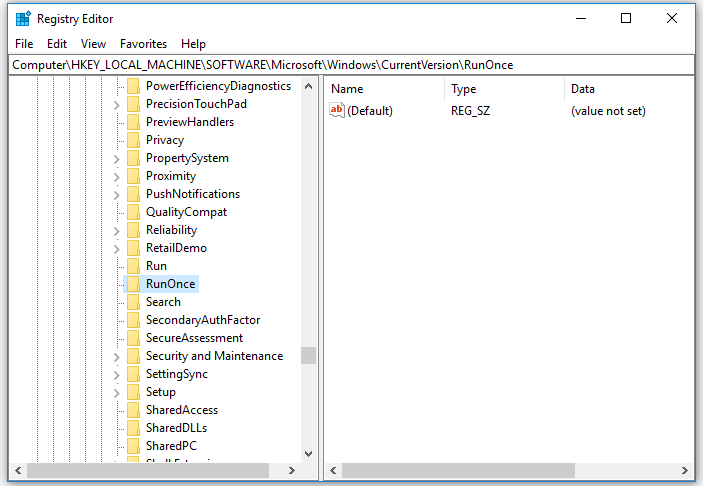
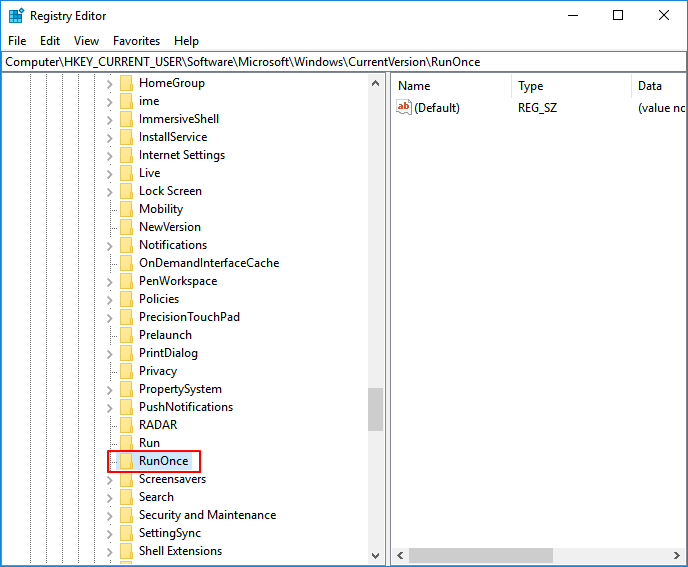
Method 2. Look for Files via Regedit
Step 1. Press «Windows + R» and enter regedit. If there is a prompt asking for permission, click «Yes».
Step 2. Go to HKEY_LOCAL_MACHINE\SOFTWARE\Microsoft\Windows\CurrentVersion and check if there is «RunOnce». If not, add it manually.
Step 3. Go to HKEY_CURRENT_USER\Software\Microsoft\Windows\CurrentVersion and check whether there is «RunOnce». If not, create it manually.
Step 4. Quit Registry Edit, restart your computer, and install hard disk drivers again.
Method 3. Check for RTHDCPL in Registry Key
Step 1. Press «Windows + R» and enter regedit. If there is a prompt asking for permission, click «Yes».
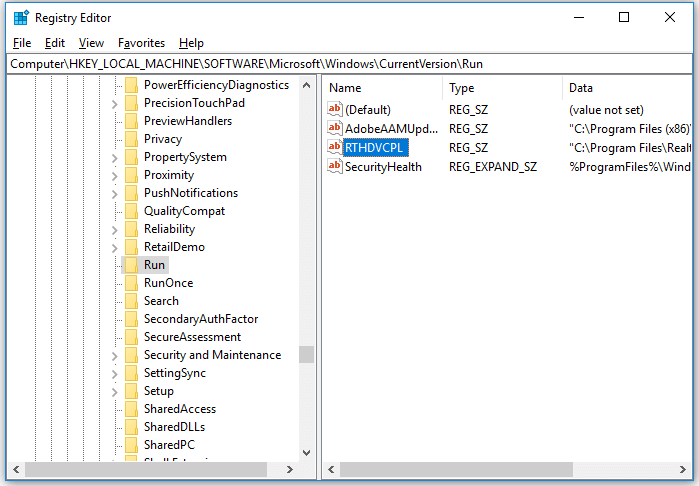
Step 2. Go to HKLM\Software\Microsoft\Windows\CurrentVersion\Run\ and look for RTHDCPL. If it doesn’t exist, check for «Run» property and set the Admin-user permission as «Full Control», press «OK» to continue.
Be careful not to delete content from your registry since it may result in severe issues on your computer.
Situation 3. See the Prompt Saying, «The system cannot find the file specified» While Launching Programs
This one seems to occur frequently among users. Apply one of the three methods below to have a try.
Method 1. Update Your Hard Disk Driver
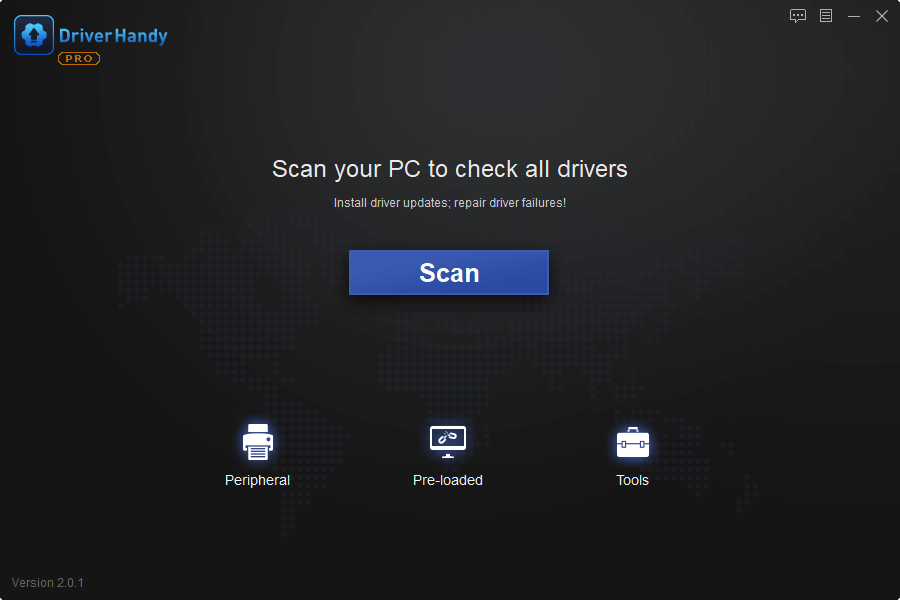
In this method, you will know a utility that is called, EaseUS DriverHandy. This tool can help you update all drives with one click. It can automatically scan all your outdated drives and update these drivers automatically. It can free your hands from the complex updating process. Now, download it to try.
With the help of EaseUS DriverHandy, you can have:
- Better audio and sharper graphics
- Less freezing and crashing
- Smoother browsing and downloading
- Fewer hardware and system issues
Method 2. Reinstall the Program
Step 1. Quit the program.
- Right-click on your taskbar and choose «Task Manager.»
- Under the Processes tab, select the program and choose «End Task.»
Step 2. Reinstall your program
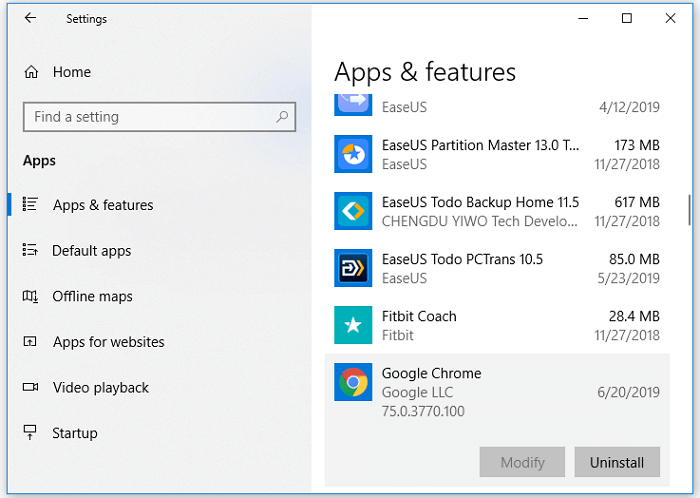
- Go to «Windows Settings» > «Apps» > «Apps & features»
- Click the problematic program and choose «Uninstall.»
- Go to Microsoft Store, download the application, and install it again.
Step 3. Restart your computer.
Method 3. End nginx.exe Process
You may feel unfamiliar with nginx.exe, which is an essential Windows process. The notification of the «The system cannot find the find specified» error may result from the fact that the Windows OS starts or restart the nginx.exe abnormally. To fix it:
Step 1. Right-click on your taskbar and choose «Task Manager».
Step 2. Under the Processes tab, select nginx.exe and choose «End Task.»
Step 3. Download nginx.exe again and restart it.
Situation 4. Receive «The system cannot find the file specified» While Installing Drivers
If you receive the notification while installing a driver on your PC, you can try method 2 or 3 in Situation 2 to eliminate the «The system cannot find the file specified» error.
Situation 5. Get the Error Message «The system cannot find the file specified» While Backing Up System
If your condition fits this situation, you have several options to try. In addition to trying method 3 in Situation 3, you can also try the two tips detailed below.
Method 1. Install Windows updates
If you haven’t updated Windows for a long time, the «The system cannot find the file specified» error signifies that it’s about time to install all pending updates. For this purpose, you have to:
Step 1. Press the «Windows + I» keys and select Update & Security.
Step 2. Click «Check for Updates» and wait.
Step 3. When the list of available updates is revealed, install all of them.
Step 4. Repeat the same procedure several times to ensure that all needed updates have been installed.
Step 5. Don’t forget to restart the system to finish the installation of updates.
If you find files are missing after the Windows update, you can restore the files with the help of the EaseUS data recovery tool. This free tool allows you to recover lost files in Windows 10, 8 or 7, etc., due to the system upgrade, system crash, careless deleting, or virus attacking within three simple steps.
Method 2. Check Services Settings
Step 1. Go to the Start menu and type services.
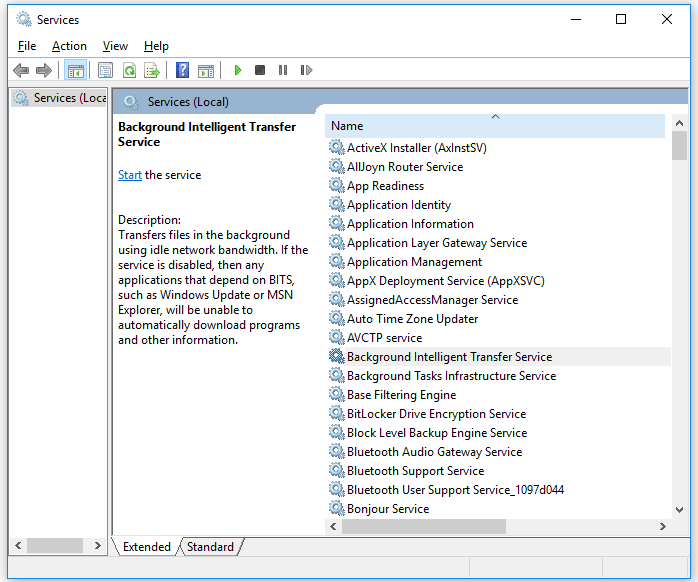
Step 2. Go to «Background Intelligent Transfer Services», right-click it, and set the «Startup type» to «Automatic» or «Automatic (Delayed Start)», then click «Start».
Step 3. Go back to find «Cryptographic Services» and «Windows Update», then set their «Startup type» to «Automatic», too.
Step 4. Don’t forget to click «Start» to initiate the service and click «Apply» > «OK».
The Bottom Line
Since the error message «The system cannot find the file specified» may appear in many situations, it’s almost impossible to include all the solutions in one article. Thus, we have presented you with four commonest situations and the most effective fixes for them. Hope one of the tips above can fix «The system cannot find the file specified» for you successfully.
Windows 7 Enterprise Windows 7 Home Basic Windows 7 Home Premium Windows 7 Professional Windows 7 Starter Windows 7 Ultimate More…Less
Symptoms
After you back up files by using Windows Backup on a Windows 7-based computer, you receive a notification that resembles the following:
Check your backup results
The backup completed but some files were skipped.
When you click the Options button that is next to the notification, you receive the following message:
Check your backup results
The backup completed but some files were skipped.
View skipped files
When you click the View skipped files link, you see one of the following error logs.
Scenario 1:
Backup encountered a problem while backing up file C:\Windows\System32\config\systemprofile\<folder Name>. Error:(The system cannot find the file specified. (0x80070002))
Scenario 2:
Backup encountered a problem while backing up file C:\Users\<User Name>\AppData\LocalLow. Error:(The system cannot find the file specified. (0x80070002))
Backup encountered a problem while backing up file C:\Users\<User Name>\Contacts. Error:(The system cannot find the file specified. (0x80070002))
Backup encountered a problem while backing up file C:\Users\<User Name>\Searches. Error:(The system cannot find the file specified. (0x80070002))
Scenario 3:
Windows Backup will fail with error code 0x80070002, «The system cannot find the file specified.» In this scenario, either of the following issues occurs:
-
The computer stops responding.
-
The copy operation stops.
Cause
Scenario 1 cause
This issue occurs if you back up a library that contains custom folders that are located under your user profile.
Scenario 2 cause
This issue occurs if the following conditions are true:
-
Windows Backup tries to back up files in the LocalLow, Contacts, and Searches folders.
-
These folders are not present on your computer.
Note These folders are created only if certain applications are installed on the computer.
Scenario 3 cause
This issue occurs if the following conditions are true:
-
The computer has an NVIDIA USB Enhanced Host Controller Interface (EHCI) chipset.
-
The computer has at least 4 GB of RAM.
-
You try to copy data from the computer to an external USB storage device.
Notes
-
This issue may also occur when you are using USB devices other than storage devices.
-
This issue may also occur if you perform other input/output (I/O) operations on the USB storage device. In this situation, the I/O operations fail.
Resolution
To resolve this issue, use one of the resolution methods that are listed for your scenario.
Scenario 1 resolution
To resolve this issue, take one of the following actions:
-
Ignore the error message.
Note The custom library files that are stored in your user profile will not be backed up.
-
Move the library folder from the user profile path to a location outside the user profile path. For example, move the folder to the C:\MyLibraries folder.
-
Exclude the library from the list of files that Windows Backup backs up. Then, include the original location of the content in the library in the backup list.
-
Move the library folder to a location other than the user profile folder. Then, add a link to the moved folder from the library. Make sure that the library is included in the backup.
To do this, follow these steps:
-
Click Start, and then click your user name.
-
Right-click the folder that you want to move, and then click Cut.
-
On the navigation pane, expand Computer, locate the place where you want to store the folder, and then paste the folder in that location.
-
Right-click the folder that you moved to the new location, and then click Copy.
-
Click Start, click your user name, right-click any empty area in the folder, and then click Paste shortcut.
Note To store the folder in a location other than a folder in your user profile, you may have to create a new folder. To do this, browse to the root of the drive in Windows Explorer, click New Folder on the Windows Explorer menu, and then edit the folder name. For example, rename the folder «MyLibraries.»
-
Scenario 2 resolution
You can safely ignore this error message.
However, you can also use one of the following methods to eliminate this error message during future backup operations:
-
Create the missing LocalLow, Contacts, and Searches folders that are listed in the error message.
-
Exclude the folders from the files to back up in the Backup settings, and then include those folders in their original location. To exclude the folders in the additional locations and to include those folders in the original location, follow these steps:
-
In Control Panel, open Backup and Restore.
-
In the Backup section, click Change settings.
-
In the Set up backup dialog box, click Next.
-
In the What do you want to back up dialog box, click Let me choose, and then click Next.
-
Expand Data Files, expand <your user name> Libraries, expand Additional Locations, and then click to clear the AppData folder, Contacts, and Searchescheck boxes.
-
Expand Computer, expand the item for your system drive (for example, expand Local Disk (C:)), expand Users, expand <your user name>, and then click to select the AppData, Contacts, and Searchescheck boxes if they exist.
-
Click Next, and then click Save settings and exit.
-
In Backup and Restore, click Back up now to perform a new backup. The backup operation should complete without errors.
-
Scenario 3 resolution
For information about how to resolve this issue, see the following Microsoft Knowledge Base article:
976972 You encounter problems when you move data over USB from a Windows 7 or Windows Server 2008 R2-based computer that has an NVIDIA USB EHCI chipset and at least 4GB of RAM
Need more help?
Want more options?
Explore subscription benefits, browse training courses, learn how to secure your device, and more.
Communities help you ask and answer questions, give feedback, and hear from experts with rich knowledge.
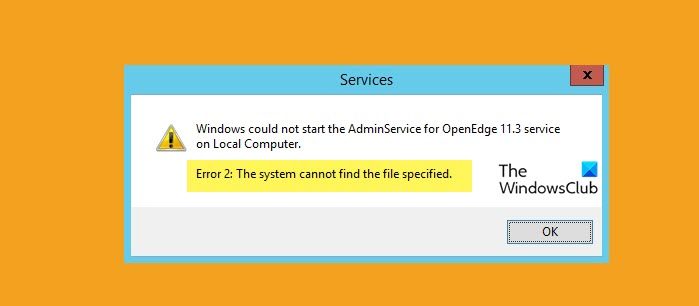
When some users try to start or restart a Service from the ServiceManager, Windows fails to do the same. According to this error, Windows is unable to find the files required to start the process. In this post, we will see what to do when you get Services Error 2, The system cannot find the file specified.
What is System Error 2?
Error 2 occurs when the operating system is unable to locate the service it asked to start, hence, it says “Windows could not start the Service on Local Computer, Error 2, The system cannot find the file specified“. This absence can be a result of various factors such as corrupted system files, disabled dependent service, conflicting drivers, and corrupted profiles. We will resolve this error in this post.
Changing the setting of a particular service is causing the error. There can be many reasons for this error, such as unintentional file deletion, incorrect application uninstallation, or corruption of system files. We are going to delve into the reasons and solutions mentioned below:
- Run SFC and DISM
- Check Service dependencies
- Enable the Service in Safe Mode
- Create a new user profile
- Run System Restore
Let us talk about them in detail.
1] Run SFC and DISM
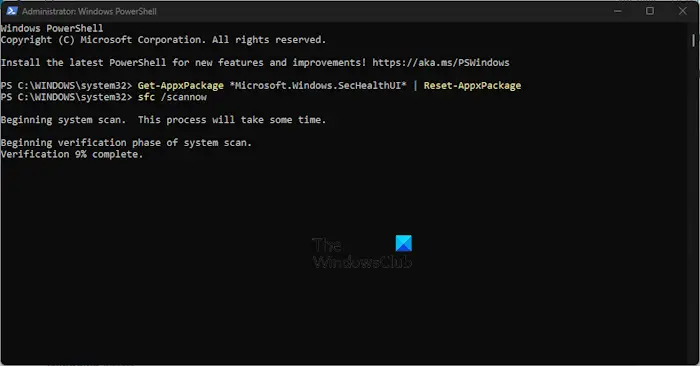
First of all, let us run the System File Checker (SFC)which is a built-in utility of the Windows operating system that helps administrators to scan their system files for corruption or any other changes. We have Deployment Image Servicing and Management (DISM), which is yet another utility to scan and repair system files. Follow the steps given below to run the DISM Tool.
Here’s how to do the same:
- Press the Windows key and type cmd in Windows search.
- Right-click on Command Prompt and select Run as administrator.
- Click Yes and enter the following command in the command prompt.
sfc /scannow
The SFC utility will run for a while and if any wrong thing is found, it replaces them while rebooting.
- Now enter the following command to run the DISM utility.
Dism /Online /Cleanup-Image /CheckHealth
Dism /Online /Cleanup-Image /ScanHealth
Dism /Online /Cleanup-Image /RestoreHealth
Finally, reboot your system and hopefully after rebooting the issue will be resolved.
2] Check Service dependencies
Windows services often depend on other services to function properly, known as Dependencies. If a service on which your present service depends isn’t functioning correctly, you could get an error. If this happened to your service then go and restart all Dependencies Service. Hopefully, after restarting the dependencies service, the issue will be resolved.
- Press Windows + R key to open the run dialog box.
- Type services.msc and hit the enter button.
- Search the service which has an issue and double-click on them.
- Now, click on the Dependencies tab to check the services on which your current service depends.
- Here, verify all dependent services should be running, If not, right-click on each service and select Start.
This post will show you how to find the Dependencies of a Windows Service.
3] Enable the Service in Safe Mode
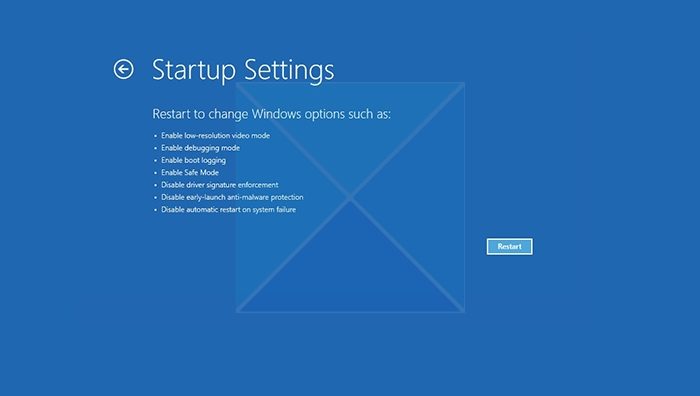
Next up, let us boot your computer in Safe Mode and then enable the service from there. It allows your system to start with only the most basic drivers, features, and services. So, open your computer in Safe Mode and then enable the service that was not opening earlier, now check if the issue is resolved.
4] Create a new user profile
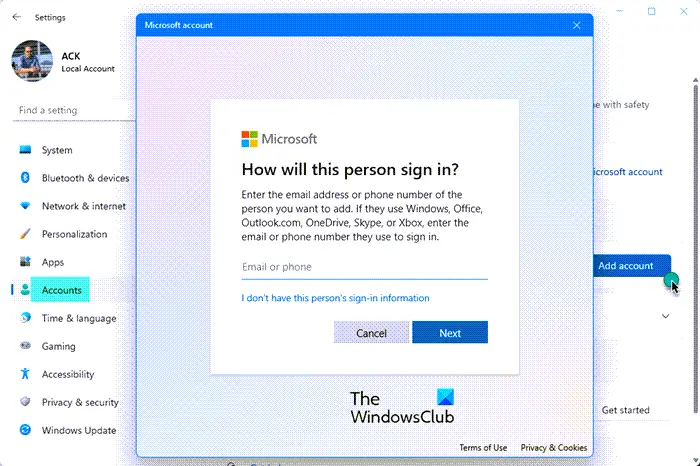
The Service error you are getting could also be due to the corruption of your user profile. If this happened in your case then surely you will get errors and inconsistencies with system functions. In this scenario, we should make a new User Profile and then log in with the newly created user to resolve this issue. Follow the steps given below to do the same.
- Press Windows + I key to open the Setting app.
- On the left side of the screen, click on Accounts option.
- Now click on Other users.
- Here, click on Add account.
- Select I don’t have this person’s sign-in information and then click on Add a user without a Microsoft account.
- Follow the on-screen instructions to create a profile..
Finally, log in with the newly created user and hopefully this issue will be resolved.
5] Run System Restore
System Restore is a Microsoft tool and it will take a snapshot of the system files, windows registry and keep those settings as Restore Points. If system malfunctions or data corruption occurs, System Restore will revert your computer to the previous state. Do keep in mind that this will only work if you have already created a System Restore or if your system automatically takes a Snapshop. Follow the steps given below to run the System Restore.
- Press the Windows key and type Create a Restore point and hit the Enter button.
- Go to the System Protection tab and click on System Restore.
- Now click on the Next button.
- Here, click on the Show more restore points option.
- Select the time before the issue happened and click on the next button.
Finally, after rebooting the computer your issue will be resolved.
Hopefully, you will resolve the issue using the solutions mentioned in this post.
Read: Windows Services will not start.
How do I fix The system cannot find the file specified error?
The system cannot find the file specified error can occurs if System files are missing or corrupted or Required Driver files are missing. To resolve this error, Run System File Checker and Identify and reinstall the driver software.
Read: Windows could not start the Windows Update service on Local Computer
If you are getting “The system cannot find the file specified issue”, then don’t worry because We are going to troubleshoot this issue in 11 ways.

If you are encountering or getting the issue when such as transferring the files to another drive, Installing Software, Creating Backup, Opening and Accessing Files and Folder then don’t worry my friends, because This article fully discussion and troubleshoot the system cannot find the file specified issue. We will request you that read this blog and follow all the steps that can be resolved your issue.
What is the root cause of the system cannot find the file-specified error?
Table of Contents
The main root cause may be an issue “the system cannot find the file specified’ issue are followings-
- The problem in Registry Files.
- Drivers Issue.
- Old Image File Issue.
- Bad Sector in Drive.
- Windows Update Issue.
- Backup Services can be stopped.
- System File missing or corrupted.
Now we are going to solve the issue “the system cannot find the file specified” on Windows 10, Windows 8, and Windows 7.
If you are getting this error “the system cannot find the file specified” on Windows 10. Windows 8, Windows 7, then you should follow the following steps-
1. Check the BAD Sector of HDD using CHKDSK Command
The system cannot find the file specified issue that may be the reason for Bad Sector in the drive so first verify your Hard Drive Bad Sector using the CHKDSK command.
How to Run CHKDSK?
For running CHKDSK follow the following steps-
- Navigate to Start Menu and Search CMD.
- Right-Click on CMD, and Run As Administrator.

3. Type CHKDSK and Hit Enter.

4. Now you can check your Bad sector Of the Hard Drive. If found any BAD sector in Hard drive repair. if not any Bad sector then follows another step.
If the issue persists, continue to the Next Step-
2. Run SFC utility to Repair Corrupted Files
SFC Scan File Checker) the utility is one of the best utilities for repairing Corrupted files and Windows Missing files such as .DLL missing file. SFC file checker was first introduced on Windows 98 Operating System for prevented malicious attacks, and Corruptions, or repaired such as .DLL missing file.
We use the SFC file for prevented external attachments, System File is Repaired, and the file is corrupted.
How to Run SFC Command?
To run the SFC command follow the following steps-
- Navigate to Start Menu, and type CMD.
- Right, Click on CMD, and Run As Administrator.
- Type sfc /scannow (For repair Windows File, Corrected File).
- if you want to only View then type – sfc /verifyonly for no repair.

If the issue persists, continue to the Next Step-
3. Verify Your Disk Partition should be Active
If you are transferring some files from the inActive partition of the Hard Drive that can also create the issue “the system cannot find the file specified”. Your computer Disk Partition should be Active State.
How to set Partition to Active?
To Set the partition to Active follow these easy steps-
- Press (Windows+R) run and type diskmgmt.msc.
- Right Click on Partition, and select Mark Partition as Active.

3. You should Read Caution. if you want then after clicking on Yes.
Note:- Only mark a partition as active if it contains a functioning operating system. If the partition lacks an operating system making it active may cause your computer to stop working. Do you want to continue?

If the issue persists, continue to the Next Step-
4. Format an External Drive or USB drive
Sometimes it happens that you are able to transfer the files to an Internal hard Drive but whenever try to transfer the file on an External Drive or USB getting an error such as “the system cannot find the file specified”.
How to Format Pen Drive using Command Prompt?
To format Pen drive using Command Prompt, you need to follow the following steps-
- Navigate to Start Menu and Search CMD.
- Right, Click on CMD and select Run as Administrator.
3. Type diskpart, and press enter.
4. type listvolume, and press enter.
5. Now you select the external Disk Using select volume press Enter.
6. Now type format fs=ntfs or fat32 quick

If you want to Format this Drive on the NTFS partition then type NTFS. If you want to format Fat32 then used the fat32 command and Exit.
If the issue persists, continue to the Next Step-
5. Restart Windows Backup Services
Windows backup services provide Windows Backup and restore capability. Sometimes backup services also can create the problem of the system cannot find the file specified issue. So you should always back up services on Restart Status.
How to Restart Windows Backup Services?
To restart or start backup services follow these easy steps-
- Navigate to Run by using (Windows+ R).
- type services.msc and press Enter.
- Scroll Down and Right Click on Windows Backup Services and click on Start.

If the issue persists, continue to the Next Step-
6. Open the Libraries Folder
If your library’s folder is on the hidden status that can also create the issue of “the system cannot find the file specified” issue. You should always put your libraries folder on “Show Libraries Status“.
How to show the Hidden Libraries Folder on Windows 10?
For Show Hidden Library Folder on Windows 10 follow these easy steps-
- Open This PC.
- Right -Click on Computer Icon and select Show Libraries.

If the issue persists, continue to the Next Step-
7. Check For Windows Latest Update
Windows Update provides the package of security and bug-related update for both hardware and software. Windows Update can be useful for the fixed system that cannot find the file specified.
For Windows Update follow the following steps-
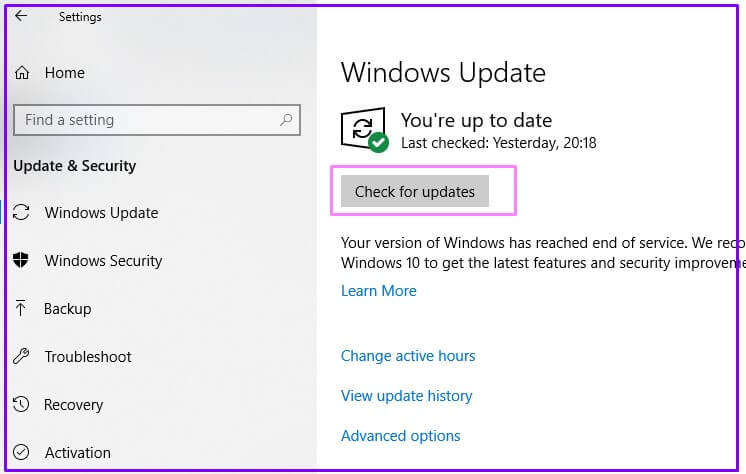
- Click on the Start button and select Settings.
- 2. Click on Update and Security (Windows Settings)
- Click on Check for Updates(Windows Update).
- If any updates then Install Updates between updates It will restart your computer.
If the issue persists, continue to the Next Step-
8. Scan from Antivirus Software
If your computer has installed updated Antivirus then scan the Files or folder from Antivirus if you are using Windows 10 then Scan the File using Microsoft Windows Defender.
If the issue persists, continue to the Next Step-
9. Delete Old Windows Files
If In computer has available old Windows Files. You should remove the Windows Old File because Some times created the problem of the system cannot find the file specified” issue.
10. Delete Profileimagepath Key
If you are transferring an image file and you are getting this error such as then you should delete the profile list image path key.
How to Delete Profileimagepath Key?
To delete Profileimagepath you should follow these easy steps-
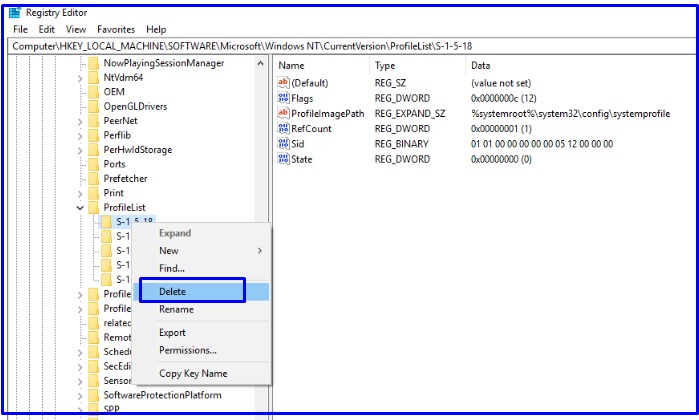
- Navigate to Run, type regedit and press Enter.
- Once Registry Editor opens, then navigate to HKEY_LOCAL_MACHINE\SOFTWARE\Microsoft\Windows NT\CurrentVersion\ProfileList
- If a certain subkey doesn’t have ProfileImagePath value available or if its Data is empty, you need to delete that subkey. To do that, right-click and select Delete.
If the issue persists, continue to the Next Step-
11. Check Permission Of Files and Folder
If you are getting “the system cannot find the file specified” may be the reason for the Permission of the Folder or access to Devices. You should discuss your System Administrator because in some cases Antivirus and Domain have also a policy that you can not transfer any files.
So, This is all about the “the system cannot find the file specified” on Windows Computer.
The Fixes mentioned in this article will help you to solve the issue. All you need to do is follow these solutions one by one until the issue is resolved.
We hope that you like this Article and helpful in fixing your issue. So We will request this article with the users having the same issue.
You can also Join Us on Social Media Pages Like Facebook and Twitter.
Thanks For Reading, Have A Nice Day.
You May Also Read.
- 5 ways to fix Not Detecting Second Monitor in Windows 10
- 9 way to Fix “Ethernet doesn’t have a valid IP configuration” Issue
Position: Resource — Disk Utilities — Fix «The System Cannot Find The File Specified» In Windows 11/10
What Does The «The System Cannot Find the File Specified» Error Mean?
The error message «The system cannot find the file specified» usually indicates that the computer is unable to locate a file or folder that it needs to access or run a program. This error can occur in various situations, such as when trying to open a file, run a program or command, or install software. The error can manifest in various symptoms depending on the underlying cause. Some of the common symptoms:
- Inability to access files or folders: This is the most common symptom of the error, where you may receive the error message when trying to open, move, or copy files or folders.
- Failed software installations: If the error occurs during a software installation, the installation may fail, preventing the program from running correctly.
- Command prompt errors: You may encounter the error message when running a command prompt command that requires a file or directory.
- Windows Update issues: If the error occurs during a Windows update, the update process may fail, and you may not be able to update your system.
- Other errors: The error message may also be accompanied by other error codes or messages, such as «File not found» or «Access denied.»
The error is usually not fatal to your computer, and it is typically a software issue that can be resolved with some troubleshooting steps. However, if the error message is related to a critical system file that is required for your computer to function properly, it could potentially cause system instability or crashes.
It is important to address the error as soon as possible to prevent any further issues or complications. You should attempt to identify the root cause of the error and take appropriate action to resolve it. If you are unsure about how to proceed, it is recommended to follow fixes discussed in this article or seek assistance from a qualified technician or Microsoft support.
Why Does It Say the System Cannot Find the File Specified?
The error message «The system cannot find the file specified» is displayed when a file or folder that the system is looking for cannot be found. This error can occur due to various reasons, for example:
- The file or folder has been deleted, moved, or renamed, and the system is unable to locate it.
- The file or folder is located on a different drive or location, and the system is unable to access it.
- The file or folder is corrupted or damaged.
- There is a problem with the file system or hard drive that is preventing Windows from accessing the file or folder.
- Malware or virus infections that may have corrupted or deleted files.
- The file or folder is being blocked by your antivirus software or Windows Firewall.
- There is an error with the Windows registry that is preventing the system from accessing the file or folder.
- The program or command which is running requires a specific file, but the file is missing or has been corrupted.
There are several ways to fix the «The system cannot find the file specified» error in Windows 11 and Windows 10. Here are some troubleshooting steps you can try:
Method #1: Verify If the File Patch Is Correct
Step 1. Open File Explorer and navigate to the location of the file or folder you are trying to access.
Step 2. Make sure the file or folder is present in the location specified by the path.
If the file or folder is not present, the «The system cannot find the file specified» error message may be due to an incorrect file path or the file being deleted.
Step 3. Right-click the specified file or folder and select «Properties». Then click the location field to ensure that the file path is correct.
If the file path if incorrect, correct it by typing in the correct path or browsing to the correct location.
Step 4. Click «Apply» and then «OK» to save changes.
Method #2: Run a Malware Scan
Here we use Windows built-in tool Windows Security to scan computer and remove any malware and virus. If the malware scan does not find any threats, it’s still a good idea to regularly run scans to keep your computer protected.
Step 1. Type «Windows Security» in the searching box to find and launch Windows Security.
Step 2. Click «Virus & threat protection». Click «Scan options» link under the Quick scan button.
Step 3. Choose the type of scan you want to run. You can perform a «Quick scan», «Full scan» or «Custom scan». Click «Scan now» to start the task.
Step 4. The scan may take some time to finish, depending on the size of the hard disk and the number of files on it. Once the scan is complete, Windows Security will display the results. If any threats are detected, it will quarantine or remove them.
Method #3: Check Hard Drive for Bad Sectors
A corrupted hard disk can also cause the error, and it is necessary to scan the hard drive to verify whether it has bad sectors. Here’s how to check for bad sectors using a popular free tool called DiskGenius:
Step 1. Download DiskGenius from the official website. Install and launch it. Then in the software, you will see a list of drives connected to your computer.
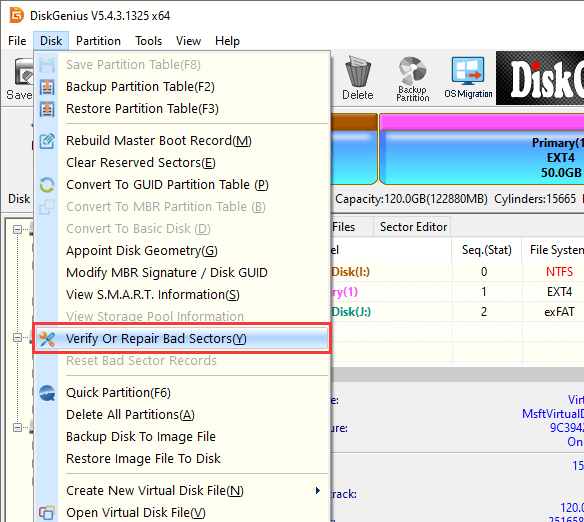
Step 2. Find and select the disk you want to check bad sectors and click «Tools» – «Verify or Repair Bad Sectors».
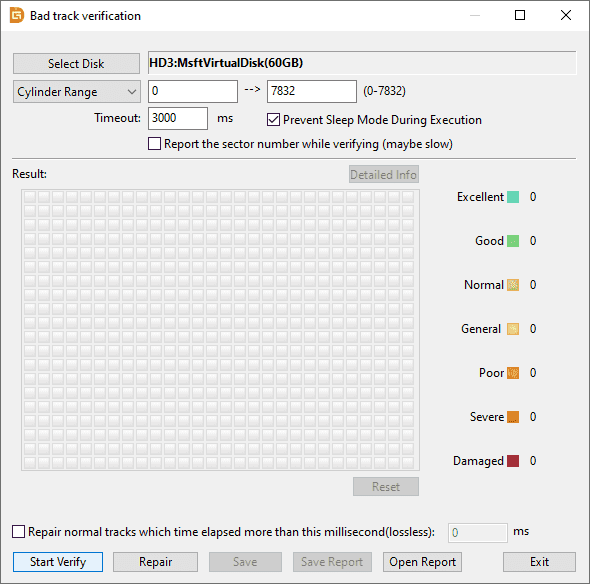
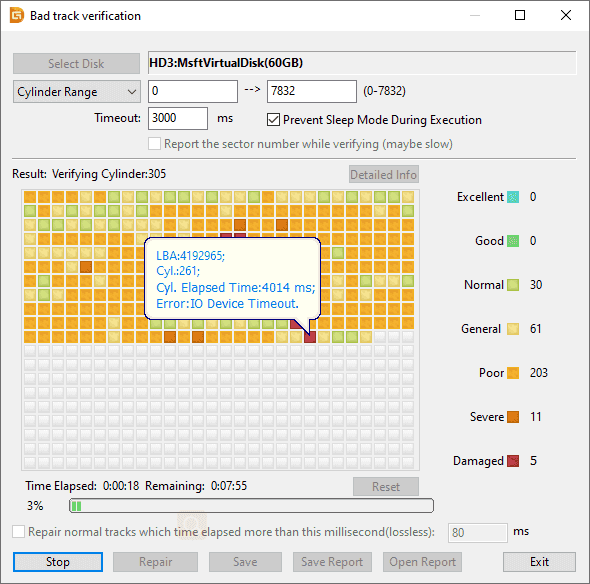
Step 3. Click «Start Verify» button on the following window, and the program will start scanning the hard drive.
Step 4. The scanning may take some time, depending on the size and speed of the disk.
Method #4: Reinstall the Driver or Software
If the error occurs when using a specific software or device, try reinstalling the driver or software to see if it resolves the issue. Here are how to reinstall drivers:
Step 1. Right-click the Start menu to locate and click «Device Manager».
Step 2. In Device Manager, find the device for which you want to reinstall drivers, right-click it and choose «Uninstall».
Step 3. Restart computer once the drive is uninstalled.
Step 4. After computer boots into Windows, drivers will be installed automatically.
Method #5: Check the Windows Registry
The Windows Registry is a critical component of the Windows operating system that contains configuration settings and options for the system and applications. If the Registry is incorrect or corrupted, it can cause issues with the system and applications. Here’s how to check if the Windows Registry is correct:
Step 1. Open Registry Editor. Press Windows key and R to open Run dialog box. Type «regedit» in the Run dialog and press Enter.
Step 2. Navigate to the key that you want to check. You can expand keys and subkeys by clicking the arrow next to them.
Step 3. Right-click on the key and select «Export» to create a backup of the key. This is important in case something goes wrong.
Step 4. Once you have created a backup of the key, you can check if it’s correct by looking at the values and data in the key. Make sure the values are correct and match the expected values.
Tip: You can also check if there are errors or inconsistencies in the Registry by running a Registry cleaner or repair tool. There are many third-party tools available that can scan the Registry for errors and fix them.
Method #6: Perform a System Restore
The error started occurring recently, try restoring your system to a previous state before the issue occurred. Open System Restore and select a restore point to revert your system to.
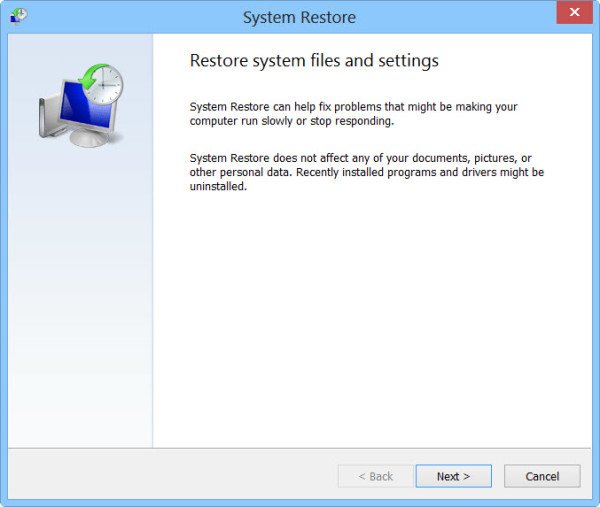
Step 1. Press the Windows key + R on your keyboard to open the Run dialog box. Type «rstrui» in the Run dialog box and press Enter. This will open the System Restore wizard.
Step 2. Click «Next» to proceed to the next step.
Step 3. Select a restore point from the list of available restore points. You can choose a restore point based on the date it was created or the name of the restore point.
Step 4. Click «Next» to proceed to the next step. Review the details of the restore point and make sure it’s the one you want to use.
Step 5. Click «Finish» to start the restore process. The system will be restarted during the restore process. Wait for the system to restart and complete the restore process. This may take some time.
How To Recover Data from Corrupted Drives?
The device that cannot be access might be an internal hard drive or external hard drive, and data recovery should be done as long as lost files are of great importance to you. DiskGenius can recover files lost due to formatting, deleting, RAW drive, lost partition, etc. and the recovery process is easy-to-proceed. Here are steps to regain lost files:
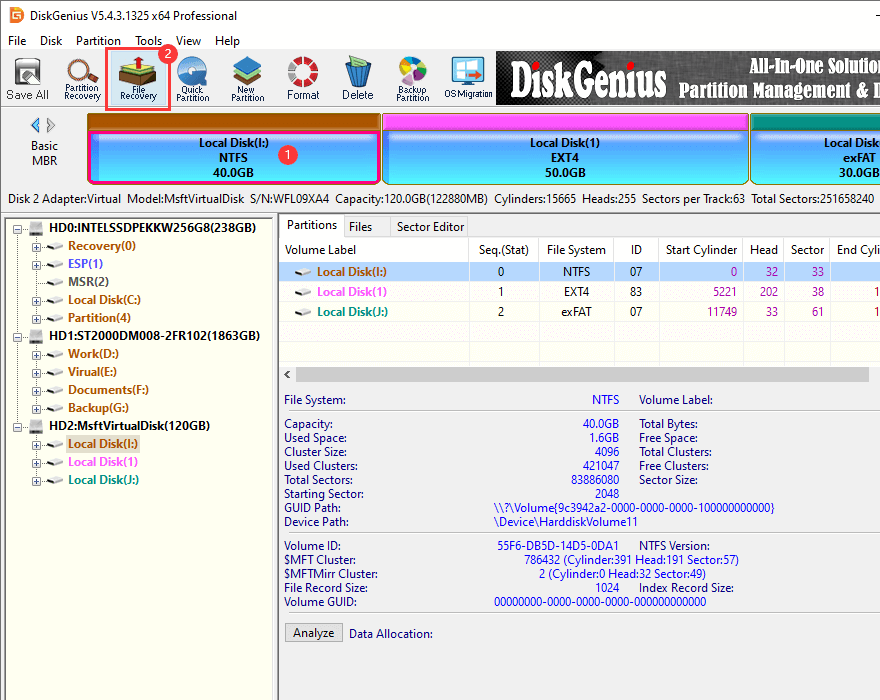
Step 1. Select the partition where lost files were stored and click «File Recovery» button.
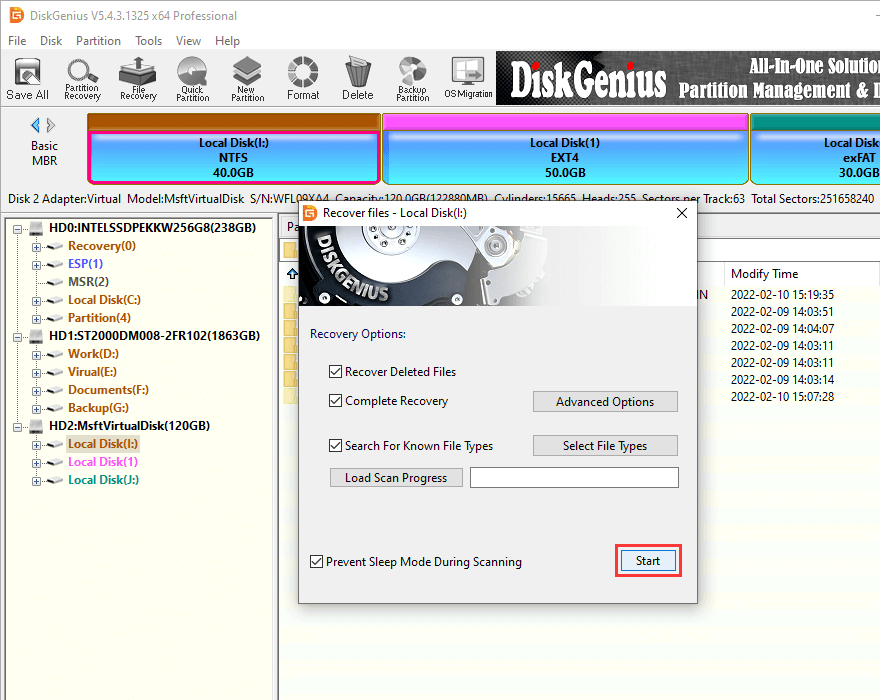
Step 2. A new window will open as the picture below. Click «Start» button to start the file searching process.
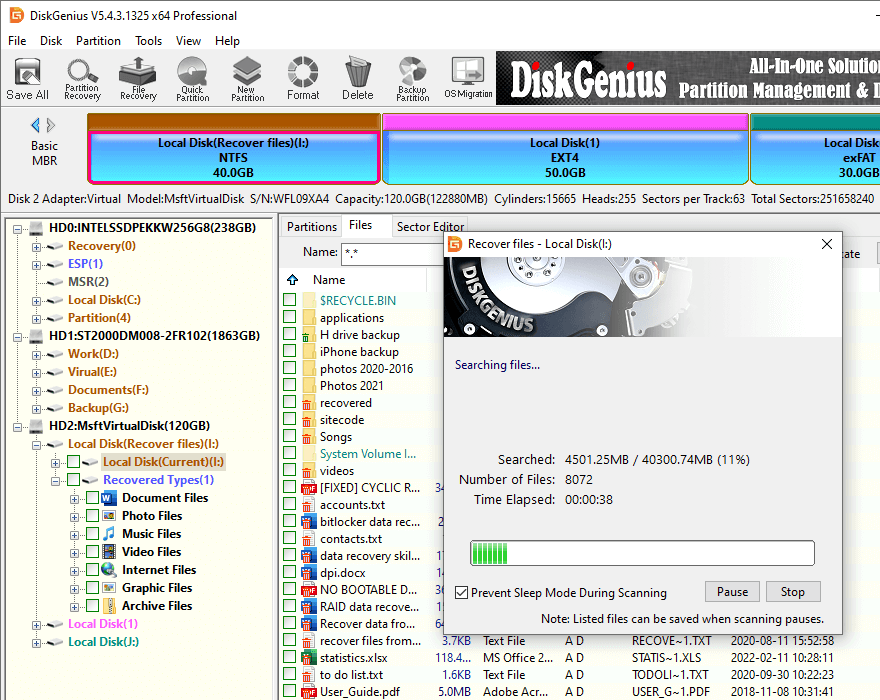
Step 3. Let the scan to complete. Lost files found by the scanning process are displayed in the software.
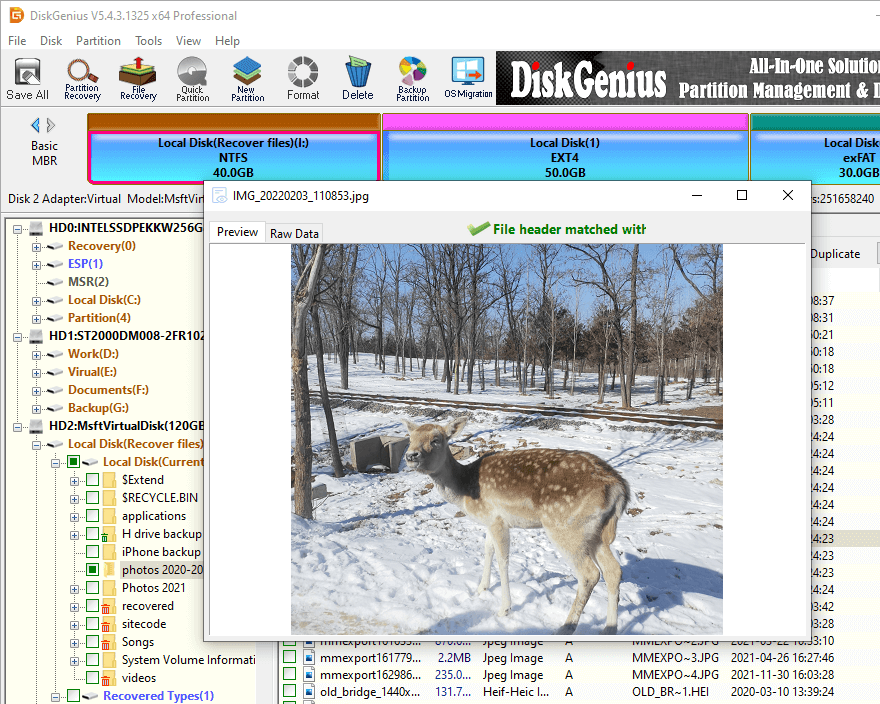
Step 4. Check the result and verify if files are recoverable.
Preview files to make sure whether files you want to recover are correct and recoverable.
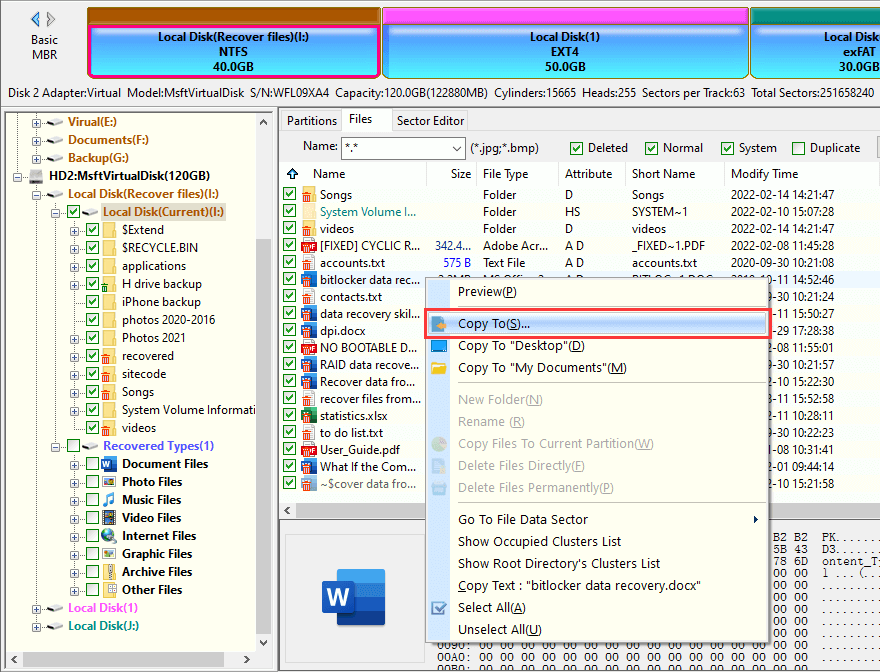
Step 5. Select files you want to recover and copy them to another drive.
Conclusion
These are some of the common troubleshooting steps to fix the «The system cannot find the file specified» error in Windows 11 and Windows 10. If the issue persists, it is recommended to try a system restore or a clean installation of Windows. Moreover, you can also seek assistance from a qualified technician or Microsoft support. No matter which soluton you want to try, be sure to back up or recover data in the first place.
Frequently Asked Questions
1. How to fix the system Cannot find the path specified in Java?
If you encounter the «system cannot find the path specified» error in Java, it usually means that the Java Virtual Machine (JVM) is unable to locate a file or folder that it needs to execute a particular Java program. Here are some methods you can try to fix this error: check for the file or folder path, verify that the file or folder exists, ensure that you have permission to access the file or folder, use absolute paths, set the CLASSPATH variable, and check for spelling mistakes.
2. What to do when Command Prompt says the system Cannot find the path specified?
If you encounter the error message «The system cannot find the path specified» in Command Prompt, it usually means that the system is unable to locate the file or folder that you are trying to access. Here are some steps you can take to fix this error: check if the file path is correct, ensure the file name is typed correctly, launch Command Prompt as administrator, log in computer with the admin account, check if the file is corrupted, check if there are errors inside the operating system.
3. How do you fix error code 0x80070002 the system Cannot find the file specified?
Error code 0x80070002 in Windows 10 typically occurs when the system is unable to find a required file or folder. Here are some troubleshoots to this error: delete the Software Distribution folder, reset Windows Update components, run System File Checker to fix corrupted system files, perform a system restore, etc.
4. What is 0x80070003 path not found?
Error code 0x80070003 on Windows is a common error that usually indicates that a file or folder that is required for a particular task cannot be found. The specific message «Path not found» suggests that the file or folder path that Windows is looking for does not exist or is invalid.
5. How do I fix Windows error 0x80070003?
To fix Windows error 0x80070003, you can try these methods: run Windows update troubleshooter, delete temporary update files, run a full scan for malware and viruses, check and repair corrupted system files, perform a clean boot, etc.
6. What does the system Cannot find the path specified environment variable?
«The system cannot find the path specified» error message usually appears when a user tries to access a file or folder that the system is unable to locate. In the case of environment variables, this error message can occur when a user tries to use an environment variable in a command prompt or batch file, but the system cannot locate the path specified in the environment variable.
Environment variables are variables that hold information about the environment in which a program is running. They are used by the operating system to pass information to applications and to store system settings. Examples of environment variables include %PATH%, which specifies the directories where the operating system looks for executable files, and %TEMP%, which specifies the directory where temporary files are stored.
7. How to fix pc if it says Windows cannot access the specified device path or file?
If you see the error message «Windows cannot access the specified device, path, or file» on your PC, it can be frustrating and prevent you from accessing important files and applications. Here are some steps you can take to fix this error:
- Verify if the file or application path is correct and matches the actual location.
- Ensure you have the necessary permission to access the file or application.
- Disable your antivirus software temporarily and see if the error goes away.
- Use a reputable antivirus software to scan your system for malware.
- Use SFC command to scan your system and repair any corrupted files.
- Perform a clean boot to start Windows with a minimal set of drivers and startup programs.
8. How to fix operating system denied access to the specified file?
If you are seeing the error message «Operating system denied access to the specified file» on your computer, it indicates that the operating system is preventing you from accessing the file. Here are some solutions you can follow to fix this error: run the file as administrator, check file permissions, take ownership of the file, disable file protection, repair or replace corrupted files, and make sure that the file is located in the correct location.
9. How to fix the system cannot execute the specified program?
If you see the error message «The system cannot execute the specified program» on your computer, it means that Windows is unable to launch the program you are trying to open. Here are some fixes you can go through to fix this error: check the file path, get the permission to run the program, check if the program is compatible with your OS, make sure all required libraries and dependencies of the program are not missing, temporarily disable your antivirus software, and reinstall the specified program.
10. What is error 2 the system Cannot find?
Error 2 — «The system cannot find the file specified» is a common error message in Windows, which typically occurs when a file or folder that the system is looking for cannot be found. This error can occur for various reasons, including: the file or folder has been deleted, the path is located on an external drive which is not connected, the file system or hard disk contains errors, etc.
Further Reading
- How to Fix Error Code 0x80070002 in Windows 11/10/8/7?
- How to Fix Error Code 0x80004005 in Windows 11/10/8/7?
- How to fix error code 0x80070057 in Windows 11/10/8/7? (4 Fixes)
- Fixed: Windows Cannot Access the Specified Device, Path, or File

