Symptoms
When you are installing Windows XP, you may receive the following Stop error:
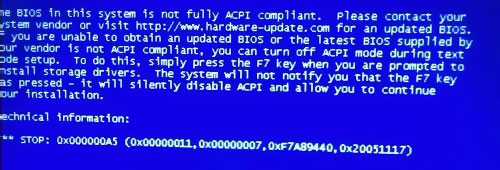
STOP: 0x000000A5 (Parameter1, Parameter2, Parameter3, Parameter4)
The ACPI Bios in this system is not fully compliant to the specification. Please read the Readme.txt for possible workarounds, or contact your system vendor for an updated bios.
The bios in this system is not fully ACPI compliant. Please contact your system vendor for an updated bios. If you are unable to obtain an updated bios or the latest bios supplied by your vendor is not ACPI compliant, you can turn off ACPI mode during text mode setup. To do this, simply press the F7 key when you are prompted to install storage drivers. The system will not notify you that the F7 key was pressed—it will silently disable ACPI and allow you to continue your installation.»
The parameters Parameter1, Parameter2, Parameter3, and Parameter4 vary from computer to computer.
Cause
This behavior can occur if Windows has detected that the BIOS in the computer is not fully compliant with Advanced Configuration and Power Interface (ACPI).
Resolution
To resolve this behavior, contact the manufacturer of your computer to obtain a BIOS that is fully ACPI compliant.
To work around this behavior, manually install the Standard PC hardware abstraction layer (HAL):
-
Restart the computer to restart Setup.
-
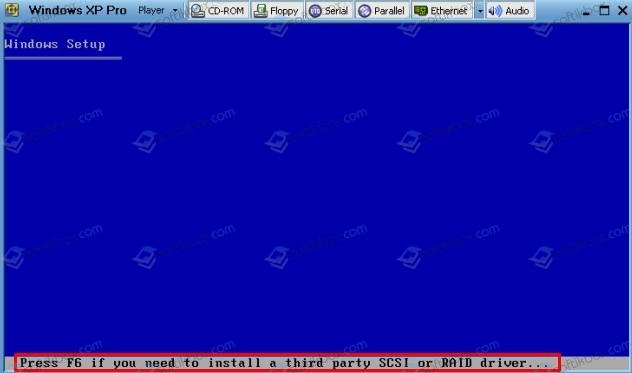
When Setup starts again, press F7 (not F6) when you see the «Press F6 if you need to install a third-party SCSI or RAID driver» screen.
Windows automatically disables the installation of the ACPI HAL and installs the Standard PC HAL.
More Information
The following information can help you debug a Stop 0x000000A5 error.
-
The cause of the Stop message is always errors in the ACPI BIOS. There is nothing that you can fix at the level of the operating system.
-
This Stop message can occur at other times. For example, you could receive this Stop error after you install Windows XP and later make a hardware change, such as adding a device. A computer that works properly with Microsoft Windows 98 may not work with Windows XP. Windows 98 does not necessarily use all of the ACPI functions that Windows XP uses. Windows 98 may allow workarounds that Windows XP cannot use because of its more stringent requirements for system stability).
The following information lists possible causes of the Stop 0x000000A5 error. To identify the cause of this Stop error, note Parameter1 and compare it to the numbers listed in the following paragraphs, to get a general idea of the problem.
The other parameters (arguments) are not discussed in this article. You can view these other arguments only by connecting the system to a kernel debugger. This article provides a description of the issues that this Stop error can involve, without requiring more advanced debugging. For more information, refer to Acpidbg.h.
(0x00000001, Parameter2, Parameter3, Parameter4):
This argument is defined as an ACPI root resources failure. More specifically, ACPI could not find the system control interrupt (SCI) vector in any of the resources that ACPI received at startup. SCI is a special interrupt type that provides a more efficient way to deal with problems that are normally handled by system management interrupts (SMI). If SCIs cannot be initialized, ACPI cannot function. This can occur if no entry for this IRQ is found in the list or if no IRQ resource list was found at all.
(0x00000002, Parameter2, Parameter3, Parameter4):
This error is defined as ACPI root PCI resource failure. To discover what current resources are being used by PCI devices, ACPI must be able to query the CRS descriptor in the ACPI namespace. This error occurs if the BIOS lacks a pointer to the list, or if the list is empty, or if the list contains errors or conflicts.
(0x00000003, Parameter2, Parameter3, Parameter4):
This error is defined as «ACPI failed must succeed method.» This error occurs if ACPI cannot build a control method to reference the ACPI namespace. Other arguments for this error reference the ACPI object that was being run and the name of the control method. One greatly simplified explanation (which might not be completely accurate) is that the system cannot find a way to get to the ACPI tables that define the Plug and Play and Power Management capabilities of the system.
(0x00000004, Parameter2, Parameter3, Parameter4):
This error occurs because the system received some data type other than the expected integer as a package element when defining a _PRW method in the ACPI namespace. _PRW is only defined for systems that have the ability to wake the system from Sleep mode. Among other things, _PRW defines the lowest power system state that the system can enter and be able to wake up.
(0x00000005, Parameter2, Parameter3, Parameter4):
The _PRW referenced must contain at least two elements. When queried, the _PRW indicated that it was incomplete.
(0x00000006, Parameter2, Parameter3, Parameter4):
A power resource is named, but there is no information available in the namespace for this resource.
(0x00000007, Parameter2, Parameter3, Parameter4):
When the system referenced a method in the ACPI namespace, the system expected a data type of BUFFER but received some other data type.
(0x00000008, Parameter2, Parameter3, Parameter4):
The system expected a data type of INTEGER but received some other data type.
(0x00000009, Parameter2, Parameter3, Parameter4):
The system expected a data type of PACKAGE but received some other data type.
(0x0000000A, Parameter2, Parameter3, Parameter4):
The system expected a data type of STRING but received some other data type.
(0x0000000B, Parameter2, Parameter3, Parameter4):
An _EJD string referenced a nonexistent object. The _EJD object defines objects that are dependent on a specific ejection device. For example, if you have an add-in adapter in a docking station and you attempt to eject the laptop computer, ACPI references this namespace to determine whether the dependent adapter in the docking station supports the ejection. This error occurs because there is no object to define the name referenced in the _EJD string.
(0x0000000C, Parameter2, Parameter3, Parameter4):
The namespace defines support for docking but lacks enough information to implement it. This can be because it is not properly defined or because there are duplicate services defined.
(0x0000000D, Parameter2, Parameter3, Parameter4):
There are many objects that must be defined in the ACPI namespace, and one or more of these was not found. This error generally occurs if either the _HID or _ADR object is missing. An _ADR is used to define the address of a device on its parent bus. The _ADR is a static address that defines slot numbers for devices that reside on any number of bus types, including EISA, floppy, IDE controller, IDE channel, PCI, PCMCIA, and CardBus. The _HID contains objects that supply the operating system with Plug and Play hardware ID for a device. Technically, these objects are optional, but they absolutely must be present to describe any device that is enumerated by an ACPI driver.
(0x0000000E, Parameter2, Parameter3, Parameter4):
This error occurs because the system could not find a required method or object in the namespace for a power resource. These are anything other than a «device.» If the BIOS does not supply either an ON, OFF, or STA for a power resource, the system stops with this error.
(0x0000000F, Parameter2, Parameter3, Parameter4):
This occurs when a Plug and Play resource descriptor is smaller than its defined size, indicating that the descriptor is either incomplete or corrupted. Resource descriptors describe the system resources that the computer is using, can use, or wants to use. Each descriptor entry has a predefined size, which must match the data returned.
(0x000000010, Parameter2, Parameter3, Parameter4):
When a system transitions from one power state to another, the system compares the states that are supported system-wide to those supported by the individual devices in the system. This error occurs if Power Resource maps to a nonexistent system-wide resource. You can use a kernel debugger to view the specifics of this error, including the system power state that is causing the problem.
(0x000000011, Parameter2, Parameter3, Parameter4):
The system cannot enter ACPI mode. There are many reasons for this, including:
-
The system cannot initialize the AML interpreter.
-
The system cannot find the Root System Description table.
-
The system cannot allocate a critical driver.
-
The system cannot load the Root System Description table.
-
The system cannot load device descriptor blocks.
-
The system cannot connect an interrupt vector.
-
The SCI_EN (system control interrupt enable request) cannot be set (see 0x00000001).
-
The ACPI Table checksum is incorrect.
ACPI is a hierarchical arrangement of tables, each one building upon the next to define the complete capabilities of the system and of every device in the system. ACPI starts by looking for the Root System Description table, which points to the next table, which points to the next table, and so on. Usually, the 0x000000011 error occurs because these tables are damaged or missing.
(0x000000012, Parameter2, Parameter3, Parameter4):
ACPI is expecting a Power Resource Object that it cannot find. You can view the error through a kernel debugger to see what the exact object is.
(0x00002001, Parameter2, Parameter3, Parameter4):
ACPI tried to evaluate the control method for a specific type of Programmable Interrupt Controller and did not succeed.
(0x00010001, Parameter2, Parameter3, Parameter4):
ACPI tried to perform interrupt routing and did not succeed. This error is usually due to a damaged interrupt routing table.
(0x00010002, Parameter2, Parameter3, Parameter4):
ACPI could not find a link node that is referenced in the interrupt routing table.
(0x00010003, Parameter2, Parameter3, Parameter4):
A device is present in the system, but there is no entry for the device in the IRQ routing table.
(0x00010005, Parameter2, Parameter3, Parameter4):
This error relates to the rules about how a PCI routing table is written. To prevent ambiguity, the device number must be specified in the table but the function number must not. To this end, the function field must be set to all F’s. This error occurs when a function number is not all F’s.
(0x00010006, Parameter2, Parameter3, Parameter4):
ACPI must able to disabling a link node to reprogram it. This error occurs if ACPI cannot disable a link node.
 Ошибка с кодом 0x000000A5, появляющаяся на синем экране смерти в Windows 7 имеет несколько иные причины, чем она же при установке Windows XP. В этой инструкции мы рассмотрим, как избавиться от этой ошибки и в том и в другом случае.
Сначала поговорим о том, что делать если при работе в Windows 7, при включении компьютера или после выхода из режима гибернации (сна) вы видите синий экран смерти и сообщение с кодом 0X000000A5.
Как исправить ошибку STOP 0X000000A5 в Windows 7
В большинстве случаев, причина появления данного кода ошибки в операционной системе Windows 7 — те или иные проблемы с оперативной памятью. В зависимости от того, в какие именно моменты появляется эта ошибка, ваши действия могут быть различными.

Если ошибка появляется при включении компьютера
При появлении ошибки с кодом 0X000000A5 сразу после включения компьютера или во время загрузки ОС, попробуйте проделать следующее:
- Выключите компьютер, снимите боковую крышку с системного блока
- Вытащите платы оперативной памяти из слотов
- Продуйте слоты, убедитесь, что в них нет пыли
- Почистите контакты на планках памяти. Хороший для этого инструмент — обычный ластик.
Установите планки памяти на место.
Если это не помогло и при условии, что у вас в компьютере установлено несколько модулей памяти, попробуйте оставить один из них и включить компьютер. Если с ним ошибка сохранилась — поставить второй на его место, а первый вынуть. Таким нехитрым способом, методом проб и ошибок, можно выявить сбойный модуль RAM или же проблемный слот для памяти на материнской плате компьютера.
Обновление 2016: один из читателей (Дмитрий) в комментариях для ноутбуков Lenovo предлагает такой способ исправить ошибку 0X000000A5, который, судя по отзывам, работает: В биосе на вкладке Save поставить настройку Оптимизировано под Windows 7, затем нажать на надпись Загрузить настройки по умолчанию (Load Defaults). Ноутбук Lenovo.
Если ошибка появляется при выходе компьютера из сна или режима гибернации
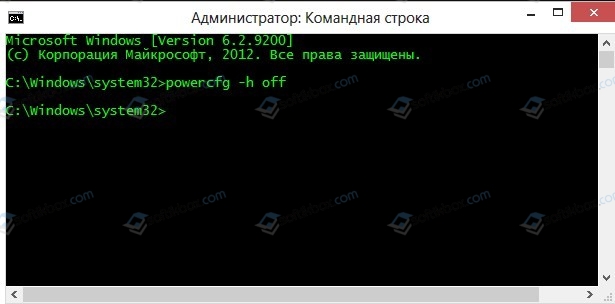
Эту информацию я нашел на сайте Microsoft. Если ошибка 0x000000A5 появляется при выходе компьютера из режима гибернации, то, возможно, Вам следует временно отключить режим гибернации и удалить файл hiberfil.sys в корне системного диска. В случае, если не удается запустить операционную систему, вы можете воспользоваться каким-либо Live CD для удаления данного файла.
Ошибка при установке Windows 7
Пока изучал мануалы Microsoft на эту тему, обнаружил еще один возможный момент появления данного синего экрана — на этапе установки Windows 7. В данном случае, рекомендуют отключить все неиспользуемые накопители и периферию до тех пор, пока установка не будет завершена. Некоторым помогает.
Ошибка 0x000000A5 при установке Windows XP
В случае с Windows XP несколько проще — если при установке Windows XP у вас появляется синий экран с данным кодом ошибки и содержащий тест ACPI BIOS ERROR, начните установку заново и в тот момент, когда в нижней строке увидите текст «Нажмите F6 для установки драйверов SCSI или RAID» (Press F6 if you need to install third-party SCSI or RAID driver), нажмите клавишу F7 (именно F7, это не ошибка).

Многие компании, занимающиеся созданием ПК и лэптопов, адаптируют БИОС под конкретную версию операционки. Поэтому попытки переустановить операционную систему заканчиваются появлением программного сбоя с текстом «The BIOS in this system is not fully ACPI compliant». Как быть пользователю? Сейчас определим, что обозначает ошибка, а также рассмотрим эффективные способы ее устранения.
The BIOS in this system is not fully ACPI compliant
Если переводить код ошибки дословно, то в итоге мы получаем следующее «БИОС системы не совместим с ACPI».Что такое ACPI? Это конфигурация параметров системы электропитания. Настраивается данная система преимущества через BIOS. Однако также операционная система имеет все необходимые службы для выполнения такой работы.
Если упростить, то спецификация ACPI на 100% регулирует процесс потребления лэптопом или компьютером электроэнергии. Это означает, что появление рассматриваемой ошибки является следствием отсутствия питания определенных модулей PC.
Регулирование энергопотребления – далеко не единственная задача, стоящая перед ACPI. Она также используется для работы с PaP. Все процессы выполняются при помощи операционки. Пользователь решает эту проблему одним из двух способов – инсталляция обновлений подсистемы БИОС или настройка значений под конкретную операционку.
Ошибка появилась в процессе установки Windows XP
Программный сбой вполне может появиться в процессе инсталляции этой операционки. Чтобы продолжить установку операционной системы, нажмите на клавишу F7, вследствие чего конфигурация ACPI будет деактивирована автоматически.
Сброс настроек БИОС
Иногда процесс настройки базовых параметров может существенно изменяться. Например, если ПК был выключен в аварийном режиме. Решается проблема очень легко. Пользователю необходимо откатить BIOS к стандартным значениям. Делается это следующим образом:
- Выполните перезагрузку PC, нажав на соответствующую кнопку на корпусе системника. Большая кнопка – включение, а маленькая – перезагрузка.
- Как только появится заставка первоначальной загрузки, нажмите на соответствующую кнопку, чтобы перейти в БИОС. Преимущественно переход в подсистему осуществляется путем нажатия на клавишу Del.
- Нажмите и удерживайте кнопку, пока подсистема БИОС не будет загружена.
- Отыщите раздел «Load Default BIOS». Название вкладки может немного изменяться. Многое зависит от того, какая компания занималась созданием системной платы.
- Откатите значения подсистемы БИОС к стандартным параметрам. Сохраните внесенные изменения, нажав на клавиатуре на кнопку F10.

Сброс настроек биоса
Существует и альтернативный метод отката параметров к значениям по умолчанию. Впрочем, он в большей степени подходит для продвинутых пользователей. Снимите боковую панель системника. На материнке найдите батарейку. Преимущественно она металлического цвета. Достаньте ее и подождите примерно 10 минут. Затем снова вставьте батарейку обратно.
На материнках есть специальные соединительные устройства. Они обозначены аббревиатурой «CLRTC». Соединения предназначены для замыкания двух контактов из трех. Чтобы окончательно завершить процесс сброса настроек, передвиньте батарейку на иные контакты.
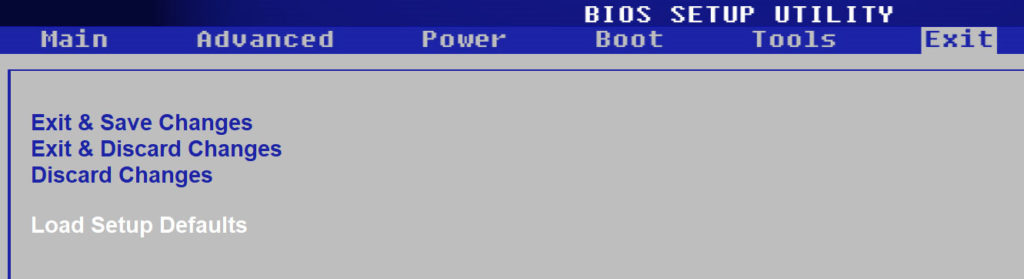
Настраиваем подсистему БИОС самостоятельно
Еще один способ устранения ошибки, возникшей вследствие проблемы совместимости BIOS и конфигурации ACPI – провести ручную настройку. Зайдите в подсистему. Отыщите раздел с приставкой OS.
Когда вкладка будет найдена, откройте ее. Здесь будет представлено несколько версий операционок. Выбирайте ту, которая была предварительно инсталлирована на ПК. Если не один из представленных вариантов не подходит, тогда просто выберите «Other». Чтобы подтвердить внесенные изменения, нажмите на клавиатуре F10.
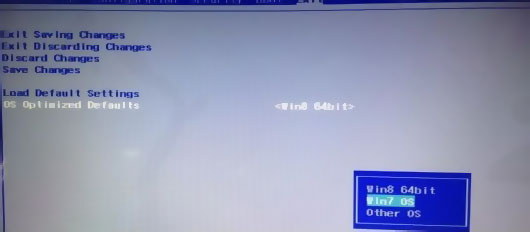
OS Optimized Defaults
Альтернативные способы решения проблемы
В некоторых ситуациях появление ошибки – следствие поломки аппаратных модулей. Вероятнее всего, что перегорела материнка. Чтобы протестировать работоспособность системной платы, используйте специальное программное обеспечение. Например, утилиту AIDA64. Тестирование также можно провести без дополнительного софта:
- Откройте командную строку.
- Пропишите «devmgmt.msc».
- В появившемся перечне выберите вкладку «Системные устройства».
- Кликните ПКМ по своей материнке, а потом зайдите в свойства.
- Здесь отображается актуальная информация о состоянии модуля.
Если здесь также отображается код ошибки, значит, вам нужно заменить материнскую плату.
Заключение
Если при переустановке windows вы столкнулись с такой ошибкой как «The BIOS in this system is not fully ACPI compliant» отключите конфигурацию ACPI, сделайте сброс настроек на значение по умолчанию, или же переключите в настройках BIOS вручную версию операционки которую вы устанавливаете, если такая имеется.
Оценка статьи:
![]() Загрузка…
Загрузка…
23.08.2018
Просмотров: 47832
Ошибка на Windows 0x000000a5 с сообщением ACPI_BIOS_ERROR появляется не только на современной Windows 10, но и на старых Windows XP, Vista, 7 и 8. Возникает она как при загрузке системы, так и при её установке. Указывает STOP 0x000000a5 на то, что BIOS не соответствует ACPI или же система обнаружила новую ОЗУ после выхода из сна. Поэтому способов решения этого синего экрана смерти будет несколько.
Содержание:
- Способы решения ошибки ACPI BIOS ERROR с кодом 0x000000a5
- Способ №1
- Способ №2
- Способ №3
- Способ №4
Способы решения ошибки ACPI BIOS ERROR с кодом 0x000000a5
Ошибка 0x000000a5 при установке или загрузке Windows появляется по следующим причинам:
- Старая прошивка BIOS, которая не соответствует ACPI;
- Установка несовместимых модулей ОЗУ;
- Обнаружение системой дополнительной виртуальной памяти при выходе из сна или режима гибернации;
- При активации Windows 7 и XP часто создается бинарный файл в корне системного диска. Он может быть причиной синего экрана смерти ACPI BIOS ERROR при загрузке системы;
- Повреждение драйвера ACPI.
Для того, чтобы исправить такую ошибку, нужно воспользоваться следующими советами.
Способ №1
Этот метод поможет исправить ошибку ACPI BIOS ERROR на Windows 10 и других более старых версиях операционной системы. Нужно скачать с официального сайта производителя материнской платы новую версию BIOS и обновить прошивку. Ошибка будет исправленной.
Способ №2
Избавиться от синего экрана смерти можно, отключив режим ACPI. Сделать это можно двумя способами.
- До начала установки Windows загружаемся в BIOS.
- Находим параметр, отвечающий за электропитание (Power Managmant. Может быть другое обозначение. Зависит от версии прошивки и материнской платы).
- Отключаем ACPI.
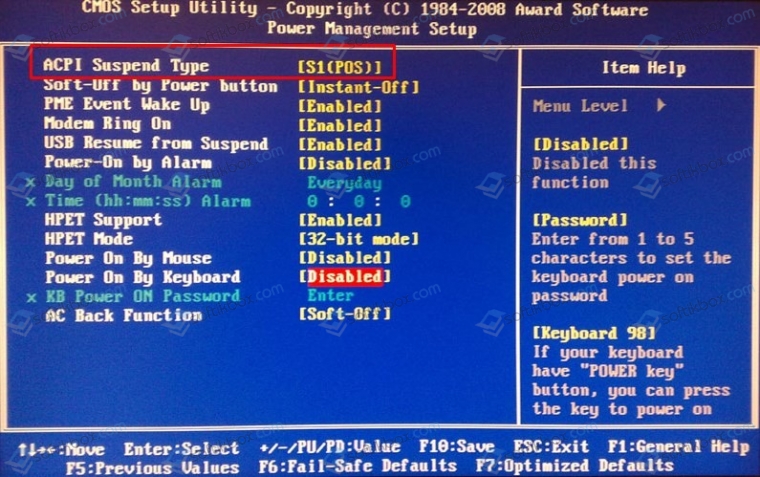
- Нажимаем «F10», чтобы сохранить результат и перезагружаем ПК. Теперь можно устанавливать Windows.
Если ошибка ACPI BIOS ERROR возникает на этапе установки операционной системы, то отключить ACPI можно следующим образом:
- Начинаем установку операционной системы заново;
- Как только на экране появится текст «Нажмите F6 для установки драйверов SCSI или RAID» (в переводе на английский появится такой текст «Press F6 if you need to install third-party SCSI or RAID driver»), то нажать нужно клавишу F7.
- Она отменит установку драйвера ACPI и продолжит дальнейшую инсталляцию Windows.
- Установка Windows продолжиться без BSODа.
Способ №3
Часто BSOD ACPI_BIOS_ERROR появляется по причине неисправной оперативной памяти, а также её разгона. Если вы выполняли последнее действие, то нужно сбросить все настройки к заводским.
Также не помешает проверить модули оперативной памяти на ошибки. Сделать это можно с помощью программы MemTest86. Или же можно по очереди доставать из слотов модули ОЗУ на некоторое время, запустив систему только с одной планкой. В данном случае вы либо услышите пост, либо система запустится корректно. Так можно исключить планку-виновницу.
Способ №4
Если синий экран смерти возник во время включения ноутбука после режима сна, значит, система обнаружила новую виртуальную память, обозначенную файлом Hiberfil.sys. Этот файл нужно удалить. Однако для начала нужно перезагрузить систему, возможно, ошибка исчезнет сама по себе. Если же BSOD не исчез, то нужно выполнить следующее:
- Вставляем установочный диск в дисковод. Нажимаем «R» на этапе «Добро пожаловать» в Setup.
- Выбираем «Командную строку» и прописываем команду «powercfg -h off».
- Или удаляем данный файл вручную, используя встроенный поиск.
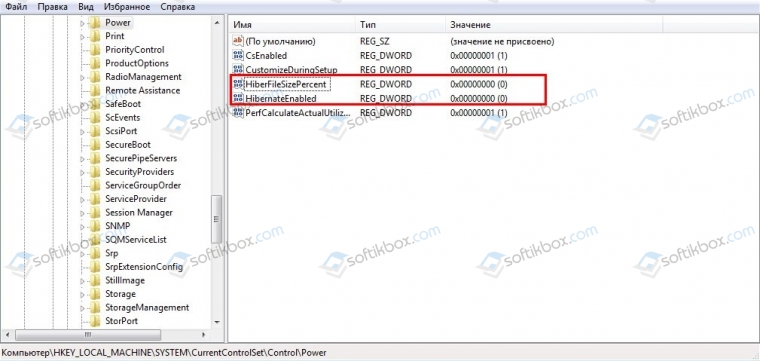
И еще один способ, как удалить hiberfil.sys – это внести изменения в редактор реестра Windows. Для этого выполняем следующее:
- Нажимаем «Win+R» и вводим «regedit».
- Откроется редактор реестра. Переходим по ветке «HKEY_LOCAL_MACHINE\SYSTEM\CurrentControlSet\Control\Power». Здесь выбираем параметры «HiberFileSizePercent» и «HibernateEnabled» и задаем им значения, равные «0».
- После редактирования реестра стоит перезагрузить систему.
Важно отметить, что если ошибка не исчезает, то нужно переустановить BIOS и провести полную диагностику аппаратной части ПК.
Home [SOLVED] Error Message ‘BIOS in this system is not fully ACPI compliant’

I am in big trouble with my new PC. The PC came with Windows 10 Home 64-bit preinstalled, but I want to install Windows 7 on it. The problem is that I am unable to install Windows 7 as I always get that blue screen with this message: Stop 0x000000A5 the BIOS in the system is not fully ACPI compliant. Please contact your system vendor for updated bios.
So, I downloaded and installed BIOS Update for Windows 7 (32-bit & 64-bit), Windows 8.1 (32-bit & 64-bit), Windows 10 (32-bit & 64-bit), and tried updating the BIOS. But still, during the Windows installation after copying pre-Windows files I’m getting that blue screen and the same error message again. Please help, because I bought the PC for work and due to this trivial problem I’m unable to work on the computer!
Add a Comment

Ronald B. Ford
You can follow these steps. I guess the problem would be gone!
- Shut down your Laptop.
- Find the small NOVO button on Left side of your Laptop near the Power cord Point. Press the button. The System loads Boot Options..
- Click on the BIOs Setup Option.
- A Blue screen menu appears. Use arrow keys to navigate to Exit option and select OS optimized Defaults to Windows
7 (The Default is Windows 8 64-Bit) - If you are about to Install a Fresh Copy of Windows 7 Then Goto Configuration Tab and Change USB Mode to USB 2.0 (Default may be USB 3.0)
- Now try installing Windows
In case you are already running Windows 7 and the problem was caused by Updating Your BIOS then reset the BIOS by using the option given in the Status Bar. Once you have done that, exit while saving changes and the problem should be resolved.
Even after following these steps, if you’re facing issues try changing boot mode and boot priority and see. Do let me know if this guide helped.
Add a Comment

Nathan Waters
Tweaking the BIOS Settings might help, but at least in my case the issue was solved by installing a driver. Try downloading and installing the Lenovo Smart Connect Driver. You can get it from Lenovo Support Site.
Though the driver kinda seems like a useless piece of software, it solved the same issue I was facing.
Add a Comment

Nathaniel Boyd
Reset Lenovo BIOS to factory default settings and follow the setp by step directions for the Lenovo recovery image.
Add a Comment

George Johnson
This problem may occur from using disk encryption tools like VeraCrypt. You can try using a FAT32 formatted USB drive with EFI shell on it. This little guide may help you actually. Follow the steps properly or else you may end up wrecking up something else!
- Look for the file
shell-x64.efion the web, download it and place it in\efi\boot\on the USB - Rename
shell-x64.efitobootx64.efi - Plug the USB drive into your powered-off system
- Turn on and press Volume-up until the Novo Menu appears
- Boot from USB into EFI shell
- Change to the EFI system partition on the internal drive
fs0: - Go into boot directory
cd efi\boot(Note that EFI shell has tab completion) - ls or dir lists files in there. Encryption can often create backup of “bootx64.efi” so we need to move or copy it back
cp original_bootx64.vc_backup bootx64.efi
reset
Now see if you are able to install a fresh copy of Windows on your system.
Add a Comment

Terry R. Berkey
Before sending it to Lenovo, I would suggest you to give a try to something else.
- Open Device Manager
- Expand the Batteries category
- Right-click the Microsoft ACPI Compliant Control method battery
listing and select
Uninstall - Select
Action
and click
Scan for hardware changes - Reboot
This method could work, but if that fails, try tweaking BIOS if and only if you know what you’re doing or get technical support from anyone who is well versed with IT and hardware.
Add a Comment


Charles Runyon
Most laptop manufacturers these days intend to provide Windows 10 only and their systems aren’t build for using Windows 7. As far as I know, Lenovo doesn’t provide drivers for Windows 7 or even Windows 8.1 for many of their products. However, you can try changing some settings in BIOS to make it compatible for Windows 7 installation.
- Get into BIOS
- Go to the BOOT tab
- Select Boot Mode and change the value to Legacy Support.
- Go to the Exit Tab
- Select OS Optimized Defaults and change the value to Other OS.
- Now select the Load Defaults Settings and Load Optimal Defaults.
- Save and exit.
I guess making these changes will solve your issue!
Add a Comment

Kenneth Wilkins
You can try to disable ACPI.sys in device manager or uninstall and reinstall the software. See if that helps!
Add a Comment

Micheal Coley
I found a possible solution from Microsoft Support and that process fixed my problem. So, maybe you can also give it a shot?
- Insert the Windows 7 CD and boot from it
- On the first screen choose your language and location and proceed to the next screen and choose Repair computer
- Setup will search for problems and give you two options: Fixing Problems Using Recovery Tools & Restore Your PC.
- Select the first option, but of course, that won’t work unless you already have created a backup image on your system.
- Now you will get a screen where you can see the option of using Command Prompt (Last Entry)
- Run the Command Prompt and type
Bootrec.exe, and then press ENTER - You will find several options to fix the MBR (Master Boot Record) or rebuild it
- I ran them all in the following order
C:\bootrec/fixMbr
C:\bootrec/FixBoot
C:\bootrec/RebuildBcd
C:\Exit
Now restart the system and see!
Add a Comment
