В данной статье показаны действия, с помощью которых можно включить компонент TFTP Client в операционной системе Windows 10, Windows 8.1 и Windows 7
TFTP (Trivial File Transfer Protocol — простой протокол передачи файлов) используется главным образом для первоначальной загрузки по сети операционных систем бездисковых рабочих станций, для обмена файлами с удаленным компьютером, на котором запущена служба TFTP, а так же для загрузки обновлений и конфигураций сетевых устройств (модемов, маршрутизаторов, систем хранения данных и т.п.). TFTP, в отличие от FTP, не содержит возможностей аутентификации (хотя возможна фильтрация по IP-адресу) и основан на транспортном протоколе UDP.
По умолчанию компонент TFTP Client в операционных системах Windows 10, Windows 8.1 и Windows 7 отключён, но при необходимости можно легко включить его используя любой из способов, которые представлены далее в этой инструкции.
Содержание
- Как включить TFTP Client в окне «Компоненты Windows»
- Включение TFTP Client в командной строке
- Всключение через Windows PowerShell
Как включить TFTP Client в окне «Компоненты Windows»
Чтобы включить компонент TFTP Client, нажмите сочетание клавиш ![]() + R, в открывшемся окне Выполнить введите (скопируйте и вставьте) OptionalFeatures и нажмите клавишу Enter↵.
+ R, в открывшемся окне Выполнить введите (скопируйте и вставьте) OptionalFeatures и нажмите клавишу Enter↵.

В открывшемся окне «Компоненты Windows» установите флажок компонента TFTP Client и нажмите OK.

Через непродолжительное время Windows применит требуемые изменения и компонент TFTP Client будет включен.

Включение TFTP Client в командной строке
Вы можете включить или отключить компонент TFTP Client в командной строке используя DISM.
Чтобы включить компонент TFTP Client, запустите командную строку от имени администратора и выполните следующую команду:
Dism /online /Enable-Feature /FeatureName:TFTP

Чтобы отключить компонент TFTP Client, запустите командную строку от имени администратора и выполните следующую команду:
Dism /online /Disable-Feature /FeatureName:TFTP

Всключение через Windows PowerShell
Также включить или отключить компонент TFTP Client можно в консоли PowerShell.
Чтобы включить компонент TFTP Client, откройте консоль Windows PowerShell от имени администратора и выполните следующую команду:
Enable-WindowsOptionalFeature –FeatureName «TFTP» -Online

Чтобы отключить компонент TFTP Client, откройте консоль Windows PowerShell от имени администратора и выполните следующую команду:
Disable-WindowsOptionalFeature –FeatureName «TFTP» -Online

После включения компонента TFTP Client можно использовать утилиту tftp.exe для выполнения необходимых задач.

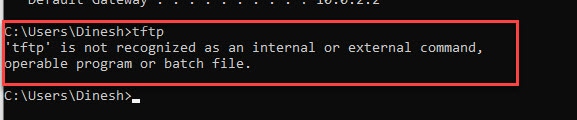
Если компонент TFTP Client отключен, то при вводе команды tftp в консоли командной строки вы увидите сообщение о том что:
«tftp» не является внутренней или внешней
командой, исполняемой программой или пакетным файлом.

Используя рассмотренные выше действия, можно включить или отключить компонент TFTP Client в операционной системе Windows 10, Windows 8.1 и Windows 7
In most cases, we do not need to install TFTP Client on a Windows computer. This is because the TFTP (Trivial File Transfer Protocol) is a very simple file transfer protocol that has less security (or no security). This makes it unsafe for day-to use except for certain special situations.
TFTP is mostly used to move the backup/restore configurations and transfer the OS/boot images to network devices where the internet or USB drive access is not available. For example, upgrading the OS of CISCO or Fortigate devices can be done only via Telnet or SSH (no web access) by using TFTP.
Though we rarely use it on Windows client OS, installing a TFTP client on Windows 10 or Windows 11 will be helpful to test and confirm that the TFTP server is working well and ready to transfer data over the network.
In this guide, we will install/enable the built-in Windows TFTP client and test whether it can send and receive data through this protocol.

Installing a TFTP client on a Windows 11 computer is almost identical to Windows 10. The below screenshots are suitable for all Windows clients and Server Operating Systems.
1) Make sure that you have administrative access to enable the feature.
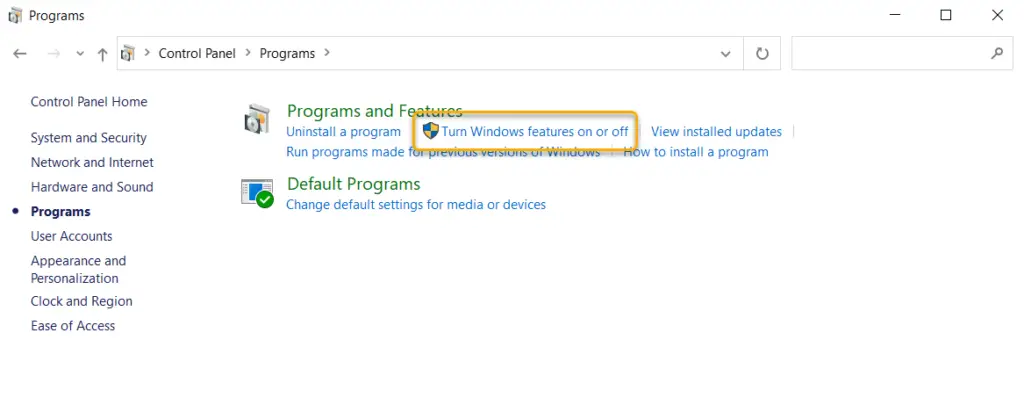
2) Go to the Control panel and click on ‘Programs & Features’.
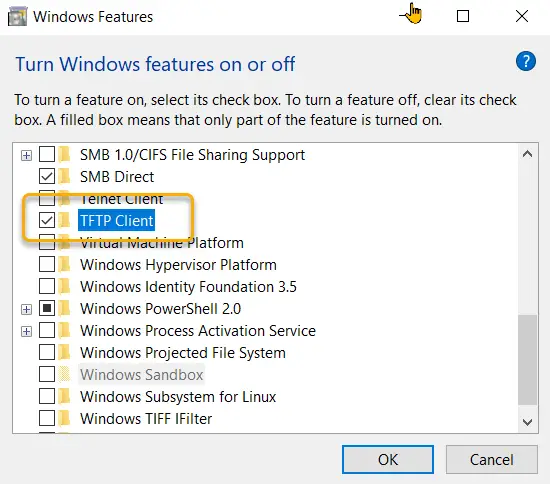
3) Click on ‘Turn Windows features on or off’ then tick the ‘TFTP Client’ as shown below.
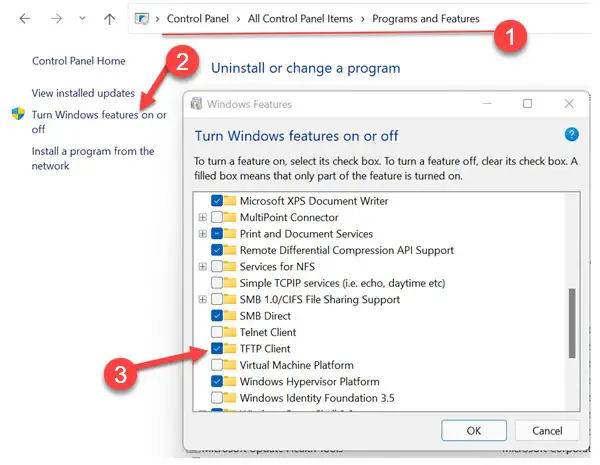
4) Press OK and wait for the installation to complete.
How to Verify that Windows TFTP Client Installed Successfully?
It is like a telnet client, when the feature has not been installed on a computer, the relevant commands will return an unknown command error.
For example, before installing the TFTP client, if you open a command prompt and type ‘tftp’, it will return the below message.
When it is installed, the same command will give the below output.
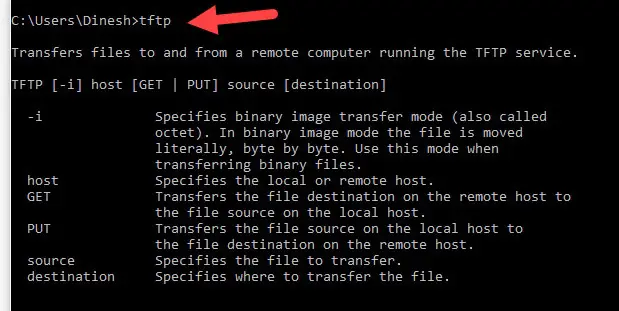
That was a clear indication that the Windows TFTP client is installed on your computer correctly.
How to Check a TFTP Server from Windows 10/11 Client
Let’s assume that the TFTP server setup is done correctly and the network security firewall is accepting incoming and outgoing traffic in the server.
Once we installed the client on Windows PC, we need to allow TFTP traffic in the Windows firewall or third-party firewall/anti-virus solution.
- You can altogether disable the Windows firewall to test it.
- Allow the TFTP program or port number in the firewall.
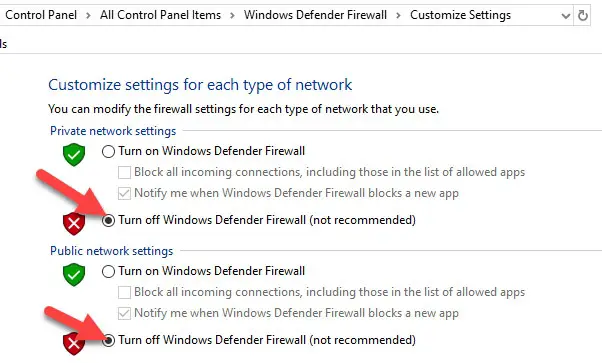
How to Completely switch off the Windows Defender Firewall to allow TFTP
5) Visit the control panel, and enable the ‘Large Icons’ view. This will show the all Control panel icons.
6) Click on ‘Windows Defender Firewall’ and open ‘Turn Windows Defender Firewall on or off.’
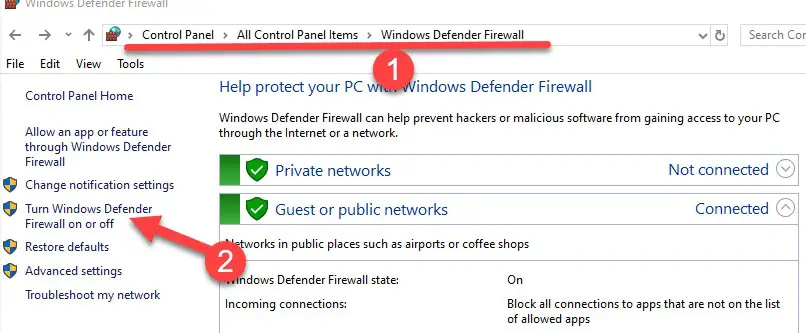
7) Depending on the connectivity type, you can turn off the Windows firewall. If you are not sure about it, then turn off both (Private and Public network settings). This will entirely turn off the network protection. It is highly recommended to put back the settings once the TFTP test is completed.
If you are not convinced about switching off the full Windows firewall, then follow the below step to allow particular TFTP traffic only.
How to Enable only TFTP Traffic in Windows Firewall
It can be done in two ways.
- Allow the TFTP application
- Allow the TFTP protocol.
Enable TFTP Application.
This method depends on which program you are using to connect the TFTP server. In our case, we are using the built-in Windows TFTP client. So, we need to allow the appropriate .exe file through the Windows firewall. If you are using any other third-party tools, you need to call those .exe files as shown below.
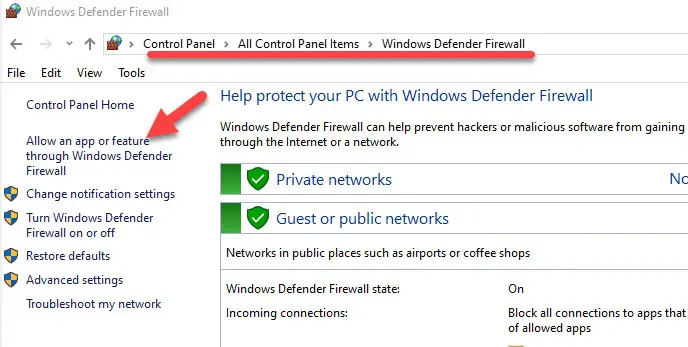
 Go to the same Windows defender firewall settings in Windows 10 or Windows 11. Click on ‘Allow an app or feature….’ Option.
9) Mostly you will not find the TFTP app on this list. Click on the ‘Change Settings’ button at the top right, ‘Allow another app.’
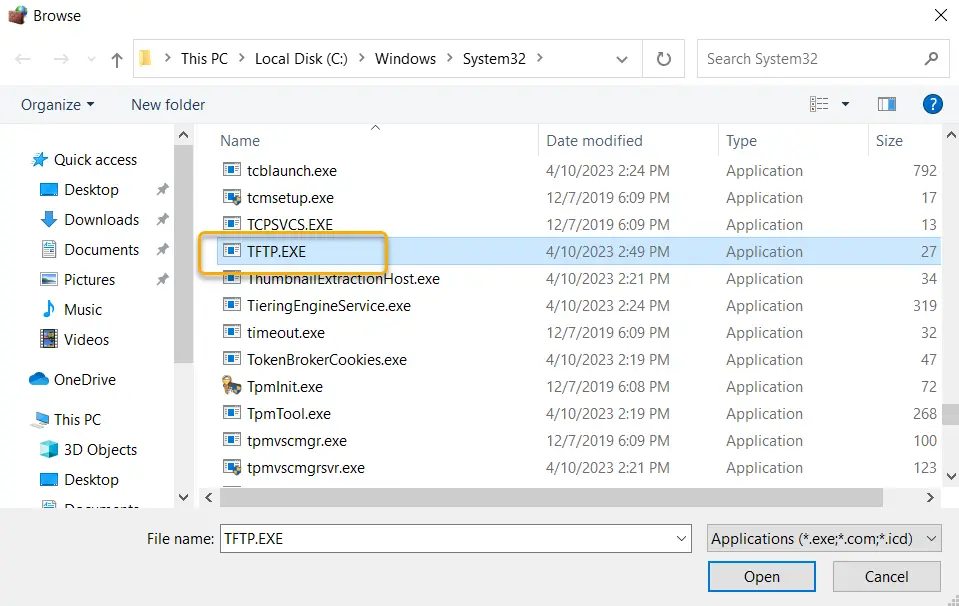
10) Browse the TFTP.exe, which is located under the system32 folder. If you are using any third-party TFTP clients; you need to browse the particular exe file from its location.
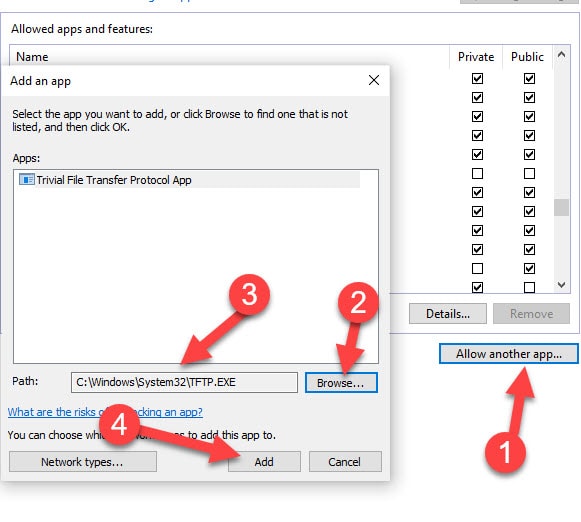
11) Click add to give the exception in the Windows. In this way, the Windows defender firewall will allow incoming and outgoing traffic of the TFTP.exe program without any restriction.
Allow TFTP Protocol in Windows 10/11 Firewall
Let’s assume you use multiple tools and programs which use the TFTP protocol. It is not advisable to follow the earlier step and add each program to the firewall. Instead of that, we can add the common TFTP protocol.
TFTP uses TCP port 69. We will simply enable this port for incoming and outgoing traffic.
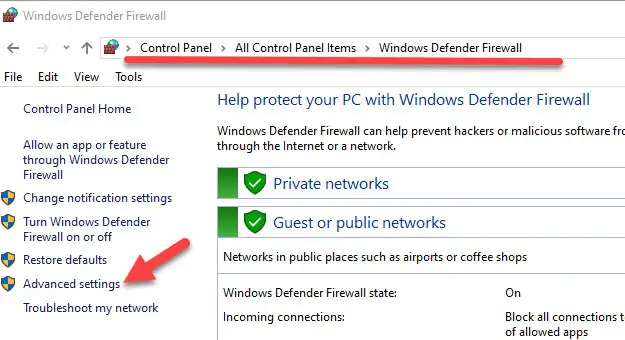
12) In the usual Windows defender firewall settings page, click on ‘Advanced Settings.’
13) In the ‘Inbound Rules’ create a new rule.
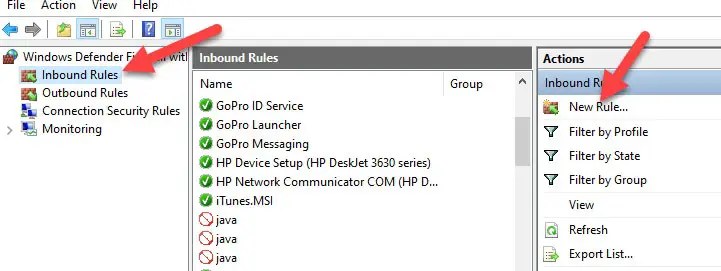
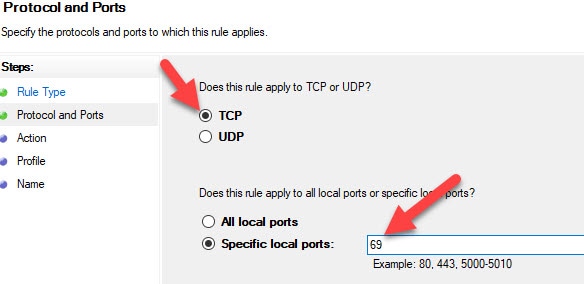
14) Select ‘Port’ and enter 69 as TCP port.
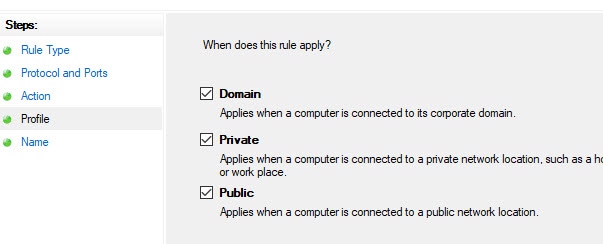
15) Make sure that ‘Allow the connection‘ is selected on the next screen. Also, select all 3 network types.
16) Give a name to the rule and press OK.
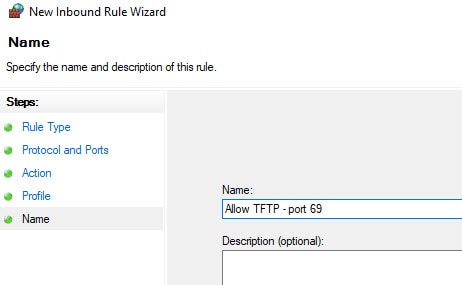
17) Make sure it is enabled and listed in ‘Inbound Rules’.
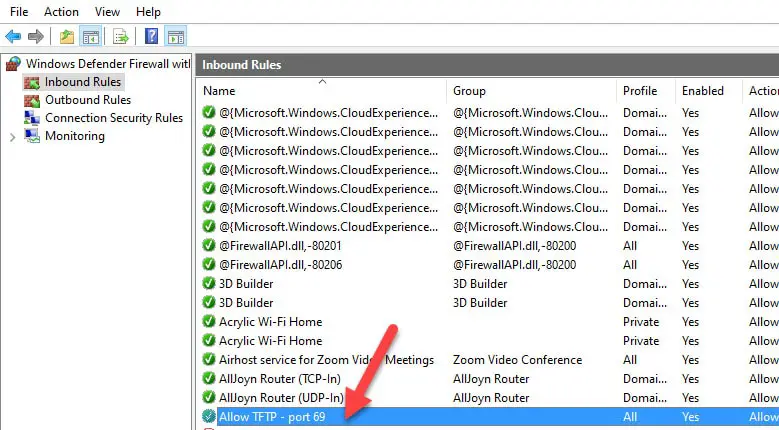
18) Repeat the same steps in ‘Outbound Rules’
With these above steps, your Windows 10/11 PC is ready to use the TFTP client.
Test Windows TFTP Client on Windows 10/11
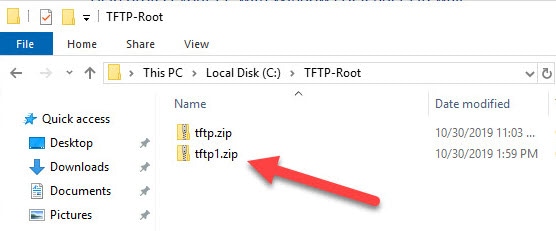
Let’s assume that the TFTP server setup is done and files are available at the correct location. Before you download a file from the TFTP server, you must know the right file name with the extension.
In this example, I’m going to download a file called ‘tftp.zip’ from server 192.168.1.244. We use the GET command to download a file.
Type the below command in the command prompt (you must have a working network communication with the server, the ping command is handy to confirm the connectivity)
Tftp -i [server IP address] GET [file name with the expension]
The below message indicates that the file transfer is successful. The file will be downloaded at the location where you execute the command. In this case, it is C:\Users\Dinesh folder.

To upload a file using the TFTP client, use the following command. We use the PUT command to upload a file.
Tftp -i [server IP address] PUT [path of the file with the expension]
The below command output shows the successful file upload to the server by the Windows TFTP client. The file will be uploaded to the root of the TFTP server. We do not have any option to change the upload location.

As I’m using the Solarwind TFTP server in this example, the above command uploaded the file to this root location.
There you go, we learned how to install the built-in TFTP client on Windows 10/11 and how to ensure it works fine by modifying the firewall settings. Also, we showed the simple steps to upload and download a file using the TFTP client.
Overview
This page describes how to use the TFTP client on Windows OS. The screenshots on this page are for Windows 10, but the same applies to Windows 11.
You can use the TFTP client on Windows 10. You do not need to bother installing a TFTP client application. However, it is not enabled by default. Follow the steps below to enable the TFTP client on Windows 10.
- Open [Windows Features]
- TFTP Client checked and enabled
- Allow TFTP on Windows Firewall
The screenshots of the following steps are for Windows 10; they are almost the same for Windows 11.
Open [Windows Features]
To enable the TFTP client, do so from the [Windows Features] dialog box. To open [Windows Features], click [Control Panel] -> [Programs] -> [Turn Windows Features on or off].
TFTP Client checked and enabled
On [Windows Features] dialog box, check [TFTP Client] and click [OK] to enable the TFTP client. If prompted for a reboot, reboot the system.
Allow TFTP on Windows Firewall
Firewall conditions must be added for TFTP file transfers with an enabled TFTP client. Click on [Control Panel] -> [System and Security] -> [Windows Defender Firewall].
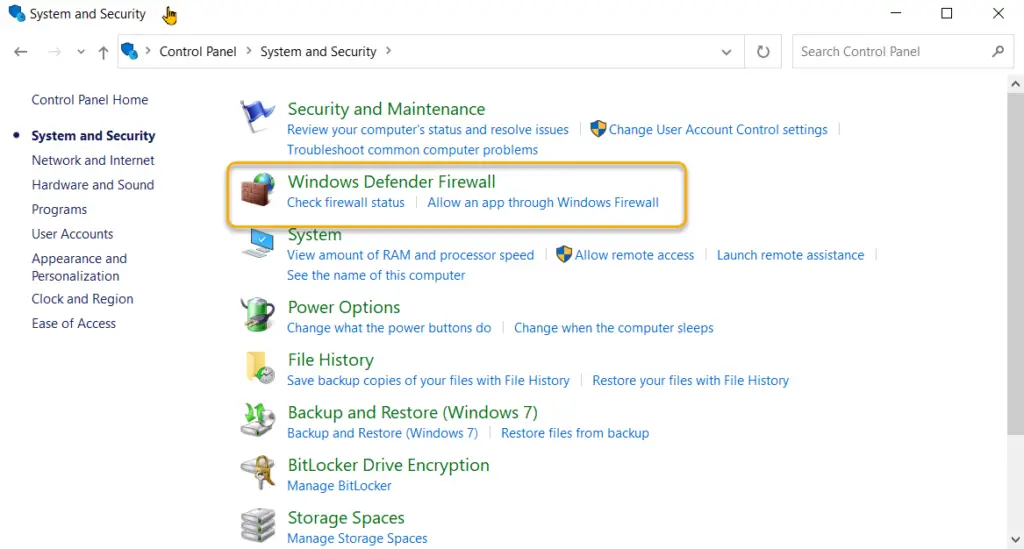
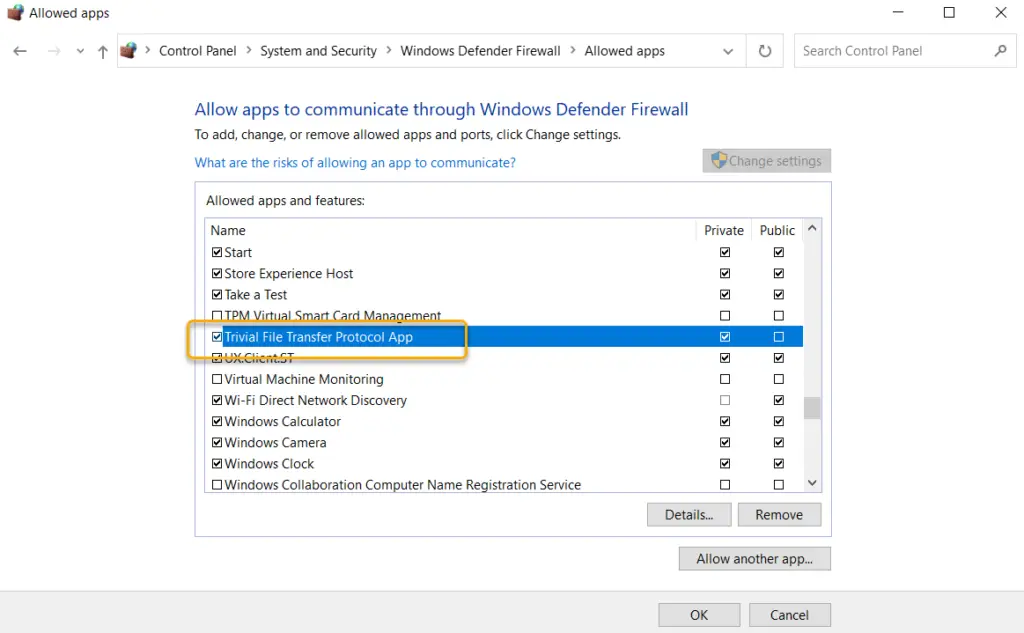
Click [Allow an app or feature through Windows Defender Firewall].
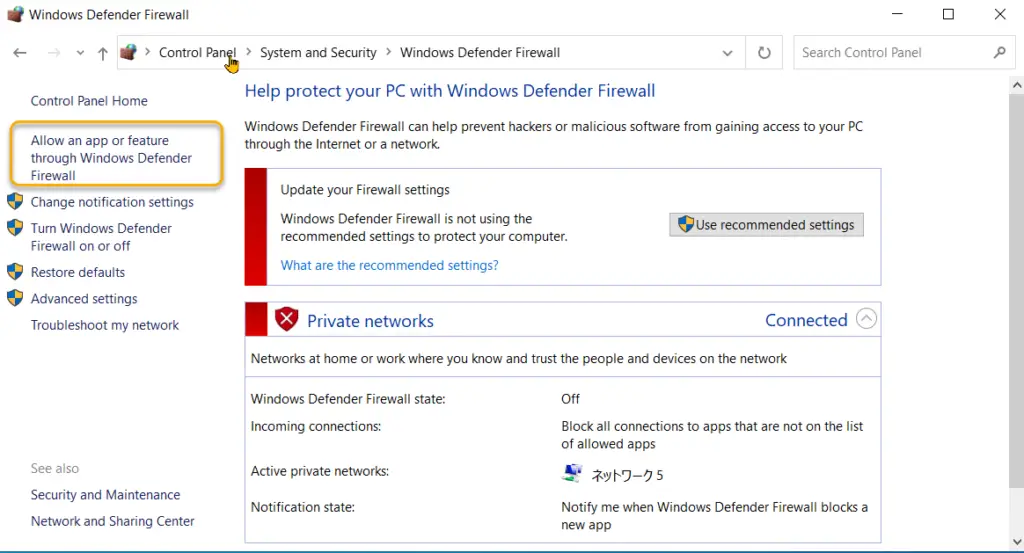
By clicking on [Change settings], [Allow another app] will become active.
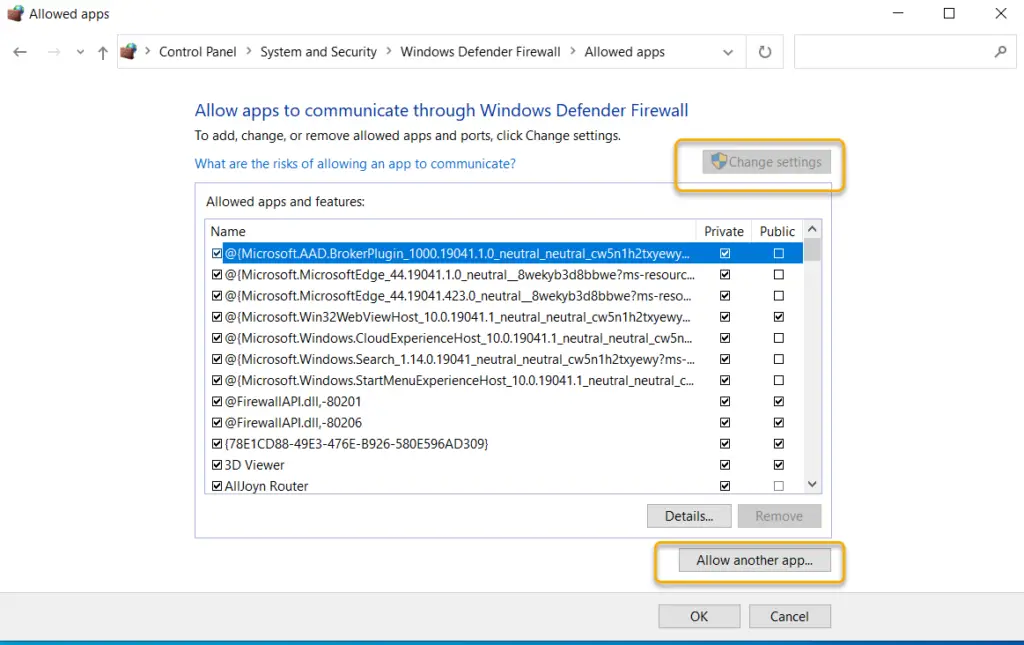
From [Browse], specify the path to TFTP.EXE. TFTP.EXE is located under Windows\System32.

It is OK if [Trivial File Transfer Protocol App] is added to [Allowed apps and features].
If you are using firewall software other than Windows Firewall, please allow TFTP in that firewall software.
Once the TFTP client is enabled, you can transfer files via TFTP using the tftp command on the command prompt. tftp command format can be found in the help. Below is the help for the tftp command.
C:\Users\Gene>tftp

Transfers files to and from a remote computer running the TFTP service.

TFTP [-i] host [GET | PUT] source [destination]

  -i              Specifies binary image transfer mode (also called
                  octet). In binary image mode the file is moved
                  literally, byte by byte. Use this mode when
                  transferring binary files.
  host            Specifies the local or remote host.
  GET             Transfers the file destination on the remote host to
                  the file source on the local host.
  PUT             Transfers the file source on the local host to
                  the file destination on the remote host.
  source          Specifies the file to transfer.
  destination     Specifies where to transfer the file.
For example, to transfer the file “c1841-ipbase-mz.124-12a.bin” with the TFTP server IP address of 192.168.1.111, enter the following command.
C:\Users\gene>tftp -i 192.168.1.111 get c1841-ipbase-mz.124-12a.bin
Transfer successful:  15788240 bytes in 49 second(s)、322208 bytes/s
The downloaded file is stored in the current directory of the command prompt.
Summary
Points
- TFTP clients can be added from [Windows features].
- Once the TFTP client is enabled, the tftp command is available at the command prompt.
Если вы хотите знать, как включить TFTP-клиент в Windows 10, то вы находитесь в нужном месте. TFTP-клиент — это утилита, которая позволяет передавать файлы через TFTP-протокол, который широко используется в сетевой инфраструктуре, особенно в сетях Cisco.
Некоторые пользователи уже знают, что TFTP-клиент по умолчанию не включен в Windows 10, и необходимо вручную его включить. Но если вы новичок в этой области, то мы предоставим вам полное руководство по включению TFTP-клиента в Windows 10.
Данный процесс довольно прост и легок для выполнения, не требуется никаких специализированных знаний. Вам потребуется выполнить несколько простых шагов, которые мы подробно опишем ниже. Готовы начать?
Содержание
- Почему нужно включить TFTP-клиент в Windows 10
- Что такое TFTP-клиент и как он работает
- Как включить TFTP-клиент в Windows 10 вручную
- Шаг 1: Откройте «Панель управления»
- Шаг 2: Выберите «Программы и компоненты»
- Шаг 3: Нажмите «Включение или отключение компонентов Windows»
- Шаг 4: Найдите «TFTP Client» и включите его
- Шаг 5: Сохраните изменения и закройте «Панель управления»
- Как использовать TFTP-клиент в Windows 10
- Ошибки, возникающие при работе с TFTP-клиентом в Windows 10 и их решение
- Ошибка «Сбой при передаче файла»
- Ошибка «Отказ в доступе»
- Ошибка «Невозможно создать новый файл на сервере»
- Вопрос-ответ
- Какой командой можно проверить, установлен ли TFTP-клиент в Windows 10?
- Как установить TFTP-клиент в Windows 10?
- Какие настройки необходимо задать для TFTP-клиента, чтобы выполнить передачу файлов?
- Что делать, если при передаче файла TFTP-клиент выдаёт ошибку «Access violation»?
- Можно ли использовать TFTP-клиент для резервного копирования конфигурационных файлов сетевого оборудования?
Почему нужно включить TFTP-клиент в Windows 10
Для успешной работы сетевых устройств необходимо использование протоколов передачи данных. TFTP (Trivial File Transfer Protocol) — один из таких протоколов, предназначенных для передачи файлов в локальных сетях. Он используется для загрузки и обновления прошивок, настройки сетевых устройств, а также для сброса конфигурации.
В Windows 10 не включен TFTP-клиент по умолчанию, что может привести к сложностям при работе с сетевыми устройствами. Поэтому включение TFTP-клиента в Windows 10 является необходимым условием для полноценной работы с сетевыми устройствами, которые используют данный протокол.
Одним из преимуществ TFTP является его простота в настройке и использовании, что делает его очень популярным в работе сетевых инженеров и администраторов. Это протокол, который позволяет сэкономить время и упростить работу с сетевыми устройствами, особенно при работе с большим количеством устройств.
Что такое TFTP-клиент и как он работает
TFTP-клиент – это специальная программа, которая позволяет пользователям передавать файлы между компьютерами, используя протокол TFTP (Trivial File Transfer Protocol). TFTP-клиент возможно использовать как на Windows, так и на других операционных системах. Он выполняет функцию отправки и получения данных между устройствами в локальной сети.
Как правило, TFTP-клиент используется для передачи файлов на устройства с ограниченной памятью, такими как маршрутизаторы и коммутаторы. Также этот протокол часто используется для обновления программного обеспечения на устройствах без возможности установки стандартной программы для передачи данных, например, FTP.
Протокол TFTP работает по модели клиент-сервер, где сервер предоставляет доступ к файлам, а клиент запрашивает их и передает на определенное устройство. Он имеет минимальную защиту данных и не поддерживает шифрование информации. Вместо этого он предоставляет быструю и надежную передачу файлов, используя UDP-протокол. С помощью TFTP можно передавать файлы любого размера, но он обычно используется для передачи небольших файлов, таких как конфигурационные файлы.
Как включить TFTP-клиент в Windows 10 вручную
Если вы хотите использовать протокол TFTP для обмена данными в сети, возможно потребуется включить TFTP-клиент в Windows 10. Следующие инструкции помогут вам сделать это вручную:
Шаг 1: Откройте «Панель управления»
Первым шагом откройте «Панель управления» в операционной системе Windows 10.
Шаг 2: Выберите «Программы и компоненты»
В «Панели управления» найдите раздел «Программы и компоненты» и выберите его.
Шаг 3: Нажмите «Включение или отключение компонентов Windows»
На левой стороне «Программы и компоненты» найдите ссылку «Включение или отключение компонентов Windows» и нажмите на неё.
Шаг 4: Найдите «TFTP Client» и включите его
В открывшемся окне найдите опцию «TFTP Client» и поставьте галочку рядом с ней, чтобы включить этот компонент в Windows 10.
Шаг 5: Сохраните изменения и закройте «Панель управления»
Сохраните изменения нажав на кнопку «ОК» и закройте «Панель управления». Теперь вы сможете использовать TFTP-клиент на компьютере с Windows 10.
Как использовать TFTP-клиент в Windows 10
После того как вы успешно включили TFTP-клиент в Windows 10, вы можете начать использовать его в своих задачах. TFTP-клиент является протоколом передачи файлов, который используется для передачи файлов между устройствами по сети.
Чтобы использовать TFTP-клиент, необходимо указать адрес сервера и имя файла. Вы можете использовать команду Tftp.exe в командной строке или выполнить TFTP-запрос в Windows PowerShell.
Когда вы вводите команду в командной строке, необходимо также указать какой файл вы хотите загрузить или выгрузить, и расположение файла на целевом компьютере.
В Windows PowerShell можно использовать модуль NetworkDeviceTFTP для работы с TFTP-клиентом. Этот модуль позволяет выполнить все необходимые действия, включая загрузку и выгрузку файлов, в наглядном и простом формате.
Если вы знакомы с командной строкой и основными концепциями протокола TFTP, использование этого клиента в Windows 10 не составит для вас труда.
Ошибки, возникающие при работе с TFTP-клиентом в Windows 10 и их решение
Ошибка «Сбой при передаче файла»
Эта ошибка возникает, когда TFTP-клиент в Windows 10 не может передать файл на сервер из-за низкой скорости передачи данных или нестабильного подключения к сети.
Решение: проверьте качество вашего подключения к сети и убедитесь, что скорость передачи данных достаточно высока. Если проблема не устраняется, попробуйте увеличить таймаут передачи пакетов: для этого откройте командную строку и введите следующую команду: «timeout /T 5». Эта команда установит таймаут передачи пакетов на 5 секунд.
Ошибка «Отказ в доступе»
Эта ошибка возникает, когда у пользователя нет прав на доступ к файлам, которые он пытается передать на сервер.
Решение: убедитесь, что у вас есть права на запись в папки, в которых находятся файлы, которые вы пытаетесь передать. Если у вас нет доступа к этим папкам, обратитесь к администратору системы для предоставления вам соответствующих прав.
Ошибка «Невозможно создать новый файл на сервере»
Эта ошибка возникает, когда TFTP-клиент не может создать новый файл на сервере из-за ограничений безопасности ОС Windows 10.
Решение: убедитесь, что у вас есть права на запись в папке, в которой вы пытаетесь создать новый файл. Если у вас нет необходимых прав, обратитесь к администратору системы.
Вопрос-ответ
Какой командой можно проверить, установлен ли TFTP-клиент в Windows 10?
Для этого необходимо открыть командную строку от имени администратора и ввести команду tftp. Если клиент установлен, то появится приглашение TFTP>.
Как установить TFTP-клиент в Windows 10?
Чтобы установить TFTP-клиент в Windows 10, необходимо перейти в раздел «Управление оборудованием и звуком» в «Параметры». Далее выбрать «Программы и компоненты» и нажать «Включение или отключение компонентов Windows». В списке нужно найти «TFTP-клиент» и поставить галочку напротив него. Затем следует нажать «ОК» и дождаться завершения установки.
Какие настройки необходимо задать для TFTP-клиента, чтобы выполнить передачу файлов?
Для передачи файлов с помощью TFTP-клиента нужно указать два параметра: IP-адрес сервера и имя файла. Это можно сделать двумя способами: через командную строку или с помощью интерфейса TFTP-клиента. В первом случае нужно ввести команду tftp -i <ip-адрес> put <имя_файла>, а во втором — в соответствующих полях интерфейса вписать IP-адрес и имя файла.
Что делать, если при передаче файла TFTP-клиент выдаёт ошибку «Access violation»?
Ошибка «Access violation» может возникнуть в случае, если TFTP-сервер не позволяет выполнить запись файла на диск. Чтобы решить эту проблему, нужно проверить права доступа к файлу на сервере и убедиться, что они разрешают запись. Если эта операция запрещена, следует изменить настройки сервера или обратиться к администратору.
Можно ли использовать TFTP-клиент для резервного копирования конфигурационных файлов сетевого оборудования?
Да, TFTP-клиент может использоваться для резервного копирования конфигурационных файлов сетевого оборудования. Для этого нужно выполнить следующие действия: подключиться к устройству через консольный интерфейс, убедиться в наличии TFTP-сервера, перейти в режим конфигурации и указать IP-адрес и имя файла для резервного копирования. После этого запустить операцию и сохранить файл на компьютере.
Install TFTP Client on Windows 10 Go to Windows Start and search for “Control Panel” then click on “Programs” Open Turn Windows features on or off. From the Windows Features list, find the TFTP Client feature and turn it on. Wait for the installation to complete and click “Ok”.
Install TFTP Client Click on the Start Menu and click on Control Panel. Click on the Programs and Features => Turn Windows features on or off. Scroll down until you see the TFTP Client check box and CHECK it as shown below: Click on the OK button to start the installation process of the TFTP client.
How do I enable TFTP?
How to enable TFTP in Windows Access your Windows “Control Panel” and select “Programs” Into the menu “Programs and Features” select “Turn Windows features on or off” In the window that will appear, scroll the list and enable “TFTP Client”, then press OK.
How do I enable TFTP on Windows 10 firewall?
Allow TFTP with a Firewall Configuration Change Click on the start menu and type in Control Panel, then click on that icon when it appears. Click on Windows Defender Firewall. Next, click on Turn Windows Defender on or off. Tick the boxes as seen below and then click ok. You have now turned off you firewall.
How do I know if TFTP server is running Windows 10?
How can I find an existing tftp server on our network? netstat -an|more. for linux. netstat -an|grep 69. in either case you should see something like: udp 0 0 0.0. 0.0:69 If there is a current TFTP server running on your system.
What port is TFTP?
69 Service Name Port Number Transport Protocol tftp 69 tcp tftp 69 udp subntbcst-tftp 247 tcp subntbcst_tftp 247 tcp.
What is a TFTP client?
Trivial File Transfer Protocol (TFTP) is a simple lockstep File Transfer Protocol which allows a client to get a file from or put a file onto a remote host. One of its primary uses is in the early stages of nodes booting from a local area network.
What is the difference between FTP and TFTP?
TFTP is used to transfer a file either from client to server or from server to client without the need of FTP feature. Software of TFTP is smaller than FTP.TFTP: S.NO FTP TFTP 1. FTP stands for File Transfer Protocol. TFTP stands for Trivial File Transfer Protocol.
Should I disable TFTP?
Trivial File Transfer Protocol (TFTP) is a simple File Transfer Protocol which allows file transfer between remote hosts. Therefore it is easy for hackers to spoof your TFTP server and perform malicious actions. To prevent this, disable TFTP in your network computers.
How do I find my TFTP server IP address?
Right-click on a device in the network either from the network area. Select the option TFTP Client. This will display the TFTP client dialog. IPv4 or IPv6 address: Select the IPv4 option if the TFTP server is having IPv4 address or select the IPv6 address option if the TFTP server is having IPv6 address.
How do I know if TFTP server is working?
Troubleshooting TFTP Access a root prompt on the UNIX host. Make sure that you are not in the /tftpboot directory. Enter this command: tftp ipaddress. Enter this command at the TFTP prompt: tftp > get tftp_file_name. Enter this command at the TFTP prompt to exit TFTP: tftp> quit.
What is a TFTP server?
TFTP Server is used for simple file transfer (typically for boot-loading remote devices). Trivial File Transfer Protocol (TFTP) is a simple protocol for exchanging files between two TCP/IP machines. The TFTP Server can also be used to upload HTML pages onto the HTTP Server or to download log files to a remote PC.
How do I transfer files using TFTP?
The Trivial File Transfer (TFTP) utility provides the user interface to TFTP. This program allows a user to transfer files to and from a remote host. TFTP primarily allows remote diskless systems to read bootstrap images over the network. TFTP uses UDP to make transfers.
Does Windows 10 have a built in TFTP server?
Install TFTP Client on Windows 10 Fortunately, most Windows versions (servers and workstations) come with the TFTP client feature built-in, you only have to enable it. From the Windows Features list, find the TFTP Client feature and turn it on. Wait for the installation to complete and click “Ok”.
How do I fix TFTP timeout?
Solution 1: Just restart CCBoot service to fix it. Solution 2: If this problem is about network optimization, please re-enable large send offload. Solution 3: Use 3rd Party TFTP server. Solution 4 Try to downgrade the BIOS and Realtek boot agent version.
How do I check if port 69 is open?
Another program is using port 69 – Do the following to find out if another program is using port 69: Open Command Prompt. Enter netstat -a. Identify any items under the Local Address column that include:69 or :tftp. If another program is using port 69, you need to close that program before you can run TFTP Server.
Where is TFTP used?
So where is TFTP used? TFTP is used mostly for backing up router configuration files like Cisco and its IOS images, it is also used for diskless booting PC’s where, after the workstation has booted from the network card’s ROM, TFTP is used to download the program it needs to load and run from a central server.
Is port 80 A TCP?
Port 80 is one of the most commonly used port numbers in the Transmission Control Protocol (TCP) suite. Any Web/HTTP client, such as a Web browser, uses port 80 to send and receive requested Web pages from a HTTP server.
Is port 69 TCP or UDP?
Well-known ports Port TCP Description 67 Assigned Bootstrap Protocol (BOOTP) server; also used by Dynamic Host Configuration Protocol (DHCP) 68 Assigned Bootstrap Protocol (BOOTP) client; also used by Dynamic Host Configuration Protocol (DHCP) 69 Assigned Trivial File Transfer Protocol (TFTP) 70 Yes Gopher protocol.
Is TFTP encrypted?
TFTP is a simplified alternative to FTP that provides no authentication and is most often used to transfer configurations to and from network devices. They do not use encryption and allow both authentication and file data to traverse the network in the clear.
How does TFTP boot work?
The PXE-enabled NIC of the client sends out a broadcast request to DHCP server, which returns with the IP address of the client along with the address of the TFTP server, and the location of boot files on the TFTP server. TFTP server sends the boot image (pxelinux. 0), and the client executes it.
What is TFTP protocol used for?
Trivial File Transfer Protocol (TFTP). TFTP was designed as a lightweight file transfer mechanism primarily used for transferring short configuration files to routers and other devices, typically over a short dedicated link or at least within a LAN environment.