— Advertisement —
Windows Server 2019 offers a wide range of security options. However, data backup and restore are the most sensitive. Because a failure in data availability can have serious consequences for the organization. For both the user and the administrator. With this intention, the system makes use of the Volume Snapshot System. With this intention, the system makes use of the Instant Volume System. This feature first appeared in Windows Server 2003. Consequently, Windows Server 2019 uses this technology to use the Volume Shadow Copy function. In this way, it is possible to back up the system without affecting its performance. Therefore, system security is enhanced by being able to safely restore data. This allows you to create backups to return to a previous point or restore the system. See how to enable shadow copies in windows server 2019/2016.
Activating Volume Shadow Copy in Windows Server 2019/2016
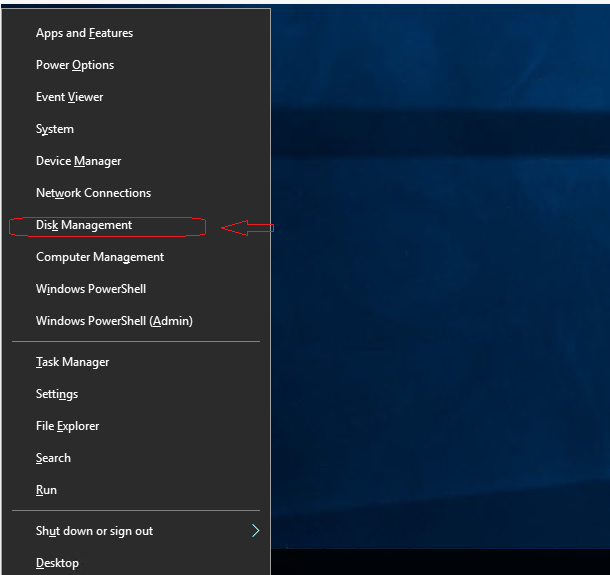
In the first place, it is necessary to open the disk manager by pressing the Win+X combination.

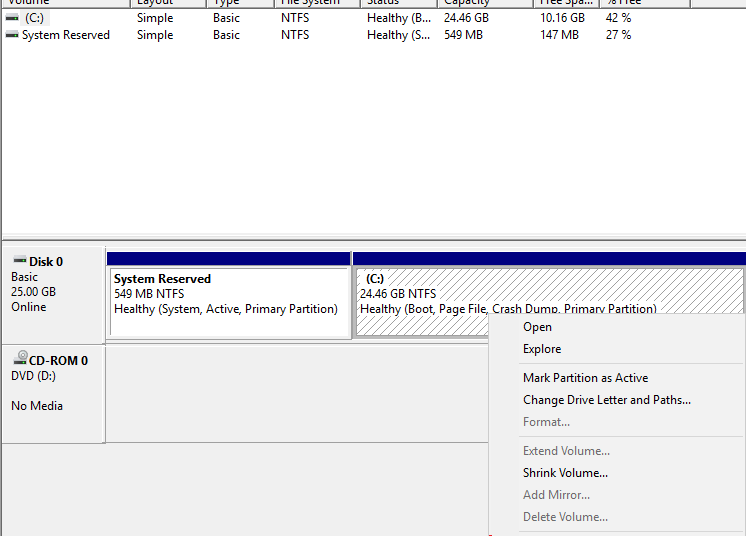
Then select the partition where the server is installed. Then, right-click on it and enter Properties.

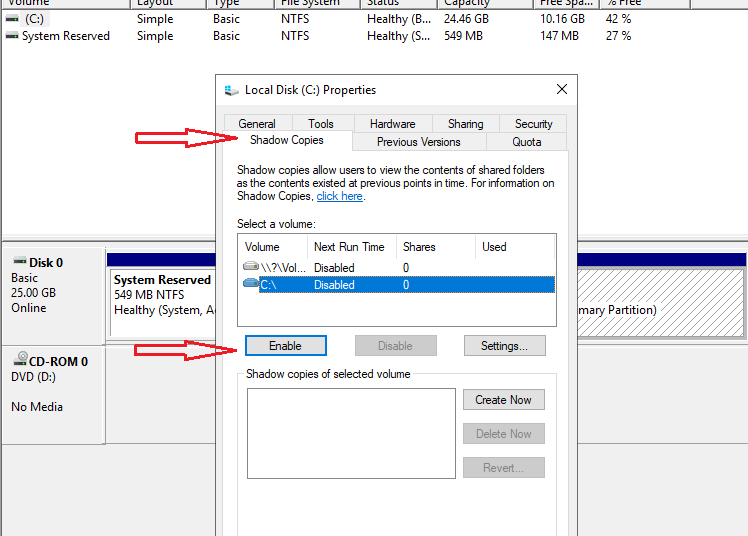
Now, go to the Shadow Copies tab and then click on Enable.

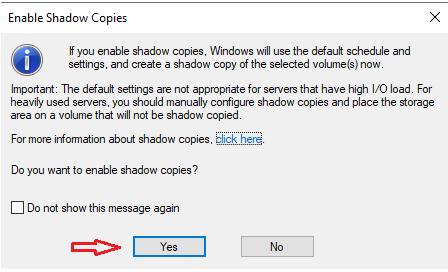
In the next window, press Yes to confirm the creation.

After confirmation, we see how a restore point has been created in the selected unit. Please click on Settings.

Within this table you can see the following parameters:
- To know which is the volume where the backup will be made
- Setting a maximum copy size
- Set a custom schedule on which to back up

Within this section, it will be possible to define the following:
- Define the exact date and time of each backup
- Define the programming frequency
- Define how often the copy will be made
- Activate which days the copy will be made

In this way, it is possible to enable the shadow copies in Windows Server 2019/2016. Now it is possible to increase the security in the system. This is all for now. Before saying goodbye, I invite you to see our post about creating a local account on Windows 10.
Windows Server 2019 offers a wide range of security options. However, data backup and restore are the most sensitive. Because a failure in data availability can have serious consequences for the organization. For both the user and the administrator. With this intention, the system makes use of the Volume Snapshot System. With this intention, the system makes use of the Instant Volume System. This feature first appeared in Windows Server 2003. Consequently, Windows Server 2019 uses this technology to use the Volume Shadow Copy function. In this way, it is possible to back up the system without affecting its performance. Therefore, system security is enhanced by being able to safely restore data. This allows you to create backups to return to a previous point or restore the system. See how to enable shadow copies in windows server 2019
Activating Volume Shadow Copy in Windows Server 2019
In the first place, it is necessary to open the Disk Manager by pressing the Win+X combination
Enter the disk manager
Then select the partition where the server is installed. Then, right-click on it and enter Properties.
Go to the Properties of the disk where the system is installed.
In the next window, press Yes to confirm the creation.
After confirmation, we see how a restore point has been created in the selected unit. Please click on Settings.
Within this table you can see the following parameters:
- To know which is the volume where the backup will be made
- Setting a maximum copy size
- Set a custom schedule on which to back up
Within this section, it will be possible to define the following:
- Define the exact date and time of each backup
- Define the programming frequency
- Define how often the copy will be made
- Activate which days the copy will be made
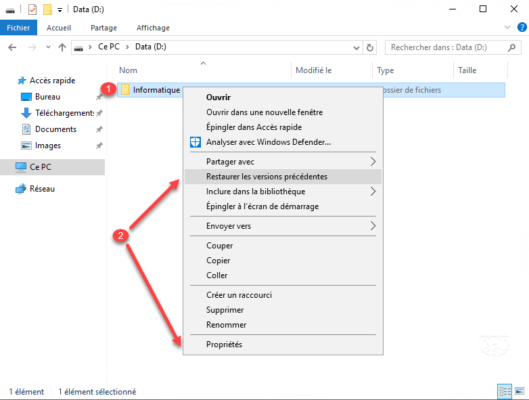
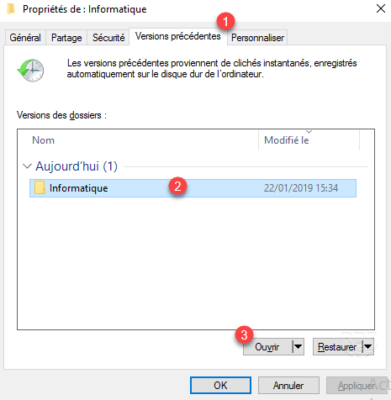
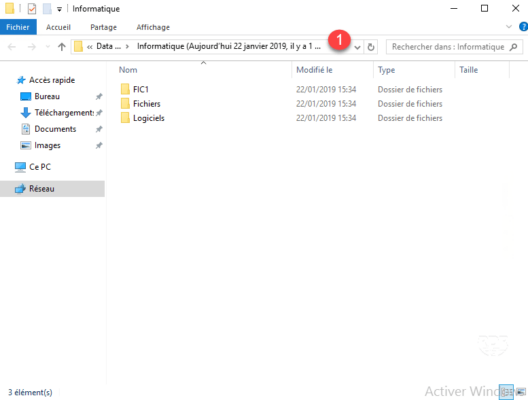
Once shadow copies have been enabled, users can use shadow copies to revert files to previous versions. To do so, the user must right click on the file and choose the Properties command from the shortcut menu. This will cause the file’s Properties sheet to be displayed. At this point, the user can select the Previous Versions tab, choose the file version that they want to restore and click the Restore button.
Keep in mind that shadow copies are not a true versioning feature. Shadow copies are created on a scheduled basis and are not automatically created every time that a user makes a change to a file.
Good Luck!

Windows Server 2019 предлагает возможность создания теневых копий файлов и папок, что позволяет легко и быстро восстанавливать данные в случае их потери или повреждения. Это особенно важно для организаций, работающих с ценными и критическими данными.
В данном руководстве мы рассмотрим, как настроить и использовать функцию теневых копий в Windows Server 2019. Мы расскажем о нескольких методах создания теневых копий, объясним, как настроить расписание автоматического создания копий, а также как восстанавливать данные из теневых копий.
Создание теневых копий является очень полезной функцией, поскольку она позволяет сохранять предыдущие версии файлов и папок. Таким образом, вы сможете восстановить данные, которые были удалены или изменены ошибочно, а также вернуться к предыдущим версиям в случае непредвиденных проблем. Теневые копии могут быть созданы не только для локальных дисков, но и для сетевых ресурсов.
Настройка теневых копий является важным этапом для обеспечения безопасности данных и минимизации потерь в случае сбоев или ошибок. В данном руководстве мы подробно рассмотрим все шаги настройки и использования этой полезной функции Windows Server 2019.
Содержание
- Основные понятия
- Выбор места хранения
- Установка и настройка
Основные понятия
Теневая копия тома (Volume Shadow Copy) – это технология, которая создает копии данных на томе в определенный момент времени, чтобы обеспечить возможность их восстановления в случае утраты или повреждения. Теневая копия тома позволяет создавать точки восстановления для всех файлов и папок на томе, а не только для отдельных файлов.
Теневая копия тома по расписанию (Scheduled Volume Shadow Copy) — это автоматическое создание теневых копий томов по заданному расписанию. Расписание определяет, когда и с какой периодичностью будут создаваться теневые копии томов.
Агент теневой копии (Shadow Copy Agent) — это служба, которая управляет созданием и хранением теневых копий. Агент теневой копии обеспечивает взаимодействие между файловой системой главного тома и теми томами, на которых создаются теневые копии.
Теневой копировальный набор (Shadow Copy Set) — это множество томов, для которых создаются теневые копии. Теневые копии томов входящие в теневой копировальный набор можно использовать для восстановления данных на этих томах.
Выбор места хранения
Для настройки места хранения в Windows Server 2019 можно использовать различные варианты, включая:
- Локальный диск: можно использовать отдельный локальный диск или раздел жесткого диска для хранения теневых копий. В этом случае рекомендуется выбирать отдельный физический диск, который не используется для других задач и имеет достаточно свободного места.
- Сетевой ресурс: можно выбрать сетевое хранилище, такое как файловый сервер или сетевой диск, для хранения теневых копий. В этом случае важно обеспечить надежное и быстрое сетевое соединение, чтобы доступ к теневым копиям был быстрым и стабильным.
- Съемный носитель: можно использовать внешний жесткий диск или флэш-накопитель для хранения теневых копий. В этом случае важно регулярно подключать и обновлять съемный носитель, чтобы обеспечить актуальность теневых копий.
При выборе места хранения также следует учитывать следующие факторы:
- Достаточное свободное место: место хранения должно обеспечивать достаточную емкость для хранения всех теневых копий и предоставлять возможность для их регулярного обновления.
- Доступность и скорость: выбранное место хранения должно обеспечивать быстрый и надежный доступ к теневым копиям, чтобы в случае потери данных можно было легко восстановить данные с теневой копии.
- Надежность: выбранное место хранения должно быть надежным и защищенным от физических и сетевых сбоев. Рекомендуется использовать резервные копии данных для дополнительной защиты от потери информации.
При настройке теневой копии Windows Server 2019 важно тщательно выбрать место хранения, учитывая потребности организации и требования к доступности и надежности данных. Правильный выбор места хранения позволит обеспечить эффективную работу с теневыми копиями и обеспечить защиту и восстановление данных в случае необходимости.
Установка и настройка
Шаг 1: Установка теневой копии Windows Server 2019
Перед началом установки убедитесь, что ваш сервер соответствует минимальным системным требованиям, указанным в документации. Затем следуйте инструкциям ниже:
- Вставьте установочный диск или подключите ISO-образ операционной системы.
- Перезагрузите сервер и выберите загрузку с установочного диска или ISO-образа.
- Выберите язык установки и другие предпочтительные параметры.
- Согласитесь с лицензионным соглашением и нажмите «Далее».
- Выберите тип установки — «Пользовательская установка».
- Выберите диск для установки и нажмите «Далее».
- Дождитесь завершения установки и перезагрузите сервер.
Шаг 2: Подготовка целевого диска
После установки сервера и входа в систему выполните следующие действия:
- Откройте «Диспетчер дисков» и найдите диск, на который вы хотите создать теневую копию.
- Щелкните правой кнопкой мыши на выбранном диске и выберите «Свойства».
- Вкладка «Теневые копии» содержит параметры теневого копирования для данного диска. Нажмите «Настроить», чтобы изменить эти параметры.
- В открывшемся окне вы можете настроить время создания теневых копий, объем выделенного пространства и другие параметры. Нажмите «ОК», когда закончите настройку.
Шаг 3: Включение и настройка теневых копий
Для включения и настройки теневых копий выполните следующие действия:
- Откройте «Диспетчер дисков» и найдите диск, на который вы хотите настроить теневые копии.
- Щелкните правой кнопкой мыши на выбранном диске и выберите «Свойства».
- Вкладка «Теневые копии» содержит параметры теневого копирования для данного диска. Нажмите «Включить», чтобы включить теневые копии.
- Выберите диск, который будет использоваться для хранения теневых копий, и нажмите «Настроить».
- В открывшемся окне укажите объем выделенного пространства для теневых копий и нажмите «ОК», когда закончите настройку.
Шаг 4: Проверка и восстановление теневых копий
После настройки и активации теневых копий вы можете проверить и восстановить данные из них:
- Откройте «Эксплорер Windows» и найдите файл или папку, которые вы хотите проверить.
- Щелкните правой кнопкой мыши на выбранном файле или папке и выберите «Свойства».
- Перейдите на вкладку «Восстановление» и нажмите «Показать предыдущие версии» для просмотра доступных теневых копий.
- Выберите нужную версию файла или папки и нажмите «Восстановить».
- Подтвердите восстановление и дождитесь его завершения.
Следуя этим шагам, вы сможете успешно установить и настроить теневую копию в операционной системе Windows Server 2019.

In this guide, I will show you how to configure Volume Shadow Copies (VSS) on Windows Server. Volume Shadow Copies (VSS) is a feature available in Windows Server 2022, Windows Server 2019, Windows Server 2016, Windows Server 2012 R2, Windows Server 2012, Windows Server 2008 R2, Windows 10, Windows 8.1, Windows 8, Windows 7, and Windows Server 2008. For the purpose of this guide, we’re going to configure VSS on Windows Server 2019. Volume Shadow Copies is also a Windows 11/10/8/7 feature that creates snapshots (shadow copies) of disk volumes even when they are in use. It is implemented as a Windows service known as Volume Shadow Copies. You can use it to make or save shadow copies on a local disk, an external hard drive, or a network drive.
The Shadow Copies feature in Windows Server is one implementation of VSS (called Restore Points in client versions of Windows). On a disk, you enable and schedule shadow copies, and then you can restore a file, folder, or the entire volume. Shadow copies are “differential, block-level backups,” which means they only capture the changed bits of each file and thus don’t take up much space. They are also quick and simple to recover from windows. See also how to create a Restore Point in Windows 10 and Windows 11, Bare-metal Backup: How to setup Windows server backup and create backup jobs, How to create and delete a snapshot on VMware Workstation, SEP Sesam Hybrid Backup, and Disaster Recovery Solution
To create and save shadow copies, the NTFS file system is required. As a result, only NTFS volumes can be protected when Shadow Copy technology is enabled in Windows Backup and Restore. The same can be said of System Restore and File History.Volume Shadow Copies Service is a Microsoft technology that creates recoverable snapshots of a volume.
Why VSS?
Data must usually be backed up while the applications that generate it are still running. This implies that some of the data files may be open or in an inconsistent state. When the data set is large, backing it up all at once can be difficult.
Shadow Copies can be used to recover accidentally deleted or modified user files. Additionally, Shadow Copies can be enabled on any disk on your server; however, they are most useful for volumes that store user data, such as data disks on a Windows file server that store user profile disks and network drives.
Prerequisite:
Following Microsoft’s best practices, to avoid performance issues, create an additional disk to hold the shadow copies on each server that you want to protect with VSS. To create an additional disk, follow these short steps:
Step 1-From the menu bar, search for Disk Management
Step 2 – From the list of disks that displays, click-right click on the disk you will like to create an additional disk from and select "Shrink Volume" from the drop-down menu.

Step 3 – Enter the amount of volume you will like to shrink and click okay. Here, we created a 10GB volume size.

Step 4 – From step 3 above, a new unallocated 10GB size of the disk is created. Right-click on it and select "New Simple Volume". Kindly refer to these related guides: How to extend a VM’s Hard Disk on VMware Workstation, and How to Add a New Virtual Disk to an EC2 Instance and Format it.

A new simple volume screen wizard shows up:

Step 5 – Click Next to go to specify the volume size screen

Step 6 – Format the new partition using the NTFS file system and assign a name to the new partition and click on Next. Leave the "Perform quick format" box checked.

Step 7 – Assign a drive letter and click on Next. Here, we assigned letter F to the new partition

Step 8 – Click on finished to complete the process

Now, navigate to the list of drives in the disk management pane to see the newly created volume.

Configuring Volume Shadow Copies on Disk
Now, let’s configure the shadow copies on one of our disk partitions.
Step 1-Open File Explorer, click on "This PC" and right-click on the drive volume for which you want Shadow Copies enabled, and then select Configure Shadow Copies.

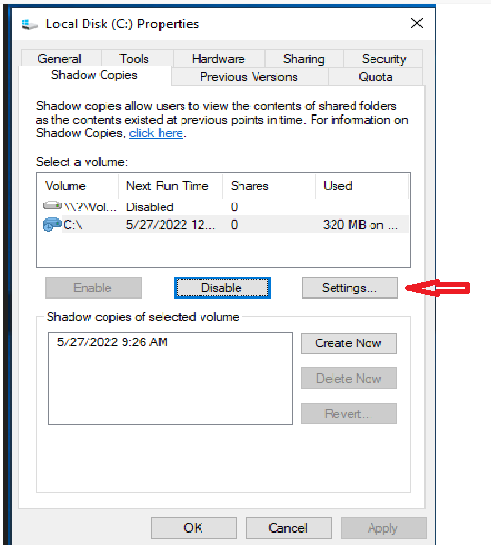
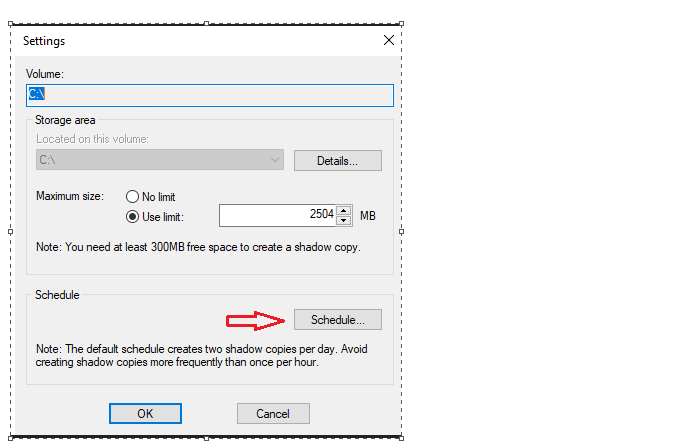
Step 2 – Click on the Volume you want to enable Shadow Copies for, then click Settings. Here, I want to enable Shadow Copies on the C:\ drive. C:\ drive is the drive with the operating system boot manager.

Move the Storage Area to the additional disk you created in the Prerequisite Steps section of this guide. Additionally, you can modify the volume copy size limit, therefore system will automatically delete the oldest copy when it reaches this storage limit.

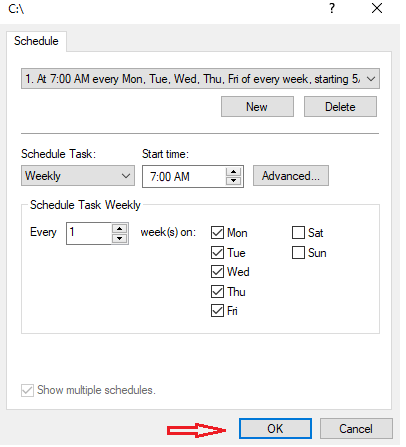
You can set a preferred schedule for capturing Shadow Copies using the Schedule button. Configure the settings as desired, then click OK to save your changes in the Schedule and Settings dialogues.

As shown in the screenshot above, we selected Mon – Fri and scheduled tasks to occur on weekly basis at 7: 00 AM
Step 3 – In the Shadow Copies window, ensure the volume is still selected and click Enable. Windows will create the first Shadow Copy with the settings you implemented and will use the schedule to create subsequent Copies.
Kindly pay attention to the warning displayed in the image below for your production environment setup.
From the above step, you will get a prompt, click yes to continue. The screenshot below shows that the Volume Shadow copies have been enabled fully.

Note: You can create more one Volume Shadows Copies in one disk. To create additional shadows copies, simply click on the "Create Now" button. To revert or delete the shadow copies, simply select it and click on either revert or delete button. To disable it completely, click on “Disable“.
Note: You cannot revert a volume that contains operating system files or a files that reside on a cluter shared disk. In conclusion, you have learned how to configure Volume Shadow Copies on Windows Server and Windows because the same steps stated above also apply to client versions of Windows such as Windows 11 and so on.
Now you have also learned how to create a new disk volume from an existing disk volume. I hope you found this blog post helpful. Please let me know in the comment session if you have any questions.
— Advertisement —
Windows Server 2019 offers a wide range of security options. However, data backup and restore are the most sensitive. Because a failure in data availability can have serious consequences for the organization. For both the user and the administrator. With this intention, the system makes use of the Volume Snapshot System. With this intention, the system makes use of the Instant Volume System. This feature first appeared in Windows Server 2003. Consequently, Windows Server 2019 uses this technology to use the Volume Shadow Copy function. In this way, it is possible to back up the system without affecting its performance. Therefore, system security is enhanced by being able to safely restore data. This allows you to create backups to return to a previous point or restore the system. See how to enable shadow copies in windows server 2019/2016.
Activating Volume Shadow Copy in Windows Server 2019/2016
In the first place, it is necessary to open the disk manager by pressing the Win+X combination.
Then select the partition where the server is installed. Then, right-click on it and enter Properties.
Now, go to the Shadow Copies tab and then click on Enable.
In the next window, press Yes to confirm the creation.
After confirmation, we see how a restore point has been created in the selected unit. Please click on Settings.
Within this table you can see the following parameters:
- To know which is the volume where the backup will be made
- Setting a maximum copy size
- Set a custom schedule on which to back up
Within this section, it will be possible to define the following:
- Define the exact date and time of each backup
- Define the programming frequency
- Define how often the copy will be made
- Activate which days the copy will be made
In this way, it is possible to enable the shadow copies in Windows Server 2019/2016. Now it is possible to increase the security in the system. This is all for now. Before saying goodbye, I invite you to see our post about creating a local account on Windows 10.
Содержание
- Записки IT специалиста
- Windows Server. Настраиваем теневые копии для общих папок.
- Windows Server 2019 часть три. Сетевые папки и диски, теневые копии.
- Сетевые паки.
- Теневые копии.
- Как включить и настроить теневые копии Windows
- Открываем консоль Управление дисками
- Включаем теневые копии
- Настраиваем расписание теневых копий
- Как пользоваться созданными копиями
- HOW-TO: Как настроить теневые копии в Windows
- Xakep #208. Атака на сигналку
- Как использовать Теневые копии
Записки IT специалиста
Технический блог специалистов ООО»Интерфейс»
Теневые копии могут быть использованы для восстановления случайно удаленных и случайно перезаписанных файлов, а также позволяет сравнить несколько версий одного файла. Следует помнить, что теневые копии не могут служить заменой резервному копированию в силу ряда ограничений и особенностей о которых мы поговорим ниже.
Теневое копирование поддерживают серверные ОС начиная с Windows Server 2003, клиентское ПО для работы с теневыми копиями доступно начиная с Windows XP SP2.
При использовании теневых копий следует учитывать следующие ограничения:
Перед тем, как настраивать теневое копирование, следует продумать расписание. Для этого нужно проанализировать активность пользователей и критичность данных, найдя компромисс между частотой создания теневых копий и промежутком времени который должно охватывать теневое копирование. При этом следует отталкиваться от того, потерю какого промежутка рабочего времени можно считать допустимым, после чего рассчитать за какой промежуток времени будет достигнут предел, составляющий 64 копии. Не рекомендуется делать теневые копии чаще чем раз в час. Также продумайте расписание таким образом, чтобы копии делались только в рабочее время.
Для включения теневых копий перейдите в оснастку Управление компьютером в меню Администрирование.


В открывшемся окне выберите том, на котором вы будете включать теневое копирование для общих папок и нажмите Включить, первая теневая копия будет создана немедленно.

Затем нажмите на кнопку Параметры и укажите размер дискового пространства, выделяемый для хранения теневых копий.

Следующим шагом задайте расписание.

Теперь самое время проверить работу теневых копий в действии. В обучающих целях мы установили небольшой промежуток между созданием теневых копий и провели несколько типовых действий с файлами в общей папке.

Открываем свойства файла, переходим на закладку Предыдущие версии и выбираем одну из доступных теневых копий (в нашем случае только одна).

Мы можем открыть, восстановить или скопировать файл. Для начала просто откроем.

Убедившись, что перед нами необходимая версия файла, мы можем ее восстановить или скопировать, если нам нужны оба варианта файлов.

Для восстановления удаленных файлов откройте свойства папки и выберите одну из ее теневых копий, затем вы можете просмотреть содержащиеся в ней файлы и восстановить нужные. Помните, что из теневой копии файлы можно открыть только на чтение.

Как видим, теневое копирование дает пользователям и администратору богатые возможности по работе предыдущими версиями файлов и папок. Данная технология, в сочетании с правильно настроенным резервным копированием, позволяет обеспечить высокую доступность данных и свести риск их потери к разумному минимуму.
Помогла статья? Поддержи автора и новые статьи будут выходить чаще:

Или подпишись на наш Телеграм-канал: 
Источник
Windows Server 2019 часть три. Сетевые папки и диски, теневые копии.
Мы с вами проделали уже большую работу. Развернули сервер, настроили основные службы, создали пользователей. Давайте теперь перейдем к теме сетевого доступа. Ведь не удобно если люди будут бегать с флешками или отправлять другу другу письма.
Сетевые паки.
В прошлой статье мы создали пользователя и группу Public, допустим у нас в этой группе даже несколько пользователей. Для совместного использования файлами логично создать им сетевую папку(Public), где они могли-бы хранить файлы.
Так же нам потребуется роль Файловые службы и службы хранилища ( по умолчанию у меня стоит, если нет добавляем роль)

Создадим папку где нам удобно, зайдем в свойства паки, вкладка Доступ. Выберем общий доступ и добавим нашу группу Public.
Вот и все. Для всех пользователей группы Public доступна сетевая папка расположенная на сервере.
Теневые копии.
Что же такое теневая копия? По сути это снапшот (снимок) всей информации, хранящейся на диске. После создания теневой копии служба VSS начинает отслеживать изменение данных на диске. VSS разбивает все данные на блоки по 16Кб каждый, и если данные в таком блоке были изменены, служба записывает в файл теневой копии этот блок целиком. Таким образом получается, что при создании следующей теневой копии данных система не копирует данные целиком, а только лишь блочные изменения. Благодаря этому система теневого копирования позволяет существенно сэкономить место на диске. Теневые копии могут храниться на том же диске, на котором хранятся данные, либо на отдельном (решение для высоконагруженных систем с большой частотой изменения данных). Все файлы теневых копий хранятся в служебном каталоге System Volume Information. Эти файлы можно отличить по имени, все они содержат в имени идентификатор службы VSS — 3808876b-c176-4e48-b7ae-04046e6cc752.
Для включения данной функции переходим в Управление компьютером — Общие папки — Все задачи.
Ну и конечно нам не мешало бы настроить расписание :

Тут мы выбрали ежедневно с 9.00 до 18.00 каждые 60 минут делать копии.
Обратите внимание, что для восстановления не требуется права Администратора. То есть любой пользователь имеющий доступ может восстановить старую версию папки ( свойства — предыдущие версии).

Если вы нашли ошибку, пожалуйста, выделите фрагмент текста и нажмите Ctrl+Enter.
Источник
Как включить и настроить теневые копии Windows
Открываем консоль Управление дисками
Для этого кликаем правой кнопкой по Пуск и выбираем пункт Управление дисками:


Включаем теневые копии
В списке дисков находим нужный и кликаем по нему правой кнопкой мыши. Выбираем Свойства.

В появившемся окне переходим на вкладку Теневые копии и нажимаем кнопку Включить:

Если появится предупреждение, прочитайте его и нажмите Да. Пройдет несколько секунд и появится первая теневая копия.
Настраиваем расписание теневых копий
В этом же окне нажимаем Параметры:

В открывшемся окне кликаем по Расписание:

Составляем новое расписание или оставляем имеющееся:

Нажимаем OK 3 раза.
Как пользоваться созданными копиями
Теневые копии создаются только для измененных файлов и по заданному расписанию.
Чтобы восстановить предыдущую версию файла, кликаем по нему правой кнопкой мыши и выбираем Свойства. В открывшемся окне переходим на вкладку Предыдущие версии и находим список всех версий файла:

* если список окажется пустым, значит либо файл не менялся с момента создания, либо еще не отрабатывало задание по созданию теневой копии.
Чтобы восстановить старую версию файла, перетащите файл из списка на рабочий стол, проверьте его корректность и замените основной файл на восстановленный или задайте ему новое имя.
Источник
HOW-TO: Как настроить теневые копии в Windows

Потеря информации при перезаписи важных файлов может быть настоящей проблемой. Особенно часто она возникает при работе с файловыми серверами, доступ к которым есть у целого коллектива. В современных версиях Windows перезапись или удаление файла можно откатить благодаря наличию теневой копии.
В теневых копиях (VSS) содержатся записи об изменениях файлов. Копии делаются автоматически каждый час — по умолчанию Windows хранит целых 64 копии файла. Использовать их можно без прав администратора, что удобно — как для пользователей, так и для самого администратора :).
Вот несколько важных особенностей теневых копий:
Включение теневых копий
Xakep #208. Атака на сигналку
После этого нужно выбрать раздел, активировать его и настроить расписание копирования. Если через какое-то время кликнуть на файл правой кнопкой мышки и зайти в «Свойства —> Предыдущие версии», то можно будет увидеть список доступных теневых копий.
 Список теневых копий
Как видишь, включить службу легко и никаких особых настроек она не требует. Польза же от этого может быть огромной. Впрочем, помни: теневые копии — это не замена бэкапу. Не полагайся на них и не ленись бэкапить все, как обычно.
Источник
Как использовать Теневые копии
Порой сталкиваешься на рабочем месте, что к тебе как к системному администратору обращается пользователь с просьбой восстановить файл который он редактировал весь день, а потом вернулся к рабочему месту, но весь его труд утерян. Да, на его совести тот момент если он отошел от своего компьютера и не заблокировал вручную экран (приучаю нажимать сочетание клавиш: Win + L), а таймаут выставленный групповой политикой еще не активировался. Использовать такую отговорку, что можно восстановить файл(ы) только из вчерашнего бекапа — ну это не профессионализм. Вот в этом случае каждый системный администратор должен совершенствоваться и знать, что система Windows имеет такую важную настройку как использование «Теневых копий».
За основу функции/настройки теневого копирования отвечает служба теневого копирования (Volume Shadow Copies, VSS). Служба VSS применяется ко всему логическому диску и создаем снимок всех находящихся на нем файлов. После через запланированные промежутки времени отслеживает изменения и снова создает снимок.
Покажу на примере, как такая настройка «Теневые копии» включается и что она дает обычному пользователю.
Есть файловый сервер под управлением Windows Server 2016 Standard (на заметку: настройка «Теневые копии» работает и на Server 2008 R2,Server 2012/R2).
На заметку: логический диск с общими папками должен располагаться не на системном диске и не на диске с бекапами — это мое мнение.
На заметку: при использовании настройки «Теневые копии» следует под общие папки (файловый ресурс) заложить большой логический диск для хранения снимков. Если используется система виртуализации Hyper-V или ESXi то проблем с его расширением быть не должно и отрепетирована процедура его расширения.
На логическом диске D: создана папка с именем fileserver и настроена как общая с отключенным наследованием.
Запускаю оснастку «Управление компьютером»:
Win + R → control.exe — Просмотр: Категория — Мелкие значки — «Администрирование» — «Управление компьютером» — «Служебные программы» — и на «Общие папки» через правый клик мышью выбираю «Все задачи» — «Настроить теневые копии», выделяю том, в моем случае том D: и нажимаю «Настроить».
В данных настройках задается максимальный размер использования теневой копии, но не менее 300 МБ. По умолчанию хранилище теневых копий занимает 10 % от размера диска, а в снимках хранятся только изменения, а не сами изменившиеся файлы. Если места не достаточно, то при создании нового снимка старые снимки удаляют.
Как выбрать какой размер задать, прикинем, всего файлов под файловый ресурс 50 Gb, то я бы выбрал 50% от размера диска или: Максимальный размер: => не ограничен.
После нажимаю «Расписание» чтобы указать как часто будут делаться теневые копии. Если обратить внимание на рекомендацию, то не следует указывать создание одной теневой копии в час, вот только здесь уже каждый системный администратор должен все правильно взвесить как отразится потеря данных на продуктивной работе организации. Т.к. у меня жесткий диск под 2Tb, а данных всего 500Gb, то я делаю под себя следующее расписание:
Нажимаю «Дополнительно…»
и получается расписание: Каждые 2 часа с 09.00 по 10 час начиная с текущей даты и каждый день.
В процессе эксплуатации я подкорректирую данное расписание.
и нажимаю кнопку Ok окна настройки расписания для тома D: — кнопку OK окна «Параметры» и выделив том D: нажимаю «Создать» тем самым создаю теневую копию текущего диска.
 Из представленного выше скриншота видно, что текущий снимок занимаем целых 2.5G, так что об выделяемом размере под теневые копии каждый должен смотреть самостоятельно.
Также функцию теневые копии можно включить если перейти из оснастки «Управление компьютером» — «Запоминающие устройства» — «Управление дисками» — через правый клик по тому D: вызвать «Свойства» и перейдя во вкладку «Теневые копии».
Если сымитировать добавление файлов и последующее нажатие создания снимка можно будет видеть как изменяется размер и количество теневые копий в оснастке тома:
 Итак копии имеются, объясняю пользователю что он может сделать сам на своем рабочем месте если что-то у него пропало.
Под Windows 10 Pro:
Шаг №1: Перейти на файловый ресурс
Шаг №2: По каталогу (или по файлу) внутри которого располагаются его файлы нажать на нем через правый клик мышью перейти на меню «Восстановить прежнюю версию» после чего на вкладку «Предыдущие версии».
Шаг №3: Тут он увидит сделанные снимки и открывая последний ориентируясь на дату и время будут открываться экраны с файлами/или файл за указанный временной промежуток при нажатии на кнопку «Открыть» или через правый клик мышью по нему «Изменить» ту версию где результаты его работы самые последние.
Шаг №4: После чтобы его восстановить нужно либо когда файл найден и открыт сделать «Файл» — «Сохранить как» и сохранить в ту директорию где он был затерев не актуальный или же нажать кнопку «Восстановить» и воспользоваться мастером восстановления:
 Нажимаю «Восстановить» и получаю сообщение «Файл был успешно переведен в предыдущее состояние».
Шаг №5: Пользователь возвращается к редактированию на том месте файл(ы) которого были восстановлены.
Шаг №6: После этого момента пользователь становится чуть счастливее от того что теперь он сам может это делать и ему не надо писать заявку на helpdesk или подходить к Вам лично.
На заметку: Не советую включать теневые копии на системном диске, т. к. обновления, логирование и многое другое будет все заполоняется никому не нужными снимками и расходуемым местом. Возьмите за правило, один логический диск под систему, другой под данные.
На заметку: если выключить «Теневое копирование тома» в свойства диска, то все снимки будут удалены, а файлы будут оставлены как есть.
На заметку: Теневые копии — это не то же самое что и резервная копия, так что не советую полностью на них надеяться, ведь это всего лишь дельта изменения от первого и последующих снимков, а бекап — это наше все.
Итого, я для себя оформил те моменты с которыми сталкиваешься когда задействуешь «Теневые копии» для тома и что пользователь может сам сделать в случае проблемы с потерей файла(ов).
На этом я прощаюсь, если что будет интересного я дополню данную заметку, а пока собственно и всё, с уважением автор блога Олло Александр aka ekzorchik.
Источник
In this tutorial, I will explain how snapshots and snapshots work in general and then how to activate them on Windows Server.
This functionality is often used on file servers to restore a file or a folder without going through the backup environment, which saves time and avoids handling.
Table Of Contents
- Presentation of shadow copies
- Operation
- On which type of partition can I activate shadow copies?
- Enabling shadow copies
- Using previous versions
- Conclusion
Presentation of shadow copies
Shadow copies also called previous version or snapshot is a feature available on Windows Servers.
It allows to make a “backup” of a partition by storing only the modified files.
Operation
When making the snapshots at a time T (12H) a photograph of the partition is made, it contains only pointers to the files. At 14H a file on this partition is modified then save, at that moment, Windows will copy the old file to have it as it was at 12H. If the user who modified the file realizes that he made a mistake, it is possible to restore him as he was at 12H.
On which type of partition can I activate shadow copies?
This feature is mainly activated on the file servers, because it allows to restore a file at time T very quickly and allows to make several “backups” in the day taking few resources.
Personally I also activate it on the web servers taking care to separate on different partitions the file and database part.
On partitions containing virtual machines, databases, and system, it is not recommended to enable shadow copies.
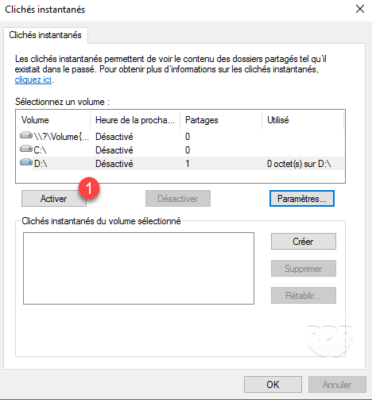
Enabling shadow copies
1. Open Windows Explorer, right click on partition 1 where shadow copies are to be activated and click on Configure shadow copies 2 .
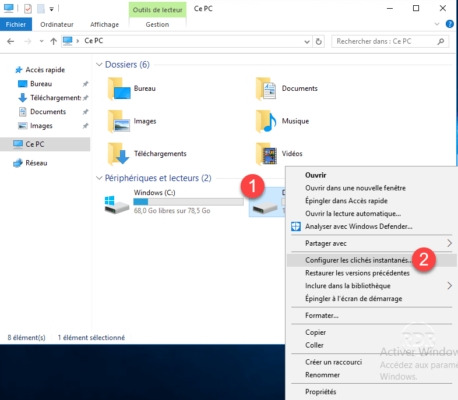
2. Before activating shadow copies, click Settings 1 .
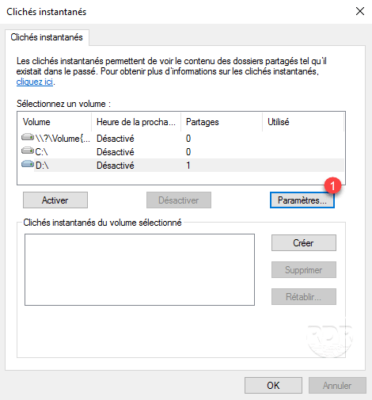
3. From here, you can configure the space allocated for shadow copies (the larger the space, the more restore points will be there). It is also possible to manage the planning, click on the button Plan 1 .
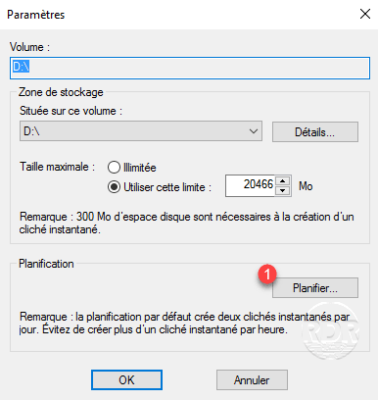
4. By default, there are two snapshots to configure at 7H and 12H, the MTWTF.
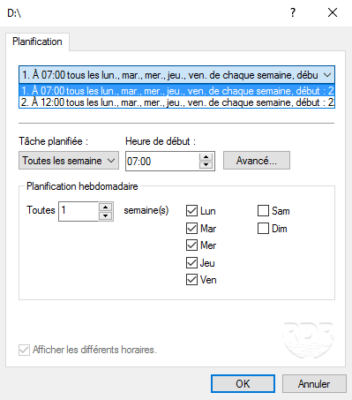
5. To add a schedule, click New 1 and configure it and click OK to validate.
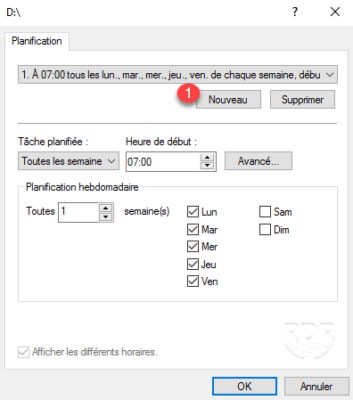
6. Now that the snapshots are set, click on Enable 1 .
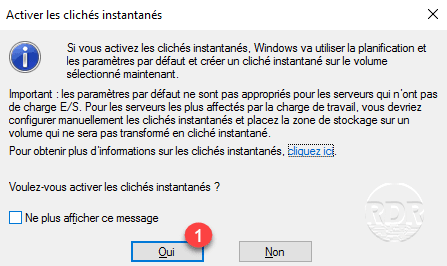
7. Confirm activation by clicking Yes 1 .
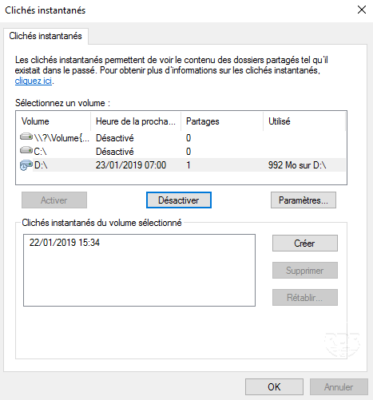
8. Shadow copies are now enabled, a first snapshot is done during activation.
Using previous versions
Access to previous versions is available using Windows Explorer on clients (W7 / 8/10) and on Servers (2008/2012/2016/2019 …). They are available both locally and by network shares and by default are available to everyone.
1. From Windows Explorer, go to the folder where you want to restore the file and right click on 1 . Depending on the location and system two options are available 2 , click on:
- Restore previous versions
- properties
2. If you go through Properties, go to the Previous Versions 1 tab. Choose the recovery point to explore 2 and click Open 3 .
The Restore option allows you to directly replace the contents of the folder.
3. The snapshot content 1 is available in the Explorer, all you have to do is browse and copy / paste to restore the file / folder.
Conclusion
Shadow copies allow for “backups” and restores of a file server. Fast access to restore points can restore a file in less than 5 minutes, which is not the case with most backup software.
Il est quand même nécessaire de sauvegarder quotidiennement le serveur, les clichés instantanés ne remplacent pas une vrai sauvegarde.
| description | title | ms.date | author | manager | ms.author | ms.topic |
|---|---|---|---|---|---|---|
|
Learn more about: Volume Shadow Copy Service |
Volume Shadow Copy Service |
12/06/2022 |
JasonGerend |
elizapo |
jgerend |
article |
Volume Shadow Copy Service
Applies to: Windows Server 2022, Windows Server 2019, Windows Server 2016, Windows Server 2012 R2, Windows Server 2012, and Windows Server 2008 R2, Windows Server 2008, Windows 10, Windows 8.1, Windows 8, Windows 7
Backing up and restoring critical business data can be very complex due to the following issues:
-
The data usually needs to be backed up while the applications that produce the data are still running. This means that some of the data files might be open or they might be in an inconsistent state.
-
If the data set is large, it can be difficult to back up all of it at one time.
Correctly performing backup and restore operations requires close coordination between the backup applications, the line-of-business applications that are being backed up, and the storage management hardware and software. The Volume Shadow Copy Service (VSS), which was introduced in Windows Server® 2003, facilitates the conversation between these components to allow them to work better together. When all the components support VSS, you can use them to back up your application data without taking the applications offline.
VSS coordinates the actions that are required to create a consistent shadow copy (also known as a snapshot or a point-in-time copy) of the data that is to be backed up. The shadow copy can be used as-is, or it can be used in scenarios such as the following:
-
You want to back up application data and system state information, including archiving data to another hard disk drive, to tape, or to other removable media.
-
You are data mining.
-
You are performing disk-to-disk backups.
-
You need a fast recovery from data loss by restoring data to the original Logical Unit Number (LUN) or to an entirely new LUN that replaces an original LUN that failed.
Windows features and applications that use VSS include the following:
-
Windows Server Backup (https://go.microsoft.com/fwlink/?LinkId=180891)
-
Shadow Copies of Shared Folders (https://go.microsoft.com/fwlink/?LinkId=142874)
-
System Center Data Protection Manager (https://go.microsoft.com/fwlink/?LinkId=180892)
-
System Restore (https://support.microsoft.com/windows/use-system-restore-a5ae3ed9-07c4-fd56-45ee-096777ecd14e)
How Volume Shadow Copy Service Works
A complete VSS solution requires all of the following basic parts:
VSS service Part of the Windows operating system that ensures the other components can communicate with each other properly and work together.
VSS requester The software that requests the actual creation of shadow copies (or other high-level operations like importing or deleting them). Typically, this is the backup application. The Windows Server Backup utility and the System Center Data Protection Manager application are VSS requesters. Non-Microsoft® VSS requesters include nearly all backup software that runs on Windows.
VSS writer The component that guarantees we have a consistent data set to back up. This is typically provided as part of a line-of-business application, such as SQL Server® or Exchange Server. VSS writers for various Windows components, such as the registry, are included with the Windows operating system. Non-Microsoft VSS writers are included with many applications for Windows that need to guarantee data consistency during back up.
VSS provider The component that creates and maintains the shadow copies. This can occur in the software or in the hardware. The Windows operating system includes a VSS provider that uses copy-on-write. If you use a storage area network (SAN), it is important that you install the VSS hardware provider for the SAN, if one is provided. A hardware provider offloads the task of creating and maintaining a shadow copy from the host operating system.
The following diagram illustrates how the VSS service coordinates with requesters, writers, and providers to create a shadow copy of a volume.
.jpg)
Figure 1 Architectural diagram of Volume Shadow Copy Service
How a Shadow Copy Is Created
This section puts the various roles of the requester, writer, and provider into context by listing the steps that need to be taken to create a shadow copy. The following diagram shows how the Volume Shadow Copy Service controls the overall coordination of the requester, writer, and provider.
.jpg)
Figure 2 Shadow copy creation process
To create a shadow copy, the requester, writer, and provider perform the following actions:
-
The requester asks the Volume Shadow Copy Service to enumerate the writers, gather the writer metadata, and prepare for shadow copy creation.
-
Each writer creates an XML description of the components and data stores that need to be backed up and provides it to the Volume Shadow Copy Service. The writer also defines a restore method, which is used for all components. The Volume Shadow Copy Service provides the writer’s description to the requester, which selects the components that will be backed up.
-
The Volume Shadow Copy Service notifies all the writers to prepare their data for making a shadow copy.
-
Each writer prepares the data as appropriate, such as completing all open transactions, rolling transaction logs, and flushing caches. When the data is ready to be shadow-copied, the writer notifies the Volume Shadow Copy Service.
-
The Volume Shadow Copy Service tells the writers to temporarily freeze application write I/O requests (read I/O requests are still possible) for the few seconds that are required to create the shadow copy of the volume or volumes. The application freeze is not allowed to take longer than 60 seconds. The Volume Shadow Copy Service flushes the file system buffers and then freezes the file system, which ensures that the file system metadata is recorded correctly and the data to be shadow-copied is written in a consistent order.
-
The Volume Shadow Copy Service tells the provider to create the shadow copy. The shadow copy creation period lasts no more than 10 seconds, during which all write I/O requests to the file system remain frozen.
-
The Volume Shadow Copy Service releases file system write I/O requests.
-
VSS tells the writers to thaw application write I/O requests. At this point applications are free to resume writing data to the disk that is being shadow-copied.
[!NOTE]
The shadow copy creation can be aborted if the writers are kept in the freeze state for longer than 60 seconds or if the providers take longer than 10 seconds to commit the shadow copy.
-
The requester can retry the process (go back to step 1) or notify the administrator to retry at a later time.
-
If the shadow copy is successfully created, the Volume Shadow Copy Service returns the location information for the shadow copy to the requester. In some cases, the shadow copy can be temporarily made available as a read-write volume so that VSS and one or more applications can alter the contents of the shadow copy before the shadow copy is finished. After VSS and the applications make their alterations, the shadow copy is made read-only. This phase is called Auto-recovery, and it is used to undo any file-system or application transactions on the shadow copy volume that were not completed before the shadow copy was created.
How the Provider Creates a Shadow Copy
A hardware or software shadow copy provider uses one of the following methods for creating a shadow copy:
Complete copy This method makes a complete copy (called a «full copy» or «clone») of the original volume at a given point in time. This copy is read-only.
Copy-on-write This method does not copy the original volume. Instead, it makes a differential copy by copying all changes (completed write I/O requests) that are made to the volume after a given point in time.
Redirect-on-write This method does not copy the original volume, and it does not make any changes to the original volume after a given point in time. Instead, it makes a differential copy by redirecting all changes to a different volume.
Complete copy
A complete copy is usually created by making a «split mirror» as follows:
-
The original volume and the shadow copy volume are a mirrored volume set.
-
The shadow copy volume is separated from the original volume. This breaks the mirror connection.
After the mirror connection is broken, the original volume and the shadow copy volume are independent. The original volume continues to accept all changes (write I/O requests), while the shadow copy volume remains an exact read-only copy of the original data at the time of the break.
Copy-on-write method
In the copy-on-write method, when a change to the original volume occurs (but before the write I/O request is completed), each block to be modified is read and then written to the volume’s shadow copy storage area (also called its «diff area»). The shadow copy storage area can be on the same volume or a different volume. This preserves a copy of the data block on the original volume before the change overwrites it.
| Time | Source data (status and data) | Shadow copy (status and data) |
|---|---|---|
|
T0 |
Original data: 1 2 3 4 5 |
No copy: — |
|
T1 |
Data changed in cache: 3 to 3′ |
Shadow copy created (differences only): 3 |
|
T2 |
Original data overwritten: 1 2 3′ 4 5 |
Differences and index stored on shadow copy: 3 |
Table 1 The copy-on-write method of creating shadow copies
The copy-on-write method is a quick method for creating a shadow copy, because it copies only data that is changed. The copied blocks in the diff area can be combined with the changed data on the original volume to restore the volume to its state before any of the changes were made. If there are many changes, the copy-on-write method can become expensive.
Redirect-on-write method
In the redirect-on-write method, whenever the original volume receives a change (write I/O request), the change is not applied to the original volume. Instead, the change is written to another volume’s shadow copy storage area.
| Time | Source data (status and data) | Shadow copy (status and data) |
|---|---|---|
|
T0 |
Original data: 1 2 3 4 5 |
No copy: — |
|
T1 |
Data changed in cache: 3 to 3′ |
Shadow copy created (differences only): 3′ |
|
T2 |
Original data unchanged: 1 2 3 4 5 |
Differences and index stored on shadow copy: 3′ |
Table 2 The redirect-on-write method of creating shadow copies
Like the copy-on-write method, the redirect-on-write method is a quick method for creating a shadow copy, because it copies only changes to the data. The copied blocks in the diff area can be combined with the unchanged data on the original volume to create a complete, up-to-date copy of the data. If there are many read I/O requests, the redirect-on-write method can become expensive.
Shadow Copy Providers
There are two types of shadow copy providers: hardware-based providers and software-based providers. There is also a system provider, which is a software provider that is built in to the Windows operating system.
Hardware-based providers
Hardware-based shadow copy providers act as an interface between the Volume Shadow Copy Service and the hardware level by working in conjunction with a hardware storage adapter or controller. The work of creating and maintaining the shadow copy is performed by the storage array.
Hardware providers always take the shadow copy of an entire LUN, but the Volume Shadow Copy Service only exposes the shadow copy of the volume or volumes that were requested.
A hardware-based shadow copy provider makes use of the Volume Shadow Copy Service functionality that defines the point in time, allows data synchronization, manages the shadow copy, and provides a common interface with backup applications. However, the Volume Shadow Copy Service does not specify the underlying mechanism by which the hardware-based provider produces and maintains shadow copies.
Software-based providers
Software-based shadow copy providers typically intercept and process read and write I/O requests in a software layer between the file system and the volume manager software.
These providers are implemented as a user-mode DLL component and at least one kernel-mode device driver, typically a storage filter driver. Unlike hardware-based providers, software-based providers create shadow copies at the software level, not the hardware level.
A software-based shadow copy provider must maintain a «point-in-time» view of a volume by having access to a data set that can be used to re-create volume status before the shadow copy creation time. An example is the copy-on-write technique of the system provider. However, the Volume Shadow Copy Service places no restrictions on what technique the software-based providers use to create and maintain shadow copies.
A software provider is applicable to a wider range of storage platforms than a hardware-based provider, and it should work with basic disks or logical volumes equally well. (A logical volume is a volume that is created by combining free space from two or more disks.) In contrast to hardware shadow copies, software providers consume operating system resources to maintain the shadow copy.
For more information about basic disks, see What Are Basic Disks and Volumes?.
System provider
One shadow copy provider, the system provider, is supplied in the Windows operating system. Although a default provider is supplied in Windows, other vendors are free to supply implementations that are optimized for their storage hardware and software applications.
To maintain the «point-in-time» view of a volume that is contained in a shadow copy, the system provider uses a copy-on-write technique. Copies of the blocks on volume that have been modified since the beginning of the shadow copy creation are stored in a shadow copy storage area.
The system provider can expose the production volume, which can be written to and read from normally. When the shadow copy is needed, it logically applies the differences to data on the production volume to expose the complete shadow copy.
For the system provider, the shadow copy storage area must be on an NTFS volume. The volume to be shadow copied does not need to be an NTFS volume, but at least one volume mounted on the system must be an NTFS volume.
The component files that make up the system provider are swprv.dll and volsnap.sys.
In-Box VSS Writers
The Windows operating system includes a set of VSS writers that are responsible for enumerating the data that is required by various Windows features.
For more information about these writers, see In-Box VSS Writers.
How Shadow Copies Are Used
In addition to backing up application data and system state information, shadow copies can be used for a number of purposes, including the following:
-
Restoring LUNs (LUN resynchronization and LUN swapping)
-
Restoring individual files (Shadow Copies for Shared Folders)
-
Data mining by using transportable shadow copies
Restoring LUNs (LUN resynchronization and LUN swapping)
In Windows Server 2008 R2 and Windows 7, VSS requesters can use a hardware shadow copy provider feature called LUN resynchronization (or «LUN resync»). This is a fast-recovery scheme that allows an application administrator to restore data from a shadow copy to the original LUN or to a new LUN.
The shadow copy can be a full clone or a differential shadow copy. In either case, at the end of the resync operation, the destination LUN will have the same contents as the shadow copy LUN. During the resync operation, the array performs a block-level copy from the shadow copy to the destination LUN.
[!NOTE]
The shadow copy must be a transportable hardware shadow copy.
Most arrays allow production I/O operations to resume shortly after the resync operation begins. While the resync operation is in progress, read requests are redirected to the shadow copy LUN, and write requests to the destination LUN. This allows arrays to recover very large data sets and resume normal operations in several seconds.
LUN resynchronization is different from LUN swapping. A LUN swap is a fast recovery scenario that VSS has supported since Windows Server 2003 SP1. In a LUN swap, the shadow copy is imported and then converted into a read-write volume. The conversion is an irreversible operation, and the volume and underlying LUN cannot be controlled with the VSS APIs after that. The following list describes how LUN resynchronization compares with LUN swapping:
-
In LUN resynchronization, the shadow copy is not altered, so it can be used several times. In LUN swapping, the shadow copy can be used only once for a recovery. For the most safety-conscious administrators, this is important. When LUN resynchronization is used, the requester can retry the entire restore operation if something goes wrong the first time.
-
At the end of a LUN swap, the shadow copy LUN is used for production I/O requests. For this reason, the shadow copy LUN must use the same quality of storage as the original production LUN to ensure that performance is not impacted after the recovery operation. If LUN resynchronization is used instead, the hardware provider can maintain the shadow copy on storage that is less expensive than production-quality storage.
-
If the destination LUN is unusable and needs to be recreated, LUN swapping may be more economical because it doesn’t require a destination LUN.
[!WARNING]
All of the operations listed are LUN-level operations. If you attempt to recover a specific volume by using LUN resynchronization, you are unwittingly going to revert all the other volumes that are sharing the LUN.
Restoring individual files (Shadow Copies for Shared Folders)
Shadow Copies for Shared Folders uses the Volume Shadow Copy Service to provide point-in-time copies of files that are located on a shared network resource, such as a file server. With Shadow Copies for Shared Folders, users can quickly recover deleted or changed files that are stored on the network. Because they can do so without administrator assistance, Shadow Copies for Shared Folders can increase productivity and reduce administrative costs.
For more information about Shadow Copies for Shared Folders, see Shadow Copies for Shared Folders (https://go.microsoft.com/fwlink/?LinkId=180898) on TechNet.
Data mining by using transportable shadow copies
With a hardware provider that is designed for use with the Volume Shadow Copy Service, you can create transportable shadow copies that can be imported onto servers within the same subsystem (for example, a SAN). These shadow copies can be used to seed a production or test installation with read-only data for data mining.
With the Volume Shadow Copy Service and a storage array with a hardware provider that is designed for use with the Volume Shadow Copy Service, it is possible to create a shadow copy of the source data volume on one server, and then import the shadow copy onto another server (or back to the same server). This process is accomplished in a few minutes, regardless of the size of the data. The transport process is accomplished through a series of steps that use a shadow copy requester (a storage-management application) that supports transportable shadow copies.
To transport a shadow copy
-
Create a transportable shadow copy of the source data on a server.
-
Import the shadow copy to a server that is connected to the SAN (you can import to a different server or the same server).
-
The data is now ready to be used.
.jpg)
Figure 3 Shadow copy creation and transport between two servers
[!NOTE]
A transportable shadow copy that is created on Windows Server 2003 cannot be imported onto a server that is running Windows Server 2008 or Windows Server 2008 R2. A transportable shadow copy that was created on Windows Server 2008 or Windows Server 2008 R2 cannot be imported onto a server that is running Windows Server 2003. However, a shadow copy that is created on Windows Server 2008 can be imported onto a server that is running Windows Server 2008 R2 and vice versa.
Shadow copies are read-only. If you want to convert a shadow copy to a read/write LUN, you can use a Virtual Disk Service-based storage-management application (including some requesters) in addition to the Volume Shadow Copy Service. By using this application, you can remove the shadow copy from Volume Shadow Copy Service management and convert it to a read/write LUN.
Volume Shadow Copy Service transport is an advanced solution on computers running Windows Server 2003 Enterprise Edition, Windows Server 2003 Datacenter Edition, Windows Server 2008, or Windows Server 2008 R2. It works only if there is a hardware provider on the storage array. Shadow copy transport can be used for a number of purposes, including tape backups, data mining, and testing.
Frequently Asked Questions
This FAQ answers questions about Volume Shadow Copy Service (VSS) for system administrators. For information about VSS application programming interfaces, see Volume Shadow Copy Service (https://go.microsoft.com/fwlink/?LinkId=180899) in the Windows Developer Center Library.
When was Volume Shadow Copy Service introduced? On which Windows operating system versions is it available?
VSS was introduced in Windows XP. It is available on Windows XP, Windows Server 2003, Windows Vista®, Windows Server 2008, Windows 7, and Windows Server 2008 R2.
What is the difference between a shadow copy and a backup?
In the case of a hard disk drive backup, the shadow copy created is also the backup. Data can be copied off the shadow copy for a restore or the shadow copy can be used for a fast recovery scenario—for example, LUN resynchronization or LUN swapping.
When data is copied from the shadow copy to tape or other removable media, the content that is stored on the media constitutes the backup. The shadow copy itself can be deleted after the data is copied from it.
What is the largest size volume that Volume Shadow Copy Service supports?
Volume Shadow Copy Service supports a volume size of up to 64 TB.
I made a backup on Windows Server 2008. Can I restore it on Windows Server 2008 R2?
It depends on the backup software that you used. Most backup programs support this scenario for data but not for system state backups.
Shadow copies that are created on either of these versions of Windows can be used on the other.
I made a backup on Windows Server 2003. Can I restore it on Windows Server 2008?
It depends on the backup software you used. If you create a shadow copy on Windows Server 2003, you cannot use it on Windows Server 2008. Also, if you create a shadow copy on Windows Server 2008, you cannot restore it on Windows Server 2003.
How can I disable VSS?
It is possible to disable the Volume Shadow Copy Service by using the Microsoft Management Console. However, you should not do this. Disabling VSS adversely affects any software you use that depends on it, such as System Restore and Windows Server Backup.
For more information, see the following Microsoft TechNet Web sites:
-
System Restore (https://go.microsoft.com/fwlink/?LinkID=157113)
-
Windows Server Backup (https://go.microsoft.com/fwlink/?LinkID=180891)
Can I exclude files from a shadow copy to save space?
VSS is designed to create shadow copies of entire volumes. Temporary files, such as paging files, are automatically omitted from shadow copies to save space.
To exclude specific files from shadow copies, use the following registry key: FilesNotToSnapshot.
[!NOTE]
The FilesNotToSnapshot registry key is intended to be used only by applications. Users who attempt to use it will encounter limitations such as the following:
- It cannot delete files from a shadow copy that was created on a Windows Server by using the Previous Versions feature.
- It cannot delete files from shadow copies for shared folders.
- It can delete files from a shadow copy that was created by using the Diskshadow utility, but it cannot delete files from a shadow copy that was created by using the Vssadmin utility.
- Files are deleted from a shadow copy on a best-effort basis. This means that they are not guaranteed to be deleted.
For more information, see Excluding Files from Shadow Copies (https://go.microsoft.com/fwlink/?LinkId=180904) on MSDN.
My non-Microsoft backup program failed with a VSS error. What can I do?
Check the product support section of the Web site of the company that created the backup program. There may be a product update that you can download and install to fix the problem. If not, contact the company’s product support department.
System administrators can use the VSS troubleshooting information on the following Microsoft TechNet Library Web site to gather diagnostic information about VSS-related issues.
For more information, see Volume Shadow Copy Service (https://go.microsoft.com/fwlink/?LinkId=180905) on TechNet.
What is the «diff area»?
The shadow copy storage area (or «diff area») is the location where the data for the shadow copy that is created by the system software provider is stored.
Where is the diff area located?
The diff area can be located on any local volume. However, it must be located on an NTFS volume that has enough space to store it.
How is the diff area location determined?
The following criteria are evaluated, in this order, to determine the diff area location:
-
If a volume already has an existing shadow copy, that location is used.
-
If there is a preconfigured manual association between the original volume and the shadow copy volume location, then that location is used.
-
If the previous two criteria do not provide a location, the shadow copy service chooses a location based on available free space. If more than one volume is being shadow copied, the shadow copy service creates a list of possible snapshot locations based on the size of free space, in descending order. The number of locations provided is equal to the number of volumes being shadow copied.
-
If the volume being shadow copied is one of the possible locations, then a local association is created. Otherwise an association with the volume with the most available space is created.
Can VSS create shadow copies of non-NTFS volumes?
Yes. However, persistent shadow copies can be made only for NTFS volumes. In addition, at least one volume mounted on the system must be an NTFS volume.
What’s the maximum number of shadow copies I can create at one time?
The maximum number of shadow copied volumes in a single shadow copy set is 64. Note that this is not the same as the number of shadow copies.
What’s the maximum number of software shadow copies created by the system provider that I can maintain for a volume?
The max number is of software shadow copies for each volume is 512. However, by default you can only maintain 64 shadow copies that are used by the Shadow Copies of Shared Folders feature. To change the limit for the Shadow Copies of Shared Folders feature, use the following registry key: MaxShadowCopies.
How can I control the space that is used for shadow copy storage space?
Type the vssadmin resize shadowstorage command.
For more information, see Vssadmin resize shadowstorage (https://go.microsoft.com/fwlink/?LinkId=180906) on TechNet.
What happens when I run out of space?
Shadow copies for the volume are deleted, beginning with the oldest shadow copy.
Volume Shadow Copy Service Tools
The Windows operating system provides the following tools for working with VSS:
-
DiskShadow (https://go.microsoft.com/fwlink/?LinkId=180907)
-
VssAdmin (https://go.microsoft.com/fwlink/?LinkId=84008)
DiskShadow
DiskShadow is a VSS requester that you can use to manage all the hardware and software snapshots that you can have on a system. DiskShadow includes commands such as the following:
-
list: Lists VSS writers, VSS providers, and shadow copies
-
create: Creates a new shadow copy
-
import: Imports a transportable shadow copy
-
expose: Exposes a persistent shadow copy (as a drive letter, for example)
-
revert: Reverts a volume back to a specified shadow copy
This tool is intended for use by IT professionals, but developers might also find it useful when testing a VSS writer or VSS provider.
DiskShadow is available only on Windows Server operating systems. It is not available on Windows client operating systems.
VssAdmin
VssAdmin is used to create, delete, and list information about shadow copies. It can also be used to resize the shadow copy storage area («diff area»).
VssAdmin includes commands such as the following:
-
create shadow: Creates a new shadow copy
-
delete shadows: Deletes shadow copies
-
list providers: Lists all registered VSS providers
-
list writers: Lists all subscribed VSS writers
-
resize shadowstorage: Changes the maximum size of the shadow copy storage area
VssAdmin can only be used to administer shadow copies that are created by the system software provider.
VssAdmin is available on Windows client and Windows Server operating system versions.
Volume Shadow Copy Service Registry Keys
The following registry keys are available for use with VSS:
-
VssAccessControl
-
MaxShadowCopies
-
MinDiffAreaFileSize
VssAccessControl
This key is used to specify which users have access to shadow copies.
For more information, see the following entries on the MSDN Web site:
-
Security Considerations for Writers (https://go.microsoft.com/fwlink/?LinkId=157739)
-
Security Considerations for Requesters (https://go.microsoft.com/fwlink/?LinkId=180908)
MaxShadowCopies
This key specifies the maximum number of client-accessible shadow copies that can be stored on each volume of the computer. Client-accessible shadow copies are used by Shadow Copies for Shared Folders.
For more information, see the following entry on the MSDN Web site:
MaxShadowCopies under Registry Keys for Backup and Restore (https://go.microsoft.com/fwlink/?LinkId=180909)
MinDiffAreaFileSize
This key specifies the minimum initial size, in MB, of the shadow copy storage area.
For more information, see the following entry on the MSDN Web site:
MinDiffAreaFileSize under Registry Keys for Backup and Restore (https://go.microsoft.com/fwlink/?LinkId=180910)
Supported Operating System Versions
The following table lists the minimum supported operating system versions for VSS features.
| VSS feature | Minimum supported client | Minimum supported server | ||
|---|---|---|---|---|
|
LUN resynchronization |
None supported |
Windows Server 2008 R2 |
||
|
FilesNotToSnapshot registry key |
Windows Vista |
Windows Server 2008 |
||
|
Transportable shadow copies |
None supported |
Windows Server 2003 with SP1 |
||
|
Hardware shadow copies |
None supported |
Windows Server 2003 |
||
|
Previous versions of Windows Server |
Windows Vista |
Windows Server 2003 |
||
|
Fast recovery using LUN swap |
None supported |
Windows Server 2003 with SP1 |
||
|
Multiple imports of hardware shadow copies
|
None supported |
Windows Server 2008 |
||
|
Shadow Copies for Shared Folders |
None supported |
Windows Server 2003 |
||
|
Transportable auto-recovered shadow copies |
None supported |
Windows Server 2008 |
||
|
Concurrent backup sessions (up to 64) |
Windows XP |
Windows Server 2003 |
||
|
Single restore session concurrent with backups |
Windows Vista |
Windows Server 2003 with SP2 |
||
|
Up to 8 restore sessions concurrent with backups |
Windows 7 |
Windows Server 2003 R2 |
Additional References
Volume Shadow Copy Service in Windows Developer Center
| description | title | ms.date | author | manager | ms.author | ms.topic |
|---|---|---|---|---|---|---|
|
Learn more about: Volume Shadow Copy Service |
Volume Shadow Copy Service |
12/06/2022 |
JasonGerend |
elizapo |
jgerend |
article |
Volume Shadow Copy Service
Applies to: Windows Server 2022, Windows Server 2019, Windows Server 2016, Windows Server 2012 R2, Windows Server 2012, and Windows Server 2008 R2, Windows Server 2008, Windows 10, Windows 8.1, Windows 8, Windows 7
Backing up and restoring critical business data can be very complex due to the following issues:
-
The data usually needs to be backed up while the applications that produce the data are still running. This means that some of the data files might be open or they might be in an inconsistent state.
-
If the data set is large, it can be difficult to back up all of it at one time.
Correctly performing backup and restore operations requires close coordination between the backup applications, the line-of-business applications that are being backed up, and the storage management hardware and software. The Volume Shadow Copy Service (VSS), which was introduced in Windows Server® 2003, facilitates the conversation between these components to allow them to work better together. When all the components support VSS, you can use them to back up your application data without taking the applications offline.
VSS coordinates the actions that are required to create a consistent shadow copy (also known as a snapshot or a point-in-time copy) of the data that is to be backed up. The shadow copy can be used as-is, or it can be used in scenarios such as the following:
-
You want to back up application data and system state information, including archiving data to another hard disk drive, to tape, or to other removable media.
-
You are data mining.
-
You are performing disk-to-disk backups.
-
You need a fast recovery from data loss by restoring data to the original Logical Unit Number (LUN) or to an entirely new LUN that replaces an original LUN that failed.
Windows features and applications that use VSS include the following:
-
Windows Server Backup (https://go.microsoft.com/fwlink/?LinkId=180891)
-
Shadow Copies of Shared Folders (https://go.microsoft.com/fwlink/?LinkId=142874)
-
System Center Data Protection Manager (https://go.microsoft.com/fwlink/?LinkId=180892)
-
System Restore (https://support.microsoft.com/windows/use-system-restore-a5ae3ed9-07c4-fd56-45ee-096777ecd14e)
How Volume Shadow Copy Service Works
A complete VSS solution requires all of the following basic parts:
VSS service Part of the Windows operating system that ensures the other components can communicate with each other properly and work together.
VSS requester The software that requests the actual creation of shadow copies (or other high-level operations like importing or deleting them). Typically, this is the backup application. The Windows Server Backup utility and the System Center Data Protection Manager application are VSS requesters. Non-Microsoft® VSS requesters include nearly all backup software that runs on Windows.
VSS writer The component that guarantees we have a consistent data set to back up. This is typically provided as part of a line-of-business application, such as SQL Server® or Exchange Server. VSS writers for various Windows components, such as the registry, are included with the Windows operating system. Non-Microsoft VSS writers are included with many applications for Windows that need to guarantee data consistency during back up.
VSS provider The component that creates and maintains the shadow copies. This can occur in the software or in the hardware. The Windows operating system includes a VSS provider that uses copy-on-write. If you use a storage area network (SAN), it is important that you install the VSS hardware provider for the SAN, if one is provided. A hardware provider offloads the task of creating and maintaining a shadow copy from the host operating system.
The following diagram illustrates how the VSS service coordinates with requesters, writers, and providers to create a shadow copy of a volume.
Figure 1 Architectural diagram of Volume Shadow Copy Service
How a Shadow Copy Is Created
This section puts the various roles of the requester, writer, and provider into context by listing the steps that need to be taken to create a shadow copy. The following diagram shows how the Volume Shadow Copy Service controls the overall coordination of the requester, writer, and provider.
Figure 2 Shadow copy creation process
To create a shadow copy, the requester, writer, and provider perform the following actions:
-
The requester asks the Volume Shadow Copy Service to enumerate the writers, gather the writer metadata, and prepare for shadow copy creation.
-
Each writer creates an XML description of the components and data stores that need to be backed up and provides it to the Volume Shadow Copy Service. The writer also defines a restore method, which is used for all components. The Volume Shadow Copy Service provides the writer’s description to the requester, which selects the components that will be backed up.
-
The Volume Shadow Copy Service notifies all the writers to prepare their data for making a shadow copy.
-
Each writer prepares the data as appropriate, such as completing all open transactions, rolling transaction logs, and flushing caches. When the data is ready to be shadow-copied, the writer notifies the Volume Shadow Copy Service.
-
The Volume Shadow Copy Service tells the writers to temporarily freeze application write I/O requests (read I/O requests are still possible) for the few seconds that are required to create the shadow copy of the volume or volumes. The application freeze is not allowed to take longer than 60 seconds. The Volume Shadow Copy Service flushes the file system buffers and then freezes the file system, which ensures that the file system metadata is recorded correctly and the data to be shadow-copied is written in a consistent order.
-
The Volume Shadow Copy Service tells the provider to create the shadow copy. The shadow copy creation period lasts no more than 10 seconds, during which all write I/O requests to the file system remain frozen.
-
The Volume Shadow Copy Service releases file system write I/O requests.
-
VSS tells the writers to thaw application write I/O requests. At this point applications are free to resume writing data to the disk that is being shadow-copied.
[!NOTE]
The shadow copy creation can be aborted if the writers are kept in the freeze state for longer than 60 seconds or if the providers take longer than 10 seconds to commit the shadow copy.
-
The requester can retry the process (go back to step 1) or notify the administrator to retry at a later time.
-
If the shadow copy is successfully created, the Volume Shadow Copy Service returns the location information for the shadow copy to the requester. In some cases, the shadow copy can be temporarily made available as a read-write volume so that VSS and one or more applications can alter the contents of the shadow copy before the shadow copy is finished. After VSS and the applications make their alterations, the shadow copy is made read-only. This phase is called Auto-recovery, and it is used to undo any file-system or application transactions on the shadow copy volume that were not completed before the shadow copy was created.
How the Provider Creates a Shadow Copy
A hardware or software shadow copy provider uses one of the following methods for creating a shadow copy:
Complete copy This method makes a complete copy (called a «full copy» or «clone») of the original volume at a given point in time. This copy is read-only.
Copy-on-write This method does not copy the original volume. Instead, it makes a differential copy by copying all changes (completed write I/O requests) that are made to the volume after a given point in time.
Redirect-on-write This method does not copy the original volume, and it does not make any changes to the original volume after a given point in time. Instead, it makes a differential copy by redirecting all changes to a different volume.
Complete copy
A complete copy is usually created by making a «split mirror» as follows:
-
The original volume and the shadow copy volume are a mirrored volume set.
-
The shadow copy volume is separated from the original volume. This breaks the mirror connection.
After the mirror connection is broken, the original volume and the shadow copy volume are independent. The original volume continues to accept all changes (write I/O requests), while the shadow copy volume remains an exact read-only copy of the original data at the time of the break.
Copy-on-write method
In the copy-on-write method, when a change to the original volume occurs (but before the write I/O request is completed), each block to be modified is read and then written to the volume’s shadow copy storage area (also called its «diff area»). The shadow copy storage area can be on the same volume or a different volume. This preserves a copy of the data block on the original volume before the change overwrites it.
| Time | Source data (status and data) | Shadow copy (status and data) |
|---|---|---|
|
T0 |
Original data: 1 2 3 4 5 |
No copy: — |
|
T1 |
Data changed in cache: 3 to 3′ |
Shadow copy created (differences only): 3 |
|
T2 |
Original data overwritten: 1 2 3′ 4 5 |
Differences and index stored on shadow copy: 3 |
Table 1 The copy-on-write method of creating shadow copies
The copy-on-write method is a quick method for creating a shadow copy, because it copies only data that is changed. The copied blocks in the diff area can be combined with the changed data on the original volume to restore the volume to its state before any of the changes were made. If there are many changes, the copy-on-write method can become expensive.
Redirect-on-write method
In the redirect-on-write method, whenever the original volume receives a change (write I/O request), the change is not applied to the original volume. Instead, the change is written to another volume’s shadow copy storage area.
| Time | Source data (status and data) | Shadow copy (status and data) |
|---|---|---|
|
T0 |
Original data: 1 2 3 4 5 |
No copy: — |
|
T1 |
Data changed in cache: 3 to 3′ |
Shadow copy created (differences only): 3′ |
|
T2 |
Original data unchanged: 1 2 3 4 5 |
Differences and index stored on shadow copy: 3′ |
Table 2 The redirect-on-write method of creating shadow copies
Like the copy-on-write method, the redirect-on-write method is a quick method for creating a shadow copy, because it copies only changes to the data. The copied blocks in the diff area can be combined with the unchanged data on the original volume to create a complete, up-to-date copy of the data. If there are many read I/O requests, the redirect-on-write method can become expensive.
Shadow Copy Providers
There are two types of shadow copy providers: hardware-based providers and software-based providers. There is also a system provider, which is a software provider that is built in to the Windows operating system.
Hardware-based providers
Hardware-based shadow copy providers act as an interface between the Volume Shadow Copy Service and the hardware level by working in conjunction with a hardware storage adapter or controller. The work of creating and maintaining the shadow copy is performed by the storage array.
Hardware providers always take the shadow copy of an entire LUN, but the Volume Shadow Copy Service only exposes the shadow copy of the volume or volumes that were requested.
A hardware-based shadow copy provider makes use of the Volume Shadow Copy Service functionality that defines the point in time, allows data synchronization, manages the shadow copy, and provides a common interface with backup applications. However, the Volume Shadow Copy Service does not specify the underlying mechanism by which the hardware-based provider produces and maintains shadow copies.
Software-based providers
Software-based shadow copy providers typically intercept and process read and write I/O requests in a software layer between the file system and the volume manager software.
These providers are implemented as a user-mode DLL component and at least one kernel-mode device driver, typically a storage filter driver. Unlike hardware-based providers, software-based providers create shadow copies at the software level, not the hardware level.
A software-based shadow copy provider must maintain a «point-in-time» view of a volume by having access to a data set that can be used to re-create volume status before the shadow copy creation time. An example is the copy-on-write technique of the system provider. However, the Volume Shadow Copy Service places no restrictions on what technique the software-based providers use to create and maintain shadow copies.
A software provider is applicable to a wider range of storage platforms than a hardware-based provider, and it should work with basic disks or logical volumes equally well. (A logical volume is a volume that is created by combining free space from two or more disks.) In contrast to hardware shadow copies, software providers consume operating system resources to maintain the shadow copy.
For more information about basic disks, see What Are Basic Disks and Volumes?.
System provider
One shadow copy provider, the system provider, is supplied in the Windows operating system. Although a default provider is supplied in Windows, other vendors are free to supply implementations that are optimized for their storage hardware and software applications.
To maintain the «point-in-time» view of a volume that is contained in a shadow copy, the system provider uses a copy-on-write technique. Copies of the blocks on volume that have been modified since the beginning of the shadow copy creation are stored in a shadow copy storage area.
The system provider can expose the production volume, which can be written to and read from normally. When the shadow copy is needed, it logically applies the differences to data on the production volume to expose the complete shadow copy.
For the system provider, the shadow copy storage area must be on an NTFS volume. The volume to be shadow copied does not need to be an NTFS volume, but at least one volume mounted on the system must be an NTFS volume.
The component files that make up the system provider are swprv.dll and volsnap.sys.
In-Box VSS Writers
The Windows operating system includes a set of VSS writers that are responsible for enumerating the data that is required by various Windows features.
For more information about these writers, see In-Box VSS Writers.
How Shadow Copies Are Used
In addition to backing up application data and system state information, shadow copies can be used for a number of purposes, including the following:
-
Restoring LUNs (LUN resynchronization and LUN swapping)
-
Restoring individual files (Shadow Copies for Shared Folders)
-
Data mining by using transportable shadow copies
Restoring LUNs (LUN resynchronization and LUN swapping)
In Windows Server 2008 R2 and Windows 7, VSS requesters can use a hardware shadow copy provider feature called LUN resynchronization (or «LUN resync»). This is a fast-recovery scheme that allows an application administrator to restore data from a shadow copy to the original LUN or to a new LUN.
The shadow copy can be a full clone or a differential shadow copy. In either case, at the end of the resync operation, the destination LUN will have the same contents as the shadow copy LUN. During the resync operation, the array performs a block-level copy from the shadow copy to the destination LUN.
[!NOTE]
The shadow copy must be a transportable hardware shadow copy.
Most arrays allow production I/O operations to resume shortly after the resync operation begins. While the resync operation is in progress, read requests are redirected to the shadow copy LUN, and write requests to the destination LUN. This allows arrays to recover very large data sets and resume normal operations in several seconds.
LUN resynchronization is different from LUN swapping. A LUN swap is a fast recovery scenario that VSS has supported since Windows Server 2003 SP1. In a LUN swap, the shadow copy is imported and then converted into a read-write volume. The conversion is an irreversible operation, and the volume and underlying LUN cannot be controlled with the VSS APIs after that. The following list describes how LUN resynchronization compares with LUN swapping:
-
In LUN resynchronization, the shadow copy is not altered, so it can be used several times. In LUN swapping, the shadow copy can be used only once for a recovery. For the most safety-conscious administrators, this is important. When LUN resynchronization is used, the requester can retry the entire restore operation if something goes wrong the first time.
-
At the end of a LUN swap, the shadow copy LUN is used for production I/O requests. For this reason, the shadow copy LUN must use the same quality of storage as the original production LUN to ensure that performance is not impacted after the recovery operation. If LUN resynchronization is used instead, the hardware provider can maintain the shadow copy on storage that is less expensive than production-quality storage.
-
If the destination LUN is unusable and needs to be recreated, LUN swapping may be more economical because it doesn’t require a destination LUN.
[!WARNING]
All of the operations listed are LUN-level operations. If you attempt to recover a specific volume by using LUN resynchronization, you are unwittingly going to revert all the other volumes that are sharing the LUN.
Restoring individual files (Shadow Copies for Shared Folders)
Shadow Copies for Shared Folders uses the Volume Shadow Copy Service to provide point-in-time copies of files that are located on a shared network resource, such as a file server. With Shadow Copies for Shared Folders, users can quickly recover deleted or changed files that are stored on the network. Because they can do so without administrator assistance, Shadow Copies for Shared Folders can increase productivity and reduce administrative costs.
For more information about Shadow Copies for Shared Folders, see Shadow Copies for Shared Folders (https://go.microsoft.com/fwlink/?LinkId=180898) on TechNet.
Data mining by using transportable shadow copies
With a hardware provider that is designed for use with the Volume Shadow Copy Service, you can create transportable shadow copies that can be imported onto servers within the same subsystem (for example, a SAN). These shadow copies can be used to seed a production or test installation with read-only data for data mining.
With the Volume Shadow Copy Service and a storage array with a hardware provider that is designed for use with the Volume Shadow Copy Service, it is possible to create a shadow copy of the source data volume on one server, and then import the shadow copy onto another server (or back to the same server). This process is accomplished in a few minutes, regardless of the size of the data. The transport process is accomplished through a series of steps that use a shadow copy requester (a storage-management application) that supports transportable shadow copies.
To transport a shadow copy
-
Create a transportable shadow copy of the source data on a server.
-
Import the shadow copy to a server that is connected to the SAN (you can import to a different server or the same server).
-
The data is now ready to be used.
Figure 3 Shadow copy creation and transport between two servers
[!NOTE]
A transportable shadow copy that is created on Windows Server 2003 cannot be imported onto a server that is running Windows Server 2008 or Windows Server 2008 R2. A transportable shadow copy that was created on Windows Server 2008 or Windows Server 2008 R2 cannot be imported onto a server that is running Windows Server 2003. However, a shadow copy that is created on Windows Server 2008 can be imported onto a server that is running Windows Server 2008 R2 and vice versa.
Shadow copies are read-only. If you want to convert a shadow copy to a read/write LUN, you can use a Virtual Disk Service-based storage-management application (including some requesters) in addition to the Volume Shadow Copy Service. By using this application, you can remove the shadow copy from Volume Shadow Copy Service management and convert it to a read/write LUN.
Volume Shadow Copy Service transport is an advanced solution on computers running Windows Server 2003 Enterprise Edition, Windows Server 2003 Datacenter Edition, Windows Server 2008, or Windows Server 2008 R2. It works only if there is a hardware provider on the storage array. Shadow copy transport can be used for a number of purposes, including tape backups, data mining, and testing.
Frequently Asked Questions
This FAQ answers questions about Volume Shadow Copy Service (VSS) for system administrators. For information about VSS application programming interfaces, see Volume Shadow Copy Service (https://go.microsoft.com/fwlink/?LinkId=180899) in the Windows Developer Center Library.
When was Volume Shadow Copy Service introduced? On which Windows operating system versions is it available?
VSS was introduced in Windows XP. It is available on Windows XP, Windows Server 2003, Windows Vista®, Windows Server 2008, Windows 7, and Windows Server 2008 R2.
What is the difference between a shadow copy and a backup?
In the case of a hard disk drive backup, the shadow copy created is also the backup. Data can be copied off the shadow copy for a restore or the shadow copy can be used for a fast recovery scenario—for example, LUN resynchronization or LUN swapping.
When data is copied from the shadow copy to tape or other removable media, the content that is stored on the media constitutes the backup. The shadow copy itself can be deleted after the data is copied from it.
What is the largest size volume that Volume Shadow Copy Service supports?
Volume Shadow Copy Service supports a volume size of up to 64 TB.
I made a backup on Windows Server 2008. Can I restore it on Windows Server 2008 R2?
It depends on the backup software that you used. Most backup programs support this scenario for data but not for system state backups.
Shadow copies that are created on either of these versions of Windows can be used on the other.
I made a backup on Windows Server 2003. Can I restore it on Windows Server 2008?
It depends on the backup software you used. If you create a shadow copy on Windows Server 2003, you cannot use it on Windows Server 2008. Also, if you create a shadow copy on Windows Server 2008, you cannot restore it on Windows Server 2003.
How can I disable VSS?
It is possible to disable the Volume Shadow Copy Service by using the Microsoft Management Console. However, you should not do this. Disabling VSS adversely affects any software you use that depends on it, such as System Restore and Windows Server Backup.
For more information, see the following Microsoft TechNet Web sites:
-
System Restore (https://go.microsoft.com/fwlink/?LinkID=157113)
-
Windows Server Backup (https://go.microsoft.com/fwlink/?LinkID=180891)
Can I exclude files from a shadow copy to save space?
VSS is designed to create shadow copies of entire volumes. Temporary files, such as paging files, are automatically omitted from shadow copies to save space.
To exclude specific files from shadow copies, use the following registry key: FilesNotToSnapshot.
[!NOTE]
The FilesNotToSnapshot registry key is intended to be used only by applications. Users who attempt to use it will encounter limitations such as the following:
- It cannot delete files from a shadow copy that was created on a Windows Server by using the Previous Versions feature.
- It cannot delete files from shadow copies for shared folders.
- It can delete files from a shadow copy that was created by using the Diskshadow utility, but it cannot delete files from a shadow copy that was created by using the Vssadmin utility.
- Files are deleted from a shadow copy on a best-effort basis. This means that they are not guaranteed to be deleted.
For more information, see Excluding Files from Shadow Copies (https://go.microsoft.com/fwlink/?LinkId=180904) on MSDN.
My non-Microsoft backup program failed with a VSS error. What can I do?
Check the product support section of the Web site of the company that created the backup program. There may be a product update that you can download and install to fix the problem. If not, contact the company’s product support department.
System administrators can use the VSS troubleshooting information on the following Microsoft TechNet Library Web site to gather diagnostic information about VSS-related issues.
For more information, see Volume Shadow Copy Service (https://go.microsoft.com/fwlink/?LinkId=180905) on TechNet.
What is the «diff area»?
The shadow copy storage area (or «diff area») is the location where the data for the shadow copy that is created by the system software provider is stored.
Where is the diff area located?
The diff area can be located on any local volume. However, it must be located on an NTFS volume that has enough space to store it.
How is the diff area location determined?
The following criteria are evaluated, in this order, to determine the diff area location:
-
If a volume already has an existing shadow copy, that location is used.
-
If there is a preconfigured manual association between the original volume and the shadow copy volume location, then that location is used.
-
If the previous two criteria do not provide a location, the shadow copy service chooses a location based on available free space. If more than one volume is being shadow copied, the shadow copy service creates a list of possible snapshot locations based on the size of free space, in descending order. The number of locations provided is equal to the number of volumes being shadow copied.
-
If the volume being shadow copied is one of the possible locations, then a local association is created. Otherwise an association with the volume with the most available space is created.
Can VSS create shadow copies of non-NTFS volumes?
Yes. However, persistent shadow copies can be made only for NTFS volumes. In addition, at least one volume mounted on the system must be an NTFS volume.
What’s the maximum number of shadow copies I can create at one time?
The maximum number of shadow copied volumes in a single shadow copy set is 64. Note that this is not the same as the number of shadow copies.
What’s the maximum number of software shadow copies created by the system provider that I can maintain for a volume?
The max number is of software shadow copies for each volume is 512. However, by default you can only maintain 64 shadow copies that are used by the Shadow Copies of Shared Folders feature. To change the limit for the Shadow Copies of Shared Folders feature, use the following registry key: MaxShadowCopies.
How can I control the space that is used for shadow copy storage space?
Type the vssadmin resize shadowstorage command.
For more information, see Vssadmin resize shadowstorage (https://go.microsoft.com/fwlink/?LinkId=180906) on TechNet.
What happens when I run out of space?
Shadow copies for the volume are deleted, beginning with the oldest shadow copy.
Volume Shadow Copy Service Tools
The Windows operating system provides the following tools for working with VSS:
-
DiskShadow (https://go.microsoft.com/fwlink/?LinkId=180907)
-
VssAdmin (https://go.microsoft.com/fwlink/?LinkId=84008)
DiskShadow
DiskShadow is a VSS requester that you can use to manage all the hardware and software snapshots that you can have on a system. DiskShadow includes commands such as the following:
-
list: Lists VSS writers, VSS providers, and shadow copies
-
create: Creates a new shadow copy
-
import: Imports a transportable shadow copy
-
expose: Exposes a persistent shadow copy (as a drive letter, for example)
-
revert: Reverts a volume back to a specified shadow copy
This tool is intended for use by IT professionals, but developers might also find it useful when testing a VSS writer or VSS provider.
DiskShadow is available only on Windows Server operating systems. It is not available on Windows client operating systems.
VssAdmin
VssAdmin is used to create, delete, and list information about shadow copies. It can also be used to resize the shadow copy storage area («diff area»).
VssAdmin includes commands such as the following:
-
create shadow: Creates a new shadow copy
-
delete shadows: Deletes shadow copies
-
list providers: Lists all registered VSS providers
-
list writers: Lists all subscribed VSS writers
-
resize shadowstorage: Changes the maximum size of the shadow copy storage area
VssAdmin can only be used to administer shadow copies that are created by the system software provider.
VssAdmin is available on Windows client and Windows Server operating system versions.
Volume Shadow Copy Service Registry Keys
The following registry keys are available for use with VSS:
-
VssAccessControl
-
MaxShadowCopies
-
MinDiffAreaFileSize
VssAccessControl
This key is used to specify which users have access to shadow copies.
For more information, see the following entries on the MSDN Web site:
-
Security Considerations for Writers (https://go.microsoft.com/fwlink/?LinkId=157739)
-
Security Considerations for Requesters (https://go.microsoft.com/fwlink/?LinkId=180908)
MaxShadowCopies
This key specifies the maximum number of client-accessible shadow copies that can be stored on each volume of the computer. Client-accessible shadow copies are used by Shadow Copies for Shared Folders.
For more information, see the following entry on the MSDN Web site:
MaxShadowCopies under Registry Keys for Backup and Restore (https://go.microsoft.com/fwlink/?LinkId=180909)
MinDiffAreaFileSize
This key specifies the minimum initial size, in MB, of the shadow copy storage area.
For more information, see the following entry on the MSDN Web site:
MinDiffAreaFileSize under Registry Keys for Backup and Restore (https://go.microsoft.com/fwlink/?LinkId=180910)
Supported Operating System Versions
The following table lists the minimum supported operating system versions for VSS features.
| VSS feature | Minimum supported client | Minimum supported server | ||
|---|---|---|---|---|
|
LUN resynchronization |
None supported |
Windows Server 2008 R2 |
||
|
FilesNotToSnapshot registry key |
Windows Vista |
Windows Server 2008 |
||
|
Transportable shadow copies |
None supported |
Windows Server 2003 with SP1 |
||
|
Hardware shadow copies |
None supported |
Windows Server 2003 |
||
|
Previous versions of Windows Server |
Windows Vista |
Windows Server 2003 |
||
|
Fast recovery using LUN swap |
None supported |
Windows Server 2003 with SP1 |
||
|
Multiple imports of hardware shadow copies
|
None supported |
Windows Server 2008 |
||
|
Shadow Copies for Shared Folders |
None supported |
Windows Server 2003 |
||
|
Transportable auto-recovered shadow copies |
None supported |
Windows Server 2008 |
||
|
Concurrent backup sessions (up to 64) |
Windows XP |
Windows Server 2003 |
||
|
Single restore session concurrent with backups |
Windows Vista |
Windows Server 2003 with SP2 |
||
|
Up to 8 restore sessions concurrent with backups |
Windows 7 |
Windows Server 2003 R2 |
Additional References
Volume Shadow Copy Service in Windows Developer Center