Служба теневого копирования томов — Volume Shadow Copy Service (VSS) впервые на платформе Windows появилась целых десять лет назад еще в Windows Server 2003, однако до сих пор далеко не все администраторы Windows используют функционал данной службы. Даже существует мнение, что при наличии грамотной политике резервного копирования использовать теневое копирование тома нецелесообразно. Однако это далеко не всегда так.
Возьмем в качестве примера файловый сервер с множеством каталогов и большим количеством пользователей, бэкап которого выполняется, допустим, ежедневно. Представим ситуацию, что пользователь в начале рабочего дня внес важные изменения в некий сверхкритичный документ, а в течении рабочего дня, случайно его модифицировал или удалил. Восстановить данный документ из резервной копии не получится, т.к. он в нее просто не попал. Настроить традиционный бэкап файлового сервера в течении рабочего дня технически затруднительно (да и сама процедура создания и восстановления из такого бэкапа может занять довольно много времени, усугубляющаяся использованием инкрементального или дифференциального бэкапа). В такой ситуации «спасти» положение может теневое копирование данных с помощью службы Volume Shadow Copy Service.
Эта статья посвящена настройке теневого копирования томов (Volume Shadow Copy) в новой серверной ОС Windows Server 2012.
Рассмотрим основные преимущества службы VSS по сравнению с классическими средствами резервного копирования данных:
- Высокая скорость создания резервных копий
- Возможность самостоятельного восстановления файлов пользователями (при наличии прав на запись в каталог)
- Возможность копирования используемых (заблокированных) пользователями файлов
- Небольшой размер копий (по информации MS около 30 Мб на 1 Гб данных)
Основные особенности работы службы теневого копирования томов
Что же такое теневая копия? По сути это снапшот (снимок) всей информации, хранящейся на диске. После создания теневой копии служба VSS начинает отслеживать изменение данных на диске. VSS разбивает все данные на блоки по 16Кб каждый, и если данные в таком блоке были изменены, служба записывает в файл теневой копии этот блок целиком. Таким образом получается, что при создании следующей теневой копии данных система не копирует данные целиком, а только лишь блочные изменения. Благодаря этому система теневого копирования позволяет существенно сэкономить место на диске. Теневые копии могут храниться на том же диске, на котором хранятся данные, либо на отдельном (решение для высоконагруженных систем с большой частотой изменения данных). Все файлы теневых копий хранятся в служебном каталоге System Volume Information. Эти файлы можно отличить по имени, все они содержат в имени идентификатор службы VSS — 3808876b-c176-4e48-b7ae-04046e6cc752.
Еще несколько особенностей VSS:
- По-умолчанию максимальное количество хранимых снапшотов для диска – 64. При превышении этого значения, служба VSS начинает циклическую перезапись теневых копий, удаляя самые ранние снапшоты.
- Под теневые копии система выделяет 10% емкости раздела, однако это значение можно изменить.
- Теневое копирование включается для тома целиком, и включить его для отдельной общей папки невозможно.
- Microsoft не рекомендует создавать снапшоты чаще, чем раз в час (однако, это всего лишь рекомендации).
Настройка теневого копирования сетевого каталога в Windows Server 2012
Попробуем настроить теневое копирование данных общей сетевой папки, расположенной на отдельном диске сервера с ОС Windows Server 2012.
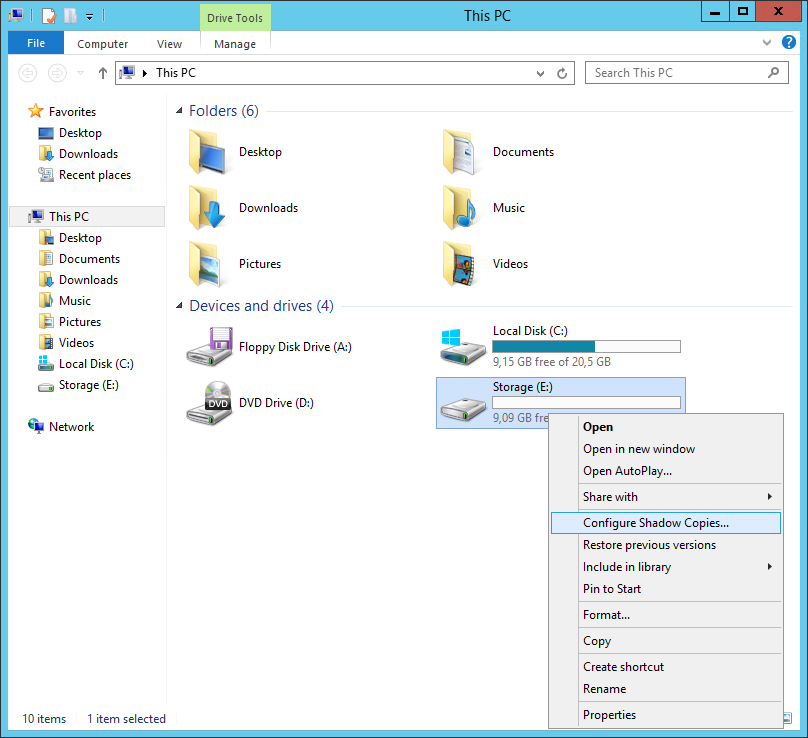
Откройте оснастку «Управление компьютером» («Computer Management»), разверните блок «Служебные программы», щелкните правой кнопкой мыши по элементу Общие папки и выберите Все задачи -> Настроить теневые копии.

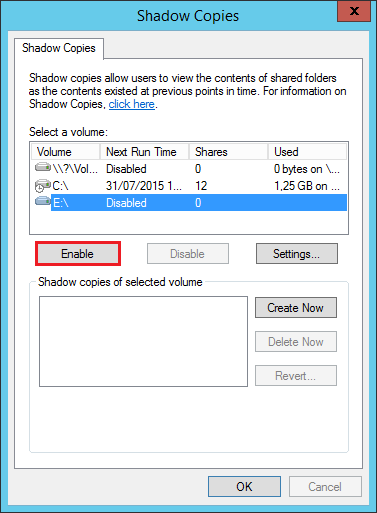
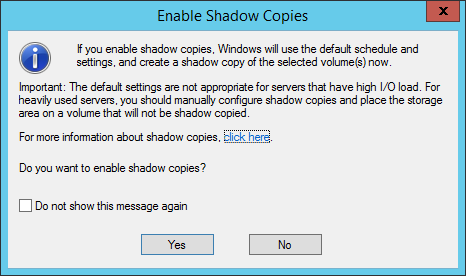
Затем нужно включить теневое копирование для раздела, на котором хранятся общие сетевые папки. Для этого выберите нужный том и нажмите кнопку «Включить». В этот момент будет создана первая теневая копия раздела (снапшот).

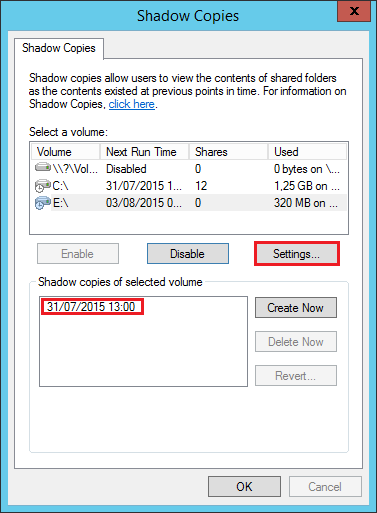
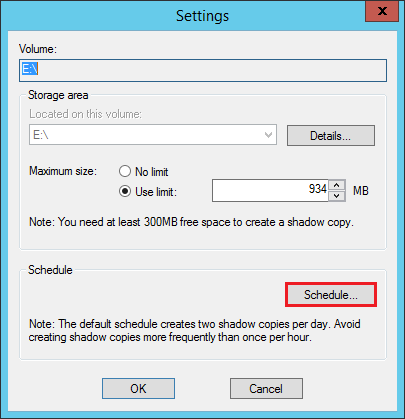
Далее необходимо задать максимальный размер копий и периодичность (расписание) их создания. Нажмите кнопку Параметры.

В данном примере настроим создание теневых копий по следующей схеме: снапшоты общих папок должны создаваться ежедневно в течении рабочего дня (с 9:00 до 19:00) каждые 10 минут. Вы, естественно, основываясь на особенности бизнес-процессов компании, можете настроить собственное расписание. 
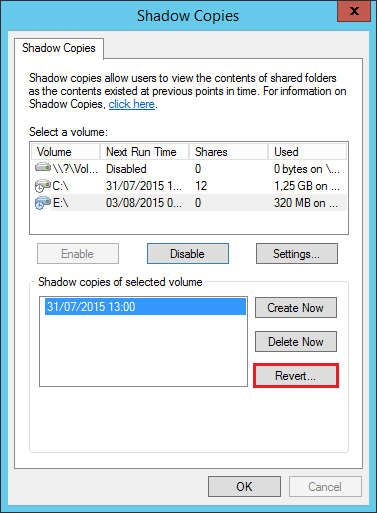
Если через некоторое время открыть свойства общей папки и перейти на вкладку «Предыдущие версии», то можно увидеть список доступных на данный момент теневых копий.

Далее у пользователя есть три варианта действия: просмотреть содержимое копии (Открыть), скопировать данные из копии в другое место (Копировать) или восстановить данные с перезаписью (Восстановить)

При попытке восстановить содержимое копии на момент снапшота появится соответствующее предупреждение.

VSS — отличное средство, позволяющее пользователям в течении дня оперативно и в удобной форме восстановить удаленный файл или откатиться к предыдущей версии документа. Нужно не забывать, что теневое копирование не отменяет необходимость выполнения классического резервного копирования данных, позволяющего восстановить данные даже в случае аппаратного сбоя.
Отметим также, что функция теневого копирования в Windows 8 была заменена на функцию File History
Posted: August 11th, 2015
Volume Shadows Copies (also known as Volume Snapshot Service or VSS) is a technology developed by Microsoft to take restorable snapshots of a volume.
On Windows Server 2012 // 2012 R2 it’s quite easy to set up and restore operations are pretty straightforward.
Note: Volume Shadow Copies allow to restore previous states of the entire volume, you can’t restore previous states of single files and/or folders.
Open the File Explorer and right-click on the volume where you want to enable Volume Shadow Copies. Select Configure Shadow Copies:
Select the volume and click Enable:
Microsoft suggests to use a dedicated drive to store Volume Shadow Copies in case of high-load. Click Yes:
A first snapshot will be generated. Default VSS settings work as following:
- Volume Shadow Copies will be stored in the same volume
- Volume Shadow Copies will take a maximum amount of 10% of the local disk space
- The system reserves a minimum of 300MB of disk space for the shadow copies
- The system schedules two shadow copies per day (7.00 AM and 12.00 PM)
To modify these settings click Settings:
The option panels are quite explicative:
To restore a previous snapshot just select it and click Revert:
Share:


Tags: Microsoft Windows
In this post, we’ll learn the steps to enable Volume Shadow Copy (VSC) in Server 2012 R2. Volume Shadow copy service (VSS) is a technology of Microsoft through which we can take backup of files, folders, and volumes. Using VSS we can either take backup manually or schedule it for automatic backup. Volume Shadow copy service (VSS) is also known as Previous Versions. Through the snapshots of files and folders taken by VSC, we can revert back the files as per our requirements.
Steps to take System State Backup
Steps to configure Volume Shadow Copy (VSC) in Windows Server 2012 R2:
1. For this practical, we have created a text file naming IT in E: drive. You can also create a folder and create file in that.
2. To Enable Volume Shadow copy, right click on the drive for which you want to enable Volume Shadow Copy (VSC) i.e. E: drive for this practical and then click on “Configure Shadow Copies”.

3. On Shadow Copies console, we can select the drive on which we want to enable volume shadow copy. Select the E: drive and then click on “Enable“.

4. After clicking on Enable, it opens the Enable Shadow Copies console, this console tell us about the shadow copies. The information contains that the Windows will use the default schedule and settings. Click on Yes to enable Volume Shadow Copy Services (VSS).

5. VSC of selected volume is created, it would show the time and date. Click on OK to continue.

6. Now, we will modify the text file naming IT which we have created earlier.
7. Again we are creating a new shadow copy of E: drive by click on Create Now.

8. On Shadow Copies console, We can see that the new shadow copy of E: drive is created.

9. Select the previous shadow copy and click on “Revert“. As we click on the Revert option all the changes made after the snapshot will vanish. Or we can say, that the file will be reverted back to the state when the first snapshot is taken.

10. After clicking on Revert, it opens the Volume Revert console, which shows details about the shadow copy. Select the option of “Check here if you want to revert this volume” and click on Revert Now to continue.

11. On Shadow Copies console, we can see that reverting of volume E:\ is 100% completed. Click on Ok to close this console.

12. Now open the file to verify if it has been successfully reverted back to its previous state. If you can see old contents then it indicates that the VSC is working properly.
13. On Shadow Copies console, click on Settings to modify the various settings related to the VSS.

14. On Settings console, we can change the allocated space for shadow copy but minimum 300 MB free space is required to create a VSC. We can also schedule the creation of shadow copies by clicking on the option of “Schedule“.

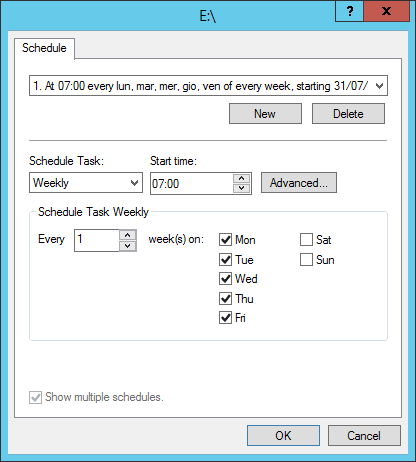
15. On Schedule console, we can modify the settings of default schedule. By default, the snapshot is scheduled once a day except weekends. We can create a new schedule or modify the default schedule as per our requirements.

Hope you understood the steps to configure Volume Shadow copy services (VSS) in Windows Server 2012 R2. Please feel free to leave your comments and suggestions in the comment section below.
What Are Shadow Copies?
A shadow copy is a snapshot of a set of data, such as a file or folder.
Shadow copies provide the capability to recover files and folders based on snapshots of storage drives.
After a snapshot is taken, you can view and potentially restore previous versions of files and folders from that snapshot.
A shadow copy does not make a complete copy of all files for each snapshot.
Instead, after a snapshot is taken, Windows Server 2012 R2 tracks changes to the drive. A specific amount of disk space is allocated for tracking the changed disk blocks. When you access a previous version of a file, some of the content might be in the current version of the file, and some might be in the snapshot.
On this post this time, lets go through a very simple step how you can implement & configure shadow copies in Windows Server 2012 R2…
1- For this Shadow Copies demo, i will be using my F: drive which located in my OSI-SVR01 server…
right click F: drive and then click Configure Shadow Copies…

2 – In the Shadow Copies interface, click drive F:, and then click Enable…

3 – In the Enable Shadow Copies interface, click Yes…

4 – In the drive Shadow Copies interface, click Settings…

5 – In the Settings interface, click Schedule…

6 – In drive F:\ interface, change Schedule Task to Daily, change Start time to 3:00 AM, and then click Advanced…

7 – In the Advanced Schedule Options interface, select Repeat task, and then set the frequency to every 1 hours, then Select Time, and then change the time value to 2:58 AM…

8 – Click OK, and then in Settings interface, type 500 in Use limit: box and then click OK…

9 – next, open IT Consultant folder and then create a file call Profile…
Switch back to the Shadow Copies interface. It should be opened on the Shadow Copies tab and then click Create Now…

10 – under Shadow copies of selected volume notice that you should have new date & time for shadow copies…

11 – to simulate the shadow copies function, lets delete the profile.txt file…

12 – In File Explorer, right-click the IT Consultant folder, and then click Properties…

13 – In the IT Consultant Properties dialog box, click the Previous Versions tab…
then click the most recent folder version for IT Consultant, and then click Open…

14 – Confirm that Profile.txt is in the folder, right-click Profile.txt, and then click Copy…

15 – lastly, in the other File Explorer window, right-click the IT Consultant folder, and then click Paste…

What are Shadow Copies?
A shadow copy is a snapshot of a set of data, such as a file or folder.
It works by Windows periodically crawling the system and looking for file changes made since the last crawl and recording the changes. These changes are indexed and stacked on top of each other which creates a history of the file/folder.
Shadow copies provide the capability to recover files and folders based on snapshots of storage drives.
After a snapshot is taken, you can view and potentially restore previous versions of files and folders from that snapshot.
A shadow copy does not make a complete copy of all files for each snapshot.
Instead, after a snapshot is taken, Windows Server 2012 R2 tracks changes to the drive. A specific amount of disk space is allocated for tracking the changed disk blocks. When you access a previous version of a file, some of the content might be in the current version of the file, and some might be in the snapshot.
This is done in the background as a system level process which isn’t subject to the same limitations as user initiated file operations. As a result, the system is able to capture changes to files which are locked to the user.
So in order to access a locked file, we simply need to access the latest shadow copy. The same method is used by Windows Backup and other backup products to backup the file(s) when it is open or used by any applications.
Step by Step Procedures:
For this demo, I am going to enable volume shadow copy for my C Drive.
Right Click Drive and Select Configure Shadow Copies.
In the Shadow Copies interface, select drive and then click Enable.

In the notification Click Yes.

In the drive Shadow Copies interface, click Settings.

In the Settings interface, you can set the maximum size or space for the shadow copy.
In this demo, I am selecting 1000MB.

Then Click Schedule, to configure the schedules to run shadow copies.
Scheduled Tasks available options are
Daily, weekly, monthly, once, at system startup, at logon, at idle.

Then Click Advanced option, select Repeat task, and then set the frequency to every 1 hour, then Select Time, and then change the time value.

Now we will test this shadow copies.
Create a folder/file on the drive for which shadow copy enabled.
Switch back to the Shadow Copies interface. It should be opened on the Shadow Copies tab and then click Create Now.

Note: For this demo I am manually creating now, or else according to our schedule it will run every one hour automatically.
After Clicking Create Now, we see new time stamp created which confirms new shadow copy created.

To test, I am deleting the file created (shadow copy test) on my C drive.

Now right-click the folder where the file existed (Shadow Copy) and then click Properties or Restore Previous Versions.

Click the most recent folder or any previous version and then click Open.

When you open you can see the file which we deleted. Now if want copy and paste this file to the required location.

You can also Copy & Restore.
If you restore then it replaces the existing file if any exists. But in our demo we deleted the file so no issues.
In production environment try to use the option open or copy.

When I select option Copy, it asks where to copy the file.

When I select the option Restore, it will warn saying the existing file will be replaced.

Now finally, we see the deleted file has been restored.
