Introduction
Telnet (teletype network) is a network protocol for two-way text-based communication through a CLI, allowing remote access. Telnet is vulnerable to cybersecurity attacks because it lacks encryption methods compared to the more modern SSH. However, it is still helpful for tasks that do not involve transmitting sensitive information.
This article teaches you what Telnet is as well as how to use Telnet on Windows to test for open ports.
Prerequisites
- Windows OS with administrator privileges
- Access to the command prompt
- An address and port to test
What is Telnet?
Telnet is a client-server protocol predating the TCP protocol. The network protocol allows a user to log into another computer within the same network through a TCP/IP connection.
A client machine running the Telnet client connects to a CLI on a remote device, most commonly a dedicated platform. Telnet is lightweight and fast, making it the preferred option in some use cases:
- Initial network hardware configuration.
- Remote access to trusted internal networks.
- Testing for open or used ports.
- Troubleshooting mail and web servers.
- Checking port forwarding.
How Does Telnet Work?
The Telnet protocol creates a communication path through a virtual terminal connection. The data distributes in-band with Telnet control information over the transmission control protocol (TCP).
Unlike other TCP/IP protocols, Telnet provides a log-in screen and allows logging in as the remote device’s actual user when establishing a connection on port 23. This type of access grants direct control with all the same privileges as the owner of the credentials.
Telnet comes with a command accessible from the command line in Windows. The telnet command also exists for macOS and Linux operating systems.
How to Enable Telnet on Windows 10?
In Windows systems, Telnet is disabled by default. To check if Telnet is already activated, open your command line, and run telnet:

If the command prompt does not recognize the command, there are two possible ways to enable the Telnet client in Windows.
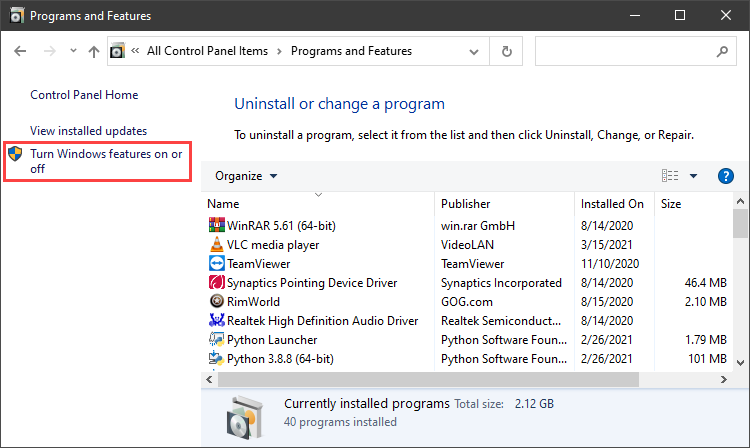
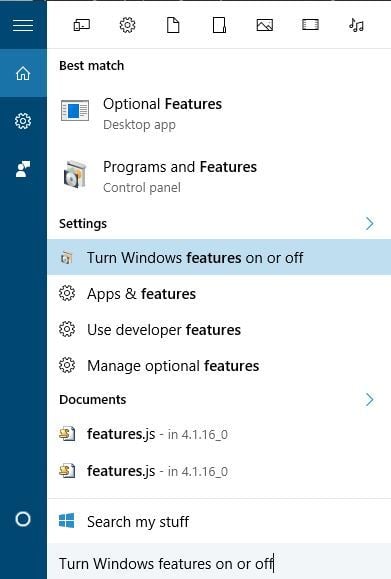
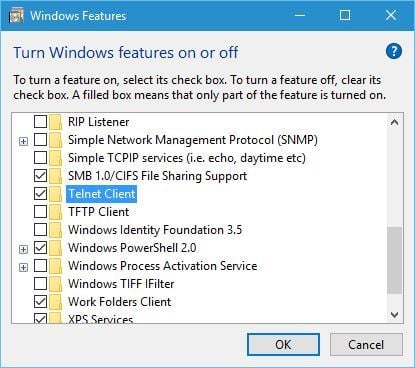
Option 1: Enable Telnet using GUI
To activate the Telnet command using the GUI:
1. Open the Programs and Features options in Control Panel:

2. Click the Turn Windows features on or off setting:
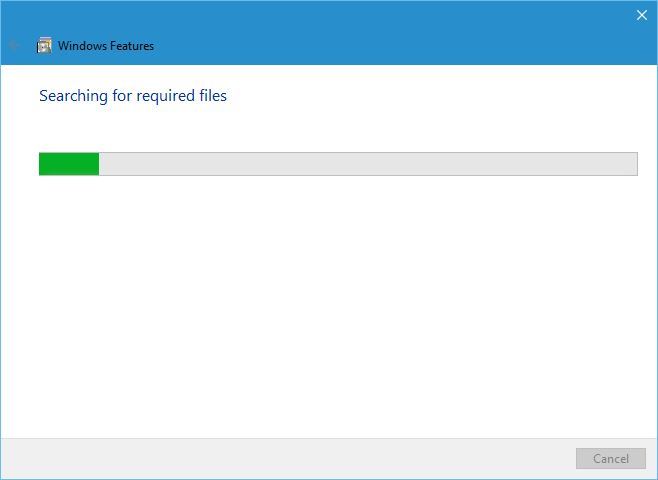
3. Locate the Telnet Client option on the list, select it and click OK to install the feature:

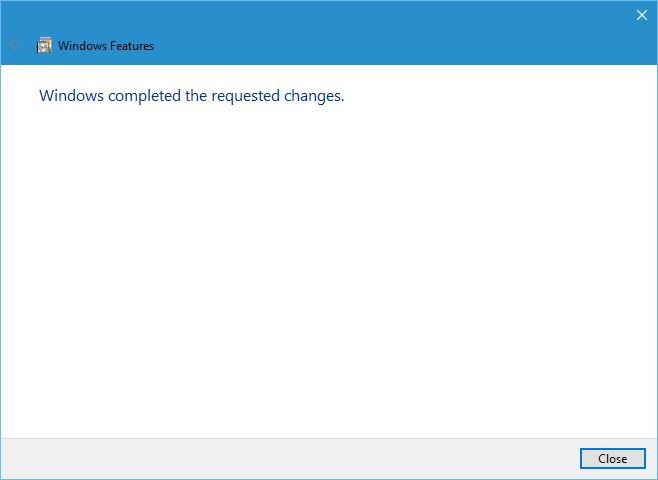
4. When Windows completes the requested change, click Close.
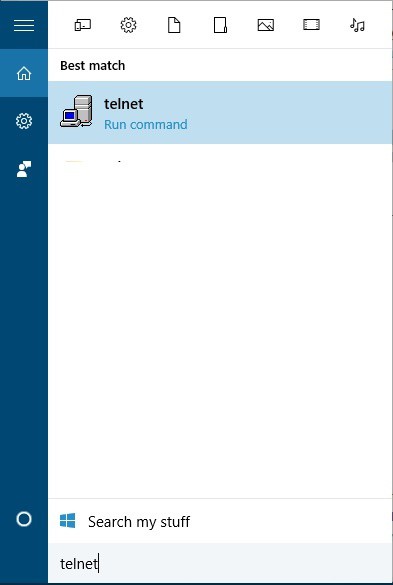
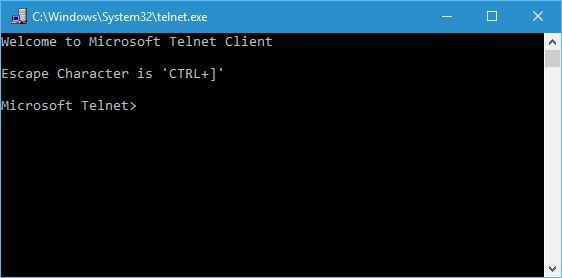
5. Open the command prompt and run telnet to open the Microsoft Telnet Client:

6. Run quit to exit the Telnet client.
Option 2: Enable Telnet Using Command Prompt
To activate the Telnet client from the command prompt:
1. In the command prompt, run:
pkgmgr /iu:"TelnetClient"2. Restart the command prompt and run telnet to open the Microsoft Telnet Client.
3. Run quit to exit the client:

How to Use Telnet in Windows to Test Open Ports
The Telnet syntax for testing open ports is:
telnet <address> <port number>The command accepts both symbolic and numeric addresses. For example:
telnet towel.blinkenlights.nl 23Or alternatively:
telnet 127.0.0.1 80After running the command, one of the following three options happen:
1. The command throws an error, indicating the port is not available for connection:

2. The command goes to a blank screen, indicating the port is available.
3. Running the command on an open port 23 displays the screen of the telnet host, confirming an established Telnet connection:

Note: Learn how Telnet differs from SSH in our comparison article Telnet vs SSH.
Conclusion
The Telnet communication protocol provides a way to establish a direct connection with a remote host. Although not a secure option for most tasks, there are use cases where Telnet is a viable option.
For further reading, check out the more secure option and learn how to use SSH to connect to a remote server in Linux or Windows.
Table of Contents
- Enabling The Telnet Client
- Verifying The Install
- Summary
- See Also
The Telnet Client is a great tool for developers and administrators to help manage and test network connectivity. However, the Telnet Client application is disabled by default in Microsoft Windows 10. Attempts to use it before activation returns the error
message ’not recognized as an internal or external command, operable program or batch file’.

The following step-by-step shows you how to enable
Telnet.
Enabling The Telnet Client
To enable Telnet Client on Windows 10, follow these steps:
- Right-click the Start button and select Programs and Features.

- Click Turn Windows features on or off from the left-hand menu.
- The Windows Features dialog box appears. Scroll down and select Telnet Client. Click
OK.
- The Telnet Client installations begins.
- Once complete, a success message appears.
- Click Close. There’s no need to restart your computer.


Verifying The Install
Once the installation completes, we can use the Telnet Client.
- Launch the Command Prompt by typing Command Prompt into the search box on the menu bar and clicking the app returned.
- Alternatively, you can also type Windows Key + R to open the
Run command dialog. Type cmd and hit the
Enter key. - Type telnet and hit Enter to access the Telnet Client.
- Type help to see the supported Telnet commands.
- Type q or quit to exit Telnet.
- Type telnet google.com 80 to Telnet into Google on port 80.


Summary
In this article, we have seen how to enable and use the Telnet Client in Windows 10.
See Also
- How To Enable Telnet in Windows Server 2012
- Windows 7: Enabling Telnet Client
Telnet is a network protocol that allows you to connect to remote computers. In order to use telnet on Windows 10, you need to enable the Telnet Client feature. To do this, open the Control Panel and go to Programs and Features. Then, click on Turn Windows features on or off. Scroll down and check the box next to Telnet Client. Click OK to install the feature.
Once the Telnet Client is installed, you can use it by opening the Command Prompt and typing «telnet» followed by the IP address or hostname of the remote computer.
How do I use telnet?
Telnet is a network protocol that allows for text-based communication between two devices. To use telnet, you will need to have a telnet client installed on your computer. Once you have a telnet client installed, you can use it to connect to a telnet server. To do this, you will need to know the IP address or hostname of the telnet server. Once you have the IP address or hostname, you can connect to the telnet server by entering the following command into your telnet client:
open [IP address or hostname]
Once you have connected to the telnet server, you will be able to enter text-based commands into the telnet client and receive text-based responses from the telnet server.
How do I telnet from a command prompt in Windows 10?
To telnet from a command prompt in Windows 10, you will need to first open the command prompt. To do this, you can either search for «command prompt» in the search bar or you can press the Windows key + R, type «cmd» into the Run box, and press Enter.
Once the command prompt is open, you can type «telnet» followed by the IP address or hostname that you want to connect to. For example, if you wanted to connect to Google, you would type «telnet google.com«. Press Enter to run the command.
Can you run telnet with Windows 10?
Yes, you can run telnet with Windows 10 by following these steps:
1. Open the Start menu and search for «cmd«.
2. Right-click on the «Command Prompt» result and select «Run as administrator«.
3. Type the command «telnet» and press Enter.
If you are not able to run telnet with Windows 10, you can try using a different terminal emulator such as PuTTY.
How do I start Telnet from command line?
To start Telnet from the command line, you will need to open the Command Prompt. To do this, you can type «cmd» into the search bar on your taskbar and click on the Command Prompt application that appears.
Once the Command Prompt is open, you can type «telnet» into the command line and press Enter. This will start the Telnet application and connect you to the Telnet server.
How does Telnet work step by step?
Telnet is a network protocol that allows for remote control of a computer. It uses a virtual terminal connection to communicate with a remote host. Telnet is typically used to control servers or to access applications that are not available locally.
To use Telnet, you must first establish a connection to a remote host. This is done by specifying the host’s IP address or hostname. Once a connection is established, you can enter commands that will be executed on the remote host. Telnet connections are typically unencrypted, which means that your commands and passwords will be sent in plain text. This is a security risk, so it is important to only connect to hosts that you trust.
What is telnet command in cmd?
The telnet command is used to connect to remote hosts using the Telnet protocol. The syntax for the telnet command is:
telnet [hostname or IP address] [port]
For example, to connect to a remote host with the IP address 10.0.0.1 on port 23, you would use the following command:
telnet 10.0.0.1 23
Once you have connected to a remote host using the telnet command, you can issue commands as if you were logged into the remote host. To exit the telnet session, you can type the exit command or use the Ctrl+] shortcut.
How do you open a port 23?
In order to open port 23, you will need to use a software or online tool that allows you to modify your computer’s firewall settings. Once you have located the appropriate tool, you will need to add an exception for port 23.
Why telnet is not working in CMD?
There could be a few reasons why telnet is not working in CMD. One reason could be that the telnet client is not installed on the computer. Another reason could be that the telnet service is not running. To check if the telnet service is running, open the Services snap-in by clicking Start, pointing to Administrative Tools, and then clicking Services. If the status of the Telnet service is Started, continue to the next step. If the status of the Telnet service is Stopped, click Start to start the service.
How does telnet work step by step?
Telnet is a network protocol that allows for remote control of a computer. It uses a simple text-based interface, which can be accessed using a variety of programs. Telnet is most commonly used to check whether a particular port is open on a remote machine. To do this, the user connects to the remote machine using the telnet program and then types in the port number that they want to check. If the port is open, the user will see a blank screen; if the port is closed, the user will see an error message.
Can I telnet from CMD?
Yes, you can telnet from CMD by opening the Command Prompt and typing «telnet» followed by the IP address or hostname of the machine you want to connect to.
Is telnet disabled on Windows 10?
Yes, telnet is disabled on Windows 10 by default. However, it can be enabled by following these steps:
1. Open the Control Panel.
2. Click on Programs.
3. Click on Turn Windows features on or off.
4. Scroll down and check the box next to Telnet Client.
5. Click OK.
Once telnet is enabled, you can use it by opening the Command Prompt and typing «telnet» followed by the IP address or hostname of the server you want to connect to.
Why telnet is not working in cmd?
There could be a few reasons why telnet is not working in cmd. One reason could be that the telnet client is not installed on the computer. To check if the telnet client is installed, open the Control Panel and search for «telnet«. If the telnet client is not installed, you can install it by following the instructions here: https://technet.microsoft.com/en-us/library/cc771275(v=ws.10).aspx
Another reason why telnet might not be working could be that the telnet service is not running. To check if the telnet service is running, open the Services console (search for «services» in the Start menu) and look for the «Telnet» service. If the service is not running, you can start it by right-clicking on it and selecting «Start«.
If telnet is still not working after following the steps above, please contact your network administrator for further assistance.
How do I telnet to TCP?
In order to telnet to TCP, you will need to have a telnet client installed on your computer. Once you have a telnet client installed, you can open a command prompt and type «telnet {ip address} {port number}«.
Windows Интересное Задать вопросНаписать пост
Не все пользователи компьютеров знают о наличии скрытых служб, которые позволяют выполнять различные операции без использования специального программного обеспечения. В операционных системах Windows и Linux присутствует служба Telnet. В этом материале будет подробно рассмотрено назначение службы, команды, возможности и как с ней правильно работать.
Telnet – представляет собой средство связи, которое устанавливается между терминальными устройствами. Пример такой связи достаточно простой: персональный компьютер и сервер, который поддерживает подобный тип соединения. Телнет не является каким-либо программным обеспечением, это протокол связи. Но необходимо отметить, что есть некоторые утилиты, которые работают посредством протокола «terminalnetwork».
В недавнем прошлом Телнет был одним из основных способов подключения к сети. Сейчас утилита практически не используется. На сегодняшний день в операционные системы установлены более совершенные протоколы, исключая какие-либо дополнительные действия от пользователя.
Этот протокол связи используется в некоторых операциях:
- подключение к удаленному рабочему столу;
- проверка портов на возможность подключения;
- использование программного обеспечения, которое доступно только на удаленных машинах;
- применение системных каталогов, которые могут быть открыты только с использованием этого типа протокола;
- отправка электронной почты без использования дополнительного софта;
- пользователи, применяя этот протокол позволяет другим юзерам получить доступ к своему персональному компьютеру.
Установка и запуск
Скачивать утилиту не нужно, Telnet встроен в Windows 7/8/10 по умолчанию.
Инструкция по установке и запуску:
Для того, чтобы запустить клиент нужно открыть командную строку:
Предлагаем ознакомиться с видео по установке Телнет в Windows:
Проверка порта
Проверка сетевого порта на наличие доступа к нему персонального компьютера в Telnet:
- в окне необходимо ввести команду telnetip;
- далее следует ввести IP адрес компьютера, например, 192.168.1.1. Посмотреть адрес можно в настройках сетевого маршрутизатора;
- в конце вводим порт FTP «21». Таким образом команда будет выглядеть так: telnet 192.168.0.1 21;
- после этого появится сообщение об ошибке, если порт недоступен или с просьбой ввести дополнительные данные, если порт открыт.
Команды Telnet
Команды утилиты являются способом взаимодействия с ней. Для отображения списка всех команд, необходимо ввести «help». Далее подробно разберем основные команды:
- «open» — запрос позволяет выполнить подключение к удаленному серверу;
- «close» — прерывание процесса подключения к удаленному серверу;
- «set» — настройка параметров подключения к серверу;
- «term» — запрос предназначен для указания типа терминала;
- «escape» — задает управляющий символ;
- «mode» — выбор режима работы;
- «unset» — сброс ранее введенных параметров;
- «start» — запуск сервера;
- «pause» — временная остановка работы сервера;
- «continue» — продолжение работы сервера после паузы;
- «stop» — полное прекращение работы сервера.
Telnet в Linux
Как и в Виндовс, Телнет встроен в операционную систему Linux. Ранее он использовался, как стандартный протокол Telnet, теперь на его место пришел более улучшенный SSH. Как и с предыдущей ОС, утилита в Linux используется для проверки портов, маршрутизаторов и т.д.
Рассмотрим основные режимы работы:
- «построчный». Данный режим работы является рекомендованным. В этом случае редактирование запроса осуществляется на локальном ПК и отправляется на сервер только в том случае, когда она готова;
- «посимвольный». Каждый набранный символ в окне консоли отправляется на удаленный сервер. Здесь нельзя осуществить редактирование текста. При удалении символа с помощью «Backspace», он тоже будет отправлен на сервер.
Базовые команды в Linux:
- «close» — прерывание подключения;
- «encrypt» — включение шифрования;
- «logout» — выключение утилиты и закрытие соединения;
- «mode» — выбор режима работы;
- «status» — состояние соединения;
- «send» — отправка запроса телнет;
- «set» — настройка параметров сервера;
- «open» — подключение к удаленному серверу;
- «display» — отображение специальных символов.
Далее рассмотрим несколько способов применение утилиты в Linux:
- в окне консоли вводим запрос для проверки доступности сервера, например, «telnet 192.168.1.243»;
- далее проверим доступ к порту путем ввода запроса «telnet localhost 122» и «telnet localhost 21». На экране консоли появится сообщение о том принимает ли соединение какой-либо из портов;
- пример удаленного управления с помощью телнет. Для этого необходимо ввести в главном окне запрос «telnet localhost 23». «23» порт используемый по умолчанию. Чтобы произвести удаленное управление, необходимо установить на локальный компьютер «telnet-server». После этого появится сообщение с требованием ввода логина и пароля.
Недостатки Telnet
Главным недостатком данного протокола является – удаленное соединение без использования шифрования. Единственным моментом безопасности является авторизация пользователей в сессии телнет. Но тем не менее логин и пароль также передаются в незашифрованном виде, тем самым доступ к ним можно так или иначе получить. Настоятельно не рекомендуется передавать какие-либо важные данные в локальных сетях.
Telnet не является внутренней или внешней командой
Данная ошибка появляется в том случае, если данный клиент не установлен на персональном компьютере. Необходимо выполнить следующие действия:
- открываем «Панель управление»;
- переходим в «Программы» и в левом столбце «Включение или отключение компонентов Windows»;
- в открывшемся окне находим «Клиент Telnet» и отмечаем данный чекбокс, жмем «Ок».


Второй способ:
Reader Interactions
by Milan Stanojevic
Milan has been enthusiastic about technology ever since his childhood days, and this led him to take interest in all PC-related technologies. He’s a PC enthusiast and he… read more
Updated on

XINSTALL BY CLICKING THE DOWNLOAD
FILE
If you’re not familiar with it, today we’re going to explain you how Telnet works and can you use it on Windows 10.
The development of Internet saw the invention of many protocols that allowed us to use it better. One of these protocols was Telnet.
What is Telnet and how does it work?
Telnet is an Internet protocol that allows you to connect to a different computer on your local network or on the Internet.
Telnet was invented in 1969, and it’s often considered an ancestor of modern Internet.
Today most users use a graphical user interface, but when Telnet was invented there were no browsers or graphical operating systems. Therefore, users had to rely solely on command line interface.
It’s worth mentioning that Telnet still works like it did decades ago, and Telnet clients are available for almost any platform.
Telnet changed the way how people use Internet because in the time before Telnet users had to manually use the server in order to get certain data.
How we test, review and rate?
We have worked for the past 6 months on building a new review system on how we produce content. Using it, we have subsequently redone most of our articles to provide actual hands-on expertise on the guides we made.
For more details you can read how we test, review, and rate at WindowsReport.
With Telnet, users could access the server remotely from the comfort of their home for the first time.
In addition to remote access, multiple users were able to connect to the server over Telnet. Therefore, it’s not hard to see how Telnet influenced the development of the Internet.
We have to mention that there are two different terms when it comes to Telnet: Telnet server and Telnet client. The former is a computer designed to run as a Telnet server.
You can easily turn your Windows PC into a Telnet server and you should be able to access it over Telnet.
Bear in mind that having a public IP address leaves your computer open for access by any computer on the Internet, so be sure to use a firewall in order to protect your PC from unauthorized remote access.
The same principles apply to running Telnet on Windows 11, so make sure to check it out if you’re running the latest OS from Microsoft.
- READ ALSO: 7 best tabbed command line tools for Windows 10
Telnet client is a PC that uses a Telnet connection to connect to a Telnet server. In fact, you can use Telnet from Windows 10 by following these steps:
- Press Windows Key + S on your keyboard and enter features. Select Turn Windows Features on or off.

- When Windows Features opens, scroll down and check Telnet Client. Click OK to install Telnet.

- Wait until Windows installs the necessary components.

- Once the installation is completed click the Close button.
After you install Telnet, you can start it by doing the following:
- Press Windows Key + S and enter telnet. Select Telnet from the list of results.

- Command line will now open, and you should be able to use Telnet without any problems.

Why is Telnet obsolete?
Although running Telnet on Windows 10 is fairly simple, the question remains why would you use Telnet for? Telnet is an outdated protocol, and most people don’t use it anymore.
This protocol is great if you are a computer geek, and you want to access Internet by using command line. Unfortunately, there aren’t many Telnet servers available nowadays, so you might have to do some research before you find one.
One of the biggest flaws of Telnet is its lack of security. Telnet transmits all the data between the client and the server without any encryption which means that almost anyone can intercept your data.
This is especially important if you’re sending sensitive information over Telnet, such as your username or password. Due to lack of encryption, malicious users can easily steal your password and see all the data between the Telnet client and server.
Also, Telnet doesn’t have authentication, which means that malicious users can easily intercept your traffic. Lastly, Telnet has several additional security vulnerabilities which make it quite unsafe to use.
Even though Telnet in Windows 10 might not be the safest Internet protocol, newer protocols, such as SSH for example, were inspired by Telnet. They are designed to fix many flaws that original Telnet had.
Telnet might not be as popular as it was a few decades ago. Stll, it’s certain that Telnet changed the way how Internet works forever.
READ ALSO:
- How to protect your Windows 10 device on public Wi-Fi network
- Fix: Network Protocol Missing in Windows 10
- Fix: Error ‘Err_ssl_protocol_error’ in Windows 8.1, 10
- 4 best bandwidth monitors for Windows 10
- How to fix Ethernet problems in Windows 10
![]()