Telnet – это самый старый компьютерный протокол, позволяющий двум компьютерам общаться друг с другом через Интернет или локальную сеть. Однако Microsoft решила удалить сервер Telnet из Windows 10 и Windows Server 2012 и далее. Это хороший шаг, учитывая, что Telnet не поддерживает шифрование и данные проходят по сети в виде обычного текста. Но что, если мне понадобится Telnet в образовательных целях? Или что, если я не хочу настраивать SSL, поскольку имею дело с публичным сервером.
Итак, вот несколько способов включить клиент Telnet, а также сервер Telnet в Windows версии 8, 8.1, 10 или Windows Server 2012 и выше. Начнем сначала с клиента.
Читайте: Лучший диспетчер пакетов Windows для автоматического обновления приложений
Если вы введете telnet в командной строке, вы получите сообщение об ошибке «Telnet не распознается как внутренняя или внешняя команда». Это связано с тем, что клиент Telnet по умолчанию отключен в Windows 10. Чтобы включить Telnet, перейдите в меню «Пуск» и введите «Включение и выключение компонентов Windows».
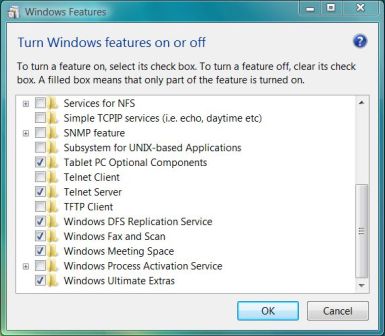
В следующем всплывающем окне перейдите к клиенту Telnet. Установите флажок рядом с ним и нажмите ОК.
Windows потребуется некоторое время для установки Telnet, и после этого вы можете использовать команду telnet в CMD или запустить утилиту telnet из меню поиска. Для этого нажмите Win + S и введите Telnet.
Это откроет клиент telnet прямо в CMD, и окно должно выглядеть так, как показано ниже.
Как включить Telnet Server для Windows 10
Клиенты Telnet позволяют подключаться к другим серверам Telnet. Вы не можете подключиться к своей собственной системе и запускать удаленные команды. Для этого вам понадобится Telnet-сервер, и, к сожалению, в Windows 10 нет собственного способа его включения. Чтобы начать обслуживание Telnet через порт 23, необходимо установить сторонние приложения.
Две мои любимые утилиты для этого: HK Telnet-сервер а также Сервер KpyM Telnet. Оба они обслуживают разную аудиторию.
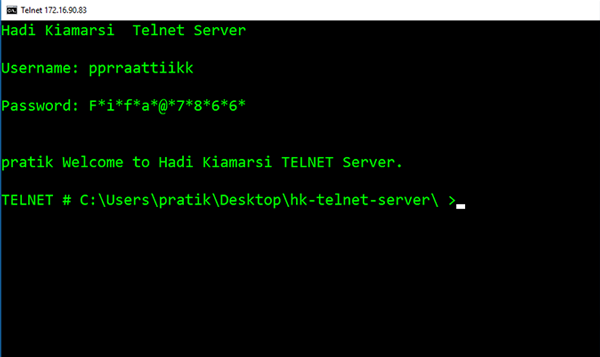
Если все, что вам нужно, – это разрешить серверу telnet запускать удаленные команды на вашу машину, я бы предложил сервер Telnet HK. Настроить довольно просто. Просто скачайте приложение и запустите его. Это больше похоже на портативное приложение, чем на exe. Как только вы запустите приложение, у вас появится плавающее окно.
Здесь вы можете ввести номер порта, с которого Telnet будет принимать соединения. Пользовательский интерфейс довольно простой, с минимумом настроек. Вы можете установить ID пользователя и пароль для входа в telnet.
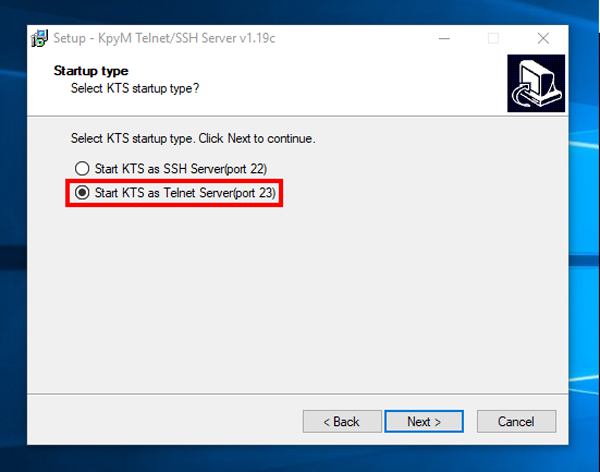
Приложение не предоставляет возможности принудительно использовать SSL или шифрование. Если вам нужно более крупное решение с SSH, такое как настраиваемое сообщение для входа в систему и блокировка IP, вам необходимо перейти на KpyM Telnet Server. Во время установки приложения вам будет предложено запустить сервер либо через порт 22 (SSH), либо через порт 23 (telnet). В случае, если вы собираетесь запустить telnet, выберите порт 23 сейчас, потому что это единственный раз, когда вы увидите графический интерфейс в этом приложении.
После того, как вы закончили его установку, вы можете продолжить настройку с помощью демона KTS. Перейдите в меню «Пуск» и введите «Настройка сервера kpyM Telnet SSH». Откроется черное диалоговое окно, в котором вы можете настроить такие параметры, как использование SSL, номер порта, сообщение_входа, пароль и т. Д. Тот же демон также предоставляет параметры для запуска или остановки сервера telnet.
Заключительные слова
Безопасность была одной из основных проблем, из-за которой Telnet Server был удален из Windows. Желательно не использовать telnet, когда вы имеете дело с конфиденциальными данными. Однако в случае общедоступных серверов ничего страшного, если вы не хотите настраивать сертификаты ключей шифрования и SSL.
Высказывайте свои вопросы в комментариях, и я буду рад вам помочь.
Также читайте: 6 лучших SSH-клиентов для Android, которые стоит попробовать
Telnet is the oldest computer protocol that allows two computers to talk to each other over the Internet or local area network. However, Microsoft decided to remove the Telnet server from Windows 10 and Windows Server 2012 onwards. It’s a good step considering that Telnet doesn’t support encryption and the data go through the network in plain text. But, what if I need Telnet for educational purpose? Or what if I don’t want to configure SSL since I am dealing with a public server.
So, here are few ways to enable Telnet client as well as Telnet server on Windows version 8, 8.1, 10 or Windows Server 2012 and higher. Let’s start with the client first.
Read: Best Windows Package Manager to Auto Update Apps
How to enable Telnet Client in Windows 10
If you type in telnet in the command prompt you will get an error stating “Telnet is not recognized as an internal or external command.”. This is because telnet client is disabled in Windows 10 by default. To enable Telnet, go to the start menu and type “Turn Windows features on and off“.

On the next pop-up, browse to Telnet Client. Click the checkbox beside it and hit Ok.

Windows will take some time to install Telnet and once done, you can use the telnet command in CMD or you can fire the telnet utility from the search menu. To do that, press Win+S and type Telnet.

This will open the telnet client directly within CMD and the window should look like the one below.

How to enable Telnet Server for Windows 10
Telnet clients let you connect to other Telnet Servers. You cannot connect to your own system and fire remote commands. For that, you need a Telnet Server and unfortunately, there is no native way to enable it in Windows 10. You have to install third-party apps to start serving Telnet on port 23.
My two favorite utilities to do so are HK Telnet Server and KpyM Telnet Server. Both of them serve a different audience.
If all you want is to enable the telnet server to fire remote commands to your machine, I would suggest HK Telnet server. It is pretty easy to set up. Simply, download the app and launch the application. It is more of like a portable app rather than an exe. As soon, as you launch the application, you get a floating window.

Here, you can enter the port number where you want Telnet to accept the connections from. The UI is pretty simple with minimum options. You can set a user ID and password for the telnet login.
The app doesn’t provide an option to force SSL or encryption. If you want a bigger solution with SSH like custom login message and IP blocking then you need to get on KpyM Telnet Server. During the installation of the app, you will be prompted to start the server either at port 22 (SSH) or port 23 (telnet). In case, you are going to run telnet choose port 23 now because this is the only time you will be seeing GUI in this app.
Once you have finished installing it, you can configure further through the KTS daemon. Go to the Start menu and type “Setup kpyM Telnet SSH Server“. This will open a black dialogue box where you can configure settings like use SSL, port number, login_message, password etc. The same daemon also provides the options to start or stop the telnet server.

Closing Words
Security was one of the major concerns due to which Telnet Server was removed from Windows. It is advisable not to use telnet when you are dealing with sensitive data. However, in the case of public servers, it is okay if you don’t want to set up encryption key certificates and SSL.
Voice out your queries in the comments and I will be happy to help you out.
Also Read: 6 Best Android SSH Client You Should Try
Pratik
Pratik works as an In-house writer and video host at TechWiser. Former Programmer, Current writer. Loves tech in any form, quite optimistic about AI, data science and IoT. Talks extremely less but you betcha can geek out over anything on Twitter.

Приведу небольшую цитату из Википедии:
TELNET (англ. TErminaL NETwork) — сетевой протокол для реализации текстового интерфейса по сети (в современной форме — при помощи транспорта TCP). Название «telnet» имеют также некоторые утилиты, реализующие клиентскую часть протокола.
В общем смысле это протокол, созданный для управления различного вида системами, посредством текстового интерфейса командной строки. Активно используется системными администраторами. Но в клиентской версии операционной системы он по умолчанию отключен. И эта небольшая инструкция покажет вам, как его включить.
1) Идём в «Панель управления» → группа «Программы» и открываем «Включение или отключение компонентов Windows».

2) Откроется окно выбора компонентов системы.

3) Здесь в зависимости от того, что нам нужно ставим галочки на «telnet-сервер» и «клиент telnet». Если вам нужно что-либо одно, ставьте соответственно только одну галочку.

Жмём кнопку «ОК».
4) Пойдет процесс установки компонентов по завершению которого, система покажет следующее окно:

Всё, можно заходить в командую строку и пробовать команды telnet.

На этом всё. Надеюсь эта статья оказалась вам полезной, нажмите одну из кнопок ниже, чтобы рассказать о ней друзьям. Также подпишитесь на обновления сайта, введя свой e-mail в поле справа.
Спасибо за внимание ![]()
Материал сайта Skesov.ru
- Распечатать
Оцените статью:
- 5
- 4
- 3
- 2
- 1
(3 голоса, среднее: 1.7 из 5)
Поделитесь с друзьями!
Install and Enable Telnet Server Service in Windows
The disabling of Telnet Server is good practice to minimize security risks.
The following guide will install and enable Telnet Server in Windows if you really need it running. Telnet Server in Windows is similar to the one comes with Windows Server 2003, where it provides ASCII terminal sessions to Telnet clients, and supports two types of authentication plus four types of terminals: ANSI, VT-100, VT-52, and VTNT.
How to Enable the Telnet Server Service in Windows
- Click on Start button or open the Win-X Quick Access menu in Windows 8, Windows 8.1 or Windows 10, then go to Control Panel -> Programs.
- Under the Programs and Features section, click Turn Windows features on or off. If User Account Control permission confirmation request warning pops up, click on Continue. If you are prompted for an administrator password, type the password.
- In the Windows Features dialog box, select (tick) the Telnet Server check box.

- Click OK. Wait for the installation to finish.
- Go back to Control Panel, then go to System or System and Security -> Administrator Tools.
- Click on Services applet (services.msc if you prefer to use Run command or Start Search).
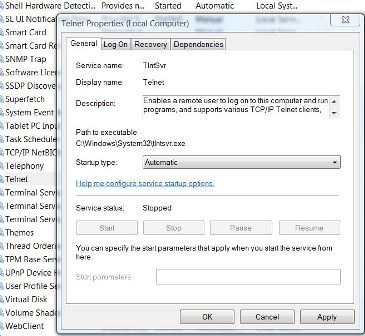
- Locate the Telnet service, right-click on it and select Properties.
- In the Startup Type drop down menu, select Automatic instead of “Disabled”.

- Click on Apply button.
- Right-click on the Telnet service again, but this time select Start option on right click context menu. Telnet Server service should be running after this.
- Click OK.
After installing Telnet Server Windows feature, instead of going to Services MMC applet, if you prefer you can use elevated command prompt to start Telnet Server, and set Telnet service to run automatically on every system startup. The commands to use are:
- Set Start Type option to Auto:
sc config TlntSvr start=auto
- Start the Telnet Server immediately:
sc start TlntSvr
Or,
net start TlntSvr
Configuration Options for Telnet Server
As Windows Telnet Server is ported from Telnet Server in Windows 2003, XP and 2000 (W2K), the configuration settings available and how to configure the server are pretty much similar. Generally tlntadmin command is used to administer a local or remote Telnet Server.
For example, you can use tlntadmin command to start, stop, pause or continue Telnet server. Command syntax is:
tlntadmn [\\RemoteServer] [start] [stop] [pause] [continue] [-u UserName-p Password]
The Telnet Server requires NTLM authentication by default. To deactivate and disable NTLM authentication and switch to use only password authentication, use following tlntadmin command:
tlntadmn config sec=-NTLM
Another example command that make Telnet session switch to streams mode in order to make display easier for Unix/Linux clients:
tlntadmn config mode=stream
For more command references visit Telnet Operations Guide.
About the Author: LK

Page load link
- Remove From My Forums
-
Question
-
the telnet server cannot be found in add/remove feature panel from control panel.
Answers
-
That’s not useful, David. With build 9879 of Win 10 TP, Telnet Server is specifically
removed. Telnet Client remains.For reference, here’s where it lived in Win 8.1 Pro.

Telnet Server has been deprecated since server 2012, so I think we can assume it’s being removed as the expected subsequent step.
From: http://technet.microsoft.com/en-us/library/dn303411.aspx
Telnet server
Telnet server is deprecated. Instead, use Remote Desktop.
-Noel
-
Proposed as answer by
Monday, December 29, 2014 6:56 AM
-
Marked as answer by
Zen the OcelotModerator
Tuesday, January 6, 2015 5:02 AM
-
Proposed as answer by