 Несмотря на то, что Telnet протокол уже редко используется, что связано с отсутствием шифрования и проверки подлинности данных, у некоторых пользователей могут возникать задачи, требующие подключения с использованием клиента Telnet.
В Windows 11 и Windows 10 клиент для Telnet протокола присутствует, но отключен по умолчанию. При необходимости его можно включить одним из способов, описанных далее.
Компоненты Windows
Клиент Telnet — один из дополнительных компонентов Windows, который может быть включен, как и другие такие компоненты:
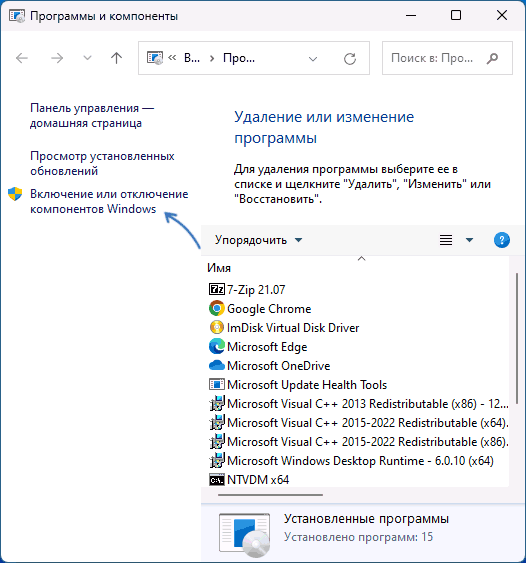
- Нажмите клавиши Win+R на клавиатуре (либо нажмите правой кнопкой мыши по кнопке «Пуск» и выберите пункт «Выполнить»), введите appwiz.cpl и нажмите Enter.
- В открывшемся окне в панели слева нажмите по пункту «Включение или отключение компонентов Windows».

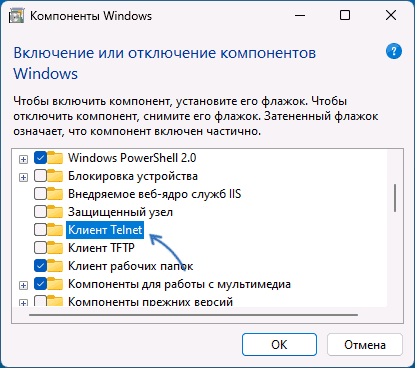
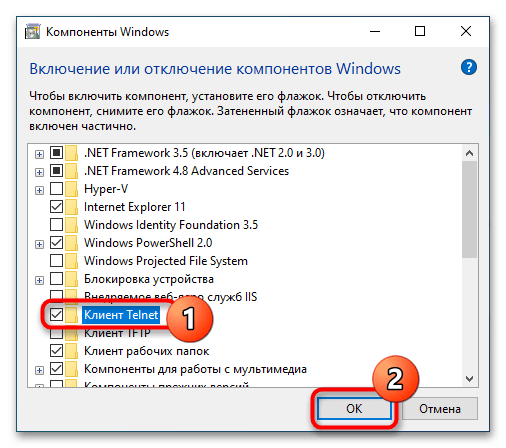
- Отметьте «Клиент Telnet» в списке доступных компонентов и нажмите «Ок».

Останется дождаться, когда клиент Telnet будет установлен.
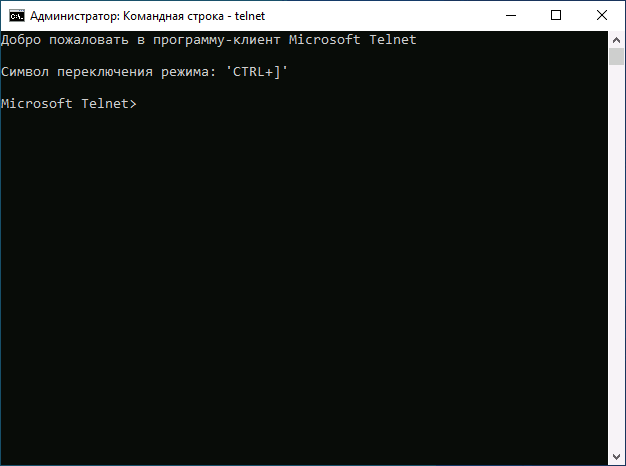
Для начала использования достаточно будет запустить командную строку, ввести команду telnet и нажать Enter.
Командная строка
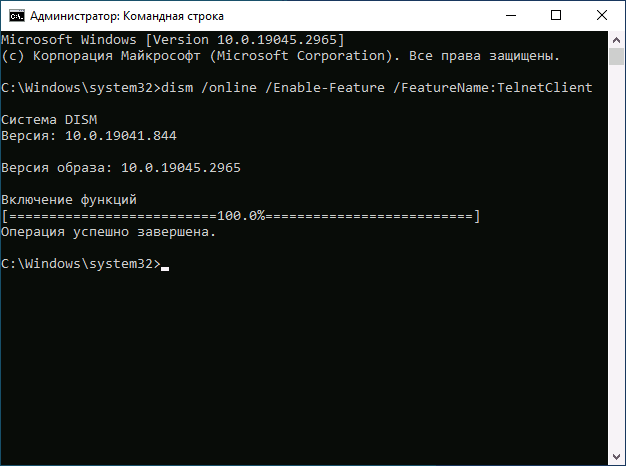
Вы можете включить Telnet в командной строке, установив компонент с помощью DISM:
- Запустите командную строку от имени администратора.
- Введите команду
dism /online /Enable-Feature /FeatureName:TelnetClient
и нажмите Enter.

- Дождитесь завершения установки компонента.
Windows PowerShell
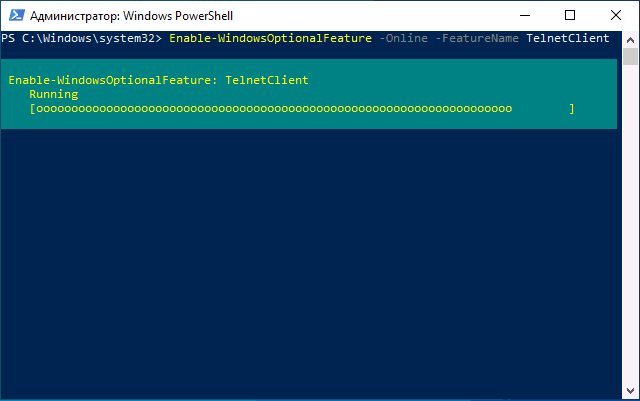
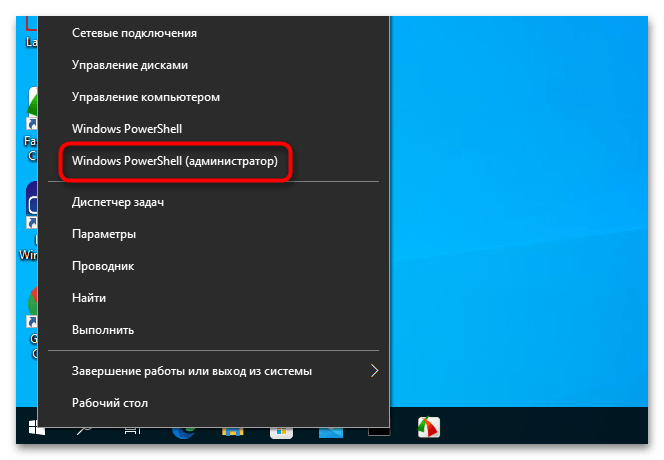
Включить компонент можно и в PowerShell: запустите Windows PowerShell или Терминал Windows от имени администратора, сделать это можно в контекстном меню кнопки «Пуск», после чего введите команду:
Enable-WindowsOptionalFeature -Online -FeatureName TelnetClient
и нажмите Enter. Через короткое время клиент Telnet будет установлен на вашем компьютере.
Завершая статью, поинтересуюсь: для какой цели вам потребовался именно Telnet клиент в наше время SSH, шифрования и защищенных протоколов? Будет отлично, если вы сможете поделиться этим в комментариях.
На чтение 4 мин Просмотров 64.1к. Опубликовано
По-умолчанию клиент Telnet клиент в операционных системах Microsoft Windows отключен, чего обычные пользователи вряд ли заметят. Сама возможность включить его в настольных системах присутствует. И поскольку это чрезвычайно полезный инструмент, который можно использовать для тестирования подключения TCP к внешним хостам на указанном порту, то разберемся как активировать данный функционал. Тем, кто дочитает статью до конца, покажу пару интересных вариантов использования команды telnet, о которых многие не догадываются.
Содержание
- Для чего нужен telnet клиент
- Активация Telnet клиента
- Включение клиента telnet с помощью командной строки
- Включение telnet клиент с помощью графического интерфейса
- Проверяем корректно ли установлен telnet клиент
- У вас уже установлен telnet клиент, но все еще не удается подключиться к сетевым ресурсам?
- Превращаем командную строку в web браузер
- Отправка письма из командной строки с помощью telnet
Для чего нужен telnet клиент
Замечательно, когда вы пытаетесь устранить проблемы с сетевыми подключениями, для примера у нас есть веб-сервер, который должен обрабатывать HTTP запросы на 80 порту. Используя telnet для подключения на веб-сервер на порт 80, мы можем проверить возможность подключения, даже когда мы не можем загрузить веб-страницу с помощью браузера.
Возможно, что с подключением все в порядке, но проблема связана с веб-сервером или что веб-сервер остановлен, и, например, порт вообще не прослушивается. С telnet мы можем лучше понять, что происходит.
Активация Telnet клиента
Для начала, нам необходимо включить telnet-клиент. Если не включить, то получим результат, аналогичный приведенному ниже при попытке его использования:
C:\Users\MikroTik>telnet google.com 80
"telnet" не является внутренней или внешней командой, исполняемой программой или пакетным файлом.

Вы можете включить клиента либо из командной строки, либо с помощью графического интерфейса.
Включение клиента telnet с помощью командной строки
Запустите команду ниже в командной строке от имени администратора. В противном случае вы получите следующее сообщение системы:
dism /online /Enable-Feature /FeatureName:TelnetClient

Вот и все, через несколько секунд telnet клиент должен быть готов к работе.
Включение telnet клиент с помощью графического интерфейса
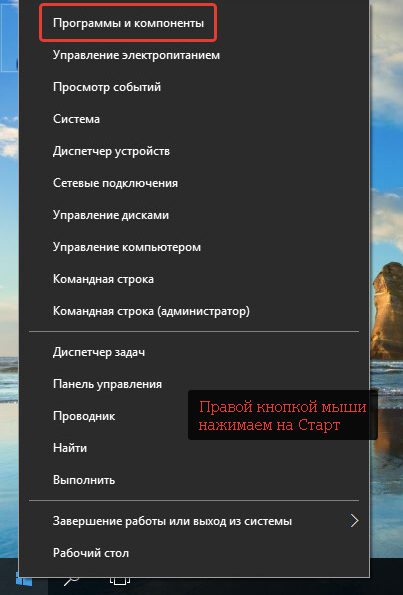
Щелкните правой кнопкой мыши на кнопку «Пуск» и выберите «Программы и компоненты».
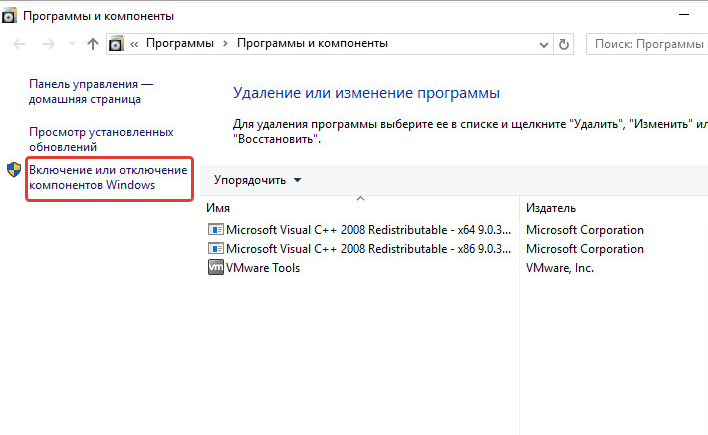
Выберите «Включение или отключение компонентов Windows» в меню слева.
 Откроется окно «Копоненты Windows», прокрутите вниз и выберите «Клиент Telnet».
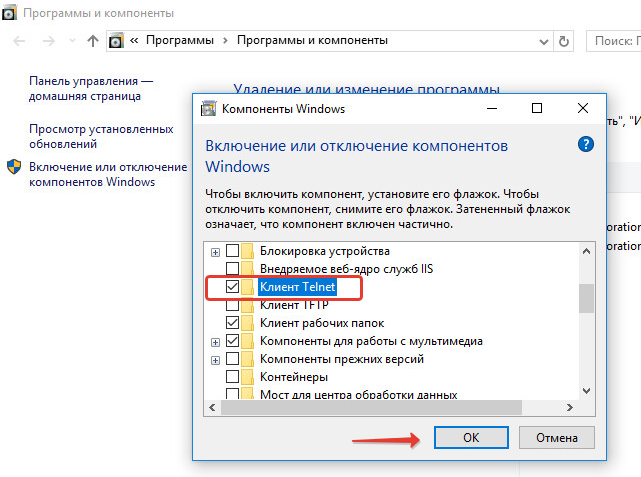
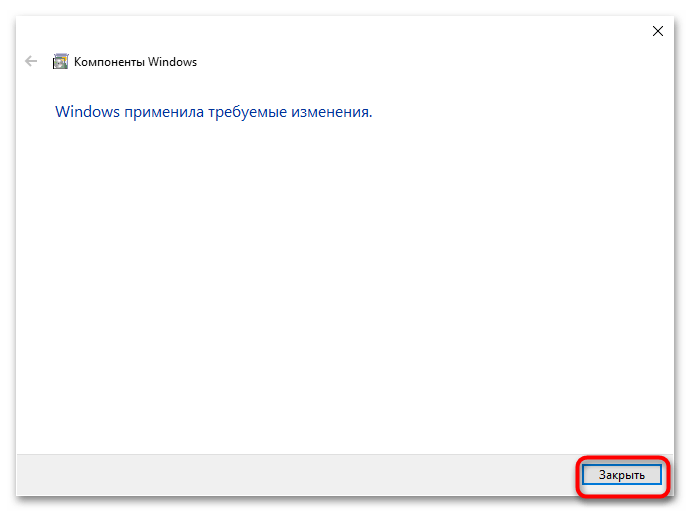
Нажмите кнопку «ОК», на экране отобразится ход установки клиента telnet. Дождитесь момента применения изменений и закройте окно.
Проверяем корректно ли установлен telnet клиент
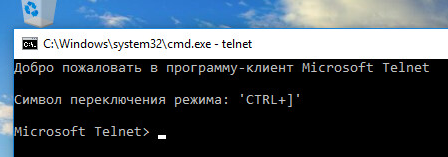
Просто откроем командную строку или powershell, введем «telnet» и нажмем клавишу «Ввод» на клавиатуре. Если все прошло успешно, то вы получите приглашение, подобное приведенному ниже:
Добро пожаловать в программу-клиент Microsoft Telnet

Символ переключения режима:  'CTRL+]'

Microsoft Telnet>
У вас уже установлен telnet клиент, но все еще не удается подключиться к сетевым ресурсам?
В некоторых случаях для выполнения команды telent вы должны запускать командную строку cmd или powershell с правами администратора. Иначе получите ошибку аналогичную отсутствующему в системе telnet клиенту.
Превращаем командную строку в web браузер
Возвращаясь к началу статьи, проверим, сможем ли мы подключиться по протоколу HTTP к web серверу google.com на 80 порт:

Появится пустой экран, необходимо ввести запрос «GET /», что равносильно запросу корневой web страницы. Получим следующий ответ от web сервера Google:

Теперь, когда вы включили компоненту telnet в своей системе, сможете сможете использовать данную команды для подключения к сетевым устройствам по различным протоколам.
Отправка письма из командной строки с помощью telnet
Например, при мы можем отправить письмо по SMTP протоколу из командной строки. Для этого введем команду
telnet smtp.mailserver.com 25
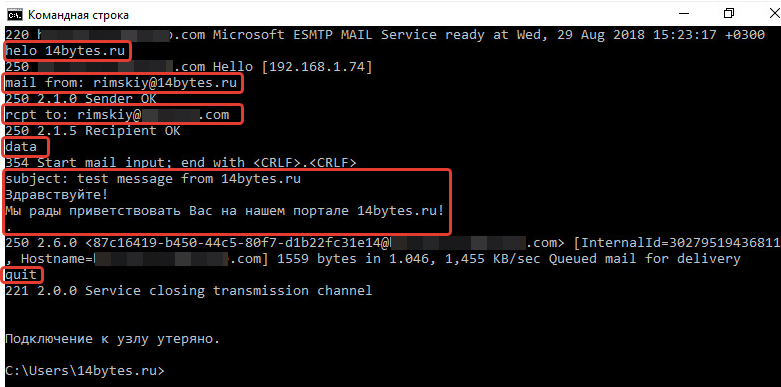
Если порт открыт, то получим приглашение от сервера на отправку команд. Нам интересно проверить отправку писем. Будьте внимательны при вводе последовательно следующих команд. Так как опечатки будут приводить к ошибкам, а команды удаления некорректных символов не работают.
- helo имя_вашего_хоста
- mail from: pochta@myhost.ru
- rcpt to: pochta@host.com (если не настроен почтовый relay, будьте внимательны при использовании домена, отличного от поддерживаемого на данном почтовом сервере)
- data
- subject: тема письма
- содержание письма
- . (точка с новой строки означает завершение ввода сообщения)
- quit (выход из сеанса связи)
Таким образом мы использовали telnet для проверки работы сетевых сервисов HTTP и SMTP. Также не забывайте использовать инструмент для устранения неполадок TCP-подключений.
Содержание
- Способ 1: «Программы и компоненты»
- Способ 2: «Командная строка / «Windows PowerShell»»
- Вопросы и ответы

В настоящее время протокол Telnet является устаревшим. Использовать его для удаленного управления компьютером небезопасно, поскольку весь трафик передается в незашифрованном виде. В современных версиях Windows вместо протокола Telnet рекомендуется использовать защищенный протокол SSH.
Способ 1: «Программы и компоненты»
Это самый простой и очевидный способ задействовать компонент «Telnet», предназначенный для удаленного управления компьютером. Чтобы открыть оснастку «Программы и компоненты», сделайте следующее:
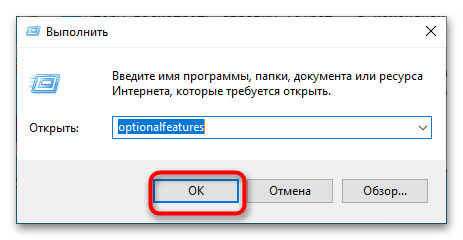
- Вызовите нажатием Win + R окошко быстрого выполнения команд, вставьте в него команду
optionalfeaturesи нажмите клавишу ввода. Также открыть оснастку можно через приложение «Параметры», перейдя в раздел «Приложения и возможности» → «Дополнительные компоненты» → «Другие компоненты Windows». - Отыщите в открывшемся окне оснастки пункт «Клиент Telnet», отметьте его флажком и нажмите кнопку «OK».
- Windows 10 выполнит поиск необходимых файлов и установит их.
Если Windows попросит перезагрузить компьютер, дайте согласие на перезагрузку.
Способ 2: «Командная строка / «Windows PowerShell»»
Для включения устаревшего клиента «Telnet» можно задействовать классическую «Командную строку» либо же консоль «PowerShell».
- Запустите ту или иную консоль от имени администратора любым удобным вам способом. Например, из контекстного меню кнопки «Пуск».
- Вставьте или введите в консоль команду
dism /online /Enable-Feature /FeatureName:TelnetClientи нажмите клавишу ввода.
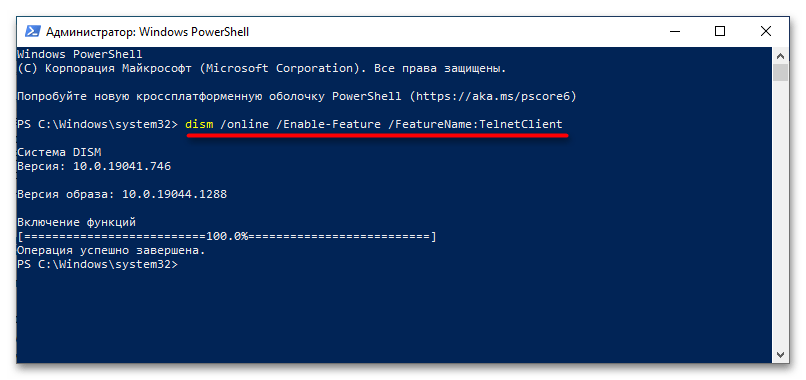
В случае удачного включения компонента команда вернет сообщение «Операция успешно завершена».
Еще статьи по данной теме:
Помогла ли Вам статья?
The Telnet protocol is capable of remotely managing network devices or computers over LAN or WAN. It is still popular today because it was one of the first protocols used with the launch of the Internet in 1969.

What is Telnet?
Telnet is an abbreviation of “teletype network”, “terminal network” or “telecommunications network”.
TELecommunication NETwork is one of the oldest protocols on the Internet, extends to the time of ARPANET and is used to connect to a remote computer over the Network so that the client computer acts as a terminal connected to the remote computer.
All it takes is a Telnet client. Using pre-web computing terminology, we can say that a client is actually a teleprocessor terminal emulation program adapted to the Internet system, that is, the TCP / IP protocol.
Introduction to the Protocol
Telnet is a standard Internet protocol that allows terminals and applications to connect to the Internet. The protocol provides basic rules that allow a client (a system consisting of a screen and keyboard) to connect with a command interpreter (on the server-side). It is implemented over a TCP connection to send data in an 8-bit encoded ASCII format with verification sequences between them. Thus, it provides an easy-to-implement 8-bit coded, bidirectional (half-duplex) communication system.
This protocol is used to configure remote hosts. So, for example, you use Serial Cable to initially configure a Cisco Router, and then you can configure this protocol remotely from the local or remote network without being next to this device.
Telnet protocol is based on three basic concepts:
- Virtual Network Terminal (NVT) paradigm.
- The principle of options negotiated.
- The trading rules.
This is a basic protocol to which other protocols of the TCP/IP set (FTP, SMTP, POP3, etc.) are implemented. It does not mention authentication because it is completely separate from the applications that use it. Also, it is not a secure data transfer protocol because the data it transmits travels over the network as unencrypted text. Port 23 is assigned to this protocol when it is used to connect the remote host to a computer running as a server.
Apart from the associated options and negotiation rules, these protocol features are essential. Data transmission consists of only byte transmission in the TCP stream. When byte 255 is transmitted, the next byte should be interpreted as a command. Therefore, byte 255 is called IAC (Interpret as Command).
The basic features of the Telnet protocol are available in RFC 854.
How Does It Work?
To use Telnet, it is very important to note that its client has two ways to work: Command mode and normal use mode. Command mode allows you to use a series of commands that affect the operating mode, including connection and disconnection.
These commands include:
- CLOSE: Closes the Telnet connection to the remote computer and returns to command mode (if started in command mode) or closes the application.
- QUIT: Sign out of the Telnet session. If you are connected to a remote computer, this command closes the connection and then the application.
- SET ECHO: If we cannot see what we are writing or, on the contrary, we double it, this command corrects the situation.
- OPEN: This command establishes a connection to a remote computer.
In normal mode, our equipment behaves like the keyboard of the computer we connect to. Each keystroke is sent to the remote device, and what we see on the screen is the echo that the remote equipment actually sends to us in response to this signal.
When you are in normal mode and want to go into command mode (for example, to end the session using QUIT), you must send the escape character. In turn, we are in command mode and if we press CR or Enter, we exit the mode and return to normal mode.
Telnet only serves terminal mode, i.e. without graphics access, but it is a very useful tool for remotely correcting errors without having to be physically in the same place as the machine they own. In addition, personal data on machines accessible by the Internet were used to consult data such as bibliographic information remotely.
Apart from these uses, in general, Telnet was used to log in with a UNIX machine (and it can still be used in the SSH variant today), so multiple users who have an account on the machine, connect, login and work using this machine. It is a very usual way of working with UNIX systems.
Details
Given the above, the first action for Telnet on a remote system would be to connect (“Login”). The client program initiates a negotiation with the host that we want to access the negotiation involving the creation of certain methods and features of the transmission/service to be used. For this, it is necessary to provide the customer with a few initial data that you need to know:
- Name: Refers to the server’s IP Address numerically or URL form. For example 192.168.0.1.
- Port Number: Specifies the service you want to access on the server. An address with an additional port number allows access to not only the remote computer but also to a particular service or program within it. Unless otherwise stated, the default number is 23 (normally used to connect to a user access account). During connection, the number can be added after the name or in a separate box, depending on the program.
- Terminal Type: Terminal identification is a contract used by both the client machine and the server with reference to the specific features and queues to be used. In this way, a virtual terminal is used regardless of what the physically used terminal actually is. From the customer’s point of view, identification should be done in two parts.
- a: It is shown to the client program, which acts as a particular type of virtual terminal.
In MS Telnet v.1.0, this is done in Terminal Preferences Emulation. You can choose two types: 52 and 100 / ANSI.
- b: Sets what type of terminal we will use on the server. This is a string of characters that is sent to the host during the connection negotiation.
In MS Telnet v.1.0, it is specified in the Connect, Remote system, Terminal type section. The available options are typical character strings (the most standard is VT100) that a host expects during this call.
- Login: In some services, login and password are not required because the server does not require them for that service.
- Password: The password that authenticates the user. You can enter your own e-mail address for general services that accept guests (visiting users).
- Log-Off: The last step at the end of a session on a remote system is to log out before physical connection is interrupted, so as not to leave a session open indefinitely on the host computer (it always consumes system resources). The concrete form depends on the system. There are no fixed rules, but on some systems, at the entrance, along with a welcome message, the appropriate word for disconnection is indicated. Usually, it is one of the following:
BYE, LOGOFF, LOGOUT, QUIT, END, EXIT, STOP. CLOSE first, the escape sequence comes. ABORT, escape sequence before (Use as a last resort).
Both Unix and Windows have their own clients: Telnet.exe. In the case of Windows, you can find it in the C: \ Windows directory. This program has Telnet.chm, a good help file with all the details necessary for its operation.
The usual thing is that it involves connecting with large computers (hosts, hosts, servers, etc.), at companies, universities, research centers and similar sites (usually Unix machines). Therefore, it is not a problem to connect to the neighbor’s computer over the Internet (there are other types of tools for this). The reason for the connection is not Web services, from a researcher who wants to continue the workday away from home, to a user who only requests service on a host that can be accessed this way.
The first idea to consider is not to connect to a PC, as we said, but to huge machines with dozens, sometimes hundreds of users. For security reasons, nobody can access these systems. The process is done by granting a right (access account) issued by the system administrator, which expresses a wide range of conditions.
For example, the dates and times we can connect; directories we can visit/use; if we can register for them or just read; how much information we can save. To identify each user with an account opened in the system, a name (nickname) identifying the user or service and an access key (password) that authenticates are used.
It is important to know how to work with Telnet on a remote computer, after communication. There is no point in connecting to a remote machine without knowing the Operating System and the application program we should use to a minimum.
Security
For security reasons, there are three main reasons why Telnet is not recommended for modern systems:
- Telnet General Purpose Domains have several vulnerabilities that have been discovered over the years and still exist.
- Telnet does not encrypt data (including passwords) sent over the connection by default, so it’s easy to interfere and save communications and use the password for malicious purposes later.
- Telnet does not have an authentication scheme that allows communication between two desired hosts and is not interrupted.
SSH Issues
The biggest problem is security, as all the usernames and passwords required to enter the machines browse the Internet in Plain Text (unencrypted text strings). This makes it easy for anyone who spies on network traffic to get usernames and passwords so they can access all these machines. Therefore, SSH appeared almost a few years ago when it emerged and became popular as an encrypted version of Telnet – at the moment all protocol communications can be encrypted during session setup.
Where Not Used?
Telnet should not be used in environments where security is important, for example on the public internet, because sessions are not encrypted.
This means that anyone who has access to any Router, Switch, or Gateway on the Network between two hosts using Telnet can capture packets passing close by and easily get connection and password information with any of the few common ones, such as TCPDump and Wireshark.
These flaws resulted in the rapid abandonment and depreciation of the Telnet protocol in favor of a safer and functional protocol called SSH launched in 1995. SSH provides all the functionality available in Telnet and strong encryption is added to prevent data sensitivity.
Computer security experts such as the SANS Institute and members of the comp.os.linux.security newsgroup recommends stopping Telnet usage for remote connections under all normal conditions.
When Telnet was first developed in 1969, the majority of Internet computer users were in the computer services of academic institutions or large private and government research facilities. Security was not a cause for concern in this environment, and only after the explosion of the 90’s bandwidth was a cause for concern. It may not be recommended to use Telnet in networks with an Internet connection, by multiplying the number of people with Internet access and by the number of people trying to break other people’s servers.
Nowadays
Today, this protocol is also used to access BBSs that was initially only accessible via a modem via a telephone line. To access BBS over Telnet, the Client must support ANSI graphics and file transfer protocols. ANSI charts are widely used among BBS. With file transfer protocols (the most common and best employee is ZModem), you can send and receive files from the BBS, whether it’s a program, a game, or a BBS (local mail, mail from FidoNet).
Some Telnet clients; (Supporting ANSI graphics and file transfer protocols such as Zmodem and others) mTelnet !, NetRunner, Putty, Zoc.
You can configure all network devices using the TCP/IP protocol with this protocol. In addition, a user name and password are required when connecting to a remote device.
When you transfer data with this protocol, it is an unsafe protocol because of your data sends as Clear Text. Instead of using Telnet over the network, SSH protocol is preferred.
How to Use It?
To use telnet, it must first be enabled on a host to be managed. After you enable it, you can easily connect to your remote host via the TCP 23 port with Command Prompt (CMD).
There are two different structures to use/configure the Telnet protocol. These; Server and Client. If you configure a server, you must install or activate the Client service to connect to it remotely.
After the definition of Telnet, now let’s examine how to use Telnet in Windows 10.
In this article, after enabling Telnet Client, we will provide a connection to the active Telnet Server on the ADSL Router.
How to Enable Telnet on Windows 10
You can easily enable and use it on Microsoft Win XP, Vista, 7, 8, 8.1, and 10 operating systems.
Follow the steps below to activate/install the Telnet Client.
Step 1
Right-click on the Start menu, and then click Programs and Features.

Step 2
In the Programs and Features, click Turn Windows features on or off.

Step 3
When the Windows features open or close window opens, select the Telnet Client option.

Step 4
After selecting the Client option, press the OK button.

Step 5
Applying changes to your system …

Step 6
After installing the service, click on the Close button.

Step 7
Open the Run by pressing the Windows Key + R together, type “cmd” and press the Enter key. After running the CMD prompt, type “telnet” at the command prompt and press Enter to start this service.

Step 8
After you see the welcome message, you can see that it works successfully.

Step 9
Now, type O (o) at the CMD prompt to connect to the ADSL Router on the local area network and press Enter.

Step 10
Type your default gateway IP address to access the ADSL Modem and press Enter.

Step 11
When you look at the image below, you can see a successful connection to an ADSL router using CMD.

How to Enable it using CMD
Another way to enable this service is to use the CMD command prompt. You can enable or disable it by using the CMD command prompt.
The DISM command is used on the CMD to activate the client. Execute the command below to install Telnet with CMD on the Windows operating system.
dism /online /Enable-Feature /FeatureName:TelnetClient

How to Disable it using CMD
Use the following command to disable/remove Telnet.
dism /online /Disable-Feature /FeatureName:TelnetClient

How to Use it on PC ⇒ Video
You can watch the video below to configure the teletype network on your computer and also subscribe to our YouTube channel to support us.
Final Word
In this article, we have defined the Telnet protocol used to manage remote devices in Windows operating systems and then enabled it. Thanks for following us!
Related Articles
♦ How to Install Net Framework 3.5
♦ How to Activate Windows Photo Viewer
♦ How to Use Ping in CMD
♦ How to Use Windows Experience Index Software
♦ Windows 10 Brightness Not Working
telnet.exe — это штатный телнет-клиент в операционных системах семейства Windows. Он позволяет удалённо управлять различными сетевыми устройствами (коммутаторами, роутерами, серверами и т.п.) по протоколу Телнет. Присуствует во всех версиях операционных систем Microsoft. В последних версиях (Windows 7, 8 и 10) по умолчанию деактивирован и чтобы запустить telnet.exe нужно дополнительно активировать его в компонентах ОСи.
Месторасположение программы: папка
Команды Telnet:
c - close - закрыть текущее подключение
d - display - отобразить параметры операции. Доступные параметры:
- WILL AUTH (проверка подлинности NTLM)
- WONT AUTH
- WILL TERM TYPE
- WONT TERM TYPE
- LOCALECHO off
- LOCALECHO on
o - open имя_узла [Порт] - подключиться к сайту (по умолчанию, Порт = 23)
q - quit - выйти из telnet
set - set установить параметры ("set ?" для вывода их списка).
Доступные параметры:
- bsasdel     символ  будет отправляться как символ
- crlf        режим возврата каретки; приводит к отправке символов CR & LF
- delasbs     символ  будет отправляться как символ
- escape x    где x - символ переключения в режим telnet-терминала и обратно
- localecho   включение локального эха.
- logfile x   где x - файл входа текущего клиента в систему
- logging     выполнение входа в систему
- mode x      где x - консоль или поток
- ntlm        включение проверки подлинности NTLM.
- term x      где x - ansi, vt100, vt52, или vtnt
sen - send - отправить строки на сервер
st - status - вывести сведения о текущем состоянии
u - unset - сбросить параметры ("unset ?" для вывода их списка)
Доступные параметры:
- bsasdel     символ  будет отправляться как символ
- crlf        режим возврата каретки; приводит к отправке символов CR & LFbsasdel     символ  будет отправляться как символ
- crlf        режим перевода строки; приводит к отправке символа CR
- delasbs     символ  будет отправляться как символ
- escape      символ переключения в режим telnet-терминала и обратно не задан
- localecho   отключение локального эха
- logging     отключение выполнения входа в систему
- ntlm        отключение проверки подлинности NTLM.
?/h - help вывести справку
Включаем telnet в Виндовс:
Последовательность действий следующая:
1. Заходим в Панель управления Виндовс 10 и находим раздел «Программы и компоненты». Попав в него, в меню справа находим пункт «Включение или отключение компонентов Windows»:
Откроется окно «Компоненты Windows» в котором надо найти и поставить галку на Клиент Telnet.
Жмём на «ОК» и ждём выполнения изменений:
Кликаем на «Закрыть». Готово, мы успешно установили telnet.exe в Windows 10.
Как запустить Telnet в Виндовс:
Нажимаем комбинацию клавиш Win+R чтобы открыть окно «Выполнить»:
В строчку «Открыть» вводим команду cmd и кликаем на «ОК».
Так мы запустим командную строку Виндовс.
Затем вводим команду telnet и нажимаем клавишу «Enter». Телнет-клиент Windows 10 запущен и можно им пользоваться.
взято отсюда: http://set-os.ru/telnet-exe-windows-10/
Отблагдарить автора статьи также можно переводом, +100 вам в карму!