by Milan Stanojevic
Milan has been enthusiastic about technology ever since his childhood days, and this led him to take interest in all PC-related technologies. He’s a PC enthusiast and he… read more
Updated on

XINSTALL BY CLICKING THE DOWNLOAD
FILE
If you’re not familiar with it, today we’re going to explain you how Telnet works and can you use it on Windows 10.
The development of Internet saw the invention of many protocols that allowed us to use it better. One of these protocols was Telnet.
What is Telnet and how does it work?
Telnet is an Internet protocol that allows you to connect to a different computer on your local network or on the Internet.
Telnet was invented in 1969, and it’s often considered an ancestor of modern Internet.
Today most users use a graphical user interface, but when Telnet was invented there were no browsers or graphical operating systems. Therefore, users had to rely solely on command line interface.
It’s worth mentioning that Telnet still works like it did decades ago, and Telnet clients are available for almost any platform.
Telnet changed the way how people use Internet because in the time before Telnet users had to manually use the server in order to get certain data.
How we test, review and rate?
We have worked for the past 6 months on building a new review system on how we produce content. Using it, we have subsequently redone most of our articles to provide actual hands-on expertise on the guides we made.
For more details you can read how we test, review, and rate at WindowsReport.
With Telnet, users could access the server remotely from the comfort of their home for the first time.
In addition to remote access, multiple users were able to connect to the server over Telnet. Therefore, it’s not hard to see how Telnet influenced the development of the Internet.
We have to mention that there are two different terms when it comes to Telnet: Telnet server and Telnet client. The former is a computer designed to run as a Telnet server.
You can easily turn your Windows PC into a Telnet server and you should be able to access it over Telnet.
Bear in mind that having a public IP address leaves your computer open for access by any computer on the Internet, so be sure to use a firewall in order to protect your PC from unauthorized remote access.
The same principles apply to running Telnet on Windows 11, so make sure to check it out if you’re running the latest OS from Microsoft.
- READ ALSO: 7 best tabbed command line tools for Windows 10
Telnet client is a PC that uses a Telnet connection to connect to a Telnet server. In fact, you can use Telnet from Windows 10 by following these steps:
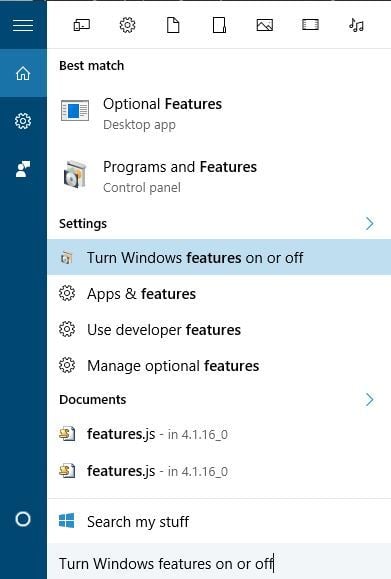
- Press Windows Key + S on your keyboard and enter features. Select Turn Windows Features on or off.

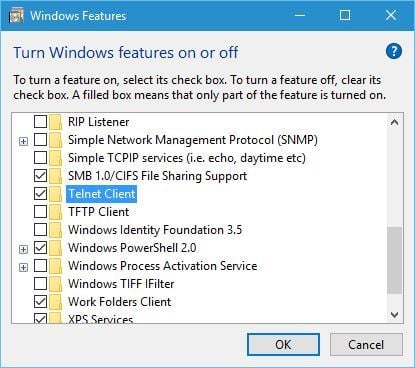
- When Windows Features opens, scroll down and check Telnet Client. Click OK to install Telnet.

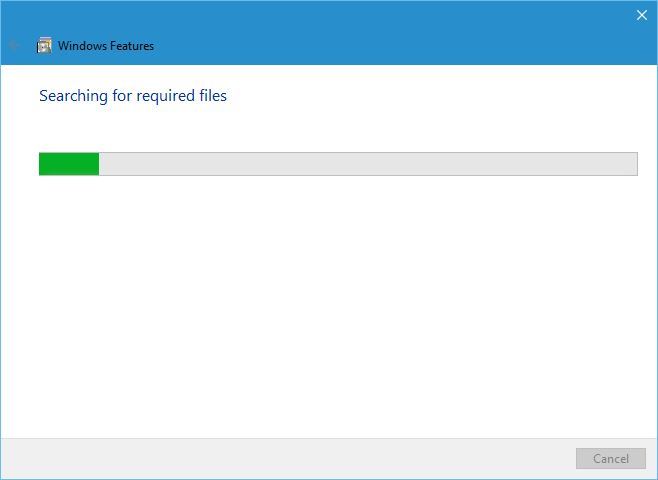
- Wait until Windows installs the necessary components.

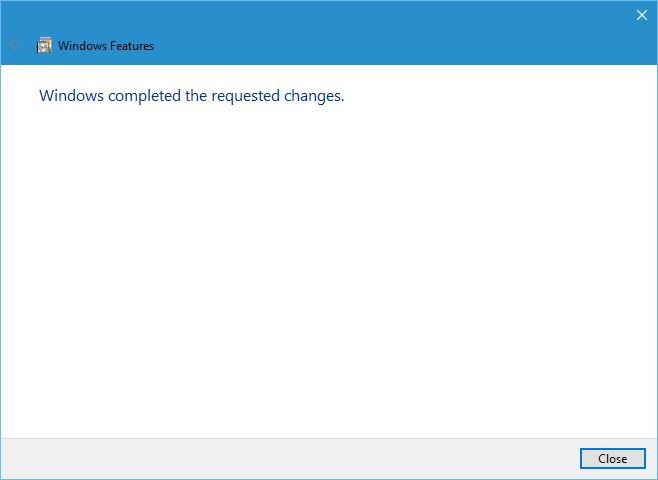
- Once the installation is completed click the Close button.
After you install Telnet, you can start it by doing the following:
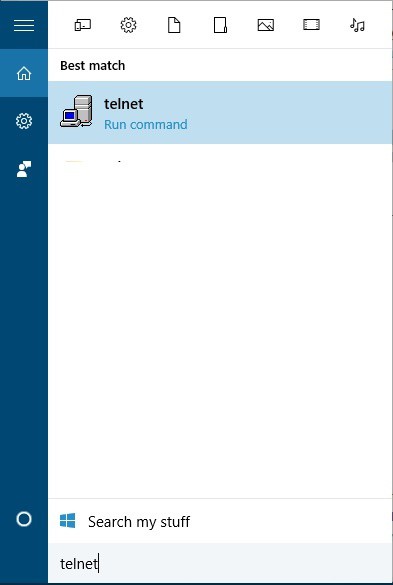
- Press Windows Key + S and enter telnet. Select Telnet from the list of results.

- Command line will now open, and you should be able to use Telnet without any problems.

Why is Telnet obsolete?
Although running Telnet on Windows 10 is fairly simple, the question remains why would you use Telnet for? Telnet is an outdated protocol, and most people don’t use it anymore.
This protocol is great if you are a computer geek, and you want to access Internet by using command line. Unfortunately, there aren’t many Telnet servers available nowadays, so you might have to do some research before you find one.
One of the biggest flaws of Telnet is its lack of security. Telnet transmits all the data between the client and the server without any encryption which means that almost anyone can intercept your data.
This is especially important if you’re sending sensitive information over Telnet, such as your username or password. Due to lack of encryption, malicious users can easily steal your password and see all the data between the Telnet client and server.
Also, Telnet doesn’t have authentication, which means that malicious users can easily intercept your traffic. Lastly, Telnet has several additional security vulnerabilities which make it quite unsafe to use.
Even though Telnet in Windows 10 might not be the safest Internet protocol, newer protocols, such as SSH for example, were inspired by Telnet. They are designed to fix many flaws that original Telnet had.
Telnet might not be as popular as it was a few decades ago. Stll, it’s certain that Telnet changed the way how Internet works forever.
READ ALSO:
- How to protect your Windows 10 device on public Wi-Fi network
- Fix: Network Protocol Missing in Windows 10
- Fix: Error ‘Err_ssl_protocol_error’ in Windows 8.1, 10
- 4 best bandwidth monitors for Windows 10
- How to fix Ethernet problems in Windows 10
![]()
На чтение 4 мин. Просмотров 547 Опубликовано
Если вы не знакомы с ним, сегодня мы расскажем вам, как работает Telnet, и можете ли вы использовать его в Windows 10.
Развитие Интернета привело к появлению множества протоколов, которые позволили нам использовать его лучше. Одним из таких протоколов был Telnet.
Что такое Telnet и как он работает?
Telnet – это интернет-протокол, который позволяет вам подключаться к другому компьютеру в локальной сети или в Интернете.
Telnet был изобретен в 1969 году, и его часто считают родоначальником современного Интернета.
Сегодня большинство пользователей используют графический пользовательский интерфейс, но на момент изобретения Telnet не было браузеров или графических операционных систем. Поэтому пользователям приходилось полагаться исключительно на интерфейс командной строки.
Стоит отметить, что Telnet по-прежнему работает так же, как и десятилетия назад, и клиенты Telnet доступны практически для любой платформы.
Telnet изменил способ, которым люди используют Интернет, потому что до того, как пользователи Telnet должны были вручную использовать сервер для получения определенных данных.
Благодаря Telnet пользователи могут впервые получить удаленный доступ к серверу, не выходя из дома.
В дополнение к удаленному доступу несколько пользователей смогли подключиться к серверу через Telnet. Поэтому нетрудно понять, как Telnet повлиял на развитие Интернета.
Мы должны упомянуть, что в отношении Telnet существуют два разных термина: сервер Telnet и клиент Telnet. Первый – это компьютер, предназначенный для работы в качестве сервера Telnet.
Вы можете легко превратить ваш компьютер с Windows в сервер Telnet и получить доступ к нему через Telnet.
Имейте в виду, что общедоступный IP-адрес оставляет ваш компьютер открытым для доступа с любого компьютера в Интернете, поэтому обязательно используйте брандмауэр, чтобы защитить ваш компьютер от несанкционированного удаленного доступа.
- Читайте также: 7 лучших инструментов командной строки с вкладками для Windows 10
Клиент Telnet – это компьютер, который использует соединение Telnet для подключения к серверу Telnet. Фактически, вы можете использовать Telnet из Windows 10, выполнив следующие действия:
-
Нажмите Windows Key + S на клавиатуре и введите функции. Выберите Включить или отключить функции Windows .

-
Когда откроется Функции Windows , прокрутите вниз и проверьте клиент Telnet . Нажмите ОК , чтобы установить Telnet.
-
Подождите, пока Windows установит необходимые компоненты.
-
После завершения установки нажмите кнопку Закрыть .


После установки Telnet вы можете запустить его, выполнив следующие действия:
-
Нажмите Windows Key + S и введите telnet . Выберите Telnet из списка результатов.
-
Теперь откроется командная строка, и вы сможете без проблем использовать Telnet.


Почему Telnet устарел?
Хотя запустить Telnet в Windows 10 довольно просто, остается вопрос, зачем вам использовать Telnet? Telnet – это устаревший протокол, и большинство людей его больше не используют.
Этот протокол отлично подходит, если вы компьютерный фанат, и вы хотите получить доступ к Интернету с помощью командной строки. К сожалению, в настоящее время доступно не так много серверов Telnet, поэтому вам, возможно, придется провести некоторое исследование, прежде чем вы его найдете.
Одним из самых больших недостатков Telnet является отсутствие безопасности. Telnet передает все данные между клиентом и сервером без какого-либо шифрования, что означает, что почти каждый может перехватить ваши данные.
Это особенно важно, если вы отправляете конфиденциальную информацию через Telnet, например, свое имя пользователя или пароль. Из-за отсутствия шифрования злоумышленники могут легко украсть ваш пароль и просмотреть все данные между клиентом и сервером Telnet.
Кроме того, Telnet не имеет аутентификации, что означает, что злоумышленники могут легко перехватить ваш трафик. Наконец, у Telnet есть несколько дополнительных уязвимостей, которые делают его довольно небезопасным для использования.
Хотя Telnet в Windows 10 может быть не самым безопасным интернет-протоколом, новые протоколы, такие как, например, SSH, были вдохновлены Telnet. Они предназначены для устранения многих недостатков, которые имел оригинальный Telnet.
Возможно, Telnet не так популярен, как несколько десятилетий назад. Stll, наверняка Telnet изменил способ работы Интернета навсегда.

Здравствуйте, уважаемые читатели блога. Сегодня решил написать статью, которая полностью будет посвящена довольно — таки распространённому вопросу пользователей — как проводится установка Telnet Windows 10. Прочитав эту статью, вы за несколько минут сможете правильно и без киках — либо проблем установить клиент Telnet на ваш компьютер.
Что такое клиент Телнет?
- Как настроить OpenVPN на Windows 10
- Пропал звук на Windows 10 — испраляем ошибку
- Для чего нужен журнал событий в Windows 10
- Как установить несколько ОС Windows 7 8 10 на одну флешку
- Устраняем критическую ошибку меню «Пуск» на Windows 10
Telnet — достаточно распространённый сетевой протокол, который используется для реализации всего текстового интерфейса по сети при помощи транспорта TCP. Одна из его самых главных задач — это создание идеального взаимодействия между терминальными  процессами и терминальными устройствами.
Если говорить простым языком, то данный клиент являет собой простую программу, которая имеет текстовый интерфейс и даёт возможность выполнить быстрое подключение одного компьютера к другому при помощи интернета. Как правило, такой процесс осуществляется при помощи обычной командной строки. Месторасположения программы — диск C, папка Windows \ System32. А работает клиент примерно таким способом:
Администратор одного из компьютеров даёт разрешение на подключение к нему другого. При включении службы Telnet, она даёт возможность вводить все необходимые команды, использующиеся для доступа к программам и разнообразным службам на удалённом компьютере. Такой софт можно использовать для очень широкого круга процессов: для открытия доступа к электронной почте, баз данных, файлов или других заданий. За умолчанием данный сетевой протокол отключён, но провести его активацию можно быстро и достаточно легко.
Пошаговая инструкция процесса активации продукта
Включение компонентов Windows
- Запустите компьютер;
- Откройте панель управления;
- Найдите вкладку «Программы и компоненты». В левом верхнем углу вкладки, которая откроется выберете пункт «Включение или отключение компонентов Windows».
Активация программного обеспечения
В появившемся списке доступных компонентов выберете папку «Telnet Client» (поставьте птичку возле нужной папки), нажмите «ОК».

ВАЖНО: В некоторых случаях нужно будет подождать одну или даже больше минут, пока произойдет полная установка клиента. Во время этого процесса не нужно думать, что ваш ПК завис и принимать какие — то меры по решению проблемы. Это может привести к ряду ошибок, благодаря которым может потребоваться повторная установка клиента.
Установка службы Телнет через CMD
В случаях, когда вы хотите произвести активацию через командную строку, вам стоит воспользоваться быстрой командой. Для этого:
- В поле «Выполнить «откройте командную строку (наберите команду «cmd»);
- В появившейся строке напечатайте следующую фразу:
start /w pkgmgr /iu:"TelnetClient"Нажмите клавишу «Enter». Через несколько секунд произойдет возврат на начальную командую строку. Чтобы начать пользоваться клиентом Telnet, просто перезагрузите её.

3. Есть еще один способ, но для этого нам понадобятся права администратора. Запускаем консоль с правами админа и вводим следующую команду:
dism /online /Enable-Feature /FeatureName:TelnetClient
Как включить и начать пользоваться программой?
Для начала откройте командную строку. Не стоит забывать, что сетевой протокол Telnet теперь запускается через командную строку. Чтобы совершить действие просто нажмите на клавишу «Win» и введите команду «Cmd» в поле «Выполнить». Далее наберите фразу «Telnet» и нажмите «Enter». Если всё было сделано верно, командная строка должна исчезнуть, вместо неё запустится линия Telnet, которая должна иметь примерно такой вид — «Microsoft Telnet».

Следующий этап — подключение к серверу. Как включить Telnet Windows 10?
В командной строке без ошибок введите команду:
open serveraddress [port]
При успешном завершении операции перед вами откроется окно запроса имени пользователя и пароля. После удачного подключение и пользования сервисом, всё, что осталось сделать — это правильно завершить сессию: откройте командную строку, пропишите в ней слово «quit» и нажмите «Enter».
Клиент запущен и доступен для пользования абсолютно бесплатно. Практически все доступные команды для пользования данным сетевым протокол можно скачать в интернете (close, display, set, st и другие).
Видео как установить Telnet
На этом хотел бы попрощаться с вами и завершить сегодняшнею статью. Чтобы решить раз и навсегда проблему с Telnet Windows 7 / 8 /10, весь текст разбил на детально разобранные пункты. Поэтому, очень надеюсь, что текст вам поможет и не вызовет никаких вопросов. Буду очень благодарен за подписку на мой блог и репост в социальных сетях.
С уважением, Виктор
The Telnet protocol is capable of remotely managing network devices or computers over LAN or WAN. It is still popular today because it was one of the first protocols used with the launch of the Internet in 1969.

What is Telnet?
Telnet is an abbreviation of “teletype network”, “terminal network” or “telecommunications network”.
TELecommunication NETwork is one of the oldest protocols on the Internet, extends to the time of ARPANET and is used to connect to a remote computer over the Network so that the client computer acts as a terminal connected to the remote computer.
All it takes is a Telnet client. Using pre-web computing terminology, we can say that a client is actually a teleprocessor terminal emulation program adapted to the Internet system, that is, the TCP / IP protocol.
Introduction to the Protocol
Telnet is a standard Internet protocol that allows terminals and applications to connect to the Internet. The protocol provides basic rules that allow a client (a system consisting of a screen and keyboard) to connect with a command interpreter (on the server-side). It is implemented over a TCP connection to send data in an 8-bit encoded ASCII format with verification sequences between them. Thus, it provides an easy-to-implement 8-bit coded, bidirectional (half-duplex) communication system.
This protocol is used to configure remote hosts. So, for example, you use Serial Cable to initially configure a Cisco Router, and then you can configure this protocol remotely from the local or remote network without being next to this device.
Telnet protocol is based on three basic concepts:
- Virtual Network Terminal (NVT) paradigm.
- The principle of options negotiated.
- The trading rules.
This is a basic protocol to which other protocols of the TCP/IP set (FTP, SMTP, POP3, etc.) are implemented. It does not mention authentication because it is completely separate from the applications that use it. Also, it is not a secure data transfer protocol because the data it transmits travels over the network as unencrypted text. Port 23 is assigned to this protocol when it is used to connect the remote host to a computer running as a server.
Apart from the associated options and negotiation rules, these protocol features are essential. Data transmission consists of only byte transmission in the TCP stream. When byte 255 is transmitted, the next byte should be interpreted as a command. Therefore, byte 255 is called IAC (Interpret as Command).
The basic features of the Telnet protocol are available in RFC 854.
How Does It Work?
To use Telnet, it is very important to note that its client has two ways to work: Command mode and normal use mode. Command mode allows you to use a series of commands that affect the operating mode, including connection and disconnection.
These commands include:
- CLOSE: Closes the Telnet connection to the remote computer and returns to command mode (if started in command mode) or closes the application.
- QUIT: Sign out of the Telnet session. If you are connected to a remote computer, this command closes the connection and then the application.
- SET ECHO: If we cannot see what we are writing or, on the contrary, we double it, this command corrects the situation.
- OPEN: This command establishes a connection to a remote computer.
In normal mode, our equipment behaves like the keyboard of the computer we connect to. Each keystroke is sent to the remote device, and what we see on the screen is the echo that the remote equipment actually sends to us in response to this signal.
When you are in normal mode and want to go into command mode (for example, to end the session using QUIT), you must send the escape character. In turn, we are in command mode and if we press CR or Enter, we exit the mode and return to normal mode.
Telnet only serves terminal mode, i.e. without graphics access, but it is a very useful tool for remotely correcting errors without having to be physically in the same place as the machine they own. In addition, personal data on machines accessible by the Internet were used to consult data such as bibliographic information remotely.
Apart from these uses, in general, Telnet was used to log in with a UNIX machine (and it can still be used in the SSH variant today), so multiple users who have an account on the machine, connect, login and work using this machine. It is a very usual way of working with UNIX systems.
Details
Given the above, the first action for Telnet on a remote system would be to connect (“Login”). The client program initiates a negotiation with the host that we want to access the negotiation involving the creation of certain methods and features of the transmission/service to be used. For this, it is necessary to provide the customer with a few initial data that you need to know:
- Name: Refers to the server’s IP Address numerically or URL form. For example 192.168.0.1.
- Port Number: Specifies the service you want to access on the server. An address with an additional port number allows access to not only the remote computer but also to a particular service or program within it. Unless otherwise stated, the default number is 23 (normally used to connect to a user access account). During connection, the number can be added after the name or in a separate box, depending on the program.
- Terminal Type: Terminal identification is a contract used by both the client machine and the server with reference to the specific features and queues to be used. In this way, a virtual terminal is used regardless of what the physically used terminal actually is. From the customer’s point of view, identification should be done in two parts.
- a: It is shown to the client program, which acts as a particular type of virtual terminal.
In MS Telnet v.1.0, this is done in Terminal Preferences Emulation. You can choose two types: 52 and 100 / ANSI.
- b: Sets what type of terminal we will use on the server. This is a string of characters that is sent to the host during the connection negotiation.
In MS Telnet v.1.0, it is specified in the Connect, Remote system, Terminal type section. The available options are typical character strings (the most standard is VT100) that a host expects during this call.
- Login: In some services, login and password are not required because the server does not require them for that service.
- Password: The password that authenticates the user. You can enter your own e-mail address for general services that accept guests (visiting users).
- Log-Off: The last step at the end of a session on a remote system is to log out before physical connection is interrupted, so as not to leave a session open indefinitely on the host computer (it always consumes system resources). The concrete form depends on the system. There are no fixed rules, but on some systems, at the entrance, along with a welcome message, the appropriate word for disconnection is indicated. Usually, it is one of the following:
BYE, LOGOFF, LOGOUT, QUIT, END, EXIT, STOP. CLOSE first, the escape sequence comes. ABORT, escape sequence before (Use as a last resort).
Both Unix and Windows have their own clients: Telnet.exe. In the case of Windows, you can find it in the C: \ Windows directory. This program has Telnet.chm, a good help file with all the details necessary for its operation.
The usual thing is that it involves connecting with large computers (hosts, hosts, servers, etc.), at companies, universities, research centers and similar sites (usually Unix machines). Therefore, it is not a problem to connect to the neighbor’s computer over the Internet (there are other types of tools for this). The reason for the connection is not Web services, from a researcher who wants to continue the workday away from home, to a user who only requests service on a host that can be accessed this way.
The first idea to consider is not to connect to a PC, as we said, but to huge machines with dozens, sometimes hundreds of users. For security reasons, nobody can access these systems. The process is done by granting a right (access account) issued by the system administrator, which expresses a wide range of conditions.
For example, the dates and times we can connect; directories we can visit/use; if we can register for them or just read; how much information we can save. To identify each user with an account opened in the system, a name (nickname) identifying the user or service and an access key (password) that authenticates are used.
It is important to know how to work with Telnet on a remote computer, after communication. There is no point in connecting to a remote machine without knowing the Operating System and the application program we should use to a minimum.
Security
For security reasons, there are three main reasons why Telnet is not recommended for modern systems:
- Telnet General Purpose Domains have several vulnerabilities that have been discovered over the years and still exist.
- Telnet does not encrypt data (including passwords) sent over the connection by default, so it’s easy to interfere and save communications and use the password for malicious purposes later.
- Telnet does not have an authentication scheme that allows communication between two desired hosts and is not interrupted.
SSH Issues
The biggest problem is security, as all the usernames and passwords required to enter the machines browse the Internet in Plain Text (unencrypted text strings). This makes it easy for anyone who spies on network traffic to get usernames and passwords so they can access all these machines. Therefore, SSH appeared almost a few years ago when it emerged and became popular as an encrypted version of Telnet – at the moment all protocol communications can be encrypted during session setup.
Where Not Used?
Telnet should not be used in environments where security is important, for example on the public internet, because sessions are not encrypted.
This means that anyone who has access to any Router, Switch, or Gateway on the Network between two hosts using Telnet can capture packets passing close by and easily get connection and password information with any of the few common ones, such as TCPDump and Wireshark.
These flaws resulted in the rapid abandonment and depreciation of the Telnet protocol in favor of a safer and functional protocol called SSH launched in 1995. SSH provides all the functionality available in Telnet and strong encryption is added to prevent data sensitivity.
Computer security experts such as the SANS Institute and members of the comp.os.linux.security newsgroup recommends stopping Telnet usage for remote connections under all normal conditions.
When Telnet was first developed in 1969, the majority of Internet computer users were in the computer services of academic institutions or large private and government research facilities. Security was not a cause for concern in this environment, and only after the explosion of the 90’s bandwidth was a cause for concern. It may not be recommended to use Telnet in networks with an Internet connection, by multiplying the number of people with Internet access and by the number of people trying to break other people’s servers.
Nowadays
Today, this protocol is also used to access BBSs that was initially only accessible via a modem via a telephone line. To access BBS over Telnet, the Client must support ANSI graphics and file transfer protocols. ANSI charts are widely used among BBS. With file transfer protocols (the most common and best employee is ZModem), you can send and receive files from the BBS, whether it’s a program, a game, or a BBS (local mail, mail from FidoNet).
Some Telnet clients; (Supporting ANSI graphics and file transfer protocols such as Zmodem and others) mTelnet !, NetRunner, Putty, Zoc.
You can configure all network devices using the TCP/IP protocol with this protocol. In addition, a user name and password are required when connecting to a remote device.
When you transfer data with this protocol, it is an unsafe protocol because of your data sends as Clear Text. Instead of using Telnet over the network, SSH protocol is preferred.
How to Use It?
To use telnet, it must first be enabled on a host to be managed. After you enable it, you can easily connect to your remote host via the TCP 23 port with Command Prompt (CMD).
There are two different structures to use/configure the Telnet protocol. These; Server and Client. If you configure a server, you must install or activate the Client service to connect to it remotely.
After the definition of Telnet, now let’s examine how to use Telnet in Windows 10.
In this article, after enabling Telnet Client, we will provide a connection to the active Telnet Server on the ADSL Router.
How to Enable Telnet on Windows 10
You can easily enable and use it on Microsoft Win XP, Vista, 7, 8, 8.1, and 10 operating systems.
Follow the steps below to activate/install the Telnet Client.
Step 1
Right-click on the Start menu, and then click Programs and Features.

Step 2
In the Programs and Features, click Turn Windows features on or off.

Step 3
When the Windows features open or close window opens, select the Telnet Client option.

Step 4
After selecting the Client option, press the OK button.

Step 5
Applying changes to your system …

Step 6
After installing the service, click on the Close button.

Step 7
Open the Run by pressing the Windows Key + R together, type “cmd” and press the Enter key. After running the CMD prompt, type “telnet” at the command prompt and press Enter to start this service.

Step 8
After you see the welcome message, you can see that it works successfully.

Step 9
Now, type O (o) at the CMD prompt to connect to the ADSL Router on the local area network and press Enter.

Step 10
Type your default gateway IP address to access the ADSL Modem and press Enter.

Step 11
When you look at the image below, you can see a successful connection to an ADSL router using CMD.

How to Enable it using CMD
Another way to enable this service is to use the CMD command prompt. You can enable or disable it by using the CMD command prompt.
The DISM command is used on the CMD to activate the client. Execute the command below to install Telnet with CMD on the Windows operating system.
dism /online /Enable-Feature /FeatureName:TelnetClient

How to Disable it using CMD
Use the following command to disable/remove Telnet.
dism /online /Disable-Feature /FeatureName:TelnetClient

How to Use it on PC ⇒ Video
You can watch the video below to configure the teletype network on your computer and also subscribe to our YouTube channel to support us.
Final Word
In this article, we have defined the Telnet protocol used to manage remote devices in Windows operating systems and then enabled it. Thanks for following us!
Related Articles
♦ How to Install Net Framework 3.5
♦ How to Activate Windows Photo Viewer
♦ How to Use Ping in CMD
♦ How to Use Windows Experience Index Software
♦ Windows 10 Brightness Not Working
The Terminal Over A Network (telnet) connection allows you to connect to a remote computer using the command line. You can then run scripts and programs on the remote PC. The system administrators may already be familiar with this feature.
If you are new to this, then this article is for you. Before you can remotely access another computer, the telnet feature needs to be enabled on all Windows versions. In this article, we discuss in detail what telnet is, and how to enable it.
Note: The methods discussed in this post explain how to enable Telnet Client, which is enabled on the source computer. Telnet Server will need to be enabled on the remote (target) computer to which you want to connect.
On This Page
What is Telnet
Telnet is a network protocol that is used to log into a remote computer on the same network using the command line interface.
To establish remote sessions, telnet adheres to a user command Transmission Control Protocol/Internet Protocol (TCP/IP) networking protocol. Using this, users can sign in with regular user accounts with the permissions they have been allowed to the particular programs and data on the target computer.
Telnet uses a client-server relationship to establish a connection. It is a text-based communication mechanism between a client machine and a server where an individual can run commands on a remote computer while being logged in as a local user.
Telnet can be used to perform any number of functions, like editing files, running applications, etc., on remote computers.
Telnet Client vs. Telnet Server
As mentioned earlier, Telnet uses the client-server configuration method to establish a connection to a remote computer. Telnet Client is a piece of software that you enable on client computers from which you access the remote computer. Whereas, the Telnet Server is the target computer that you connect with over the network.
In other words, on the Telnet Server, the Telnet port needs to be opened and allowed to let other computers connect to it.
That said, one common issue that many users face on the Windows command line is experiencing the error “telnet is not recognized as an internal or external command.”
Fix “Telnet is Not Recognized”
If telnet is not enabled on a computer and you try to connect to a remote computer using this protocol, you will see the following error message:
'telnet' is not recognized as an internal or extenral command, operable program or batch file.

This means that telnet needs to be enabled before you can use it to establish remote connections over the network. Of course, if the feature is not enabled, how can the Windows computer recognize it?
If you are seeing such an error, then you can also benefit from all the methods shared below to enable Telnet on your Windows PC.
How to Enable Telnet on Windows
Enable Telnet from Optional Features
The files for the optional features on a Windows PC are always there, but the feature is not installed. Since telnet is an optional feature, here is how you can enable it:
-
Open the Optional Features applet by typing in “optionalfeatures” in the Run Command box.

Open Optional Features -
Check the box with “Telnet Client” and click Ok.

Enable telnet from Optional Features The feature will now begin to install.
-
Once installed, close the wizard.

Close wizard


Telnet will now be enabled and you may continue to use the command line to connect to a remote computer.
To disable Telnet, simply uncheck the box next to “Telnet Client” in the Optional Features applet.
Enable Telnet from Command Prompt
You can also enable the telnet client directly from the Command Prompt. This method can come in handy if you are already inside the Command Prompt and trying to connect remotely using telnet.
-
Ensure you are running Command Prompt with elevated privileges.
-
Run this cmdlet:
pkgmgr /iu:"TelnetClient"
Enable telnet from Command Prompt The command will run silently and install telnet in the background. Alternatively, you can also use this command to enable Telnet:
Note: Elevated privileges are required to run the DISM command.
dism /online /Enable-Feature /FeatureName:TelnetClient -
If prompted with a UAC, click Yes.
You can now begin connecting to a remote computer once the telnet is installed

To disable telnet from the Command Prompt, run the following cmdlet using Deployment Image Servicing and Management (DISM):
dism /online /Disable-Feature /FeatureName:TelnetClient
Enable Telnet from Windows PowerShell
If you are using PowerShell, run the following command in an elevated PowerShell instance to enable the Telnet Client:
Enable-WindowsOptionalFeature -Online -FeatureName TelnetClient
Telnet will now be enabled. You may now continue to access a remote PC using telnet directly from PowerShell.
In case you wish to disable the feature in the future, run this cmdlet in Windows PowerShell:
Disable-WindowsOptionalFeature -Online -FeatureName TelnetClient
Enable Telnet Remotely
The methods above show how you can enable the Telnet Client on the local computer. However, you can also enable it on a remote PC on your network. This is especially useful if Telnet has not been allowed through the target computer’s firewall.
To enable telnet on a remote Pc, we must use PsTools by SysInternals – which is a suite of command-line tools for the Windows operating system. Using the PsExec utility inside this suite, you can remote access the Command Prompt of the target PC and then run any command.
Use the following steps to enable Telnet on a remote PC:
-
Start by downloading and extracting PsTools.

Extract PsTools -
Launch an elevated Command Prompt and use the
CDcmdlet to change the directory to the extracted folder:CD [PathToExtractedPsTools]Change directory to PsTools -
Now use the following command syntax to connect to the remote computer:
Note: If you see an “Access is denied” error at this point, a solution for it is provided at the end of these steps.
PsExec -i \\[RemoteComputerName] -u [Username] -p [Password] cmdReplace [RemoteComputerName] with the name of the PC you want to connect to, [Username] with the account name, and [Password] with the account password. Make sure that the account you are logging in with has administrative rights.
Connect to remote computer using PsTools PsExec You will now be connected to the remote PC.
-
Now, use the following command to enable telnet on the remote PC:
dism /online /Enable-Feature /FeatureName:TelnetClientEnable Telnet remotely


That’s it! Telnet has been successfully enabled on the remote computer, and you can now close the Command Prompt window.
If you faced the “Access is denied” error while attempting to access the remote computer with PsExec, it is probably because UAC is running on the remote machine. You must perform the following steps on the remote computer physically to disable UAC:
Note: This process involves making changes to the Windows Registry manually. Misconfiguration of critical values in the system’s registry could be fatal for your operating system. Therefore, we insist that you create a system restore point or a complete system image backup before proceeding forward with the process.
You can also use our top selection of disk imaging and backup software so you never lose your data or operating system again.
-
Open the Registry Editor by typing in “regedit” in the Run Command box.
Open the Registry Editor -
Paste the following in the address bar for quick navigation:
Computer\HKEY_LOCAL_MACHINE\SOFTWARE\Microsoft\Windows\CurrentVersion\Policies\System
Navigate to the System key -
Right-click the “System” key, expand New, and then click “DWORD (32-bit) Value.” Name this DWORD “LocalAccountTokenFilterPolicy“.
Create the DWORD LocalAccountTokenFilterPolicy -
Double-click the DWORD “LocalAccountTokenFilterPolicy” and change its Value Data to 1.
Change Value Data to 1 -
Now restart the computer for the changes to take effect.


Once these steps are performed, you should be able to access the remote computer using PsExec.
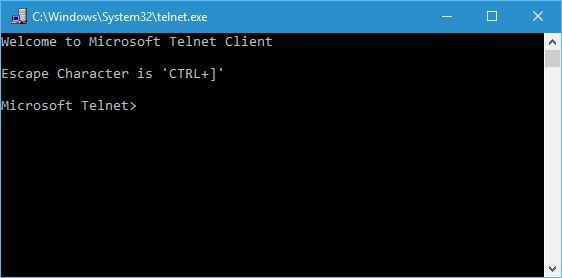
How to Check if Telnet is Disabled
Once Telnet is enabled, you can verify it by typing in “Telnet” in the Command Prompt. This will change and open another command line with “Microsoft Telnet” written, as in the image below.

Closing Words
In comparison, the Remote Desktop Connection can also be used to access a PC on the same network remotely. It offers a GUI interface, and you can log into a local account, and run apps and cmdlets, just like telnet.
However, if you prefer using the Command Line Interface instead, then telnet is the right tool for you. It is quick to connect and gives you more control over the remote PC.