Несколько лет назад, работая в IT отделе одной компании, столкнулся я с одной проблемой. Заключалась она в невозможности копирования по сети файлов большого размера. При попытке скопировать\перенести файл размером больше 100 МБ процесс намертво вставал, иногда вешая всю систему. Причем, что самое неприятное, проблема проявлялась периодически на разных компьютерах и локализовать ее не удавалось.
В тот раз решить проблему так и не удалось. Через некоторое время она ушла сама, так же неожиданно, как и появилась, и о ней благополучно забыли. И вот, по прошествии некоторого количества лет (и смены нескольких мест работы) я снова увидел знакомые симптомы. Но на сей раз все же удалось раскопать причину подобного поведения.
Дело в том, что в новой версии набора протоколов TCP/IP для Windows 7\Server 2008 была реализована функция TCP Receive Window Auto-Tuning — автоматическая настройка окна приема TCP. Теоретически эта функция предназначена для оптимизации пропускной способности и улучшения работы сети, а практически является причиной множества проблем.
Теория
Окно приема TCP используется для ограничения потока данных и для обеспечения возможности контроля потока на принимающей стороне. Окно TCP представляет собой объем данных, который получатель разрешает отправлять за один прием. То есть, чем больше окно, тем лучше работа в сетях с высокой пропускной способностью.
Для TCP/IP в Windows XP\Server 2003 максимальный размер окна приема фиксирован и по умолчению составляет 64КБ. В Windows 7\Server 2008 оптимальный размер окна приема определяется динамически. Для этого измеряется пропускная способности канала и скорость извлечения приложением данных из окна приема, после чего размер окна адаптируется в соответствии с этими параметрами. Автотюнинг использует масштабирование окна TCP, благодаря чему максимальный размер окна приема составляет 16 МБ.
В идеале при включении автотюнинга передача данных по сети должна стать более эффективной. Однако не всё так просто. Например, приложение не успевает извлекать данные, текущее окно приема заполняется и принимающий узел начинает уменьшать его размер. При заполнении максимального окна приема размер текущего окна уменьшается до 0 байт, после чего передача данных прекратится.
Практика
Как я уже говорил, проблему с автотюнингом очень сложно локализовать. Поэтому, при наличии неопределенных проблем с сетевыми подключениями в первую очередь смотрим настройки TCP. Сделать это можно из командной строки (с повышенными привилегиями) командой:
netsh interface tcp show global
Здесь нас интересует параметр ″Уровень автонастройки окна получения″ (англ. Receive Window Auto-Tuning Level). Он может принимать значения:
• disabled — автотюнинг выключен, используется фиксированное значение размера приемного окна TCP — 64KB;
• higlyrestricted — позволяет размеру приемного окна выходить за пределы значения по умолчанию, очень ограниченно превышая его;
• restricted — допускает более существенный рост размера окна относительно значения по умолчанию;
• normal — по умолчанию. Позволяет менять размер окна в зависимости от различных условий работы;
• experimental — позволяет увеличивать размер окна до очень больших значений. Следует применять очень осторожно.
Можно попробовать подобрать нужный уровень, например попробовать higlyrestricted, а если не помогает, то отключить:
netsh interface tcp set global autotuninglevel=disabled
После изменения настройки компьютер следует перезагрузить.

Проблема с автотюнингом присутствует в операционных системах Windows Vista, Windows 7, Windows Server 2008 и 2008 R2. По Windows 8 и Server 2012 пока данных нет, хотя автотюнинг в них есть и используется. Возможно всплывет позже 🙂
Download Windows Speedup Tool to fix errors and make PC run faster
Window Auto-Tuning feature is said to improve the performance for programs that receive TCP data over a network. It is nothing new. It was introduced in Windows Vista and is present in Windows 11/10 too. In today’s Internet, the range of latencies & throughput speeds is too large to manage statically. It needs to be adjusted dynamically. Windows 11/10 will dynamically adjust the receive buffer size to the throughput and latency of the link, using this feature.
Programs like Automatic Updates, Windows Update, Remote Desktop Connection, Windows Explorer for network file copy, etc, use WinHTTP or Windows HTTP Services.
Window Auto-Tuning feature is enabled by default in Windows 11/10 and makes data transfers over networks more efficient. But if your network uses an old router or your firewall software does not support this feature, then you may experience slow data transfers or even loss of connectivity.
Says Microsoft,
When the Receive Window Auto-Tuning feature is enabled for HTTP traffic, older routers, older firewalls, and older operating systems that are incompatible with the Receive Window Auto-Tuning feature may sometimes cause slow data transfer or a loss of connectivity. When this occurs, users may experience slow performance.

To check the status of Auto-Tuning feature on your system, in an elevated command prompt window, type the following and hit Enter:
netsh interface tcp show global
If you see ‘normal’ written against Receive Window Auto-Tuning Level, it means that the feature is enabled and it is working fine.
To disable Windows AutoTuning, run the following command:
netsh int tcp set global autotuninglevel=disabled
To enable Windows AutoTuning, run the following command:
netsh int tcp set global autotuninglevel=normal
Let the default settings of Window Auto-Tuning feature be enabled
Let the default settings of Window Auto-Tuning feature be enabled. If your network uses an old router or your firewall software does not support this feature, and you are experiencing poor or no connectivity issues, only then may you disable this feature and see if it works in your favor.
BONUS TIP:
To enable the Receive Window Auto-Tuning feature for HTTP traffic, you can run regedit and navigate to the following registry subkey, says KB947239:
HKEY_LOCAL_MACHINE\Software\Microsoft\Windows\CurrentVersion\Internet Settings\WinHttp
Right-click on it > New > DWORD Value. Type TcpAutotuning and give it a vale of 1.
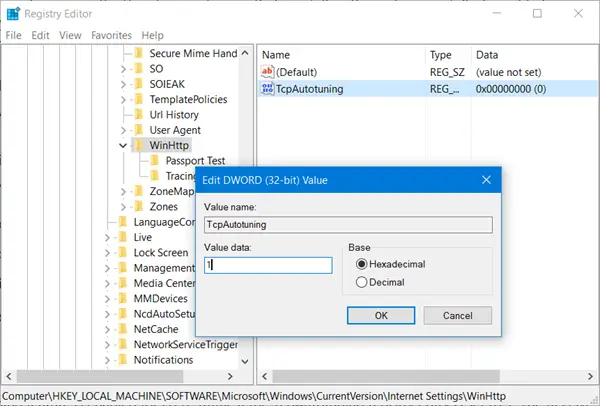
Click OK and exit.
To disable Receive Window Auto-Tuning feature for HTTP traffic, give it a value of 0 or delete the created TcpAutotuning DWORD.
The Receive Window Auto-Tuning feature lets the operating system continually monitor routing conditions such as bandwidth, network delay, and application delay. Therefore, the operating system can configure connections by scaling the TCP receive window to maximize the network performance. To determine the optimal receive window size, the Receive Window Auto-Tuning feature measures the products that delay bandwidth and the application retrieve rates. Then, the Receive Window Auto-Tuning feature adapts the receive window size of the ongoing transmission to take advantage of any unused bandwidth.
TIP: You can Analyze and Optimize TCP/IP with TCP Optimizer
I hope this solves the confusion about whether to enable or disable the Window Auto-Tuning feature.
See this post if you are facing Network & Internet connection problems.
Anand Khanse is the Admin of TheWindowsClub.com, a 10-year Microsoft MVP (2006-16) & a Windows Insider MVP (2016-2022). Please read the entire post & the comments first, create a System Restore Point before making any changes to your system & be careful about any 3rd-party offers while installing freeware.
You can optimize TCP/IP settings in Windows 10 either manually or using a third-party app. Optimizing it can potentially improve your internet connection speed. If you’re wondering whether it’s necessary, what settings you need to change, and how, we’ll walk you through the process. But before that, let’s get some basics out of the way.
What Is TCP/IP?
TCP/IP, short for Transmission Control Protocol/Internet Protocol, is a group of communication protocols that allow network devices to communicate when they’re connected. TCP/IP is a set of rules and procedures that dictate the way data is transmitted and received over the internet.

Your computer system interacts with countless other systems on a network, but at any given point in time, only two systems can communicate with each other. For this communication to work effectively, computers need protocols.
A protocol is a set of rules that computers use for interacting with each other. TCP/IP is a standard communication protocol that allows all computers to interact, regardless of the vendor. IP (Internet Protocol) is like an address where the data is to be sent, while TCP is the method of delivering the data to that address.
TCP and IP are different things, but they’re mostly used together because they rely on each other. Think of a text message for example. An IP address is similar to your phone number; it helps determine where the data is sent. TCP is the technology that transmits the message, plays the notification tone, and allows you to read the text message.
Do You Need to Optimize TCP/IP Settings on Windows 10?
In most cases, there’s no need to optimize TCP/IP settings unless you know a setting that you want to change for a specific purpose.
However, Windows Vista introduced a new feature called Receive Window Auto-Tuning, which monitors several parameters of the TCP including bandwidth and network delay in real-time. It determines the optimal receive window size by measuring products that delay application retrieve rates and bandwidth. Next, it tries to capitalize on the surplus bandwidth by adjusting the receive window size.

This is how the feature scales the TCP receive window to maximize network performance and throughput. Essentially, Windows added a feature to optimize TCP such that it maximizes your network speed.
That said, there are still a few cases where manual optimization may be warranted. For instance, if you’re using Windows XP or an older version of Windows, an old router or modem that doesn’t support the Auto-Tuning feature, or you want to change a specific TCP/IP setting, you’ll need to optimize TCP/IP settings manually.
How to Disable the Auto-Tuning Feature in Windows?
If you have an older version of Windows than Windows Vista or have a router that doesn’t support Auto Tuning, you can easily disable it.
Most third-party TCP optimization tools allow disabling Auto-Tuning from within their interface. However, if yours doesn’t, you can run a few commands to disable Auto-Tuning.
Start by launching the Command Prompt, and run the following commands:
- Check if Auto-Tuning is enabled:
netsh interface tcp show global

If Receive Window Auto-Tuning Level appears as normal, Auto-Tuning is enabled.
- Disable Auto-Tuning:
netsh int tcp set global autotuninglevel=disabled
At this point, you’ll have disabled Auto-Tuning. If you want to re-enable it, run the following command:
netsh int tcp set global autotuninglevel=normal
You can also disable Auto-Tuning from the Registry Editor. Press Win + R, type regedit, and press Enter. Paste the following address in the navigation bar:
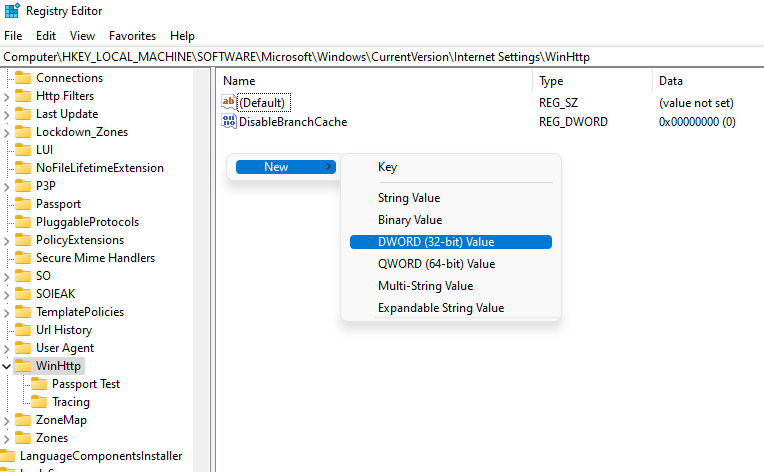
HKEY_LOCAL_MACHINE\Software\Microsoft\Windows\CurrentVersion\Internet Settings\WinHttp
You’ll need to create a new value in the WinHttp subkey. Right-click in the whitespace and select New > DWORD (32-bit) Value.
Name the value TcpAutotuning. Double-click on the DWORD, insert 1 in the Value data field and select OK.
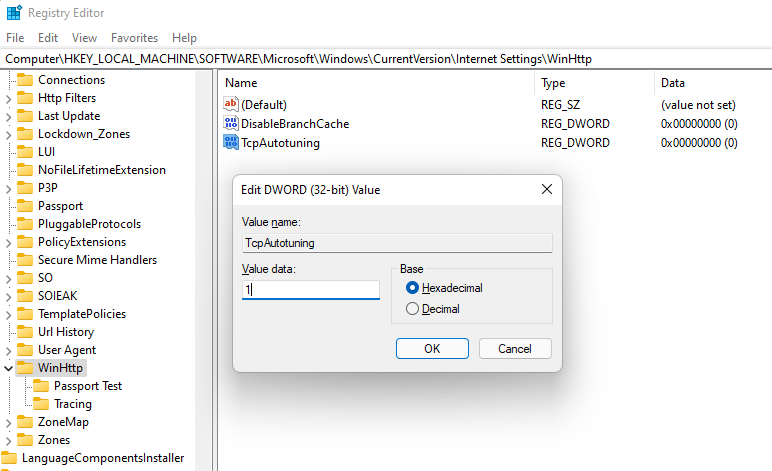
To re-enable, delete the value or set Value data to 0.
The Auto-Tuning feature and TCP/IP settings are pre-configured on Windows 10, which means they’re the same for everyone who uses Microsoft Windows unless they have changed them manually. But even people with the same operating systems can, of course, have different types of internet connections or old routers.
Internet connections may be broadband or fiber, offer different bandwidths, or have different latency. You can tweak your TCP/IP settings such that they work best for the specific characteristics of your internet connection.
If you’re tech-savvy, you can optimize TCP/IP on Windows 10 by changing Windows registry settings, or by running a combination of commands in the Command Prompt. But the process is much simpler with a third-party tool because you’ll be able to do everything using an interface and from one place.
Download TCP Optimizer
Before you can start optimizing your TCP/IP settings, you’ll need to download a third-party tool like TCP Optimizer.
Download it, right-click on the downloaded file, and select Run as administrator.
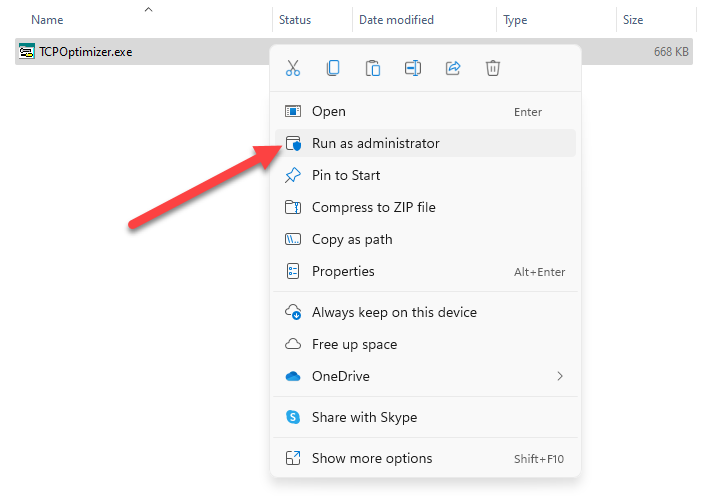
You’ll see the interface on your screen now.
Optimize TCP/IP
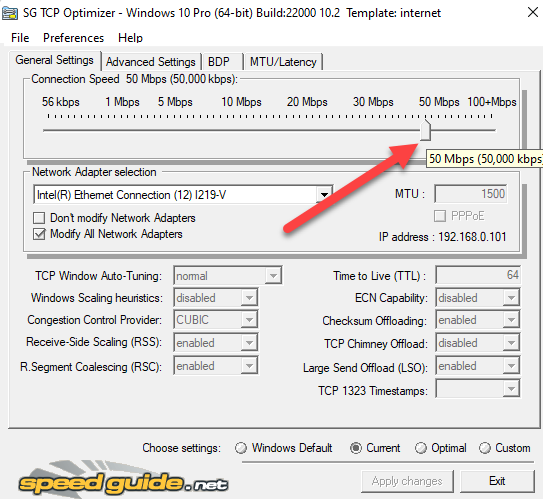
To start, you’ll need to only insert your internet speed into the TCP Optimizer and it will optimize all settings accordingly. Set the speed to the maximum speed that your internet connection offers. This is the maximum bandwidth available, not your LAN speed. For instance, if your bandwidth is 50Mbps connection, set the speed to 50 Mbps.
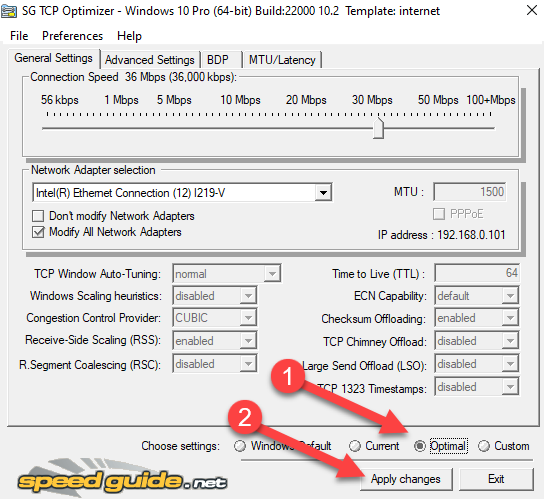
Then, select Optimal from the Choose settings section at the bottom and select Apply changes.
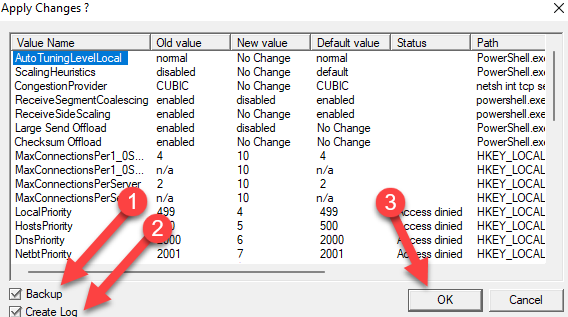
On the window that pops up, check both boxes next to Backup and Create Log at the bottom right, and select OK.
You’ll be prompted for a reboot, click Yes. Click No if you want to reboot later. Changes are applied only after the reboot, though.
That’s it, you’re done.
If something goes wrong, you can always revert to the default settings because TCP Optimizer automatically creates a backup of your settings before applying any changes.
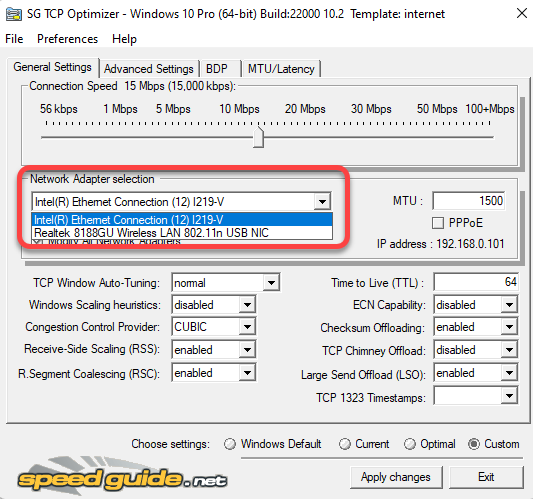
If you know your way around networking and you want to change individual settings, start by selecting Custom in the Choose settings section at the bottom. Once you do this, you’ll see that all settings that were grayed out before can now be tweaked.
Before you change any settings, make sure that you’ve selected the correct network adapter in the Network Adapter selection section.
You can then change the MTU, Congestion Control Provider, and even advanced TCP/IP parameters like QoS. But these are typically helpful when you have an exact problem you’re trying to solve and know how to solve it using these settings.
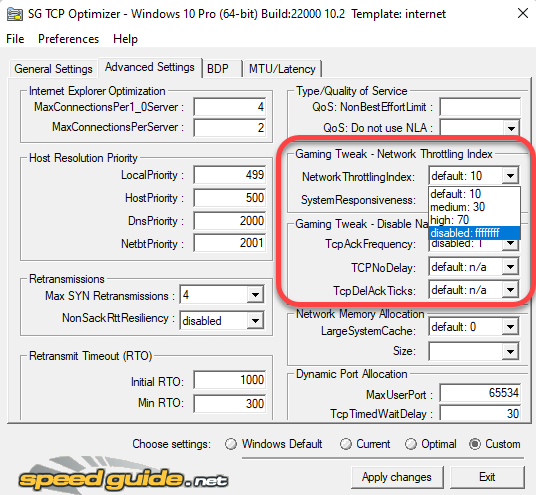
For instance, if you’re a gamer trying to optimize your internet speed, you can switch over to the Advanced Settings tab and disable the Network Throttling Index and Nagle’s algorithm.
TCP Optimizer comes with a lot of advanced functionality, but it’s best not to tinker with those unless you know what you’re doing. Plus, applying the optimal settings using TCP Optimizer, in most cases, is more than enough to optimize your TCP/IP settings on Windows 10.
If you do mess something up, you can always apply the default Windows settings and reset TCP/IP and WINSOCK from the File menu at the top.

TCP Settings, Optimized
Optimizing TCP can be very helpful when you want to ensure high performance from your network connections. If the current settings aren’t allowing you to leverage your internet plan’s full potential, you may try optimizing TCP settings.
Of course, it’s best to ensure that optimization is in fact warranted. For instance, it’s possible that all you need to do is improve your WiFi signal to get better internet speeds. Note that there are several other ways of improving your upload and download speeds too.
С выходом Vista в операционной системе Windows появилась функция под названием TCP/IP Receive Window Auto-Tuning, предназначенная для повышения производительности приложений, участвующих в обмене TCP-пакетами по сети. Имеется она и в Windows 10 Anniversary Update, но в отличие от более ранних версий системы, в «десятке» она включена по умолчанию.
Как уже было сказано, главной ее задачей является оптимизация работы сетевых приложений, однако при определенных условиях TCP/IP Receive Window Auto-Tuning может снижать скорость интернет-подключения. Проверить, не вызывает ли она снижение производительности сети, вместо того чтобы ее повышать, очень просто. Откройте от имени администратора командную строку и выполните в ней следующую команду:
netsh interface tcp show global
В результате выполнения команды вы получите список глобальных параметров TCP. Найдите в нем запись «Уровень автонастройки окна получения» и для начала убедитесь, что он имеет значение normal.

Это будет означать, что функция включена. Теперь протестируйте с помощью любых удобных для вас средств скорость интернет-подключения, запишите данные, а затем отключите TCP/IP Receive Window Auto-Tuning командой netsh int tcp set global autotuninglevel=disabled.
После этого еще раз протестируйте скорость интернета и сравните полученные данные. Если функция работала некорректно, скорость соединения должна будет увеличиться. В этом случае функцию автотюнинга можно оставить отключенной. Если же ничего не изменилось, либо напротив, скорость подключения снизилась, сетевой автотюнинг следует включить заново, выполнив в консоли CMD команду netsh int tcp set global autotuninglevel=normal.
Отличного Вам дня!
Некоторые пользователи используют «десятку» достаточно долго и в какой-то момент, начинают замечать, что у них возникли проблемы с интернет-соединением, которое стало достаточно медленным. Именно по этой причине, мы рекомендуем вам обратить внимание на данную статью, так как в ней пойдет речь о том, как TCP/IP Receive Window Auto-Tuning снижает скорость интернета в Windows 10 Anniversary, что собственно и становится для большинства пользователей ПК камнем преткновения с бесчисленным количеством проблем.
Для тех из вас, кто не в курсе, поясняем, что функция TCP/IP Receive Window Auto-Tuning была создана еще несколько лет назад и предназначалась она для того, чтоб поднимать производительность приложений взаимодействующих с сетевыми подключениями, которые так или иначе участвуют в обмене TCP-пакетами по сети. Так как функция в предыдущих версиях ОС Windows оказалась вполне работоспособной, то и в «десятку» она перебралась благополучно… Вот только в последней версии ОС, с вышеназванной функцией произошло что-то не то, ведь мало того, что в настройках «по умолчанию» она включена, так ещё бывают ситуации, когда происходит сбой и функция начинает беспощадно «жрать» интернет трафик…
Для того, чтоб проверить правильность работы TCP/IP Receive Window Auto-Tuning, вам необходимо произвести открытие от имени Администратора командной строки и прописать в неё команду вида «netsh interface tcp show global» (без кавычек) → в результате, перед вами появится список глобальных параметров TCP и уже в нём, вам необходимо отыскать пункт «Уровень автонастройки окна получения» и посмотреть, чтоб он имел значение «normal»:

Значение «normal» информирует нас с вами о том, что функция полностью включена.
Теперь, необходимо произвести тестирование скорости интернета имеющимися у вас средствами → запишите полученные данные → отключите TCP/IP Receive Window Auto-Tuning при помощи команды «netsh int tcp set global autotuninglevel=disabled» (без кавычек) → еще раз протестируйте скорость интернет-соединения → запишите полученные данные в данный момент → произведите сравнение полученных данных по скорости интернет-соединения после двух замеров.
Если функция TCP/IP Receive Window Auto-Tuning снижает скорость интернета в Windows 10 Anniversary, то во втором числовом значение после замера интернет-соединения, скорость интернета будет выше! Таким образом, вам стоит оставить отключенной функцию «Auto-Tuning», так как в ней и заключались ваши проблемы.
Если же во время сравнения замеров скорости интернет-соединения не какой разницы замечено не было, тогда функцию «Auto-Tuning» стоит включить, а для этого вам нужно просто выполнить в консоли CMD команду «netsh int tcp set global autotuninglevel=normal» (без кавчек).