Hello,
I have been using openvpn for some years now and came to a point were I need to connect to 2 different OpenVPN-Servers.
For this I installed a second TAP-Adapter and then renamed both adapters to names I can remember better and put them together with dev-node into the to them belonging config.
The older one (that also uses the older adapter) works fine, the new one does not. OpenVPN says «TAP-Windows adapter ‘ACT-VPN’ not found» even though I can see it in my system. Google returned nothing useful for me — so I hope that someone can help me here.
I am using a Windows 8.1 Pro x64 Laptop with the current v2.3.6 x86_64
Here’s the config(s), logfile of the broken VPN:
working:
Code: Select all
client
dev tun
dev-node THA-VPN
proto udp
remote ###.###.###.### 1194
remote-random
resolv-retry infinite
lport 52500
persist-key
persist-tun
ca ca.crt
cert rin.crt
key rin.key
ns-cert-type server
comp-lzo
verb 3
non working
Code: Select all
client
dev tun
dev-node ACT-VPN
resolv-retry infinite
nobind
mute-replay-warnings
ns-cert-type server
comp-lzo
verb 3
persist-key
persist-tun
proto udp
port 1194
cipher AES-128-CBC
cert keys/untangle-9171-rin-mherrguth.crt
key keys/untangle-9171-rin-mherrguth.key
ca keys/untangle-9171-rin-mherrguth-ca.crt
remote ###.###.###.### 1194
Log file non working:
Code: Select all
Mon May 11 11:55:50 2015 OpenVPN 2.3.6 x86_64-w64-mingw32 [SSL (OpenSSL)] [LZO] [PKCS11] [IPv6] built on Mar 19 2015
Mon May 11 11:55:50 2015 library versions: OpenSSL 1.0.1m 19 Mar 2015, LZO 2.08
Mon May 11 11:55:51 2015 Socket Buffers: R=[65536->65536] S=[65536->65536]
Mon May 11 11:55:51 2015 UDPv4 link local: [undef]
Mon May 11 11:55:51 2015 UDPv4 link remote: [AF_INET]###.###.###.###:1194
Mon May 11 11:55:51 2015 TLS: Initial packet from [AF_INET]###.###.###.###:1194, sid=8876622c 311d71eb
Mon May 11 11:55:52 2015 VERIFY OK: depth=1, CN=certificateAuthority, C=CO, ST=ST, L=L, O=O, OU=OU, dnQualifier=certificateAuthority
Mon May 11 11:55:52 2015 VERIFY OK: nsCertType=SERVER
Mon May 11 11:55:52 2015 VERIFY OK: depth=0, C=CO, ST=ST, O=O, OU=OU, CN=server, dnQualifier=server
Mon May 11 11:55:55 2015 Data Channel Encrypt: Cipher 'AES-128-CBC' initialized with 128 bit key
Mon May 11 11:55:55 2015 Data Channel Encrypt: Using 160 bit message hash 'SHA1' for HMAC authentication
Mon May 11 11:55:55 2015 Data Channel Decrypt: Cipher 'AES-128-CBC' initialized with 128 bit key
Mon May 11 11:55:55 2015 Data Channel Decrypt: Using 160 bit message hash 'SHA1' for HMAC authentication
Mon May 11 11:55:55 2015 Control Channel: TLSv1, cipher TLSv1/SSLv3 DHE-RSA-AES256-SHA, 2048 bit RSA
Mon May 11 11:55:55 2015 [server] Peer Connection Initiated with [AF_INET]85.183.55.87:1194
Mon May 11 11:55:57 2015 SENT CONTROL [server]: 'PUSH_REQUEST' (status=1)
Mon May 11 11:55:57 2015 PUSH: Received control message: 'PUSH_REPLY,register-dns,route 192.168.168.0 255.255.255.0,route 172.16.65.0 255.255.255.0,topology net30,ping 10,ping-restart 60,dhcp-option DNS 172.16.65.1,ifconfig 172.16.65.6 172.16.65.5'
Mon May 11 11:55:57 2015 OPTIONS IMPORT: timers and/or timeouts modified
Mon May 11 11:55:57 2015 OPTIONS IMPORT: --ifconfig/up options modified
Mon May 11 11:55:57 2015 OPTIONS IMPORT: route options modified
Mon May 11 11:55:57 2015 OPTIONS IMPORT: --ip-win32 and/or --dhcp-option options modified
Mon May 11 11:55:57 2015 do_ifconfig, tt->ipv6=0, tt->did_ifconfig_ipv6_setup=0
Mon May 11 11:55:57 2015 open_tun, tt->ipv6=0
Mon May 11 11:55:57 2015 TAP-Windows adapter 'ACT-VPN' not found
Mon May 11 11:55:57 2015 Exiting due to fatal error

When it concerns the wireless connection, choosing the right router is essential, and one cannot go wrong with Netgear. On the contrary, there are various issues persistent with Netgear routers, and tap-windows adapter ‘Netgear-VPN’ not found is one of the common ones. For this purpose, we have outlined the troubleshooting methods to help you fix the issue!
1. Connection Rename
To begin with, you need to understand that VPN adds a new network connection, and there are high chances that the VPN didn’t have the correct name entered. In this case, it is suggested that you rename the connection to ClientVPN, and the issue will be resolved pretty quickly.
2. Version
When it comes down to the OpenVPN with Netgear router, you need to understand that people have installed the wrong version. If that’s the case, you need to delete the current version of OpenVPN that you are using. On the other hand, you need to back up the configuration files before deleting OpenVPN. Once you’ve backed up the configuration files, delete OpenVPN and restart the router. Once the router restarts, download the latest OpenVPN version.
3. Mode Settings
For everyone who needs to work out, the Netgear-VPN not found the issue, tweaking up the mode settings will resolve the issue. In this matter, you need to open the advanced tab and move to the advanced setup. Scroll down to VPN service and enable it. In addition, you need to use TAP & TUN modes under UDP settings. You will need to use the default ports as 12973 and 12974.
Then, forward the sites on the internet and direct LAN through VPN for ensuring the highest standards of privacy. Once you’ve applied the settings, click on the “for smartphone” button, and download the OpenVPN file. Then, download the OpenVPN on the device, and you will be able to resolve the issue.
4. Firmware
In some cases, the VPN issue persists if your device or Netgear router doesn’t have the latest firmware installed. This issue usually happens when you are using a Windows laptop. If that’s the matter, we suggest that you download and install the files and scripts of the latest firmware for the PC. So, we suggest that you look for the latest Netgear router firmware, and it will help fix the error.
5. Rename
For people who couldn’t resolve the issue by downloading the latest firmware, we suggest that you rename the adapter. For this purpose, you will need to rename the TAP adapter on the PC to Netgear-VPN through the control panel. Keep in mind that if OpenVPN is unable to find the TAP adapter, login will not be possible. So, we suggest that you rename the TAP adapter, and the connection will be streamlined.
6. Client Change
Usually, changing the client’s configuration will help resolve the VPN issue. For this purpose, open the cientx.ovpn in the notepad and remove the dev-node from the line. Once you remove the line, add a semi-colon before dev-mode, such as;dev-mode, and save the adapter settings. Once you change the client name and lines, don’t forget to restart the router!
При запуске OpenVPN сервера или подключения из клиента OpenVPN вы можете столкнуться с ошибкой:
All TAP-Windows adapters on this system are currently in use
Exiting due to fatal error
Или
All wintun adapters on this system are currently in use or disabled
Или
No TAP Adapter Available
Вы можете увидеть эту ошибку логе OpenVPN сервера (файл C:\Program Files\OpenVPN\log\openvpn.log) или в клиенте OpenVPN GUI/
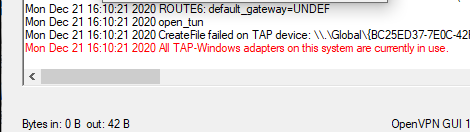
Это известная ошибка, связанная с тем что в Windows не установлены или некорректно работают виртуальные сетевые адаптеры TAP или wintun.
В OpenVPN 2.5+ вместо сетевых адаптеров TAP можно использовать WinTun от разработчиков WireGuard. По словам разработчиков, wintun драйвер работает быстрее чем классический OpenVPN драйвер TAP. Вы можете выбрать какой сетевой драйвер использовать при установке OpenVPN (TAP-Windows6 или Wintun).

Чтобы исправить эту ошибку нужно выполнить один из следующих шагов (расположены в порядке от самого простого к самому сложному):
- Перезапустить TAP-Windows/WinTun через панель управления.
- Переустановить драйвер TAP-Windows/Wintun;
- Создать новый сетевой адаптер для OpenVPN (или другого VPN клиента)
Выведите список всех TAP адаптеров, доступных клиенту OpenVPN:
cd "c:\Program Files\OpenVPN\bin"
“C:\Program Files\OpenVPN\bin\openvpn.exe” --show-adapters

В нашем случае установлен как Wintun, так и TAP адаптер:
'OpenVPN Wintun' {1199219C-C5AD-4722-B195-C80332101710} wintun
'OpenVPN TAP-Windows6' {9C6B25CA-0AF0-4752-AD4A-032947F6A6FD} tap-windows6
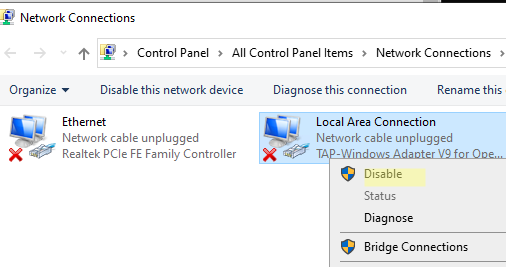
Для устранения ошибки обычно достаточно включить и отключить TAP адаптер в панели управления Windows, перезагрузить компьютер или переустановить клиент OpenVPN.
Вы можете включить и отключить сетевой адаптер WinTap из панели управления ncpa.cpl. Щелкните в панели управления по нужному адаптеру (TAP-Windows или Wintun Userspace Tunnel) и выберите Disable. Затем включите его (Enable.)
Также вы можете перезапустить все сетевые интерфейсе OpenVPN TAP с помощью PowerShell:
$TapAdapter= Get-NetAdapter| where {$_.InterfaceDescription -like "*TAP-Windows*"}
Disable-NetAdapter -Name $TapAdapter -Confirm:$false
Enable-NetAdapter -Name $TapAdapter -Confirm:$false

Если предыдущий способ не помог, попробуйте переустановить драйвера для вашего виртуального TAP адаптера вручную
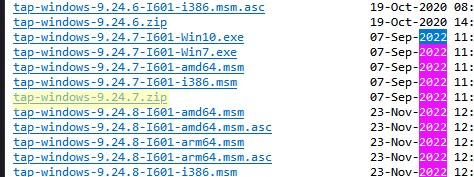
- Скачайте последнюю версию TAP драйвера для Windows здесь (http://build.openvpn.net/downloads/releases/). Например, tap-windows-9.24.7.zip или wintun-amd64-0.8.1.

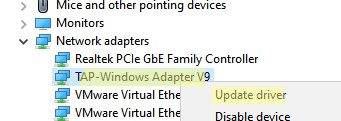
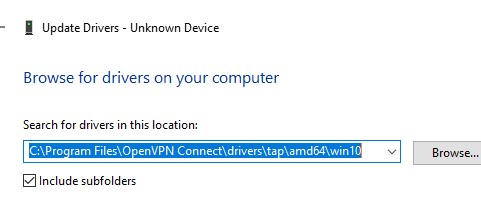
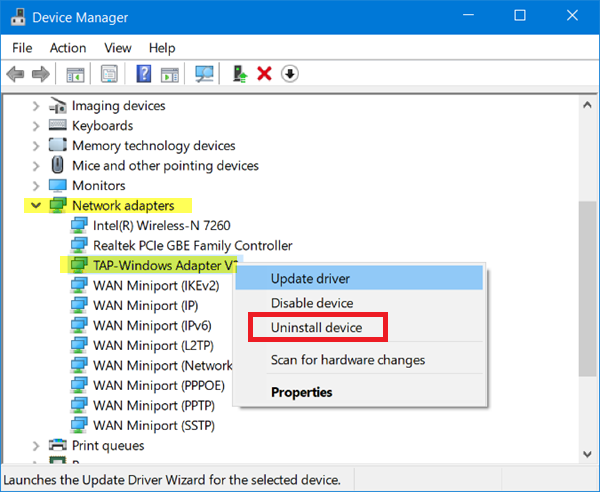
- Распакуйте архив, запустите Device Manager (
devmgmt.msc), щелкните правой кнопкой по сетевому адаптеру TAP-Windows Adapter v9 в секции Network Adapters и выберите Update driver;
- Укажите путь к каталогу с драйвером TAP.
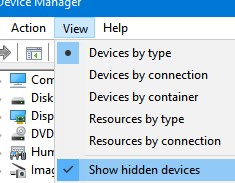
Если вы не видите в панели управления TAP-Windows Adapter V9, откройте консоль Device Manager и включите опцию View-> Show hidden device.
Если в секции Network adapters есть устройства типа unknown device, откройте его свойства, перейдите на вкладку Details и проверьте значение свойства Device instance path.
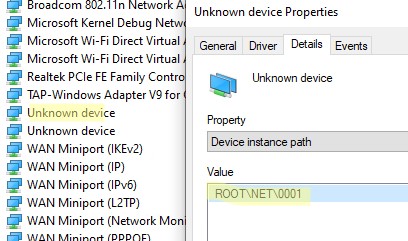
Если здесь указано ROOT\NET\0000, значит попробуйте выполнить авматотический поиск дрвйвера или вручную укажите путь к INF файлу (например C:\Program Files\OpenVPN Connect\drivers\tap\amd64\win10\OemVista.inf). После этого в панели управления появится ваш TAP адаптер.
В Windows 7 драйвер TAP, подписанный с помощью SHA256, не будет работать корректно, пока вы вручную не установите обновление KB4474419.
В самых редких случаях может помочь полное пересоздание TAP/Wintun адаптера.
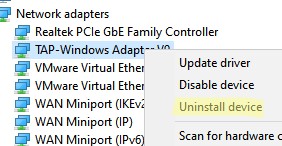
Перед установкой нужно удалить существующий сетевой адаптер TAP и его драйвер. Для этого запустите программу C:\Program Files\TAP-Windows\Uninstall.exe или просто удалите устройство из Device Manager (Uninstall device).
Для установки TAP драйвера используется утилита tapinstall.exe.

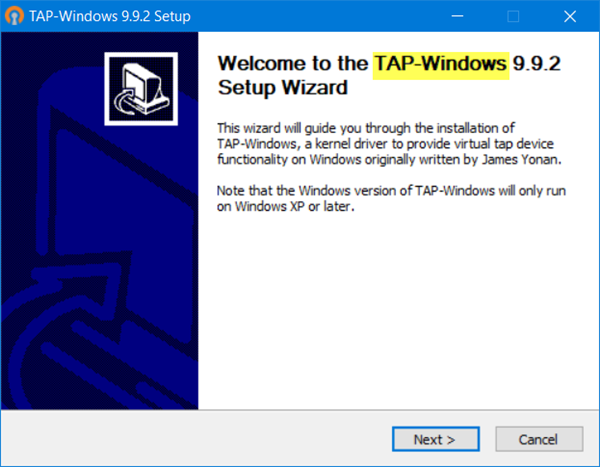
Распакуйте архив и запустите установочный файл с правами администратора.
В новых версиях OpenVPN для управления виртуальными сетевыми адаптерами используется утилита c:\Program Files\OpenVPN\bin\tapctl.exe.
Вывести список сетевых адаптеров OpenVPN:
tapctl.exe list

Удалить адаптер:
tapctl.exe delete "OpenVPN TAP-Windows6"
Создать новый адаптер TAP:
tapctl.exe create
Создать новый wintun адаптер:
tapctl.exe create --hwid wintun
Обязательно проверьте, что новый сетевой адаптер TAP-Windows Adapter появился в списке сетевых подключения в панели управления Windows (консоль ncpa.cpl).
Также ошибка “ All TAP-Windows adapters on the system are currently in use” может возникнуть, если вы пытаетесь установить несколько OpenVPN подключений с одного компьютера. Для каждого VPN подключения нужно создать свой адаптер.
Вы можете создать дополнительный WinTap сетевой адаптер с помощью скрипта (bat файл) %ProgramFiles%\TAP-Windows\bin\addtap.bat.
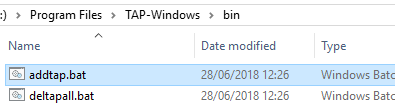
Или с помощью команды (в современных версиях клиента OpenVPN):
c:\Program Files\OpenVPN\bin\tapctl.exe.tapctl.exe create
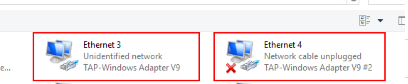
В результате в панели управления появится два (или более) сетевых адаптеров TAP-Windows Adapter V9, и вы сможете одновременно установить несколько одновременных OpenVPN сессий с разными серверами.
Теперь вы можете использовать ваше OpenVPN подключение в Windows и настроить автоматическое подключение к VPN. [/alert]
Ошибка Ошибка «Нет доступного адаптера TAP» Вкл. OpenVPN or Все TAP-Windows адаптеры в этой системе в настоящее время используются обычно бывает, когда OpenVPN TAP (сетевой адаптер) был отключен вами (по ошибке) или вашей системой.
Чтобы решить эту проблему, выполните следующие действия, попробуйте обходное решение, указанное ниже.
Все TAP-Windows Адаптеры в этой системе в настоящее время используются

Прежде всего, нажмите на OK кнопку, когда вы видите Подключение к (Ваш VPN) не удалось ошибка.

В поле поиска слева внизу введите Панель управления и откройте его.

В меню панели управления нажмите на Сеть и Интернет.

Теперь нажмите Центр управления сетями и общим доступом

Затем нажмите Изменение параметров адаптера в левой части экрана.

Найдите тот, который называется ‘Подключение по локальной сети XX или Ethernet XX (XX обозначает число) и в котором есть описание НАЖМИТЕ-Windows Адаптер V9.
Если он отключен, щелкните его правой кнопкой мыши и выберите Включите и теперь вы можете использовать OpenVPN снова.

Добавление OpenVPN Адаптер TAP вручную
Если вы не видите НАЖМИТЕ-Windows Адаптер V9, он мог быть удален, и вам нужно будет снова добавить его вручную.
Для этого выполните следующие действия:
Windows XP, Vista и 7: Идти к Пуск — Все программы — Тап-Windows
Windows 8, 8.1 и 10: Windows + Qи ищите Добавить новый кран
Щелкните правой кнопкой мыши по Добавление нового адаптера Tap Virtual Ethernet и Запуск от имени администратора.
Если у вас нет параметра Запуск от имени администратора (Windows 8, 8.1 и 10), выберите Открыть расположение файла, щелкните правой кнопкой мыши Добавление нового адаптера Tap Virtual Ethernet и Запуск от имени администратора.
Следуйте инструкциям, и вы получите следующий экран:

Теперь нажмите любую клавишу на клавиатуре, чтобы продолжить, и дайте VPN еще одна попытка.
Внимание: Если вы все еще используете более старую версию OpenVPN приложение, вы можете найти инструмент в расположении ниже:
Пуск — Все программы — OpenVPN — Утилиты
Не удается настроить сетевой адаптер TAP?
Если вы не можете найти возможность добавить OpenVPN Адаптер TAP или установка не удалась из-за ошибки ниже, пожалуйста, переустановите OpenVPN до последней версии.

Повторная установка OpenVPN
Мы предлагаем вам скачать бесплатный инструмент для удаления приложений под названием Revo Uninstaller. Это отличный инструмент для удаления приложений, оставшихся файлов и сломанных ключей реестра.
Как только OpenVPN был удален, проверьте наличие оставшихся файлов и ключей реестра. Удалите их и перезагрузите компьютер.
Наконец, загрузите последнюю версию OpenVPN из Официальном сайте и установить его на своем компьютере.
Лучшие бесплатные VPN Поставщик
Если вы ищете надежный и надежный VPN провайдер, мы рекомендуем вам попробовать бесплатно hide.me VPN
hide.me VPN клиентское приложение поддерживает OpenVPN в их приложении, поэтому вам не нужно настраивать VPN подключение вручную, и их приложение настолько простое в использовании.
Бесплатный сервис обеспечивает тот же уровень защиты, что и платный. Они не ведут журналы своих пользовательских действий, и нет рекламы!
Заключение
Добавление/повторное включение OpenVPN Адаптер TAP должен быть довольно простым, но часто VPN провайдеры не обновляют OpenVPN client на своем сайте, что может привести к таким проблемам.
Hello,
I have been using openvpn for some years now and came to a point were I need to connect to 2 different OpenVPN-Servers.
For this I installed a second TAP-Adapter and then renamed both adapters to names I can remember better and put them together with dev-node into the to them belonging config.
The older one (that also uses the older adapter) works fine, the new one does not. OpenVPN says «TAP-Windows adapter ‘ACT-VPN’ not found» even though I can see it in my system. Google returned nothing useful for me — so I hope that someone can help me here.
I am using a Windows 8.1 Pro x64 Laptop with the current v2.3.6 x86_64
Here’s the config(s), logfile of the broken VPN:
working:
Code: Select all
client
dev tun
dev-node THA-VPN
proto udp
remote ###.###.###.### 1194
remote-random
resolv-retry infinite
lport 52500
persist-key
persist-tun
ca ca.crt
cert rin.crt
key rin.key
ns-cert-type server
comp-lzo
verb 3
non working
Code: Select all
client
dev tun
dev-node ACT-VPN
resolv-retry infinite
nobind
mute-replay-warnings
ns-cert-type server
comp-lzo
verb 3
persist-key
persist-tun
proto udp
port 1194
cipher AES-128-CBC
cert keys/untangle-9171-rin-mherrguth.crt
key keys/untangle-9171-rin-mherrguth.key
ca keys/untangle-9171-rin-mherrguth-ca.crt
remote ###.###.###.### 1194
Log file non working:
Code: Select all
Mon May 11 11:55:50 2015 OpenVPN 2.3.6 x86_64-w64-mingw32 [SSL (OpenSSL)] [LZO] [PKCS11] [IPv6] built on Mar 19 2015
Mon May 11 11:55:50 2015 library versions: OpenSSL 1.0.1m 19 Mar 2015, LZO 2.08
Mon May 11 11:55:51 2015 Socket Buffers: R=[65536->65536] S=[65536->65536]
Mon May 11 11:55:51 2015 UDPv4 link local: [undef]
Mon May 11 11:55:51 2015 UDPv4 link remote: [AF_INET]###.###.###.###:1194
Mon May 11 11:55:51 2015 TLS: Initial packet from [AF_INET]###.###.###.###:1194, sid=8876622c 311d71eb
Mon May 11 11:55:52 2015 VERIFY OK: depth=1, CN=certificateAuthority, C=CO, ST=ST, L=L, O=O, OU=OU, dnQualifier=certificateAuthority
Mon May 11 11:55:52 2015 VERIFY OK: nsCertType=SERVER
Mon May 11 11:55:52 2015 VERIFY OK: depth=0, C=CO, ST=ST, O=O, OU=OU, CN=server, dnQualifier=server
Mon May 11 11:55:55 2015 Data Channel Encrypt: Cipher 'AES-128-CBC' initialized with 128 bit key
Mon May 11 11:55:55 2015 Data Channel Encrypt: Using 160 bit message hash 'SHA1' for HMAC authentication
Mon May 11 11:55:55 2015 Data Channel Decrypt: Cipher 'AES-128-CBC' initialized with 128 bit key
Mon May 11 11:55:55 2015 Data Channel Decrypt: Using 160 bit message hash 'SHA1' for HMAC authentication
Mon May 11 11:55:55 2015 Control Channel: TLSv1, cipher TLSv1/SSLv3 DHE-RSA-AES256-SHA, 2048 bit RSA
Mon May 11 11:55:55 2015 [server] Peer Connection Initiated with [AF_INET]85.183.55.87:1194
Mon May 11 11:55:57 2015 SENT CONTROL [server]: 'PUSH_REQUEST' (status=1)
Mon May 11 11:55:57 2015 PUSH: Received control message: 'PUSH_REPLY,register-dns,route 192.168.168.0 255.255.255.0,route 172.16.65.0 255.255.255.0,topology net30,ping 10,ping-restart 60,dhcp-option DNS 172.16.65.1,ifconfig 172.16.65.6 172.16.65.5'
Mon May 11 11:55:57 2015 OPTIONS IMPORT: timers and/or timeouts modified
Mon May 11 11:55:57 2015 OPTIONS IMPORT: --ifconfig/up options modified
Mon May 11 11:55:57 2015 OPTIONS IMPORT: route options modified
Mon May 11 11:55:57 2015 OPTIONS IMPORT: --ip-win32 and/or --dhcp-option options modified
Mon May 11 11:55:57 2015 do_ifconfig, tt->ipv6=0, tt->did_ifconfig_ipv6_setup=0
Mon May 11 11:55:57 2015 open_tun, tt->ipv6=0
Mon May 11 11:55:57 2015 TAP-Windows adapter 'ACT-VPN' not found
Mon May 11 11:55:57 2015 Exiting due to fatal error
When it concerns the wireless connection, choosing the right router is essential, and one cannot go wrong with Netgear. On the contrary, there are various issues persistent with Netgear routers, and tap-windows adapter ‘Netgear-VPN’ not found is one of the common ones. For this purpose, we have outlined the troubleshooting methods to help you fix the issue!
1. Connection Rename
To begin with, you need to understand that VPN adds a new network connection, and there are high chances that the VPN didn’t have the correct name entered. In this case, it is suggested that you rename the connection to ClientVPN, and the issue will be resolved pretty quickly.
2. Version
When it comes down to the OpenVPN with Netgear router, you need to understand that people have installed the wrong version. If that’s the case, you need to delete the current version of OpenVPN that you are using. On the other hand, you need to back up the configuration files before deleting OpenVPN. Once you’ve backed up the configuration files, delete OpenVPN and restart the router. Once the router restarts, download the latest OpenVPN version.
3. Mode Settings
For everyone who needs to work out, the Netgear-VPN not found the issue, tweaking up the mode settings will resolve the issue. In this matter, you need to open the advanced tab and move to the advanced setup. Scroll down to VPN service and enable it. In addition, you need to use TAP & TUN modes under UDP settings. You will need to use the default ports as 12973 and 12974.
Then, forward the sites on the internet and direct LAN through VPN for ensuring the highest standards of privacy. Once you’ve applied the settings, click on the “for smartphone” button, and download the OpenVPN file. Then, download the OpenVPN on the device, and you will be able to resolve the issue.
4. Firmware
In some cases, the VPN issue persists if your device or Netgear router doesn’t have the latest firmware installed. This issue usually happens when you are using a Windows laptop. If that’s the matter, we suggest that you download and install the files and scripts of the latest firmware for the PC. So, we suggest that you look for the latest Netgear router firmware, and it will help fix the error.
5. Rename
For people who couldn’t resolve the issue by downloading the latest firmware, we suggest that you rename the adapter. For this purpose, you will need to rename the TAP adapter on the PC to Netgear-VPN through the control panel. Keep in mind that if OpenVPN is unable to find the TAP adapter, login will not be possible. So, we suggest that you rename the TAP adapter, and the connection will be streamlined.
6. Client Change
Usually, changing the client’s configuration will help resolve the VPN issue. For this purpose, open the cientx.ovpn in the notepad and remove the dev-node from the line. Once you remove the line, add a semi-colon before dev-mode, such as;dev-mode, and save the adapter settings. Once you change the client name and lines, don’t forget to restart the router!
What is the Tap Windows Adapter?
Tap Windows Adapter V9 is a driver for a network that enables a VPN connection to connect to the company’s servers. The original installation location is C:/Program Files/tap Windows.
It may be found in the Network adapter category in Device management. When Tap Windows Adapter V9 is activated.
Some users have reported connectivity issues, even if the device is disabled. It will re-enable itself once the machine is rebooted.
TAP Adapter V9 may show on your device shortly after the installed VPN client. The majority of VPN clients use this adapter to establish a secure connection to the server. As a result, consumers may be perplexed and unsure of where the application originated.
Unlike TAP Provider V9 for Private Tunnel, this driver is safe and secure. It’s used to keep the VPN running smoothly.
Users should not tamper with this component at first. However, if connectivity problems emerge, there are a few options. You can either restart the adapter or entirely remove it and reinstall it. Issues with it usually go away, as the root of the problem is a residual adapter from a prior VPN service.
There are two versions of Windows TAP drivers, depending on your Windows version:
- On Windows XP, use the NDIS 5 driver (tap windows, version 9.9.x).
- On Windows 10 / 8 / 7 / Vista, use the NDIS 6 driver (tap windows, version 9.21.x).
What is VPN Software?
Virtual Private Network majority of times referred to as VPN. Its features let you visit websites that are restricted in your country. It also protects you from internet providers, hackers, ISPs, and data-gathering websites. Speed up your server connections by using private, direct channels.
Several IT professionals recommend using a VPN since it minimizes the risk of many online and espionage threats. The benefits of a private connection may be enjoyed by both home and business users, making VPNs a beneficial tool for many.
When To Delete Or Reinstall The Tap Windows Adapter V9
In general, if you access the internet over a VPN network connection, there are few reasons to remove the adapter. If you’re having difficulty connecting to the VPN when it’s active, check for a faulty driver. Also, reinstall the Tap Windows Adapter.
It’s entirely likely that the remaining Tap Adapter is causing internet troubles. If you previously used a VPN connection but stopped using it in the interim. The issue will most likely be resolved by removing the adaptor. If you select to retain the VPN installed on your device, you may notice that the adapter is reinstalled.
Solutions to Fix The “Tap Windows Adapter V9” Error
- Reset the Tap Windows Adapter Connection
- Use the Internet Connection Troubleshooter
- Re-install Tap Windows Network Adapters Driver
- Uninstall The Windows Tap Adapter Driver From Windows 10
- Reset your Windows 10 OS
Methods To Fix The “Tap Windows Adapter V9” Error
Tap windows adapter V9 error messages are standard errors many users have faced. Here we have provided some easy remedies to solve this error message.
1. Reset the Tap Windows Adapter Connection
Reset the TAP windows adapter V9 error by disabling and re-enable. It will reset its network functions. It may also resolve the Adapter V9 issue, and it is a relatively straightforward procedure.
All you have to perform is complete the following steps:
- On your keyboard, press the Win key.
- Type network in the search area.
- Select the network status from the search results.
- Select Network and Sharing Center from the drop-down menu.

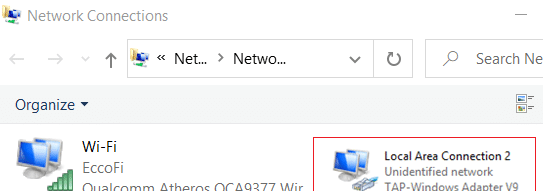
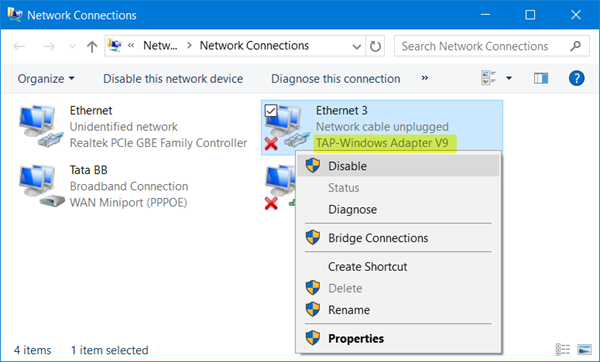
- Select the “Change adapter settings” from the network setting window as shown in the image.
- Right-click the local area connection, using tap Windows Adapter and select Disable.

- Right-click the tap Windows Adapter again and select Enable.
- Restart your personal computer to see if things have improved.
2. Use the Internet Connection Troubleshooter
If you’re just encountering problems with your Windows PC, your network settings are most likely to blame. While the built-in Windows troubleshooter isn’t always practical, it’s worth a shot before moving on.
Using Windows’ built-in Internet Connections troubleshooter is the simplest solution.
This program can usually cure a variety of connectivity issues, so it’s worth a look.
It is what you must do:
- Press the Win key on your keyboard.
- Type troubleshoot into the search box.
- Select Troubleshoot settings and from the search results.

- Access the Additional Troubleshooters from the link given below in the same window.
- To run the troubleshooter, go to Internet Connections and select Run the Troubleshooter.

- Choose Please troubleshoot my internet connection.
- Follow the instructions in the troubleshooting wizard.

3. Re-install Tap Windows Network Adapters Driver
It’s possible that reinstalling the Adapter V9 driver will solve the problem.
However, because VPN clients require most TAP adapter drivers, most VPN companies provide their version.
As a result, it would be simpler to simply uninstall the TAP and your VPN client, then reinstall both services from scratch.
The following steps will help you reinstall your TAP driver and VPN client:
- Close your VPN and disconnect all VPN connections. It is crucial to ensure that the tap Windows V9 may be safely removed without causing any problems or issues.
- Use the Windows + S keyboard shortcut to bring up the Search functionality, or click the Search icon in your taskbar.
- Enter “Device Manager” in the search box.

- Expand the section Network Adapters.
- Locate the tap Windows Adapter V9 on your computer. The file name may also include the name of a VPN service, such as “TurboVPN TAP Adapter.” If a yellow exclamation mark is visible next to the driver icon, it implies you need to reinstall it.
- Uninstall the driver by right-clicking on it and selecting Uninstall device.

- Open the VPN you’re using after the driver has been successfully uninstalled.

- Depending on your VPN, you may be prompted to replace the TAP Adapter V9 or install the missing Network Driver.

- When the installation is finished, check to see if your connection problems have been repaired.
Note: If your VPN software merely displays a missing driver error and fails to reinstall Adapter V9, you should reinstall the VPN client. The installer will then be prompted to install the missing driver as well.
If re-installing your VPN and TAP adapter network does not resolve the issue, you should consider moving to a better option.
4. Uninstall The Windows Tap Adapter Driver From Windows 10
You’d think that deleting the Tap Windows Adapter driver from Device Manager would be simple. Depending on the VPN software you have installed on your system.
The adapter may reappear in Device management each time your computer starts up. It occurs because some VPN programs include a starting function that scans for missing drivers. Also, it immediately installs those drivers that are missing.
- To launch the Run dialogue box, press Windows + R.
- Press Enter after typing the following text.
- devmgmt.msc

- Double-click on the Network adapters in the Device Manager window to expand it.
- Select Properties from the context menu of tap Windows Adapter V9.
- If you can’t find tap Windows Adapter V9 under Network adapter, go to View > Show hidden devices from the top menu bar.
- Click Uninstall device on the Driver tab.

- Make a check. To continue, delete the driver program for this device and click OK.
5. Reset your Windows 10 OS
You can restore Windows 10 while retaining your files. However, because your PC will be wiped clean, you’ll need to reinstall all of your software and drivers.
It is one of the most extreme methods, but it works the majority of the time.
To reset your Windows 10 computer, follow these steps:
- On your keyboard, press the Win key.
- Restart your computer by typing Reset PC.
- Select the option to Reset this PC.

- Choose “Get started.”

- Select “Keep my files” from the displayed menu.

- Then press the Next button.
- To continue, select the Reset option.
- Wait for the procedure to finish.
Conclusion
We aim this article to give you a better understanding of the tap Windows Adapter 9.21.2. Suppose your tap Windows Adapter V9 error is causing various connectivity errors. We recommend contacting your VPN provider’s customer care.
Reinstalling the TAP driver and VPN client will usually solve the problem. However, you may need to reset your computer completely, so stay calm and don’t give up.
Прежде всего, мы собираемся объяснить, что такое адаптеры TAP-Windows. Когда мы идем в диспетчер устройств и вводим сетевые адаптеры, мы видим нашу карту Wi-Fi или карту Ethernet, а также другие, которые у нас есть. Это физические карты, которые установлены в нашем оборудовании. Но мы также можем установить виртуальные адаптеры. То есть TAP-Окна .

Поэтому можно сказать, что TAP-Windows адаптер — это виртуальный сетевой адаптер который существует в системе Windows. Его можно использовать для различных задач, в зависимости от конкретных характеристик программного обеспечения.
Обычно они связаны с установкой и использованием VPN инструменты , а также установка программ для изменения сетевых настроек. Поэтому они тесно связаны с правильным функционированием виртуальной частной сети. В случае возникновения проблем, если он не включен правильно, у нас могут возникнуть сбои с нашим VPN.
Многие пользователи замечают, что при использовании VPN в Windows устанавливается что-то под названием TAP-Windows V9. Это может вызвать проблемы при использовании VPN или при обычном подключении.
Этот виртуальный адаптер позволяет VPN подключаться к вашим серверам. По крайней мере, на бумаге пользователям не нужно прикасаться ни к одному из этих компонентов. Им просто нужно оставить все как есть, и все. Но иногда возникают проблемы.
Как мы говорим, иногда возникают проблемы и TAP-Windows плохо работает , это не позволяет нам использовать VPN в обычном режиме или даже нарушать наше сетевое соединение. К счастью, у нас есть ряд простых действий, которые мы можем выполнить.
Перезагрузите адаптер TAP-Windows
Один из первых шагов, которые мы можем сделать, — это перезапустить TAP-Окна адаптер . Иногда с помощью этого небольшого шага мы можем решить ошибки, которые влияют на наше соединение.
Для этого мы должны щелкнуть правой кнопкой мыши значок подключения в правом нижнем углу и выбрать «Открыть настройки сети и Интернета».

Здесь мы должны ввести параметры изменения адаптера. Там мы увидим значок адаптера TAP-Windows, и мы должны щелкнуть второй кнопкой над ним, мы нажимаем «Деактивировать», и мы повторно активируем его позже. Таким образом он перезапускается.
Переустановите адаптер
Другой вариант, который мы также можем принять во внимание, если предыдущий шаг не решил проблему, — это переустановите адаптер . Первым шагом будет удаление программного обеспечения VPN, которое мы используем, и его повторная установка. Как только мы сделаем этот процесс, мы должны перезагрузить компьютер.
Если это по-прежнему не дает решения, мы переустановим адаптер TAP-Windows. Для этого щелкаем правой кнопкой мыши по кнопке Пуск и открываем Диспетчер устройств. Мы идем в Cеть адаптеры, и когда мы покажем это, он появится. Мы должны щелкнуть правой кнопкой мыши по адаптеру и нажать «Удалить».
Позже мы запускаем VPN, и он может попросить нас снова установить адаптер TAP-Windows. Мы также можем скачать и установить его вручную.
Создайте новый адаптер TAP-Windows
Последним решением было бы создать новый TAP-Окна адаптер . Это происходит, когда мы подключаемся к новой VPN.
В конечном счете, это шаги, которые мы должны предпринять в случае, если у нас возникнут проблемы с использованием VPN в Windows, и ошибка связана с адаптером TAP-Windows. Мы можем повторно включить его, переустановить или создать новый, чтобы увидеть, можно ли легко решить эту проблему.
The error of No TAP Adapter Available Error On OpenVPN or All TAP-Windows adapters on this system are currently in use usually happens when the OpenVPN TAP (Network Adapter) has been disabled by you (mistakenly) or by your system.
To resolve this, please follow the steps below, please try the workaround as per below.
All TAP-Windows Adapters On This System Are Currently In Use
First of all, click on the OK button when you see Connecting to (Your VPN) has failed error.
How Do I Enable the TAP Adapter?
At the search box at the bottom left, type in Control Panel and open it.
In the Control Panel menu, click on Network and Internet.
Now, click on Network and Sharing Center
Next, click on Change adapter settings on the left side of your screen.
Find the one that is called ‘Local Area Connection XX or Ethernet XX (XX denoting a number) and that has a description of TAP-Windows Adapter V9.
If it’s disabled, right-click on it and choose Enable and you can now use OpenVPN again.
Adding OpenVPN TAP Adapter Manually
If you don’t see the TAP-Windows Adapter V9, it could have been deleted and you will need to add it back again manually.
To do so, please follow the steps below:
Windows XP, Vista & 7: Go to Start – All Programs – Tap-Windows
Windows 8, 8.1, & 10: Windows + Q, and look for Add a New Tap
Right-click on Add a New Tap Virtual Ethernet Adapter and select Run as Administrator.
If you do not have the Run as Administrator option (Windows 8, 8.1 & 10), select Open File Location, right-click on Add a New Tap Virtual Ethernet Adapter and select Run as Administrator.
Follow through the instructions and you’ll end up with the following screen:
Now, press any key on your keyboard to continue and give the VPN another try.
Note: If you are still on an older version of the OpenVPN application, you can find the tool in the location below:
Start – All Programs – OpenVPN – Utilities
Can’t Setup A TAP Network Adapter?
If you can’t find the option to add the OpenVPN TAP adapter or the installation has failed as per the error below, Please re-install OpenVPN to the latest version.
Re-install OpenVPN
We suggest that you download a free application removal tool called Revo Uninstaller. This is a great tool to remove applications, leftover files and broken registry keys.
Once OpenVPN has been removed, please scan for leftover files and registry keys. Remove them and restart your computer.
Finally, download the latest version of OpenVPN from the official website and install it on your computer.
Best Free VPN Provider
If you’re looking for a secured and trusted VPN provider, we would recommend you that you try free hide.me VPN
hide.me VPN client app supports OpenVPN in their app so you don’t need to configure the VPN connection manually and their app is so easy to use.
The free service provides the same level of protection as the paid service. They don’t keep logs of their user activities and there are no ADs!
Conclusion
Adding/re-enabling the OpenVPN TAP adapter should be pretty straight forward but often, VPN providers don’t update the OpenVPN client on their site which can lead to such issues.
by Vlad Constantinescu
Vlad might have a degree in Animal Husbandry and Livestock Management, but he’s currently rocking anything software related, ranging from testing programs to writing in-depth reviews about them…. read more
Updated on February 28, 2023
- The TAP-Windows Adapter V9 is a network driver that VPNs require in order to establish secure connections.
- From time to time, the TAP adapter driver may fail to work as it should. We’ll teach you how to fix it in no time.
- Visit our VPN Troubleshooting section to discover more user-friendly VPN tutorials.
- Check out our Network Hub for more tips on fixing common network issues.
The TAP-Windows Adapter V9 is a network driver that’s essential for VPN connections.
More often than not, this network driver gets automatically installed along with VPN clients.
Usually, the driver’s default path is: C:/Program Files/Tap-Windows
However, certain users noticed that their internet connections don’t always work while the TAP-Windows Adapter driver is enabled.
What’s even more strange is that even disabling it wouldn’t work, as the TAP network driver would re-enable itself shortly after.
Therefore, users were still unable to establish a connection.
If that ever happened to you, check out some easy-to-follow suggestions that could fix your TAP-Windows Adapter V9 error.
How can I fix the TAP-Windows Adapter v9 error?
Use the Internet Connections Troubleshooter
The easiest fix would be using Windows’ built-in Internet Connections troubleshooter.
This tool can usually fix various connectivity issues, so it might be worth checking out.
Here’s what you need to do:
- Press the Win key
- Type troubleshoot
- Select Available Recommended troubleshooting
- Click the Available troubleshooters hyperlink

- Select Internet Connections and click Run the troubleshooter

- Select Troubleshoot my connection to the internet
- Go through the troubleshooting wizard’s steps


Reset the TAP-Windows Adapter Connection

Disabling and re-enabling the TAP adapter driver will (or better yet should) reset its network functions.
Furthermore, it may also fix the TAP-Windows Adapter V9 error and it’s a really simple task.
All you have to do is:
- Press the Win key on your keyboard
- Type network
- Select Network status
- Click on the Network and Sharing Center button

- Select the Change adapter settings option
- Right-click the TAP-Windows Adapter
- Select Disable
- Right-click the TAP-Windows Adapter once more
- Select Enable
- Restart your PC and check if there’s any improvement


Reinstall TAP-Windows Adapter and VPN client

The best resolution for the TAP-Windows Adapter V9 error might be to reinstall the driver altogether.
However, considering that most TAP adapter drivers are a dependency for VPN clients, most VPN providers come with their own version.
Thus, it would be easier to just uninstall the TAP driver and your VPN client, and perform a clean install of both services after you’re done.
This is how you should reinstall your TAP driver and VPN client:
- Right-click the Start button
- Select Device Manager

- Expand the Network adapters category
- Right-click the TAP-Windows Adapter V9
- Click on Uninstall device
- Select Uninstall to confirm
- Press the Windows key + R key combination
- Type appwiz.cpl and press Enter

- Select your VPN software in the window
- Press the Uninstall button to remove it
- Proceed with the uninstallation
- Restart your PC shortly after uninstalling both services
- Reinstall your VPN software + TAP adapter driver


If you notice that reinstalling your VPN client and TAP adapter driver didn’t work, you might consider switching to a better alternative.
Private Internet Access, for instance, is an excellent VPN service that comes with its own TAP driver.
Furthermore, even if it stops working at some point, you can easily reinstall it directly from the VPN client’s configuration screen.
Private Internet Access
Did your TAP adapter driver stop working? Try using PIA as an alternative.
Reset Windows 10

Apparently, resetting Windows 10 fixes the TAP-Windows Adapter V9 error in most cases.
You can reset Windows 10 and also keep your files. However, you’ll need to reinstall all the apps and drivers, as those will be swept clean from your PC.
Additionally, you’ll lose any configuration you did before resetting your PC.
Granted, this method is one of the most drastic ones, but it also gets the job done most of the time.
Follow these steps to reset your Windows 10 PC:
- Press the Win key on your keyboard
- Type Reset PC
- Click on the Reset this PC option
- Select Get started

- Press the Keep my files button
- Click the Next button
- Select the Reset option to proceed
- Wait for the process to complete


Conclusion
To wrap things up, if you notice that your TAP-Windows Adapter V9 triggers various connectivity errors, there are some things you could try.
More often than not, reinstalling the TAP driver and VPN client will fix the issue.
However, you may need to go as far as resetting your PC altogether, so buckle up and don’t lose hope.
![]()
Newsletter
Download PC Repair Tool to quickly find & fix Windows errors automatically
TAP-Windows Adapter is a network driver through which VPN services can allow your computer to connect to the VPN servers. Unfortunately, when connecting to a VPN, you may get the error that says,
There are no TAP-Windows adapters installed on this system.
Similar to the All TAP-Windows adapters on this system are currently in use error, this is not a crucial error, and the message states precisely what is wrong with the connection.
You can repair this TAP driver issue in three stages. The troubleshooting guide will list these stages and explain how to go about them.
- Restart the TAP-Windows adapter.
- Reinstall TAP-Windows drivers.
- Create a new TAP-Windows adapter.
Below is the full guide. I advise that you follow the steps in the order in which I’ve listed them here.
1] Restart the TAP-Windows adapter

The recommended way to fix this TAP driver error is to restart the TAP adapter. To do this, follow the steps below:
Right-click on the network icon on your taskbar and click on Open Network & Internet settings.
In the network status window that opens, select Change adapter options.
Find the TAP adapter on this screen. They are named differently based on the VPNs, so you can only look out for an adapter or connection with TAP in its description.
Right-click on the TAP and hit the Disable option.
After disabling the network adapter, right-click on it again and re-name it.
2] Reinstall TAP-Windows drivers
If you restart the TAP network adapter and still receive the error, then you should go ahead and reinstall the TAP drivers. You can do this in several ways.
First, you may uninstall your VPN software and reinstall it again. Ensure that you restart your computer after uninstalling the VPN.
When the machine comes back on, install the VPN software, and the installation will most likely come with TAP drivers.
Press the Windows key + R combination, type devmgmt.msc in the Run dialog box and hit ENTER.
In Device Manager, expand the Network adapters section and find the TAP-Windows adapter listed under it.
Right-click on the driver and choose the Uninstall device option.
Complete the uninstall process by following the on-screen instructions.
With the driver uninstalled, launch your VPN client, and it may ask you to install the missing TAP network drivers.
Some VPNs will only prompt you that the driver is missing. If this is the case, you need to download the driver off the internet or download the VPN client’s latest version.
Alternatively, you download the TAP-Windows driver software and install it on your computer manually. If you’re unsure where to download the drivers or even how to use them, this guide is a great starting point.
3] Create a new TAP-Windows adapter
Windows says that it couldn’t find TAP-Windows adapters on your system. The most straightforward method is to create a new TAP-Windows adapter.
Windows creates a new TAP-Windows adapter when you create a hyper-machine or connect to a VPN service.
Also, note that you can have only one TAP-Windows adapter active at a given time.

Keshi Ile is a seasoned technology expert who holds a Bachelors’s degree in Electronics Engineering and a Master’s in Digital Marketing. He runs several internet companies and contributes to technology blogs.