by Vlad Constantinescu
Vlad might have a degree in Animal Husbandry and Livestock Management, but he’s currently rocking anything software related, ranging from testing programs to writing in-depth reviews about them…. read more
Updated on
- The TAP-Windows Adapter V9 is a network driver that VPNs require in order to establish secure connections.
- From time to time, the TAP adapter driver may fail to work as it should. We’ll teach you how to fix it in no time.
- Visit our VPN Troubleshooting section to discover more user-friendly VPN tutorials.
- Check out our Network Hub for more tips on fixing common network issues.
XINSTALL BY CLICKING THE DOWNLOAD
FILE
The TAP-Windows Adapter V9 is a network driver that’s essential for VPN connections.
More often than not, this network driver gets automatically installed along with VPN clients.
Usually, the driver’s default path is: C:/Program Files/Tap-Windows
However, certain users noticed that their internet connections don’t always work while the TAP-Windows Adapter driver is enabled.
What’s even more strange is that even disabling it wouldn’t work, as the TAP network driver would re-enable itself shortly after.
Therefore, users were still unable to establish a connection.
If that ever happened to you, check out some easy-to-follow suggestions that could fix your TAP-Windows Adapter V9 error.
How can I fix the TAP-Windows Adapter v9 error?
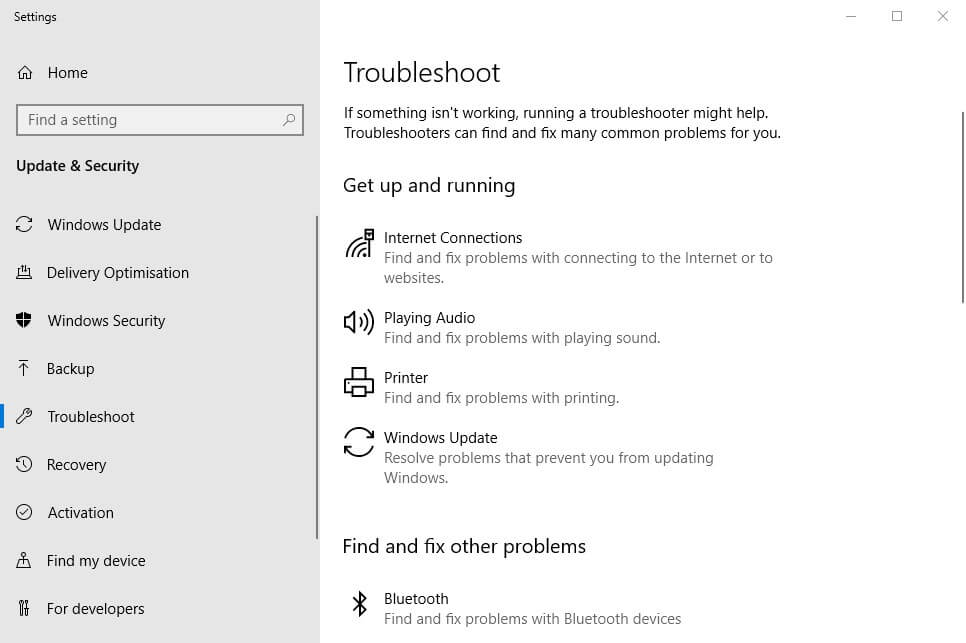
Use the Internet Connections Troubleshooter
The easiest fix would be using Windows’ built-in Internet Connections troubleshooter.
This tool can usually fix various connectivity issues, so it might be worth checking out.
Here’s what you need to do:
- Press the Win key
- Type troubleshoot
- Select Available Recommended troubleshooting
- Click the Available troubleshooters hyperlink
- Select Internet Connections and click Run the troubleshooter
- Select Troubleshoot my connection to the internet
- Go through the troubleshooting wizard’s steps
Reset the TAP-Windows Adapter Connection

Disabling and re-enabling the TAP adapter driver will (or better yet should) reset its network functions.
Furthermore, it may also fix the TAP-Windows Adapter V9 error and it’s a really simple task.
All you have to do is:
- Press the Win key on your keyboard
- Type network
- Select Network status
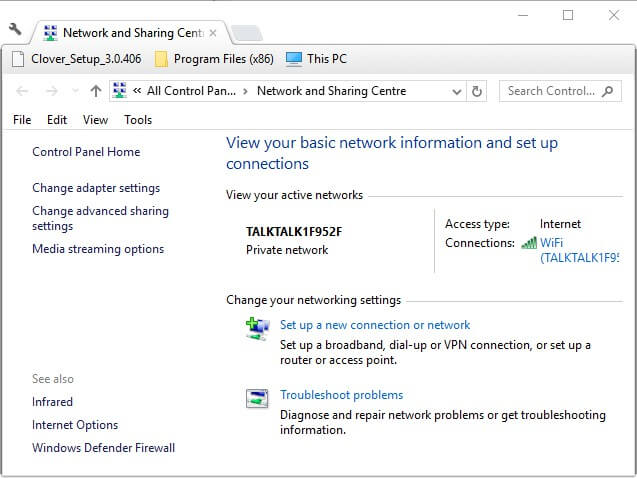
- Click on the Network and Sharing Center button
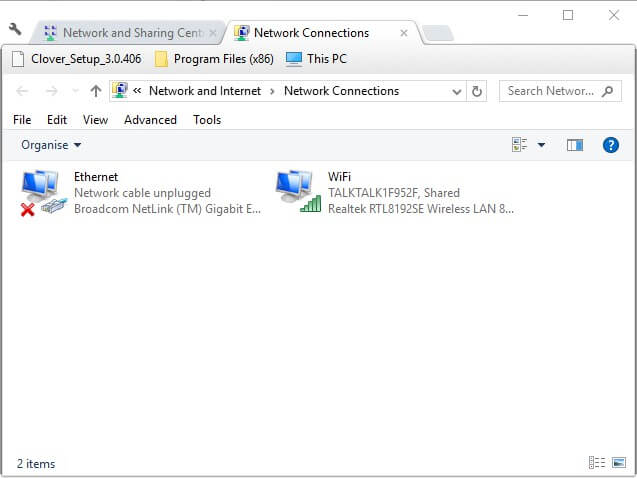
- Select the Change adapter settings option
- Right-click the TAP-Windows Adapter
- Select Disable
- Right-click the TAP-Windows Adapter once more
- Select Enable
- Restart your PC and check if there’s any improvement
Reinstall TAP-Windows Adapter and VPN client

The best resolution for the TAP-Windows Adapter V9 error might be to reinstall the driver altogether.
However, considering that most TAP adapter drivers are a dependency for VPN clients, most VPN providers come with their own version.
Thus, it would be easier to just uninstall the TAP driver and your VPN client, and perform a clean install of both services after you’re done.
This is how you should reinstall your TAP driver and VPN client:
- Right-click the Start button
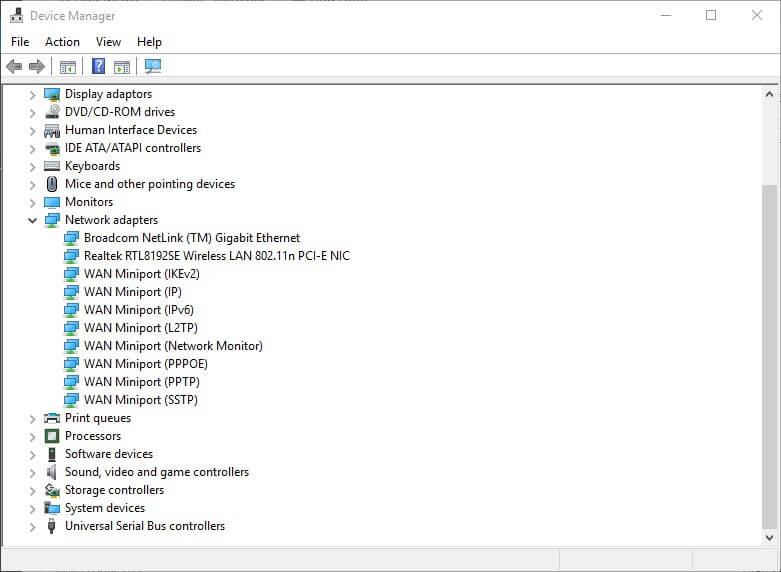
- Select Device Manager
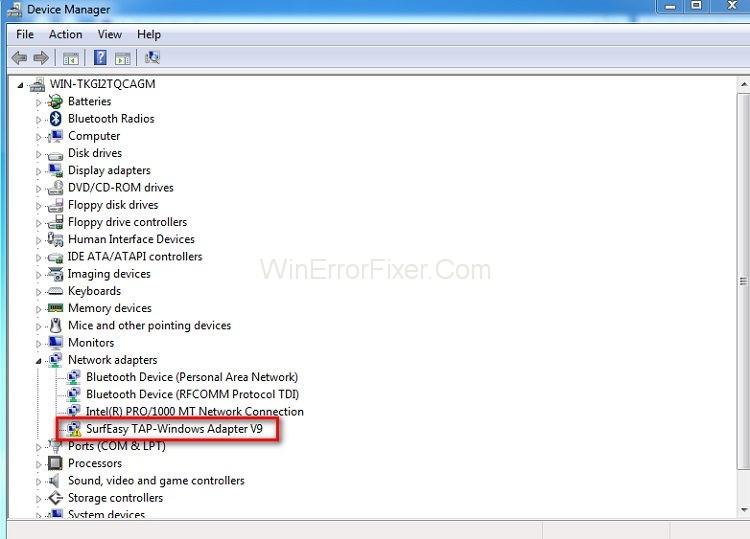
- Expand the Network adapters category
- Right-click the TAP-Windows Adapter V9
- Click on Uninstall device
- Select Uninstall to confirm
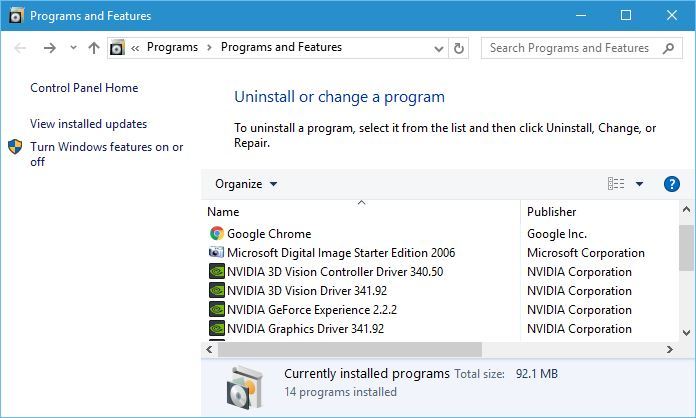
- Press the Windows key + R key combination
- Type appwiz.cpl and press Enter
- Select your VPN software in the window
- Press the Uninstall button to remove it
- Proceed with the uninstallation
- Restart your PC shortly after uninstalling both services
- Reinstall your VPN software + TAP adapter driver
If you notice that reinstalling your VPN client and TAP adapter driver didn’t work, you might consider switching to a better alternative.
Private Internet Access, for instance, is an excellent VPN service that comes with its own TAP driver.
Furthermore, even if it stops working at some point, you can easily reinstall it directly from the VPN client’s configuration screen.

Private Internet Access
Did your TAP adapter driver stop working? Try using PIA as an alternative.
Reset Windows 10
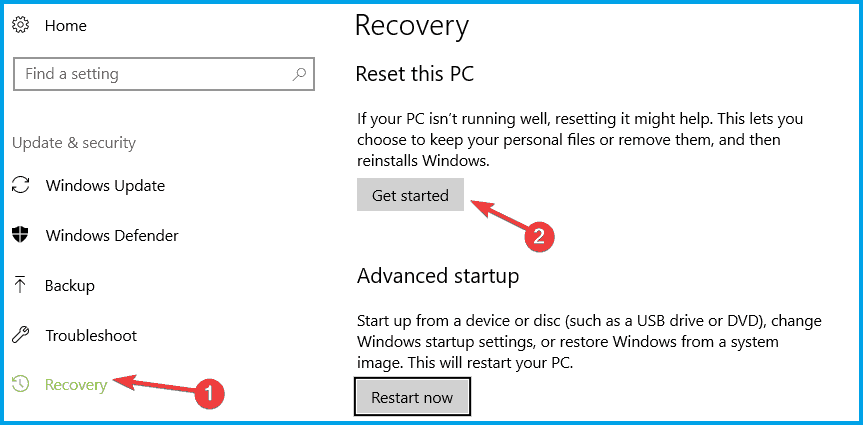
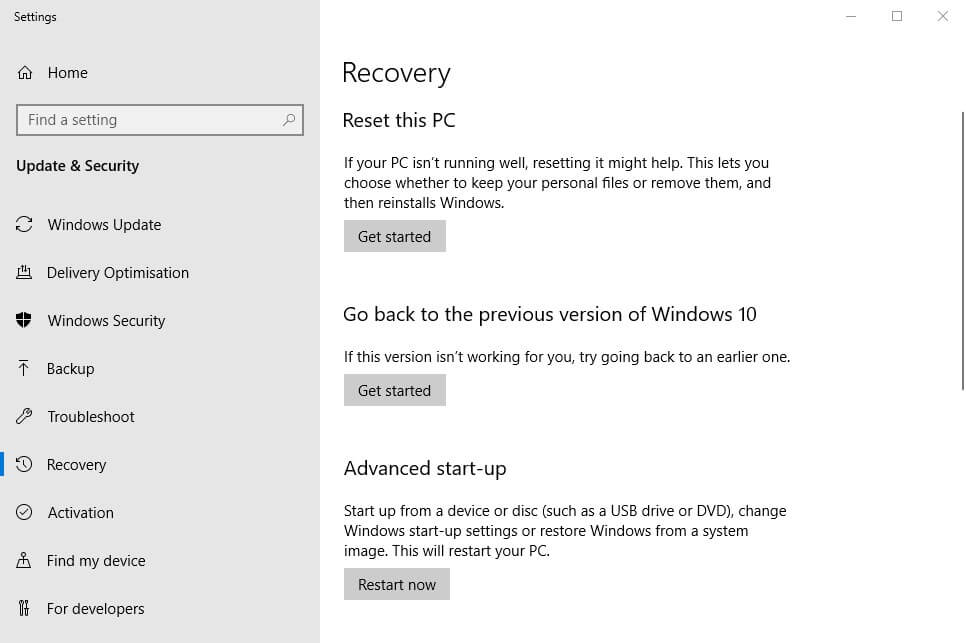
Apparently, resetting Windows 10 fixes the TAP-Windows Adapter V9 error in most cases.
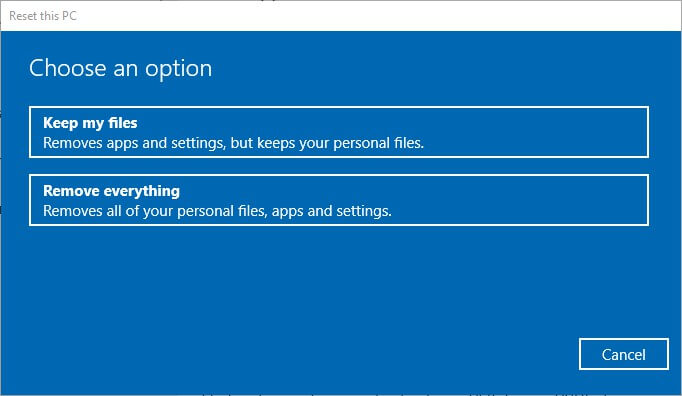
You can reset Windows 10 and also keep your files. However, you’ll need to reinstall all the apps and drivers, as those will be swept clean from your PC.
Additionally, you’ll lose any configuration you did before resetting your PC.
Granted, this method is one of the most drastic ones, but it also gets the job done most of the time.
Follow these steps to reset your Windows 10 PC:
- Press the Win key on your keyboard
- Type Reset PC
- Click on the Reset this PC option
- Select Get started
- Press the Keep my files button
- Click the Next button
- Select the Reset option to proceed
- Wait for the process to complete
Conclusion
To wrap things up, if you notice that your TAP-Windows Adapter V9 triggers various connectivity errors, there are some things you could try.
More often than not, reinstalling the TAP driver and VPN client will fix the issue.
However, you may need to go as far as resetting your PC altogether, so buckle up and don’t lose hope.
Tap Windows Adapter V9 — это виртуальный сетевой интерфейс, обеспечивающий функциональность, необходимую для различных VPN-клиентов. Пользователи сообщают, что их подключение к Интернету не работает должным образом, когда включен адаптер Taps Windows Adapter V9. Итак, здесь мы рассмотрим, как исправить эти проблемы.
Содержание
- 1 Что такое адаптер TAP-Windows?
- 1.1 Когда переустанавливать или удалять адаптер Tap для Windows
- 1.2 Как удалить TAP адаптер Windows V9
- 2 Как переустановить его
- 3 Заключение
Что такое адаптер TAP-Windows?
Адаптер ответвления Windows — это эксклюзивный сетевой драйвер, устанавливаемый большинством программ VPN. Этот адаптер появляется после установки VPN-клиента. Некоторые из клиентов VPN включают Hamachi , SoftEther , Cyberghost .
Большинство наборов VPN используют адаптер для частного подключения к Интернету. Существует две разные версии драйверов TAP для Windows: драйвер NDIS 5 для Windows XP и драйвер NDIS 6 для Windows 10.
Когда переустанавливать или удалять адаптер Tap для Windows
Пока VPN-подключение активно и у вас возникают проблемы с подключением, вы должны исследовать их. Возможно, у вас проблемы с поврежденным драйвером. Поэтому переустановите адаптер Tap Windows.
У вас есть проблемы с подключением к Интернету, если вы перестали использовать свое предыдущее VPN-подключение. Эти проблемы можно решить, удалив адаптер. Адаптер будет переустановлен, если вы сохраните программное обеспечение VPN в системе.
Как удалить адаптер Windows TAP V9
В зависимости от типа программного обеспечения VPN в системе, пользователь будет снова появляться каждый раз при загрузке системы. Следуйте всем вышеперечисленным методам до шага 5, чтобы удалить адаптер Windows V9.
(Program Files> Tap-Windows> Double Click on Uninstall.exe)
Следуйте инструкциям на экране, пока драйвер не будет удален. Если вы остановитесь на этом шаге, то драйвер вернется к следующему запуску.
Чтобы драйвер не переустановился автоматически на вашем компьютере. Выполните следующие шаги:
Шаг 1: Введите клавишу Windows + R , чтобы запустить окно.
Шаг 2: Теперь введите « appwiz.cpl » и введите .
Шаг 3: Откройте окно « Программы и компоненты ».
Шаг 4: Найдите VPN-клиент и удалите его.
Шаг 5: Убедитесь, что вы удалили всех клиентов, если вы уже пробовали VPN-решения.
Как переустановить
Не удается подключиться к сети VPN? Проверьте, правильно ли он установлен. Переустановите его, если есть признаки повреждения. Выполните следующие шаги, чтобы переустановить Tap Windows Adapter:
Шаг 1: Прежде всего, начните завершать VPN-подключение. И закройте соответствующую программу VPN.
Шаг 2: Введите клавишу Windows + R , чтобы открыть окно «Выполнить». Теперь введите « devmgmt.msc » и нажмите Enter. Он открывает вам Диспетчер устройств .
Шаг 3: Перейдите к сетевым адаптерам и разверните раскрывающееся меню.
Шаг 4: Найдите Tap-Windows Adapter V9 . Проверьте, есть ли восклицательный знак. Если он имеет метку, то переустановка работает в этом случае.
Шаг 5: Теперь щелкните правой кнопкой мыши драйвер. Выберите Удалить устройство .
Шаг 6: Как только он будет удален, откройте VPN-клиент. Согласно программному обеспечению VPN, оно либо предложит установить сетевой драйвер , либо установит его автоматически.
Шаг 7: Вернитесь в диспетчер устройств . Проверьте, удален ли желтый восклицательный значок.
Шаг 8: Если ваше программное обеспечение VPN показывает « Ошибка отсутствия драйвера », переустановите весь VPN-клиент.
Не пропустите
- Как исправить предупреждение об обнаружении вируса IDP.Generic
- Как полностью или временно отключить Avast Antivirus
- Как исправить, если узел Modern Setup перестал работать
- Как исправить отсутствие панели управления NVIDIA в Windows 10
- Код ошибки Центра обновления Windows 0x8024a105 Ошибка
Вывод
Вышеуказанные методы помогут вам переустановить и удалить адаптер Windows V9.
Tap windows adapter v9 — это виртуальный сетевой адаптер, который широко используется программами VPN для создания безопасных и зашифрованных соединений. Однако, пользователи временами сталкиваются с проблемой, когда этот адаптер не подключен и интернет-соединение недоступно.
Если у вас возникла ошибка «Сетевой кабель не подключен Tap windows adapter v9», не отчаивайтесь, существует несколько способов решения этой проблемы. Перед тем как приступить к исправлению, убедитесь, что у вас есть права администратора на компьютере.
Первым шагом может быть перезагрузка компьютера. Иногда простое перезапуск устройства может решить множество проблем, в том числе и с сетевым адаптером. После перезагрузки проверьте, подключен ли Tap windows adapter v9 и есть ли доступ к интернету.
Если перезагрузка не помогла, проверьте настройки сетевого адаптера. Для этого откройте меню «Пуск» и введите «Управление устройствами». В открывшемся окне найдите «Сетевые адаптеры» и раскройте список. Если Tap windows adapter v9 отображается с ошибкой или не отображается вовсе, попробуйте обновить драйвер для этого адаптера.
Примечание: Официальный сайт разработчика программы регулярно обновляет драйверы, поэтому рекомендуется загрузить последнюю версию драйвера Tap windows adapter v9.
Если перезагрузка и обновление драйвера не помогли, попробуйте отключить антивирусное ПО или брандмауэр временно и проверьте, подключен ли Tap windows adapter v9 и работает ли интернет. В случае если проблема не исчезла, рекомендуется обратиться за помощью к специалистам или в службу поддержки разработчика программы, которая использует Tap windows adapter v9.
Содержание
- Возможные причины и решения проблемы
- Перезагрузка компьютера и проверка соединений
- Проверка драйверов и установка обновлений
- Использование утилиты для восстановления сетевых настроек
- Отключение и включение Tap Windows Adapter V9
- Изменение настроек сетевого адаптера
- Возможность сброса настроек TCP/IP
Возможные причины и решения проблемы
Если сетевой кабель не подключен Tap windows adapter v9, возможно, это связано с одной из следующих причин:
- Поврежденный или неисправный кабель: Проверьте состояние сетевого кабеля и убедитесь, что он не поврежден и правильно подключен к компьютеру и сетевому устройству.
- Проблемы с сетевой картой: Проверьте, что сетевая карта работает исправно. Если она не определяется или не работает должным образом, возможно, требуется замена или настройка сетевой карты.
- Драйверы сетевой карты: Проверьте, что драйверы для сетевой карты установлены и обновлены. Устаревшие или неправильные драйверы могут привести к проблеме с подключением.
- Проблемы с настройками сети: Проверьте настройки сетевого подключения в операционной системе. Убедитесь, что IP-адрес и другие сетевые параметры настроены правильно.
- Программное обеспечение VPN: Если вы используете VPN-сервис и вам не удается подключиться из-за проблем с Tap windows adapter v9, попробуйте переустановить или обновить программное обеспечение VPN.
Если вы не можете самостоятельно решить проблему с подключением сетевого кабеля Tap windows adapter v9, рекомендуется обратиться к специалисту по компьютерной технике или сетевому администратору для дополнительной помощи и диагностики.
Перезагрузка компьютера и проверка соединений
Если перезагрузка не помогла или проблема возникает регулярно, следует провести дополнительные действия:
- Убедитесь, что кабель надежно подключен как к компьютеру, так и к роутеру или другому сетевому устройству.
- Проверьте состояние сетевых адаптеров на компьютере. Для этого откройте «Управление устройствами» (Device Manager), найдите раздел «Сетевые адаптеры» и проверьте наличие и работоспособность Tap Windows Adapter V9.
- Также стоит проверить работу других сетевых адаптеров. Если они работают неправильно или не подключены, это может указывать на большую проблему с сетью или сетевыми устройствами.
- Попробуйте временно отключить антивирусное программное обеспечение или брандмауэр. В некоторых случаях эти программы могут блокировать подключение к Tap Windows Adapter V9.
- Если все вышеперечисленные действия не помогли, рекомендуется обратиться к специалисту или службе поддержки, которые смогут более точно определить и исправить проблему.
Проверка драйверов и установка обновлений
Если сетевой кабель не подключен к устройству Tap windows adapter v9, может потребоваться проверить драйверы и установить обновления. Вот несколько шагов, которые могут помочь вам в этом:
- Откройте «Диспетчер устройств» на вашем компьютере. Вы можете это сделать, нажав правой кнопкой мыши на значок «Пуск» и выбрав соответствующий пункт меню или через Панель управления.
- В «Диспетчере устройств» найдите раздел «Адаптеры сетевых устройств» и разверните его.
- Найдите устройство «Tap windows adapter v9» и щелкните правой кнопкой мыши по нему.
- Выберите пункт меню «Обновить драйвер».
- В открывшемся окне выберите опцию «Автоматический поиск обновленного программного обеспечения драйвера».
- Дождитесь завершения процесса обновления драйверов.
После выполнения этих шагов перезагрузите компьютер и проверьте, подключен ли сетевой кабель к устройству Tap windows adapter v9. Если проблема остается, рекомендуется обратиться за помощью к специалистам технической поддержки или провайдеру интернет-услуг.
Использование утилиты для восстановления сетевых настроек
Если у вас возникла проблема с подключением сетевого кабеля и устройство Tap windows adapter v9 не работает, вы можете попробовать восстановить сетевые настройки с помощью специальной утилиты.
Для этого выполните следующие шаги:
- Правой кнопкой мыши щелкните по значку «Пуск» в левом нижнем углу экрана и выберите «Командная строка (администратор)».
- В открывшемся окне командной строки введите команду «netsh winsock reset» и нажмите клавишу Enter.
- После завершения выполнения команды перезагрузите компьютер и проверьте, работает ли теперь сетевой кабель.
Если после выполнения этих шагов проблема не была решена, попробуйте также повторить процедуру восстановления IP-настроек с помощью команды «netsh int ip reset». Это может помочь в случае, если проблема связана с некорректными IP-настройками.
Если же ни одна из указанных выше методик не привела к восстановлению работы сетевого кабеля, рекомендуется обратиться к специалисту или провайдеру интернет-услуг для дальнейшей диагностики и решения проблемы.
Отключение и включение Tap Windows Adapter V9
| Шаг | Действие |
|---|---|
| 1 | Нажмите правой кнопкой мыши на значок «Пуск» в левом нижнем углу экрана. |
| 2 | Выберите «Устройства и принтеры». |
| 3 | Найдите ищущее по имени устройство «Tap Windows Adapter V9». |
| 4 | Нажмите правой кнопкой мыши на устройстве «Tap Windows Adapter V9». |
| 5 | Выберите «Отключить» в контекстном меню. Пользователям Windows 10 может потребоваться выбрать «Отключить устройство». |
| 6 | Подождите несколько секунд и повторно нажмите правой кнопкой мыши на устройстве «Tap Windows Adapter V9». |
| 7 | Выберите «Включить» в контекстном меню. Пользователям Windows 10 может потребоваться выбрать «Включить устройство». |
| 8 | После того, как устройство будет включено, проверьте, работает ли ваша сетевая связь. |
Эти шаги должны помочь вам отключить и включить Tap Windows Adapter V9. Если после выполнения этих действий проблема не решена, вы можете попробовать перезагрузить компьютер или обратиться за помощью к специалисту по поддержке.
Изменение настроек сетевого адаптера
Если у вас возникла проблема с подключением сетевого кабеля и вы видите ошибку Tap Windows Adapter V9, вы можете попробовать следующие шаги:
1. Перезагрузите компьютер и повторно подключите сетевой кабель. Иногда простое обновление соединения может помочь устранить проблему.
2. Проверьте физическое состояние сетевого адаптера и кабеля. Убедитесь, что адаптер правильно подключен к компьютеру и что кабель не поврежден.
3. Проверьте настройки сетевого адаптера. Для этого откройте «Управление устройствами» (Device Manager) на вашем компьютере. Нажмите правой кнопкой мыши на адаптере Tap Windows Adapter V9 и выберите «Свойства».
4. В окне «Свойства» перейдите на вкладку «Драйвер» (Driver) и нажмите кнопку «Обновить драйвер» (Update Driver). Попробуйте выбрать «Автоматический поиск драйверов» (Search automatically for drivers) и дождитесь завершения процесса.
5. Если автоматическое обновление не помогло, вы можете попробовать загрузить и установить драйвер с официального сайта производителя вашего сетевого адаптера.
6. После установки нового драйвера перезагрузите компьютер и проверьте, появилась ли ошибка Tap Windows Adapter V9.
Будьте осторожны при изменении настроек сетевого адаптера, чтобы не повредить работу вашей сети. Если проблема не устранена, рекомендуется обратиться за помощью к специалисту или технической поддержке.
Возможность сброса настроек TCP/IP
Если ваш сетевой кабель не подключен к Tap windows adapter v9, возможно, проблема связана с настройками TCP/IP. Для устранения данной проблемы вы можете попробовать сбросить настройки TCP/IP на вашем компьютере. Следуйте инструкциям ниже:
- Откройте командную строку: Нажмите клавишу Win + R, введите «cmd» (без кавычек) и нажмите Enter.
- Выполните команду: В командной строке введите следующую команду и нажмите Enter: netsh int ip reset
- Перезагрузите компьютер: После выполнения команды, перезагрузите компьютер, чтобы изменения вступили в силу.
После перезагрузки компьютера, настройки TCP/IP должны быть сброшены, и ваш сетевой кабель может быть подключен к Tap windows adapter v9 без проблем. Если проблема не устранена, рекомендуется обратиться к специалисту по настройке сети или к поставщику услуг интернета для получения дополнительной помощи.
Every VPN user needs to know what TAP-Windows is, as the issues associated with TAP-Windows 9.21.2 Adapter can be a bit worrisome.
Many users have reported trouble connecting to the internet while the TAP-Windows Adapter was enabled.
You need not worry anymore as we will tell you how to manage the TAP-Windows Adapter in this article.
What is TAP-Windows Adapter?
If you have been using the Windows VPN to safeguard the personal data stored on the PC, you must be aware of the role of the TAP-Windows Adapter V9.
Essentially, the Adapter acts as a virtual network interface that lets the VPN clients fetch the desired VPN connection by making all the necessary functionalities available.
The TAP-Windows 9.21.2 Adapter can be found as an installed program at the location C:\Program Files\Tap-Windows.

Many VPN software runs only after installing a specific network driver, known as TAP-Windows. You can find this Adapter mainly in the Device Manager once installed by any VPN client like SoftEther, Cyberghost, Hamachi, etc.
The VPN suites mostly use it as a helping medium for establishing a private connection to any internet network nearby.
You will find two different types of driver versions of TAP-Windows that operate only on the specific Windows OS version running on the PC. The two types are:
- The Windows XP version uses the NDIS 5 driver for TAP-Windows and version 9.9.x
- The Windows 10/ 8/ 7/ Vista versions use the NDIS 6 driver for TAP-Windows and version 9.21.x

Note: An amazing VPN facilitating software for your Windows PC or laptop would be PureVPN. This software is compatible with Windows 8, 8.1, and 10. It has a very simple-to-use interface, and the streaming speed is blazing fast. PureVPN will be your best bet for making your PC a VPN hotspot with high-security features like IPv6 Leak protection and DNS.
PS: Learn more about the full TigerVPN review.
Why would you need to remove TAP-Windows?
Whether you use TAP-Windows 9.21.2 or the other version, there are chances of an error in the drivers. Suppose you use the VPN with the help of the internet frequently, and you experience connectivity problems during that process when the VPN connection is running.
In that case, there is a possibility that the driver associated with the TAP-Windows might have gone corrupted. You should better start with an investigation of the problem.
The major and best solution to help you in this scenario would be reinstalling the TAP-Windows Adapter. Another situation might be where you have been using a VPN connection for a long time but have discontinued the usage in the present for a while.
In this case, the leftover data from the TAP-Windows Adapter might be the potential culprit behind the internet connectivity issues. It may have gone corrupted in the time being and started causing trouble.

In both the cases mentioned above, removing the particular Adapter is the best fix. A thing to note here is that if you decide not to uninstall the VPN software from the PC or laptop, then there are chances that the TAP-Windows Adapter will get reinstalled automatically.
If you see the following error message – “All TAP-Windows adapters on this system are currently in use,” then it is time for you to restart the TAP-Windows fox adapter to fix such issues.
Now that the air is clear on the possible issue that might happen. Let us take you through the methods for removing, restarting, and reinstalling the TAP-Windows adapter.
Method for removing the TAP-Windows 9.21.2 Adapter V9
As we have already discussed, removing the TAP-Windows Adapter is not as easy as it may seem once you have uninstalled it from the Device Manager. You may find the Adapter reinstalled into the Device manager as per the VPN software installed on the system.
This will happen every time you boot the system. The main reason behind this is the startup service that is associated with some of the VPN programs. This service looks for the missing drivers and automatically installs the required ones.
Once you decide to remove the driver associated with the TAP-Windows Adapter V9, follow the given steps:
Open the window of Program Files.
Navigate through and find the option of TAP-Windows.
Hit double-click over the option uninstall.exe. Now keep following the instructions as they appear on the screen for finally deleting the driver from the system.
If you decide to terminate the process at this stage, remember that the next time you start the device, the driver will return once again and reinstall upon opening the VPN software.
You have to fully shut the software off the system to ensure that the driver is barred from getting reinstalled on the PC.
Follow the steps below to do so:
Press the keys Windows + R together to launch the Run window. Enter the command appwiz.cpl into the box. Hit OK now. This will open the window of Programs and Features.

Find the relevant VPN client from the given list and then uninstall it.

Note that if you have previously been a user of more than one VPN solution, ensure that you d the same removal process with every other client on the list.
Make sure that there is no such software left that can cause trouble again, and reinstall the TAP-Windows Adapter.
Method for restarting the TAP-Windows 9.21.2 Adapter V9
Suppose you don’t wish to remove the Adapter altogether and think there is a possible chance of its recovery by removing any minor issue. In that case, you may try it by just performing a restart of the Adapter.
As we know that when the error message tells you that every Adapter is currently being used, restarting the TAP-Windows is a good option to try.
We will tell you how to do so in the steps given below:
Open the Control Panel of the PC.
Click the option of Network and Internet.

At this stage, hit the tab Change Adapter options.

In the next Network Connections window, hit a right-click on the local area connection associated with your TAP-Windows Adapter V9. Then click on the tab Disable.

Wait for some time. Hit a right-click again on the same option and then click Enable.
Try running your VPN client once again and see if the error is resolved.
Method for reinstalling the TAP-Windows 9.21.2 Adapter V9
Suppose you face difficulties establishing a connection with any VPN network (it doesn’t matter which program you are using).
In that case, you may have to first start your troubleshooting operation by running a check on the TAP-Windows Adapter primarily.
If installed correctly, reinstall the adapter from scratch if you encounter any incorrect settings.
The steps given below are going to be your guide to do so:
It would be best if you first terminated your VPN connection and shut down the related program of the VPN client simultaneously.
Now press the keys Windows + R together to launch the Run window. Enter the command devmgmt.msc into the box. Hit Enter now. This will open the window of Device Manager.

In this window, navigate the options and select the Network Adapters tab. Open the menu that drops down.
Now, find the option TAP-Windows Adapter V9. Look for an exclamation mark that might appear over the icon adjacent to the option.
If the exclamation mark is there, your next move would be to reinstall the particular driver that will fix the problem. To do that, right-click over the icon and click the tab Uninstall device.

Once you successfully remove the TAP-Windows 9.21.2 Adapter V9 from the Device Manager, open the VPN client again. Now keeping in mind the VPN software you use, you may have to face two situations over here.
Either a prompt will emerge asking you to install the missing Network Driver, or the Client will automatically install the driver again without asking for permission.
Note: If you see a “missing driver error” message on the VPN software when it has not automatically reinstalled the driver, you may have to remove the VPN Client. All the installation kits associated with the VPN client come with the TAP-Windows Adapter.
If you do not wish to reinstall the VPN client, then visit the website of OpenVPN. Scroll down and stop at TAP-Windows. Now download the right installer as per the windows version of the PC.
Go back and open Device Manager. Check if the exclamation mark is gone from the icon. If it is still there, you may resort to expert support from the VPN client or go for another VPN provider.
FAQs
Q1: Can I fix TAP-Windows 9.21.2 Adapter errors without technical knowledge? Yes, the solutions provided in this article are designed to be user-friendly and can be followed by individuals with varying technical expertise.
Q2: Is it necessary to update the TAP-Windows driver? Yes, updating the driver is an important step as outdated drivers can cause compatibility issues and lead to TAP-Windows 9.21.2 Adapter errors.
Q3: Can I reinstall the TAP-Windows Adapter manually? Yes, you can manually uninstall and reinstall the TAP-Windows Adapter by following the steps provided in this article.
Q4: What should I do if none of the solutions work? If none of the solutions work, it is recommended to seek technical support from the VPN software provider or consult an IT professional for further assistance.
Q5: How can I ensure a smooth VPN connection after resolving the errors? After resolving the TAP-Windows 9.21.2 Adapter errors, it is advisable to restart your computer and test the VPN connection to ensure it is functioning properly.
Conclusion
We hope this article dealt with all your queries related to TAP-Windows and the TAP-Windows 9.21.2 Adapter.
We gave you a thorough guide to help you better manage the adapter and prevent it from hindering your internet connection.
What is the Tap Windows Adapter?
Tap Windows Adapter V9 is a driver for a network that enables a VPN connection to connect to the company’s servers. The original installation location is C:/Program Files/tap Windows.
It may be found in the Network adapter category in Device management. When Tap Windows Adapter V9 is activated.
Some users have reported connectivity issues, even if the device is disabled. It will re-enable itself once the machine is rebooted.
TAP Adapter V9 may show on your device shortly after the installed VPN client. The majority of VPN clients use this adapter to establish a secure connection to the server. As a result, consumers may be perplexed and unsure of where the application originated.
Unlike TAP Provider V9 for Private Tunnel, this driver is safe and secure. It’s used to keep the VPN running smoothly.
Users should not tamper with this component at first. However, if connectivity problems emerge, there are a few options. You can either restart the adapter or entirely remove it and reinstall it. Issues with it usually go away, as the root of the problem is a residual adapter from a prior VPN service.
There are two versions of Windows TAP drivers, depending on your Windows version:
- On Windows XP, use the NDIS 5 driver (tap windows, version 9.9.x).
- On Windows 10 / 8 / 7 / Vista, use the NDIS 6 driver (tap windows, version 9.21.x).
What is VPN Software?
Virtual Private Network majority of times referred to as VPN. Its features let you visit websites that are restricted in your country. It also protects you from internet providers, hackers, ISPs, and data-gathering websites. Speed up your server connections by using private, direct channels.
Several IT professionals recommend using a VPN since it minimizes the risk of many online and espionage threats. The benefits of a private connection may be enjoyed by both home and business users, making VPNs a beneficial tool for many.
When To Delete Or Reinstall The Tap Windows Adapter V9
In general, if you access the internet over a VPN network connection, there are few reasons to remove the adapter. If you’re having difficulty connecting to the VPN when it’s active, check for a faulty driver. Also, reinstall the Tap Windows Adapter.
It’s entirely likely that the remaining Tap Adapter is causing internet troubles. If you previously used a VPN connection but stopped using it in the interim. The issue will most likely be resolved by removing the adaptor. If you select to retain the VPN installed on your device, you may notice that the adapter is reinstalled.
Solutions to Fix The “Tap Windows Adapter V9” Error
- Reset the Tap Windows Adapter Connection
- Use the Internet Connection Troubleshooter
- Re-install Tap Windows Network Adapters Driver
- Uninstall The Windows Tap Adapter Driver From Windows 10
- Reset your Windows 10 OS
Methods To Fix The “Tap Windows Adapter V9” Error
Tap windows adapter V9 error messages are standard errors many users have faced. Here we have provided some easy remedies to solve this error message.
1. Reset the Tap Windows Adapter Connection
Reset the TAP windows adapter V9 error by disabling and re-enable. It will reset its network functions. It may also resolve the Adapter V9 issue, and it is a relatively straightforward procedure.
All you have to perform is complete the following steps:
- On your keyboard, press the Win key.
- Type network in the search area.
- Select the network status from the search results.
- Select Network and Sharing Center from the drop-down menu.

- Select the “Change adapter settings” from the network setting window as shown in the image.
- Right-click the local area connection, using tap Windows Adapter and select Disable.

- Right-click the tap Windows Adapter again and select Enable.
- Restart your personal computer to see if things have improved.
2. Use the Internet Connection Troubleshooter
If you’re just encountering problems with your Windows PC, your network settings are most likely to blame. While the built-in Windows troubleshooter isn’t always practical, it’s worth a shot before moving on.
Using Windows’ built-in Internet Connections troubleshooter is the simplest solution.
This program can usually cure a variety of connectivity issues, so it’s worth a look.
It is what you must do:
- Press the Win key on your keyboard.
- Type troubleshoot into the search box.
- Select Troubleshoot settings and from the search results.

- Access the Additional Troubleshooters from the link given below in the same window.
- To run the troubleshooter, go to Internet Connections and select Run the Troubleshooter.

- Choose Please troubleshoot my internet connection.
- Follow the instructions in the troubleshooting wizard.

3. Re-install Tap Windows Network Adapters Driver
It’s possible that reinstalling the Adapter V9 driver will solve the problem.
However, because VPN clients require most TAP adapter drivers, most VPN companies provide their version.
As a result, it would be simpler to simply uninstall the TAP and your VPN client, then reinstall both services from scratch.
The following steps will help you reinstall your TAP driver and VPN client:
- Close your VPN and disconnect all VPN connections. It is crucial to ensure that the tap Windows V9 may be safely removed without causing any problems or issues.
- Use the Windows + S keyboard shortcut to bring up the Search functionality, or click the Search icon in your taskbar.
- Enter “Device Manager” in the search box.

- Expand the section Network Adapters.
- Locate the tap Windows Adapter V9 on your computer. The file name may also include the name of a VPN service, such as “TurboVPN TAP Adapter.” If a yellow exclamation mark is visible next to the driver icon, it implies you need to reinstall it.
- Uninstall the driver by right-clicking on it and selecting Uninstall device.

- Open the VPN you’re using after the driver has been successfully uninstalled.

- Depending on your VPN, you may be prompted to replace the TAP Adapter V9 or install the missing Network Driver.

- When the installation is finished, check to see if your connection problems have been repaired.
Note: If your VPN software merely displays a missing driver error and fails to reinstall Adapter V9, you should reinstall the VPN client. The installer will then be prompted to install the missing driver as well.
If re-installing your VPN and TAP adapter network does not resolve the issue, you should consider moving to a better option.
4. Uninstall The Windows Tap Adapter Driver From Windows 10
You’d think that deleting the Tap Windows Adapter driver from Device Manager would be simple. Depending on the VPN software you have installed on your system.
The adapter may reappear in Device management each time your computer starts up. It occurs because some VPN programs include a starting function that scans for missing drivers. Also, it immediately installs those drivers that are missing.
- To launch the Run dialogue box, press Windows + R.
- Press Enter after typing the following text.
- devmgmt.msc
- Double-click on the Network adapters in the Device Manager window to expand it.
- Select Properties from the context menu of tap Windows Adapter V9.
- If you can’t find tap Windows Adapter V9 under Network adapter, go to View > Show hidden devices from the top menu bar.
- Click Uninstall device on the Driver tab.

- Make a check. To continue, delete the driver program for this device and click OK.
5. Reset your Windows 10 OS
You can restore Windows 10 while retaining your files. However, because your PC will be wiped clean, you’ll need to reinstall all of your software and drivers.
It is one of the most extreme methods, but it works the majority of the time.
To reset your Windows 10 computer, follow these steps:
- On your keyboard, press the Win key.
- Restart your computer by typing Reset PC.
- Select the option to Reset this PC.

- Choose “Get started.”

- Select “Keep my files” from the displayed menu.

- Then press the Next button.
- To continue, select the Reset option.
- Wait for the procedure to finish.
Conclusion
We aim this article to give you a better understanding of the tap Windows Adapter 9.21.2. Suppose your tap Windows Adapter V9 error is causing various connectivity errors. We recommend contacting your VPN provider’s customer care.
Reinstalling the TAP driver and VPN client will usually solve the problem. However, you may need to reset your computer completely, so stay calm and don’t give up.
