
Join the Chocolatey Team on our regular monthly stream where we discuss all things Community, what we do, how you can get involved and answer your Chocolatey questions.

Join the Chocolatey Team on our regular monthly stream where we put a spotlight on the most recent Chocolatey product releases. You’ll have a chance to have your questions answered in a live Ask Me Anything format.

Livestream from
Thursday, 06 October 2022
We recently released our largest update to Chocolatey Central Management so far. Join Gary and Steph to find out more about Chocolatey Central Management and the new features and fixes we’ve added to this release.
Watch On-Demand

Webinar Replay from
Wednesday, 30 March 2022
At Chocolatey Software we strive for simple, and teaching others. Let us teach you just how simple it could be to keep your 3rd party applications updated across your devices, all with Intune!
Watch On-Demand

Livestream from
Thursday, 9 June 2022
Join James and Josh to show you how you can get the Chocolatey For Business recommended infrastructure and workflow, created, in Azure, in around 20 minutes.
Watch On-Demand

Livestream from
Thursday, 04 August 2022
Join Paul and Gary to hear more about the plans for the Chocolatey CLI in the not so distant future. We’ll talk about some cool new features, long term asks from Customers and Community and how you can get involved!
Watch On-Demand

Livestreams from
October 2022
For Hacktoberfest, Chocolatey ran a livestream every Tuesday! Re-watch Cory, James, Gary, and Rain as they share knowledge on how to contribute to open-source projects such as Chocolatey CLI.
Watch On-Demand

Livestream from
Thursday, 03 November 2022
Join Paul and Gary for this months Chocolatey product livestream where we look at the latest release of Chocolatey 1.2.0, Chocolatey Licensed Extension 5.0.0 and shine a spotlight on the new hook scripts functionality. This opens up so many possibilities for Chocolatey CLI users!
Watch On-Demand

Livestream from
Tuesday, 29 November 2022
Join Josh as he adds the ability to manage Chocolatey GUI config and features with the Chocolatey Ansible Collection.
Watch On-Demand

Webinar from
Tuesday, 13 December 2022
Join Gary, Paul, and Maurice as they introduce and demonstrate how to use Chocolatey! Questions will be answered live in an Ask Me Anything format.
Watch On-Demand
![]()
Проверено на вирусы
?
Проверено на virustotal
Характеристики
Описание
Версии
Обновлено
Совместимость
Windows XP, Windows 7, Windows 8, Windows 10
Описание
Tap-windows — это драйверы виртуальных TAP-устройств. Данное устройство необходимо для нормальной работы программы OpenVPN. Как правило, драйверы устанавливаются вместе с этим программным обеспечением, однако в редких случаях может потребоваться их отдельная установка.
Версии
Нет официального представителя разработчика на сайте
Рейтинг
Нажмите, для быстрой оценки
Оставить отзыв
Отзывы
Похожие приложения
Актуальные статьи
TAP-Windows driver (NDIS 6)
This is an NDIS 6.20/6.30 implementation of the TAP-Windows driver, used by
OpenVPN and other apps. NDIS 6.20 drivers can run on Windows 7 or higher except
on ARM64 desktop systems where, since the platform relies on next-gen power
management in its drivers, NDIS 6.30 is required.
Build
The prerequisites for building are:
- Python 2.7
-
- Microsoft Windows 10 EWDK (Enterprise Windows Driver Kit)
-
- Visual Studio+Windows Driver Kit works too. Make sure to work from a «Command Prompt for Visual Studio» and to call buildtap.py with «—sdk=wdk».
-
- The devcon source code directory (setup/devcon) from Windows-driver-samples (optional)
-
- If you use the repo from upstream remember to include our patch to devcon.vcxproj to ensure that devcon.exe is statically linked.
- Windows code signing certificate
- Git (not strictly required, but useful for running commands using bundled bash shell)
- MakeNSIS (optional)
- Prebuilt tapinstall.exe binaries (optional)
- Visual Studio 2019 and WiX Toolset for MSM packaging (optional)
Make sure you add Python’s install directory (usually c:\python27) to the PATH
environment variable.
Tap-windows6 has been successfully build on Windows 10 and Windows Server 2016 using
CMD.exe, Powershell and Git Bash.
View build script options:
$ python buildtap.py
Usage: buildtap.py [options]

Options:
  -h, --help           show this help message and exit
  -s SRC, --src=SRC    TAP-Windows top-level directory, default=<CWD>
  --ti=TAPINSTALL      tapinstall (i.e. devcon) directory (optional)
  -d, --debug          enable debug build
  --hlk                build for HLK tests (test sign, no debug)
  -c, --clean          do an nmake clean before build
  -b, --build          build TAP-Windows and possibly tapinstall (add -c to
                       clean before build)
  --sdk=SDK            SDK to use for building: ewdk or wdk, default=ewdk
  --sign               sign the driver files
  -p, --package        generate an NSIS installer from the compiled files
  -m, --package-msm    generate a MSM installer from the compiled files
  --cert=CERT          Common name of code signing certificate,
                       default=openvpn
  --certfile=CERTFILE  Path to the code signing certificate
  --certpw=CERTPW      Password for the code signing certificate/key
                       (optional)
  --crosscert=CERT     The cross-certificate file to use, default=MSCV-
                       VSClass3.cer
  --timestamp=URL      Timestamp URL to use, default=http://timestamp.verisign
                       .com/scripts/timstamp.dll
  --versionoverride=FILE
                       Path to the version override file
Edit version.m4 and paths.py as necessary then build:
$ python buildtap.py -b
On successful completion, all build products will be placed in the «dist»
directory as well as tap6.tar.gz. The NSIS installer package will be placed to
the build root directory.
Building tapinstall (optional)
The easiest way to build tapinstall is to clone the Microsoft driver samples
and copy the source for devcon.exe into the tap-windows6 tree. Using PowerShell:
$ git clone https://github.com/OpenVPN/Windows-driver-samples.git
$ Copy-Item -Recurse Windows-driver-samples/setup/devcon tap-windows6
$ cd tap-windows6
$ python.exe buildtap.py -b --ti=devcon
The build system also supports reuse of pre-built tapinstall.exe executables.
To make sure the buildsystem finds the executables, create the following
directory structure under tap-windows6 directory:
devcon
├── Release
│   └── devcon.exe
├── x64
│   └── Release
│       └── devcon.exe
└── ARM64
    └── Release
        └── devcon.exe
This structure is equal to what building tapinstall would create. Then call
buildtap.py with «—ti=devcon». Replace «Release» with your build configuration;
for example, when using —Hlk you’d use «Hlk».
Please note that the NSIS packaging (-p) step will fail if you don’t have
tapinstall.exe available. Also don’t use the «-c» flag or the above directories
will get wiped before MakeNSIS is able to find them.
Developer Mode: Installing, Removing and Replacing the Driver
The driver can be installed using a command-line tool, tapinstall.exe, which is
bundled with OpenVPN and tap-windows installers. Note that in some versions of
OpenVPN tapinstall.exe is called devcon.exe. To install, update or remove the
tap-windows NDIS 6 driver follow these steps:
- place tapinstall.exe/devcon.exe to your PATH
- open an Administrator shell
- cd to dist
- cd to amd64, i386, or arm64 depending on your system’s processor architecture.
If you are actively developing the driver (e.g.: Edit, Compile, Debug, Loop…), you may not be signing your driver each time, thus you need to be aware of the following additional items.
Disable Secure Boot:
Unsigned drivers require disabling secure boot.
- Secure Boot: Varies depending on PC Maker and/or the BIOS setting on your test machine.
- https://docs.microsoft.com/en-us/windows-hardware/manufacture/desktop/disabling-secure-boot
- VMWare (one example): https://docs.vmware.com/en/VMware-vSphere/7.0/com.vmware.vsphere.vm_admin.doc/GUID-898217D4-689D-4EB5-866C-888353FE241C.html
- Virtual Box: SecureBoot is not supported on Virtual Box
- Parallels (MacOS) https://kb.parallels.com/en/124242 [With Parallels 15, it is enabled by default, use 0 to disable]
Enable Windows Test Mode:
Test mode is also required.
- Enable Windows Test Mode via BCEDIT
- For details: https://docs.microsoft.com/en-us/windows-hardware/manufacture/desktop/bcdedit-command-line-options
- Specifically,
bcdedit /set testsigning offorbcdedit /set testsigning on - The result should be
Test Modein the bottom right corner of the windows screen.
Driver Installation:
Notes
- The command
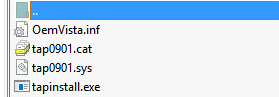
tapinstall install OemVista.inf TAP0901installs the driver - Because your driver is not signed, the
tapinstall installstep will pop up the «Big Scary Unsigned Driver Warning», you’ll need to click OK. - As a result, the driver will be copied into the Windows Driver Store
Updating the Driver, and the Windows Driver Store:
At some point, you will build a shinny new driver and need to test it.
- The command
tapinstall remove TAP0901— removes the driver - However, the previously approved driver is still in the Windows Driver Store
- Typing
tapinstall install ...now, only re-installs the old driver that was copied into the driver store.
Key step: The driver needs to be removed from the driver store also.
- Details: https://docs.microsoft.com/en-us/previous-versions/windows/it-pro/windows-server-2008-R2-and-2008/cc730875(v=ws.11)
There is a script to do this, but it only works if you have not changed the text strings in your driver package
- Script Location: https://github.com/mattock/tap-windows-scripts
The manual steps are:
- Step 1 — Obtain a list of Installed drivers via the command:
pnputil -e, this will list all of theoemNUMBER.inffiles that are in the driver store. - Step 2 — Find your driver in that list, it will be some
oem<NUMBER>.inffile - Step 3 — To delete, use
pnputil.exe /d oemNUMBER.inf
Finally use tapinstall install OemVista.inf TAP0901 to install your driver
Important:
If you do not see the Big Scary Unsigned Driver Warning — Windows will use the old (not new) driver.
Troubleshooting:
Examining the SetupAPI log file helps, see C:\Windows\INF\setupapi.dev.log.
Build for HLK tests
A test-signed version of tap-windows6 driver should be used for the HLK tests.
The recommended procedure is to use pre-built, cross-signed devcon.exe and use
the WDK-generated key for signing the driver.
First setup the directory with prebuilt devcon as described above.
Then run the build with the —hlk option:
$ python.exe buildtap.py -c -b --ti=devcon-prebuilt --hlk
Release process and signing
Microsoft’s driver signing requirements have tightened considerably over the
last several years. Because of this this buildsystem no longer attempts to sign
files by default. If you want to sign the files at build time use the —sign
option. The «sign» directory contains several Powershell scripts that help
produce release-signed tap-windows6 packages:
- Cross-Sign: cross-sign tap-windows6 driver files and tapinstall.exe
- Create-DriverSubmission: create architecture-specific attestation signing submission cabinet files
- Extract-DriverSubmission: extract attestation-signed zip files
- Sign-File: sign files (e.g. tap-windows6 installer or driver submission cabinet files)
- Sign-tap6.conf.ps1: configuration file for all the scripts above
- Prepare-Msm.ps1: take Win7- and Win10-signed «dist» directories and produce a «dist» directory that MSM packaging can consume
Most of these scripts operate directly on the «dist» directory that
tap-windows6 build system produces. Below it is assumed that building and
signing is done on the same computer.
First produce cross-signed drivers for (Windows 7/8/8.1/Server 2012r2):
$ python.exe buildtap.py -c -b --ti=devcon
$ sign\Cross-Sign.ps1 -SourceDir dist -Force
Note that the «-Force» option for Cross-Sign.ps1 is required except in the
unlikely case that you’re appending a signature.
Next produce a driver submission cabinet files for attestation signing:
$ sign\Create-DriverSubmission.ps1
$ Get-ChildItem -Path disk1|sign\Sign-File.ps1
Three architecture-specific (i386, amd64, arm64) cabinet files are created.
Submit these to Windows Dev Center for attestation signing. Note that unsigned
cabinet files will be automatically rejected.
When submitting the drivers to Microsoft take care to only request signatures
applicable for each architecture.
At this point move the cross-signed «dist» directory away:
$ Move-Item dist dist.win7
Download the attestation-signed drivers as zip files put them into a temporary
directory (e.g. tap-windows6tempdir). Then run Extract-DriverSubmission.ps1:
$ Get-ChildItem -Path tempdir -Filter "*.zip"|sign\Extract-DriverSubmission.ps1
This extracts the drivers into the «dist» directory. Move that directory to dist.win10:
$ Move-Item dist dist.win10
After this you can start creating the installers and/or MSM packages.
If you’re creating NSIS packages do:
$ Move-Item dist.win7 dist
$ python.exe buildtap.py -p --ti=devcon
$ Move-Item dist dist.win7
Followed by:
$ Move-Item dist.win10 dist
$ python.exe buildtap.py -p --ti=devcon
$ Move-Item dist dist.win10
Finally sign both installers:
$ Get-Item tap-windows*.exe|sign\Sign-File.ps1
On the other hand if you’re creating MSM packages do:
$ sign\Prepare-Msm.ps1
$ python buildtap.py -m --sdk=wdk
$ Get-Item tap-windows*.msm|sign\Sign-File.ps1
For additional instructions and background information please refer to
this article on OpenVPN community wiki.
Overriding setting defined in version.m4
It is possible to override one or more of the settings in version.m4 file with
the —versionoverride <file> option. Any settings given in the override file
have precedence over those in version.m4.
This is useful when building several tap-windows6 drivers with different
component ids for example.
Notes on proxies
It is possible to build tap-windows6 without connectivity to the Internet but
any attempt to timestamp the driver will fail. For this reason configure your
outbound proxy server before starting the build. Note that the command prompt
also needs to be restarted to make use of new proxy settings.
MSM packaging
In order to build the MSM packages build and sign the driver first:
- Build the TAP driver with buildtap.py and «-b» flag.
- EV-sign the drivers
- WHQL/Attestation-sign the drivers
Place the signed drivers in a directory structure under tap-windows6
directory. Each platform directory should contain the EV-signed driver with a
«win10» subdirectory containing WHQL/Attestation signed driver for that
platform:
dist
├── amd64
│   ├── win10
│   │   ├── OemVista.inf
│   │   ├── tap0901.cat
│   │   └── tap0901.sys
│   ├── OemVista.inf
│   ├── tap0901.cat
│   └── tap0901.sys
├── arm64
│   ├── win10
│   │   ├── OemVista.inf
│   │   ├── tap0901.cat
│   │   └── tap0901.sys
│   └── (Note: EV-signed driver for arm64 is not used.)
├── include
│   └── tap-windows.h
└── i386
    ├── win10
    │   ├── OemVista.inf
    │   ├── tap0901.cat
    │   └── tap0901.sys
    ├── OemVista.inf
    ├── tap0901.cat
    └── tap0901.sys
Building MSM packages requires Visual Studio 2019 (EWDK is not sufficient) and
the WiX Toolset installed. In a Developer Command Prompt for Visual Studio
2019, run:
$ python buildtap.py -m --sdk=wdk
This will compile the installer.dll file with embedded drivers and package it
as a platform-dependent tap-windows-<version>-<platform>.msm files.
As the WiX Toolset does not support the arm64 platform yet, only amd64 and
i386 MSM files are built.
Optional: Consider EV-signing the MSM packages before deploying them. Thou,
MSM signature is ignored when merging MSM into MSI package, users get a choice
to validate the integrity of the downloaded MSM packages manually.
License
See the file COPYING.
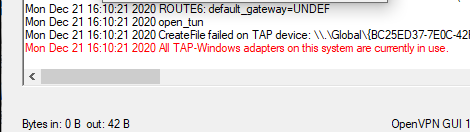
При запуске OpenVPN сервера или подключения из клиента OpenVPN вы можете столкнуться с ошибкой:
All TAP-Windows adapters on this system are currently in use
Exiting due to fatal error
Или
All wintun adapters on this system are currently in use or disabled
Или
No TAP Adapter Available
Вы можете увидеть эту ошибку логе OpenVPN сервера (файл C:\Program Files\OpenVPN\log\openvpn.log) или в клиенте OpenVPN GUI/
Это известная ошибка, связанная с тем что в Windows не установлены или некорректно работают виртуальные сетевые адаптеры TAP или wintun.
В OpenVPN 2.5+ вместо сетевых адаптеров TAP можно использовать WinTun от разработчиков WireGuard. По словам разработчиков, wintun драйвер работает быстрее чем классический OpenVPN драйвер TAP. Вы можете выбрать какой сетевой драйвер использовать при установке OpenVPN (TAP-Windows6 или Wintun).

Чтобы исправить эту ошибку нужно выполнить один из следующих шагов (расположены в порядке от самого простого к самому сложному):
- Перезапустить TAP-Windows/WinTun через панель управления.
- Переустановить драйвер TAP-Windows/Wintun;
- Создать новый сетевой адаптер для OpenVPN (или другого VPN клиента)
Выведите список всех TAP адаптеров, доступных клиенту OpenVPN:
cd "c:\Program Files\OpenVPN\bin"
“C:\Program Files\OpenVPN\bin\openvpn.exe” --show-adapters

В нашем случае установлен как Wintun, так и TAP адаптер:
'OpenVPN Wintun' {1199219C-C5AD-4722-B195-C80332101710} wintun
'OpenVPN TAP-Windows6' {9C6B25CA-0AF0-4752-AD4A-032947F6A6FD} tap-windows6
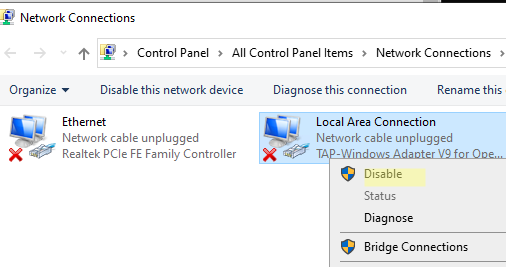
Для устранения ошибки обычно достаточно включить и отключить TAP адаптер в панели управления Windows, перезагрузить компьютер или переустановить клиент OpenVPN.
Вы можете включить и отключить сетевой адаптер WinTap из панели управления ncpa.cpl. Щелкните в панели управления по нужному адаптеру (TAP-Windows или Wintun Userspace Tunnel) и выберите Disable. Затем включите его (Enable.)
Также вы можете перезапустить все сетевые интерфейсе OpenVPN TAP с помощью PowerShell:
$TapAdapter= Get-NetAdapter| where {$_.InterfaceDescription -like "*TAP-Windows*"}
Disable-NetAdapter -Name $TapAdapter -Confirm:$false
Enable-NetAdapter -Name $TapAdapter -Confirm:$false

Если предыдущий способ не помог, попробуйте переустановить драйвера для вашего виртуального TAP адаптера вручную
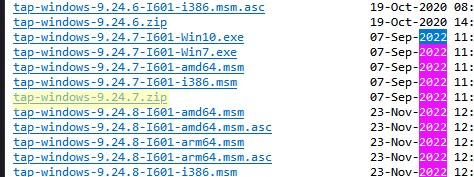
- Скачайте последнюю версию TAP драйвера для Windows здесь (http://build.openvpn.net/downloads/releases/). Например, tap-windows-9.24.7.zip или wintun-amd64-0.8.1.

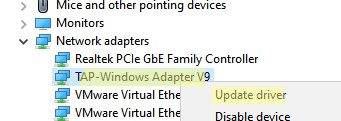
- Распакуйте архив, запустите Device Manager (
devmgmt.msc), щелкните правой кнопкой по сетевому адаптеру TAP-Windows Adapter v9 в секции Network Adapters и выберите Update driver;
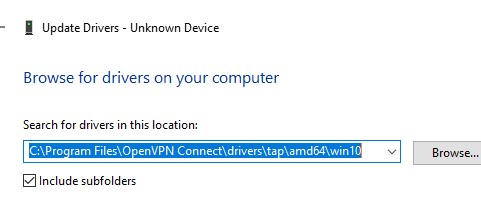
- Укажите путь к каталогу с драйвером TAP.
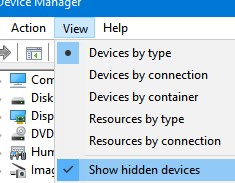
Если вы не видите в панели управления TAP-Windows Adapter V9, откройте консоль Device Manager и включите опцию View-> Show hidden device.
Если в секции Network adapters есть устройства типа unknown device, откройте его свойства, перейдите на вкладку Details и проверьте значение свойства Device instance path.
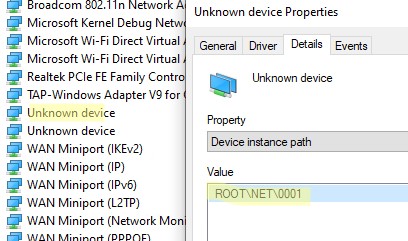
Если здесь указано ROOT\NET\0000, значит попробуйте выполнить авматотический поиск дрвйвера или вручную укажите путь к INF файлу (например C:\Program Files\OpenVPN Connect\drivers\tap\amd64\win10\OemVista.inf). После этого в панели управления появится ваш TAP адаптер.
В Windows 7 драйвер TAP, подписанный с помощью SHA256, не будет работать корректно, пока вы вручную не установите обновление KB4474419.
В самых редких случаях может помочь полное пересоздание TAP/Wintun адаптера.
Перед установкой нужно удалить существующий сетевой адаптер TAP и его драйвер. Для этого запустите программу C:\Program Files\TAP-Windows\Uninstall.exe или просто удалите устройство из Device Manager (Uninstall device).
Для установки TAP драйвера используется утилита tapinstall.exe.
Распакуйте архив и запустите установочный файл с правами администратора.
В новых версиях OpenVPN для управления виртуальными сетевыми адаптерами используется утилита c:\Program Files\OpenVPN\bin\tapctl.exe.
Вывести список сетевых адаптеров OpenVPN:
tapctl.exe list

Удалить адаптер:
tapctl.exe delete "OpenVPN TAP-Windows6"
Создать новый адаптер TAP:
tapctl.exe create
Создать новый wintun адаптер:
tapctl.exe create --hwid wintun
Обязательно проверьте, что новый сетевой адаптер TAP-Windows Adapter появился в списке сетевых подключения в панели управления Windows (консоль ncpa.cpl).
Также ошибка “ All TAP-Windows adapters on the system are currently in use” может возникнуть, если вы пытаетесь установить несколько OpenVPN подключений с одного компьютера. Для каждого VPN подключения нужно создать свой адаптер.
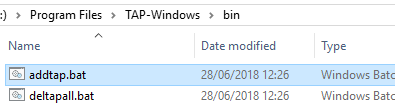
Вы можете создать дополнительный WinTap сетевой адаптер с помощью скрипта (bat файл) %ProgramFiles%\TAP-Windows\bin\addtap.bat.
Или с помощью команды (в современных версиях клиента OpenVPN):
c:\Program Files\OpenVPN\bin\tapctl.exe.tapctl.exe create
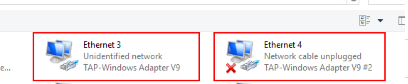
В результате в панели управления появится два (или более) сетевых адаптеров TAP-Windows Adapter V9, и вы сможете одновременно установить несколько одновременных OpenVPN сессий с разными серверами.
Теперь вы можете использовать ваше OpenVPN подключение в Windows и настроить автоматическое подключение к VPN. [/alert]
Download Windows Speedup Tool to fix errors and make PC run faster
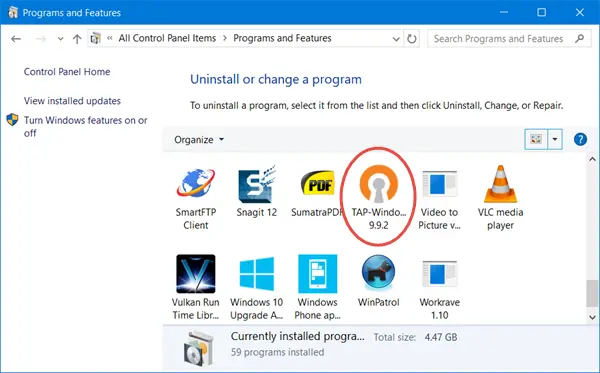
This post talks about TAP-Windows Adapter v9, what they are, why VPNs require them, and where you can download the TAP Drivers. We will also show you how to install, update or uninstall the TAP driver.
If you open the Windows Settings, you will see a program called TAP-Windows installed.

Windows 11/10/8/7/Vista users will see it in the Control Panel.
If your open Devices Manager and expand Adapters, you will also see it there.
Read: Where to download drivers for Windows.
- TAP-Windows Adapters provide virtual TAP device functionality on the Windows OS. It is installed in the C:\Program Files\TAP-Windows folder and is required by your VPN software to function.
- TAP devices are virtual network kernel devices supported entirely in software – and not backed up by hardware network adapters.
- TAP drivers are used for TAP devices to work and they are designed with low-level kernel support for Ethernet tunneling.
You don’t need to install TAP-Windows separately, as your VPN installers include it and install it automatically along with the VPN software.
The TAP-Windows driver comes in two types:
- NDIS 6 (TAP-windows6, version 9.21.x) for Windows 11/10/8/7/Vista.
- NDIS 5 driver (TAP-windows, version 9.9.x) for Windows XP.
At times, you may face issues caused by this driver. Let us take a look at some of them.
TAP-Windows adapters on this system are currently in use
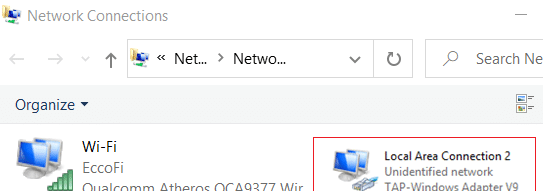
If you see a message All TAP-Windows adapters on this system are currently in use or if your VPN software is facing problems starting, you may restart the TAP Adapter and see if it helps. To do so, open Control Panel > Network and Sharing Center > Click on Change Adapter Settings to open Network Connections.
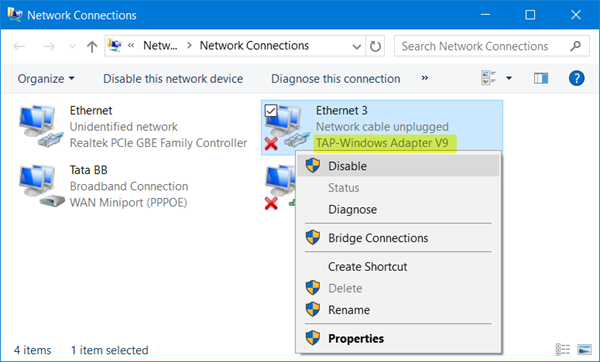
You will see that one of the local area connections will have an under name TAP-Windows Adapter. Right-click on it and select Disable. After a few seconds again right-click on it and select Enable. Now try to connect again and see if it works.
If you face other issues in running your VPN software, I suggest you open the Control panel and from there, either Repair, or Uninstall and reinstall your VPN software and see. During Repair/Installation, it will install the TAP drivers.
If you wish to uninstall, disable or update TAP-Windows, from the Windows 10 WinX Menu, open Devices Manager, and expand Adapters, you will see TAP-Windows Adapter v9.
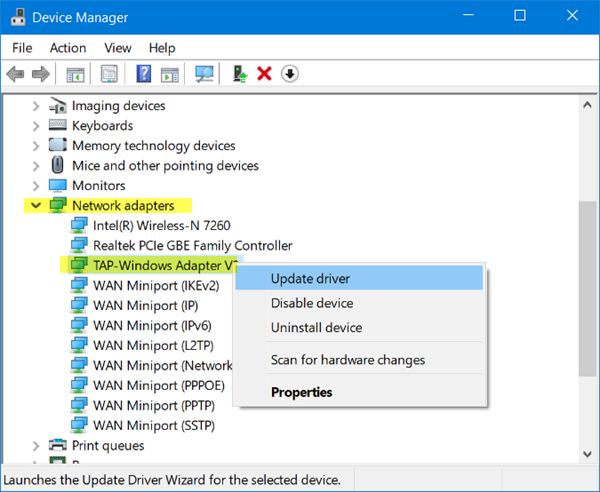
Right-click on it and you will be offered the options to update, disable or uninstall the driver.
There are no TAP-Windows adapters on this system
If your VPN software doesn’t find this driver installed on your computer, you may receive a There are no TAP-Windows adapters on this system error message. You will then have to download its setup and install the driver.
TAP-Windows adapter driver download
To download TAP-Windows driver file, visit openvpn.net. Scroll down, and you will see their download links.
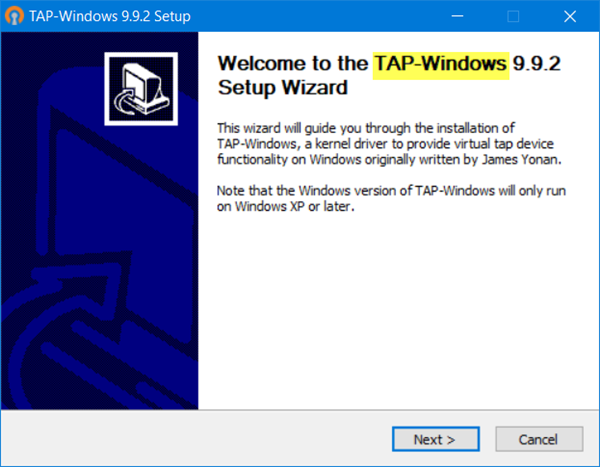
Run its installer. Once the driver installation is completed, restart your computer and check.
If your Internet Connection stops working, then you might want to uninstall this adapter and see if that helps you. If it does not, perhaps you need to uninstall and reinstall the latest version of this driver afresh.
Can I uninstall Tap Windows Adapter v9?
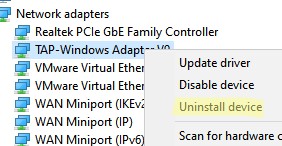
You can uninstall Tap Windows Adapter via Control Panel or Settings as usual or via Device Manages as follows:
Open Device Manager > Expand Network adapters > Right-click TAP-Windows Adapter V9 > Select Properties. On the Driver tab, click Uninstall > Select Delete the driver software for this device > Click OK > Restart your PC.
Read next: VPN not working in Windows.
Anand Khanse is the Admin of TheWindowsClub.com, a 10-year Microsoft MVP (2006-16) & a Windows Insider MVP (2016-2022). Please read the entire post & the comments first, create a System Restore Point before making any changes to your system & be careful about any 3rd-party offers while installing freeware.