 Если при попытке изменить, открыть или удалить папку или файл в Windows вы получаете сообщения о том, что вам отказано в доступе, «Нет доступа к папке», «Запросите разрешение на изменение этой папки» и аналогичные, то вам следует изменить владельца папки или файла, о чем и поговорим.
Есть несколько способов стать владельцем папки или файла, основные среди которых — использование командной строки и дополнительные настройки безопасности ОС. Есть также и сторонние программы, позволяющие изменить владельца папки в два клика, на одного из представителей которых тоже посмотрим. Все описанное ниже подходит для Windows 11, Windows 10, 8.1 и 7. Также может быть полезным: Как добавить пункт «Стать владельцем» в контекстное меню файлов и папок Windows
Примечания: для того, чтобы стать владельцем того или иного элемента с использованием способов ниже, вы должны иметь права администратора на компьютере. Кроме этого, не следует изменять владельца для всего системного диска — это может повлечь нестабильную работу Windows. Также, если вы хотите стать владельцем папки для того, чтобы удалить ее, а иначе она не удаляется, и пишет Запросите разрешение от TrustedInstaller или от Администраторы, используйте следующую инструкцию (там же есть видео): Запросите разрешение от Администраторы на удаление папки.
Использование команды takeown для того, чтобы стать владельцем объекта
Для того, чтобы изменить владельца папки или файла с помощью командной строки, имеются две команды, первая из них — takeown.
Для ее использования, запустите командную строку от имени Администратора, в Windows 11 и Windows 10 это можно сделать через поиск в панели задач с последующим выбором пункта «Запуск от имени администратора». В командной строке, в зависимости от того, владельцем какого объекта вам нужно стать, введите одну из команд:
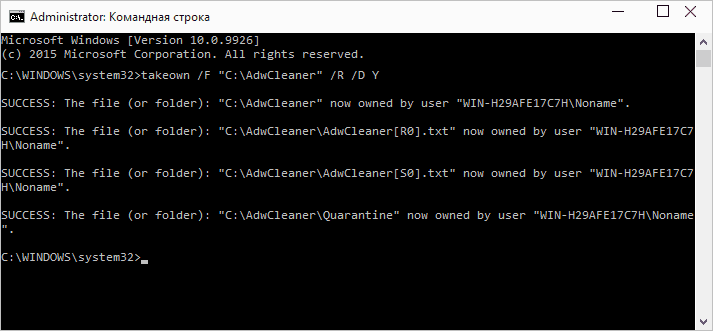
- takeown /F «полный путь к файлу» — стать владельцем указанного файла. Чтобы сделать всех администраторов компьютера владельцами, используйте параметр /A после пути к файлу в команде.
- takeown /F «путь к папке или диску» /R /D Y — стать владельцем папки или диска. Путь к диску указывается в виде D: (без слэша), путь к папке — C:\Folder (также без слэша).
При выполнении данных команд вы получите сообщение о том, что вы успешно стали владельцем конкретного файла или отдельных файлов в указанной вами папке или на диске (см. скриншот).
Как изменить владельца папки или файла с помощью команды icacls
Еще одна команда, которая позволяет получить доступ к папке или файлам (изменить их владельца) и получить необходимые права — icacls, использовать которую следует так же, в командной строке, запущенной от имени администратора.
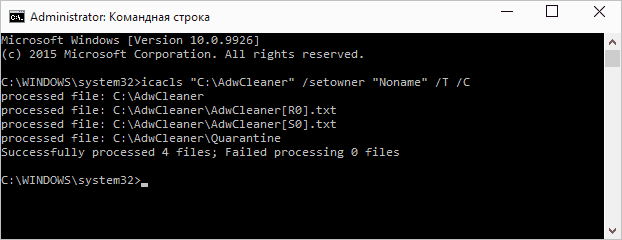
Для установки владельца используйте команду в следующем виде (пример на скриншоте):
icacls "путь к файлу или папке" /setowner "Имя_пользователя" /T /C
Пути указываются аналогично предыдущему способу. Если требуется сделать владельцами всех администраторов, то вместо имени пользователя используйте Администраторы (или, если не сработает, Administrators). Ниже пример быстрого получения полного доступа к папке с использованием сочетания команд takeown и icacls:
takeown /F D:\ПУТЬ /R /A
icacls D:\ПУТЬ /T /Inheritance:e /grant Администраторы:F
Дополнительная информация: помимо того, чтобы стать владельцем папки или файла, вам может потребоваться также получить разрешения для изменения, для этого вы можете использовать следующую команду (дает полные права пользователю для папки и вложенных объектов):
ICACLS "%1" /grant:r "имя_пользователя":(OI)(CI)F
Получение доступа с помощью настроек безопасности
Следующий способ — использовать лишь мышь и интерфейс Windows, не обращаясь к командной строке.
- Кликните правой кнопкой мыши по файлу или папке, доступ к которому нужно получить (стать владельцем), в контекстном меню выберите пункт «Свойства».
- На вкладке «Безопасность» нажмите кнопку «Дополнительно».

- Напротив пункта «Владелец» нажмите «Изменить».

- В открывшемся окне нажмите кнопку «Дополнительно», а в следующем — кнопку «Поиск».

- Выберите в списке пользователя (или группу пользователей), которого нужно сделать владельцем элемента. Нажмите Ок, затем — снова Ок.
- Если вы изменяете владельца папки или диска, а не отдельного файла, отметьте также пункт «Заменить владельца подконтейнеров и объектов».

- Нажмите Ок.


На этом вы стали владельцем указанного объекта Windows и сообщения о том, что нет доступа к папке или файлу вас не должны больше потревожить.
Другие способы стать владельцем папок и файлов
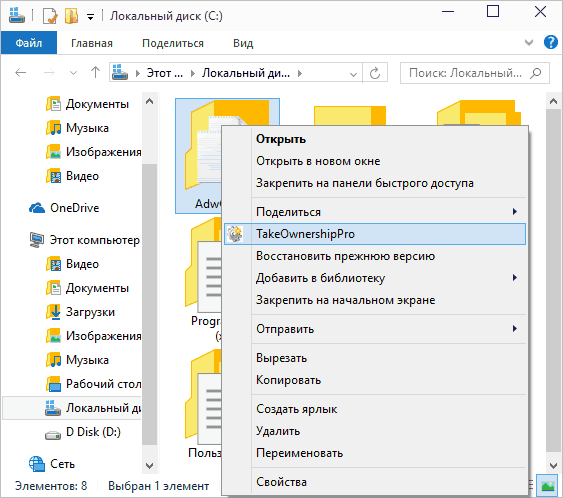
Есть и другие способы решить проблему «отказано в доступе» и быстро стать владельцем, например, с помощью сторонних программ, встраивающих пункт «Стать владельцем» в контекстное меню проводника. Одна из таких программ — TakeOwnershipPro, бесплатная и, насколько я могу судить, без чего-то потенциально нежелательного. Аналогичный пункт в контекстное меню можно добавить и путем редактирования реестра Windows.
Однако, с учетом того, что подобная задача возникает сравнительно редко, я не рекомендую устанавливать стороннее ПО или вносить изменения в систему: на мой взгляд, лучше изменить владельца элемента одним из способов «вручную».
When you try to access certain files and folders in Windows 10, you might bump into the «access is denied» error. This can be quite frustrating, especially when you need to manage or work with some of your files quickly.
You could resolve this issue by configuring your settings, but this often involves several steps. Alternatively, you can take ownership of files and folders using a third-party app.
This article will show you the best tools you can use to take ownership of files and folders. Let’s get started.
1. TakeOwnershipPro
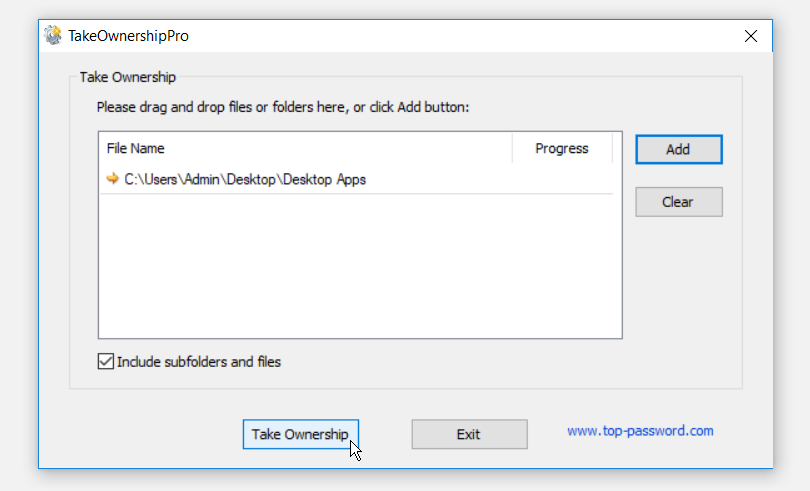
TakeOwnershipPro is a great alternative to taking ownership of files and folders manually. This is a free program that allows you to change file ownership and access rights effortlessly. The best part is that it allows you to take ownership of multiple files at the same time. It’s a lightweight app, so the download and installation process is quick and easy.
It’s completely adware-free and features an intuitive graphic interface that’s easy to use.
To get started, drag and drop your files to the program or press the Add button. From there, press the Take Ownership button. If you want to take ownership of all the files within a folder, tick the Include subfolders and files box. To clear the files and folders on the program, press the Clear button.
To make things easier, the tool also appears in the Windows 10 File Explorer context menu. If you want to take ownership of a specific file quickly, right-click on the file, and select the TakeOwnershipPro option.
Download: TakeOwnershipPro for Windows 10 (Free)
2. TakeOwnershipEx
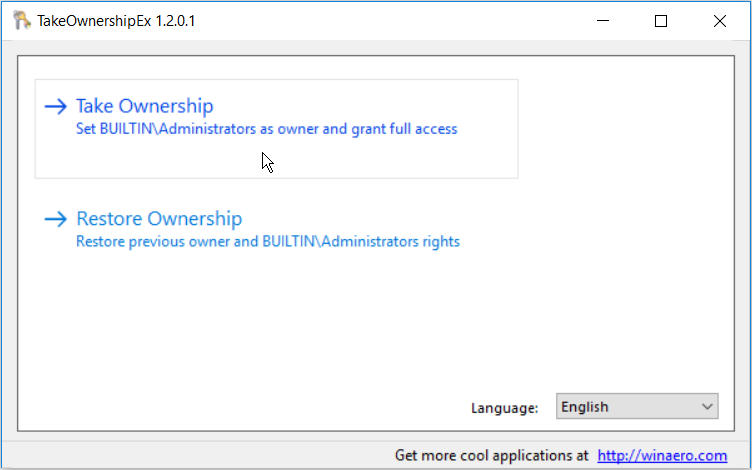
TakeOwnershipEx features a minimal interface with only three options. The first two options allow you to either take or restore ownership of your files. The third option allows you to choose a language (English or Russian). Given its simple interface and design, the app is lightweight and easy to use.
To get started, select the Take Ownership option and select your files or folders. If you’ve previously taken ownership of a file, select the Restore Ownership option. This will restore the default permissions that the file had.
Just like TakeOwnershipPro, TakeOwnershipEx integrates into File Explorer’s context menu. To do this, right-click your file and select the Take Ownership/Restore Rights option.
Download: TakeOwnershipEx for Windows 10 (Free)
3. WinOwnership

WinOwnership has a minimalist look and makes taking file ownership a simple process. It’s a lightweight and clean program that doesn’t leave any traces in the Windows Registry.
You can copy the program to a portable storage device and use it on your other PC devices. This makes taking ownership of files a breeze and spares you from installing the program on multiple devices.
To get started, drag and drop files to the program. Alternatively, double-click on the program to browse for your files. Once you’ve selected a file or folder, the program shows you the file type and name. It also shows you whether you already have full access to the file or not.
To take full ownership of your file, press the Apply button. If you’d like to cancel, press the Undo button.
Download: WinOwnership for Windows 10 (Free)
4. Grant Admin Full Control
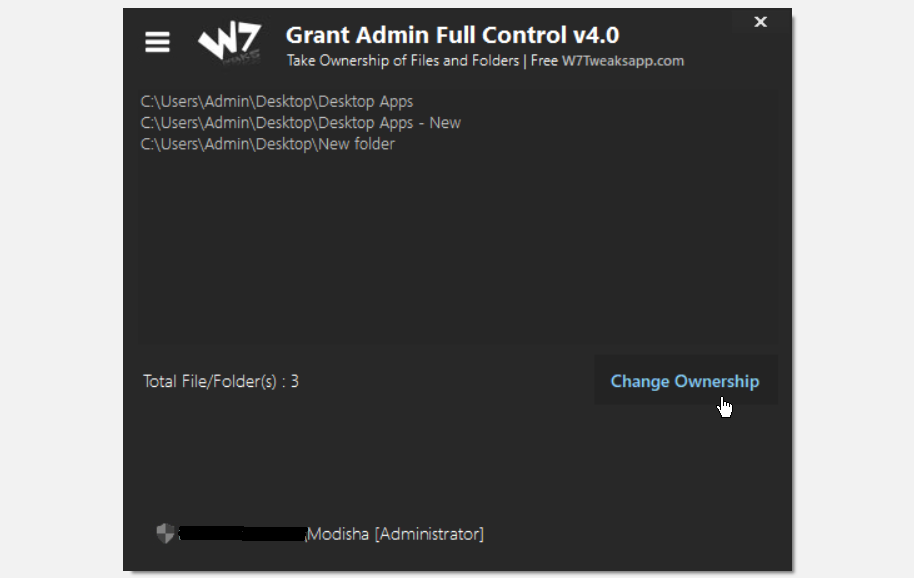
Grant Admin Full Control features an appealing and intuitive design. It’s light on system resources, so it doesn’t affect your PC’s overall performance. It allows you to take ownership of up to 200 files simultaneously.
To get started, select the Enable Administrator Rights option on the bottom left of the screen. From there, drag and drop your files or folders into the program. Finally, press the Change Ownership button.
The app gives you the option to integrate it into File Explorer’s context menu. To do this, press the menu button on the top left, and then select the Add to Explorer Context Menu option. From there, you can take ownership of a specific file or folder by right-clicking on it and selecting Grant Admin Full Control.
Just like WinOwnership, this is a portable program that you can copy to your external storage devices. You can take it with you anywhere and use it on your other Windows 10 devices.
Download: Grant Admin Full Control for Windows 10 (Free)

Unlike the other programs, Easy Context Menu is an all-in-one tool that you can use for various purposes. It adds various context menu options to File Explorer, including the Take Ownership option. The program’s interface contains various options but is easy to use. Also, it’s lightweight and portable, so you can store it on your external storage devices.
The program organizes its options into various categories. To get started, scroll down and locate the Folder Context Menu and File Context Menu categories. Check the Take Ownership boxes for both these categories. Apply these changes by selecting File followed by Apply changes.
To take ownership of a specific file or folder, right-click on it and select the Take Ownership option. Should you wish to disable the context menu option, uncheck the Take Ownership boxes. From there, press File and select Apply changes.
Download: Easy Context Menu for Windows 10 (Free)
6. SysMate — System File Walker
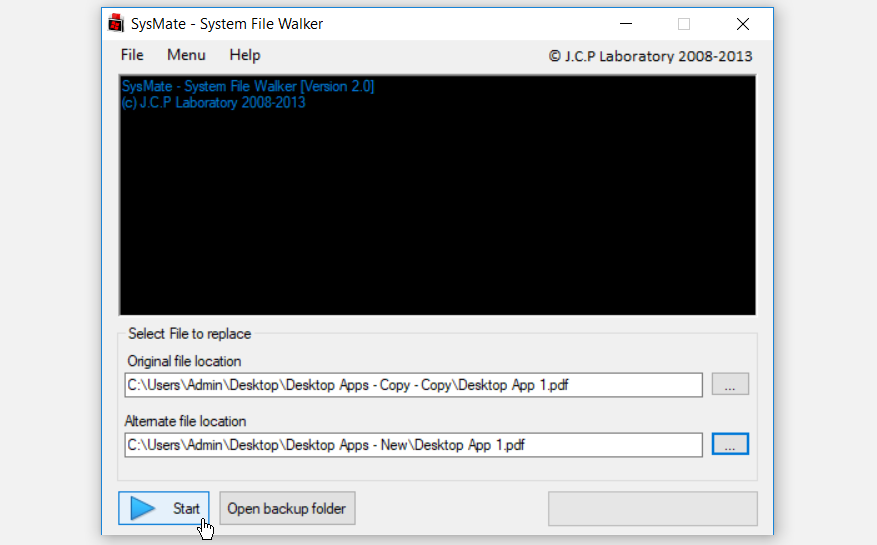
While the other apps give you file ownership privileges, SysMate — System File Walker works differently. It allows you to replace system files that encounter the “access is denied” error. By so doing, it removes file restrictions and allows you to open those files without any trouble.
To get started, press the button next to the Original file location box. Select your file or folder and press Open. Next, press the button next to the Alternate file location box. Select your desired file location and press Open. Finally, press Start to replace the file or folder.
The program creates a backup of each file that you load into it. You can access the backup file by pressing the Open backup folder button.
Download: SysMate — System File Walker for Windows 10 (Free)
Access All Your Windows 10 Files and Folders, Anytime
It can be quite frustrating when Windows restricts you from opening your own files and folders. If you’ve encountered this issue, the tools we’ve suggested here should help you. Just by pressing a button, you can easily take full ownership of all your files and folders.
Как пользователю Windows 10, необходимо знать, как можно получить право собственности на файлы и папки , чтобы получить полный доступ к ним. В основном, когда мы имеем ограниченный доступ к системным файлам Windows, и каждый раз, когда мы идем для внесения изменений в такие файлы, Windows всегда мешает нам делать какие-либо изменения. Такой доступ нужен и в тех случаях, когда файл был создан с помощью учетной записи пользователя, а теперь этой учетной записи больше нет. На самом деле, получение прав собственности — непростая задача, и процедура командной строки не менее сложна. В этом руководстве я покажу вам, как получить право собственности на любой файл, папку и диск в Windows 10. Сделав это, пользователь сможет получить полный доступ к любому диску, папке и файлу Windows. Но чтобы выполнить все шаги, описанные в этом руководстве, вам необходимо получить доступ администратора.
Содержание
Это руководство также полезно для пользователей Windows 7, Windows 8 и Windows 8.1.
Получение прав собственности на файлы и папки в Windows 10 вручную
Не используя сторонние программы, вы можете получить права собственности на любые диски, файлы и папки. Шаги следующие:
- Откройте файл или папку, на которую вы хотите получить право собственности
- Щелкните правой кнопкой мыши и выберите Свойства
- Перейдите на вкладку Безопасность
- Нажмите кнопку Дополнительно, чтобы открыть Дополнительные параметры безопасности для Windows окно
- Вам нужно изменить владельца файла. Нажмите на ссылку Изменить рядом с владельцем уровня
- Выберите пользователя или группу .В следующем окне нажмите на кнопку Дополнительно
- Нажмите на кнопку Найти сейчас
- Выберите учетную запись пользователя из поиска, чтобы сделать владельцем файла/папки и дважды щелкните на ней, чтобы сделать выбор имени пользователя
- Нажмите OK, Применить, OK
- Теперь, чтобы просмотреть или изменить разрешение пользователя на эту папку, снова нажмите на папку правой кнопкой мыши.
- Нажмите Свойства , перейдите на вкладку Безопасность
- Нажмите Дополнительно , затем нажмите Добавить , чтобы открыть Ввод разрешений для Windows раздел
- В опции Принцип выберите выберите принцип ссылка
- Нажмите Дополнительно , Find Now , и выберите пользователя, которого вы выбрали ранее
- Нажмите OK , чтобы открыть опцию basic permissions и установите все флажки, чтобы получить полное разрешение
- Рядом с ней отметьте Only apply these permissions to objects and/or containers with in this container option.
- Нажмите на кнопку OK. Вы можете получить следующее уведомление в виде всплывающего окна:
- Подтвердите его, нажав кнопку Да.
Теперь все готово. Таким образом, вы можете получить полный доступ к любому файлу, папке или диску в Windows 10 и принять право собственности на него.
Добавление опции Take Ownership в контекстное меню правой кнопки мыши в Windows 10
Добавив следующий код в реестр Windows, вы можете легко добавить опцию «Take Ownership» в контекстное меню правой кнопки мыши при нажатии на файл или папку в Windows 10.Windows 10.
Windows Registry Editor Version 5.00 [-HKEY_CLASSES_ROOT\*\shell\runas] [HKEY_CLASSES_ROOT\*\shell\runas] @="Take Ownership" "HasLUAShield"="" "NoWorkingDirectory"="" "Position"="middle" [HKEY_CLASSES_ROOT\*\shell\runas\command] @="cmd.exe /c takeown /f \"%1\" && icacls \"%1\" /grant administrators:F /c /l & pause" "IsolatedCommand"="cmd.exe /c takeown /f \"%1\" && icacls \"%1\" /grant administrators:F /c /l & pause" [-HKEY_CLASSES_ROOT\Directory\shell\runas] [HKEY_CLASSES_ROOT\Directory\shell\runas] @="Take Ownership" "HasLUAShield"="" "NoWorkingDirectory"="" "Position"="middle" [HKEY_CLASSES_ROOT\Directory\shell\runas\command] @="cmd.exe /c takeown /f \"%1\" /r /d y && icacls \"%1\" /grant administrators:F /t /c /l /q & pause" "IsolatedCommand"="cmd.exe /c takeown /f \"%1\" /r /d y && icacls \"%1\" /grant administrators:F /t /c /l /q & pause" [-HKEY_CLASSES_ROOT\dllfile\shell\runas] [HKEY_CLASSES_ROOT\dllfile\shell\runas] @="Take Ownership" "HasLUAShield"="" "NoWorkingDirectory"="" "Position"="middle" [HKEY_CLASSES_ROOT\dllfile\shell\runas\command] @="cmd.exe /c takeown /f \"%1\" && icacls \"%1\" /grant administrators:F /c /l & pause" "IsolatedCommand"="cmd.exe /c takeown /f \"%1\" && icacls \"%1\" /grant administrators:F /c /l & pause" [-HKEY_CLASSES_ROOT\Drive\shell\runas] [HKEY_CLASSES_ROOT\Drive\shell\runas] @="Take Ownership" "HasLUAShield"="" "NoWorkingDirectory"="" "Position"="middle" [HKEY_CLASSES_ROOT\Drive\shell\runas\command] @="cmd.exe /c takeown /f \"%1\" /r /d y && icacls \"%1\" /grant administrators:F /t /c /l /q & pause" "IsolatedCommand"="cmd.exe /c takeown /f \"%1\" /r /d y && icacls \"%1\" /grant administrators:F /t /c /l /q & pause" [-HKEY_CLASSES_ROOT\exefile\shell\runas] [HKEY_CLASSES_ROOT\exefile\shell\runas] "HasLUAShield"="" [HKEY_CLASSES_ROOT\exefile\shell\runas\command] @="\"%1\" %*" "IsolatedCommand"="\"%1\" %*"
Скопируйте приведенный выше код в файл блокнота и сохраните файл как takeownership.reg . Дважды щелкните по файлу, чтобы установить скрипт. Для установки скрипта в файлы реестра Windows вам необходимо войти под учетной записью администратора. После успешной установки скрипта, когда вы щелкните правой кнопкой мыши на определенном файле, папке или диске Windows, вы увидите опцию Take Ownership в контекстном меню. Однако вы можете удалить скрипт в любое время и вернуть изменения, добавив этот скрипт.
Windows Registry Editor Version 5.00 [-HKEY_CLASSES_ROOT\*\shell\runas] [-HKEY_CLASSES_ROOT\Directory\shell\runas] [-HKEY_CLASSES_ROOT\dllfile\shell\runas] [-HKEY_CLASSES_ROOT\Drive\shell\runas] [-HKEY_CLASSES_ROOT\exefile\shell\runas] [HKEY_CLASSES_ROOT\exefile\shell\runas] "HasLUAShield"="" [HKEY_CLASSES_ROOT\exefile\shell\runas\command] @="\"%1\" %*" "IsolatedCommand"="\"%1\" %*"
Установите приложение Windows для изменения права собственности на файл или папку
С помощью приложения Ownership Windows вы можете в любое время принять право собственности на файлы и папки. Это бесплатная программа, которую можно легко найти в Softpedia. Вот ссылка на скачивание:
http://www.softpedia.com/get/System/OS-Enhancements/Rizone-Take-Ownership-Shell-Extension.shtml
Просто установите приложение, и оно мгновенно добавит опцию «Take Ownership» в контекстное меню правой кнопки мыши в Windows 10.
Смотрите также:
YouTube видео: Как получить полное право собственности на файлы, папки в Windows 10 / 7 / 8.1
Вопросы и ответы по теме: “Как получить полное право собственности на файлы, папки в Windows 10 / 7 / 8.1”
Как дать полные права на папку Windows 10?
Щелкните файл или папку правой кнопкой мыши и выберите пункт Свойства. Откройте вкладку Безопасность. В разделе Группы или пользователи выберите свое имя, чтобы увидеть имеющиеся у вас разрешения. Нажмите кнопку Изменить, выберите свое имя, установите флажки для нужных разрешений и нажмите кнопку ОК.
Как разрешить полный доступ к папке?
Нажмите кнопку Пуск , выберите Параметры > Сеть и Интернет , а затем справа выберите Параметры общего доступа. В разделе Частные выберите Включить сетевое обнаружение и Включить общий доступ к файлам и принтерам.
Как получить право собственности на папку?
**Как принять или отклонить запрос на передачу **права собственности****1. Откройте Google Диск.
2. В поле поиска вверху окна введите pendingowner:me .
3. Нажмите на файл или папку правой кнопкой мыши.
4. Нажмите “Поделиться” Принять приглашение Принять или Отклонить.
Как дать права администратора на папку?
Щелкните правой кнопкой на файле или папке и выберите команду Свойства, затем перейдите на вкладку Безопасность. Выберите в поле Группы или пользователи нужного пользователя/группу и щелкните на кнопке Изменить. Теперь в столбце Разрешить и Запретить установите нужные флажки напротив тех разрешений, что вам требуются.
Как поменять владельца папки на себя?
Кликните правой кнопкой мыши по файлу или папке, доступ к которому нужно получить (стать владельцем), в контекстном меню выберите пункт «Свойства». На вкладке «Безопасность» нажмите кнопку «Дополнительно». Напротив пункта «Владелец» нажмите «Изменить».
Как дать полные права пользователю Windows 10?
- Выберите Пуск > Параметры > Учетные записи .
- В разделе Семья и другие пользователи щелкните имя владельца учетной записи и нажмите Изменить тип учетной записи.
- В разделе Тип учетной записи выберите Администратор, и нажмите OK.
- Войдите в систему с новой учетной записью администратора.
- Как удалить встроенные приложения из Windows 10
- Почему Windows 10 вам не подходит
To totally unlock this section you need to Log-in
Many organizations with a Microsoft Windows environment rely on NTFS as the main file system for their storage devices that contain sensitive data. It is the easiest way for users to work with files. In order to implement a least-privilege model, which is a best practice for system security, IT security specialists and system administrators configure NTFS access control lists (ACLs) by adding access control entries (ACEs) on NTFS file servers.
There are both basic and advanced NTFS permissions. You can set each of the permissions to “Allow” or “Deny”. Here are the basic permissions:
- Full Control: Users can modify, add, move and delete files and directories, as well as their associated properties. In addition, users can change permissions settings for all files and subdirectories.
- Modify: Users can view and modify files and file properties, including deleting and adding files to a directory or file properties to a file.
- Read & Execute: Users can run executable files, including script
- Read: Users can view files, file properties and directories.
- Write: Users can write to a file and add files to directories.
Here is the list of advanced permissions:
- Traverse Folder/Execute File: Users can navigate through folders to reach other files or folders, even if they have no permissions for these files or folders. Users can also run executable files. The Traverse Folder permission takes effect only when the group or user doesn’t have the “Bypass Traverse Checking” right in the Group Policy snap-in.
- List Folder/Read Data: Users can view a list of files and subfolders within the folder as well as the content of the files.
- Read Attributes: Users can view the attributes of a file or folder, such as whether it is read-only or hidden.
- Write Attributes: Users can change the attributes of a file or folder.
- Read Extended Attributes: Users can view the extended attributes of a file or folder, such as permissions and creation and modification times.
- Write Extended Attributes: Users can change the extended attributes of a file or folder.
- Create Files/Write Data: The “Create Files” permission allows users to create files within the folder. (This permission applies to folders only.) The “Write Data” permission allows users to make changes to the file and overwrite existing content. (This permission applies to files only.)
- Create Folders/Append Data: The “Create Folders” permission allows users to create folders within a folder. (This permission applies to folders only.) The “Append Data” permission allows users to make changes to the end of the file, but they can’t change, delete or overwrite existing data. (This permission applies to files only.)
- Delete: Users can delete the file or folder. (If users don’t have the “Delete” permission on a file or folder, they can still delete it if they have the “Delete Subfolders And Files” permission on the parent folder.)
- Read Permissions: Users can read the permissions of a file or folder, such as “Full Control”, “Read”, and “Write”.
- Change Permissions: Users can change the permissions of a file or folder.
- Take Ownership: Users can take ownership of the file or folder. The owner of a file or folder can always change permissions on it, regardless of any existing permissions that protect the file or folder.
- Synchronize: Users can use the object for synchronization. This enables a thread to wait until the object is in the signaled state. This right is not presented in ACL Editor.
You can find all these user permissions by running the following PowerShell script:
[system.enum]::getnames([System.Security.AccessControl.FileSystemRights])
NTFS permissions can be either explicit or inherited. Explicit permissions are permissions that are configured individually, while inherited permissions are inherited from the parent folder. The hierarchy for permissions is as follows:
Explicit Deny
Explicit Allow
Inherited Deny
Inherited Allow
Change File and Folder Ownership
If you want to set an owner for a folder, you need to run the “SetOwner” method. Let’s make “WORKSTATION\E.Xample” the owner of the “Sales” folder:
$acl = Get-Acl \\srv1\shared\sales
$object = New-Object System.Security.Principal.Ntaccount("WORKSTATION\E.Xample")
$acl.SetOwner($object)
$acl | Set-Acl \\srv1\shared\sales
Notice that we again used the “Ntaccount” class to convert the user account name from a string into a SID.
Note that the “SetOwner” method does not enable you to change the owner to any account you want; the account must have the “Take Ownership”, “Read” and “Change Permissions” rights.
Permissions Inheritance
Each permission that exists can be assigned one of two ways: explicitly or by inheritance. For this reason, permissions are referred to as explicit permissions and inherited permissions.
- Explicit permissions are permissions that are set by default when the object is created, or by user action.
- Inherited permissions are permissions that are given to an object because it is a child of a parent object.
Similar to the way rights are managed for groups of users, permissions are best managed for containers of objects. Objects within the container inherit all the access permissions in that container.
For example, you might explicitly give permissions to a folder named MyFolder. All subfolders created within MyFolder automatically inherit the permissions assigned to MyFolder.
To manage inheritance, we use the SetAccessRuleProtection method. It has two parameters:
- The first parameter is responsible for blocking inheritance from the parent folder. It has two states: “$true” and “$false”.
- The second parameter determines whether the current inherited permissions are retained or removed. It has the same two states: “$true” and “$false”.
Let’s disable inheritance for the Sales folder and delete all inherited permissions as well:
$acl = Get-Acl \\srv1\shared\sales
$acl.SetAccessRuleProtection($true,$false)
$acl | Set-Acl \\srv1\shared\sales
Let’s revert this change and enable inheritance for the folder Sales again:
$acl = Get-Acl \\srv1\shared\sales
$acl.SetAccessRuleProtection($false,$true)
$acl | Set-Acl \\srv1\shared\sales
Recursively Taking Ownership of Files and Folders
The following function can be useful to be used when we need to recursively taking ownership of files and folders: the function calls takeown.exe, available also in Windows 10, that enables an administrator to recover access to a file that previously was denied, by making the administrator the owner of the file, against the folder it is passed, then adds entries to the ACL for that folder.
The function takes the folder name as a parameter, [String]$Folder, then runs takeown.exe against it using the /A option to add the administrators group.
We then get the current ACL from the folder, build a new ACL permission as a string and use that to create a FileSystemAccessRule object. That object is then added to the ACL we copied from the folder. In this example We are adding two accounts, NT AUTHORITY\SYSTEM and a domain group DOMAIN\AdminGroup (you can change this with a local Administrators group, if your system is not into a domain).
The Set-ACL command applies the ACL list with the two new entries to the folder.
function Take-Ownership {
 param(
   [String]$Folder
 )
 takeown.exe /A /F $Folder
 $CurrentACL = Get-Acl $Folder

 write-host ...Adding NT Authority\SYSTEM to $Folder -Fore Yellow
 $SystemACLPermission = "NT AUTHORITY\SYSTEM","FullControl","ContainerInherit,ObjectInherit","None","Allow"
 $SystemAccessRule = new-object System.Security.AccessControl.FileSystemAccessRule $SystemACLPermission
 $CurrentACL.AddAccessRule($SystemAccessRule)

 write-host ...Adding Infrastructure Services to $Folder -Fore Yellow
 $AdminACLPermission = "DOMAIN\AdminGroup","FullControl","ContainerInherit,ObjectInherit","None","Allow"
 $SystemAccessRule = new-object System.Security.AccessControl.FileSystemAccessRule $AdminACLPermission
 $CurrentACL.AddAccessRule($SystemAccessRule)
 Set-Acl -Path $Folder -AclObject $CurrentACL
}
After the creation of the Take-Ownership function, we can use another function, called Test-Folder, with which we can test if, after taking ownership recursively of a folder, we are able to traverse all of them with no issues, but evaluating, for each folder, if we get or not the DirUnauthorizedAccessError error:
function Test-Folder($FolderToTest){
 $error.Clear()
 $ErrorArray = @()
 Get-ChildItem $FolderToTest -Recurse -ErrorAction SilentlyContinue | Select FullName
 if ($error) {
 $ErrorArray = $error + $ErrorArray
 foreach ($err in $ErrorArray) {
 if($err.FullyQualifiedErrorId -eq "DirUnauthorizedAccessError,Microsoft.PowerShell.Commands.GetChildItemCommand") {
     Write-Host Unable to access $err.TargetObject -Fore Red
    Write-Host Attempting to take ownership of $err.TargetObject -Fore Yellow
    Take-Ownership($err.TargetObject)
    Test-Folder($err.TargetObject)
   }
  }
}
An alternative code to get and change ownership of a folder, and files and folder recursively, is the following function:
function Grant-Ownership {
       [CmdletBinding()]
       param
       (
            [ValidateNotNullOrEmpty()][string]
            $FileFolder,
            [switch]
            $Recurse
       )

       $Errors = $false
       If ((Test-Path $FileFolder) -eq $true) {
            $Output = "Taking ownership of " + $FileFolder + "....."
            If ($Recurse.IsPresent) {
                 $Items = takeown.exe /F $FileFolder
                 $Items = Get-ChildItem $FileFolder -Recurse | ForEach-Object { takeown.exe /F $_.FullName }
            } else {
                 $Executable = takeown.exe /F $FileFolder
            }
       }

       [string]$CurrentUser = [Environment]::UserDomainName + "\" + [Environment]::UserName

       If ($Recurse.IsPresent) {

            $Item = Get-Item $FileFolder | where-object { (get-acl $_.FullName).owner -ne $CurrentUser }
            $Items = Get-ChildItem $FileFolder -Recurse | where-object { (get-acl $_.FullName).owner -ne $CurrentUser }

            If ((($Item -ne "") -and ($Item -ne $null)) -and (($Items -ne "") -and ($Items -ne $null))) {
                 $Output += "Failed"
            } else {
                 $Output += "Success"
            }
       } else {
            [string]$FolderOwner = (get-acl $FileFolder).owner
            If ($CurrentUser -ne $FolderOwner) {
                 $Output += "Failed"
                 $Errors = $true
            } else {
                 $Output += "Success"
            }
       }
       Write-Host $Output
       If ($Errors -eq $true) {
            Exit 1
       }
  }
Take permissions using Command Prompt
Open the Command Prompt (Admin) or PowerShell (Admin).
The following commands are available for changing permissions:
takeown /F directory\* /R /A
icacls directory\*.* /T /grant administrators:F
Example:
takeown /F C:\Users\Test\* /R /A
icacls C:\Users\Test\*.* /T /grant administrators:F
Replace directory with the path of the directory or files you wish to take ownership of, and administrators with the group of users you wish to assign to the directory or file.
The wildcards (*) at the end of the path means that all files within the defined directory will also have their permission changed.
Reset ownership & permissions
Open the Command Prompt (Admin) or PowerShell (Admin). The following command is available for resetting permissions:
cd /d driveLetter:\
icacls * /T /Q /C /reset
Example:
cd /d E:\
icacls * /T /Q /C /reset
Replace driveLetter with the assigned letter of the disk drive.
Create «Take Ownership» menu entry in Windows 10 Context Menu
A good addition for all Windows 10 administrators would be to get ownership of files and folders by using a right-click context menu entry, and this goal is reachable by modifying a bit the Windows Registry with the following .reg additions.
First, we need to enable the Take Ownership menu entry to the Windows 10 right-click menu:
Windows Registry Editor Version 5.00

[HKEY_CLASSES_ROOT\*\shell\runas]
@="Take Ownership"
"Extended"=-
"HasLUAShield"=""
"NoWorkingDirectory"=""
"Position"="middle"
The HasLUAShield, with no values, will just instruct Windows to add the UAC shield icon so that users know that the task requires elevation to the verb we are adding, Take Ownership.
The NoWorkingDirectory will instruct the system that we are not wanting the location right clicked to become part of the environmental path for the execution of the specified command.
The Extended string value is removed, if already present, to allow to see the Take Ownership always after right-clicking an object; as a general rule, a command/verb will be located in the extended shift when it has a String Value called Extended under the main key. If we want it to be in the main shell context menu, we will delete the «Extended» String Value entry. We want want to transfer something to the extended menu…we will just put «Extended» in it’s main key.
[HKEY_CLASSES_ROOT\*\shell\runas\command]
@="cmd.exe /c takeown /f \"%1\" && icacls \"%1\" /grant *S-1-3-4:F /c /l"
"IsolatedCommand"="cmd.exe /c takeown /f \"%1\" && icacls \"%1\" /grant *S-1-3-4:F /c /l"
The above code section, that will be added to the same .reg file, will actually add the action that will be executed on the file selected with right-click. The following command will execute first the takeown to get the ownership of the file, then the icacls will apply the proper ACLs to get full control permissions on the selected object:
cmd.exe /c takeown /f \"%1\" && icacls \"%1\" /grant *S-1-3-4:F /c /l"
Now, the following code section will add, with the same approach, using takedown and icacls (for directories it will be user Powershell to call cmd.exe). The below section will add the Take Ownership command, in the right-click context menu, also for directories and drives: for the drives, it will be excluded the C: volume, defined into the AppliesTo value, as it is critical and it would be not so wise trying to get or change the full ownership all all system files….
[HKEY_CLASSES_ROOT\Directory\shell\TakeOwnership]
@="Take Ownership"
"AppliesTo"="NOT (System.ItemPathDisplay:=\"C:\\Users\" OR System.ItemPathDisplay:=\"C:\\ProgramData\" OR System.ItemPathDisplay:=\"C:\\Windows\" OR System.ItemPathDisplay:=\"C:\\Windows\\System32\" OR System.ItemPathDisplay:=\"C:\\Program Files\" OR System.ItemPathDisplay:=\"C:\\Program Files (x86)\")"
"Extended"=-
"HasLUAShield"=""
"NoWorkingDirectory"=""
"Position"="middle"

[HKEY_CLASSES_ROOT\Directory\shell\TakeOwnership\command]
@="powershell -windowstyle hidden -command \"Start-Process cmd -ArgumentList '/c takeown /f \\\"%1\\\" /r /d y && icacls \\\"%1\\\" /grant *S-1-3-4:F /t /c /l /q' -Verb runAs\""
"IsolatedCommand"="powershell -windowstyle hidden -command \"Start-Process cmd -ArgumentList '/c takeown /f \\\"%1\\\" /r /d y && icacls \\\"%1\\\" /grant *S-1-3-4:F /t /c /l /q' -Verb runAs\""

[HKEY_CLASSES_ROOT\Drive\shell\runas]
@="Take Ownership"
"Extended"=-
"HasLUAShield"=""
"NoWorkingDirectory"=""
"Position"="middle"
"AppliesTo"="NOT (System.ItemPathDisplay:=\"C:\\\")"

[HKEY_CLASSES_ROOT\Drive\shell\runas\command]
@="cmd.exe /c takeown /f \"%1\\\" /r /d y && icacls \"%1\\\" /grant *S-1-3-4:F /t /c"
"IsolatedCommand"="cmd.exe /c takeown /f \"%1\\\" /r /d y && icacls \"%1\\\" /grant *S-1-3-4:F /t /c"
At the end of this article you will find this .reg file to properly enable this right-click command.
An alternative version of this reg file is the following, in which the command will create a Takeown.txt file under C:\Windows\Logs folder, for further analysis, if needed:
Windows Registry Editor Version 5.00

[-HKEY_CLASSES_ROOT\*\shell\TakeOwnership]
[-HKEY_CLASSES_ROOT\*\shell\runas]

[HKEY_CLASSES_ROOT\*\shell\runas]
@="Take Ownership"
"Extended"=-
"HasLUAShield"=""
"NoWorkingDirectory"=""
"Position"="middle"

[HKEY_CLASSES_ROOT\*\shell\runas\command]
@="cmd.exe /c takeown /f \"%1\" >> \"C:\\Windows\\Logs\\Takeown.txt\" && icacls \"%1\" /grant *S-1-3-4:F /c /l >> \"C:\\Windows\\Logs\\Takeown.txt\""
"IsolatedCommand"="cmd.exe /c takeown /f \"%1\" >> \"C:\\Windows\\Logs\\Takeown.txt\" && icacls \"%1\" /grant *S-1-3-4:F /c /l >> \"C:\\Windows\\Logs\\Takeown.txt\""

[HKEY_CLASSES_ROOT\Directory\shell\TakeOwnership]
@="Take Ownership"
"AppliesTo"="NOT (System.ItemPathDisplay:=\"C:\\Users\" OR System.ItemPathDisplay:=\"C:\\ProgramData\" OR System.ItemPathDisplay:=\"C:\\Windows\" OR System.ItemPathDisplay:=\"C:\\Windows\\System32\" OR System.ItemPathDisplay:=\"C:\\Program Files\" OR System.ItemPathDisplay:=\"C:\\Program Files (x86)\")"
"Extended"=-
"HasLUAShield"=""
"NoWorkingDirectory"=""
"Position"="middle"

[HKEY_CLASSES_ROOT\Directory\shell\TakeOwnership\command]
@="powershell -windowstyle hidden -command \"Start-Process cmd -ArgumentList '/c takeown /f \\\"%1\\\" /r /d Y >> \"C:\\Windows\\Logs\\Takeown.txt\" && icacls \\\"%1\\\" /grant *S-1-3-4:F /t /c /l >> \"C:\\Windows\\Logs\\Takeown.txt\"' -Verb runAs\""
"IsolatedCommand"="powershell -windowstyle hidden -command \"Start-Process cmd -ArgumentList '/c takeown /f \\\"%1\\\" /r /d Y >> \"C:\\Windows\\Logs\\Takeown.txt\" && icacls \\\"%1\\\" /grant *S-1-3-4:F /t /c /l >> \"C:\\Windows\\Logs\\Takeown.txt\"' -Verb runAs\""

[HKEY_CLASSES_ROOT\Drive\shell\runas]
@="Take Ownership"
"Extended"=-
"HasLUAShield"=""
"NoWorkingDirectory"=""
"Position"="middle"
"AppliesTo"="NOT (System.ItemPathDisplay:=\"C:\\\")"

[HKEY_CLASSES_ROOT\Drive\shell\runas\command]
@="cmd.exe /c takeown /f \"%1\\\" /r /d y && icacls \"%1\\\" /grant *S-1-3-4:F /t /c"
"IsolatedCommand"="cmd.exe /c takeown /f \"%1\\\" /r /d y && icacls \"%1\\\" /grant *S-1-3-4:F /t /c"
NOTE: take note that the Y character of /r /d Y of the command takeown /f /r /d Y is language-dependent, so if you have and English version the Y wil be good, if French it will be «O» (for Oui), if Italian it will be «S» (for Si), and so on, so this character will need to be changed before merging the new registry keys and values in your Windows Registry.
The following version of the Take Ownership command will show a Command Prompt window after the execution of takeown.exe and icacls.exe (using pause command) to show you directly the exit statuses of each try taking ownership of files and/or folders:
Windows Registry Editor Version 5.00

[-HKEY_CLASSES_ROOT\*\shell\TakeOwnership]
[-HKEY_CLASSES_ROOT\*\shell\runas]

[HKEY_CLASSES_ROOT\*\shell\runas]
@="Take Ownership"
"Extended"=-
"HasLUAShield"=""
"NoWorkingDirectory"=""
"Position"="middle"

[HKEY_CLASSES_ROOT\*\shell\runas\command]
@="cmd.exe /c takeown /f \"%1\" && icacls \"%1\" /grant *S-1-3-4:F /c /l & pause"
"IsolatedCommand"="cmd.exe /c takeown /f \"%1\" && icacls \"%1\" /grant *S-1-3-4:F /c /l & pause"

[HKEY_CLASSES_ROOT\Directory\shell\TakeOwnership]
@="Take Ownership"
"AppliesTo"="NOT (System.ItemPathDisplay:=\"C:\\Users\" OR System.ItemPathDisplay:=\"C:\\ProgramData\" OR System.ItemPathDisplay:=\"C:\\Windows\" OR System.ItemPathDisplay:=\"C:\\Windows\\System32\" OR System.ItemPathDisplay:=\"C:\\Program Files\" OR System.ItemPathDisplay:=\"C:\\Program Files (x86)\")"
"Extended"=-
"HasLUAShield"=""
"NoWorkingDirectory"=""
"Position"="middle"

[HKEY_CLASSES_ROOT\Directory\shell\TakeOwnership\command]
@="powershell -windowstyle hidden -command \"Start-Process cmd -ArgumentList '/c takeown /f \\\"%1\\\" /r /d Y && icacls \\\"%1\\\" /grant *S-1-3-4:F /t /c /l & pause' -Verb runAs\""
"IsolatedCommand"="powershell -windowstyle hidden -command \"Start-Process cmd -ArgumentList '/c takeown /f \\\"%1\\\" /r /d Y >> \"C:\\Windows\\Logs\\Takeown.txt\" && icacls \\\"%1\\\" /grant *S-1-3-4:F /t /c /l & pause' -Verb runAs\""

[HKEY_CLASSES_ROOT\Drive\shell\runas]
@="Take Ownership"
"Extended"=-
"HasLUAShield"=""
"NoWorkingDirectory"=""
"Position"="middle"
"AppliesTo"="NOT (System.ItemPathDisplay:=\"C:\\\")"

[HKEY_CLASSES_ROOT\Drive\shell\runas\command]
@="cmd.exe /c takeown /f \"%1\\\" /r /d y && icacls \"%1\\\" /grant *S-1-3-4:F /t /c"
"IsolatedCommand"="cmd.exe /c takeown /f \"%1\\\" /r /d y && icacls \"%1\\\" /grant *S-1-3-4:F /t /c"
NOTE: take note that the Y character of /r /d Y of the command takeown /f /r /d Y is language-dependent, so if you have and English version the Y wil be good, if French it will be «O» (for Oui), if Italian it will be «S» (for Si), and so on, so this character will need to be changed before merging the new registry keys and values in your Windows Registry.
The following alternative code will enable the Take Ownership command only with the Shift combination of your keyboard with the right-click of the mouse, on files, folders and drives:
Windows Registry Editor Version 5.00

[-HKEY_CLASSES_ROOT\*\shell\TakeOwnership]
[-HKEY_CLASSES_ROOT\*\shell\runas]

[HKEY_CLASSES_ROOT\*\shell\runas]
@="Take Ownership"
"Extended"=""
"HasLUAShield"=""
"NoWorkingDirectory"=""
"Position"="middle"

[HKEY_CLASSES_ROOT\*\shell\runas\command]
@="cmd.exe /c takeown /f \"%1\" >> \"C:\\Windows\\Logs\\Takeown.txt\" && icacls \"%1\" /grant *S-1-3-4:F /c /l >> \"C:\\Windows\\Logs\\Takeown.txt\""
"IsolatedCommand"="cmd.exe /c takeown /f \"%1\" >> \"C:\\Windows\\Logs\\Takeown.txt\" && icacls \"%1\" /grant *S-1-3-4:F /c /l >> \"C:\\Windows\\Logs\\Takeown.txt\""

[HKEY_CLASSES_ROOT\Directory\shell\TakeOwnership]
@="Take Ownership"
"AppliesTo"="NOT (System.ItemPathDisplay:=\"C:\\Users\" OR System.ItemPathDisplay:=\"C:\\ProgramData\" OR System.ItemPathDisplay:=\"C:\\Windows\" OR System.ItemPathDisplay:=\"C:\\Windows\\System32\" OR System.ItemPathDisplay:=\"C:\\Program Files\" OR System.ItemPathDisplay:=\"C:\\Program Files (x86)\")"
"Extended"=""
"HasLUAShield"=""
"NoWorkingDirectory"=""
"Position"="middle"

[HKEY_CLASSES_ROOT\Directory\shell\TakeOwnership\command]
@="powershell -windowstyle hidden -command \"Start-Process cmd -ArgumentList '/c takeown /f \\\"%1\\\" /r /d Y >> \"C:\\Windows\\Logs\\Takeown.txt\" && icacls \\\"%1\\\" /grant *S-1-3-4:F /t /c /l >> \"C:\\Windows\\Logs\\Takeown.txt\"' -Verb runAs\""
"IsolatedCommand"="powershell -windowstyle hidden -command \"Start-Process cmd -ArgumentList '/c takeown /f \\\"%1\\\" /r /d Y >> \"C:\\Windows\\Logs\\Takeown.txt\" && icacls \\\"%1\\\" /grant *S-1-3-4:F /t /c /l >> \"C:\\Windows\\Logs\\Takeown.txt\"' -Verb runAs\""

[HKEY_CLASSES_ROOT\Drive\shell\runas]
@="Take Ownership"
"Extended"=""
"HasLUAShield"=""
"NoWorkingDirectory"=""
"Position"="middle"
"AppliesTo"="NOT (System.ItemPathDisplay:=\"C:\\\")"

[HKEY_CLASSES_ROOT\Drive\shell\runas\command]
@="cmd.exe /c takeown /f \"%1\\\" /r /d y && icacls \"%1\\\" /grant *S-1-3-4:F /t /c"
"IsolatedCommand"="cmd.exe /c takeown /f \"%1\\\" /r /d y && icacls \"%1\\\" /grant *S-1-3-4:F /t /c"
NOTE: take note that the Y character of /r /d Y of the command takeown /f /r /d Y is language-dependent, so if you have and English version the Y wil be good, if French it will be «O» (for Oui), if Italian it will be «S» (for Si), and so on, so this character will need to be changed before merging the new registry keys and values in your Windows Registry.
Finally, the following .reg file will remove completely the added Take Ownership command from the right-click context menu:
Windows Registry Editor Version 5.00

[-HKEY_CLASSES_ROOT\*\shell\TakeOwnership]
[-HKEY_CLASSES_ROOT\*\shell\runas]
[-HKEY_CLASSES_ROOT\Directory\shell\TakeOwnership]
[-HKEY_CLASSES_ROOT\Drive\shell\runas]
Download
The following download will let you to enable the Take Ownership command in right-click context menu (on files, folders and drives except C:\ volume) in Windows 10.
TakeOwn (Windows Registry Files)

You are here: Home / Windows / How To Take Ownership Of Windows 10? – Ultimate Guide
In Windows 10, every file and folder comes with certain permission requirements for opening, customizing, or deleting it. When you try to edit, open, or delete certain files that you lack permission for access to, you will likely face the “Access Denied” or “You require permission from system” Windows 10 errors.
System files and folders are an example of this. You may also be unable to access old files from other user accounts or files from your old hard drive.
To access such files and folders, you will need to take ownership of it. In this article, I have discussed how to take ownership of Windows 10 files and folders and thus get complete control over Windows 10 directories.
We have shown a VIDEO walk through at the end of the post for easy solution.
How To Take Ownership Of Windows 10 Files And Folders?
When you try to access files that your user account lacks permissions for, you will only trigger the require permission from system Windows 10 error. In these situations, you will need to take ownership of Windows 10 inaccessible files and folders. To do that, follow the steps given below:
- Press the Windows + E keys on your keyboard to open the Windows File Explorer.
- Navigate to the file or folder that you are unable to access.
- Right-click on that file or folder and select the Properties option from the right-click context menu.
- Select the Security tab and click on the Advanced option. This will open the Advanced Security Settings dialog of the file and folder you want to access.
- Beside the Owners, click on the Change option. This will open the Select User or Group dialog.
- After that, select the Advanced option.
- In the advanced Select User or Group dialog, click on the Find Now option. This will fill the Search result section.
- Locate your account’s username in the Search result and click on it.
- Then, click on OK to select the object. Again, click on OK to confirm the new owner.
- Now, click on Apply and OK in the Advanced Security Settings dialog to save the changes. Click on OK again in the folder properties dialog.
Pro Tip: Check the Replace ownership on sub containers and object box when taking the ownership of a folder, after selecting the new owner at step 9, in the Advanced Security Settings dialog. This will give the owner, or in other words your user account, access over the subfolders inside the folder.
How To Grant Full Access To Your User Account Over The Files And Folders?
After you have completed the above steps, the owner of the file or folder will be changed to your user account. But this doesn’t mean that your account has complete access to the file or folder. To grant full access to your user account, follow the steps given below:
- Open the Advanced Security Settings of the folder again.
- Under the Permission Entries section, click on the Add option.
- Click on the Select a principal option. This will open the Select User or Group dialog.
- Select the Advanced option.
- Click on the Find Now option and select your account’s username from the search result.
- Click on OK and after that click on OK again.
- In the Basic Permissions section, check the Full control box.
- Make sure the Type is set to Allow and Applies to is set to This folder, subfolders, and files.
- Click on OK, then on Apply and OK to save the changes.
- Again, click on OK to close the file or folder properties.
Now, you will have full access to the file or folder. By taking ownership, you can get complete control over Windows 10 directories.
How To Access Files On Old Hard Drive Of Windows 10?
If you have ever tried to access files on your old hard drive in your new PC, you were likely unable to do so. When you try to access files on an older hard drive, you will face permission issues.
This is because the files on your older hard drive are under the ownership of the previous computer’s account. To access them you will have to take ownership of the files.
So, how to access files on old hard drive of Windows 10? Simply connect the hard drive to your PC and take ownership of Windows 10 files as mentioned above. Once you have taken ownership of the files and folders, you will be able to access them again.
The above method for taking ownership is a pretty long process. Doing it one or two times can be fine, but what if you need to take ownership of multiple files and folders?
Using the above method each time will become quite taxing. There is an easier and faster alternative that can be used to take ownership of Windows 10 files and folders.
There is a way you can add the Take Ownership option in the right-click context menu. This means that all you will need to do for taking ownership of a file or folder is to right-click on it and select the Take Ownership option from the right-click context menu. This can be done by editing the Registry. Make sure you backup the registry keys before following the steps given below.
To add the Take Ownership option for files in the right-click context menu for making it easier to take ownership of Windows 10 files, follow the steps given below:
- Press the Windows + R keys to open the Run utility.
- Type regedit in the search box and press Enter to open the Registry Editor.
- In the Registry Editor, navigate to the following key:
HKEY_CLASSES_ROOT\*\shell - Check if there is a subkey inside the shell key named If no, then right-click on the shell key and select New>>Key to create a new subkey. Name the new key runas.
- Select the runas key and on the right panel double-click on the (Default) value. This will open its properties dialog.
- Type Take Ownership in the Value data Click on OK to save the changes.
- Right-click on the white area and select New>>String Value. Name the string value NoWorkingDirectory.
- Now, right-click on the runas key and select New>>Key to create another subkey. Name this key command.
- Select the command key and on the right-panel double-click on the (Default) value.
- Type the following command in the Value data section:
cmd.exe /c takeown /f \”%1\” && icacls \”%1\” /grant administrators:F - Click on OK to save the changes.
- Right-click on the empty white part and create a new String value like before.
- Name the string value IsolatedCommand and double-click on it.
- Type the following command in the Value data section:
cmd.exe /c takeown /f \”%1\” && icacls \”%1\” /grant administrators:F - Click on OK to save the changes.
Now, you can right-click on any file and you will see the Take Ownership option present in the right-click context menu.
To add the Take Ownership option for folders in the right-click context menu, follow the steps given below:
(Most of the steps are similar to adding the option for files. I will skip the common parts and reference them to the above steps that you need to do)
- Open Registry Editor and navigate to the following key:
HKEY_CLASSES_ROOT\Directory\shell - Follow steps 4-9 as mentioned above in adding this option for files.
- Type the following command in the Value data section:
cmd.exe /c takeown /f \”%1\” /r /d y && icacls \”%1\” /grant administrators:F /t - Click on OK to save the changes.
- Now, create a new string value in the Command key and name it IsolatedCommand. Double-click on it to open it.
- Type the following command in the Value data section:
cmd.exe /c takeown /f \”%1\” /r /d y && icacls \”%1\” /grant administrators:F /t - Click on OK to save the changes.
Now, the Take Ownership option will be added for the right-click context menu of folders also and you will be easily able to take ownership of Windows 10 folders.
Wrapping Up
So, there you have it. Now you know how to take ownership of Windows 10 files and folders. If you have any other questions related to this topic, ask them in the comment section below.