PowerShell is an advanced shell with integration of .NET objects. It’s more than just a replacement for the older cmd.exe. It can work with .NET assemblies, process large datasets and even interact with web services.
Because of the .NET assemblies support, it can work with WinForms (or even WPF), making it possible to create scripts with GUIs.
Requirements
This has been tested to work with Windows PowerShell verion 5.1. It’s likely going to work with older versions as well, but it’s not going to work with the new cross-platform PowerShell (there are no WinForms on Linux/macOS). You can check the version with
Get-Host | Select-Object version
Setting up the environment
Before we can start, let’s check a few things.
The first one is the script execution policy. It controls which scripts can be run. By default, Windows blocks execution of all scripts (more on that here). We have to allow it to run local scripts that are not digitally signed. It’s possible to do this this either by going through Windows Settings > Updates & Security > For developers, checking the Change execution policy… checkbox and clicking Apply, or just executing
Set-ExecutionPolicy RemoteSigned
from administrator PowerShell.
Another (less important) thing is the code editor. Even though we could just write the entire script directly in PowerShell, it’s easier to use a full-featured editor with error checking and syntax highlighting. Windows already comes with PowerShell ISE (Integrated Scripting Environment), but you can use Visual Studio Code with the PowerShell extension.
Writing our script
Let’s start!
Importing the assemblies
We have to import both System.Windows.Forms and System.Drawing assemblies. It’s possible to only include the first one but we also need the 2nd to specify control sizes.
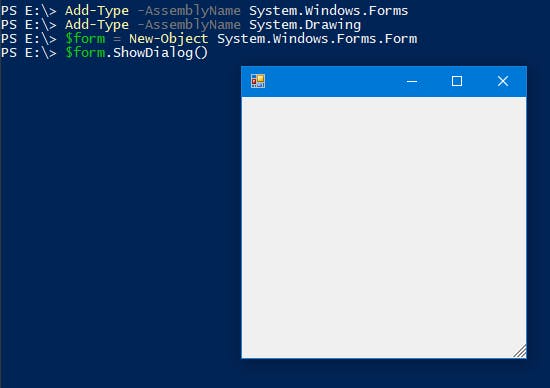
Add-Type -AssemblyName System.Windows.Forms
Add-Type -AssemblyName System.Drawing
You can test it by creating a blank form:
$form = New-Object System.Windows.Forms.Form
$form.ShowDialog()
Adding controls
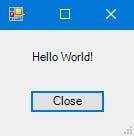
Let’s make a «Hello World» form. First, we create a top-level Form object:
$form = New-Object System.Windows.Forms.Form
$form.Text = "Some form"
$form.Size = New-Object System.Drawing.Size(150, 145)
$form.AutoSize = $true
In PowerShell, objects are created using New-Object. You can also pass parameters to constructors, similar to the new keyword in C#. Values are assigned to properties directly. Another difference is using $true instead of just true.
Let’s add a label and a button:
$lbl1 = New-Object System.Windows.Forms.Label
$lbl1.Text = "Hello World!"
$lbl1.Location = New-Object System.Drawing.Point(30, 20);

$btn = New-Object System.Windows.Forms.Button
$btn.Text = "Close"
$btn.location = New-Object System.Drawing.Point(30, 60);
$btn.DialogResult = [System.Windows.Forms.DialogResult]::OK
The $btn.DialogResult line tells the form what to return when the button is clicked. You can use this to figure out whether the user clicked OK or Cancel. We also make $btn the default button and lay controls onto the form:
$form.AcceptButton = $btn
$form.controls.Add($lbl1)
$form.controls.Add($btn)
All that’s left is showing the form itself:
$form.ShowDialog()
Event handlers
In our form, $btn is the default OK button which just terminates the form. But we can use non-terminating event handlers as well. For example, let’s make it possible to click on the label:
$lbl1.Add_Click({
    [System.Windows.Forms.MessageBox]::Show("Hey!")
})
You can call functions from event handlers as you normally would.
Visual Styles
Something I’ve noticed with these GUI scripts is that different control styles are used when the script is run from the PowerShell console instead of VSCode. The console uses legacy rendering which falls back to using Windows 95-style controls. We need to enable Visual Styles to fix that:
[System.Windows.Forms.Application]::EnableVisualStyles()
From here on, you can add more controls and event handlers. If you’ve used C#/VB.NET before you can reuse large parts of that knowledge to create nicer and more powerful scripts.
That’s it for now 😉
The full script:
Add-Type -AssemblyName System.Windows.Forms
Add-Type -AssemblyName System.Drawing

[System.Windows.Forms.Application]::EnableVisualStyles()

$form = New-Object System.Windows.Forms.Form
$form.Text = "Some form"
$form.Size = New-Object System.Drawing.Size(150, 145)
$form.AutoSize = $true

$lbl1 = New-Object System.Windows.Forms.Label
$lbl1.Text = "Hello World!"
$lbl1.Location = New-Object System.Drawing.Point(30, 20);

$lbl1.Add_Click({
    [System.Windows.Forms.MessageBox]::Show("Hey!")
})

$btn = New-Object System.Windows.Forms.Button
$btn.Text = "Close"
$btn.location = New-Object System.Drawing.Point(30, 60);
$btn.DialogResult = [System.Windows.Forms.DialogResult]::OK

$form.AcceptButton = $btn
$form.controls.Add($lbl1)
$form.controls.Add($btn)

$Null = $form.ShowDialog()
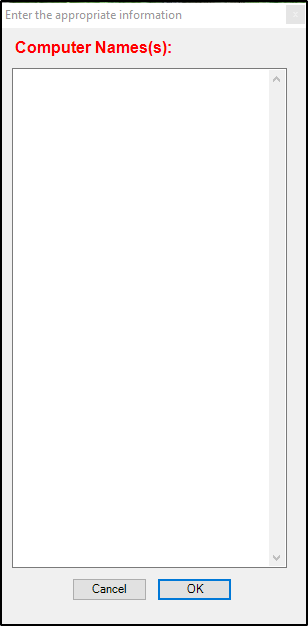
Do you have a PowerShell GUI that needs to accept text input? Maybe you want to be able to copy and paste a list of computers, ip addresses, user names or some other data. I will show you how to add a text box into your PowerShell GUI to handle that input. If you haven’t created a PowerShell GUI yet but are interested in doing so, check out my previous post on how to make a simple GUI.
Code
Let’s start breaking down the sections of code needed to make this happen. I like to put the input box code inside of a function, but you may decide you don’t want to do that. To see the entire code, look at my GitHub.
The first thing we need to do is create the form via the .NET windows forms namespace. Here we specify the text that we want in the title of the window, as well as what size we want it to be. Some optional settings are to have the window start in the center of the screen, preventing resize of the window and putting the window on top of other open windows.
    ### Creating the form with the Windows forms namespace
    Add-Type -AssemblyName System.Windows.Forms
    Add-Type -AssemblyName System.Drawing
    $form = New-Object System.Windows.Forms.Form
    $form.Text = 'Enter the appropriate information' ### Text to be displayed in the title
    $form.Size = New-Object System.Drawing.Size(310,625) ### Size of the window
    $form.StartPosition = 'CenterScreen'  ### Optional - specifies where the window should start
    $form.FormBorderStyle = [System.Windows.Forms.FormBorderStyle]::FixedToolWindow  ### Optional - prevents resize of the window
    $form.Topmost = $true  ### Optional - Opens on top of other windows
Next, we will add an OK button to the bottom of the window. Once the data has been inputted, the user will hit the OK button to pass the input into the next step of the GUI.
    ### Adding an OK button to the text box window
    $OKButton = New-Object System.Windows.Forms.Button
    $OKButton.Location = New-Object System.Drawing.Point(155,550) ### Location of where the button will be
    $OKButton.Size = New-Object System.Drawing.Size(75,23) ### Size of the button
    $OKButton.Text = 'OK' ### Text inside the button
    $OKButton.DialogResult = [System.Windows.Forms.DialogResult]::OK
    $form.AcceptButton = $OKButton
    $form.Controls.Add($OKButton)
Then we will add a cancel button in case the user decides against running the GUI.
    ### Adding a Cancel button to the text box window
    $CancelButton = New-Object System.Windows.Forms.Button
    $CancelButton.Location = New-Object System.Drawing.Point(70,550) ### Location of where the button will be
    $CancelButton.Size = New-Object System.Drawing.Size(75,23) ### Size of the button
    $CancelButton.Text = 'Cancel' ### Text inside the button
    $CancelButton.DialogResult = [System.Windows.Forms.DialogResult]::Cancel
    $form.CancelButton = $CancelButton
    $form.Controls.Add($CancelButton)
In order to avoid confusion and help the user understand what type of data to input, we are going to add a label. This label will be defined by the parameter used when the function is called. If you want to hard code the label text, just replace the $Input_Type with the text that you want displayed.
    ### Putting a label above the text box
    $label = New-Object System.Windows.Forms.Label
    $label.Location = New-Object System.Drawing.Point(10,10) ### Location of where the label will be
    $label.AutoSize = $True
    $Font = New-Object System.Drawing.Font("Arial",12,[System.Drawing.FontStyle]::Bold) ### Formatting text for the label
    $label.Font = $Font
    $label.Text = $Input_Type ### Text of label, defined by the parameter that was used when the function is called
    $label.ForeColor = 'Red' ### Color of the label text
    $form.Controls.Add($label)
The last piece of the GUI window is the text box that will be used to accept inputted text.
    ### Inserting the text box that will accept input
    $textBox = New-Object System.Windows.Forms.TextBox
    $textBox.Location = New-Object System.Drawing.Point(10,40) ### Location of the text box
    $textBox.Size = New-Object System.Drawing.Size(275,500) ### Size of the text box
    $textBox.Multiline = $true ### Allows multiple lines of data
    $textbox.AcceptsReturn = $true ### By hitting enter it creates a new line
    $textBox.ScrollBars = "Vertical" ### Allows for a vertical scroll bar if the list of text is too big for the window
    $form.Controls.Add($textBox)
Putting together the finishing touches so that it all works together and cleans up the inputted data.
    $form.Add_Shown({$textBox.Select()}) ### Activates the form and sets the focus on it
    $result = $form.ShowDialog() ### Displays the form

    ### If the OK button is selected do the following
    if ($result -eq [System.Windows.Forms.DialogResult]::OK)
    {
        ### Removing all the spaces and extra lines
        $x = $textBox.Lines | Where{$_} | ForEach{ $_.Trim() }
        ### Putting the array together
        $array = @()
        ### Putting each entry into array as individual objects
        $array = $x -split "`r`n"
        ### Sending back the results while taking out empty objects
        Return $array | Where-Object {$_ -ne ''}
    }

    ### If the cancel button is selected do the following
    if ($result -eq [System.Windows.Forms.DialogResult]::Cancel)
    {
        Write-Host "User Canceled" -BackgroundColor Red -ForegroundColor White
        Write-Host "Press any key to exit..."
        $Host.UI.RawUI.ReadKey("NoEcho,IncludeKeyDown")
        Exit
    }
Calling the Text Box
Now that the code to create the GUI text box is finished, we need to call the text box and return the inputted data. I will share a few examples of how to utilize the text box we just created. The below examples are assuming that you’ve put the text box inside of a function with the use of a parameter.
Function GUI_TextBox ($Input_Type){...}
Here is an example of how to use the text box to accept a list of computer names. This example will just output the list of computer names inputted to screen. In order to make this useful, you will need to add your code to have the script take action on those computer names. Maybe you need to conduct power actions on a list of computers or any number of admin actions.
###############################################################################
### Computer Name(s) example of how to utilize the GUI_TextBox function
###############################################################################
$Computers = GUI_TextBox "Computer Names(s):" ### Calls the text box function with a parameter and puts returned input in variable
$Computer_Count = $Computers | Measure-Object | % {$_.Count} ### Measures how many objects were inputted

If ($Computer_Count -eq 0){ ### If the count returns 0 it will throw and error
    Write-Host "Nothing was inputed..." -BackgroundColor Red -ForegroundColor White
    Return
}
Else { ### If there was actual data returned in the input, the script will continue
    Write-Host "Number of computers entered:" $Computer_Count -BackgroundColor Cyan -ForegroundColor Black
    $Computers
    ### Here is where you would put your specific code to take action on those computers inputted
}
Here is an example of how to use the text box to accept a list of users. This example will just output the list of users inputted to screen. In order to make this useful you will need to add your code to have the script take action on those user. Maybe you need to disable their Active Directory accounts or any number of admin actions.
###############################################################################
### User Name(s) example of how to utilize the GUI_TextBox function
###############################################################################
$Users = GUI_TextBox "User Names(s):" ### Calls the text box function with a parameter and puts returned input in variable
$User_Count = $Users | Measure-Object | % {$_.Count} ### Measures how many objects were inputted

If ($User_Count -eq 0){ ### If the count returns 0 it will throw and error
    Write-Host "Nothing was inputed..." -BackgroundColor Red -ForegroundColor White
    Return
}
Else { ### If there was actual data returned in the input, the script will continue
    Write-Host "Number of users entered:" $User_Count -BackgroundColor Cyan -ForegroundColor Black
    $Users
    ### Here is where you would put your specific code to take action on those users inputted
}
Text Box in Action
When you are done, you should have something that looks like this:
That’s it for now, thanks for reading!
Check out my other blog posts:
Media Sync: Organize Your Photos and Videos with PowerShell
Do you have photos and videos that you have taken over the years that are scattered all over the place? Do you want to have all your photos and videos organized? Do you want all your photos and videos to have a standardized naming scheme? If you answered YES to these questions, then this is…
NetNeighbor Watch: The PowerShell Alternative To Arpwatch
In this post, we are going to setup NetNeighbor Watch on a Raspberry Pi. NetNeighbor Watch can keep an eye on your network and send you an email when a new host is discovered. NetNeighbor Watch is done completely in PowerShell. The results are very similar to those of arpwatch. NetNeighbor Watch is for anyone…
Generate a Citrix Desktop Report Based on Active Directory Users
In this post, we are going to merge data from two different sources to generate a report that can provide insight into your Citrix environment. I will show you how to combine Active Directory data for the users in your domain with Citrix data. This report will provide you with the following knowledge: Users that…
Creating a PowerShell Module to Improve Your Code
Do you have PowerShell code that you reuse in your scripts over and over? Do you have server names hard coded in variables? Are you using a text file or CSV file to import server names? Do you find yourself only utilizing one server out of a cluster of servers to make your PowerShell commands?…
Generate a DHCP Report Via PowerShell
Today we are going to look at how to generate a DHCP scope statistics HTML report by using PowerShell. This report will give you one location to see all of your DHCP scope statistics across all of your Windows DHCP servers. It will dynamically pull the DHCP servers and associated DHCP scopes within your Active…
Increase VMware VM Disk Size with PowerShell
In this post, I will cover how to use PowerShell to increase the disk size of a Windows 10 VM running in a VMware vCenter environment. Automating simple but time consuming tasks like this can save precious time for your support staff or yourself. There are two parts to accomplishing this task; first we need…
Manage Citrix Tags with PowerShell
In this post, we are going to cover how to manage Citrix tags with PowerShell. Citrix Studio is a great tool, but it can be very time consuming especially if you have to do bulk tag actions. Citrix tags can be used in several methods, but this post is focused on desktop tagging. This post…
Utilizing PowerShell Out-GridView as a GUI Alternative
In my previous post, I showed how you can build a simple menu driven PowerShell GUI; check it out here. To further improve upon that simple GUI, we will go over how to use Out-GridView. Out-GridView is a built-in powershell cmdlet that sends the output from a given command to an interactive window. This post…
How to Create a Simple PowerShell GUI
Have you ever wanted to create a menu driven PowerShell GUI to conduct a series of automated tasks? You are in luck, because that is exactly what we are going to cover in this post. This very simple PowerShell GUI will help you easily distribute your code to other team members or maybe you just…
![]()
This is simple ping utility that will demonstrate some of PowerShell’s form capabilities, which are fairly easy to implement, once you know how to do it.
This will create a basic form (a canvas for you to add items to). In the example, I have included labels, an input box, a background image, a button, an action to a button, title bar icon, etc. No extra tools or software are necessary; I created this in the PowerShell ISE (you could even use notepad).
Check out this training video at Channel 9, if you want to learn more: Link
I’ve made Part II, which is built upon Part I, a Microsoft page: Link, or this pdf, if the MS page goes missing.
Screenshots


Code
[void] [System.Reflection.Assembly]::LoadWithPartialName("System.Windows.Forms")
[void] [System.Reflection.Assembly]::LoadWithPartialName("System.Drawing")

# form specs
$objForm = New-Object System.Windows.Forms.Form
$objForm.Text = "Check Network Status"
$objForm.Size = New-Object System.Drawing.Size(300,170)
$objForm.StartPosition = "CenterScreen"
$objForm.KeyPreview = $True
$objForm.MaximumSize = $objForm.Size
$objForm.MinimumSize = $objForm.Size

# form icon
$objIcon = New-Object system.drawing.icon ("C:\Windows\Installer\{FFD1F7F1-1AC9-4BC4-A908-0686D635ABAF}\installer.ico")
$objForm.Icon = $objIcon

$objImage = [system.drawing.image]::FromFile("c:\setup\psform_background.jpg")
$objForm.BackgroundImage = $objImage
$objForm.BackgroundImageLayout = "None"
# None, Tile, Center, Stretch, Zoom

$objForm.Width = $objImage.Width
$objForm.Height = $objImage.Height

# label
$objLabel = New-Object System.Windows.Forms.label
$objLabel.Location = New-Object System.Drawing.Size(7,10)
$objLabel.Size = New-Object System.Drawing.Size(130,15)
$objLabel.BackColor = "Transparent"
$objLabel.ForeColor = "yellow"
$objLabel.Text = "Enter Computer Name"
$objForm.Controls.Add($objLabel)

# input box
$objTextbox = New-Object System.Windows.Forms.TextBox
$objTextbox.Location = New-Object System.Drawing.Size(10,45)
$objTextbox.Size = New-Object System.Drawing.Size(120,20)
$objForm.Controls.Add($objTextbox)

# ok button
$objButton = New-Object System.Windows.Forms.Button
$objButton.Location = New-Object System.Drawing.Size(140,44)
$objButton.Size = New-Object System.Drawing.Size(75,23)
$objButton.Text = "OK"
$objButton.Add_Click($button_click)
$objForm.Controls.Add($objButton)

# return status
$returnStatus = New-Object System.Windows.Forms.label
$returnStatus.Location = New-Object System.Drawing.Size(8,70)
$returnStatus.Size = New-Object System.Drawing.Size(130,30)
$returnStatus.BackColor = "Transparent"
$returnStatus.Text = ""
$objForm.Controls.Add($returnStatus)

# action item here - you could add your own actions
$button_click =
{

$returnStatus.Text = ""
$objStatusBar.Text = "Checking status..."
$computerName = $objTextbox.Text

# output - online
if (Test-Connection $computerName -quiet -Count 2){
Write-Host -ForegroundColor Green "$computerName is online"
$returnStatus.BackColor = "Transparent"
$returnStatus.ForeColor = "lime"
$returnStatus.Text = "Status: Online"
}
Else{
# output - offline
Write-Host -ForegroundColor Red "$computerName is offline"
$returnStatus.ForeColor= "Red"
$returnStatus.Text = "Status: Offline"
}

$objStatusBar.Text = "Done"

}

# form status bar
$objStatusBar = New-Object System.Windows.Forms.StatusBar
$objStatusBar.Name = "statusBar"
$objStatusBar.Text = "Ready"
$objForm.Controls.Add($objStatusBar)

$objForm.Add_KeyDown({if ($_.KeyCode -eq "Enter"){& $button_click}})
$objForm.Add_KeyDown({if ($_.KeyCode -eq "Escape")
{$objForm.Close()}})

# modal
$objForm.Topmost = $True
$objForm.Add_Shown({$objForm.Activate()})
[void] $objForm.ShowDialog()
When it comes to working with the assembly System.Windows.Form there really is a lot of Classes available to you which allows you to add elements to your GUI Form to make it more user friendly and functional; afterall the entire purpose of creating a GUI Form is to remove the users need to type in all those commands you have coded into your Script.
Given the number of Classes is quite large I will not be covering every option in this tutorial, and instead will focus on a handful, which I hope will illustrate to you the basic principals of using these classes to create a functional GUI Form.
We’ll start with a very simple Form, and slowly build on it as I did in Part 1 to help you come to grips with the way to create your GUI Form, and make you realize that while there is a certain amount of finger exercise to come, that it is not as difficult to do as one might imagine.
So let’s get started!
Open Windows PowerShell ISE and enter the following code into the Script pane:
Code:
# Load required assemblies
Add-Type -AssemblyName System.Windows.Forms
Add-Type -AssemblyName System.Drawing

# Create Form to contain elements
$Form = New-Object System.Windows.Forms.Form

# Set Form Titlebar text
$Form.Text = "Console to list Directories of chosen path"

# Set size of form
# Size(<length>,<height>) in pixels
$Form.Size = New-Object System.Drawing.Size(600,400)

# Initialize form and show it
# [void] used to suppress other messages generated by Form actions
[void] $Form.ShowDialog()
After typing or copy & pasting the above code into the script pane click File > Run

- As you can see we now have a Blank Form which we’ll be able to build on.
- At this build we’ve set the Forms title bar text using $Form.Text
- Unlike in Part 1, this time we used a new assembly class to control the size of our Form (System.Drawing.Size).
- The Size() takes integer values to determine the size of the object being drawn in the format: Size(<length>,<height>) e.g. Size(600,400)
- Note: We’ve initialized our Form slightly differently that in Part 1
- [void] $Form.ShowDialog()
- [void] suppresses other messages generated by the Form. If we do not use [void], then, for example, if the user closes the Form the word «Cancel» appears in the console. We do not need that information, nor do they.
Add some elements to make the GUI Form functional
A User Input Textbox
We can add textbox to our GUI Form which takes input from the User. by adding the following code block to our Script:
Code:
# Create an Input textbox
$inputBox = New-Object System.Windows.Forms.TextBox

# Size(<length>,<height) in pixels
# .Location will position the textbox in a position relative to the
# base Form based on the Forms size(600,400)
# In this case location is 20 pixels in from Form boundary, and 50 pixels down from Form boundary
$inputBox.Location = New-Object System.Drawing.Size(20,50)

# Size(<length>,<height) in pixels
# .Size determines the actual size of the textbox
$inputBox.Size = New-Object System.Drawing.Size(150,20)

# Initialize the textbox inside the Form
$Form.Controls.Add($inputBox)
I’ve added comments to the code block to help explain each snippet, but here is a break down of what it does:
- First we create a variable $inputBox to assign our new object to. You can name your variable whatever you wish, but it helps when later analyzing your scripts to use a descriptive name.
- Next we assign a new object using the cmdlet New-Object and passing it our assembly Class System.Windows.Forms.TextBox
- Now using our $inputBox variable we append the .Location method in order to assign a new Drawing object by making using of the assembly class System.Drawing.Size(<length>,<height>)
- The System.Drawing.Size class takes two integer arguments: <length> and <height> which represent the number of pixels to draw the new textbox in from a specific location which is relative to the boundary walls of the GUI Form
- In the code above we are instructing the textbox be drawn 20 pixels in from the left boundary wall of GUI Form and 50 pixels down from the top boundary wall of our GUI Form
- Next we set the size of the textbox using the .Size method and assigning the System.Drawing.Size(<length>,<height>) class which takes integer values to represent the length and height (in pixels) of the object being drawn. In our case that will be 150 pixels wide by 20 pixels high)
- Finally, we need to initialize the textbox so it can be seen on the GUI Form. We do this by the snippet: $Form.Controls.Add($inputBox) which adds the Control element we pass to it (in this case our $inputBox variable which is storing our object.)
So now we need to add this to our current Script in the Windows PowerShell ISE Script Pane:

If we click File > Save, then File > Run we get:
It would be great to add a label to help the User understand what to do with that input field. To do that we simply add, the following code block before we initialize the $inputBox
Code:
# Create Instruction Label for inputBox
$Label = New-Object System.Windows.Forms.Label
$Label.Text = "Type Path here: e.g C:\Users"
$Label.Location = New-Object System.Drawing.Size(20,30)
$Label.BackColor = "Transparent"
$Label.AutoSize = $true

# Initialize Label
$Form.Controls.Add($Label)

When we run our updated script we get:
The label helps user understand the purpose of the input field
- The message for the user was placed onto the Label using $Label.Text
- We positioned the Label using $Label.Location = New Object System.Drawing.Size(20,30) i.e. 20 pixels in from left boundary wall of the GUI Form and 30 pixels down from top boundary wall of the GUI Form
- Just as in Part 1 of this tutorial we made the Label itself transparent, using $Label.BackColor = «Transparent» so as not to distract the eye from the input field.
- We initialized the $Label so it can be seen on the GUI Form using $Form.Controls.Add($Label) to pass our $Label variable storing the object via Controls.Add(<variable) to our $Form.
Supply feedback using an Output Textbox
Now we want to add an Output Textbox which will provide information to the User.
As the information may contain more than a single line of information we will make our new Textbox a multi-line field. This will be done by using the following code block:
Code:
# Create an Output textbox, 10 pixels in from Form Boundary and 150 pixels down
# As we want a multiline output set textbox size to 565 px x 200 px
# .Multiline declares the textbox is multi-line
$outputBox = New-Object System.Windows.Forms.TextBox
$outputBox.Location = New-Object System.Drawing.Size(10,150)
$outputBox.Size = New-Object System.Drawing.Size(565,200)
$outputBox.MultiLine = $True

# Initialize the textbox inside the Form
$Form.Controls.Add($OutputBox)- So we start by creating a variable $outputBox which we can name whatever we like as before. We will assign this variable a new Textbox object by using the cmdlet New-Object and passing the assembly class System.Windows.Forms.Textbox to it.
- Next we position the textbox as we did before with our input textbox.
- Next, also as before with the input textbox, we set its size. In this example, it will be 565 pixels wide by 200 pixels high.
- Now we declare that our textbox will be Multi-lined. To do this we use the boolean .MultiLine and as it is a boolean we assign $true to confirm its to be a multi-lined textbox who’s information is stored inside the variable $outputBox
- Finally, we need to initialize the textbox so it can be seen on the GUI Form
Now we add this to our current Script:

Then we save the changes, and click File > Run to get:
So now out GUI Form has a Textbox for the User to input data, and an Output Textbox that is multi-lined to report back data to the User. But how do we get the User input results to the Output Textbox?
Add an Action Button to GUI Form
To get the User input activated we can use a Button element which the User can click to start processing what they typed into the Input field, so a result can be displayed into the Output field.
To add this button we will use the following code block:
Code:
# Add a Button which can be used to generate an action from our textboxes
$Button = New-Object System.Windows.Forms.Button
$Button.Location = New-Object System.Drawing.Size(400,30)

# Button size(length>,<height>) in pixels
$Button.Size = New-Object System.Drawing.Size(110,80)

# Label the button
$Button.Text = "Click to view Directories"

# Declare the action to occur when button clicked
$Button.Add_Click( { GetDirectories } )

# Initialize the button inside the Form
$Form.Controls.Add($Button)- So as before we start by creating a variable to assign our new button object to, and as before we can name that variable whatever we like. In this example I used $Button for the variable and then used the cmdlet New-Object and then the assembly Class System.Windows.Forms.Button
- Then we position the button on the GUI Form using the .Location method appended to our variable. So the button will be 400 pixels from the left boundary wall of our GUI Form and 30 pixels down from the top boundary wall of our GUI Form.
- Now we set the size of the button by appending the .Size method to our variable then assigning the new object obtained by using the assembly Class System.Drawing.Size(<length>,height>)
- We add some text on our Button using $Button.Text = <String> which in this example is an instruction to tell User to click the button to view the Directories in the Path they just typed into their Input field.
- Next we need to code what action to take when the button is clicked. To do this we append the .Add_Click to our $Button variable so it knows the action to detect is the button being clicked, then we provide an Function to go seek, which contains the instructions on what action to take when button is clicked.
- Note: This function does not exist yet.
- Finally, we need to initialize our Button so it can be seen on the GUI Form
Now we add this code block to our Script, then save the changes:

After saving the changes we click File > Run to get:
Our GUI Form now has an Input & Output textbox, and a Button
Add a Function to process input, and show output by using Button Click action
The Form is almost ready now, but without a Function nothing will happen if the User typed a path into the Input Field, then clicked the button.
Functions are a code block normally placed at the top of a Script, or at least before the elements they are designed to provide actions to, in this case, our input, output and button.
Take a look at the code block for a Function that will bring our GUI Form to life:
Code:
# Create a Function to make use of textboxes
function GetDirectories {

  # Variable to store what user types into Input textbox
  $Input = $inputBox.Text

  # Set path to user's input
  Set-Location $Input

  # Variable to store results of actioning the Input
  $Result = $Input | Get-ChildItem -Directory  | Out-String

  # Assign Result to OutputBox
  $outputBox.Text = $Result
}- Our Function is named GetDirectories { }
- The parameters we will assign this function are the variables we created for our GUI Form, and some cmdlets we will use to generate an action.
- So we start by declaring a function: function GetDirectories {
- Now we create a new variable $Input that will have the User’s input assigned to it. To get the User’s input we call the .Text method by appending it to the $inputBox variable which is where the User is typing their data.
- Now we use the cmdlet Set-Location <variable> which in this example is our new $Input variable that stores the path the User typed into the $inputBox. This instruction changes the current directory to the directory the User chose to type into their textbox.
- Now we create another new variable $Result which will ultimately store the data gathered by processing the $Input we piped to the Get-ChildItem cmdlet then filter result using parameter -Directory which only supplies directories and not all other files, then piped to the cmdlet Out-String
- To get the information stored in our $Result variable to the $outputBox we append the method .Text to our $outputBox and then assign the $Result to that.
- Then we close our function with }
Let’s add this code block to our Script:

After saving the change and then clicking File > Run, our GUI Form now has life.
Example: User types C:\Windows\System32 into the Input field & clicks button
Have you spotted the problem yet?
No, its not that ugly formatting on the Sub-directory names (although we could tidy that up too.) Click inside the Output textbox then use your down arrow. As you get to last entry viewable more content will begin to appear. Our Textbox for the output is not big enough.
Now we could increase the size, but how can we possibly guess what is the correct size for a user; after all, we do not know if they’ve added their own custom sub-folders or not. What about using formatting to create two columns or more. Well that could work, but our textbox is not wide enough to avoid truncation of the result (you know, those …‘s).
What about adding a scrollbar? That does two things for us:
- It makes it very clear to the user they may need to scroll down to view all content, and
- It makes it a lot easier to actually scroll as now they can use their mouse.
Add a scrollbar to textbox
We know its our $outputBox than needs the ability to scroll, so that means we’ll need to edit the block of code relating to this textbox.
We know when we want to add to an object (in this case $outputBox) we need to append what we create to that object.
So this is how easy it is to fix our problem:
Code:
$outputBox.Scrollbars = "Vertical"
Add that to our Script:

Save the edit, then click File > Run and we get this if we enter C:\Windows and click the button:
So at this point you have created your own filtered version of File Explorer. Filtered, because you are only displaying sub-folders of a path you enter.
If you wanted to filter it to show files and not sub-folders, then you’d change this code snippet: $Result = $Input | Get-ChildItem -Directory | Out-String
- To view files only, and not sub-folders:
Code:
$Result = $Input | Get-ChildItem -File | Out-String- To view files and sub-folders:
Code:
$Result = $Input | Get-ChildItem | Out-StringDrag & Drop Feature
Something a lot of users love in Windows is the ability to drag and drop files.
For example, people drag an executable to their Command Prompt to quickly run it.
You can offer this feature in your GUI Form in PowerShell too.
To illustrate this I’m going to redesign our GUI Form, and create a left and right pane. The left pane will contain our File Explorer, and the right pane will contain a Listbox. You’ll be able to drag en element from the left pane to the Listbox in the right pane which will record the elements full path into a variable which will also be piped to a text file that will be saved to the Desktop.
So let’s get to the coding!
Code:
# Load required assemblies
Add-Type -AssemblyName System.Windows.Forms
Add-Type -AssemblyName System.Drawing

# Create a Function to make use of textboxes
function GetDirectories {

  # Variable to store what user types into Input textbox
  $Input = $inputBox.Text

  # Set path to user's input
  Set-Location $Input

  # Variable to store results of actioning the Input
  $Result = $Input | Get-ChildItem | Out-String

  # Assign Result to OutputBox
  $outputBox.Text = $Result
}

# Create Form to contain elements
$Form = New-Object System.Windows.Forms.Form

# Set Form Titlebar text
$Form.Text = "Console to list Files & Directories of chosen path and Drag & Drop to Listbox"

# Set size of form
# Size(<length>,<height>) in pixels
$Form.Size = New-Object System.Drawing.Size(800,600)

# Create an Input textbox
$inputBox = New-Object System.Windows.Forms.TextBox

# Size(<length>,<height) in pixels
# .Location will position the textbox in a position relative to the
# base Form based on the Forms size(800,600)
# In this case location is 20 pixels in from Form boundary, and 50 pixels down from Form boundary
$inputBox.Location = New-Object System.Drawing.Size(20,50)

# Size(<length>,<height) in pixels
# .Size determines the actual size of the textbox
$inputBox.Size = New-Object System.Drawing.Size(300,20)

# Create Instruction Label for inputBox
$Label = New-Object System.Windows.Forms.Label
$Label.Text = "Type Path here: e.g C:\Users"
$Label.Location = New-Object System.Drawing.Size(20,30)
$Label.BackColor = "Transparent"
$Label.AutoSize = $true

# Initialize Label
$Form.Controls.Add($Label)

# Initialize the textbox inside the Form
$Form.Controls.Add($inputBox)

# Create an Output textbox, 10 pixels in from Form Boundary and 150 pixels down
# As we want a multiline output set textbox size to 440 px x 400 px
# .Multiline declares the textbox is multi-line
# Declare vertical scrollbars
$outputBox = New-Object System.Windows.Forms.TextBox
$outputBox.Location = New-Object System.Drawing.Size(10,150)
$outputBox.Size = New-Object System.Drawing.Size(440,400)
$outputBox.MultiLine = $True
$outputBox.ScrollBars = "Vertical"

# Initialize the textbox inside the Form
$Form.Controls.Add($OutputBox)

# Add a Button which can be used to generate an action from our textboxes
$Button = New-Object System.Windows.Forms.Button
$Button.Location = New-Object System.Drawing.Size(20,90)

# Button size(length>,<height>) in pixels
$Button.Size = New-Object System.Drawing.Size(200,20)

# Label the button
$Button.Text = "Click to view Files `&& Directories"

# Declare the action to occur when button clicked
$Button.Add_Click( { GetDirectories } )

# Initialize the button inside the Form
$Form.Controls.Add($Button)

# Initialize form and show it
# [void] used to suppress other messages generated by Form actions
[void] $Form.ShowDialog()
Our edited Form now lists Files and Directories of the Path entered by user.
Note: I’ve left room on the right side for the Listbox yet to be created, which is what we’ll drag and drop to.
If above code and enter C:\Windows\System32 then click the button we get:

I will not explain the above again, as apart from some minor manipulation of the original Script to relocate, resize and re-label items, everything ought to be self-explanatory.
Add the listbox
Adding a listbot is no different to adding a textbox. Take a look at the code:
Code:
# Create a Listbox to drag items to
$listBox = New-Object Windows.Forms.ListBox
$listBox.Location = '480,100'
$listBox.Size = New-Object System.Drawing.Size(295,450)
$listBox.Anchor = (
  [System.Windows.Forms.AnchorStyles]::Bottom -bor
  [System.Windows.Forms.AnchorStyles]::Left -bor
  [System.Windows.Forms.AnchorStyles]::Right -bor
  [System.Windows.Forms.AnchorStyles]::Top
)
$listBox.IntegralHeight = $False
$listBox.AllowDrop = $True

# Initialize Listbox
$form.Controls.Add($listBox)- Most of this will be familiar to you.
- We’ve used the assembly Class Windows.Forms.ListBox
- The only subtle difference here is the use of the parameter -bor which stands for Bitwise OR (inclusive) in conjunction with specific borders which are piped via the assembly Class [System.Windows.Forms.AnchorStyles].
There are five choices for this class. Top, Bottom, Left, Right & None.
The control (e.g. Listbox) is anchored to the Bottom, left, right and top.
If I instead chose None then the control would not be anchored to any border.
While this was not truly needed in this code, I’ve shown it as an alternate way to position a control on your GUI Form.
- $listBox.IntegralHeight = $False
$True indicates that the text box resizes itself to display only complete items (default). $False indicates that the text box does not resize itself even if the item is too tall to display completely.
The IntegralHeight property relates to the height of the text box, just as the AutoSize property relates to the width of the text box.
If IntegralHeight is $True, the text box automatically resizes when necessary to show full rows. If False, the text box remains a fixed size; if items are taller than the available space in the text box, the entire item is not shown.
- $listBox.AllowDrop = $True — This boolean allows us to drop a dragged item into the ListBox
So let’s add our Listbox code block to the Script:

Now save the changes, then click File > Run and we get:
Label the listbox
We can add a descriptive label to our Listbox to help the User understand its purpose, by using the code block:
Code:
# Create Instruction Label for Listbox
$Label2 = New-Object System.Windows.Forms.Label
$Label2.Text = "Drag files or directories from Output field and drop here"
$Label2.Location = New-Object System.Drawing.Size(480,80)
$Label2.BackColor = "Transparent"
$Label2.AutoSize = $true

# Initialize Label2
$Form.Controls.Add($Label2)
Add this code to our Script:

Save the changes, then click File > Run to get:
Add a Button & Checkbox for our Listbox
Now we want to add a Button that when clicked will produce a text file saved to the Desktop of the contents of the ListBox.
We will also offer a checkBox that if checked will clear the ListBox once the button has been activated.
Take a look at the following code blocks to achieve this:
Code:
# Add a button for the Listbox
$Button2 = New-Object System.Windows.Forms.Button
$Button2.Location = '480,30'
$Button2.Size = New-Object System.Drawing.Size(180,20)
$Button2.Text = "Save as Listbox.txt on Desktop"

# Initialize Button2
$Form.Controls.Add($Button2)

# Add a checkbox to allow User to clear listbox if desired
# Will clear if checked and button is clicked
$Checkbox = New-Object Windows.Forms.Checkbox
$Checkbox.Location = '680,30'
$Checkbox.AutoSize = $True
$Checkbox.Text = "Clear Listbox"

# Initialize checkbox
$Form.Controls.Add($Checkbox)
Now add this code to our Script:

Save the changes, then click File > Run to get:
The easy bit is over — Let’s add a little colour to our Form to help highlight buttons, and differentiate from the OutputBox and ListBox fields (both of which are a TextBox). While we are at it let’s give the user some filter options to select all files, or a particular file type to view from the folder path they select.
To do all this we will make use of the BackColor and ForeColor methods with the listBox and outputBox and button variables. For example:
Code:
$listBox.BackColor = "#9a94be"
$listBox.ForeColor = "#000000"
This sets the BackColor of our listBox to #9a94be (a lilac shade) and the ForeColor to #000000 which is ‘black‘ — So the field is lilac and the font that appears in the listBox will be black.
We can set the font face, size and style too. For example:
Code:
$listBox.Font = "Microsoft Sans Serif,10"
This sets the font face for our listBox to Microsoft Sans Serif. The size is 10 pt.
I did not do it here, but if you wanted to, after the size you could add ,style=bold:
Code:
$listBox.Font = "Microsoft Sans Serif,10,style=bold"
This would make the 10 pt Microsoft Sans Serif font appear in bold within the listBox.
We can add buttons for file types to our Form using code blocks like:
Code:
$button2 = New-Object system.windows.Forms.Button
$button2.BackColor = "#000000"
$button2.Text = "EXE"
$button2.ForeColor = "#ffffff"
$button2.Width = 60
$button2.Height = 30
$button2.location = new-object system.drawing.point(90,100)
$button2.Font = "Microsoft Sans Serif,12"
This creates a black button, with EXE on the button in a white font color, located 90 pixels in from the left and 100 pixels down from the top of form. The button itself is 60 pixels wide x 30 pixels high.
Each of these file type buttons needs its own function to allow it to instruct the computer what to do when clicked. For example:
Code:
# All Executable files in selected path explored
Function ExeFileExplorer {

  # Variable to store what user types into Input textbox
  $Input = $inputBox.Text

  # Set path to user's input
  Set-Location $Input

  # Create Temporary File
  foreach ($item in $outputBox) {
    # Set filepaths
    $str = Get-ChildItem -Filter *.exe
  }
  $outputBox.Text = $str.FullName
  # Save Temporary file to Desktop
  $outputBox.Text.Split() | Out-File $env:USERPROFILE\Desktop\FilePath.txt -Append
  $outputBox.Clear()

  # Variable to store results of actioning the Input
  $Result = Get-ChildItem -Name $Input -Filter *.exe | Out-String

  # Assign Result to OutputBox
  $outputBox.Text = $Result
}
We need to call our Function for the buttons. This is easy; for example:
Code:
$button2.Add_Click({ ExeFileExplorer })When $button2 is clicked it calls the Function ExeFileExplorer which controls the actions to take place when button is clicked. In this case it will filter the results to display any executable file in the filepath supplied by the User into out $outputBox
So after these modifications and other similar modifications for other control items in the form we end up with a form looking like the following:
Event Handlers
So we have a few bells now, but still no whistles. We need to add some event handlers in order to make it possible to drag items from $outputBox (the left pane) to our $listBox (the right pane).
There are three ways to approach this, but for this we’ll use a relatively pain free method. I’ll go into more advanced details in a later tutorial.
For our basic form simple is best to achieve the goal of Drag & Drop capabilities.
I’ll make use of three events — MouseDown, DragEnter, DragDrop — and some Functions to inject some life into our Form. We also need to declare a new boolean to be true, to be able to make this work.
Boolean
To be able to drag and drop anything into your ListBox, we first need to declare true a boolean to allow DragDrop to even work. To do this we simply need to add one more line to our $listBox properties:
Code:
$listBox.AllowDrop = $trueThis makes use of the boolean AllowDrop to declare that any item dragged can be dropped into the ListBox.
MouseEventHandler MouseDown coupled with DragDropEffects
In order to be able to drag the text contents of our $outputBox we make use of the [System.Windows.Forms.MouseEventHandler] coupled with [System.Windows.Forms.DragDropEffects]. Again this is a nice tidy code block to add to our code:
Code:
<#
   ------------------------------------------------------------
   OutputBox Event Handler
   Allows 1 or more items to be selected and dragged to listBox
   ------------------------------------------------------------ #>
$outputBox_MouseDown = [System.Windows.Forms.MouseEventHandler] {
  $outputBox.DoDragDrop($outputBox.Text,[System.Windows.Forms.DragDropEffects]::Copy)
}- We declare our MouseDown event by appending _MouseDown to the $outputBox variable.
- This is event is assigned as a MouseEventHandler by adding = [System.Windows.Forms.MouseEventHandler] { }
- The action to take place on MouseDown [ i.e. left mouse button pressed and held as you drag ] is placed inside the { } braces.
- We append the method: DoDragDrop() to our $outputBox then pass two arguments through this method.
(1) SoutputBox.Text instructs that the text inside the TextBox $outputBox is the focus of the action to be taken.
(2) The second argument is the action to take. In this case we parse the Text contents of the TextBox $outputBox through the [System.Windows.Forms.DragDropEffects] class and instruct that it is to be copied :: Copy. Ultimately it will be copied to our ListBox, but first we need to provide Event Handlers for our ListBox and some functions to deal with the copied text data.
Drag & Drop requires two event handlers: The first deals with the Effect — DragEventHandler DragEnter for the ListBox
We made it possible to drop a dragged item into our ListBox using the boolean AllowDrop = $true.
If we left that as is, and provided no Event Handler to deal with our MouseDown then you could drag items from anywhere on your computer to the ListBox, however, that is not the plan with this project. We already have a TextBox that stored the data we want to drag to our ListBox.
Thus we need to create some Event Handlers for the ListBox to reflect this.
First, we want to handle what happens after we press and hold our left mouse button down and drag the cursor from the TextBox to our ListBox [i.e. what happens when we enter the ListBox with our mouse cursor ].
Code:
<#
   ----------------------------------------------------------------------------------
   ListBox Event Handlers
   Sets the only location a dragged item can enter.  In this case that is the ListBox
   ----------------------------------------------------------------------------------  #>
$listBox_DragEnter = [System.Windows.Forms.DragEventHandler] {
  $_.Effect = $_.AllowedEffect
}- As explained in the comments within this code block, when we append _DragEnter to out ListBox $listBox and assign [System.Windows.Forms.DragEventHandler] class to it, then declare that this.Effect = this.AllowedEffect (remember in PowerShell this is represented by $_) we are instructing the computer to only allow a dragged item from our TextBox $outputBox to be dropped into the ListBox $listBox.
When you run this program you’ll see as you drag from the TextBox the mouse cursor will remain a Circle with a diagonal line, until it Enters inside the ListBox then the cursor will change and the user will know they can release their mouse button to drop the dragged content into the ListBox.
- The AllowedEffect in this case is to Copy the Text from our $outputBox into our $listBox which as you will recall you set with the previous MouseEventHandler MouseDown coupled with DoDragDrop and [System.Windows.Forms.DragEventHandler]::Copy.
Drag & Drop requires two event handlers: The second deals with the Drop itself — DragEventHandler DragEnter for the ListBox
Code:
<#
   ------------------------------------------------------------------------
   > Set how to drop selected item(s) into ListBox
   > Makes use of [System.IO.File] to read each line
     of a file, then add each line to the ListBox.

     Required to prevent multiple items from a multiline TextBox
     appearing as one long line inside ListBox, rather than a list of items
     ---------------------------------------------------------------------- #>
$listBox_DragDrop = [System.Windows.Forms.DragEventHandler] {

  # Read Temorary File back into ListBox
  [string[]] $lines =  [System.IO.File]::ReadAllLines("$env:USERPROFILE\Desktop\FilePath.txt")
  [string] $line

  foreach ($line in $lines) {
    $listBox.Text = $listBox.Items.Add($line)
  }
  # Clear OutputBox
  $outputBox.Clear()

  # Delete Temporary File
  Remove-Item "C:\Users\Regedit32\Desktop\FilePath.txt"
}- We declare _DragDrop and assign it as a [System.Windows.Form.DragEventHandler]
- Now we pass our instructions between the { } braces. In this case we’ll be making use of Functions we have called on. I’ll show these next.
- [String[]] $lines creates a String array called $lines
- = [System.IO.File] assigns an assembly class System Input/Output File
- ::ReadAllLines instructs that the file being passed as the ReadAllLines() method will have all lines of text in it read
- («$env:USERPROFILE\Desktop\FilePath.txt») is the argument being passed through the ReadAllLines() method which in this case is pointing a temporary file created on the Users Desktop named FilePath.txt
- [string] $line declares a new String variable $line
- foreach ($line in $lines) { $listBox.Text = $listBox.Items.Add($line) } is a conditional loop which continues until there are no more new lines of text in our file $FilePath.txt. For each new line in FilePath.txt assign that line of text to our [String] $line. Now add this $line to our ListBox.
Without this snippet of code when we copy the data from $outputBox to $listBox, all lines would appear as a single long line in our ListBox. Using this Array conditional loop approach allows us to take one line at a time and add it to the ListBox.
- $outputBox.Clear() instructs in this case to clear the TextBox $outputBox of its contents once the conditional loop has completed.
- Remove-Item «C:\Users\Regedit32\Desktop\FilePath.txt» will delete the temporary file on User’s Desktop named FilePath.txt when the actions of the conditional loop have completed and thus populated our dragged text from the TextBox to our ListBox.
Note: You’ll notice if you run this Script the TextBox $outputBox contains a list of names of a particular file extension the User chose, for example regedit.exe
However, after we drag this list to our ListBox that Text data miraculously changes to a full file path to the file, e.g. C:\Windows\regedit.exe
This occurs because of another conditional loop coded earlier that is contained in each of the supporting Functions for the file type the User chooses to explore.
I will not re-explain this here as (1) it is very similar to the conditional loop already explained above, and (2) the Function its included in while supporting the clicking of the EXE button in our Form, is simply using standard snippets of code explained in previous Tutorials. If you need help understanding the support functions in this Script ask and I’ll go through it step by step.
Remove and/or Initialize these control event handlers
As one last piece of house maintenance, we need to add our event handlers to the Form, and also remove them as the Form is closed ( Disposed() ).
Code:
$form_FormClosed = {
  try {
    $Form.remove_FormClosed($Form_Cleanup_FormClosed)
    $outputBox.remove_MouseDown($outputBox_MouseDown)
    $listBox.remove_DragEnter($listBox_DragEnter)
    $listBox.remove_DragDrop($listBox_DragDrop)
  }
  catch [Exception] {}
}
#Initialize Events
$Form.Add_Click($button6_Click)
$button1.Add_Click($button1_Click)
$button2.Add_Click($button2_Click)
$button3.Add_Click($button3_Click)
$button4.Add_Click($button4_Click)
$button5.Add_Click($button5_Click)
$button6.Add_Click($button6_Click)
$outputBox.Add_MouseDown($outputBox_MouseDown)
$listBox.Add_DragEnter($listBox_DragEnter)
$listBox.Add_DragDrop($listBox_DragDrop)

$Form.Add_FormClosed($Form_FormClosed)
Again, I’ve explained these techniques in previous tutorials, so I will not repeat myself, but as you can see in the code block above, you do need to add each event handler and remove them too for Form Opening and Closure.
If you need help understanding this code block, just ask and I’ll give a detailed break down of what its doing.
The Full Script Code is below:
Code:
<#
__          ___           _                  __  ___  ______
\ \        / (_)         | |                /_ |/ _ \|  ____|
\ \  /\  / / _ _ __   __| | _____      _____| | | | | |__ ___  _ __ _   _ _ __ ___  ___   ___ ___  _ __ ___
  \ \/  \/ / | | '_ \ / _` |/ _ \ \ /\ / / __| | | | |  __/ _ \| '__| | | | '_ ` _ \/ __| / __/ _ \| '_ ` _ \
   \  /\  /  | | | | | (_| | (_) \ V  V /\__ \ | |_| | | | (_) | |  | |_| | | | | | \__ \| (_| (_) | | | | | |
    \/  \/   |_|_| |_|\__,_|\___/ \_/\_/ |___/_|\___/|_|  \___/|_|   \__,_|_| |_| |_|___(_)___\___/|_| |_| |_|


PowerShell Script Repository: https://www.windows10forums.com/articles/categories/powershell-scripts.8/
Author: Regedit32
#>

Add-Type -AssemblyName System.Windows.Forms

# All file types explored
Function AllFileExplorer {

  # Variable to store what user types into Input textbox
  $Input = $inputBox.Text

  # Set path to user's input
  Set-Location $Input

  # Create Temporary File
  foreach ($item in $outputBox) {
    # Set filepaths
    $str = Get-ChildItem -Filter *.*
  }
  $outputBox.Text = $str.FullName
  # Save Temporary file to Desktop
  $outputBox.Text.Split() | Out-File $env:USERPROFILE\Desktop\FilePath.txt -Append
  $outputBox.Clear()

  # Variable to store results of actioning the Input
  $Result = Get-ChildItem -Name $Input -Filter *.* | Out-String


  # Assign Result to OutputBox
  $outputBox.Text = $Result
}

# All Executable files in selected path explored
Function ExeFileExplorer {

  # Variable to store what user types into Input textbox
  $Input = $inputBox.Text

  # Set path to user's input
  Set-Location $Input

  # Create Temporary File
  foreach ($item in $outputBox) {
    # Set filepaths
    $str = Get-ChildItem -Filter *.exe
  }
  $outputBox.Text = $str.FullName
  # Save Temporary file to Desktop
  $outputBox.Text.Split() | Out-File $env:USERPROFILE\Desktop\FilePath.txt -Append
  $outputBox.Clear()

  # Variable to store results of actioning the Input
  $Result = Get-ChildItem -Name $Input -Filter *.exe | Out-String

  # Assign Result to OutputBox
  $outputBox.Text = $Result
}

# All DLL files in seleced path explored
Function DllFileExplorer {

  # Variable to store what user types into Input textbox
  $Input = $inputBox.Text

  # Set path to user's input
  Set-Location $Input

  # Create Temporary File
  foreach ($item in $outputBox) {
    # Set filepaths
    $str = Get-ChildItem -Filter *.dll
  }
  $outputBox.Text = $str.FullName
  # Save Temporary file to Desktop
  $outputBox.Text.Split() | Out-File $env:USERPROFILE\Desktop\FilePath.txt -Append
  $outputBox.Clear()

  # Variable to store results of actioning the Input
  $Result = Get-ChildItem -Name $Input -Filter *.dll | Out-String

  # Assign Result to OutputBox
  $outputBox.Text = $Result
}


# All SYS files of selected path explorered
Function SysFileExplorer {

  # Variable to store what user types into Input textbox
  $Input = $inputBox.Text

  # Set path to user's input
  Set-Location $Input

  # Create Temporary File
  foreach ($item in $outputBox) {
    # Set filepaths
    $str = Get-ChildItem -Filter *.sys
  }
  $outputBox.Text = $str.FullName
  # Save Temporary file to Desktop
  $outputBox.Text.Split() | Out-File $env:USERPROFILE\Desktop\FilePath.txt -Append
  $outputBox.Clear()

  # Variable to store results of actioning the Input
  $Result = Get-ChildItem -Name $Input -Filter *.sys | Out-String
  $str = Get-ChildItem -Filter *.sys

  # Assign Result to OutputBox
  $outputBox.Text = $Result

  Return $str
}

# All TXT files of selected path explored
Function TxtFileExplorer {

  # Variable to store what user types into Input textbox
  $Input = $inputBox.Text

  # Set path to user's input
  Set-Location $Input

  # Create Temporary File
  foreach ($item in $outputBox) {
    # Set filepaths
    $str = Get-ChildItem -Filter *.txt
  }
  $outputBox.Text = $str.FullName
  # Save Temporary file to Desktop
  $outputBox.Text.Split() | Out-File $env:USERPROFILE\Desktop\FilePath.txt -Append
  $outputBox.Clear()

  # Variable to store results of actioning the Input
  $Result = Get-ChildItem -Name $Input -Filter *.txt | Out-String

  # Assign Result to OutputBox
  $outputBox.Text = $Result
}

$Form = New-Object system.Windows.Forms.Form
$Form.Text = "Drag & Drop Files to listBox"
$Form.TopMost = $true
$Form.Width = 800
$Form.Height = 600

$listBox = New-Object system.windows.Forms.ListBox
$listBox.BackColor = "#9a94be"
$listBox.ForeColor = "#000000"
$listBox.Size = New-Object System.Drawing.Size(360,404)
$listBox.location = new-object system.drawing.point(400,137)
$listBox.Font = "Microsoft Sans Serif,10"
$listBox.AllowDrop = $true

$label2 = New-Object system.windows.Forms.Label
$label2.Text = "Drag `&& Drop Files or Directories Here"
$label2.AutoSize = $true
$label2.Width = 360
$label2.Height = 20
$label2.location = new-object system.drawing.point(400,100)
$label2.Font = "Microsoft Sans Serif,14"

$checkBox = New-Object system.windows.Forms.CheckBox
$checkBox.Text = "Clear "
$checkBox.AutoSize = $true
$checkBox.Width = 95
$checkBox.Height = 30
$checkBox.location = new-object system.drawing.point(710,60)
$checkBox.Font = "Microsoft Sans Serif,12,style=Bold"

# Create an Output textbox, 10 pixels in from Form Boundary and 150 pixels down
# As we want a multiline output set textbox size to 360 px x 400 px
# .Multiline declares the textbox is multi-line
# Declare vertical scrollbars
$outputBox = New-Object System.Windows.Forms.TextBox
$outputBox.Location = New-Object System.Drawing.Size(20,140)
$outputBox.Size = New-Object System.Drawing.Size(360,400)
$outputBox.MultiLine = $true
$outputBox.ScrollBars = "Vertical"
$outputBox.Font = "Microsoft Sans Serif,10"

# Buttons
$button1 = New-Object system.windows.Forms.Button
$button1.BackColor = "#000000"
$button1.Text = "*.*"
$button1.ForeColor = "#ffffff"
$button1.Width = 60
$button1.Height = 30
$button1.location = new-object system.drawing.point(20,100)
$button1.Font = "Microsoft Sans Serif,12"

$button2 = New-Object system.windows.Forms.Button
$button2.BackColor = "#000000"
$button2.Text = "EXE"
$button2.ForeColor = "#ffffff"
$button2.Width = 60
$button2.Height = 30
$button2.location = new-object system.drawing.point(90,100)
$button2.Font = "Microsoft Sans Serif,12"

$button3 = New-Object system.windows.Forms.Button
$button3.BackColor = "#000000"
$button3.Text = "DLL"
$button3.ForeColor = "#ffffff"
$button3.Width = 60
$button3.Height = 30
$button3.location = new-object system.drawing.point(160,100)
$button3.Font = "Microsoft Sans Serif,12"

$button4 = New-Object system.windows.Forms.Button
$button4.BackColor = "#000000"
$button4.Text = "SYS"
$button4.ForeColor = "#ffffff"
$button4.Width = 60
$button4.Height = 30
$button4.location = new-object system.drawing.point(230,100)
$button4.Font = "Microsoft Sans Serif,12"

$button5 = New-Object system.windows.Forms.Button
$button5.BackColor = "#000000"
$button5.Text = "TXT"
$button5.ForeColor = "#ffffff"
$button5.Width = 60
$button5.Height = 30
$button5.location = new-object system.drawing.point(300,100)
$button5.Font = "Microsoft Sans Serif,12"

$button6 = New-Object system.windows.Forms.Button
$button6.BackColor = "#4d194b"
$button6.Text = "Click to save as listBox.txt to Desktop"
$button6.ForeColor = "#ffffff"
$button6.Width = 300
$button6.Height = 30
$button6.location = new-object system.drawing.point(400,60)
$button6.Font = "Microsoft Sans Serif,12"

# Declare the action to occur when buttons clicked
$button1.Add_Click({ AllFileExplorer })
$button2.Add_Click({ ExeFileExplorer })
$button3.Add_Click({ DllFileExplorer })
$button4.Add_Click({ SysFileExplorer })
$button5.Add_Click({ TxtFileExplorer })
$button6.Add_Click($button6_Click)

# Input Box
$inputBox = New-Object system.windows.Forms.TextBox
$inputBox.Width = 360
$inputBox.Height = 20
$inputBox.location = new-object system.drawing.point(20,40)
$inputBox.Font = "Microsoft Sans Serif,10"

# Labels
$label1 = New-Object system.windows.Forms.Label
$label1.Text = "  Type Directory View (e.g. C:\Windows)  "
$label1.BackColor = "#b41c1f"
$label1.AutoSize = $true
$label1.ForeColor = "#ffffff"
$label1.Width = 360
$label1.Height = 30
$label1.location = new-object system.drawing.point(20,10)
$label1.Font = "Microsoft Sans Serif,14"

$label3 = New-Object system.windows.Forms.Label
$label3.Text = "Select File Extension to view"
$label3.AutoSize = $true
$label3.Width = 360
$label3.Height = 30
$label3.location = new-object system.drawing.point(20,70)
$label3.Font = "Microsoft Sans Serif,14"

# Add controls to form
$Form.SuspendLayout()
$Form.Controls.Add($button1)
$Form.Controls.Add($button2)
$Form.Controls.Add($button3)
$Form.Controls.Add($button4)
$Form.Controls.Add($button5)
$Form.Controls.Add($button6)
$Form.Controls.Add($checkBox)
$Form.Controls.Add($label1)
$Form.Controls.Add($label2)
$Form.Controls.Add($label3)
$Form.Controls.Add($inputBox)
$Form.Controls.Add($outputBox)
$Form.Controls.Add($listBox)
$Form.ResumeLayout()
# Event handlers
$button6_Click = {
  foreach ($item in $listBox) {
    # Save listBox to Desktop
    $listBox.Items | Out-File $env:USERPROFILE\Desktop\ListBox.txt -Append
  }
  if ($checkBox = 'Checked') {
    $listBox.Items.Clear()
  }
}

<#
   ------------------------------------------------------------
   OutputBox Event Handler
   Allows 1 or more items to be selected and dragged to listBox
   ------------------------------------------------------------ #>
$outputBox_MouseDown = [System.Windows.Forms.MouseEventHandler] {
  $outputBox.DoDragDrop($outputBox.Text,[System.Windows.Forms.DragDropEffects]::Copy)
}

<#
   ----------------------------------------------------------------------------------
   ListBox Event Handlers
   Sets the only location a dragged item can enter.  In this case that is the ListBox
   ----------------------------------------------------------------------------------  #>
$listBox_DragEnter = [System.Windows.Forms.DragEventHandler] {
  $_.Effect = $_.AllowedEffect
}

<#
   ------------------------------------------------------------------------
   > Set how to drop selected item(s) into ListBox
   > Makes use of [System.IO.File] to read each line
     of a file, then add each line to the ListBox.

     Required to prevent multiple items from a multiline TextBox
     appearing as one long line inside ListBox, rather than a list of items
     ---------------------------------------------------------------------- #>
$listBox_DragDrop = [System.Windows.Forms.DragEventHandler] {

  # Read Temorary File back into ListBox
  [string[]] $lines =  [System.IO.File]::ReadAllLines("$env:USERPROFILE\Desktop\FilePath.txt")
  [string] $line

  foreach ($line in $lines) {
    $listBox.Text = $listBox.Items.Add($line)
  }
  # Clear OutputBox
  $outputBox.Clear()

  # Delete Temporary File
  Remove-Item "$env:USERPROFILE\Desktop\FilePath.txt"
}

$form_FormClosed = {
  try {
    $Form.remove_FormClosed($Form_Cleanup_FormClosed)
    $outputBox.remove_MouseDown($outputBox_MouseDown)
    $listBox.remove_DragEnter($listBox_DragEnter)
    $listBox.remove_DragDrop($listBox_DragDrop)
  }
  catch [Exception] {}
}
#Initialize Events
$Form.Add_Click($button6_Click)
$button1.Add_Click($button1_Click)
$button2.Add_Click($button2_Click)
$button3.Add_Click($button3_Click)
$button4.Add_Click($button4_Click)
$button5.Add_Click($button5_Click)
$button6.Add_Click($button6_Click)
$outputBox.Add_MouseDown($outputBox_MouseDown)
$listBox.Add_DragEnter($listBox_DragEnter)
$listBox.Add_DragDrop($listBox_DragDrop)

$Form.Add_FormClosed($Form_FormClosed)

# Initialize Form
[void]$Form.ShowDialog()
$Form.Dispose()
Well that is it for now. In Part 3 of this tutorial, I’ll be showing you are much more User Friendly GUI for the Drag&DropGUI we’ve just been looking at.
I’ll be also going into more examples of Drag & Drop to illustrate the various ways to acheive this in PowerShell, including the use of custom templates.
Got a Question? Ask away? Got a request for things to add or a new tutorial topic, let us know in the Discussion section. Want to contribute your own tutorials on PowerShell? Please do!
Regards,
Regedit32
Одним из существенных недостатков скриптов PowerShell при использовании их простыми пользователями (не сисадминами или программистами) — его консольный интерфейс. Результат выполнения скрипта PoSh отображается также в командной строке и не всегда удобен для восприятия конечного пользователя. Однако Powershell это мощное и современное средство автоматизации для Windows, которое позволяет прозрачно использовать разнообразные объекты .NET Framework. К примеру, с помощью API. NET вы сможете легко создать простой графический интерфейс для ваших PowerShell скриптов.
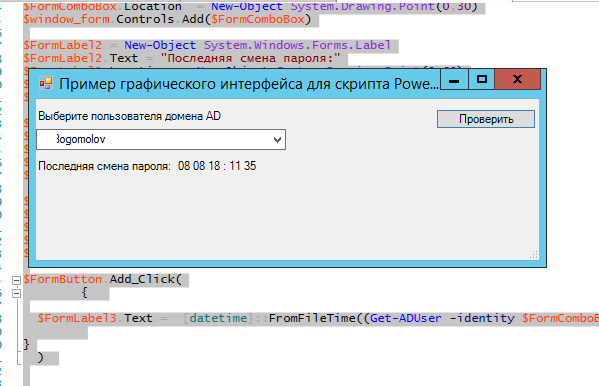
В этом примере вы покажем, как с помощью PowerShell создать простую Windows форму и расположить на ней различные стандартные диалоговые элементы (кнопки, поля для ввода, текстовые элементы, выпадающие списки). К примеру наша задача – написание простого GUI для определения времени последней смены пароля пользователя в Active Directory. Логика скрипта следующая — из AD в выпадающий список загружается список всех учетных записей в домене. Пользователь выбирает учетную запись, нажимает кнопку и в текстовом поле отображается данные о последнем времени смены пароля пользователя.
В данном примере мы используем PowerShell 3.0+ (я буду писать скрипт в PowerShell ISE в Windows 10).
Для использования функционала .NET по созданию форм мы воспользуемся классом System.Windows.Forms. Загрузить данный класс в сессию PowerShell можно так:
Add-Type -assembly System.Windows.Forms
Теперь создадим графическую форму (окно):
$window_form = New-Object System.Windows.Forms.Form
Установим заголовок и размеры окна формы (в пикселях):
$window_form.Text ='Пример графического интерфейса для скрипта PowerShell'
$window_form.Width = 500
$window_form.Height = 200
Чтобы форма автоматически растягивалась, если элементы расположенные на форме выйдут за границы, нужно включить атрибут AutoSize:
$window_form.AutoSize = $true
Теперь можно отобразить форму на экране.
$window_form.ShowDialog()
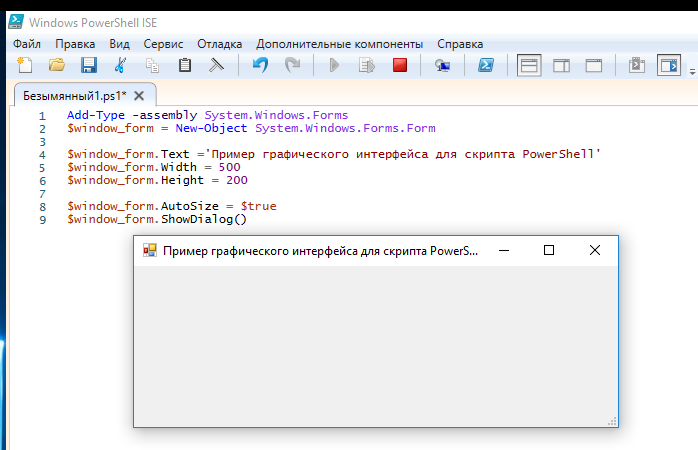
Как вы видите, на экране появилась пустая форма указанных размеров. Чтобы добавить не нее различные графические диалоговые элементы, перед строкой $window_form.ShowDialog() добавим следующие строки.
Создадим на форме надпись:
$FormLabel1 = New-Object System.Windows.Forms.Label
$FormLabel1.Text = "Выберите пользователя домена AD"
$FormLabel1.Location = New-Object System.Drawing.Point(0,10)
$FormLabel1.AutoSize = $true
$window_form.Controls.Add($FormLabel1)
Создадим выпадающий список и заполним его списком учетных записей из домена, полученных с помощью командлета Get-ADuser (входит в модуль ActiveDirectory для PowerShell).
$FormComboBox = New-Object System.Windows.Forms.ComboBox
$FormComboBox.Width = 250
$Users = get-aduser -filter * -Properties SamAccountName
Foreach ($User in $Users)
{
$FormComboBox.Items.Add($User.SamAccountName);
}
$FormComboBox.Location = New-Object System.Drawing.Point(60,10)
$window_form.Controls.Add($FormComboBox)
Отобразим еще две надписи. Во второй будет отображаться время последней смены пароля выбранного пользователя.
$FormLabel2 = New-Object System.Windows.Forms.Label
$FormLabel2.Text = "Последняя смена пароля:"
$FormLabel2.Location = New-Object System.Drawing.Point(0,40)
$FormLabel2.AutoSize = $true
$window_form.Controls.Add($FormLabel2)
$FormLabel3 = New-Object System.Windows.Forms.Label
$FormLabel3.Text = ""
$FormLabel3.Location = New-Object System.Drawing.Point(140,60)
$FormLabel3.AutoSize = $true
$window_form.Controls.Add($FormLabel3)
Теперь поместим на форму кнопку действия с надписью «Проверить»:
$FormButton = New-Object System.Windows.Forms.Button
$FormButton.Location = New-Object System.Drawing.Size(400,10)
$FormButton.Size = New-Object System.Drawing.Size(100,20)
$FormButton.Text = "Проверить"
$window_form.Controls.Add($FormButton)
Теперь к созданной кнопке привяжем скрипт проверки, которые должен вызываться при щелчке на кнопке (событие Add_Click). Для преобразования даты из формата TimeStamp в нормальный вид воспользуемся функцией [datetime]::FromFileTime.
$FormButton.Add_Click(
{
$FormLabel3.Text = [datetime]::FromFileTime((Get-ADUser -identity $FormComboBox.selectedItem -Properties pwdLastSet).pwdLastSet).ToString('dd mm yy : hh ss')
}
)
Запустите PowerShell скрипт. Как вы видите, он заполняет выпадающий список именами учётных записей из AD. Если вы выберите нужную учетную запись пользователя и нажмите на кнопку, в поле отобразится время последней смены пароля данного пользователя в Active Directory.
Аналогичным образом вы можете создать следующие графические элементы на форме:
- CheckBox
- RadioButton
- TextBox
- ChekedListBox
- GroupBox
- ListBox
- TabControl
- ListView
- TreeView
- DateTimePicker
- TrackBar
- PictureBox
- ProgressBar
- HScrollBar
- VScrollBar
- ContextMenu
- Menu
Для вывода диалогового окна с уведомлением пользователю можно испоьзоват следующий код:
[System.Windows.Forms.MessageBox]::Show("Запущен процесс расчета","Предупреждение",0)
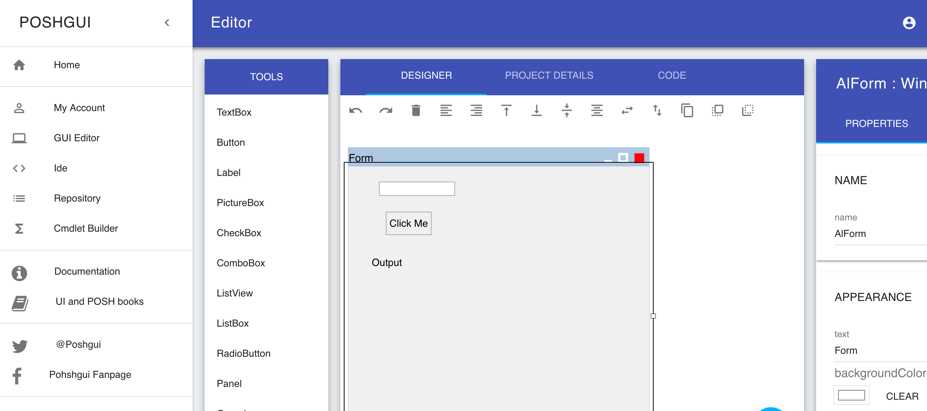
Для более удобного и быстрого создания графических элементов для PowerShell форм вы можете воспользоваться онлайн редактор для создания GUI формы для Powershell : https://poshgui.com/Editor.
С помощью него вы сможете создать красивую форму с необходимыми диалоговыми элементами. И получить готовый код графической формы с разными элементами и кнопками для ваших PowerShell скриптов.