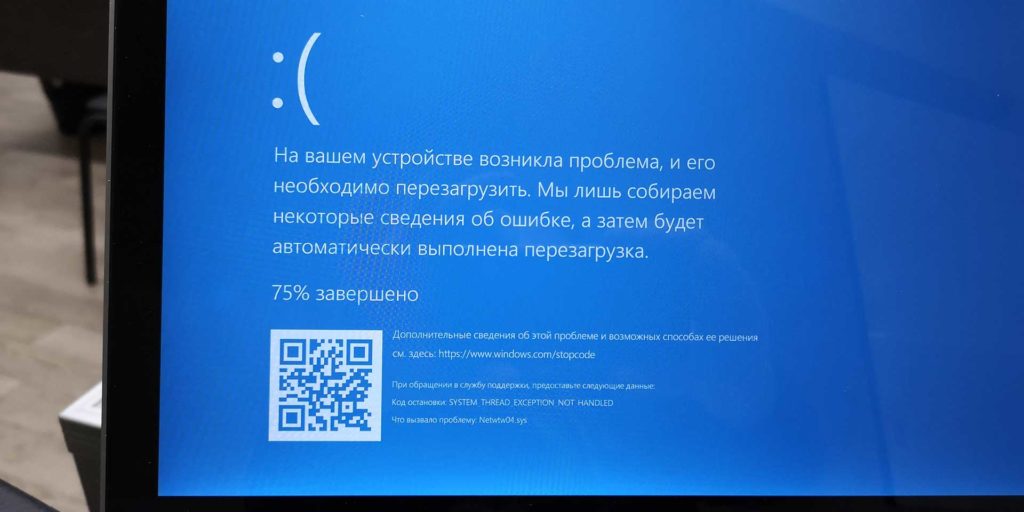
Этот пост поможет вам, если вы получите сообщение Драйвер IRQL НЕ МЕНЬШЕ ИЛИ РАВЕН или ИСКЛЮЧЕНИЕ СИСТЕМНОЙ РЕЗЬБЫ НЕ ОБРАБОТАНО , ошибка Netwtw04.sys в Windows 10. Системные файлы или файлы .sys являются неотъемлемой частью операционной системы Windows. Это хранилище настроек системного драйвера, используемое системой Windows для связи с подключенным оборудованием и устройствами. Системные файлы необходимы для нормального функционирования операционной системы. Многие пользователи Windows сталкиваются с ошибкой Window Blue Screen of Death во время запуска приложения или при отключении внешних устройств от системы.

Netwtw04.sys является частью программного обеспечения Intel PROSet/Wireless WiFi. Вы можете увидеть две ошибки Stop для файла драйвера Netwtw04.sys:
- DRIVER_IRQL_NOT_LESS_OR_EQUAL Что не удалось: Netwtw04.sys. Это указывает на то, что драйвер режима ядра попытался получить доступ к доступной памяти в процессе IRQL, который был слишком высоким.
- SYSTEM_THREAD_EXCEPTION_NOT_HANDLED Что не удалось: Netwtw04.sys. Основной причиной этой ошибки могут быть несовместимые драйверы с операционной системой.
Вообще говоря, причина появления синего экрана Netwtw04.sys может быть вызвана несколькими причинами, такими как поврежденные файлы, неправильно настроенные драйверы устройств, вредоносные программы, устаревшие драйверы, плохие драйверы, поврежденный реестр Windows или поврежденные системные файлы.
Содержание
- Netwtw04.sys Ошибка синего экрана
- 1] Откат сетевого драйвера
- 2] Обновление сетевого драйвера
- 3] Запустите сканирование SFC
- 4] Запустите DISM
- 5] Запустите CHKDSK
Netwtw04.sys Ошибка синего экрана
В этой статье мы расскажем о некоторых решениях для исправления ошибок типа «синий экран» netwtwo4.sys в Windows 10.
1] Откат сетевого драйвера
Если вы недавно обновили программное обеспечение драйвера, вам необходимо откатить драйвер устройства, т. Е. Вернуться к предыдущей рабочей версии.
Откройте Диспетчер устройств , щелкните запись, помеченную как Сетевые адаптеры , и разверните ее. Затем выберите записи драйвера, помеченные соответствующим образом, кроме чего-либо, в контексте WAN Miniport. Выберите их по одному и дважды щелкните по ним. Откроется новое мини-окно.

Убедитесь, что вы находитесь на вкладке с именем Драйвер. Если нет, перейдите к нему. Теперь нажмите кнопку Откатить драйвер.
Это установит предыдущую известную стабильную версию драйвера, установленного на вашем компьютере.
Перезагрузите компьютер, чтобы изменения вступили в силу.
2] Обновление сетевого драйвера
Если ваш текущий драйвер создает вам эту проблему, вам необходимо обновить драйвер устройства. Откройте Панель управления и нажмите «Диспетчер устройств». Нажмите Сетевой адаптер и щелкните правой кнопкой мыши текущий драйвер. В раскрывающемся меню выберите Обновить драйвер .
Вы также можете загрузить драйвер с веб-сайта производителя, использовать утилиту обновления драйверов Intel или автоматически обновить его через Интернет. Вы можете скачать последнюю версию этого драйвера Intel здесь на intel.com.
3] Запустите сканирование SFC
Проверка системных файлов – это инструмент командной строки, который сканирует поврежденные системные файлы, включая файлы Netwtw04.sys, а также восстанавливает поврежденные системные файлы. Рекомендуется запустить сканирование SFC для восстановления проблемных системных файлов.
4] Запустите DISM
Найдите команду Командная строка в меню «Пуск». Щелкните правой кнопкой мыши командную строку и выберите параметр «Запуск от имени администратора» в раскрывающемся меню.
Введите команду следующую команду для запуска DISM и нажмите Enter:
DISM/Online/Cleanup-Image/RestoreHealth
Перезагрузите вашу систему. Это восстановит поврежденный образ системы.
5] Запустите CHKDSK
Поврежденный жесткий диск может привести к ошибке синего экрана Netwtw04.sys. CHKDSK сканирует диск на наличие поврежденных жестких дисков.
Откройте командную строку от имени администратора. Введите команду CHKDSK и нажмите Enter, чтобы проверить свой диск.
Перезагрузите вашу систему.
Если ничего не помогает, вы можете отключить HardwareAcceleration или выполнить восстановление системы и посмотреть, поможет ли это вам.
Всего наилучшего!
Blue Screen of Death errors or Stop errors are indications that something’s wrong with your computer. So when you encounter one, you must find out what the root cause of the problem is before it gets out of hand. One of the BSOD errors you might encounter on your Windows 10 computer is the “DRIVER IRQL NOT LESS OR EQUAL or SYSTEM THREAD EXCEPTION NOT HANDLED, Netwtw04.sys failed” error.
As you know, system files or .sys files are some of the essential parts of the Windows operating system. It is a repository of system driver settings used by the Windows operating system in order to communicate with the connected hardware and devices. They are essential for the normal functioning of the operating system. A lot of Windows 10 users are facing this particular Blue Screen of Death error whenever they open an app or disconnect external devices from the system.
The Netwtw04.sys file is a part of the Intel PROSet/Wireless Wi-Fi software. And so when you might encounter two kinds of Stop errors for the Netwtw04.sys driver file such as:
- “DRIVER_IRQL_NOT_LESS_OR_EQUAL What failed: Netwtw04.sys.” – This kind of error message signifies that a kernel-mode driver tried to access pageable memory at a process IRQL that was too high.
- “SYSTEM_THREAD_EXCEPTION_NOT_HANDLED What failed: Netwtw04.sys” – This error message indicates that the root cause of the error might be incompatible drivers with the operating system. In general, the root cause of the Netwtw04.sys BSOD error might be due to several reasons such as corrupted files, incorrect device driver configuration, malicious programs, outdated drivers, bad drivers, corrupted Windows Registry as well as some damaged or corrupted system files.
Whichever of the two error messages you got, you can try the troubleshooting options given below to fix the “DRIVER IRQL NOT LESS OR EQUAL or SYSTEM THREAD EXCEPTION NOT HANDLED, Netwtw04.sys failed” BSOD error.
Option 1 – Try to rollback your Network driver
If you have updated the driver software as of late and you suddenly got this BSOD error, you might have to roll back the device driver – in other words, switch back to the previous working version. To do that, follow these steps:
- Tap the Win + R keys to launch the Run window and then type in the “devmgmt.msc” command and hit Enter to open the Device Manager window.
- Under the Device Manager, you will see a list of drivers. From there, look for the Network Adapters and expand it.
- Next, select the driver entries that are labeled appropriately other than anything in the context of the WAN Miniport.
- Then select each one of them and double-click to open a new mini window.
- After that, make sure that you’re on the Driver tab and if you are not, just navigate to it then click the Roll Back Driver button to switch back to the previous version of your Network adapters.
- Now restart your computer to successfully apply the changes made.
Option 2 – Try to update the Network drivers
If the present Network driver is giving you a headache that is the “DRIVER IRQL NOT LESS OR EQUAL or SYSTEM THREAD EXCEPTION NOT HANDLED, Netwtw04.sys failed” BSOD error, then you need to update the Network drivers. To do so, here’s what you have to do:
- Tap the Win + R keys to launch the Run window and then type in the “devmgmt.msc” command and hit Enter to open the Device Manager window.
- Under the Device Manager, you will see a list of drivers. From there, look for the Network Adapters and expand it.
- Then right-click on each one of the Network drivers and update them all.
- Restart your PC and see if it helped in fixing the BSOD error.
Note: If updating the network drivers didn’t help in fixing the problem, you can also try to uninstall the very same drivers and restart your Windows 10 PC. After that, the system itself will reinstall the drivers you just uninstalled. Alternatively, you can also download and install the drivers from the manufacturer’s website directly.
Option 3 – Try running the System File Checker Scan
The SFC or System File Checker scan could detect and automatically repair damaged system files that could be causing the Netwtw04.sys failed BSOD error. SFC is a built-in command utility that helps in restoring corrupted files as well as missing files. It replaces bad and corrupted system files to good system files. To run the SFC command, follow the steps given below.
- Tap Win + R to launch Run.
- Type in cmd in the field and tap Enter.
- After opening Command Prompt, type in sfc /scannow
The command will start a system scan which will take a few whiles before it finishes. Once it’s done, you could get the following results:
- Windows Resource Protection did not find any integrity violations.
- Windows Resource Protection found corrupt files and successfully repaired them.
- Windows Resource Protection found corrupt files but was unable to fix some of them.
Option 4 – Run the DISM Tool
The DISM tool is another command-line tool in the Windows operating system that could help users fix various corrupted system files. To use it, follow these steps:
- Open the Command Prompt as admin.
- Then type in this command: DISM /Online /Cleanup-Image /RestoreHealth
- The DISM command you entered will repair the corrupted system image. Do not close the window if the process takes a while as it will probably take a few minutes to finish.
Option 5 – Run the CHKDSK Utility
Running the CHKDSK utility might also help you resolve the Netwtw04.sys failed BSOD error. If your hard drive has issues with integrity, the update will really fail as the system will think that it’s not healthy and that’s where the CHKDSK utility comes in. The CHKDSK utility repairs hard drive errors that might be causing the problem.
- Open Command Prompt with admin privileges.
- After opening Command Prompt, execute the following command and hit Enter:
chkdsk /f /r
- Wait for the process to be completed and then restart your computer.
Do You Need Help with Your Device?
Our Team of Experts May Help

Troubleshoot.Tech Experts are There for You!
GET HELP
Troubleshoot.Tech experts work with all versions of Microsoft Windows including Windows 11, with Android, Mac, and more.
Share this article:
You might also like
The GifsGalore Toolbar from Mindspark Interactive Network, Inc. is proposed to active Web users who like to embed GIFs into their emails and share entertaining GIFs with friends via social media services. The GifsGalore software can be added to your Internet client for free but you need to be using Google Chrome, Internet Explorer or Mozilla Firefox for the GifsGalore Toolbar to be activated.
When installed it hijacks your New tab page and default search engine changing them to search.myway.com. This extension also monitors user browsing activity recording information such as: visited websites, clicked links, viewed products, etc. This information is later used to better target ads.
While browsing the internet with this extension enabled you will see additional pop-up ads, as well as sponsored links and injected ads throughout your browsing session, especially in search results.
About Browser Hijackers
Browser hijacking is actually a form of unwanted software program, often a browser add-on or extension, which causes modifications in web browser’s settings. There are various reasons why you may experience an internet browser hijack; however commercial, advertising, and marketing are definitely the main reasons for their creation. The idea would be to force users to visit specific sites that are aiming to improve their site visitor traffic and generate higher ad earnings. It could seem naive, but most of these sites are not legitimate and could present a serious risk to your online safety. Browser hijackers can even let other vicious programs without your knowledge further damage the computer.
Find out how to identify a browser hijack
When your web browser is hijacked, the following can happen: the browser’s homepage is modified; bookmark and the new tab are also changed; the default search engine has been changed and your browser security settings have been lowered without your knowledge; you see unwanted new toolbars added; unstoppable flurries of popup ads appear on your computer screen; your web browser gets sluggish, buggy, crashes very often; you are prohibited access to particular web pages, including the site of an anti-malware software developer like SafeBytes.
How browser hijacker finds its way onto your computer system
Browser hijackers might use drive-by downloads or file-sharing networks or perhaps an email attachment to reach a targeted computer. They may also come from any BHO, browser extension, toolbar, add-on, or plug-in with malicious purpose. Other times you might have unintentionally accepted a browser hijacker as part of an application package (usually freeware or shareware). Examples of well-known browser hijackers are Fireball, CoolWebSearch. save, Ask Toolbar, RocketTab, and Babylon Toolbar.
Removal
Some browser hijacking could be quite easily reversed by discovering and removing the corresponding malware software from your control panel. Yet, certain hijackers are far harder to find or eliminate since they might get themselves associated with some crucial computer files that enable them to operate as a necessary operating system process. Additionally, manual removals demand deep system knowledge and therefore can be a very difficult job for novices.
Installing and running an anti-malware program on the affected computer could automatically erase browser hijackers and other malicious applications. Safebytes Anti-Malware has a sophisticated anti-malware engine to help you prevent browser hijacking in the first place, and mop up any pre-existing problems. And use a PC optimizer, like Total System Care, to get rid of all related files in the registry and repair browser issues.
What you can do if Malware Stops You From Downloading Or Installing Anything?
All malware is bad, but certain types of malware do a lot more damage to your computer than others. Some malware is created to restrict or prevent things that you want to do on your PC. It may well not let you download anything from the internet or stop you from accessing some or all websites, particularly the antivirus websites. If you’re reading this article, you may have infected by a virus that stops you from installing security software such as Safebytes Antimalware on your PC. There are some actions you can take to circumvent this problem.
Remove malware in Safe Mode
The Windows OS includes a special mode known as “Safe Mode” in which just the bare minimum required programs and services are loaded. If the malware is obstructing internet access and affecting the computer, launching it in Safe Mode allows you to download anti-virus and run a scan whilst limiting possible damage. To enter into Safe Mode or Safe Mode with Networking, press the F8 key while the computer is starting up or run MSConfig and find the “Safe Boot” options in the “Boot” tab. After you restart into Safe Mode with Networking, you can download, install, as well as update the anti-malware program from there. At this point, you could run the antivirus scan to remove computer viruses and malware without any interference from another application.
Download the security software using an alternate web browser
Web-based viruses can be environment-specific, aiming for a particular browser or attacking specific versions of the browser. If you are not able to download the anti-malware software program using Internet Explorer, it means the virus could be targeting IE’s vulnerabilities. Here, you should switch over to a different browser like Firefox or Chrome to download the Safebytes Anti-malware program.
Install and run antivirus from your USB drive
Another solution is to create a portable anti-malware program onto your USB stick. Adopt these measures to run the antivirus on the affected computer system.
1) Make use of another virus-free computer to download Safebytes Anti-Malware.
2) Plug the Thumb drive into the uninfected computer.
3) Double click on the executable file to run the installation wizard.
4) Select flash drive as the place when the wizard asks you where you wish to install the software. Do as instructed on the screen to finish up the installation process.
5) Now, transfer the USB drive to the infected computer system.
6) Double click the Safebytes Anti-malware icon on the thumb drive to run the software.
7) Click on “Scan Now” to run a complete scan on the affected computer for malware.
How SafeBytes Anti-Malware Keep your Computer Virus Free
If you’re planning to purchase anti-malware for your desktop, there are plenty of brands and utilities for you to consider. A few of them are good but there are lots of scamware applications that pretend as legit anti-malware programs waiting around to wreak havoc on your computer. You need to go with a tool that has obtained a strong reputation and detects not only viruses but other kinds of malware as well. Amongst few good applications, SafeBytes Anti-Malware is the strongly recommended software program for the security-conscious individual.
SafeBytes anti-malware is a trusted tool that not only protects your PC completely but is also extremely user-friendly for people of all ability levels. With its cutting-edge technology, this application can help you remove multiples types of malware which include viruses, trojans, PUPs, worms, ransomware, adware, and browser hijackers.
SafeBytes anti-malware provides a myriad of enhanced features that sets it aside from all others. Below are a few of the good ones:
Robust, Anti-malware Protection: Built upon a greatly acclaimed anti-virus engine, this malware removal tool can identify and remove several stubborn malware threats like browser hijackers, PUPs, and ransomware that other common antivirus software will miss.
Live Protection: SafeBytes gives you round-the-clock protection for your personal computer restricting malware intrusions instantly. They’re extremely effective in screening and removing numerous threats because they are regularly improved with new updates and alerts.
Web Filtering: SafeBytes inspects the links present on a web page for possible threats and alerts you whether the website is safe to browse or not, through its unique safety ranking system.
Fast Scan: SafeBytes’s virus scan engine is one of the quickest and most efficient in the industry. It’s targeted scanning greatly increases the catch rate for viruses which is embedded in various computer files.
Very Low CPU and RAM Usage: SafeBytes is a lightweight and easy-of-use anti-virus and anti-malware solution. Since it uses low computer resources, this application leaves the computer power exactly where it belongs to: with you.
24/7 Premium Support: You will get 24/7 technical support to quickly resolve any issue with your security tool.
To sum it up all, SafeBytes Anti-Malware offers superb protection combined with very low system resource usage with both great malware detection and prevention. You now may realize that this particular software does more than just scan and eliminate threats from your computer. You’ll get the best all-around protection for the money you spend on SafeBytes AntiMalware subscription, there isn’t any doubt about it.
Technical Details and Manual Removal (Advanced Users)
To remove GifsGalore manually, go to the Add or Remove programs list in the Windows Control Panel and select the program you want to get rid of. For internet browser extensions, go to your web browser’s Addon/Extension manager and choose the add-on you would like to remove or disable. You’ll probably also want to reset your web browser.
If you choose to manually delete the system files and registry entries, use the following list to make sure you know precisely what files to remove before undertaking any actions. However, editing the registry is usually a difficult task that only experienced users and professionals should try to fix it. Moreover, some malware is capable of replicating or preventing deletion. Carrying out this malware-removal process in Safe Mode is recommended.
Files:
%LOCALAPPDATA%\GifsGaloreTooltab
%UserProfile%\Local Settings\Application Data\GifsGaloreTooltab
%UserProfile%\Local Settings\Application Data\Google\Chrome\User Data\Default\Sync Extension Settings\fnjgjdfhhakkbojkgmiihabbbjhgbchh
%UserProfile%\Local Settings\Application Data\Google\Chrome\User Data\Default\Extensions\fnjgjdfhhakkbojkgmiihabbbjhgbchh
%LOCALAPPDATA%\Google\Chrome\User Data\Default\Sync Extension Settings\fnjgjdfhhakkbojkgmiihabbbjhgbchh
Registry:
HKEY_LOCAL_MACHINE\Software\[APPLICATION]\Microsoft\Windows\CurrentVersion\Uninstall..Uninstaller
GifsGaloreTooltab Uninstall Internet Explorer
HKEY_CURRENT_USER\Software\Microsoft\Internet Explorer\LowRegistry\DOMStorage\gifsgalore.dl.tb.ask.com
HKEY_CURRENT_USER\Software\Microsoft\Internet Explorer\LowRegistry\DOMStorage\gifsgalore.dl.myway.com
HKEY_CURRENT_USER\Software\GifsGalore
Read More
Qualcomm Atheros Qca61x4a Driver is a software driver used in WI FI communication between OS and device itself. When this driver stops working usually it means loss of connection and no internet available.
This error knows to comes frequently and repeat itself over long periods of time which makes it quite annoying. If you are one of the unlucky users of Windows who get this error please keep reading in order to eliminate it and continue working on your computer normally.
-
Disable & Enable the Qualcomm Adapter Driver
Press ⊞ WINDOWS + X to open the secret menu, click on the device manager.
In device manager expand network adapters.
Right-click on Qualcomm Atheros Qca61x4a wireless network adapter and click on disable
Right-click on Qualcomm Atheros Qca61x4a wireless network adapter and click on enable -
Rollback the Qualcomm Adapter driver
Press ⊞ WINDOWS + X to open the secret menu, click on the device manager.
In device manager expand network adapters.
Right-click on Qualcomm Atheros Qca61x4a wireless network adapter and click on properties
Under properties, window click on Driver tab and left-click on Roll Back driver (if the option is greyed there is no previous driver, follow next step)
Choose your reason and click on OK -
Update Qualcomm Atheros driver to the latest version
Press ⊞ WINDOWS + X to open the secret menu, click on the device manager.
In device manager expand network adapters.
Right-click on Qualcomm Atheros Qca61x4a wireless network adapter and click on Update Driver -
Install the new driver in compatibility mode
Right-click on the installer package and choose properties
Go to the compatibility tab
Choose compatibility settings and install.
Read More
Error 118 — What is it?
Error 118 is a typical Google Chrome error. It pops up when Google Chrome fails to load websites like Facebook. It is usually displayed in the following format:
‘Error Message: Error 118 (net::ERR_CONNECTION_TIMED_OUT): The operation timed out.’
Solution
 Error Causes
 Error Causes
Error 118 may be triggered due to several reasons. This includes:
- Problems with DNS setting
- IP Address is filtering websites
- Cookies and invalid registry entries
Further Information and Manual Repair
To ensure smooth internet browsing on Google Chrome, it is advisable to repair the error 118. If error 118 is not resolved you will be unable to load and access your desired websites.
To avoid inconvenience and resolve the issue immediately, try the methods suggested below. These are easy and effective do-it-yourself methods that require no technical skills.
Method 1 — Change Proxy Settings
If your IP address is filtering websites, then you might experience error 118 while using Google Chrome. When this is the error cause, then it is advisable to add a proxy for your PC.
To change proxy settings and add a new proxy, simply click on Customize and Control Google Chrome menu. Now click the options button. Under the Google Chrome Options window select the Under the Hood tab.
After that in the Network, section click the change proxy settings button.
Check Show Suggestions for navigation errors and Use DNS pre-fetching to improve page load performance boxes. Now under Internet Properties, click LAN Settings.
Under LAN settings you will see the Proxy Server box, check it, and enter your new proxy settings. Click OK to confirm and save settings. This will hopefully resolve the issue.
Method 2 — Change to Google DNS
When the error is related to DNS settings then try this method to resolve it. Simply set DNS to use Google DNS. Here’s how it’s done:
- Go to the start menu, click Windows Control Panel, Network and Internet, and change adapter settings. Here you will see Local Area Connection.
- Right click to select properties at the bottom.
- Check Internet Protocol Version 4 and click properties.
- Now check the ‘Obtain an IP address automatically’ box and also select the option that says ‘Use the following DNS server addresses’.
- Change Preferred DNS to 8.8.4.4 and Alternate DNS server to 8.8.8.8 now click OK to confirm.
Method 3 — Remove the Bad Entries and Cookies Damaging the Registry
Bad entries and cookies saved in the registry can also trigger error 118.
To fix the issue immediately download Restoro. This is PC Fixer with multiple utilities including a registry cleaner. The registry cleaner removes all bad entries and cookies in seconds and repairs the damaged registry.
Click here to download Restoro and resolve error 118.
Read More
High Efficiency Image File Format (HEIF) is a container format for individual images and image sequences. The standard covers multimedia files that can also include other media streams, such as timed text, audio, and video. A HEIF image using High-Efficiency Video Coding, HEVC, requires only about half the storage space as the equivalent quality JPEG. HEIF also supports animation and is capable of storing more information than an animated GIF or APNG at a small fraction of the size.
HEIF files are a special case of the ISO Base Media File Format (ISOBMFF, ISO/IEC 14496-12), first defined in 2001 as a shared part of MP4 and JPEG 2000. Introduced in 2015, it was developed by the Moving Picture Experts Group (MPEG) and is defined as Part 12 within the MPEG-H media suite (ISO/IEC 23008-12).
HEIF was adopted by Apple in 2017 with the introduction of iOS 11, and support on other platforms is growing.
HEIF files can store the following types of data:
- Image items
- Storage of individual images, image properties, and thumbnails.
- Image derivations
- Derived images enable non-destructive image editing and are created on the fly by the rendering software using editing instructions stored separately in the HEIF file. These instructions (rectangular cropping, rotation by one, two or three quarter-turns, timed graphic overlays, etc.) and images are stored separately in the HEIF file, and describe specific transformations to be applied to the input images. The storage overhead of derived images is small.
- Image sequences
- Storage of multiple time-related and/or temporally predicted images (like a burst-photo shot or cinemagraph animation), their properties, and thumbnails. Different prediction options can be used in order to exploit the temporal and spatial similarities between the images. Hence, file sizes can be drastically reduced when many images are stored in the same HEIF file.
- Auxiliary image items
- Storage of image data, such as an alpha plane or a depth map, which complements another image item. These data are not displayed as such but used in various forms to complement another image item.
- Image metadata
- Storage of EXIF, XMP and similar metadata which accompany the images stored in the HEIF file.
Read More
The Gardening Enthusiast toolbar is another product that is advertised as a helpful addition to your browsing experience when it is really nothing more than the software you should remove as soon as possible. It is touted as a toolbar that will provide you with a lot of useful gardening tips. That is the hook to get you to install it. But, in truth, the only thing that it does is provide you with links to popular gardening websites that you can easily find on any search engine.
When installed the extension will change your default search engine and home page to MyWay.com
While browsing the internet with this extension you will see additional sponsored ads and links throughout your browsing session.
Anti-virus applications have marked this extension as a Browser Hijacker and are therefore marked for removal. While not considered malware, the fact that many users find it to hinder browser performance has led to its detection and flag for optional removal.
About Browser Hijackers
Browser hijacking means a malicious program code has control over and modified the settings of your browser, without your permission. Practically all browser hijackers are made for marketing or advertising purposes. Usually, hijackers will force hits to internet sites of their preference either to increase web traffic producing higher ad earnings, or to obtain a commission for every user visiting there. Nevertheless, it isn’t that harmless. Your internet safety is jeopardized and it is extremely annoying. Once the malware attacks your laptop or computer, it starts to mess things up a whole that slows your PC down to a crawl. In the worse case, you will be forced to tackle serious malware threats too.
Browser hijacking symptoms
The typical symptoms that suggest having this malware on your PC are: your home page has been reset to some unfamiliar website; you see new unwanted favorites or bookmarks added, usually directed to ad-filled or pornography sites; the default online search engine has been changed and the web browser security settings have been lowered without your knowledge; find new toolbars that you didn’t add; you notice lots of pop-up ads on your screen; your web browser gets sluggish, buggy, crashes quite often; Inability to navigate to certain sites, especially anti-malware and also other security software webpages.
Exactly how browser hijacker finds its way to your PC
A browser hijacker can be installed on your computer when you go to an infected site, click an e-mail attachment, or download something from a file-sharing website. They could be included with toolbars, BHO, add-ons, plug-ins, or browser extensions. Other times you might have accidentally accepted a browser hijacker as part of a software program package (generally freeware or shareware). Examples of popular browser hijackers are Fireball, Ask Toolbar, GoSave, CoolWebSearch, Babylon Toolbar, and RocketTab.
Browser hijackers can record user keystrokes to gather potentially invaluable information that leads to privacy issues, cause instability on computers, significantly disrupt user’s browsing experience, and ultimately slow down the PC to a point where it will become unusable.
Removing browser hijackers
Certain browser hijacking could be easily reversed by identifying and eliminating the corresponding malware application from your control panel. Unfortunately, many of the software products used to hijack an internet browser are deliberately designed to be hard to detect or get rid of. You should think of undertaking manual fixes only if you are a tech-savvy person, as risks are associated with tinkering with the computer registry and HOSTS file.
Browser hijackers can be effectively removed by installing anti-malware software on the affected PC. If you need to remove persistent hijackers effectively, install the award-winning anti-malware tool Safebytes Anti-Malware. And employ a system optimizer, like Total System Care, to eliminate all related files in the registry and fix browser issues.
How To Get Eliminate Malware That Is Preventing Anti-Malware Installation?
All malware is inherently harmful, but certain kinds of malicious software do more damage to your computer or laptop than others. Certain malware types alter internet browser settings by including a proxy server or change the computer’s DNS configuration settings. When this happens, you’ll be unable to visit certain or all of the sites, and thus unable to download or install the necessary security software to get rid of the computer virus. If you are reading this, chances are you’re stuck with a virus infection that is preventing you to download and/or install Safebytes Anti-Malware software on your computer. Even though this sort of problem can be harder to get around, there are some steps you can take.
Remove viruses in Safe Mode
Safe Mode is a special, basic version of Microsoft Windows where only the bare minimum services are loaded to prevent viruses as well as other problematic applications from loading. In the event, the malware is set to load immediately when PC boots, shifting to this particular mode can prevent it from doing so. To enter into Safe Mode or Safe Mode with Networking, press F8 while the PC is starting up or run MSCONFIG and locate the “Safe Boot” options under the “Boot” tab. Once you reboot into Safe Mode with Networking, you could download, install, as well as update anti-malware software from there. At this point, you can run the antivirus scan to eliminate viruses and malware without any interference from another application.
Switch over to an alternate internet browser
Malicious code might exploit vulnerabilities on a specific browser and block access to all antivirus software websites. In the event you suspect that your Internet Explorer happens to be hijacked by a virus or otherwise compromised by cybercriminals, the most effective thing to do would be to switch over to a different browser like Firefox, Chrome, or Safari to download your chosen computer security software – Safebytes Anti-Malware.
Install security software on a flash drive
To successfully get rid of the malware, you need to approach the problem of installing the anti-malware program on the affected computer system from a different perspective. To run antivirus from a USB drive, follow these simple measures:
1) Make use of another virus-free computer to download Safebytes Anti-Malware.
2) Plug the USB drive into the clean computer.
3) Double click on the downloaded file to open the installation wizard.
4) When asked, select the location of the pen drive as the place in which you want to store the software files. Follow the activation instructions.
5) Unplug the pen drive. You may now use this portable antivirus on the infected computer.
6) Double-click the anti-malware program EXE file on the pen drive.
7) Click on “Scan Now” to run a complete scan on the affected computer for viruses.
Benefits and Features of SafeBytes Security Suite
If you’re planning to purchase anti-malware for your desktop, there are numerous brands and utilities for you to consider. Some are well worth your money, but most aren’t. You must select a company that creates industry-best anti-malware and has earned a reputation as trustworthy. Among few good applications, SafeBytes Anti-Malware is the highly recommended software program for security-conscious people.
SafeBytes anti-malware is a very effective and easy-to-use protection tool that is designed for end-users of all levels of IT literacy. Using its cutting-edge technology, this application will help you get rid of several types of malware like viruses, worms, PUPs, trojans, adware, ransomware, and browser hijackers.
SafeBytes anti-malware takes PC protection to a totally new level with its enhanced features. Here are some of the features you will like in SafeBytes.
Anti-Malware Protection: Built upon a highly acclaimed anti-virus engine, this malware removal tool can detect and remove several stubborn malware threats such as browser hijackers, potentially unwanted programs, and ransomware that other typical antivirus programs will miss.
Real-time Threat Response: SafeBytes offers real-time active supervision and protection from all known viruses and malware. It will constantly monitor your computer for hacker activity and also gives end-users sophisticated firewall protection.
Safe Browsing: Safebytes allots all sites a unique safety ranking that helps you to have an idea of whether the website you’re about to visit is safe to browse or known to be a phishing site.
Lightweight: SafeBytes is renowned for its low impact on processing power and great detection rate of countless threats. It works silently and efficiently in the background so you are free to make use of your personal computer at full power all the time.
24/7 Premium Support: You will get 24/7 technical support to quickly resolve any issue with your security software.
SafeBytes will keep your personal computer safe from the latest malware threats automatically with hardly any input needed from you again. Malware problems will become a thing of the past once you put this software to use. You’ll get the best all-around protection for the money you spend on SafeBytes Anti-Malware subscription, there is no doubt about it.
Technical Details and Manual Removal (Advanced Users)
If you do not wish to use malware removal software and like to remove Gardening Enthusiast manually, you could do so by going to the Add/Remove Programs menu in the Control Panel and deleting the offending program; in cases of browser add-ons, you may uninstall it by visiting the browsers Add-on/Extension manager. You might also want to reset your home page and search engine providers, and also delete browsing history, temporary files, and internet cookies.
To make sure of complete removal, find the following Windows registry entries on your computer and remove them or reset the values appropriately. However, editing the Windows registry is really a difficult job that only experienced computer users and professionals should attempt to fix the problem. In addition, certain malware keeps replicating which makes it difficult to eliminate. Completing this task in Safe Mode is advised.
Folders:
C:\Program Files\GardeningEnthusiast_7j
Files:
Search and Delete:
7jbar.dll
7jhighin.exe
7jmedint.exe
7jregfft.dll
7jregiet.dll
7jhkstub.dll
7jreghk.dll
7jSrcAs.dll
7jSrchMn.exe
NP7jStub.dll
7jPlugin.dll
7jauxstb.dll
7jbprtct.dll
7jdlghk.dll
7jradio.dll
7jieovr.dll
INSTALL.RDF
Read More
EverydayLookup is a browser extension for Google Chrome developed by Mindspark Inc. This extension allows users to find what mobile network a certain number belongs to, to find out an area code of a country/town, or locate a town by zip code. While these features look promising and interesting, this extension comes with a downside.
When installed, this extension will change your default search engine, the home page, and new tab to search from MyWay.com, it will monitor user browsing activity, log searches, visited links, opened websites, and other information. This information is forwarded to Mindspark ad servers, then later sold/used to better target ads.
While browsing the internet with this extension you will see additional injected ads and sponsored content throughout your browsing sessions (even if the ads do not match your search queries). It can inject banners to websites, and sometimes even put an ad above website content making it extremely annoying to deal with.
About Browser Hijackers
Browser hijacking means that a malicious code has taken power over and modified the settings of your web browser, without your permission. Browser hijackers are capable of doing many different things on your computer. Typically, browser hijacking is used for earning ad revenue that comes from forced advert mouse clicks and site visits. Even though it might seem naive, all browser hijackers are damaging and thus always classified as security threats. Browser hijackers can also permit other destructive programs without your knowledge to further damage the computer.
How one can determine if your browser is hijacked
Signs that a browser is a hi-jacked include:
1. your home page is reset to some unknown webpage
2. new bookmarks pointing to pornographic websites have been added to your favorite pages
3. the essential web browser settings are modified and unwanted or unsafe resources are added to the trusted sites list
4. find new toolbars that you simply did not add
5. you find lots of pop-ups on your screen
6. your web browser starts running slowly or presents frequent errors
7. Inability to navigate to certain websites, particularly antivirus and other security software webpages.
Exactly how browser hijacker finds its way to your computer
Browser hijackers can get into a computer in some way or other, for instance via file sharing, downloads, and e-mail too. Many web browser hijackings come from add-on programs, i.e., browser helper objects (BHO), toolbars, or extensions added to browsers to give them additional features. Sometimes you may have mistakenly accepted a browser hijacker as part of a software bundle (generally freeware or shareware). A good example of some well-known browser hijackers includes Conduit, Anyprotect, Babylon, DefaultTab, SweetPage, Delta Search, and RocketTab, but the names are continually changing.
Browser hijackers can record user keystrokes to gather potentially invaluable information leading to privacy concerns, cause instability on computers, severely disrupt user’s browsing experience, and eventually slow down the computer to a stage where it becomes unusable.
How to get rid of a browser hijacker
Certain browser hijacking could be simply stopped by discovering and removing the corresponding malware application through your control panel. Many times, it could be a tough job to find and delete the malicious program because the associated file will be running as part of the operating system process. Moreover, manual removal requires you to perform many time-consuming and tricky procedures that are very hard to conduct for new computer users.
Industry experts always suggest users eliminate any malware including browser hijacker by using an automatic removal tool, which is easier, safer, and faster than the manual removal solution. If you’d like to eliminate persistent hijackers effectively, install the award-winning anti-malware software Safebytes Anti-Malware. And employ a system optimizer, such as Total System Care, to erase all related files from the registry and fix browser issues.
Can’t Install Safebytes Anti-malware because of a Virus? Try This!
Practically all malware is inherently harmful, but certain types of malware do a lot more damage to your computer than others. Some malware types modify browser settings by adding a proxy server or modify the computer’s DNS configuration settings. In such cases, you will be unable to visit some or all sites, and thus unable to download or install the required security software to remove the infection. So what to do if malicious software prevents you from downloading or installing Anti-Malware? There are some fixes you could try to get around with this problem.
Install in Safe Mode with Networking
In the event the malware is set to load at Windows startup, then booting in safe mode should avoid it. Since only the bare minimum applications and services launch in “Safe Mode”, there are rarely any reasons for issues to take place. To start your Windows XP, Vista, or 7 computers in Safe Mode with Networking, do as instructed below.
1) At power on, press the F8 key while the Windows splash screen starts to load. This will conjure up the Advanced Boot Options menu.
2) Choose Safe Mode with Networking with arrow keys and hit Enter.
3) Once you get into this mode, you should have an internet connection once again. Now, utilize your browser to download and install Safebytes Anti-malware.
4) After installation, run a full scan and let the program delete the threats it discovers.
Obtain the security software using an alternate browser
Malicious program code may exploit vulnerabilities on a specific browser and block access to all anti-malware software sites. In the event you suspect that your Internet Explorer has been hijacked by a computer virus or otherwise compromised by online hackers, the ideal approach would be to switch to a different internet browser like Mozilla Firefox, Google Chrome, or Apple Safari to download your chosen security software – Safebytes Anti-Malware.
Install and run anti-virus from your Thumb drive
Another way is to download and transfer anti-malware software from a clean PC to run a scan on the affected computer. Abide by these steps to run the anti-malware on the infected computer.
1) On a clean computer, install Safebytes Anti-Malware.
2) Insert the USB drive into the uninfected computer.
3) Double-click the executable file to open the installation wizard.
4) Pick the USB drive as the location when the wizard asks you exactly where you want to install the application. Follow the directions to complete the installation process.
5) Now, transfer the pen drive to the infected PC.
6) Double-click the EXE file to open the Safebytes software right from the pen drive.
7) Hit the “Scan Now” button to start the virus scan.
A Look at the Best AntiMalware Program
Today an anti-malware tool can protect your computer or laptop from different types of internet threats. But how to choose the right one amongst various malware protection application that’s available on the market? Perhaps you might be aware, there are numerous anti-malware companies and tools for you to consider. A few are well worth your money, but most aren’t. You need to be careful not to select the wrong application, particularly if you purchase a premium program. One of the highly recommended tools by industry leaders is SafeBytes Anti-Malware, the most dependable program for Windows computers.
SafeBytes anti-malware is a trustworthy tool that not only secures your computer permanently but is also quite easy to use for people of all ability levels. This program can easily identify, remove, and protect your personal computer from the latest malware attacks such as spyware, adware, trojan horses, ransomware, PUPs, worms, parasites along other potentially harmful software programs.
SafeBytes has excellent features when compared to various other anti-malware programs. Listed here are some of the great ones:
Anti-Malware Protection: Using its advanced and sophisticated algorithm, this malware elimination tool can detect and eliminate the malware threats hiding in your computer system effectively.
Active Protection: SafeBytes provides round-the-clock protection for your computer limiting malware attacks instantly. This software will constantly keep track of your computer for suspicious activity and updates itself continuously to keep current with the latest threats.
Web Protection: Through its unique safety rating, SafeBytes alerts you whether a website is safe or not to access it. This will assure that you’re always certain of your online safety when browsing the internet.
High-Speed Malware Scanning Engine: SafeBytes’s high-speed malware scanning engine lessens scan times and extends battery life. At the same time, it’ll effectively find and eradicate infected computer files or any internet threat.
Low Memory/CPU Usage: SafeBytes is renowned for its minimal influence on computer resources and great detection rate of diverse threats. It runs quietly and efficiently in the background so you’re free to use your computer or laptop at full power all of the time.
Premium Support: For any technical inquiries or product guidance, you can obtain 24/7 professional assistance via chat and e-mail.
To conclude, SafeBytes Anti-Malware is really great for securing your computer against all sorts of malware threats. Malware trouble will become a thing of the past once you put this software program to use. If you’re looking for the very best malware removal application out there, and when you don’t mind shelling out some dollars for it, go for SafeBytes Anti-Malware.
Technical Details and Manual Removal (Advanced Users)
If you’d like to manually get rid of EverydayLookup without using an automated tool, it might be possible to do so by removing the application from the Microsoft Windows Add/Remove Programs menu, or in cases of browser plug-ins, going to the browsers AddOn/Extension manager and uninstalling it. You will likely also want to reset your internet browser.
To be certain of complete removal, find the following registry entries on your computer and delete them or reset the values appropriately. However, this is a complicated task and only computer experts can perform it safely. Furthermore, certain malware is capable of replicating or preventing removal. It is recommended that you carry out the removal procedure in Windows Safe Mode.
Files:
%LOCALAPPDATA%\EverydayLookup_d9
%UserProfile%\Local Settings\Application Data\EverydayLookup_d9
%UserProfile%\Local Settings\Application Data\Google\Chrome\User Data\Default\Extensions\fpeepicldbpmefboahpolegllmiglnai
%LOCALAPPDATA%\Google\Chrome\User Data\Default\Extensions\fpeepicldbpmefboahpolegllmiglnai
%PROGRAMFILES%\EverydayLookup_d9
%PROGRAMFILES(x86)%\EverydayLookup_d9
%UserProfile%\Local Settings\Application Data\EverydayLookupTooltab
Registry:
HKEY_LOCAL_MACHINE\SYSTEM\ControlSet001\services\EverydayLookup_d9Service
HKEY_LOCAL_MACHINE\SOFTWARE\Microsoft\Windows\CurrentVersion\Run, value: EverydayLookup EPM Support
HKEY_LOCAL_MACHINE\SOFTWARE\Wow6432Node\Microsoft\Windows\CurrentVersion\Run, value: EverydayLookup EPM Support
HKEY_LOCAL_MACHINE\SOFTWARE\Microsoft\Internet Explorer\Toolbar, value: 0a7d3c2c-131d-4b0a-9c1b-2045f6bae42a
HKEY_LOCAL_MACHINE\SOFTWARE\Wow6432Node\Microsoft\Internet Explorer\Toolbar, value: 0a7d3c2c-131d-4b0a-9c1b-2045f6bae42a
HKEY_LOCAL_MACHINE\SOFTWARE\Wow6432Node\Microsoft\Internet Explorer\SearchScopes\3eb9a50f-f2ab-4d63-8e33-96d71f659640
HKEY_CURRENT_USER\Software\Microsoft\Internet Explorer\SearchScopes\3eb9a50f-f2ab-4d63-8e33-96d71f659640
HKEY_CURRENT_USER\Software\Microsoft\Internet Explorer\Approved Extensions, value: 0A7D3C2C-131D-4B0A-9C1B-2045F6BAE42A
HKEY_LOCAL_MACHINE\SOFTWARE\Wow6432Node\EverydayLookup_d9
HKEY_CURRENT_USER\Software\EverydayLookup_d9
HKEY_CURRENT_USER\Software\AppDataLow\Software\EverydayLookup_d9
HKEY_CURRENT_USER\Software\EverydayLookup
Read More
In case you don’t know, Windows 10 actually allows users to set the Keyboard Repeat Rate and Repeat Delay. Both of these terms are interrelated and when you make active, any text field or an editor and then press and hold a single character key, it will quickly type the character for the first time and will show delay until the second and later characters appear. This is what you call the Keyboard Repeat Delay. On the other hand, the rate at which the later character appears is known as Keyboard Repeat Rate.
There are two ways you can set the Keyboard Repeat Rate and the Keyboard Repeat Delay on Windows 10. The first one is using the Keyboard Properties while the second one is using the Registry Editor.
Option 1 – Set up Keyboard Repeat Rate and Repeat Delay via Keyboard Properties
- First, tap the Win + R keys to open the Run dialog box and type in “control keyboard” in the field, and hit Enter to open the Keyboard Properties.
- From there, you can use the slider to make the respective options for both Keyboard Repeat Delay and Repeat Rate shorter or whatever you prefer them to be.
- You should also see a text field in the mini window where you can test out your preferences. Once done, click on the Apply and OK buttons to save the changes made.
Option 2 – Keyboard Repeat Rate and Repeat Delay via Registry Editor
- Tap the Win + R keys to open the Run utility and type “Regedit” in the field and then hit Enter to open the Registry Editor.
- Next, navigate to this registry path: HKEY_CURRENT_USERControl PanelAccessibilityKeyboard Response
- From there, you can set your own value for both the AutoRepeatDelay and AutoRepeatRate registry keys so that you can set the Keyboard Repeat Rate and Repeat Delay in Windows 10.
- Once you’re done, exit the Registry Editor and restart your computer to save the changes made.
Read More
The Sysfader iexplore.exe Application Error — What is it?
To understand Sysfader iexplore.exe application error, first, it is important to learn what is Sysfade.exe file.
Sysfader.exe is basically an IE (Internet Explorer) application file that provides cool animation effects. These animation effects include fading menus in and out, animated windows and etc. It is responsible for the graphical enhancements for animated pages.
The Sysfader iexplore.exe application error occurs when this file fails to execute properly and open animated websites on Internet Explorer.
The error code is displayed in the following format:
“SysFader: iexplore.exe – Application Error
The instruction at “0×00000000″ referenced memory at “0×00000000″. The memory could not be “read”.”
Solution
Error Causes
The Sysfader iexplorer.exe application error may be triggered due to many causes. These include:
- Sysfader.exe file corrupted by malware and spyware
- Recently upgraded Internet Explorer which resulted in the Sysfader iexplorer.exe application error due to incompatibility issues with the system program.
- Issues with IE configuration
- Damaged registry files
- Damaged DLL files
- Obsolete and bad registry entries
Due to Sysfader iexplorer.exe application error, your Internet Explorer browser may crash. Furthermore if the error is not fixed timely, it may result in even more severe PC problems like system slowdown, system crash and failure.
This happens especially when Sysfader iexplorer.exe application error is related to the registry.
The registry saves all the activities performed on the computer. This also includes junk files, invalid registry entries, bad registry keys, cookies, temporary internet files, and files of the programs uninstalled.
If the registry is not cleaned frequently, these obsolete files overload the RAM causing great deal of damage to the registry. When you try to upgrade your browser, the installation fails and results in browser incompatibility issues because of the previous files of the uninstalled program saved in the registry.
Furthermore, the error code may also pop up due to the Sysfader.exe file corrupted by malicious software like spyware and adware on your system if you don’t run an antivirus on your system regularly.
Further Information and Manual Repair
To prevent IE web browser and your PC from coming crashing, here are some solutions that you can try to resolve the Sysfader iexplorer.exe application error:
- Repair and restore the registry by changing the configuration settings in the Registry Editor Window. This is accessible by typing ‘Regedit’ in the Run window. However, to edit the configuration settings manually and restore the registry, you should be technically sound. If not then making the changes would be slightly complex and time-consuming for you.
- However, another alternative to this is to download Restoro. Restoro is a powerful, advanced, and highly functional PC repair tool that includes multiple utilities such as a registry cleaner and a system optimizer. The registry cleaning feature scans your entire PC for registry issues triggering error codes like Sysfader iexplorer.exe.It wipes out all the unnecessary and obsolete files and fixes the damaged dll files thus simultaneously restoring the registry. The antivirus utility scans for and removes viruses and spyware from your PC which as we explained earlier could be the reason for Sysfader error code.
With Restoro, it takes only a few seconds to resolve this error and repair the registry. If you have system slowdown issues, it takes care of that too.
It has simple navigations and a user-friendly interface which makes it very easy to operate even if you are not technically sound. It is safe, efficient, and compatible on all Windows versions including Vista, XP, Windows 7, 8, 8.1, and 10.
Click here to download Restoro and resolve Sysfader iexplorer.exe application error on your PC today!
Read More
 Steam has cemented itself as the largest digital game shop in the World. First, release all the way back on September 12th, 2003, it was meant to be a standalone software client aimed to deliver updates to Valve’s games. It was soon expanded to include titles from third parties.
The greatest Steam expansion and its popularity started in 2004 with the release of Half-life 2. Steam allowed prepurchased editions to be downloaded before the official release of the game making it available for play the moment it was officially out.
Very soon after Steam gained its popularity, Valve has opened doors to other developers and offered them to use Steam as means for a digital distribution platform. Today it hosts over 30000 different game titles, not including DLC or applications.
And how soon Valve’s steam deck is coming out soon we would like to share some great tips and tricks about Steam itself for easy everyday gaming.
Steam guard account security
Security of any of your accounts should be something that you really take seriously. So as always use a strong password for Steam but if you want an extra layer of security for it, and you should, use the Steam built-in feature: Guard Account Security.
In order to activate Security Guard go to Steam>Settings>Account>Manage Steam Guard Account Security. Once enabled you will be able to use the Steam mobile application for special code when opening Steam or your email address.
Use Steam beta feature
Once a Steam account is created by default you will download and install the client. In the client, you will have the latest features available but there are more Steam features than default ones, beta features that can offer some improved and new functionality, and do not worry, they are stable and bug-free.
I have been in Steam beta for years and not even once have I had any issues with the client itself but I have always had the latest features that will come to regular users later.
To enable beta participation to go to Steam>Settings>Account, open the drop-down Beta participation menu, and choose Steam Beta Update. Confirm on OK and restart the Steam client. You will now get all the latest features first.
Manage your library via Collections
The collection is a neat idea for organizing your large game library into different collections or sections easily expanded and contracted for easier navigation and organization. To add the game to a collection just right-click on it and select Add To>New Collection, make a name for a collection like action, RPG, or whatever rocks your boat, and you are done. Once the collection is created other games can be added to it simply just by dragging it into the desired collection.
Make shelves
Shelves are ways to see your collections in the larger areas of the Steam clients. By clicking Add Shelf>Choose a Shelf, you can now add your collection to a shelf on the larger part of the client as a horizontal scrolling container with your chosen games. There are also some predefined shelves like All Games, Recent friend activity, and more.
Hide Game from Library
By right-clicking on a game and selecting Manage>Hide This Game you will remove the game from the active view of your Steam library. Note that the game will still be owned and a part of your library, you will just not be able to see it.
This is a great feature when for example you have some things that came as a part of the game pack you are not really interested in when you have 2 different versions of the same game as for example standard and deluxe edition or just by simply not wanting to have game visible in the library.
You can find a hidden game by typing its name in the search box and from there you can unhide it.
Play game soundtracks inside Steam
Some games offer you to purchase their soundtracks if you like music from them and some even include OST with a regular purchase. Steam lets you play these soundtracks and even lets you import your own music library folder into it in order to play all of your music inside the client itself.
It has even options to automatically stop music playing once the game is run and you can make playlists as well. Your purchased game soundtracks are automatically included, the rest you will need to add by pointing Steam to the folder where you keep music in.
Configure gamepad
Inside Steam, you can configure your gamepad’s general settings, big picture settings, desktop settings, etc. Steam embraced the idea that many OC users these days own and play with gamepads so it has implemented configuration options inside it. To configure your pad go to Steam>Settings>Controller.
Use big picture Steam mode
Big picture mode is Steam’s idea of making Steam an entertainment center. Once it is activated it switches from the application into full-screen mode aimed at large TV screens or monitors. You can easily navigate through it via gamepad, mouse, keyboard, or other devices.
You have access to the store, your game library, etc. Same as your typical steam app but a little different. You can easily activate it via View> Big Picture Mode and see for yourself is this something you prefer over a standard application layout.
Enable Steam Cloud
Steam Cloud is a great feature that uses cloud storage to save your game progress meaning that you can easily switch to another PC, install games there and continue where you have left off. Many games support this feature instead of keeping saves locally and it is a great feature worth turning it ON.
To turn and use Steam Cloud service go to Steam>Settings>Cloud>Enable Steam Cloud Synchronization. Just remember to check does game you are playing supports this option.
Share your Games via Family sharing
Family sharing is a Steam feature allowing you to share your game library with up to 5 accounts on up to 10 different devices. This is a great way to let other members of your family or even close friends enjoy some games you have or vice versa. They will get as well their own save games so you can sleep safe knowing that your progress can not be changed or hindered.
Family sharing can be turned ON by logging into PC Steam client where you would like to share your library and navigate to Steam>Settings>Family and then clicking on Authorize Library Sharing On This Computer.
Refund a game
Sometimes the game is not the same as advertised, sometimes it will not work on your PC, sometimes hardware specifications are too high making the game unplayable, etc. For whatever reason, you might have Steam offers you a full game price refund if you wish to do so, you only need to meet 2 criteria, the game must have been purchased within 2 weeks period, older purchases cannot be refunded, and your game playtime must not be over 2 hours of game time.
If you fit into this category all you need to do in order to get the full money back is going to Help>Steam Support, pick a recent game from the eligible list, and ask for a refund.
Gift a game
As you can buy gifts for your friends or loved ones in real life, Valve made sure you can do it in digital as well. Gifting game via Steam is simple and straightforward. Choose a game you wish to gift, go to your shopping cart and instead of clicking Purchase for myself, click on Purchase As a Gift, from there you will be taken to your friend list to choose to whom you would like to gift a game along with the option to write a little note to the receiver like happy birthday, enjoy or whatever.
Stream games in Steam itself
Although Steam is not there yet in streaming as Twitch or Facebook gaming is, there is an option to stream your game sessions on it. Click on Steam>Settings>Broadcast to make all adjustments and start streaming.
You can also watch streams from your friend list and Steam is now broadcasting popular streams directly to its client if you want to watch it.
Take a game screenshot
By pressing F12, you can take a screenshot from any game and save it inside your Steam cloud library. You can change of course this default screenshot key via Settings>In-Game and if you would like to see your screenshots you can always do it under View Screenshot Library on a game’s page.
That’s it, our Steam tips and tricks for easy and good gaming life, I hope to see you soon on errortools.com for your daily articles, tips, and tricks.
Read More
Error Code 46 – What is it?
Error Code 46 is a device driver error that occurs when Windows fails to access the connected peripheral device to the computer as Windows is in a process of shutting down.
Users experience this error on any Windows 2000 and later operating system versions and usually see a pop-up with the following message:
“Windows cannot gain access to this hardware device because the operating system is in the process of shutting down. (Code 46)”
Solution
Error Causes
 Error Causes
Error Code 46 is caused when there is a temporary problem with windows system files which prompts that the system is undergoing a shut down when in fact is it not.
This prevents access to the connected devices. This error may also be caused by a registry issue in which case it has either become corrupted or damaged.
Further Information and Manual Repair
Unlike all other Windows error codes, code 46 is relatively easy to fix with the right knowledge and does not pose any serious threat to the well-being of your PC. Here is how you can do it.
Method 1 – Restart your PC
The simplest method to resolve Error Code 46 is to run a restart of your computer.
The error is most commonly a temporary registry glitch that prevents you from accessing the device connected to your computer. Upon restarting your computer, it will resume working properly as before.
There is no need to run a troubleshooting wizard, use system restore, or run anti-virus software to scan and remove malware or spyware. A simple restart is all that is needed.
Method 2 – Install DriverFIX
Although the error code can be resolved upon restarting the computer, there’s a possibility of damaged or corrupted Windows registry files. This can be fixed by using a program like DriverFIX.
DriverFIX, with its user-friendly approach to help you fix your PC issues, comes with an integrated database that detects which drivers you need to reconfigure within just a few seconds and downloads it automatically.
It further ensures that your drivers are installed in their entirety leaving no room for any corrupted or damaged registry.
Error Code 46 may not be much of an issue, however, to prevent any risk of a Windows system corruption can be disastrous for your computer.
DriverFIX helps you fix your PC registry and device driver problems with user-friendly software and an integrated database. The database which consists of detailed information on what device driver needs to be installed will automatically download the required device driver without you need to refer to your hardware instruction manual.
Registry problems resulting from incomplete program installations and viruses such as malware and spyware damaged registry files. This affects your PC in serious ways.
DriverFIX further has an automatic backup and restoration system that helps create system ‘checkpoints’ which allow you to roll back to a healthier state and resume operations. This can help you avert any Windows error codes in the future.
Click here to download DriverFIX now!
Read More
![]()
Copyright © 2023, ErrorTools. All Rights Reserved
Trademark: Microsoft Windows logos are registered trademarks of Microsoft. Disclaimer: ErrorTools.com is not affiliated with Microsoft, nor claims direct affiliation.
The information on this page is provided for information purposes only.
![]()
На чтение 5 мин. Просмотров 10.1k. Опубликовано
Вы пользователь Windows, испытывает ошибку Windows 10 netwtw04.sys? Сегодня мы покажем вам, как решить эту проблему.
Пользователи ПК Dell сообщили о получении ошибки Windows BSod, в которой говорится Driver_IRQL_NOT_LESS_OR_EQUAL Netwtw04.sys. Эта (синий экран смерти) ошибка BSod появляется каждый раз, когда вы запускаете приложения или когда вы отключаете наушники.
Однако эта ошибка может быть вызвана несколькими факторами, такими как устаревший драйвер, несовместимые программы, поврежденные реестры системных файлов и неполное обновление Windows.
Содержание
- Шаги для исправления ошибок netwtw04.sys
- Решение 1. Перезагрузите компьютер
- Решение 2. Запустите полное сканирование системы
- Решение 3: Восстановление реестра ПК
- Решение 4. Обновите драйверы сетевого адаптера
- Решение 5. Временно отключите вторичный антивирус
- Решение 6. Запустите восстановление системы
- Решение 7. Установите Центр обновления Windows
Шаги для исправления ошибок netwtw04.sys
Решение 1. Перезагрузите компьютер
Некоторые пользователи Windows сообщали о возможности исправить ошибку Windows 10 netwtw04.sys путем перезагрузки компьютера. Вы можете перезагрузить компьютер после появления сообщения об ошибке. Если ошибка все еще сохраняется, вы можете перейти к следующему шагу.
Решение 2. Запустите полное сканирование системы
Вирусы и вредоносные программы могут вызвать ошибку Windows 10 netwtw04.sys. Эти вредоносные программы заражают ваш системный файл, вызывая ошибку Windows 10. Следовательно, запустите полную проверку системы на вашем компьютере, чтобы удалить все возможные вирусы. Вы также можете использовать встроенный антивирус Windows Defender Windows. Вот как выполнить полное сканирование системы в Windows 10 Creators Update:
- Перейдите в «Пуск»> введите «защитник»> дважды щелкните Защитник Windows, чтобы запустить инструмент.
- На левой панели выберите значок щита.
-
В новом окне выберите опцию «Расширенное сканирование».

- Установите флажок «Полная проверка», чтобы запустить полную проверку системы на наличие вредоносных программ.

- Читайте также: как исправить ошибку BSOD atikmdag.sys в Windows 10
Примечание . Существует несколько сторонних антивирусных программ, которые вы можете использовать. Однако, если вы закончили сканирование вашего компьютера, рекомендуется удалить все обнаруженные вирусы; опция может быть «чистой» или «удалить» в зависимости от используемого антивируса.
Решение 3: Восстановление реестра ПК
Самый простой способ восстановить реестр Windows – использовать специальный инструмент, такой как CCleaner. Кроме того, вы также можете использовать средство проверки системных файлов Microsoft для проверки повреждений системных файлов.
Утилита проверяет целостность всех системных файлов и исправляет файлы, если это возможно. Вот как запустить сканирование SFC на всех версиях Windows:
-
Перейдите в Пуск> введите cmd> щелкните правой кнопкой мыши Командная строка> выберите Запуск от имени администратора.
- Теперь введите команду sfc/scannow.
- Подождите, пока процесс сканирования завершится, а затем перезагрузите компьютер. Все поврежденные файлы будут заменены при перезагрузке.

Решение 4. Обновите драйверы сетевого адаптера
Некоторые пользователи Windows сообщали, что смогли исправить ошибку Windows 10 netwtw04.sys, обновив драйверы сетевого адаптера. Следовательно, вы можете обновить сетевой адаптер, чтобы устранить проблему. Вот как это сделать:
- Нажмите клавишу Windows + R, введите devmgmt.msc и нажмите Enter. (В качестве альтернативы вы можете щелкнуть правой кнопкой мыши ключ Windows и выбрать «Диспетчер устройств»).
- В окне «Диспетчер устройств» разверните раздел «Сетевые адаптеры».
- Затем щелкните правой кнопкой мыши сетевой адаптер Intel и выберите «Обновить драйвер».
Кроме того, вы также можете вернуть назад старые версии драйверов, если обновление драйвера не устранило проблему.
- Читайте также: исправлено: курсор мыши исчез в Windows 10
Решение 5. Временно отключите вторичный антивирус
Некоторые антивирусные программы могут вызвать ошибку Windows 10 netwtw04.sys. Следовательно, вам может потребоваться временно отключить антивирус или брандмауэр, чтобы исправить проблему BSod. Однако некоторые антивирусные программы имеют опцию «временно отключить защиту», которую вы можете использовать, а другие – нет.
Если у вас есть возможность удалить вторичный антивирус, вы можете сделать это и рассмотреть возможность замены вторичных антивирусных программ и использовать альтернативы, такие как Bitdefender, BullGuard и Malwarebytes. Эти программы безопасности настоятельно рекомендуются из-за их универсальности и отличной производительности.
Решение 6. Запустите восстановление системы
Запуск восстановления системы также может исправить проблему с ошибкой на вашем ПК с Windows. Безопасный режим – это режим диагностики в Windows, который запускает ваш компьютер только с основными файлами и драйверами. Однако вы можете выполнить восстановление системы в безопасном режиме, чтобы вернуться к определенной точке восстановления в вашей системе, лишенной отображения сообщения об ошибке при запуске. Вот как это сделать:
- Выключите компьютер и включите его снова.
- Перейдите к опции «Запуск в безопасном режиме» и нажмите «Enter».
- Перейдите в «Пуск»> введите «восстановление системы» и нажмите «Enter».
- Следуйте инструкциям, чтобы вернуться к определенной точке восстановления.
- Подождите, пока процесс завершится, а затем перезагрузите компьютер.
Примечание. Убедитесь, что вы можете определить дату точки восстановления до начала отображения ошибки BSod netwtw04.sys. Восстановление системы не влияет ни на какие ваши файлы, документы и личные данные.
Решение 7. Установите Центр обновления Windows
Наконец, вы также можете исправить проблему Windows 10 error netwtw04.sys, обновив ОС Windows 10 до последней версии. Microsoft постоянно выпускает обновления Windows, чтобы улучшить стабильность системы и исправить различные проблемы и ошибки, связанные с ошибкой запуска.
Тем не менее, выполните следующие действия для обновления ОС Windows 10:
 Последние лет 10 я с внимательным ужасом наблюдаю как стремительно деградирует сфера информационных технологий. Если еще каких-то 15 лет тому назад работа в IT была доступна только избранным, то сейчас в айтишники идут все кому не лень. А ведь большие зарплаты в отрасли необходимы для поддержания высокого уровня профессионализма сотрудников. Разработчикам и прочему IT-люду платят сотни тысяч рублей не просто так. К сожалению, нынешняя ситуация с IT напоминает больше цирковое представление с постепенным и неуклонным трендом к тотальной деградации. В первую очередь тенденция проявилась у мирового лидера в сфере информационных технологий — США, но от штатов не отстает и Китай, с его бурным развитием и несколькими миллиардами населения. Наши пока еще держатся, но первые отголоски уже ощущаются. Отрасль деградирует, снижается качество продуктов, падает надежность. Кто в этом виноват? Низкоквалифицированные кадры? Внедрение «современных» стандартов разработки? Искаженные требования бизнеса?
Я помню свой первый шок от американской платежной системы PayPal. От ее недружественного интерфейса, огромного количества ошибок в коде и крайне неквалифицированной технической поддержкой. У меня закончился срок действия банковской карты, мой банк ее перевыпустил, но все ее реквизиты, за исключением срока действия оставил прежними. Разумеется, PayPal не давал мне добавить новую карту, так как думал, что я пытаюсь добавить карту старую. Проблему решить удалось спустя месяц общения с поддержкой PayPal. А великий и могучий Facebook? После последнего обновления в конце 2020 года работать с системой со стороны бизнеса стало просто невозможно. Полная рассинхронизация документации и реальных функций, неработоспособность ранее работающих опций, тотальное неудобство и нелогичность интерфейса. А вот и AliExpress с его AliBaba-ой (ну или наоборот). Вы часто замечали, что, работая пользователем вы постоянно натыкаетесь на ошибки системы, например, когда хотите оставить отзыв? А теперь представьте, какой системный хаос творится на стороне продавца. У меня сложилось впечатление, что весь AliExpress построен из китайского навоза и сена. В одном месте нужно использовать Excel, в другом нельзя нажимать сюда, так как потом все сохраненное пропадает, а настройка прав доступа не работает принципиально… И это только вершина айсберга, если копнуть поглубже, пройтись грабельками по другим корпоративным системам, то неподготовленный индивид впадет в перманентное состояние первобытного ужаса бытия от безысходности.
Вот из последнего. Есть у меня ноутбук HP (Ново-Русский). Ноут в принципе не плохой, использую его как рабочий, таскаю туда-сюда, цепляюсь к Wi-Fi. Но после очередного обновления Windows 10 и драйверов на Wi-Fi адаптер от Intel я с толкнулся с такой проблемой, как появление «синего экрана смерти» или BSoD после включения ноутбука из выключенного состояния. Диагностика на экране бодренько сообщает, что проблема заключается в SYSTEM_THREAD_EXCEPTION_NOT_HANDLED и возникла она в файле netwtw04.sys. Система создавала дамп памяти на случай, если я вдруг захочу его проанализировать (живьем я видел только одного человека, который пробовал провести подобную операцию), а затем шла перезагрузка. После чего все продолжало работать как ни в чем не бывало, Wi-Fi принимался, таблицы Excel работали, интернет серфился.
В моем HP-ноутбуке установлена Wi-Fi плата производства Intel AC 7265 (полное название Intel® Dual Band Wireless-AC 7265) на разъеме M2 (подключение PCIe для Wi-Fi и USB для BT). Адаптер AC-7265 весьма интересная штука, которая позволяет подключаться по Wi-Fi на каких-то умопомрачительных скоростях, на рабочем месте я подключаюсь к сети стабильно на скоростях свыше 800 Mbps, и оно работает. Правда внешний канал у нас в десять раз «уже», но внутренние ресурсы доступны на полной скорости. Файл netwtw04.sys относится к файлам драйвера Wi-Fi от компании Intel. Ошибка SYSTEM_THREAD_EXCEPTION_NOT_HANDLED означает возникшую проблему с необработанной исключительной ситуацией в программном коде драйвера от Intel. Другими словами, в программном коде драйвера возникла некая ситуация, которую разработчик драйвера не предусмотрел и соответствующим образом не обработал. И эта ошибка «полезла» дальше. А поскольку драйвера устройств исполняются в операционной системе с высокими привилегиями, то ошибка в драйвере приводит к аварийной остановке всей операционной системы. Собственно, по этой причине и возникает синий экран. Подобные ошибки зачастую появляются, когда программный код пытается обработать данные, которые находятся за пределами рабочего диапазона, полностью отсутствуют, либо происходит обращение к неинициализированным программным/аппаратным компонентам.
Постепенно ситуация с частыми синими экранами мне начала досаждать. Включаешь компьютер, а потом ждешь пока он загрузится, «упадет», и еще раз загрузится. Неудобно. Я начал копать в сторону исправления ситуации. Пробовал переустанавливать драйвера, менять всяческие настройки, но все оказалось тщетным. Проблема сохранялась. У меня даже возникло желание заменить Intel на что-то более другое, но ни одного альтернативного производителя в наличии не оказалось. Только разнообразные модули от Intel. Ситуация начала накаляться. Почему пришлось провести небольшое расследование.
В общем проблема с синими экранами не только у меня, не только с AC 7265 и не только на HP. В сети обнаружилось великое множество жалоб пользователей на синие экраны после одного из обновлений Windows 10. Если в моем случае проблема возникала только при перезагрузке системы, то у некоторых синий экран мог возникнуть во время работы. Что уже вообще ни в какие ворота не лезет. После некоторого количества попыток и неудач, мне удалось, не без помощи базы знаний форума поддержки Community Intel решить проблему. Итак, способов решения оказалось несколько и не факт, что они все могут помочь.
Способ нулевой — настроечки
Проблема с ошибками может возникать в том числе и по причине каких-то экзотических настроек самого беспроводного адаптера. На форуме Intel рекомендуют привести следующие настройки к их значениям по умолчанию:
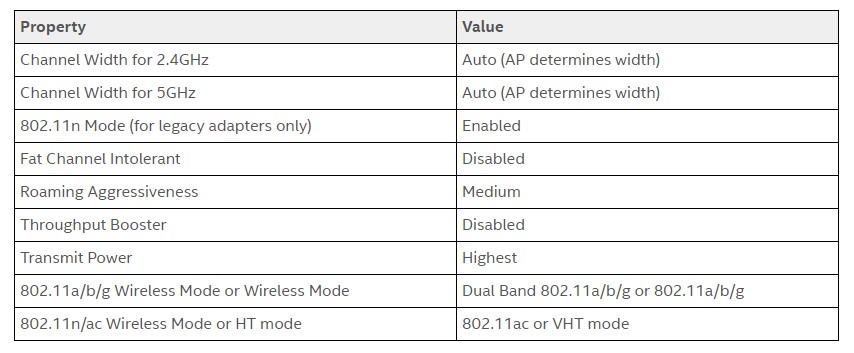
Наиболее полный список рекомендаций настроек для Wi-Fi от Intel
Увы, как эти настройки выглядят на языках отличных от английского, мне не ведомо. Способ мне не помог.
Способ первый — USB и BIOS
Поскольку PCIe и USB шины также управляются драйверами, то проблема может крыться где-то на их уровне. Поэтому имеет смысл попробовать либо обновить драйвер чипсета (в моем случае это так же Intel) и USB, либо откатить их до штатных, которые идут в поставке операционной системы. Дополнительно стоит попробовать посмотреть на обновление BIOS, особенно если ноутбук не самый свежий, вероятно, что там тоже были какие-то ошибки и их уже успели исправить. Не лишним будет попробовать скинуть настройки BIOS (UEFI) до стандартных, а если не поможет, то покрутить настройки PCIe (если таковые имеются) и USB в BIOS.
Переустановка драйверов куда легче, чем переустановка всей операционной системы, хотя последний способ, как правило самый действенный. На форуме Intel рекомендуют следующий способ переустановки:
- Скачиваем последние драйвера от Intel для используемого Wi-Fi адаптера.
- Заходим в диспетчер устройств и удаляем Wi-Fi и BT адаптеры (в теории достаточно удалить только Wi-Fi, т.к. BT удалится сам). При удалении ставим галку «Delete driver software for this device», т.е., удаляя устройство, удалям еще и драйвера от него.
- Нажимаем кнопку (все там же в диспетчере устройств) на пересканирование устройств. Если находится старый драйвер от Intel или от производителя ноутбука, то повторяем предыдущий пункт.
- Делаем очистку временных файлов: запускаем очистку системного диска, либо вызываем утилиту cleanmgr.exe. На забываем поставить галку на очистке временных файлов. Таким образом мы подчищаем все ошметки и настройки старых драйверов.
- Перезагружаем компьютер, устанавливаем драйвера скачанные в первом пункте.
Вариант мне не помог, увы.
Способ третий — родные драйвера от производителя ноутбука
Все то же самое, что во втором способе, только драйвера скачиваем с сайта производителя. В случае HP вариант не помог, поскольку они прямиком дают ссылку на драйверы от Intel.
Способ четвертый — стандартные драйвера от Microsoft
Все тоже самое, что и во втором способе, только после перезагрузки не устанавливаем драйвера от Intel (но не забываем их скачать, если вдруг что-то пойдет не так). В этом случае должны установиться стандартные драйвера от Microsoft лохматого года. В теории Wi-Fi должен будет запуститься, но не гарантировано, что он будет работать на полную катушку, либо будут активными специфические функции.
Способ пятый — Fast boot
Отключение режима быстрой загрузки в Windows 10. Fast boot работает следующим образом: когда пользователь выключает свой компьютер, то хитрая система записывает в специальный гибернационный файл текущее состояние всех своих устройств, включая тот самый злосчастный Wi-Fi + BT адаптер. При включении же ПК, происходит обратный процесс, всё загружается из файла в оперативную память, а всё оборудование считается проинициализированным. Таким образом, система загружается существенно быстрее, чем при обычной загрузке.
Но не тут-то было. Все драйвера и все устройства в моем ноутбуке реагировали на режим быстрой загрузки адекватно, работали как ни в чем не бывало, а вот драйвер от Intel вступал в контры и «кидал» исключение. После отключения режима быстрого запуска ситуация нормализовалась, синие экраны исчезли. Да, ноут стал загружаться немного медленнее, но на SSD время загрузки не так критично и даже те несколько секунд, пока лэптоп загружает операционную систему, да инициализирует устройства, не вызывают глубокой печали, так как прежде, во времена двойной загрузки.
Вот таким вот образом удалось победить «синие экраны смерти» при загрузке моего ноутбука. Конечно, в случае, когда BSOD-ы возникают во время работы, а не перезагрузки, простым отключением быстрой загрузки не исправить, тут следует попробовать применить оставшиеся варианты. А в самом запущенном случае поменять Wi-Fi адаптер на устройство другого производителя. Что уж делать, придется заказывать их из-за границы. Нет, конечно, я соглашусь, что сложности систем возросли многократно, но ведь и раньше они простыми не были. А ведь мы в IT раньше как-то старались, выдавали качество, надежность, безопасность и удобство. И ведь получалось.
Download Windows Speedup Tool to fix errors and make PC run faster
This post will help you if you receive DRIVER IRQL NOT LESS OR EQUAL or SYSTEM THREAD EXCEPTION NOT HANDLED, Netwtw04.sys failed error in Windows 11/10. This error can also occur due to Netwtw08.sys, Netwtw06.sys, Netwtw10.sys, etc, files. System files or .sys files are an essential part of the Windows operating system. It is a repository of system driver settings used by the Windows system to communicate with the connected hardware and devices. System files are necessary for the normal functioning of the operating system. Many Windows users are facing the Window Blue Screen of Death error during the app launch or while disconnecting the external devices from the system.
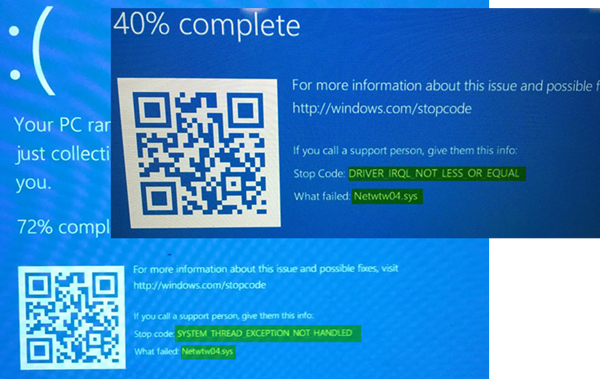
Netwtw08.sys,Netwtw04.sys, Netwtw06.sys, Netwtw10.sys are a part of the Intel PROSet/Wireless WiFi software. You may see two Stop Errors if these drivers fail to load:
- DRIVER_IRQL_NOT_LESS_OR_EQUAL What failed: Netwtw04.sys. This indicates that a kernel-mode driver attempted to access pageable memory at a process IRQL that was too high.
- SYSTEM_THREAD_EXCEPTION_NOT_HANDLED What failed: Netwtw04.sys. The root cause of this error might be incompatible drivers with the operating system.
Generally speaking, the cause for the Netwtw04.sys blue screen error may be because of several reasons like corrupt files, misconfigured device drivers, malicious programs, outdated drivers, bad drivers, corrupted Windows registry, or due to damaged system files.
In this article, we explain some solutions to fix Netwtw08.sys,Netwtw04.sys, Netwtw06.sys, Netwtw10.sys Bblue screen errors on Windows 11/10.
If you can log in normally, good; else you will have to boot into Safe Mode, enter Advanced Startup options screen, or use the Installation Media to boot to be able to carry out these instructions.
1] Rollback Network driver
If you recently updated the driver software, you need to Rollback the device driver, ie, go back to the previous working version.
Open the Device Manager and click on the entry labeled as Network adapters and expand it. Then, select the driver entries labeled appropriately other than anything in the context of WAN Miniport. Select them one by one and double click on them. It will open a new mini window.
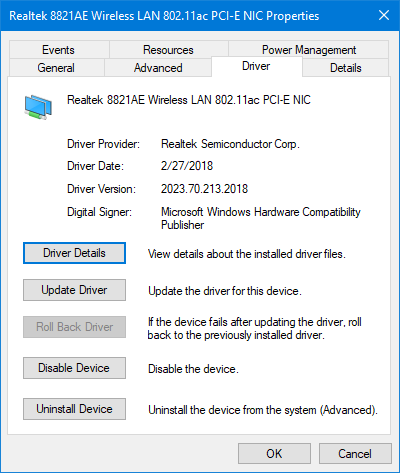
Make sure that you are on the tab named Driver. If you are not, navigate to it. Now, click on the button called Roll Back Driver.
This will install the previously known stable version of the driver installed on your computer.
Restart your computer for the changes to take effect.
2] Update Network driver
If your present driver is giving you this problem, you need to update the device driver. Open Control Panel and click on Device Manager. Click on Network adaptor and right-click on the current driver. Click on Update driver option from the drop-down menu.
You can also download the driver from the manufacturers’ website, use Intel Driver Update Utility or can update it online automatically.
3] Run SFC scan
System File Checker is a command prompt tool that scans for corrupted system files including Netwtw04.sys files as well as repair the corrupted system files. It is recommended to run an SFC scan to repair the problematic system files.
4] Run DISM
Search Command Prompt in the Start Menu. Right-click on the Command Prompt and select the option Run as administrator from the drop-down menu
Type the command the following command to Run DISM and click Enter:
DISM /Online /Cleanup-Image /RestoreHealth
Restart your system. This will repair a corrupted system image.
5] Run CHKDSK
A corrupted hard drive may lead to Netwtw04.sys blue screen error. CHKDSK scans the disk to check if there are any corrupt hard drives.
Open Command Prompt as administrator. Type the command CHKDSK and click enter to check your disk.
Restart your system.
If nothing helps, you may want to consider disabling Hardware Acceleration or performing System Restore and see if that helps you.
All the best!
Anand Khanse is the Admin of TheWindowsClub.com, a 10-year Microsoft MVP (2006-16) & a Windows Insider MVP (2016-2022). Please read the entire post & the comments first, create a System Restore Point before making any changes to your system & be careful about any 3rd-party offers while installing freeware.