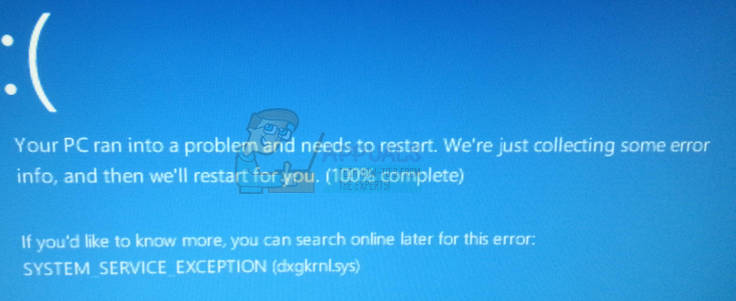
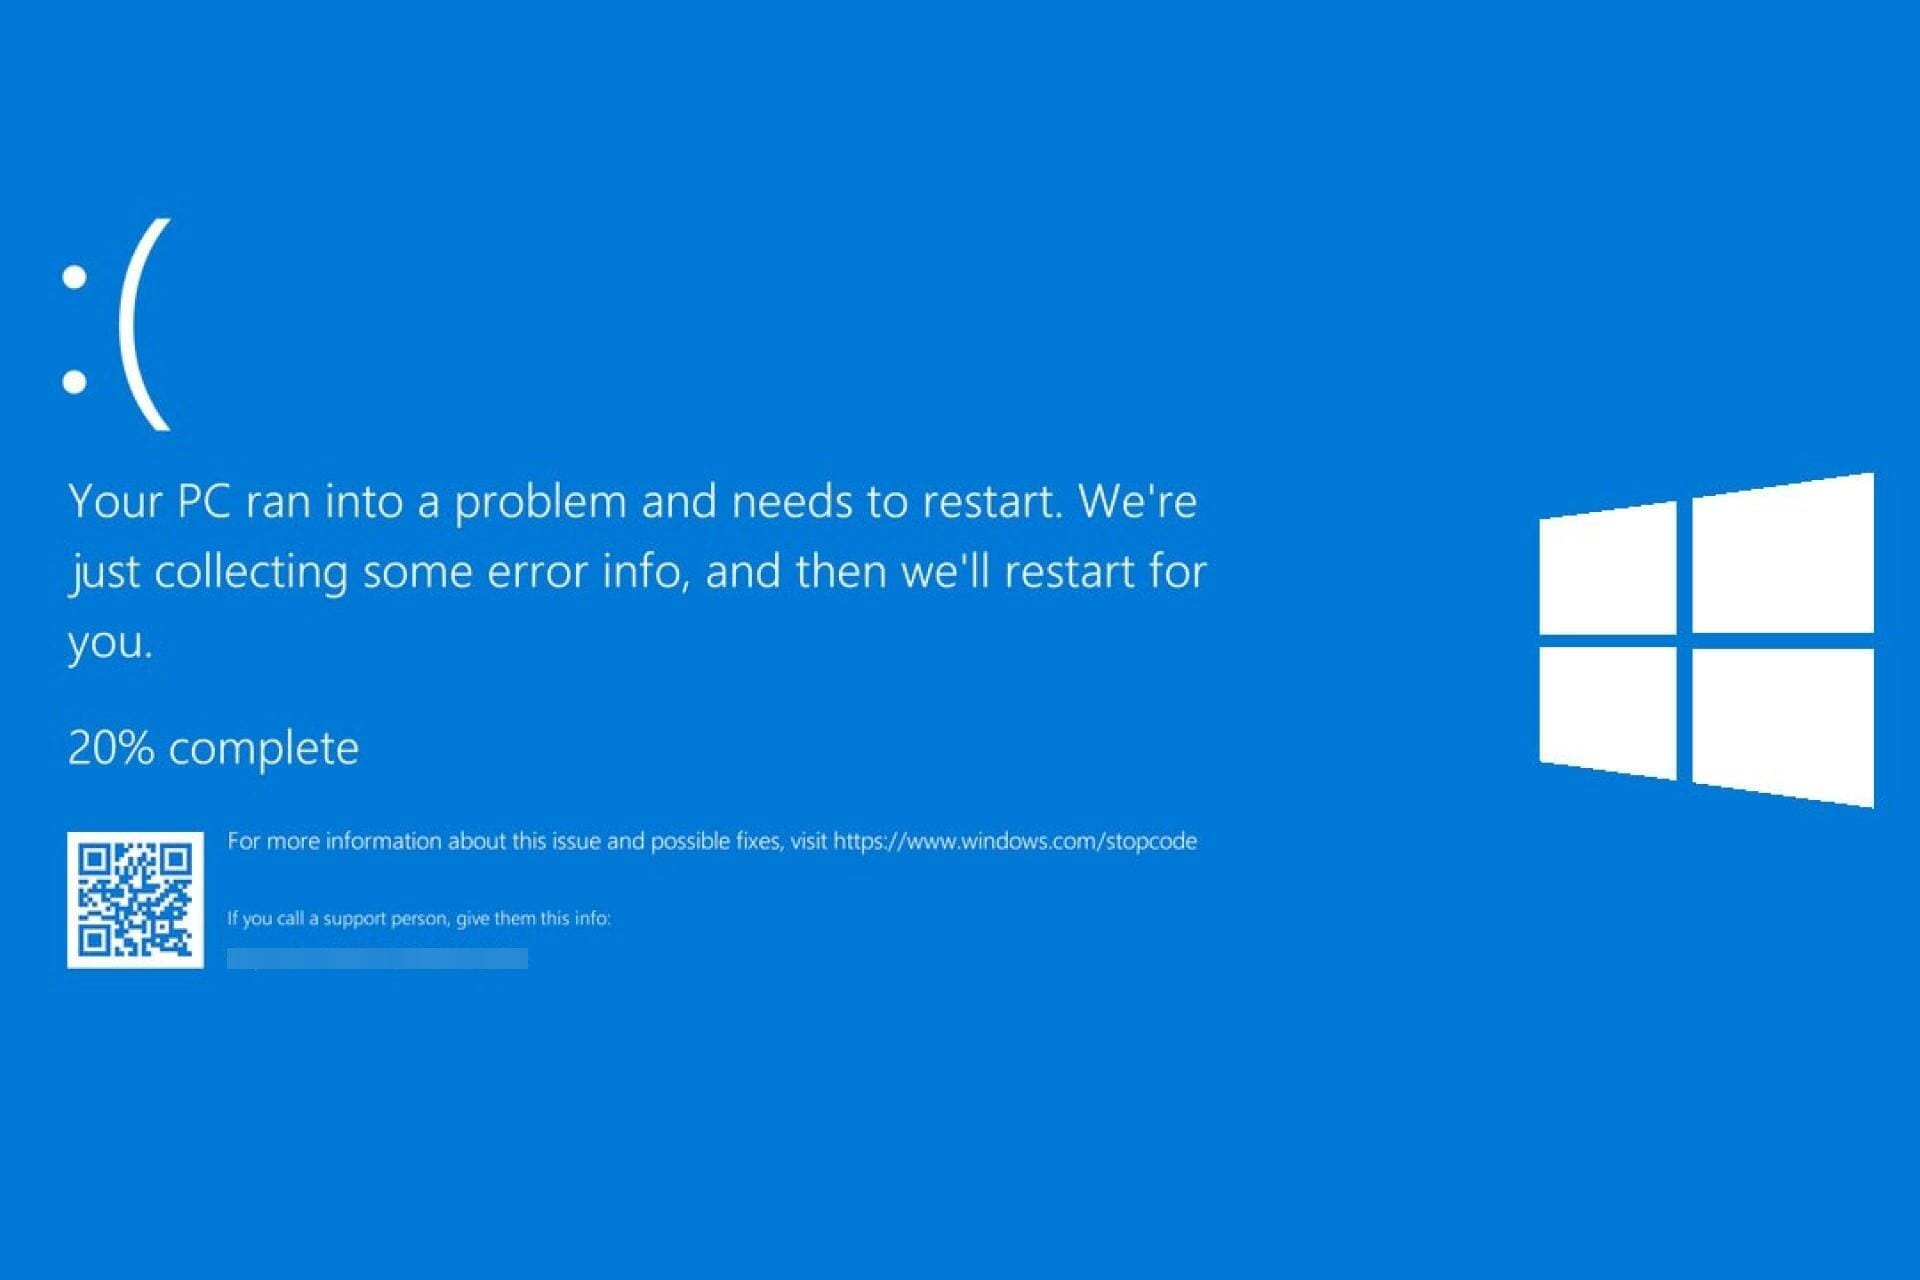
 Одна из распространенных ошибок у пользователей Windows 10 — синий экран смерти (BSoD) SYSTEM_SERVICE_EXCEPTION и текстом «На вашем ПК возникла проблема и его необходимо перезагрузить. Мы лишь собираем некоторые сведения об ошибке, а затем будет автоматически выполнена перезагрузка».
В этой инструкции — подробно о том, как исправить ошибку SYSTEM SERVCIE EXCEPTION, чем она может быть вызвана и о самых часто встречающихся вариантах этой ошибки с указанием первоочередных действий по её устранению.
Причины ошибки SYSTEM SERVICE EXCEPTION
Наиболее частой причиной появления синего экрана с сообщением об ошибке SYSTEM_SERVICE_EXCEPTION являются ошибки работы драйверов оборудования компьютера или ноутбука.
При этом, даже если ошибка возникает при запуске определенной игры (с сообщениями об ошибках SYSTEM_SERVICE_EXCEPTION в файлах dxgkrnl.sys, nvlddmkm.sys, atikmdag.sys) сетевых программ (с ошибками netio.sys) или, что является распространенным случаем, при запуске Skype (с сообщением о проблеме в модуле ks.sys) дело, как правило, именно в неправильно работающих драйверах, а не в самой запускаемой программе.
Вполне возможно, что до этого на вашем компьютере всё работало нормально, вы не устанавливали новые драйверы, но Windows 10 сама обновила драйверы устройств. Однако, возможны и другие варианты причин ошибки, которые также будут рассмотрены.
Распространенные варианты ошибки и основные способы исправления для них
В некоторых случаях при появлении синего экрана смерти с ошибкой SYSTEM SERVICE EXCEPTION в информации об ошибке сразу указывается вызвавший сбой файл с расширением .sys.

Если этот файл не указан, то придется посмотреть информацию о вызвавшем BSoD файле в дампе памяти. Для этого можно использовать программу BlueScreenView, загрузить которую можно с официального сайта https://www.nirsoft.net/utils/blue_screen_view.html (ссылки на загрузку находятся внизу страницы, там же есть файл русского перевода, который достаточно скопировать в папку с программой, чтобы она запустилась на русском языке).
Примечание: в случае, если появление ошибки не дает работать в Windows 10, попробуйте выполнять следующие действия, зайдя в безопасный режим (см. Как зайти в безопасный режим Windows 10).
После запуска BlueScreenView посмотрите информацию о последних ошибках (список в верхней части окна программы) и обратите внимание на файлы, сбои в которых привели к появлению синего экрана (в нижней части окна). Если список «Файлы дампа» пуст, то по всей видимости, у вас отключено создание дампов памяти при ошибках (см. Как включить создание дампов памяти при сбоях Windows 10).

Часто по именам файлов можно найти (поискав имя файла в интернете) частью какого драйвера они являются и предпринять действия по удалению и установке другой версии этого драйвера.
Типичные варианты файлов, вызывающих сбой SYSTEM_SERVICE_EXCEPTION:
- netio.sys — как правило, проблему вызывают сбойные драйверы сетевой карты или Wi-Fi адаптера. При этом, синий экран может появляться на определенных сайтах или при высокой нагрузке на сетевое устройство (например, при использовании торрент-клиента). Первое, что следует попробовать при появлении ошибки — установить оригинальные драйверы используемого сетевого адаптера (с сайта производителя ноутбука для вашей модели устройства или с сайта производителя материнской платы именно для вашей модели МП, см. Как узнать модель материнской платы).
- dxgkrnl.sys, nvlddmkm.sys, atikmdag.sys — вероятнее всего, проблема с драйверами видеокарты. Попробуйте полностью удалить драйверы видеокарты с помощью DDU (см. Как удалить драйверы видеокарты) и установить последние доступные драйверы с сайтов AMD, NVIDIA, Intel (в зависимости от модели видеокарты).
- ks.sys — может говорить о разных драйверах, но наиболее распространенных случай — ошибка SYSTEM SERVICE EXCEPTION kc.sys при установке или запуске Skype. В данной ситуации причиной чаще всего являются драйверы веб-камеры, иногда — звуковой карты. В случае с веб-камерой возможен вариант, что причина — именно в фирменном драйвере от производителя ноутбука, а со стандартным всё работает исправно (попробуйте зайти в диспетчер устройств, нажать правой кнопкой мыши по веб-камере — обновить драйвер — выбрать «Выполнить поиск драйверов на этом компьютере» — «Выбрать из списка доступных драйверов на компьютере» и проверить, есть ли в списке другие совместимые драйверы).
Если же в вашем случае это какой-то другой файл, прежде всего попробуйте найти в Интернете, за что он отвечает, возможно, это позволит вам предположить, драйверы каких устройств являются причиной появления ошибки.
Дополнительные способы исправить ошибку SYSTEM SERVICE EXCEPTION
Далее описаны дополнительные шаги, которые могут помочь при появлении ошибки SYSTEM SERVICE EXCEPTION, если выяснить проблемный драйвер не удалось или его обновление не решило проблемы:
- Если ошибка стала появляться после установки антивирусного ПО, фаервола, блокировщика рекламы или иных программ для защиты от угроз (особенно нелицензионных), попробуйте удалить их. Не забудьте перезагрузить компьютер.
- Установите последние обновления Windows 10 (правый клик по кнопке «Пуск» — «Параметры» — «Обновление и безопасность» — «Центр обновления Windows» — кнопка «Проверить наличие обновлений»).
- Если до недавнего времени всё работало исправно, то попробуйте посмотреть, есть ли на компьютере точки восстановления и использовать их (см. Точки восстановления Windows 10).
- Если вы примерно знаете, какой драйвер вызвал проблему, можно попробовать не обновить (переустановить его), а откатить (зайти в свойства устройства в диспетчере устройств и использовать кнопку «Откатить» на вкладке «Драйвер»).
- Иногда ошибка может быть вызвана ошибками на диске (см. Как проверить жесткий диск на ошибки) или оперативной памяти (Как проверить оперативную память компьютера или ноутбука). Также, если на компьютере установлено более одной планки памяти, можно попробовать работу с каждой из них по отдельности.
- Выполните проверку целостности системных файлов Windows 10.
- Помимо программы BlueScreenView можно использовать утилиту WhoCrashed (бесплатная для домашнего использования) для анализа дампов памяти, которая иногда может предоставить полезную информацию о модуле, вызвавшем проблему (правда, на английском языке). После запуска программы нажмите кнопку Analyze, а затем ознакомьтесь с содержимым вкладки Report.

- Иногда причиной проблемы могут служить не драйверы оборудования, а само оборудование — плохо подключенное или неисправное.

Надеюсь, какой-то из вариантов помог исправить ошибку в вашем случае. Если же нет, опишите в комментариях подробно, как и после чего появилась ошибка, какие файлы фигурируют в дампе памяти — возможно, мне удастся помочь.
If you got a message like SYSTEM_SERVICE_EXCEPTION (dxgkrnl.sys) on the blue screen, it indicates that your computer has a Blue Screen of Death error due to dxgkrnl.sys. “dxgkrnl” stands for DirectX Graphics Kernel. As you can learn from its name, the problems are mainly graphics relevant problem.
For below solutions, solution 1 and 2 apply to all conditions with this problem, while the last two solutions can be used when you have installed NVIDIA Graphics Drivers.
Solutions:
1: Enter Safe Mode
2: Uninstall Graphics Drivers
3: Update the Graphics Driver
4: Disable SLI Technology
5: Turn off NVIDIA Surround
6: Check for Windows 10 Updates
Solution 1: Enter Safe Mode
On some conditions, users can’t log in to Windows 10 as dxgkrnl.sys BSOD comes up every time you manage to boot up. So you may as well enter the safe mode. In the safe mode, you are able to troubleshoot this system service exception blue screen error with a minimal set of programs.
Solution 2: Uninstall Graphics Drivers
Just as mentioned above, this system service exception blue screen Windows 7 or 10 is associated with the graphics card. While in terms of the video card, the outdated graphics driver will cause this dxgkrnl.sys failed error in some cases. That is why you should make sure your graphics driver is updated to the latest version.
Uninstall the Display Driver:
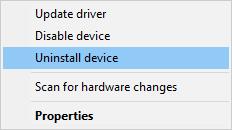
1. Right-click Start Menu and choose Device Manager.
2. Expand Display adapters. Right-click your graphics driver and choose Uninstall device.
3. Confirm to Uninstall the graphics driver on Windows 10.
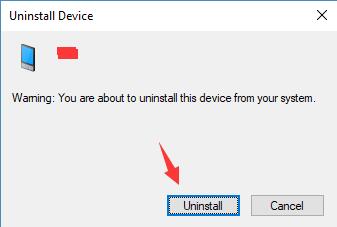
Immediately Device Manager gets rid of the NVIDIA, AMD, or Intel HD graphics driver for you, get down to reinstalling the up-to-date driver again in hope that the dxgkrnl.sys BSOD won’t appear.
Related: How to Uninstall Graphic Card Drivers Automatically
Solution 3: Update the Graphics Driver
Now you had better update your display driver to further improve the performance of your graphics card, thus fixing System Service Exception blue screen of death on Windows 10.
Download and Update Graphics Driver Automatically:
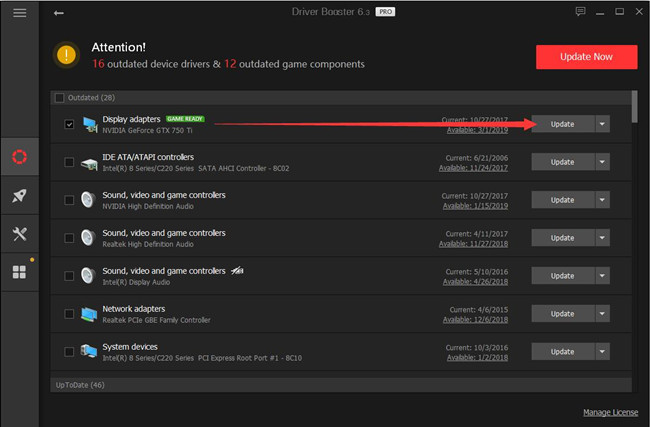
Here if you have no time or skills to update the display driver on your own, Driver Booster can be the most professional and efficient driver updater for you. It boasts of 3,000,000 drivers and allows you to do a scheduled scan on Windows 10.
1. Download and install Driver Booster on your computer.
2. Run Driver Booster and click Scan to get it to start scanning for the problematic drivers including the graphics card driver.

3. Pinpoint Display adapters and then choose to Update your display driver.
Upon the video card driver is installed by Driver Booster, the error message that your PC ran into a problem and needs to restart. We‘re just collecting some error info would not pop up now and then.
But even if system_service_exception dxgkrnl.sys remains, it is feasible to further take advantage of Driver Booster to install or update the DirectX for Windows 10. It is said above that dxgkrnl denotes DirectX Graphics Kernel. So it does make sense to ensure the DirectX runs properly as well.
4. Driver Booster scanning result, slide down to find out DirectX package and then Update it.
With the most up-to-date graphics driver and DirectX from Driver Booster, the system service error on Windows 7 32-bit or Windows 10 will be solved.
Of course, in order to update the display driver, you can note the information of your graphics driver in Device Manager. Then go to the manufacturer’s Download Center to download the corresponding graphics driver.
After you downloaded the driver from the website, you can open the file and install it according to the on-screen installation wizard.
Solution 4: Disable SLI Technology
SLI mode can give gamers better performance, but it can cause some problems. Some users already find it can result in dxgkrnl.sys error. If you installed NVIDIA Graphics Drivers and enabled SLI, you should disable it following this way:
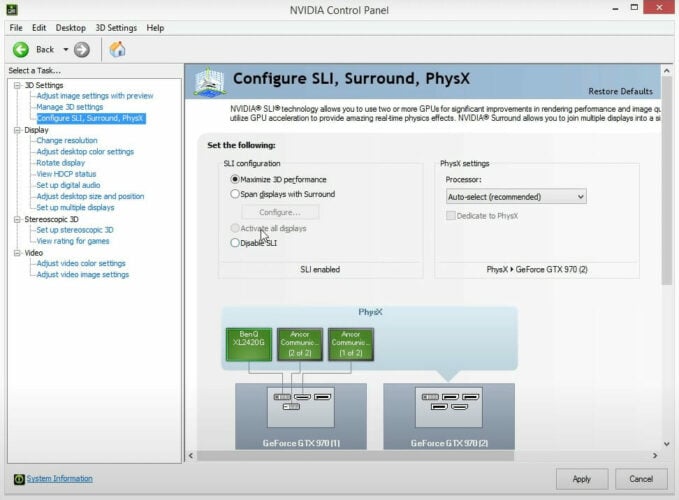
1. Go to NVIDIA Control Panel.
2. Expand the 3D Settings and choose Configure SLI, PhysX, Surround.
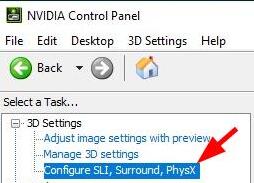
3. Inside this menu, choose Disable SLI.
Tips: What is NVIDIA SLI Technology?
SLI, short for Scalable Link Interface, is a multi-GPU technology by NVIDIA. With SLI enabled, NVIDIA users are able to connect two or more graphics cards but work like just one output. Though it can enhance processing performance, it does also cause various graphics-related errors, like system_service_exception blue screen of death on Windows 7, 8, and 10.
Here you would have turned NVIDIA SLI off. You can check if it helps to fix dxgkrnl.sys Blue Screen of Death on Windows 10.
Solution 5: Turn off NVIDIA Surround
NVIDIA Surround is a kind of technology that can give users 3D experience. It sounds great. However, it has been proved that it can cause problems with Windows 10, and disabling it can help with BSOD error by dxgkrnl.sys.
You can use shortcut CTRL+ALT+S or CTRL+ALT+R to turn it off.
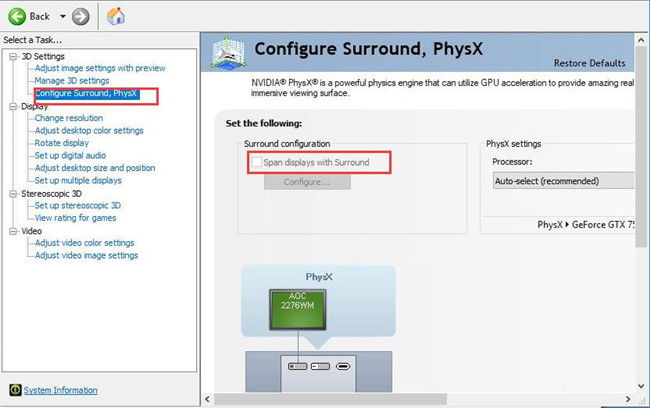
Or you can turn it off on NVIDIA Control Panel too. Go to NVIDIA Control Panel > 3D Settings > Configure SLI, PhysX, Surround > uncheck Span display with Surround.
After you disable this feature, your problem should be gone now.
Solution 6: Check for Windows 10 Updates
Windows Update can always fix some problems for you. When you are encountering system_service_exception dxgkrnl.sys BSOD, you can try to update Windows 10 to see if its new features will be helpful to remove the dxgkrnl.sys blue screen.
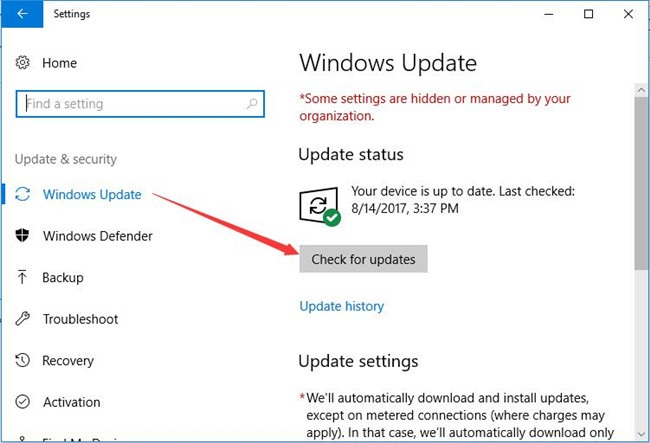
1. Go to Settings > Update & security > Windows Update.
2. Click on Check for updates.
If there are updates available, it will download for you automatically. With the updated system, you can see whether dxgkrnl.sys Blue Screen of Death persists on Windows 10.
Supposing that you have tried all solutions above, but the blue screen error caused by dxgkrnl.sys appears again, you may need to check if there is some problem in your hardware such as RAM module or motherboard. Hope this passage can help you with this issue.
More Articles:
Fix Stop 0x0000007e BSOD Error
FIX FAULTY HARDWARE CORRUPTED PAGE BLUE SCREEN ERROR ON WINDOWS 10
Fixed: IRQL UNEXPECTED VALUE BSOD Windows 10
dxgkrnl.sys is Microsoft’s DirectX graphics kernel file. It works with your graphic card’s drivers, and as such, shouldn’t be modified in any way.
Getting a BSOD with this message, SYSTEM_SERVICE_EXCEPTION (dxgkrnl.sys) indicates that the graphic card and its drivers have malfunctioned in some way. However, it is a software issue, and an easy one to solve. Vulnerable users include, but are not limited to, people who use multiple GPUs in SLI, as well as people who use Nvidia Surround for working on multiple monitors. It usually appears with Windows 10 users, but users of older versions of Windows are not excluded.
There are a few things that you can do to solve this problem, and all of them are fairly easy to follow. You might want to read all of them, as they concern different user groups, so you should see which one you fit first, and apply the appropriate method.
Method 1: Disable SLI
Although this is more of a workaround than a method, if you’re on Nvidia’s version 353.62 and you use more than one graphics card, this is the only solution so far. Disabling SLI will cause you to suffer a performance hit when working with graphic intensive applications, or gaming, but it is the only solution for this version of Nvidia’s drivers.
To disable SLI, you will need to open Nvidia Control Panel, by right-clicking on your desktop and selecting it from the dropdown menu. To the left, you will see a navigation pane. Expand the 3D Settings option and choose Set SLI and PhysX configuration. Inside this menu, under SLI configuration, you should choose Disable SLI. Close the Nvidia Control Panel by clicking Apply, then OK afterwards.
This method is for users who for some reason can’t, or won’t update to newer drivers for their GPUs. This one in particular is known to cause a BSOD, especially with Windows 10. You can use the method to prevent BSODs until you can find a more permanent fix, such as a newer driver.
Method 2: Disable Nvidia Surround
Surround is Nvidia’s technology for people who want to run more than one display at a time, and it offers immersive gaming options that can truly enhance your experience. However, it is known to cause problems with Windows 10, and disabling it can stop those dreaded BSODs from appearing.
To disable it, right click on your desktop and open Nvidia Control Panel. Again, in the navigation pane to your left, expand 3D Settings and click on Configure Surround, PhysX. Under Surround configuration, you should uncheck Span displays with Surround. You can now close the Nvidia Control Panel by clicking Apply, then OK.
Method 3: Uninstall the Nvidia drivers, and let Windows install its own
Since this is after all a driver issue, one more possible solution is to uninstall the drivers you have installed, and let Windows install its own. Windows will find compatible drivers which shouldn’t be causing any issues with your computer, and you will be able to use it without worrying afterwards. The steps to doing this are fairly easy.
Open the Start menu, and search for Device Manager. Open the result, and you will see a list of devices connected to your computer. Expand Display Drivers and inside you will find your graphics card’s drivers. Right-click it, and choose Uninstall. Let the uninstall wizard do its thing, following the steps, and reboot your system. When you reboot, you can use Windows Update to download the latest drivers. Type Windows Update in the Start menu and open the result. Click on Check for Updates and Windows should see that no drivers are currently installed for your graphics card, which will make it look for appropriate ones on the Internet. Let it download and install them, and reboot your system again.
With Windows having installed drivers for your graphics card, your system should be up and running as it was prior to the errors. This is a method that works for a number of GPU driver issues, and it has been proven to work for this one as well.
The dxgkrnl.sys error is known to exist to both Nvidia and Microsoft. However, if you’d rather avoid waiting for them to issue a solution to it, you can follow the aforementioned steps and fix your device by yourself, so you can continue using it without fearing a Blue Screen of Death.
Method 4: Analyse DMP Files
If the methods above won’t resolve the issue for you, then click (here) to view the WinDBG guide so you can analyse the BSOD Dump Files yourself.

Kevin Arrows
Kevin Arrows is a highly experienced and knowledgeable technology specialist with over a decade of industry experience. He holds a Microsoft Certified Technology Specialist (MCTS) certification and has a deep passion for staying up-to-date on the latest tech developments. Kevin has written extensively on a wide range of tech-related topics, showcasing his expertise and knowledge in areas such as software development, cybersecurity, and cloud computing. His contributions to the tech field have been widely recognized and respected by his peers, and he is highly regarded for his ability to explain complex technical concepts in a clear and concise manner.
Aug. 08, 2022 / Updated by
Vivi to
Windows 11
If your computer is having a blue screen with the message SYSTEM_SERVICE_EXCEPTION (dxgkrnl.sys), it means that you are encountering the blue screen of death due to dxgkrnl.sys. In the message, «dxgkrnl» stands for DirectX Graphics Kernel, so this error is caused by problematic graphics drivers. Here are 5 effective fixes for the blue screen of death error SYSTEM_SERVICE_EXCEPTION (dxgkrnl.sys) on Windows 10/11.
Contents:
Fix 1. Update graphics drivers
Fix 2. Enter Safe Mode
Fix 3. Disable SLI in NVIDIA settings
Fix 4. Turn Off NVIDIA Surround settings
Fix 5. Check for Windows Updates
Fix 1. Update graphics drivers
Just as mentioned above, the dxgkrnl.sys blue screen of death error is caused by corrupted or incompatible graphics drivers, so updating the graphics drivers is one of the common solutions to this problem. As for how to update drivers, we’d recommend you to use Driver Talent.
Driver Talent is a professional driver updater software that help to fix driver-related issues by uninstalling drivers, reinstalling drivers, updating drivers or restoring drivers. Now click the button below to download and install Driver Talent.
Download Driver Talent
Then following these three steps to update your graphics drivers.
Step 1. Check all drivers on your computer with one click.

Step 2. Click the Update button beside the graphics driver. Or you can click Install All to update multiple drivers for all devices.

Step 3. Restart your Windows.
After that, the blue screen of death error SYSTEM_SERVICE_EXCEPTION (dxgkrnl.sys) should be resolved.
Fix 2. Enter Safe Mode
If you cannot log into Windows because of the dxgkrnl.sys blue screen of death, you may need to enter the safe mode. This will allow you to troubleshoot the problem. Here are the steps to boot Windows in safe mode:
Step 1. Shut down the computer completely.
Step 2. Turn on the PC.
Step 3. Immediately hold down the power button until the boot is interrupted and your PC shuts down again.
Step 4. Repeat Step 2 and Step 3 twice more.
Step 5. Startup Repair will pop up after the third interrupted reboot.
Step 6. Choose Advanced Options, click Start Up Settings and then click Restart.
After that, select the Safe Mode you want from the options.
Fix 3. Disable SLI in NVIDIA settings
SLI mode can help to improve game performance and provide players better gaming experience, but it is reported that occasionally it can cause dxgkrnl.sys error if you are using multiple GPUs on your device. Thus you should disable the SLI technology in NVIDIA settings.
To do so:
Step 1. Click the Windows key, type NVIDIA Control Panel, and select it.
Step 2. Expand the 3D Settings, and then select Configure SLI, PhysX, Surround.
Step 3. Disable SLI and then click on Apply.

Step 4. Reboot the PC.
Check if the blue screen dxgkrnl.sys problem still occurs.
Fix 4. Turn Off NVIDIA Surround settings
Many people fixed the dxgkrnl.sys problem by turning off the NVIDIA Surround settings, so you can give it a shot.
Step 1. Click the Windows key, type NVIDIA Control Panel, and select it.
Step 2. Click 3D settings, and then select Configure Surround, PhysX.
Step 3. Under the Surround configuration section, uncheck the box beside Span displays with Surround, and then click Apply.

Restart your PC and check if the blue screen of death error SYSTEM_SERVICE_EXCEPTION (dxgkrnl.sys) is solved.
Fix 5. Check for Windows Updates
If the solutions listed above didn’t work, you may need to update your Winodws 10 or Windows 11. The latest Windows Update always comes with the fixes for some known issues and bugs, so it is worthy of checking for Windows Updates.
Step 1. Press Win and I on the keyboard altogether.
Step 2. Select Update & Security.
Step 3. Under the Windows Update section, find Check for updates and click on it.
Step 4. If there is a update available, click Download and install.
When the downloading and installing process is over, check if the SYSTEM_SERVICE_EXCEPTION (dxgkrnl.sys) is fixed.
Hope these 5 solutions can help you fix the blue screen of death error SYSTEM_SERVICE_EXCEPTION (dxgkrnl.sys). If you still have any questions, please contact us in the comments section below.
Read more:
1. How do I fix device driver error code 43: Windows has stopped this device because it has reported problems
2. How to fix This Device Is Not Configured Correctly (Code 1)
3. Fix Blue Screen of Death in Windows 10/11
4. How to Fix Windows 11 Screen Flickering Issue
5. How to Fix «Windows can’t connect to this network» Error in Windows 11
Recommended Download

|
ExplorerMax |

|
Driver Talent for Network Card | |
| Smart and advanced file explorer tool for Windows platforms | Download & Install Network Drivers without Internet Connection | |||
|
30-day Free Trial |
Free Download |
Resolve this BSOD error with our expert solutions
by Milan Stanojevic
Milan has been enthusiastic about technology ever since his childhood days, and this led him to take interest in all PC-related technologies. He’s a PC enthusiast and he… read more
Updated on
- The dxgkrnl.sys Windows 10 error usually happens due to driver problems.
- Using third-party software that restores your files will quickly fix the dxgkrnl.sys blue screen.
- Turning it off in the NVIDIA settings should also eliminate the issue if you’re using SLI.
- Some users suggested updating your Windows 10 and hardware drivers to the latest versions.
Blue Screen of Death errors can cause many problems, and users have reported that file DXGKRNL.sys causes these issues on Windows 10.
They’re unpleasant and unlikely to get solved out of the blue. If you experience such an error, let’s see how to fix it quickly.
Here are some more examples of this problem:
- dxgkrnl.sys failed – When facing this issue, check if there is any hardware failure that requires your attention.
- dxgkrnl.sys dpc latency Windows 10 – Is this your problem as well? Then, make sure to keep your Windows 10 and graphics card drivers updated.
- dxgkrnl.sys Windows 10 won’t boot – In this case, don’t hesitate to run the SFC scan and get further answers.
- driver_irql_not_less_or_equal dxgkrnl sys – When bothered by this error, the first thing you should do is turn off Nvidia Surround.
What causes the DXGKRNL.sys BSOD?
The DXGKRNL.sys BSOD is usually encountered when running an outdated version of DirectX. And to update DirectX, you need to update the graphics driver installed on the PC.
Besides, other underlying causes for the error include corrupt system files, problematic drivers, or connecting incompatible hardware to the PC. But these are unlikely scenarios, and the error usually involves the graphics driver.
How can I fix the BSOD error caused by DXGKRNL.sys?
1. Use a third-party BSoD fixer
The easiest and less consuming way to fix the blue screen DXGKRNL.sys in Windows 10 is by installing a third-party app that will do it for you.
The software can automatically scan your device for problematic files and restore or replace them with healthy ones, thus keeping your system up and going.
2. Disable SLI
- Open the Nvidia Control Panel.
- Go to 3D Settings from the navigation pane, and click on Configure SLI, Surround, PhysX.

- Make sure the Disable SLI option is selected, and click Apply to save the changes.
Many gamers use two Nvidia graphics cards in SLI mode for better performance. Although this sounds great, it has been reported that SLI can cause the system_service_exception DXGKRNL.sys error.
There’s a memory leak in VRAM when you use SLI on Windows 10, so to fix this issue, it’s advised that you disable SLI.
How we test, review and rate?
We have worked for the past 6 months on building a new review system on how we produce content. Using it, we have subsequently redone most of our articles to provide actual hands-on expertise on the guides we made.
For more details you can read how we test, review, and rate at WindowsReport.
After disabling SLI on your computer, verify if the DXGKRNL.sys fatal error is fixed.
3. Turn off Nvidia Surround
Nvidia Surround is a feature on Nvidia GPUs that lets you enjoy a 3D experience on multiple monitors.
Although this sounds like a fantastic feature for gamers, this feature has led to issues on Windows 10 and the System_Service_Exception DXGKRNL.sys BSOD error.
So far, the only solution is to turn off Nvidia Surround to fix this error. However, we also have to mention that sometimes Nvidia Surround can’t be turned off easily, and users have suggested using the CTRL + ALT + S or CTRL + ALT + R shortcut to turn it off.
If the shortcut isn’t working for you, try unplugging other monitors and booting with only one monitor plugged in. When you do that, the Nvidia Surround should be turned off automatically.
4. Keep your Windows 10 and GPU drivers updated
It has been reported that the graphics card driver causes this issue. Do you happen to you use the Nvidia graphic card? You should make sure you’re using the latest GPU driver available.
If you want to download any driver easily, you should install a third-party driver updater that will scan your PC for compatible hardware and software and then install the latest drivers.
All you have to do is choose whether to update all of the drivers at once or individually if you have reasons not to install specific ones.
5. Change graphics memory size in BIOS
- Restart your computer and keep pressing Del, F2, or F10 while your computer boots. The specific key may be different on your computer and should be listed during boot, or you can verify the same from the system manufacturer’s website.
- The Advanced, Advanced Chipset, or Advanced Features menu must be found.
- Locate Graphics Settings or Video Settings and change the memory size to 128 MB or more.
If you’re using integrated graphics, you might be able to fix this BSOD error by changing the graphics memory size in BIOS.
Users have reported successfully fixing errors caused by DXGKRNL.sys on ASUS laptops with integrated Intel HD 4400 graphics.
This solution should work for any other laptop or integrated graphic card, including DXGKRNL.sys latency AMD.
We must mention that changing the memory size for the integrated graphic card isn’t the same for all computers, and the process might be different depending on the BIOS you’re using.
6. Check for hardware malfunctions
There have been a few cases where a faulty RAM module or motherboard caused this issue. If your PC is under warranty, you might want to take it to the repair shop and have it checked for hardware malfunctions.
Since any installed hardware might be the underlying cause, the repair shop can quickly identify the one and make the necessary repairs to fix it or replace it with a functional component.
7. Run the SFC scan
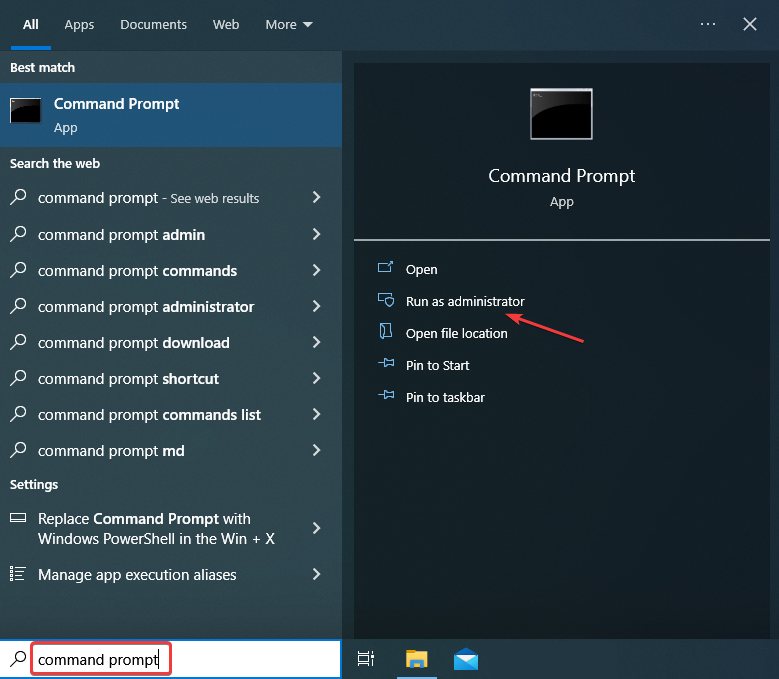
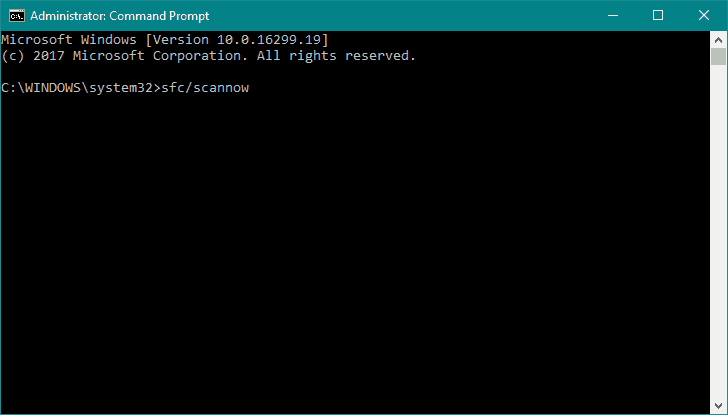
- Type Command Prompt in the Search bar, and click on Run as administrator.

- Click Yes in the UAC prompt.
- Type in the following command, and press Enter:
sfc/scannow
- Wait for the process to finish.
- Restart your computer.
If none of the solutions from above managed to fix the DXGKRNL.sys not loaded error, it could be the corrupt system files to blame. And in this case, the SFC (System File Checker) scan will come to your aid.
- Security Settings Blocked Self-signed Application [Fix]
- Bugcheck 0x0000012B: How to Fix This BSoD
- Stop Error Code 0x0000008E: How to Fix it
- 0x000000ED BSOD: Unmountable Boot Volume [Error Fix]
8. Run the Blue Screen Troubleshooter

NOTE
If you can’t find the Blue Screen troubleshooter on the computer, head to the following method.
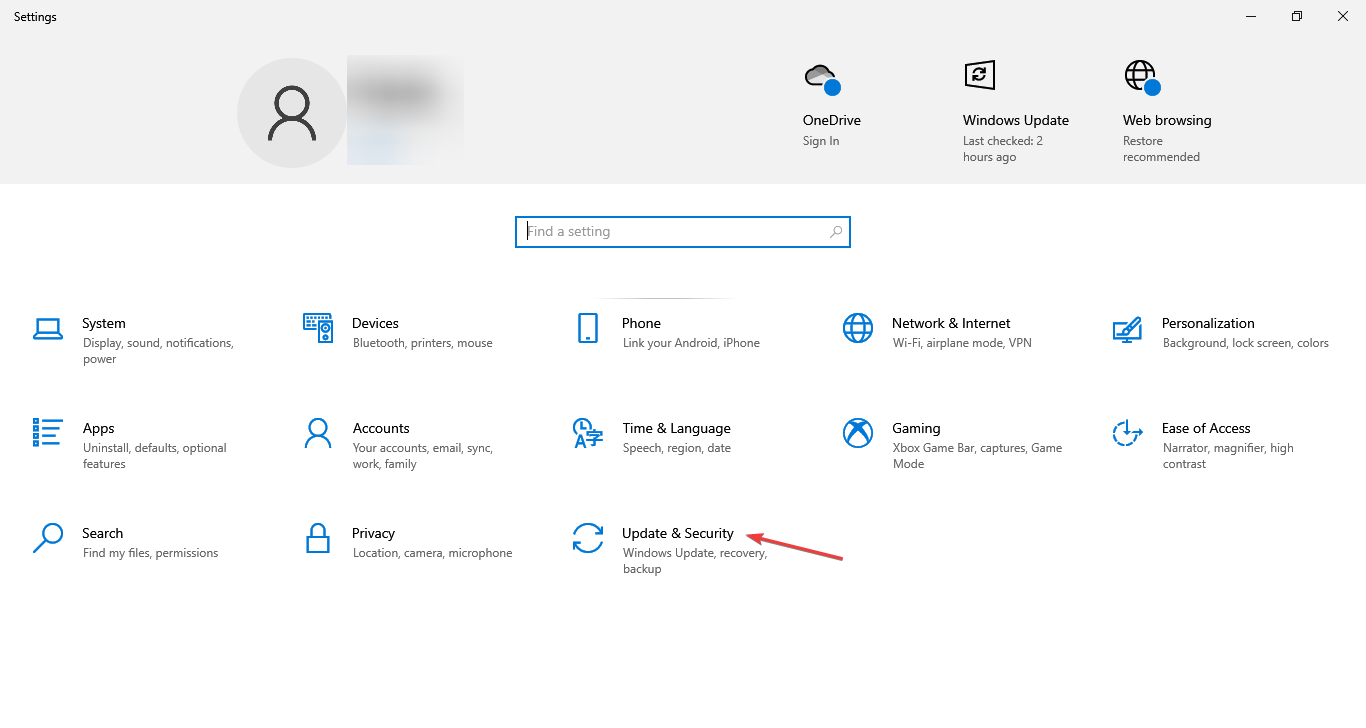
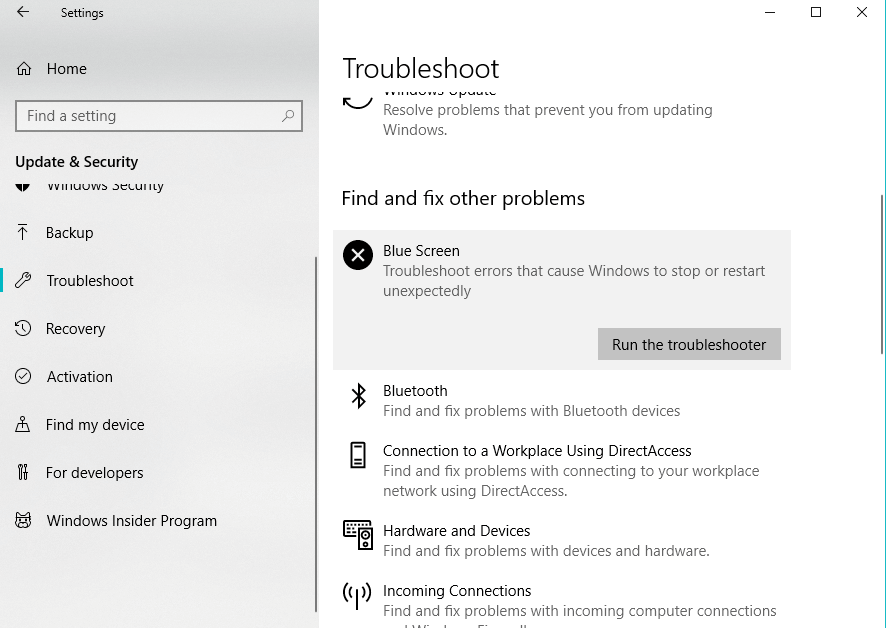
- Press Windows + I to open the Settings app, and click on Update & Security.

- Select Troubleshoot from the navigation pane, and click on Addition troubleshooters.
- Now, select Blue Screen, and click on the Run the troubleshooter button.

- Follow further instructions, and let the wizard finish the process.
- Restart your computer.

The following troubleshooting tool we’re going to try is Blue Screen, a built-in troubleshooter in Windows 10. After you are done with it, verify if the problem is resolved. If not, head to the final solution.
9. Run DISM
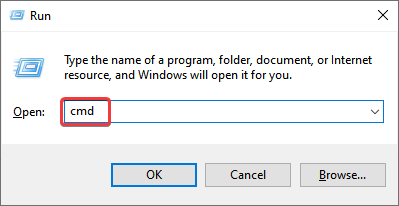
- Press Windows + R to open Run, type cmd, and hit Ctrl + Shift + Enter.

- Click Yes in the UAC prompt.
- In the command line, copy-paste these lines one by one and press Enter after each:
DISM/online/Cleanup-Image/ScanHealthDISM/Online/Cleanup-Image/RestoreHealth
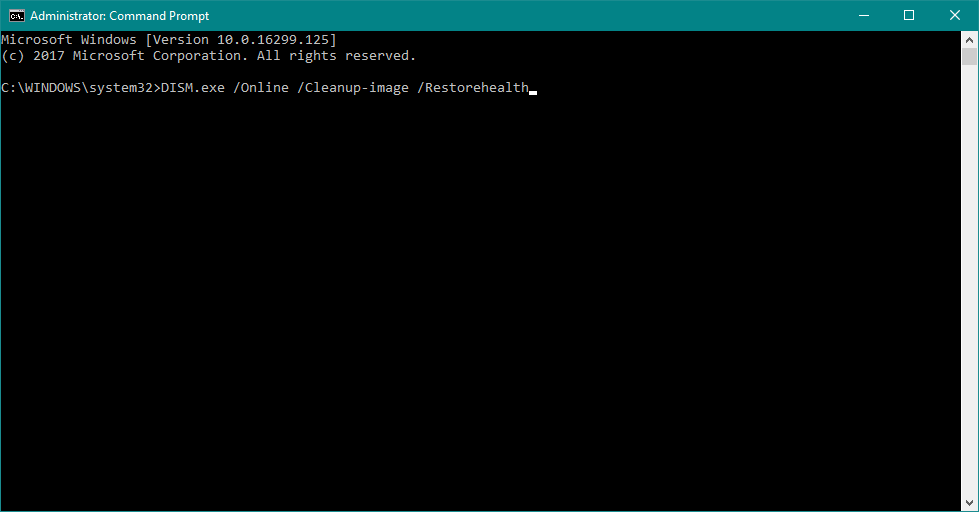
Lastly, run the DISM (Deployment Image Servicing and Management) tool. It has been found to fix many BSOD errors and might help in the case of DXGKRNL.sys.
How do I replace Dxgkrnl sys?
DXGKRNL.sys is a DirectX Kernel File with a .sys (system) extension. It’s a critical file, which, when it goes missing or is corrupt, you are bound to encounter issues.
Now, if you plan to replace it, several websites claim to offer DXGKRNL.sys for download. However, proceed at your own risk after verifying the authenticity and reliability of the source.
A simple solution in case you are getting the DXGKRNL.sys error would be to perform a System Restore, and it would get the file back to its normal state, given you choose a restore point created before the error was first encountered. Another option is to factory reset Windows.
And that’s about it! We hope one of our solutions helped you eliminate the DXGKRNL.sys BSOD error on Windows 10.
Also, please find out the location of the BSOD log file since it will help identify the underlying cause and fix things.
If you have any other questions or suggestions, feel free to leave them in the comments section below, and we will certainly check them out.
![]()