Восстановление системы отключено системным администратором — как исправить?
 Некоторые пользователи Windows 11 и Windows 10, 8.1 и Windows 7 могут столкнуться с сообщением о том, что восстановление системы отключено системным администратором при попытке создать точку восстановления системы вручную или запустить восстановление. Также, если речь идет о настройке точек восстановления, в окне параметров защиты системы можно увидеть еще два сообщения — что создание точек восстановления отключено, равно как и их конфигурация.
В этой инструкции — пошагово о том, как включить точки восстановления (а точнее — возможность их создания, настройки и использования) в Windows 11, 10, 8.1 и 7. На эту тему также может пригодиться подробная инструкция: Точки восстановления Windows 11, Точки восстановления Windows 10.
Обычно, проблема «Восстановление системы отключено системным администратором» бывает не какими-то вашими или сторонними действиями, а работой программ и твиков, например, программы для автоматической настройки оптимальных параметров работы твердотельных накопителей в Windows, например, SSD Mini Tweaker, могут так сделать (на эту тему, отдельно: Как настроить SSD для Windows 10). При этом на вкладке «Защита системы» вы можете наблюдать следующие уведомления:
- Восстановление системы отключено системным администратором
- Конфигурация отключена системным администратором
- Создание точек восстановления отключено системным администратором

Включение восстановления системы с помощью редактора реестра
Первый способ решения проблемы — устранение сообщения о том, что восстановление системы отключено, подойдет для всех редакций Windows, в отличие от следующего, который предполагает использование редакции Pro или Enterprise.
Шаги по устранению проблемы будут следующими:
- Запустите редактор реестра. Для этого вы можете нажать клавиши Win+R (Win — клавиша с эмблемой Windows в нижнем ряду) на клавиатуре, ввести regedit и нажать Enter.
- В редакторе реестра перейдите к разделу (папки слева)
HKEY_LOCAL_MACHINE\SOFTWARE\Policies\Microsoft\Windows NT\SystemRestore
- Либо удалите целиком этот раздел, нажав по нему правой кнопкой мыши и выбрав «Удалить», либо выполните пункт 4.
- Измените значения параметров DisableRestore, DisableConfig и DisableSR c 1 на 0. Либо удалите эти параметры. Набор параметров в разделе в каждом конкретном случае может отличаться, но каждый из них отключает одну из возможностей использования защиты системы: само восстановление, создание точек восстановление или конфигурацию.

- Закройте редактор реестра. Как правило, перезагрузка компьютера не требуется.

Готово. Теперь, если снова зайти в параметры защиты системы, сообщений о том, что восстановление Windows отключено, появиться не должно, а точки восстановления будут работать так, как от них ожидается.
Возврат восстановления системы с помощью редактора локальной групповой политики
Для Windows 11/10, 8.1 и Windows 7 редакций Профессиональная, Корпоративная и Максимальная вы можете исправить «восстановление системы отключено администратором» и сопутствующие проблемы с помощью редактора локальной групповой политики. Шаги будут следующими:
- Нажмите клавиши Win+R на клавиатуре и введите gpedit.msc затем нажмите Ок или Enter.
- В открывшемся редакторе локальной групповой политики перейдите к разделу Конфигурация компьютера — Административные шаблоны — Система — Восстановление системы.

- В правой части редактора вы увидите два параметра «Отключить конфигурацию» и «Отключить восстановление системы». Дважды кликните по каждому из них и установите значение «Отключено» или «Не задано». Примените настройки.


После этого можно закрыть редактор локальной групповой политики, снова зайти в настройки защиты системы и выполнять все необходимые действия с точками восстановления Windows.
На этом всё, думаю, один из способов вам помог. Кстати, было бы интересно узнать в комментариях, после чего, предположительно, восстановление системы стало отключено администратором у вас.
System Restore is one feature that has saved me a lot many times. It allows one to return to the previously saved computer’s state, which reverts system files, installed applications, registry, and a few system settings. It comes in very handy when you have a messed-up driver or something that has caused a problem in your Windows desktop. But if System Restore is Disabled for you, then in this guide, we will learn how to Enable “Disabled” System Restore in Windows 11/10
The case of System Restore is Disabled in Windows 11/10
It is interesting to note that System Restore is also enabled on per drive/partition basis. After I upgraded to Windows 10, I was surprised that this option was entirely disabled. I could get to the exact point where I could enable it, but the option to turn it on was grayed out. If you are in a similar situation, follow-up these steps to enable it.
Use the following methods to enable the disabled System Restore in Windows 11/10
- System Properties
- Group Policy
You will need admin permission to resolve this.
1] Enable System Restore in Windows 11/10 via System Properties

- Right-click on the Start button and select System.
- On the left part of the System windows, look for a system protection link. Click to open it.
- Switch to the System Protection tab. It will have a list of all the drives and status of protection ( on/off)
- Select C drive, and click configure button.
- If you can select the radio option Turn on System protection in this window, you are good to go. Set it up and create a restore point.
- If you cannot, then follow up to the next section.
2] Enable System Restore via Group Policy Editor
- Type GPEDIT.MSC in your Start Search box. It will list the app Group Policy Editor.
- Now follow this path Computer Configuration > Administrative Templates > System > System Restore.
- Look for a setting that says Turn Off System Restore. It is not configured by default.
- Double click it and select Disabled.
- Click OK.

Now follow the steps to go to the System Restore option, and you will be able to turn on the System protection for any of the drives. Make sure to keep enough space on the drive to enable System Restore.
Always make sure to keep System Restore enabled, especially for the drive on which Windows is installed.
Download Windows Speedup Tool to fix errors and make PC run faster
System Restore is different from System Backup. It captures resident programs, their settings, and Windows Registry as an image and backs up a few things that are necessary to reconstruct the system drive to the point – if you opt to go back. By default, System Restore is enabled on all Windows operating systems, including Windows 11 and Windows 10. But some users who upgraded their computers are reporting that their System Restore feature was turned off.
When you try to run System Restore, you may see a message:
You must enable system protection on this drive
It is therefore imperative that all users check if System Restore is enabled on their systems and if not to turn it on. This post will show you how to turn on and enable System Restore in Windows 11/10.
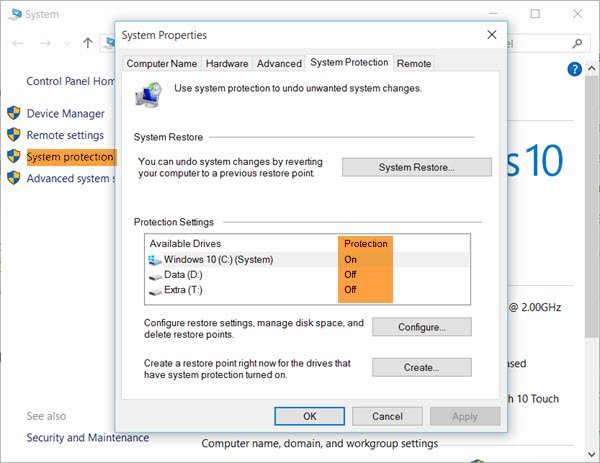
To check if your System Restore has been disabled or not, type Control Panel in Start Search and hit Enter to open it. Click on System to open Control Panel’s System applet.
In the left pane, you will see System protection. Click on it to open System Properties. Under System Protection tab, you will see the Protection Settings.
Ensure that Protection is set to ‘On’ for the System drive.
If not, select the System Drive or C Drive and press the Configure button. The following box will open.
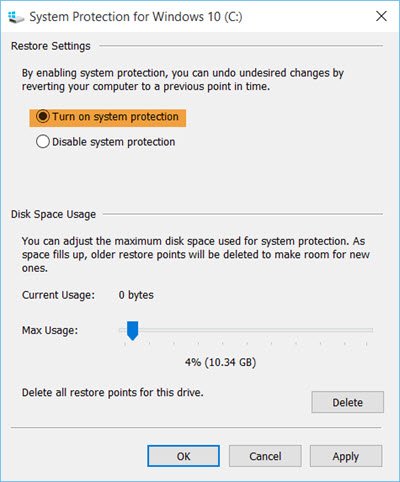
Select Turn on system protection and click on Apply.
That’s it! You will have enabled System Restore on Windows 11/10/8/7.
Having done this, you will want to immediately create a system restore point first. Do that and check if it has been created.
Turn on System Protection is greyed out or missing
If the Turn on System Protection option is greyed out or missing on your Windows computer, maybe System Restore is disabled by your system administrator.
You may also use the Enable-ComputerRestore cmdlet. It turns on the System Restore feature. So run the following command in an elevated PowerShell window:
PS C:\> Enable-ComputerRestore -Drive "C:\"
This command enables System Restore on the C: drive of the local computer.
If System Restore is not working and system restore points are not created, you may want to open Run box from the WinX menu, type services.msc to open the Services Manager and ensure that the Volume Shadow Copy & Task Scheduler & Microsoft Software Shadow Copy Provider Service is Running and set to Automatic.
Using system protection on a drive that contains system image backups will cause other shadow copies to be deleted faster than normal
If you see this message after you turn on System restore, then you need to know this.
System protection (System restore) uses a reserved space to backup file versions for every Restore point. Now as this reserved space starts filling up, older versions start getting deleted. Now if you have configured your Windows Backup to save System Image Backups to this drive, then because these image backups take up large disk space, the other file backups (shadow copies) will start getting deleted faster. If this is your case, then Windows warns you about this.
So in this case, you can let the reserved disk space settings remain as it is knowing that the shadow copies will get deleted faster or you may increase the Reserved Space allotted to System protection.
Anand Khanse is the Admin of TheWindowsClub.com, a 10-year Microsoft MVP (2006-16) & a Windows Insider MVP (2016-2022). Please read the entire post & the comments first, create a System Restore Point before making any changes to your system & be careful about any 3rd-party offers while installing freeware.
По умолчанию восстановление системы включено во всех операционных системах Windows, включая Windows 10. Но некоторые пользователи, которые обновили свои компьютеры до Windows 10 , сообщают, что их функция Восстановление системы была отключена. выкл. Поэтому обязательно, чтобы все пользователи проверяли, включено ли восстановление системы в их системах, и если нет, чтобы включить его. Этот пост покажет вам, как включить и включить восстановление системы в Windows 10.
Восстановление системы отличается от резервного копирования системы. Он записывает резидентные программы, их настройки и реестр Windows в виде образа и создает резервные копии нескольких вещей, которые необходимы для восстановления системного диска, – если вы решите вернуться назад.
Включите восстановление системы в Windows 10

Чтобы проверить, было ли отключено восстановление системы, введите Панель управления в поле «Начать поиск» и нажмите Enter, чтобы открыть его. Нажмите Система , чтобы открыть системный апплет панели управления.
На левой панели вы увидите Защита системы . Нажмите на него, чтобы открыть Свойства системы. На вкладке Защита системы вы увидите Настройки защиты .
Убедитесь, что для параметра Защита установлено значение «Вкл.» Для системного диска.
Если нет, выберите системный диск или диск C и нажмите кнопку Конфигурировать . Откроется следующее окно.

Выберите Включить защиту системы и нажмите «Применить».
Это оно! Вы включите восстановление системы в Windows 10/8/7.
Сделав это, вы сначала захотите немедленно создать точку восстановления системы. Сделайте это и проверьте, был ли он создан.
Включите Защита системы отображается серым цветом или отсутствует
Если параметр Включить защиту системы неактивен или отсутствует на вашем компьютере Windows, возможно, восстановление системы отключено вашим системным администратором.
Вы также можете использовать командлет Enable-ComputerRestore . Включает функцию восстановления системы. Запустите следующую команду в окне PowerShell с повышенными правами:
PS C: \> Enable-ComputerRestore -Drive "C: \"
Эта команда включает восстановление системы на диске C: на локальном компьютере.
Если восстановление системы не работает и точки восстановления системы не созданы, вы можете открыть окно «Выполнить» из меню WinX, введите services.msc , чтобы открыть диспетчер служб и убедиться, что теневое копирование тома & Планировщик заданий и служба Microsoft Shadow Copy Provider Service работают, и для них установлено значение Автоматически.
If you want to use System Restore, but Windows tells you it has been disabled by an administrator, there are ways to fix this annoying problem.

When your PC is having issues, sometimes you want to send it back in time to a point where everything worked fine. Fortunately, with Windows machines, you can do just that with its handy system restore feature.
However, just when your troubles are over, you run into the dreaded “System Restore is disabled by your system administrator” error. You may feel frustrated and clueless about what to do, but don’t worry; there is a way to fix this. In this article, we’ll show you how you can tackle this issue and get your PC up and running again.
What Is the Windows System Restore Feature?
The Windows System Restore is a tool designed to protect and repair your PC whenever you run into issues. This feature takes a snapshot of your system files and registry entries and then saves them as restore points.
When something suddenly goes wrong with your PC, a system restore point takes your PC back to its previous state without you having to reinstall the operating system. You can create restore points manually or configure your system to create daily system restore points automatically.
So if restore points are a useful and time-saving tool, what is it that causes the “System Restore is disabled by your system administrator” error? Let’s find out.
What Causes the «System Restore Is Disabled by Your System Administrator» Error?
When System Restore fails, you’ll usually notice via one of two ways. You’ll either see an error message or your restore points will be grayed out. This issue can be caused by dodgy third-party software or the way you’ve configured your system settings.
If you’re using someone else’s PC, it’s also possible that the administrator has disabled System Restore. In this case, you could request administrator privileges or ask the administrator to enable the System Restore feature.
Otherwise, here’s how you can get rid of the “System Restore is disabled by your system administrator” error on your PC.
1. Configure the System Restore Settings
An easy way to resolve this issue is by configuring your restore point settings. Here’s how you can do this:
- Type create a restore point in the Windows search bar and select the Best match.
- Navigate to the System Protection tab.
- Click the Configure button under Protection settings.
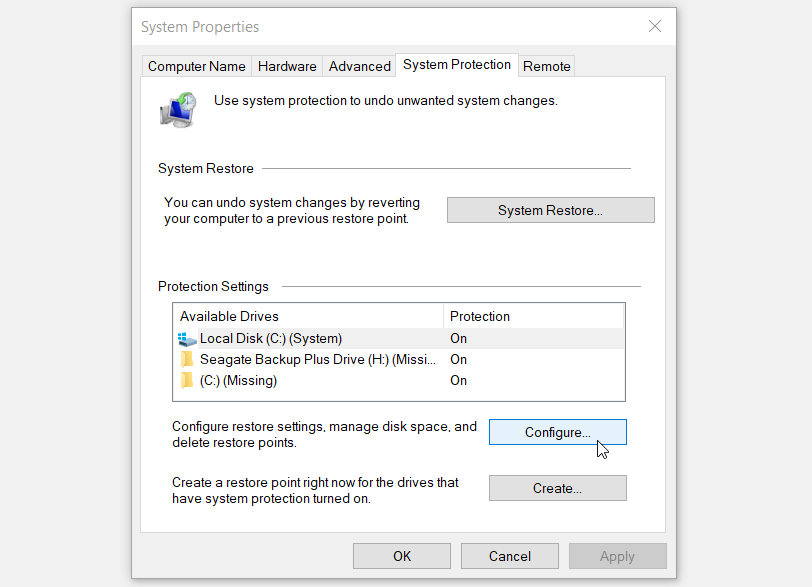
In the next window, select Turn on system protection, click Apply, and then click OK. Restart your PC to save these changes.
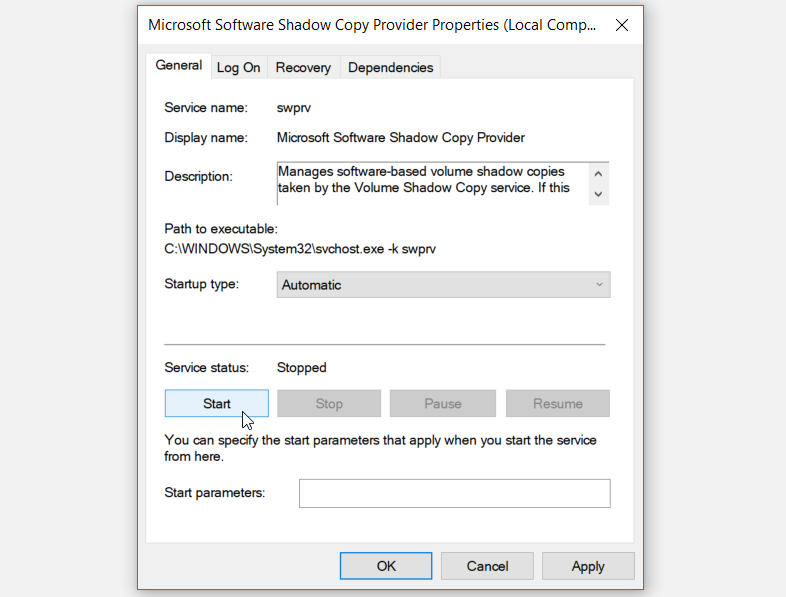
2. Ensure Your System Restore Services are Running
If your computer’s system restore point services aren’t running, there’s a good chance they’re causing the error message. These services include the Microsoft Software Shadow Copy Provider Service and the Volume Shadow Copy.
To resolve this issue, here’s what you can do:
- Press Win + R, type services.msc, and press Enter.
- Locate Microsoft Software Shadow Copy Provider Service and double-click on it.
- In the next window, select Automatic from the Startup type drop-down menu.
- From here, click Start under the Service status options. Press Apply and then press OK to save these changes.
When you finish, locate the Volume Shadow Copy and configure it the same way you did for the previous steps. Then, restart your PC to save the changes.
3. Use the Registry Editor
One of the best ways to get your System Restore up and running again is by using the Registry Editor. This is a Windows built-in tool that helps modify registry keys that control how your PC works.
However, because the registry handles information that is crucial for your PC’s performance, it’s a good idea to take precautions so you don’t end up doing damage to your computer. Before you continue with these steps, you might want to back up the Registry Editor just in case something goes wrong.
Here’s how you can fix System Restore using the Registry Editor:
- Press Win + R to open the Run command dialog box.
- Type regedit and press Enter.
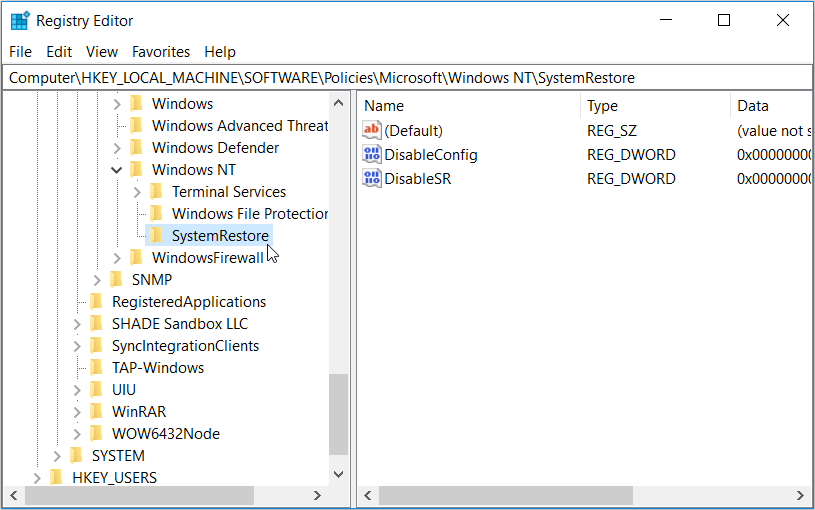
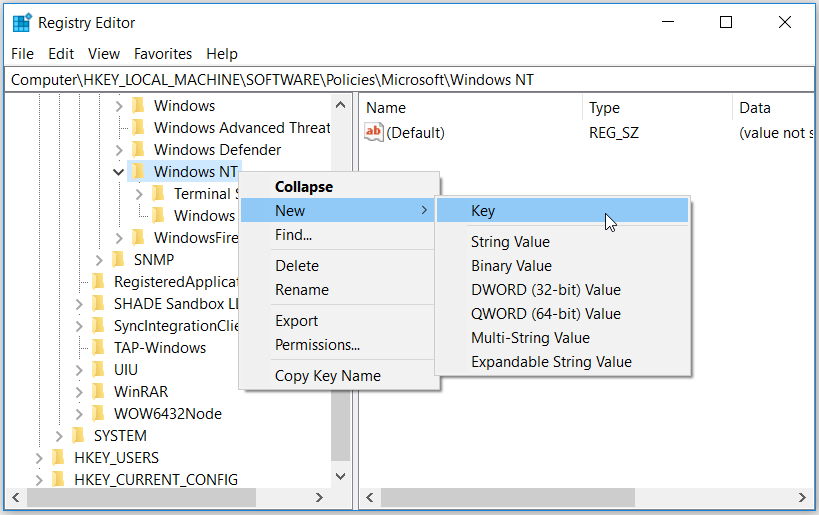
- In the left pane of the Registry Editor window, navigate to HKEY_LOCAL_MACHINE > SOFTWARE > Policies > Microsoft > Windows NT > SystemRestore.
If the SystemRestore key is present, you can skip to the next step. However, if the key is missing, here’s how to make your own:
- Right-click on the Windows NT key, click New, and then click Key.
- Rename the new key as SystemRestore.
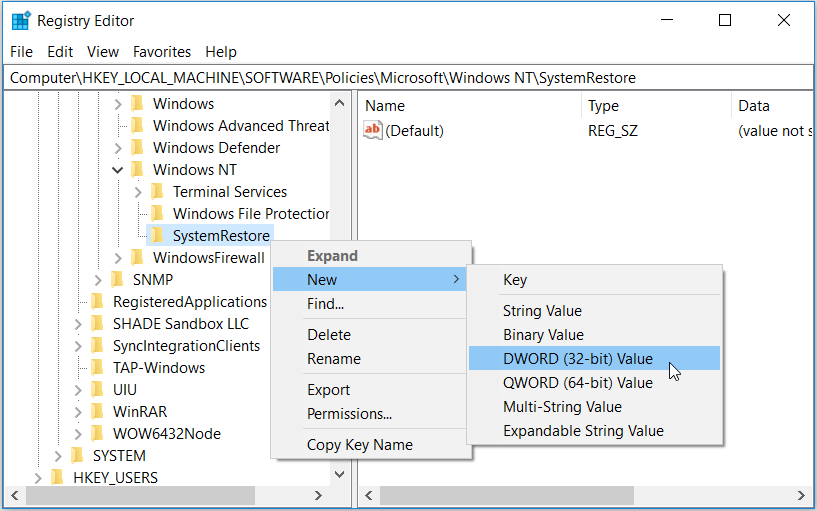
Next, click the SystemRestore key—you should see the DisableConfig and DisableSR values on the right-hand pane. If these values are present, skip to the next step.
If these values are missing, here’s how to create them:
- Right-click the SystemRestore key, click New, and then select DWORD (32-bit) Value.
- Name this value as DisableConfig and click Enter.
- When you finish, create the DisableSR value as per the previous steps.
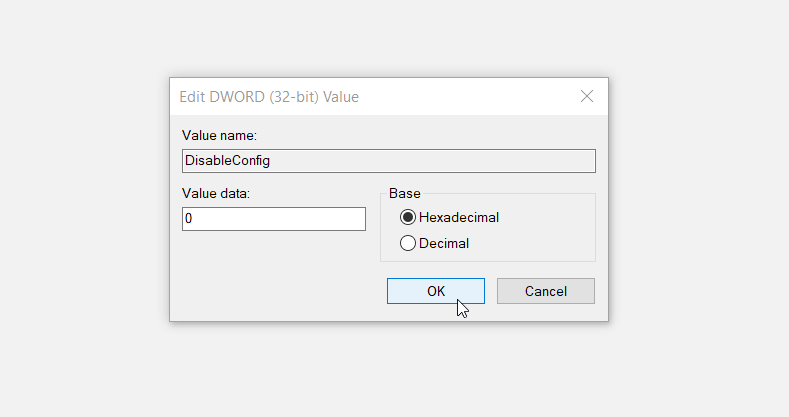
Double-click the DisableConfig value. In the next window, set the Value data to «0» (zero), and click OK to finish. Finally, double-click the DisableSR value, set its Value data to «0«, and click OK.
When you finish, close the Registry Editor and restart your PC to save these changes.
4. Use the Local Group Policy Editor
You can also tackle this error by configuring some settings in the Local Group Policy Editor. However, this feature is only available in the Windows 10 Pro, Education, and Enterprise editions. Despite that, there are some steps you could follow to access the Local Group Policy Editor on Windows 10 Home.
Here’s how you can fix the System Restore issue using the Local Group Policy Editor:
- Press Win + R to open the Run command dialog box.
- Type gpedit.msc and press Enter.
- Navigate to Computer Configuration > Administrative Templates > System > System Restore.
- Double-click the Turn off System Restore setting on the right-hand side pane.
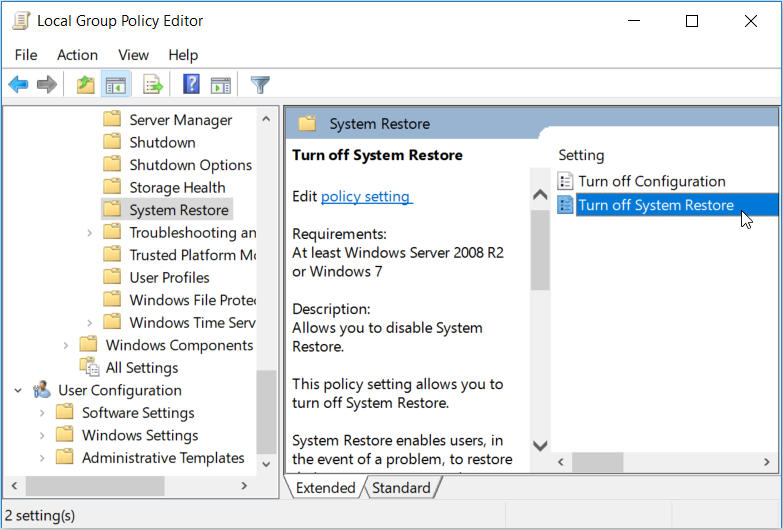
In the next window, select Not configured or Disabled. From there, press Apply, press OK, and then restart your PC.
There’s a chance that this error could be caused by corrupt system files. If this is the case, you can fix the problem with Windows’ DISM and SFC tools. These tools automatically scans and fixes corrupt or missing system files, so it’s worth giving both of them a shot to see if they fix your problem.
However, if you want to use these tools, it’s best to start by running the DISM tool first. And while DISM has various functions, using it here then ensures that SFC will work properly.
To run DISM, follow these steps:
- Press Win + R and type CMD.
- Press Ctrl + Shift + Enter to open an elevated Command Prompt.
- Type the following command and press Enter:
DISM /Online /Cleanup-Image /ScanHealth
When the scan is complete, type the following command and press Enter:
DISM /Online /Cleanup-Image /RestoreHealth
Wait for the scan to complete and then restart your PC.
From there, you can run the SFC tool. To do this, open the Command Prompt as per the previous steps. Next, type the following command and press Enter:
sfc /scannow
When the scan is complete, close the Command Prompt and restart your PC.
The Windows System Restore tool is a handy feature when a new and mysterious error creeps into your system. However, it really gets frustrating when you bump into several error messages that prevent you from accessing this tool. Fortunately, if you bump into the “System Restore is disabled by your system administrator” error, you can easily resolve it using the tips in this article.
Unfortunately, this isn’t the only problem you can encounter with System Restore. There are plenty of ways it can break down, and an equal number of ways to get it working again.