SYSTEM_PTE_MISUSE – ошибка на синем экране BSOD, которая приводит к сбою и требует перезагрузки. Сбои BSOD довольно неожиданны, поскольку в любой момент могут прервать работу за компьютером, и приводят к возможному повреждению файлов и потери данных.

Синий экран SYSTEM_PTE_MISUSE вызван проблемами защиты, связанными с технологией безопасности, используемой микропрограммным обеспечением. Есть два типа технологий безопасности, которые вызывают эту ошибку: PTT и TPM. Отключение их в Биосе может решить проблему. Если этот метод не сработает, попробуйте обновить BIOS до последней версии.
Отключение функции защиты PTT в Биосе
Технология Platform Trust Technology реализует доверенный платформенный модуль TPM (Trusted Platform Module) в системном микропрограммном обеспечении. Эта функция была представлена компанией Intel. Попробуйте ее отключить, чтобы устранить постоянное появление ошибки SYSTEM_PTE_MISUSE. Выполните следующие шаги:
Включите компьютер и при возникновении первого экрана нажмите на клавишу Setup для входа в настройки BIOS. В большинстве случаев используются клавиши: F2, F10, Del и прочие.
Опция PTT, для которой нужно изменить значение, находится в разных разделах прошивки. Ее расположение в разных моделях материнских плат отличается. В большинстве случаев, она находится на вкладке Безопасность (Security), но у нее есть много имен. Найдите опцию с именем PTT Security или похожую.
Если нашли указанный параметр, то нажмите Enter и с помощью клавиш со стрелками выберите значение «Disable» (Отключено).
Выйдите из настроек с сохранением изменений, начнется загрузка Windows. Теперь проверьте, удалось ли избавится от ошибки SYSTEM_PTE_MISUSE.
Установка значения Hidden для функции TPM
Эта функция — альтернатива PTT, что делает этот метод похожим на первый. Если в настройках нет опции PTT, то поищите TPM, которая находится в том же месте.
Включите компьютер и войдите в настройки БИОС с первого экрана, нажатием на указанную клавишу Setup.
В большинстве случаев опция TPM находится на вкладке Безопасность (Security) или Дополнительно (Advanced). Найдите параметр TPM SUPPORT или похожим именем.
После выбора опции измените ее значение нажатием на клавишу Enter. Клавишами со стрелками выберите значение Hidden. Если эта опция отсутствует, тогда нужно выбрать Disable.
Выйдите из Биоса с сохранением изменений. После загрузки Windows проверьте, возникает ли синий экран с кодом остановки SYSTEM_PTE_MISUSE.
Обновление BIOS
Эта процедура требует использования внешнего носителя, такого как USB или DVD. Если текущая версия Биос слишком устарела, то можно столкнуться с ошибкой SYSTEM_PTE_MISUSE.
Узнайте текущую версию утилиты BIOS, установленную на компьютере, с помощью введения команды msinfo в строке поиска. Найдите данные версии BIOS указанной под моделью процессора и скопируйте в текстовый файл.
Подготовьте компьютер к обновлению BIOS. Если обновляете ноутбук, убедитесь, что батарея полностью заряжена и подключите его к сети на всякий случай. При обновлении компьютера рекомендуется использовать источник бесперебойного питания (ИБП), чтобы убедиться, что компьютер не выключится во время обновления из-за отключения питания.
by Milan Stanojevic
Milan has been enthusiastic about technology ever since his childhood days, and this led him to take interest in all PC-related technologies. He’s a PC enthusiast and he… read more
Updated on
- SYSTEM_PTE_MISUSE is a Blue Screen of Death error, and it’s often caused by file corruption.
- Keeping Windows and your drivers up to date can prevent this and similar issues.
- In some instances, there might be a problem with your RAM causing this inconvenience.
SYSTEM_PTE_MISUSE and other Blue Screen of Death errors can cause a lot of issues on your PC, therefore it’s important to fix them as soon as possible.
The main problem is that a BSOD will force your computer to crash resulting in losing any unsaved work and data and making your PC unstable to use.
If the issue keeps appearing, it might cause permanent damage along the way, therefore you need to find a way to fix it.
We’ve put together a list consisting of solutions for all these problems below. Make sure you follow every step and you will solve the error in no time.
Why does the SYSTEM PTE MISUSE error appear?
In most cases, these types of errors appear if you have an issue with certain files, such as file corruption or incompatible drivers. Incorrect BIOS settings can also lead to this problem.

Hover, the issue can occur if your hardware is faulty, so you might have to replace it to fix it.
Is SYSTEM PTE MISUSE error dangerous?
This depends on the cause of the issue. If it is software-related, you’ll lose unsaved work whenever this error appears since you’ll be forced to restart your PC.
On the other hand, if the cause is related to your hardware, your computer will eventually stop working if you don’t find and replace the problematic component.
How we test, review and rate?
We have worked for the past 6 months on building a new review system on how we produce content. Using it, we have subsequently redone most of our articles to provide actual hands-on expertise on the guides we made.
For more details you can read how we test, review, and rate at WindowsReport.
How can I fix the SYSTEM PTE MISUSE BSOD error?
- Run the Hardware Troubleshooter
- Use a third-party BSOD fixer
- Run the SFC scan
- Update Windows 10 and all your drivers
- Run DISM
- Remove your antivirus software
- Use Safe Mode
- Overclock or underclock your RAM
- Check your hardware and clean your PC from dust
- Fix SYSTEM PTE MISUSE on Windows 11
1. Use a third-party BSOD fixer
The simplest way to solve these error messages is by installing software specialized in restoring crucial OS files. The program will ensure that your PC is running properly with no bugs.
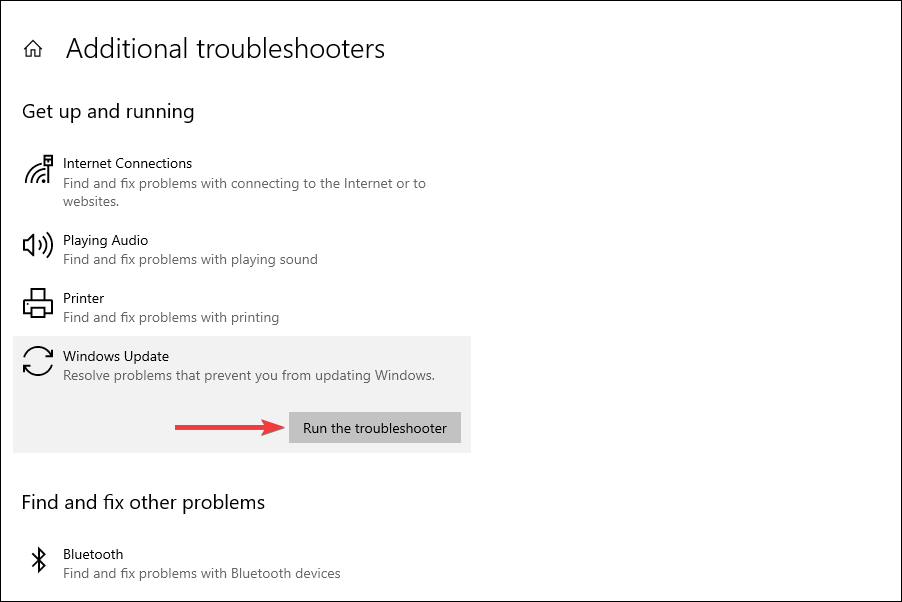
2. Run the Hardware troubleshooter
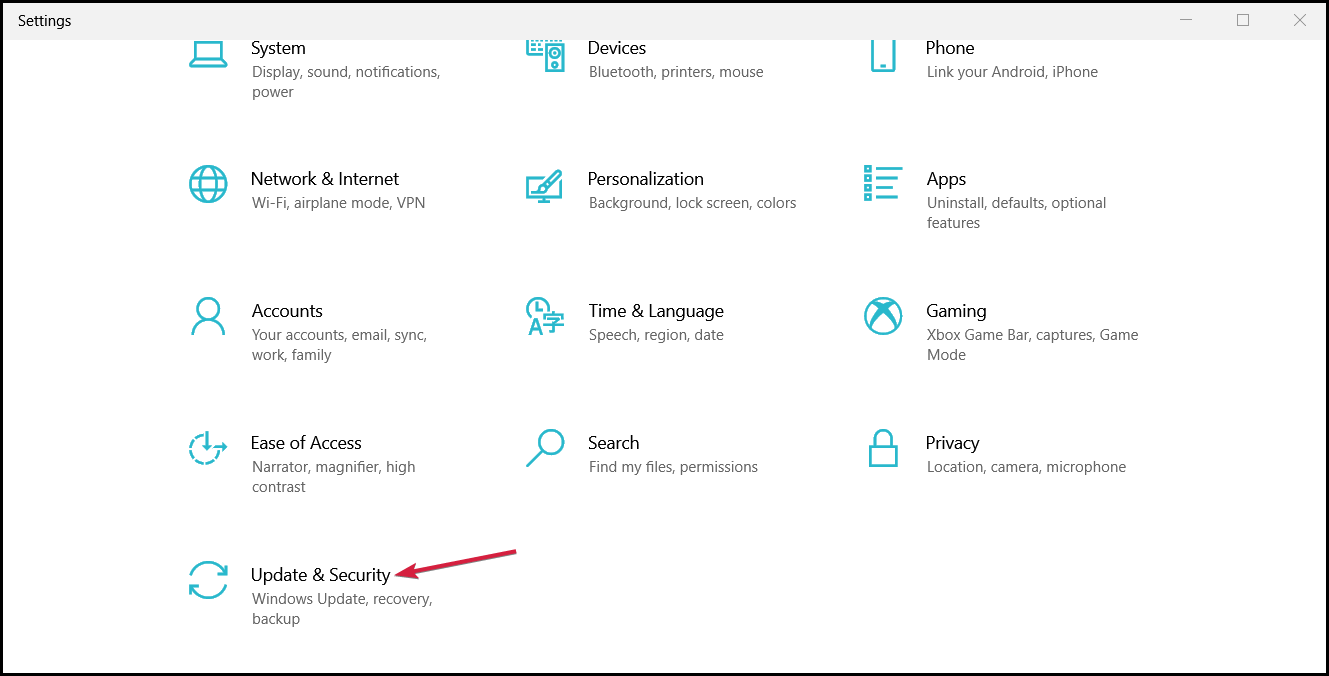
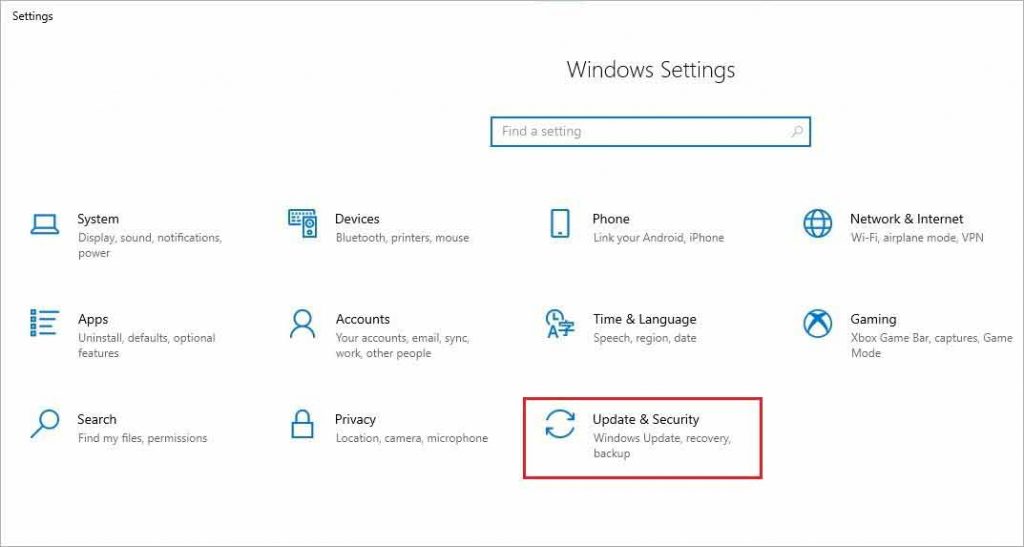
- Open the Settings app and go to Update & Security section.

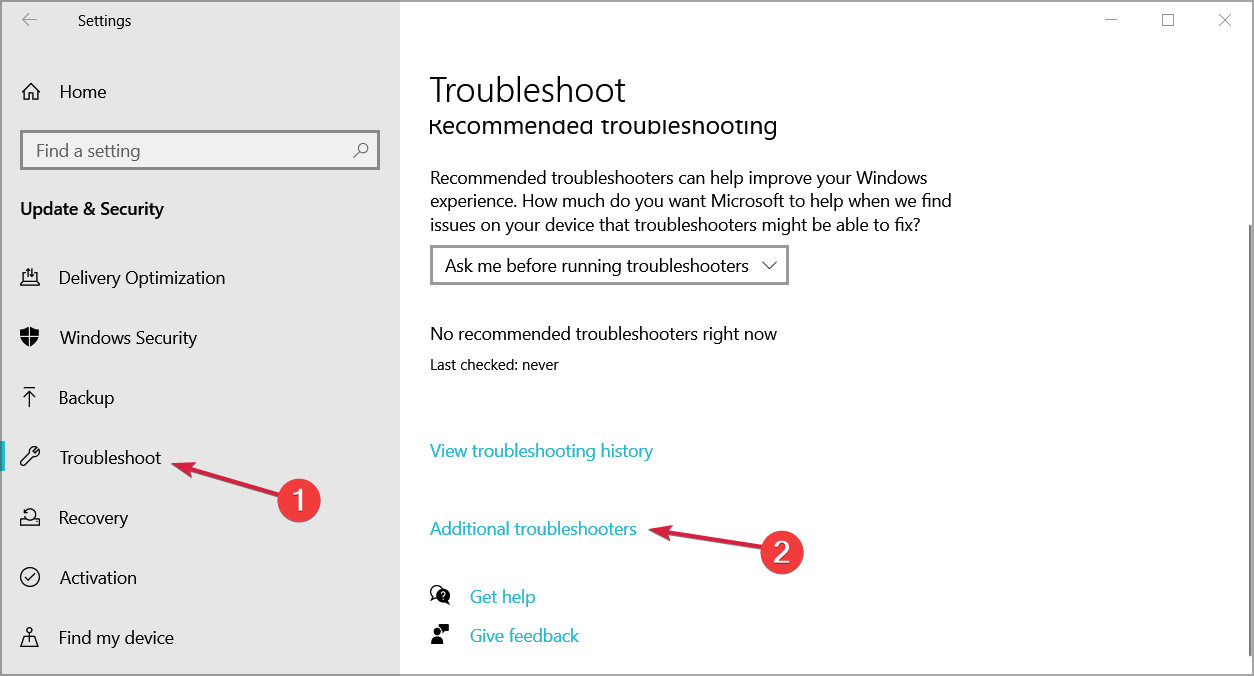
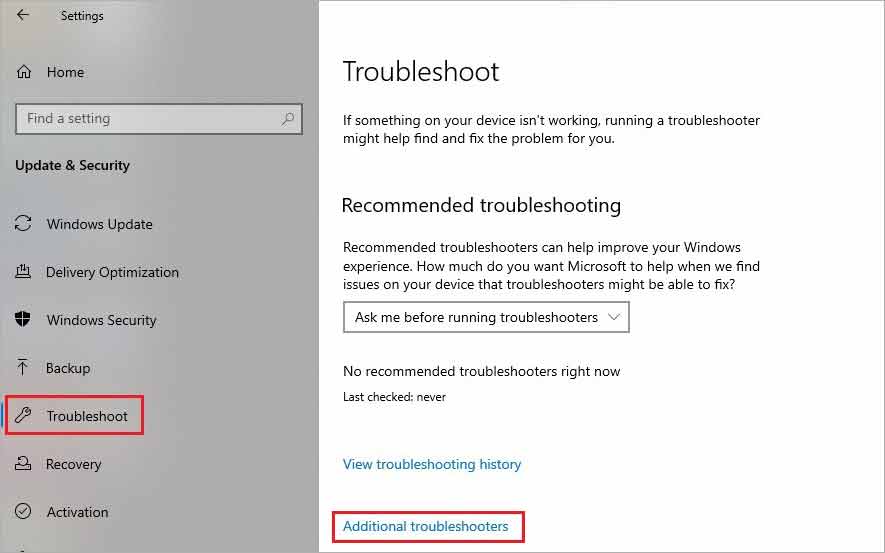
- Select Troubleshoot from the menu on the left. Now select Additional troubleshooters.

- Select the desired troubleshooter and click the Run thetroubleshooter.

- Follow the instructions on the screen to complete the troubleshooter.
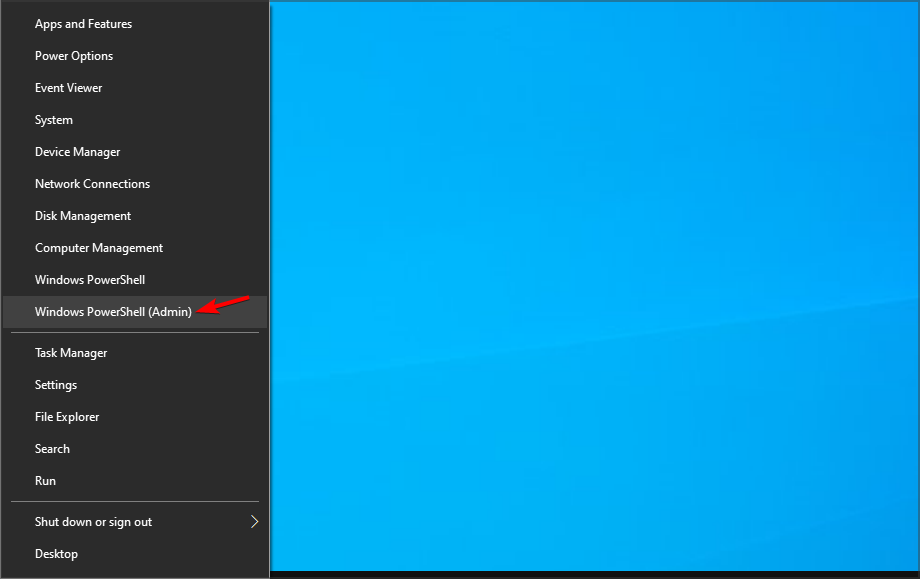
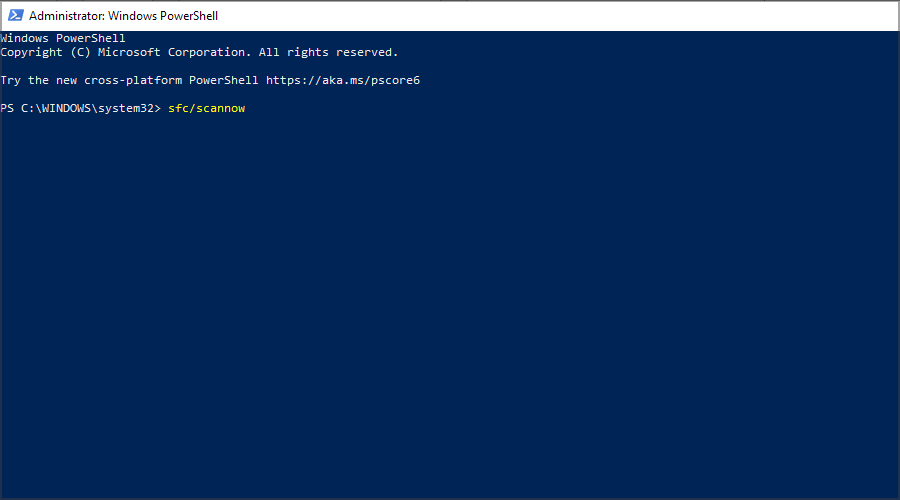
3. Run the SFC scan
- Right-click on the Start Menu button, and select Windows PowerShell (Admin).

- Enter the following line and run it:
sfc/scannow
- Wait until the process is done (it may take a while).
- If the solution is found, it will automatically be applied.
- Now, close the PowerShell and restart your computer.
Few users reported that SFC /scannow stops for some reason, but there are ways to fix that issue.
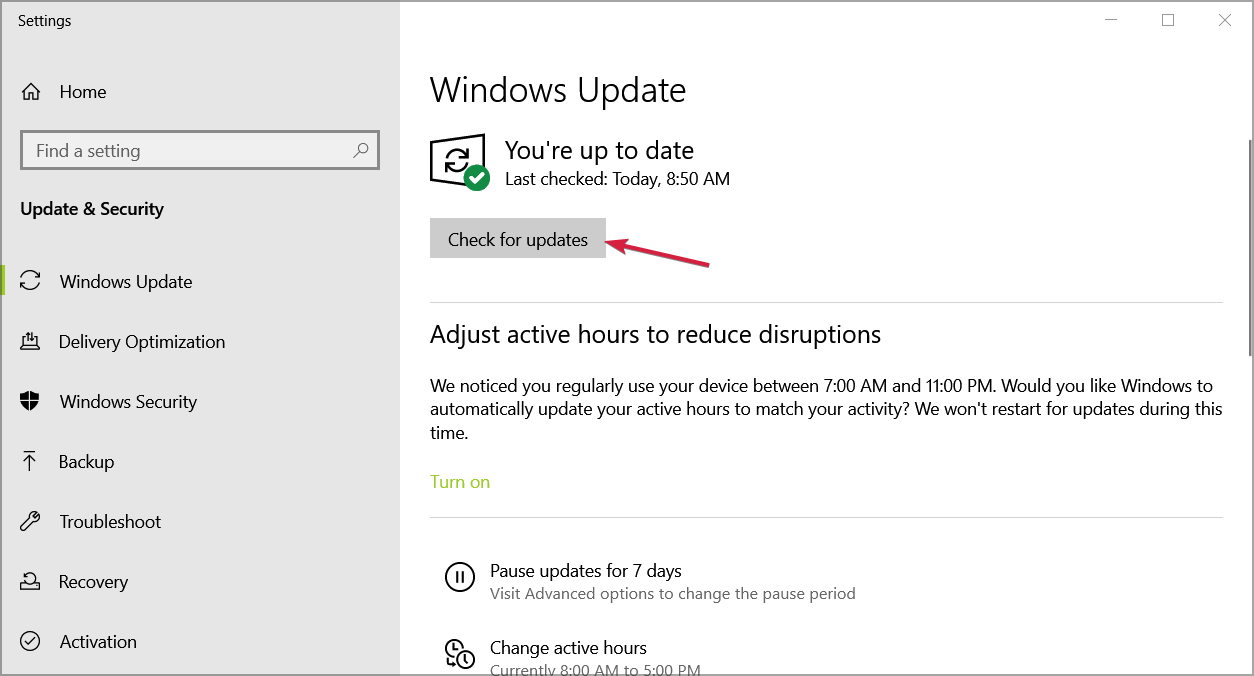
4. Update Windows 10 and all your drivers
➡ Update Windows
- Press Windows key + I to open the Settings app.
- Navigate to Update & Security section.
- Now check for available updates and download them.
➡ Update drivers
- Visit your hardware manufactuer’s website.
- Go to the Drivers section.

- Locate your model and download the latest driver for it.
- Repeat this for all devices whose drivers you want to update.

To make this process faster, you might want to consider using dedicated driver updater software.
5. Run DISM
➡ Standard way
- Right-click Start and open Windows PowerShell (Admin).
- Paste the following command and press Enter:
DISM /Online /Cleanup-Image /RestoreHealth
- Wait until the scan is finished.
- Restart your computer and try updating again.

➡ With the Windows installation media
- Insert your Windows installation media.
- Right-click the Start button and choose the Windows PowerShell (Admin).
- Now, type the following command and press Enter:
DISM/Online/Cleanup-Image/RestoreHealth/source:WIM:X:SourcesInstall.wim:1/LimitAccess
- Make sure to change an X value with the letter of the mounted drive with Windows 10 installation.
- After the procedure is finished, restart your computer.

6. Remove your antivirus software
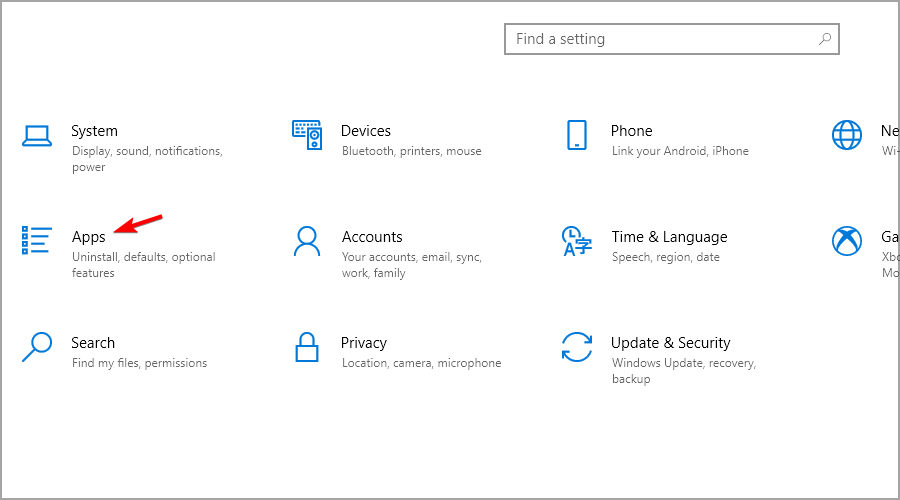
- Press Windows key + I to open the Settings app.
- Navigate to the Apps section.
- Select your antivirus software and click on Uninstall.
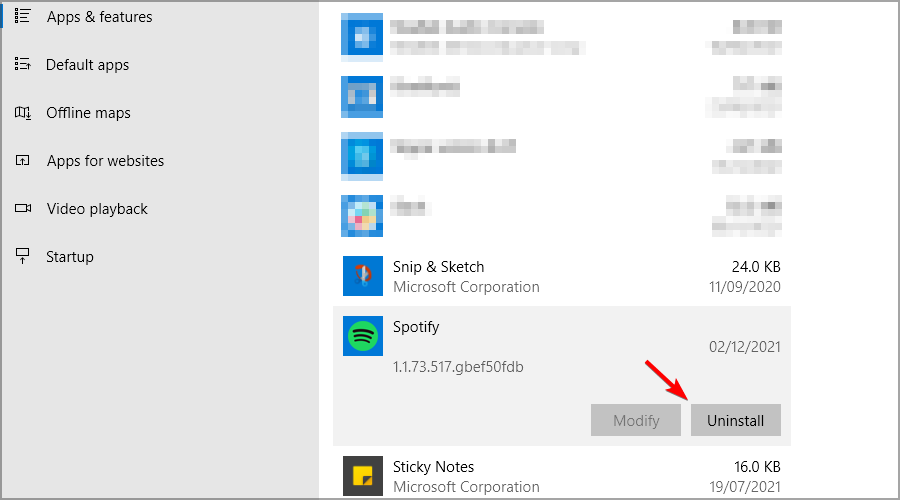
If this solution fixes the problem, you might want to consider switching to different antivirus software to avoid future issues.
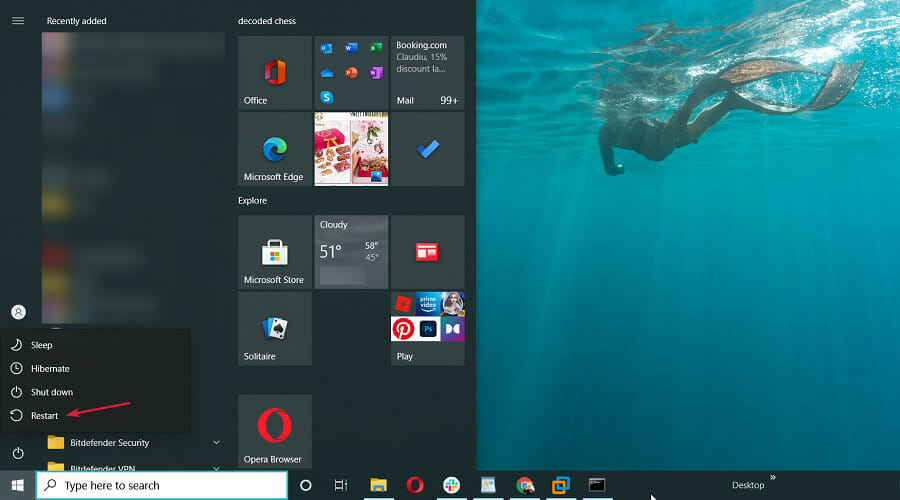
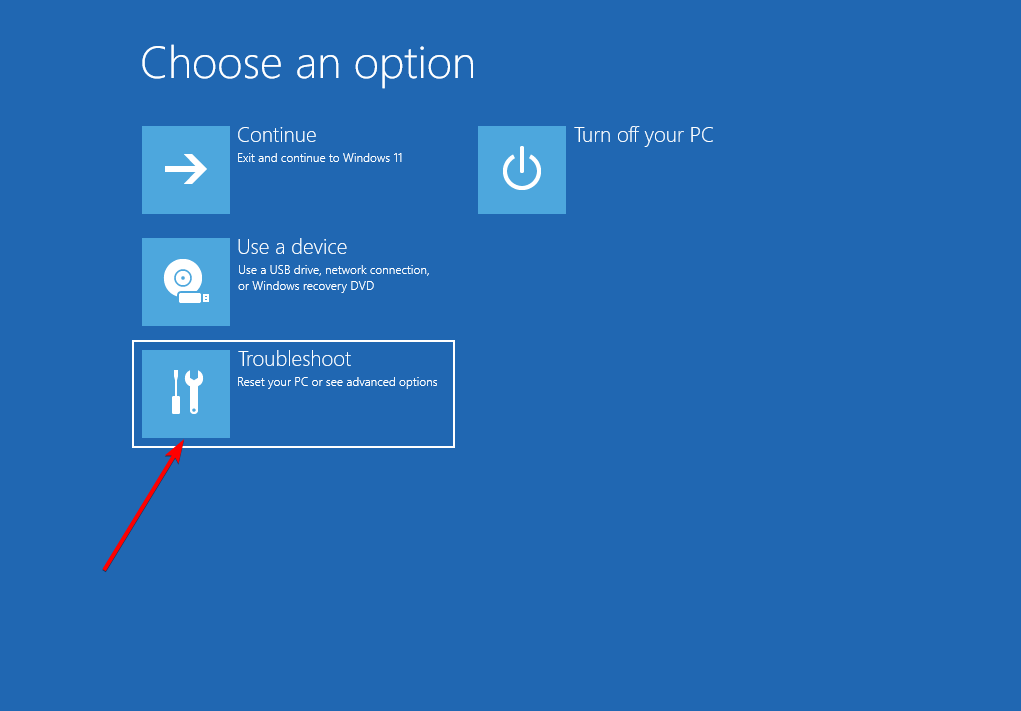
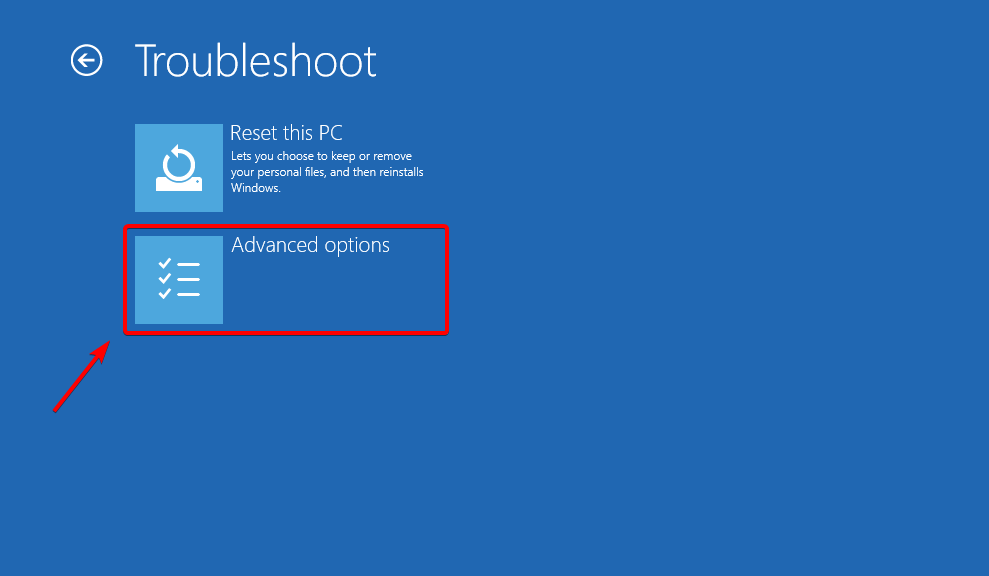
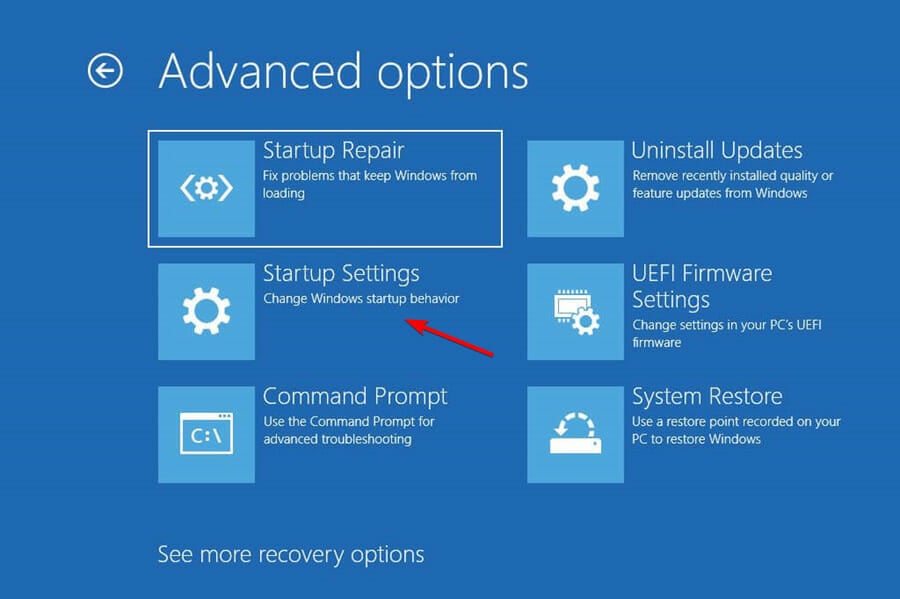
7. Use Safe Mode
- Hold the Shift key on your keyboard and click the Restart button.
- Choose Troubleshoot.

- Navigate to Advanced options.

- Pick the Startup Settings.

- Click the Restart button.

- When your computer restarts you’ll see a list of options. Select Safe Mode with Networking by pressing 5 or F5.
- Your computer will now enter Safe Mode.
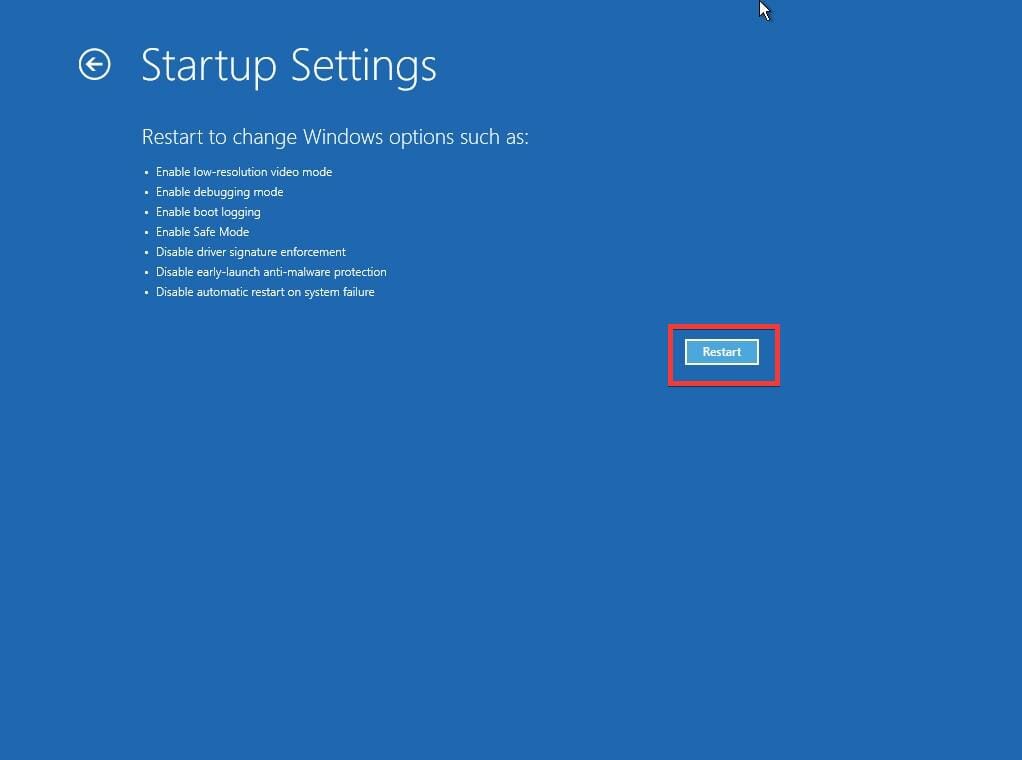

If the BSOD error doesn’t appear, it means that it was caused by a third-party application or a driver that you have installed, and you can use the Safe Mode to remove the problematic software.
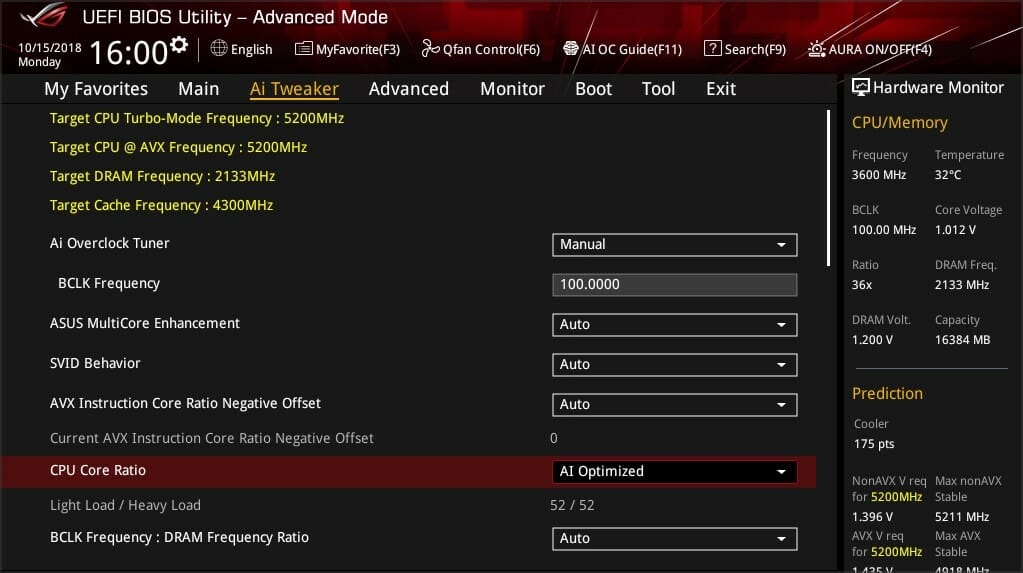
8. Overclock or underclock your RAM

NOTE
Overclocking your memory can lead to system instability and permanent damage if you’re not careful, so use this solution at your own risk.
- While your PC boots, keep pressing F2 or Del to access BIOS.
- Navigate to Overclock section.

- If you’re using 1600MHz RAM, change the frequency of your to 1333MHz.
- Alternatively, change the voltage of your RAM from 1.5 to 1.6V.
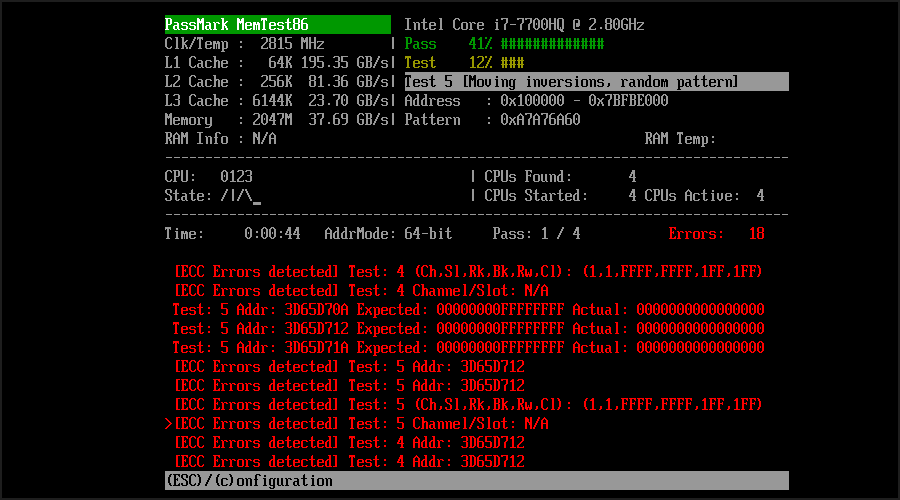
9. Check your hardware and clean your PC from dust
- Use Memtest86 to check your RAM.
- Reseat your RAM modules.
- Clean your PC from dust.
10. How can I fix the SYSTEM PTE MISUSE error in Windows 11?
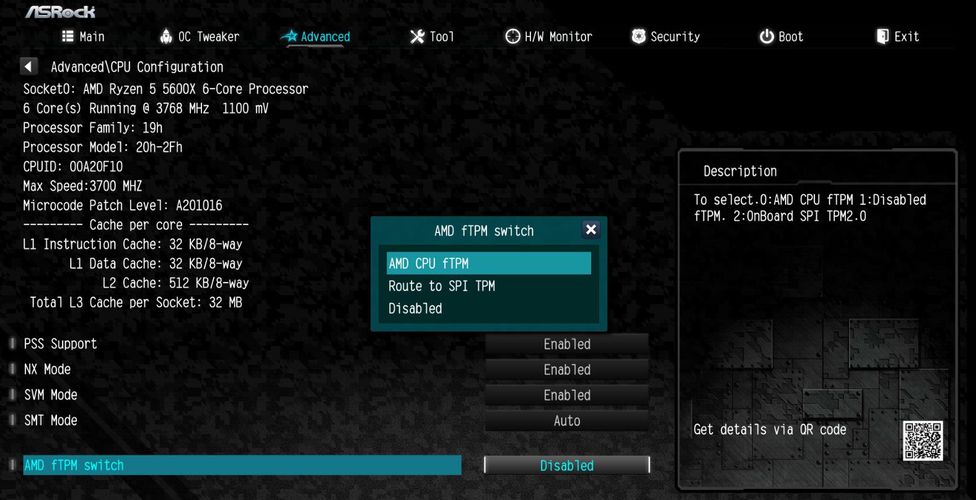
10.1. Disable PTT/TPM in BIOS
- While your system boots, keep pressing F2 or Del to enter BIOS.
- Navigate to Security section.
- Select PTT and set it to Hidden.
- Look for TPM and set it to Disabled.

- Save changes.
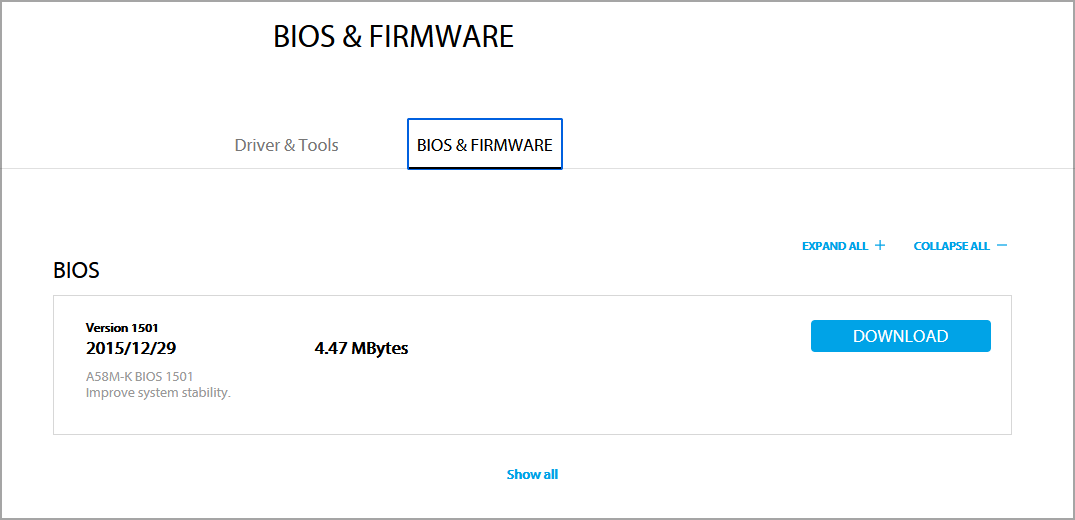
10.2. Update BIOS
- Visit your motherboard manufactuer’s website.
- Locate your model and navigate to the Download section.

- Locate the latest BIOS for it and download it.
- Move the downloaded file to a flash drive.
- Restart your PC and keep pressing F2 or Del to enter BIOS.
- Select the BIOS update option and choose the file that you downloaded from the flash drive.

- Wait for the process to finish.

For more solutions, check out this guide on how to fix the SYSTEM PTE MISUSE error in Windows 11. Rest assured that you will be able to resolve the problem in no time.
Where can I find BOSD crash files?
Whenever a BSOD error occurs, Windows save the crash information to a file that you can use to analyze the issue.
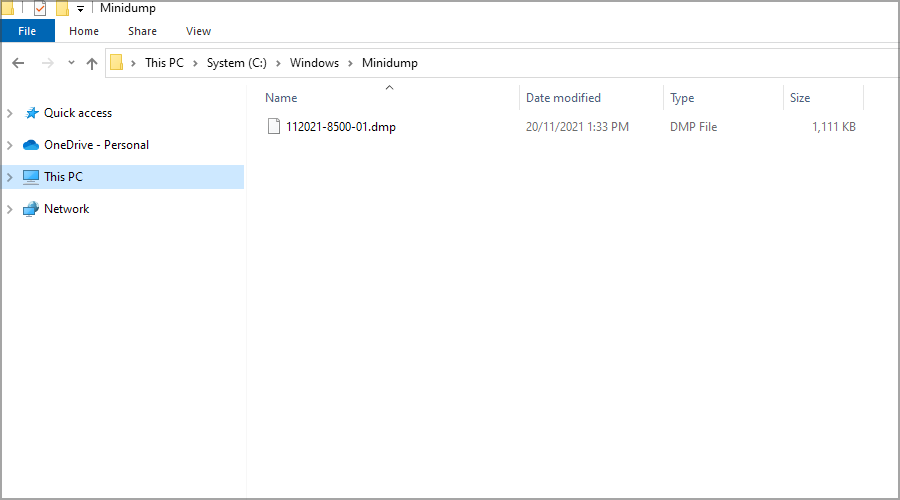
You can find these files in the following directory: C:\Windows\Minidump
How to open crash files?
By default, Windows doesn’t have the necessary components to open the crash files, so it needs to rely on third-party solutions.
Many applications can do that, but we recommend using WinDbg Preview.
SYSTEM_PTE_MISUSE Blue Screen of Death error can cause many problems, but it can be easily fixed by replacing the faulty RAM or by underclocking it.
To make the process simpler, you can always use Blue Screen of Death repair software to solve any non-hardware issues on your PC.
If that doesn’t work, feel free to try other solutions from this article and let us know what worked for you in the comments section below.
![]()
The problem of ‘system pte misuse’ is mostly caused due to issues with PTT and TPM security technology used by your system’s firmware. To resolve the system pte misuse error, you must rectify the BIOS settings. Let’s walk you through the methods to deal with the problem and recover any data lost due to BSOD.
How to resolve the SYSTEM PTE MISUSE error?
The SYSTEM PTE MISUSE error with the error code 0x000000DA, being a reason for BSOD, is potentially harmful to your system and the data stored on it. If the issue is caused due to logical reasons, you might lose any unsaved data as you will be forced to restart your Windows 10 PC. You won’t be allowed to save the unsaved data. Similarly, if the reason is hardware-related, your system will eventually give up unless you repair or replace the responsible component. Since you have reached this page, you need not worry, as the following methods will resolve the problem, and there is an additional tip to counter any data loss scenario.
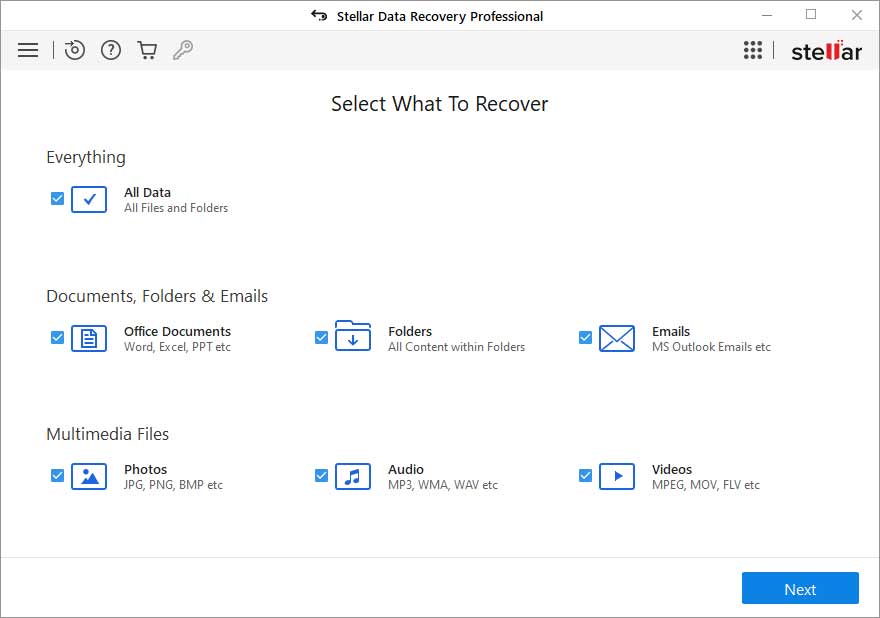
Caution: There are chances of potential data loss if you interfere with the PTT, TPM, or BIOS. Tread very carefully, stick to the exact steps and keep Stellar Data Recovery Professional for Windows handy to deal with any data loss scenario.
Method 1: Disable PTT security technology in BIOS setup
PTT or Platform Trust Technology is responsible for implementing Trusted Platform Module (TPM) in the system firmware of your PC. PTT is a functionality used by Windows 11 and 10 for credential storage and key management. You can disable it in the BIOS setup to stop the frequent appearance of SYSTEM_PTE_MISUSE error. Here’s how to do it.
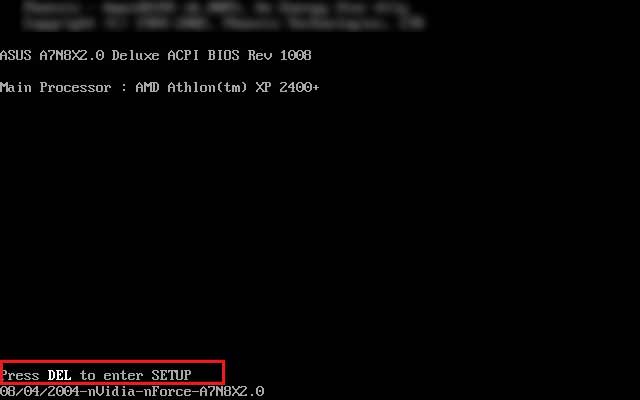
Step 1: Turn on your computer and enter the Setup by pressing the BIOS key.
Note: When you start your PC, you will find Press DEL to enter SETUP message written at the bottom of your screen. The DEL key (or any other key mentioned in its place like F1, F2, etc.) is the BIOS key for your PC.
Step 2: Click on the Security or Configuration or System Configuration tab in BIOS setup depending on your system’s manufacturer (Lenovo, HP, Dell, etc.).
Step 3: Select the Platform Trust Technology option and press Enter. Now use the up-down arrow keys to select the Disable option.
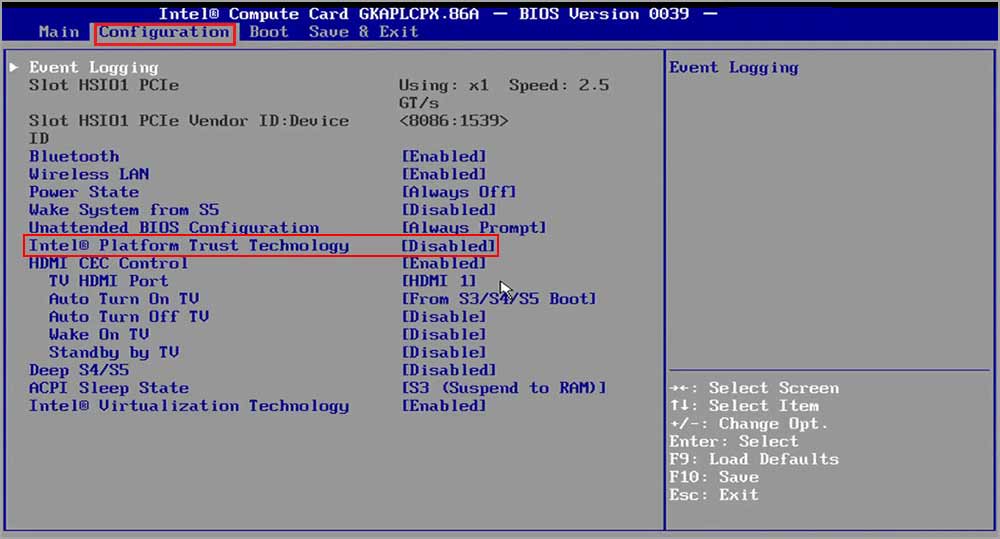
Step 4: Click F10 to save the changes and press Esc to exit.
Your system will proceed to the normal boot-up. Now, check if the error is resolved.
Method 2: Disable TPM or set it to Hidden in BIOS setup
Trusted Platform Module is an alternative to PTT. If you could not find PTT as described in the previous method, it might be because your system is using TPM instead. You can find the TPM placed in the same section as PTT. Here’s how you can disable/hide the TPM in the BIOS setup.
Step 1: Turn on your Windows 11/10 PC and press the BIOS key to enter setup.
Step 2: Click the Security tab and locate Trusted Platform Module.
Step 3: Select the TPM option and hit Enter.
Step 4: Use the up-down arrow keys to select Hidden in the options. If there’s no Hidden option, select Disable.
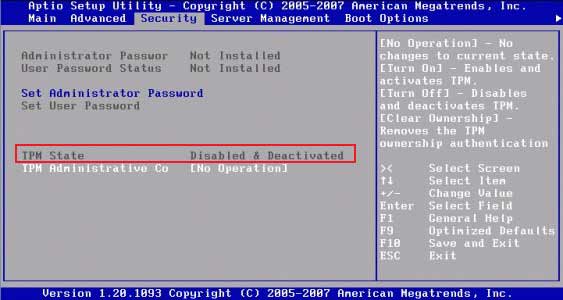
Step 5: Click the Exit system setup after saving the changes or press F10, whichever is applicable on your system based on the make of your PC.
Your OS will proceed to a normal startup. Check and confirm if the error 0x000000DA is resolved.
Method 3: Run the Hardware Troubleshooter on your PC
If you could not fix the SYSTEM_PTE_MISUSE error using the above fixes, there might be an issue with some hardware components. Therefore, before updating the BIOS, it is witty to check and fix any hardware issue on your PC. This method will help you address any hardware-related problem, and your OS will resolve it if it’s not major and within its capabilities. Here’s how to do it.
Step 1: Open Settings from the Windows Start menu and select Update & Security.
Step 2: Click on the Troubleshoot option in the left pane and select Additional troubleshooters.
Step 3: Select the hardware component from the list and click Run the troubleshooter option under each of them.
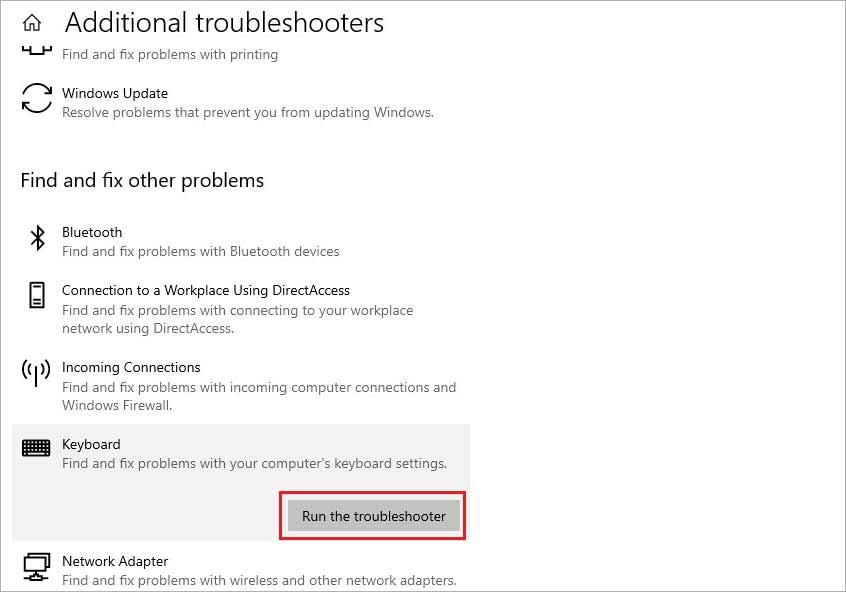
Note: If you are unsure which hardware component is causing the trouble, select the hardware components one by one and run troubleshoot for each.
Step 4: Follow the instructions on your screen to automatically resolve any existing hardware issue.
Method 4: Update BIOS on Windows 11/10 PC
If none of the methods above have resolved the problem of SYSTEM_PTE_MISUSE error and you are still facing the BSOD, you need to update the BIOS on your system. Your system’s microprocessor uses BIOS or Basic Input Output System to start your system when you turn it on. It helps in data flow between your Windows OS and connected components like a Hard drive, keyboard, printer, etc.
Updating BIOS is not a simple task, and you need an external USB drive or CD/DVD to assist you in doing it. However, we will provide the common steps, and you can use the links specific to your system’s make and manufacturer to proceed to updates. Here’s how to do it.
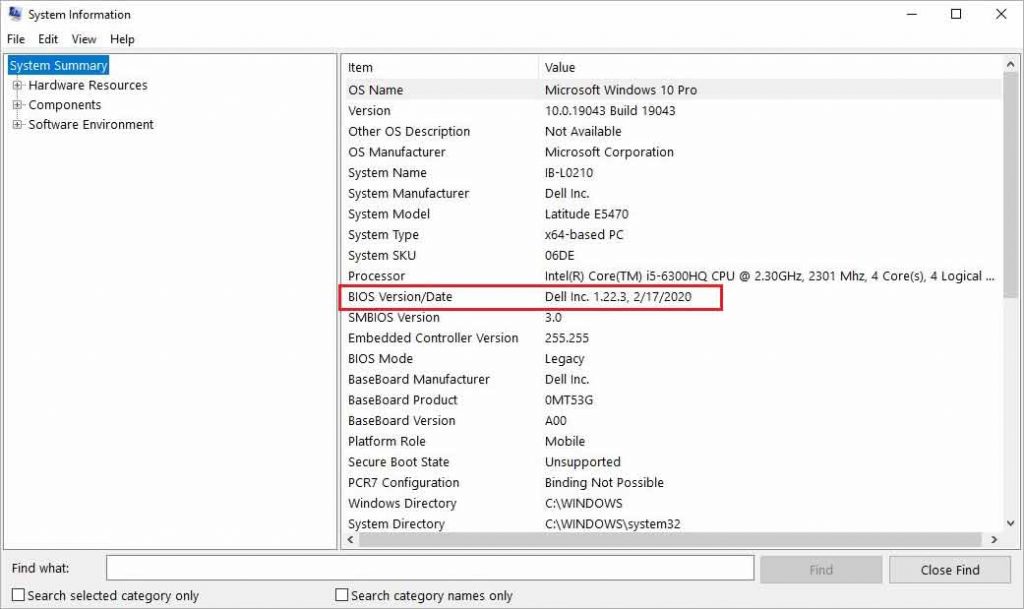
Step 1: Type msinfo in the search bar of your Windows PC and select System Information.
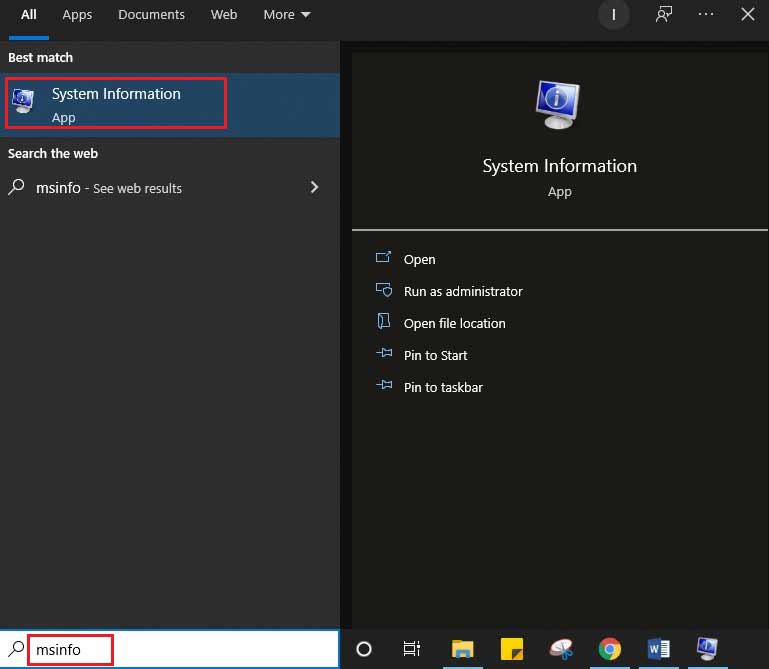
Step 2: In the System Information window, navigate the BIOS Version/Date below the Processor information and note it down.
Step 3: Note down the System Manufacturer, System Model, and System Type information from the System Information window.
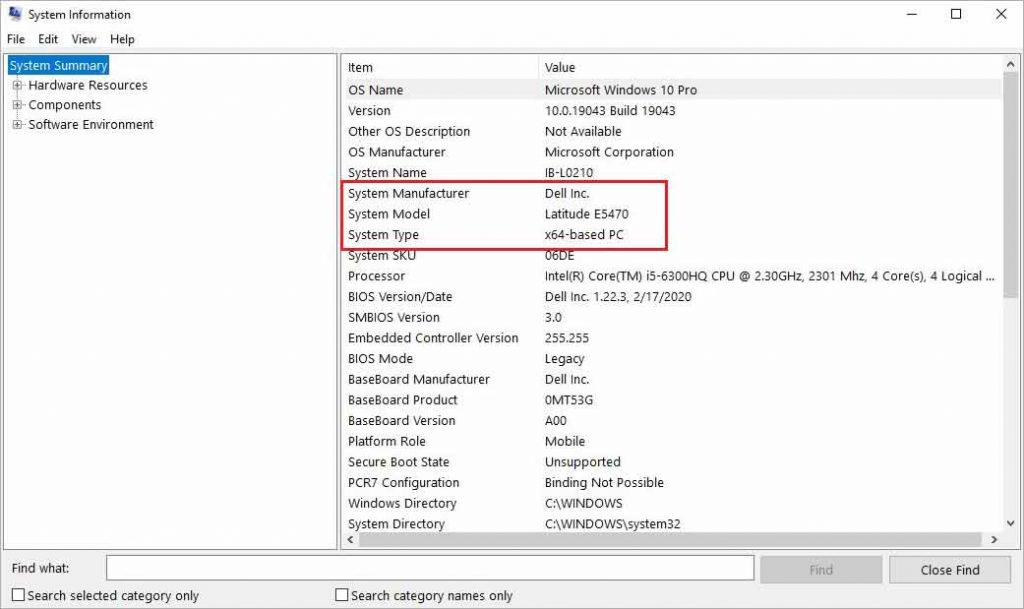
Note: In the System Type section, if you see x64-based PC, it reflects a 64-bit version of OS. Similarly, if you see an x86-based PC, you have a 32-bit version of Windows OS.
Step 4: Now, use the BIOS update link based on your system’s manufacturer from the list below.
- Dell BIOS update
- HP BIOS update
- Lenovo BIOS update
- Gateway BIOS update
- MSI BIOS update
Remedy for data loss due to SYSTEM_PTE_MISUSE error and BSOD
BIOS is a critical element of the operation of your Windows PC. There are chances of data loss if anything goes wrong while updating it. Similarly, you may lose the keys and other information collected by TPM if you disable it. Therefore, working with the system processes requires utmost caution as any glitches may jeopardize the entire data on the PC. However, as we assured you, you can easily get back any data lost during the encounter with the said error or BSOD using the secure Stellar Data Recovery Professional for Windows.
Even if you lose data due to any mishap while applying the fixes, you can recover it using the software. The software is equipped with multiple features to deal with any data loss scenario on Windows 11, 10, 8, and 7. For example, the bootable recovery option of the recovery software allows you to recover data from a crashed or non-booting Windows device. All you need to do is follow the step-by-step data recovery procedure prompted by the DIY software.
The problem of ‘system pte misuse’ is mostly caused due to issues with PTT and TPM security technology used by your system’s firmware. To resolve the system pte misuse error, you must rectify the BIOS settings. Let’s walk you through the methods to deal with the problem and recover any data lost due to BSOD.
- Despite the terrifying name, BSODs are usually not fatal. But in case you’ve stumbled across the stop code SYSTEM_PTE_MISUSE Windows 10 error, check out these effective solutions to fix the problem.
- Rest assured that we want to help you & we try our best to tell you the most effective fixes for any Blue Screen Errors that come across your way.
- You can certainly learn everything about common Windows 10 errors here!
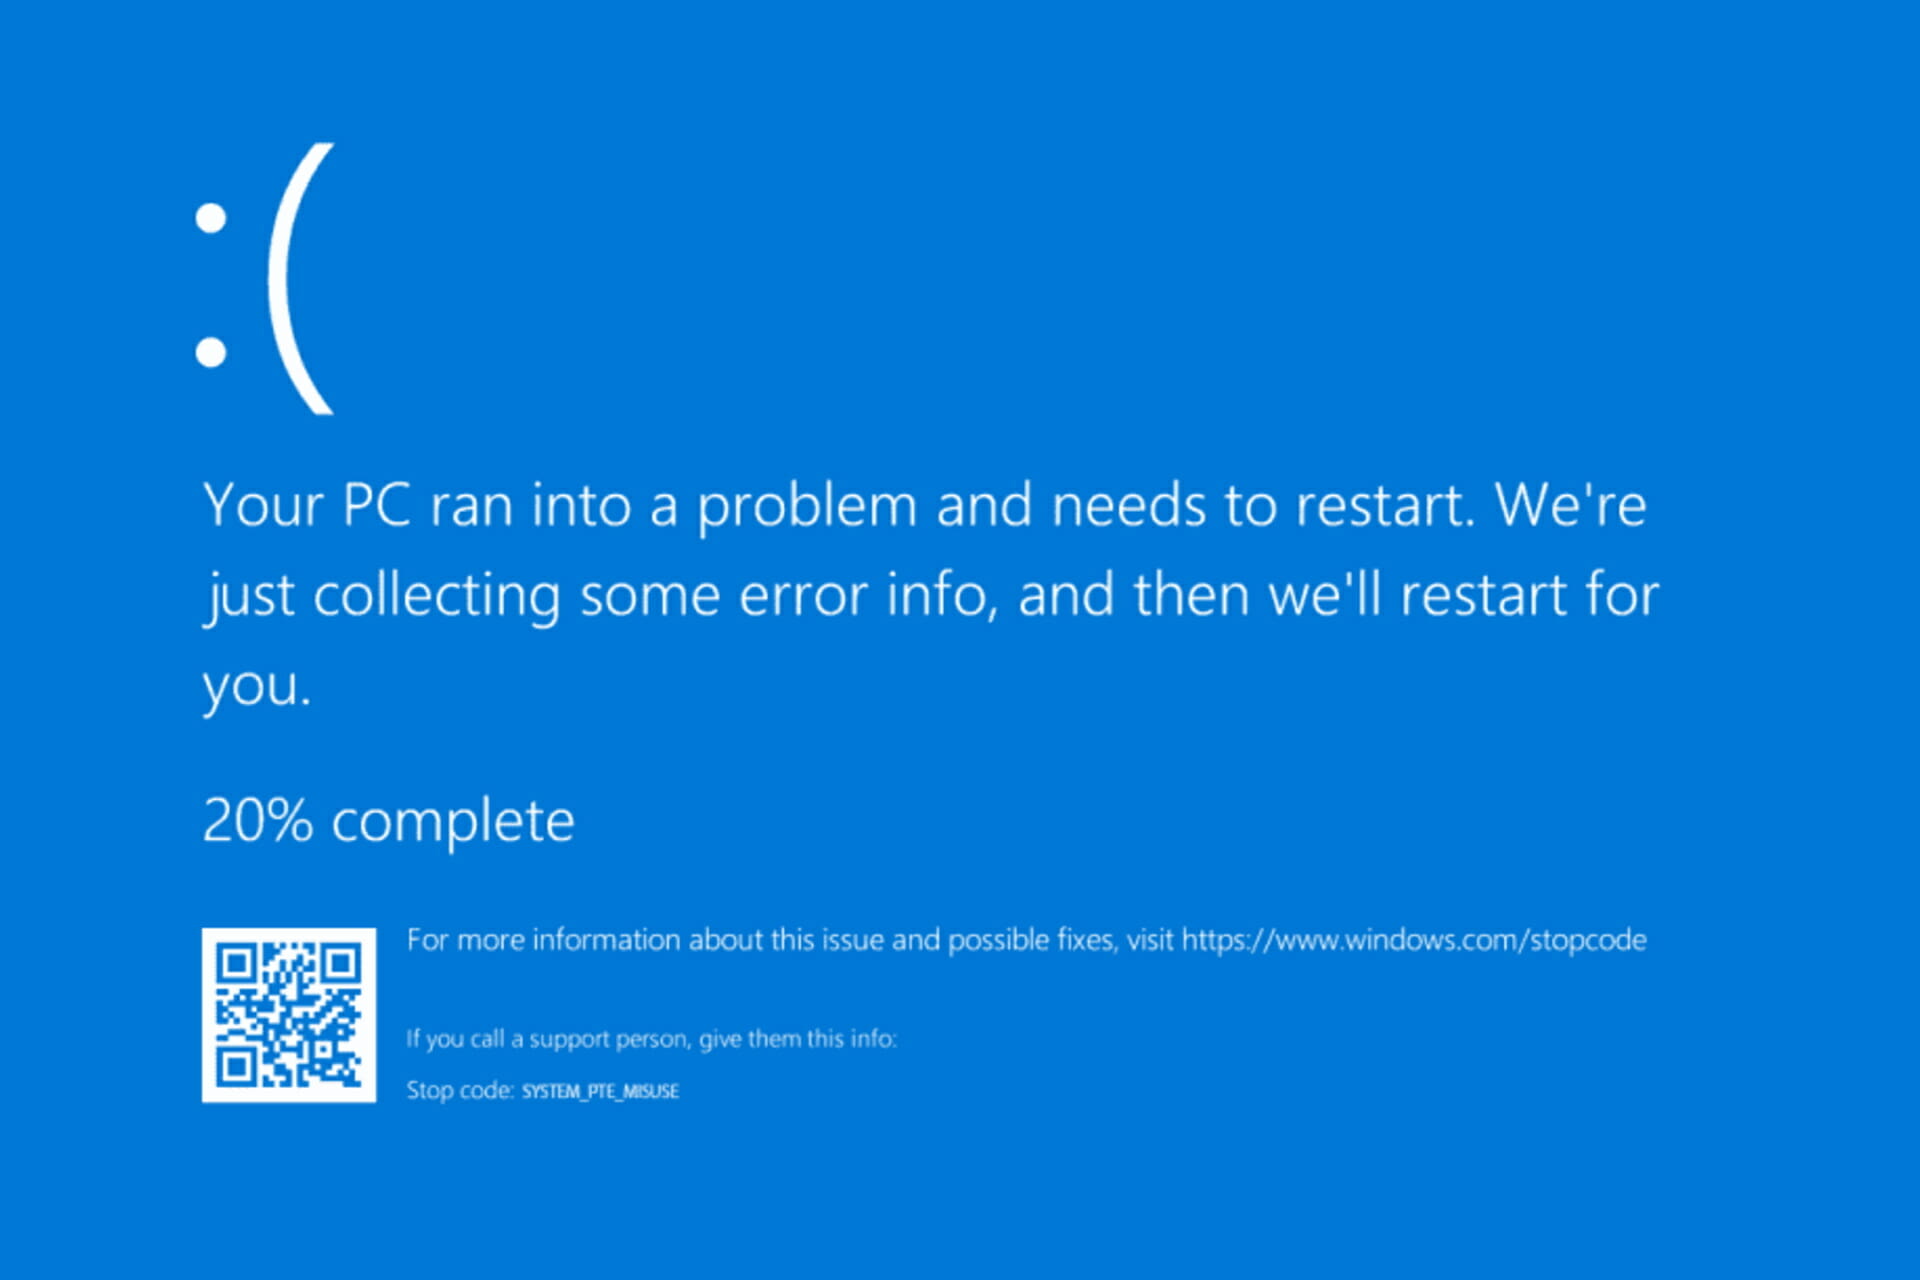
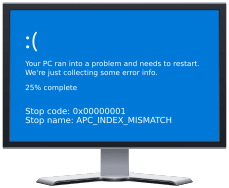
Since you are here, we can safely assume that you are stuck with “SYSTEM PTE MISUSE’ Error On Windows 10. It looks something like:
“Your PC Ran Into A Problem And Need To Restart. We Will Restart For You
Stop Code: SYSTEM_PTE_MISUSE”
According to Microsoft, the aforementioned Blue Screen Error is often generated due to damaged & incompatible drivers, Windows registry database corruption, Driver clash after recently installing new hardware or software. The Stop Code can further lead to frequent system crashes, file corruption, and even data loss. The Windows 10 BSOD Error is not very common, but it can certainly be very annoying. But no need to panic, follow the given methods to fix the error quickly!
Top 3 Recommended Quick Fixes To Resolve Stop Code SYSTEM_PTE_MISUSE
| Quick Workarounds | Resolve: SYSTEM_PTE_MISUSE | How To Fix? |
|---|---|---|
| METHOD 1 – Update Device Drivers |
Install Smart Driver Care > Start Scan > Update All.(Fastest & Easiest Way To Find & Download Right & Most Compatible Device Drivers)
|
 |
| METHOD 2- Run SFC Scan |
Launch Command Prompt > Type “sfc/scannow” > Hit Enter (It Will Check & Replace Corrupted System Files) |
 |
| METHOD 3- Run The Troubleshooter |
Type & Enter ‘Troubleshooting’ in the Settings bar > Click ‘View All’ button > From the list of troubleshooters, click on Hardware and Devices & Run the Troubleshooter. |
 |

To solve the constant appearance of the SYSTEM_PTE_MISUSE Windows 10 problem, you can further try these fixes:
How To Fix BSOD “SYSTEM PTE MISUSE” On Windows 10?
Follow the methods carefully:
METHOD 1 – Disable PTT Security In BIOS
For users unaware, PTT is a Platform Trust Technology that implements TPM (Trusted Platform Module) in System Firmware. Try disabling it in the BIOS settings to see if it fixes the SYSTEM_PTE_MISUSE.
Step 1- Switch On your PC & press the BIOS key while the system is in the booting process. Usually, the BIOS key appears on the boot screen, with Press_to enter SETUP. The keys are DEL, F1, F2, etc.
Step 2- Navigate to the Security tab & locate the option PTT, PTT Security or something similar.
Step 3- Now hit the Enter key while PTT or PTT Security option selected & choose Disable to deactivate in BIOS.
The process will be implemented while booting the computer. Check if the Windows 10 error persists.
METHOD 2- Check For Virus & Malware
Certain viruses or malware are also responsible for bringing this Windows 10 Blue Screen Error. So, go ahead running a deep virus scan on your system. Unfortunately Windows Defender is not strong enough to detect malicious content so it’s worth trying dedicated antivirus software such as Systweak Antivirus for PC. It also offers a free trial version, but with limited functionality.
Read This: A Guide To Choosing The Best Antivirus

Both security utilities for Windows are designed with advanced algorithms so that no existing or new virus can harm your system. Their database of viruses gets regularly updated so that users are protected from all kinds of potential threats. You can install the software using the button below. If any malware gets detected, follow the instructions provided by the Systweak Antivirus program to fix it. Restart your Windows system & see if you still witness the SYSTEM_PTE_MISUSE Windows 10 problem!

METHOD 3 – Rollback Drivers
Well, for most of the users updating to most compatible & recent device drivers solves all the major Blue Screen Windows 10 errors. But you can undoubtedly try going back to the previous versions of drivers. This helps when everything was stable before you attached or installed any new hardware or software. Follow the steps carefully to rollback drivers to previous versions.
Step 1- Click on the Start button & locate for Device Manager.
Step 2- Now expand the category with problems. If you aren’t sure which drivers are causing the SYSTEM_PTE_MISUSE Windows 10 error, then you probably have to repeat these steps for each device.
Step 3- Right-click on the category & go to its Properties.
Step 4- Navigate to the Driver tab & click on the Rollback Driver option.

Step 5- Hit the Yes button to complete the process.
If the aforementioned method sounds hectic, here’s a quick trick to rollback drivers, when needed in the future.
- Using Smart Driver Care is a clever choice when you want to backup all the old versions of device drivers.
- The driver updater utility not only helps users to find and install the right & most compatible versions. But you can undoubtedly back up previous versions, so that you can restore them as and when required.
- This Backup & Restore option is generally used when someone faces BSOD errors.
So, ensure you install Smart Driver Care on your Windows 10 system & have a backup of all your previous device drivers. Next time, you surely do not have to follow the lengthy manual process to rollback drivers for each device. Just One Click & Smart Driver Care will do the task for you!
Skip to content
Как убрать SYSTEM_PTE_MISUSE (0x000000DA)?
Как убрать « SYSTEM_PTE_MISUSE» ( 0x000000DA)?
На компьютере или ноутбуке под управлением Windows появился «синий экран смерти»? После появления сообщения «
SYSTEM_PTE_MISUSE» (
0x000000DA) система перезагружается? Ищите как исправить
0x000000DA: «
SYSTEM_PTE_MISUSE»?
Как просмотреть информацию об ошибках, исправить ошибки в Windows 10, 8 или 7
Причины появления ошибки
- На жестком диске компьютера или ноутбука не достаточно места. Для правильной работы ОС Windows 10 на системном диске должно быть свободно 2 — 10 ГБ.
- На компьютер был установлен не совместимый BIOS или прошивка была повреждена.
- Установлены не совместимые с ОС драйвера устройств.
- Реестр Windows был поврежден или удален. Возможно в результате очистки были удалены системные ключи реестра.
- Ативирусное программное обеспечение или компьютерные вирусы могут заблокировать системные файлы или удалить важные ключи реестра.
- В результате ошибок в работе программы для резервного копирования.
- В результате обновления ОС Windows.
Актуально для ОС: Windows 10, Windows 8.1, Windows Server 2012, Windows 8, Windows Home Server 2011, Windows 7 (Seven), Windows Small Business Server, Windows Server 2008, Windows Home Server, Windows Vista, Windows XP, Windows 2000, Windows NT.
Вот несколько способов исправления ошибки «
SYSTEM_PTE_MISUSE»:
Восстановите удаленные файлы
Часто появление BSoD ошибок приводит к утери важных файлов. Блокировка файлов компьютерными вирусами, ошибки в работе программ для резервного копирования, повреждение или перезапись системных файлов, ошибки файловой системы или наличие битых секторов диска – это не далеко полный список причин удаления данных.
Исправление соответствующих ошибок восстановит работоспособность устройства, но не всегда восстановит повреждённые или утерянные файлы. Не всегда имеется возможность устранить ту или иную ошибку без форматирования диска или чистой установки операционной системы, что также может повлечь за собой утерю файлов.
Загрузите бесплатно и просканируйте ваше устройство с помощью Hetman Partition Recovery. Ознакомьтесь с возможностями программы и пошаговой инструкцией.
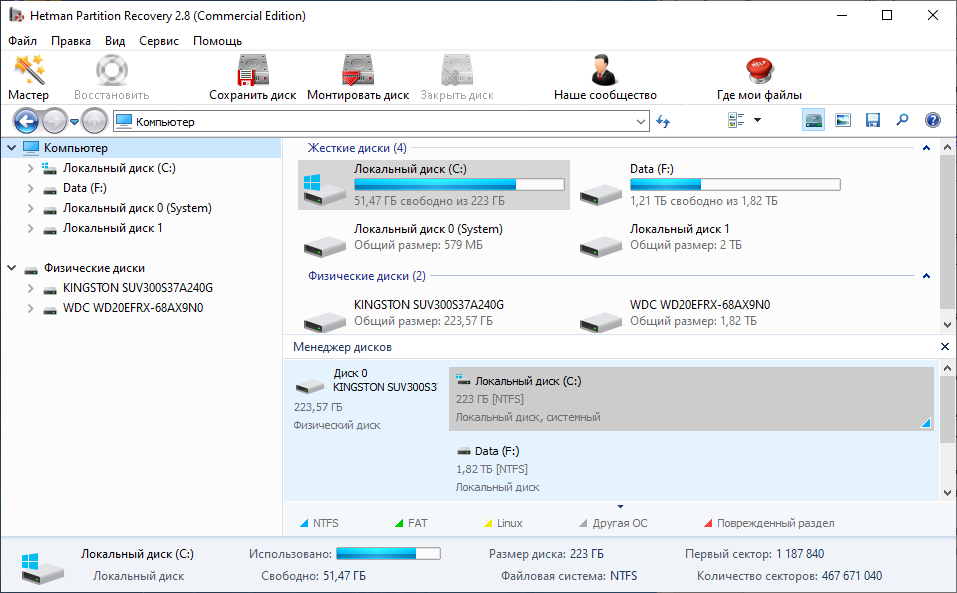
Программа для восстановления данных
Запустите компьютер в «безопасном режиме»
Если ошибка «SYSTEM_PTE_MISUSE» (0x000000DA) возникает в момент загрузки Windows и блокирует любую возможность работы с системой, попробуйте включить компьютер в «безопасном режиме». Этот режим предназначен для диагностики операционной системы (далее ОС), но функционал Windows при этом сильно ограничен. «Безопасный режим» следует использовать только если работа с системой заблокирована.
Чтобы запустить безопасный режим сделайте следующее:
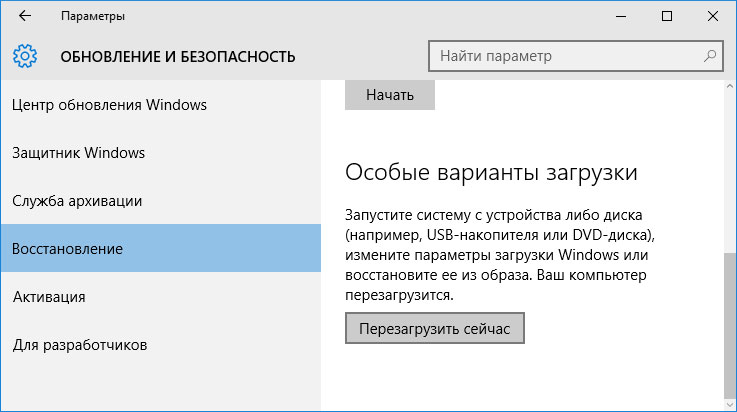
- Перейдите в меню Пуск и выберите Параметры.
- В открывшемся окне параметров перейдите в меню Обновление и Безопасность и выберите раздел Восстановление.
- В разделе Восстановление найдите Особые варианты загрузки и нажмите кнопку Перезагрузить сейчас.
- После этого Windows перезагрузится и предложит выбрать следующее действие. Выберите Поиск и устранение неисправностей.
- В меню Поиск и устранение неисправностей кликните на Дополнительные параметры, далее — Параметры загрузки.
- Далее Windows уведомит вас о том, что компьютер можно перезагрузить с использованием дополнительных параметров загрузки. Укажите — Включить безопасный режим. Нажмите Перезагрузить.
- После перезагрузки выберите Включить безопасный режим нажав клавишу F4.
Как загрузить Windows в безопасном режиме

Обновите драйвер через Диспетчер устройств
Вы установили новое аппаратное обеспечение на компьютере? Возможно вы начали использовать новое USB-устройство с вашим компьютером. Это могло привести к ошибке «SYSTEM_PTE_MISUSE». Если вы установили драйвер устройства используя диск, который поставляется вместе с ним, или использовали драйвер не c официального сайта Microsoft, то причина в нем. Вам придется обновить драйвер устройства, чтобы устранить эту проблему.
Вы можете сделать это вручную в диспетчере устройств Windows, для того выполните следующие инструкции:
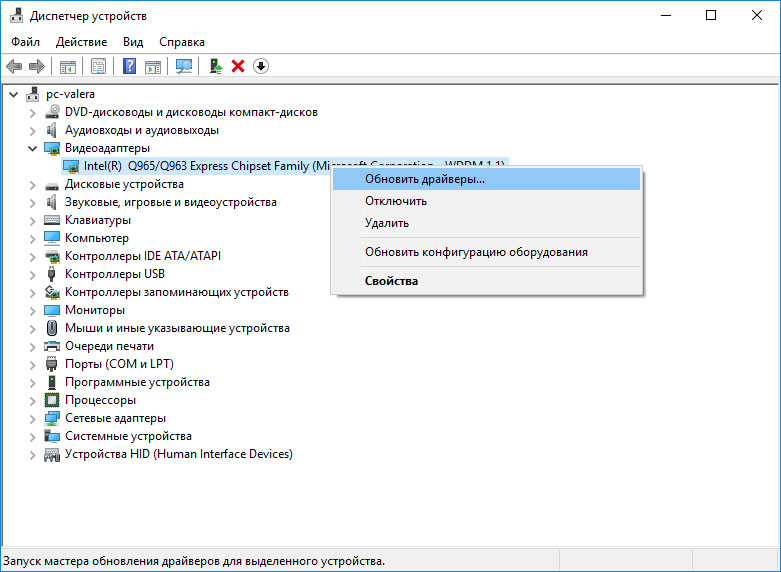
- Нажмите кнопку Windows, затем введите диспетчер устройств с клавиатуры.
- Выберите Диспетчер устройств из списка.
- Просмотрите список категорий устройств, нажмите на стрелочку рядом с категорией вашего нового устройства. Драйвер может быть отмечен желтым треугольником.
- Кликните правой кнопкой мыши на имя устройства и нажмите Обновить драйвер.
- Далее откроется окно Мастера обновления драйверов с двумя опциями:
- Автоматический поиск обновленных драйверов. Windows проверит наличие наиболее подходящего драйвера для этого устройства в автоматическом режиме.
- Выполнить поиск драйверов на этом компьютере. Используйте эту опцию, что бы самостоятельно указать ОС файлы драйвера.
Перезагрузите компьютер после установки драйвера.
Используйте sfc /scannow для проверки всех файлов системы
Повреждение или перезапись системных файлов может привести к ошибке «SYSTEM_PTE_MISUSE». Команда sfc находит поврежденные системные файлы Windows и заменяет их.
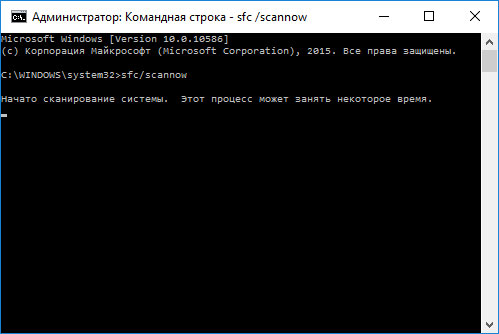
- Нажмите кнопку Windows, затем введите cmd с клавиатуры.
- Правой кнопкой мышки кликните на CMD и запустите от имени администратора.
- В окне командной строки введите sfc /scannow и нажмите Enter.
Этот процесс может занять несколько минут.
Как восстановить системные файлы Windows 10

Проверьте диск с Windows на наличие ошибок командой chkdsk c: /f
Возможно к синему экрану с «SYSTEM_PTE_MISUSE» привела ошибка файловой системы или наличие битых секторов диска. Команда CHKDSK проверяет диск на наличие ошибок файловой системы и битых секторов. Использование параметра /f заставит программу автоматически исправлять найденные на диске ошибки, а параметр /r позволяет найти и «исправить» проблемные сектора диска. Для запуска следуйте инструкциям:
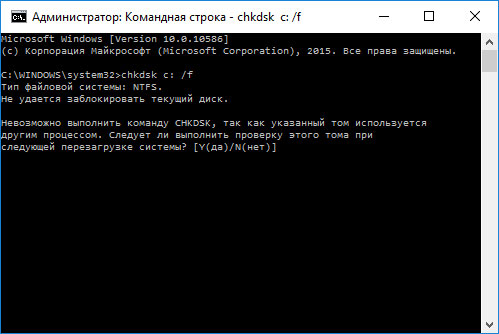
- Нажмите кнопку Windows, затем введите CMD с клавиатуры.
- Правой кнопкой мышки кликните на CMD и запустите от имени администратора.
- В окне командной строки введите chkdsk c: /f и нажмите Enter (используйте ту букву диска, на котором установлена ОС).
Дождитесь окончания процесса и перезагрузите компьютер.
Используйте режим совместимости со старой версией Windows
Отключите лишние программы из автозагрузки Windows
Программное обеспечение, вызывающее «SYSTEM_PTE_MISUSE» (0x000000DA), может быть прописано в автозагрузку Windows и ошибка будет появляться сразу после запуска системы без вашего участия. Удалить программы из автозагрузки можно с помощью Диспетчера задач.

- Загрузитесь в Безопасном режиме.
- Кликните правой кнопкой мышки на Панели задач, затем на пункте Диспетчер задач.
- Перейдите на вкладку Автозагрузка.
- Чтобы убрать ту или иную программу из автозагрузки выберите её из списка и отключите, нажав кнопку Отключить в правом нижнем углу окна.
Обратитесь в поддержку Microsoft
Microsoft предлагает несколько решений удаления ошибки «голубого экрана». «SYSTEM_PTE_MISUSE» (0x000000DA) можно убрать с помощью Центра обновления или обратившись в поддержку Windows.
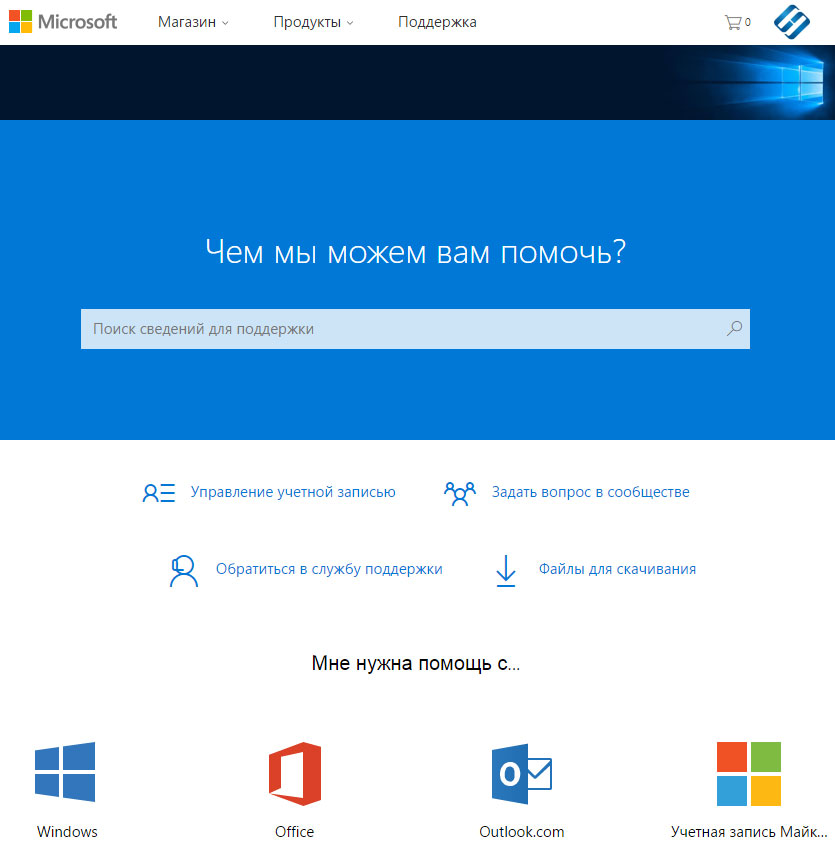
- Перейдите на сайт технической поддержки Microsoft.
- Введите код и сообщение об ошибке в поисковую строку и следуйте найденным рекомендациям.
- Если вы не найдете готового решения, то задайте вопрос в сообществе — возможно вам ответит сертифицированный системный администратор.
Установите последние обновления системы
С обновлениями Windows дополняет базу драйверов, исправляет ошибки и уязвимости в системе безопасности. Загрузите последние обновления, что бы избавиться от ошибки «SYSTEM_PTE_MISUSE» (0x000000DA).
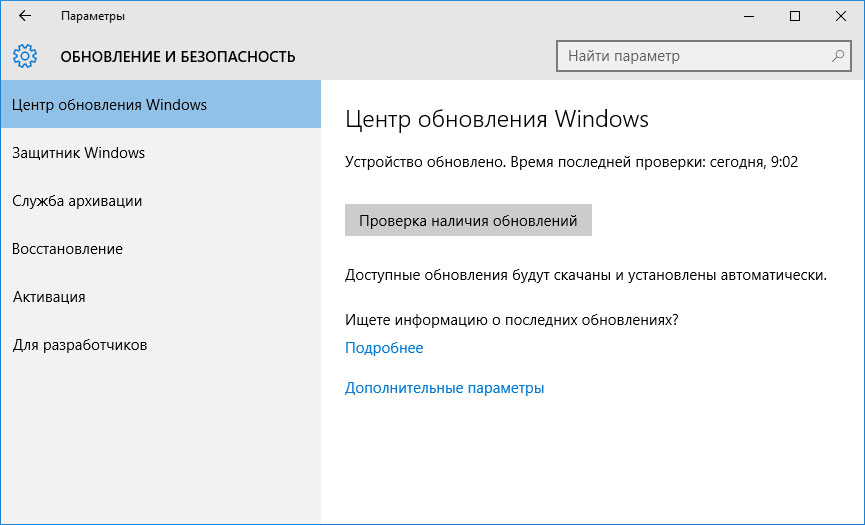
Запустить Центр обновления Windows можно следующим образом:
- Перейдите в меню Пуск и выберите Параметры.
- В окне Параметров перейдите в меню Обновление и Безопасность.
- Для установки последних обновлений Windows нажмите кнопку Проверка наличия обновлений и дождитесь окончания процесса их поиска и установки.
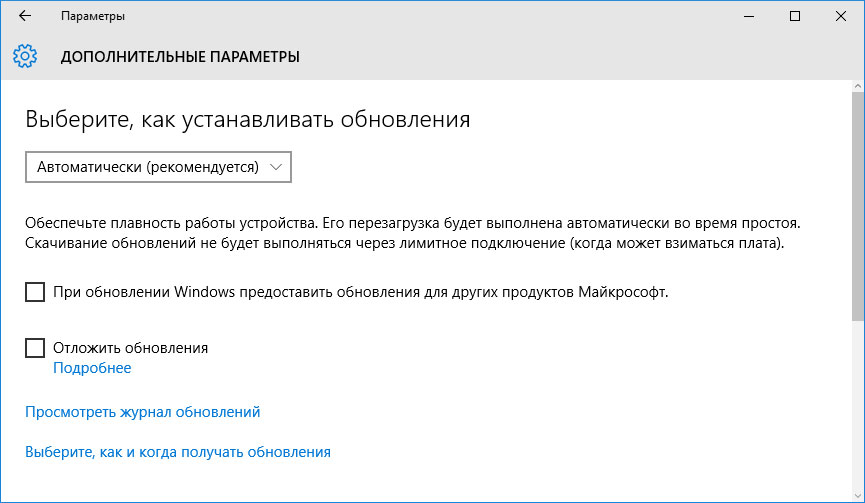
Рекомендуется настроить автоматическую загрузку и установку обновлений операционной системы с помощью меню Дополнительные параметры.
Чтобы включить автоматическое обновление системы необходимо запустить Центр обновления Windows:
- Перейдите в меню Пуск и выберите Параметры.
- В окне Параметров перейдите в меню Обновление и Безопасность и выберите подменю Центр обновления Windows. Для установки последних обновлений Windows нажмите кнопку Проверка наличия обновлений и дождитесь окончания процесса их поиска и установки.
- Перейдите в Дополнительные параметры и выберите, как устанавливать обновления — Автоматически.
Запустите проверку системы на вирусы
«Синий экран смерти» с ошибкой «SYSTEM_PTE_MISUSE» 0x000000DA может вызывать компьютерный вирус, заразивший систему Windows.
Для проверки системы на наличие вирусов запустите установленную на компьютере антивирусную программу.
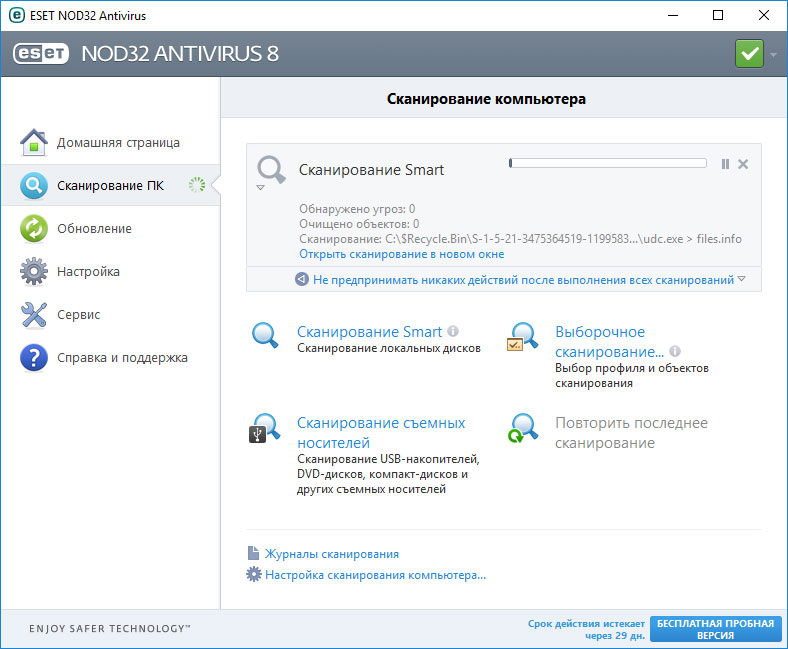
Современные антивирусы позволяют проверить как жесткие диски, так и оперативную память. Выполните полную проверку системы.
Выполните проверку оперативной памяти
Неполадки с памятью могут привести к ошибкам, потере информации или прекращению работы компьютера.
Прежде чем проверять оперативную память, отключите её из разъёма на материнской плате компьютера и повторно вставьте в него. Иногда ошибка SYSTEM_PTE_MISUSE» вызвана неправильно или не плотно вставленной в разъём планкой оперативной памяти, или засорением контактов разъёма.
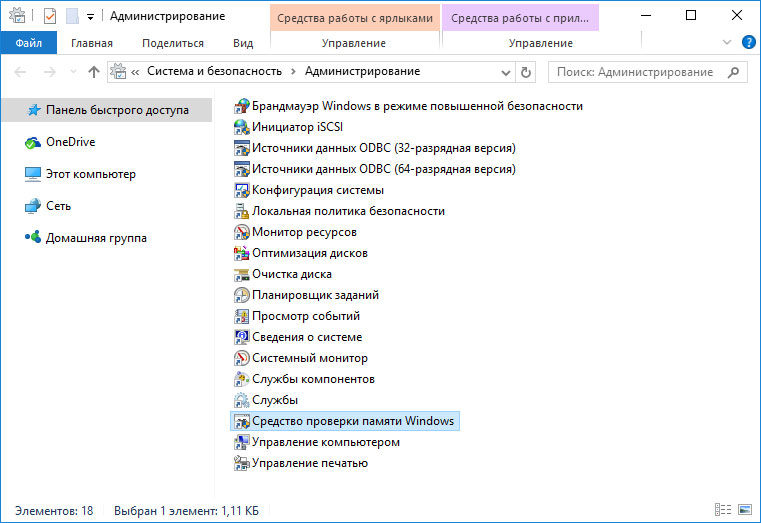
Если предложенные действия не привели к положительному результату, исправность оперативной памяти можно проверить средствами операционной системы, с помощью средства проверки памяти Windows.
Запустить средство проверки памяти Windows можно двумя способами:
- С помощью Панели управления:

Перейдите в Панель управления / Система и безопасность / Администрирование. Запустите приложение Средство проверки памяти Windows.
- С помощью средства Выполнить:

Запустите средство Выполнить с помощью комбинации клавиш Windows + R. Наберите mdsched и нажмите Enter. После чего откроется средство проверки Windows.
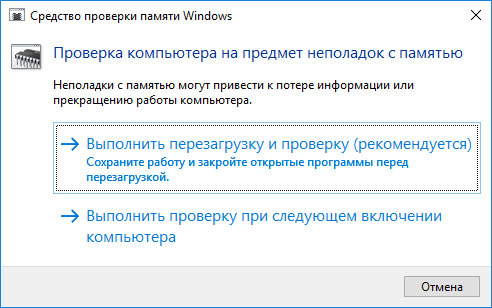
Для начала проверки выберите один из предлагаемых вариантов, проверка оперативной памяти в соответствии с которым будет запущена после перезагрузки компьютера.
Если в результате проверки будут определены ошибки, исправить которые не представляется возможным, то такую память необходимо заменить (замене подлежит модуль памяти с неполадками).
Выполните «чистую» установку Windows
Если не один из перечисленных методов не помог избавиться от SYSTEM_PTE_MISUSE», попробуйте переустановить Windows. Для того чтобы выполнить чистую установку Windows необходимо создать установочный диск или другой носитель с которого планируется осуществление установки операционной системы.
Загрузите компьютер из установочного диска. Для этого может понадобиться изменить устройство загрузки в BIOS или UEFI для более современных компьютеров.
Следуя пунктам меню установщика укажите диск, на который вы хотите установить Windows. Для этого понадобится отформатировать его. Если вас не устраивает количество или размер локальных дисков, их можно полностью удалить и заново перераспределить.
Помните, что форматирование, удаление или перераспределения дисков удалит все файлы с жесткого диска.
После указания диска для установки Windows запуститься процесс копирования системных файлов и установки операционной системы. Во время установки от вас не потребуется дополнительных действий. В течении установки экран компьютера будет несколько раз гаснуть на непродолжительное время, и для завершения некоторых этапов установки компьютер будет самостоятельно перезагружаться.
В зависимости от версии Windows на одном из этапов от вас может понадобиться выбрать или внести базовые параметры персонализации, режим работы компьютера в сети, а также параметры учётной записи или создать новую.
После загрузки рабочего стола чистую установку Windows можно считать законченной.
Примечание. Прежде чем приступить к выполнению чистой установки Windows заранее побеспокойтесь о наличии драйверов ко всем установленным устройствам и сохранности ваших файлов. Загрузите и сохраните драйвера на отдельный носитель информации, а для важных данных создайте резервную копию.
Как сбросить Windows 10 к исходному состоянию
Как сбросить Windows 10, 8, 7 если компьютер не загружается