 В новых билдах Windows 10 удивительные вещи происходят, привычные нам штуки — исчезают.
Например если нажать правой кнопкой по пуску, то в меню уже нет пункта панель управления… имею ввиду Windows 10 билд 1903.
Такое чувство, что нас отучают от старого, привычного нам интерфейса Windows.. а ведь панель управления была еще в Windows XP..
Поэтому в новых версиях винды не так просто попасть в панель управления как раньше, не говоря уже о настройке Система и безопасность.
Однако я покажу способ — простой, легкий, удобный:
- Зажмите Win + R, появится окошко Выполнить.
- Укажите команду — control либо control panel, нажмите ОК.
- Откроется панель управления.
- Убедитесь, что в меню Просмотр выбрано Категория.
- В левом верхнем углу должна появиться настройка Система и безопасность.
Используем команду control panel:

Проверяем — в меню Просмотр должно быть выбрано Категория:

Результат:

Мое мнение — Майкрософт хочет обьединить интерфейс декстопной версии винды и мобильной. Не сделать одну операционку, нет, а чтобы они были максимально похожи, некий единый интерфейс настольных ПК и смартфонов на виндовс мобайл. Однако, как мне кажется, мобильный рынок Майкрософт давно уже потеряла.. и вообще — Windows 7 в плане интерфейса была очень привлекательной..
Надеюсь информация пригодилась. Удачи.
На главную!
29.08.2019
Безопасность Windows — это встроенная служба Windows 10, которая предлагает удобный интерфейс и инструменты для управления общими функциями безопасности операционной системы. Сюда относится «Защитник Windows», который предлагает защиту компьютера в реальном времени от вирусов и других вредоносных программ.
В этом руководстве мы расскажем, как начать работу с настройками безопасности Windows 10 и выполнять повседневные задачи с помощью встроенного антивируса, чтобы защитить свой компьютер от вредоносных программ и хакеров.
Содержание
- Безопасность Windows и Windows Defender
- Обзор возможностей безопасности Windows 10
- Как проверить компьютер на наличие вредоносных программ
- Как просмотреть журнал защиты
- Как временно отключить антивирус Windows 10
- Как включить защиту от программ-вымогателей
- Как исключить файлы и папки для сканирования
- Как проверить защиту учётной записи
- Как управлять сетевой безопасностью с помощью брандмауэра
- Как защитить устройство от вредоносного кода
- Как включить изоляцию ядра в Windows Security
- Как просмотреть отчёт о работоспособности и производительности
- Как управлять родительским контролем и отслеживать устройства
- Настройка уведомлений безопасности Windows
Безопасность Windows и Windows Defender
Прежде чем углубиться в руководство, необходимо понять разницу между терминами «Защитник Windows» (он же Windows Defender) и «Безопасность Windows»:
- Безопасность Windows — это служба, которая предлагает единый интерфейс для просмотра состояния и управления функциями безопасности, такими как антивирус, брандмауэр, производительность и прочие.
- Защитник Windows — это встроенное ПО, которое в реальном времени предлагает защиту от вредоносных программ, вирусов, шпионского ПО, программ-вымогатели и так далее.
Установка стороннего антивируса автоматически отключает Защитника, но не влияет на работоспособность службы «Безопасность Windows». Точно так же отключение встроенного антивируса или брандмауэра, не приведёт к отключению «Безопасности Windows».
Обзор возможностей безопасности Windows 10
Безопасность Windows — это простое интуитивно понятное приложение. Вы можете открыть его из меню «Пуск» или дважды щёлкнув значок щита в области уведомлений на панели задач.
На домашней странице можно смотреть состояние безопасности всех функций защиты, доступных по умолчанию в Windows 10. Здесь же отображаются предупреждения обо всех действиях, которые необходимо предпринять для обеспечения безопасности вашего компьютера.
Значок щита в области уведомлений панели задач также может предупредить вас, когда необходимо выполнить действие. Если имеется более одного предупреждения, отображается только самое серьёзное предупреждение.
Безопасность Windows включает семь областей защиты, которыми вы можете управлять:
- Защита от вирусов и угроз — содержит настройки встроенного антивируса. Он позволяет отслеживать защиту от вредоносных программ, сканировать устройство на наличие угроз, запускать автономное сканирование, настраивать расширенную функцию защиты от программ-вымогателей.
- Защита учётных записей — позволяет настаивать защиту своей учётную запись в Windows 10.
- Брандмауэр и безопасность сети — позволяет отслеживать сетевые подключения и настраивать различные параметры встроенного брандмауэра.
- Управление приложениями и браузером — помогает защититься от вредоносного кода, скрытого в приложениях, файлах или сайтах.
- Безопасность устройства — содержит функции безопасности на уровне оборудования, такие как изоляция ядра для защиты компьютера от атак.
- Производительность и работоспособность устройства — отчёт о работоспособности вашего компьютера.
- Параметры для семьи — предлагает лёгкий доступ к управлению устройствами семьи с помощью учётной записи Microsoft.
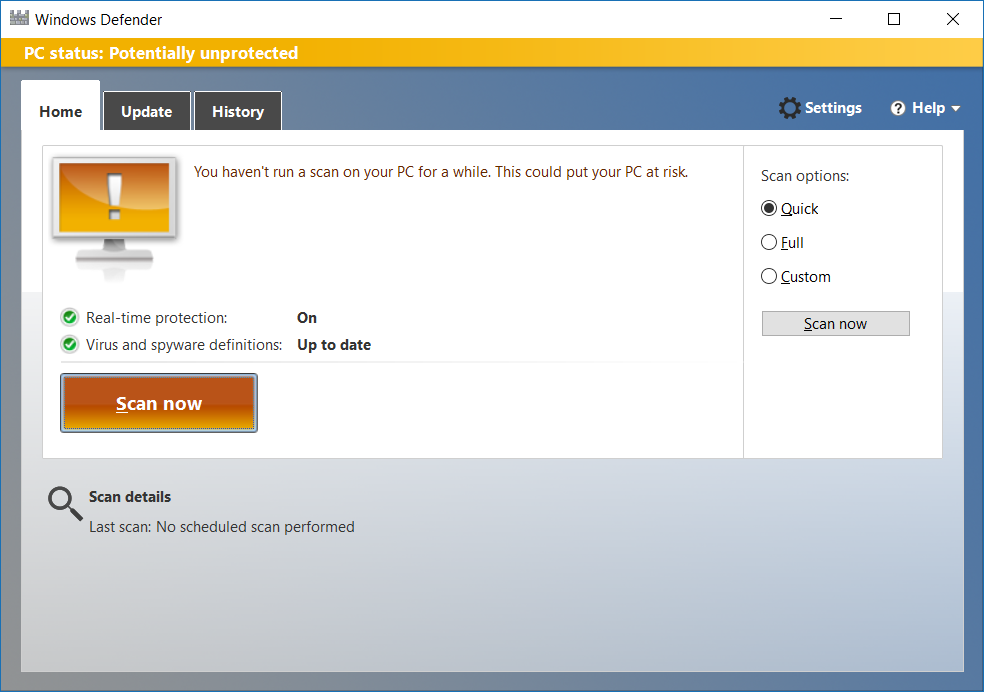
Как проверить компьютер на наличие вредоносных программ
Windows 10 автоматически обновляет базы вредоносного ПО и регулярно сканирует устройство на наличие вредоносных программ. Но вы можете выполнять все эти проверки вручную.
Быстрая проверка на вирусы
Быстрое сканирование занимает меньше минуты и проверяет только те части системы, в которых наиболее вероятно могут скрываться вредоносные программы.
Чтобы запустить проверку на вирусы с помощью Microsoft Defender, выполните следующие действия:
- Щёлкните Защита от вирусов и угроз.
- Нажмите кнопку Быстрая проверка.
После выполнения этих шагов начнётся сканирование системы, а в разделе «Текущие угрозы» будут показаны обнаруженные угрозы, а также время, необходимое для завершения сканирования, и количество просканированных файлов.
Если вы подозреваете, что на вашем компьютере есть вирус, попробуйте выполнить полное сканирование.
Полная проверка на вирусы
Полная проверка на вирусы занимает больше времени, но при этом проверяются все файлы, папки и приложения.
Чтобы запустить полную проверку на вирусы с помощью Microsoft Defender, выполните следующие действия:
- Щёлкните Защита от вирусов и угроз.
- В разделе «Текущие угрозы» щёлкните ссылку Параметры сканирования .
- Выберите опцию Полная проверка, нажмите кнопку Выполнить сканирование сейчас.
После выполнения этих шагов можно продолжить использование устройства, антивирус выполнит полное сканирование для обнаружения любых потенциальных вредоносных программ в фоновом режиме.
Настраиваемое сканирование на вирусы
Если вы хотите сканировать только определённую папку или файл, антивирус Windows 10 предоставляет возможность выполнить насраиваемое сканирование.
Для запуска настраиваемого сканирования на вирусы, выполните следующие действия:
- Щёлкните Защита от вирусов и угроз.
- В разделе «Текущие угрозы» щёлкните ссылку Параметры сканирования.
- Выберите вариант Выборочное сканирование, нажмите кнопку Выполнить сканирование сейчас.
- Выберите место для сканирования и нажмите кнопку «Выбор папки».
Вы можете щёлкнуть правой кнопкой мыши диск, папку или файл и выбрать параметр «Проверка с использованием Microsoft Defender» в контекстном меню, чтобы выполнить выборочное сканирование.
Проверка на вирусы автономным модулем
Иногда, если вы имеете дело с серьёзным вирусом или другим типом вредоносного ПО, антивирус может не удалить его во время работы Windows 10. В этом случае можно использовать Microsoft Defender для автономного сканирования.
При использовании функции автономного модуля компьютер автоматически перезагружается в среде восстановления и выполняет полное сканирование перед запуском Windows 10.
Чтобы запустить проверку на вирусы автономным модулем, выполните следующие действия:
- Щёлкните Защита от вирусов и угроз.
- В разделе «Текущие угрозы» щёлкните ссылку Параметры сканирования.
- Выберите опцию Проверка автономным модулем Microsoft Defender.
- Нажмите кнопку Выполнить сканирование сейчас.
- В открывшемся окне щёлкните кнопку Проверка.
После того, как вы выполните эти шаги, устройство перезагрузится и загрузится с автономным модулем антивируса Microsoft Defender, которая просканирует весь ПК. Если вредоносный код обнаружен, он будет автоматически удалён или помещён в карантин.
После сканирования устройство автоматически загрузит Windows 10, и вы сможете просмотреть отчёт в приложении «Безопасность Windows».
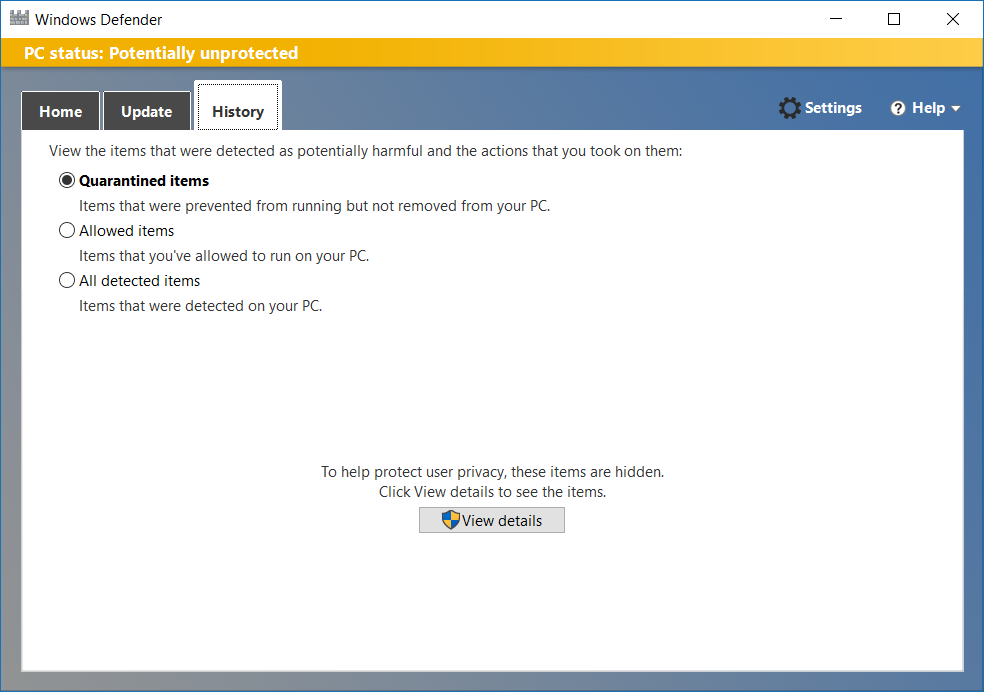
Как просмотреть журнал защиты
В антивирусе Microsoft Defender есть область, в которой вы можете просматривать последние действия и рекомендации по защите.
Чтобы просмотреть журнал защиты, выполните следующие действия:
- Щёлкните Защита от вирусов и угроз.
- Щёлкните параметр Журнал защиты.
- Щёлкните раскрывающееся меню «Фильтры» и выберите что хотите посмотреть: рекомендации, помещённые в карантин, удалённые или заблокированные файлы.
После выполнения этих шагов вы увидите отчёт с файлами, которые были удалены, очищены или всё ещё ждут вашего действия.
Как временно отключить антивирус Windows 10
Не рекомендуется использовать компьютер без защиты от вредоносных программ, но иногда антивирус может мешать установке приложения или обновления программного обеспечения. В этом случае вы можете временно отключить антивирус Windows 10, чтобы завершить установку своего ПО.
Чтобы отключить антивирус Microsoft Defender, выполните следующие действия:
- Щёлкните Защита от вирусов и угроз.
- В разделе «Параметры защиты от вирусов и угроз» выберите параметр «Управление настройками».
- Выключите ползунок Защита в режиме реального времени.
Выполнив эти шаги, вы сможете выполнить задачи, которые конфликтовали с антивирусом.
Если не включить антивирус повторно, он будет автоматически активирован при перезагрузке компьютера.
Как включить защиту от программ-вымогателей
Windows 10 включает функцию контролируемого доступа к папкам, предназначенную для мониторинга и защиты ваших данных от атак программ-вымогателей или нежелательных изменений со стороны вредоносных программ.
Поскольку эта функция может вызывать ложные срабатывания, она по умолчанию неактивна. Вам нужно включить её вручную с помощью приложения безопасности Windows.
Чтобы включить контролируемый доступ к папкам в Windows 10, выполните следующие действия:
- Щелкните Защита от вирусов и угроз.
- В разделе «Параметры защиты от вирусов и угроз» выберите параметр «Управление параметрами».
- В разделе «Контролируемый доступ к папкам» выберите опцию Управление контролируемым доступом к файлам.
- Активируйте ползунок.
После выполнения этих шагов функция безопасности будет отслеживать приложения, пытающиеся внести изменения в файлы в защищённых папках.
Если приложение помечено как вредоносное или неизвестное, контролируемый доступ к папке заблокирует попытку внесения изменений, а вы получите уведомление об этом.
Как исключить файлы и папки для сканирования
Если у вас есть папка с файлами, которую вы не хотите проверять на вирусы, можно исключить её из процесса сканирования.
Чтобы антивирус не сканировал определённые папки, выполните следующие действия:
- Щёлкните Защита от вирусов и угроз.
- В разделе «Параметры защиты от вирусов и других угроз» выберите «Управление настройками».
- В разделе «Исключения» выберите параметр «Добавление или удаление исключений».
- Нажмите кнопку Добавить исключение.
- Выберите тип исключения, который вы хотите настроить: файл, папка, тип файла, процесс и его расположение.
После того, как вы выполните эти шаги, антивирус не будет сканировать указанный файл, папку, тип файла или процесс.
За один раз можно добавить одно исключение. Чтобы добавить больше исключений, повторите шаги выше несколько раз.
Рекомендуем ознакомиться со статьёй про то, как сканировать на вирусы сетевые файлы в Windows 10.
Как проверить защиту учётной записи
Функция защиты учётной записи Windows 10 предназначена для отслеживания и уведомления о любых проблемах с вашей учётной записью.
Чтобы проверить защиту учётной записи в Windows 10, выполните следующие действия:
- Щёлкните Защита учётных записей.
- Убедитесь, что учётная запись Microsoft, Windows Hello и динамическая блокировка имеют зелёную отметку, указывающую на то, что всё работает правильно.
Если один из элементов защиты учётной записи требует вашего внимания, вы увидите предупреждение о необходимости принять меры по устранению проблемы.
Если вы используете пароль для входа в систему, система порекомендует настроить учётную запись с помощью одного из доступных методов проверки подлинности Windows Hello, таких как отпечаток пальца, распознавания лица или PIN-кода.
Как управлять сетевой безопасностью с помощью брандмауэра
В приложении есть область для мониторинга и управления настройками брандмауэра Microsoft Defender.
Просмотр статуса брандмауэра
Чтобы получить доступ к настройкам брандмауэра с помощью безопасности Windows, выполните следующие действия:
- Щёлкните Брандмауэр и безопасность сети.
На странице вы можете увидеть, какой сетевой профиль включён в данный момент. Тот, что отмечен как активный — это текущий сетевой профиль, который используется.
На странице также отображаются настройки параметров брандмауэра, позволяющие приложениям проходить через брандмауэр. Однако эти параметры являются ссылками для изменения конфигурации через Панель управления.
Включить или отключить брандмауэр
Чтобы включить или отключить брандмауэр Защитника Windows, выполните следующие действия:
- Щёлкните Брандмауэр и безопасность сети.
- Щёлкните активный брандмауэр. Например, Частная сеть.
- Включите или выключите тумблер брандмауэра защитника Microsoft.
Здесь же можно установить флажок, заблокировав все входящие подключения, включая те, что указаны в списке разрешённых приложений.
После того, как вы выполните эти шаги, на вашем компьютере отключится брандмауэр.
Если вы отключаете брандмауэр для тестирования приложения, не забудьте снова включить его после теста. Если проблема была в брандмауэре, лучше всего создать правило исключения, а не полностью отключать функцию безопасности.
Как защитить устройство от вредоносного кода
На странице «Управление приложениями/браузером» можно настроить защиту приложений и параметры безопасности в интернете, которые помогут защитить компьютер от сайтов, приложений и файлов с вредоносным кодом.
Параметры по умолчанию — это рекомендуемая конфигурация, которую вы должны использовать (их можно изменить в любой момент).
Защита репутации
Чтобы защитить устройство с помощью защиты на основе репутации, выполните следующие действия:
- Откройте Безопасность Windows .
- Щёлкните Управление приложениями и браузером .
- Выберите Параметры защиты на основе репутации.
- Включите или выключите нужные параметры в соответствии с вашими предпочтениями.
Доступны несколько вариантов:
- Проверять приложения и файлы — защита от нераспознанных приложений и файлов из Интернета.
- SmartScreen для Microsoft Edge — защищает устройство от вредоносных загрузок и сайтов.
- Блокировка потенциально нежелательных приложений блокирует приложения с низкой репутацией.
- SmartScreen для приложений Microsoft Store — проверяет веб-контент, который используют приложения из магазина Microsoft Store.
Примечание: Windows 10 по умолчанию имеет оптимальные настройки этой функции. Вы можете выборочно включать или отключать их в зависимости от личных предпочтений.
После выполнения этих действий антивирус Microsoft Defender защитит ваше устройство от нежелательных приложений, файлов и сайтов.
Изолированный просмотр
Изолированный просмотр — это возможность редакций Windows 10 Pro, Education и Enterprise, которая разработана для изоляции браузера Microsoft Edge на аппаратном уровне, чтобы защитить устройство и данные от вредоносных программ или атак нулевого дня.
Если этот параметр доступен, вы можете получить доступ к его настройкам в Защитнике Microsoft, выполнив следующие действия:
- Щёлкните Управление приложениями и браузером.
- Щёлкните параметр Изменить параметры Application Guard.
Если вы используете поддерживаемую версию Windows 10, то сможете получить доступ к настройкам, если компонент «Microsoft Defender Application Guard» включён с помощью функции «Включение или отключение компонентов Windows».
Выполнив эти шаги, вы можете начать новый сеанс безопасного просмотра, открыв новый браузер Microsoft Edge на базе движка Chromium, нажав кнопку главного меню (трехточечную) и выбрав параметр «Новое окно Application Guard».
Защита от эксплойтов
Защита от эксплойтов — это расширенная функция, которая может помочь уменьшить количество вредоносных программ и уязвимостей.
Windows 10 включает наиболее оптимальные настройки для защиты от эксплойтов. Не следует вносить какие-либо изменения в них, если вы не знаете, что делаете.
Чтобы настроить параметры защиты от эксплойтов, выполните следующие действия:
- Щёлкните Управление приложениями и браузером.
- Щёлкните параметр Параметры защиты от эксплойтов.
- Выберите вкладку Системные параметры и настройте параметры в соответствии с личными предпочтениями.
- Аналогично настройте вкладку Параметры программы.
После выполнения этих шагов защита от эксплойтов будет работать на устройстве в соответствии с вашими настройками.
Как включить изоляцию ядра в Windows Security
Изоляция ядра — это технология виртуализации, которая добавляет дополнительный уровень защиты от сложных атак.
Как правило, не нужно беспокоиться об этой функции, но вы можете включить её, выполнив следующие действия:
- Щёлкните Безопасность устройства.
- Щёлкните параметр Сведения об изоляции ядра.
- Включите ползунок целостности памяти.
После выполнения этих действий необходимо перезагрузить компьютер, чтобы изменения вступили в силу.
Если вы не видите этот параметр, скорее всего, виртуализация не включена в базовой системе ввода-вывода (BIOS) или унифицированном расширяемом интерфейсе микропрограмм (UEFI).
Как просмотреть отчёт о работоспособности и производительности
Служба безопасности Windows включает информацию о состоянии и производительности компьютера.
Чтобы просмотреть отчёт о работоспособности и производительности устройства, выполните следующие действия:
- Щёлкните Производительность и работоспособность устройств.
В отчёт включены статусы Центра обновления Windows, хранилища, драйвера устройства и аккумулятора. Если необходимо предпринять какие-то действия, вы увидите предупреждение с рекомендациями по устранению проблемы.
Вот значения для каждого возможного состояния статуса:
- Зелёный: всё работает правильно.
- Жёлтый: рекомендация доступна.
- Красный: предупреждение, требующее немедленного внимания.
Как управлять родительским контролем и отслеживать устройства
Раздел «Параметры для семьи» — это не то место, где можно управлять какими-либо настройками. Здесь предлагается доступ к учётной записи Microsoft для управления родительским контролем и другими устройствами, подключёнными к учётной записи.
Чтобы получить доступ к семейным параметрам, выполните следующие действия:
- Щёлкните Параметры семьи.
- В разделе «Родительский контроль» выберите параметр « Просмотр параметров семьи», чтобы открыть эти параметры в своей учётной записи Microsoft в Интернете.
- В разделе «Быстрый обзор устройств семьи» выберите «Просмотр устройств», чтобы открыть эти настройки в своей учётной записи Microsoft в Интернете.
Настройка уведомлений безопасности Windows
Есть страница настроек, которая позволяет управлять сторонним антивирусом и файерволом, а также настройками уведомлений.
Чтобы отключить уведомления защитника Windows 10, выполните следующие действия:
- Нажмите кнопку «Параметры» в левом нижнем углу окна.
- В разделе «Уведомления» выберите параметр «Управление уведомлениями».
- Настройте уведомления в соответствии со своими предпочтениями.
После выполнения этих шагов уведомления будут вести себя в соответствии с вашей конфигурацией.
На странице настроек вы также заметите раздел «Обновления системы безопасности», который отображает список установленных сторонних решений безопасности — веб-защита, брандмауэр и антивирус. Здесь нельзя настраивать какие-либо параметры, но можно использовать эту страницу, чтобы открыть настройки в самом приложении.
Подводя итог стоит отметить, что вы можете использовать сторонние решения от популярных компаний, таких как Norton, AVG, Kaspersky, Avast, Bitdefender, но стандартные возможности Windows 10 предлагают хороший набор инструментов с простым интерфейсом, которые работают быстро и могут конкурировать с любым другим решением.
Sign in
Welcome! Log into your account
your username
your password
Forgot your password? Get help
Privacy Policy
Password recovery
Recover your password
your email
A password will be e-mailed to you.
 My Windows Hub

- Windows News
- Windows Tutorials
- Windows 11 Tutorials
- Windows 10 Tutorials
- Windows 8 /8.1 Tutorial Categories
- General Windows Guides
- Windows Apps / Games
- Windows Desktop Apps
- Windows Store Apps
- Windows Themes
- MWH Bytes
- Site
- Index
- Windows Phone
- Windows Phone News & Updates
- Windows Phone Apps / Games
- Windows Phone Help / Howtos
- Contact Us
Home Windows 10 Tutorials System and Security
All Windows 10 Security and System tips. Know Windows 10 Technical Preview System and security tools details, new security features of Windows 10, different registry tweaks etc. Which Antivirus is optimized for Windows 10? How to enable maximum security for your Windows 10? Get all details.
How to password protect a text file on Windows 10?
Shakshi Bhuiya —
It’s a smart idea to password-protect any text files that contain private information. Although text files cannot be password-protected natively on Windows, you may…
How To Create A Shortcut For Hyper V Machine In Windows…
Harsit Mohapatra —
Hyper-V is a Microsoft proprietary tool that enables running virtual machines over a physical host. These virtualized machines are like any physical machines running…
How To Turn On or Off Hardware Accelerated GPU Scheduling in…
Harsit Mohapatra —
No matter how efficient your CPUs are, there’s always a need for extra hertz cycles for graphics processing. Although modern systems are equipped with…
How To Add Safe Mode To Boot Options At Startup In…
Debaleena —
Windows 10 has a Safe mode and we all know that. The function of the Safe mode is to boot Windows operating system in…
How To Specify Deadlines For Automatic Updates And Restarts In Windows…
Debaleena —
In Windows 10 devices, there are two types of updates, feature updates and Quality Updates. When these updates are downloaded and installed, Windows notifies…
How To Enable Or Disable SMBv1 In Windows 10?
Debaleena —
In this article, you will learn how to enable or disable SMBv1 in Windows 10. The acronym for SMB is Server Message Block. SMB…
How To Install A CAB File In Windows 10?
Debaleena —
Cabinet files are archive file formats for Windows operating systems. Cabinet files facilitate loss less data and file compression. In addition, it supports embedded…
How To Add Or Remove Install CAB Context Menu In Windows…
Debaleena —
Cab files or .cab files are extensions for cabinet files. Cabinet files are archive file formats for Windows operating systems. Cabinet files facilitate loss…
How To Add/Remove Locations In Windows Search Index In Windows 10?
Debaleena —
Windows Search option is used by a Windows user for searching files, settings, drivers, etc. Windows Search indexer is a process that proliferate your…
How To Prevent Users From Modifying Windows Search Index Locations?
Debaleena —
Windows Search option is used by a Windows user for searching files, settings, drivers, etc. Windows Search indexer is a process that proliferate your…
123…37Page 1 of 37
- Contact Us
- Privacy & Cookie Policy
© Since 2012 MyWindowsHub | You may not be authorised to reproduce any of the articles published in mywindowshub.com
This site uses cookies to improve performance, for advertising and analytics. By browsing this site, you accept our use of cookies. Learn More. Got it
ACCOUNTS
What it is
When installing Windows 10, you’ll be prompted to either log into your Microsoft account, if you have one, or you can choose to use a local account.
What’s new
If you choose to use a Microsoft account, you’ll be able to synchronize some of your settings between your devices (if you have multiple laptops, PCs or mobile with Windows Phone, but also for your other online accounts, such as Skype, Xbox, Hotmail, Outlook or Office 365).
If you’d rather use a local account, you’ll find that you’re not as limited as you would’ve been on Windows 8 or 8.1. This is a good option if you only have one device you use Windows 10 on or if you want enhanced privacy.
Where to find it
Click on the Windows icon in the bottom-left corner. Go to the top of the window and click on the username (this can be either the local account or your Microsoft account).
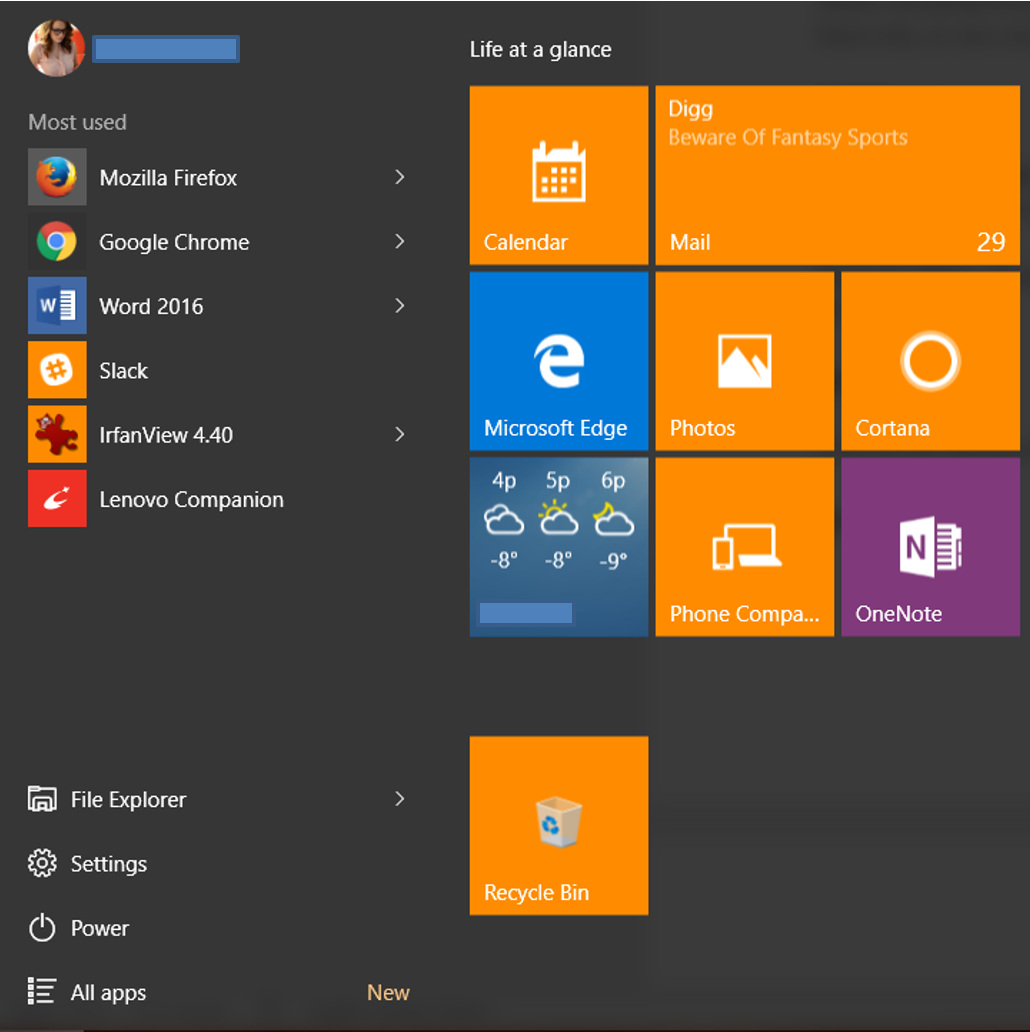
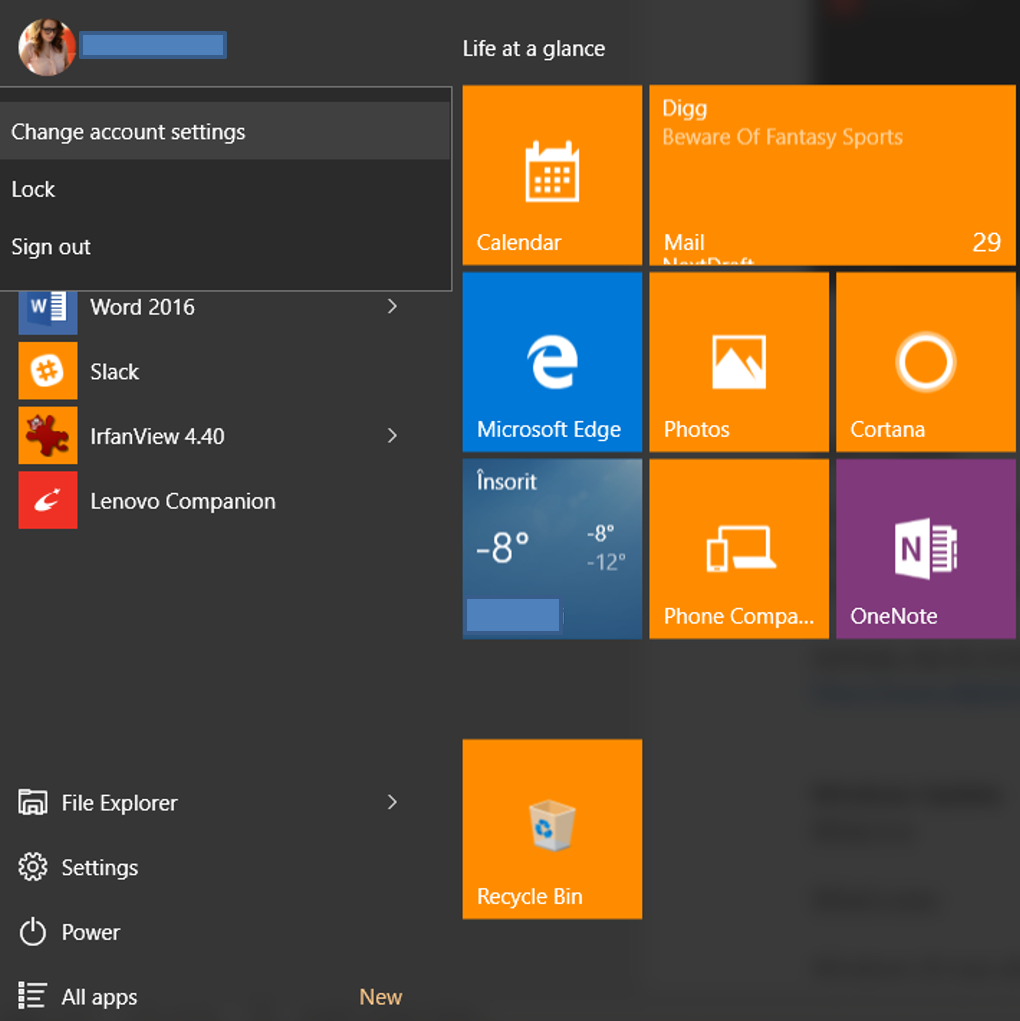
Here, you’ll find 3 options:
Change account settings
Lock
And Sign out.
Click on Change account settings to adjust detailed settings such as:
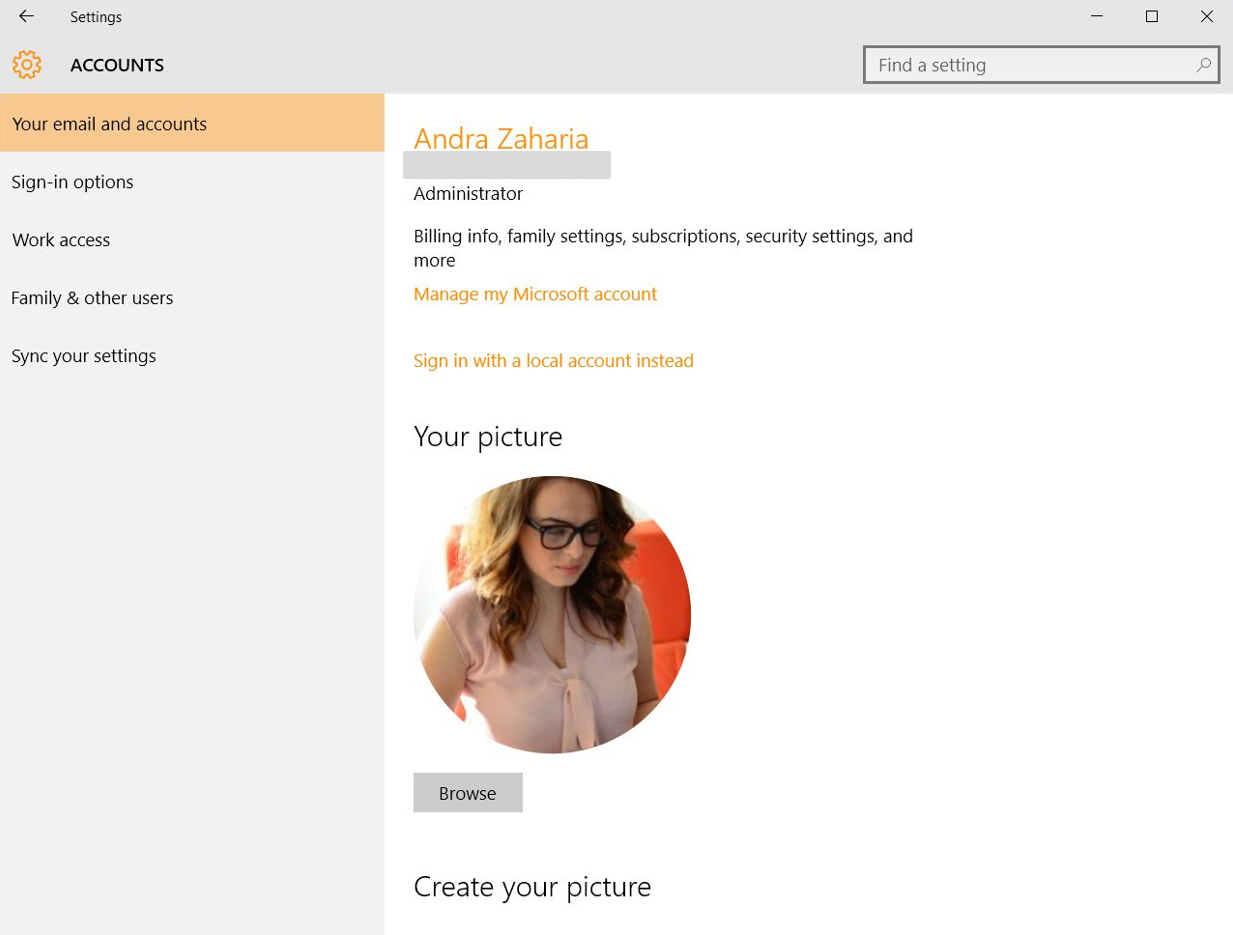
Billing info, family settings, subscriptions, security settings and more for your Microsoft account (if you chose to log in with it) — this setting will take you to https://account.microsoft.com/about, where you can manage all these details;
Sign in with a local account;
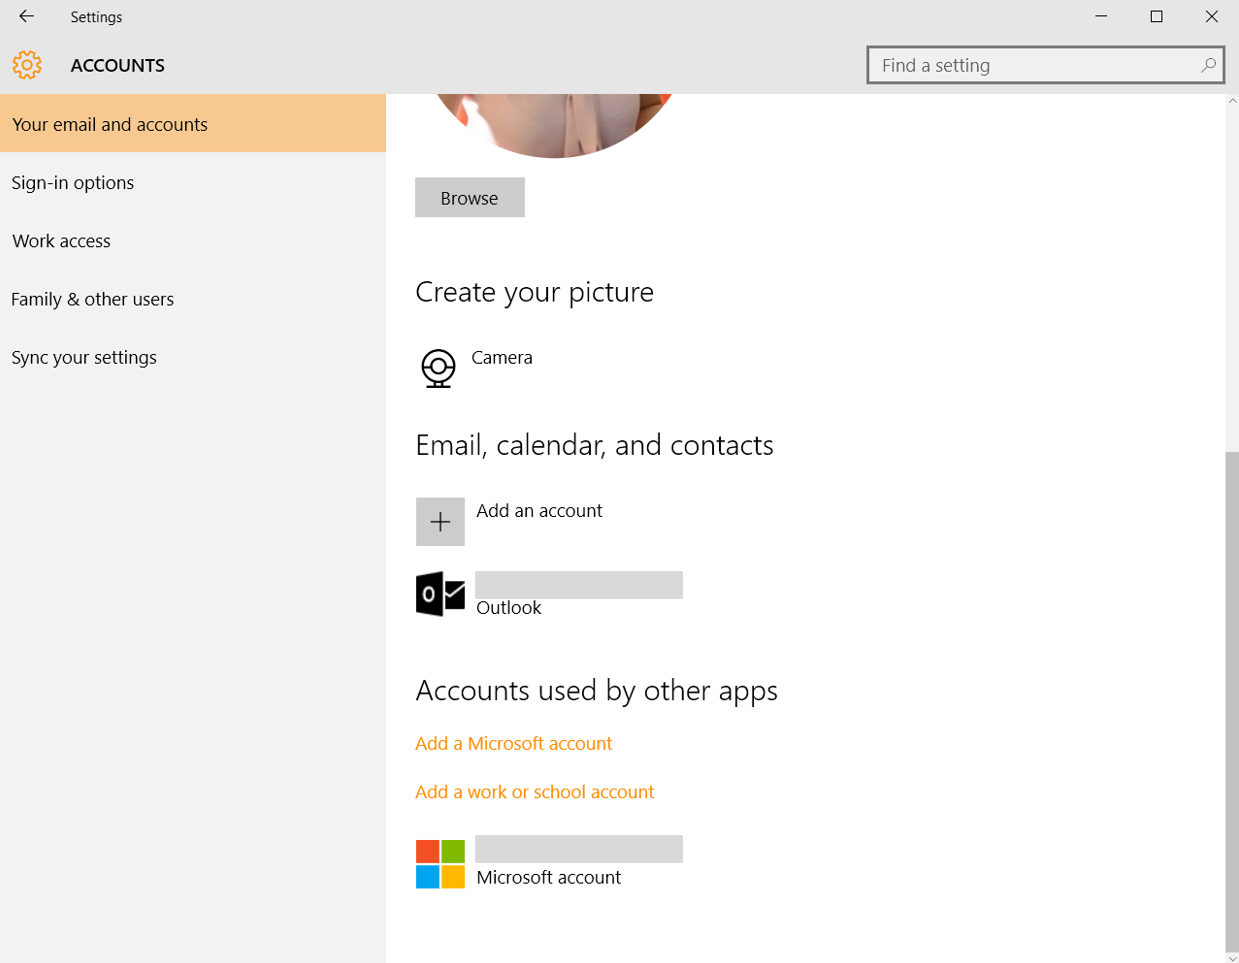
Choose a picture for your account or create one using your computer’s camera;
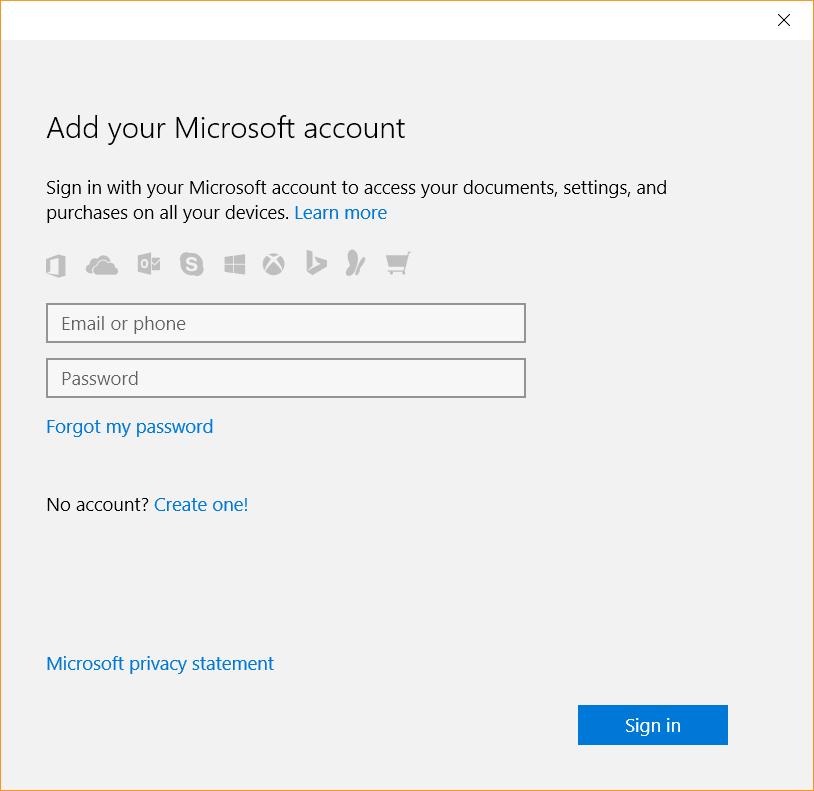
Add other accounts to access email, calendar and contacts from; you have the following options:
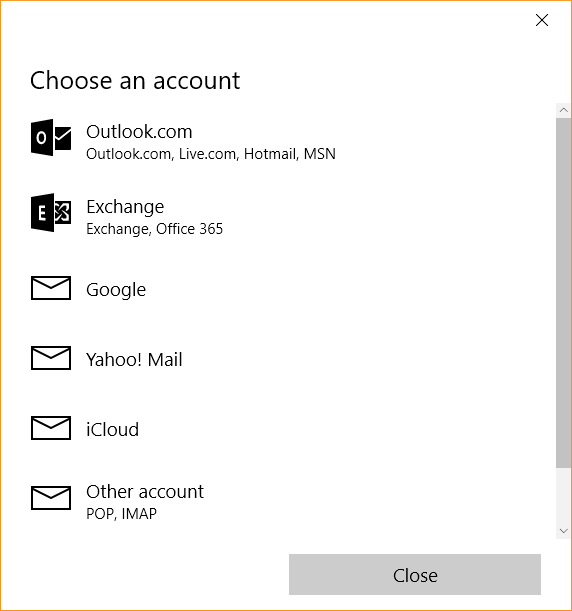
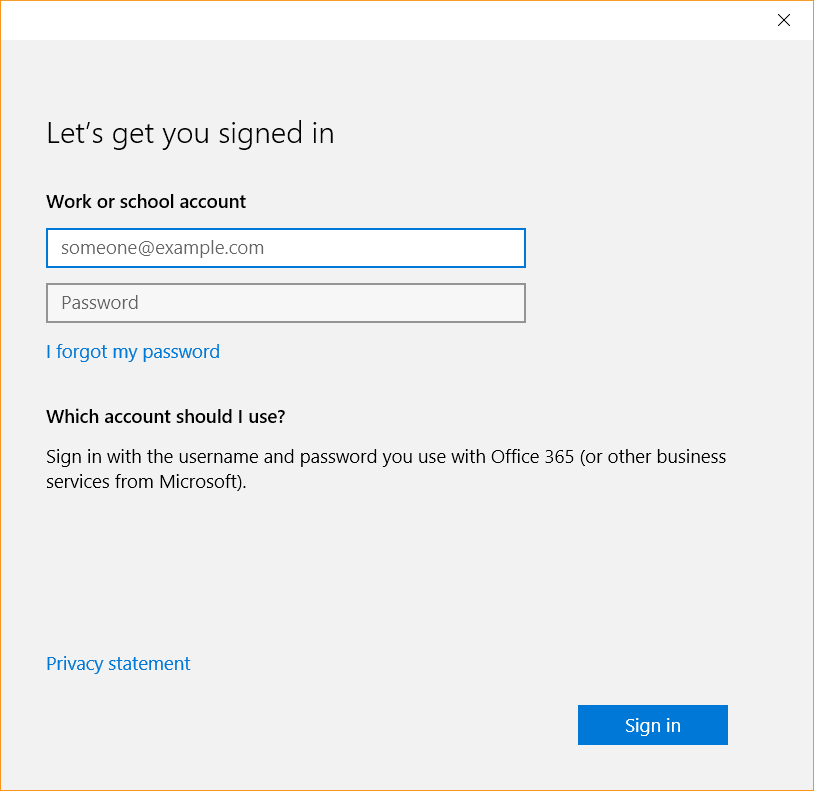
You can also add another Microsoft account or a work or school account to your device:
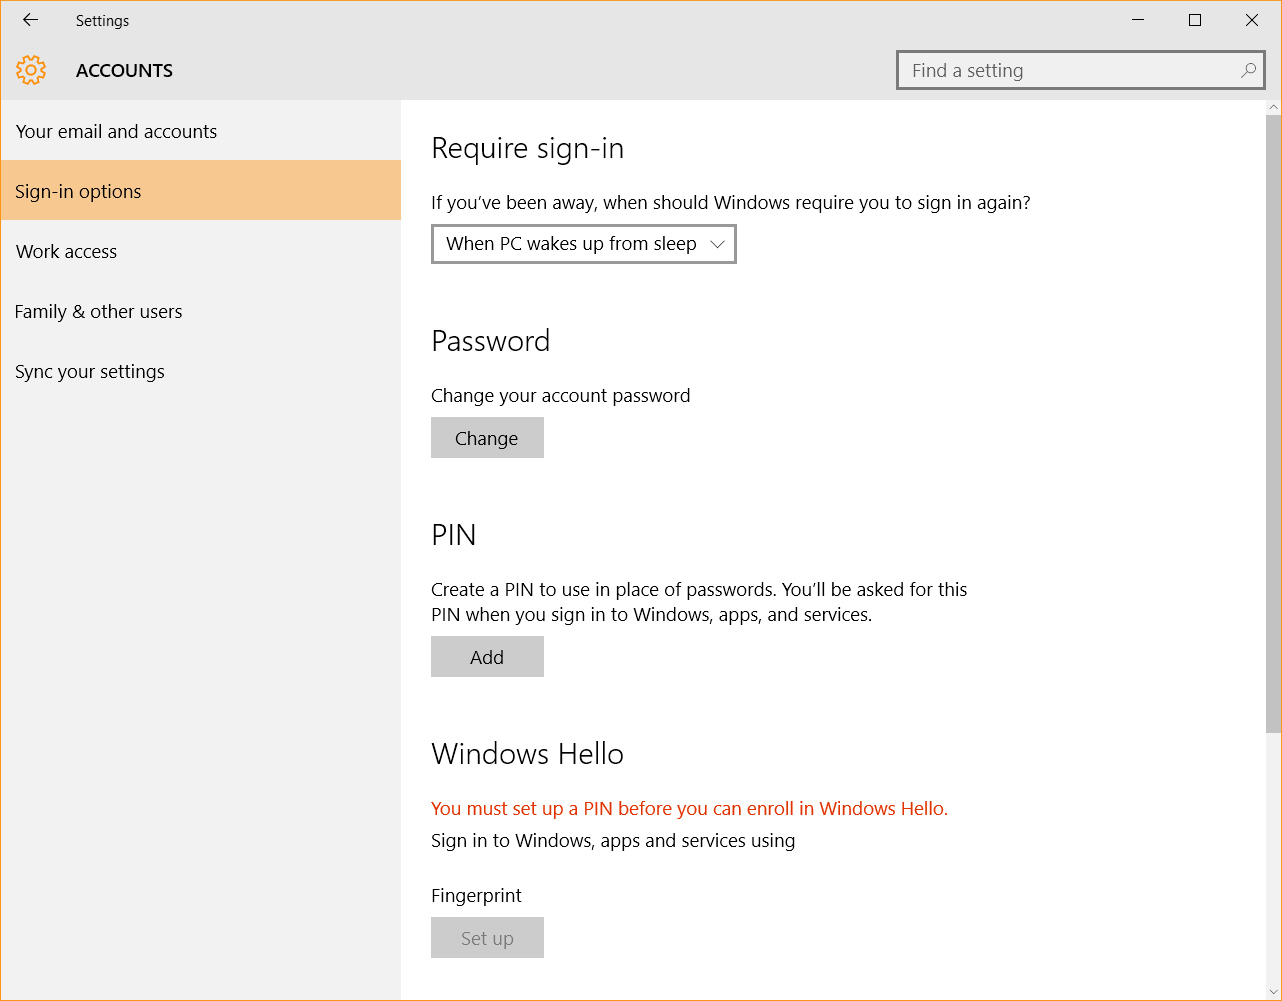
From here you can also customize your sign-in options, such as:
Pick when Windows 10 should require you to sign in again;
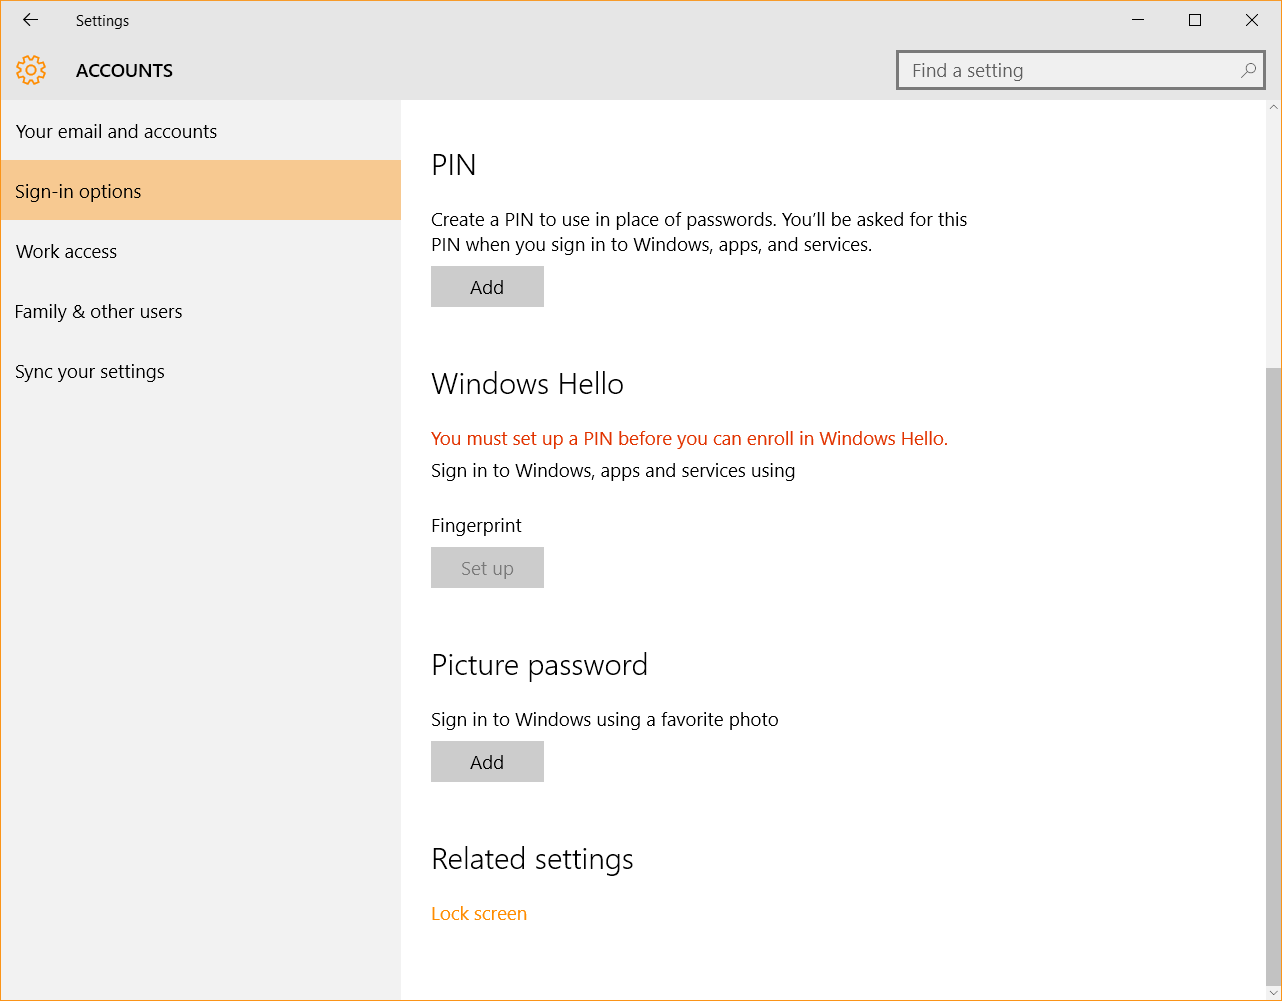
Choose or change a password for your account;
Set up a PIN to use instead of passwords;
Set up Windows Hello to use biometric-based authentication, such as your fingerprint, instead of passwords;
Windows Hello helps address this challenge with a biometric alternative to passwords which provides enterprise-grade secure instant access to your Windows 10 devices* and Microsoft online services. Using just your finger print or even your face, Windows will greet you by name, providing a fast, secured, password-free way to log in.
Source: Security in Windows 10
Set up a picture password.
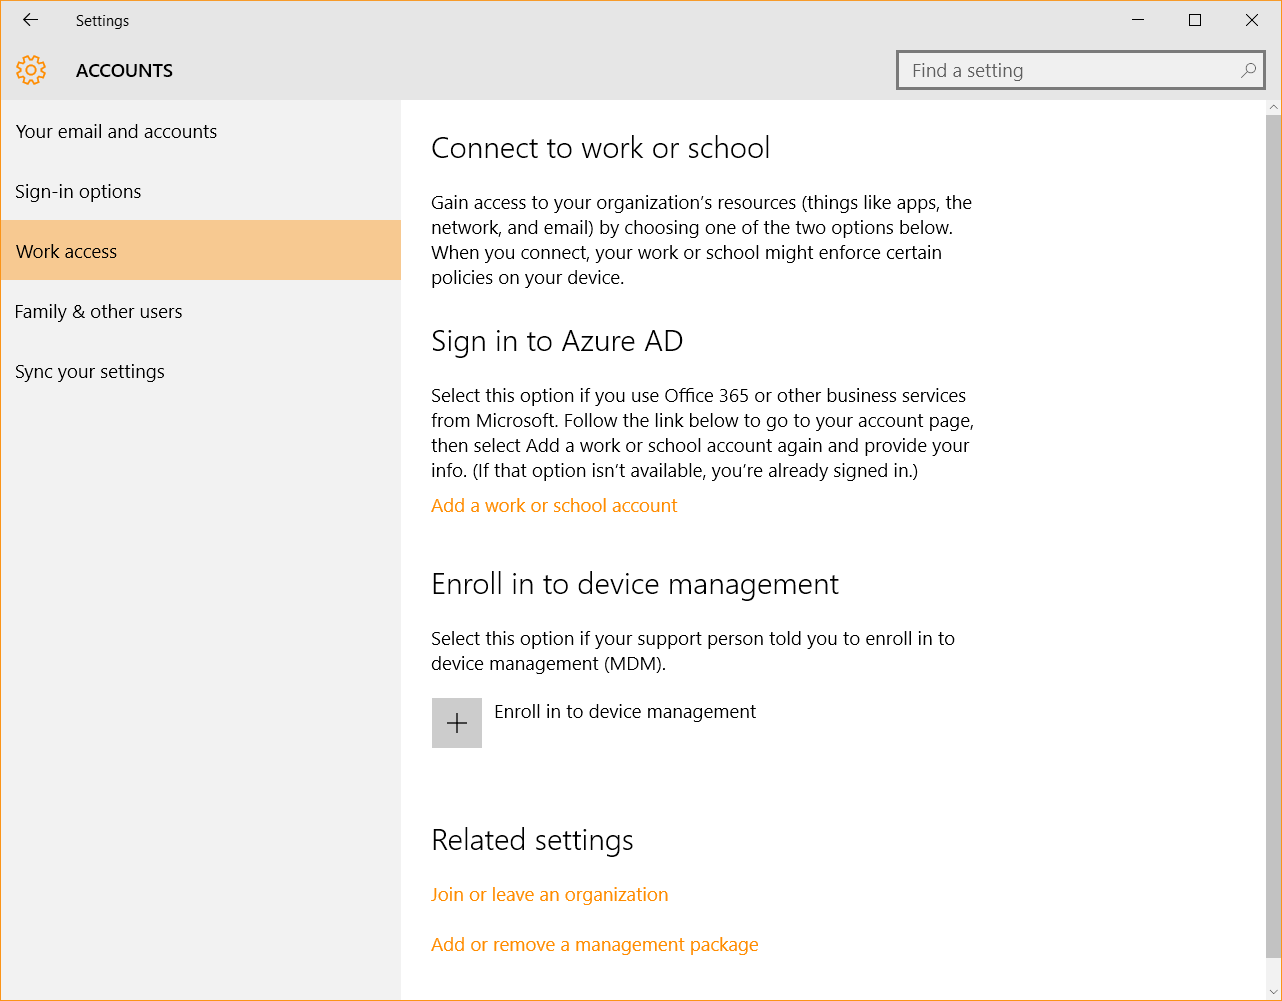
In the «Work access» section you’ll be able to connect to your workplace or school account to get access to the data you have stored there.
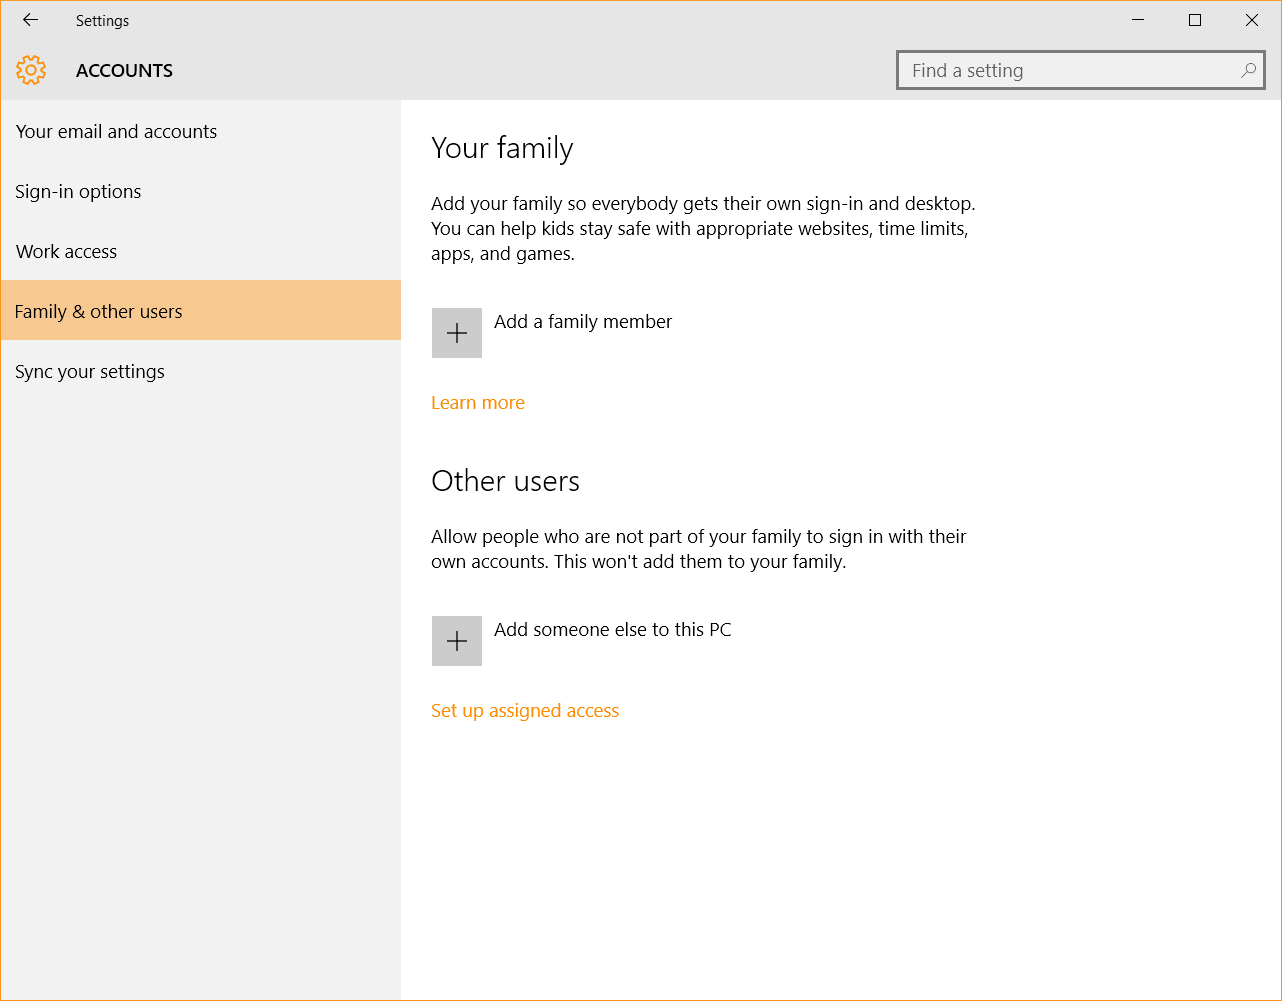
In the «Family & other users» section, you can set up dedicated accounts for your kids or other family members, with settings of their own. Here, you can also create guest accounts with limited access, to keep your system and data safe from intrusion.
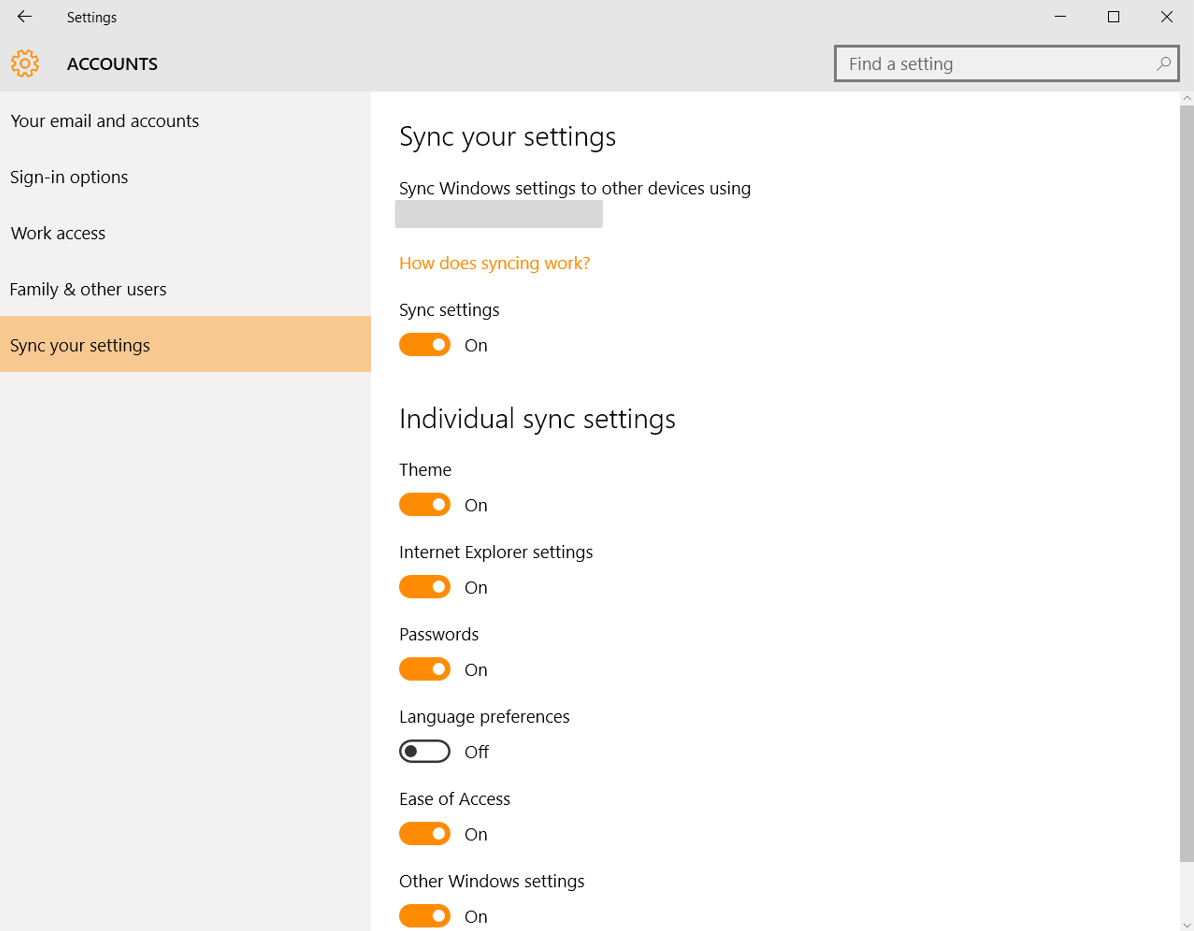
In the «Sync your settings» section, you’ll be able to… sync your settings across devices (obviously). You can see, at a glance, what options you have and decide if and what data you want to make available on other devices you own that run Windows 10.
There’s also another way to find the Account settings: Start > Settings > Accounts.
Available on
All Windows 10 versions.
How it works
If you choose to use a Microsoft account, you’ll be able to sync settings such as: theme preferences, Internet Explorer settings, passwords, language preferences, Ease of Access and other Windows settings across devices.
However, if you chose to use a local account, you won’t be able to sync settings and preferences across devices. Also, you won’t have the possibility to install applications from the Windows Store, because it requires a Microsoft account to do so.
Key takeaway
Set up an account that doesn’t have administrator privileges to limit the damages that a potential malware infection can cause. Use a local account if you want to protect your privacy and send as little information to Microsoft as possible.
Settings, tips & tricks
No matter which option you choose, we recommend setting a strong password for your Microsoft account or for your local account. Also, if your computer supports biometric authentication via Microsoft Hello, we highly recommend you start using it (today). Picture passwords are also a good way to enhance your security, so try out and see what works best for you.
For a more in-depth look at using user accounts on Windows 10, we recommend the following resources:
Should you use a local or a Microsoft account in Windows 10?
How to Set Up and Configure User Accounts on Windows 10
How to manage Microsoft and user accounts in Windows 10
UPDATES & SECURITY
This is your go-to section for security-related settings and more. Let’s take a peek into what it can help you do.
WINDOWS UPDATE
What it is
You probably already got it from the name that this is the place where you get your system updates. And it’s also where you can choose how to receive and install these updates.
What’s new
Windows 10 has been criticized for limiting how users can manage Windows updates. The biggest change is that users can no longer selectively install updates. You get them all at once and they can actually be installed automatically or you can choose to be notified to schedule a restart.
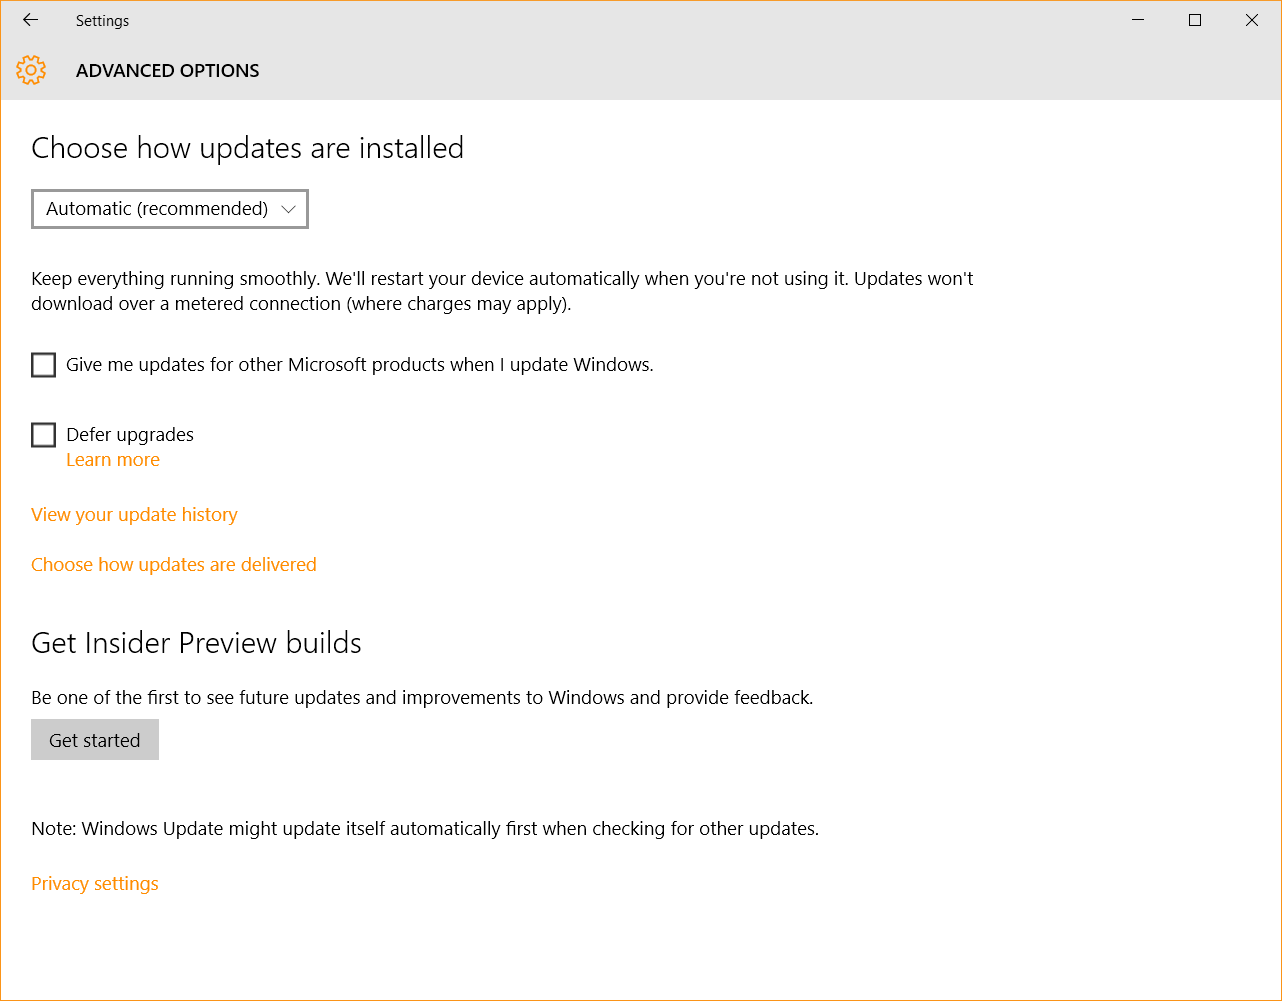
You can choose to defer upgrades, but you’ll still get security updates automatically (and that’s a very good thing):
Some Windows 10 editions let you defer upgrades to your PC. When you defer upgrades, new Windows features won’t be downloaded or installed for several months. Deferring upgrades doesn’t affect security updates. Note that deferring upgrades will prevent you from getting the latest Windows features as soon as they’re available.
Source: Defer upgrades in Windows 10
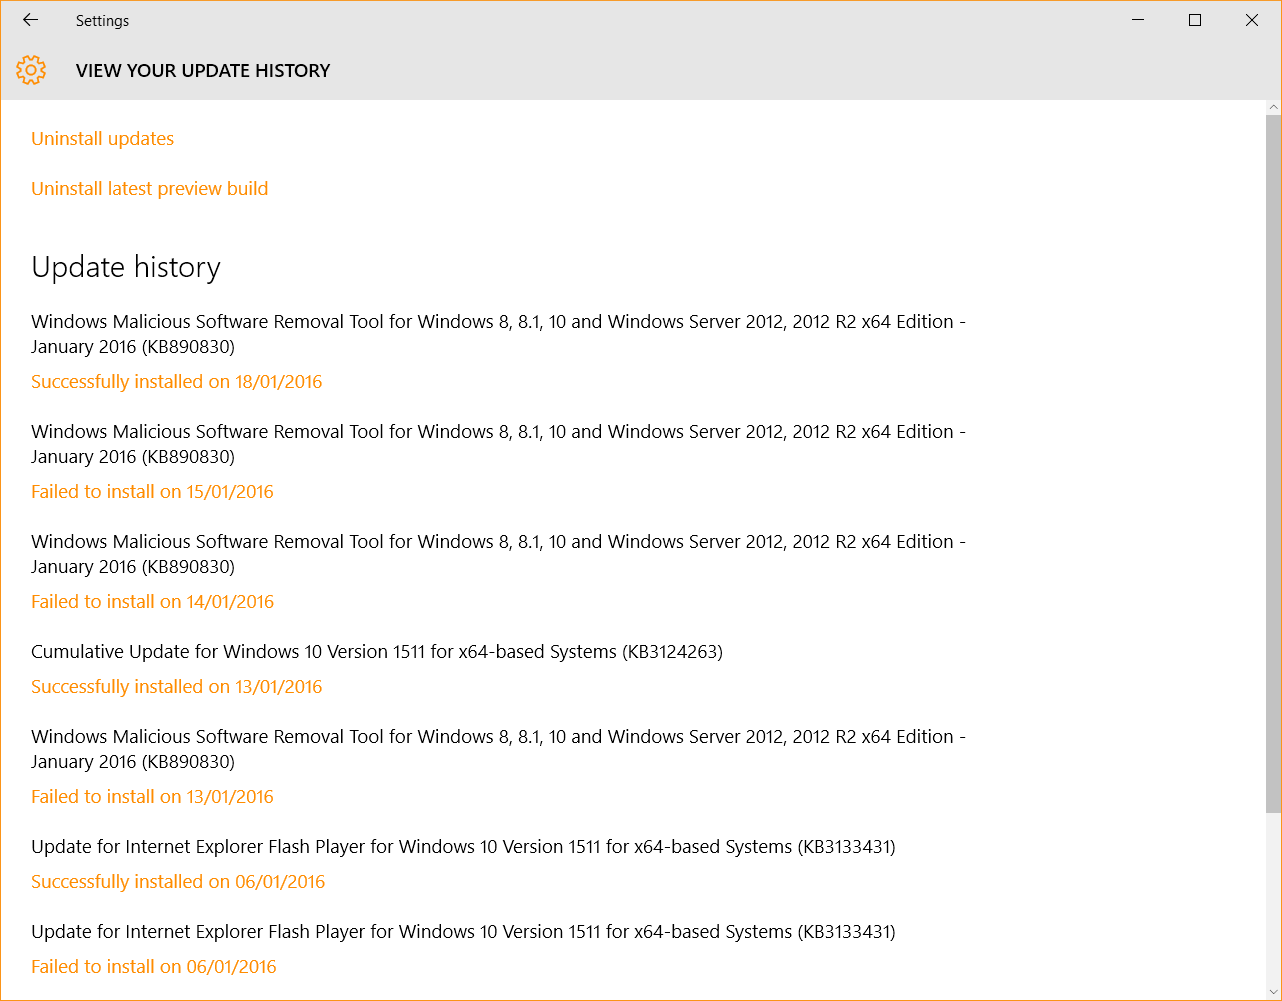
You may not be able to selectively install updates, but you can still see your full update history in the dedicated section:
And if you’re an early adopter or just plain curious, you can check the «Get Insider Preview Builds» to be part of the first few who get updates and improvements for the OS.
Where to find it
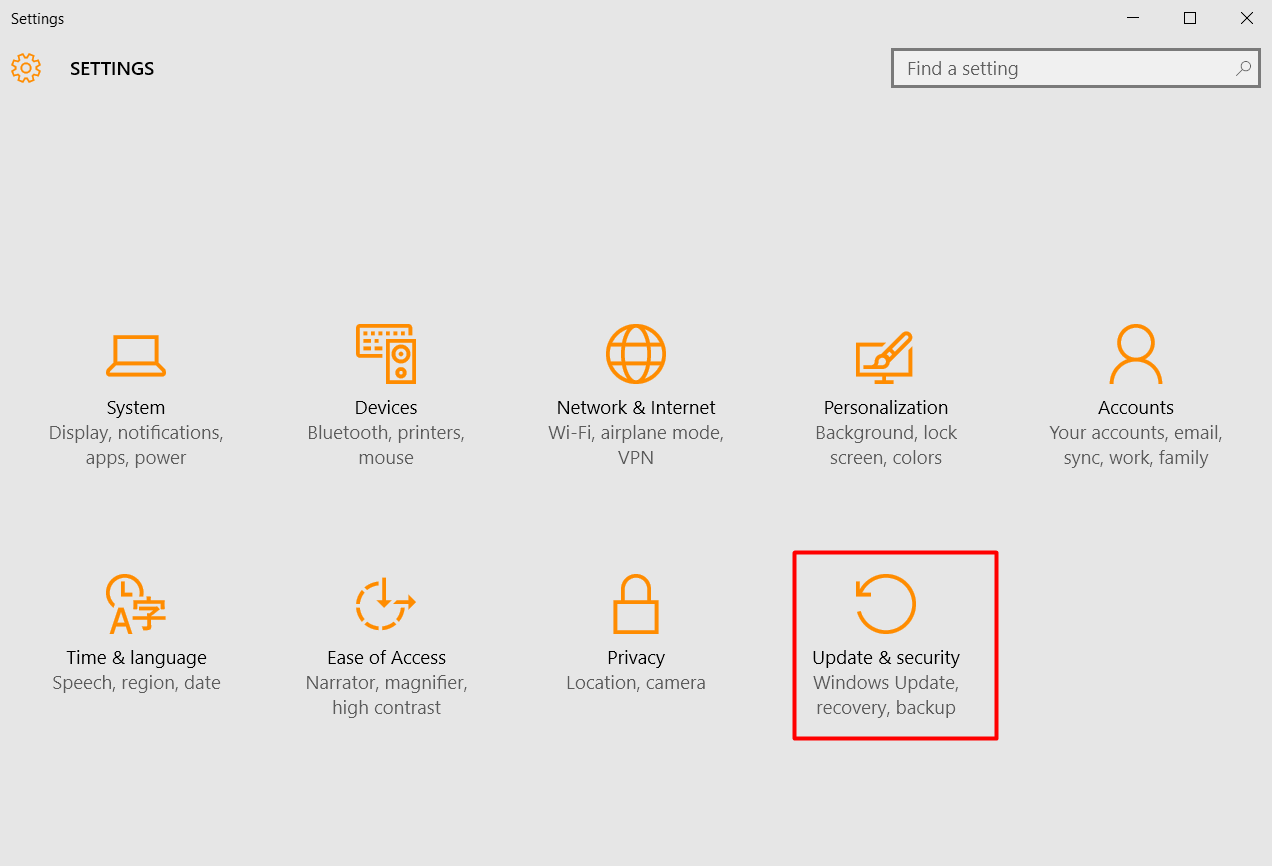
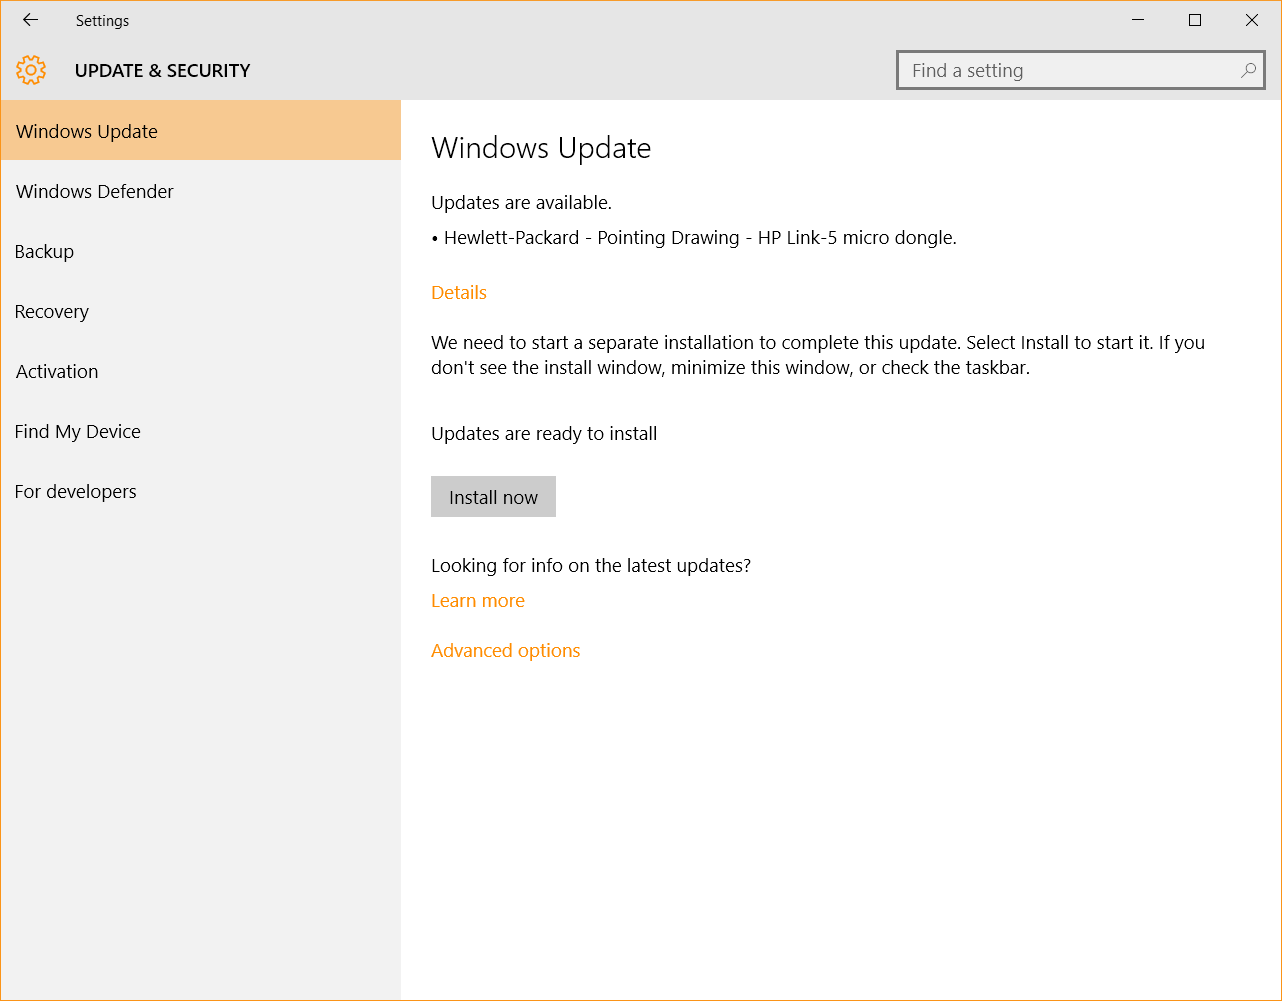
Follow this path to find it: Start > Settings > Update & Security > Windows Update. Clicking on Advanced options takes you to the aforementioned options.
Available on
All Windows 10 versions.
How it works
Well, in Windows 10, updates work by themselves. All you have to do is sit back and choose when to install them or just let them follow their course and install automatically.
If you really, really want to keep updates from installing automatically, there’s a workaround, but we don’t recommend it. Keeping your system up to date is crucial to your data’s security!
Key takeaway
Windows 10 will install operating system updates automatically, which is a great thing for your security. Keeping your OS and all your apps up to date is crucial for preventing malware infections and other cyber threats.
Settings, tips & tricks
If you want to read more about Windows Update in Windows 10, check out these useful links:
What You Need to Know About Windows Update on Windows 10
How to Manage Windows Update in Windows 10
WINDOWS DEFENDER
What it is
Windows Defender is a software that attempts to detect and remove malware from your Windows-based computer. Microsoft released Windows Defender as an antispyware program initially, but improved it and embedded it into the operating system starting with Vista.
What’s new
In Windows 10, Windows Defender comes with real-time antivirus capabilities. Another benefit is that it’s simple enough to use that anyone can enjoy its benefits. The software runs in the background, scanning your files and offering a basic level of protection for all Windows 10 users.
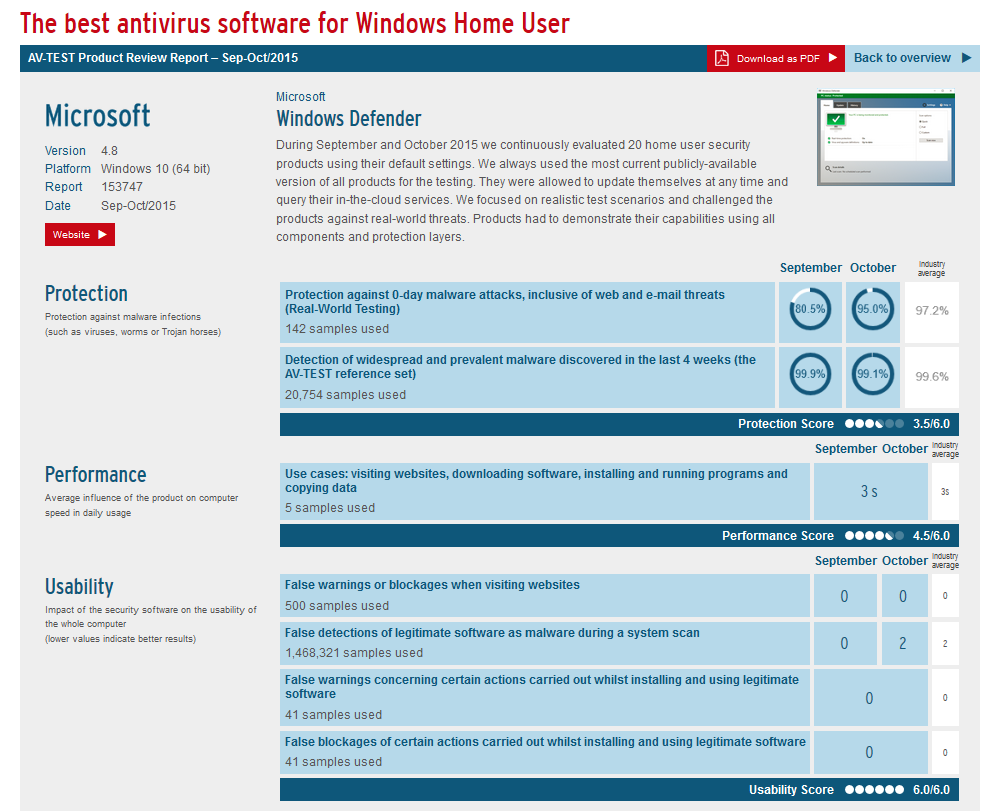
In terms of protection, you can’t expect it to perform the way a paid antivirus would. Here is a snapshot of the analysis that AV-TEST performed in October 2015. On Windows 10, Windows Defender scored:
3.5/6 in terms of protection effectiveness
4.5/6 when it comes to performance
And 6/6 for usability.
Where to find it
Get there by following this path: Start > Settings > Update & Security > Windows Defender. Here, you’ll be able to tweak the settings to your liking.
Available on
All Windows 10 versions.
How it works
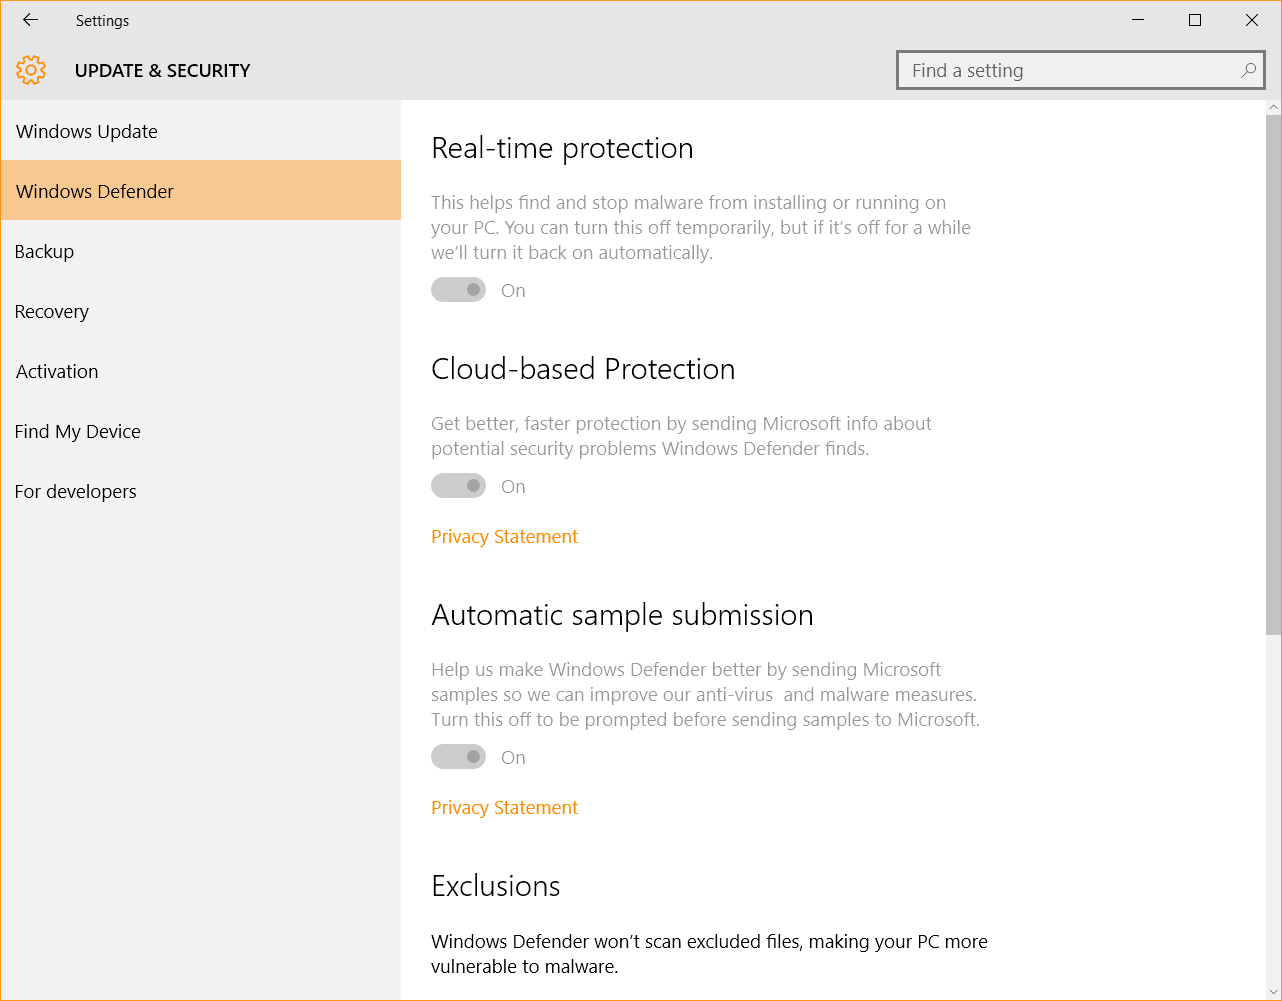
Windows Defender offers a primary level of protection for your PC by finding and stopping malware from running on your PC. You can also choose to enable Cloud-based protection and Automatic sample submission to send Microsoft data about malware samples. This helps improve your protection and enhances Windows Defender for all users as well.
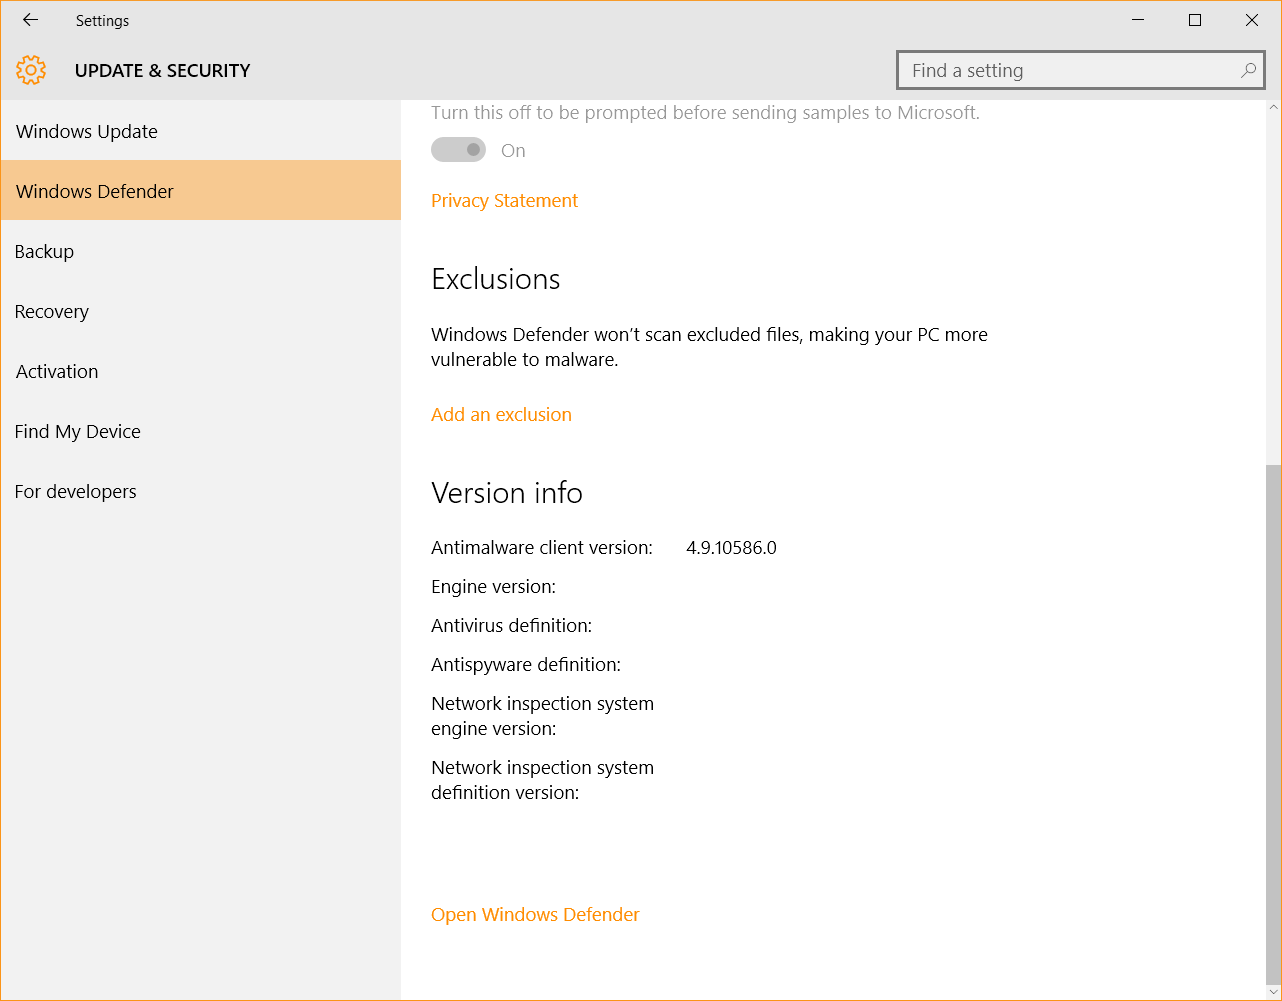
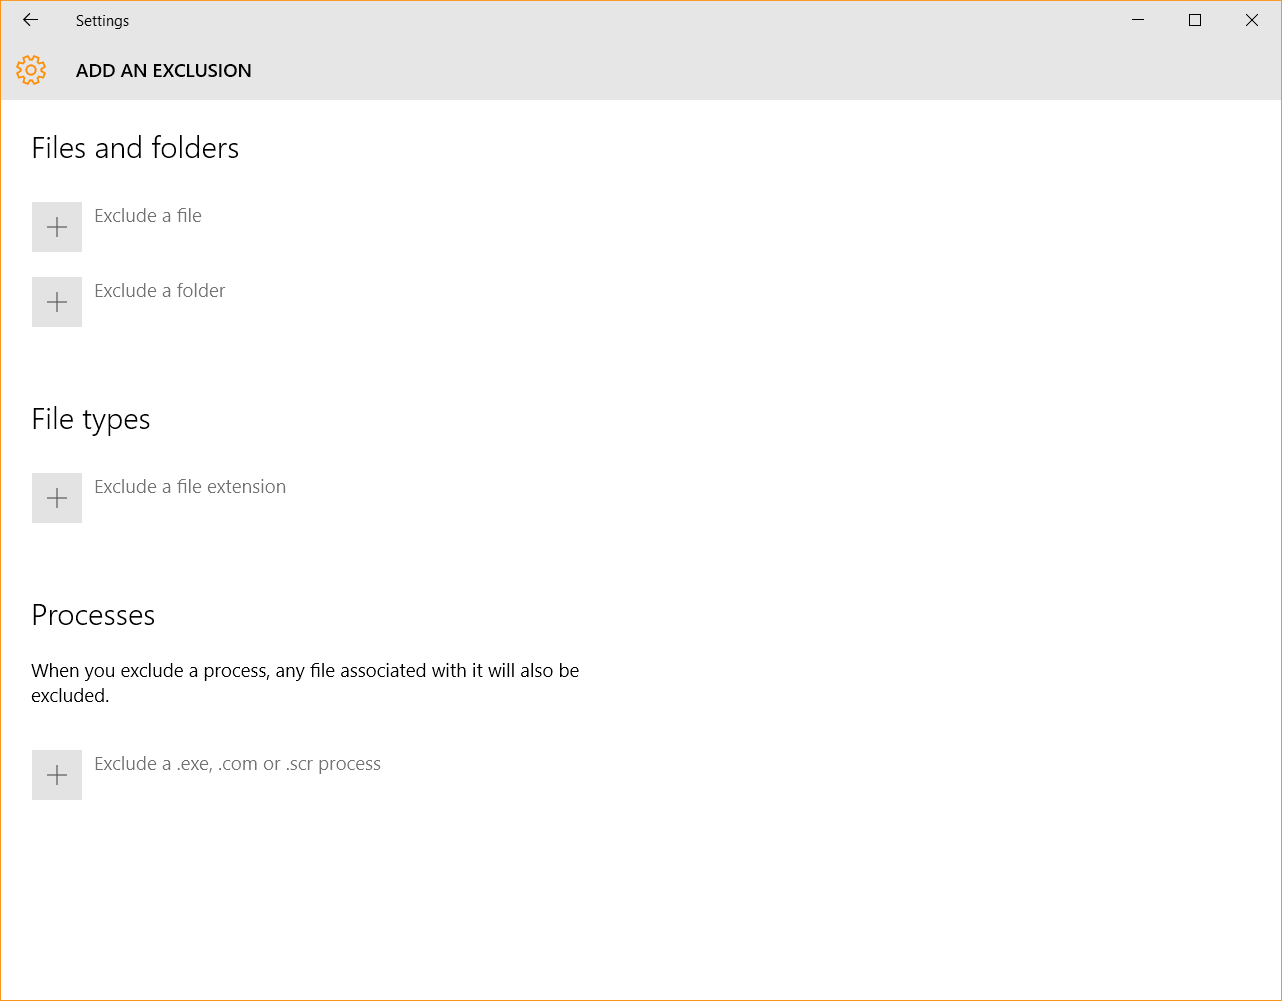
Should you want it, you can select to add exclusions in Windows Defender, but this will make your PC more vulnerable, as those files won’t be scanned (obviously).
When you open Windows Defender, you’ll see that you can perform three types of scans: Quick, Full and Custom. If you choose to use Windows Defender as your antivirus product, we recommend doing a Full scan as often as possible.
If Windows Defender finds any malware or suspicious files, it will clean it up and quarantine the files automatically. Should this happen, you’ll get a «Malware detected» notification or a «Detected threats are being cleaned» one.
In Windows 10, Defender will get automatic updates, which are delivered automatically via Windows Update.

In the History tab in Windows Defender, you’ll see a list of quarantined items, allowed items and all detected items on your PC, if you’re one to be curious about such details.
If you choose to use a different and more effective antivirus solution (highly recommended!), Windows 10 will automatically disable Windows Defender. That’s because two antivirus solutions can’t coexist on the same operating system.
All the options in Windows Defender will be grayed out and, when you try to open it, you’ll get this message:
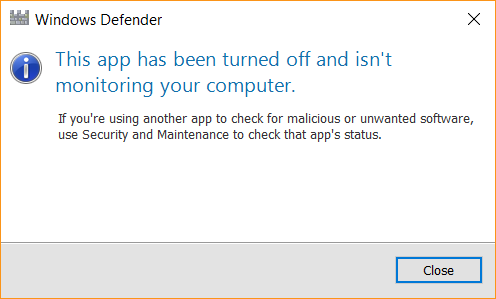
If you uninstall your antivirus of choice, Windows Defender will automatically turn back on and provide protection for your computer.
An important note is that you can also use Windows Defender offline:
If Windows Defender finds a virus it can’t remove, it will prompt you to download and run Windows Defender Offline.
Once your download is complete, your PC will automatically restart into the recovery environment, where Defender will run a more complete scan of your system and remove threats.
Source: Using Windows Defender Offline
Key takeaway
Use Windows Defender as a baseline antivirus to protect your system until you can find a more reliable antivirus solution. But please keep in mind that it can’t ensure sufficient protection against advanced cyber threats, such as ransomware.
Settings, tips & tricks
The following articles offer more in-depth advice on how to use Windows 10 or how to manage it to better fit your protection needs:
How to Use the Built-in Windows Defender Antivirus on Windows 10
What’s the Best Antivirus for Windows 10? (Is Windows Defender Good Enough?)
Picking a Windows 10 Security Package
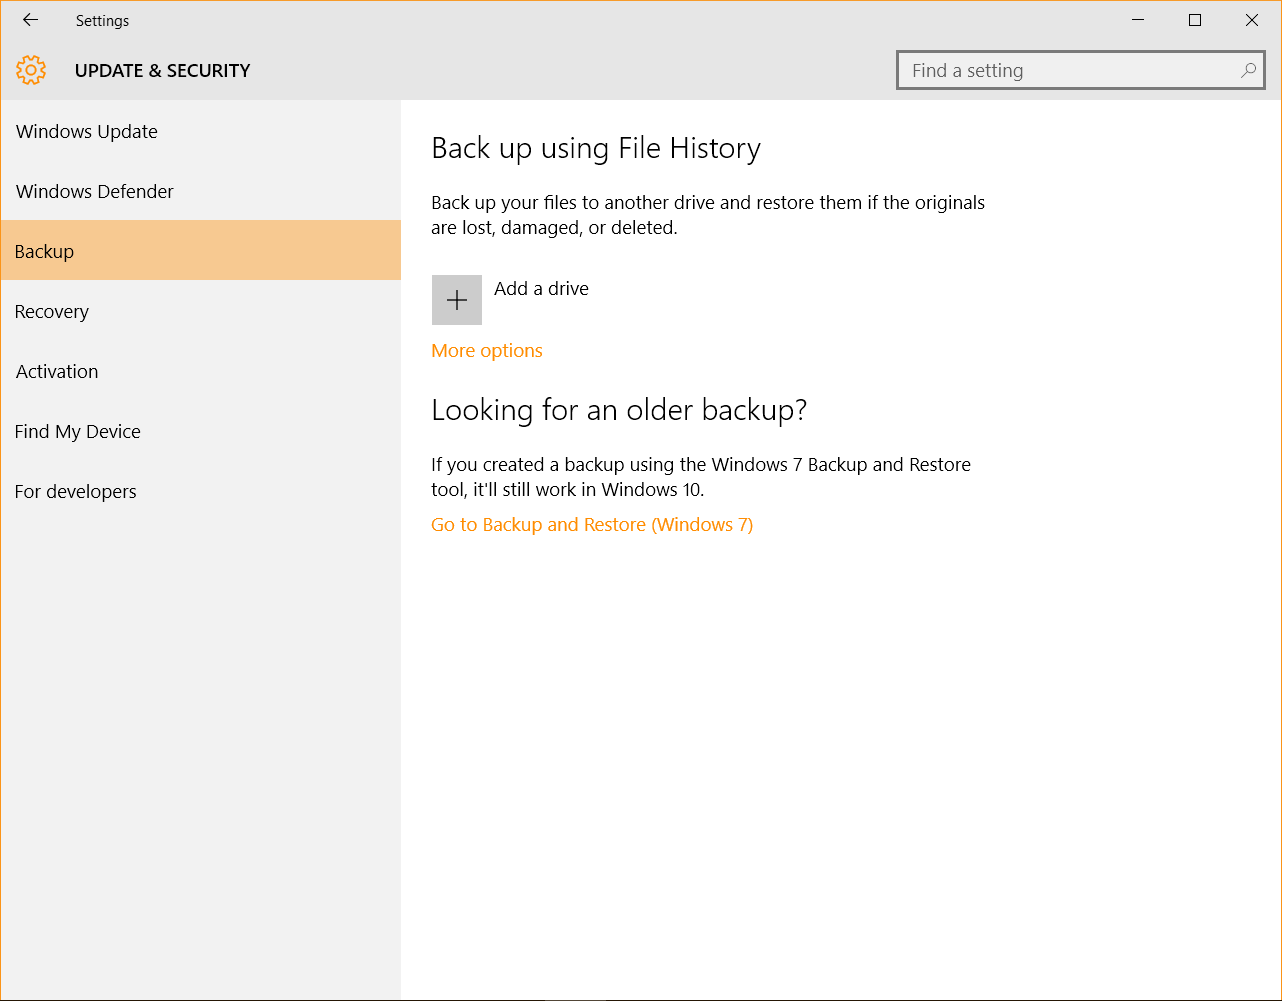
BACKUP
What it is
One of our favorite subjects is the constantly disregarded backup. There is no such things as too many backups, so we strongly encourage you to use this feature and some other backup systems as well.
Windows Backup provides a simple way to create a copy of your data on a connected disk drive (external storage device), so you can make sure that your data is safe if something happens to your computer. That something could be a malware infection, theft or physical damage, so don’t believe it can’t happen to you.
What’s new
On Windows 10, the Backup option is extremely easy to use. It also provides a way to start your own backup routine to help keep your data backed-up over time. It’s something you’ll definitely thank yourself for!
There are two types of backups you can perform:
File History — useful if you want to back up your documents and other important files, and also the previous versions of those files. This way, you can recover older file versions if you need them
System image backup — this helps you create a full system image backup. You can perform a full system restore from this backup.
For more details on both these options, check out the recommended links at the end of this section.
Where to find it
As always, the Start menu is the place you want to begin with. The Backup option is also included in the «Update & security» section in your Settings app on Windows 10.
Available on
All Windows 10 versions.
How it works
It’s super easy to get started, so you really have no excuse for not doing it. Just select an external drive or a network location and then let the app do the work. According to Microsoft:
All set. Every hour, we’ll back up everything in your user folder (C:\Users\username). To change which files get backed up or how often backups happen, go to More options.
Source: Back up and restore your files
Key takeaway
Keeping at least one backup of your data is the best insurance you can get that your information will be available in case anything happens to your computer. It’s recommended that you keep at least two back-ups of your data, one in the cloud and one on an external hard drive.
Settings, tips & tricks
This small collection of links is exactly what you need to get step-by-step advice on how to back-up your data on Windows 10:
How to Use All of Windows 10’s Backup and Recovery Tools
How to create an image backup in Windows 10 and restore it, if need be
How to use Windows 10’s File History backup feature
RECOVERY
What it is
You may find yourself in need to do a system recovery at some point. The cause could be one of the following, as presented by Microsoft:
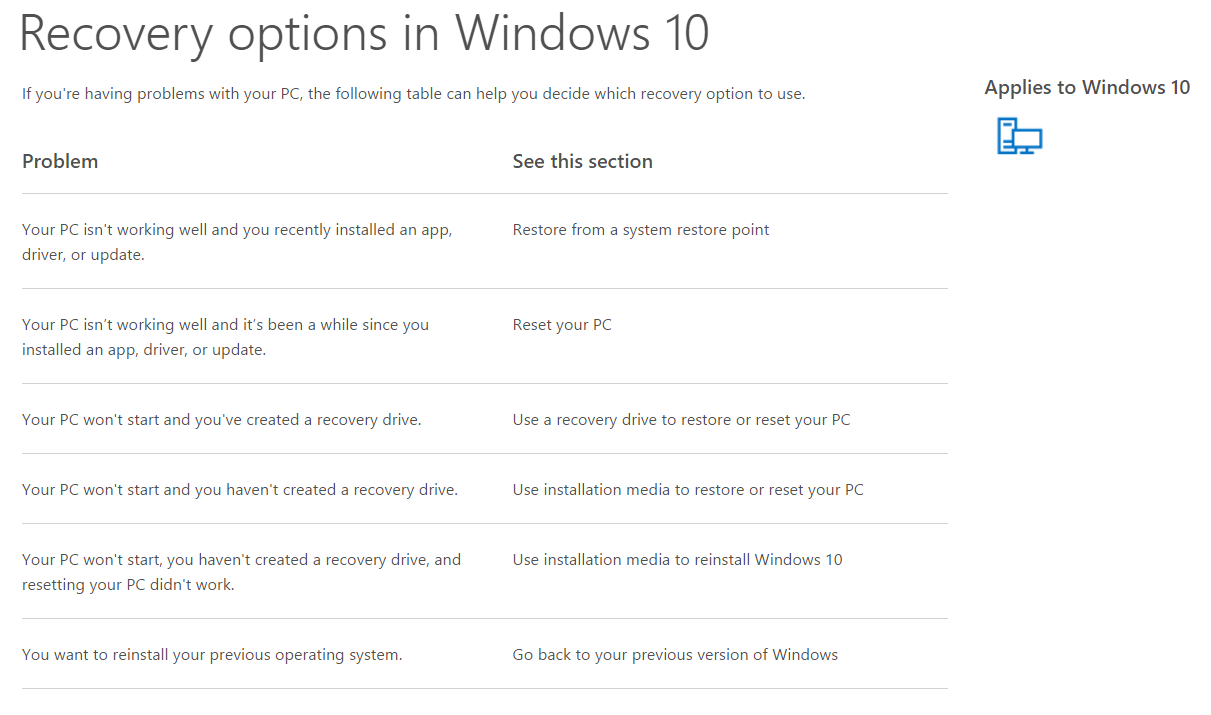
By using your backup from a restore point, you can revert back to it to fix your potential issue.
What’s new
In Windows 10 you get three different recovery options which give you different ways to do a system restore, either a full or a partial one.
Moreover, in case you upgraded to Windows 10, you’ll have a month to change your mind and go back to a previous version of Windows.
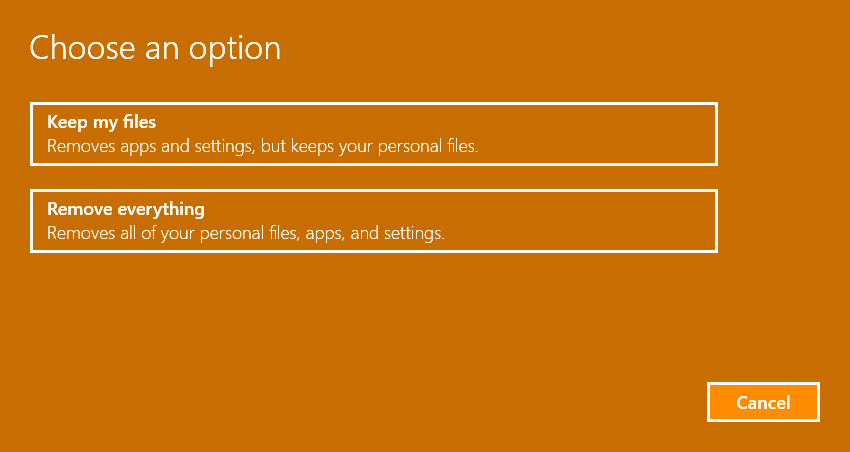
This will keep your personal files, but it’ll remove apps and drivers installed after the upgrade, as well as any changes you made to settings.
Source: How System Restore & Factory Reset Work in Windows 10
Where to find it
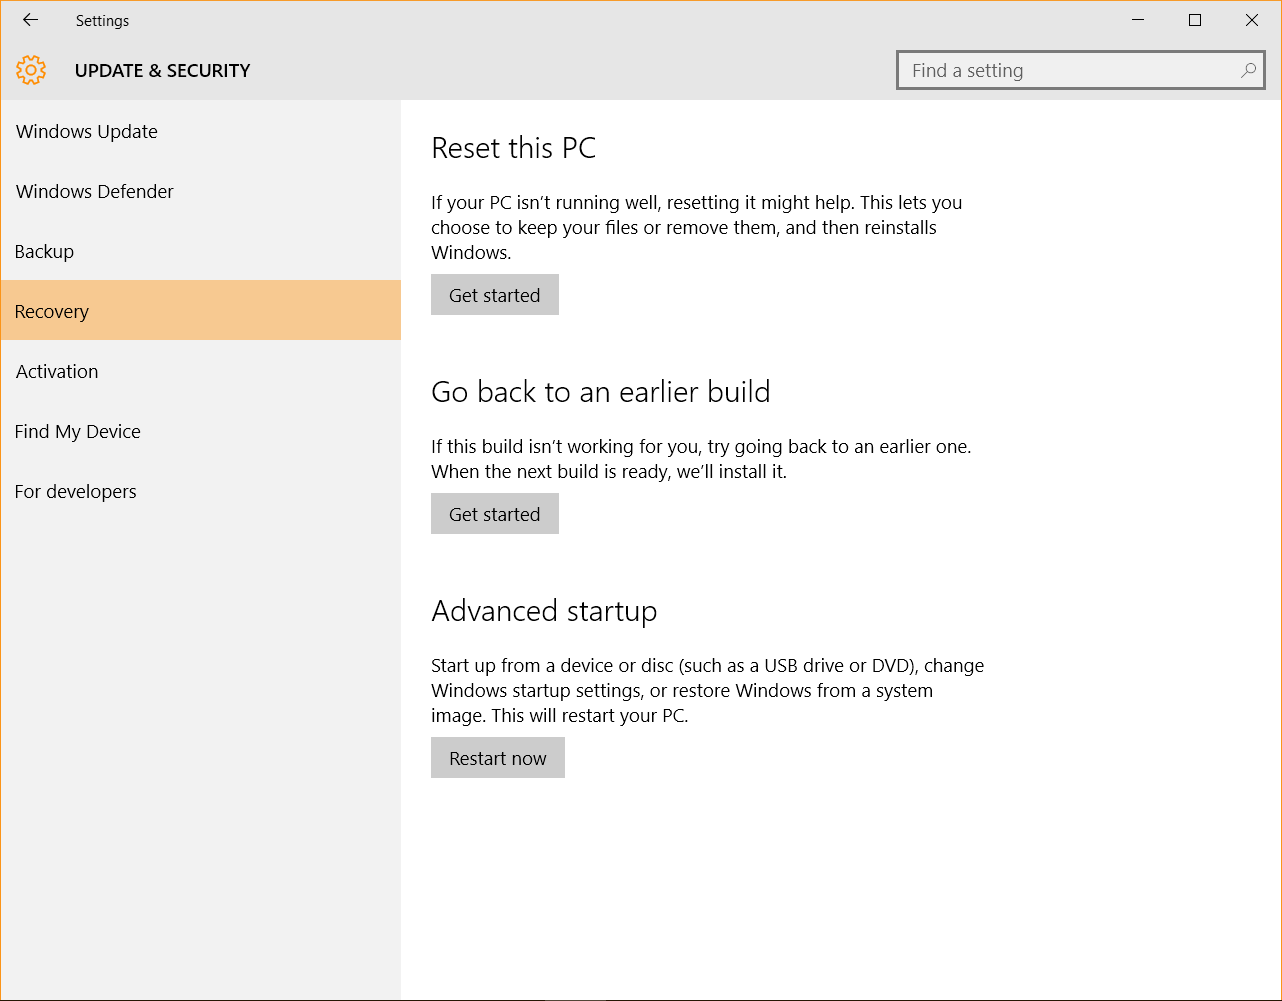
Go to Start > Settings > Update & Security > Recovery to start using any of the three options presented below.
Available on
All Windows 10 versions.
How it works
In Windows 10, you have three options:
Reset this PC — this option lets you keep your files or remove them, and then reinstalls Windows;
Go back to an earlier build — if the Windows 10 build you have installed doesn’t work for you, you can choose to go back to an earlier one;
Advanced startup — you can use a USB drive or a DVD to change the Windows startup settings, or restore Windows from a system image.
Key takeaway
Backing up your data is one of the best things you can do for yourself, but knowing how to recover your data from backups is half of this process. Using the Recovery option offered by Windows 10 will help you save time and effort.
Settings, tips & tricks
If you’d like to explore in detail each of the recovery options that Windows 10 features, these helpful resources will provide all the answers:
Recovery options in Windows 10
How System Restore & Factory Reset Work in Windows 10
How to Reset Your Windows 10 PC
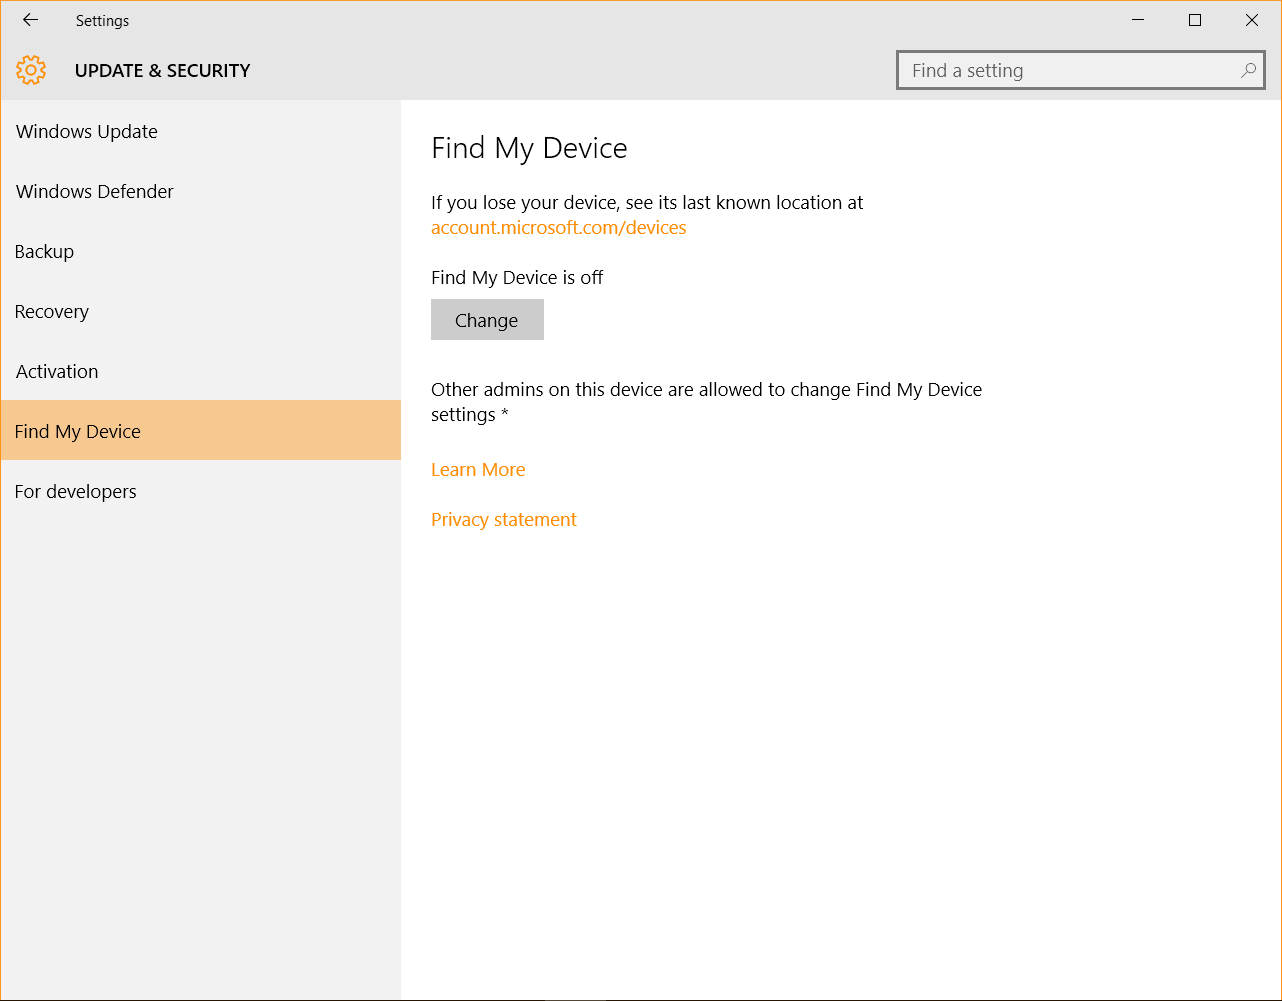
FIND MY DEVICE
What it is
Losing a device or having it stolen is one of the most terrible things that can happen to your digital life. We all know we shouldn’t get so deeply attached to our laptops, smartphones or tablets, but we can’t help it. Our stuff is on them and we need that stuff, either for work or personal purposes.
So it’s a great thing that the «Find My Device» option was introduced in Windows 10. It works just like it would on a smartphone, if you’re familiar with it. You can use «Find my device» to find your laptop if you misplaced it or if it was stolen (which we hope never happens).
This is a free service we recommend you enable (if you’re not worried about Microsoft getting your location data).
What’s new
The option is entirely new and Microsoft periodically gets your device’s location so you can see where your laptop is. And, from our experience, its ability to pinpoint the exact place is quite good.
If you’re worried about privacy issues, here is an excerpt from the Windows 10 Privacy Statement:
Examples of data we may collect include your name, email address, preferences and interests; location, browsing, search and file history; phone call and SMS data; device configuration and sensor data; voice, text and writing input; and application usage.
Source: Privacy Statement, Data We Collect
Where to find it
This is how to find the option on your device: Start > Settings > Update & Security > Find My Device.
Available on
All Windows 10 versions.
How it works
First, in order to set up «Find My Device» you have to be logged into your Microsoft account and log in with administrator rights.
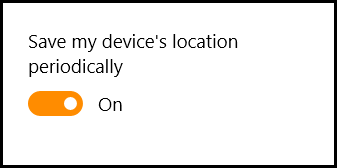
To change settings for Find My Device
Set up Find My Device to save your location every few hours so it’s easier to locate your device. To change these settings, make sure you’ve already turned on the master location setting on your device and signed in on your device using your Microsoft account.
Sign in to your device as an administrator.
On your device, go to Start, then select Settings > Update and Security > Find My Device.
Turn the Find My Device setting on.
To find your device
Go to account.microsoft.com/devices. If you’re prompted to sign in, use the same Microsoft account you used to sign in on your device.
Choose the device you want to find, and then click Find My Device.
You’ll see a map with your device’s location.
Tips from Microsoft:
Not seeing the latest location? Make sure you’re signed in with the same Microsoft account as the administrator on your device.
Your device only sends its location if it’s connected to Wi-Fi and has enough battery power.
Source: Find a lost phone or device
Key takeaway
This feature can help you recover your lost or stolen computer, so it may be tremendously helpful when you least expect it. You’ll have to trade off a bit of your privacy to do so (location data), but, in return, you can end up recovering your device when you most need it.
Settings, tips & tricks
Leverage the «Find my device» option to keep your Windows 10 gadgets safe and locate them asap. These links can help provide more details on how to connect to your account and trace your device’s whereabouts:
How to turn on Windows 10’s Find My Device feature
Find a lost phone or device
BITLOCKER ENCRYPTION
What it is
BitLocker is a full disk encryption feature integrated into Windows 10 that you can use to protect your data by encrypting it. Using BitLocker is easy, because it’s built into the operating system, so there’s no need to use additional software to encrypt and decrypt your data.
BitLocker was first introduced to Windows Vista users and had been present on every Windows version ever since.
According to Microsoft:
BitLocker ensures that data stored on a computer running Windows Vista [in our case, Windows 10] remains encrypted even if the computer is tampered with when the operating system is not running. This helps protect against «offline attacks,» attacks made by disabling or circumventing the installed operating system, or made by physically removing the hard drive to attack the data separately.
Source: Windows BitLocker Drive Encryption Step-by-Step Guide
What’s new
Here’s where it gets a bit technical, but bear with me. In Windows 10, BitLocker supports the XTS-AES encryption algorithm, which makes the encryption stronger. And there are also a few details that only apply to Windows 10 usage in companies, so, if you’re interested, you can check out the details on the Microsoft website.
Where to find it
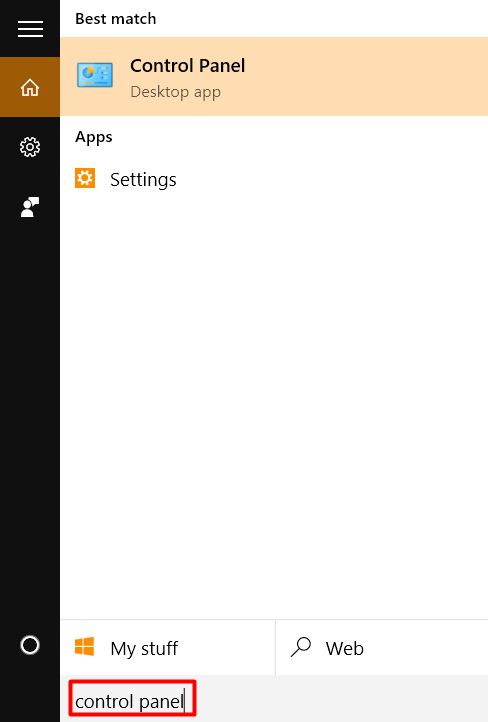
To find your encryption options, search for «control panel» in the search bar included in the Windows 10 taskbar.
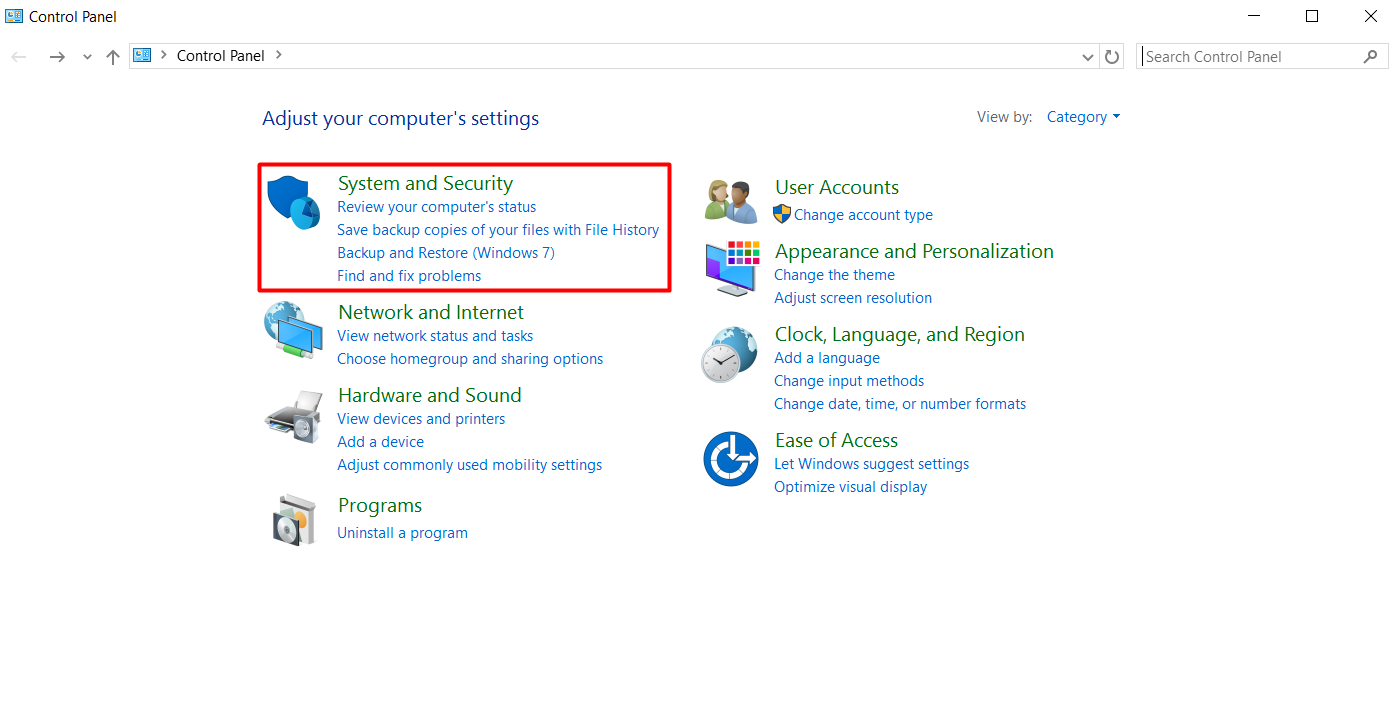
Choose «System and Security«:
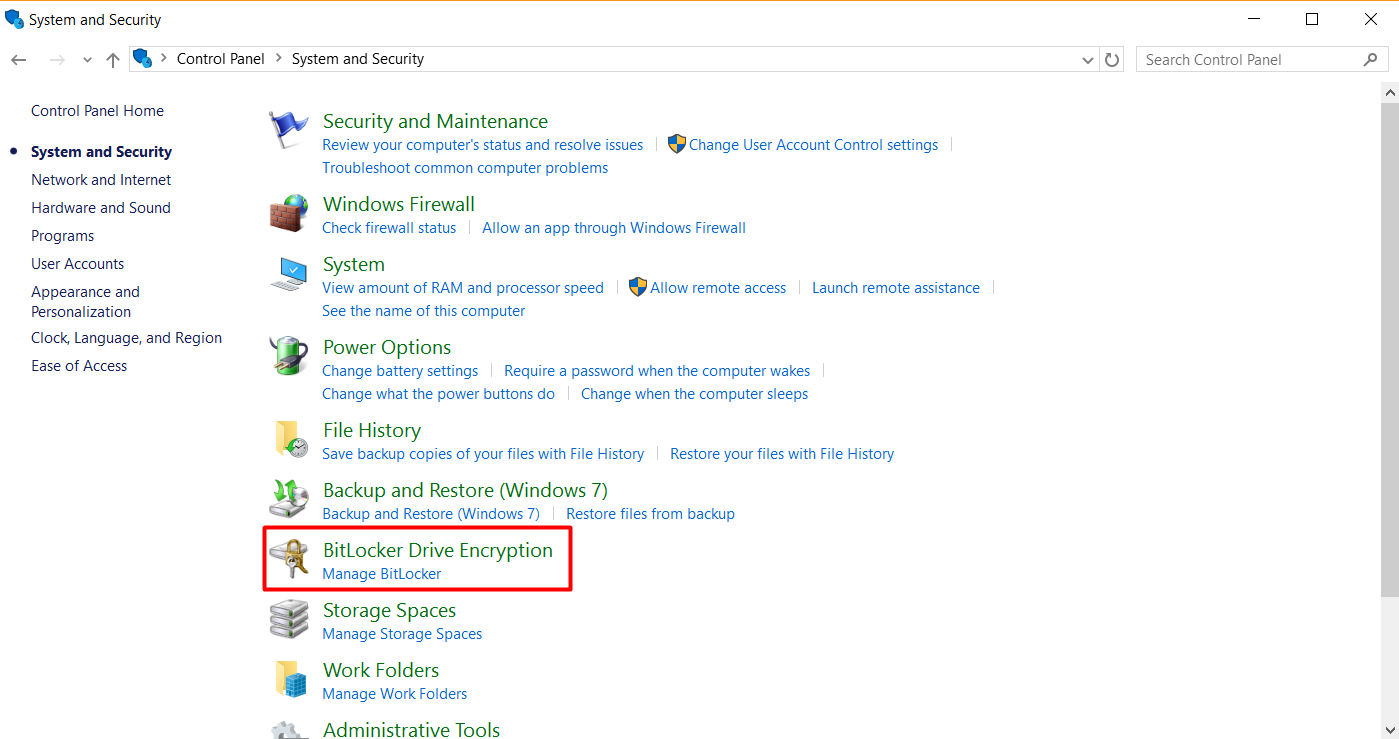
And then go to BitLocker Drive Encryption:
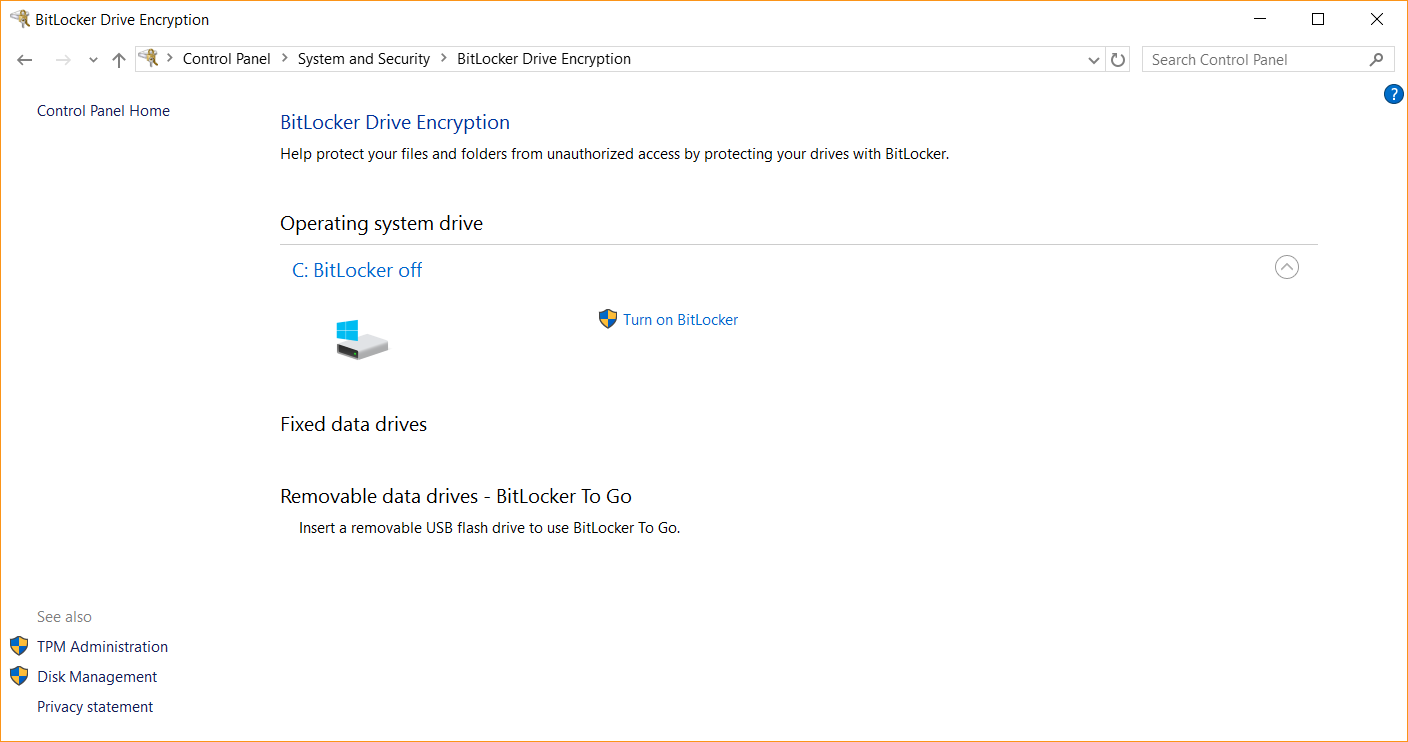
Available on
BitLocker encryption is available on Windows 10 Pro and Windows 10 Enterprise.
How it works
As Microsoft says:
You can use BitLocker Drive Encryption to help protect your files on an entire drive. BitLocker can help block hackers from accessing the system files they rely on to discover your password, or from accessing your drive by physically removing it from your PC and installing it in a different one. You can still sign in to Windows and use your files as you normally would.
Source: BitLocker Drive Encryption
There are a few details you should go over before starting to encrypt your drive though, and we’ve collected them below.
Key takeaway
Encryption is an important safeguard for both your security and your privacy. Keeping your data encrypted will help you protect it against prying eyes and malware attacks of all kinds. It may take a bit to set up your system, but it will be easier to maintain afterwards.
Settings, tips & tricks
Ready to encrypt your hard drive and add an important layer of protection for your data?
The guides below will help you get set up and master BitLocker encryption like a pro:
How to enable BitLocker encryption without a TPM chip in Windows
How to Set Up BitLocker Encryption on Windows
Windows BitLocker Drive Encryption Step-by-Step Guide
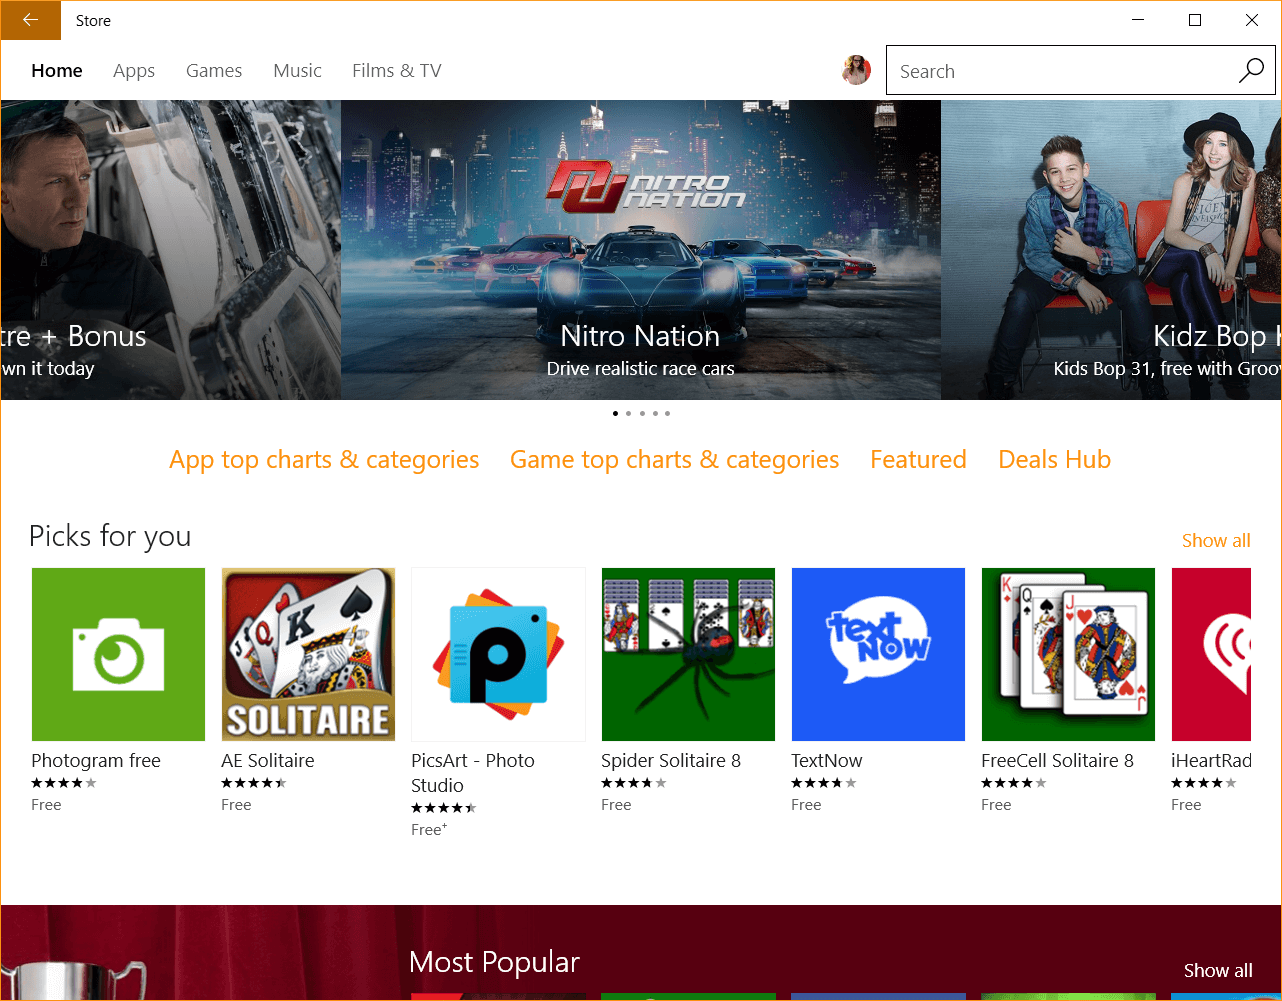
TRUSTED APPS
What it is
This is a new feature integrated into the Windows Store. Long story short: every application distributed through the Windows Store has to be signed by either Microsoft or by a trusted vendor. This helps reduce the number of dangerous applications that can harm your data’s safety or privacy from being sold or distributed through the store.
What’s new
The Windows store in its actual form is rather new (it first appeared in this form on Windows 8). So the app vetting process is also recent. You may rush to compare it to the system that Apple uses for its App Store, but Microsoft’s approach is probably not as thorough as Apple’s.
However, this is a security layer that’s more than welcome and that hopefully Microsoft will continue to build on.
Where to find it
You can find the Windows Store by clicking on Start > Store.
Once you find the app you need, scroll to Additional information and check:
The publisher’s name
Its age rating (especially for protecting your children)
The type of permissions that the app requires
If it offers additional links for supplemental information.
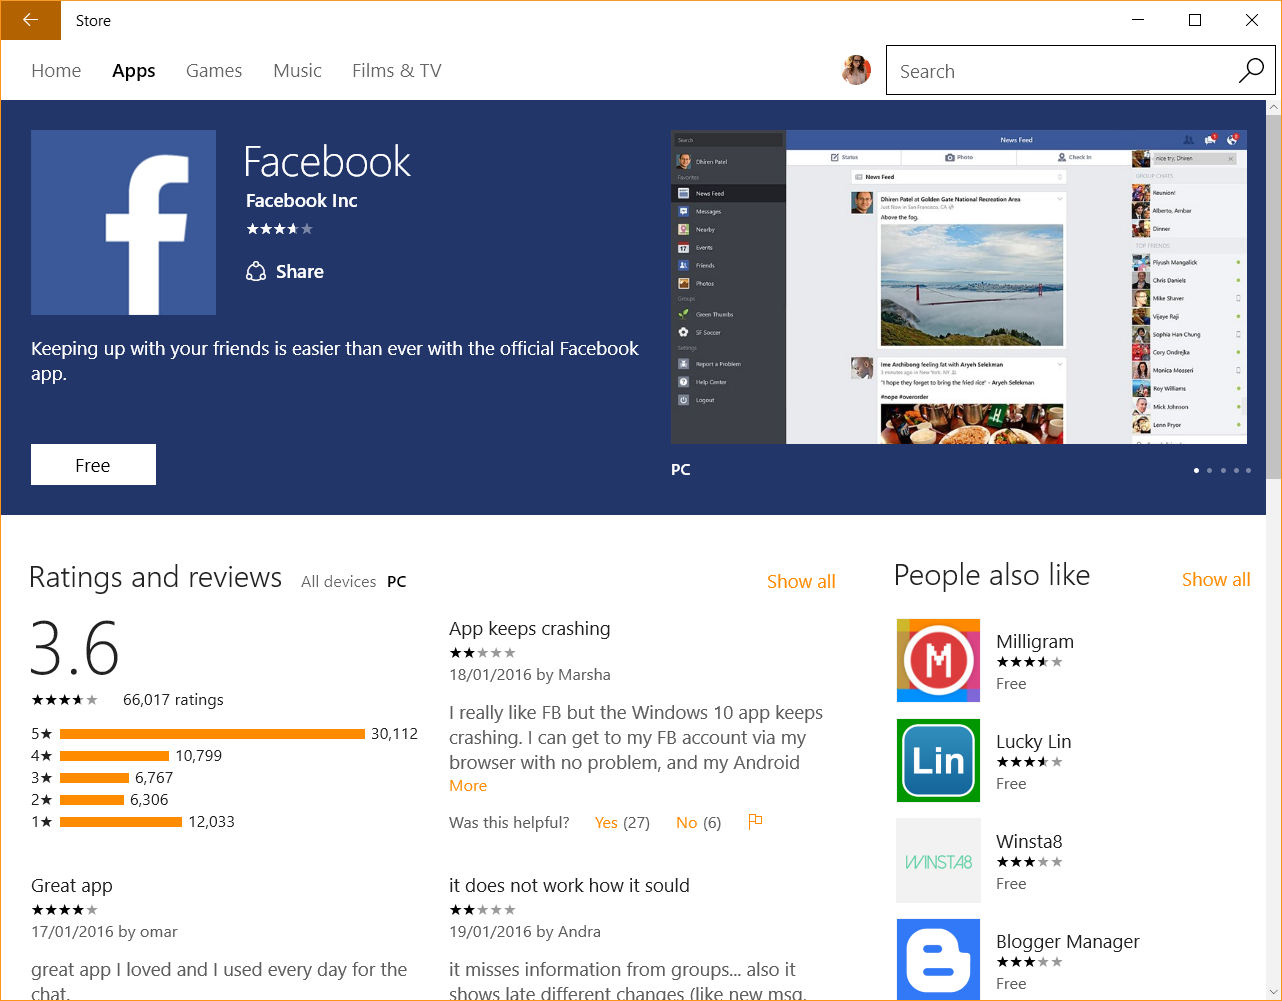
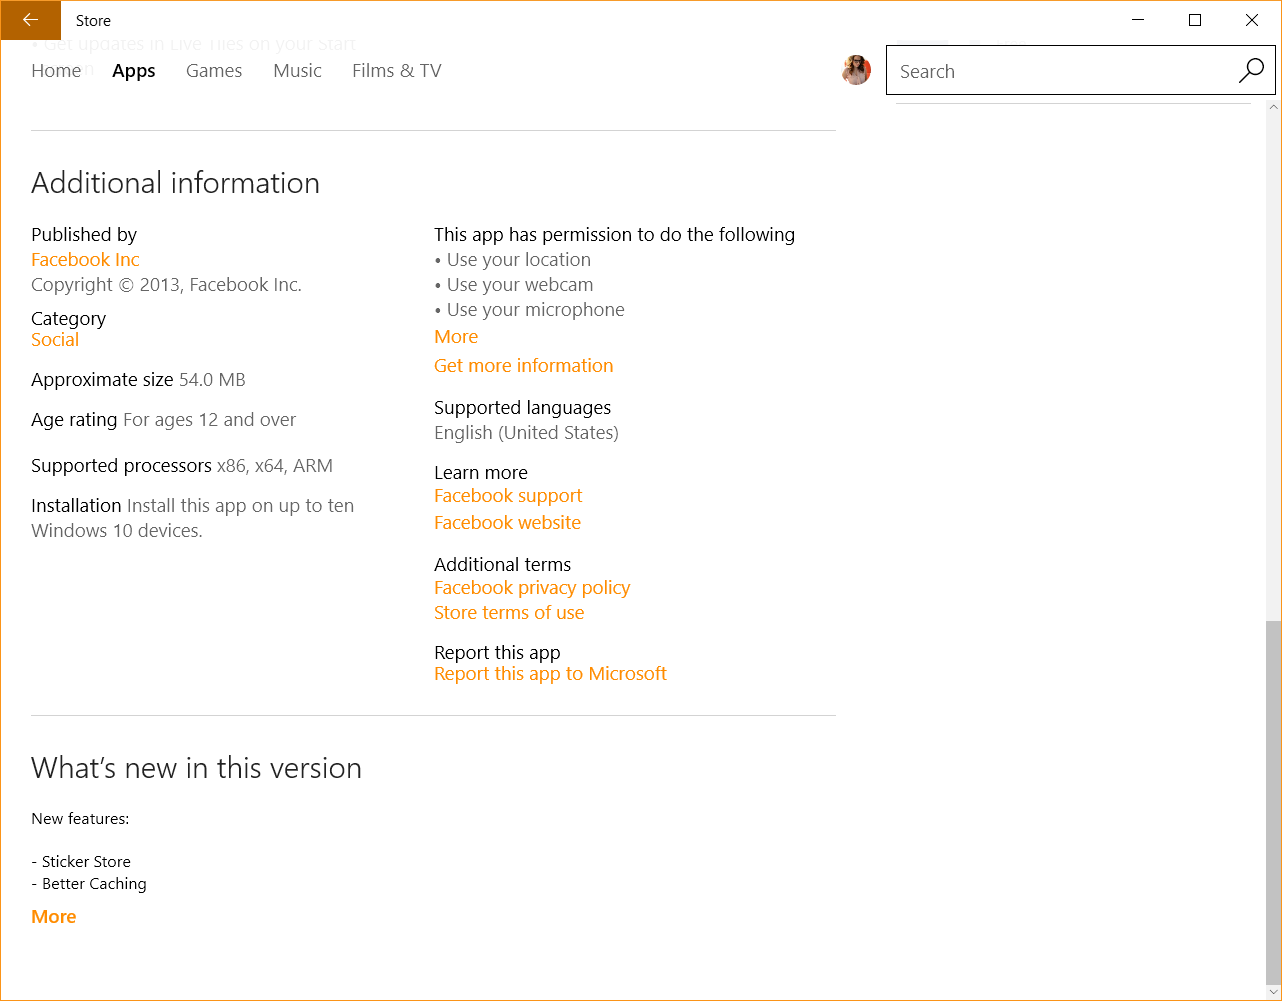
Should an app cause you trouble, you can go to the app’s page in the Windows Store and report it to Microsoft, so they can take the appropriate measures.
Where to find it
All Windows 10 versions.
How it works
Microsoft or trusted vendors verify the app so that it meets the Microsoft Store security standards. Only after that will they allow it to show up in the store for distribution or sale.
In order to download or buy apps from Windows Store, you’ll need to log in with your Microsoft account.
Key takeaway
By knowing which details to check in the Windows Store, you’ll be able to avoid installing rogue apps and thus giving cyber criminals a way into your computer. Also, the filter put in place by Microsoft will help keep you protected from most malicious apps.
Settings, tips & tricks
There is not that much information out there about Trusted Apps in Windows Store, but this might help fill in some blanks:
Top Windows 10 Security Features Explained
SMARTSCREEN FILTER
What it is
According to Microsoft, SmartScreen Filter is a technology embedded into the Windows Store and in Microsoft Edge that helps protect you against phishing attempts.
What’s new
SmartScreen has been around since Windows 8, so there’s not much new about it. Read below for more information on how it works.
Available on
All Windows 10 versions.
Where to find it
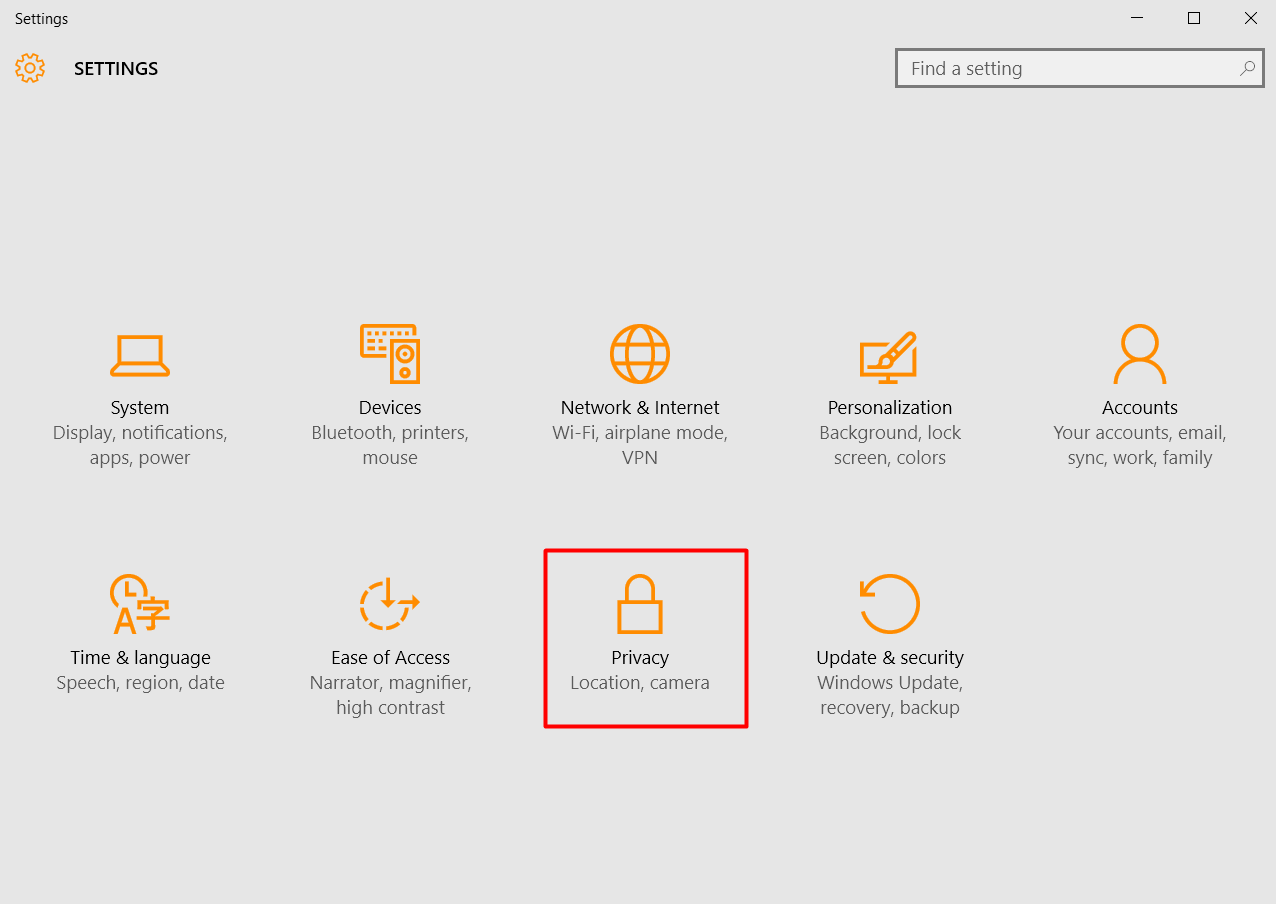
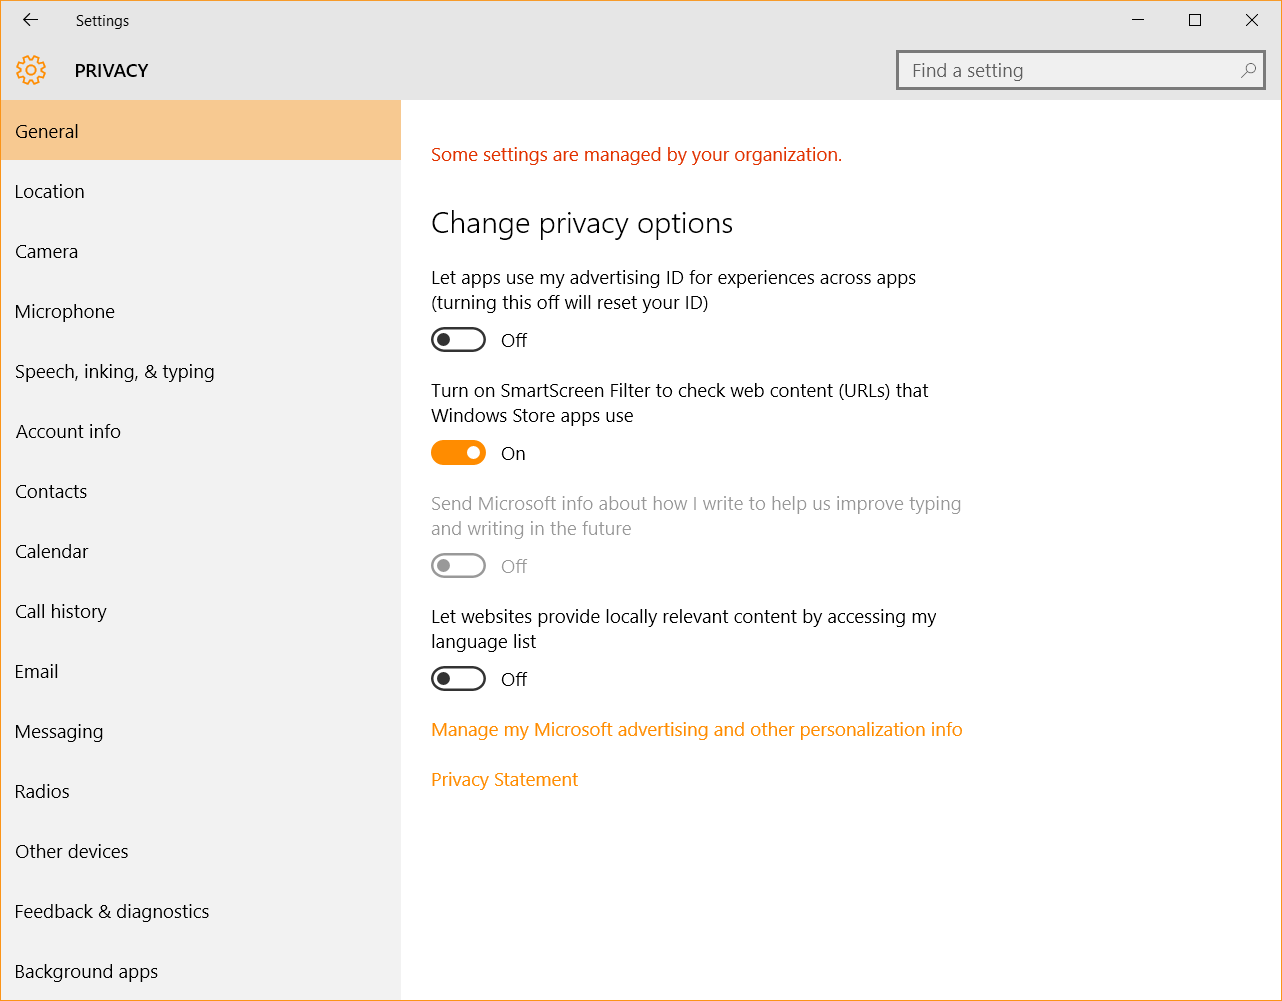
You can turn the SmartScreen Filter on and off by going to Start > Settings > Privacy > General. There, you can «Turn on SmartScreen Filter to check web content (URLs) that Windows Store apps use.»
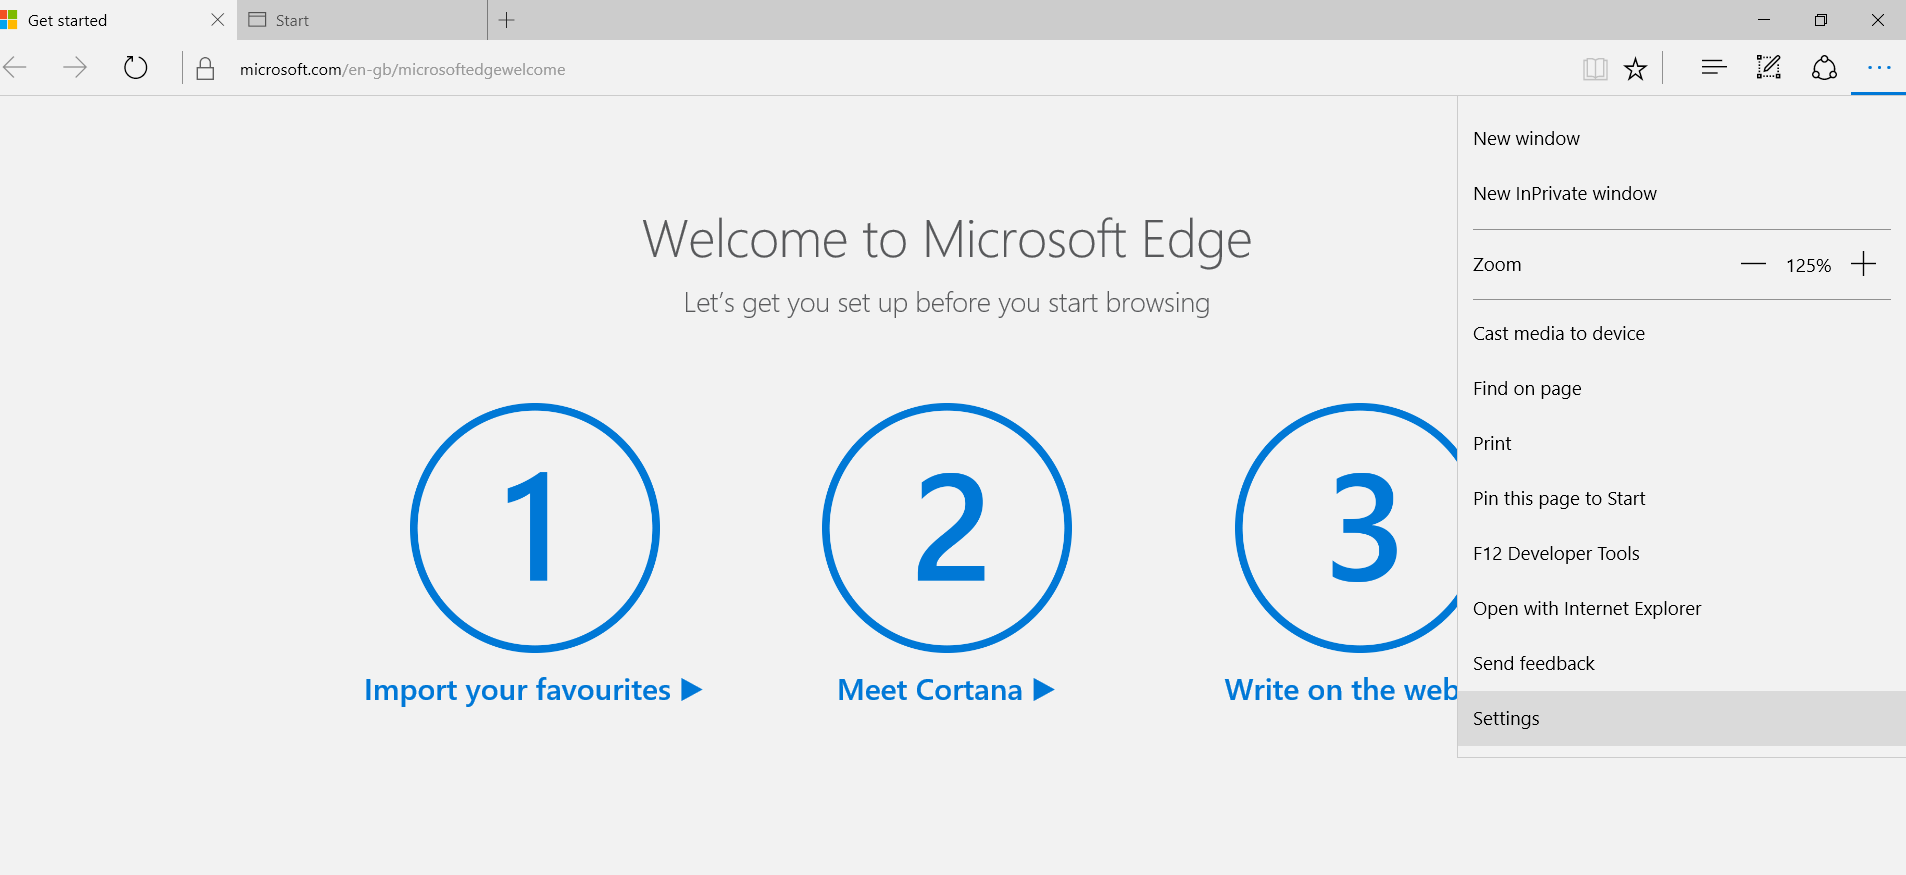
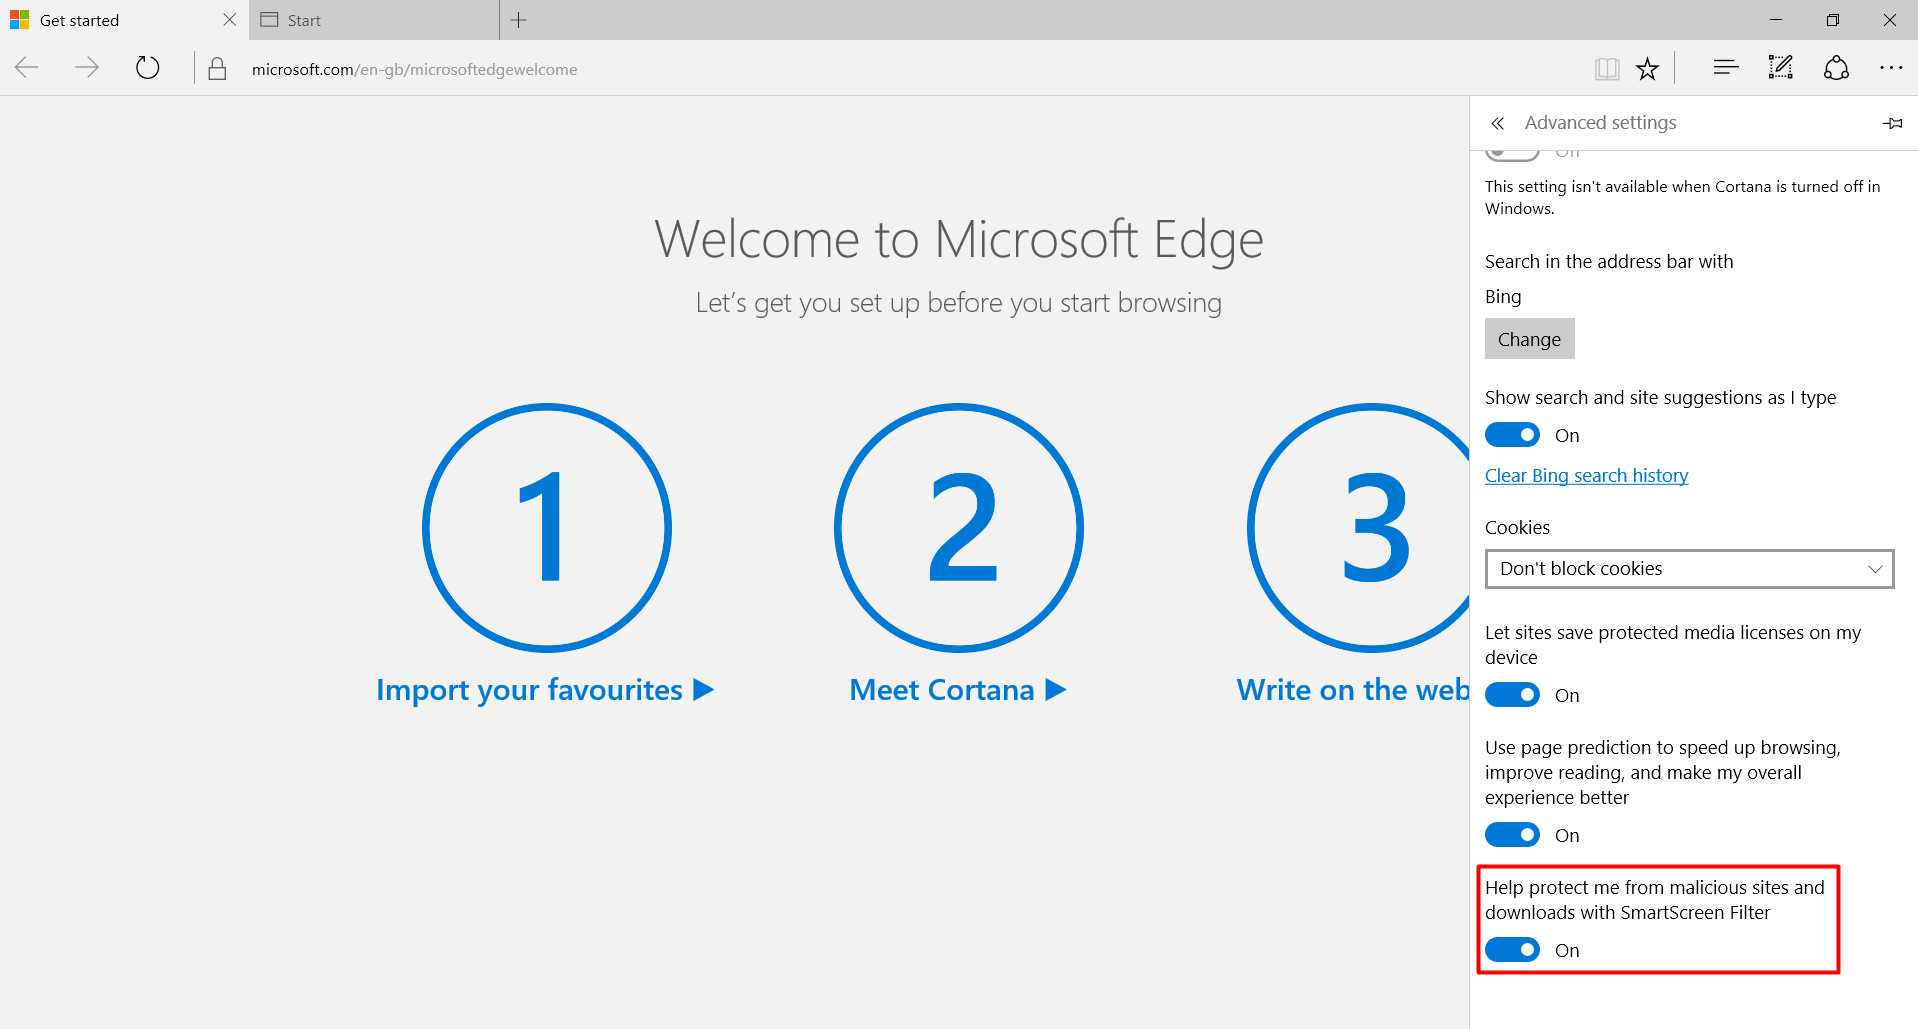
Remember that SmartScreen Filter is also embedded into Microsoft Edge. Here’s how to find the option in Microsoft’s latest browser. Follow this path: Edge > Settings > Advanced Settings and turn on «Help protect me from malicious sites and downloads with SmartScreen Filter.»
How it works
According to Microsoft, here’s how SmartScreen kicks into action:
As you browse the web, it analyses webpages and determines if they have any characteristics that might be suspicious. If it finds suspicious webpages, SmartScreen will display a message giving you an opportunity to provide feedback and advising you to proceed with caution.
SmartScreen Filter checks the sites you visit against a dynamic list of reported phishing sites and malicious software sites. If it finds a match, SmartScreen Filter will show you a warning notifying you that the site has been blocked for your safety.
SmartScreen Filter checks files that you download from the web against a list of reported malicious software sites and programs known to be unsafe. If it finds a match, SmartScreen Filter will warn you that the download has been blocked for your safety. SmartScreen Filter also checks the files that you download against a list of files that are well known and downloaded by many Internet Explorer users. If the file that you’re downloading isn’t on that list, SmartScreen Filter will warn you.
Source: SmartScreen Filter: frequently asked questions
Key takeaway
Even though you may find the SmartScreen Filter annoying at first, it’s really useful to have it on. We suggest you keep it activated for potential malicious apps that might try to install themselves on your computer.
Settings, tips & tricks
If you’re curious to read more on the SmartScreen Filter, here are two resources to help you achieve just that:
What is the SmartScreen Filter & How Does it Work?
SmartScreen Filter: frequently asked questions
MICROSOFT EDGE
What it is
Microsoft Edge is the default browser in Windows 10, and its role is to replace Internet Explorer on all devices in the Windows ecosystem.
Edge claims to be a rather safe browser, because of the various integrated security settings and because it limits add-ons and plugins that can have a potential harmful impact.
What’s new
Bottom line: quite a lot. We won’t get into the details of all the behind-the-scenes action here, but we’ll mention some security aspects that you may find useful.
Microsoft Edge no longer supports the extensions VML, VB Script, Toolbars, BHOs or ActiveX. For non-techies, this means that Edge is more secure because it gave up on using some technologies that were often exploited by cyber criminals.
Edge also features increased protection against code injection, which is essential to protect against a large part of cyber attacks that target browsers (more details in this Microsoft blogpost).
The new Microsoft Edge also includes the SmartScreen Filter feature that we mentioned earlier, which is meant to protect users against phishing.
What’s more, Edge constantly runs in a partial sandbox. Sandboxing is a technique used in security to run a program in a controlled and contained environment, so it can’t affect other apps or data.
Java is not supported in Edge, but Adobe Flash is and let’s not forget that Flash was one of the most vulnerable and exploited plugins in 2015.
Yes, Adobe Flash is supported as a built-in feature of Microsoft Edge. We continue to work closely in partnership with Adobe to provide this version of Flash, which we support and service via Windows Update.
Source: Microsoft Edge FAQ
Where to find it
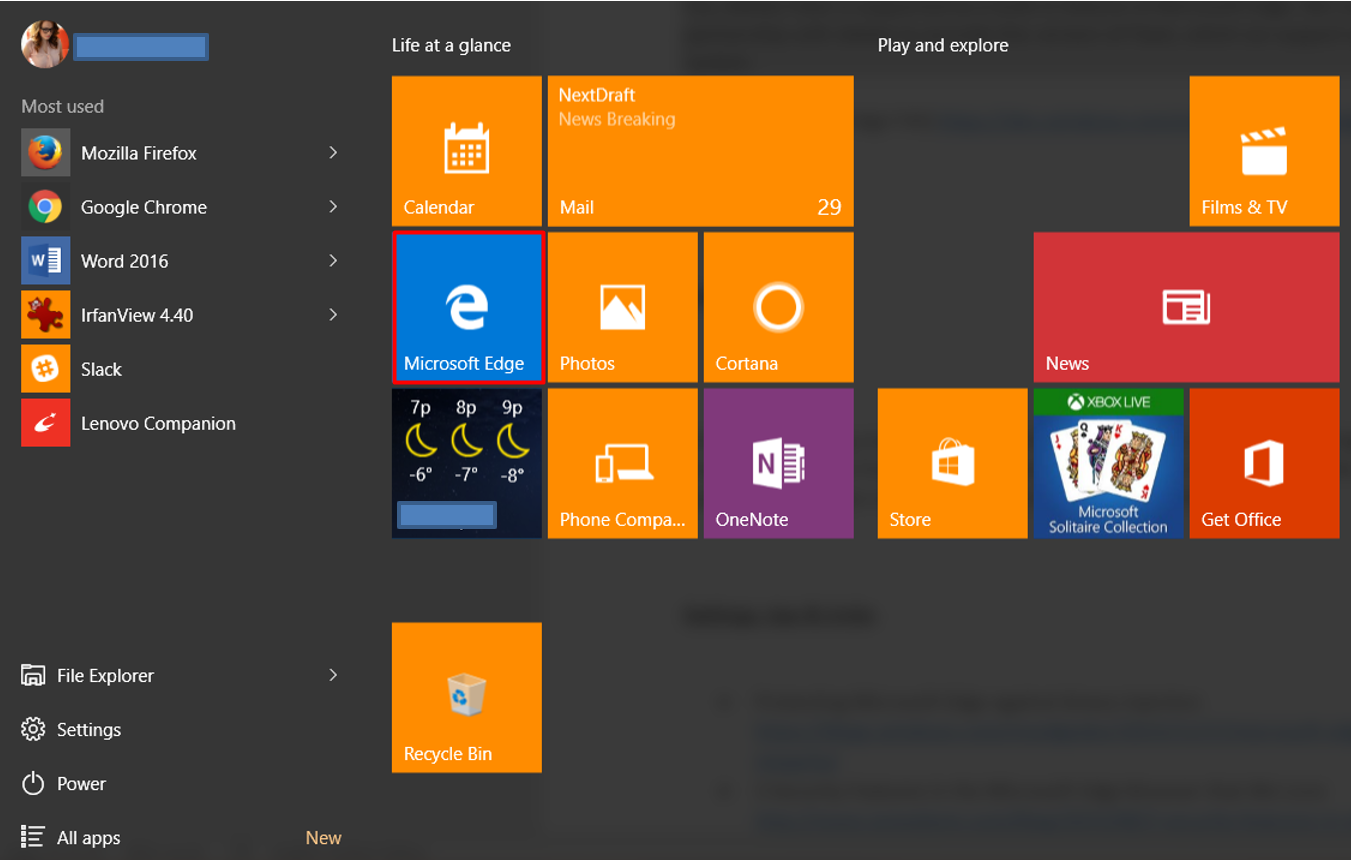
Just go to the Start menu and you’ll find Edge in the «Life at a glance» section, as Microsoft chose to name it.
Key takeaway
Using Microsoft Edge can actually be safer than using Firefox or Chrome, as it doesn’t support vulnerable plugins. It can also be protected with an additional security product which has web filtering capabilities and a VPN for enhanced privacy.
Settings, tips & tricks
Protecting Microsoft Edge against binary injection
3 Security Features in the Microsoft Edge Browser that We Love
A break from the past, part 2: Saying goodbye to ActiveX, VBScript, attachEvent…
Microsoft Edge Brings Bigger, Badder Security to Windows 10
CYBER THREATS TARGETING WINDOWS 10
Cyber criminals knew Windows 10 was coming and they’ve prepared for it. The new operating system brought some improvements in terms of security and some changes, but the most vulnerable applications continued to exist.
The most targeted applications you may be using on Windows 10:
Internet Explorer
Google Chrome
Mozilla Firefox
Oracle Java
Office Word
Office Excel
Adobe Acrobat Reader
Adobe Flash and Flash plugin
It’s no wonder that cyber criminals are keeping up with the times and adapting to Windows 10’s specific elements.
In November 2015, our team at Heimdal Security picked up and analyzed a new variant of the infamous banking Trojan Dyreza.
The results of the analysis show that the info-stealer malware now includes support for Windows 10. This new variant can also hook to Microsoft Edge to collect data and then send it to malicious servers.
Moreover, the new Dyreza variant kills a series of processes linked to endpoint security software, in order to make its infiltration in the system faster and more effective.
The cyber criminals behind Dyreza often spread the malware via «spray & pray» spam campaigns, which are sent to random recipients.
Source: Security Alert: New Dyreza variant supports Windows 10 & Edge
Threats such as ransomware, banking Trojans and data-stealing malware won’t go away just because a new OS is released. That’s why it’s important to know and adjust your security settings to counteract their malicious tactics.
And you’re certainly interested in solutions, which we’re very keen on offering.
RECOMMENDED SECURITY APPS FOR WINDOWS 10
Even if it claims to be «the most secure Windows» to date, Windows 10 is surely not impenetrable against cyber attacks. That’s why you need additional applications to keep your data and confidential information safe.
There are 5 categories of security-related products we recommend you install:
Antivirus
Windows Defender can only offer baseline protection, but you need much more than that. Choose a reliable and strong antivirus product that’s placed in the top 5 recommended AVs by experts (independent ones, if possible).
And because we know it’s a difficult choice to make, here’s a guide to help you pick the right one for your: What Is The Best Antivirus For My PC? A Step-By-Step Research Guide.
Antimalware
Antivirus can’t provide 100% protection against malware or other cyber attacks. In fact, no security solution can. But if you use complementary solutions, then you can increase your protection against cyber criminals and their malicious tools.
If you’re unsure why antivirus is really not good enough, here’s a recommended read to help you see the big picture: Is Antivirus Dead? Meet The NextGen Anti-Hacking Tools.
Password manager
You can’t have strong security without strong passwords. And it’s very often an aspect that users neglect. So much so that the most used passwords in 2015 probably make cyber criminals laugh.
We’ve all used the same password more than once, there’s no shame in admitting it. But it’s crucially important to stop doing it, for your online safety. If attackers break one of them, they will get into all of your accounts.
Here’s a top 5 of reaaaally bad passwords that I hope will make you change your ways:
123456
password
12345678
qwerty
12345
So we’re obviously not good at passwords, which is why it’s great to have some help. Here’s a step-by-step plan to help you boost your password security:
Password Security 101: How to Manage Your Credentials Like an Expert in 8 Easy-to-Follow Steps
Encryption tools
Encryption is all the rage right now, with talks around it spanning from government to private users. What we know is that encryption is necessary and very useful to protect our data from prying eyes or malicious attempts. Of course, we have to make sure it’s done right.
If you don’t want to use the built-in BitLocker encryption that comes with Windows 10 (the Pro edition), then there are plenty of alternatives. Here’s a guide to help you choose the right encryption tool for you:
9 Free Encryption Software Tools to Protect Your Data
Backup solutions
Data backups are exactly like washing your teeth before you go to sleep: you know they’re good for you and you should do it more often, but you just can’t seem to find the motivation.
With ransomware and other data-stealing malware out there, backups can be life savers! And the same goes for accidentally damaging your computer, having it stolen or what else could happen.
So do yourself a big favor and start a backup schedule. You can either do it using the backup tool integrated in Windows 10, or you can choose one of the many options available on the market. Or, even better, you can do both!
How to back up your computer — the best advice in one place