Время на прочтение
3 мин
Количество просмотров 29K
 В предыдущей части статьи мы подготовили сервер-образец для клонирования: установили все необходимые драйверы, обновления (системные компоненты) и программное обеспечение. Сделали необходимые настройки — включили MPIO для ISCSI и SAS дисков, объединили интерфейсы в группы, создали логические интерфейсы в разных VLAN, изменили размер обрабатываемых пакетов Jumbo Frames (значение MTU выставили равным 9014<).
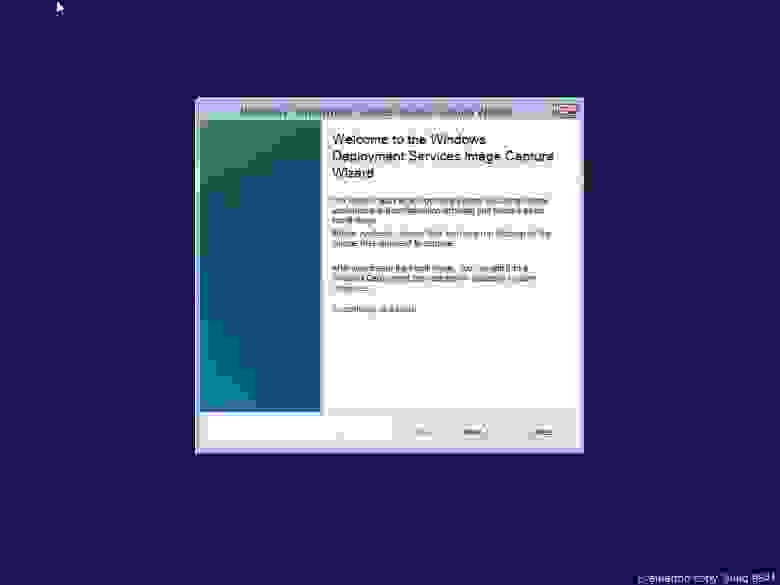
Теперь перейдем к настройке WDS (Windows Deployment Services — Службы развертывания Windows).
Установка этого компонента ОС Windows Server не вызовет никаких проблем, процедура стандартная. После установки открываем «Панель управления — Администрирование — Службы развертывания Windows». Монтируем ISO образ или подключаем виртуальный DVD-привод и в него вставляем образ ОС Windows Server 2012 R2, находим на нем файлы boot.wim (для добавления образа загрузки) и install.wim (для добавления образа установки ОС):

В детали вдаваться не будем, статья не об этом — хотим лишь отметить необходимые моменты настройки: для удобства управления, создавайте группы для образов загрузки\установки, а так же добавляйте необходимые драйверы сетевых адаптеров — это избавит вас от массы проблем!
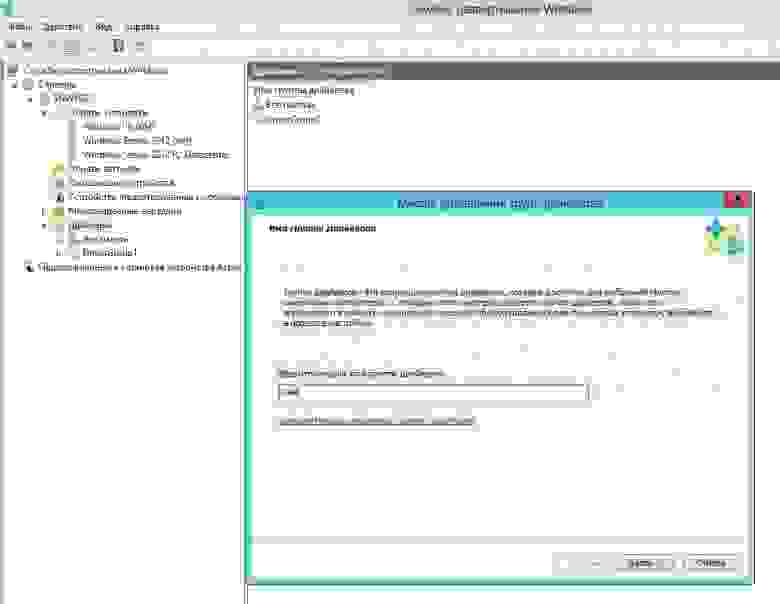
разделение по группам помогает применять фильтры при добавлении драйверов (фильтр по вендорам или моделям, видам оборудования и пр.)
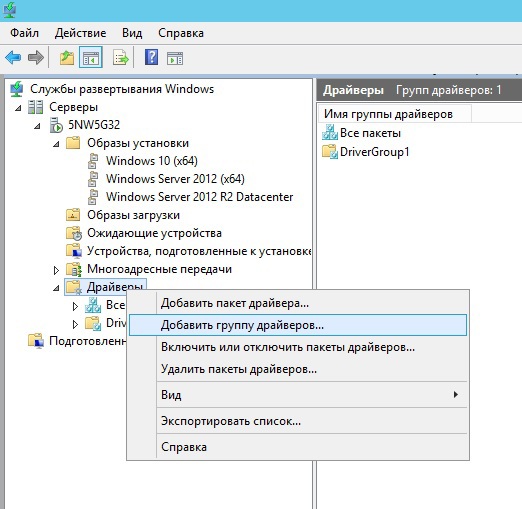

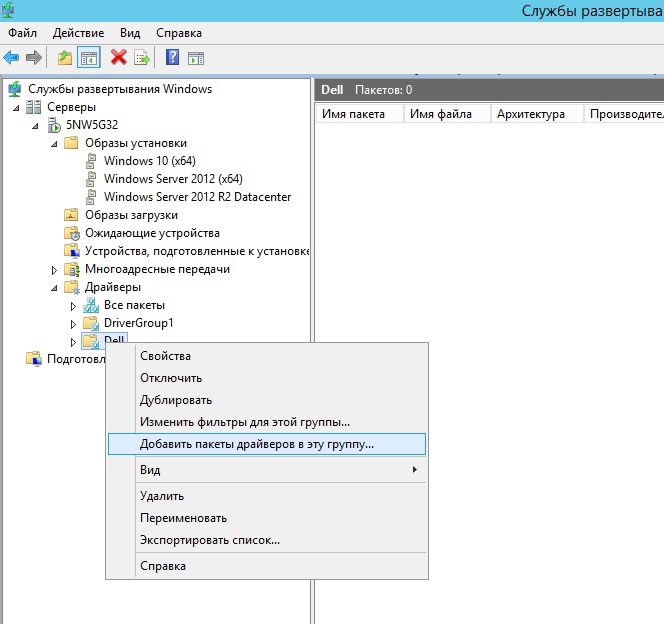
Опытным путем была выявлена сложность с загрузкой WinPE для снятия образа, без добавления драйверов сетевого адаптера и RAID-контроллера. Из каких-то соображений производитель не выкладывает драйверы в распакованном виде, только пакет установки. Хорошо, что необходимые драйверы можно найти на компьютере. где уже была произведена установка. Находятся они по следующему адресу: C:\Program Files\Intel
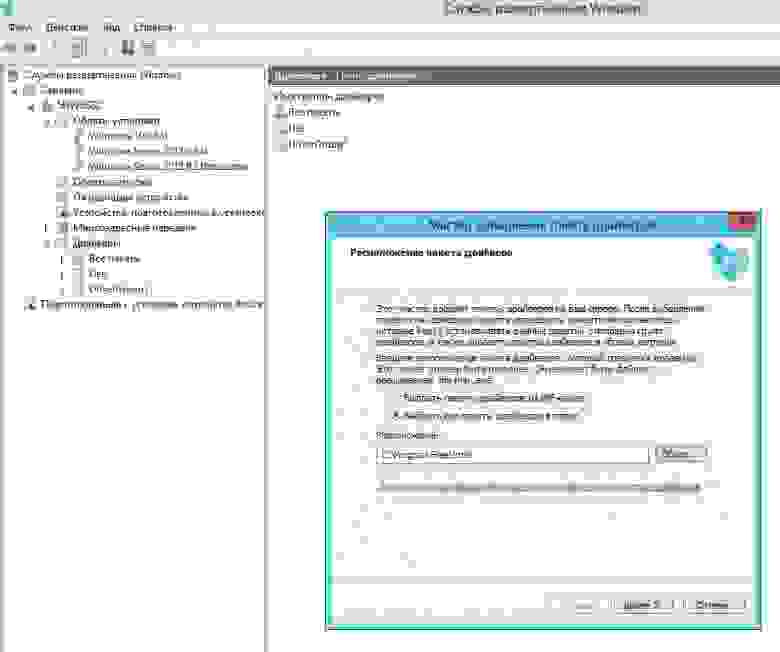
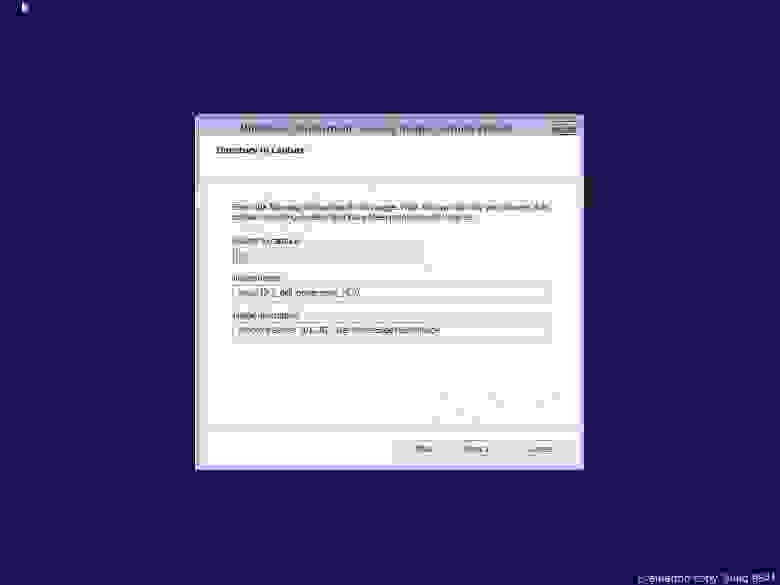
Следующий этап — создание образа записи:
Вводим имя образа записи и его описание (чтобы самим потом не путаться, в название добавляем слово Capture). Выбираем место где он будет сохранен. После создания, убедимся что образ добавлен на сервер (раздел «Образы загрузки»), выделяем его и вызываем контекстное меню, где нас интересует пункт «Добавить пакеты драйверов к образу». Соответственно — добавляем ранее созданную группу драйверов к образу…
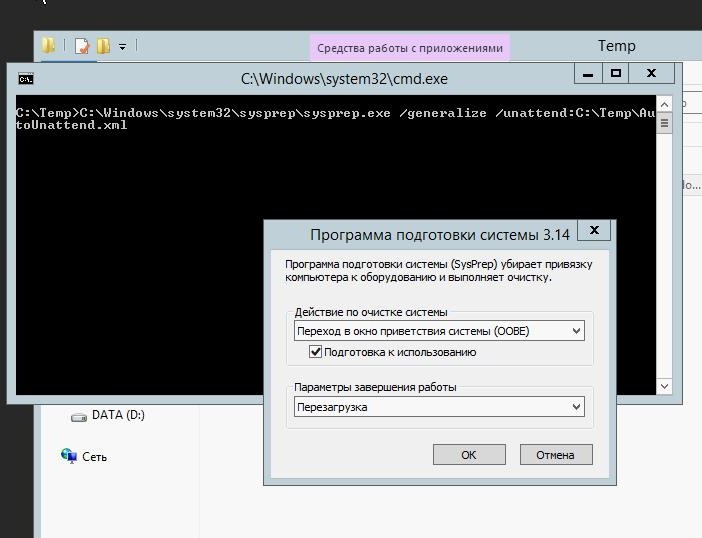
Переходим к серверу образцу. Создадим файл
AutoUnattend.xml
следующего содержания:
<?xml version="1.0" encoding="utf-8"?>
<unattend xmlns="urn:schemas-microsoft-com:unattend">
<settings pass="generalize">
        <component name="Microsoft-Windows-PnpSysprep" processorArchitecture="amd64" publicKeyToken="31bf3856ad364e35" language="neutral"
versionScope="nonSxS" xmlns:wcm="http://schemas.microsoft.com/WMIConfig/2002/State" xmlns:xsi="http://www.w3.org/2001/XMLSchema-instance">
            <PersistAllDeviceInstalls>true</PersistAllDeviceInstalls>
        </component>
    </settings>
</unattend>
Сохраняем по следующему пути C:\Temp. Далее в командной строке запускаем утилиту sysprep:
%SystemRoot%\system32\sysprep\sysprep.exe /generalize /unattend:C:\Temp\AutoUnattend.xml
После выполнения sysprep и перезагрузки заходим в BIOS и выбираем загрузку по сети (PXE). Если у вас нормально настроен DHCP, — он передаст необходимые параметры (IP адрес PXE сервера и пр.) сетевому адаптеру, для загрузки WinPE и мы увидим строку загрузки для захвата образа:
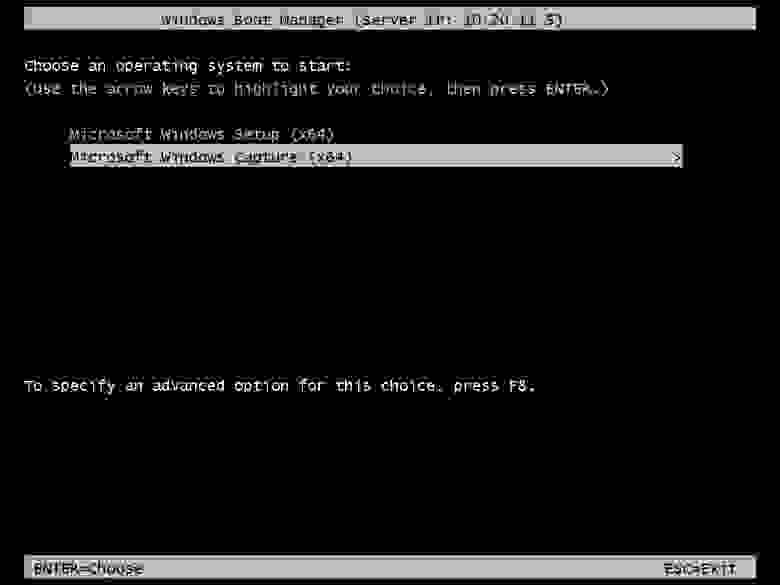
жмем Enter и загружаем WinPE со всеми необходимыми инструментами для захвата:
выбираем раздел диска, с которого будет создан образ (на скриншоте он обозначен как D:\ — потому как он второй раздел на диске). если выбрать нечего — значит, что-то пошло не так с подготовкой системы утилитой sysprep или с добавлением необходимых драйверов, повторите эти этапы.
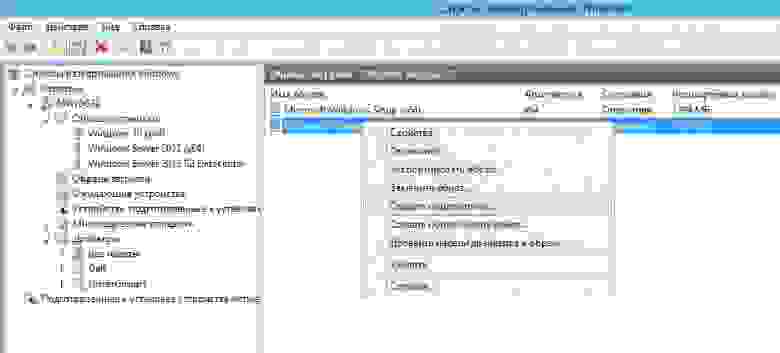
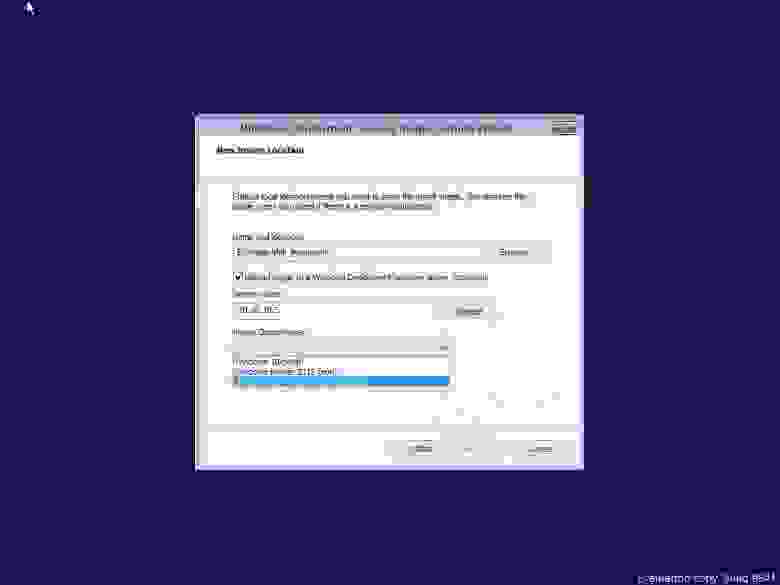
созданный образ можно загрузить на сервер WDS (но как показывает наш печальный опыт — эта загрузка проходит не оправдано долго и лучше его загрузить вручную позже):
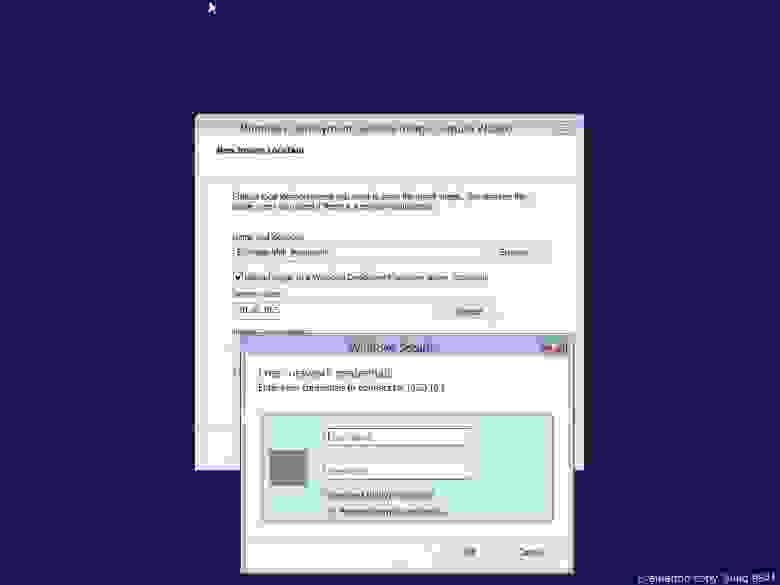
для подключения используйте учетные данные записи доменного или локального администратора. при удачном подключении вы увидите группу образов для установки на сервере WDS
На этом с созданием образа все — можно разворачивать на оставшиеся серверы… Экономия по времени увеличивается с количеством серверов, на которые требуется установить систему. Кроме того, — в дальнейшем этот образ можно будет использовать для загрузки по iSCSI. Об этом мы расскажем в будущем.
How to run Sysprep in Server 2012 (R2)?
- Press Windows logo key + X at the same time.
- Type cd \Windows\System32\Sysprep and then press Enter.
- Sysprep can be run in 2 modes, the GUI mode and the command line.
- Choose Enter System Out-of-Box Experience (OOBE) and check the Generalize checkbox.
How do I run sysprep on Windows Server?
Log on to the computer as an administrator. Open a command window and change directories to the C:\windows\system32\sysprep directory; then run the sysprep.exe command. Click OK to run the System Preparation Tool and reboot the computer. Now the system is ready for capturing.
Can you sysprep a domain controller?
Sysprep removes domain joinedness, and it’s not possible to be an active domain controller without being a member of the domain under control.
What is Windows sysprep?
Sysprep (System Preparation) prepares a Windows installation (Windows client and Windows Server) for imaging, allowing you to capture a customized installation. Sysprep removes PC-specific information from a Windows installation, “generalizing” the installation so it can be installed on different PCs.
Does sysprep remove roles?
Sysprep does not remove applications. Some applications are sensitive to sysprep, but those are rare exceptions. Sometimes, software will look at the machine key or SID as part of a license activation.
Can I clone a domain controller?
There is no special role or feature installation for virtualized domain controllers; all domain controllers automatically contain cloning and safe restore capabilities. You cannot remove or disable these capabilities.
Can Windows 10 sysprep?
To run Sysprep in Windows 10, open Windows Explorer and navigate to C:\Windows\System32\sysprep. You can also just type “sysprep” in the Run command and click “Enter.” In the Sysprep folder, double-click sysprep.exe. In the System Preparation Tool window, click “Generalize”, click “Shutdown”, and then click “OK”.
Does sysprep work Windows 10?
Although other tools exist that claim to do similar things, Sysprep is the only tool that’s supported by Microsoft for this purpose. To run Sysprep in Windows 10, open Windows Explorer and navigate to C:\Windows\System32\sysprep. You can also just type “sysprep” in the Run command and click “Enter.”
Does Sysprep reset activation?
When you run the sysprep /generalize command, the activation clock will automatically reset. You can bypass resetting the activation clock by using the SkipRearm setting in the Microsoft-Windows-Security-SPP component. This enables you to run the Sysprep command multiple times without resetting the activation clock.
How to run Sysprep in Windows Server 2012 R2?
How to run Sysprep in Server 2012 (R2)? Follow the steps below to use Sysprep in Windows Server 2012. 1. Press Windows logo key + X at the same time. Then choose Command Prompt (Admin) from the menu. 2. Type cd WindowsSystem32Sysprep and then press Enter. 3. Sysprep can be run in 2 modes, the GUI mode and the command line.
How many times can I run the Sysprep command?
For more information about Sysprep -related Windows unattend components, see the Unattended Windows Setup Reference for Microsoft-Windows-PnpSysprep. You can run the Sysprep command up to 1001 times on a single Windows image. After running Sysprep 1001 times, you must recreate your Windows image.
Do you have to use skiprearm when running Sysprep?
In previous versions of Windows, you could use the SkipRearm answer file setting to reset the Windows Product Activation clock when running Sysprep. If you are using a volume licensing key or a retail product key, you don’t have to use SkipRearm because Windows is automatically activated.
Do you have to run Sysprep to generalize an image?
When you generalize an image, Windows replaces the computer SID only on the operating system volume where you ran Sysprep. If a single computer has multiple operating systems, you must run Sysprep on each image individually.
How do I Sysprep Server 2012?
How to run Sysprep in Server 2012 (R2)
- Press Windows logo key + X at the same time.
- Type cd \Windows\System32\Sysprep and then press Enter.
- Sysprep can be run in 2 modes, the GUI mode and the command line.
- Choose Enter System Out-of-Box Experience (OOBE) and check the Generalize checkbox.
Can you still buy server 2012 R2?
2 Answers. We can’t Buy Windows Server 2012 R2 for Microsoft official channel now. However, Many retailers still have 2012R2 in stock – Amazon, Newegg, etc. If you purchase a Volume License edition, you would be purchasing Server 2016 or 2019 then you would have downgrade rights to 2012.
How do I create a new SID?
In Active Directory you will need to delete the computer object of your problem server and then rejoin it to the Domain. This will get you a new SID for the server.
How do I change the SID of a Windows server?
To change a SID, you must use the Windows utility Sysprep (System Preparation Tool). This is the only method that is supported by Microsoft. For more information on using Sysprep, see this Microsoft article: How to Use Sysprep: An Introduction. Note: Microsoft does not support using NewSID to change a SID.
When should I run Sysprep?
Remember that Sysprep should only be used when creating an image that will be used in setting up new Windows installations — it should never be used to change a Windows setup that is already deployed and running, because doing so will destroy the operating system.
Where is Sysprep located?
system32\sysprep
Sysprep.exe is located in the %WINDIR%\system32\sysprep directory on all Windows installations. To use the command line instead of the System Preparation Tool GUI, you must first close the GUI and then run %WINDIR\System32\Sysprep\Sysprep.exe .
How long is Server 2012 R2 supported?
Support Dates
| Listing | Start Date | Extended End Date |
|---|---|---|
| Windows Server 2012 R2 | Nov 25, 2013 | Oct 10, 2023 |
How do I find the SID of a server?
Find Security Identifier via Command Prompt Step 1: Run Command Prompt as administrator in the search box. Step 2: In the elevated window, type wmic useraccount get name, sid and hit Enter to execute the command. Wait for a while, and then you will get the result.
How do I find my SID in Active Directory?
Run the command ‘whoami /user’ from command line to get the SID for the logged in user.
How do I reset my SID?
- Open Windows Explorer > Go to C:\Windows\System32\Sysprep, run the sysprep.exe.
- Tick the checkbox Generalize, then click OK to proceed with the change.
- Sysprep is working, It will require a machine restart to re-settings.
- Restart your machine, re-settings as Windows recommend.
How do I reset my server SID?
Solution
- Step 1) Type whoami /user on the CMD. Copy the SID to a txt file.
- Click to Start->Run, type sysprep and press OK. This opens folder c:\Windows\System32, where application syspre locates.
- Double-click sysprep. It opens the System Preparation Tool 3.14 window.
- After reboot, the SID will be changed.
How to generate new Sid in Server 2012?
Generate New SID in Server 2012 Log on to Windows Server. Open Windows Explorer, and browse, C:WindowsSystem32Sysprep Right-click sysprep application and click Run as Administrator.
What is new in Windows Server 2012 R2?
Description. Windows Server 2012 R2 provides a wide range of new and enhanced features and capabilities spanning server virtualization, storage, software-defined networking, server management and automation, web and application platform, access and information protection, virtual desktop infrastructure, and more.
What happened to NewSID for Windows 7?
I found out the hard way that NewSID will totally hose a Windows 7 setup ( BSOD on reboot). Apparently the same problem occurs for Windows Server 2008 R2. They’ve officially announced that NewSID will be retired in November, possibly because of this issue.
What’s the difference between NewSID versions?
Version 3.0 introduces a SID-sync feature that directs NewSID to obtain a SID to apply from another computer. Version 2.0 has an automated-mode option, and let’s you change the computer name as well. Version 1.2 fixes a bug in that was introduced in 1.1 where some file system security descriptors were not updated.
-
Build
First install Windows 2012R2 Server.
-
Patch
Install all Windows Patches. At least the Critical and Security updates.
-
Create Snapshot
Take the first Snapshot before running SysPrep.
-
SysPrep
Run SysPrep with the shutdown command.
-
Create New VM
Clone the VM machine to a new machine.
-
Customise VM
Now just changed the server name and add to the domain.
-
Maintain Template
Ensure that you regularly update the VM with the latest patches.
I’m using SysPrep on Windows 2012R2 and Acropolis (AHV) and Prism by Nutanix to show how simple it is to create many new Windows 2012R2 Virtual Machine (VM) servers, when you are not using VMware or something else that does a lot of the hard work for you.
VMware provides enhanced capabilities when using a pre-created VM template. As those who know, it is then a simple matter of deploying a new VM from a template, giving it a name, which it normally gets from the name that you have provided and then you choose a few options and the new VM is built and potentially joined to the domain.
With Prism, I’m sure there are some fairly clever ways of doing this, but I’m no coder or script whiz, so I’m going to do it all via their rather nice GUI and a few manual steps.
Using SysPrep on Windows 2012R2 will not suit those who need to deploy hundreds of machines in continous cycles for heavy dev and test platforms.
Using SysPrep on Windows 2012R2 will provide those smaller business a way to deploy VM with less hassle than building a server from scratch using an ISO each time they need a new Server VM.
Build

Step 1 is to build your first Windows 2012R2 server. Most likely from an ISO.
patch
Once you have built your first Windows 2012R2 Server and patched it, you don’t need to join it to the domain, you are nearly ready to use SysPrep on Windows 2012R2.
Create Snapshot
Before using SysPrep on Windows 2012R2 command on this brand new server VM, you will want to make a Snapshot first.
I find this particularly useful, as I can then revert the VM to an earlier Snapshot that was not Sysprep’d and quickly patch to the latest updates.
To make this procedure repeatable, I Snapshot it once again, before starting the SysPrep command.
With the Nutanix platform and with de-duplication enabled, these Snapshots and Clones takes up very little space on the actual disk.

Create a Snapshot
Within Nutanix Prism Web Interface, find the VM that you are going to use as your template.
Select the VM and then Click on Take Snapshot.

Enter some text for the name of the Snapshot.
Make it descriptive so you can find it easily later on. If you are going to keep many Snapshots.

Under VM Snapshots you can now see a list of snapshots.

SysPrep

Now we are going to run Sysprep on Windows 2012R2, this is very simple, just open a command prompt with Administrator rights and then ensure that you are in the correct folder
C:\Windows\system32\Sysprep
Then run
sysprep /generalize /oobe /shutdownYou will now see this little dialog appear on your Windows Server VM.


The Server will then shutdown once the operation has completed.
You Template VM, is now complete.
At this point I normally create another Snapshot, something that I can roll back to if need be.
I personally normally tidy up, keeping the Snapshot that I did after patching the VM, but before performing the SysPrep on Windows 2012R2.
I also retain the Snapshot after SysPrep had completed and shutdown the server VM.

Create New VMs
Under the current Nutanix Community Edition that I am using, I have found that you cannot clone multiple new VMs from a VM Snapshot.
If you only wanted 1 new Virtual Machine, you could clone directly from the Snapshot, or if you plan to create multiple VMs at a time, you clone from the VM that we have SysPrep’d.
Clone from the Snapshot that you performed, after you ran Sysprep and the VM had shutdown.
Click on the your Virtual Machine, so that it is highlighted.

With the VM highlighted, Click on Clone.
Under General Configuration, Complete the information that you require to create a clone or multiple clone VMs.
If creating multiple, you can also define how many (1), a prefix (2), the starting number (3). You are also shown an example of what the VM display names will look like (4) within the GUI.

When you are happy with vCPUs, cores in vCPU and Memory, Disks assigned, Click on Save, this will submit the request.

Pretty quickly the new VMs will be shown in the GUI.

Now you can power the VMs on.
As we are not using any fancy scripts, answer files and as I personally don’t require hundreds of VMs, maybe the occasional new Server VM, All I do now, is complete the standard 2012R2 installation.
Pretty quickly the new VMs will be shown in the GUI.
Choose your Region.

Enter a Product Key

Agree to the Microsoft Terms.

Set the Administrators Password.

Change Server Name and Domain Membership
The final steps, that only take a few minutes in my experience, is to rename the Server and then add it to a domain.

You can then install any applications or features/roles that that server will provide.
Maintain Your Template VM.
Now that you are creating new VMs from your Template, you will need to ensure that you periodically perform maintenance, like updating the latest Windows security and critical patches.
This is a simple case of reverting to the Snapshot you created before running the SysPrep command.
Power the VM on, then perform your maintenance.
Once complete, create a new Snapshot before performing Sysprep command.
Summary
When using Sysprep on Windows 2012R2, with Nutanix CE, AHV and Prism, this is all pretty quick and simple. For the smaller environments who may be looking at virtualisation and don’t want to pay for virtualisation and the annual fees that come with it, or don’t want to consume lots of disk space hosting Hyper-V. Nutanix, AHV and Prism provide a very cohesive platform to use.
AHV on a Nutanix platform can reduce your costs and if you are not a Service Provider, but a small to medium business, that does not need all the functionally that the other hypervisor vendors bring, but just require the basics, like High availability, the the combination of Using SysPrep on Windows 2012R2 and Acropolis by Nutanix will be some real would cost saving, as you now longer need to pay annual renewal fees.
Skip to content
windows server 2012’s System Preparation Tool (sysprep.exe) contains a new switch that allows system administrators to generalize the OS (remove any installation specific configuration) faster than previous versions of the tool that were designed for use on physical hardware.
What’s New in Sysprep for Windows server 2012?
The new vm-mode method for generalizing a windows 8 or Server 2012 installation only works from inside a virtual machine. Once sysprep has completed the generalization and shutdown the VM, you can copy the VM’s .vhd file and attach it to a new VM in any system that uses the same hypervisor technology.
Use Sysprep to Generalize Windows Server 2012 running in a VM
You will need to use sysprep from the command line, as there is no option to enable VM mode in the GUI.
- Install Windows 8 or Windows Server 2012 (or later editions) in a virtual machine.
- Customize the operating system as required.
- Switch to the Start screen and type cmd. Make sure that Command Prompt is highlighted in the search results and press CTRL+SHIFT+ENTER to launch the process with administrative privileges. Give consent or enter credentials if prompted.
- change the working directory to System32 by typing cd c:\windows\system32\sysprep and pressing Enter.
- To run sysprep with the standard GUI options, but also the /mode:vm switch, type sysprep.exe /oobe /generalize /shutdown /mode:vm and press Enter.