Jump to configuration for your system:
-
Windows
-
macOS
-
Linux
Windows
There is currently no official installer available for Windows. However,
there are a number of easy solutions.
Built-in solutions:
-
Run at user log on or at system startup using Task Scheduler
-
Run at user log on using the Startup folder
Other solutions:
-
Install and run using third-party tools
-
Run as a service independent of user log on
Run at user log on or at system startup using Task Scheduler
Task Scheduler is a built-in administrative tool, which can be used to
start Syncthing automatically either at user log on, or at system
startup. In both cases, Syncthing will open and stay invisible in
background.
For technical information about Task Scheduler visit
https://docs.microsoft.com/windows/win32/taskschd.
-
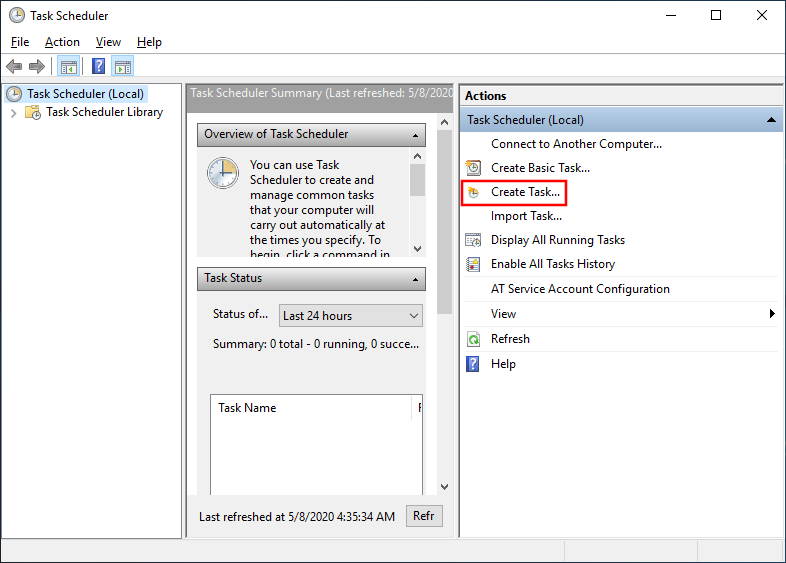
Start the Task Scheduler either by going to
Start Menu > Windowsand clicking on
Administrative ToolsTask Scheduler, or by
openingtaskschd.mscfrom the Run command (Win+R). -
Create a new Task (“Actions” sidebar > “Create Task…”).

-
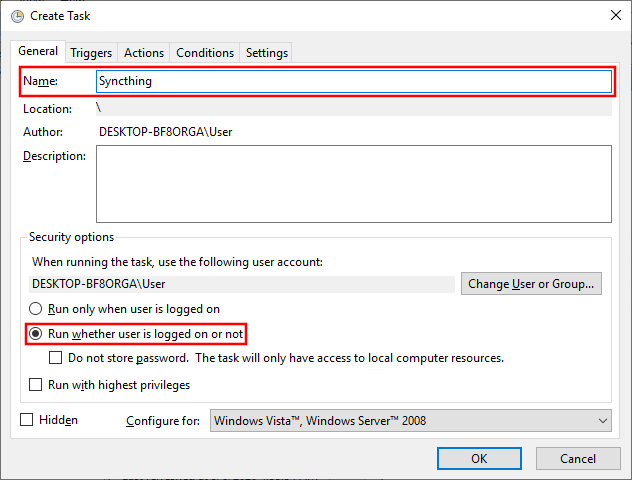
General tab:
-
Name the task (for example “Syncthing”).
-
Select “Run whether user is logged on or not”.
-
-
Triggers tab:
Syncthing can be set up to start either at user log on, or at system
startup. Pick your preferred method and follow the instructions
below. If unsure, read the explanations underneath each of the two
options.-
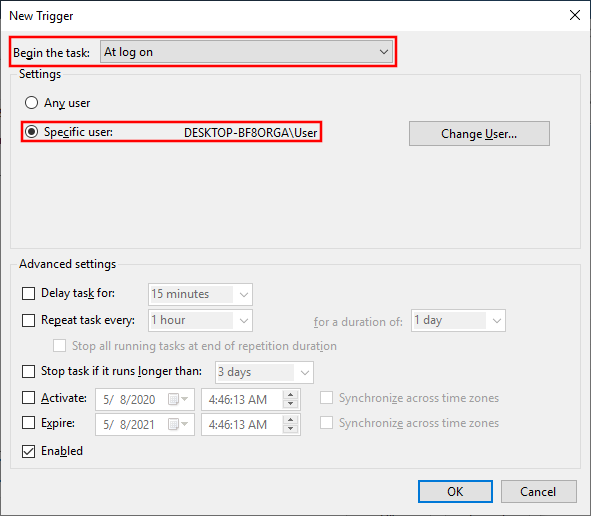
Run at user log on
Choose this option if you intend to use Syncthing only when being
logged on to your Windows user account.-
Click “New…”.
-
Set “Begin the task:” to “At log on”.
-
Select “Specific user:”
-
Click “OK”.
-
-
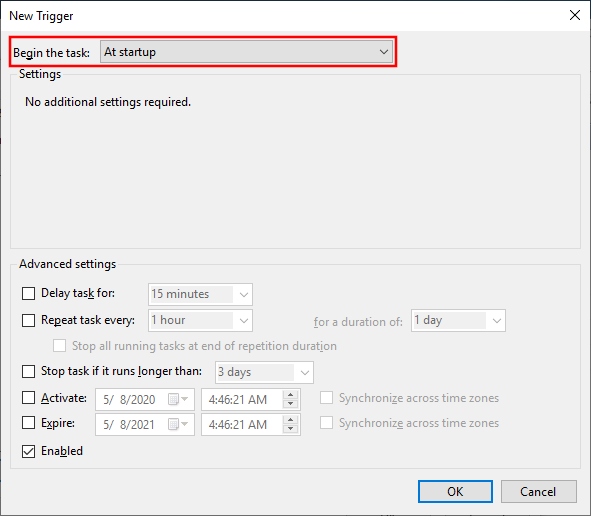
Run at system startup
Choose this option if you want Syncthing to open in background as
soon as Windows starts, and even when not being logged on to your
user account. Do not use this method if your Syncthing folders are
stored on a non-system partition protected by BitLocker, as they
will be inaccessible before user log on.-
Click “New…”.
-
Set “Begin the task:” to “At startup”.
-
Click “OK”.
-
-
-
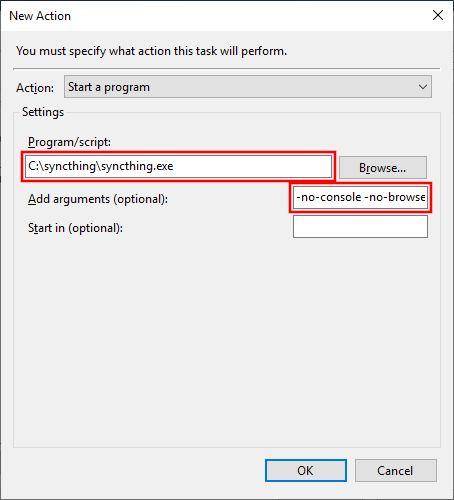
Actions tab:
-
Click “New…”.
-
Enter the path to
syncthing.exein “Program/script:” (for
exampleC:\syncthing\syncthing.exe). -
Enter
--no-console --no-browserin “Add arguments (optional):” -
Click “OK”.
-
-
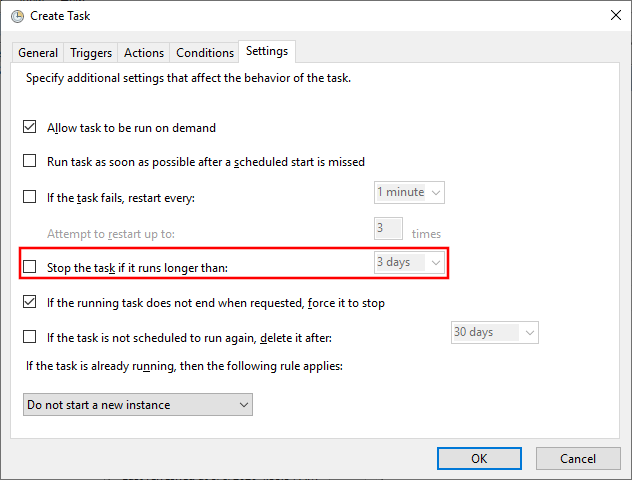
Settings tab:
-
Uncheck “Stop task if it runs longer than:”.
-
Click OK.
-
Enter password for the user.
-
Additional configuration in Task Scheduler
The following settings are optional. They are not required for Syncthing
to run properly, but can offer additional functionality. Feel free to
make selective use of them depending on your needs.
-
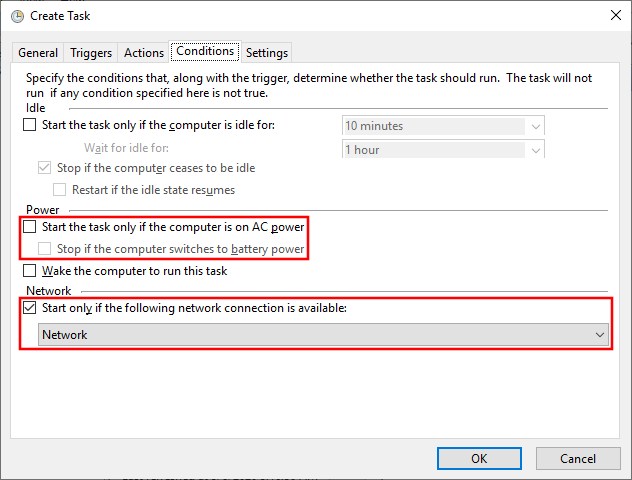
Conditions Tab:
-
Uncheck “Stop if the computer switches to battery power”. Note that
unchecking “Start the task only if the computer is on AC power”
does not disable this option. Even if greyed out, it still applies,
and has to be unchecked separately. -
Uncheck “Start the task only if the computer is on AC power”.
-
Check “Start only if the following network connection is available”
and set to “Network”. Use this option on a laptop, when you want
Syncthing to start only on a wired Internet connection, and not on
Wi-Fi. Note that once started, Syncthing will not stop running if
the connection changes or becomes unavailable later.
-
-
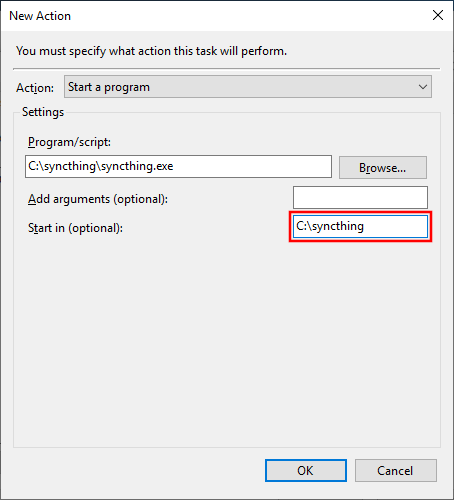
Actions Tab:
-
Select the previously created action and click “Edit…”.
-
Enter the path to the parent folder of
syncthing.exein “Start
in (optional)”. This will allow you to use paths relative to this
folder in Syncthing. -
Click “OK”.
-
Warning
Due to technical limitations, ending the task in Task Scheduler
terminates only the monitor process of Syncthing. In order to actually
exit Syncthing, open the Web GUI and press the “Shutdown” button under
the “Actions” dropdown menu.
Run at user log on using the Startup folder
Starting Syncthing at user log on, without a console window or browser
opening on start, is relatively easy.
-
Copy and paste
%APPDATA%\Microsoft\Windows\Start Menu\Programs\Startup
into the Address Bar in Windows Explorer, and press Enter.Alternatively, in newer versions of Windows, open
shell:startup
from the Run command (Win+R). -
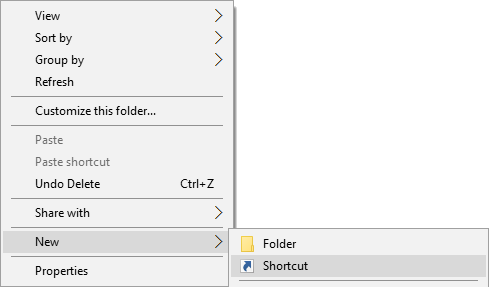
Right-click empty space in the folder and choose “New”, and then
“Shortcut”. -
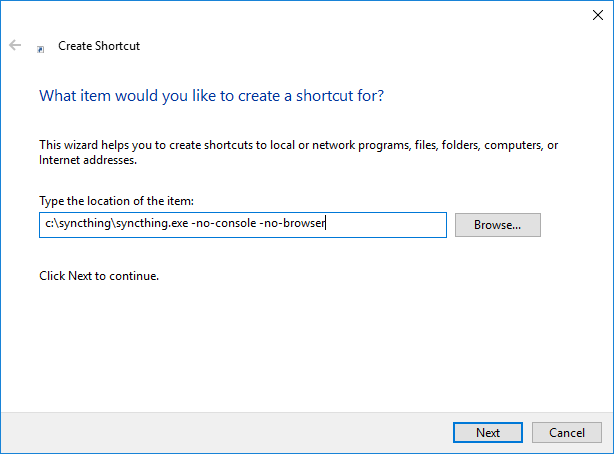
Enter the path to
syncthing.exein “Type the location of the item:”
followed by--no-console --no-browser(for exampleC:\syncthing\syncthing.exe).
--no-console --no-browser -
Click “Next”.
-
Click “Finish”.

Syncthing will now automatically start the next time you log on to your
user account in Windows. No console or browser window will pop-up, but
you can still access the interface by opening http://localhost:8384 in
a Web browser.
Install and run using third-party tools
There are a number of third-party utilities which aim to help install
and run Syncthing more easily. These typically provide an installer,
an option to start the program automatically, and a more polished user
experience (e.g. by behaving as a “proper” Windows application, rather
than forcing you to start a Web browser to interact with Syncthing).
Run as a service independent of user login
Warning
There are important security considerations with this approach. If you do not
secure Syncthing’s GUI (and REST API), then any process running with
any permissions can read/write any file on your filesystem, by opening
a connection with Syncthing.
Therefore, you must ensure that you set a GUI password, or run Syncthing
as an unprivileged user.
With the above configuration, Syncthing only starts when a user logs on to the machine. This is not optimal on servers where a machine can
run long times after a reboot without anyone logged in. In this case it
is best to create a service that runs as soon as Windows starts. This
can be achieved using NSSM, the “Non-Sucking Service Manager”.
Note that starting Syncthing on login is the preferred approach for
almost any end-user scenario. The only scenario where running Syncthing
as a service makes sense is for (mostly) headless servers, administered
by a sysadmin who knows enough to understand the security implications.
-
Download and extract nssm to a folder where it can stay. The NSSM executable performs administration as well as executing as the Windows service so it will need to be kept in a suitable location.
-
From an administrator Command Prompt, CD to the NSSM folder and run
nssm.exe install <syncthing service name> -
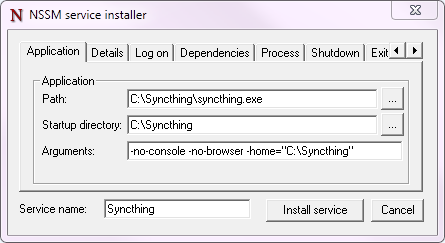
Application Tab
-
Set Path to your
syncthing.exeand enter--no-restart --no-browser --home="<path to your Syncthing folder>"as Arguments. Note: Logging is set later on.--logfilehere will not be applied. -
-
-
Details Tab
-
Optional: Set Startup type to Automatic (Delayed Start) to delay the start of Syncthing when the system first boots, to improve boot speed.
-
-
Log On Tab
-
Enter the user account to run Syncthing as. This user needs to have full access to the Syncthing executable and its parent folder, configuration files / database folder and synced folders. You can leave this as Local System but doing so poses security risks. Setting this to your Windows user account will reduce this; ideally create a dedicated user account with minimal permissions.
-
-
Process Tab
-
Optional: Change priority to Low if you want a more responsive system at the cost of somewhat longer sync time when the system is busy.
-
Optional: To enable logging enable “Console window”.
-
-
Shutdown Tab
-
To ensure Syncthing is shut down gracefully select all of the checkboxes and set all Timeouts to 10000ms.
-
-
Exit Actions Tab
-
Set Restart Action to Stop service (oneshot mode). Specific settings are used later for handling Syncthing exits, restarts and upgrades.
-
-
I/O Tab
-
Optional: To enable logging set Output (stdout) to the file desired for logging. The Error field will be automatically set to the same file.
-
-
File Rotation Tab
-
Optional: Set the rotation settings to your preferences.
-
-
Click the Install Service Button
-
To ensure that Syncthing exits, restarts and upgrades are handled correctly by the Windows service manager, some final settings are needed. Execute these in the same Command Prompt:
-
nssm set syncthing AppExit Default Exit -
nssm set syncthing AppExit 0 Exit -
nssm set syncthing AppExit 3 Restart -
nssm set syncthing AppExit 4 Restart
-
-
Start the service via
sc start syncthingin the Command Prompt. -
Connect to the Syncthing UI, enable HTTPS, and set a secure username and password.
macOS
Using homebrew
-
brew install syncthing -
Follow the information presented by
brewto autostart Syncthing using launchctl.
Without homebrew
Download and extract Syncthing for Mac:
https://github.com/syncthing/syncthing/releases/latest.
-
Copy the syncthing binary (the file you would open to launch
Syncthing) into a directory calledbinin your home directory i.e. into /Users/<username>/bin. If
“bin” does not exist, create it. -
Open
syncthing.plistlocated in /etc/macos-launchd. Replace the four occurrences of /Users/USERNAME with your actual home directory location. -
Copy the
syncthing.plistfile to~/Library/LaunchAgents. If
you have trouble finding this location select the “Go” menu in Finder
and choose “Go to folder…” and then type
~/Library/LaunchAgents. Copying to ~/Library/LaunchAgents will
require admin password in most cases. -
Log out and back in again. Or, if you do not want to log out, you can
run this command in terminal:
launchctl load ~/Library/LaunchAgents/syncthing.plist
Note: You probably want to turn off “Start Browser” in the web GUI
settings to avoid it opening a browser window on each login. Then, to
access the GUI type 127.0.0.1:8384 (by default) into Safari.
Linux
Using the Desktop Environment (KDE, Gnome, Xfce, Cinnamon, …)
You can make Syncthing start when you log into your desktop environment (DE) in
two ways.
Using DE tools:
-
Search for and launch a tool related to autostart or startup applications.
-
Add a new autostart application and search for and choose “Start Syncthing”.
If you don’t find “Start Syncthing” in the steps above or just prefer doing it
manually:
-
Find the file
syncthing-start.desktop: Either from the package you
downloaded from GitHub inetc/linux-desktop/, in
/usr/share/applications/if installed from your package manager
or from our repository. -
Copy
syncthing-start.desktopto~/.config/autostart/.
For more information relating to .desktop files e.g. for application menus,
refer to https://github.com/syncthing/syncthing/tree/main/etc/linux-desktop.
Using Supervisord
Go to /etc/supervisor/conf.d/ and create a new file named syncthing.conf with the following content (ensure you replaced <USERNAME> with valid username):
[program:syncthing]
autorestart = True
directory = /home/<USERNAME>/
user = <USERNAME>
command = /usr/bin/syncthing --no-browser --home="/home/<USERNAME>/.config/syncthing"
environment = STNORESTART="1", HOME="/home/<USERNAME>"
Reload Supervisord:
Then start it:
supervisorctl start syncthing
and check it is all working:
supervisorctl status syncthing
In case of troubles check the logs:
supervisorctl tail syncthing
Using systemd
systemd is a suite of system management daemons, libraries, and
utilities designed as a central management and configuration platform
for the Linux computer operating system. It also offers users the
ability to manage services under the user’s control with a per-user
systemd instance, enabling users to start, stop, enable, and disable
their own units. Service files for systemd are provided by Syncthing,
either in the etc/linux-systemd directory of the downloaded tarball
or directly installed to the appropriate location on your system when
installed through apt.syncthing.net.
You have two primary options: You can set up Syncthing as a system service, or a
user service.
Running Syncthing as a system service ensures that Syncthing is run at startup
even if the Syncthing user has no active session. Since the system service keeps
Syncthing running even without an active user session, it is intended to be used
on a server.
Running Syncthing as a user service ensures that Syncthing only starts after the
user has logged into the system (e.g., via the graphical login screen, or ssh).
Thus, the user service is intended to be used on a (multiuser) desktop
computer. It avoids unnecessarily running Syncthing instances.
The official Debian/Ubuntu Syncthing repository, and
several distros (including Arch Linux) ship these service files along with
the Syncthing package. If your distro provides the systemd service files for
Syncthing, you can skip step #2 when you’re setting up either the system service
or the user service, as described below. If in doubt, try if it works without and
go back to step #2 only if enabling the service failed.
How to set up a system service
-
Create the user who should run the service, or choose an existing one.
-
(Skip if your distribution package already installs these files, see above.)
From git location mentioned above copy theSyncthing/etc/linux-systemd/system/syncthing@.servicefile into the
load path of the system instance. -
Enable and start the service. Replace “myuser” with the actual Syncthing
user after the@:systemctl enable syncthing@myuser.service systemctl start syncthing@myuser.service
How to set up a user service
-
Create the user who should run the service, or choose an existing
one. Probably this will be your own user account. -
(Skip if your distribution package already installs these files, see above.)
Copy theSyncthing/etc/linux-systemd/user/syncthing.servicefile into the load path
of the user instance.
To do this without root privileges you can just use this folder under your
home directory:~/.config/systemd/user/. -
Enable and start the service:
systemctl --user enable syncthing.service
systemctl --user start syncthing.service
-
If your home directory is encrypted with eCryptfs on Debian/Ubuntu, then you will need to make
the change described in Ubuntu bug 1734290.
Otherwise the user service will not start, because by default, systemd checks for user
services before your home directory has been decrypted.
Automatic start-up of systemd user instances at boot (before login) is possible
through systemd’s “lingering” function, if a system service cannot be used
instead. Refer to the enable-linger command of loginctl to allow this
for a particular user.
Checking the service status
To check if Syncthing runs properly you can use the status
subcommand. To check the status of a system service:
systemctl status syncthing@myuser.service
To check the status of a user service:
systemctl --user status syncthing.service
Using the journal
Systemd logs everything into the journal, so you can easily access Syncthing log
messages. In both of the following examples, -e tells the pager to jump to
the very end, so that you see the most recent logs.
To see the logs for the system service:
journalctl -e -u syncthing@myuser.service
To see the logs for the user service:
journalctl -e --user-unit=syncthing.service
Permissions
If you enabled the Ignore Permissions option in the Syncthing client’s
folder settings, then you will also need to add the line UMask=0002 (or any
other umask setting you like) in the
[Service] section of the syncthing@.service file.
For the syncOwnership option to work, you can
grant extra capabilities to the service via the systemd unit file.
Add the following snippet to the service file (commented out in the
provided template). To ensure smooth upgrades, keeping it in an
override file using systemd edit ... is advised:
[Service]
AmbientCapabilities=CAP_CHOWN CAP_FOWNER
Debugging
If you are asked on the bugtracker to start Syncthing with specific
environment variables it will not work the normal way. Systemd isolates each
service and it cannot access global environment variables. The solution is to
add the variables to the service file instead.
To edit the system service, run:
systemctl edit syncthing@myuser.service
To edit the user service, run:
systemctl --user edit syncthing.service
This will create an additional configuration file automatically and you
can define (or overwrite) further service parameters like e.g.
Environment=STTRACE=model.
Запуск Syncthing в виде службы Windows
.
Время чтения — 2 мин.
Syncthing — это приложение для синхронизации каталогов между сетевыми устройствами. В качестве сетевых устройств могут
выступать настольные системы, ноутбуки и мобильные устройства. Syncthing можно запустить во всех популярных операционных системах.
Если на мобильных устройствах приложение стартует самостоятельно как служба, то на настольных системах необходима настройка.
Вы можете запустить приложение в сеансе текущего пользователя, но запускать при каждом запуске компьютера неудобно.
Официальное руководство предлагает два способа:
- Запускать через планировщик задач Windows;
- Запускать в виде службы.
Первый способ костыльный и перестанет работать если пользователь поменяет пароль, поэтому лучше настроить службу Windows.
Установка NSSM
Для настройки необходимо использовать утилиту которая умеет запускать Windows-приложения как службы.
Подобных утилит достаточно много, но мы возьмём одну из самых удобных — NSSM (The Non-Sucking Service Manager).
Скачиваем с официального сайта дистрибутив https://nssm.cc/download.
Распаковываем куда-нибудь, например, в c:\apps\nssm.
Затем складываем файл nssm.exe так, чтобы полный путь до приложения был следующим — c:\apps\nssm\nssm.exe.
Создание службы Windows
Допустим полный путь до исполняемого файла Syncthing — c:\apps\syncthing\syncthing.exe.
Запускаем командную строку Windows с правами локального администратора и создаём службу:
c:\apps\nssm\nssm.exe install Syncthing c:\apps\syncthing\syncthing.exe
c:\apps\nssm\nssm.exe set Syncthing AppDirectory c:\apps\syncthing
c:\apps\nssm\nssm.exe set Syncthing start SERVICE_DELAYED_AUTO_START
Настраиваем пользователя
В целях безопасности рекомендуется запускать Syncthing от имени пользователя без привилегий администратора.
Заходим в оснастку служб Windows, переходим в свойств службы Syncthing.

Выбираем существующего пользователя и указываем пароль.

Жмём «ОК» и перезапускаем службу.
Приложение станет доступно по ссылке http://127.0.0.1:8384.
Другие статьи
- Установка Syncthing для CentOS 7
- Статьи про другие приложения с тэгом #awesomeware
Automatically start Syncthing in the background when your PC boots, without having to log on. Survive accidental shutdowns when you log off and other potential problems.
Syncthing keeps files synchronized between two or more machines. To configure Syncthing as a Windows Service with AlwaysUp:
Syncthing not working properly as a Windows Service?
|


Modified on: Sat, 22 May, 2021 at 7:00 PM

Syncthing Syncthing is a continuous file synchronization program. It synchronizes files between two or more computers in real-time, using TLS encryption.

Syncthing can be run as a Windows service using FireDaemon Pro. This allows you to start and run the application automatically when Windows boots and before login. FireDaemon Pro also allows you to start multiple instances of the server, monitoring them and automatically restarting those instances in the event they crash. FireDaemon Fusion can also be used to manage your Syncthing service, plus other Windows services via your web browser.
Syncthing Setup Under FireDaemon Pro
Please follow the steps below to set up a Syncthing as a Windows service with FireDaemon Pro
Step 1: Download and Install Syncthing
- Download the latest Windows version from here. For the purposes of this guide, we will be using the Windows x64 version.
- Extract the contents to a directory such as «C:\Syncthing».
- Run the Syncthing.exe file included in the directory. There is no installer; instead, the .exe file starts the browser GUI as well as a console. Configure Syncthing to suit your preferences, such as adding remote machines. The Syncthing Getting Started guide explains more on setup
Step 2: Set Up Syncthing as a FireDaemon Pro Service
Download and install FireDaemon Pro. Double click the FireDaemon Pro icon on your desktop, then click on the New (i.e. +) button in the toolbar (or type Ctrl + N) to create a new service. Enter the information into the fields as you see below. Adjust the path names to suit your installation. Note the required parameters.

Next, click on the FireDaemon Pro Settings tab:

Enter appropriate values in the fields on the Settings tab as follows:
- (Required) Job Type: You must set job type to «Global Job». If you do not set the job type to «Global Job», «syncthing.exe» will be orphaned when the service is stopped or restarted.
- (Required) Logon Account: Enter the Windows account under which the application is to be run, e.g. the current administrator account.
- Password / Confirm Password: Enter the logon account’s password twice.
- (Optional) Interact with Desktop: If this setting is enabled (default), the application’s output messages can be seen in the console window on Windows Session 0. To switch to Session 0, it may be necessary to install FireDaemon Zero and ZeroInput. Alternatively, this setting may be disabled, in which case the application’s messages will be hidden.
- (Optional) Priority: To allocate more CPU time to the application, select a higher scheduling priority in this field.
- (Optional) CPU Bindings: To run the application on a specific CPU, specify the appropriate CPU in this field.
Next, click on the Lifecycle tab. Set Shutdown By to Forceful Termination and check «Console Application».

Lastly, click the Save and Close (ie. the tick) button on the toolbar. If the service’s Startup Type is set to Automatic or Automatic (Delayed-Start), it will start immediately.

If the service’s Interact with Desktop setting is enabled, the Syncthing status can also be verified by switching to Windows Session 0 to view the Syncthing’s messages.

Did you find it helpful?
Yes
No
Send feedback
Sorry we couldn’t be helpful. Help us improve this article with your feedback.
Related Articles
Windows
1 Minute
Yesterday I blogged about SyncThing as an alternative to BitTorrentSync. Today a business partner asked me whether it is possible to run SyncThing as a service. The answer is definitely yes, but it requires an additional tool.
As per this StackOverflow answer you can use NSSM – the Non-Sucking Service Manager to create a service that works fine.
I had to add the following command line arguments to the call:
- -no-console
- -no-browser
- -home=”c:\users\<myaccount>\AppData\Local\Syncthing”
(Mind the extra dash after the “no”!)
The latter was because I wanted to keep using the configuration which was generated by just starting the SyncThing console application. It’s perfectly possible to move this folder somewhere else.
Also, on the I/O tab, I added log files for stdout and stderr, so I am able to see any error messages it might write. I didn’t specify any file rotation yet, but that’s probably something you want to do.
After creating the service using NSSM, I could simply start the SyncThing service and connect to it with the browser.
Due to a restriction of our router (no UPnP), I also had to configure port forwarding for port 22000 as described here for it to be able to connect to other servers over the internet.
Published