About Lenovo
-
Our Company
-
News
-
Investor Relations
-
Sustainability
-
Product Compliance
-
Product Security
-
Lenovo Open Source
-
Legal Information
-
Jobs at Lenovo
Shop
-
Laptops & Ultrabooks
-
Tablets
-
Desktops & All-in-Ones
-
Workstations
-
Accessories & Software
-
Servers
-
Storage
-
Networking
-
Laptop Deals
-
Outlet
Support
-
Drivers & Software
-
How To’s
-
Warranty Lookup
-
Parts Lookup
-
Contact Us
-
Repair Status Check
-
Imaging & Security Resources
Resources
-
Where to Buy
-
Shopping Help
-
Track Order Status
-
Product Specifications (PSREF)
-
Forums
-
Registration
-
Product Accessibility
-
Environmental Information
-
Gaming Community
-
LenovoEDU Community
-
LenovoPRO Community
©
Lenovo.
|
|
|
|
Microsoft has effectively resolved the Bluetooth connecting or pairing issues in Windows 10 with Swift Pair. This is basically a new feature that allows a quick connection between Bluetooth peripherals and the computer. Although this came way back with April 2018 update, the company lately improved this on Windows 10 May 2020 update.
Enabling this feature will reduce the steps required to pair up your device to the computer. Once turned On, users may directly connect to the PC via notification section on the taskbar. In this post, we have covered two different ways to activate the Bluetooth Swift Pair on the computer.
Recent: Uninstall or Reinstall the Bluetooth driver in Windows 10
Here, we discuss two different ways enabling the Bluetooth Swift Pair on Windows 10 PC. They are –
1] Windows Settings
To start using the Swift pair in Bluetooth on the computer, follow these easy steps –
- Use Win + I to launch the Windows Settings.
- Click Devices thereafter Bluetooth & other devices on the subsequent screen.
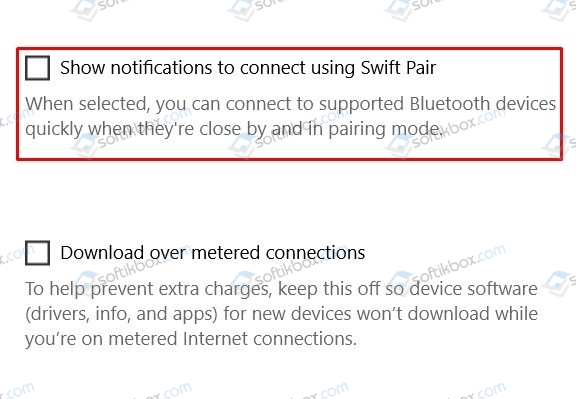
- Head over to the right page and mark the checkbox left of “Show notifications to connect using Swift Pair“.
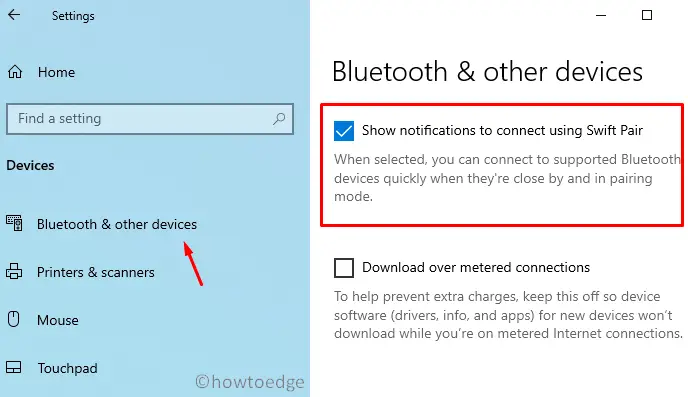
That’s it, you may now easily connect to any supported Bluetooth devices directly from the notifications section.
How to connect Bluetooth devices using Swift Pair
To connect a Bluetooth device using Swift Pair, use the below steps –
- First of all, enable Bluetooth on both devices.
- Now, take the device closer to the PC so that Windows triggers a setup.
- Click the connect button and the device pairs to the computer.
That’s it, you may now start transferring data or listening to Phone Music on PC or vice-versa.
2] Via Registry Editor
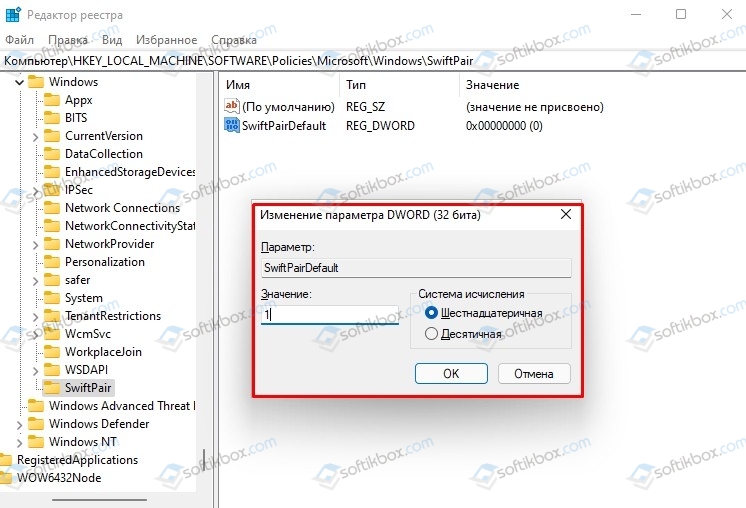
If your Windows 10 device doesn’t support Swift Pair, modify a few entries inside the registry. Here’s are the steps to work upon –
- Make a right-click on the Windows icon and select Run.
- Type “
regedit” in the text box and press OK. - When the UAC window comes into view, tap Yes.
- Now, browse to the below location –
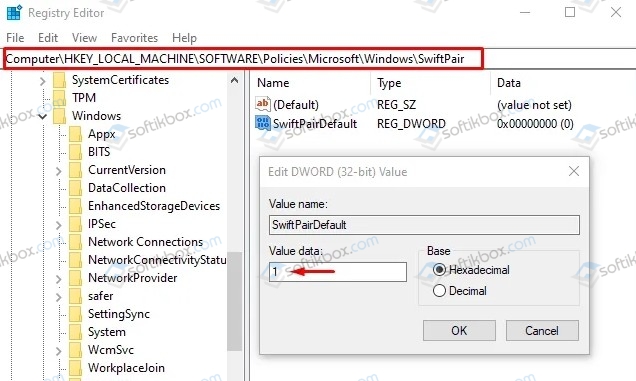
HKEY_LOCAL_MACHINE\Software\Policies\Microsoft\Windows\SwiftPair
- Double-click the “SwiftPairDefault” and assign its value to “1” from “0”.
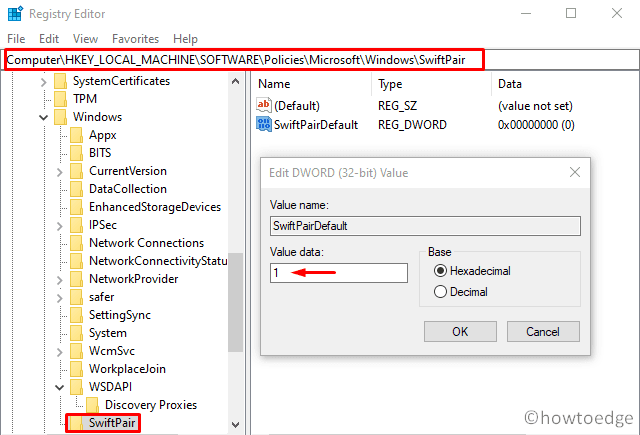
Create SwiftPair folder on the Registry Editor
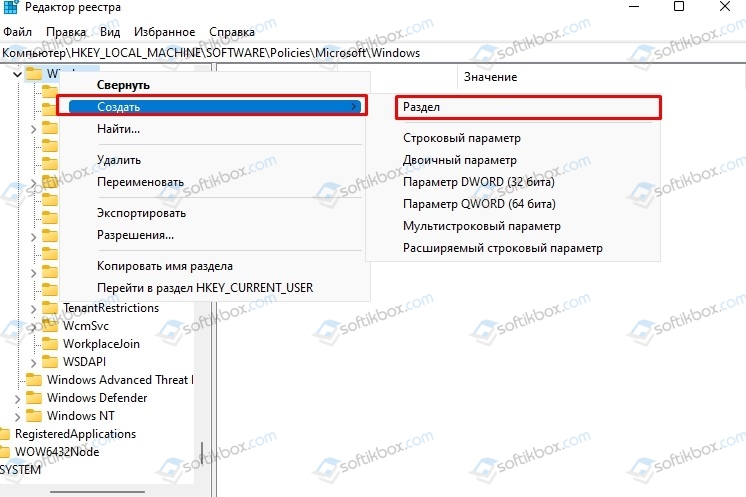
Sometimes, reaching out to the above path simply doesn’t display any files or folders. If that’s the case, you need to create a new key then DWORD entry. Here are the essential steps to work upon –
- First of all, copy/paste
HKEY_LOCAL_MACHINE\Software\Policies\Microsoft\Windowsat the address bar and hit Enter. - Right-click on the Windows folder and select New > Key. Make sure to name this key folder to “SwiftPair“.
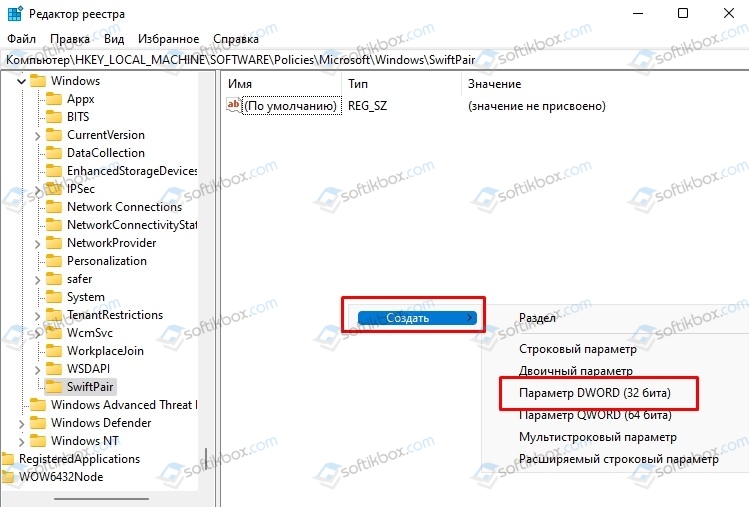
- Next, right-click again on the right pane and select New > DWORD (32 bit) value.
- Rename this entry as “
SwiftPairDefault“. - Double-click over this and put “1” instead of by-default value i.e. “0”.
- Lastly, click OK to come out of the registry editor and Restart Windows.
That would be all, I hope this article helps to address the Bluetooth Swift Pair issues in Windows 10. If you have any queries or suggestions, let us know in the comment section.
Read Next:
- How to Fix Missing Generic Bluetooth Driver Error on Windows 10
- How to Enable or Disable Bluetooth Absolute Volume on Windows 10 PC
01.02.2022
Просмотров: 1847
Начиная с Windows 10, компания Майкрософт внедрила в состав операционной системы новую опцию Swift Pair, которая позволяет намного быстрее подключать к компьютеру устройства посредством Bluetooth технологии. Не является исключением и Windows 11, в которой также можно включить Swift Pair, приблизив устройство к Windows 11 и выполнив краткие шаги сопряжения.
Читайте также: Как в Windows 11 включить и отключить Bluetooth?
Где находятся настройки Bluetooth Swift Pair в Windows 11?
Для того, чтобы включить Swift Pair в Windows 11, стоит выполнить следующие действия:
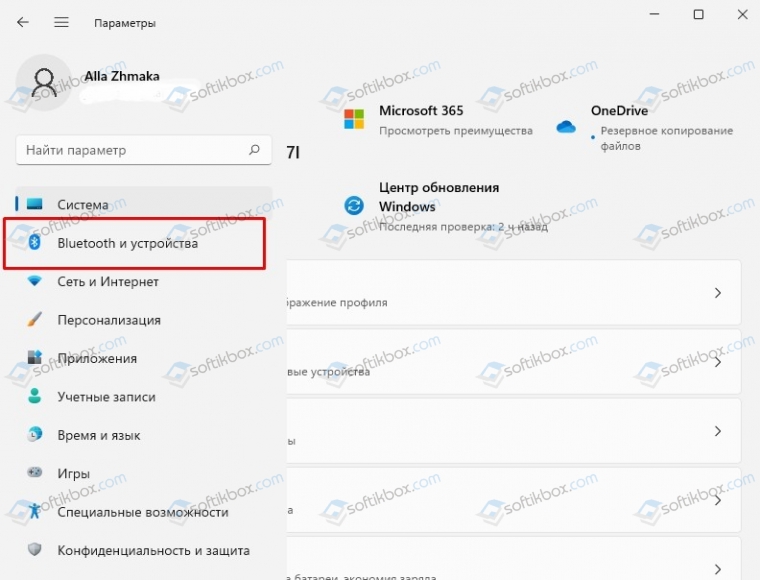
- Открываем «Параметры» и выбираем «Bluetooth и устройства».
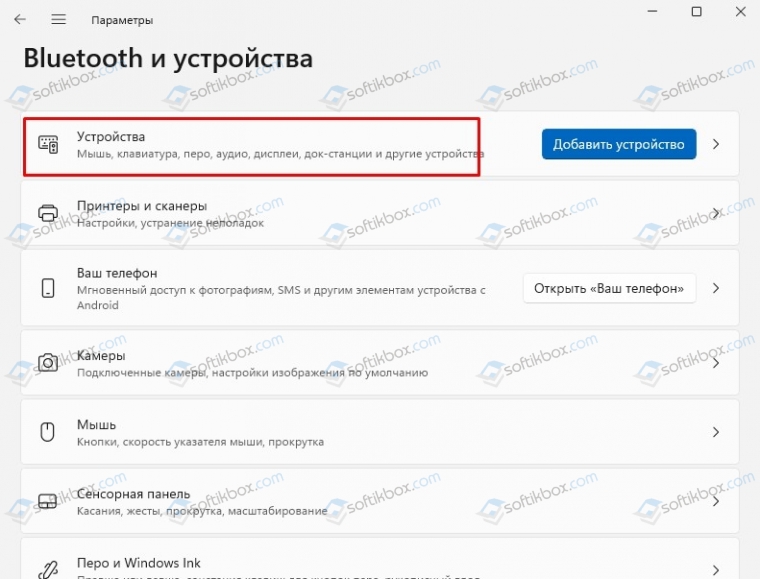
- Выбираем вновь «Устройства».
- В новом окне находим параметр «Показывать уведомления для подключения с помощью переключателя Swift Pair» и отмечаем галочкой или перетаскиваем ползунок в положение «Включено».
- Функция активирована.
В случае, если такого пункта в параметрах вашей ОС нет и вы не можете включить или отключить Swift Pair, тогда стоит внести несколько изменений в системный реестр. Для этого выполняем следующее:
- Жмем «Win+R» и вводим «regedit».

- Теперь переходим по ветке HKEY_LOCAL_MACHINE\Software\Policies\Microsoft\Windows\SwiftPair. Здесь находим параметр «SwiftPairDefault» и задаем ему значение «1».
- Если такого раздела нет, то нужно нажать на папке Windows в древовидном меню реестра и выбрать «Создать», «Раздел».
- Присваиваем разделу название «SwiftPair».
- В нем нажимаем на пустом месте правой кнопкой мыши и выбираем «Создать», «Параметр DWORD 32-бит».
- Теперь перезагружаем систему, чтобы изменения вступили в силу и повторяем попытку включения SwiftPair.
Как связать два устройства по Bluetooth Swift Pair в Windows 11?
Для того, чтобы подключить устройство Bluetooth Swift Pair в Windows 11, стоит выполнить следующие действия:
- Включаем Bluetooth на обоих устройствах.
- Подносим второй гаджет к ПК настолько близко, чтобы он попал в зону видимости блютуза.
- Появится небольшое уведомление. Нажимаем «Подключиться». Далее выполняем инструкции с экрана (всего два шага).
Невзирая на то, что Sift Pair позволяет быстрее подключить гаджет к ПК посредством технологии Bluetooth, все же его совместимость только с ограниченным кругом устройств является минусом. На данный момент с Sift Pair совместимы Surface Precision Mouse, наушники Surface, Bluetooth-клавиатура Microsoft и другие гаджеты бренда Surface и Microsoft.
On Windows 10, Swift Pair is a feature that allows you to connect Bluetooth peripherals to your computer quickly.
Swift Pair has been available since version 1803, and basically, it’s a feature that reduces the steps required to pair a device. When enabled, you can set the Bluetooth peripheral closer to your computer for Windows 10 to detect it and display a notification to complete the pairing.
However, if the feature isn’t already enabled, you must turn it on from the Settings app before using it.
In this guide, you’ll learn the steps to enable Swift Pair to set up Bluetooth devices on Windows 10 without even opening the Settings app.
- Enable Bluetooth Swift Pair on Windows 10
- Connect Bluetooth Swift Pair on Windows 10
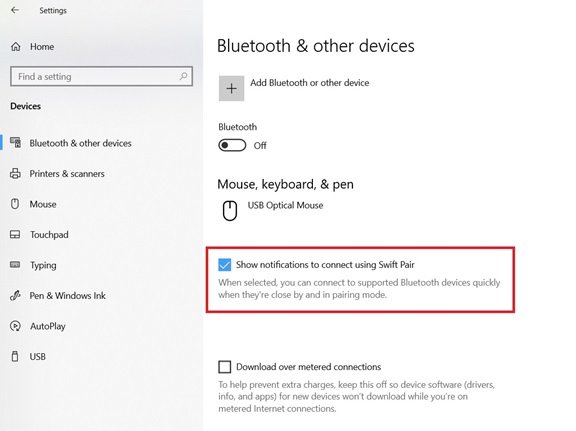
To enable Swift Pair on your computer, use these steps:
-
Open Settings on Windows 10.
-
Click on Devices.
-
Click on Bluetooth & other devices.
-
Check the “Show notifications to connect using Swift Pair” option.

Enable Swift Pair on Windows 10

Once you complete the steps, you’ll be able to connect supported Bluetooth devices from the toast notification quickly.
Connect Bluetooth Swift Pair on Windows 10
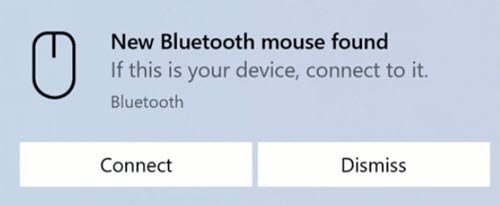
To pair a Bluetooth device with Swift Pair, use these steps:
-
Enable the pairing mode on the Bluetooth device.
-
Get the device closer to Windows 10 to trigger the setup.
-
Select the Connect button from the notification to pair it.

Swift Pair connect (image source Microsoft)

After you complete the steps, you’ll be able to start using the Bluetooth device. Then, when the peripheral isn’t in pairing mode or nearby, Windows 10 will remove it from Action Center.
We may earn commission for purchases using our links to help keep offering the free content. Privacy policy info.
All content on this site is provided with no warranties, express or implied. Use any information at your own risk. Always backup of your device and files before making any changes. Privacy policy info.
Download Windows Speedup Tool to fix errors and make PC run faster
Bluetooth is a wireless technology that provides a ‘wire-free’ way to connect peripherals over a short distance directly to your computer system. Previous versions of Windows came with a simple Bluetooth pairing process that involved scanning for the peripherals, then entering a pairing code, and finally completing a wizard.
If you use Bluetooth devices on your system often you may have experienced cases where pairing your device and the computer takes a couple of more seconds to complete. Basically, pairing Bluetooth devices on Windows 11/10 can continue to be one time-consuming task – but Microsoft’s Bluetooth feature, Swift Pair, makes things easy.
What is this new Bluetooth Swift Pair feature?
Microsoft wanted to make the experience of pairing Bluetooth devices on Windows 11/10 smooth – this is exactly why they released Swift Pair with Windows 10 April 2018 Update. Swift Pair cuts through the steps of conventional Bluetooth pairing on Windows 11/10 and turns it into one seamless process that demands a single click. In simple words, Swift Pair is an option for pairing Bluetooth devices more quickly in Windows 11/10. This feature clips up your Bluetooth peripherals to your computer in a timely manner; also, your devices can connect to Windows 11/10 PCs in no time if they are into active pairing mode.
The limitation:
Users need to note that Microsoft’s Swift Pair feature is limited by devices. This means it supports only certain devices which include:
- Microsoft Bluetooth Keyboard
- Microsoft Bluetooth Mouse
- Surface Ergonomic Keyboard
- Surface Precision Mouse
- Microsoft Modern Mobile Mouse
- Surface Mobile Mouse
- Microsoft Arc Mouse
- Surface Arc Mouse
- Surface Headphones
So, whatever Bluetooth peripheral you have, if your Bluetooth device is not a Microsoft product, or maybe an exceptionally popular product, it will not be compatible with the Swift Pair feature and won’t be available for you at all when trying to pair over Bluetooth.
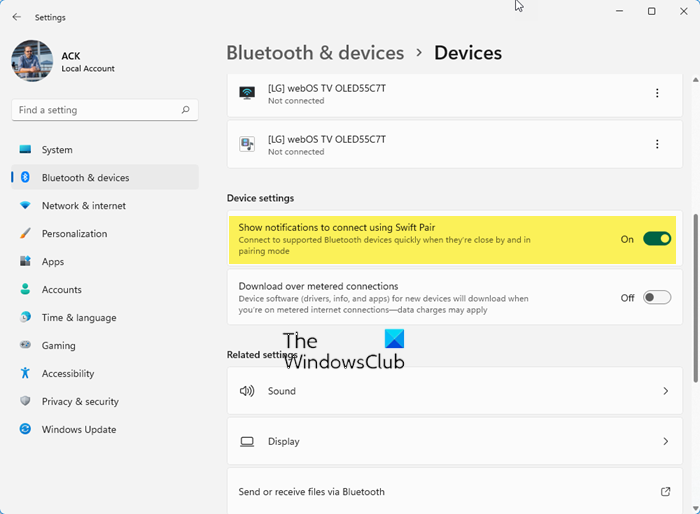
To enable Swift Pair on Windows 11, follow these steps:
- Open Windows 11 Settings
- Click on Bluetooth and devices settings
- On the right side, click on View more devices
- Locate Device settings for your device
- Toggle On the switch against Show notifications to connect using Swift Pair
- Now you can enable Pairing Mode and Connect the device.
Enable Bluetooth Swift Pair on Windows 10
Swift pair released starting with Windows 10 version 1803 but was not turned on automatically for users. To start using Swift Pair on your Windows 10 system you will need to enable it from the settings app. Use the below steps:
- Go to the Windows ‘Settings’ app from the Start Menu
- Click on ‘Devices’
- Select ‘Bluetooth & other devices’
- Check the option ‘Show notifications to connect using Swift Pair’
Done! Once these steps are completed you will be able to connect Bluetooth devices (compatible ones) directly from the toast notifications.
Read: Bluetooth speaker paired, but no Sound or Music.
How to use Bluetooth Swift Pair on Windows 11/10
Follow these steps to pair a Bluetooth device with the Swift Pair feature:
- To use the Swift Pair feature, make sure your Bluetooth device is on pairing mode.
- Now get the device near your Windows 10 system to automatically trigger the setup.
- When the peripheral is close by, Windows will show a notification to the user.
- Hit the ‘Connect’ button from the notification popup; this starts pairing the peripheral.
Please note: In most cases, pairing mode can be enabled by pressing a physical button on the device for around 10 seconds. When the pairing mode is enabled, a light on the device starts blinking letting the user know that it is ready to be connected to the system. For any further instructions, you can go through the instruction manual of the device or contact the manufacturer.
Once you complete the above steps, your Bluetooth device will be ready to use on your system. Also, when the device is not nearby or when the pairing mode is not enabled, Windows 10 will remove it from Action Center.
Related: How to boost or extend Bluetooth Signal Range.
How to disable Bluetooth Swift Pair on Windows 11/10
If for any reason you wish to disable the Swift Pair Feature (like security concerns), you can do it from the ‘Settings’ app in the ‘Bluetooth & other devices’ section. Simply uncheck the ‘Show notifications to connect using Swift Pair’ option.
Final words
Swift Pair makes the process of pairing Bluetooth devices quick. But again, just because your device is not compatible it does not mean you cannot connect your device to your PC. You can always connect it through the conventional pairing menu.
TIP: This post will help you if Bluetooth devices are not showing, pairing, or connecting.
Anand Khanse is the Admin of TheWindowsClub.com, a 10-year Microsoft MVP (2006-16) & a Windows Insider MVP (2016-2022). Please read the entire post & the comments first, create a System Restore Point before making any changes to your system & be careful about any 3rd-party offers while installing freeware.