Storport.sys в Windows 10 генерирует различные проблемы. У одних, он стал причиной появления BSOD. У других пользователей, возникла неожиданно большая нагрузка на процессор от данного файла, появляются лаги, зависания и т. п. Есть и те, кто видит ошибку в LatencyMon. Порой его также рекомендуют обновлять вручную, что является некорректным подходом к задаче. Предлагаем разобраться, в чем причина проблемы.
Разновидности кодов с ошибками (по ссылкам ниже вы можете найти дополнительную информацию):
KMODE EXCEPTION NOT HANDLED
KERNEL DATA INPAGE
PAGE FAULT IN A NONPAGED AREA
SYSTEM THREAD EXCEPTION NOT HANDLED Storport.sys
IRQL NOT LESS OR EQUAL
SYSTEM SERVICE EXCEPTION
Причины
Полезно знать, что файл Storport.sys – это драйвер операционной системы. Файл Storport.sys относится к Microsoft Storage Port Driver. Логично предположить, что неполадка связана с драйвером и вы будете отчасти правы, но гораздо чаще проблема отдаленно затрагивает данное программное обеспечение.
Причины BSOD:
- неправильно выставленное питание для комплектующих компьютера;
- конфликт или даже повреждение драйверов;
- сбой питания или поломка SSD;
- нарушение целостности файлов Windows.
Согласно нашему исследованию, довольно часто Storport.sys создает высокую нагрузку в LatencyMoon и даже появляются синие экраны смерти у тех, кто собирал компьютер самостоятельно. Некорректный подбор комплектующих или настройка питания тому виной.
Как исправить ошибку из-за файла Storport.sys в Windows 10?
Мы не будем перебирать все стандартные решения, вроде сканирования Windows на повреждение системных файлов. Это само собой разумеется и может сработать в отдельных случаях. Наша цель – сконцентрироваться на наиболее вероятных способах исправления.
Способы устранения ошибки Storport.sys в Windows 10:
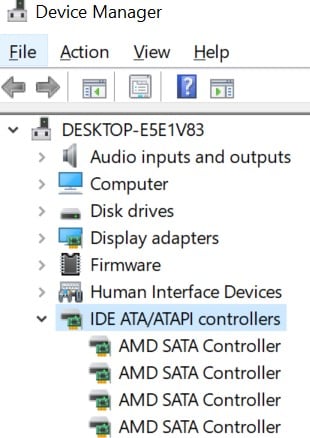
- Работа с драйвером. Очень многие на форуме написали, что отключение AMD Sata controller сработало для них. Для этого нужно открыть «Диспетчер устройств», зайти во вкладку «Контроллеры IDE ATA/ATAPI» и через правую кнопку мыши удалить драйвер.
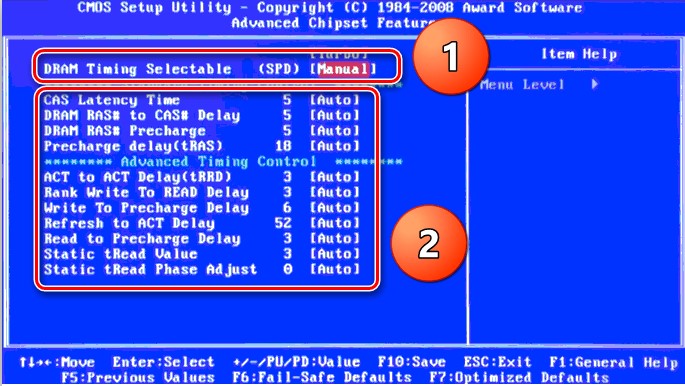
- Изменить напряжение. Данная процедура гораздо сложнее и требует повышенной осторожности, чтобы не спалить компьютер. К примеру, для одного из пользователей решением стало увеличение напряжения ОЗУ с 1,35 В до 1,38 В и BSOD перестал проявляться. Подобная история – изменение напряжения для SSD диска. Выполнить задуманное можно через BIOS, раздел «Advanced Chipset Features». Сбросить конфигурацию питания к состоянию по умолчанию можно через командную строку, нужно использовать команду powercfg -restoredefaultschemes.
- Проверка накопителей. Нередко наблюдается проблема у тех, кто подключил старый жесткий диск или SSD от предыдущего ПК к своему новому. Следует поочередно отключать накопители и проверять работоспособность без них.
Не забудьте также попробовать обновить систему и драйвера, возможно, это тоже сработает. Может иметь место и конфликт комплектующих, следует проверить эту теорию в качестве запасной, если перечисленные выше действия не сработают.
Мы желаем знать, работают указанные решения или нет и насколько эффективно. Проще всего это сделать, если вы оставите свои комментарии. Помогите нам и другим читателям больше узнать об ошибке. Вместе мы точно найдем рабочее решение.
If you keep getting random blue screens with storport.sys lately, don’t panic. It can be easily fixed!
Fixes for storport.sys in Windows 10
Here’re 6 fixes that have helped other users resolve the storport.sys in Windows 10 problem.
If you CANNOT log into your computer system, please start from Fix 1; If you CAN log into your computer system properly, please start from Fix 2.
- Enter Safe Mode with Networking
- Update your device drivers
- Repair corrupt system files
- Run DISM
- Power cycle your SSD
- Check disk errors
Fix 1: Enter Safe Mode with Networking
Fix 1 is a step to allow you to log into Windows if you cannot boot into Windows normally.
- Make sure your computer is off.
- Press the power button to turn on your PC. Then when Windows displays a login screen (i.e. Windows has fully booted), long press the power button to turn it off.

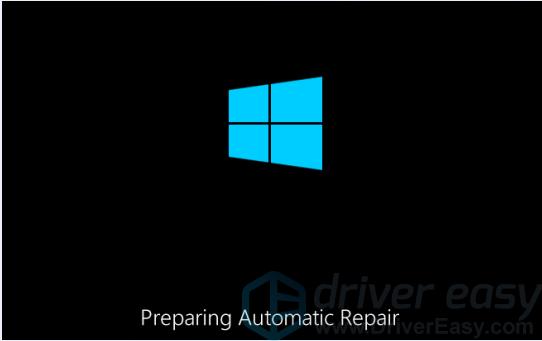
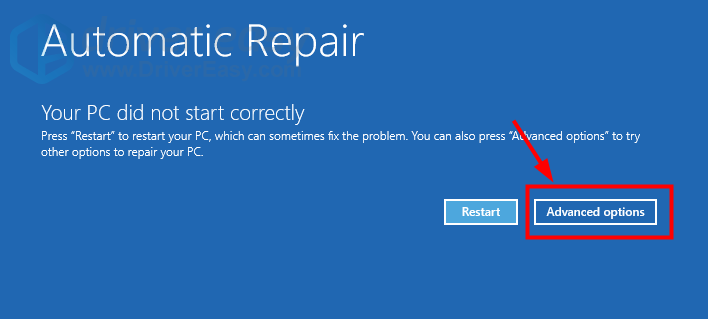
- Repeat 1) and 2) until the screen says Preparing Automatic Repair.

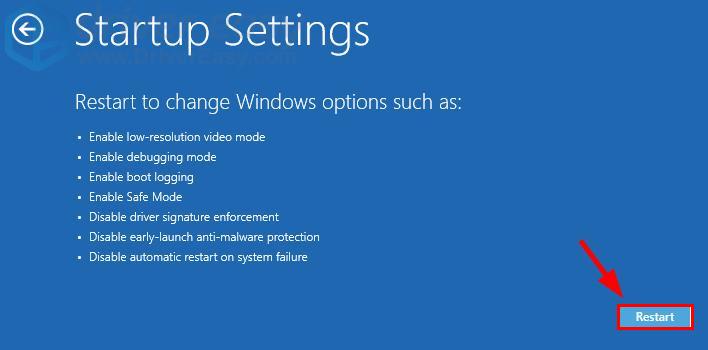
- Wait for Windows to finish diagnosing your PC, and click Advanced options.

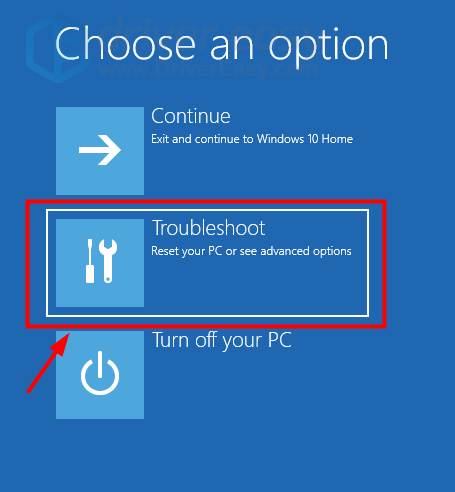
- Click Troubleshoot.
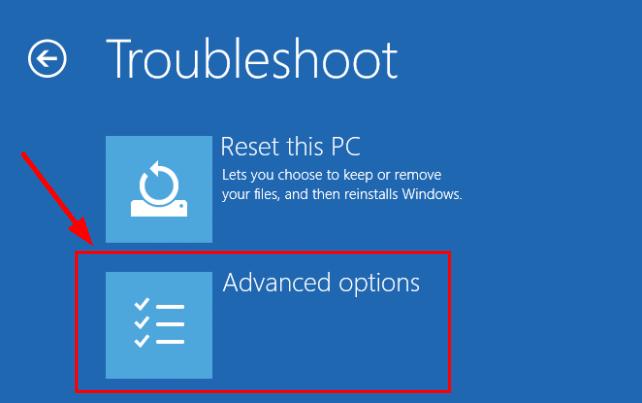
- Click Advanced options.
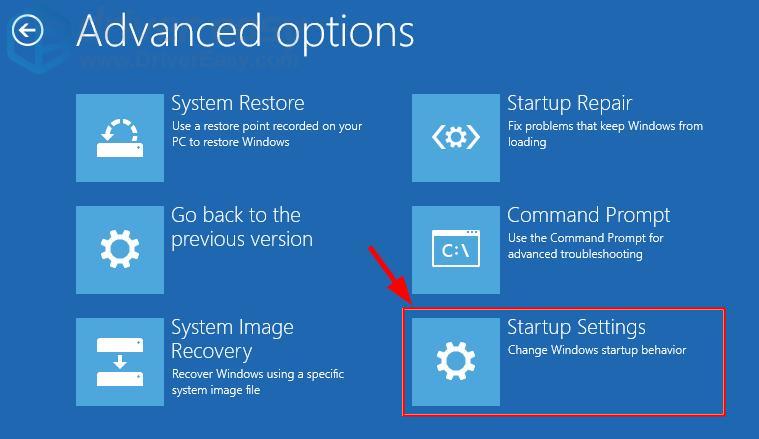
- Click Startup settings.

- Click Restart.

- On your keyboard, press 5 to enable Safe Mode with Networking.

- Now you’ve successfully booted up in Safe Mode with Networking, continue with Fix 2 to troubleshoot the storport.sys blue screen problem.

Fix 2: Update your device drivers
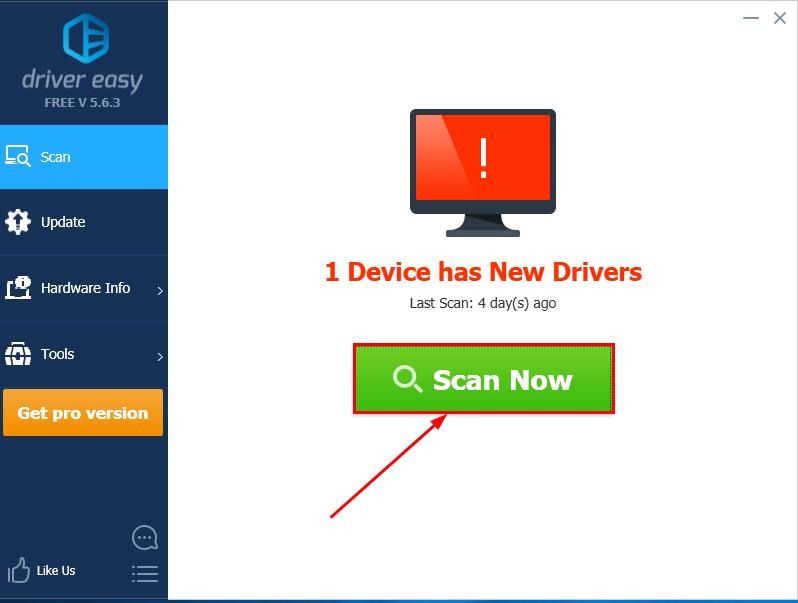
This problem may occur if you’re using the wrong or outdated device drivers. So you should update your device drivers to see if it fixes your problem. If you don’t have the time, patience or skills to update the driver manually, you can do it automatically with Driver Easy.
Driver Easy will automatically recognize your system and find the correct drivers for it. You don’t need to know exactly what system your computer is running, you don’t need to risk downloading and installing the wrong driver, and you don’t need to worry about making a mistake when installing. Driver Easy handles it all.
You can update your drivers automatically with either the FREE or the Pro version of Driver Easy. But with the Pro version it takes just 2 clicks (and you get full support and a 30-day money back guarantee):
1) Download and install Driver Easy.
2) Run Driver Easy and click the Scan Now button. Driver Easy will then scan your computer and detect any problem drivers.
3) Click Update All to automatically download and install the correct version of ALL the drivers that are missing or out of date on your system (this requires the Pro version – you’ll be prompted to upgrade when you click Update All).
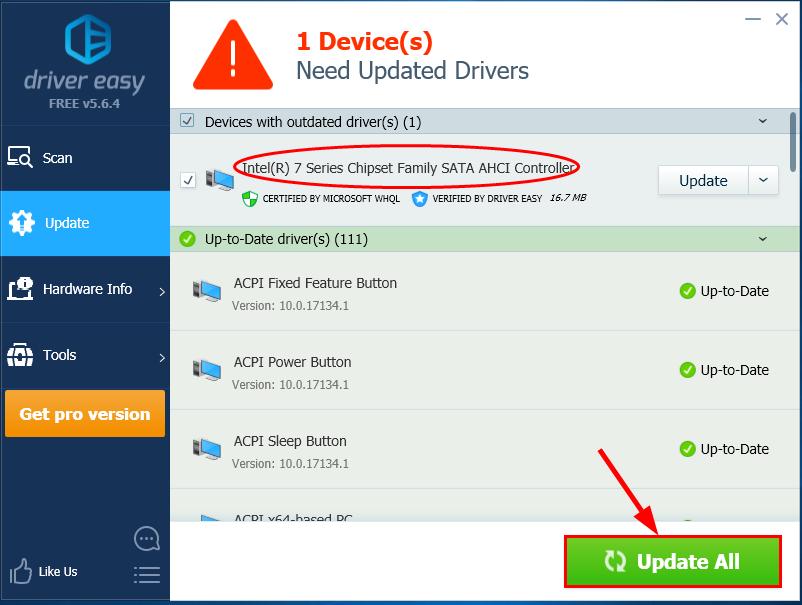
4) Restart your computer for the changes to take effect.
5) Check to see if the storport.sys blue screen issue is resolved. If yes, then congrats! If the problem remains, please move on to Fix 3, below.
Fix 3: Repair corrupt system files
The storport.sys blue screen error could be caused by missing, corrupt or damaged system files on your computer. To see if this is the case, you should run a Windows repair.
There are two ways you can repair possible issues with your system files:
- Repair & replace corrupt system files with Fortect
- Run SFC scan
Repair & replace corrupt system files with Fortect
Fortect is a tool specializing in Windows repair. With Fortect, the preliminary will scan your computer’s operating system for viruses, malware, and missing, damaged, or corrupt files, then it removes all problematic files found and replaces them with new healthy files. It’s like a clean reinstall of your operating system, except that you won’t lose any user data, and all programs, and settings are exactly as they are before the repair.
Here’s how to use Fortect to run a Windows repair:
1) Download and install Fortect.
2) Open Fortect and click Yes.
3) Wait for Fortect to run a scan on your PC. The process might take a couple of minutes.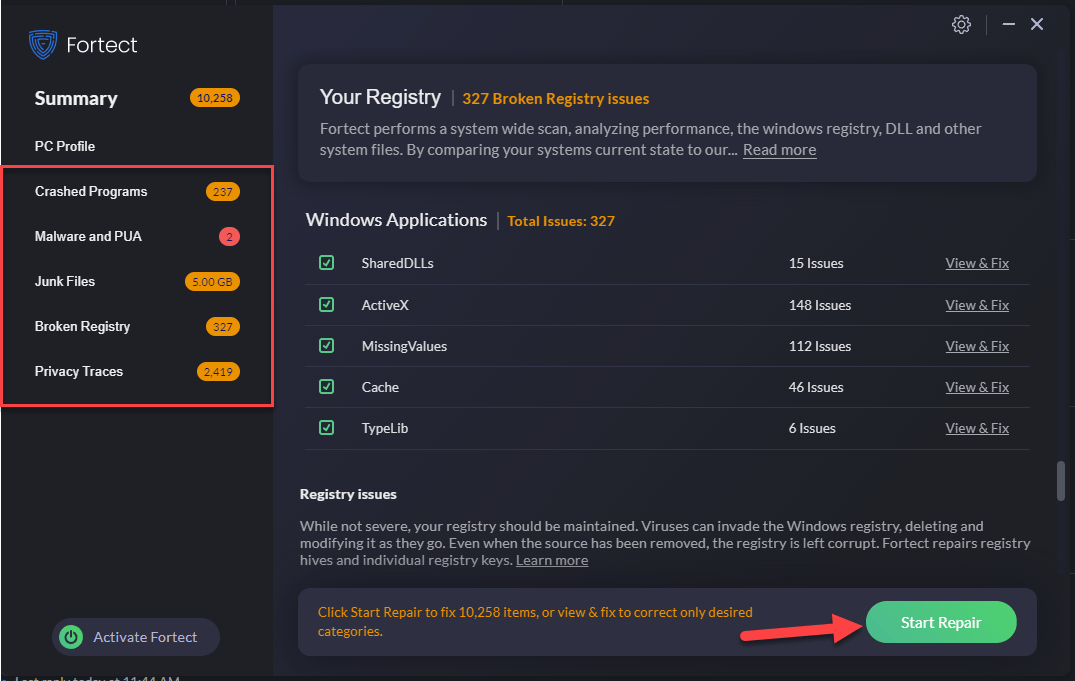
Once the scan finishes, you will get a summary of the issues found on your computer. If you need to proceed with the repair function, you’ll be required to purchase the full version.
The full version of Fortectcomes with a 60-day money-back guarantee and full custom support. If you run into any problems while using Fortect, or if it doesn’t work for you, don’t hesitate to contact Fortect support team.
5) Restart your computer for the changes to take effect.
6) Check your computer to see if the storport.sys BSOD problem has been fixed.
Run SFC scan
System File Checker (SFC) is a handy feature in Windows that helps scan your system files and repair missing or corrupted system files(including those related to BSOD). To run the SFC scan:
1) On your keyboard, press the Windows logo key and type cmd. Then right click on Command Prompt and click Run as administrator.
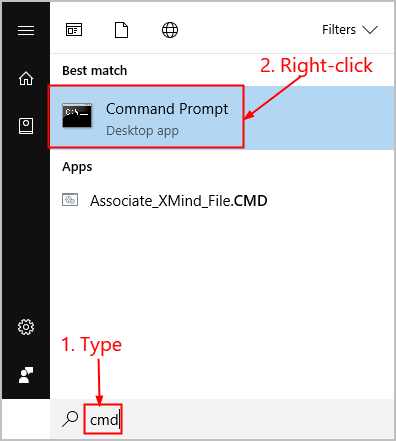
2) Click Yes when prompted to confirm.
3) In the command prompt window, type sfc /scannow and press Enter.
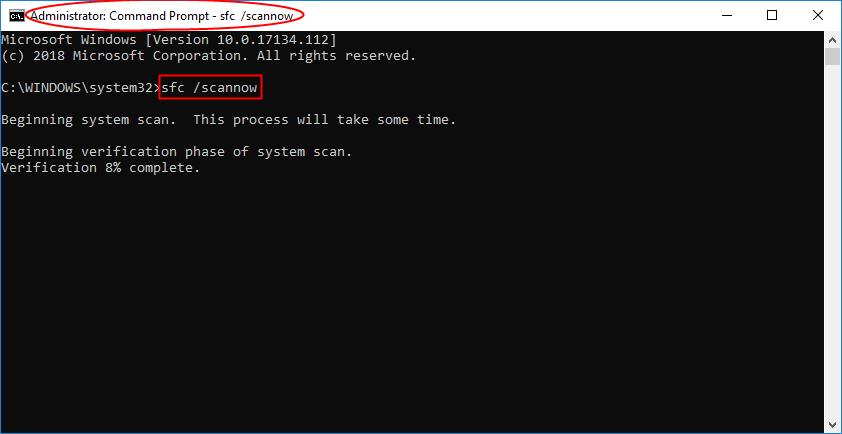
It’ll take some time for the SFC to replace the corrupted system files with new ones if it detects any, so please be patient.
4) Restart your computer for the changes to take effect.
5) Check your computer to see if the storport.sys BSOD problem has been fixed. If yes, then congrats! If the issue still persists, please move on to Fix 4, below.
Fix 4: Run DISM
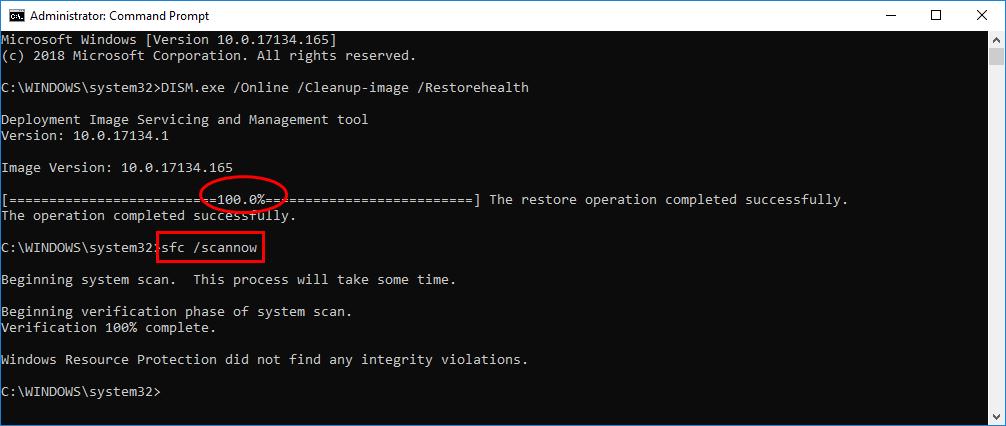
DISM (Deployment Image & Servicing Management) is another tool that helps us fix Windows-corruption-caused errors (storport.sys failed error in this case). To run DISM:
- On your keyboard, press the Windows logo key and type cmd. Then right-click on Command Prompt and click Run as administrator.

- Type the following command and press Enter:
DISM.exe /Online /Cleanup-image /Restorehealth

Wait a while for the whole process to finish.
- Type sfc /scannow and press Enter.

- Restart your computer and check if the storport.sys blue screen problem has been fixed.

Blue screen issue still not resolved yet? Please move on to Fix 5, below.
Fix 5: Power cycle your SSD
Sometimes this system crash with storport.sys failed happens simply because of an issue(a sudden shutdon/power loss) with our SSD. If that’s the case, we can do a power cycle and see it’s back to life:
- Power off your PC.
- Disconnect your PC from ALL power supplies (AC adapter plus the battery if you’re using a laptop).
- Long press the power button for at least 30 seconds and wait for 10 minutes.
- Reconnect ALL power supplies (AC adapter plus the battery if you’re using a laptop).
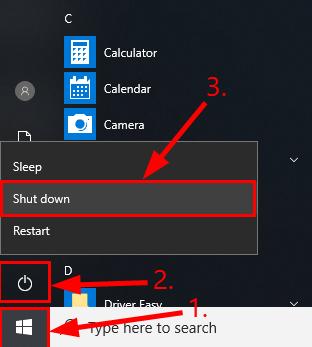
- On your keyboard, press & hold down the Shift key. Then click the Windows logo key > the power icon > Shut down.

- Press & hold the function keys to enter BIOS. (You might want to check our your user manual to know what the function keys for this are).
Note: Do not release the function keys until you see the BIOS setup screen. - Allow your PC for 20 minutes of stay in BIOS.
- Repeat steps 1) – 3).
- Remove the SSD from your PC:
For a desktop: unplug the cables.
For a laptop: disconnect the drive form the junction. - Wait 30 seconds before you reconnect the drive to your PC.
- Reconnect ALL power supplies (AC adapter and battery if you’re using a laptop).
- Power on your PC and check if the storport.sys blue screen problem is fixed. If yes, then great! If it still persists, you should try Fix 6, below.
Fix 6: Check disk errors
Disk check is a useful in-built Windows tool that scans our hard disk and external drives for errors and fix them.
The disk error scanning takes only a few minutes. But once it detects any errors, the fixing procedure can take HOURS to complete. Make sure you have enough time set aside.
To do so:
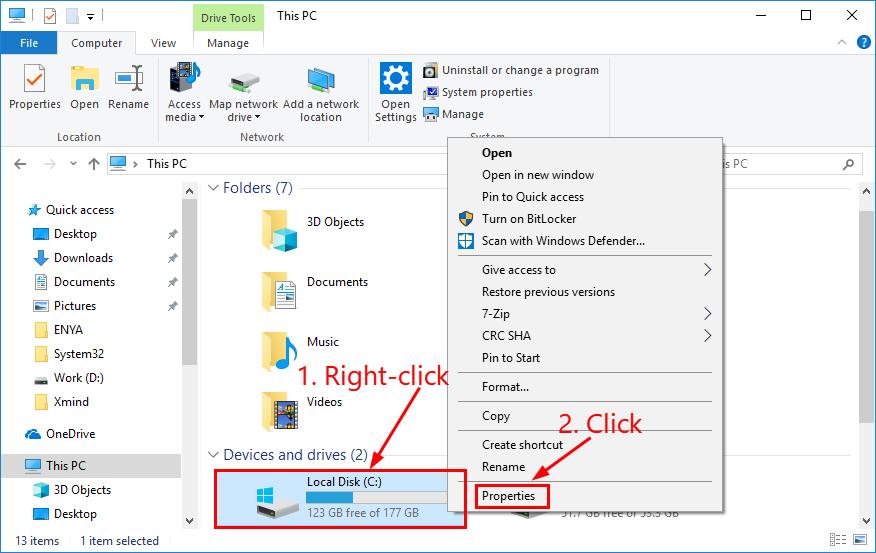
- On your keyboard, press the Windows logo key and E at the same time, then click This PC.

- Right-click on Local Disk and click Properties.
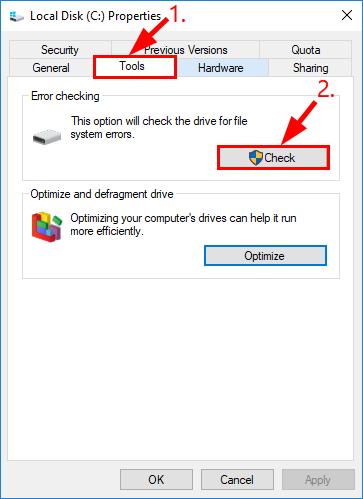
- Click the Tools tab > Check.

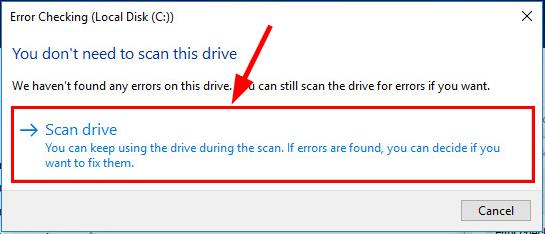
- Click Scan drive.

-
Follow the on-screen instructions for Windows to detect and fix the errors found.
-
Restart your computer and see if the storport.sys failed blue screen of death issue is resolved.

Hopefully you have successfully fixed the storport.sys in Windows 10 problem by now. If you have any ideas, suggestions or questions, please leave us a comment below. Thanks for reading!
5
5 people found this helpful
Storport.sys – это системный файл, связанный с хранением данных на устройстве хранения компьютера. Это файл, созданный драйвером порта хранилища Microsoft. Однако может быть несколько причин, из-за которых может возникнуть ошибка «Синего экрана смерти». Но основные причины включают конфликты, такие как проблемы с оборудованием, несовместимые прошивки, поврежденные драйверы и т. Д. Устранить эту проблему несложно. Тем не менее, существуют различные потенциальные обходные пути для одного и того же.

Microsoft Windows предоставляет Storport (storport.sys), драйвер порта хранения, который особенно подходит для использования с высокопроизводительными шинами, такими как шины Fibre Channel и адаптеры RAID. По словам Microsoft, есть несколько преимуществ использования Storport вместо драйвера порта SCSI:
- Улучшенная производительность, как с точки зрения пропускной способности, так и системных ресурсов, которые используются.
- Улучшенный интерфейс драйвера минипорта, который отвечает потребностям высокопроизводительных поставщиков систем хранения, в частности хост-производителей RAID и оптоволоконных каналов.
Если этот файл системного драйвера будет поврежден, это может привести к остановке ошибок.
Сопровождающие сообщения об ошибках Blue Screen могут быть:
- KMODE ИСКЛЮЧЕНИЕ НЕ ОБРАБОТАНО.
- СТРАНИЦА ДАННЫХ ЯДРА.
- НЕИСПРАВНОСТЬ СТРАНИЦЫ В НЕПРЕРЫВНОЙ ОБЛАСТИ.
- СИСТЕМНАЯ РЕЗЬБА ИСКЛЮЧЕНИЯ НЕ ОБРАБОТАНА.
- IRQL НЕ МЕНЬШЕ ИЛИ РАВЕН.
- ИСКЛЮЧЕНИЕ ОБСЛУЖИВАНИЯ СИСТЕМЫ.
Исправление ошибок BSOD Storport.sys в Windows 10
Следующие возможные исправления будут выполнены для исправления ошибок BSOD, связанных с Storport.sys в Windows 10:
- Обновление или откат драйверов.
- Скачать драйверы с сайта производителя
- Запустите проверку системных файлов.
Если вы обычно создаете точку восстановления системы, вы можете попытаться отменить любые изменения на вашем компьютере, выполнив восстановление системы. Также рекомендуется выполнять эти задачи, указанные ниже, только в безопасном режиме с поддержкой сети.
1] Откат или обновление драйверов

Основные драйверы, которые могут быть причиной для этого конкретного файла, будут перечислены в разделе Контроллеры IDE ATA/ATAPI , а также Контроллеры хранилища внутри диспетчера устройств. Так что, если вы недавно обновили эти драйверы, откатитесь и посмотрите. Если вы этого не сделали, то мы предлагаем вам обновить эти драйверы.
2] Загрузите драйверы с веб-сайта производителя .
Вы также можете загрузить соответствующие драйверы для вашего устройства непосредственно с сайта производителя.
Например, если у вас есть SSD, проблема может быть в старом драйвере хранилища. Вы можете использовать утилиту обновления драйверов Intel или загрузить драйверы с сайта intel.com. Пользователи AMD могут захотеть проверить AMD Driver AutoDetect.
3] Запустите проверку системных файлов
Нажмите правой кнопкой мыши на кнопку «Пуск» и выберите Командная строка (Admin) , введите следующую команду для запуска средства проверки системных файлов и нажмите Enter.
sfc/scannow
Перезагрузите систему после завершения сканирования.
Вы также можете использовать наше бесплатное FixWin для запуска утилиты проверки системных файлов одним щелчком мыши.
Надеюсь, что-нибудь поможет!
Are you struggling with the storport.sys blue screen issue? If yes, this post offered by MiniTool Solution is what you need. It will show you multiple effective resolutions to fix this annoying error. Meanwhile, it also introduces you a useful backup program to protect your system.
About Storport.sys
Some of Blue Screen of Death errors are related to a file such as storport.sys which will be introduced in this post. What is storport.sys?
Storport.sys is a system file and it is related to the storage of data on the storage unit on the computer. The Microsoft Storage Port Driver creates it. If you encounter BSOD storport.sys error, there could be many reasons. There are some main reasons like hardware issues, incompatible firmware issues, corrupted drivers, etc.
Microsoft Windows is the one that provides the storport.sys file. As a storage port driver, it is quite suitable for the use of high-performance buses such as fibre channel buses and RAID adapters. According to Microsoft, there are some advantages to using storport.sys instead of the SCSI Port driver.
However, you may encounter the storport.sys blue screen issue. If you are struggling with this error, don’t worry. The following part will show you some potential resolutions.
Fixes for Storport.sys in Windows 10
If your PC can’t boot to desktop, you need to enter Safe Mode firstly and then you can try to fix the storport.sys blue screen issue. If your PC boot successfully, now you can follow the methods below directly.
Solution 1: Try to Reinstall Your Device Drivers
If you are using the outdated or wrong device drivers, the storport.sys blue screen problem may occur. Thus, you can try to reinstall your device drivers to fix this issue.
Step 1: Right-click the Start menu and then click Devices Manager to open it.
Step 2: Find your device drivers, right-click them to open their Properties windows.
Tip: The main drivers that could lead to the storport.sys blue screen error are listed under the IDE ATA/ATAPI controllers section and the Storage controllers section.
Step 3: Go to the Driver tab and click the Uninstall Device button.
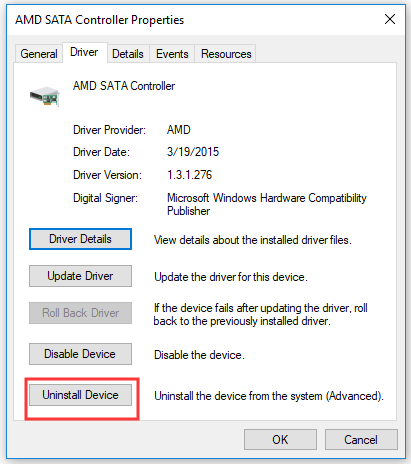
Step 4: Click Uninstall in the pop-up window.
Step 5: Restart your computer. It will just reinstall the device drivers automatically. You can also download the relevant drivers of your PC directly from the manufacturers’ website.
Now you can check if the storport.sys blue screen issue is resolved.
Solution 2: Try to Recreate the Storport.sys File
You can also try to recreate the Storport.sys file to fix the storport.sys blue screen issue.
Every time you boot your Windows 10 PC, it will search for all the system drivers in place. However, if it can’t find these system drivers, it will create them. That’s why if you remove your corrupt driver file, you will get a fixed file that has been recreated for you.
Refer to the steps below to recreate the Storport.sys file.
Step 1: Open File Explorer.
Step 2: Locate this path: Local Disk (C:)\Windows\System32\drivers.
Step 3: Find storport.sys and change its name to storport.old.

Now restart your PC and check if the storport.sys blue screen error is fixed.
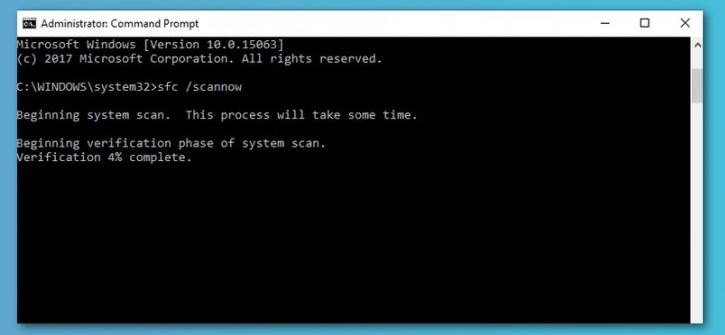
Solution 3: Run System File Checker (SFC) Scan
System File Checker is a built-in command utility in Windows 10. With it, you are allowed to restore corrupted files and missing files. It can help replace bad and corrupted system files with good system files.
Follow the steps below to run the SFC command.
Step 1: Press the Win key + R hotkey at the same time to open the Run dialog box.
Step 2: Next, input cmd and press Ctrl + Shift + Enter to open Command Prompt as administrator.
Step 3: Now, type sfc /scannow and press Enter to run this command.
Step 4: You may get one of the following results:
Windows Resource Protection did not find any integrity violations.
Windows Resource Protection found corrupt files and successfully repaired them.
Windows Resource Protection found corrupt files but was unable to fix some of them.
Step 5: Reboot your PC and then check if the storport.sys blue screen error is now fixed.
Solution 4: Run the DISM Commands
DISM is another tool that helps fix storport.sys blue screen error. With this tool, you can repair potentially corrupted files in your system. To run the DISM commands, follow the steps below.
Step 1: Type cmd in the Search bar, right-click Command Prompt and choose Run as administrator to run it with administrator privileges.
Step 2: After that, input each one of the commands listed below separately and press Enter after each to execute them:
Dism /Online /Cleanup-Image /CheckHealth
Dism /Online /Cleanup-Image /ScanHealth
Dism /Online /Cleanup-Image /RestoreHealth
Step 3: After you finish executing the commands given above, restart your PC and check if the storport.sys blue screen problem has been fixed.
Solution 5: Run the Blue Screen Troubleshooter
Now you can try to troubleshoot this BSOD error with a built-in tool in Windows 10 – the Blue Screen troubleshooter. Here is a quick guide on how to use it.
Step 1: Press the Win key + I hotkey together to open the Settings panel.
Step 2: Click Update & Security and then click Troubleshoot from the left side.
Step 3: In the right side, find Blue Screen under the Find and fix other problems section. Click it and then click the Run the troubleshooter button.

Step 4: Follow the instruction on the screen and then restart your PC. Check if the storport.sys blue screen problem still exists.
Solution 6: Try to Power Cycle SSD
Sometimes the storport.sys blue screen problem occurs because of a sudden shutdown or power loss with your SSD. In this case, you can try to do a power cycle to fix this issue. Follow the steps below to do this job.
Step 1: Power off your PC.
Step 2: Disconnect your PC from all of the power supplies.
Step 3: Hold the power button for more than 30 seconds and then wait for 10 minutes.
Step 4: Now reconnect all of the power supplies.
Step 5: Press the Shift key on your keyboard and then click the Windows logo key > the power icon > the Shut Down option.
Step 6: Hold the function keys to enter BIOS.
Step 7: Let your PC stay in BIOS for 20 minutes.
Step 8: Repeat Step 1–Step 3 and then remove SSD. For a desktop: unplug the cables. For a laptop: disconnect the drive from the junction.
Step 9: Reconnect all of the power supplies.
Step 10: Now power on your PC and then check if the storport.sys blue screen error has been fixed.
Solution 7: Try to Check Disk Errors
Disk check a useful built-in Windows tool. It can help you check the drive for file system errors and then help to fix these errors. Thus, you can try to use it to fix the storport.sys blue screen error.
Here is a tutorial.
Step 1: Press the Windows + E key combination to open File Explorer.
Step 2: Click This PC to expand it, then right-click Local Disk (C:) and choose Properties.
Step 3: Switch to the Tools tab, click the Check button under Error checking and then click Scan drive from the pop-up window.

Step 4: Follow the instructions on the screen to detect and fix errors.
Step 5: Restart your computer and check if the storport.sys blue screen issue is resolved.
Useful Suggestion: Back up Your System
BSOD, also known as Blue Screen of Death, is a stop screen. It often occurs due to a fatal system error that prevents you from running your PC properly. Thus, it is highly recommended that you back up your system ahead of time.
In case something bad happens to your system including BSOD storport.sys, you can restore your PC to the early normal state by using this system image.
Here is a piece of powerful free backup software – MiniTool ShadowMaker you can try. With it, you can not only create a system image, but also get recovery solutions when accidents happen to your PC.
It also offers you more other functions to protect your PC. You can try to synchronize your important files or folders and you are also able to clone disk. In a word, it is a really great data protection and disaster recovery solution for PCs.
If you have a need, you are welcome to get MiniTool ShadowMaker Trial. The Trial Edition can be free used for 30 days for all the backup features. Right now, simply click the following button to get it.
MiniTool ShadowMaker TrialClick to Download100%Clean & Safe
If you want to use MiniTool ShadowMaker permanently, purchase its Pro Edition by clicking this link.
Here is a guide on how to back up your system with the Backup function of MiniTool ShadowMaker in detail.
Step 1: Choose a Backup Mode
1.After installation, run MiniTool ShadowMaker.
2.Click Keep Trail to use the Trial Edition.
3.Then click Connect in the Local section to manage the local computer.

Step 2: Select Your System as Backup Source
Actually, the system reserved partition and C drive on your computer are already selected by default. Thus, you don’t need to choose them again.

Optional: If you want to choose another backup source, you are allowed to do so.
1.Click the Backup option to enter its interface.
2.Click the Source tab, then choose the Folder and Files / Disk and Partitions option when a new window pops up and choose the source that you want to back up. Finally, click the OK button to back to the Backup page.
Step 3: Select a Destination Path to Save Your System Image
1.In the Backup page, click the Destination tab.
2.There are four available destination paths for you to choose. Select one suitable destination path to save your system image and then click OK to back to the main interface.
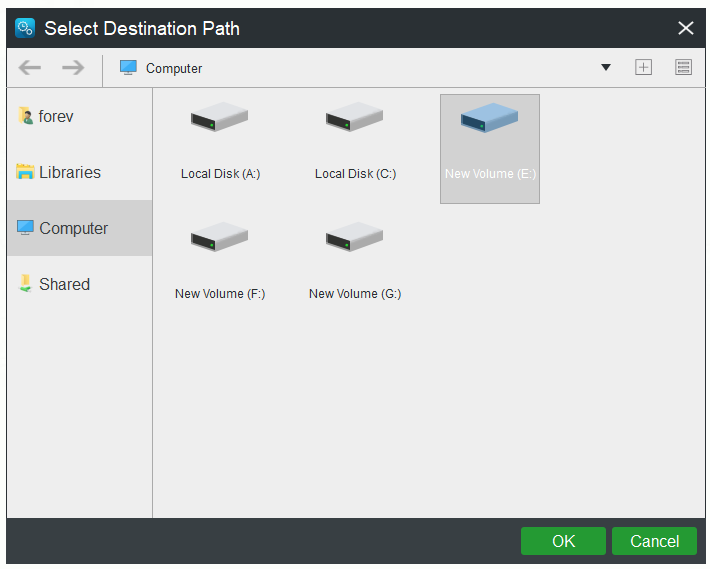
Tip:
1.It is recommended to choose an external hard drive as the destination path.
2.Before you start a backup task, you can make some advanced settings through Schedule, Scheme or Options on the Backup page. If you are interested in the Scheme function, read this post – 3 Types of Backup: Full, Incremental, Differential – MiniTool.
Step 4: Start to Back up
1.Click Back up Now to start this backup task right now.
Optional: You can also choose to delay the process by clicking Back up Later, and then you will need to click Back up Now on the Manage page to perform your pending task.

2.A confirmation message saying “Do you want to do the backup operation now” will pop up. If you confirm to perform the operation now, just click the Yes button. You are also able to choose whether to check the option: Shut down the computer when all the running backup tasks are finished.
When you finish all the steps given above, you should now back up your system with MiniTool ShadowMaker successfully.
I fix the storport.sys BSOD error with the methods given by this post. In order to keep my system safe, I also make a backup of it successfully with MiniTool ShadowMaker.Click to Tweet
Conclusion
After reading this post, now you should clearly know how to fix storport.sys BSOD error in Windows 10. At the same time, this post also provides you with a powerful backup program – MiniTool ShadowMaker to make a backup of your system.
MiniTool ShadowMaker TrialClick to Download100%Clean & Safe
If you encounter any problems when you are using it, contact us by sending an email to [email protected].
Обновленный октябрь 2023: остановите эти сообщения об ошибках и устраните распространенные проблемы с помощью этого инструмента. Получить сейчас в эту ссылку
- Скачайте и установите программного обеспечения.
- Он просканирует ваш компьютер на наличие проблем.
- Затем инструмент исправить проблемы которые были найдены.

Некоторые из синий экран ошибок смерти связаны с таким файлом, как storport.sys, который представлен в этом посте. Что такое storport.sys?
Storport.sys — это системный файл, предназначенный для хранения данных на запоминающем устройстве вашего компьютера. Он создается драйвером порта хранилища Microsoft. Когда вы сталкиваетесь с ошибкой BSOD storport.sys, это может быть вызвано многими причинами. Существует несколько основных причин, таких как проблемы с оборудованием, проблемы с несовместимой прошивкой, поврежденные драйверы.
Microsoft Windows предоставляет файл с именем storport.sys. В качестве драйвера порта памяти он идеально подходит для высокопроизводительных шин, таких как шины Fibre Channel и адаптеры RAID. Согласно Microsoft, использование storport.sys вместо драйвера порта SCSI дает некоторые преимущества.
Однако вы можете столкнуться с проблемой синего экрана storport.sys. Если вы столкнулись с этой ошибкой, не волнуйтесь. В следующем разделе показаны некоторые возможные решения.
Содержание:
Запустите проверку системных файлов или сканирование SFC
Средство проверки системных файлов или SFC — это встроенная утилита командной строки, которую можно использовать для восстановления поврежденных или отсутствующих файлов. Он заменяет плохие и поврежденные системные файлы хорошими системными файлами. Выполните следующие действия, чтобы запустить команду SFC.
- Нажмите Win + R, чтобы начать.
- Введите cmd в поле и нажмите Enter.
- Когда откроется командная строка, введите sfc /scannow.
Команда запускает сканирование системы, которое займет некоторое время. После этого вы можете получить следующие результаты:
- Защита ресурсов Windows не обнаружила нарушений целостности.
- Защита ресурсов Windows обнаружила поврежденные файлы и успешно восстановила их.
- Защита ресурсов Windows обнаружила поврежденные файлы, но не смогла их восстановить.
- Перезагрузите компьютер.
Попробуйте запустить команды DISM.

Возможно, вы захотите восстановить потенциально поврежденные файлы в вашей системе, так как они также могут вызывать ошибку синего экрана Storport.sys. Чтобы восстановить эти поврежденные системные файлы, вы можете запустить команды DISM:
- Нажмите Win + X и выберите опцию «Командная строка (администратор)».
- После этого введите каждую из приведенных ниже команд, чтобы запустить их по очереди:
- Dism / Интернет / Очистка-Изображение / CheckHealth
- Dism/Online/Cleanup-Image/ScanHealth
- Dism/Online/Cleanup-Image/RestoreHealth
- После выполнения вышеуказанных команд перезагрузите компьютер и посмотрите, исчезла ли ошибка синего экрана dxgkrnl.sys.
Обновлено: 2023 октября
Этот инструмент настоятельно рекомендуется, чтобы помочь вам исправить вашу ошибку. Кроме того, этот инструмент обеспечивает защиту от потери файлов, вредоносных программ и аппаратных сбоев, а также оптимизирует работу вашего устройства для достижения максимальной производительности. Если у вас уже есть проблема с компьютером, это программное обеспечение может помочь вам решить ее и предотвратить повторение других проблем:
- Шаг 1: Установите инструмент восстановления и оптимизации ПК. (Виндовс 10, 8, 7, ХР, Виста).
- Шаг 2: Нажмите Начать сканирование чтобы определить, какие проблемы вы испытываете с вашим компьютером.
- Шаг 3: Нажмите Починить всечтобы решить все проблемы.

Восстановление или обновление драйверов
Основные факторы, которые могут быть причиной этого конкретного файла, перечислены в контроллере IDE ATA/ATAPI и контроллере памяти в диспетчере устройств. Если вы недавно обновили эти драйверы, вернитесь и проверьте. Если нет, мы рекомендуем обновить эти драйверы.

Скачать драйвера с сайта производителя
Вы также можете загрузить соответствующие драйверы для вашего устройства непосредственно с веб-сайта производителя.
Например, если у вас есть SSD, проблема может заключаться в старом драйвере хранилища. Вы можете использовать утилиту обновления драйверов Intel или загрузить драйверы с сайта intel.com. Пользователи AMD могут попробовать автоматическое обнаружение драйверов AMD.
Включить безопасный режим с загруженными сетевыми драйверами

- Убедитесь, что ваш компьютер выключен.
- Нажмите кнопку питания, чтобы включить компьютер. Когда Windows отобразит экран входа в систему (то есть Windows будет полностью запущена), нажмите и удерживайте кнопку питания, чтобы выключить ее.
- Повторяйте шаги 1) и 2), пока на дисплее не появится сообщение «Подготовка к авторемонту».
- Подождите, пока Windows завершит диагностику вашего компьютера, а затем нажмите «Дополнительные параметры».
- Нажмите Устранение неполадок.
- Щелкните Расширенные настройки.
- Нажмите «Параметры запуска».
- Нажмите «Перезагрузить».
- Нажмите 5 на клавиатуре, чтобы войти в безопасный режим с загруженными сетевыми драйверами.
- После успешного запуска сети в безопасном режиме перейдите к исправлению 2, чтобы решить проблему синего экрана с storport.sys.
Выключите SSD, а затем включите его снова.
Иногда этот сбой системы с storport.sys просто произошел из-за какой-то проблемы (внезапное отключение / сбой питания) с нашим SSD. Если это так, мы можем включить цикл питания и увидеть, как он возвращается к жизни:
- Выключи компьютер.
- Отключите компьютер от всех источников питания (питания и аккумулятора, если вы используете ноутбук).
- Нажмите кнопку питания не менее чем на 30 секунд и подождите 10 минут.
- Повторно подключите ВСЕ питание (питание и аккумулятор, если вы используете ноутбук).
- Удерживайте нажатой клавишу Shift на клавиатуре. Затем нажмите клавишу с логотипом Windows> значок питания> Завершение работы.
- Нажмите и удерживайте функциональные клавиши, чтобы войти в BIOS. (Вы можете обратиться к руководству пользователя, чтобы узнать, что это за функциональные клавиши.)
- Примечание. Не отпускайте функциональные клавиши, пока не появится экран настройки BIOS.
- Оставьте компьютер в BIOS на 20 минут.
- Повторите шаги 1) – 3).
- Извлеките SSD из вашего ПК:
- Для настольного компьютера: отсоедините кабели.
- Для ноутбука: Отключите плеер от разъема.
- Подождите 30 секунд перед повторным подключением плеера к компьютеру.
- Снова подключите ВСЕ источники питания (адаптер переменного тока и аккумулятор при использовании ноутбука).
- Включите компьютер и проверьте, решена ли проблема с синим экраном с помощью storport.sys.
ОДОБРЕННЫЙ: Чтобы исправить ошибки Windows, нажмите здесь.
Сообщение Просмотров: 672