Время на прочтение
6 мин
Количество просмотров 23K
Пока некоторые читатели (да что уж там, и писатели — например, я) наслаждались в отпуске теплыми летними денечками, известный автор нашего англоязычного блога Адам Бертрам подготовил краткий обзор Windows Storage Spaces. В него он включил, в частности, сведения о настройке Windows Storage Spaces на популярных конфигурациях. Перевод его статьи я и предлагаю вашему вниманию.
Во многих дата-центрах и серверных фермах для хранения данных используются HDD и SSD. Статистика, однако, сообщает о том, что после трёх лет работы 10% дисков становятся негодными.
Конечно, те организации, которые заботятся о целостности и сохранности своих данных, держат руку на пульсе, а также отслеживают и другие факторы риска — будь то человеческий фактор, железо или софт. И тут тем, кто работает с Windows-инфраструктурой, могут помочь Windows Storage Spaces. Ведь их RAID-подобная функциональность (то, что мы видим в File Explorer как виртуальные диски) весьма полезна в деле обеспечения резерва мощностей хранения.

Гибкие возможности масштабирования тоже привлекательны: можно объединить 3 и более драйвов в единый сторадж-пул и затем формировать на его основе “стораджики” нужного размера. А поскольку при работе с пулом формируются и сохраняются дополнительные копии для ваших данных, то проблемы с одним из дисков не приведут к потере всего и вся. А если понадобилось больше места? Просто добавь воды еще дисков в пул.
Storage Spaces для Windows 10
— Он забирается на самую высокую сосну и оттуда планирует.
— Ага, простите, что планирует?
— Он прыгает и планирует.
(“День радио”)
Даже если сценарий развертывания, который вы хотите воплотить, входит в число самых популярных, и инструкция к нему коротка и вроде даже сходу понятна, этап подготовки и планирования все равно никто не отменял. Итак:
Если вы используете дисковые пространства Storage Spaces на машине с Windows 10, то рекомендуется обеспечить наличие минимум 2 дисков помимо системного. Эти диски могут быть как встроенными, так и внешними. Поддерживаются SSD; можно комбинировать SATA, USB и SAS.
Количество дисков рассчитывается исходя из того, какой метод обеспечения отказоустойчивости вы хотите применить. Есть вот такие варианты:
-
Simple (простой) — требует наличия минимум двух дисков. Хоть этот метод и дает хорошую производительность, но ничем вам не поможет в случае отказа. Его можно использовать, например, если вы настраиваете storage space для хранения временных данных (например, файлов видео-рендеринга, файлов-черновиков в графических редакторах, и так далее).
-
Mirror (зеркальный) — позволяет сохранять несколько копий данных на случай отказа. Так, Two-way mirror spaces хранят две копии данных, и с ними вы переживете отказ одного из дисков. Для их организации потребуется минимум два диска. Three-way mirror spaces позволят пережить отказ двух дисков, а для их организации потребуется минимум пять. Зато хранить в таких storage spaces можно самые разнообразные данные.
-
Parity (с контролем четности) — рекомендуется для хранения архивных и стриминговых данных. Хранят несколько копий на случай отказа. Если вы хотите обеспечить отказоустойчивость в случае проблемы с одним диском, то в сценарии с Parity spaces вам понадобится минимум три диска, а на случай проблемы с двумя — минимум семь дисков.
После того, как вы все рассчитали и подготовили, можно организовать собственно Storage Spaces. Для этого в Windows 10 нужно выполнить вот такие шаги:
-
Проверить, что диски, которые вы планируете задействовать, у вас подключены.
Важно! Если вы укажете, что в сторадж-пул хотите включить размеченный диск, имейте в виду, что Windows безвозвратно удалит все разделы и файлы на нём. До начала работы сделайте резервную копию всего, что вам дорого на этом диске!
-
Для простоты в поле поиска в панели задач вводим Storage Spaces и из полученного списка выбираем Storage Spaces.
-
Кликаем Create a new pool and storage space.
-
Выберем нужные нам диски и затем кликнем Сreate new storage pool.
-
Указываем имя, буквенное обозначение и файловую систему для нового сторадж пула.
-
На случай сбоя рекомендуется выбрать метод обеспечения отказоустойчивости (Resiliency) как одну из следующих опций: Two-way mirror, Three-way mirror или Parity.
Важно! Помните про количество дисков, которые потребуются в каждом из указанных вариантов, о чем мы говорили выше. Если, допустим, вы предпочтете Two-way mirror, то для нового storage space будет создаваться две копии данных. Так что для такого сценария понадобится минимум два диска (помимо системного).
-
Затем задайте максимальный размер стораджа для Storage Spaces.
Примечание: Можно указать значение, превышающее размер сторадж-пула — когда место будет заканчиваться, вы просто добавите еще один диск.
-
Когда с настройками покончено, нажимаем Create storage space.
Оптимизация работы
Рекомендуется своевременно оптимизировать работу с дисками. Вот что советует делать Microsoft:
При добавлении новых дисков в существующий пул рекомендуется оптимизировать использование диска. При этом некоторые данные будут перемещены на новый диск, чтобы оптимизировать использование емкости пула. Это стандартное действие при добавлении нового диска в обновленный пул в Windows 10: флажок Optimize to spread existing data across all drives будет установлен по умолчанию.
Однако если вы сняли этот флажок или добавили диски до обновления пула, вам нужно вручную оптимизировать использование диска. Для этого в поле поиска на панели задач введите Storage Spaces, выберите Storage Spaces из списка результатов поиска, а затем щелкните Optimize drive usage.
Автономный сервер
Если у вас один отдельно взятый сервер, то для настройки на нем дисковых пространств Storage Spaces есть подробная инструкция от Microsoft, на русском языке и даже с картинкой. Storage Spaces поддерживаются для Windows Server 2019, Windows Server 2016, Windows Server 2012 R2 и Windows Server 2012.
Обратите внимание: до начала настройки нужно обеспечить наличие одного или нескольких пулов, а также проверить конфигурацию на соответствие ряду требований (они перечислены в разделе «Предварительные условия»).
На базе сторадж-пула можно создать несколько виртуальных дисков. (Windows идентифицирует их как обычные диски, которые могут быть отформатированы.)
Для их создания можно использовать File and Storage Services; в настройках можно указать thin provisioning либо fixed provisioning, а также размер. Дополнительные настройки можно задать с помощью команд PowerShell.
Кластеры и Storage Spaces Direct
Если вы работаете с кластером и используете для каждой его ноды СХД с прямым подключением (DAS), то Storage Spaces Direct могут оказаться вполне разумным и эффективным вариантом по сравнению с NAS и SAN. Storage Spaces Direct отличаются хорошей масштабируемостью и возможностями управления. Технология Storage Spaces работает наряду с кэшированием, RDMA и поддержкой СХД для разных уровней (tiers). Помимо этого, поддерживаются диски NVMe.
Storage Spaces Direct поддерживаются для Windows Server 2019 Datacenter, 2016 Datacenter и Insider Preview Builds. Можно создать конвергентное или гипер-конвергентное пространство.
Вкратце, основные этапы развертывания Storage Spaces Direct — это:
-
Развертывание Windows Server — установка и настройка ОС, добавление доменных учеток, настройка ролей и необходимых фич.
-
Настройка сети (этот этап не относится к сценарию развертывания Storage Spaces Direct на виртуальных машинах).
-
Конфигурация собственно Storage Spaces Direct — очистка дисков и разделов, настройка кластеров, настройка Storage Spaces Direct, создание томов, развертывание необходимых виртуальных машин.
-
Для конвергентной инфраструктуры — развертывание масштабируемых файловых серверов, настройка ролей, создание шар, настройка ограниченного делегирования Kerberos.
Все эти этапы очень подробно описаны здесь (на русском языке).
Возможен сценарий, при котором все физические диски содержатся в enclosures с общим доступом — это т.н. JBOD enclosure. Такая инфраструктура должна соответствовать требованиям Windows Certification, а также включать в себя идентичные SAS HBA (имеющие сертификацию Storage Spaces). Такие диски в кластере не должны иметь встроенную функциональность RAID.
Storage Spaces vs. RAID
Как водится, у Windows Storage Spaces и RAID есть свои преимущества и свои недостатки. Об этом уже написана не одна сотня строк (например, здесь). Вкратце:
-
У RAID есть два аспекта: аппаратный и программный — а Windows Storage Spaces, так сказать, является software-driven, настраивается целиком через графический интерфейс или командную строку.
-
Для программных RAID, как и для Storage Spaces отсутствуют ограничения по числу сокетов (у традиционных RAID они есть).
-
ОС по-разному “видит” диски в RAID и в Storage Spaces — диски RAID предстают как цельный юнит (даже если у физических дисков разная емкость), что может приводить к неоптимальному использованию свободного пространства. Для Storage Spaces такой проблемы нет, так как есть доступ к отдельным дискам.
-
Если говорить о производительности, то RAID 0 превосходит Storage Spaces с режимом simple mode примерно вдвое. Однако на скоростях 4K они уже сравнимы. RAID 1 быстрее выполняет последовательные операции чтения, зато Storage Spaces в режиме two-way mirror mode вдвое быстрее выполняет операции записи, нежели RAID 1. Что касается hardware RAID, то операции чтения и записи для них гораздо быстрее, чем Storage Spaces в режиме parity mode.
Ссылки
Общие сведения о дисковых пространствах Storage Spaces
Развертывание Storage Space Direct
Дисковые пространства в Windows 10
Кейс о развертывании Storage Space Direct компанией-провайдером Veeam
Skip to content

What’s new in Windows Server 2019 Storage Spaces Direct

With Windows Server 2016 quickly gaining maturity and looking on the horizon to the next Windows Server operating system, Windows Server 2019, there are certainly a great number of new enhanced features soon to come with the latest Microsoft Windows Server operating system. Especially exciting from a hypervisor standpoint when thinking about Hyper-V, new enhancements related to the software defined storage front are certainly at the top of the list of new features that administrators will be checking out. With Windows Server 2016, Microsoft introduced Storage Spaces Direct software defined storage solution that allows aggregating locally attached disks contained in Hyper-V cluster nodes as a shared storage volume between cluster nodes.
In this post we will take a look at New Features in Windows Server 2019 Storage Spaces Direct and see how these bring about exciting new changes to Microsoft’s software defined storage solution for Hyper-V converged infrastructure.
Evolution of Storage Spaces Direct
Storage Spaces Direct in Windows Server 2016 was an exciting new feature as it brought about software defined storage to Windows Server Failover Clusters. This was especially exciting for Hyper-V environments and the possibilities this opened up for flexibility, scalability, and performance when used in conjunction with ReFS. While Storage Spaces Direct was a major step forward in hyperconverged infrastructure in the Microsoft world, there were certainly areas of the technology that could improve.
Microsoft has certainly taken many of these things into consideration with the architecting and engineering of the newest evolution of Storage Spaces Direct in Windows Server 2019. Many of the limitations with Windows Server 2016 Storage Spaces Direct have been removed in Windows Server 2019 S2D.
What are some of the new enhancements that are worth taking note of in this latest iteration of Storage Spaces Direct? We will look at the following:

- ReFS is no longer Limited with Deduplication
- New True Two-Node Configuration
- Maximum Storage Pool Size
- New Windows Admin Center Dashboards
- New Physical Health and Performance Checks
ReFS is no longer Limited with Deduplication
One of the extremely disappointing aspects of the new ReFS file system with Windows Server 2016 is that you could not use deduplication with ReFS. When thinking about using a Storage Spaces Direct Hyper-V cluster utilizing ReFS, the potential space savings could have been tremendous. However, it just simply was not supported or possible to use the two together. This was a major advantage of VMware’s vSAN technology as you can use deduplication even with two node clusters, yielding significant space savings.
This has all changed with Windows Server 2019. With Windows Server 2019, the new Storage Spaces Direct cluster making use of ReFS (which is the recommended file system for S2D) can see as much as a 10X space savings improvement with Hyper-V environments. This is especially true due to the number of duplicated blocks that exist between guest operating systems that are running the same Windows Server OS.
The ease of implementing deduplication in Windows Server 2019 is as easy as flipping a switch in the properties of the storage volume. This new enhancement certainly evens the playing field with VMware vSAN and other HCI solutions that are able to utilize deduplication for space savings.
New True Two-Node Configuration
With Windows Server 2019, Microsoft is set on making the creation of a two-node Storage Spaces Direct cluster easier than ever and with less resources than ever before. Two-node clusters are configured by having a third tie-breaker vote that makes quorum. This is generally accomplished by one of three ways – having a third node to break the tie, a witness share on-premises, or a witness share in the cloud with Windows Server 2016. However, with Windows Server 2019, Microsoft has now introduced the ability to use a USB key mounted in a commodity grade router to serve as a witness share. This enables the ability to create a witness share with little cost, requiring no additional server hardware or additional infrastructure to support quorum on a two-node Windows Server 2019 cluster. Microsoft calls this “true two-node” clustering.
Extended Maximum Storage Pool Size
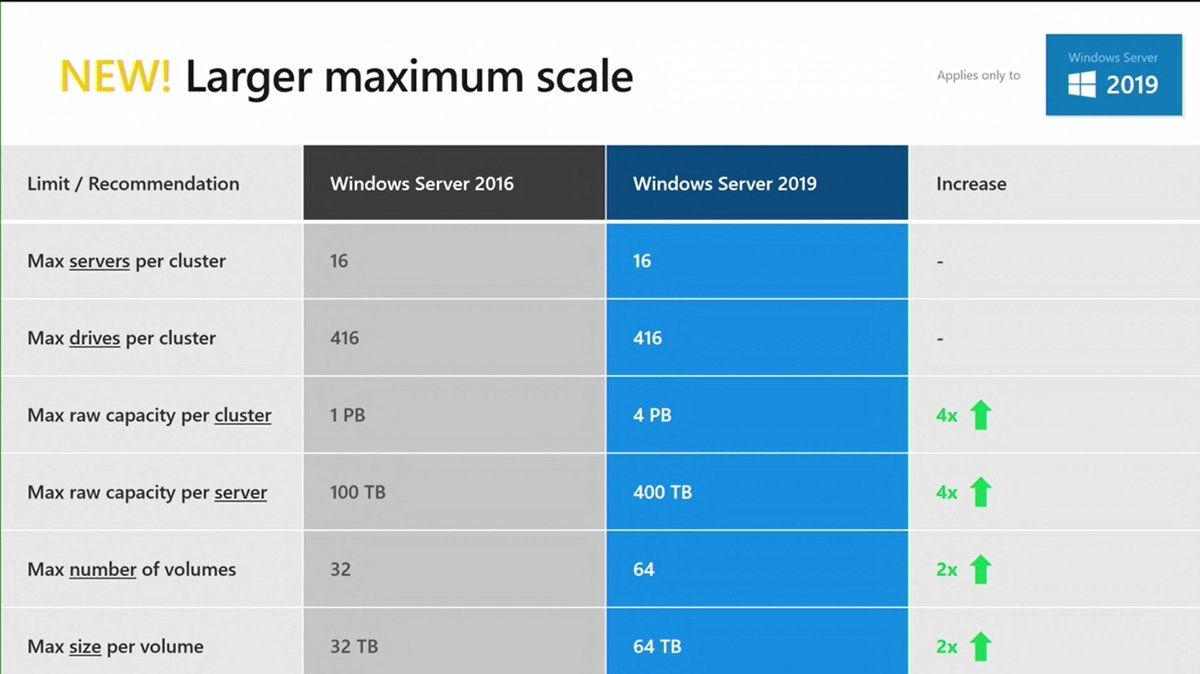
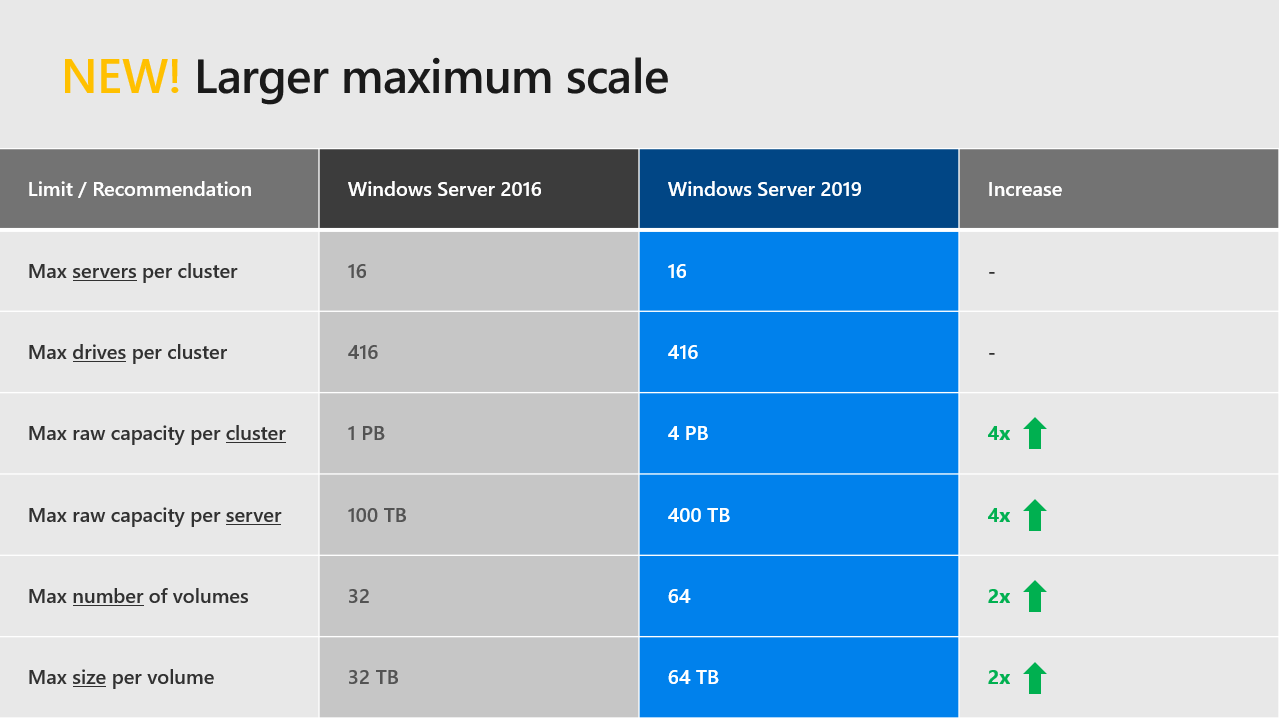
Microsoft has certainly gone above and beyond in extending the configuration maximums of Windows Server 2019 Storage Spaces Direct. While the configuration maximums in Windows Server 2016 were certainly not anemic, Windows Server 2019 Storage Spaces Direct in many cases quadruples the configuration maximums of Windows Server 2016. One of the notable configuration maximums that has been greatly extended from Windows Server 2016 is the maximum storage pool size. In Windows Server 2016, the maximum storage pool size was 1 PB or Petabyte. However, in Windows Server 2019, Microsoft has extended this configuration maximum to 4 PB. The 1 Petabyte maximum in Windows Server 2016 will most likely cover most environments, however, there may be some cases in extremely large environments where the extra storage pool size will be beneficial.
New Windows Admin Center Dashboards
Microsoft has invested a tremendous amount of development into the new Windows Admin Center management platform. The Windows Admin Center is certainly the direction Microsoft has taken moving forward with a management tool to be utilized by Windows admins to manage Windows Server environments. With Storage Spaces Direct, Microsoft has developed an additional HCI dashboard that is dedicated to displaying all the pertinent information needed in monitoring and managing a Storage Spaces Direct cluster. Windows Server administrators can now see the performance information for the Storage Spaces Direct cluster for the day, week, month, or year as this is collected directly from the Storage Spaces Direct cluster. By hovering over the graphs and information displayed, administrators can drill down further into the information for troubleshooting and other purposes. The great thing about the Windows Admin Center is it is freely available from Microsoft and requires no additional licensing charge. The power of the Windows Admin Center is akin to having system center dashboard functionality available for free. Microsoft is certainly intent on helping Windows Server administrators to have the information needed to effectively manage and administer the Storage Spaces Direct infrastructure.
New Physical Drive Health and Performance Checks
To go along with the additional HCI dashboard now available in the Windows Admin Center for Windows Server 2019 Storage Spaces Direct clusters, Microsoft has given attention to specific requests to know what is going on with individual physical disks within the Storage Spaces Direct infrastructure. Up until now, it is a bit of a “black box” trying to see the health of individual physical disks making up the Storage Spaces Direct storage pools on each server. Microsoft has now added additional functionality to see the health of the individual physical disks within the Storage Spaces Direct cluster. A new PowerShell cmdlet has been added, Get-PhysicalDiskIOReport, that allows Windows Server admins to have visibility at the individual physical disk level as to the health of a particular physical disk. The new cmdlet can display the average IO latency for the physical disk, providing tremendous visibility to health metrics for each disk.
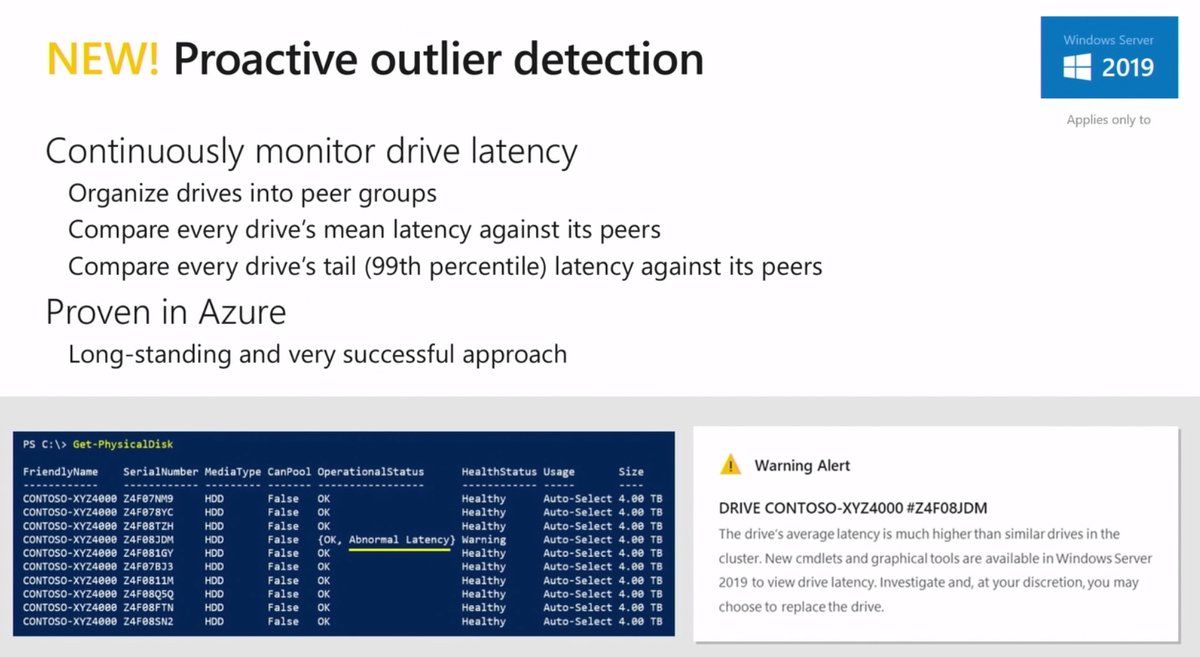
However, one might think, even though that is great, I don’t want to have to query the physical disks constantly to see if there is a potential problem. Microsoft has added a new capability in Windows Server 2019 called Proactive Outlier Detection that groups drives by media and usage. This way the Windows operating system can evaluate disks of the same type and usage to see if a particular disk stands out as far as latency is concerned which could indicate a problem. These “outlier” disks are flagged and the administrator is notified via the Windows Admin Center.
Read to know more : Windows Server 2019 Storage Spaces Direct Best Practices
Concluding Thoughts
Microsoft has certainly made tremendous strides with the upcoming release of Windows Server 2019 which will most likely be released later this year. The new Storage Spaces Direct capabilities enable Windows Server 2019 to be relatively on par with the other powerful software defined storage solutions out on the market and in some ways have capabilities not found in competing solutions. The new true two-node S2D cluster functionality leveraging a USB key and a commodity router allows a truly cheap way to provision a witness share for the quorum mechanism without having any other server infrastructure. This is certainly a game changer for edge environments that are lacking in infrastructure, Active Directory or other connectivity. Microsoft is also adding the tools that administrators need to managing the S2D infrastructure from a performance and health perspective with continued advancements in the Windows Admin Center, new PowerShell cmdlets, and Proactive Outlier Detection. Windows Server 2019 is shaping up to be a game changer for Microsoft in the software defined storage space as they are showing true commitment to this and other functionality for tomorrow’s enterprise datacenter.
Follow our Twitter and Facebook feeds for new releases, updates, insightful posts and more.


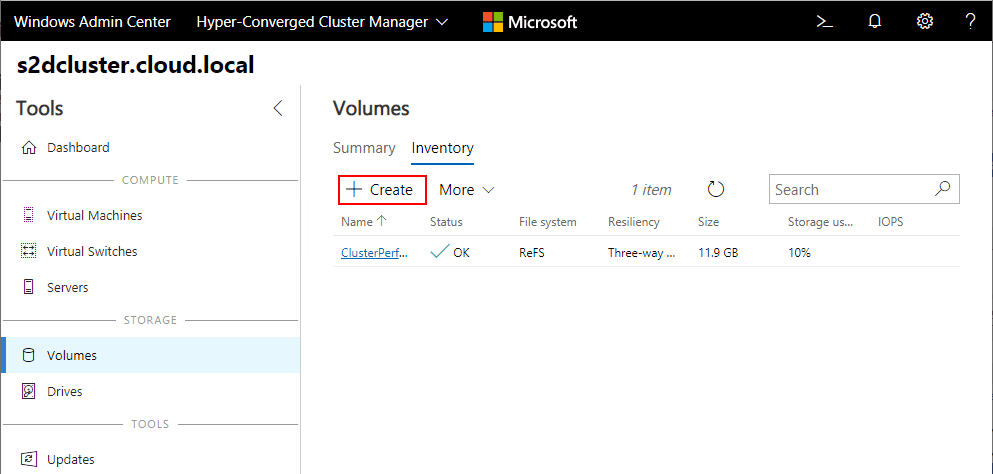
The last few days I have been playing around with Windows Server 2019 Storage Spaces Direct and the various ins and outs of the technology. In the last post, we looked at Configuring Windows Server 2019 Storage Spaces Direct S2D in VMware vSphere. In that post we configured a Hyper-V cluster and then enabled Storage Spaces Direct on the cluster. After that, we created a storage pool from the available storage. Next, on the list is actually creating the Windows Server 2019 Storage Spaces Direct volume that can be used to house virtual machines for use with running Hyper-V workloads. In this post, we will take a look at how to create Windows Server 2019 Storage Spaces Direct Volumes in Windows Admin Center and what this process looks like.
It is unlikely that you haven’t heard about Windows Admin Center. However, just in case you haven’t, this is the next generation of server management from Microsoft. The Windows Admin Center utility is a web driven management platform that allows managing Windows Servers, Failover Clusters, Hyper-V hosts, and HCI solutions from one dashboard. Microsoft has even went so far as to only expose some platform features inside of Windows Admin Center for Windows Server 2019, etc. However, Microsoft is stating at least at this point that it is not a replacement as of yet for various MSC RSAT utilities. One thing I noticed at least in the Preview version of the Windows Admin Center (1808) that there is no way to create a Storage Pool in the WAC in Storage Spaces Direct management.
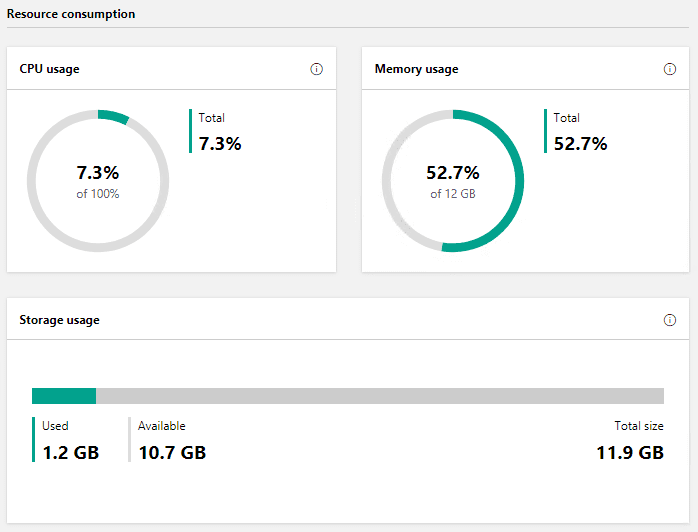
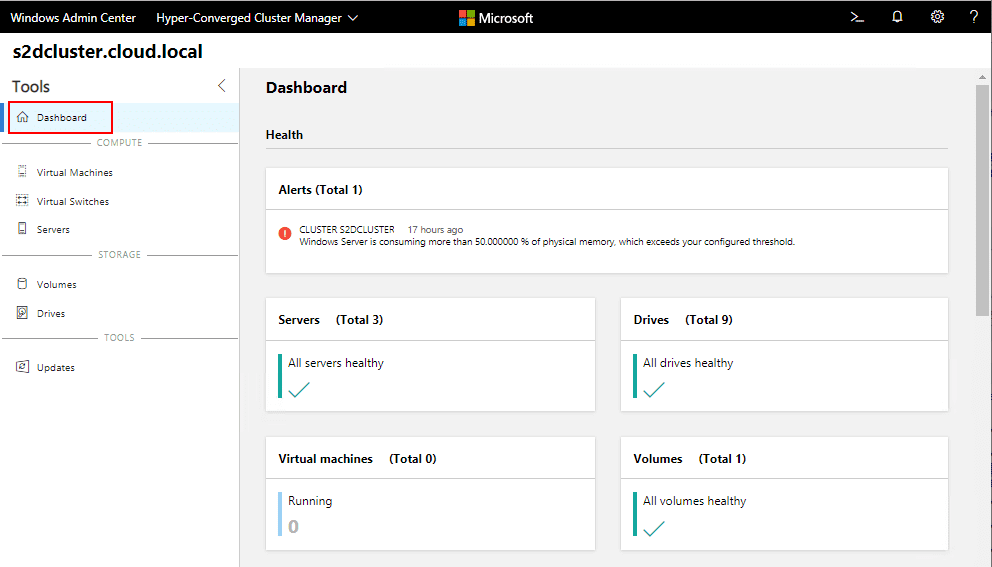
Below is an example of the S2D dashboard that gives a great overview of the health of Storage Spaces Direct, including host health, drives, volumes, etc. As you can see below, I have an alert triggered due to physical memory which is fairly expected since my cluster hosts are only running 4 GB of memory a piece.
Another look at the Windows Admin Center Storage Spaces Direct dashboard showing CPU and memory usage as well as storage usage.

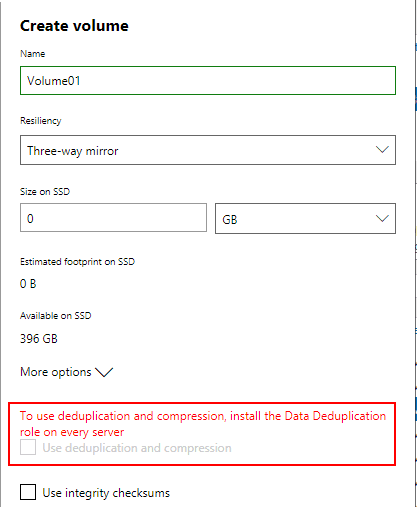
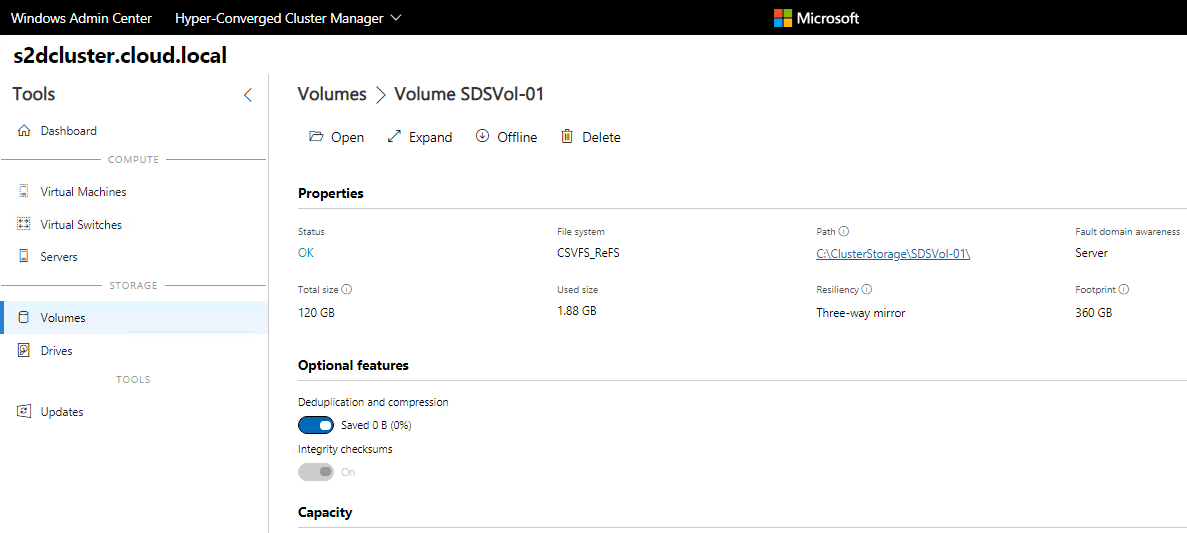
One neat thing to see with Windows Server 2019 Storage Spaces Direct is you now have the option for deduplication and compression. As noted however in the message, you need to install the Data Deduplication role on every server in your S2D cluster.
You can easily do this in Server Manager as the Data Deduplication role is found under the File and Storage Services parent role.
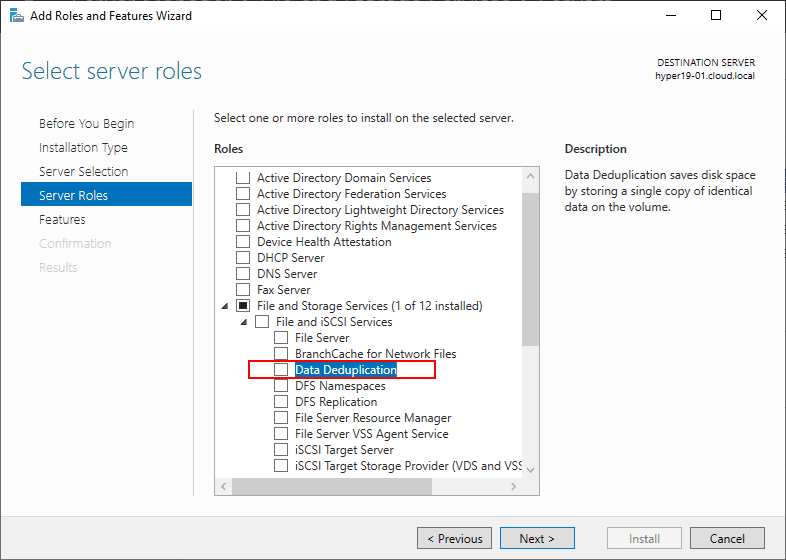
Alternately, you can use PowerShell (my preferred method) to install the FS-Data-Deduplication role. As noted in the PowerShell output, installing this role is a No Restart installation.

After creating a new Storage Pool as we covered in the previous post, you navigate to Volumes >> Create to create a new Storage Spaces Direct volume.
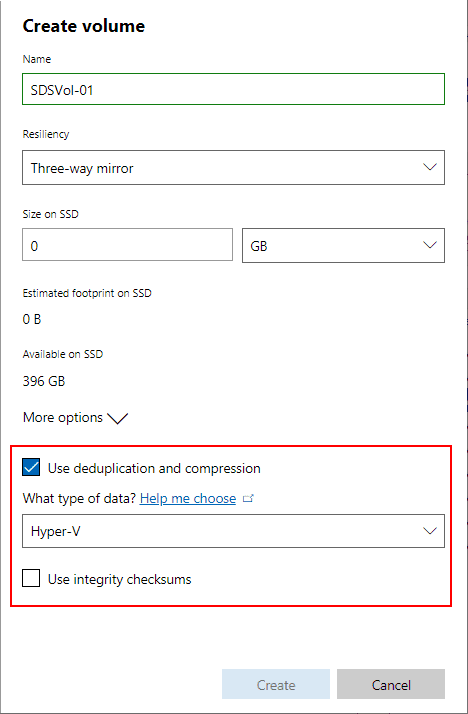
After installing the Data Deduplication role, you should see the option to be able to check Use deduplication and compression on the new volume. Note there are (3) different options that can be chose in the What type of data drop down box. Each option specially tunes the deduplication and compression option for that specific workload. According to Microsoft’s official KB on Deduplication and Compression found here: https://docs.microsoft.com/en-us/windows-server/storage/data-deduplication/install-enable#install-dedup the following description is provided for each option:
- Default – tuned specifically for general purpose file servers
- Hyper-V – tuned specifically for VDI servers
- Backup – tuned specifically for virtualized backup applications, such as Microsoft DPM
The Integrity Checksums are a ReFS function that helps to protect against corruption by verifying data integrity using these integrity checksums.
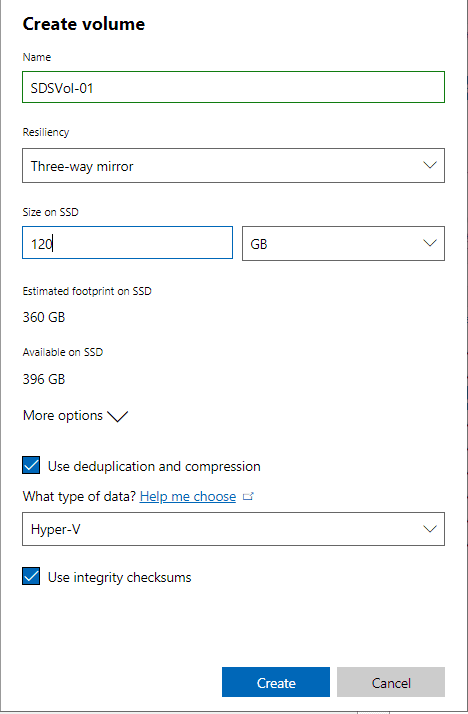
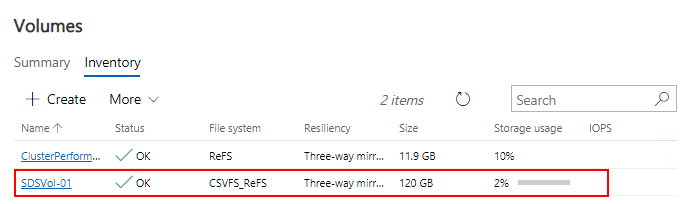
Below, creating a new 120 GB volume from the S2D pool Note how the 3-way mirror takes a considerable amount of storage space, since we are creating 3 copies of the data on 3 different hosts.
After clicking the Create button, you should see the new Windows Server 2019 Storage Spaces Direct volume get created and listed as Status OK. Notice the ClusterPerformanceHistory volume that is created by default which stores the historic health and performance information of the Storage Spaces Direct cluster.
Takeaways
So far I have to say that working with Windows Server 2019 Storage Spaces Direct has been a good experience. The process to Create Windows Server 2019 Storage Spaces Direct Volumes in Windows Admin Center was very straightforward. Windows Admin Center provides great visibility into the Storage Spaces Direct infrastructure as well with visibility into server performance, storage performance as well as the health of even individual drives contained in the storage pool. There are a few GUI operations missing from what I can tell such as creating Storage Pools as you can do in Server Manager, so there are certain features that are still missing at this point. Stay tuned as I continue to cover the functionality with Windows Server 2019 Storage Spaces Direct.

Romain Serre works in Lyon as a Senior Consultant. He is focused on Microsoft Technology, especially on Hyper-V, System Center, Storage, networking and Cloud OS technology as Microsoft Azure or Azure Stack. He is a MVP and he is certified Microsoft Certified Solution Expert (MCSE Server Infrastructure & Private Cloud), on Hyper-V and on Microsoft Azure (Implementing a Microsoft Azure Solution).
For the first time, Microsoft made an online Windows Server Summit at June 26th 2019. Microsoft talked about hybrid cloud, security, cloud native application and hyperconverged solution. Some of the new features which are coming with Windows Server 2019 were unleashed. In this topic, I’d like to summary what are the new features and why you should consider Storage Spaces Direct for a new installation or to update your existing cluster.
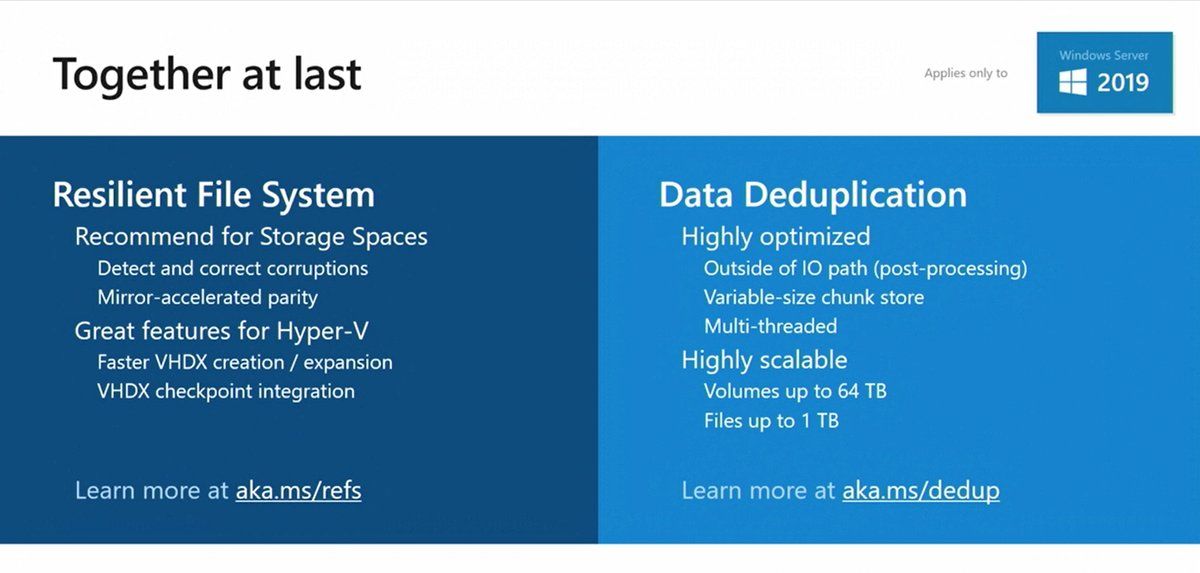
Deduplication and ReFS
With Storage Spaces Direct, Microsoft recommends the use of ReFS as the file system. ReFS brings accelerated VHDX operations and some features against corruption. However, data deduplication and ReFS are not supported together in Windows Server 2016. Some customers didn’t want to adopt S2D because the capacity required by the resiliency was to important (especially with 3-way Mirroring, where 66% of the raw capacity is used by the resiliency).
Tomorrow, with Windows Server 2019 we will be able to enable data deduplication on ReFS file system to save some storage space at the cost of some CPU workloads. Cosmos Darwin introduced this slide during Windows Server Summit.
Performance improved in Mirror-accelerated parity
One way to reduce the capacity used by the resiliency is the usage of Mirror-accelerated parity. Shortly, a Mirror-Accelerated Parity volume is a volume splited in two tiers:
- A fast tier, usually hosted on SSD and configured in 3-Way Mirroring
- A capacity tier usually hosted on HDD and configured in dual parity
All writes go to the fast tier and when it is almost full (80%), data which are less frequently used are moved to capacity tier. Mirror-Accelerated Parity is the best of mirroring and parity world on the paper. But with Windows Server 2016, Mirror-Accelerated Parity suffers of poor performance in some scenarios and is not fast as expected.
With Windows Server 2019, Microsoft announces that Mirror-Accelerated Parity has been improved and is 100% faster compared to Windows Server 2016. The following screenshot comes from Cosmos Darwin slide desk during Windows Server Summit:
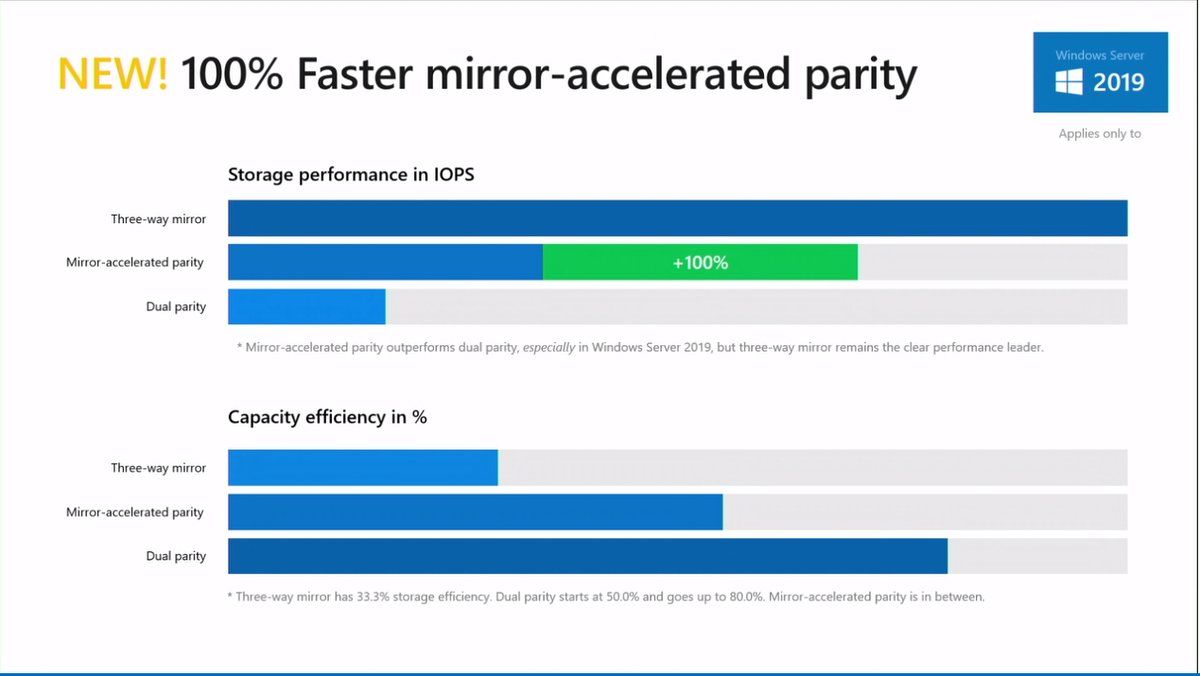
So, data deduplication and Mirror-Accelerated Parity can help you to reduce the capacity used previously by the resiliency. It is an excellent news for customers.
A better monitoring of drive latencies
In Microsoft solution (and in all hyperconverged solution), it is complicated to monitor the latency per drive. Often this is an average latency and we can’t sort IO by latency. So, we can’t get information about IOs which took the longest time (or the highest latency). With Windows Server 2019, IO will be sorted in latency timeframes to get statistics for each IO. I’m sure this feature will help to troubleshoot performance issues especially if we are able to get information about tail IOs.
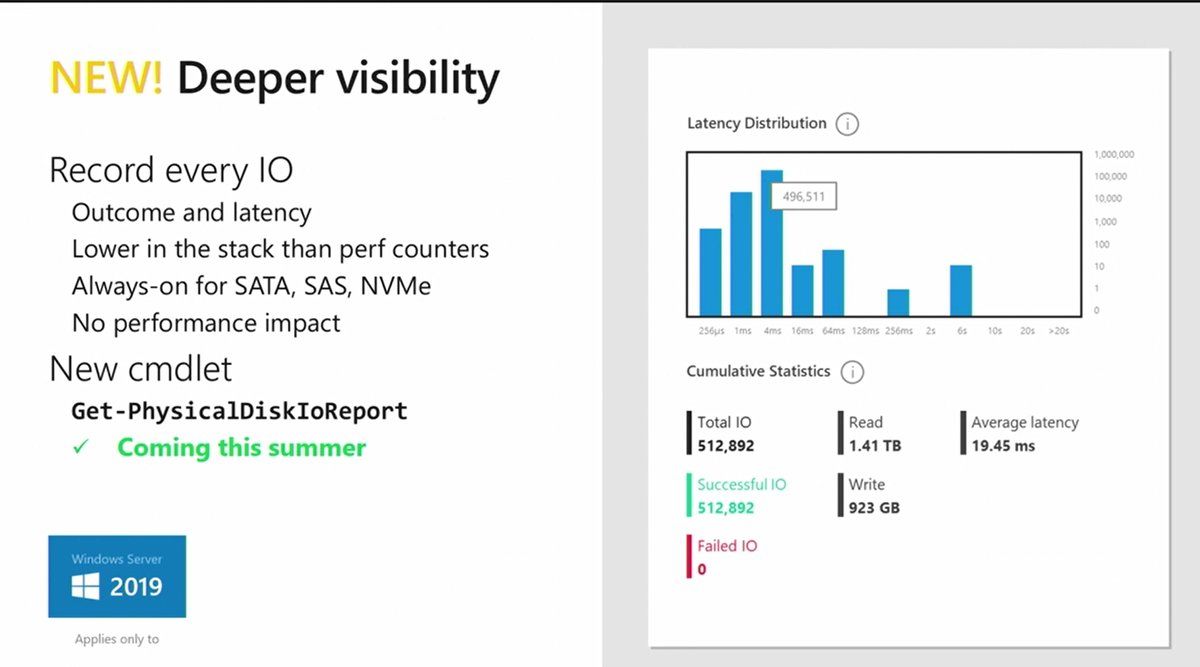
Moreover, drives will be sorted in group regarding their performances. For example, NVMe will be in one group and HDD will be added to another group. This is automatic and handled by the system. Then the system will monitor each drive latency against its peer. If a drive has abnormal latency, an alert will be raised. Sure it will help to find a defective drive!
Support of persistent memory
For those require high performance with the lowest latency, persistent memory is your salvation. Below you can find the latency comparisons per kind of drives:
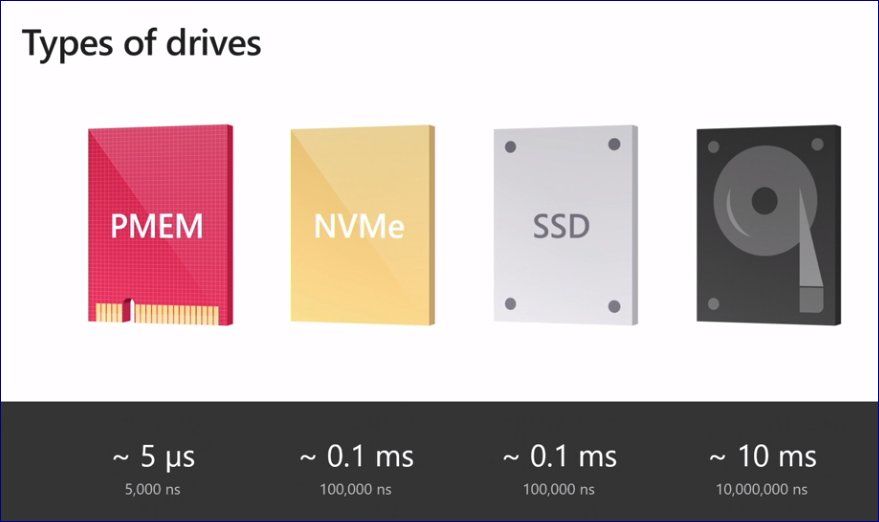
As you can see, the Persistent Memory (PMEM) can drastically reduce your latency for applications that require low latency. PMEM will be supported by Windows Server 2019 for cache or capacity.
A larger maximum scale
With Windows Server 2019, Microsoft has increased the maximum capacity and volume per server and cluster. Now a cluster can support a maximum of 4PB and you can deploy nodes with 400TB of raw capacity. In Windows Server 2019 you will be able to host 64 volumes per cluster with a maximum size of 64TB.
True two-nodes solution
Microsoft has added also some goodies for Storage Spaces Direct. Instead of using Microsoft Azure (which I do not recommend in two nodes solution) or traditional file share, you can use a USB key connected to a router. The file share witness should be hosted outside the cluster (not in a VM hosted by S2D) so usually it’s require a physical server or another infrastructure. With this solution, you can plug the USB key to the the router and set a share inside the router on the USB key.
Higher number of hardware partners
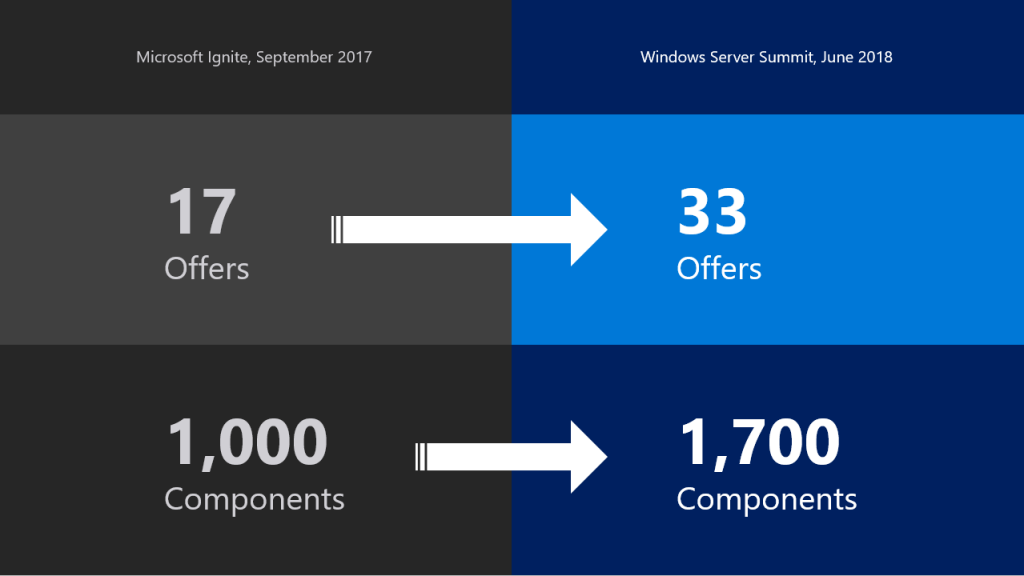
Thanks to the high value of Storage Spaces Direct and its performance, more vendors and partners are interested by this solution. In the WSSD catalog (certified hardware for S2D), you can find a higher number of offers and components compared to last year.
Conclusion
Microsoft is working hard on Storage Spaces Direct because hyperconverged solution is the future of datacenter. The future is not in legacy SAN or NAS but in software-defined solution. With Windows Server 2019, Microsoft adds expected features such as deduplication or better monitoring. I think these new features followed by those included in other parts of Windows Server 2019 such as Windows System Inisght, Windows Admin Center or Cluster Sets will help the adoption of Storage Spaces Direct. If you are already running Storage Spaces Direct in production, I suggest you to make the migration when Windows Server 2019 will be released 😊.
- Unveiling Microsoft Windows Server 2019 – Here’s Everything You Should Know About It
- Crashed Microsoft Exchange 2013 Database? No sweat. Learn how to recover it with ease
Storage Spaces Direct (S2D) is the award-winning software-defined storage (SDS) tecnhology that was first introduced in Windows Server 2016. Since that moment, S2D has become my one of the favourite and frequently used role in Windows Server (on-premises and even in Azure).
Windows Server 2019 that is going to be generally available in the second half of this year (September or October – in accordance with WS 2012-2016 release dates) continues to develop S2D by adding new features. Why don’t we discuss them right now?
TIP: Windows Server 2019 preview build is available here
Scalability
More volumes, bigger capacity per server and cluster
USB Witness
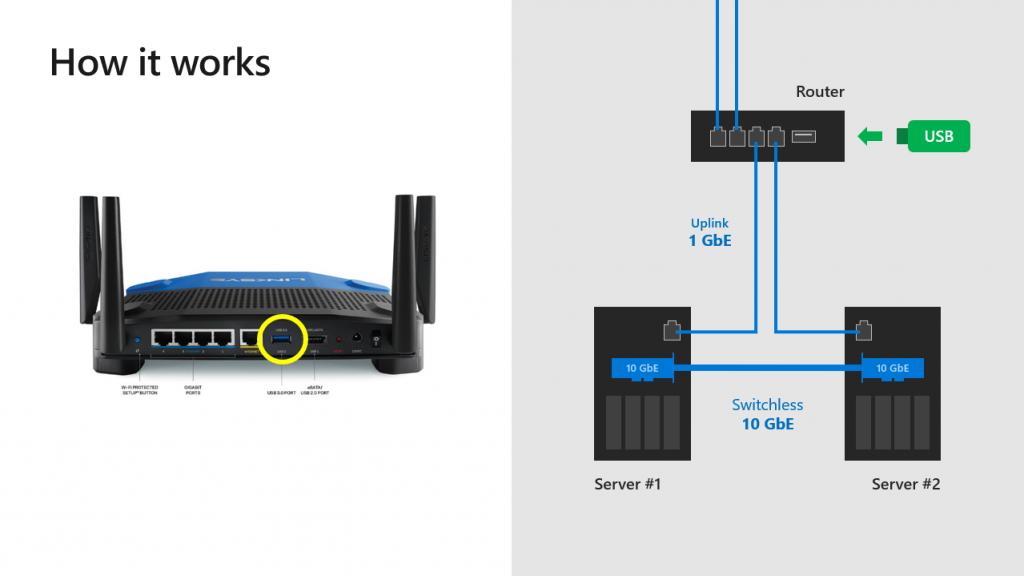
Storage Spaces Direct can be configured with just two nodes. However, we will need to design witness placement to protect our cluster from unexpected failure (in other words, we should achieve quorum). In Windows Server 2016, you can place witness on a file share, cloud (details here) or disk witness (it’d be very strange if it was actually used in S2D clusters). What about customers who don’t have any AD infrastructure or Azure/Internet access? Here is a breakthrough – USB Witness.

In short, you will be able to configure a true two-node S2D by using USB thumb drive connected to the router that is already used for VM/management traffic between nodes, for instance. Other two network interfaces (shown on the picture above), could be RDMA-adapters (recommended and supported) or Thunderbolt (POC, Project Kepler-47).
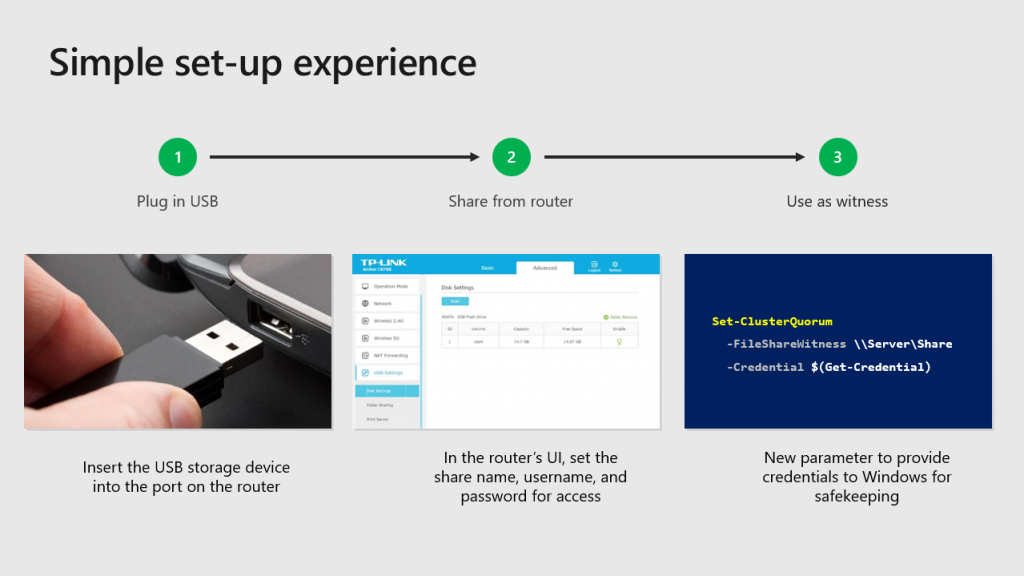
Simply insert the USB drive into the port on the router, set the share name and access information, configure witness in PowerShell: Set-ClusterQuorum -FileShareWitness \path\ -Credential and you are ready to go.
TIP: the router should support SMB2+ and USB. And, given that a witness.log is a quite small file (just kilobytes), you can use any-sized USB drives. The list of the supported routers will be available later.
Data Deduplication
ReFS is the recommended file system for S2D, improves VHDX creation/expansion speed (enables Accelerated VHDX operations), provides higher stability by detecting corruptions and allowing you to repair them with no volume downtime. However, some features such as ODX, Data Deduplication are not supported by ReFS in Windows Server 2016.
Starting with the Windows Server 2019 (1709 and later), Data Deduplication has been fully supported for ReFS. It means that you no longer need to choose between NTFS and ReFS file systems while planning S2D volumes. Create ReFS volume, enable Data Deduplication (PowerShell/Windows Admin Center), and then check the savings of storage space (use PowerShell and Get-DedupVolume cmdlet).

Proactive outlier detection
It was quite challenging to investigate performance issues in S2D in Windows Server 2016. We had to use PowerShell or performance counters (+VMFleet) to get a full picture of our setup’s behavior. Windows Server 2019 significantly simplifies that. S2D now records the outcome (success/failure) and latency (elapsed time) for every read/write IO to every drive without any performance impact. Therefore, drives with latency/outcome issues will be marked in PowerShell and Windows Admin Center as “Abnormal Latency” status. In addition, you can organize pooled drives into peer groups, and then compare latency against peers to quickly find any bottlenecks (new cmdlet: Get-PhysicalDiskIoReport).
This azure-inspired mechanism works on the lower level than performance counters and enabled by default for every SATA,SAS,NVMe drives.

Others
-Faster mirror-accelerated parity volumes (~x2)
-PMEM (Persistent Memory) drives support (Intel Optane/NVDIMM-N) for use as cache and capacity
-Deep integration with Windows Admin Center (a free HTML5-based management interface for entire Windows Server infrastructure. We’ll look at this a bit later)
-New networking recommendations for high performance, at scale, or deployments of 4+ nodes: 25 Gbps (or higher) NICs (two or more) that are remote-direct memory access (RDMA) capable, iWARP (recommended) or RoCE