In the old days all File servers where on one place, and if you want to replicate data you needed a extra tool to do this. Now days its already build in into Windows server. Storage replica can be used in several ways, replicate data from one Cluster to another or to Azure. but in this case I do a server to server replication as not everyone has a cluster.
For moving data to the Cloud there are currently several other applications like Azure file sync or Azure Migrate https://docs.microsoft.com/en-us/azure/migrate/migrate-overview Blog about Azure File Sync https://robertsmit.wordpress.com/2017/09/28/step-by-step-azure-file-sync-on-premises-file-servers-to-azure-files-storage-sync-service-afs-cloud-msignite/
Storage Replica is Windows Server technology that enables replication of volumes between servers or clusters for disaster recovery. It also enables you to create stretch failover clusters that span two sites, with all nodes staying in sync.
Storage Replica supports synchronous and asynchronous replication:
- Synchronous replication mirrors data within a low-latency network site with crash-consistent volumes to ensure zero data loss at the file-system level during a failure.
- Asynchronous replication mirrors data across sites beyond metropolitan ranges over network links with higher latencies, but without a guarantee that both sites have identical copies of the data at the time of a failure.
Storage Replica allows more efficient use of multiple datacenters. By stretching clusters or replicating clusters, workloads can be run in multiple datacenters for quicker data access by local proximity users and applications, as well as better load distribution and use of compute resources. If a disaster takes one datacenter offline, you can move its typical workloads to the other site temporarily.
Storage Replica may allow you to decommission existing file replication systems such as DFS Replication that were pressed into duty as low-end disaster recovery solutions. While DFS Replication works well over extremely low bandwidth networks, its latency is very high – often measured in hours or days. This is caused by its requirement for files to close and its artificial throttles meant to prevent network congestion. With those design characteristics, the newest and hottest files in a DFS Replication replica are the least likely to replicate. Storage Replica operates below the file level and has none of these restrictions.
Storage Replica also supports asynchronous replication for longer ranges and higher latency networks. Because it is not checkpoint-based, and instead continuously replicates, the delta of changes will tend to be far lower than snapshot-based products. Furthermore, Storage Replica operates at the partition layer and therefore replicates all VSS snapshots created by Windows Server or backup software; this allows use of application-consistent data snapshots for point in time recovery, especially unstructured user data replicated asynchronously.
The Setup I used two servers both domain joined, And there are different ways to configure the Storage Replica, the easy way and the 10 second way.

First we are installing the Storage replica feature and the File server Role. The Storage replica feature needs a reboot.

Or use Powershell
install-WindowsFeature “Storage-Replica” –IncludeAllSubFeature
If you don’t know the module name you can find it easily

A reboot is needed.

Doing this server by server is not handy, So placing this together saves us some time.
$Servers = “Building-5”,”Building-9”
$Servers | ForEach { Install-WindowsFeature -ComputerName $_ -Name Storage-Replica,FS-FileServer -IncludeManagementTools -restart }
The –restart does an automatic restart if this is needed.

Storage Replica prerequisites
- Active Directory Domain Services forest.
- Storage Spaces with SAS JBODs, Storage Spaces Direct, fibre channel SAN, shared VHDX, iSCSI Target, or local SAS/SCSI/SATA storage. SSD or faster recommended for replication log drives. Microsoft recommends that the log storage be faster than the data storage. Log volumes must never be used for other workloads.
- At least one Ethernet/TCP connection on each server for synchronous replication, but preferably RDMA.
- At least 2GB of RAM and two cores per server. (with less memory the replication won’t start)
- A network between servers with enough bandwidth to contain your IO write workload and an average of 5ms round trip latency or lower, for synchronous replication. Asynchronous replication does not have a latency recommendation.
As there is no Gui on the replica part we need to configure this by PowerShell or with the new Windows Admin Center
- Download and install Windows Admin Center.
Both our servers had Two extra disks. One log and Data Disk.


- You must create two volumes on each enclosure: one for data and one for logs.
- Log and data disks must be initialized as GPT, not MBR.
- The two data volumes must be of identical size.
- The two log volumes should be of identical size.
- All replicated data disks must have the same sector sizes.
- All log disks must have the same sector sizes.
- The log volumes should use flash-based storage, such as SSD. Microsoft recommends that the log storage be faster than the data storage. Log volumes must never be used for other workloads.
- The data disks can use HDD, SSD, or a tiered combination and can use either mirrored or parity spaces or RAID 1 or 10, or RAID 5 or RAID 50.
- The log volume must be at least 9GB by default and may be larger or smaller based on log requirements.
- The File Server role is only necessary for Test-SRTopology to operate, as it opens the necessary firewall ports for testing.
As you can see there are some needs for the Replication As I show you below with the performance test why you need this.
First we are configuring the Disks on both servers. with some PowerShell commands but this can also be done with Disk manager.
Get-Disk | Where FriendlyName -eq ‘Msft Virtual Disk’

Get-Disk | Where FriendlyName -eq ‘Msft Virtual Disk’|Initialize-Disk -PartitionStyle GPT –PassThru

1..2 | % { Get-Disk $_ }| Where FriendlyName -eq ‘Msft Virtual Disk’|New-Partition -AssignDriveLetter -UseMaximumSize | Format-Volume -FileSystem ReFS -NewFileSystemLabel “SR01-disk” -Confirm:$false

I formatted the disk with ReFS and not with NTFS.
Now that the disks are in place we can start but before we start building the replica I want to make sure the connection and the network is fast and the server can deliver the performance we need.
Therefor I download a test tool Diskspd. https://aka.ms/diskspd
Important is that the network speed between the server is good as this is the life line for the storage replica. We can test the replication before the build things for real.
With this test tool we bring up a small load to test the server.

Using the Diskspd with the line below.
Diskspd.exe -c1g -d600 -W5 -C5 -b8k -t2 -o2 -r -w5 –i100 –j2 E:test
Storage replica has a great test tool report. So with this we configure the test. Using Powershell
MD c:temp
Test-SRTopology -SourceComputerName “Building-5” -SourceVolumeName “e:” -SourceLogVolumeName “f:” -DestinationComputerName “Building-9” -DestinationVolumeName “e:” -DestinationLogVolumeName “f:” -DurationInMinutes 30 -ResultPath c:Temp
#set output file
$outputfile=”$Env:TEMP”
Test-SRTopology -SourceComputerName “Building-5” -SourceVolumeName “e:” -SourceLogVolumeName “f:” -DestinationComputerName “Building-9” -DestinationVolumeName “e:” -DestinationLogVolumeName “f:” -IntervalInSeconds 5 -DurationInMinutes 30 -ResultPath $outputfile
#open output file
If (Test-Path $outputFile) { Invoke-Item $outputFileTestSrTopologyReport.html } Else { Write-Host “FAILED: Output file not found: $url” -fore red }
Write-Host “Done” -ForegroundColor Cyan


while running the Test-SRTopology with the -DurationInMinutes 30 option we also run Diskspd.
Diskspd.exe -c1g -d600 -W5 -C5 -b8k -t2 -o2 -r -w5 –i100 –j2 E:test
It is a 1 Gb file placed on our E drive that is our Data disk for replication.


As you can see I have just one network adapter and no RDMA and in this config I hit the limit of the CPU and the network card max 4.4 Gbps not bad for a test config. (if you use a better machine in Azure Pick a Azure H-series those have RDMA

One CPU with 99% usage.
When the test is done the is a log file created in -ResultPath c:Temp
Open the log file and detailed information is there about the test. this is why I choose 30 min duration.

Nice graph about the Data throughput, in this case not bad.

the Latency is always a issue this could change you from sync to async or more network adapters or better disks. But for now it is good.

Log Volume Free Disk Space Test: The log volume F: in Building-5 has enough free space to hold the recommended log volume size of 8GB
Log Volume Free Disk Space Test: The log volume F: in Building-9 has enough free space to hold the recommended log volume size of 8GB
Storage replica has not that much PowerShell commands
#list all the commands
get-command *sr*
Setting up the actual replica is done with a long PowerShell command
The default log size is 8GB. Depending on the results of the Test-SRTopology cmdlet, you may decide to use -LogSizeInBytes with a higher or lower value.
New-SRPartnership -SourceComputerName “Building-5” –SourceRGName rg01 -SourceVolumeName “e:” -SourceLogVolumeName “f:” -DestinationComputerName “Building-9” –DestinationRGName rg02 -DestinationVolumeName “e:” -DestinationLogVolumeName “f:”

The default log size is 8GB. Depending on the results of the Test-SRTopology cmdlet, you may decide to use -LogSizeInBytes with a higher or lower value.
New-SRPartnership -SourceComputerName “Building-5” –SourceRGName rg01 -SourceVolumeName “e:” -SourceLogVolumeName “f:” -DestinationComputerName “Building-9” –DestinationRGName rg02 -DestinationVolumeName “e:” -DestinationLogVolumeName “f:” -LogSizeInBytes 1gb

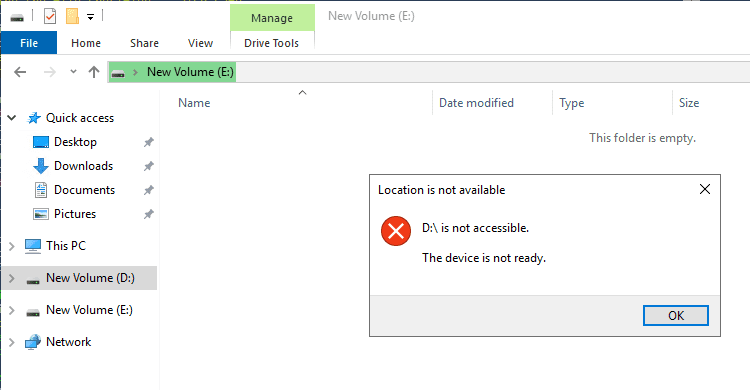
here you can see the disk setup between both servers, the active side you can access the data disk, on the passive side the disk is not accessible.
Don’t place files on the Log disk.
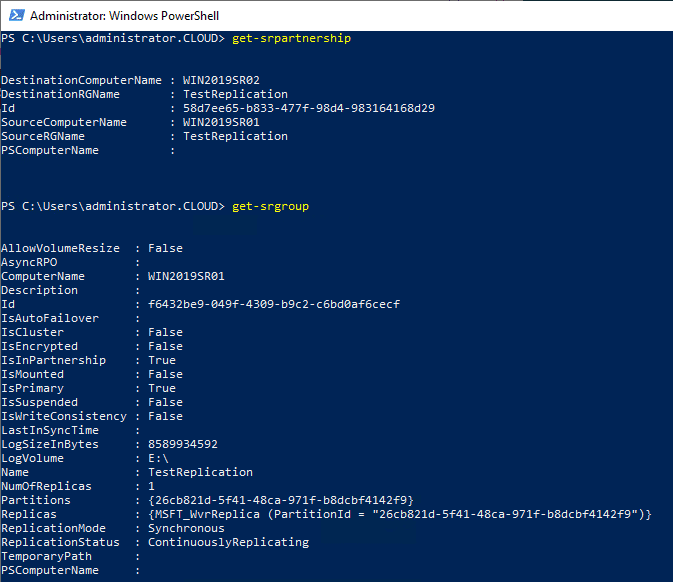
To get replication source and destination state, use Get-SRGroup and Get-SRPartnership
Get-SRGroup
Get-SRGroup |fl *

Get-SRPartnership

(Get-SRGroup).replicas

This is just after the creation so no data yet for the last time in sync.
New-SRPartnership -SourceComputerName “Building-5” –SourceRGName rg01 -SourceVolumeName “e:” -SourceLogVolumeName “f:” -DestinationComputerName “Building-9” –DestinationRGName rg02 -DestinationVolumeName “e:” -DestinationLogVolumeName “f:”
For troubleshooting there are some events that you can check, go to the event viewer and check for the Storage replica events.

Or check the events with PowerShell
Get-WinEvent -ProviderName Microsoft-Windows-StorageReplica -max 20

On the destination server, we can do the same or look for the events in the eventlog.
Get-WinEvent -ProviderName Microsoft-Windows-StorageReplica | Where-Object {$_.ID -eq “1215”} | fl

(Get-SRGroup).Replicas | Select-Object numofbytesremaining
There are also a lot of performance counters that can be viewed with PowerShell
Get-Counter -Counter “Storage Replica Statistics(*)Total Bytes Received”
Get-Counter -Counter “Storage Replica Statistics(*)Total Bytes Sent”
Get-Counter -Counter “Storage Replica Statistics(*)Avg. Network Send Latency”
Get-Counter -Counter “Storage Replica Statistics(*)Replication State”
Get-Counter -Counter “Storage Replica Statistics(*)Last Recovery Elapsed Time”
Get-Counter -Counter “Storage Replica Partition I/O Statistics(*)Number of times flush paused”
Get-Counter -Counter “Storage Replica Statistics(*)Number of Flushed Recovery Transactions”
Get-Counter -Counter “Storage Replica Statistics(*)Number of Recovery Transactions”
Get-Counter -Counter “Storage Replica Statistics(*)Number of Flushed Replication Transactions”
Get-Counter -Counter “Storage Replica Statistics(*)Number of Replication Transactions”
Get-Counter -Counter “Storage Replica Statistics(*)Number of Messages Received”
Get-Counter -Counter “Storage Replica Statistics(*)Number of Messages Sent”
Get-Counter -Counter “Storage Replica Partition I/O Statistics(*)Avg. App Write Latency”
Get-Counter -Counter “Storage Replica Partition I/O Statistics(*)Avg. App Read Latency”
Get-Counter -Counter “Storage Replica Statistics(*)Target RPO”
Get-Counter -Counter “Storage Replica Statistics(*)Current RPO”
Get-Counter -Counter “Storage Replica Statistics(*)Avg. Log Queue Length”
Get-Counter -Counter “Storage Replica Statistics(*)Current Log Queue Length”
Get-Counter -Counter “Storage Replica Statistics(*)Total Bytes Received”
Get-Counter -Counter “Storage Replica Statistics(*)Total Bytes Sent”
Get-Counter -Counter “Storage Replica Statistics(*)Avg. Network Send Latency”
Get-Counter -Counter “Storage Replica Statistics(*)Replication State”
Get-Counter -Counter “Storage Replica Statistics(*)Avg. Message Round Trip Latency”
Get-Counter -Counter “Storage Replica Statistics(*)Last Recovery Elapsed Time”
Get-Counter -Counter “Storage Replica Statistics(*)Number of Flushed Recovery Transactions”
Get-Counter -Counter “Storage Replica Statistics(*)Number of Recovery Transactions”
Get-Counter -Counter “Storage Replica Statistics(*)Number of Flushed Replication Transactions”
Get-Counter -Counter “Storage Replica Statistics(*)Number of Replication Transactions”
Get-Counter -Counter “Storage Replica Statistics(*)Max Log Sequence Number”
Get-Counter -Counter “Storage Replica Statistics(*)Number of Messages Received”
Get-Counter -Counter “Storage Replica Statistics(*)Number of Messages Sent”
these counters look like this

To remove the Replication we run the following command :
Get-SRPartnership Get-SRPartnership | Remove-SRPartnership Get-SRGroup | Remove-SRGroup
Or change the direction of the replication just run the PowerShell command
#move the replication direction from one site, use the
Set-SRPartnership -NewSourceComputerName “Building-9” -SourceRGName rg02 -DestinationComputerName “Building-5” -DestinationRGName rg01
Why not use Windows Admin Center ?
But all this PowerShell my fear you on using this. Good news than when using Windows Admin Center
Windows Admin Center is a locally deployed, browser-based app for managing servers, clusters, hyper-converged infrastructure, and Windows 10 PCs. It comes at no additional cost beyond Windows and is ready to use in production.
Get it here
When opening the Source Storage Replica server you will see a quick over view of you configuration

Easy switch replication direction.


Notifications on the preformed actions

With an overview of the current configuration.
But the best part of Windows Admin Center is creating a new Replica. I removed the old replica and create a new one with the WAC.
Fill in the source and destination and your done.


With the Admin center you got a GUI wrapper for creating the Storage replica, No PowerShell needed

There are more options in Windows Admin Center that could be useful to you just try it.
And if you want to use file replication to Azure take a look at the Azure File Sync https://docs.microsoft.com/en-us/azure/storage/files/storage-files-introduction
Step by Step Azure File Sync – on-premises file servers to #Azure Files Storage Sync Service
Follow Me on Twitter @ClusterMVP
Follow My blog https://robertsmit.wordpress.com
Linkedin Profile Robert Smit MVP Linkedin profile
Google : Robert Smit MVP profile
A capability that has been around for quite some time with Storage Area Network (SAN) devices is the ability to replicate the storage between one SAN device to another SAN device. SAN vendors have long had this capability. It provides an easy way to replicate all the data on a SAN device safely to a DR or other facility where you have another SAN device receiving the replicated data. Back in Windows Server 2016, Microsoft released an extremely interesting capability that allows you to essentially replicate volumes between Windows Servers. This feature is called Storage Replica. This holds out some very interesting and extremely beneficial use cases. With Windows Server 2019, these capabilities were further extended. In this post, we will take a look at Storage Replica in Windows Server 2019 Features and Configuration and see how to leverage this feature.
What is Storage Replica?
What is Storage Replica technology? Storage Replica is a new Windows Server technology that allows you to replicate the content of your volumes between servers or clusters for disaster recovery. In addition, it provides a means to create streteched failover clusters that span two sites and keeps the data between those two sites in sync.
This is a data replication technology that copies data between teh two Windows Servers at the block-level. The Windows Servers can be located at different physical locations and wasn’t an available technology in Windows Server versions prior to Windows Server 2016.
The technology is also important when thinking about architecting a multi-site failover cluster configuration. It allows keeping the the data in synce continuously between the cluster nodes at each site. This is the feature that allows successful failover between cluster configurations at various sites.
When you think about the benefits of this solution in terms of uniformity, simplicity, and functionality, it is a win-win across the board. Microsoft is the sole vendor of the solution and the solution does not depend on a specific type or brand of storage solution as it is taken care of in software. Much like the benefits of software-defined storage in general, this allows you to choose your own preference of hardware vendor backing the storage solution configured for your Windows Servers.
Types of Replication
In looking at Storage Replica in Windows Server 2019 Features and Configuration, there are two types of Storage Replica synchronization technologies:
Synchronous replication – As you would expect, this mirrors data within a low-latency network site with crash-consistent volumes to ensure you have no data loss of your data at a file-system level if and when a failure occurs.
Asynchronous replication – With Asynchronous replication, this mirrors the data across sites beyond metropolitan ranges over network links that may have much higher latencies. Using this type of replication, you don’t have a guarantee the data will be identical between both sites.
Storage Replica Features with Windows Server 2019
One of the limiting factors with Windows Server 2016 with Storage Replica was that you only had this feature with Windows Server Datacenter Edition. However, new with Storage Replica in Windows Server 2019 Features and Configuration, Storage Replica is now available with Standard Edition.
This unlocks the feature for many environments who may be limited to Standard Edition with their servers. However, there are limitations to note with Standard Edition including the following:
- You only have this feature between Standard Edition servers running Windows Server 2019
- You can only replicate a single volume instead of an unlimited number of volumes as with Windows Server 2019 Datacenter Edition
- Volumes can have a size of up to 2 TB instead of unlimited size
Also new is the ability to manage Storage Replica with Windows Admin Center which provides a really nice GUI to manage the solution.
Storage Replica Prerequisites
The prerequisites for Storage Replica include the following:
- Active Directory Domain Services
- Storage Spaces Direct, Fibre Channel SAN, iSCSI, or local SAS/SCI/SATA storage. SSDs are recommended for log drives and other similar workloads
- You want to dedicate a connection to synchronous replication and preferably an RDMA-enabled connection
- At least 2 GB RAM and 2 CPU cores per server
- An average of 5ms round trip latency or lower for synchronous replication. Asynchronous replication can deal with any amount of latency
- With Windows Server 2019, you can use Standard or Datacenter Editions for enabling Storage Replica
Storage Replica Considerations
Considerations to make with Storage Replica:
- Network bandwidth and storage are going to certainly come into play with synchronous replication. You must back sure you are using low latency, high-bandwidth connections and high-throughput disks
- With Windows Server 2016, the destination volume will not be made available for use. You won’t be able to access it through file explorer and other means even though the drive letter may show as available. With Windows Server 2019, there is a Test-Failoer cmdlet that allows you to temporarily mount a read-write snapshot of the destination volume for backups, testing, etc
- Microsoft uses their own version of asynchronous replication that actually allows better RPOs than traditional asynchronous replication. It does not use “snapshot-based replication” but rather uses the same technology that is used by synchronous replication and simply removes the requirement for serialized synchronous acknowledgement
- Storage Replica is a much better solution for replicating data than DFS replication
- Do not use Storage Replica as part of a “backup” solution
- It is not a replacement for Hyper-V Replicas or SSQL AlwaysOn Availability Groups
Configuring Storage Replica with Windows Server 2019
Installing Storage Replica couldn’t be easier. It is a simple matter of installing the Storage Replica feature in Server Manager or using Windows Admin Center.
Installing Storage Replica
Below, using Server Manager in Windows Server 2019, Check off the Storage Replica feature for installation.

Add the Additional features that are required for Storage Replica when prompted.
After adding the additional features, click Install on the Confirm installation selections screen in Server Manager.
The server will need to reboot after the installation of Storage Replica. After the reboot, I went back to take a look at the features present and found the Storage Replica feature had installed.

Configuring Storage Replica
Now that Storage Replica is installed, I have also installed Windows Admin Center 1910 for easily configuring the Storage Replica feature. Navigate in Windows Admin Center to Storage Replica and select the New under Storage Replica Partnerships.
This will launch a wizard in the side panel of Windows Admin Center called Replicate with another server. Here I am choosing Use an existing server or VM and click Next.
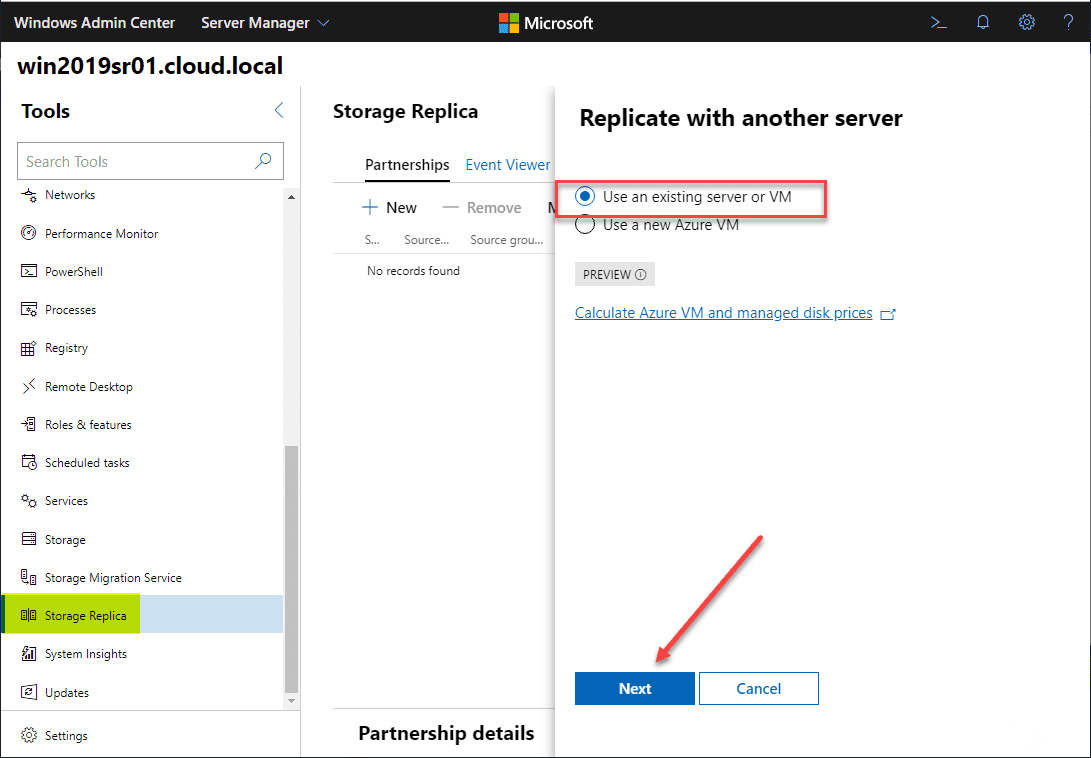
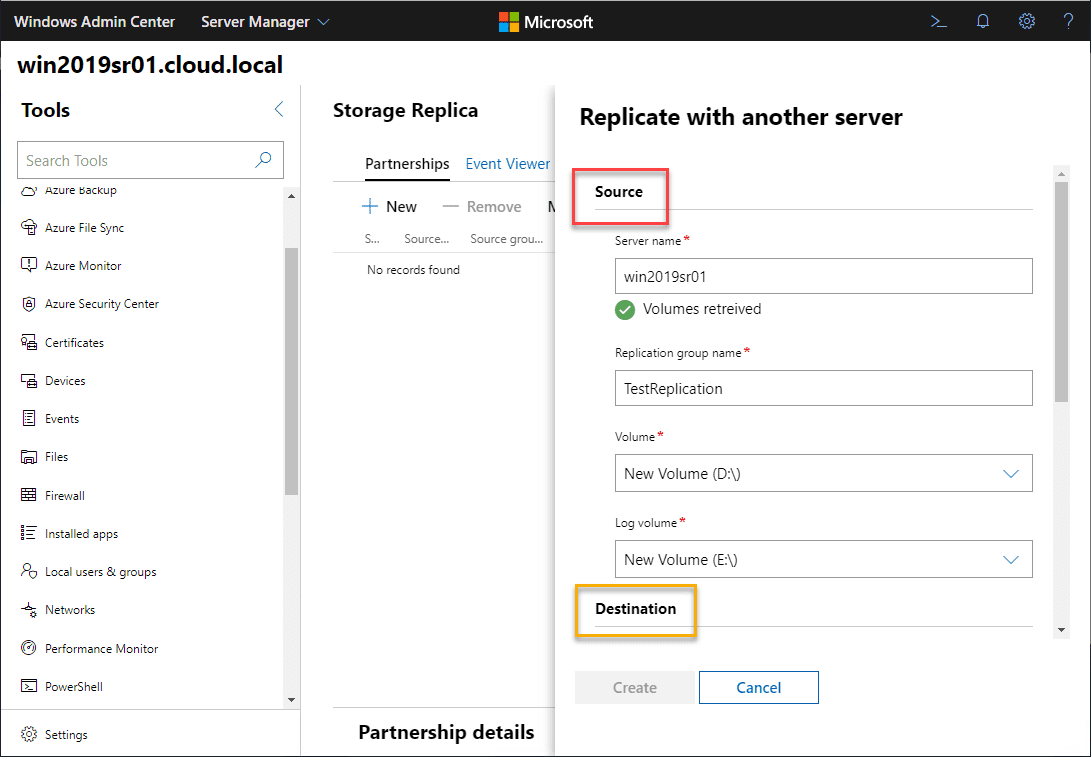
On the next screen, you will setup your Source and Destination.
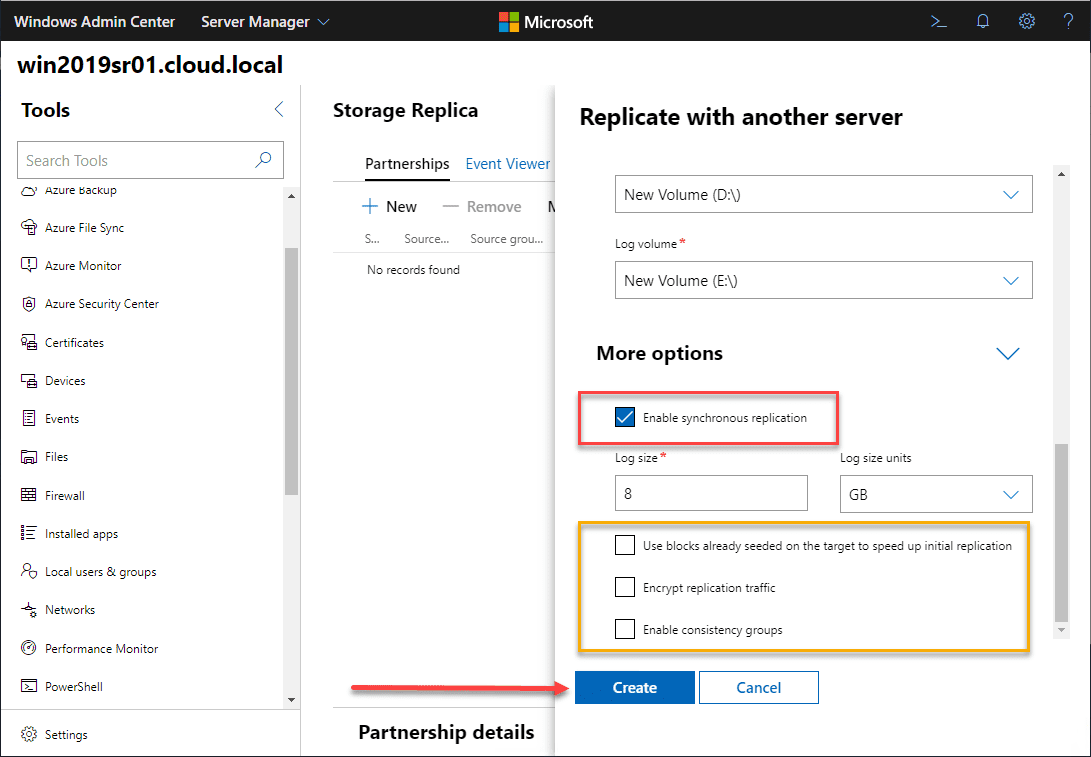
When you scroll all the way down on this screen, you will find the More options section that provides additional settings and features of the synchronization that you can either enable or leave unchecked. These include:
- Use blocks already seeded on the target to speed up initial replication
- Encrypt replication traffic
- Enable consistency groups
After a couple of moments, the Storage Replica partnership is created.
On the replication partner that is the destination of the replication, as expected, I tried to browse the “D Drive” and am unable to.
Storage Replica PowerShell Cmdlets
Below is an example of a couple of the cmdlets that are available to get the details of your Storage Replica environment as you can glean a bit more detail than is provided in Windows Admin Center if needed.
- get-srpartnership
- get-srgroup
Also, if you want to see the details of replication during the initial synchronization, you can use the following PowerShell code:
Get-SRGroup

do{
    $r=(Get-SRGroup -Name "Replication 2").replicas
    [System.Console]::Write("Number of remaining bytes {0}`n", $r.NumOfBytesRemaining)
    Start-Sleep 10
}until($r.ReplicationStatus -eq 'ContinuouslyReplicating')
Write-Output "Replica Status: "$r.replicationstatus
A full listing of available PowerShell cmdlets are found on the official Microsoft KB here: https://docs.microsoft.com/en-us/powershell/module/storagereplica/?view=win10-ps
Wrapping Up
Storage Replica is a great new feature found starting in Windows Server 2016 and now looking at Storage Replica in Windows Server 2019 Features and Configuration, it offers further enhancements. Without the need for any third-party hardware solution or vendor-specific solution, Windows Server is now able to replicate your data synchronously or asynchronously as needed between two Windows Servers by means of Storage Replica. Stay tuned for further exploration of this cool technology.
Last weeks i work with different solution in Storage Replication. Until now for a File Servers we use DFS-R as Disaster Recovery Solution.
But Windows Server 2016 launch a new feature as Storage Replica.
Until now i didn’t use it for lot of reasons but it’s time to test how is working and which scenarios can replace it with DFSR.
To be honest DFS Replication designed on low bandwidth networks which give a good solution in networks with high latency. However has big disadvantages like:
- It doesn’t replicate in-use or open files.
- It doesn’t replicate synchronously.
- Its asynchronous replication latency can be many minutes, hours, or even days.
- It relies on a database that can require lengthy consistency checks after a power interruption. This can be a big issue in specific scenarios
- Allows changes to flow in both directions that can overwrite data when you use it to replicate File Servers in multiple branches.
From the other base on Microsoft Docs Storage Replica hasn’t any of these disadvantages but maybe it doesn’t suitable for any environment.
- It only allows one-to-one replication between volumes. It’s possible to replicate different volumes between multiple servers.
- While it supports asynchronous replication, it’s not designed for low bandwidth, high latency networks.
- It doesn’t allow user access to the protected data on the destination while replication is ongoing
Another one important factor that you must know for the Storage Replica is what replication types support.
- Synchronous replication mirrors data within a low-latency network site with crash-consistent volumes to ensure zero data loss at the file-system level during a failure.
- Asynchronous replication mirrors data across sites beyond metropolitan ranges over network links with higher latencies, but without a guarantee that both sites have identical copies of the data at the time of a failure.
Let’s practice , test and learn to be sure where can use Storage Replica or where can leave DFS-R
Prerequisites
Before start to use Replica Storage you must read very careful all the prerequisites base on Microsoft Docs Storage Replica overview
- Active Directory Domain Services forest.
- Storage Spaces with SAS JBODs, Storage Spaces Direct, fibre channel SAN, shared VHDX, iSCSI Target, or local SAS/SCSI/SATA storage. SSD or faster recommended for replication log drives. Microsoft recommends that the log storage be faster than the data storage. Log volumes must never be used for other workloads.
- At least one ethernet/TCP connection on each server for synchronous replication, but preferably RDMA.
- At least 2GB of RAM and two cores per server.
- A network between servers with enough bandwidth to contain your IO write workload and an average of 5ms round trip latency or lower, for synchronous replication. Asynchronous replication does not have a latency recommendation.
- Windows Server, Datacenter Edition, or Windows Server, Standard Edition. Storage Replica running on Windows Server, Standard Edition, has the following limitations:
- You must use Windows Server 2019 or later
- Storage Replica replicates a single volume instead of an unlimited number of volumes.
- Volumes can have a size of up to 2 TB instead of an unlimited size.
Scenario
What i have use to test Storage Replication before apply in a Production Environment
- 2 x Windows Server 2019 Standard Edition as File Servers
- 2 Different Data Centers with 100Mbps Fiber Line between them
- 1 x Windows Server 2016 Std Edition to Manage Storage Replica from Windows Admin Center.
If you don’t have already a Windows Admin Center to manage your Servers find out my article Windows Admin Center — Monitoring and Managing Remote Servers how can do it.
How to Install Storage Replica Feature
Now we are ready to proceed with the installation of Storage Replica Feature in both Servers.
So let’s start
- Open Windows Admin Center
- Connect in the first Server that you would like to install Storage Replica
- Click Roles & Features
- From the Features find the Storage Replicate and check it.
- Click Install.

- Click Yes

- Wait until finish the installation

- Continues with the same steps from the second server.
How to Configure Storage Replica
Now it’s time to Configure Storage Replica in every File Server.
The steps are the below
- Create the partitions in every Server to meet the requirements for the Storage Replica
- Perform a test in Powershell from source server to verify that meet all the requirements
- Create the Partnership
Create the partitions in every Server to meet the requirements for the Storage Replica
Which are the steps that must follow?
- First of all we must create two partitions in every File Server and must meet the followings
- Must be initialize as GPT not MBR
- The first will be include the Data and the second it»s for the Logs. Don’t forget that the Servers is in Lab. So you don’t have any Disk with Data. In production environment you have already the Volume with Data.
- The Disks must has the same Size in both Servers.
- The log Volume it’s recommended to use SSD to be faster. It’s not required but you will have better performance.
- The log Volume must be at least 9 GB. The size it’s not default but may be larger or smaller base on the log requirements.
When you are ready with the Volumes in your File Servers it’s time to run a Test. The results will give us Report if met all the requirements and details for the connection between the Data Centers.
Perform a test in Powershell from source server to verify that meet all the requirements
Because Storage replica in Synchronous replication needs low latency to ensure zero data loss if we don’t know we can identify from the Test.
- Create a temp folder
- Open a Powershell Console as administrator and type the following command
Test-SRTopology -SourceComputerName flsrv3 -SourceVolumeName d: -SourceLogVolumeName e: -DestinationComputerName flsrv04 -DestinationVolumeName d: -DestinationLogVolumeName e: -DurationInMinutes 30 -ResultPath c:\temp

- After finish the test the results will be saved as HTML in the temp folder that you created.

Unfortunately because we are in Lab environment the results it’s not corresponded with the results in a production environment.
This will be a problem when you will start the implementation in your production environment.
Because its not recommended in any case to start implement Storage Replica in your production environment without test and learn in your Lab you can use any of the following workarounds.
- Copy files in the data volume while running the test.
- Download the DISKSPD to generate IOs. For example the following command run a low write IO for 10 minutes to the data Volume.
Diskspd.exe -c1g -d600 -W5 -C5 -b8k -t2 -o2 -r -w5 -i100 -j100 d:\test
Get a cup of coffee and wait until the test finish.
Examine the results of the Test to identify if you meet all the requirements.
In case that you don’t meet all the requirements find the problems , resolve it and run again the test.
If you meet all the requirements it’s time to proceed with the creation of Partnership.
Create the Partnership
This is the final step to start the Replication
- If you don’t have open Windows Admin Center
- Click in Storage Replica from the left side
- Click in New

- Type the name of the Source Server and then will identify the available Volumes.
- Give a name for a Replication Group
- Type the name of the Destination Server.
- Give a name for a Replication Group

- Click in More Options and check any of these base on your requirements:
- Enable Synchronous replication only if you have low latency. You already have identify from the Test
- The log size must already knew it from the Test
- Check the Use blocks already seeded on the target to speed up initial synchronization If you have transferred data in the destination Server
- Encrypt replication traffic
- Check the Enable consistency groups when you have to replicate servers with Applications like MS SQL Server and have create different volume for logs and different volume for databases. Ensure that application which write in multiple volumes the data is written to the destination volume sequential. For example when you use MS SQL Server which write in multiple volumes and for any reason Production Server Failed then the Destination Server must start to use it in Production environment. But all the data must be written in muitple volume at the same point time to work successful.
- When you decide how will run the replication click Create.

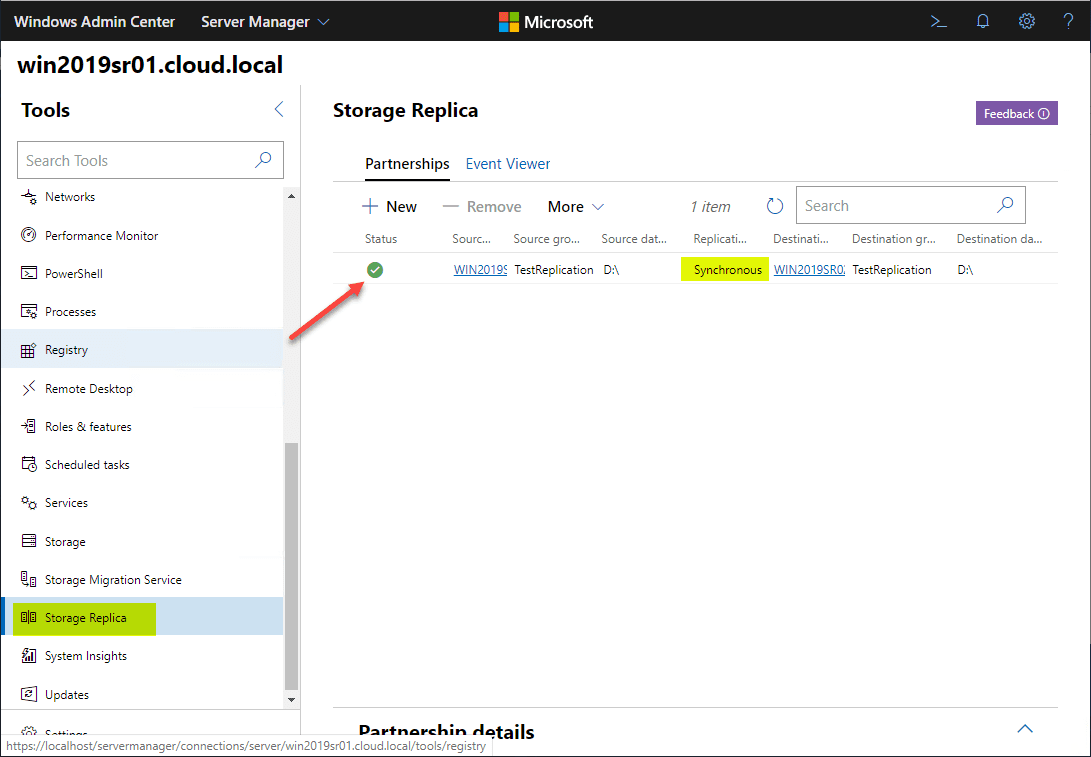
- You will see a notification that the partnership starting to created.

- When finish you can see the Partnership.

- For now on the replication start running and between the Source and the Destination Server.
Remove the Partnership
If you have decide to remove the partnership it’s better to do it from Powershell.
The reason is if remove the partnersip from Windows Admin Center will not remove the Replication Group.
So open a Powershell as Administrator and proceed with the following commands in both Servers
- Identify Partnership
Get-SRPartnerShip

- Identify Replication Group
Get-SRGroup

- Delete Partnership and verify the deletion
Get-SRPartnership | Remove-SRPartnership –confirm:$false
Get-SRPartnerShip

- Delete Replication Group and verify the deletion
Remove-SRGroup –Name rg1
Get-SRGroup

This is the first step. As IT Pro you know that the most important is to support and monitoring what you have setup.
You must be proactive probably when you have to do with data. Monitoring is the only solution to identify earlier issues and resolve it.
Until next article Have a nice weekend !!!
You can send me an email at info@askme4tech.com or do your comments in Twitter or Facebook
I invite you to follow me on Twitter or Facebook. If you have any questions, send email to me at info@askme4tech.com.

Contents
- 1 How To Configure Storage Replica In Windows Server 2019
- 2 How To Configure Storage Replica In Windows Server 2019
- 2.1 Conclusion
- 2.1.1 Related image with how to configure storage replica in windows server 2019
- 2.1.2 Related image with how to configure storage replica in windows server 2019
- 2.1 Conclusion
Immerse yourself in the fascinating realm of How To Configure Storage Replica In Windows Server 2019 through our captivating blog. Whether you’re an enthusiast, a professional, or simply curious, our articles cater to all levels of knowledge and provide a holistic understanding of How To Configure Storage Replica In Windows Server 2019. Join us as we dive into the intricate details, share innovative ideas, and showcase the incredible potential that lies within How To Configure Storage Replica In Windows Server 2019. Describe able replica implementation the replica- storage about components prerequisites this module and the completing you39ll be cases of for architect the implementing objectives in describe replica- functionality use storage 2019- windows functionality core storage learning Solution to server windows server benefits after and of learn
Storage Replica In Windows Server 2019 Features And Configuration
Storage Replica In Windows Server 2019 Features And Configuration
Step 1: install and configure windows admin center on your pc show 6 more applies to: azure stack hci, windows server 2022, windows server 2019, windows server 2016 you can use storage replica to configure two servers to sync data so that each has an identical copy of the same volume. Prerequisites before start to use replica storage you must read very careful all the prerequisites base on microsoft docs storage replica overview active directory domain services forest. storage spaces with sas jbods, storage spaces direct, fibre channel san, shared vhdx, iscsi target, or local sas scsi sata storage.

Storage Replica In Windows Server 2019 Features And Configuration
Storage Replica In Windows Server 2019 Features And Configuration
Storage replica is windows server technology that enables replication of volumes between servers or clusters for disaster recovery. it also enables you to create stretch failover clusters that span two sites, with all nodes staying in sync. storage replica supports synchronous and asynchronous replication:. Install windowsfeature “storage replica” –includeallsubfeature if you don’t know the module name you can find it easily a reboot is needed. doing this server by server is not handy, so placing this together saves us some time. $servers = “building 5”,”building 9”. Storage replica is a new windows server technology that allows you to replicate the content of your volumes between servers or clusters for disaster recovery. in addition, it provides a means to create streteched failover clusters that span two sites and keeps the data between those two sites in sync. How to configure storage replica in windows server 2019 msft webcast 76.1k subscribers 21k views 2 years ago managing networking services in windows sever 2019 video series on advance.
How To Configure Storage Replica In Windows Server 2019
How To Configure Storage Replica In Windows Server 2019
video series on advance networking with windows server 2019: step by step video on how to install and configure storage video series on advance networking with windows server 2019: this video tutorial demonstrate the steps on how to configure welcome to my channel kaptechpro. in this video tutorial of how to configure storage replication by kaptechpro, you will learn windowsserver2019 #storagereplica #mcse #mcsa #windowsadmin how to configure storage replica with windows admin center on windows server 2019 synchronous replication mirrors data in this video we will discuss about storage replica theory in server 2019. linkedin page: manage storage replica in windows 2019 using windows admin center to train the trainer. scenario storage replica storage replica is a new and awaited feature on windows server 2016 which provides block level storage replication between description: storage replica is a built in feature of windows server and azure stack hci. it is also one of the main ingredients for
Conclusion
Taking everything into consideration, it is evident that the post offers helpful information regarding How To Configure Storage Replica In Windows Server 2019. Throughout the article, the author illustrates a wealth of knowledge on the topic. Notably, the section on X stands out as particularly informative. Thanks for reading the post. If you have any questions, feel free to reach out through social media. I am excited about your feedback. Moreover, below are some related articles that you may find useful:
Window Server Edition 2016 and 2019 have new features, which have made it possible to use storage migration capabilities for storing data.
The migration service helps in keeping inventory when moving from one platform to another.
This article will try to explain what is new in the storage systems of Windows Server 2016, Windows Server 2019, and other semiannual releases.
We will start by highlighting some of the key features added in the two server systems.
Managing Storage with Windows Admin Center
The Windows Admin Center is a new feature that runs on Windows Server 2019 and some latest versions of Windows.
It is the central location where an App handles the server functions, clusters, and hyper-converged infrastructure containing storage locations.
The Admin Center does this as part of the new server configurations.
Storage Migration Service
The Storage Migration Service is the latest technology that makes it easy to move servers from old to new server versions.
All the events take place via a graphical interface that displays data on the servers and transfers data and configurations to the new servers; thereafter, it optimally moves old server identities to the new ones, ensuring the settings for apps and users are matched.
Storage Spaces Direct Improvements (Available in Server 2019 only)
Several improvements have been made to Storage Spaces Direct in Server 2019, though they are not available in Windows Server, Semi-Annual channel.
Here are some of the improvements:
1. Deduplication and Compression of ReFS Volume
You will be able to store up to 10X more data on the same storage space using deduplication and compression of the ReFS system.
You only need to turn on this feature, using a single click, on the Windows Admin Center.
The increase in storage sizes, with an option to compress data, amplifies the saving rates.
Furthermore, the multi-threaded post processing feature assists in keeping performance impact low.
However, it supports a volume of up to 64TB and with each file reaching 1TB.
2. Native Support for Persistent Memory
Windows Server 2019 comes with native support for persistent memory. This allows you to speed up performance for the continuous creation of memory modules, including the Intel Optane DC PM and NVDIMM-N.
You can use persistent memory as your cache to accelerate the active working set or use it as an extra space needed to facilitate low latency.
Of course, you can manage persistent memory the same way you can manage any other storage device in Windows Admin Center or PowerShell.
3. Nested Resiliency for Two-Node Hyper-Converged Infrastructure on the Edges
The all new software resiliency option, inspired by RAID 5 + 1, helps in surviving two hardware failures.
The nested resiliency for the two-node Storage Spaces Direct cluster offers continuous accessible storage for programs and virtual machines, even when one server node fails.
4. Two-Server Cluster Using USB Flash Drive as a Witness
You an use a low-cost USB flash plugged into your router to act as a witness between two servers in a cluster.
If the server is down, the USB will know which of the servers has more data.
5. Improved Windows Admin Center
The opportunity to manage and monitor Storage Spaces Direct with the newly built dashboard lets you create, delete, open, and expand volumes, with a few clicks.
You can follow performances of IOPS and IO latency, from the entire clusters to the individual hard disks and SSDs.
6. Increased Performance Logs Visibility
You can use the built-in history feature to see your server’s resource utilization and performance capabilities.
It has more than 50 counters that automatically collect memory, computation, storage and network data, and store them in the cluster for a full year.
This feature works without the need to install or configure anything.
7. Scale up to 4PB for Every Cluster
The Windows Server 2019 Storage Spaces Direct feature supports up to 4 petabytes (PB) (4,000 terabytes).
This way, you can get to the level of multi-petabyte scale, which makes sense in media servers for backup and archiving purposes.
Other capacity guides are increased as well; for instance, you can create volumes reaching 64, and not 32.
More so, the clusters can be stitched together into a set to make the scaling that fits within one storage namespace.
8. Accelerated Parity is now 2X Faster
You can now create Storage Spaces Direct Volumes that are part mirror and part parity.
For example, you can mix RAID-1 and RAID -5/6 to harness the advantages of both.
In Windows Server 2019, the performance of mirror accelerated parity is twice that of Windows Server 2016, due to optimizations.
9. Drive Latency Outline Detection
Using proactive monitoring and the built-in outlier detection, which is an inspiration from Microsoft Azure, you can know which drives have abnormal latency.
You can see the failing drives that have been labeled automatically in the PowerShell and Windows Admin Center.
10. Manual Delimiting of Volume Allocations to Increase Fault Tolerance
In Storage Spaces Direct, the Admin can now manually change the limit of volume allocations.
Delimiting is usually done to increase fault tolerance in specific circumstances that consider management complexities.
Storage Replica
The Storage Replica has the following improvements:
1. Introduction of Storage Replica in Windows Server, Standard Edition
It is now possible to use Storage Replica with Windows Server, Standard Edition, as well as the Datacenter editions.
Running Storage Replica on Windows Server, Standard Edition has the following weaknesses:
- Storage replica can replicate a single volume and not an unlimited volume number
- Volume varies with some taking up to 2TB, instead of taking an unlimited size
2. Storage Replica Log Performance Improvements
The Storage Replica comes with improvements that enhance the tracking of logs.
To get the increased performance, all members of the replication group must run Windows Server 2019.
3. Test Failover Improvements
You can mount a temporary snapshot of the replicated storage on destination server for testing or backing up purposes.
4. Windows Admin Center Support
Support for the graphical management of replication is made possible via the Server Manager Tool.
This involves server-to-server replication, cluster-to-cluster, and stretch cluster replication.
5. Miscellaneous Improvements
Storage Replica also has the following improvements:
- Changes to asynchronous stretch cluster behaviors for automatic failover to take place.
- Multiple bug fixes
SMB
SMB1 and Guest Authentication Removal
Windows Server does not install the SMB1 client and server by default, while, at the same time, the ability to authenticate guests in SMB2 if off by default.
SMB2/SMB3 Security and Compatibility
More options for security and applications compatibility were added, including disabling opLocks in SMB2+ for old applications.
This also covers the need for signing encryption on every connection from the client.
Data Deduplication
Data Deduplication Supports ReFS
You’ll not need to choose between the advantages of a modern file system with ReFS and Data Deduplication.
Anytime you enable Data Deduplication, enabling ReFS is also possible now.
Data Port API for Optimized Ingress/egress to Deduplicated Volumes
As a developer, you’ll now enjoy the advantages of data deduplication and possibilities of storing data in an efficient manner
File Server Resource Manager
The Windows Server 2019 can prevent the File Resources Manager service from creating a change (USN) journal on storage volumes.
This is to create and conserve more space on every volume; however, it will disable real-time classification.
This is the same effect that takes place in Windows Storage Server, Version 1803.
What’s New in Storage in Windows Server, Version 1709
Server Version 1709 is the first Windows Server release with a Semi-Annual Channel, which is a channel that is fully supported in production for 18 months, with a new version coming in every six months.
Storage Replica
Disaster recovery and protection is an added function of the Storage Replica, which is now expanded to include:
- Test Failover
You now have an option of mounting the destination storage through a test failover.
You can also mount the snapshots temporarily for both testing and backup purposes.
- Windows Admin Center Support
Thee is support for the graphical applications that are managing replications. You can access it via the Server Manager Tool.
Storage Replica also has the following improvements:
- Changes to asynchronous cluster behaviors to enable automatic failover
- Multiple bug fixes
What’s New in Storage in Windows Server 2016
1. Storage Spaces Direct
The Storage Spaces Direct feature facilitates the availability and scalability of storage using servers with local storage.
This implies that it’s now possible to deploy and manage software that control storage systems, unlocking the use of new classes of storage devices.
These devices include SATA, SSD, and NVMe disks. Achieving such storage capabilities may not be possible using clustered Storage Spaces with Shared Disks.
What Value Does this Change Add?
Storage Spaces Direct allows service providers and enterprises to use industry standard servers with local storage.
The idea is to build highly available and scalable software-defined storage.
The use of servers with local storage decreases complexity, as it increases scalability and allows the use of storage devices such as SATA solid state disks. This lowers the cost of flash storage or NVMe sold state Disks
Storage Spaces Direct Removes the need to have a shared SAS fabric, which simplifies deployment and configuration.
This means that the server uses the network as the storage fabric while leveraging the SMB3 and SMB Direct (RDMA) for both high speed and low latency, as well as good use of the processing unit.
Adding more servers to the configuration increases storage capacity and input and output performance.
The Windows Server 2016 Storage Spaces Direct works differently, as explained below.
2. Storage Replica
It enables the storage, block-level stretching of failover clusters between sites, as well as the synchronous replication between servers.
Synchronous replication enables mirroring of data in physical sites with consistent volumes to ensure no data is lost at the file system level.
Asynchronous replication may increase the possibility of data loss.
What Value Does this Change Add?
It provides a single vendor disaster recovery solution for both planned and unplanned power loss situations.
You can use SMB3 transport and gain from proven performance, scalability, and reliability.
It will help you to:
- Stretch Windows failover clusters further
- Use Microsoft end-to-end software for storage and clustering, such as Hyper-V, Scale-Out File Server, Storage Replica, Storage Spaces, ReFS/ NTFS, and deduplication
It helps in reducing complexity costs by:
- Being hardware agnostic with no specific requirements for storage configurations like DAS or SAN
- Allowing for the storage of commodities and network technologies
- Featuring easy graphical management interface for nodes and clusters through failover cluster manager
- Including comprehensive and large scale scripting options through the Windows PowerShell
- Helping in the reduction of downtimes and enhancing large scale productivity
- Providing supportability and performance metrics and diagnostic capabilities
What Works Differently
The functionality is new in Windows Server 2016
3. Storage Quality of Service
In Windows Server 2016, you can use the Storage Quality of Service (QoS) feature as a central monitor for end-to-end storage performance and developing management policies using Hyper-V and CSV clusters.
What Value Does this Change Add?
You can change the QoS policies in a CSV and assign one or more virtual disks on Hyper-V machines.
The storage automatically adjusts itself to meet the fluctuating policies and workloads.
This way, each policy can give a minimum reserve or create a maximum to be used when collecting data.
For example, a single virtual hard disk, a tenant, a service or a virtual machine can be used.
You can use Windows PowerShell or WMI to perform the following:
- Create policies on CSV cluster
- Assign the policies to virtual hard disks
- Enumerate policies on the CSV clusters
- Monitor flow performance and status of the policies
If you have several virtual hard disks sharing the same policy and performance is shared to meet the demands within the policy’s minimum and maximum settings, it means that the policy can manage virtual hard disks and a single or multiple virtual machines that constitute a service owned by a tenant.
What Works Differently
This is a new feature in Windows Server 2016.
The management of minimum reserves and monitoring the flow of all virtual disks over a cluster using a single command and central policy-based management are not possible in the previous Server releases.
4. Data Deduplication
Function |
New or Updated |
Description |
Support large volumes |
Updated | Before Windows Server 2016, you had to specify sizes. Anything above 10TB did not qualify for deduplication. Server 2016 supports deduplication sizes of up to 64TB |
Large file support |
Updated | Before Windows Server 2016, files with 1TB could not deduplicate. Server 2016 supports deduplication of files up to 1TB. |
Nano Server Support |
New | Deduplication is available and fully supported for Server 2016 |
Simple Backup Support |
New | Windows Server 2012 R2 supported Virtual backups using the Microsoft’s Data Protection Manager. Windows Server 2016 simple backup is possible and is seamless |
Cluster OS Rolling Upgrades Support |
New | Deduplication supports Cluster OS Rolling Upgrade and is available in Windows Server 2016 |
5. SMB Hardening Improvements for SYSVOL and NETLOGON Connections
Windows 10 and Windows Server 2016 client connections to the Active Directory Domain Service, the SYSVOL, and NETLOGON now all share domain controllers that require SMB signing and authentication via Kerberos.
What Value Does this Change Add?
It reduces the possibility of man-in-the-middle attacks
What Works Differently?
If the SMB and mutual authentication are not available, Windows 10 or Server 2016 will not access the domain-based Group Policy Scripts.
It is also good to note that the registry values of the settings are not present by default; the hardening rules will apply until a new policy change comes in through Group Policy or any relevant registry values.
6. Work Folders Improvements
The added changes to notifications are there when the Work Folder server is running on Windows Server 2016, and the Work Folder is on a client running Windows 10.
What Value Does this Change Add?
In Windows Server 2012 R2, when the changes in files are synchronized to the Work Folder, clients will get notified of the impending changes and wait for at least 10 minutes for the update to materialize.
When running Windows Server 2016, the Work Folders will immediately notify the Windows 10 client, and the synchronization changes take effect immediately.
What Works Differently
This is a new feature in Windows 2016.
For this feature to work, the client accessing the Work Folders must be a Windows 10.
In case you are using older clients, or if the Work Folder is on Windows Server 2012 R2, the client will poll every 10 minutes for any new changes.
7. ReFS Improvements
The ReFS (Resilient File System) offers support for large scale data storage allocation with varying workloads, reliability, resiliency, and scalability.
What Values Does this Change Add?
ReFS brings in the following improvements:
- Implementing new storage tiers that help in delivering fast performance and increased capacity
- Multipling resiliency on the same virtual disk through mirroring and parity tiers
- Enhancing responsiveness to drifting working sets
- Introducing a block of cloning and improvements to VM operations such as vhdx checkpoint merge operations
- Helping in the recovery of leaked storage and keeping them from being corrupted
What Works Differently?
These functionalities are new in Windows Server 2016.
Conclusion
With so many features available in Windows Server 2019, this article covered the fully supported features.
At the time of writing this post, some features were partially supported in earlier versions but are getting full support in the latest Server versions.
From this read, you can see that Windows Server 2019 is a good upgrade experience.