In 2015 Microsoft Cooperation produced a significant release in the operating system market which we all know as Windows 10. Since then, Microsoft releases several updates to this operating system to keep the system up to date. On the other hand, there are certain times, when their automatic updates keep annoying their users, which also results in a forceful shutdown of the system.

While installing the updates on the device, it consumes a lot of time & data to complete the whole process. So, there is no doubt that you might think to stop Windows 10 updates on the machine. This is why we’re going to discuss how to disable Windows updates.
We will now be discussing a list of required methods to disable updates on Windows 10 without causing any errors.
How To Stop Windows Update?
Method 1: Using Services
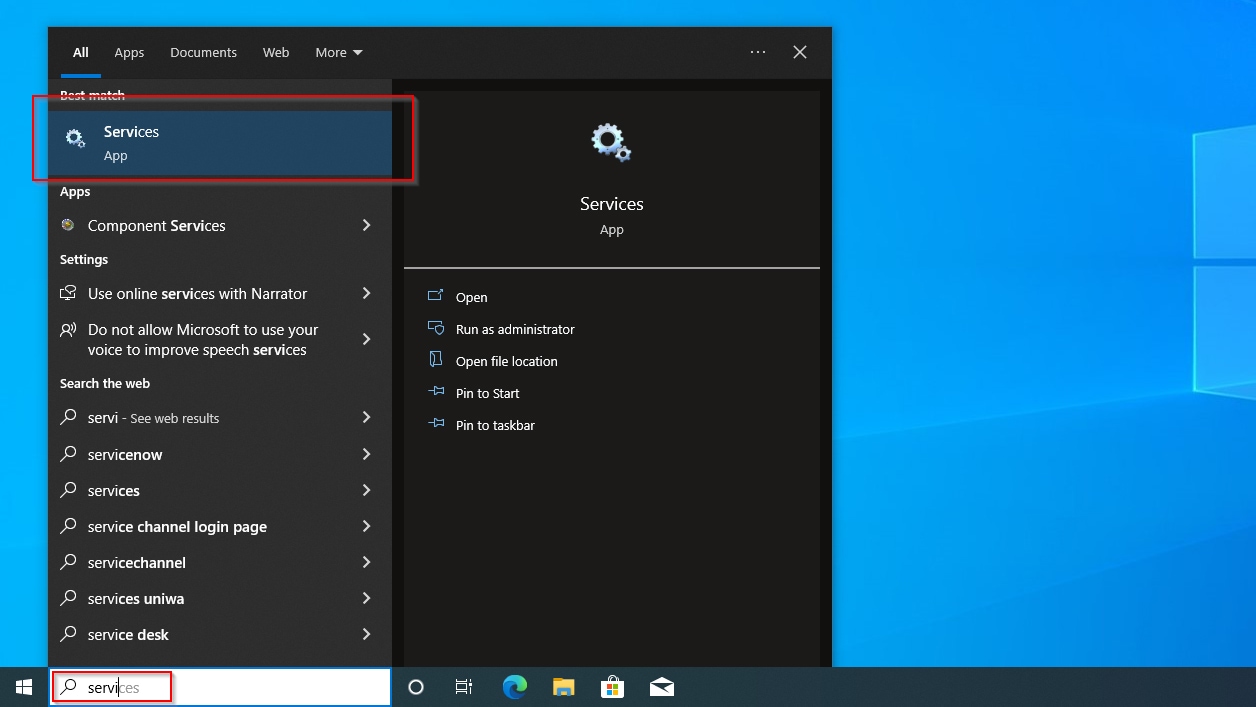
Step 1: At first, open the Search Box & write down Services there. Now, the Service option will be available & click on it.

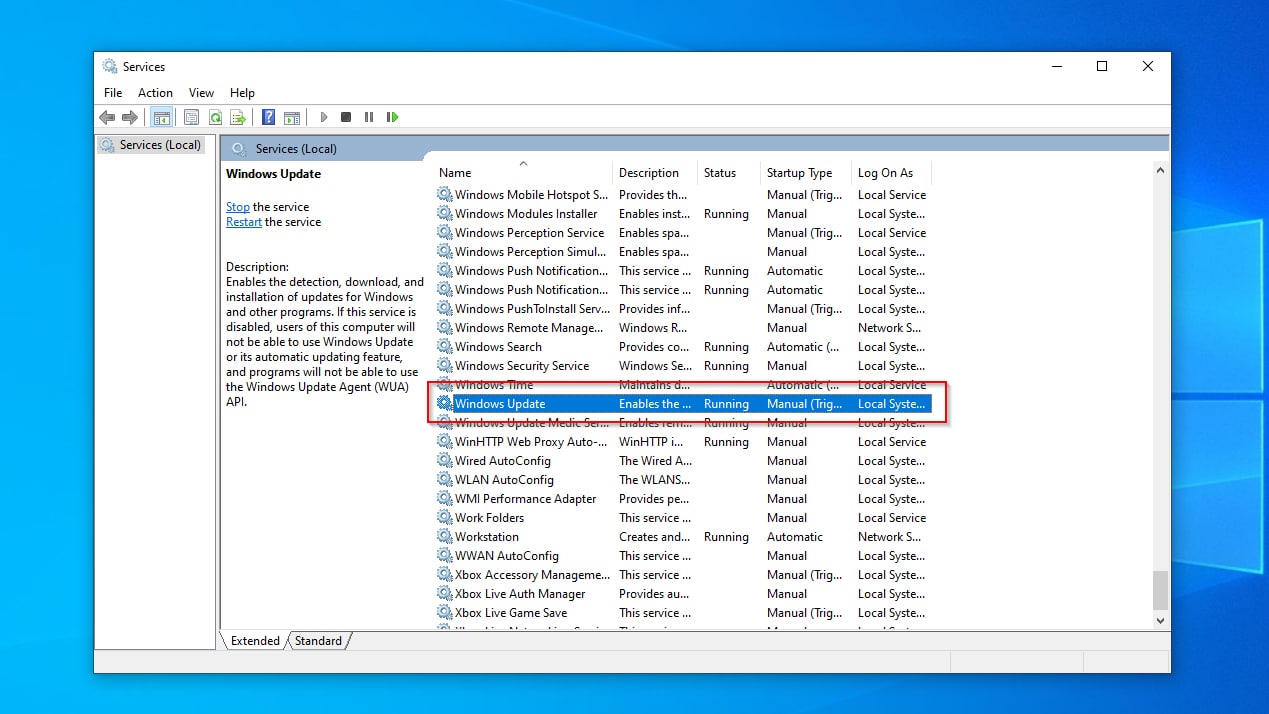
Step 2: A big list will appear in the next window. Search for the Windows Update option & right-click over there.

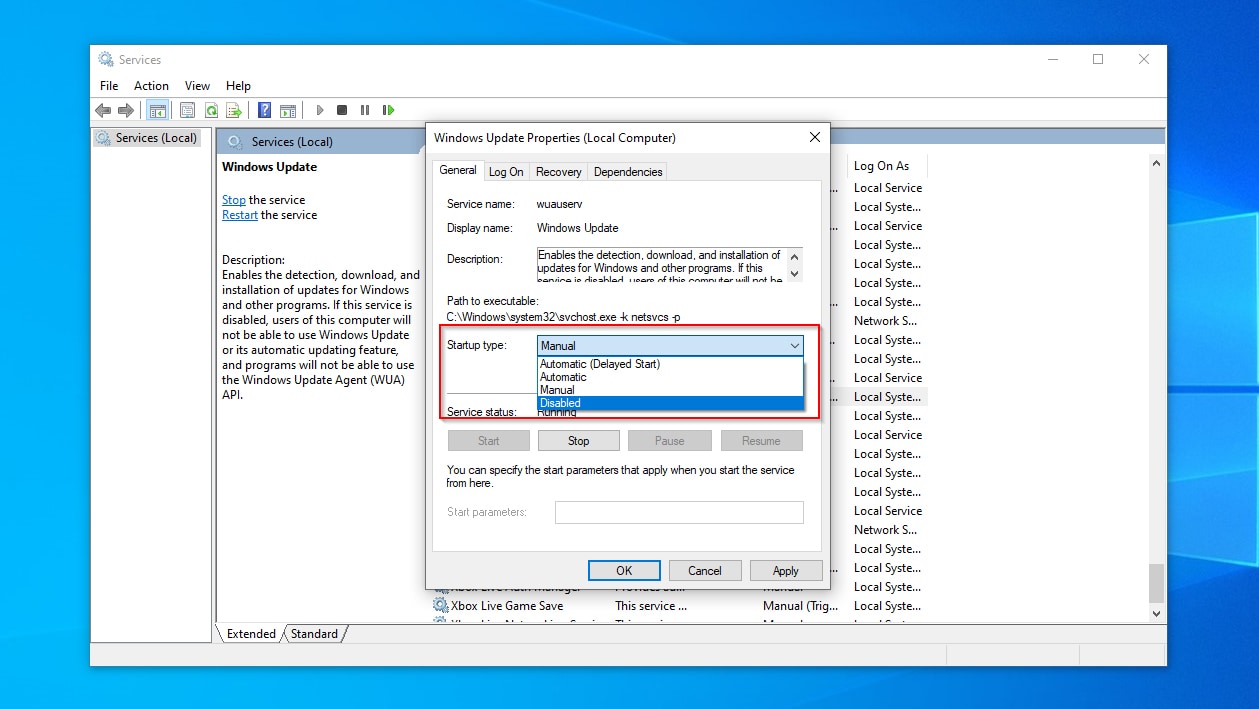
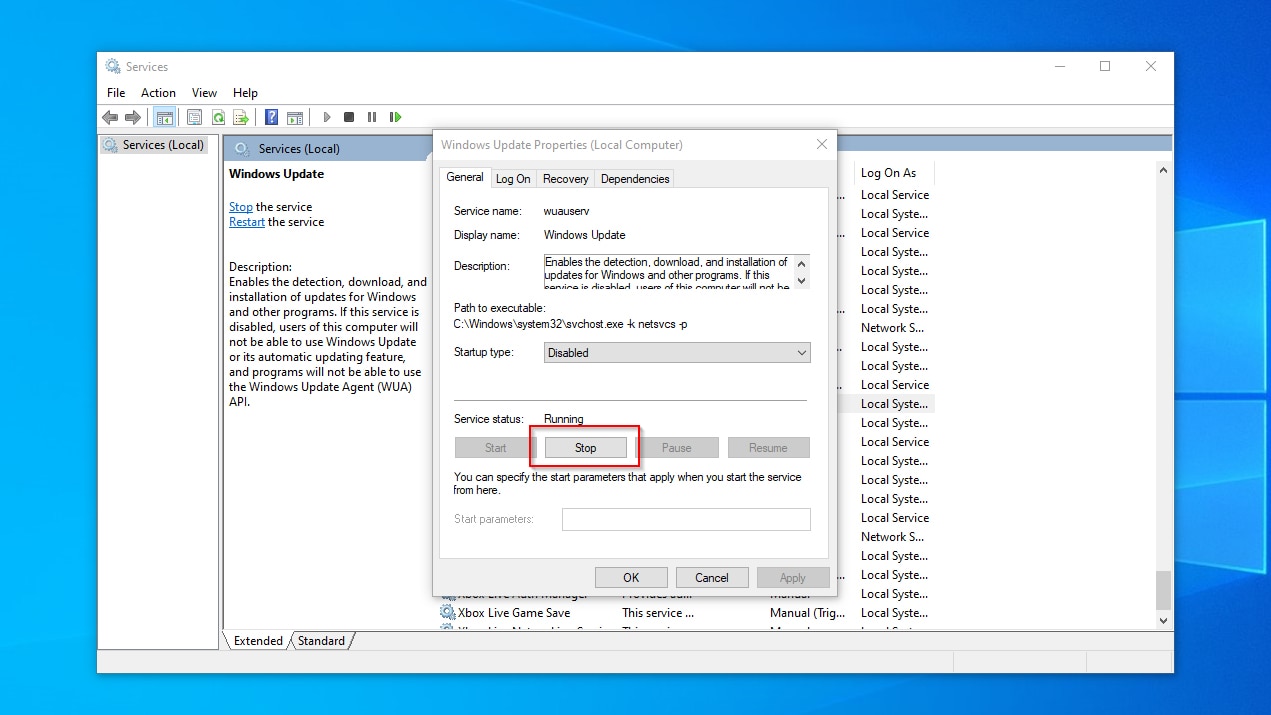
Step 3: A new popup window will be opened. From the Startup Type dropdown menu, select the Disable option. And just below it, click on the Stop button. In the end, click on the Apply button to save the changes.

Hence, we have successfully stopped Windows 10 updates using the Services on the device.
Method 2: Using Group Policy
Step 1: Agin open the Search bar in Windows 10 & Search for the “gpedit.msc”. Just press Enter to move ahead.

Step 2: Now, the window for the Group Policy will be opened. In the left sidebar, first, expand the Administrative Templates. And inside that, again expand the folder Windows Components.

Step 3: Now, on the right-hand side of the screen, double-click on the option Configure Automatic Update

Step 4: On the left-hand side of the screen, three-button options are present. Click on the option Disable & close the windows.

Hence, we have successfully stopped Windows 10 updates using the Group Policy on the device.
Method 3: Using Register Policy
Step 1: To stop Windows 10 from update, run the “regedit” command in the Search Box on the device. Press Enter to move ahead.

Step 2: Now, a new window will be opened & the below-mentioned path should be followed by expanding folders on the Left Hand Side of the Screen. After reaching the endpoint of the path, Right Click on the folder Windows. Some more options will be available. Among them click on the New option.
Path: HKEY_LOCAL_MACHINE\SOFTWARE\Policies\Microsoft\Windows

Step 3: A new subfolder will be created inside the Windows folder. Give the name “WindowsUpdate”.

Step 4: Inside the “WindowsUpdate” using the same process create another subfolder. And provide its name as “AU”.

Step 5: On the right-hand side of the screen, right-click anywhere. Under the New option, select the option DWORD (32-bit) Value.

Step 6: Now, a new value will be added there & the value will be “NoAutoUpdate”. Then press Enter to save the changes & close all the windows.

Hence, we have successfully stopped Windows 10 updates using the Register Policy on the device.
Method 4: Using Task Scheduler
Step 1: To stop updating Windows 10, search for the Task Scheduler in the Search bar on the device. One option will be available with the same name, click on that to move ahead.

Step 2: On the left-hand side of the screen, expand the folder Task Scheduler Library. Under such folder, again expand the folder Microsoft. Inside the Microsoft folder, the Windows folder will be available.

Step 3: In the right-hand side window, a Schedule Start option is present. Right-click on the option & click on the Disable option to complete the process.

Hence, we have successfully stopped Windows 10 updates using the Task Scheduler on the device.
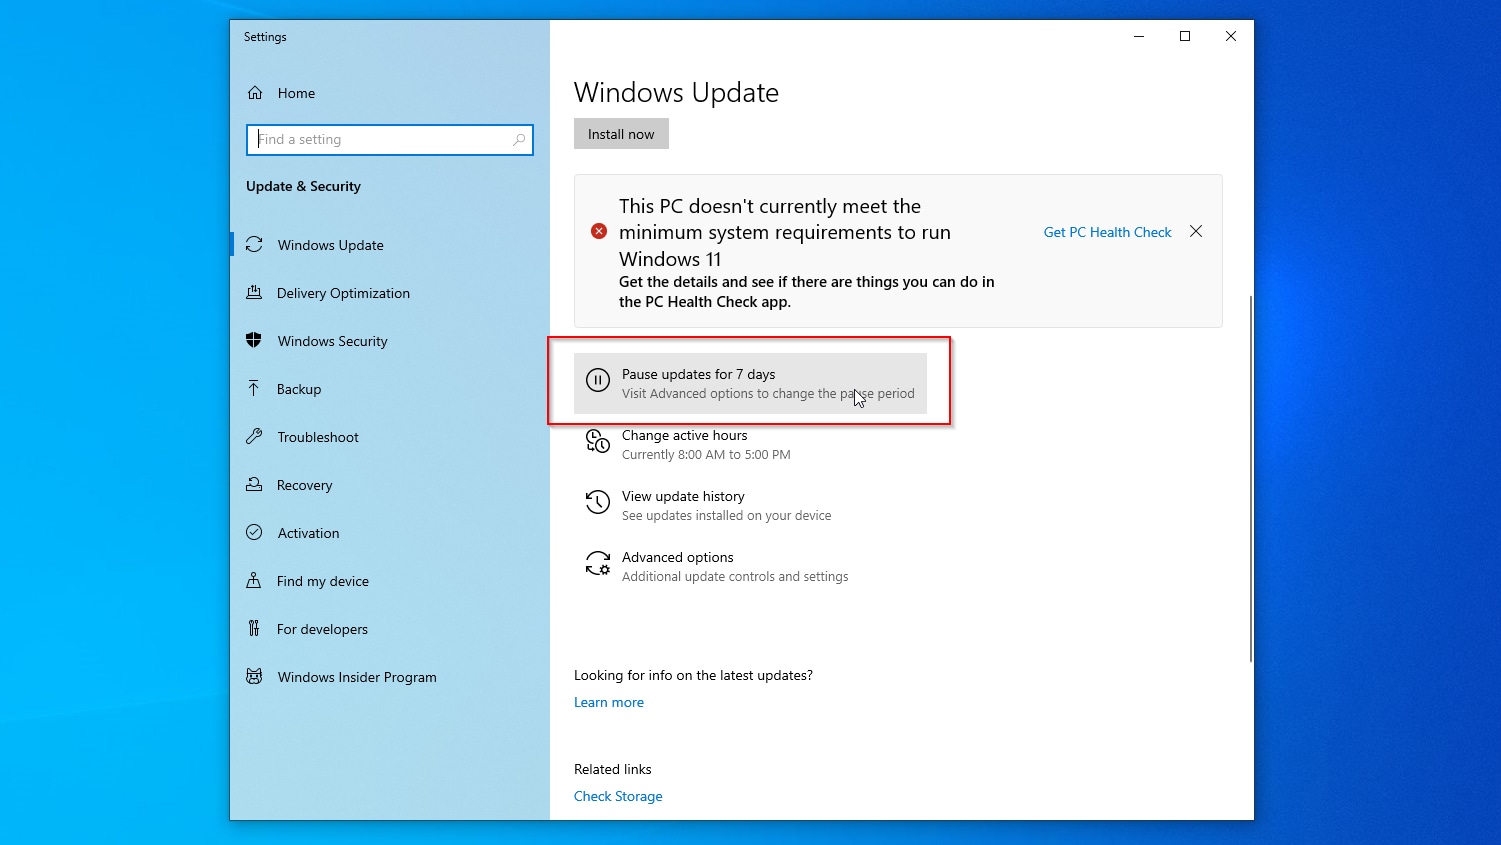
Method 5: Pause Updates
Step 1: Open the Settings. Inside the Setting window, click on the Update & Security option.

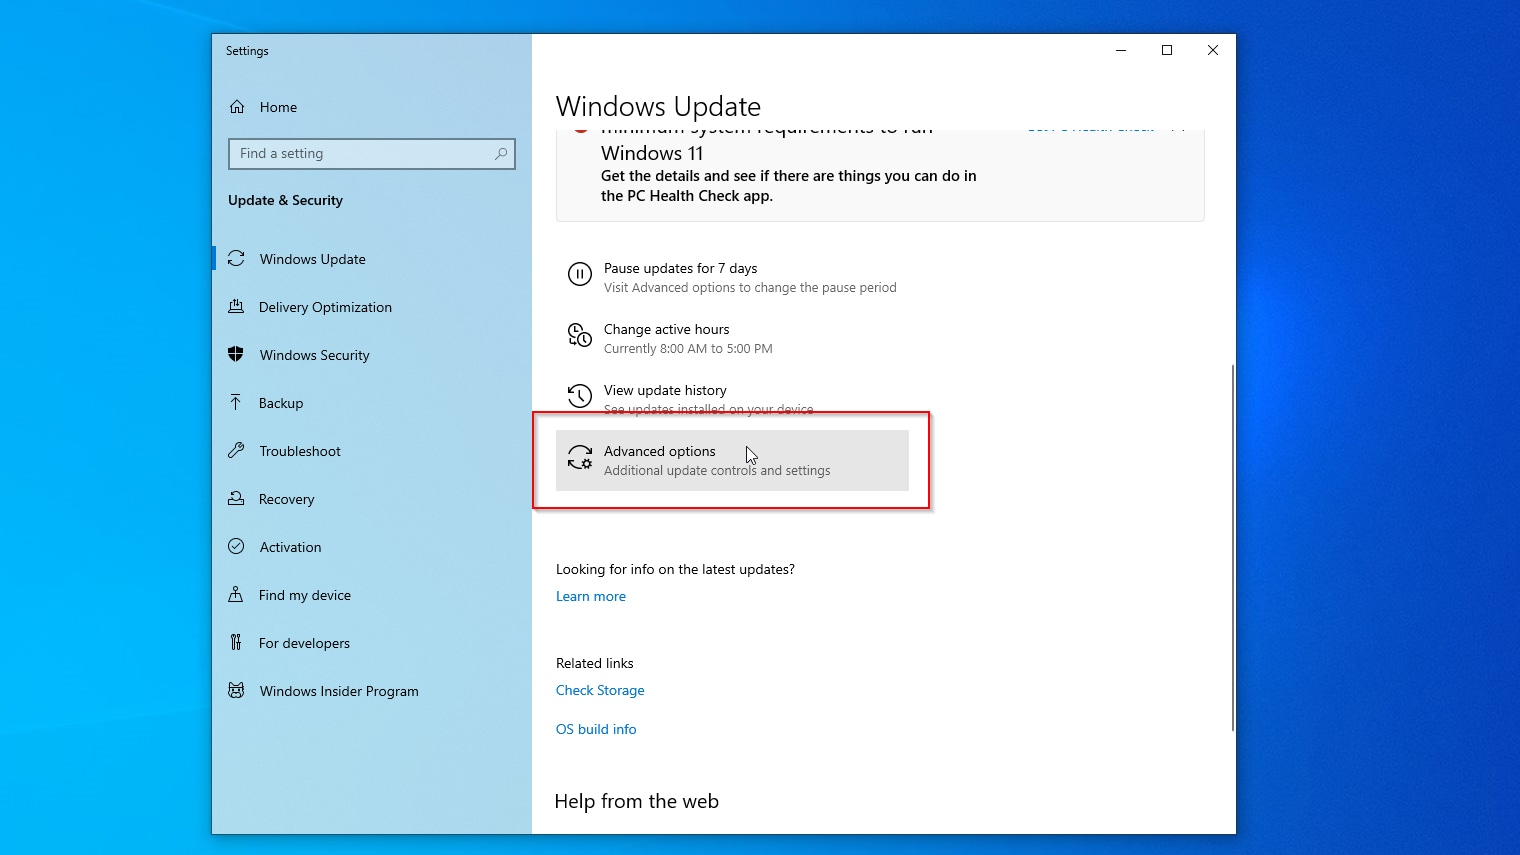
Step 2: In the next window, click on Advanced Options under the Update Settings.

Step 3: Inside the next window, the Pause Updates option will be available & enable the button. It will pause the updates in Windows 10 for 35 days.

Hence, we have successfully stopped Windows 10 updates using the Pause method on the device.
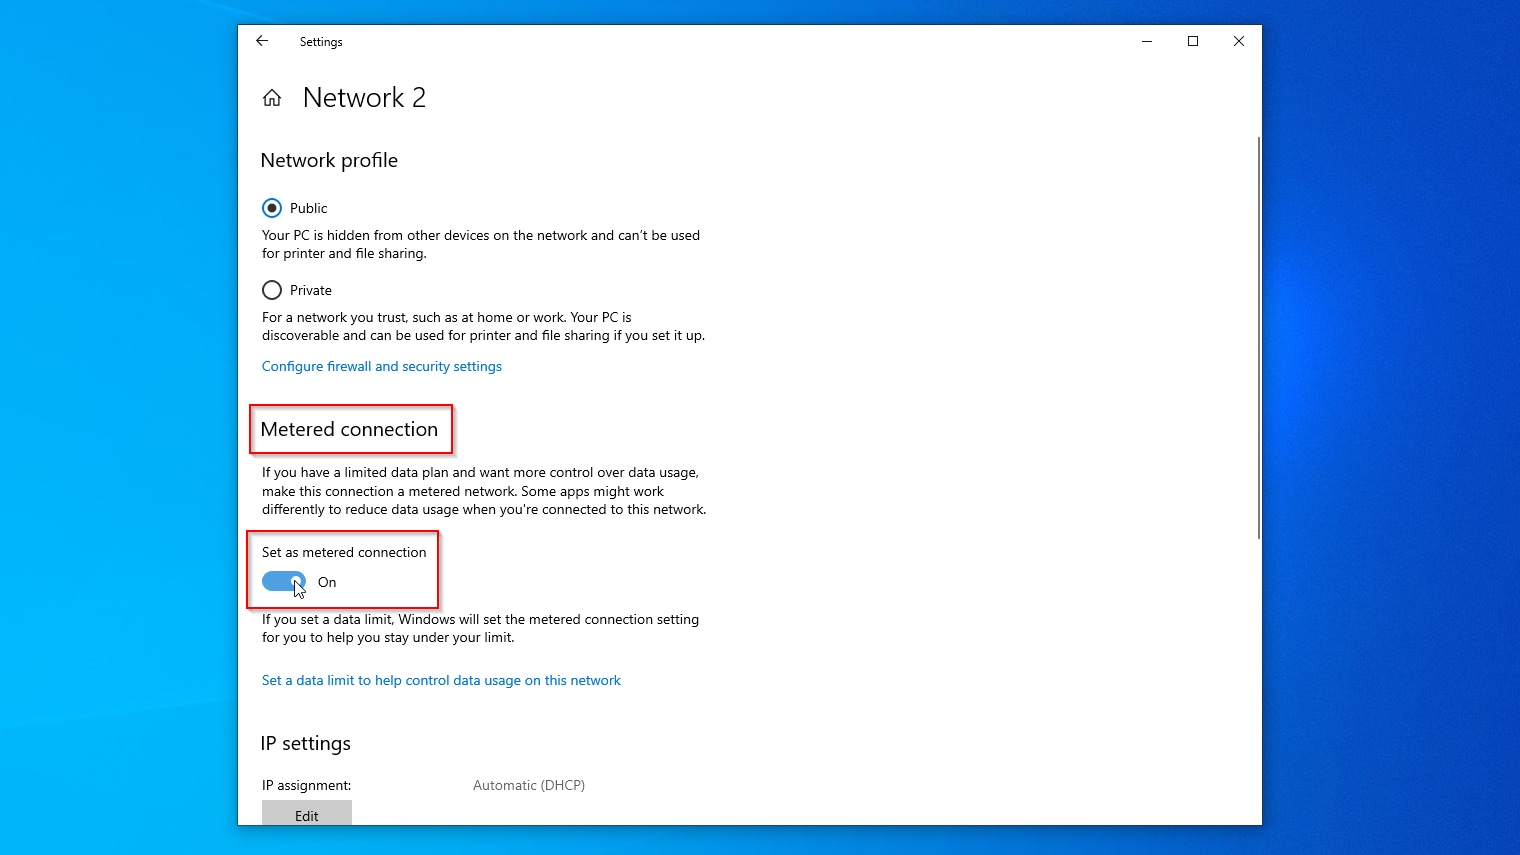
Method 6: Using Metered Connection
Step 1: At first, the Settings window will be opened. Then among so many options move for the Network & Internet option. Click on it to open.

Step 2: In the next window, from the left-hand side click on the option Ethernet.

Step 3: On the next window, an option will be present as the Metered Connection. Enable the button present below.

Hence, we have successfully stopped Windows 10 updates using the Metered Connection method on the device.
Step 7: Uninstall Updates
Step 1: In this case also, the Setitngs of the Windows will be opened. And in that window, click on the Update & Security option.

Step 2: In the next window, in the left-hand sidebar, click on the option Windows Update from so many options present there.

Step 3: After that, click on the View Update History option to move ahead.

Step 4: In the next window, click on Uninstall Updates to remove the installed updates from the device.

Hence, we have successfully stopped Windows 10 updates by Uninstalling Updates from the device.
Conclusion
These are some simple methods discussed to clear the Windows 10 update problem. But using some of the methods might not give a proper & permanent solution to it. All of the methods should be used one by one. Otherwise, you might receive another Windows 10 update patch on your device. So, following all the methods will only be the solution.
To keep Windows safe and at the forefront of technology, Microsoft “borrowed” Linux’s approach of “rolling updates”. Unlike older versions of Windows, patches with new features and tweaks to existing functionality for Windows 10/11 are now released months, weeks, or even days apart. Fixes for security-related issues may reach your PC hours after they’re created. But there’s a catch.
Sometimes those patches and fixes can break things. A new desktop feature may be incompatible with an app you’re using. A security patch may “interfere” with an older driver.
Thankfully, updating isn’t mandatory. Read on to find out how to stop Windows 10 updates by disabling the Windows update feature temporarily or permanently.
🗨️
If you’re interested in disabling updates on Windows 11 instead of 10, rest assured this guide is all you need. Despite being officially deemed a new version of Microsoft’s operating system, Windows 11 is not a radical departure from its predecessor. Plus, the methods for disabling updates have mostly remained unchanged since Windows 7.
How to Stop Windows 10 Update Permanently
The best way to ensure an update won’t “break” your OS or an app you rely on is to completely turn off automatic updates on Windows 10/11. This way, you can have a Windows update only when you decide it’s time to do so.
Let’s see all the ways you can do that.
👀
If what you want isn’t to stop Windows 10/11 Updates, but to recover the files you lost after such an update, make sure to check our guide on how to recover deleted files after a Windows update.
Method 1: Turn Off Windows Update Service
One way to disable automatic updates on Windows 10/11, since the feature relies on an active background process known as “a service”, is to completely turn off this Windows Update service.
To turn off the Windows Update service:
- Open the Start menu or Windows Search and start typing “Services” to locate the services management app. Choose to Run (it) as administrator.

- Scroll down the Services (Local) list to locate Windows Update.

- Double-click on the Windows Update service or right-click on it and choose Properties to edit it. Change its Startup type to Disabled to forbid it from running automatically.

- If the Windows Update service is active in the background, you can terminate it by clicking the Stop button. Click OK to return to the services management app and then close it. Any changes should be effective immediately.

Method 2: Apply Changes In Group Policy Editor
If you are using Windows 10 Home Edition, feel free to skip this method. Otherwise, if using Windows 10 Education, Pro, or Enterprise, the following is another excellent way to stop Windows 10 updates permanently.
⚠️
This method should also work on the “more feature-complete” versions of Windows 11 except for the “base” Home edition.
To turn off automatic updates on Windows 10/11 through the Group Policy Editor:
- Use the Start menu or search functionality and perform a search for “Group Policy Editor” (or start typing “gpedit“). When you see the edit group policy entry, launch it.

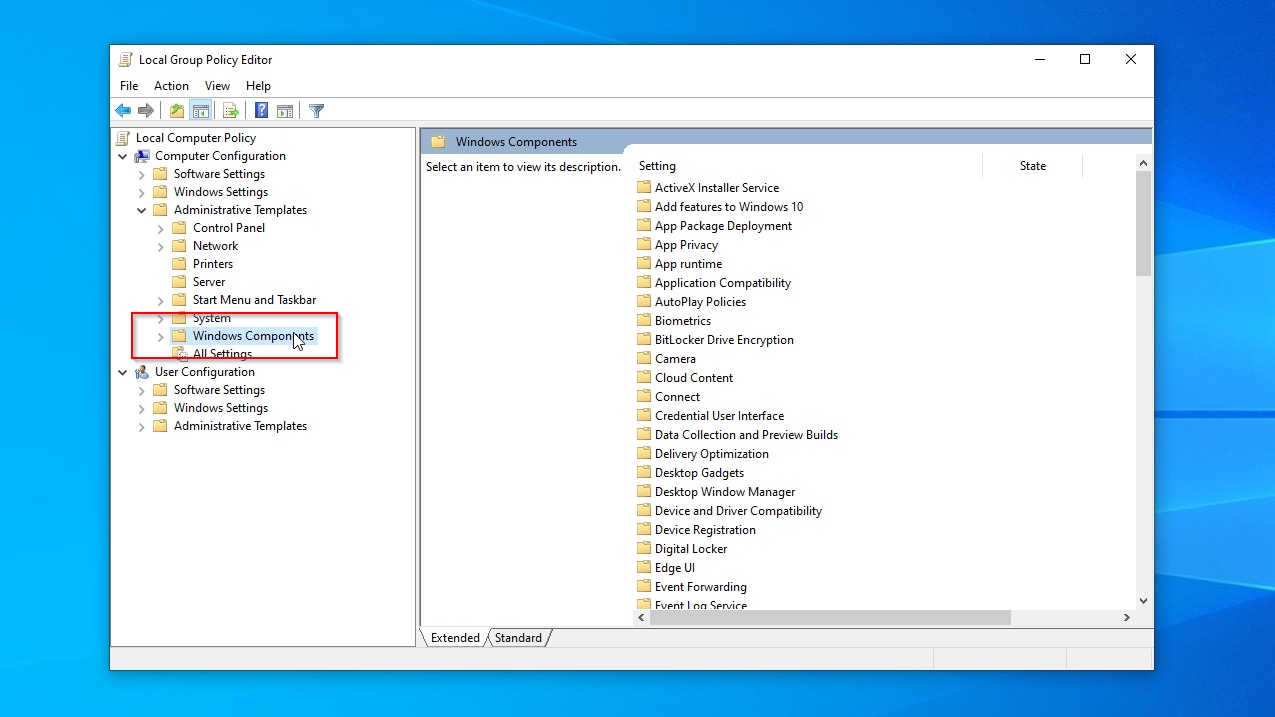
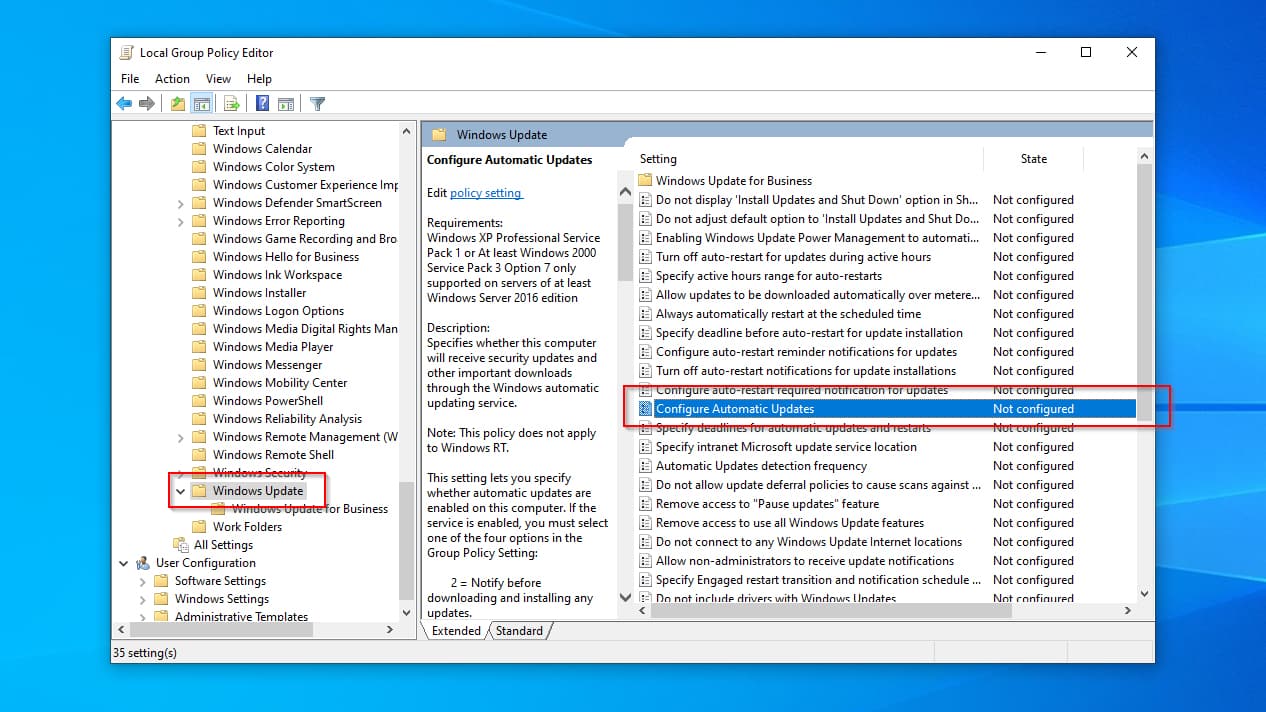
- Use the navigation pane on the left of the Local Group Policy Editor‘s window to locate Local Computer Policy > Computer Configuration > Administrative Templates > Windows Components.

- Inside Windows Components, find Windows Update, but instead of expanding that entry, click on it to select it. You will see a list of variables related to Windows Update on the right of the window. Among them, find Configure Automatic Update, and double-click on it to edit it.

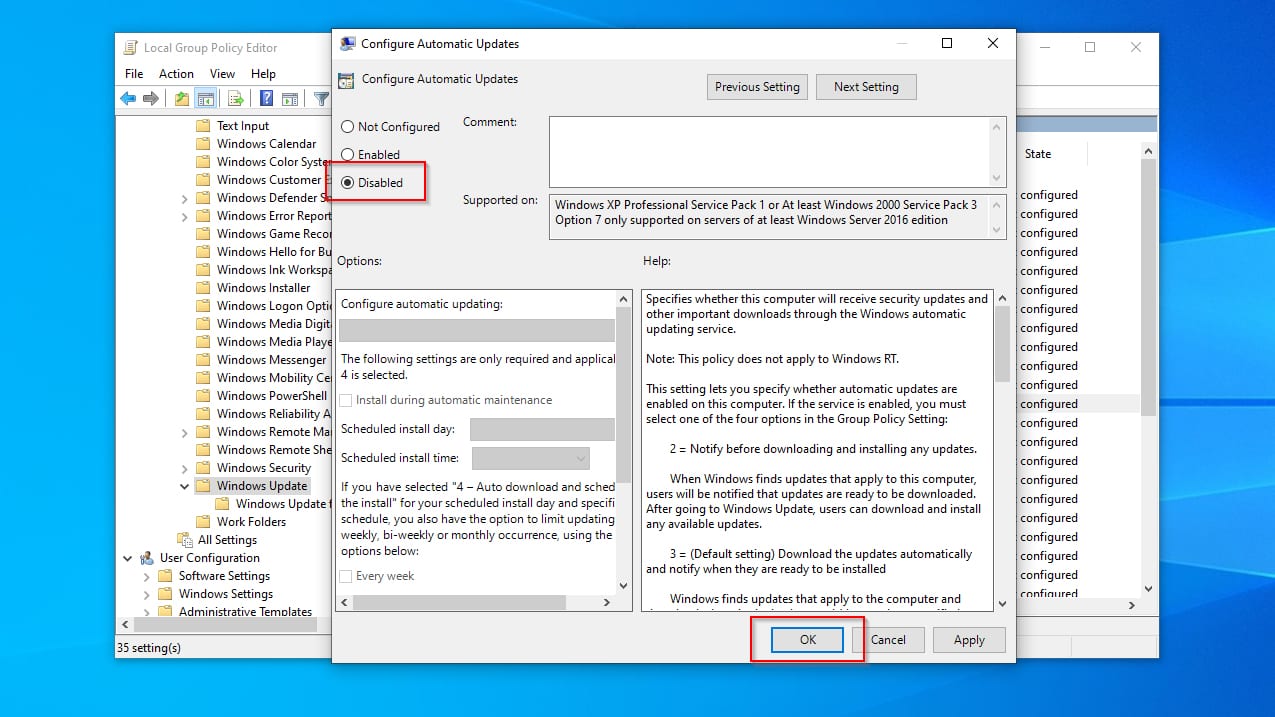
- Change the Configure Automatic Update entry’s state (from the options on the top left of the window) from Not Configured to Disabled. Click OK to accept the changes. Then, close the Local Group Policy Editor’s window and restart your PC for the changes to take effect.

Method 3: Enable Metered Connection
Instead of trying to disable Windows Update on Windows 10, there’s a cunning way to trick the OS into stopping downloading updates: set your Internet connection as metered.
⚠️
This method will only work on wireless connections. Although Windows 10/11 allows you to set Ethernet connections as metered, strangely, that’s only for show! The OS treats all “cabled” connections as unrestricted and unlimited. That is unless Microsoft updated that after this article was published.
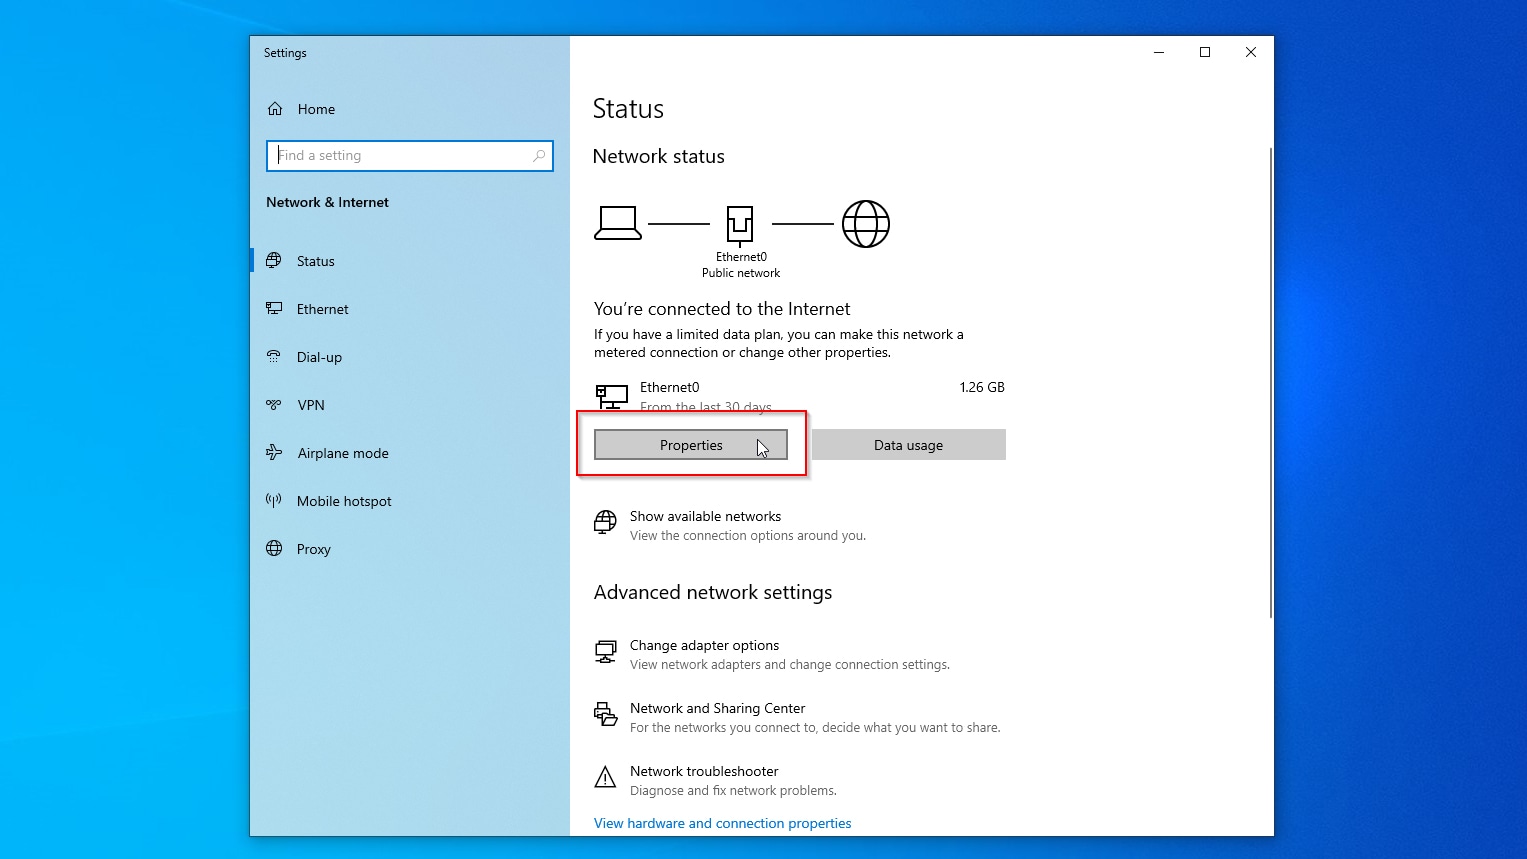
To set your Internet connection as metered:
- Search for “network status” using the Start menu or Windows 10’s search functionality—then “open” the entry.

- Select your network connection and click Properties in its Settings window.

- Flick the switch under Set as metered connection to On. You can now close your connection’s Settings window.

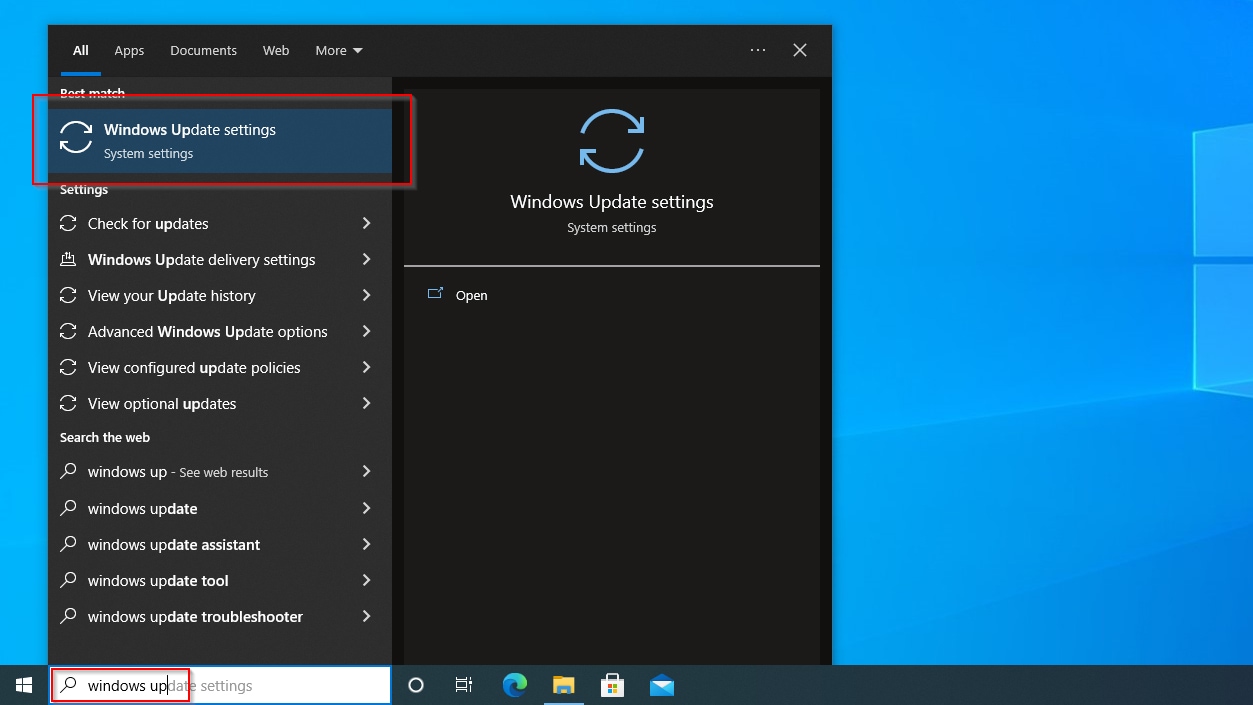
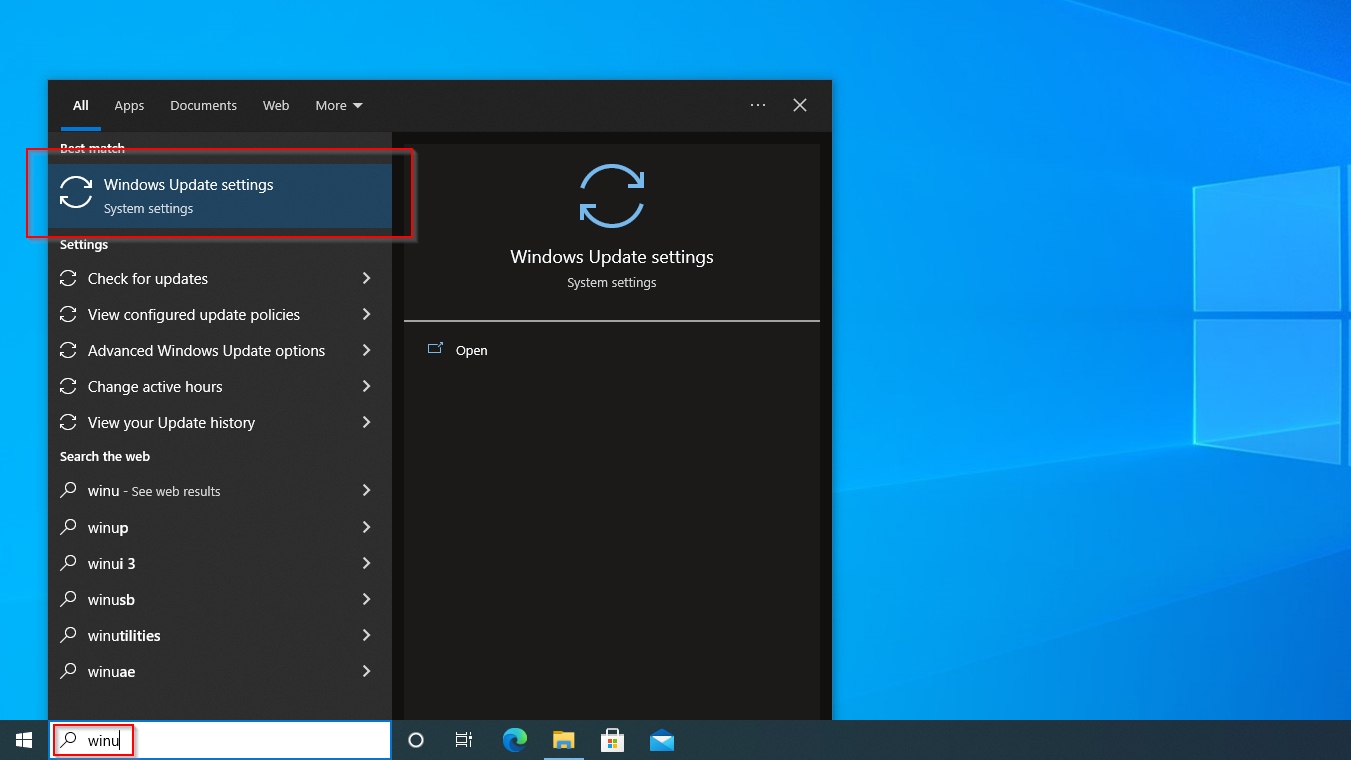
- Use the Start menu or Search and seek “Windows Update Settings“. Then launch it.

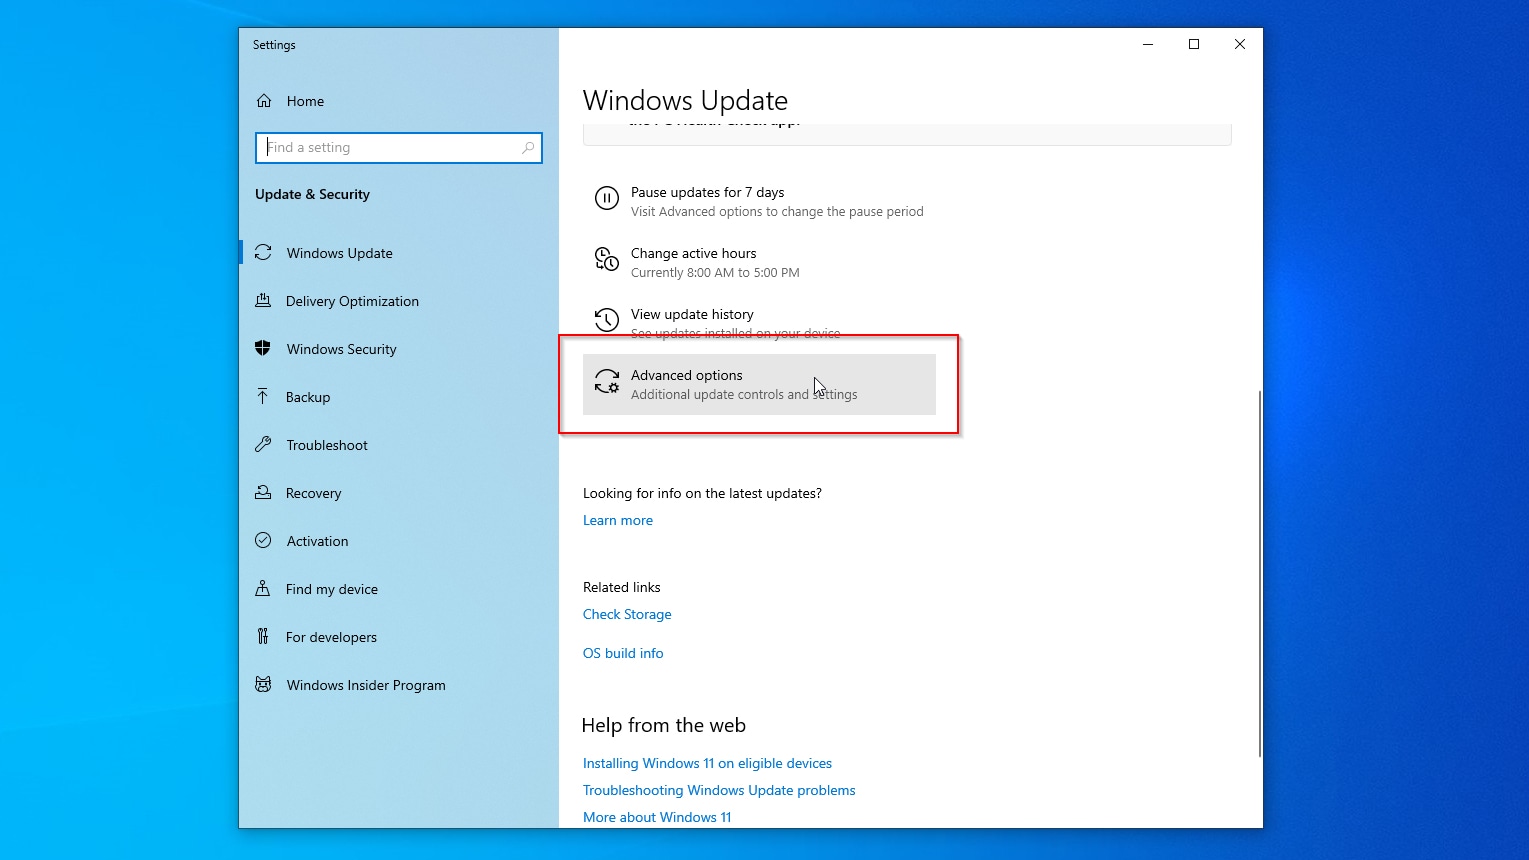
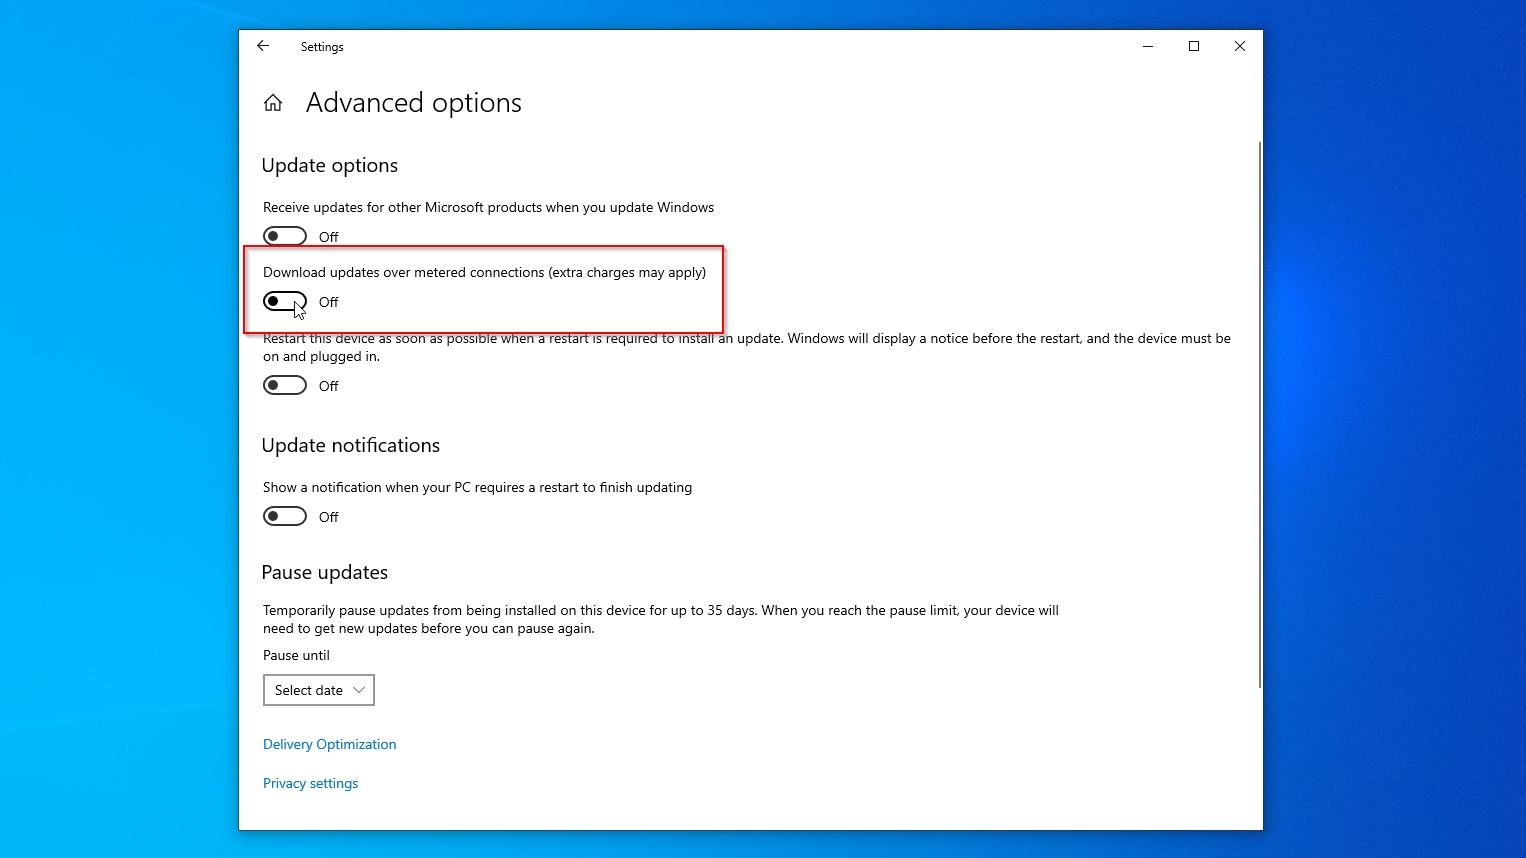
- In the Windows Update Settings window, click on Advanced Options.

- Ensure the switch under Download updates over the metered connection (extra charges may apply) is set to Off. You may have to disable and re-enable your Internet connection or restart your PC for the changes to take effect.


Method 4: Disable Windows Updates With Update Blocker
If you don’t mind downloading and using an extra piece of software to block Windows updates, you can use a third-party updating disable tool to turn off automatic updates on Windows 10. This can help you completely block Windows updates with a few clicks without having to hunt down hidden options in Windows’ convoluted settings.
To do that with one of the most popular solutions for the task, Update Blocker:
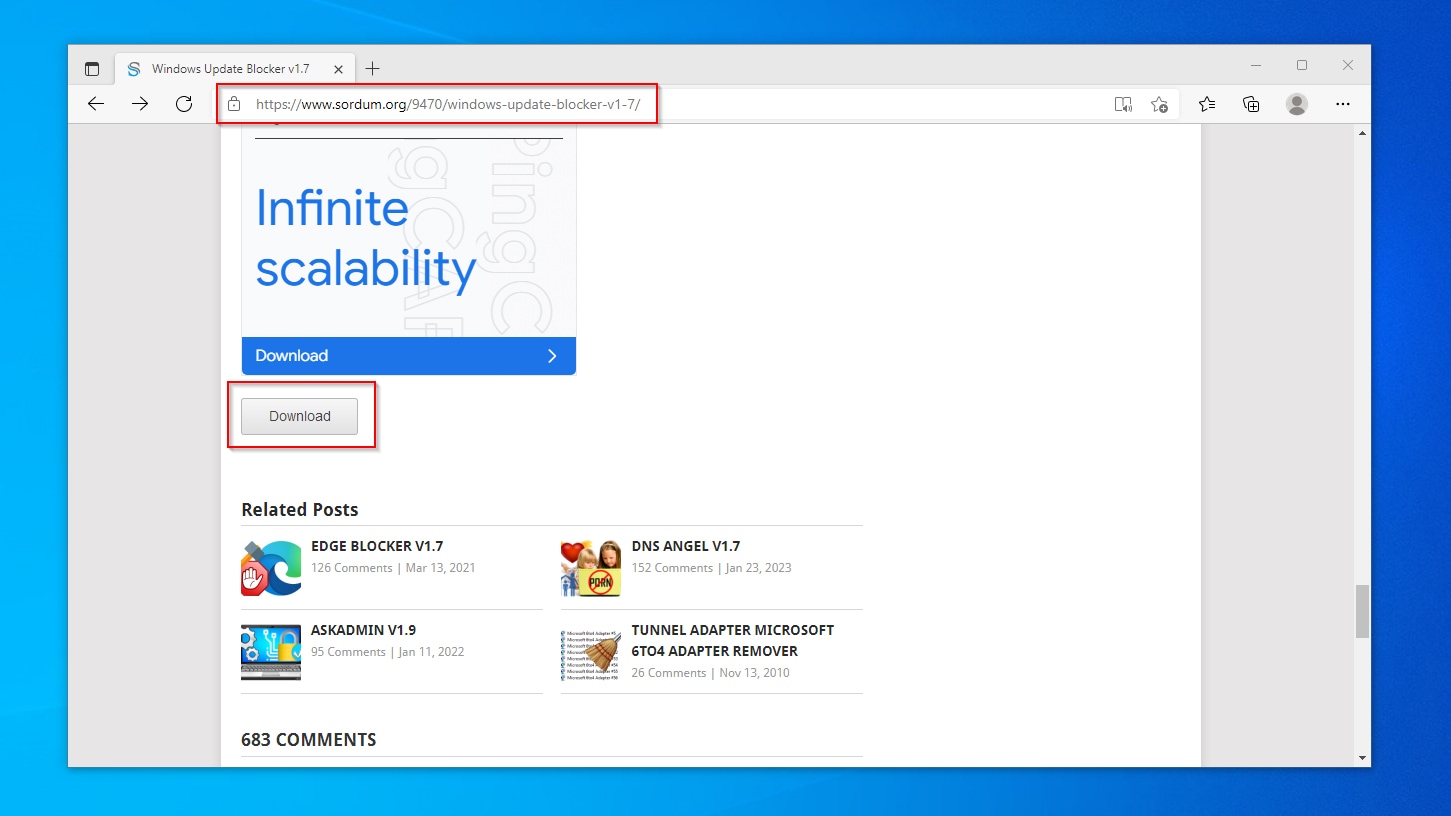
- Visit Windows Update Blocker’s official site and download it to your computer. Extract the archive to a folder and enter it with your favorite file manager (like Windows File Explorer).

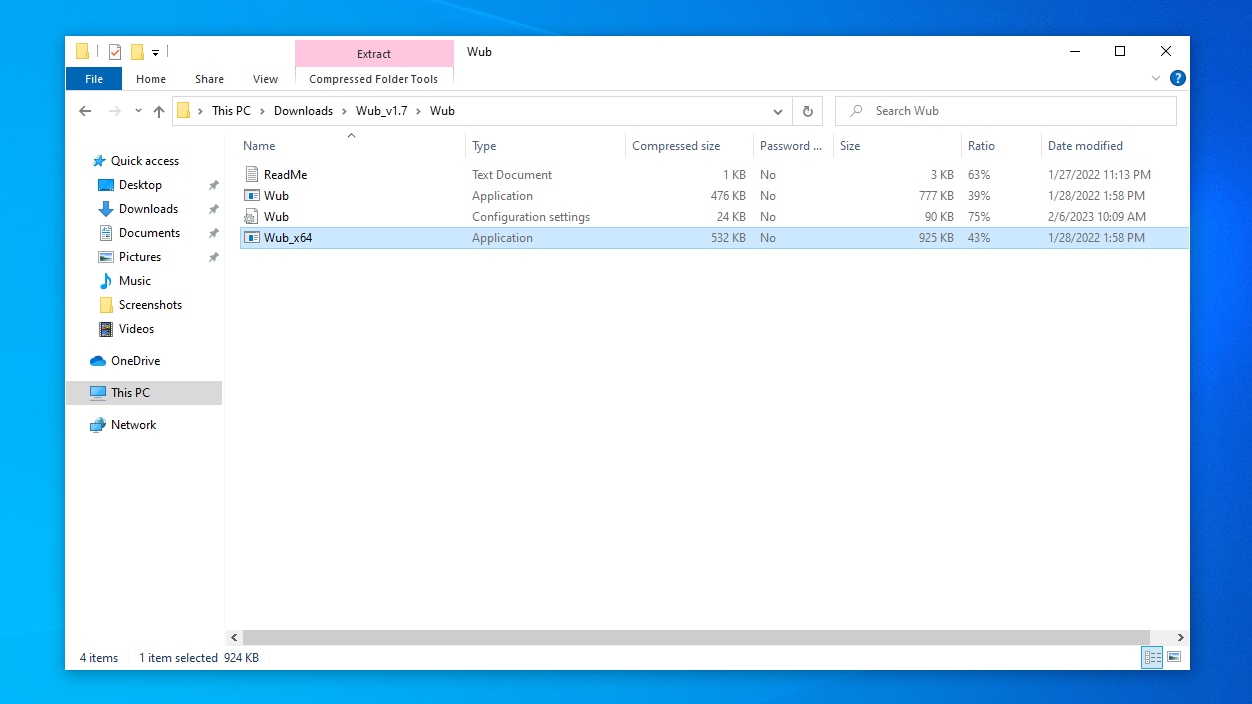
- In the folder, you will find two executables, Wub and Wub_x64, for 32-bit and 64-bit versions of Windows, respectively. Double-click on the correct one for your version of Windows to launch it.

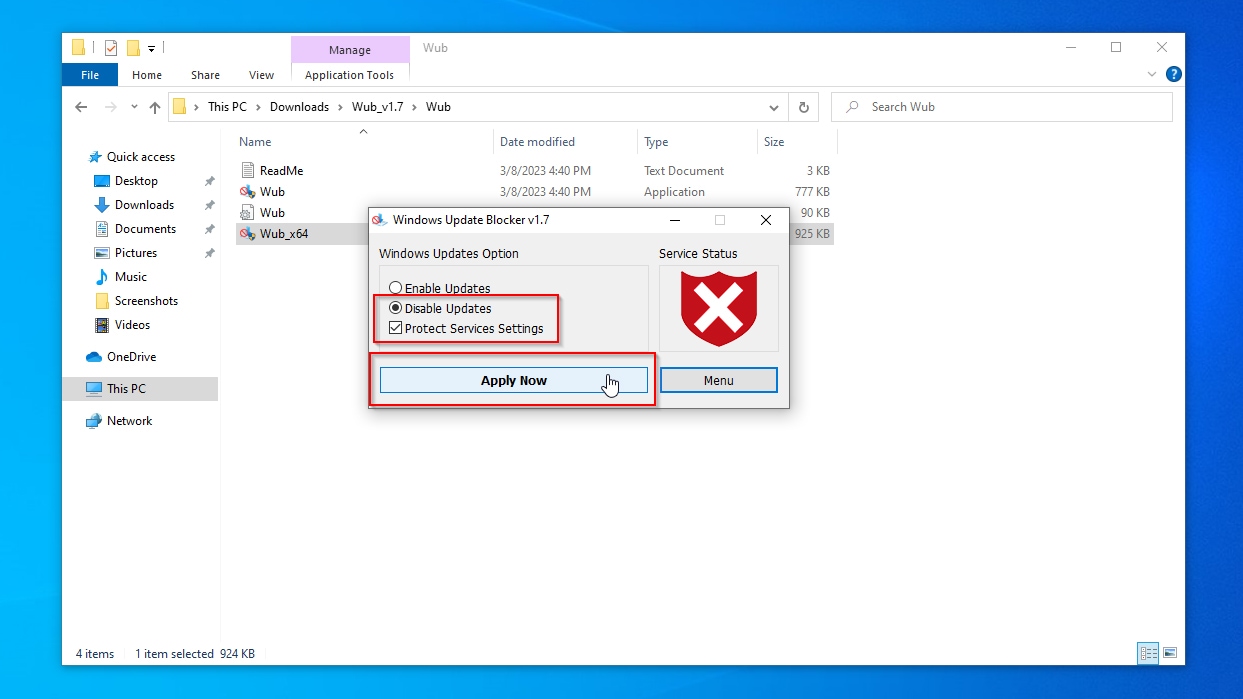
- Change the Windows Updates Option to Disable Update to block all Windows updates. Also, enable Protect Services Settings to ensure your tweak won’t revert to its initial state. Then, click on Apply Now. The changes will take effect when you restart your PC.

How to Temporarily Disable Windows Update
You might want to keep using Windows Update and only temporarily disable automatic updates on Windows 10. You may only want to skip a new update incompatible with your hardware. Or to ensure you have enough time to back up your OS before a significant upgrade to a new Windows version.
Thankfully, it’s easier to disable Windows Update on Windows 10 temporarily than it is to stop Windows Update permanently.
Pause Windows Updates
The easiest way to temporarily disable Windows Update is by pausing it for a week.
👀
This option isn’t available on Windows 10 Home or Windows 11 Home. On those “base” editions, Windows updates are mandatory. You can pause updates manually on:
- Windows 10 Education
- Windows 10 Pro
- Windows 10 Enterprise
- Windows 11 Pro
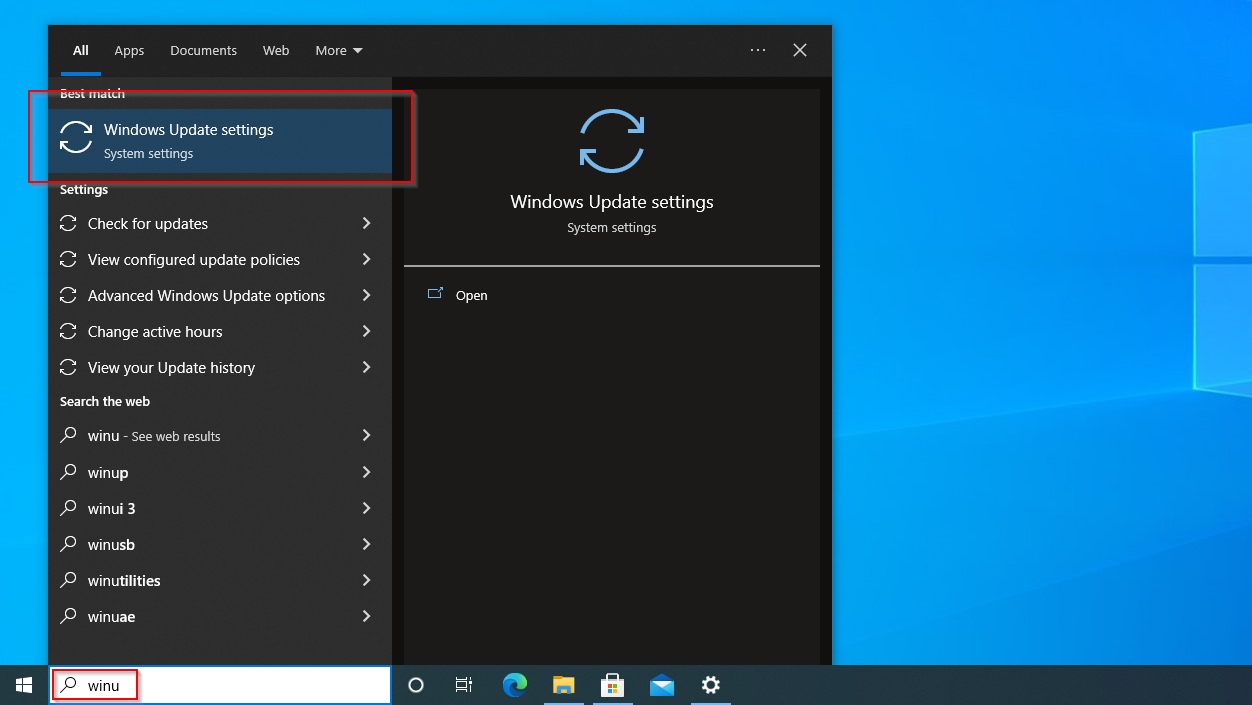
Pausing updates for a week is as easy as the following:
- Use the Start menu or Search to seek “Windows Update Settings“, then open the entry.

- Click on Pause Updates for 7 days in the Windows Update Settings window.

- Close the window, and you’re set: your PC shouldn’t receive any new updates for the next seven days.
Do you need to postpone updates for longer? That’s possible, too, although a bit more convoluted.
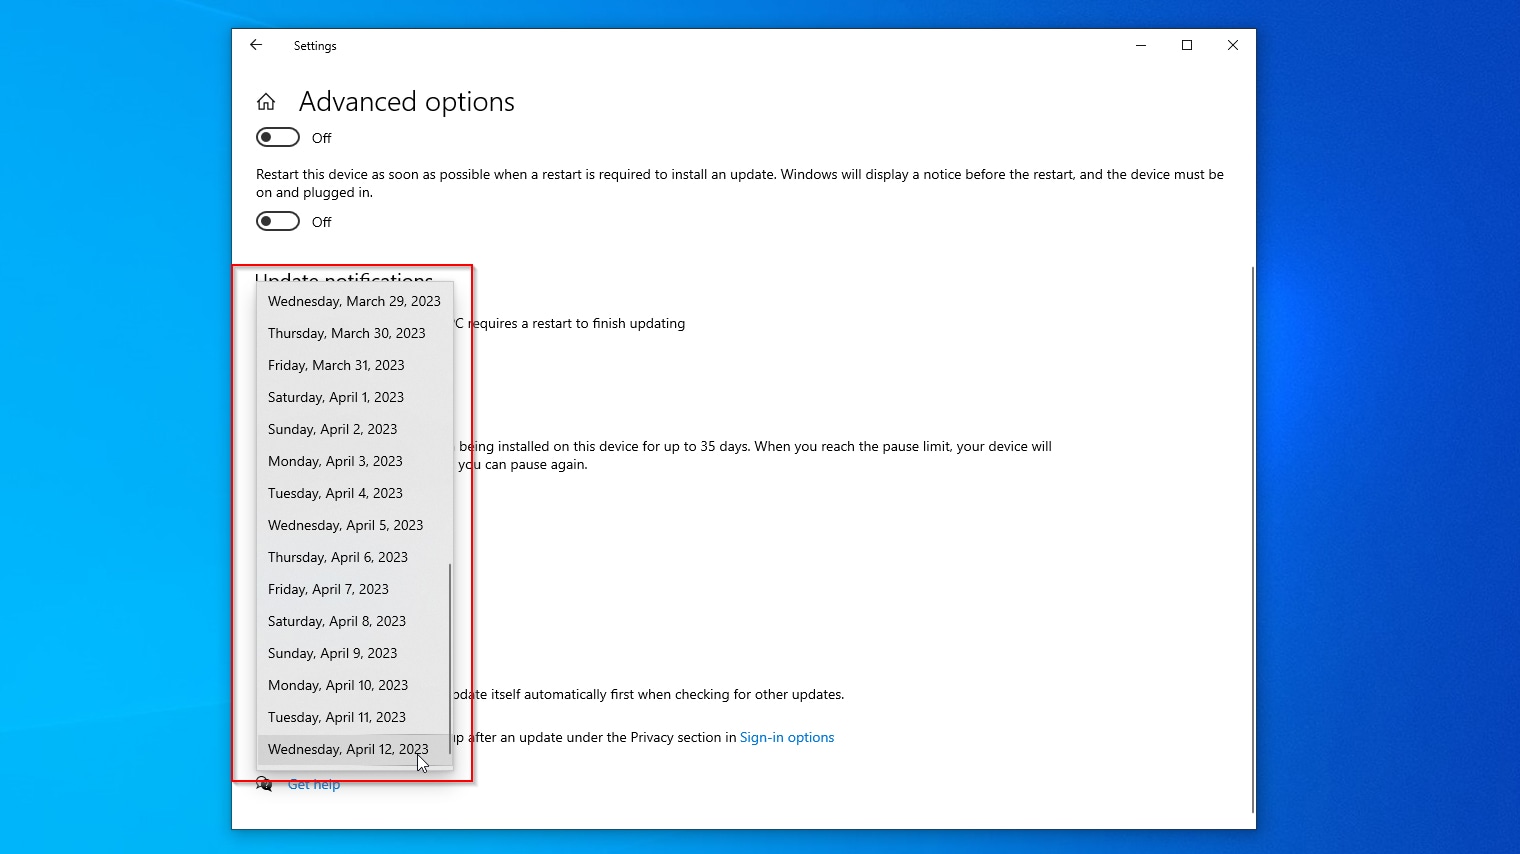
To disable Windows Update on Windows 10 for more than 7 days:
- Use the Start menu or Search to find Windows Update Settings and open it.

- Click on Advanced Options.
- Scroll down to locate the Pause Updates section.

- Click on the Select Date pulldown menu and choose for how long you want to postpone updating your Windows installation.

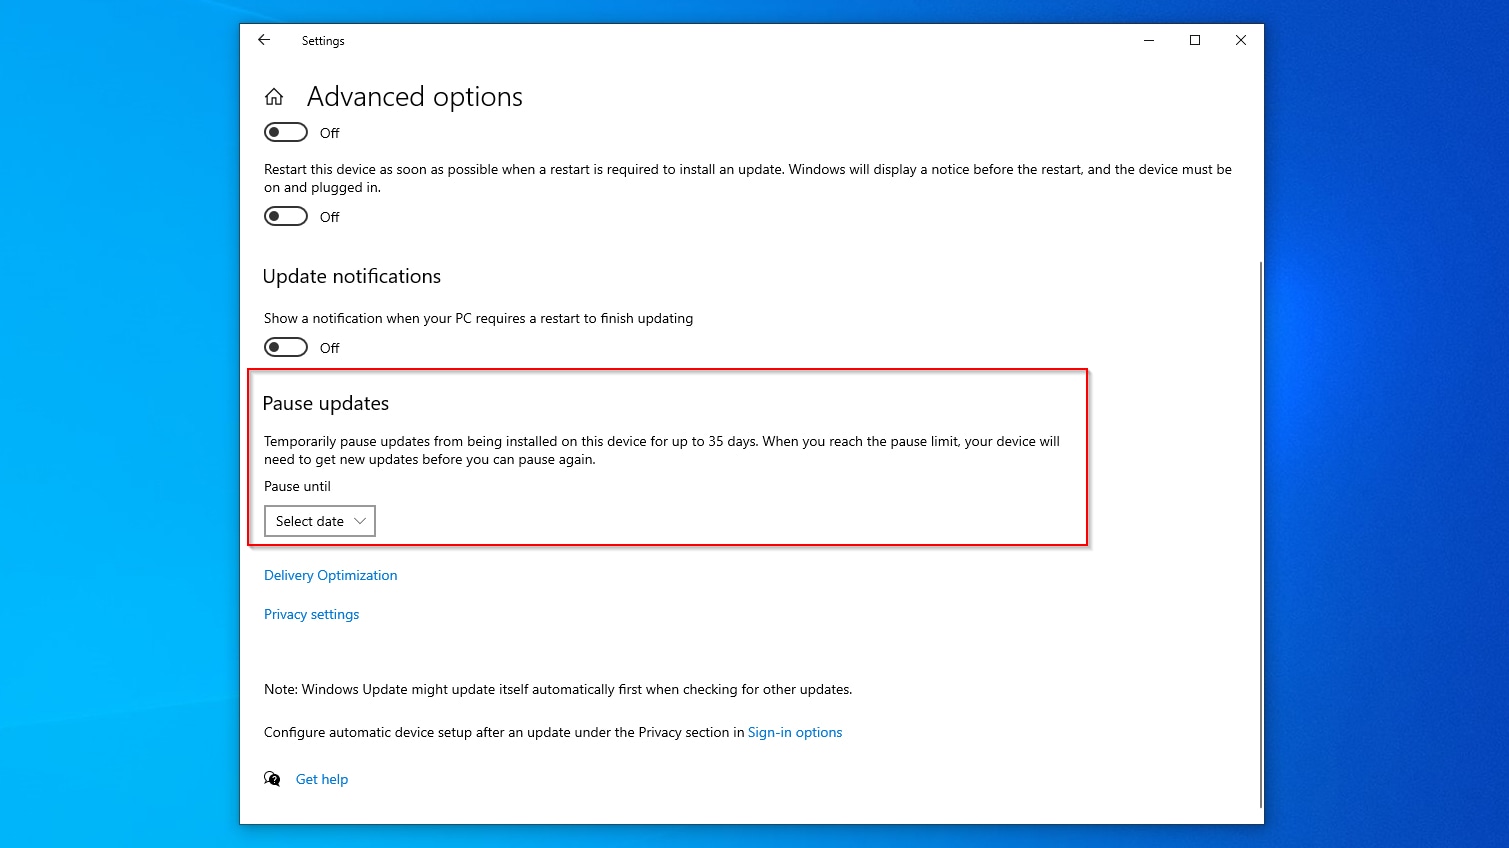
With both methods, the adjustments should work immediately.
Pause Updates in Microsoft Store
In the latest versions of Windows, there is an additional path for software updates: the Microsoft Store. Many apps included with Windows, like Windows Notepad or Windows Sound Recorder, are also available on the Microsoft Store and can be updated from there.
Thus, to fully disable all Windows updates, including those of apps accompanying the OS, you must also skip updates from the Microsoft Store.
To pause updates in the Microsoft Store:
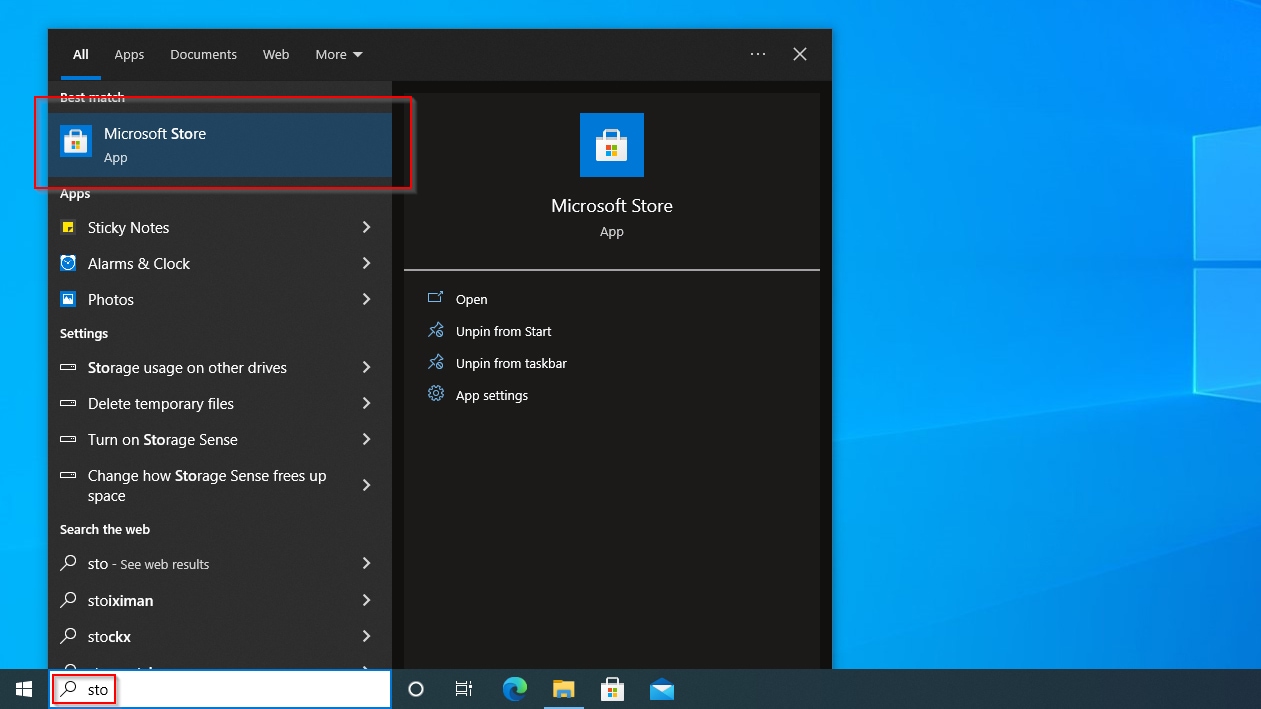
- Use the Start menu or Search to seek, find, and open the Microsoft Store app.

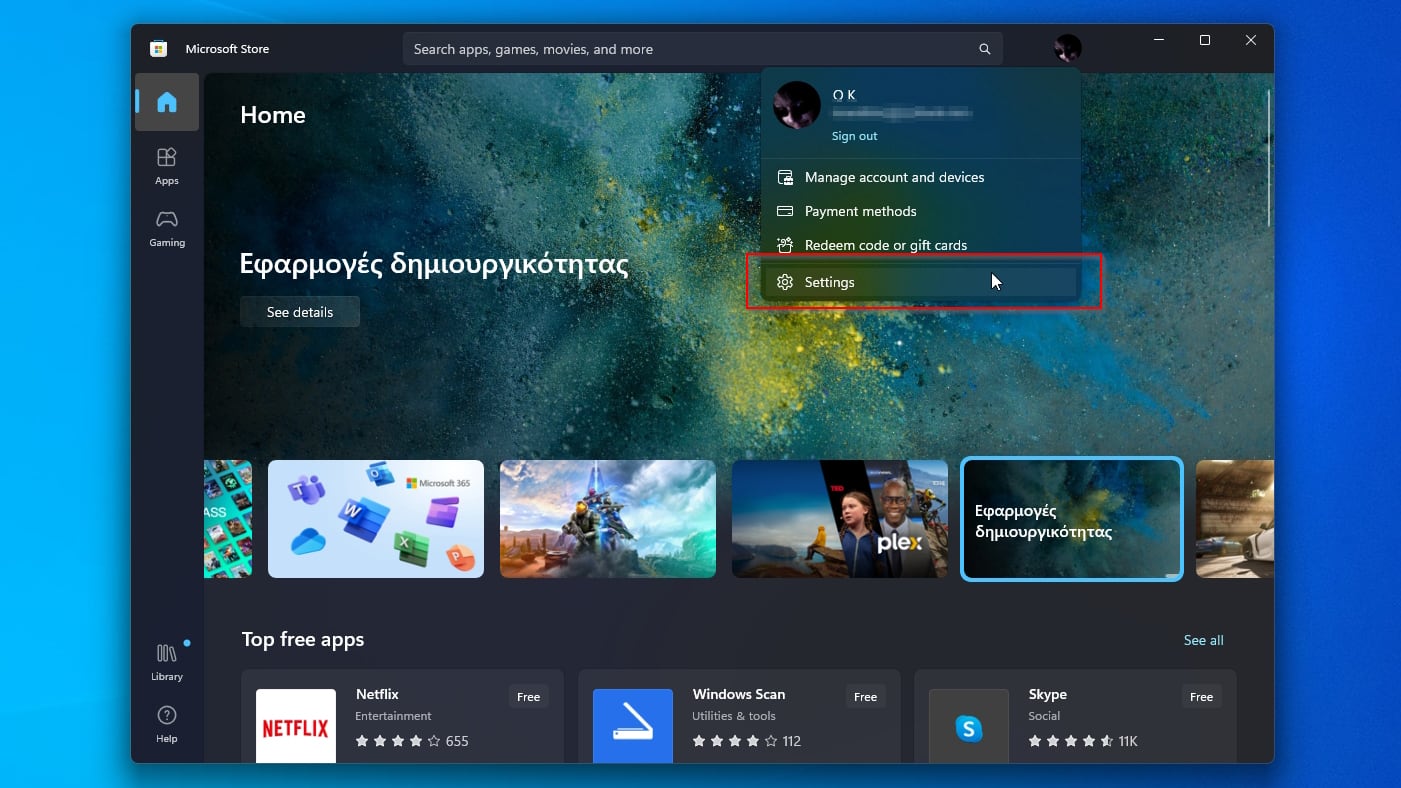
- Click on your account’s thumbnail to access your account’s menu, and click on Settings.

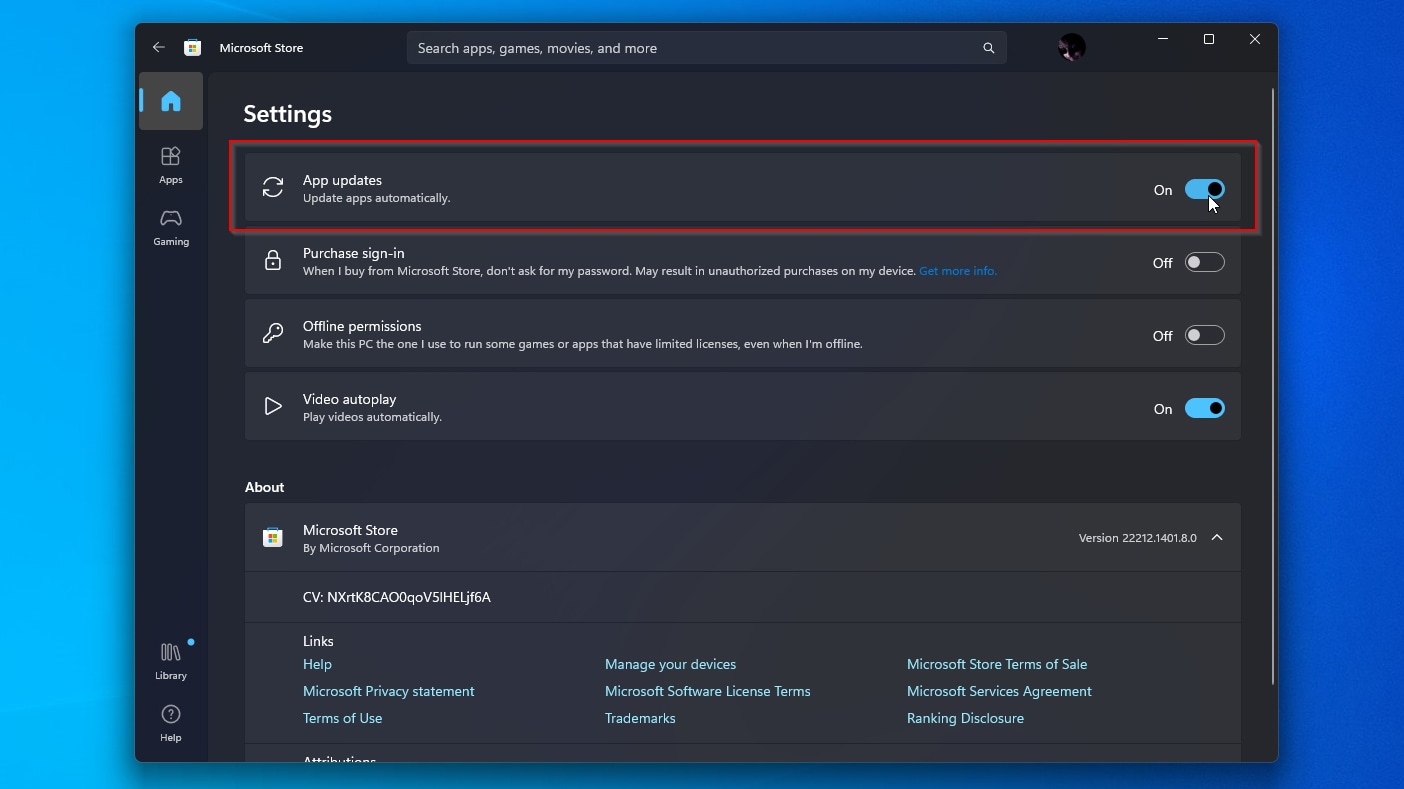
- Flick the switch next to App updates to Off to stop automatically updating apps from the Microsoft Store.

⚠️
Updates can help keep your Windows modern and secure, but they can’t “freshen up” your OS. If you’d prefer to reinstall Windows for that brand-new zippy feeling, make sure to also check our article on how to reinstall Windows without losing your data. And if you already did (reinstall Windows) but forgot to check our article and lost some files, don’t fret: we’ve got a guide on how to recover files after reinstalling Windows, too!
FAQ
It’s not suggested you turn off Windows 10 updates since they can keep your PC running smoothly, securely, and with the latest features.
Disabling Windows 10 updates is justified when you know one of them will disrupt how you use your computer.
Use the Start menu or Search to find and launch CMD “as administrator”. There, follow the steps below:
- Check the status of the Windows Update service with: sc.exe query wuauserv.
- Forbid the Windows Update service from auto-starting with: sc.exe config wuauserv start= disabled.
- Stop the Windows Update service with: sc.exe stop wuauserv.
- Recheck the service’s status with: sc.exe query wuauserv. This time it should report it’s Stopped.
Run Notepad.exe. Copy the following from here and paste it into your Notepad document:
sc.exe config wuauserv start= disabled
net stop wuauserv
Press CTRL + Shift + S, change the “Save as type” to “All files”, and save your batch file by adding “.bat” at the end of its filename instead of the default “.txt” extension for Notepad.
Right-click on your newly-created batch file, and choose Run as administrator to run it and have it issue both commands for disabling the Windows Update service in one go.
- Use the Start menu or Search to seek the “registry editor” (or “regedit” for short). Run it “as an administrator”.
- Use the navigation pane on the left of the Registry Editor’s window to find: HKEY_LOCAL_MACHINE\SOFTWARE\Policies\Microsoft\Windows .
- Right-click on the Windows folder (directly in the navigation pane on the left) and select New > Key. Give your new key the name “WindowsUpdate”.
- Right-click on your newly created WindowsUpdate key and repeat the process, making a new sub-key. Name it “AU”.
- Right-click on your new AU sub-key, and choose New > DWORD (32-Bit) Value. Name your new value “NoAutoUpdate”. Then, double-click on it to edit it, and change the number in the field under Value data to “1”. Click OK to save your edits.
- Close the Registry Editor and restart your PC for the changes to take effect.
Conclusion
Although Microsoft “borrowed” Linux’s “rolling updates” approach, it didn’t allow Windows the same freedom in controlling which updates should be applied and when.
As we saw, it’s easy to disable Windows Update temporarily for a specific timeframe as long as you know where to find the options that enable you to do so.
If you want to stop Windows 10/11 updates permanently, you have to dive deeper. It’s possible, but it can get complicated when navigating the Registry or issuing obscure commands using tools you rarely use (if ever).
Still, now you know how to do it, and after applying those tweaks once, you shouldn’t have to redo them.
Odysseas Kourafalos started playing with technology over thirty years ago, with a Commodore 128. Instead of gaming with it, he ended up trying to learn what made games — and tech, in general — tick. Since then, he’s used thousands of applications, from music trackers to video editing suites, on multiple platforms, and lived to write about them.
Andrey Vasilyev is an Editorial Advisor for Handy Recovery. Andrey is a software engineer expert with extensive expertise in data recovery, computer forensics, and data litigation. Andrey brings over 12 years of experience in software development, database administration, and hardware repair to the team.
StopUpdates10
для Windows


StopUpdates10 — бесплатная и простая в использовании программа, которая предназначена для блокировки системных обновлений Windows. Приложение создает специальные ключи реестра для блокировки обновлений, а также блокирует ряд процессов, используемых при обновлении.
Среди достоинств утилиты также следует отметить то, что она не удаляет никаких файлов, и в целом не влияет на работоспособность системы, а также имеет небольшой размер и проста в эксплуатации.
Возможности программы:
- Блокировка обновлений Windows.
- Блокировка принудительных обновлений.
- Блокировка раздражающих уведомлений об обновлении.
- Мгновенная отмена изменений.
ТОП-сегодня раздела «Настройка, оптимизация»
![]() CCleaner 6.16.10662
CCleaner 6.16.10662
CCleaner — популярное приложение для оптимизации ПК, чистки реестра и удаления различного…
![]() MSI Afterburner 4.6.5
MSI Afterburner 4.6.5
MSI Afterburner — настоящая находка для истинного оверклокера, с помощью которой можно…
![]() Mem Reduct 3.4
Mem Reduct 3.4
Mem Reduct — небольшая портативная утилита, которая позволяет высвободить до 25% используемой…
![]() Win 10 Tweaker 19.4
Win 10 Tweaker 19.4
Простой в использовании твикер для Windows, с помощью которого можно быстро и легко…
![]() CCleaner Portable 6.16.10662
CCleaner Portable 6.16.10662
CCleaner Portable — портативная (переносная, не требующая инсталляции на компьютер) версия утилиты CCleaner для чистки системного мусора…
![]() Process Hacker 2.39.124
Process Hacker 2.39.124
Process Hacker — мощное приложение для полного контроля над задачами, процессами и службами, с…
Отзывы о программе StopUpdates10
Сергей про StopUpdates10 4.0.2023.0306 [15-05-2023]
При отключении/включении АвтоОбновления перезагрузка нужна?
И затрагивает ли «отключение» приложения из Microsoft Store, и самое главное,
«Защитник Windows»?
Мне нужна программа работающая без перезагрузки системы, как «STUPID USER Windows Update MiniTool»,
но чтобы не отключала обновления приложений из Microsoft Store, и самое главное,
«Защитник Windows»?
2 | 2 | Ответить
Сергей про StopUpdates10 2.5.61 [10-07-2019]
В описании ошибка — русский язык есть!
8 | 8 | Ответить

With Windows 10 Microsoft Set To Download and Install Windows Automatically, to ensure the proper functioning of a system and maintain its security. But Due To Some Reason if you are Looking To turn off Windows 10 updates or disable automatic update installation on Windows 10, Here Step by Step Guide To Stop Windows 10 Updates from Downloading or installing updates automatically.
Contents
- 1 About Windows Update
- 2 Disable auto update Windows 10
- 2.1 Stop Windows Update using Group Policy
- 2.2 Disable auto update Windows 10 home
- 2.3 Stop Windows Update Service
- 2.4 Metered Connection
About Windows Update
Microsoft Regularly drops Windows Updates with New Features, Security improvements and Bug Fixes to patch the hole created by third-party Applications. And with Windows 10 Microsoft made it mandatory to download and install Windows Updates automatically to ensure your device stays up to date with the latest security patches and improvements.
Disable auto update Windows 10
While The Automatic Windows 10 Update installation is normal for most Windows users but for some find it extremely irritating as it restricts them from performing other activities very conveniently which they want to. If you are also one of those Windows users who want to disable auto update Windows 10 here are different ways for you.
If you’re running Windows 10 Pro or higher, it’s possible to retake control and prevent the OS from downloading and installing updates automatically using the Local Group Policy Editor or the Registry. For Windows 10 Home Basic Users a special Tweak Simply Stop the Windows update service and change the Startup Type to Disable.
Stop Windows Update using Group Policy
Note: The group policy Feature is only available on Windows Pro and higher editions. If you are Windows 10 Home Basic user skip this Step.
- Press Windows + R, type gpedit.msc and ok
- This will open the Local Group Policy Editor
- Now navigate the following folder:
Computer Configuration\Administrative Templates\Windows Components\Windows Update
- Now on the right side, double-click on the Configure Automatic Updates policy from the Settings list.
- Then on the left side, check the Enabled option to enable the policy.
- Here under options select option 2 – “Notify for download and auto install” to stop the automatic installation of updates.
- Click Apply and OK To make Save changes.
Note: Enabling and applying Notify for Download and notify for Install policy will now inform you if a new update is available on your PC and will ask you if you wish to download the update or not.
Also If you select option 4, you can specify exactly when to install new updates. You can also choose to install updates during automatic maintenance, on a particular day and time, and you can even check the option to include other Microsoft product updates when updating the OS.
With this, the policy will prevent automatic installation of Windows updates and you’ll receive a notification every time whenever a new update is available. If you ever wish to change it back to default, just select option 3 – “Auto download and notify for install”.
Disable auto update Windows 10 home
Instead of using the Local Group Policy Editor, you can Also Tweak Windows Registry Editor to prevent Automatic Update installation on Windows 10 home editions.
- Press Windows + R, type regedit and ok
- This will open the Windows registry editor,
- First backup the registry database, then navigate the following path,
HKEY_LOCAL_MACHINE\SOFTWARE\Policies\Microsoft\Windows\WindowsUpdate\AU
- Then Right click on Windows select New -> key
- Name it to Windowsupdate.
- Again Right click on Windows update New -> key and name it AU.
Click on the Au key than on the right side panel, right-click anywhere, select New > DWORD (32-bit) Value option and Rename this key as AUOptions and hit Enter.
Now, double-click on the AUOptions key and then change its Value data as per your choice. You can find out what these values mean:
- 2 – Notify for download and for install
- 3 – Auto Download and notify for install
- 4 – Auto Download and schedule the install
- 5 – Allow local admin to choose setting
For Ex If you want to stop Windows 10 from automatically updating your PC then set the Value data as 2.
That’s all Now click OK and close Registry Editor. Then restart Windows To take Effect the Changes.
Stop Windows Update Service
- Press Windows + R, type services.msc and ok
- This will open the Windows services console,
- Scroll down and look for the Windows update service,
- Right-click on Windows update service select properties,
- A properties window pop-up window will open
- Here, in the drop-down menu of “Startup type”, select “Disabled”.
- Click on Stop to Disable the Service next to Service status.

That’s All Restart Windows now onwards the update service is not started and Windows never checks for the latest Windows updates.
Note: Any time you can start the update service and change Startup Type Automatic To Check and install Windows updates.
Metered Connection
Also if you are using a WiFi connection then you can Set the Metered connection to limit the bandwidth usage and restrict Windows to download updates.
To configure the metered connection
- Press the Windows + I keyboard shortcut to open Settings
- Click on Network & Internet then WiFi
- Here click on the name of the network you’re connected to.
- Then under “Metered connection”, you’ll find a toggle called “Set as metered connection”. Turn this on and you’re done.

Did these tips help to disable automatic updates on Windows 10? Let us know on the comments below, Also read:
- Windows 10 Failed to install? Here is how to get it right way
- Fix Service Registration Is Missing Or Corrupt In Windows 10, 8.1 and 7
- Xbox One S turning off unexpectedly? Try These solutions
- Windows 11 Update won’t download or failed to install [solved]
- How to fix Steam error 16 on Windows 11 (9 Solutions)
- Solved: Spotify error code Auth 74 on Windows 11/10
on August 21, 2010
This post explains how to stop Windows update service from command line(CMD). Make sure that you open elevated administrator command prompt to execute this command.
How to stop Windows update service
Do the following
- Open elevated command prompt
- Run the below command.
net stop wuauserv
Example:
C:\Users\Administrator>net stop wuauserv
The Windows Update service is stopping.
The Windows Update service was stopped successfully.
Update service restarts automatically
It’s observed that just stopping the service does not work in some cases and it restarts automatically. In such cases one can disable the service completely by running below command.
C:\>sc config wuauserv start= disabled
[SC] ChangeServiceConfig SUCCESS
Note that these commands to stop or disable service should be run from elevated administrator command prompt. Other wise you will get the following error.
C:\Users\administrator>net stop wuauserv
System error 5 has occurred.
Access is denied.
How to start windows update
net start wuauserv
Example:
C:\Users\Administrator>net start wuauserv
The Windows Update service is starting.
The Windows Update service was started successfully.