Downloading STM32CubeIDE
In this article, we’ll delve into the process of installing an Integrated Development Environment (IDE) for streamlined coding and development. An IDE bundles all the essential tools required for code development, compilation, linking, and debugging. We will focus on the Eclipse-based STM32CubeIDE, tailored for STM32 ARM-based microcontrollers, developed by ST Microelectronics.
Installing an Integrated Development Environment(IDE)
- IDE is a software that contains all the essential tools to develop, compile, link, and debug your code.
- In some cases, you may have to integrate compiler and debugger tools to the IDE manually.
- Throughout this course we will be using Eclipse-based STM32CubeIDE which is developed by ST Microelectronics to write, compile, debug applications on STM32 ARM-based microcontrollers.
- STM32CubeIDE is an eclipse IDE with STM32 related customization.
How to download STM32CubeIDE?
Step 1: Access the Official Link
- Begin by searching for “STM32CubeIDE” and navigate to the official STM32CubeIDE link, as depicted in Figure 1.
Step 2: Logging In or Registration
- At this point, you’ll need to either Login or register an account to download the STM32CubeIDE software. Or you can do one thing, click on Get Software.
Step 3: Select Software Version
- Choose the appropriate software version based on your operating system. For instance, if you’re on Windows, select “STM32CubeIDE-Win.” The latest version is 1.8.0. Click on “Get Latest.”
Step 4: Accept the License Agreement
- Review and accept the license agreement to proceed.
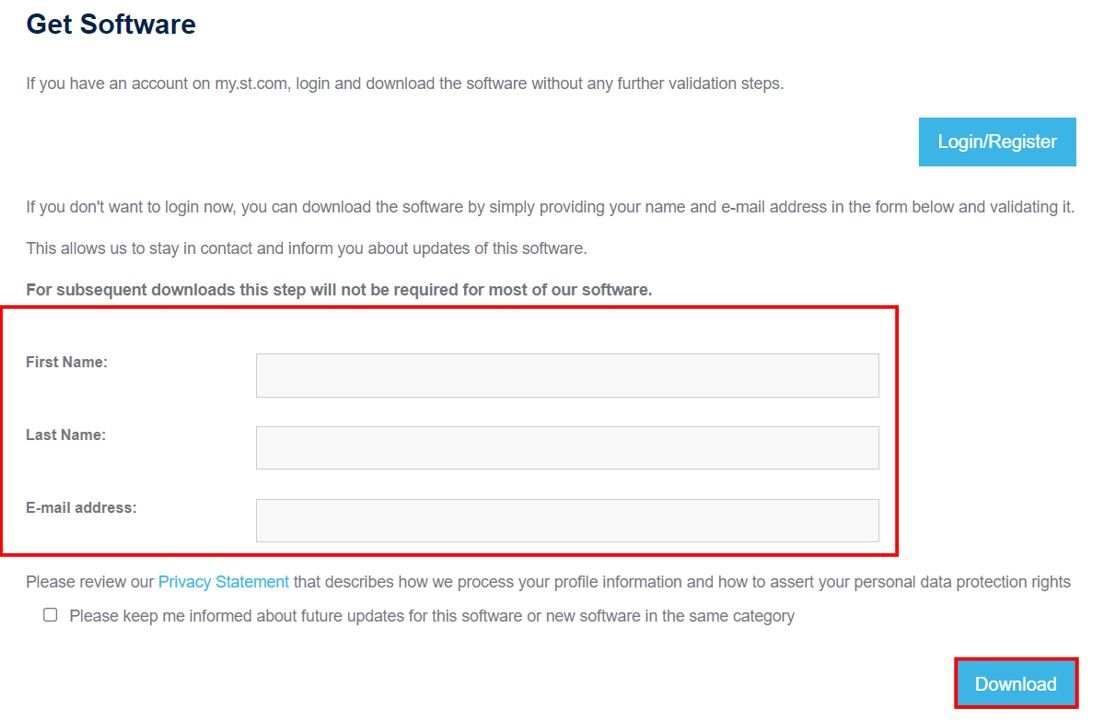
Step 5: Providing Contact Information
- Here, you’ll need to either Login or register, or provide your email address. ST will send you a download link via email.
- Enter your email and click “Download.”
Step 6: Check Your Email
- Check your inbox for an email from ST.
- This email will contain the subject “Start your software download.” Click on the “Download now” link within the email.
Step 7: Initiating Software Download
- Once you’ve clicked the “Download now” link, you’ll be redirected to the download page.
- Click on “Get Software” to commence the download(Shown in Figure 8).
Step 8: Download Process
- As you can see in Figure 9, the download has started.
The download process is now underway. You’re well on your way to acquiring the STM32CubeIDE software. Follow these steps meticulously to ensure a seamless and successful installation of this powerful IDE.
FastBit Embedded Brain Academy Courses,
Click here: https://fastbitlab.com/course1
FastBitLab
The FastBit Embedded Brain Academy uses the power of internet to bring the online courses related to the field of embedded system programming, Real time operating system, Embedded Linux systems, etc at your finger tip with very low cost. Backed with strong experience of industry, we have produced lots of courses with the customer enrolment over 3000+ across 100+ countries.
STM32CubeIDE is an Integrated Development Environment (IDE) that provides a comprehensive and user-friendly platform for developing and debugging STM32 microcontroller applications. It provides a range of tools for code development, debugging, and testing, making it an ideal solution for embedded systems developers. If you’re new to STM32CubeIDE, you may be wondering how to get started with downloading and installing this software. In this article, we’ll provide a step-by-step guide to help you get started with STM32CubeIDE, including how to download and install the software on your computer. Whether you’re a beginner or an experienced developer, this guide will help you get started with STM32CubeIDE and start developing your next project.
Downloading STM32CubeIDE
In this section, we will first show you how to set up download STM32CubeIDE for Windows, Linux, and macOS.
Go to the following link:

Click the ‘Get latest’ block according to your operating system. We are using Windows.

The following form will open up. You will have to register your account. Give the following information and click the ‘Download’ button. If you already have an account on my.st.com then you can use that to login as well.
After specifying your personal information and clicking the download button your registration will be complete. You will be given a link in your email address to validate your email address after which the download will automatically start. Note that this email address is the one which you used for registration. The email will be sent by STMicroelectronics.
Installing STM32CubeIDE
A few moments later, after specifying the directory your download will start. After opening the .zip file you will be asked for your agreement. After accepting the agreement and choosing the desired location to install the IDE, the installation process will start. It will take some time for STM32CubeIDE to get installed.
After the installation is complete, click ‘Next’.
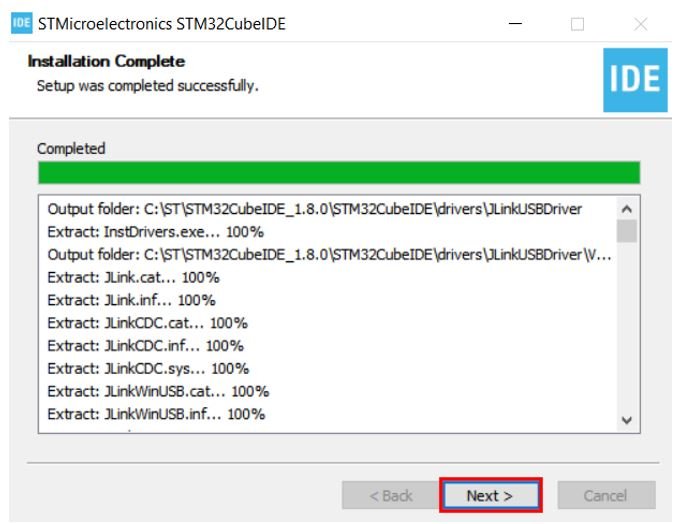
After the installation is completed, click ‘Finish’ to close the setup. Your desktop will now have a shortcut to STM32CubeIDE created.

In this section, we will see how to get started with STM32CubeIDE by creating our first project, For demonstration purposes, we will learn to use GPIO pins of STM32 Blue Pill as digital output pins and see how to configure GPIO pins as digital output in STM32CubeIDE.
For demonstration purposes, we will create a LED blinking example using STM32 Blue Pill. This board has an onboard LED connected to GPIO pin 13.
First, let’s see how to write your first program for STM32 Blue Pill in STM32CubeIDE.
Write your first STM32 Program in STM32CubeIDE
Now that we have already installed the STM32CubeIDE application in our system, let us learn how to use it to program our STM32 boards.
Open the application. You will be asked to specify the directory for the workplace. You can specify the directory and also tick the box below to keep this as the default directory. Next, click ‘Launch’ to start the application.

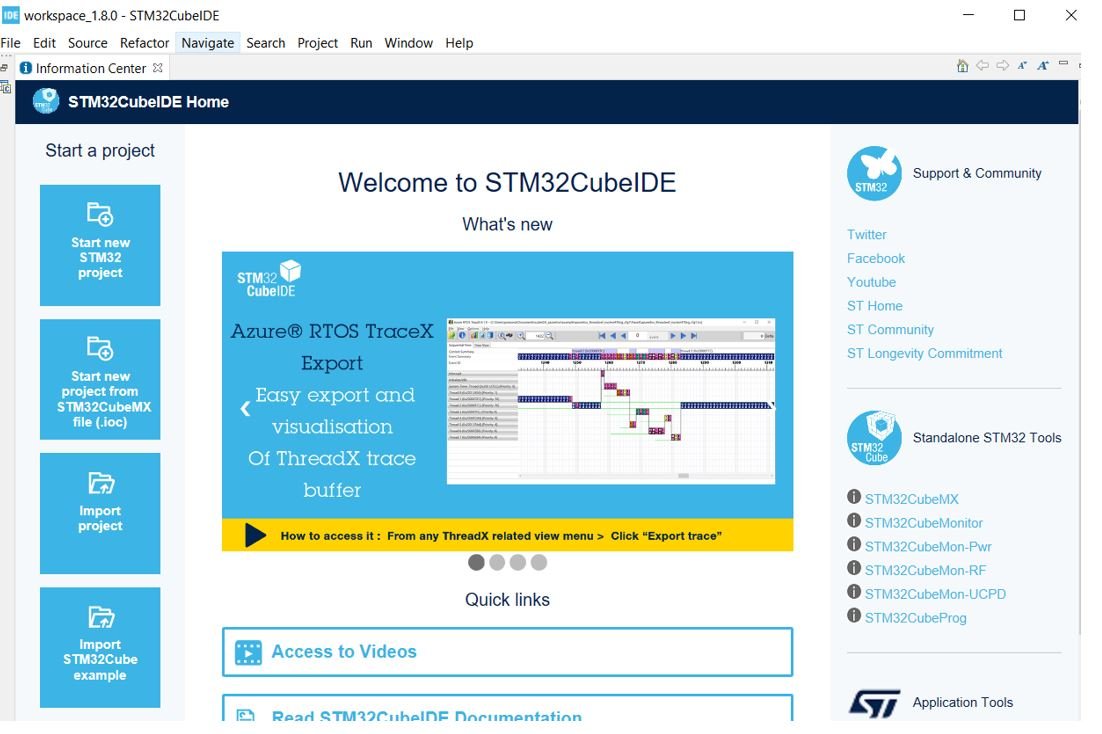
The STM32CubeIDE workspace will open.
Creating Project in STM32CubeIDE
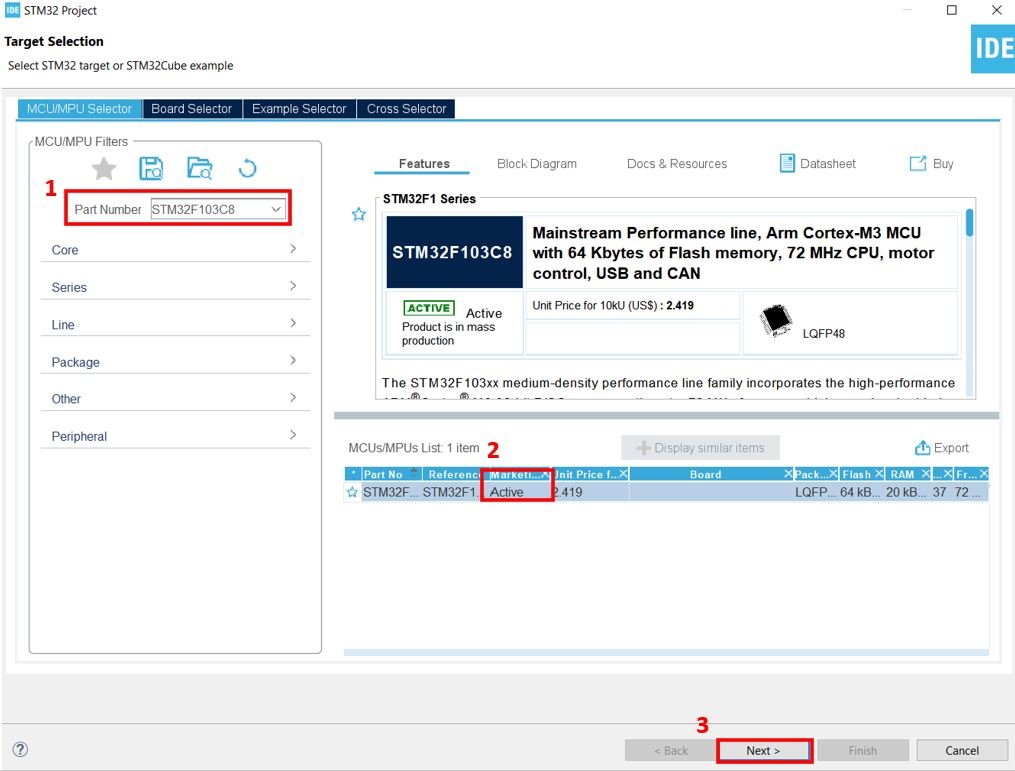
Now click ‘Start new STM32 project’.

The Target Selection will open.

Select your device from the ‘Part Number.’ We are working with ‘STM32F103C8’.Then click any column entry and then click the ‘Next’ button to proceed further.
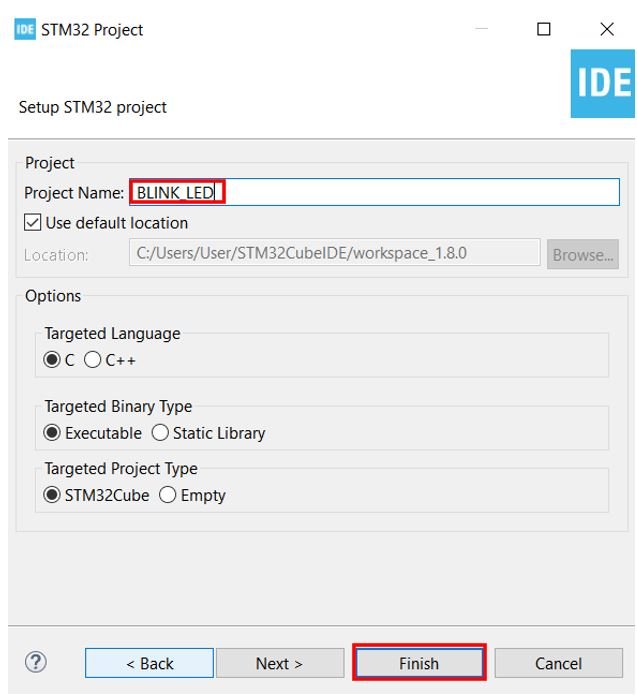
Give your project a name. As we are going to blink the on-board LED of our STM32 board hence we have named our project as ‘BLINK_LED.’ Then click ‘Finish.’
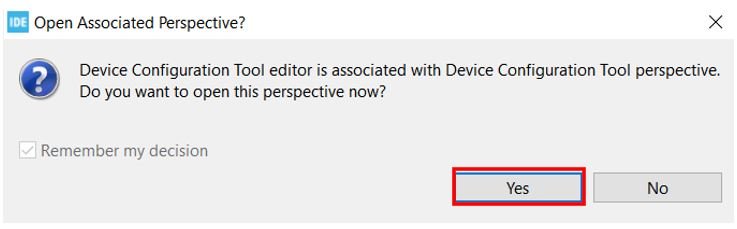
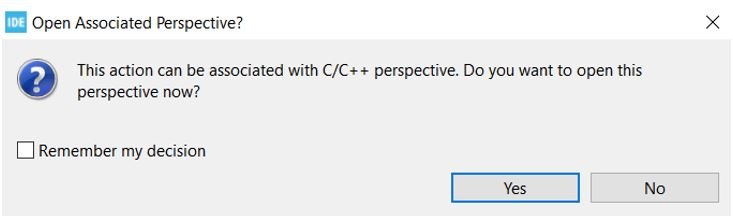
You will be asked to open associated perspective. Click ‘Yes’.
Device Configuration Tool
Now the Device Configuration Tool window will open up. We will be able to set pin specific functions here.
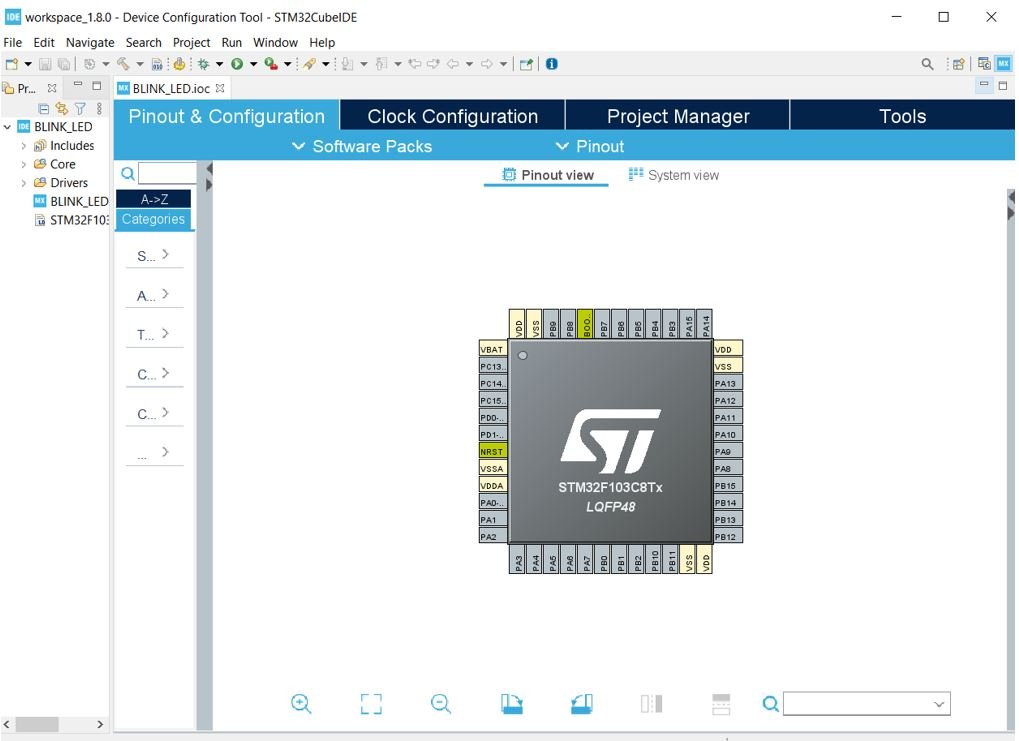
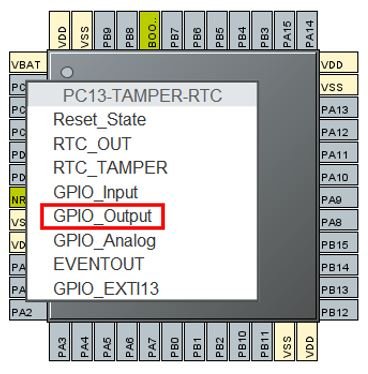
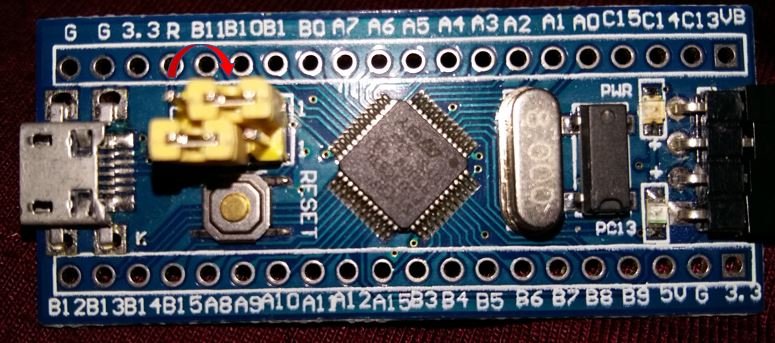
STM32 has an on-board LED connected at PC-13. Refer to the detailed pin out of the board above. Click on PC-13 pin on the Device configuration Tool.

A list of functions will appear associated with the pin. We will set this pin as a ‘GPIO Output.’
This is how it will look. Here you can see that we have attached GPIO_Output to PC-13.
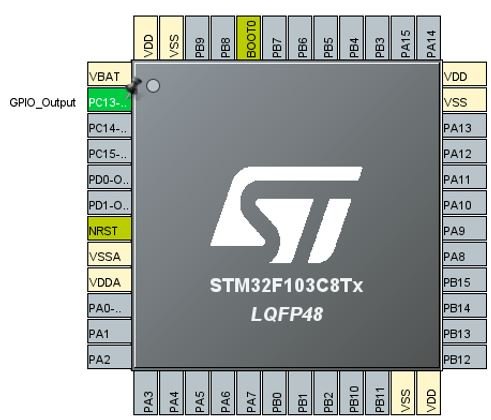
Additionally, we have more options for pins as well. Go to System Core > GPIO > PC-13 and the pin configuration for PC-13 will open up. Here we have given the pin a user label of ‘LED.’ You can see in Device Configuration Tool, that now PC-13 has been given the label ‘LED.’
Apart from the label, there are several other options to choose from including GPIO output level, mode, pull-up/pull-down state, etc.

Now we will save our file. Press Ctrl + S. The following window will appear. Click ‘Yes.’ This will generate a template code for you.

Another window will appear that will ask if you want to open the perspective. Click ‘Yes.’
Code
Now the following page opens. On the right side, you will be able to view the Outline of the code. This happened because we opened our code with perspective.
In the center, you can view the main.c file and on the left you can view the Project Explorer.
If you want to go to the Device Configuration Tool, then click the BLINK_LED.ioc tab.

STM32 Blue Pill LED Blinking Code
Now let us modify the main.c file for our BLINK_LED project. Our aim is to blink the on-board LED indefinitely after a delay.
First, inside the main() function go to while(1) and insert the following lines of code. These will be responsible to blink the onboard LED infinitely.
  while (1)
  {
    HAL_GPIO_WritePin(LED_GPIO_Port, LED_Pin, GPIO_PIN_RESET);
    delay(500000);
    HAL_GPIO_WritePin(LED_GPIO_Port, LED_Pin, GPIO_PIN_SET);
    delay(500000);
  }
Now what is happening is that the HAL_GPIO_WritePin() function takes in three parameters: the onboard LED port, the onboard LED pin, and the state of the pin. This function will be responsible for setting the onboard LED pin either HIGH or LOW.
Notice that we had labelled the onboard LED as ‘LED’ hence we have specified LABEL_GPIO_Port and LABEL_Pin : the first two parameters as LED_GPIO_Port and LED_Port. Remember to replace ‘LABEL’ with your own pin label.
The case where we are specifying the third parameter as GPIO_PIN_RESET, it sets the onboard LED pin to LOW whereas when we are specifying the third parameter as GPIO_PIN_SET, it sets the onboard LED pin to HIGH.
In between these two functions, we are calling the delay() function. It is not an in-built function therefore we will have to define it as well. Insert the following definition of the delay() function after Error_Handler().
void delay (int x)
{
  volatile int i,j;
  for (i=0 ; i < x ; i++)
  {
     j++;
  }
  return;
}
Additionally, add the prototype of the delay() function with the rest of the private function prototypes as shown below:
/* Private function prototypes -----------------------------------------------*/
void SystemClock_Config(void);
static void MX_GPIO_Init(void);
void delay (int x);
Save the main.c file after modifying it. Now we are ready to build our project.
Building Project STM32CubeIDE
To build our BLINK_LED project press Ctrl + B or go to Project > Build All.

Your project will start building. After a few moments, your project will be built if there are no errors.

Connecting ST-Link Programmer with STM32
Now as we have successfully built our BLINK_LED project let us move ahead and upload the code to our STM32 board. To do that, first we will have to connect our Blue Pill STM32 with a ST-Link programmer. We will be using ST-Link V2.
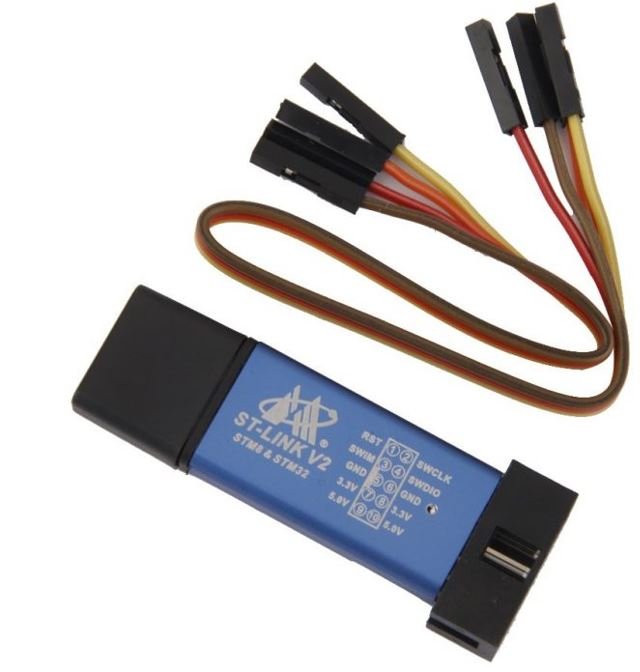
This will provide an interface between our computer and our STM32 board. It consists of 10 pins. We will be using pin2 SWDIO, pin6 SWCLK, pin4 GND, and pin8 3.3V to connect with our STM32 board. The SWDIO is the data input/output pin and the SWCLK is the clock pin. Follow the pin configuration given on the ST-LINK V2 to identify each pin.
Follow the table below to connect both devices correctly.
| STM32 Blue Pill | ST-LINK V2 |
|---|---|
| VCC 3.3V pin | pin8 3.3V |
| SWDIO pin | pin2 SWDIO |
| SWCLK pin | pin6 SWCLK |
| GND pin | pin4 GND |
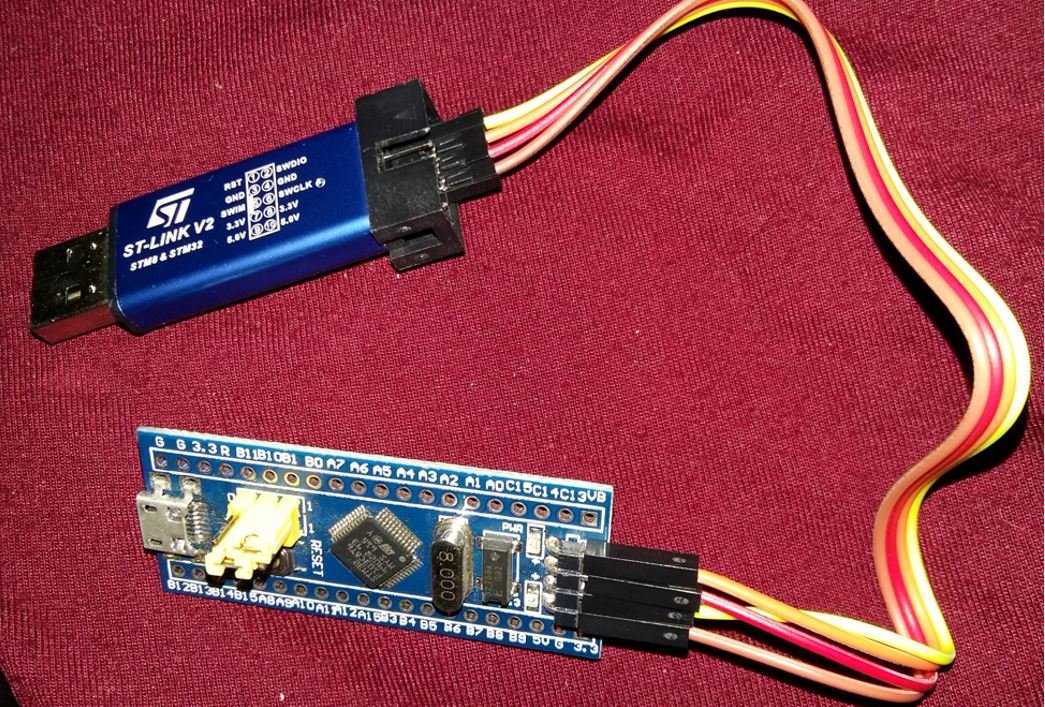
Additionally move the BOOT jumper to the right to enable the microcontroller to go into programming mode.
Now connect your ST-LINK V2 with your computer via the USB port. Both the devices will power ON.

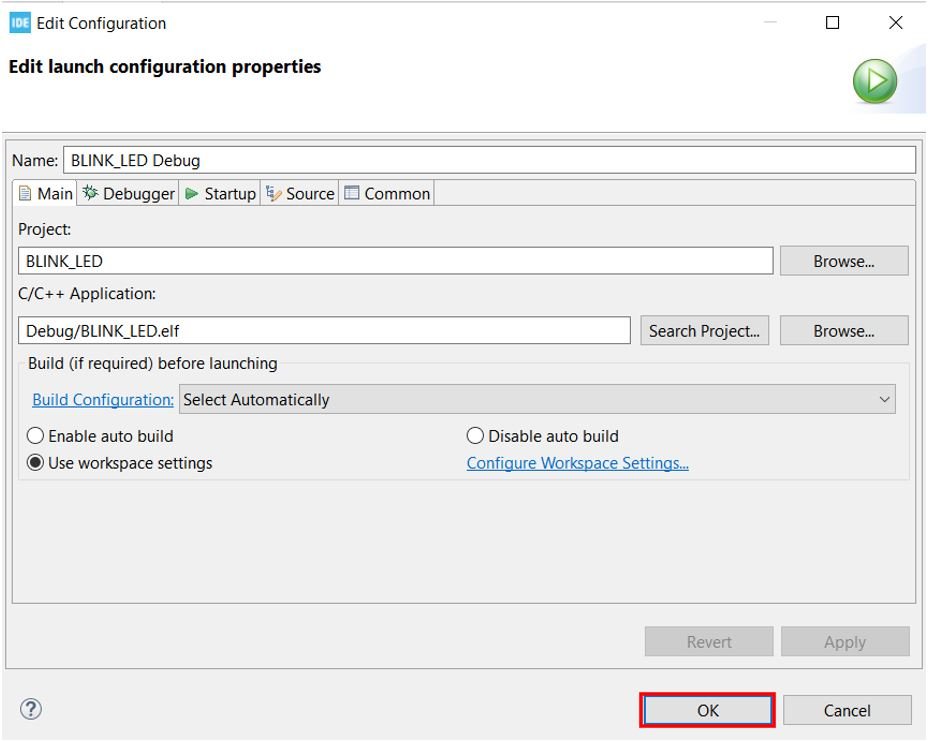
Next press the RUN button in the IDE. The following ‘Edit configuration’ window will open up. Click ‘OK’.
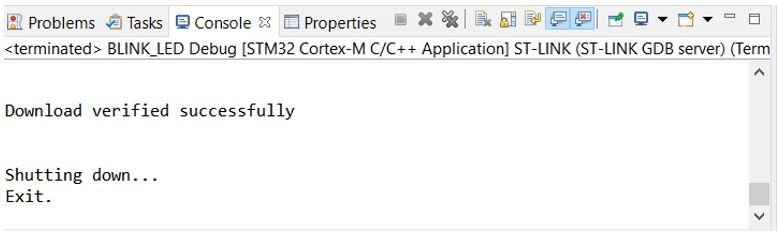
After a few moments, the code will be successfully sent to the STM32 board. You can view it in the Console terminal.
Otherwise, press the RESET button on your STM32 board.
Now to bring the Blue pill back to normal mode make sure you bring the BOOT jumper back at its place. After doing that press the RESET button on the board. Immediately, the onboard LED will start blinking.
STM32CubeIDE — среда разработки для программирования микроконтроллеров STM32.
Данная среда включает в себя достаточный набор инструментов для работы с микроконтроллерами фирмы STMicroelectronics N.V.
Компания основана в 1987 году путем слияния итальянской и французских фирм.
На сегодняшний день компания выпускает доступные по цене высокопроизводительные микроконтроллеры широкой сферы применения (например: умный дом, различные электронные устройства, автомобильное оборудование).
Скачать STM32CubeIDE с официального сайта из Российской федерации на момент написания статьи проблематично. Пять минут назад попробовал сделать это через браузерный VPN и получил ошибку.
Поэтому выложил установщик на свой Яндекс диск.
>>> https://disk.yandex.ru/d/C0pzylLYi1lV0A (клик для скачивания)
PS: Ссылка на официальную страницу загрузки -> https://www.st.com/en/development-tools/stm32cubeide.html
После скачивания распакуйте содержимое архива и выполните установку программы.
Обновления STM32CubeIDE должны происходить без VPN. За что спасибо французам.
Если установщик не запускается и выкидывают ошибку, попробуйте перенести его в папку C:\STM32CubeIDE и запустить оттуда.
После установки нужно обновить STM32CubeIDE.
Для этого выполните следующие действия.

Если обновления есть, то появится диалоговое окно с новой версией. Жмите Next -> Next -> Принимайте соглашение и обновляйте.

 (Пока оценок нет)
![]() Загрузка…
Загрузка…
Разработка электронных устройств и систем управления
Техно — блог
STM32CubeIDE – это продвинутая платформа платформа для разработки программного обеспечения нижнего уровня, которая содержит в себе : дружественный конфигиратор периферии микроконтроллера, компилятор и отладчик для всех микроконтроллеров и микропроцессоров разработанных в STMicroelecronics. Этот программный комплекс основан на использовании среды разработки Eclipse® и фреймворка CDT™ в сочетании с набором библиотек и компилятором GCC. Для отладки кода используется GDB. Такой подход позволяет использовать всё ранее накопленное «богатство» реализуемое с помощью плагинов к Eclipse®
STM32CubeIDE – объединяет в себе хорошо зарекомендовавший у многих разработчиков электроники инструмент STM32CubeMX в сочетании со средой разработки, компилятором и дебаггером, образуя целостный продукт для разработчиков «все в одном». При создании проекта разработчик выбирает целевой микроконтроллер или отладочную и получает инструмент, который помогает корректно осуществить инициализацию периферии микроконтроллера в полу-автоматическом режиме, сокращая с рутинные операции по написании кода инициализациии периферийных устройств и тактированию микроконтроллера и тем самым избегая ряда ошибок.
STM32CubeIDE – содержит в себе анализатор сборки, предоставляющий актуальную информацию об использовании оперативной и энергонезависимой памяти. Также данная среда разработки содержит в себе расширенные средства отладки позволяющие отслеживать состояния конкретных регистров микроконтроллера и периферии. В данном программном продукте поддерживается отладочные устройства ST-Link и J-Link. Поддерживается импорт проектов из других сред разработки, таких как: Atollic® TrueSTUDIO® и AC6 System Workbench для STM32 (SW4STM32). В последних версиях появилась возможность работы с Embedded Linux для STM32.
И таки да, Вы можете совершенно бесплатно скачать у нас установочные файлы данной среды разработки для всех популярных программных платформ, как говорится «без SMS и регистрации», все предоставленные файлы под архитектуру x64, и размещены совершенно легально по просьбе партнёров . Наслаждайтесь: свежий релиз STM32 Cube IDE 1.11.0
Новые операционные усилители Microchip MCP6V51

Корпорация Microchip разработала операционные усилители MCP6V51 с динамической коррекцией напряжения смещения, полосой усиления сигнала 2 МГц, функцией подавления пульсаций источника питания и синфазных шумов. Эти…
HDC1080 — датчик влажности и температуры.

Микросхема HDC1080 является цифровым датчиком влажности и температуры, ключевым отличием которого является сочетание точности измерения с малой потребляемой мощностью. Данный полупроводниковый датчик работает в широком…
GaN MOSFET от Texas со встроенным драйвером

Первый GaN MOSFET от Texas Texas Instruments разработал и запустил в производство одним из первых микросхему выполненную по очень перспективной GaN технологии, основанной на использовании полупроводникового кристалла с…
Лечение ошибки «Не удалось вызвать функцию mail».

Лечение ошибки «Не удалось вызвать функцию mail». При добавлении на сайт, работающий под управлением CMS Joomla была замечена данная ошибка. Суть её сводилась к тому, что после заполнения формы отправки почты , не…
Датчик Холла DRV5013Q1 со встроенным триггером Шмитта

Датчик Холла DRV5013Q1 со встроенным триггером Шмитта Датчик магнитного поля (датчик Холла) DRV5013Q1 со встроенным триггером Шмитта недавно разработан в Texas Instrument. Данный полупроводниковый прибор содержит в себе…
Очень простой УНЧ с «кнопочной» регулировкой громкости

Очень простой УНЧ с «кнопочной» регулировкой громкости Если необходимо быстро сделать усилитель низкой частоты (УНЧ) с цифровой регулировкой уровня громкости кнопками, Вам поможет микросхема TDA8551, особенность — в…
Полисвич – что это такое?

Полисвич – что это такое? Полисвич (или PolySwitch) — это будующее приборов, которые мы называем предохранителями. Полисвич – при самом грубом приближении, является «вечным самовосстанавливающимся прехранителем». Такой…
Близкое и прекрасное будущее интерфейсов SCSI и SAS

Будущее интерфейсов SCSI и SAS Если Вы хотите знать, какие новшества ждут рынок SCSI устройств в не очень отдаленном будущем, и вы ничего не слышали про SAS-3, SCSI Express (SCSI over PCIe) или Multilink SAS,…
Решение для питания светодиодов в системах освещения.

Решение для питания светодиодов в системах освещения. Компания On Semiconductor разработала новую микросхему для питания мощных светодиодов, применяемых в цепях освещения. Полупроводниковый прибор NCL30082 является…
Таблица диаметра отверстий для нарезки резьбы

Таблица диаметров отверстий для нарезания резьбы с помощью метчика Когда происходит разразработка электронных устройств с силовыми узлами требующего интенсивного охлаждения, наппример мощных транзсторов, мощных УНЧ,…
«КРЕН ка» на 10 Ампер

LT1581 — уникальный линейный стабилизатор на 10 Ампер Микросхема LT1581 явлется достаточно уникальной, и представляет собой регулируемый линейный стабилизатор с низким падением напряжения и огромным выходным током до 10…
Что такое dBi ?

Что такое dBi ? Часто на ВЧ устройствах (спутниковых антеннах, точках доступа Wi-Fi) можно видеть такую велину как dBi. Но каков же сакральный смысл данного обозначения? В радиотехнике используется очень интересная…
Затухание Wi-Fi в различных материалах

Затухание сигнала Wi-Fi(WLAN) в различных материалах Достаточно интересным и востребованным является вопрос, а будет ли хорошо работать Wi-Fi за соседней кирпичной стеной? Сетевые инженеры из университета Южной…
Длина волны у светодиодов

Длина волны у светодиодов цвет светодиода длина волны, нм падение напряжения на кристалле, В инфракрасный от 760 до 1.9 красный 610 — 760 1.6 … 2.03 оранжевый 590 — 610 2.03 … 2.1 жёлтый 570 — 590 2.1 … 2.2…
Как работает двухпороговый компаратор

Как устроен двухпороговый компаратор на примере нового прибора AMC23C12 от Texas Instrument? Данная микросхема как электронный прибор для отслеживания значения напряжения в заданном диапазоне, при этом аналоговая и…
Цифровой регулятор громкости MAX5486

Цифровой регулятор MAX5486 Микросхема MAX5486 является цифровым регулятором громкости и баланса с кнопочным управлением и не требует внешнего микропроцессора. Ключевые особенности: Данная микросхема имеет входное…
Открыть список закачек Firefox c помощью Dolphin

Открыть список закачек Firefox c помощью Dolphin Замечен интересный баг: После очередного обновления mozilla firefox стал открывать каталоги другим файловым менеджером,например Nautilus, а вам хочется чтоб это был,…
Среда разработки электроники eSim

eSim — ранее известный как Oscad — это новый программый продукт для разработки электроники. Или согласно принятой за рубежом классификации EDA — программная среда для разработки электронного прибора. Этот программный…
Энкодер что это такое

Определение направления вращения в осциллограмме Энкодер что это такое? Весьма часто в автомагнитоле, принтере, и других электронных устройствах можно видеть такие электронные компоненты, как энкодер. Так что же это…
Настройка WWAN модемов Qualcomm Gobi2000 под Linux

Настройка WWAN модемов Qualcomm Gobi2000 под Rosa Linux Рассмотрим настройку такого модема на примере Rosa Linux R11 x64 , который подвернулся нам для испытаний, точно также данная конструкция будет работать с CentOS…
Free Download STM32 Software IDE & PROG full version standalone offline installer for Windows. It provides a complex software tool, considerably reducing efforts, time, and cost of development.
Overview of STM32 Software IDE & PROG
STM32 Software IDE & PROG is a comprehensive software suite designed to develop and program STM32 microcontrollers. As a powerful Integrated Development Environment (IDE) and programming tool, it offers a wide range of features and functionalities to streamline the process of creating embedded systems. In this article, we will explore the remarkable features, benefits, and applications of the STM32 Software IDE & PROG, shedding light on how this software suite empowers developers and accelerates the creation of innovative embedded solutions.
Unleashing the Power of STM32 Software IDE & PROG:
STM32 Software IDE & PROG is a feature-rich software suite that combines an intuitive Integrated Development Environment (IDE) with powerful programming capabilities. It provides developers with a comprehensive set of tools, libraries, and resources to simplify the development and programming process for STM32 microcontrollers. The software suite’s user-friendly interface and extensive functionality enable developers to create innovative embedded systems easily.
Key Features of STM32 Software IDE & PROG:
- Streamlined Development Process: An intuitive and user-friendly IDE that facilitates coding, compiling, and debugging of embedded applications.
Code generation and optimization tools that enhance efficiency and ensure high-quality code. - Robust Debugging and Testing Capabilities: Real-time debugging features, including breakpoints, watchpoints, and variable tracking, to facilitate the identification and resolution of issues. Integrated debugging tools for step-by-step execution, code tracing, and error analysis, improving the overall development process.
- Versatile Programming Options: The ability to program STM32 microcontrollers using various programming techniques, such as in-circuit programming, bootloader, or external programming interfaces. Support for different programming languages, including C and C++, enabling developers to work with familiar programming paradigms.
- Wide Range of Supported STM32 Microcontrollers: Compatibility with a wide range of STM32 microcontrollers, covering different series, variations, and performance levels. Access to comprehensive libraries, middleware, and peripheral drivers specifically tailored for STM32 microcontrollers, ensuring seamless integration and optimal utilization of hardware resources.
Streamlined Development Process:
STM32 Software IDE & PROG simplifies the development process by providing a unified coding, compiling, and debugging environment. The IDE offers syntax highlighting, code completion, and project management tools, enabling developers to write and organize code efficiently. The integrated build system ensures smooth compilation, while the debugging capabilities aid in identifying and resolving issues quickly.
Robust Debugging and Testing Capabilities:
The software suite equips developers with powerful debugging and testing capabilities. Real-time debugging features, such as breakpoints and watchpoints, facilitate the identification of errors and enable developers to step through the code to analyze program execution. This helps in isolating and fixing bugs, ensuring the stability and reliability of the embedded systems.
Versatile Programming Options:
STM32 Software IDE & PROG offers developers flexibility in programming STM32 microcontrollers. Whether using in-circuit programming, bootloaders, or external programming interfaces, developers can choose the most suitable method for their application requirements. The support for popular programming languages like C and C++ allows developers to leverage their existing skills and build robust embedded solutions.
Wide Range of Supported STM32 Microcontrollers:
The software suite provides compatibility with a broad range of STM32 microcontrollers, catering to different performance requirements and application domains. Developers can leverage the extensive libraries, middleware, and peripheral drivers tailored for STM32 microcontrollers, ensuring seamless integration with hardware components and efficient utilization of resources.
Frequently Asked Questions (FAQs):
Q1: Can I use STM32 Software IDE & PROG for commercial and personal projects? A: STM32 Software IDE & PROG can be used for commercial and personal projects without any restrictions.
Q2: What programming languages are supported by STM32 Software IDE & PROG? A: STM32 Software IDE & PROG primarily supports the C and C++ programming languages.
Q3: Can I debug and test my code in real-time using STM32 Software IDE & PROG? A: Yes, the software suite provides real-time debugging capabilities, allowing developers to analyze code execution, set breakpoints, and track variables during runtime.
Q4: Does STM32 Software IDE & PROG offer comprehensive documentation and support? A: Yes, STM32 Software IDE & PROG provides extensive documentation, tutorials, and support resources to assist developers in utilizing the software suite effectively.
Q5: Is STM32 Software IDE & PROG compatible with all operating systems? A: STM32 Software IDE & PROG supports popular operating systems, including Windows, macOS, and Linux, ensuring compatibility with various development environments.
Conclusion:
STM32 Software IDE & PROG empowers developers to create innovative embedded systems using STM32 microcontrollers. With its robust features, streamlined development process, advanced debugging capabilities, and versatile programming options, the software suite simplifies the creation and programming of embedded solutions. STM32 Software IDE & PROG provides the tools and resources necessary to bring ideas to life and deliver high-performance embedded systems, whether for commercial projects or personal hobbyist endeavors.
Technical Details and System Requirements
- Supported OS: Windows 11 / Windows 10 / Windows 8.1 / Windows 7
- Processor: Multicore Intel Series or above, Xeon or AMD equivalent
- RAM: 4GB (8GB or more recommended)
- Free Hard Disk Space: 4GB or more recommended