В ходе резервного копирования образа Windows с помощью утилиты восстановления системы процесс может прерваться ошибкой STATUS_WAIT_2. Иногда сбой сопровождается кодом ошибки 0x80070002.
Причины ошибки восстановления системы
С ошибкой STATUS_WAIT_2 можно столкнуться по ряду причины:
- Низкоуровневое повреждение данных и ошибки файловой системы являются самыми распространенными причинами этого сбоя. Требуется провести сканирования ОС встроенными утилитами DISM и SFC, чтобы устранить несоответствия и «восстановить» процедуру резервного копирования.
- Несовместимость утилиты восстановления системы. Проблема может возникнуть в последних сборках Windows 10, поскольку утилита больше не поддерживается. Скорее всего, Майкрософт не будет использовать свою утилиту восстановления системы в следующих выпусках, поскольку у конкурентов есть лучшие решения. Поэтому для обхода ошибки попробуйте использовать программы резервного копирования сторонних разработчиков.
- Сбой Windows 10, который заканчивается созданием гостевой учетной записи (DefaultUser0). В результате утилита резервного копирования использует ее вместо текущей (с доступом администратора). Чтобы исправить, нужно удалить эту гостевую запись в безопасном режиме.
Сканирование системы
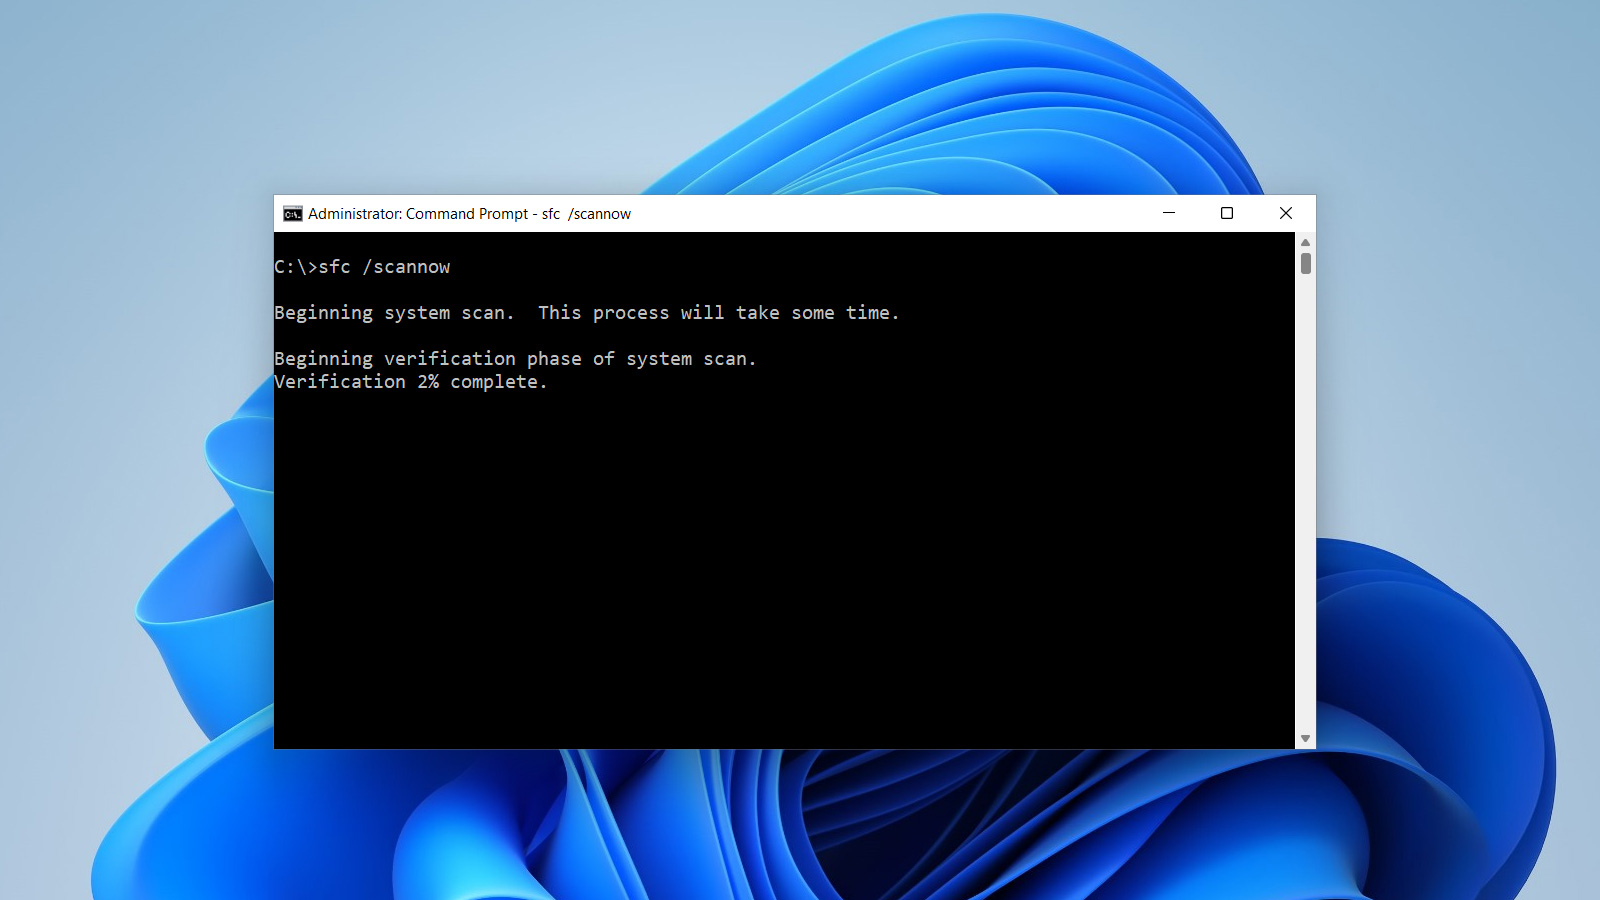
Если не удается запустить резервное копирование несколько раз подряд, и каждая попытка завершается одной и той же ошибкой STATUS_WAIT_2, вполне возможно, сто имеете дело с каким-то типом повреждения системных файлов. Поэтому в первую очередь выполним сканирование ОС встроенными утилитами SFC и DISM. Если проблема останется, перед применением следующего решения запустим проверку диска командой ChkDsk для исправления повреждений файловой системы.
Начнем с простого сканирования утилитой SFC, которая для восстановления повреждений использует локально кэшированное хранилище. Поэтому можно ее запускать без подключения к интернету. Для этого откройте в командную строку с правами администратора, например, с помощью поиска Windows и в консоли выполните команду:
sfc /scannow

Имейте в виду, что принудительное прерывание сканирование может привести к дополнительным логическим ошибкам. После завершения выполните команду:
dism /online /cleanup-image /restorehealth
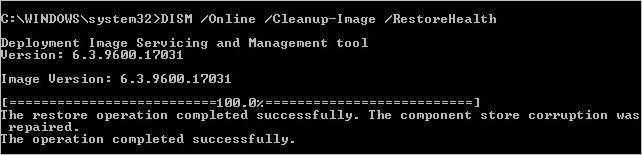
Поскольку эта утилита обращается к серверу Центра обновления Windows для загрузки копий поврежденных файлов, требуется стабильное подключение к интернету.
Когда операция будет завершена, перезапустите ОС и повторите то действие, которое вызывало ошибку STATUS_WAIT_2.
Использование программы стороннего разработчика
Если не хотите принимать крайние меры, такие как сброс компонентов Windows, попробуйте использовать сторонние альтернативы.
Имейте в виду, что Майкрософт отказался от дальнейшей разработки и поддержки в Windows 10 утилит восстановления системы, резервного копирования, образа системы и прочих. Вполне возможно, что последующие выпуски Windows больше не будут включать восстановление системы, поскольку сторонни эквиваленты намного лучше встроенного решения.
Если ищите стороннюю программу, рассмотрите одну из бесплатных альтернатив:
- Acronis True Image;
- Clonezilla;
- MiniTool Partition Wizard.
Представленные утилиты либо бесплатны, либо включают пробную версию.
Удаление гостевой учетной записи
Если видите ошибку STATUS_WAIT_2 на компьютере с Windows 10, скорее всего, процесс резервного копирования завершается неудачей из-за известного сбоя, который приводит к созданию учетной записи DefaultUser0. Неизвестно, почему Windows пытается ее получить, даже если она больше не существует. Эту запись можно увидеть в журнале ошибок со следующим содержимым:
C:\Users\defaultuser0\Contacts. Error STATUS_WAIT_2
Для устранения проблемы следуйте набору инструкций, чтобы удалить DefaultUser0.
Откройте окно Конфигурации системы командой msconfig из строки «Выполнить» (Win + R).
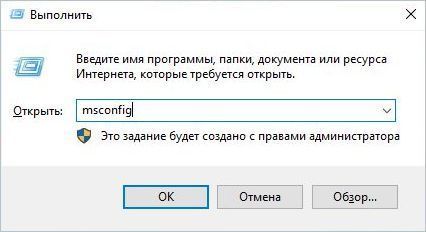
На вкладке Загрузка отметьте флажком опцию «Безопасный режим». Затем выберите минимальные параметры и примените изменения.

Подтвердите перезагрузку компьютера и подождите, пока ОС загрузится в безопасный режим.
Перейдите на Панель управления командой control из окна Win + R.
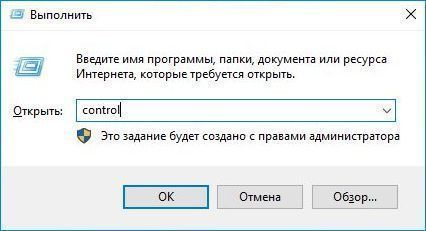
Переключите режим просмотра на категории и перейдите в раздел «Учетные записи пользователей». Выберите вкладку «Добавление и удаление учетных записей».

Как только окажетесь в окне Управления, кликните на DefaultUser0, затем выберите пункт удаления. Когда появится запрос, сохранять или удалять файлы, подтвердите удаление.
Затем откройте Проводник и перейдите в каталог C:\Пользователи, чтобы проверить, есть ли еще папка DefaultUser0. Если она присутствует, щелкните правой кнопкой мыши на нее и выберите «Удалить».
Выйдите из проводника, затем откройте Редактор реестра командой regedit из окна Win + R.
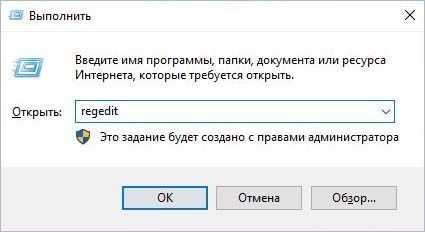
На левой панели навигации перейдите к разделу:
HKEY_LOCAL_MACHINE\SOFTWARE\Microsoft\Windows NT\CurrentVersion\ProfileList
Когда доберетесь к этой локации, выберите ключ, который начинается с S-1-5-21, затем переместитесь в правую панель.
Дважды щелкните на параметр ProfileImagepath. Если путь указывает на каталог C:\Пользователи\DefaultUser0, измените его, чтобы он указывал на основной профиль.
Закройте редактор реестра, перезагрузите компьютер. Попытайтесь создать резервную копию еще раз и посмотрите, прерывается ли этот процесс ошибкой STATUS_WAIT_2.
If when you attempt to create a System Image Backup using System Restore on Windows 11/10 and you receive the error message; STATUS_WAIT_2 with code 0x80070002, then this post is intended to help you. In this post, we will identify the possible causes, as well as provide the corresponding solutions you can try to help you mitigate this issue.

When you encounter this issue, you’ll receive the following error message-
System Restore
There was an unexpected error:
STATUS_WAIT_2 (0x80070002)
Please close System Restore and try again.
You might encounter the error due to one or more (but not limited to) of the following known causes-
- System Restore inconsistency.
- Operating System files corruption.
- Windows 10 glitch that ends up creating a persistent rogue guest account DefaultUser0 that the backup utility ends up using instead of the active one (the one with admin access).
If you’re faced with this System Restore error 0x80070002, STATUS_WAIT_2 issue, you can try our recommended solutions outlined below in no particular order and see if that helps to resolve the issue.
- Perform SFC and DISM scan
- Use a 3rd party Backup software
- Delete the DefaultUser0 rogue account (if applicable)
- Perform a Fresh Start, In-place upgrade repair or Cloud Reset
Let’s take a look at the description of the process involved concerning each of the listed solutions.
1] Perform SFC and DISM scan
If you have system file errors, you may encounter the System Restore error 0x80070002, STATUS_WAIT_2.
The SFC/DISM is a utility in Windows that allows users to scan for corruptions in Windows system files and restore corrupted files.
For ease and convenience, you can run the scan using the procedure below.
Press Windows key + R to invoke the Run dialog.
In the Run dialog box, type notepad and hit Enter to open Notepad.
Copy and paste the syntax below into the text editor.
@echo off
date /t & time /t
echo Dism /Online /Cleanup-Image /StartComponentCleanup
Dism /Online /Cleanup-Image /StartComponentCleanup
echo ...
date /t & time /t
echo Dism /Online /Cleanup-Image /RestoreHealth
Dism /Online /Cleanup-Image /RestoreHealth
echo ...
date /t & time /t
echo SFC /scannow
SFC /scannow
date /t & time /t
pause
Save the file with a name and append the .bat file extension – eg; SFC_DISM_scan.bat.
Repeatedly run the batch file with admin privilege (right-click the saved file and select Run as Administrator from the context menu) until it reports no errors.
Restart your PC.
On boot, try creating the system image backup again. If the error persists, continue with the next solution.
2] Use a 3rd party Backup software
This solution entails you use any of the 3rd party Imaging, Backup and Recovery Software capable of doing the same thing as the System Restore utility.
3] Delete the DefaultUser0 rogue account (if applicable)
In some cases, it’s likely that the backup process fails because of a bug that ends up creating a rogue account DefaultUser0 that Windows keeps trying to reconcile even though it no longer exists. This is even more likely if the logs of the error reveal a reference as stated below:
Backup encountered a problem while backing up file C:\Users\defaultuser0\Contacts. Error: ( STATUS_WAIT_2)
If this scenario is applicable, you should be able to fix the issue by removing/deleting the DefaultUser0 rogue account.
Here’s how:
- Boot Windows into Safe Mode.
- In Safe Mode, press Windows key + R, type control, and hit Enter to open Control Panel.
- In Control Panel interface, locate and click User Accounts.
- In the window that appears, click the Manage another account link.
- Once you’re inside the Manage another account window, click on the DefaultUser0 account to select it.
- Click on Delete the account from the next menu.
If prompted whether you want to keep or delete the files belonging to DefaultUser0, click on Delete files. At the final confirmation prompt, click on Delete Account to confirm the operation.
- Next, press Windows key + E to open File Explorer.
- Navigate to C:\Users to see if the DefaultUser0 folder is still there. If it is, right-click it and choose Delete.
If you’re prompted to grant admin access, click Yes at the UAC Prompt.
Once that folder is deleted, you can exit File Explorer.
- Next, invoke the Run dialog again, type regedit and hit Enter to open Registry Editor.
- Navigate or jump to the registry key path below:
Computer\HKEY_LOCAL_MACHINE\SOFTWARE\Microsoft\Windows NT\CurrentVersion\ProfileList
- At the location, select the sub-key that begins with S-1-5-21 at the left pane.
- On the right pane, double-click on ProfileImagepath to edit its properties.
- In the Value data field, if that path points towards C:\Users\DefaultUser0, change it to point towards the primary profile that you’re using.
- Click OK to save changes.
- Exit Registry Editor and reboot your computer.
On boot, attempt to create a backup once again with System Restore and see if the error 0x80070002, STATUS_WAIT_2 is fixed. If not try the next solution.
4] Perform In-place upgrade repair or Cloud Reset
At this point, if the System Restore error 0x80070002, STATUS_WAIT_2 is still unresolved, it’s most likely due to some kind of system corruption that cannot be resolved conventionally. In this case, you can try Fresh Start, In-place upgrade repair to reset every Windows component. Also, you can try Cloud Reset and see if that helps.
Any of these solutions should help you fix your System Restore problems.
NOTE: Error 0x80070002 can also be seen when using Windows Update, Windows Upgrade, Windows Features, Installer, Microsoft Store, Windows Backup, Outlook, Sandbox, Microsoft Account, Printer, and Hyper-V.

- Remove From My Forums
-
Question
-
I am getting a «STATUS_WAIT_2 0x80070002» error immediately after pressing the «Save settings and run backup» button. No files are saved as the backup aborts before the backup starts The computer I am using was upgraded
from Window 7 to Windows 10. I have the latest updates for Windows 10. So far I have been unable to find any discussion for this scenario.
All replies
-
Hi,
I noticed the error message, do you have any anti-virus program installed?
I suggest you to follow the methods below and check if it helps.
Method 1: SFC Scan
System File Checker is a utility in Windows that allows users to scan for corruptions in Windows system files and restore corrupted files. Run the System File Checker (SFC) scan to fix any corrupted files. Follow these steps:
https://support.microsoft.com/kb/929833?wa=wsignin1.0
Method 2: Deployment Image Service and Management Tool command (DISM)
By running this command we can retrieve or modify information within an image. To run the DISM command please follow the below steps:
Press “Windows Logo” + “X” keys on the keyboard and select “Command Prompt (Admin)” from the list.
Type “Dism.exe /online /cleanup-image /restorehealth” and press “Enter”.
Wait for the command to execute which might take around 30 minutes.
After the command is executed, restart the computer and check if the issue persist.
Best Regards,
Tao
Please remember to mark the replies as answers if they help. If you have feedback for TechNet Subscriber Support, contact tnmff@microsoft.com.
-
Proposed as answer by
Wednesday, January 17, 2018 6:54 AM
-
Proposed as answer by
-
I ran both sfc and dism. Both gave no indication of any error. I turned off my anti-virus and tried the backup again with the same results — the Status_Wait_2 error. (I have tried both sfc and dism before without any success). I also
have a computer which came with Windows 10 installed and successfully ran the same Windows 7 style backup on it successfully. The computer which I am having the trouble running the Window 7 style backup was upgraded from Windows 7 to Windows 10. Both
computers have the same anti-virus software so that doesn’t appear to be the issue (also I tried it with the antivirus turned off and it still didn’t work).I was able to successfully run the backup when it was a Windows 7 machine. From my research, I suspect that in upgrading from Windows 7 to Windows 10 something was missed and that is causing the problems using the Windows 7 style backup. Others
with this problem seem to all be on machines upgraded from Window 7. -
Hi,
We haven’t heard from you for a couple of days, have you solved the problem?
Best Regards,
Tao
Please remember to mark the replies as answers if they help. If you have feedback for TechNet Subscriber Support, contact tnmff@microsoft.com.
-
Hi,
See my reply above. I tried your suggestions and have the same results — the same STATUS_WAIT_2 error.
-
I haven’t heard anything on this in about three weeks. Do you have any more suggestions as the one given above did not work? The problem described in Backup
error 0x80070002 using Windows 10 may be related to this problem. While there are details of the problem missing, I have had a very similar, maybe same, problem with the other Windows 7 systems that were upgraded to Windows 10. On these
systems I would go though the steps of setting up the backup, click on the «Save settings and run backup» button. The backup would immediately abort with the «File not found — error 0x8007002». No file name was given, no files
were saved, and the backup settings were not saved. In all my attempts to get the Windows 7 style back-up to work on a system upgraded to Windows 10, I have never gotten it to work. -
Please try the following steps and check the result.
In Control Panel, open Backup and Restore.
In the Backup section, click Change settings. In the Set up backup dialog box, click Next.
In the What do you want to back up dialog box, click Let me choose, and then click Next.
Expand Data Files, expand <your user name> Libraries.
Expand Additional Locations, and then click to clear the AppData folder, Contacts, and Searches check boxes.
Expand Computer, expand the item for your system drive (for example, expand Local Disk (C:)), Expand Users, expand <your user name>, and then click to select the AppData, Contacts, and Searches check boxes if they exist. Click Next, and then click Save
settings and exit.In Backup and Restore, click Back up now to perform a new backup. The backup operation should complete without errors.
If the problem still persists, I suppose that there might be something wrong with your system, you may need to perform a clean install.
Please remember to mark the replies as answers if they help. If you have feedback for TechNet Subscriber Support, contact tnmff@microsoft.com.
-
I’ve tried your suggestion and the results are the same. I agree that there is probably something wrong with my system. I suspect that something in upgrading from Windows 7 to Windows 10 is causing the problem. Doing a clean install is
not an option as I can’t save my files and recovering all my apps is problematic. Also I can’t have my system down for the length of time needed to do a clean install. Maybe what I need to do is to get a non Microsoft backup program that works. -
I’m in the same boat as Michael. My upgraded desktop (from W7 to W10) no longer works. My new W10 laptop and tablets use Windows 7 Backup AOK. The hints noted above also do not help.
 Obviously something with the software
in the recent updates for this «upgrade» architecture. Any new suggestions? Download a Windows 7 Backup/Restore app from the Microsoft Store? -
This error has nothing to to with upgrade from Win7 to win 10. I set up a laptop with a clean Windows 10 Version 1803 and got the same error.
I used a new Backup USB disk. First time backup worked and i could reinstall my system from the image file. All seems working nicely. Then installed some programs like firefox, teamviewer — all oficial registered — and next backup failed.
Then I saw some very ridicoulous — windows backup told me there are 45 GB of other files on Backup drive. But the backup drive was empty before and i sure not copied anything to it.
I dont trust anymore now Windows backup until Microsoft solve such principle problems.
-
Edited by
Uwe_CH
Tuesday, June 19, 2018 12:20 AM -
Proposed as answer by
pbrad
Thursday, July 26, 2018 12:44 PM -
Unproposed as answer by
pbrad
Thursday, July 26, 2018 12:44 PM
-
Edited by
-
I am trying to carry out a system image using the backup and restore option (Windows 7) from the control panel option and received the following error:
Backup encountered a problem while backing up file C:\Users\defaultuser0\Contacts. Error:(STATUS_WAIT_2 (0x80070002))
Backup encountered a problem while backing up file C:\Users\defaultuser0\Searches. Error:(STATUS_WAIT_2 (0x80070002))On further investigation I came across this:
https://answers.microsoft.com/en-us/windows/forum/windows_10-update/what-is-errorstatuswait2-0x80070002-in-windows/6116f4cb-f8ca-4dd9-9742-35366c41b048
Microsoft issued this:
https://support.microsoft.com/en-us/help/4034825/features-that-are-removed-or-deprecated-in-windows-10-fall-creators-up
Stating the System Image Backup (SIB) Solution would be deprecated in the Windows 10 Fall Creators update and they recommend that users use full-disk backup solutions from other vendors.
Suggested solutions are Macrium Reflect (Free) or EASEUS TODO Backup Free. I just need this solution for one system and haven’t tried either yet. I usually use Acronis a pay for solution.
Hope this helps.
Kind regards
Brad
-
This resolved my backup problem with the above error message.
My system is not using a Win 7 upgraded but Win 10 from birth (currently flavour 1803).
Thanks for the help.
-
In the event anyone else runs into this, I figured I would post what worked for me. After trying to capture a system image from the windows 10 OS I was getting the same error. I tried another image capture program with a similar result.
I took the disk I was attempting to write the image to and formatted and re-partitioned it and then I was able to capture the system image. Hope this can help someone. -
Thanks for this reply.
I had the same problem in Windows 10. In my case, re-partitioning was part of the solution, since the Volume Shadow service kept crashing, which is necessary for the backup to work.
In my case, I had to set both the Volume Shadow and Windows Backup services to Automatic (as per one of the solutions here: https://answers.microsoft.com/en-us/windows/forum/all/system-image-backup-failed-with-error-the-backup/27e544a-ec52-4b31-8641-c1276f0cdbcc
), repartition&reformat (to get rid of the corrupted Shadow copies on my backup target that kept crashing the service) and reboot. Backup ran fine after that.Good luck to anyone else encountering this issue!
-
For me what fixed this was creating the registry key
HKEY_LOCAL_MACHINE\SOFTWARE\Microsoft\Windows\CurrentVersion\WindowsBackup
Which did not exist for some reason.
You can save this to a .reg file and run it to easily create the registry key:
Windows Registry Editor Version 5.00

[HKEY_LOCAL_MACHINE\SOFTWARE\Microsoft\Windows\CurrentVersion\WindowsBackup]
-
Proposed as answer by
gerardr
Friday, July 10, 2020 4:52 PM
-
Proposed as answer by
-
Thank you!! After trying all the steps above, this was the only solution it worked for me.
-
I’m running clean install 10.0.19041.329
Two files (one in system32 and one in user self) failed to backup for W7 backup and restore. They do not exist in the filestore, so I’m not worried; but they have probably been erased during backup. No idea why.
Suggestion: STATUS_WAIT_2 (0x80070002) may occur with deleted files.
 Obviously something with the software
Updated October 2023: Stop error messages and fix your computer problem with this tool. Get it now at this link
- Download and install the software.
- It will scan your computer for problems.
- The tool will then fix the issues that were found.
If you’re using Windows 10, system recovery can definitely be an issue for you on several occasions. If so, you may be aware of the mistake when you say so. “An unspecified error occurred during System Restore (0x80070002).” Alternatively, you may receive the code “System Restore Failed due to an Unspecified Error. The System Cannot Find The File Specified (0x8007002”. An incomplete system recovery process is obtained due to one of these error codes.
But no need to worry, we’ve put together the best solutions for you to easily remove this update. First, you need to scan your systems to make sure there is no malware. Also, make sure to turn off the antivirus software so that there are no problems with the system recovery process. If you still cannot complete the process, read the instructions below.
Contents
Check the Time and Date Settings
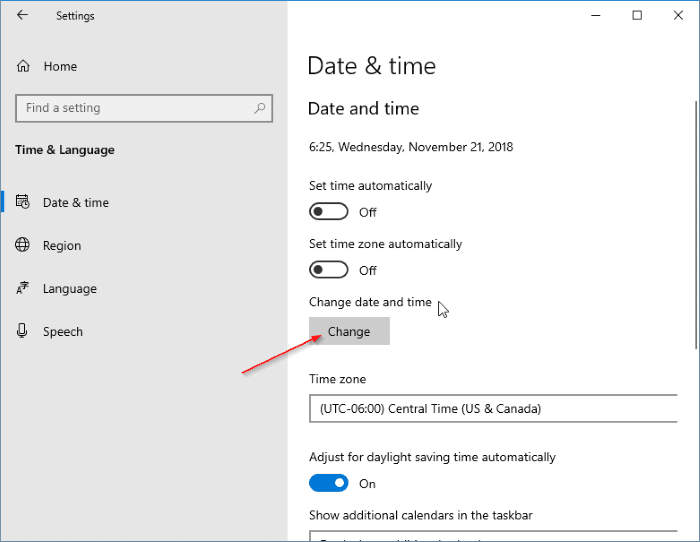
Details are the key to success. Weather settings have a major impact on updating Windows. Make sure date and time settings can solve your problem:
- Click on “Control Panel”
- Open “Date and Time”
- Press “Change date and time” and make corrections if necessary
- Configure the time zone before clicking OK
- Click the “Internet Time” tab before selecting “Change Settings”.
- Select “Synchronize with an Internet time server” before selecting the time server from the list that appears
- Touch “Update Now”
- Press “OK” twice to complete the configuration and to close all open windows
- Then restart your computer before accessing Windows Update. If you have set the wrong time on your system, the previous steps should correct error 0x80070002 for you.
Fix Hard Drive Failure with CHKDSK
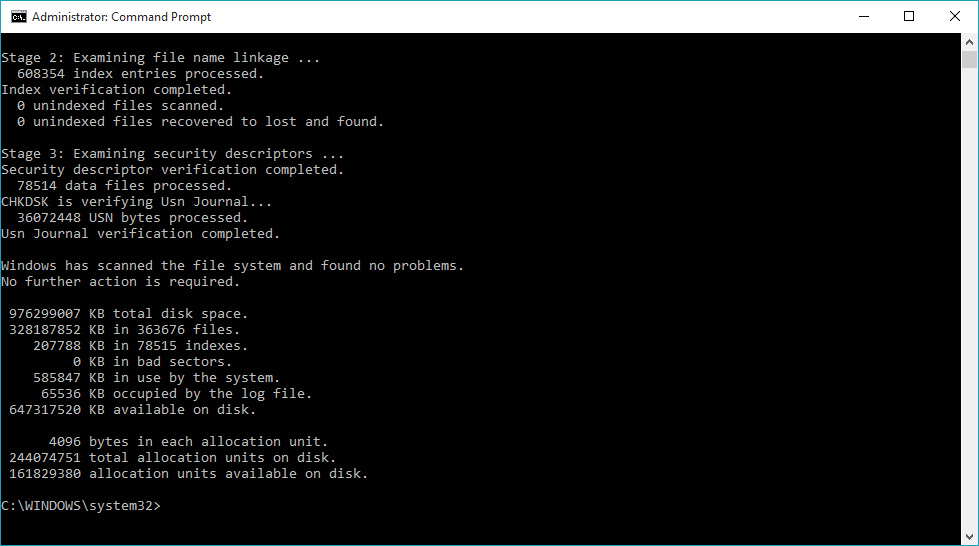
The first way to fix system recovery error 0x80070002 is to find and repair hard drive errors using the Chkdsk utility:
Updated: October 2023
We highly recommend that you use this tool for your error. Furthermore, this tool detects and removes common computer errors, protects you from loss of files, malware, and hardware failures, and optimizes your device for maximum performance. This software will help you fix your PC problems and prevent others from happening again:
- Step 1 : Install PC Repair & Optimizer Tool (Windows 10, 8, 7, XP, Vista).
- Step 2 : Click Start Scan to find out what issues are causing PC problems.
- Step 3 : Click on Repair All to correct all issues.

- Open the command prompt with administrator rights {Command Prompt (Admin)}.
- Type the following command and press Enter:
- chkdsk /F /R
- Type the Y key and press Enter to run the CHKDSK utility the next time you restart. Close the command prompt and restart your computer.
- After running CHKDSK, try to run System Restore again.
Delete the DefaultUser0 Account
If this issue occurs on a Windows 10 computer, the backup process is likely to fail due to a known error that results in creating a ghost account (defaultuser0) that Windows continues to try to insert even if it is not. The east no longer exists. This is all the more likely if the error logs contain a reference like this:
Backup encountered a problem while backing up file C:\Users\defaultuser0\Contacts. Error:( STATUS_WAIT_2
If this scenario is true, you should be able to fully resolve the problem by following a series of instructions that will guide you through the process of deleting your DefaultUser0 account. Here’s what you need to do:
- Press the Windows Key + R to open a Run dialog box. Then type “msconfig” in the Run box and press Enter to open the startup options screen.
- When you are on the Startup Options screen, select the Startup tab and select the Safe Startup checkbox (under Startup Options). Then set the associated switch to Minimum and click Apply to save the changes.
- Restart your computer and wait for the operating system to restart in safe mode.
- After the computer restarts, press the Windows key + R to open another Run dialog box. Then type “control” in the text box and press Enter to open the classic control panel interface.
- In the Classic Control Panel user interface, use the search function in the upper right corner to search for “User Accounts” and press Enter to view the results.
- In the result list, click Remove user account (under User account).
- When prompted by the User Account Control (UAC) prompt, click Yes to grant administrator privileges.
- In the Manage Account window, click the DefaultUser0 account to select it, and then click Remove Account on the next menu.
- When asked if you want to keep or delete DefaultUser0’s files, click Delete Files.
- At the final confirmation request, click Remove Account to confirm the process.
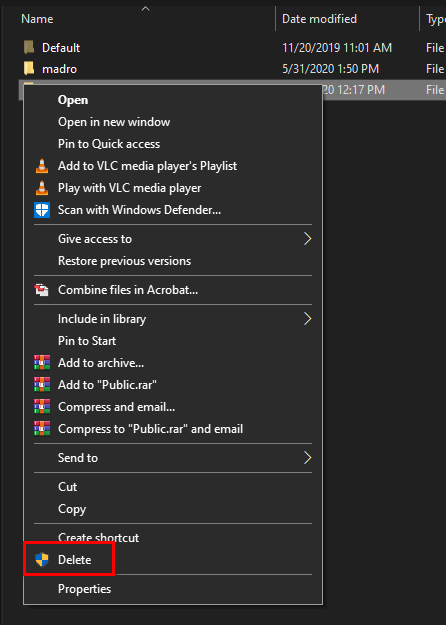
- Then open File Explorer (My Computer) and go to C: \ Users to see if the DefaultUser0 folder still exists. If so, right click on it and choose Remove to delete it.
- After deleting this folder, close the File Explorer (My Computer) window and open another Run field (Windows key + R). In the Run dialog box, type “regedit” and press Enter to open the Registry Editor. Under User Account Control, click Yes to grant administrator access.
- If you are in Registry Editor, navigate to the following location in the section on the left:
- Computer \ HKEY_LOCAL_MACHINE \ SOFTWARE \ Microsoft \ Windows NT \ CurrentVersion \ ProfileList
- Note: You can navigate manually or insert the location directly into the navigation bar to jump immediately.
- When you get to the right place, select the subkey that starts with S-1-5-21 and then go to the field on the right.
- After selecting the appropriate subkey, go to the right section and double-click ProfileImagepath. If this path points to C: \ Users \ DefaultUser0, change it to point to the main profile you are using.
- Close the registry editor, restart your computer and try again with System Restore. Check if the problem has been resolved.
https://answers.microsoft.com/en-us/windows/forum/all/statuswait2-0x80070002-error-running-windows/a62e12f9-e96b-4041-abc7-c24336f5376a
RECOMMENATION: Click here for help with Windows errors.
- The “STATUS_WAIT_2″ error occurs when some Windows users try to back up their system image using system restore.
- In some cases, this error is accompanied by error code 0x80070002.
- This problem is reported in Windows 7, Windows 8.1, and Windows 10.
- It turns out that several different causes can cause the error.
Welcome to this informative article where we delve into the perplexing realm of troubleshooting and fixing the notorious System Restore Error 0x80070002 STATUS_WAIT_2. Discover the solutions to overcome this challenging obstacle that may hinder your system’s restoration process.
Understanding the System Restore Error Code “STATUS_WAIT_2”
If you’re encountering the System Restore Error Code “STATUS_WAIT_2” (0x80070002) while trying to troubleshoot and fix system restore errors, there are a few steps you can take to resolve the issue.
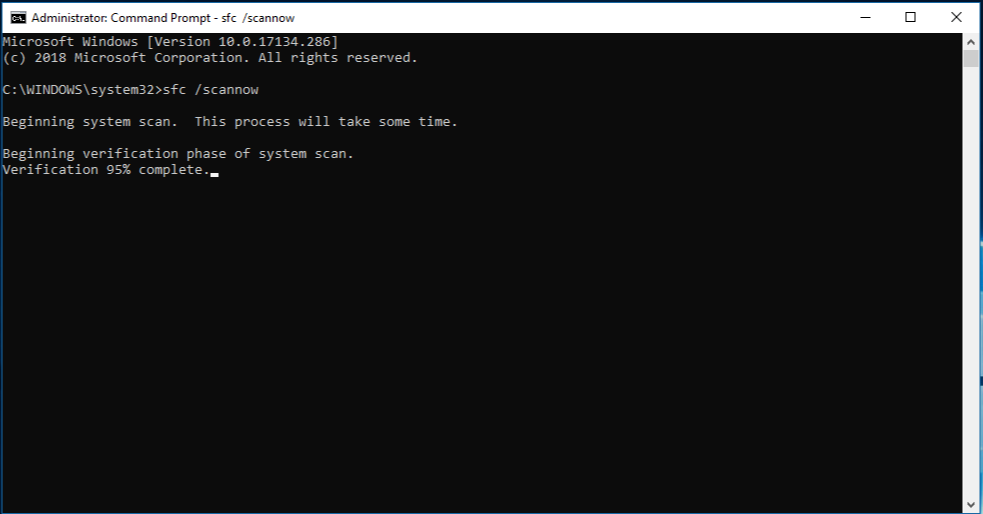
First, try running the System File Checker (SFC) utility to scan for and repair any corrupted system files. Open a command prompt as an administrator and type “sfc /scannow“. This will scan your computer for any corrupt files and attempt to fix them.
If the SFC utility doesn’t resolve the issue, you can try using the Deployment Image Servicing and Management (DISM) tool. Open a command prompt as an administrator and type “dism /online /cleanup-image /restorehealth“. This will scan and repair any issues with the Windows operating system.
If the error persists, you can try booting your computer into safe mode and running the System Restore utility from there. To enter safe mode, restart your computer and repeatedly press the F8 key until the Advanced Boot Options menu appears. Select “Safe Mode” and then try running System Restore again.
If you’re encountering the System Restore Error Code “STATUS_WAIT_2” (0x80070002) on your Windows operating system, here are some steps to troubleshoot and fix the issue:
1. Check for OS corruption: Run the System File Checker utility to scan and repair any corrupted system files. Open Command Prompt as an administrator and type “sfc /scannow“.
2. Verify system image backup: Ensure that the system image backup is located on a separate volume or partition from the system disk. If not, move it to a different location.
3. Check disk for errors: Use the CHKDSK utility to scan and fix any disk errors. Open Command Prompt as an administrator and type “chkdsk C: /f /r“.
4. Install required updates: Make sure you have the latest Windows updates installed. Check for KB2919355 and install it if missing.
5. Try a different restore point: If the error persists, try using a different restore point to perform the system restore.
By following these steps, you should be able to troubleshoot and fix the System Restore Error Code “STATUS_WAIT_2” (0x80070002) on your Windows operating system. For more detailed instructions, refer to the article linked below.
[Link: Troubleshoot and Fix System Restore Error 0x80070002 STATUS_WAIT_2]
Steps to Resolve the System Restore Error Code “STATUS_WAIT_2”
- Open the Run dialog box by pressing Windows key + R.
- Type services.msc and press Enter to open the Services window.
- Scroll down and locate the System Restore Service in the list.
- Right-click on the service and select Restart.
- Wait for the service to restart and then close the Services window.
Repair Method 2: Check Available Disk Space
- Press Windows key + E to open File Explorer.
- Right-click on the C: drive and select Properties.
- Check the Available disk space and ensure it is sufficient for System Restore to function.
- If the disk space is low, delete unnecessary files or move them to an external storage device.
- Close the Properties window.
Repair Method 3: Run System File Checker
- Open the Command Prompt as an administrator by typing cmd in the Windows search bar, right-clicking on Command Prompt, and selecting Run as administrator.
- In the Command Prompt window, type sfc /scannow and press Enter.
- Wait for the System File Checker to scan and repair any corrupted system files.
- Once the scan is complete, restart your computer.
Repair Method 4: Disable Antivirus Software
- Open the Settings of your antivirus software.
- Locate the option to disable the antivirus temporarily.
- Select the option to disable the antivirus.
- Confirm the action and close the antivirus settings.
- Attempt to perform the System Restore again.
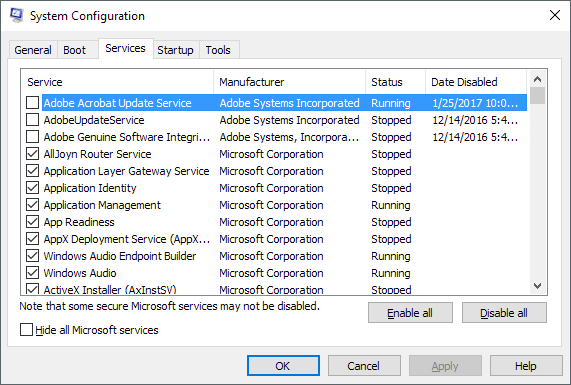
Repair Method 5: Perform a Clean Boot
- Press Windows key + R to open the Run dialog box.
- Type msconfig and press Enter to open the System Configuration window.
- In the System Configuration window, go to the Services tab.
- Check the box that says “Hide all Microsoft services.”
- Click on the Disable all button.
- Go to the Startup tab and click on Open Task Manager.
- In the Task Manager window, disable all the startup items by right-clicking on each one and selecting Disable.
- Close the Task Manager and go back to the System Configuration window.
- Click on OK and restart your computer.

Frequently Asked Questions about the System Restore Error Code “STATUS_WAIT_2”
| Question | Answer |
|---|---|
| What is the System Restore Error Code “STATUS_WAIT_2”? | The System Restore Error Code “STATUS_WAIT_2” (also known as error code 0x80070002) is an error that occurs when the System Restore utility fails to restore the computer to a previous restore point. It indicates that the system was unable to find the specified file or directory during the restore process. |
| What are the common causes of the System Restore Error Code “STATUS_WAIT_2”? | The common causes of the System Restore Error Code “STATUS_WAIT_2” include:
|
| How can I troubleshoot and fix the System Restore Error Code “STATUS_WAIT_2”? | To troubleshoot and fix the System Restore Error Code “STATUS_WAIT_2”, you can try the following solutions:
If none of these solutions work, you may need to perform a clean installation of Windows or seek assistance from a professional technician. |
| Can I prevent the System Restore Error Code “STATUS_WAIT_2” from occurring? | While it is not always possible to prevent the System Restore Error Code “STATUS_WAIT_2” from occurring, you can minimize the chances of encountering this error by regularly maintaining your computer. This includes keeping your system and software up to date, running regular antivirus scans, and regularly cleaning up unnecessary files and programs. |

Mark Ginter
Mark Ginter is a tech blogger with a passion for all things gadgets and gizmos. A self-proclaimed «geek», Mark has been blogging about technology for over 15 years. His blog, techquack.com, covers a wide range of topics including new product releases, industry news, and tips and tricks for getting the most out of your devices. If you’re looking for someone who can keep you up-to-date with all the latest tech news and developments, then be sure to follow him over at Microsoft.