Estimated reading time: 2 min
Introduction
In this tutorial, we will learn to configure a static IP address on Windows Server 2019. It may be possible that your Windows Server Ethernet adapter is configured to obtain an IP address from a DHCP server. In some networks, there may not be a DHCP server running on the network, hence the need for assigning a static IP arises. In this tutorial, we will learn how to configure static IPv4 and IPv6 address on a Windows Server 2019.
Prerequisites
- Cloud VPS or Dedicated Server with Windows Server 2019 installed.
- You must be logged in via Remote Desktop Protocol as an administrative user.
Step 1: Log in to Windows using RDP
To follow this tutorial, you need to connect to your Windows Server using RDP. You can follow these tutorials for the same.
- How to connect to your server via RDP on Windows 10
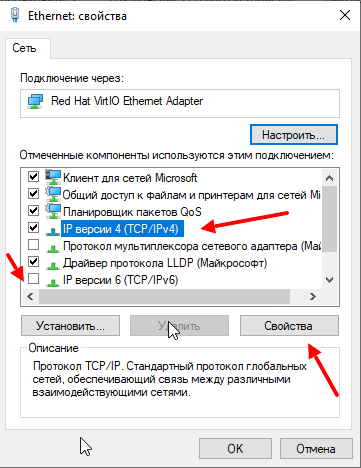
Step 2: Open Ethernet Adapter Properties
To open your Ethernet Adapter Setting, click on Control Panel in the Windows start menu. Under Control Panel, click Network and Internet and then click on Network and Sharing Center.
Under Network and Sharing Center click on Change Adapter Settings on left side pane. It will open the list of attached network adapters on your system.
On Ethernet, make a right click and click on Properties to open settings for that particular adapter.
Step 3: Find the Static IP of Your Server
Snel customers can find the IP address attached to their server by going to My.snel.com client area for the VPS or Dedicated Server. Click on Network tab >> Interfaces.
It will show you both the IPv4 and IPv6 address of interfaces attached to your server.
In the above screenshot note down the following as we will need it in Step #4 of the tutorial.
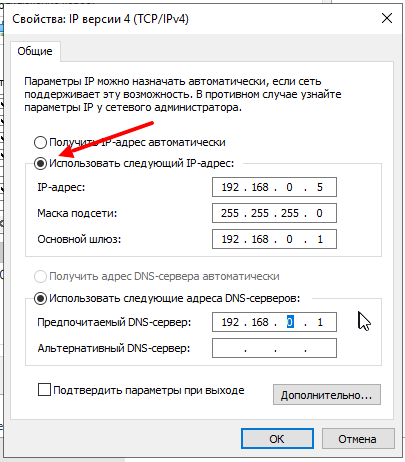
Number 1 is the IP address of the interface. In the above example, the example IPv4 address is 192.168.0.2. The subnet mask would be 255.255.255.0 and the default gateway would be 192.168.0.1.
Number 2 is the first DNS resolver server and similarly, number 3 is the second DNS resolver server.
If you are unsure about these values, feel free to contact our support team.
Step 4: Configure Static IPv4 Address
Under Properties for the Ethernet adapter, click once on Internet Protocol Version 4 (TCP/IPv4) to select this option. Now, click on properties to open IPv4 configuration.
Now, select the radio button saying Use the following IP address and put the IP address we noted down in Step #3 of the tutorial.
Similarly, also select the radio button Use the following DNS server addresses and put the address of the DNS resolver servers we obtained from Step #3.
Once done, click OK button to save the configuration.
Step 5: Obtain IPv6 Address
Snel customers can find the IPv6 address attached to their server by going to Snel control panel for the VPS or Dedicated Server. Click on Network tab >> Interfaces.
It will show you both the IPv4 and IPv6 address of interfaces attached to your server.
In the above screenshot note down the following as we will need it in Step #6 of the tutorial.
Number 1 is the IPv6 address of the interface. In the above example, the example IPv6 address is fc00:1234:abcd:12ab::236. The subnet mask length would be 48 and default gateway would be fc00:1234:abcd::1.
Number 2 is the first IPv6 DNS resolver server and similarly, number 3 is the second IPv6 DNS resolver server.
If you are unsure about these values, feel free to contact Snel Support.
Step 6: Configure Static IPv6 Address
Under Properties for the Ethernet adapter, click once on Internet Protocol Version 6 (TCP/IPv6) to select this option. Now, click on properties to open IPv6 configuration.
Under IPv6 configuration, select the radio button saying Use the following IPv6 address and put the IP address we noted down in Step #5 of the tutorial.
Similarly, also select the radio button Use the following DNS server addresses and put the address of the DNS resolver servers we obtained from Step #5.
Conclusion
In this tutorial, we looked at how to configure static IPv4 on Windows Server 2019. We looked at how to obtain the IP address assigned to the Snel Server. We also learned to configure static IPv6 on a Windows Server 2019.
Настройка сети на Windows Server 2019 является важной операцией. Без настроенной сети вы не сможете ни обновить ни активировать ваш сервер.
Ранее я уже писал о том как установить Windows Server 2019. После установки обычно первым делом устанавливают вне необходимые драйвера, которые зависят от используемого железа или способа виртуализации. А вторым шагом настраивают сеть.
На сервере обычно используется статический IP адрес. Но, по умолчанию, после установки системы сетевые интерфейсы пытаются получить IP адреса по dhcp. Сейчас я покажу как установить статический IP адрес на сетевой интерфейс вашего Windows сервера:
В меню «Пуск» переходим в «Параметры«:
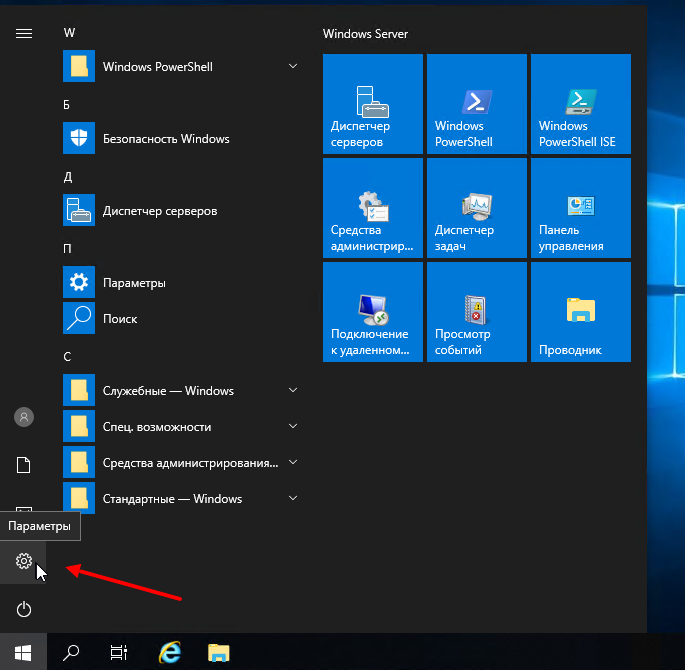
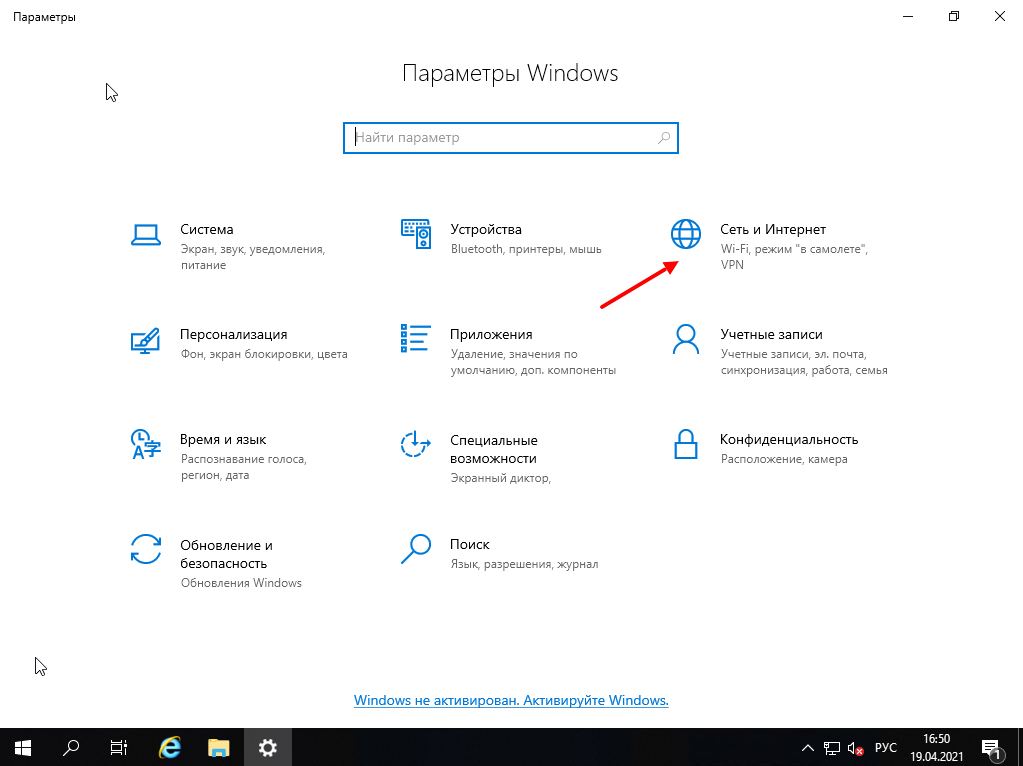
В настоящее время программисты из Microsoft пытаются перенести все элементы управления из старой «Панели управления» в новую панель под названием «Параметры Windows«. Дальше в открывшемся окне выбираем «Сеть и Интернет«:
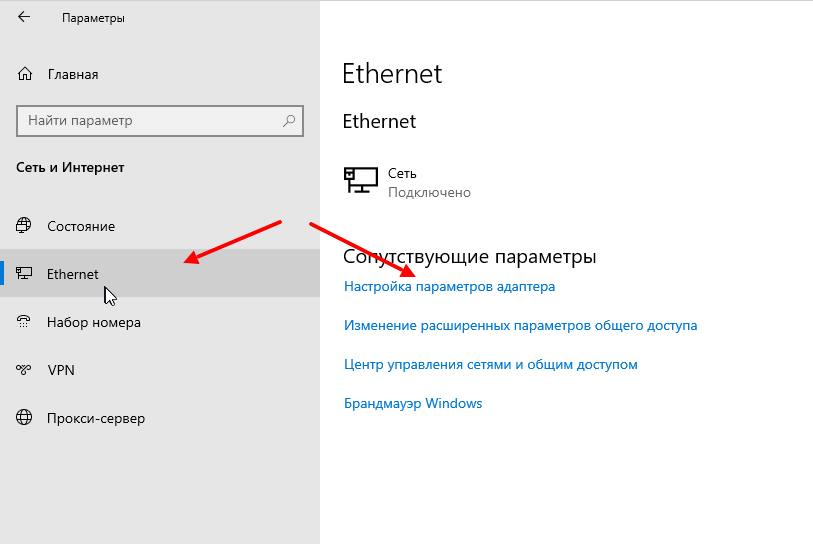
В следующим окне с лева выбираем «Ethernet«, а справа «Настройка параметров адаптера«:
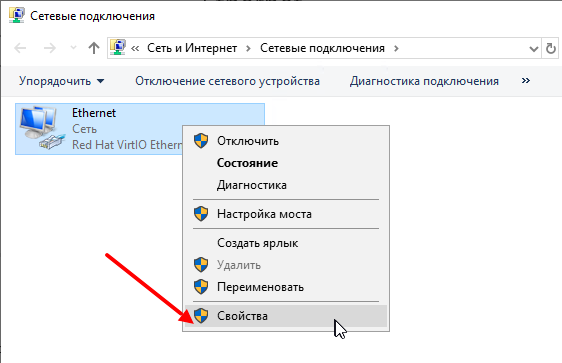
Кликаем правой кнопкой мыши по адаптеру и выбираем пункт меню «Свойства«:
Дальше выделяем компонент «IP версии 4 (TCP/IP)«. Дополнительно, ещё я отключаю «IP версии 6 (TCP/IPv4)«:
В следующем окне переключаемся на «Использовать следующий IP-адрес» и вводим необходимый адрес, не забываем указать маску, шлюз и адрес DNS сервера:
После чего остаётся нажать кнопку «ОК» и закрыть оставшиеся окна.
Сводка

Имя статьи
Настройка сети Windows Server 2019
Описание
Настройка сети на Windows Server 2019 является важной операцией. Без настроенной сети вы не сможете ни обновить ни активировать ваш сервер
Change hostname
To help better identify our windows server, I will rename mine to SN-DC1.
SN = Securitynguyen.com
DC1= Domain Controller 1
To change the hostname, we will open our command prompt and type sconfig
|
|
We are going to select 2. Then we’re presented with a prompt: Enter new computer name (Blank=Cancel): For me, I’m going to name it SN-DC1. Name it whatever you want.\
Then it will ask you to restart your computer for the setting to apply. Let’s restart the computer shall we. After, the system is restarted, let go back to sconfig and see if the changes been applied.
|
|
Look what we have here. It look like our changes have been applied.
Install DNS, DHCP.
Go to Server Manager -> Manage -> Add Roles and Features -> Keep clicking next until you hit Server Roles. Under Roles, check DHCP server, DNS server. Keep clicking next until you hit the Confirmation section. Then you will click on install.
After you installed the service, you should see DHCP and DNS on the top left of the server manager.

But we’re not done yet, we have to click on the flag symbol and click on Complete DHCP configuration. Then click done and close. Before we add the scope of the DCHP and lease it to our windows. We have to configure an active directory and promote our server to the domain controller.
Install Active Directory
Go to Add Roles and Features -> Server Roles -> Check Active Directory Domain Services -> Click install. After that is installed, you will see a yield sign on the flag. Click on it and it will ask you to “Promote this server to a domain controller”, click on it. You will see a Active Directory Domain Services Configuration Wizard.\
Check “Add a new forest” -> Name your root domain. For me, I’m going to put it as securitynguyen.com. Enter the password you want to set your active directory and click next until you see “Additionals options”, NetBIOS domain name will be your domain name. Click next and then click next again. Keep click next until you’re in the Prequisites check. Then you will have to click “install”
Then, in a short min or two, you’re machine will automatically restart.
When logging into active directory again, you will see your domainName\administrator. This mean that our domain has been set up.
As we can see from our Server Manager -> Local Server. We have the domain that we set up.

Static IP for our Windows Server 2019
We will be giving our Windows Server an static IP since we want the IP to stay the same forever. To do that, we go to server manager -> Local Server -> Then click on Ethernet0. Select the network adapter that your windows server is using -> Click Properties -> Then click on “Internet Protocol Version 4 (TCP/IPv4)” -> We will change the setting from “Obtain an IP address automatically” to “Use the following IP addresss”. Then I will fill out the form that are in the IP address field, subnet mask, and default gateway.
These are my setting, yours might be different.
IP address: 192.168.40.2
Subnet mask: 255.255.255.0
Default Gateway: 192.168.40.1 (Router IP address)
Preferred DNS server: 192.168.40.2 (Windows Server IP address)
Configure DHCP Server
Now, that we have our firewall set up. We can configure our DHCP server to give out ip addresses to the client and make sure every client is using 192.168.40.1 as the gateway.
Let’s get started.
In Server Manager, we are going click Tools. Then DHCP. The DHCP menu pop up. Now, we’re going to expand our server icon and right-click on IPv4. Afterwards, I’ll click on New Scope. Now, the new scope wizard pop up.

Click “Next”. Then it will ask us to enter a name and description for our scope. I’m going name mine “SecurityNguyen” and press Next. Now the fun stuff, It will ask us about the IP Address Range. This is the range that it will lease the IP address. Since 192.168.40.1 is already taken by the firewall, and 192.168.40.2 is already taken by the Windows Server. I am going start my IP address on 192.168.40.3 to 192.168.40.254

Then, it will ask us if we want to add “Exclusion or Delays”. This is essentially, what range of IP we want to exclude that won’t be distributed out. Since we don’t have any IP that we don’t want to exclude, we can move on.
Then it will ask us about “Lease Duration”, Lease duration is essentially how long will this computer hold this IP address. I’m just going keep it as default.
Then it will ask us about “Configure DHCP Options”, essentially saying while we are configuring the DHCP, do you want configure the DNS server and default gateways while we are at it? I’m going click “Yes”
Then it will ask us about “Router (Default Gateway))”, my firewall (192.168.40.1) is going be my gateway.
Then it will ask you about your Domain Name and DNS server. My DNS server is going to be my Windows Server 2019. As you can see it already added IP address of my Windows Server 2019 as the DNS. I’m just going click Next.
Then it will ask you about WINS servers, I’m not going use that service so I’m going skip it.
Then it will ask you to Activate Scope. I’m going select Yes, I want to activate this scope now then click Finish

We just created our scope! Now our DHCP server will start leasing IP address to computer within our network.\
Now, we are done configuring our DHCP server. It time to create some windows machine and make them domain join. I’ll cover that in later post.
Update: The start of my new DHCP is going to be 192.168.40.4 to 192.168.40.254.
192.168.40.3 will be IP of security onion.
• 1 min read
Set a static IP as usual:
To set a static IP address in Windows 7, 8, and 10:
- Click Start Menu > Control Panel > Network and Sharing Center or Network and Internet > Network and Sharing Center.
- Click Change adapter settings.
- Right-click on Wi-Fi or Local Area Connection.
- Click Properties.
- Select Internet Protocol Version 4 (TCP/IPv4).
- Click Properties.
- Select Use the following IP address.
- Enter the IP address, Subnet mask, Default gateway, and DNS server.
- Click OK.
Unfortunately, Windows Server does not show our assigned static IP.
If you type, you see that a different ip (marked as preferred) is used and our static IP is a duplicate:
C:\Users\Administrator> ipconfig /all
To fix it, enter this from Command Prompt:
C:\Users\Administrator> netsh interface ipv4 show inter
result as:
Idx Met MTU State Name
— ———- ———- ———— —————————
1 50 4294967295 connected Loopback Pseudo-Interface 1
11 10 1500 connected Local Area Connection
11: <=Keep it in mind
Next run this command:
C:\Users\Administrator>netsh interface ipv4 set interface 11 dadtransmits=0 store=persistent
Next, enter
Run > services.msc > disable DHCP Client service
Final, restart your server.
Source:
https://kb.netgear.com/27476/How-do-I-set-a-static-IP-address-in-Windows
https://social.technet.microsoft.com/Forums/ie/en-US/3e26affd-bb91-460a-b5fa-c7c0496c927c/how-to-disable-autoconfiguration-ipv4-?forum=winserverNIS
How to disable IP autoconfiguration in Core server
If you add a static IP in a core server, you may see that the auto configuration is on and giving a 169.0.0.0 number as the preferred address and the new static IP as the duplicate address. This will not work. When using a Core server, use the following steps to fix the issue.
![]() HomeSpiceworks, Inc.
HomeSpiceworks, Inc.

Предположим, что у нас уже установлена операционная система Windows Server 2019. Рассмотрим базовую настройку.
Минимальные требования:
- 64-разрядный процессор с тактовой частотой 1,4 ГГц;
- ОЗУ 512 МБ (2 ГБ для варианта установки «Сервер с рабочим столом»);
- диск 32 ГБ;
- доступ к Интернет.
Первоначальные настройки Windows Server 2019 можно разделить на несколько пунктов:
- Создание новой учетной записи Администратора.
- Настройка статического IP-адреса сервера.
- Проверка правильности настройки времени и часового пояса.
- Установка всех обновлений системы.
- Задать понятное имя для сервера и, при необходимости, ввести его в домен.
- Активировать лицензию Windows Server 2019.
- Настроить основные параметры безопасности.
Создание новой учетной записи Администратора
Первым шагом будет создание новой учетной записи администратора. Сервер может быть подвергнут атакам, т.к. предполагается, что вы используете “Администратор” в качестве основной учетной записи администратора. Поэтому создадим новую учетную запись и выдадим ей права администратора.
Нажимаем сочетание клавиш WIN+R, чтобы у вас открылось окно Выполнить, в котором для вызова панели Управление компьютером, вам нужно написать:
Затем на вкладке “Локальные пользователи и группы” переходим в “Пользователи” и по клику правой кнопки мыши в основном окне выбираем пункт “Новый пользователь”. После создаем пользователя, задаем ему пароль и выдаем права Администратора. Затем выходим из учетной записи “Администратор” и заходим в свою новую учетную запись.
Повторите все описанные действия выше до момента создания нового пользователя, отключите базовую учетную запись “Администратор” в целях безопасности сервера, так как вы будете выполнять остальные действия по настройке под учетной записью нового администратора.
Настройка статического IP-адреса сервера
Серверы должны иметь фиксированные IP-адреса. Это требование для многих служб (Active Directory,DNS,DHCP).
Нажимаем сочетание клавиш WIN+R, чтобы у вас открылось окно выполнить, в котором для вызова сетевых настроек, вам нужно написать:
У вас появится окно «сетевые подключения» со списком доступных вам сетевых адаптеров. Щелкните по нужному левой кнопкой мыши дважды.
В окне “Состояние” выберите Свойства -> IP версии 4(TCP/IP) -> Использовать следующий IP-адрес -> Введите данные статического адреса -> Нажмите “Ок”.
Настройка времени и часового пояса
В целях безопасности, таких как правильная работа двухфакторной аутентификации и правильной работы журналов, служб, отдельных программ на Windows Server 2019 — нужно, чтобы время на всех серверах совпадало и было верным по часовому поясу. Иначе неправильное системное время будет отражено во всех программах, где время является критически важным показателем.
Для настройки времени и часового пояса нажмите на: Пуск -> Параметры -> Время и язык.
Установка обновлений
Обновление Windows Server является обязательной ежемесячной рутиной, которая устраняет дыры в безопасности и исправляет неправильно работающие на сервере службы, программное обеспечение. Но, обновляя сервер на последние не протестированные патчи, будьте предельно внимательны, читайте отзывы. Для первоначальной настройки сервера, установить обновления нужно обязательно. Установите обновления Windows: Пуск -> Параметры -> Обновление и безопасность.
В нижней части экрана Центра обновления Windows есть опция “Изменить период активности”. Установите этот параметр, иначе вы станете свидетелем перезагрузки вашего рабочего сервера в рабочее время.
Настройка имени сервера и ввод в домен
Сервер настраивается для определенных целей, ему нужно имя, по которому можно будет проще понимать что это за сервер, отследить его статистику в сетевых подключениях, подключиться к нему, настроить службы и т.д. Меняем имя сервера и его описание (если нужно), вводим в домен.
Нажимаем сочетание клавиш WIN+R, чтобы у вас открылось окно Выполнить, в котором вам нужно написать:
В окне Панель управления -> Система и безопасность -> Система.
Переходим в свойства системы -> Изменить параметры -> Изменить. Задаем «Имя компьютера», и если нужно, то имя домена. После изменения параметров нужно перезагрузиться.
Активация лицензии
Без активированной лицензии, после того как закончится пробный период пользования, сервер будет перезагружаться каждые 30 минут, чтобы этого не происходило, нужно обязательно активировать сервер для дальнейшей его эксплуатации. Для активации операционной системы нужно: Пуск -> Параметры -> Обновление и безопасность -> Активация -> Изменить ключ продукта. Введите ключ продукта от Windows Server 2019.
Основные параметры безопасности
Как правило, необходимые параметры безопасности связаны с защитой сети, поэтому Брандмауэр Windows должен быть включен, узнайте какие порты нужны вашим службам для работы, настройте его соответствующим образом, но не выключайте брандмауэр.
Дальнейшая настройка заключается в настройке локальной политики безопасности сервера.
Нажимаем сочетание клавиш WIN+R, чтобы у вас открылось окно Выполнить, в котором для вызова панели локальной политики безопасности, вам нужно написать:
В локальной политике безопасности мы установим несколько параметров в разделе Политики учетных записей и Локальные политики. Политика первой учетной записи -> Политика паролей. Установим минимальный срок действия пароля равным 0 (нулю) дней, а минимальную длину пароля — 12 символов.
Политика учетных записей -> Политика Блокировки Учетной Записи -> Порог блокировки учетной записи -> 3 недопустимые попытки входа в систему. Продолжительность блокировки учетной записи и сброса блокировки учетной записи установлена на 30 минут. Если кто-то попытается принудительно ввести ваш пароль Windows Server, то после трех промахов, этот IP-адрес не сможет войти в систему в течение 30 минут.
Перейдем к следующему Локальные политики -> Политика Аудита. Здесь мы установим параметры ведения журнала. У каждого из вариантов, которые установлены, есть карточка с описанием, которую вы можете увидеть для получения более подробной информации.

Рисунок 1 — Политика аудита
Нужна помощь? Настройки Windows Server и обслуживание серверов мы осуществляем в рамках услуги ИТ-аутсорсинг. Также возможны разовые проектные работы.