Содержание
- Исправляем ошибку «Startup Repair Offline»
- Способ 1: Сброс настроек BIOS
- Способ 2: Подключение шлейфов
- Способ 3: Восстановление запуска
- Способ 4: «Командная строка»
- Заключение
- Вопросы и ответы
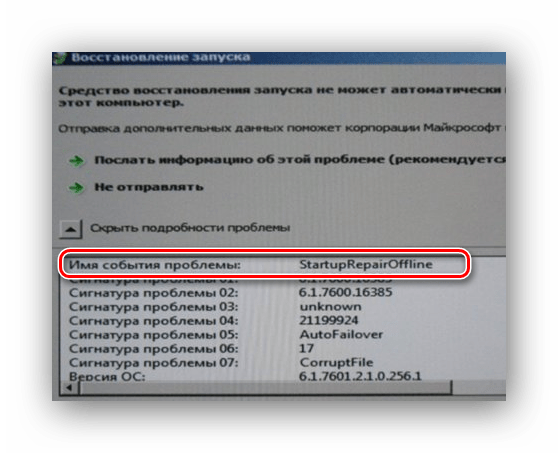
Запуская свой компьютер, юзер может наблюдать ошибки, связанные с загрузкой операционной системы. Виндовс 7 предпримет попытку по восстановлению работы, но она может оказаться безуспешной, и Вы увидите сообщение о том, что невозможно выполнить решение этой проблемы, а также есть необходимость отправить информацию о неисправности в Microsoft. Нажав на вкладку «Показать подробности» отобразится имя данной ошибки – «Startup Repair Offline». В этой статье мы рассмотрим, как нейтрализовать эту ошибку.
Исправляем ошибку «Startup Repair Offline»
Буквально данная неисправность означает – «восстановление запуска не в сети». После перезапуска компьютера, система предприняла попытку по восстановлению работы (не подключаясь к сети), но попытка оказалась неудачной.
Неисправность «Startup Repair Offline» зачастую появляется из-за проблем с жестким диском, а именно из-за повреждения сектора, на котором находятся системные данные, отвечающие за правильный запуск Windows 7. Также возможны проблемы с поврежденными разделами реестра системы. Перейдем к способам исправления этой неполадки.
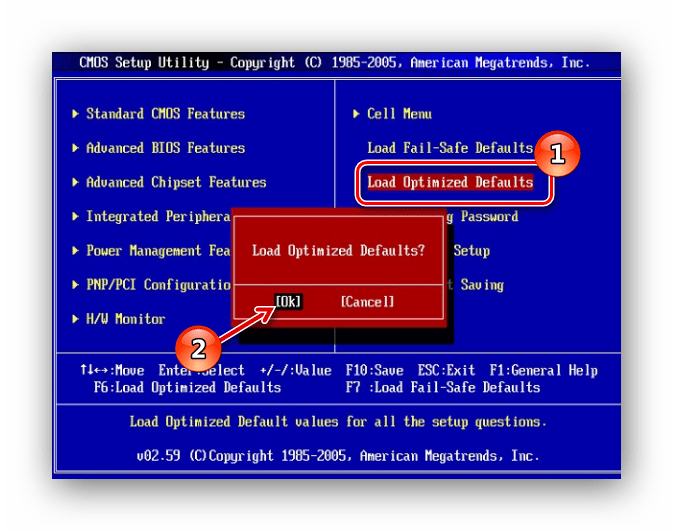
Способ 1: Сброс настроек BIOS
Переходим в БИОС (при помощи клавиш F2 или Del при загрузке компьютера). Производим загрузку настроек по умолчанию (пункт «Load optimized defaults»). Сохраняем сделанные изменения (нажав клавишу F10) и перезапускаем Виндовс.
Подробнее: Сбрасываем настройки BIOS
Способ 2: Подключение шлейфов
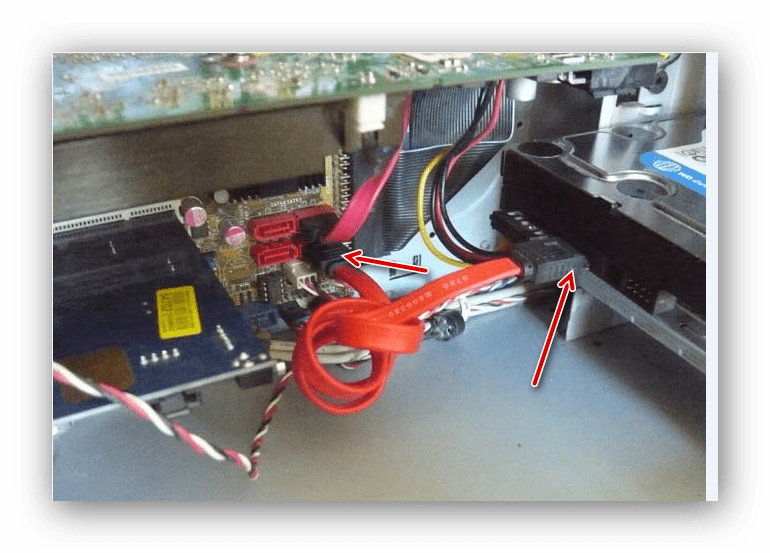
Необходимо произвести проверку целостности разъемов и плотность подключения шлейфов жесткого диска и материнской платы. Убедитесь, что все контакты подключены качественно и плотно. После проверки перезапускаем систему и проверяем на наличие неисправности.
Способ 3: Восстановление запуска
Так как обычный запуск операционной системы невозможен, рекомендуем воспользоваться загрузочным диском или флешкой с системой, которая является идентичной установленной.
Урок: Инструкция по созданию загрузочной флешки на Windows
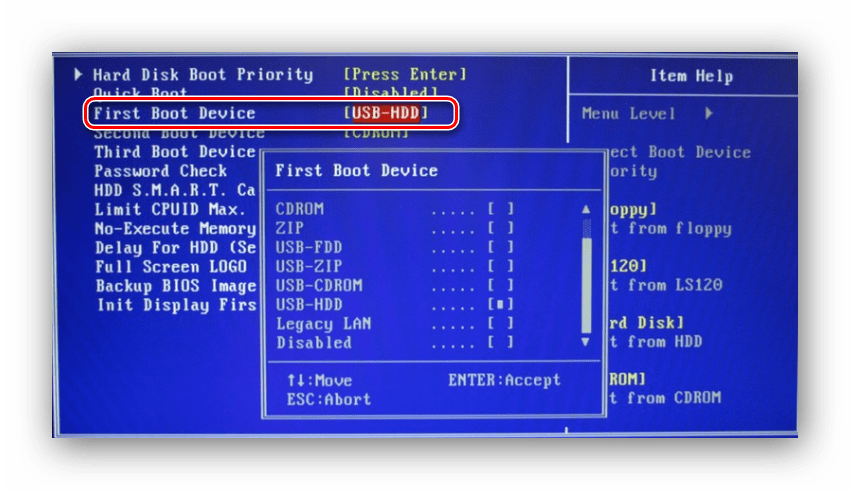
- Выполняем запуск с загрузочной флешки или диска. В БИОСе устанавливаем опцию запуска с диска или флеш-накопителя (устанавливаем в пункте «First Boot Device USB-HDD» параметр «USB-HDD«). Как это сделать на различных версиях BIOS, подробно описано в уроке, который представлен ниже.
Урок: Настраиваем BIOS для загрузки с флешки
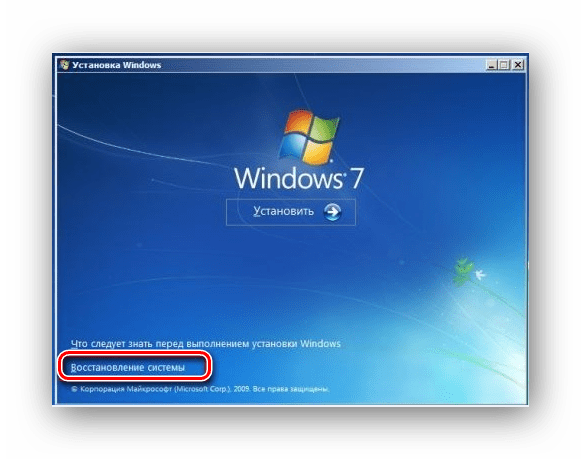
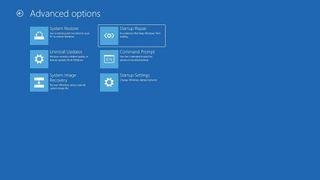
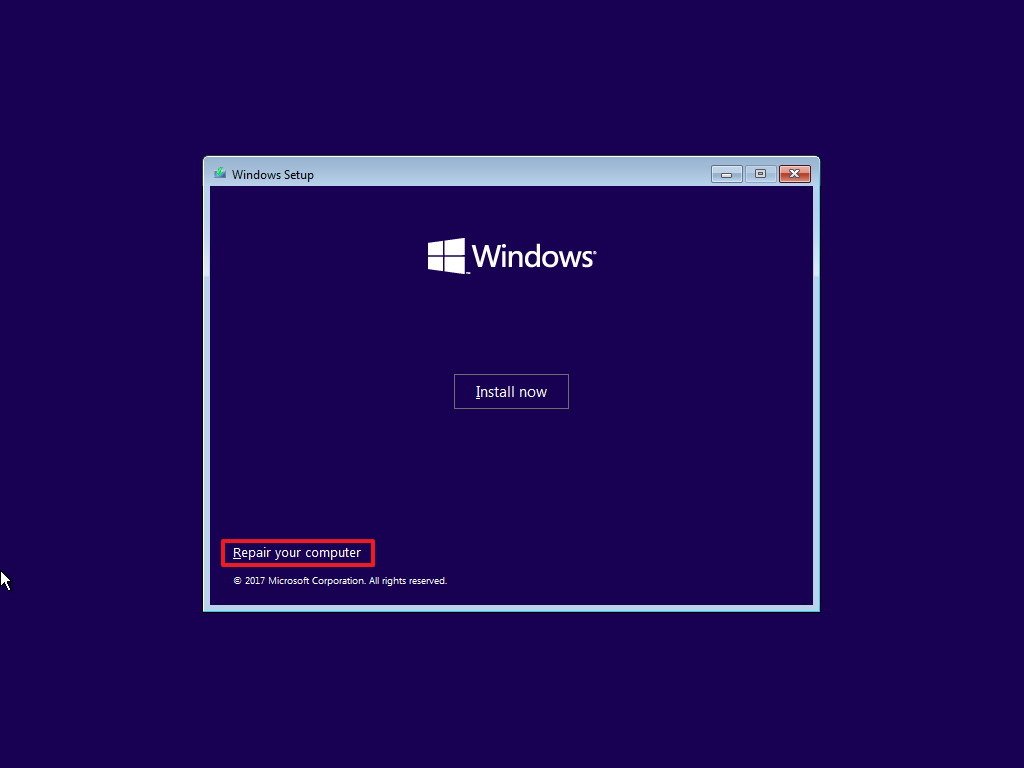
- В установочном интерфейсе выбираем язык, клавиатуру и время. Жмём «Далее» и на появившемся экране кликаем на надпись «Восстановление системы» (в англ. версии Windows 7 «Repair your computer»).
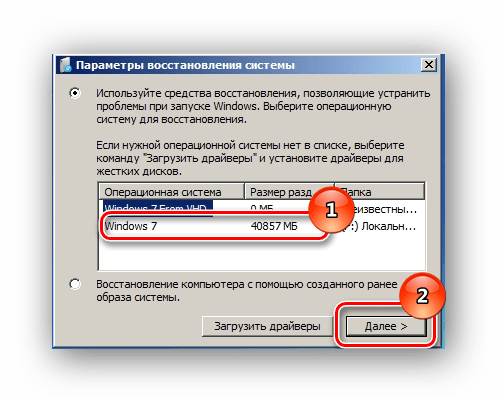
- Системой будет произведён поиск неполадок в автоматическом режиме. Жмём на кнопочку «Далее» в открывшемся окне, выбрав необходимую ОС.

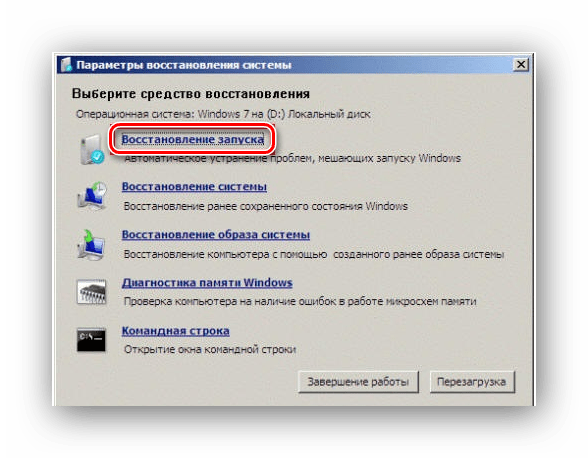
В окошке «Параметры восстановления системы» щелкаем по пункту «Восстановление запуска» и дожидаемся завершения проверочных действий и корректного запуска компьютера. После окончания проверки перезагружаем ПК.
Способ 4: «Командная строка»
Если приведенные выше способы не помогли устранить неполадку, тогда вновь запускаем систему с флешки или установочного диска.
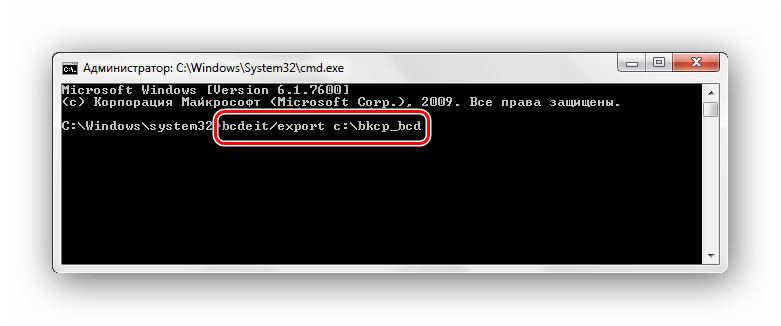
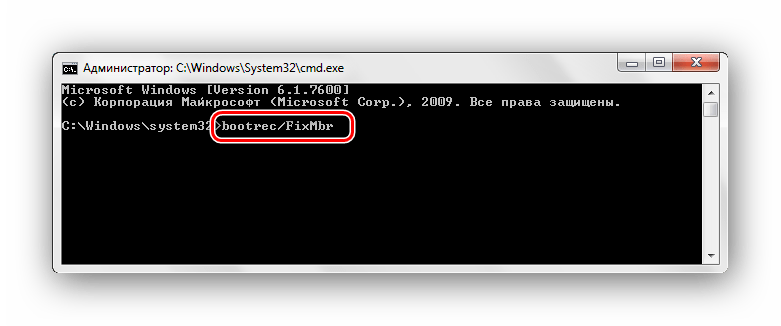
Нажимаем клавиши Shift+F10 в самом начале установочного процесса. Попадаем в меню «Командной строки», где необходимо набрать поочередно определенные команды (после ввода каждой из них нажимаем Enter).
bcdedit /export c:\bckp_bcd
attrib c:\boot\bcd -h -r –s

ren c:\boot\bcd bcd.old

bootrec /FixMbr
bootrec /FixBoot

bootrec.exe /RebuildBcd
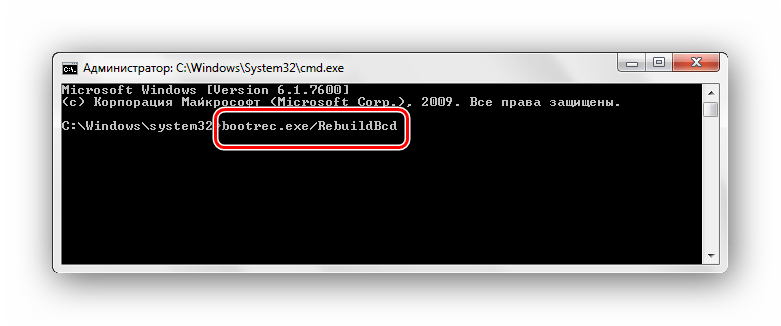
После того, как ввели все команды, перезапускаем ПК. Если Виндовс 7 не запустилась в работоспособном режиме, тогда в данных о неисправности может быть имя проблемного файла (например, библиотеки расширения .dll). Если было указано название файла, то необходимо попробовать совершить поиска данного файла в интернете и поместить его на ваш винчестер в необходимую директорию (в большинстве случаев, это папка windowds\system 32).
Подробнее: Как установить библиотеку DLL в систему Windows
Заключение
Итак, что же делать с неполадкой «Startup Repair Offline»? Самый простой и эффективный способ – это использование восстановления запуска ОС, применяя загрузочный диск или флеш-накопитель. Если способ с восстановлением системы не исправил проблему, то воспользуйтесь командной строкой. Также проверьте целостность всех соединений компьютера и настройки BIOS. Применение этих методов позволит устранить ошибку запуска Windows 7.
Еще статьи по данной теме:
Помогла ли Вам статья?
В работе операционной системы могут возникать ошибки. Некоторые из них могут нарушать работу компьютер. Но «Startup repair offline» вообще не позволит запустить Windows 7. Поэтому, необходимо разобраться с причиной и устранить ее.
При включении компьютера запускается проверка всех его компонентов на работоспособность. Также, запускается и операционная система. Если в ее работе возникают ошибки, на экране появится соответствующее уведомление. В подробностях оповещения можно узнать, какая именно неполадка помешала запуску ОС.
Startup Repair Offline переводится как Восстановление запуска оффлайн. Компьютер делает попытки восстановить работу без сетевого подключения. При этом, устройство может постоянно перезагружаться. Это не приведет ни к каким результатам, поэтому рекомендуется прервать операцию и перейти к выяснению причины ошибки.
Причины возникновения
Причин, по которой возникла ошибка «Startup Repair Offline» в Windows 7 может быть несколько. Она возникает при неправильных настройках базовой системы ввода/вывода (БИОСа). Также причина может крыться в аппаратной части компьютера.
Поэтому, рекомендуется воспользоваться несколькими способами исправления. Тогда можно убедиться, что причина была именно в этом. Если же перед возникновением ошибки пользователь совершал определенные действия, которые повлекли за собой неисправность, необходимо сразу переходить к нужному методу.
Способы исправления
Исправить ошибку с именем события «Startup Repair Offline» на компьютере можно несколькими способами, в зависимости от причины по которой она возникла. Лучше проверить несколько методов, пока один из них не сработает.
Сбрасываем БИОС
В первую очередь рекомендуется сбросить настройки БИОС. Перейти в систему ввода/вывода можно при запуске компьютера. Необходимо нажать на «F2» или «Del» в зависимости от версии. Нужные клавиши будут отображены на экране, но пользователь может их не заметить, если проверка выполняется достаточно быстро.
В БИОСе следует найти команду «Load optimized defaults». Именно она отвечает за сброс настроек. Чтобы сохранить изменения и выйти, нужно нажать на «F10». Также, как и при загрузке, нужная клавиша будет отображена в нижней части экрана.
Проверка шлейфов жесткого диска
Пользователю рекомендуется проверить непосредственно подключение жесткого диска к материнской плате. Следует убедиться, что все шлейфы подключены достаточно прочно, чтобы передавать сигнал. Можно заново подсоединить все контакты, главное запомнить, как провода располагались, чтобы не перепутать. После этого следует включить компьютер.
Восстанавливаем запуск
Для восстановления системы понадобится установочный диск или флешка. Это необходимо, так как ОС не сможет запуститься самостоятельно. Для начала, необходимо переставить в БИОСе приоритет запуска устройств на запуск с нужного накопителя.
После этого можно вставлять носитель с загруженной на нем операционной системой. После запуска следует выбрать язык и перейти к восстановлению ОС.
Данная команда проверит систему на неисправности и предложит варианты решения. Здесь необходимо выбрать «Восстановление запуска». После завершения проверки, ошибка «StartupRepairOffline» должна быть исправлена, после чего можно перезагружать компьютер.
Использование командной строки
Пользователь также может устранить неисправность через командную строку. Данный метод подразумевает наличие установочного диска или флешки, как и в предыдущем способе.
При запуске установки системы необходимо нажать на сочетание клавиш «Shift+F10». На экране появится командная строка. В ней вводятся команды в точной последовательности. После каждой следует нажать на «Enter».
После этого можно перезагружать компьютер. Если данный метод не восстановит систему, то будет указан файл, который стал причиной ошибки. Тогда, можно найти работоспособный элемент в сети и загрузить его на жесткий диск.
Quick Steps to Enter Startup Repair on Windows 10:
- 1. Go to the Settings app by pressing Win+I.
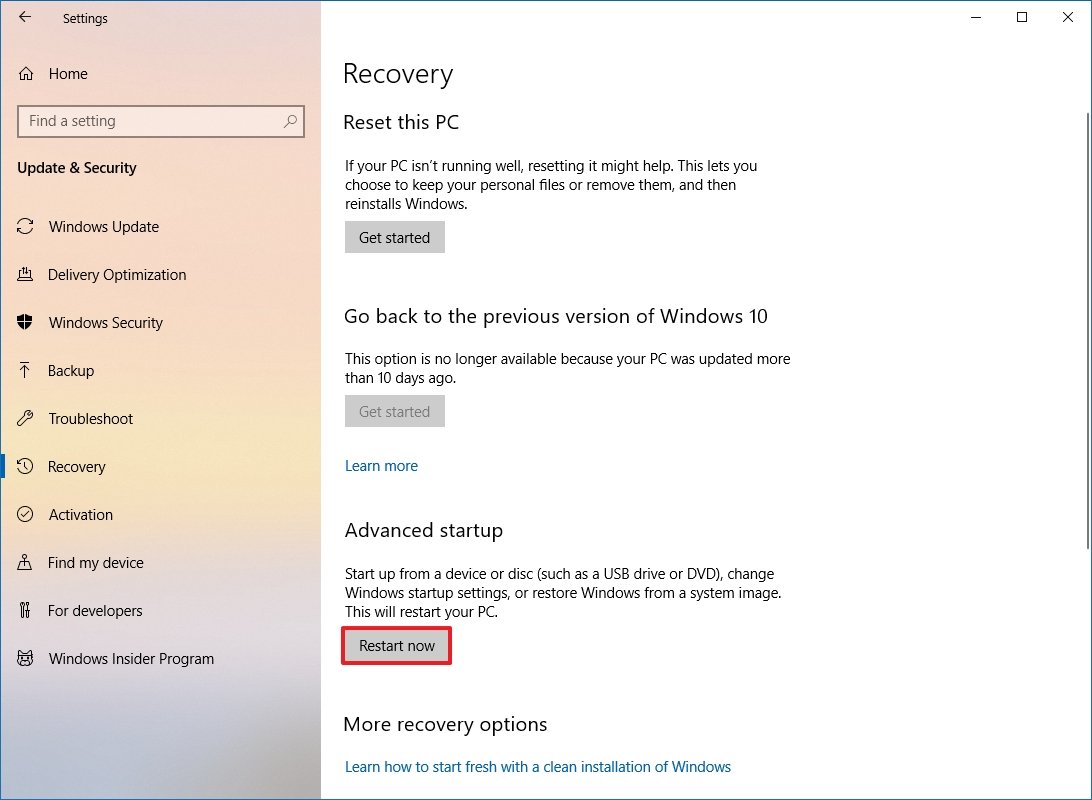
- 2. Go to Update & Security and select Recovery.
- 3. Click on Restart Now under Advanced Startup.
- 4. Click Troubleshoot > Advanced Options > Startup Repair.
When the computer detects a startup problem, the Startup Repair tool will automatically diagnose the known common problems. These diagnostics include analyzing startup log files. And this is for determining the cause of the problem.
When the Startup Repair tool determines the cause, the tool tries to fix the problem automatically. If it can’t fix the problem automatically, you can use it to diagnose more complex startup problems further and repair them. This tutorial will show you how to enter Startup Repair on Windows 10 and use the Windows 10 boot repair tool.
QUICK NAVIGATION:
- Awake Startup Repair from Settings
- Run Startup Repair from Desktop
- Run Startup Repair When You Can’t See the lock screen
- Run Startup Repair from BIOS
Way 1. Awake Startup Repair from Settings
It’s easier to enter Startup Repair if you can access the Settings app on your computer normally. If so, just follow the steps below to find and run Startup Repair on your Windows 10 computer.
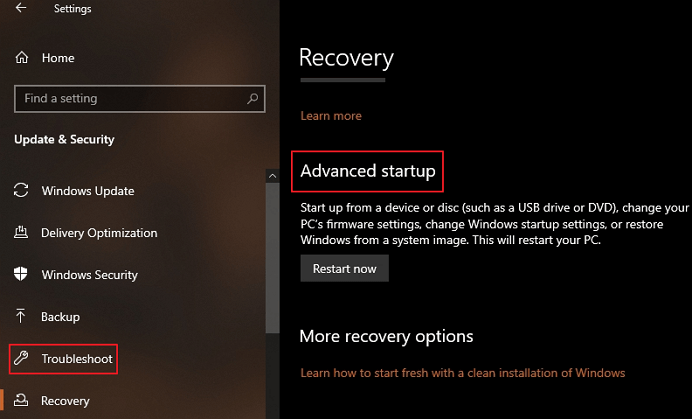
Step 1. Go to the Settings app by pressing the Win+I buttons on your keyboard.
Step 2. Go to Update & Security and then select the Recovery tab.
Step 3. Under Advanced Startup, you need to click on Restart Now.
Step 4. In the next window, go to Troubleshoot > Advanced Options > Startup Repair.
Way 2. Run Startup Repair from Desktop
Startup Repair can also be awakened easily from Windows 10 power options menu. You can access this menu from the Start menu on your desktop. Therefore, if you want to use this method to run the Startup Repair tool, you just need to follow the tutorial below.
Step 1. Click on the Start sign on your computer and click the Power button.
Step 2. Hold down the Shift key and click on Restart.
Step 3. The computer will restart and see the Troubleshoot boot menu.
Step 4. Go to Advanced Options > Startup Repair.
Way 3. Run Startup Repair When You Can’t See the lock screen
If you can see the lock screen normally, you can try the methods above. However, if you’re unable to see so much as the lock screen, what should you do? If fact, if the startup attempts failed a few times, normally, the Startup Repair should be triggered. But if it doesn’t, you can follow these steps.
Step 1. Power your system on. Before you see the Windows 10 loading screen, press the power button again to power the system off.
Step 2. Repeat this operation 3-5 times. And the Startup Repair tool should be awakened.
Step 3. After that, you will see a message saying Windows 10 failed to boot and is now running Startup Repair. And here you go.
Way 4. Run Startup Repair from BIOS
If you have tried all three methods above to enter the Startup Repair and it still fails to pop up, you need a Windows 10 installation disk. But firstly, you will need to access another working Windows 10 PC and create an installation disk. After that, you can follow these steps to run Startup Repair.
Step 1. Firstly, you need to boot to BIOS and set the first boot device to USB.
Step 2. Then, connect the installation USB to the PC you want to start.
Step 3. Power the computer on and wait for the Windows 10 installation screen to appear.
Step 4. After that, select the Windows 10 edition, language, etc.
Step 5. Lastly, click on Repair your computer to access Startup Repair.
Bonus tip. Restore Data with EaseUS Todo Backup
EaseUS Todo Backup Free is a data backup-and-restore program that can back up all your files and restore them when you need. Therefore, you can use this software to create a bootable rescue disk to help you recover your files when your computer doesn’t start normally.
Moreover, data saving is customizable with this tool. You can back up and restore data to an external hard drive or cloud storage. Dropbox, OneDrive, and Google Drive are all supported. Check more information about it below:
Main Features of EaseUS Todo Backup:
- Free Windows restore software you can use
- Support full, incremental, and differential backup modes
- Back up more than 1000 types of files
- Automatically backup data daily/weekly/yearly
- Create and restore image to a different computer
Still, have doubts? Here we give you some frequently asked questions related to this topic. Check the answers now!
1. How do I run Startup Repair in Windows 10?
We give you 4 methods to run Startup Repair in Windows 10. whether you can access your desktop normally or not, you will always find a solution in this tutorial. You can try them one by one to see if your problem solves.
2. How to repair Windows 10 from BIOS?
You can use a USB drive to do so. Firstly, make sure to set up your BIOS to boot from the USB drive. After that, click on the Repair Computer option > Troubleshoot > Advanced Options > Command Prompt to do so.
It’s just a matter of time before your device gets stuck loading or won’t start at all. Instead of spending time trying to find out the problem, Windows 10 includes the Startup Repair feature designed to quickly fix most common issues that may be preventing your computer from loading correctly.
In this Windows 10 guide, we’ll walk you through the steps to use the Startup Repair tool to fix boot problems on your device.
How to quickly repair startup problems on Windows 10
To use the Startup Repair feature to fix boot issues with Windows 10, you’ll need to access the Advanced startup settings, which you can do in at least three different ways depending on your situation.
Accessing Advanced startup when PC isn’t loading
If your device isn’t loading or stuck during boot, you can use this method to access the recovery environment:
- Turn on your PC.
- As soon as the Windows logo appears on your screen, press the power button. (This will immediately interrupt the boot sequence.)
- Repeat steps 1 and 2 two more times.
After the third interruption, Windows 10 will open into the Advanced Startup environment, and then you can continue with the steps below to use the Startup Repair tool to fix booting issues with Windows 10.
Alternatively, in the case your device isn’t starting at all, you can use a USB installation media to get to the Advanced settings environment. Here’s how:
- Start your device using a USB bootable media.
- Quick Tip: If your computer isn’t starting from the USB flash drive, you’ll need to change your system’s BIOS settings to make sure it can boot from USB. Usually, you can access the BIOS by powering up your device and pressing one of the functions, Delete, or ESC keys, but make sure to check your manufacturer’s support website for more information.
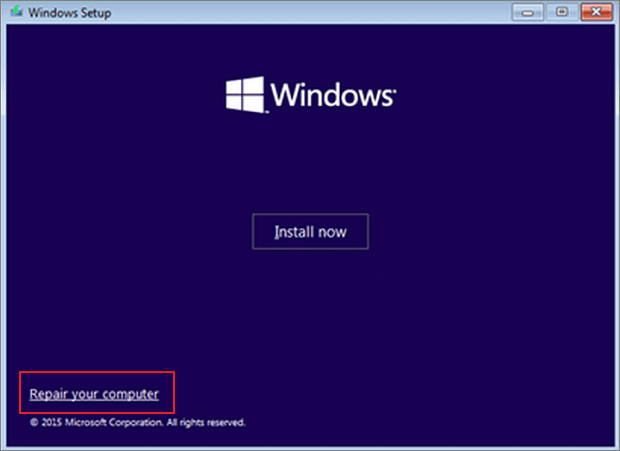
- Click Next.
- Click the Repair your computer link in the bottom-right corner.
Once you’ve completed the steps, use the steps below to continue to the Startup Repair tool.
Accessing Advanced startup when PC is loading
If you have access to the desktop, you can use these steps to access the recovery environment to use the Startup Repair tool:
- Open Settings.
- Click on Update & Security.
- Click on Recovery.
- Under the «Advanced startup» section, click the Restart now button.
After completing the steps, you can now continue with the steps below to fix loading problems with your device using the automatic repair feature.
Using Startup Repair to fix loading problems
While in the Advanced startup environment, use the following steps to use Startup Repair:
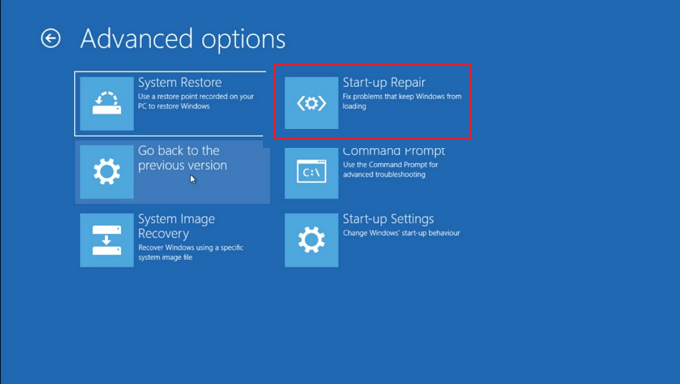
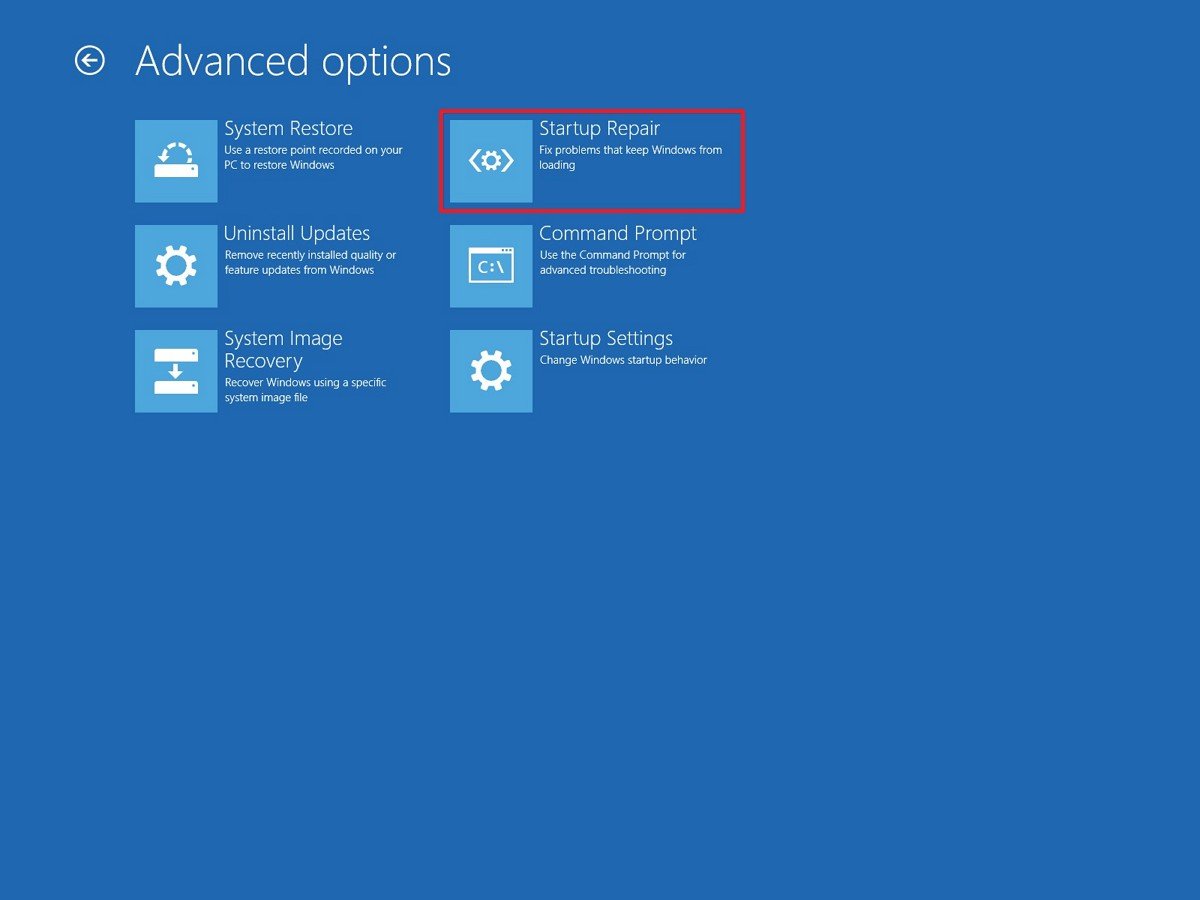
- Click the Troubleshoot button.
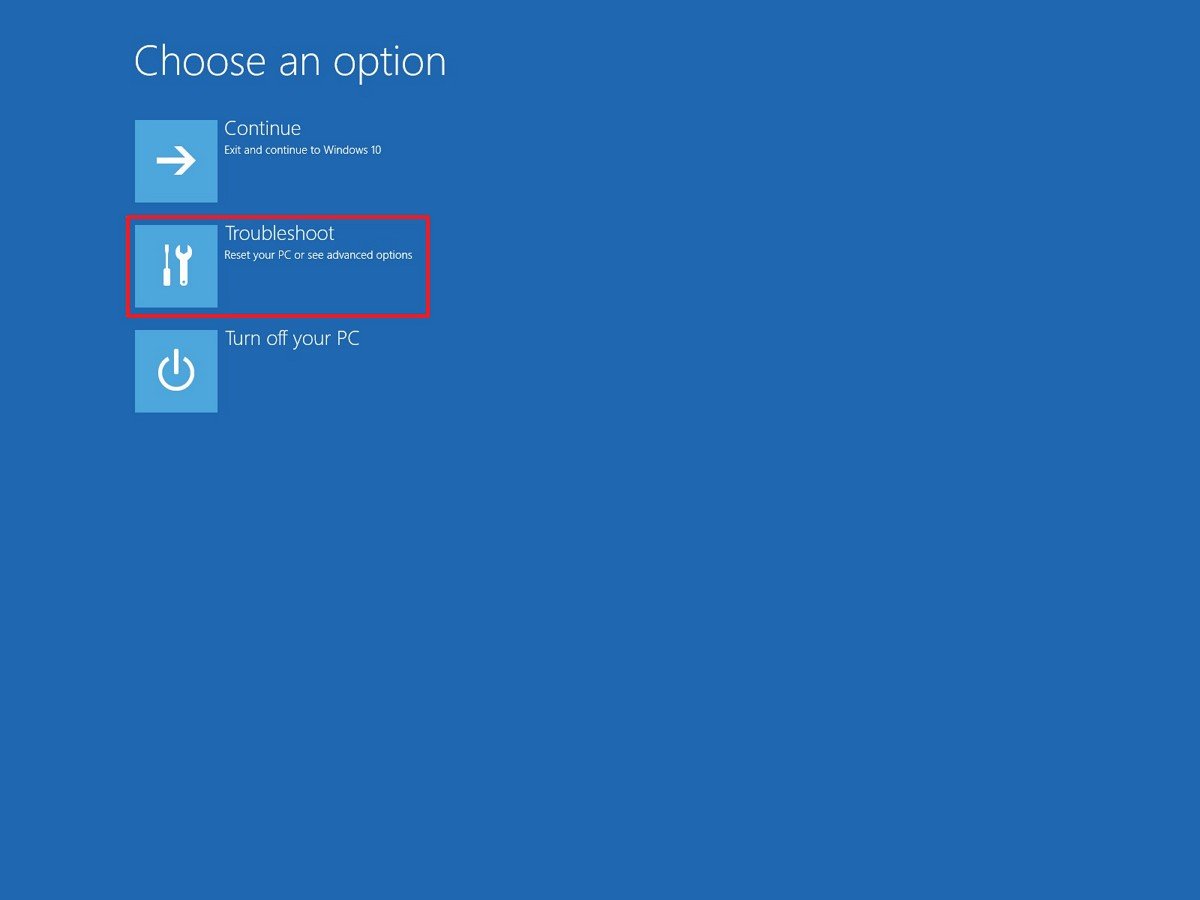
- Click the Advanced options button.
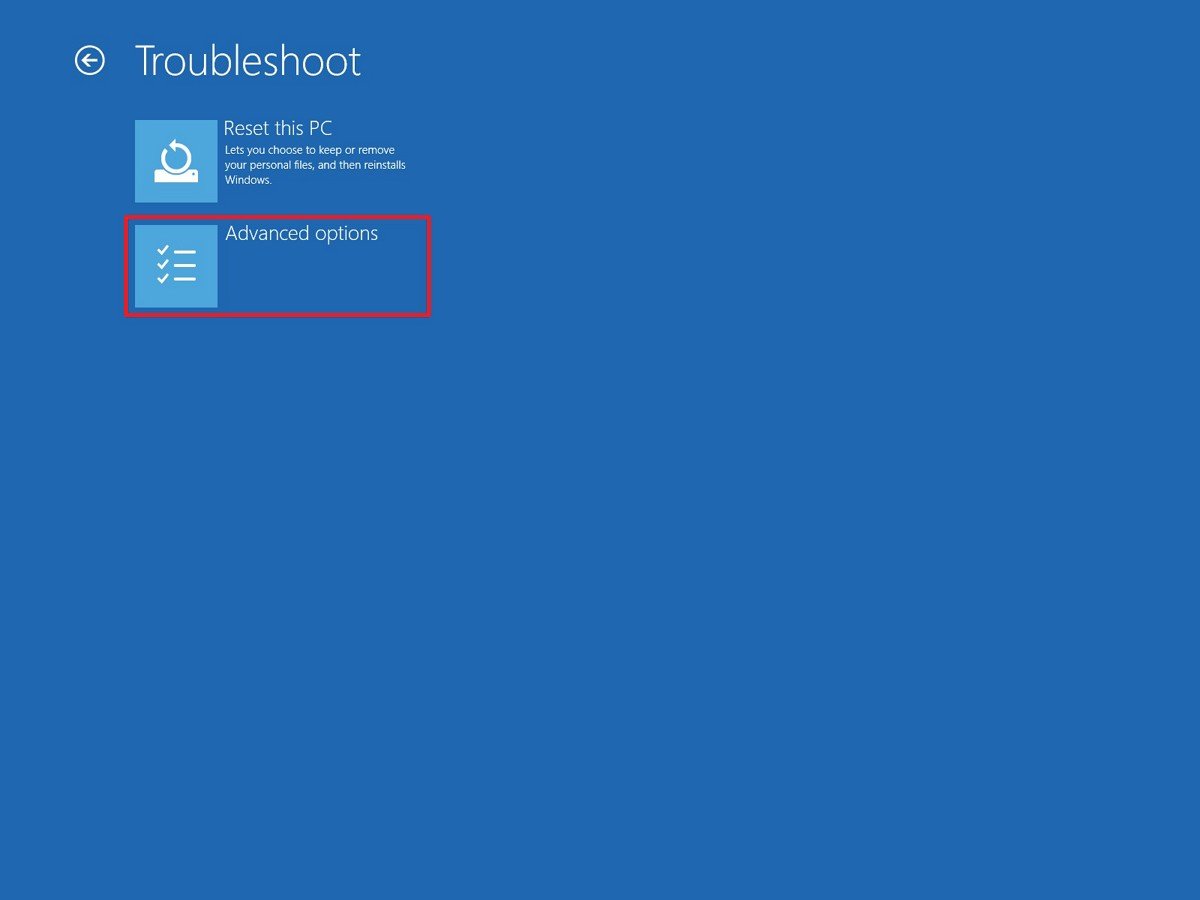
- Click the Startup Repair button.
- Select your account.
- Type your account password.
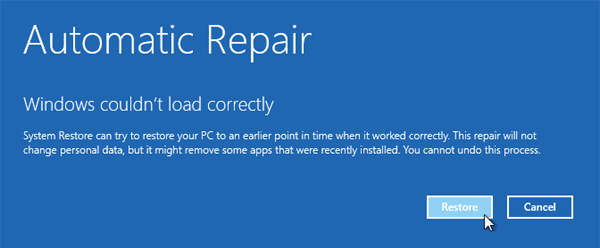
- Click the Continue button.Quick Tip: If your computer is loading correctly, using this tool, you’ll get the «Start Repair couldn’t repair your PC» message because there’s nothing that needs fixing.
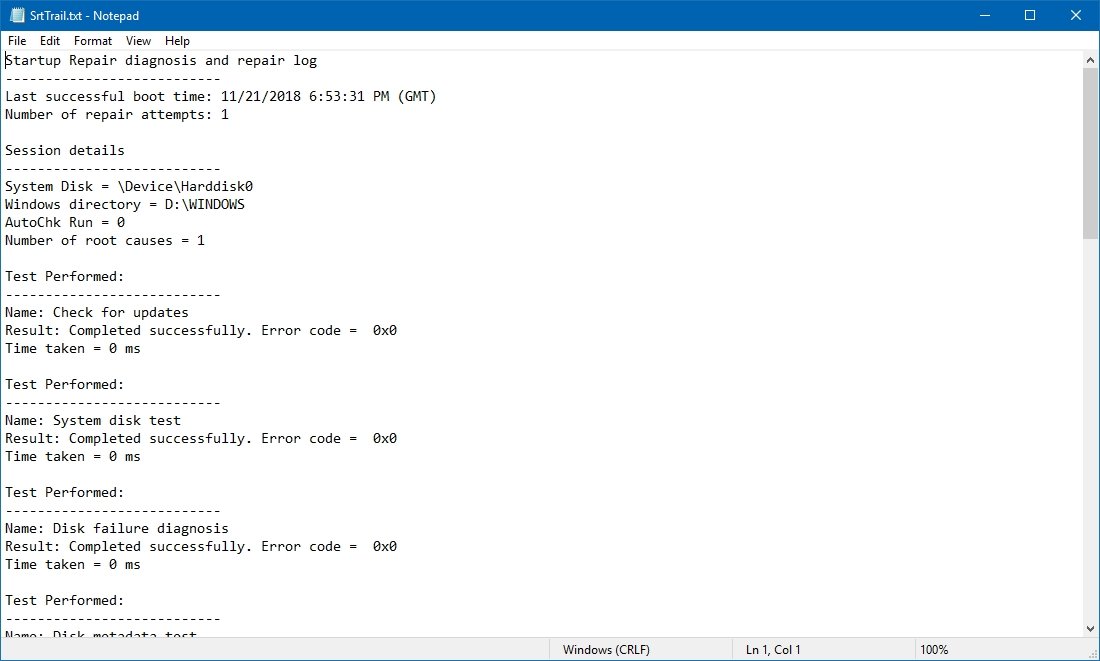
Once you’ve completed the steps, the Start Repair feature will proceed to scan, detect, and fix any problems that may prevent your device from loading correctly.
Also, the repair process creates a SrtTrail.txt file in the «C:\Windows\System32\Logfiles» folder with log information that you can view to have a better understanding of the diagnostics.
If you’re still having problems, you should use the Windows Central forums to find help.
Alternatively, if you’ve been running the same installation for a long time, you should consider nuking the old installation with a clean copy of Windows 10. This process will take longer, and it’ll erase everything on your computer, but it’ll help to fix the loading issues, as well as performance, battery life, and other problems.
More Windows 10 resources
For more helpful articles, coverage, and answers to common questions about Windows 10, visit the following resources:
- Windows 10 on Windows Central – All you need to know
- Windows 10 help, tips, and tricks
- Windows 10 forums on Windows Central
All the latest news, reviews, and guides for Windows and Xbox diehards.
Mauro Huculak is technical writer for WindowsCentral.com. His primary focus is to write comprehensive how-tos to help users get the most out of Windows 10 and its many related technologies. He has an IT background with professional certifications from Microsoft, Cisco, and CompTIA, and he’s a recognized member of the Microsoft MVP community.