If you’re having problems with your PC, the following table can help you decide which recovery option to use.
|
Problem |
See this section |
|---|---|
|
Your PC isn’t working well and you recently installed an update |
Remove an installed Windows update |
|
Your PC isn’t working well and it’s been a while since you installed an app or changed system settings |
Reset your PC |
|
Your PC won’t start or is still loading |
Use the Startup Repair function |
|
Your PC won’t start, you haven’t created a recovery drive, and resetting your PC didn’t work |
Use installation media to reinstall Windows 11 |
|
Your PC won’t start and you haven’t created a recovery drive |
Use installation media to restore your PC |
|
Your PC won’t start and you’ve created a recovery drive |
Use a recovery drive to restore or recover your PC |
|
You want to reinstall your previous operating system |
Go back to your previous version of Windows |
|
Your PC isn’t working well and you recently installed an app |
Restore from a system restore point |
|
You suspect your device has been infected |
Use installation media to reinstall Windows 11 |
Click one of the recovery options below and follow the steps to try to get things working again.
If you’ve recently installed a Windows update, uninstall the update to try to resolve the issue.
-
Select Start > Settings > Windows Update > Update history > Uninstall updates .
View update history -
On the list that appears, select update you want to remove, and then select Uninstall.
Important:
-
If you’ve encrypted your device, you’ll need your BitLocker key to reset your PC. If you don’t know your BitLocker key, see Find my BitLocker recovery key.
-
During the resetting process, it is possible that your screen may go black for a long period of time (occasionally upwards of 15 minutes) and that your device may attempt to restart itself during this period. Manually attempting to restart the device yourself during this process could cause the reset to fail. Please be patient!
Resetting reinstalls Windows 11, but lets you choose whether to keep your files or remove them, and then reinstalls Windows. You can reset your PC from Settings, the sign-in screen, or by using a recovery drive or installation media.
Reset your PC from Settings
-
Select Start > Settings > System > Recovery .
Open Recovery settings -
Next to Reset this PC , select Reset PC. Then choose from the options and/or settings in the table below.
|
Option |
What it does |
|---|---|
|
Keep my files > Change settings > Preinstalled apps On |
|
|
Keep my files > Change settings > Preinstalled apps Off |
|
|
Remove everything |
Note: Data erasure On removes files and cleans the drive. If you’re planning to donate, recycle, or sell your PC, use this option. This might take an hour or two, but it makes it harder for other people to recover files you’ve removed. Data erasure Off just removes files. It takes less time, but is less secure. The data erasure functionality is targeted at consumers and does not meet government and industry data erasure standards. |
Reset your PC from the sign-in screen
If you can’t open Settings, you can reset your PC from the sign-in screen. Here’s how:
-
Press Windows logo key + L to get to the sign-in screen. Then restart your PC by pressing the Shift key while you select the Power button > Restart .
-
Your PC will restart in the Windows Recovery Environment (WinRE) environment.
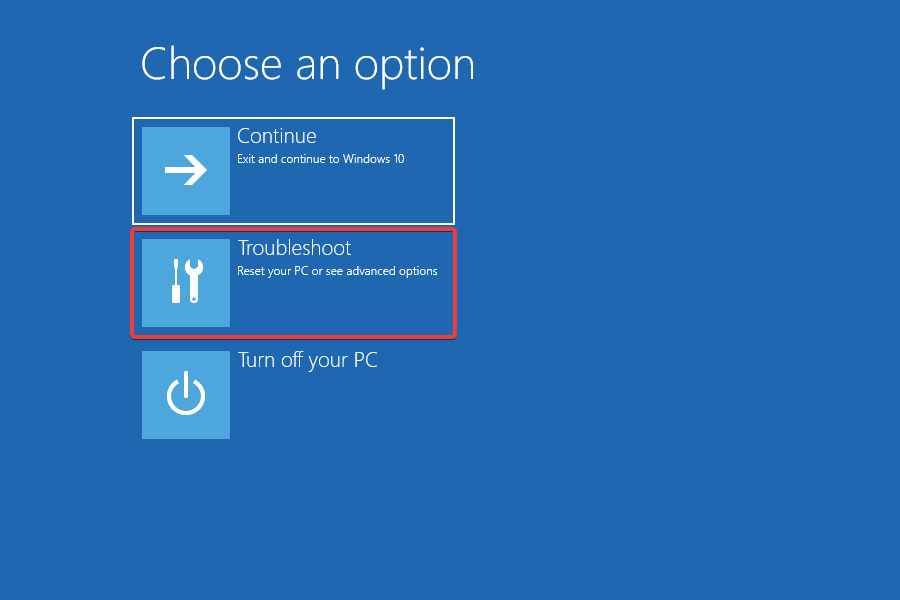
-
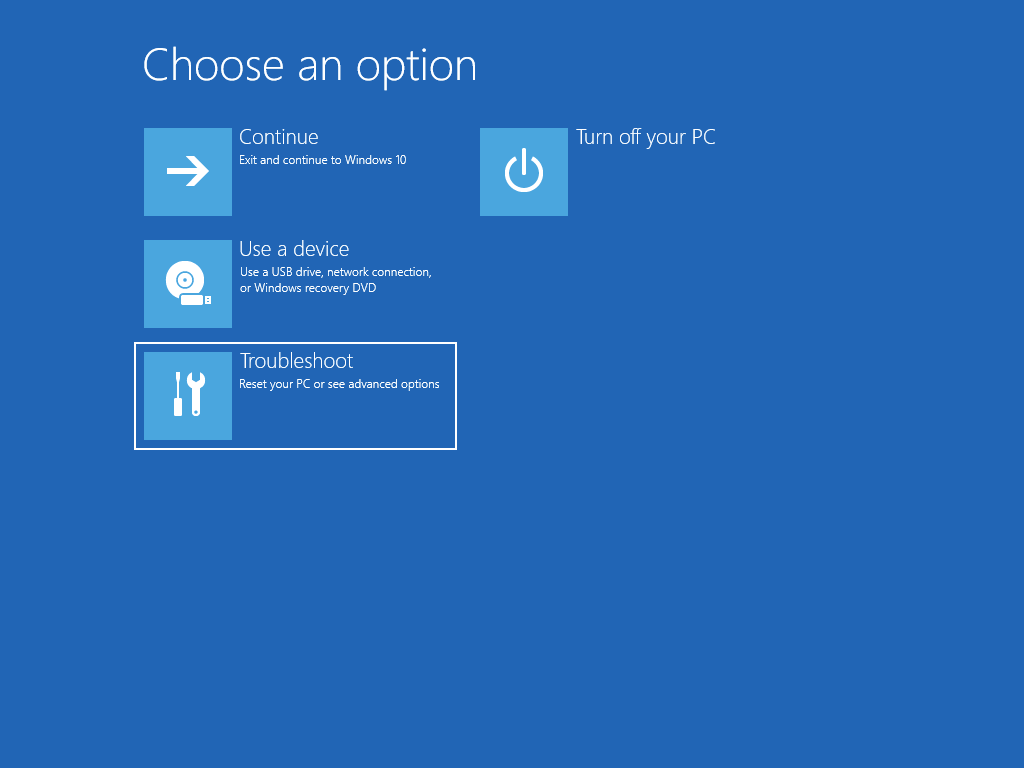
On the Choose an option screen, select Troubleshoot > Reset this PC, and then choose one of the options in the previous table.

Startup Repair helps you fix common problems that can prevent Windows from starting up.
Note: If you’ve encrypted your device, you’ll need your BitLocker key to start in safe mode.
First, you need to enter the Windows Recovery Environment (winRE). To do this, you will repeatedly turn your device off, then on:
-
Hold down the power button for 10 seconds to turn off your device.
-
Press the power button again to turn on your device.
-
On the first sign that Windows has started (for example, some devices show the manufacturer’s logo when restarting) hold down the power button for 10 seconds to turn off your device.
-
Press the power button again to turn on your device.
-
When Windows starts again, hold down the power button for 10 seconds to turn off your device.
-
Press the power button again to turn on your device.
-
This time, allow your device to fully start up.
-
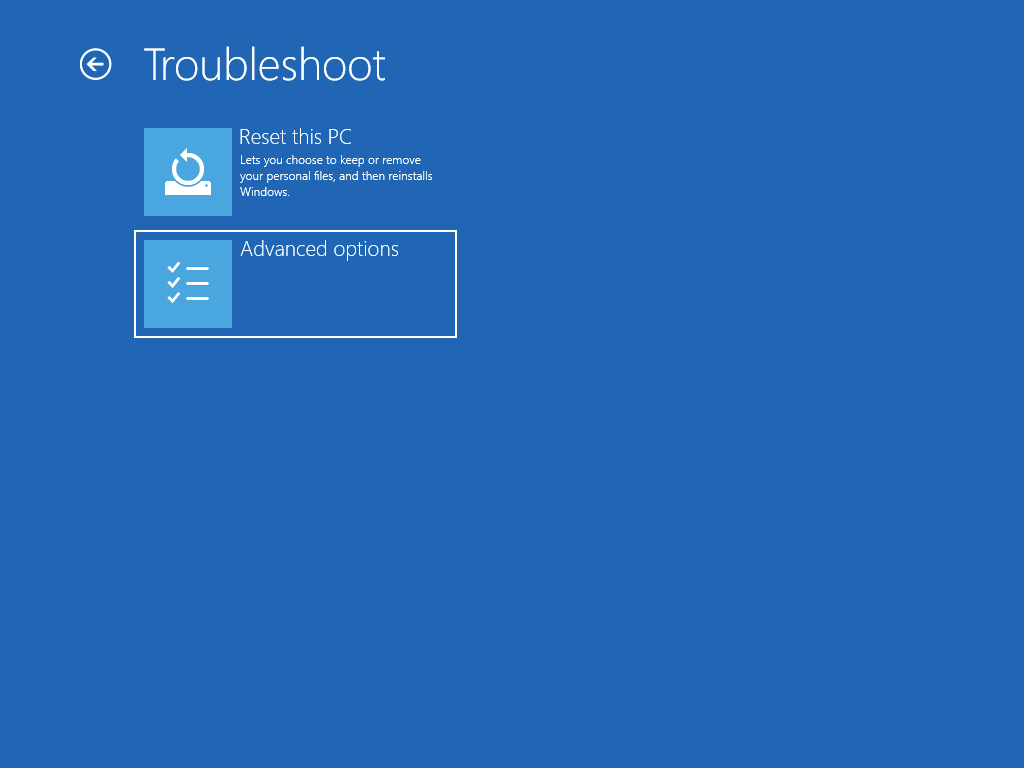
Select Advanced options.
-
Now that you’re in winRE, on the Choose an option screen, select Troubleshoot > Advanced options > Startup Repair > Restart.

Important: If you’ve encrypted your device, you’ll need your BitLocker key to use a recovery drive to restore or reset your PC If you don’t know your BitLocker key, see Find my BitLocker recovery key.
If your PC won’t start, you can use a recovery drive to restore from a system restore point or recover your PC. For info on how to create a recovery drive on a working PC, see Create a recovery drive.
To restore or recover using the recovery drive:
-
Connect the recovery drive and turn on your PC.
-
Press Windows logo key + L to get to the sign-in screen, and then restart your PC by pressing the Shift key while you select the Power button > Restart .
-
Your PC will restart in the Windows Recovery Environment (WinRE) environment.
-
On the Choose an option screen, select Troubleshoot, and then select one of the following two options. (If you don’t see the Choose your option screen, your PC might not be set up to boot from a drive. Check your PC manufacturer’s website for info on how to change your PC’s boot order.)

-
To restore from a system restore point, select Advanced Options > System Restore. This won’t affect your personal files, but it will remove recently installed apps, drivers, and updates that might be causing your PC problems.
-
To reinstall Windows 11, select Advanced Options > Recover from a drive. This will remove your personal files, apps and drivers you installed, and changes you made to settings.
For a limited time after upgrading to Windows 11, you’ll be able to go back to your previous version of Windows by selecting Start > Settings > System > Recovery . Next to Go back , select Go back. This will keep your personal files, but it’ll remove apps and drivers installed after the upgrade, as well as any changes you made to settings. In most cases, you’ll have 10 days to go back.
Open Recovery settings
To go back, you’ll need to:
-
Keep everything in the windows.old and $windows.~bt folders after the upgrade.
-
Remove any user accounts you added after the upgrade.
-
Have the USB drive you used to upgrade to Windows 11 (if you used one).
Notes:
-
The option in Settings to go back to your previous version of Windows is only available for a limited time after upgrading.
-
Apps that have been added, removed, or updated after the upgrade might not be available or function properly after going back to the previous version of Windows.
Info for Windows Insiders
If you’re an Insider and the current preview build isn’t working for you, select Start > Settings > System > Recovery . Next to Go back , select Go back. This won’t remove your personal files, but it’ll remove recently installed apps and drivers, and change settings back to their defaults.
Going back to an earlier build won’t remove you from the Insider Program. When the next preview build is ready, it’ll be installed on your PC.
This option takes your PC back to an earlier point in time, called a system restore point. Restore points are generated when you install a new app or driver, and when you create a restore point manually. Restoring won’t affect your personal files, but it will remove apps, drivers, and updates installed after the restore point was made.
-
In the search box on the taskbar, type control panel, and then choose it from the list of results
-
In the Control Panel search box, type recovery.
-
Select Recovery > Open System Restore.
-
In the Restore system files and settings box, select Next.
-
Select the restore point that you want to use in the list of results, and then select Scan for affected programs.
Notes:
-
If you don’t see the restore point that you want to use, select the Show more restore points check box to see more restore points.
-
If you’re not seeing any restore points, it might be because system protection isn’t turned on. Here’s how to check:
-
In the search box on the taskbar, type control panel, and then choose it from the list of results.
-
In the Control Panel search box, type recovery.
-
Select Recovery > Configure System Restore > Configure and see if the Turn on system protection option is selected.
-
If the Turn on system protection option is not selected, system protection isn’t turned on and there aren’t any restore points. In this scenario, you won’t be able to recovery your PC using a system restore point and will need to use one of the other recovery options listed on this page.
-
If the Turn on system protection option is selected, continue with step 6.
-
-
-
-
You’ll see a list of items that will be deleted if you remove this restore point. If you’re OK with the deletions, select Close > Next > Finish.
If you’re having problems with your PC, the following table can help you decide which recovery option to use.
|
Problem |
See this section |
|---|---|
|
Your PC isn’t working well and you recently installed an update. |
Remove an installed Windows update |
|
Your PC isn’t working well and it’s been a while since you installed an app or changed system settings. |
Reset your PC |
|
Your PC won’t start or is still loading |
Use the Startup Repair function |
|
Your PC won’t start, you haven’t created a recovery drive, and resetting your PC didn’t work. |
Use installation media to reinstall Windows 10 |
|
Your PC won’t start and you haven’t created a recovery drive. |
Use installation media to restore your PC |
|
Your PC won’t start and you’ve created a recovery drive. |
Use a recovery drive to restore or recover your PC |
|
You want to reinstall your previous operating system. |
Go back to your previous version of Windows |
|
Your PC isn’t working well and you recently installed an app. |
Restore from a system restore point |
|
You suspect your device has been infected. |
Use installation media to reinstall Windows 10 |
Click one of the recovery options below and follow the steps to try to get things working again.
If you’ve recently installed a Windows update, uninstall the update to try to resolve the issue.
-
Select the Start button, then select Settings > Update & Security > Windows Update > View your update history > Uninstall updates.
View update history settings -
Right-click the update you want to remove, and then select Uninstall.
Important:
-
If you’ve encrypted your device, you’ll need your BitLocker key to reset your PC. If you don’t know your BitLocker key, see Find my BitLocker recovery key.
-
During the resetting process, it is possible that your screen may go black for a long period of time (occasionally upwards of 15 minutes) and that your device may attempt to restart itself during this period. Manually attempting to restart the device yourself during this process could cause the reset to fail. Please be patient!
Resetting reinstalls Windows 10, but lets you choose whether to keep your files or remove them, and then reinstalls Windows. You can reset your PC from Settings, the sign-in screen, or by using a recovery drive or installation media.
Reset your PC from Settings
-
Select the Start button, then select Settings > Update & Security > Recovery .
Open Recovery settings -
Under Reset this PC, select Get started and then choose from the options and/or settings in the table below.
|
Option |
What it does |
|---|---|
|
Keep my files > Change settings > Preinstalled apps On |
|
|
Keep my files > Change settings > Preinstalled apps Off |
|
|
Remove everything |
Note: Remove everything > Change settings gives you two options. Data erasure On removes files and cleans the drive. If you’re planning to donate, recycle, or sell your PC, use this option. This might take an hour or two, but it makes it harder for other people to recover files you’ve removed. Data erasure Off just removes files. It takes less time, but is less secure. |
Reset your PC from the sign-in screen
If you can’t open Settings, you can reset your PC from the sign-in screen. Here’s how:
-
Press Windows logo key + L to get to the sign-in screen, and then restart your PC by pressing the Shift key while you select the Power button > Restart in the lower-right corner of the screen.
-
Your PC will restart in the Windows Recovery Environment (WinRE) environment.
-
On the Choose an option screen, select Troubleshoot > Reset this PC, and then choose one of the options in the previous table.
Startup Repair helps you fix common problems that can prevent Windows from starting up.
Note: If you’ve encrypted your device, you’ll need your BitLocker key to start in safe mode.
First, you need to enter the Windows Recovery Environment (winRE). To do this, you will repeatedly turn your device off, then on:
-
Hold down the power button for 10 seconds to turn off your device.
-
Press the power button again to turn on your device.
-
On the first sign that Windows has started (for example, some devices show the manufacturer’s logo when restarting) hold down the power button for 10 seconds to turn off your device.
-
Press the power button again to turn on your device.
-
When Windows starts again, hold down the power button for 10 seconds to turn off your device.
-
Press the power button again to turn on your device.
-
This time, allow your device to fully start up.
-
Select Advanced options.
-
Now that you’re in winRE, on the Choose an option screen, select Troubleshoot > Advanced options > Startup Repair > Restart.
Important: If you’ve encrypted your device, you’ll need your BitLocker key to use a recovery drive to restore or reset your PC If you don’t know your BitLocker key, see Find my BitLocker recovery key.
If your PC won’t start, you can use a recovery drive to restore from a system restore point or recover your PC. For info on how to create a recovery drive on a working PC, see Create a recovery drive.
To restore or recover using the recovery drive:
-
Connect the recovery drive and turn on your PC.
-
Press Windows logo key + L to get to the sign-in screen, and then restart your PC by pressing the Shift key while you select the Power button> Restart in the lower-right corner of the screen.
-
Your PC will restart in the Windows Recovery Environment (WinRE) environment.
-
On the Choose an option screen, select Troubleshoot, and then select one of the following two options. (If you don’t see the Choose your option screen, your PC might not be set up to boot from a drive. Check your PC manufacturer’s website for info on how to change your PC’s boot order.)
-
To restore from a system restore point, select Advanced Options > System Restore. This won’t affect your personal files, but it will remove recently installed apps, drivers, and updates that might be causing your PC problems.
-
To reinstall Windows 10, select Advanced Options > Recover from a drive. This will remove your personal files, apps and drivers you installed, and changes you made to settings.
For a limited time after upgrading to Windows 10, you’ll be able to go back to your previous version of Windows by selecting the Start button, then select Settings > Update & Security > Recovery and then selecting Get started under Go back to the previous version of Windows 10. This will keep your personal files, but it’ll remove apps and drivers installed after the upgrade, as well as any changes you made to settings. In most cases, you’ll have 10 days to go back.
Open Recovery settings
To go back, you’ll need to:
-
Keep everything in the windows.old and $windows.~bt folders after the upgrade.
-
Remove any user accounts you added after the upgrade.
-
Know the password you used to sign in to Windows 7 or Windows 8.1 (if you used one).
-
Have the USB drive you used to upgrade to Windows 10 (if you used one).
Notes:
-
The option in Settings to go back to your previous version of Windows is only available for a limited time after upgrading.
-
If you go back to Windows 8.1, some apps that came with Windows, like Mail and People, might not work anymore. To fix the apps, reinstall them from the Microsoft Store.
-
Apps that have been added, removed, or updated after the upgrade might not be available or function properly after going back to the previous version of Windows.
Info for Windows Insiders
If you’re an Insider and the current preview build isn’t working for you, select the Start button, then select Settings > Update & Security > Recovery . Under Go back to the previous version of Windows 10, select Get Started. This won’t remove your personal files, but it’ll remove recently installed apps and drivers, and change settings back to their defaults.
Going back to an earlier build won’t remove you from the Insider Program. When the next preview build is ready, it’ll be installed on your PC.
This option takes your PC back to an earlier point in time, called a system restore point. Restore points are generated when you install a new app or driver, and when you create a restore point manually. Restoring won’t affect your personal files, but it will remove apps, drivers, and updates installed after the restore point was made.
-
In the search box on the taskbar, type control panel, and then choose it from the list of results
-
In the Control Panel search box, type recovery.
-
Select Recovery > Open System Restore.
-
In the Restore system files and setting box, select Next.
-
Select the restore point that you want to use in the list of results, and then select Scan for affected programs.
Notes:
-
If you don’t see the restore point that you want to use, select the Show more restore points check box to see more restore points.
-
If you’re not seeing any restore points, it might be because system protection isn’t turned on. Here’s how to check:
-
In the search box on the taskbar, type control panel, and then choose it from the list of results.
-
In the Control Panel search box, type recovery.
-
Select Recovery > Configure System Restore > Configure and see if the Turn on system protection option is selected.
-
If the Turn on system protection option is not selected, system protection isn’t turned on and there aren’t any restore points. In this scenario, you won’t be able to recovery your PC using a system restore point and will need to use one of the other recovery options listed on this page.
-
If the Turn on system protection option is selected, continue with step 6.
-
-
-
-
You’ll see a list of items that will be deleted if you remove this restore point. If you’re OK with the deletions, select Close > Next > Finish.
If you’re having problems with your PC, you can:
-
Refresh your PC to reinstall Windows and keep your personal files and settings. Refresh also keeps the apps that came with your PC and the apps you installed from the Microsoft Store.
-
Reset your PC to reinstall Windows but delete your files, settings, and apps—except for the apps that came with your PC.
-
Restore your PC to undo recent system changes you’ve made.
If you’re having trouble starting (booting) your PC, see Windows Startup Settings (including safe mode), and go to the “Get to Windows Startup Settings in the Windows Recovery Environment” section. You can refresh, reset, or restore your PC from the Windows Recovery Environment.
If you want to back up and restore your personal files, see Back up your Windows PC.
Before you start to refresh or reset your PC
In most cases, once you start to refresh or reset your PC, it’ll finish on its own. However, if Windows needs missing files, you’ll be asked to insert recovery media, which is typically on a DVD disc or thumb drive. If that happens, what you’ll need depends on your PC.
If your PC came with Windows 8.1 or Windows RT 8.1, you’ll need the discs or thumb drive that came with your PC. Check the info that came with your PC to see if your PC manufacturer provided these discs or media. In some cases, you might have created them when you first set up your PC.
If you don’t have either of those, you can make them if you have a USB thumb drive of 16 GB or larger. Having a recovery drive can help you troubleshoot and fix problems with your PC, even if it won’t start. For more info, see Create a USB recovery drive.
If you upgraded your PC to Windows 8.1 or Windows RT 8.1 with a DVD, use that disc. If you don’t have Windows 8.1 or Windows RT 8.1 media, contact Microsoft Support.
Refresh, reset, or restore
Select any of the following for more detailed info.
If your PC isn’t performing as well as it once did, and you don’t know why, you can refresh your PC without deleting any of your personal files or changing your settings.
Note: If you upgraded your PC from Windows 8 to Windows 8.1 and your PC has a Windows 8 recovery partition, refreshing your PC will restore Windows 8. You’ll need to upgrade to Windows 8.1 after the refresh has finished.
Warning: Apps you installed from websites and DVDs will be removed. Apps that came with your PC and apps you installed from Microsoft Store will be reinstalled. Windows puts a list of removed apps on your desktop after refreshing your PC.
To refresh your PC
-
Swipe in from the right edge of the screen, tap Settings, and then tap Change PC settings.
(If you’re using a mouse, point to the upper-right corner of the screen, move the mouse pointer down, select Settings, and then select Change PC settings.) -
Tap or select Update and recovery, and then tap or select Recovery.
-
Under Refresh your PC without affecting your files, tap or select Get started.
-
Follow the instructions on the screen.
If you want to recycle your PC, give it away, or start over with it, you can reset it completely. This removes everything and reinstalls Windows.
Note: If you upgraded your PC from Windows 8 to Windows 8.1 and your PC has a Windows 8 recovery partition, resetting your PC will restore Windows 8. You’ll need to upgrade to Windows 8.1 after the reset has finished.
Warning: All of your personal files will be deleted and your settings will be reset. All apps that you installed will be removed. Only apps that came with your PC will be reinstalled.
To reset your PC
-
Swipe in from the right edge of the screen, tap Settings, and then tap Change PC settings.
(If you’re using a mouse, point to the upper-right corner of the screen, move the mouse pointer down, select Settings, and then select Change PC settings.) -
Tap or select Update and recovery, and then tap or select Recovery.
-
Under Remove everything and reinstall Windows, tap or select Get started.
-
Follow the instructions on the screen.
Note: You’ll be asked to choose whether you want to erase data quickly or thoroughly. If you choose to erase data quickly, some data might be recoverable using special software. If you choose to erase data thoroughly, this will take longer but it makes recovering data less likely.
If you think an app or driver that you recently installed caused problems with your PC, you can restore Windows back to an earlier point in time, called a restore point. System Restore doesn’t change your personal files, but it might remove recently installed apps and drivers.
Notes:
-
System Restore isn’t available for Windows RT 8.1.
-
Windows automatically creates a restore point when you install desktop apps and new Windows updates, if the last restore point is older than 7 days. You can also create a restore point manually at any time.
To restore your PC to an earlier point in time
-
Swipe in from the right edge of the screen, and then tap Search.
(If you’re using a mouse, point to the upper-right corner of the screen, move the mouse pointer down, and then select Search.) -
Enter Control Panel in the search box, and tap or select Control Panel.
-
Enter Recovery in the Control Panel search box, and then tap or select Recovery.
-
Tap or select Open System Restore and then follow the instructions.
If you need additional help refreshing, resetting, or restoring your PC, check out the Repair and Recovery community pages in the Windows forum for solutions that other people have found for problems they’ve experienced.
Need more help?
Want more options?
Explore subscription benefits, browse training courses, learn how to secure your device, and more.
Communities help you ask and answer questions, give feedback, and hear from experts with rich knowledge.
Find solutions to common problems or get help from a support agent.
Windows 10 унаследовала все особенности системы загрузки у Windows 8, предоставляя такую же графическую среду для выполнения задач восстановления системы. Предполагается, что операции восстановления системы после сбоев будут преимущественно выполняться системой автоматического восстановления. В том случае, если Windows 10 не загружается корректно, запускается система автоматического восстановления, которая без участия пользователя пытается найти и исправить проблемы, мешающие нормальной загрузке системы. Однако это не означает, что в Windows 10 отсутствует безопасный режим (Safe mode), просто по умолчанию этот режим загрузки скрыт от пользователей.
В некоторых случаях необходимо запустить систему в безопасном режиме, например чтобы отладить или удалить службу, драйвер или приложение. Посмотрим как включить безопасный режим в Windows 10.
Windows 10 можно загрузить в безопасном режиме несколькими разными способами.
Содержание:
- Утилита MSConfig (Конфигурация системы)
- Сочетание Shift + Restart
- Запуск режим диагностики из интерфейса новой Панели управления
- Запуск безопасного режима из командой строки
- Возвращаем старое текстовое меню загрузки
- Запуск Safe Mode из режима восстановления
Утилита MSConfig (Конфигурация системы)
Самый простой способ загрузить Windows 10 в безопасном режиме, как и в предыдущих версиях Windows, воспользоваться утилитой msconfig.exe. Для этого:
- Нажмите сочетание клавиш Win+R и наберите msconfig
- В открывшемся окне перейдите на вкладку Boot
- В разделе Boot options поставьте флажок у пункта Safe boot

- Сохраните изменения (OK), согласитесь с предложением перезагрузить систему (Restart)

- После перезагрузки системы, Windows 10 загрузится в безопасном режиме (о чем свидетельствует надпись Safe Mode во всех углах экрана)
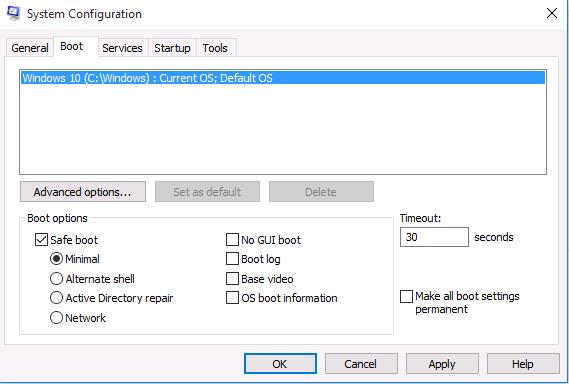
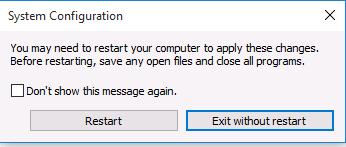

Совет. Отключить загрузку в безопасном режиме нужно также с помощью msconfig, сняв флажок у пункта Safe boot.
Сочетание Shift + Restart
В стартовом меню нажмите кнопку Power и, зажав Shift на клавиатуре, выберите пункт перезагрузки системы (Restart)
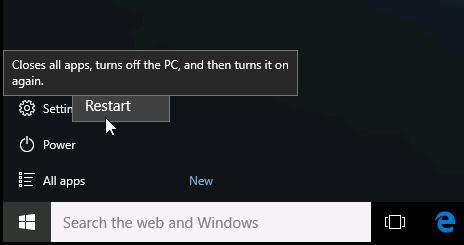
Примечание. Эту же комбинацию Shift+Перезагрузка можно использовать на экране входа в систему.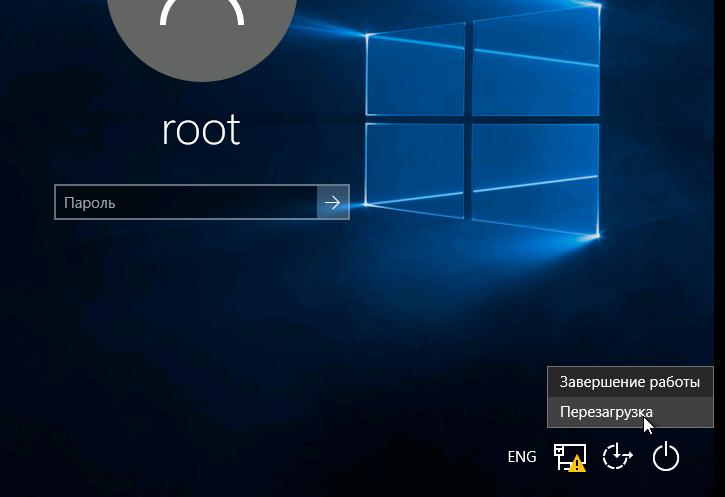
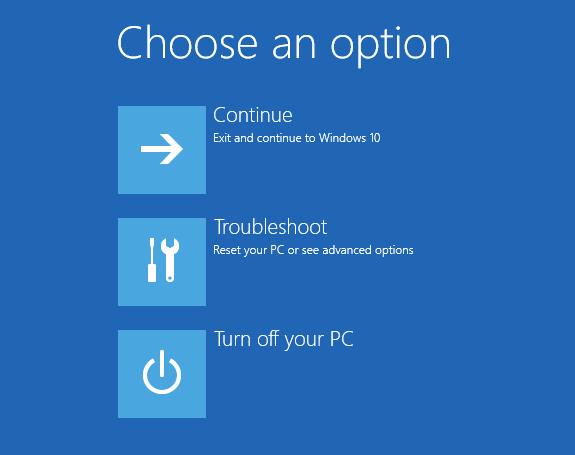
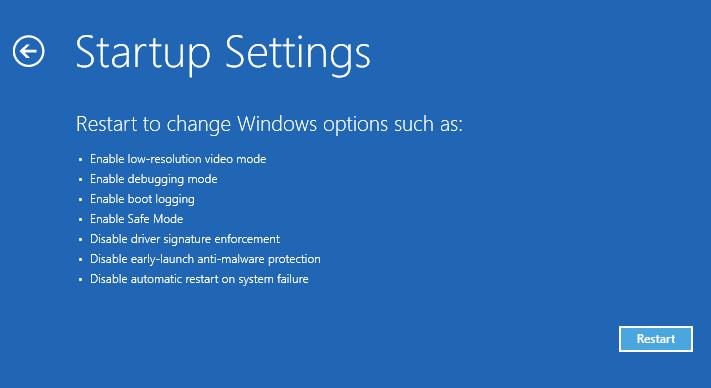
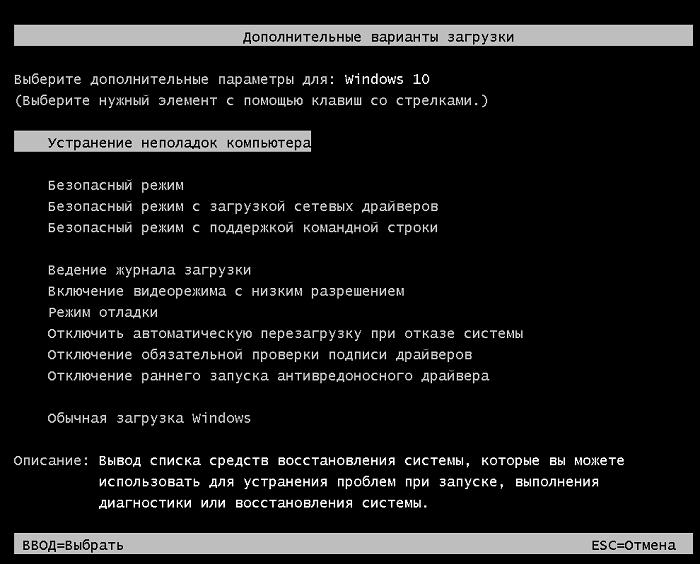
В появившемся диалоге последовательно выберите пункты Troubleshoot (Диагностика) -> Advanced options (Дополнительные параметры)-> Startup Settings (Параметры загрузки).
 Перезагружаем компьютер, нажав кнопку Restart.
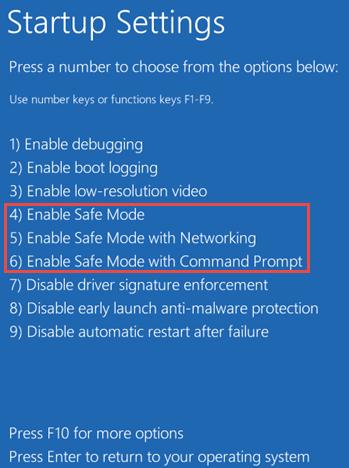
 После перезагрузки появится окно с доступными опциями загрузки системы ( 9 вариантов, включая три вида безопасного режима). Для загрузки в безопасном режиме, нажмите клавишу F4 или 4 (или F5/F6 для загрузки в безопасном режиме с поддержкой сети или командной строки соответственно).
Запуск режим диагностики из интерфейса новой Панели управления
Для запуска новой современной Панели управления Windows 10, нажмите кнопку Start и выберите меню Settings. Затем перейдите в раздел Update & security.
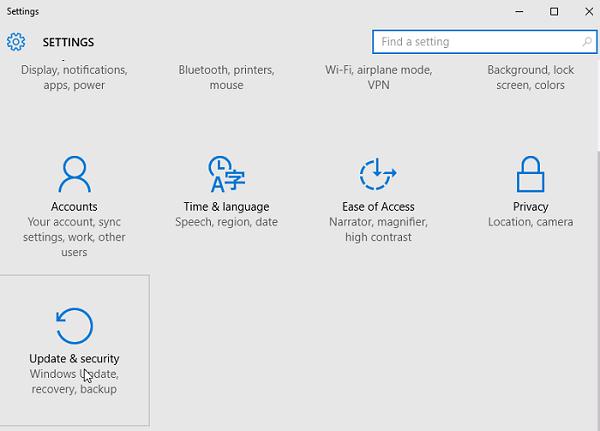
Перейдите в раздел Recovery и в секции Advanced Startup нажмите Restart now.

Далее все аналогично предыдущему способу.
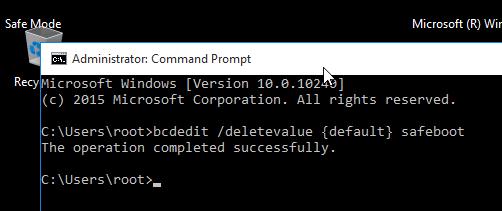
Запуск безопасного режима из командой строки
Возможно также настроить запуск Windows 10 в безопасном режиме и из командной строки. Для этого откройте командную строку (cmd) с правами администратора и выполните команду:
bcdedit /set {current} safeboot minimal
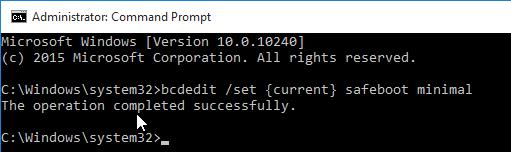 Затем перезагрузите компьютер командой:
Shutdown –f –r –t 0
Теперь Windows 10 всегда будет загружаться в безопасном режиме. Чтобы вернуть обычный режим загрузки:
bcdedit /deletevalue {default} safeboot
Возвращаем старое текстовое меню загрузки
В Windows 10/8 возможно вернуться к старому текстовому загрузчику Windows, поддерживающего клавишу F8 (Shift+F8) и возможность выбора параметров запуска системы.
Примечание. Скорость загрузки системы с таким загрузчиком будет ниже.
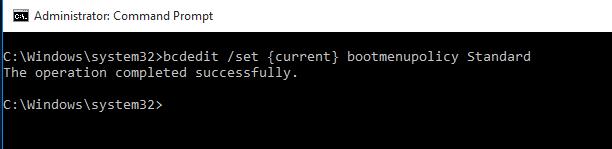
Чтобы вернуть тестовый загрузчик, выполните в командной строке с правами администратора:
bcdedit /set {default} bootmenupolicy legacy
Теперь при загрузке компьютера после стадии самотестирования (POST) , нужно несколько раз нажать клавишу F8. Должно появится старое-доброе текстовое меню с параметрами загрузки системы.
 Чтобы отключить текстовый режим загрузчика, и вернуться к быстрой загрузке, выполните:
bcdedit /set {default} bootmenupolicy standard
Запуск Safe Mode из режима восстановления
Мало кто знает, что, чтобы включить безопасный режим и прочие параметры восстановления в Windows 10, достаточно 3 раза подряд прервать загрузку системы кнопкой отключения питания.
На 4 раз запустится среда восстановления системы (Recovery mode), из которой можно выбрать загрузку в безопасном режиме или другие варианты загрузки системы.
 Выберите пункт See advanced repair options и следуйте инструкциям из второго пункта нашей статьи.
Содержание
- Способ 1: Приложение «Параметры»
- Способ 2: Комбинация клавиш
- Способ 3: Загрузочная флешка
- Способ 4: Прерывание загрузки
- Вопросы и ответы

Способ 1: Приложение «Параметры»
Традиционным методом загрузки в среду восстановления Windows 10 является использование соответствующей опции в приложении «Параметры».
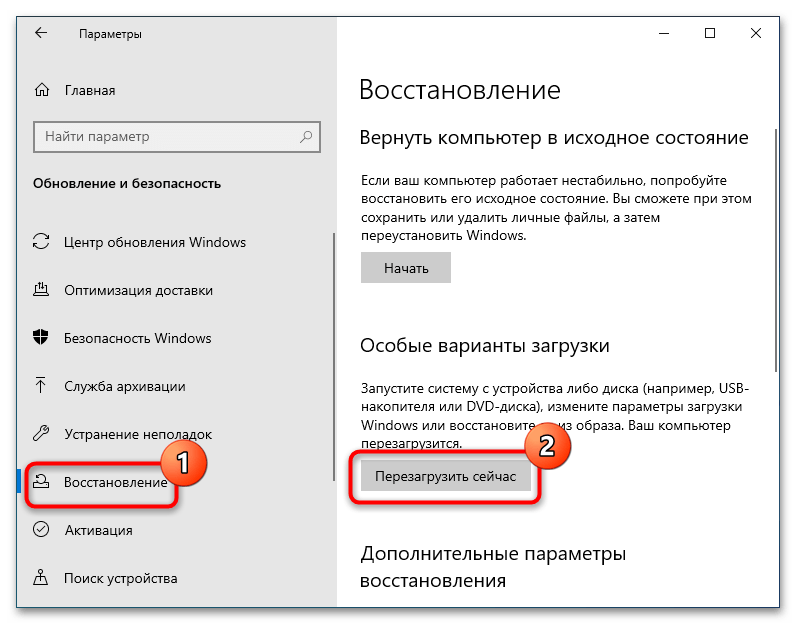
- Откройте приложение «Параметры» и перейдите в раздел «Обновление и безопасность» → «Восстановление».
- В блоке «Особые варианты загрузки» нажмите кнопку «Перезагрузить сейчас».
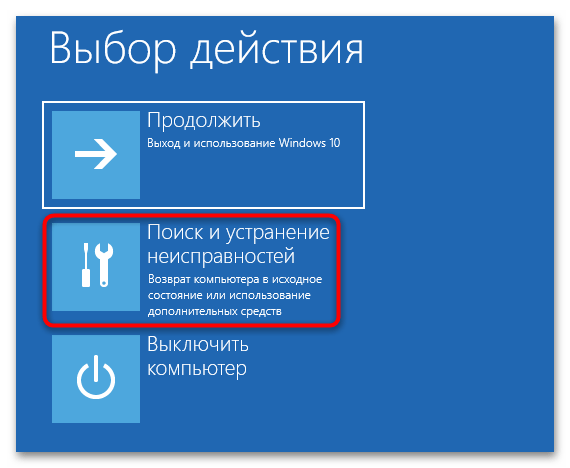
- Когда появится экран выбора действия, нажмите на «Поиск и устранение неисправностей».
В случае недоступности рабочего стола или неактивной опции перезагрузки можно воспользоваться упрощенным способом, описанным ниже.
Способ 2: Комбинация клавиш
Существует и более быстрый вариант загрузить компьютер в среду восстановления. Для этого необходимо перезагрузить устройство из меню «Пуск» или с экрана блокировки, зажав при этом клавишу Shift. Результат будет тот же, что и при использовании первого способа.

Способ 3: Загрузочная флешка
Недостатком обоих приведенных выше способов является необходимость выбора учетной записи пользователя и ввода пароля для получения доступа к инструментам среды восстановления. Также описанные выше методы не подойдут, если по какой-то причине среда WinPE окажется повреждена, отключена или удалена. В таком случае следует использовать загрузочный диск с Windows 10.
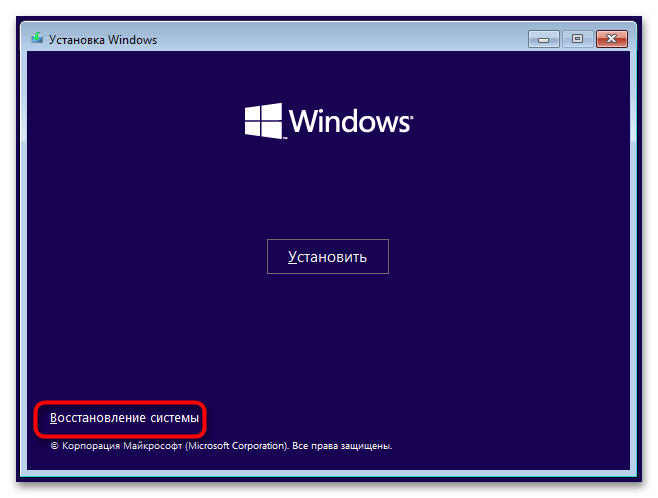
- Загрузите компьютер с установочной флешки с «десяткой» той же разрядности и желательно той же версии. Если имеется диск восстановления, можно использовать его.
Подробнее:
Создание диска восстановления Windows 10
Создание загрузочной флешки - Когда на экране появится окно мастера установки операционной системы, нажмите «Далее», а затем кликните по ссылке «Восстановление системы».
- После появления экрана выбора действия нажмите на «Поиск и устранение неисправностей».

В результате будет загружена среда восстановления, находящаяся на установочном диске. К сожалению, данный способ также не лишен недостатков: в частности, при использовании этого метода опция сброса системы к заводским настройкам будет недоступна.
Способ 4: Прерывание загрузки
В случае отсутствия загрузочного диска, недоступности рабочего стола и экрана входа в систему, для запуска среды восстановления можно воспользоваться следующей инструкцией.
- Дважды прервите процесс загрузки операционной системы на этапе появления логотипа Windows или даже раньше.
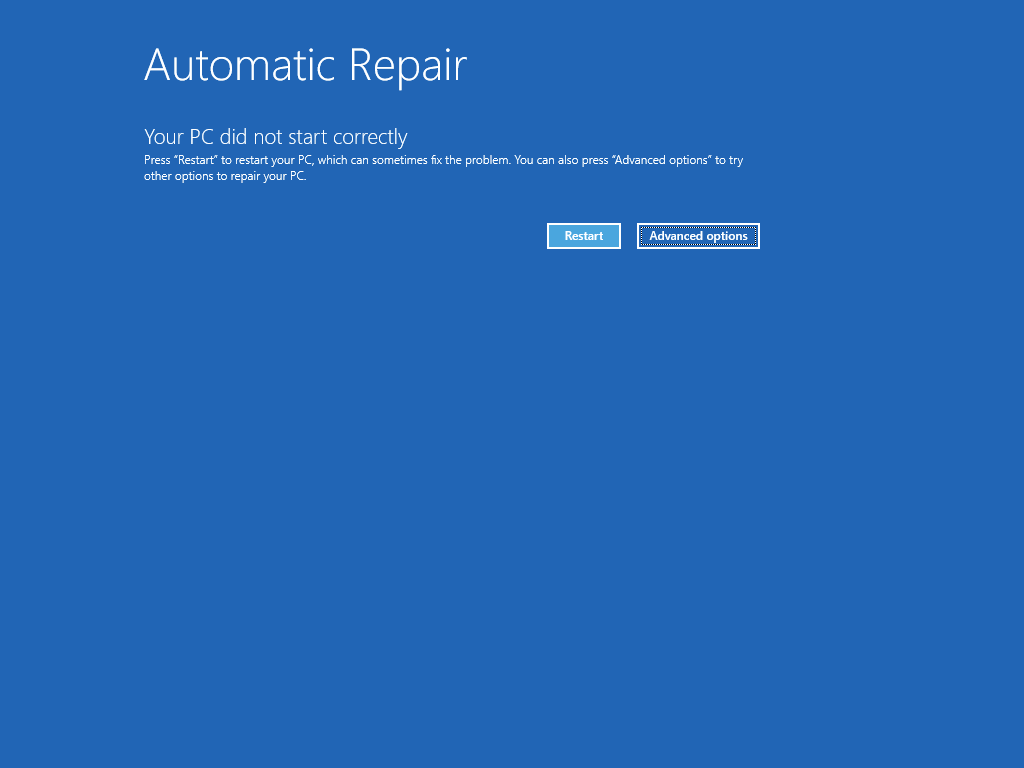
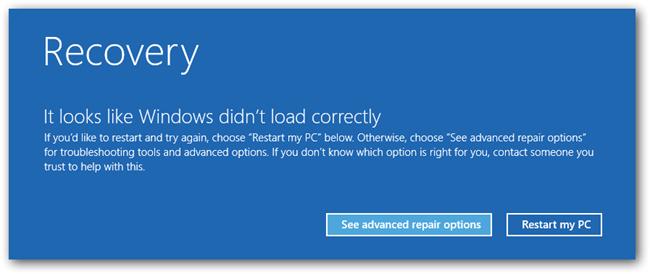
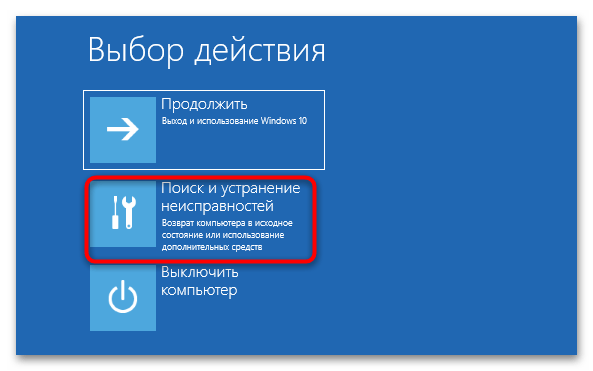
- В результате, при третьем запуске ПК, сначала отобразится сообщение «Подготовка автоматического восстановления», а через некоторое время появится экран «Автоматическое восстановление» с уведомлением «Компьютер запущен некорректно». Нажмите кнопку «Дополнительные параметры».
- Выберите на появившемся экране выбора действия плитку «Поиск и устранение неисправностей».

Описанный выше способ имеет один недостаток – прерывание работы Windows выключением компьютера может привести к повреждению секторов жесткого диска, правда, касается это дисков HDD и шанс этого не сильно большой.
Еще статьи по данной теме:
Помогла ли Вам статья?
Learn how to access Recovery Mode from every part of the OS
by Matthew Adams
Matthew is a freelancer who has produced a variety of articles on various topics related to technology. His main focus is the Windows OS and all the things… read more
Updated on
- The Recovery Mode in Windows 10 allows users access to many troubleshooting tools and the option to change startup settings.
- Sometimes, the OS automatically enters the RE when it encounters a critical error.
- There are various ways to enter the Recovery Mode, from Settings, Start menu, and login screen.
Windows 10 includes a Recovery Mode that enables users to access a range of diagnostic and repair utilities. While it usually appears after startup errors, users may sometimes need to access the Recovery Mode manually. So, let’s find out all there is.
What is PC recovery mode?
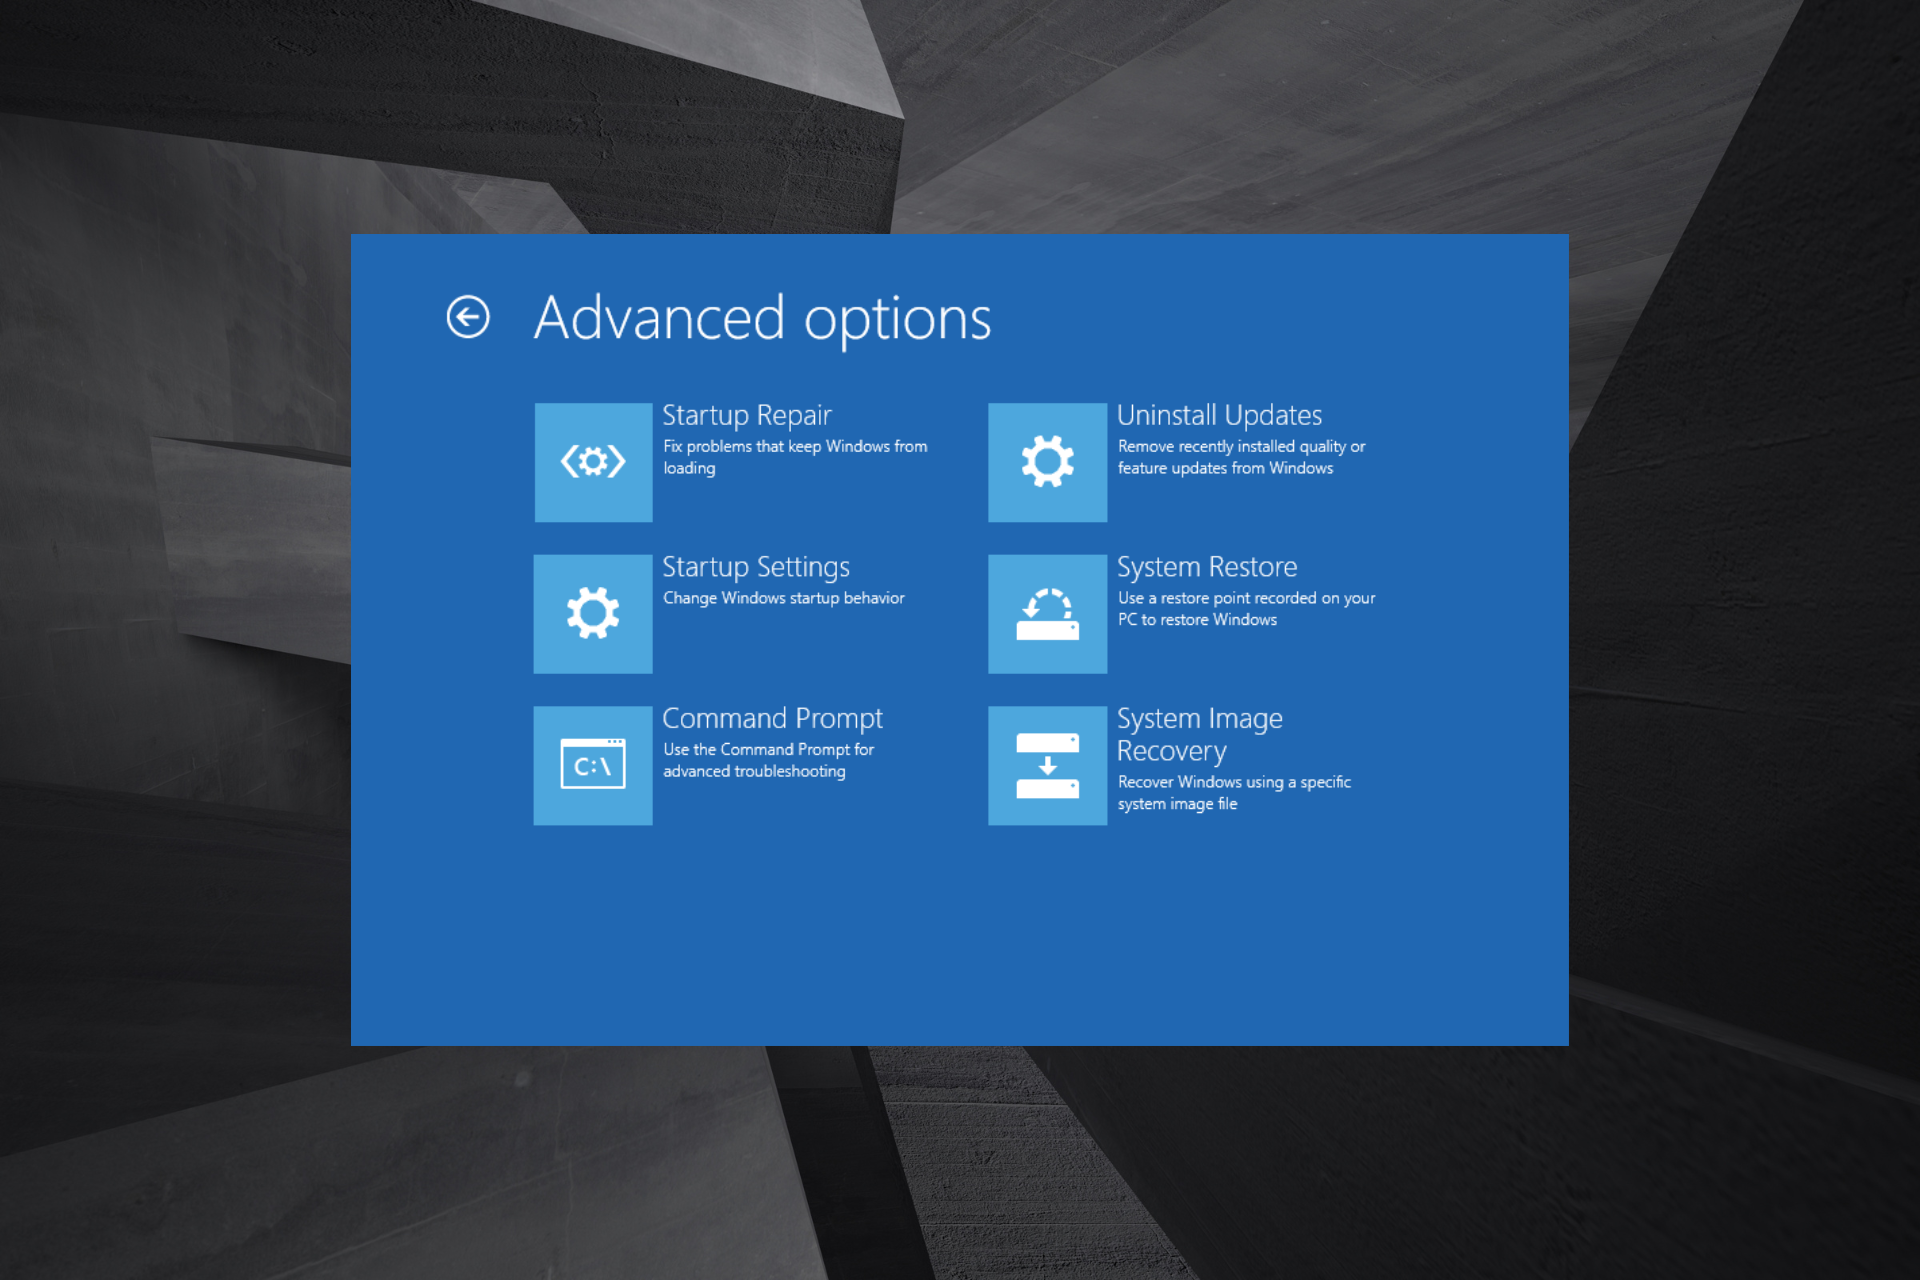
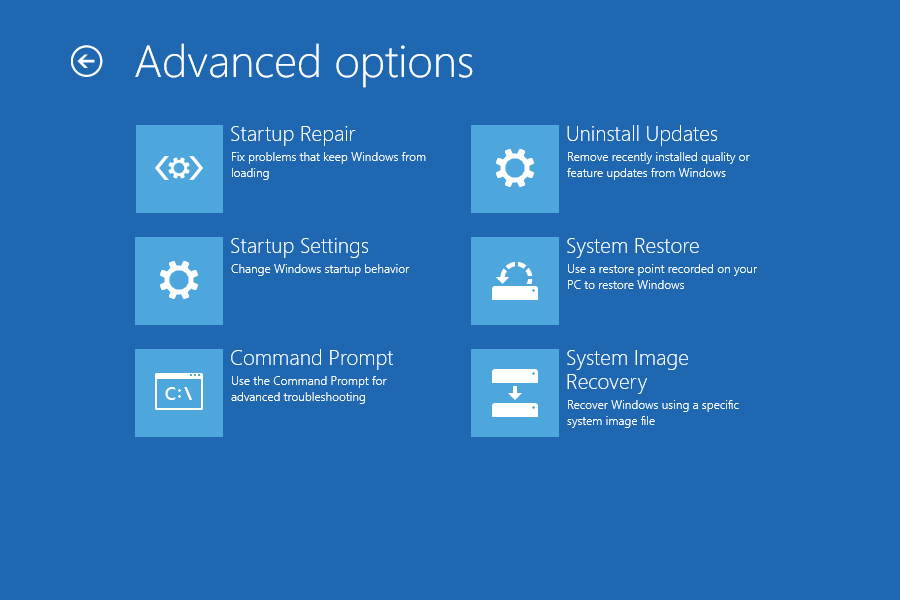
That Recovery Mode assists users in troubleshooting Windows when it doesn’t boot as expected. It offers many options, including the Command Prompt, UEFI settings, Startup Repair, System Restore, and Startup Setting (accessing Safe Mode).
Also, this mode in Windows 10 comes to aid when troubleshooting BSOD errors that appear as soon as the OS is about to load. While the RE appears automatically in some cases, users can always access it manually through a series of ways.
How can I boot into Recovery Mode on Windows 10?
1. Press F11 during the system startup
This is among the more straightforward methods for entering recovery mode. Users can press the F11 key shortly after turning on their PCs. You can enter Windows 10 Recovery Mode without going into BIOS.
Note, however, that this method might not work on all PCs. For example, some may have the F9 or F12 keys set by default, so verify that with the manufacturer.
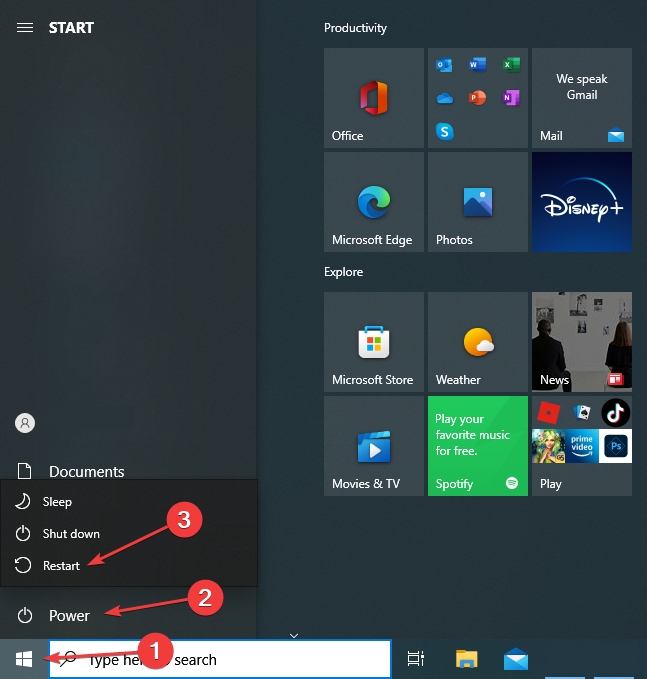
- Click on the Start icon, select the Power button, hold the Shift key, and click on Restart.

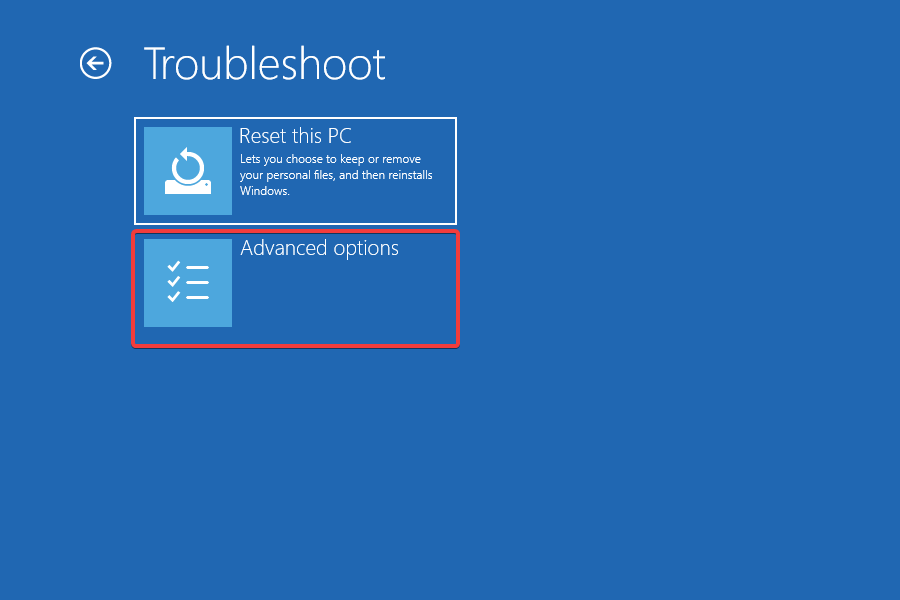
- Now, click on Troubleshoot.

- Next, click on Advanced options.
- You now have all the recovery options listed on the screen.


This is one of the most simple and seamless methods to enter the Recovery Mode in Windows 10 while working, with the OS actively running.
How we test, review and rate?
We have worked for the past 6 months on building a new review system on how we produce content. Using it, we have subsequently redone most of our articles to provide actual hands-on expertise on the guides we made.
For more details you can read how we test, review, and rate at WindowsReport.
You can similarly access Windows 10 Recovery Mode from the login screen by clicking the Power button and choosing Restart with the Shift key held.
3. Enter Recovery Mode with a bootable USB drive
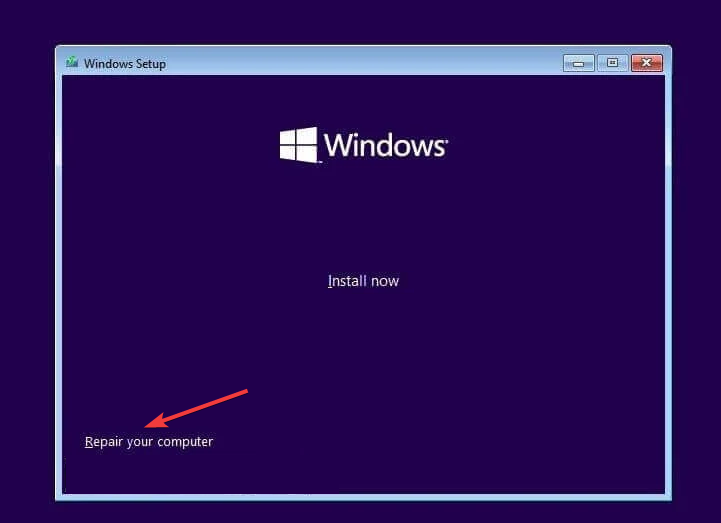
- First, create a bootable USB drive for Windows 10.
- Now, turn off the computer, power it on, enter the BIOS, and choose the USB drive.
- Click Next on the Windows setup window.
- Select the Repair your computer option.

- Click on Troubleshoot.
- Now, choose Advanced options.
- You now have all the recovery options listed here.

If you can’t boot the OS due to errors or a corrupt state, download Windows 10, boot a USB drive, and access the Recovery Mode.
4. Select the Restart now option
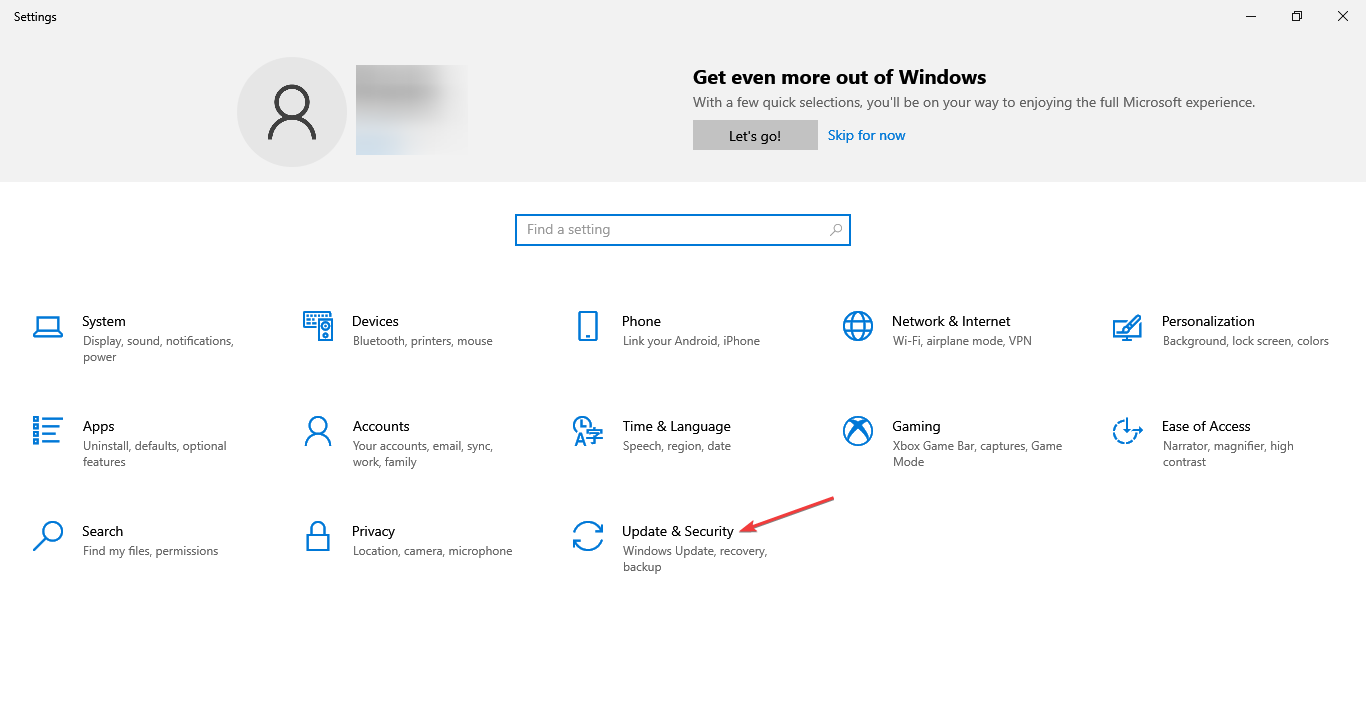
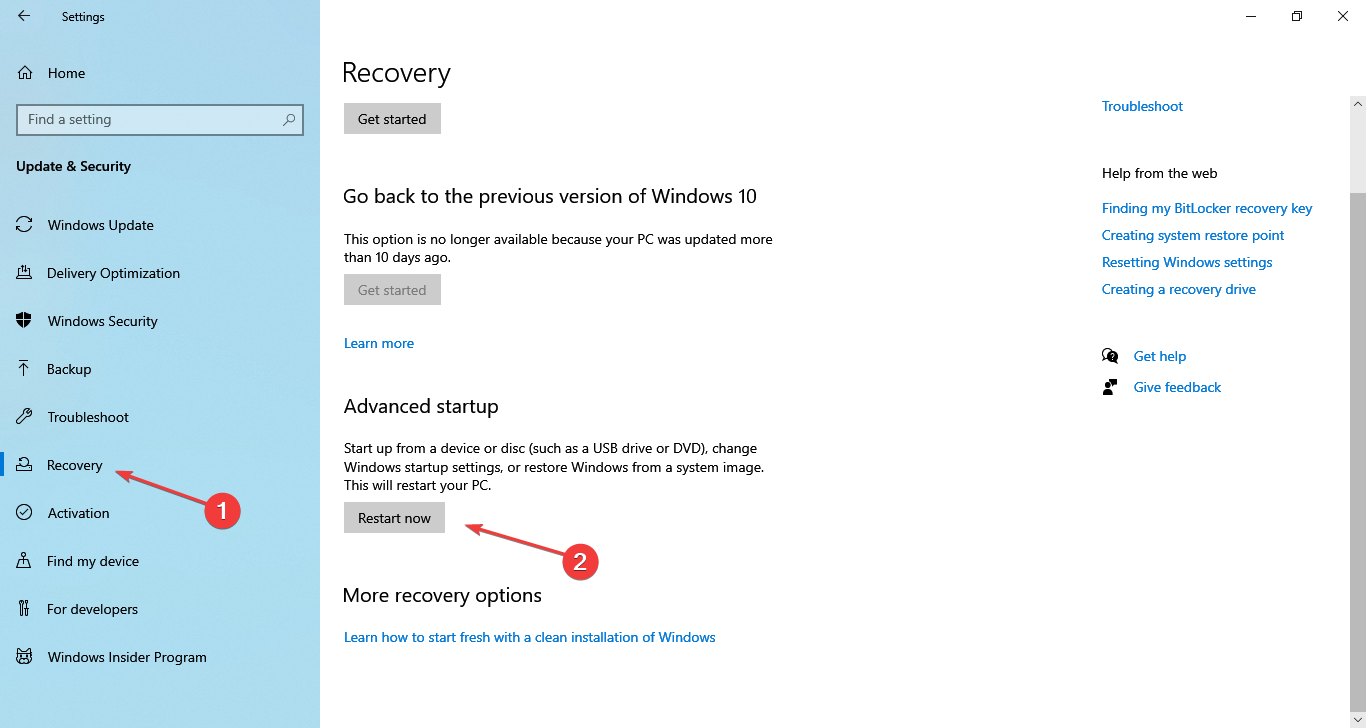
- Press Windows + I to open Settings, and choose Update & Security.

- Now, navigate the Recovery tab, and click on Restart now under Advanced startup.
- Now, choose Troubleshoot.
- Click on Advanced options.
- The Recovery Mode options are all listed now.


This is another quick way to access the Recovery Mode in Windows 10 while the OS is still running.
- How to Use Steam Deck’s Keyboard in Desktop Mode
- How to Format an NVMe SSD on Windows 11
- How to Download & Install New Microsoft Office Fonts
5. Boot into Recovery Mode using Command Prompt
Command Prompt is a built-in command-line tool that helps you get out of almost any troubleshooting situation. Similarly, you can enter Recovery Mode on Windows 10 from Command Prompt.
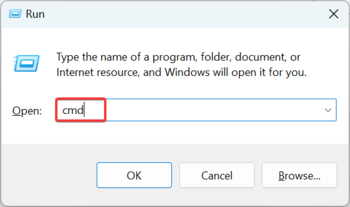
1. Press Windows + R open Run, type cmd in the text field, and hit Ctrl + Shift + Enter.
2. Click Yes in the UAC prompt.
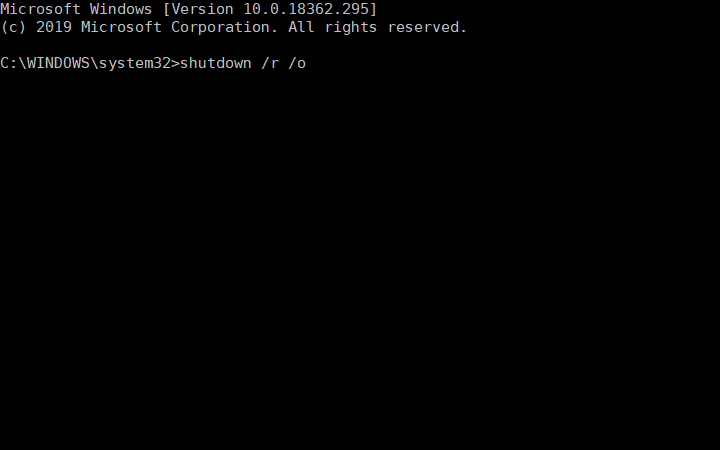
3. Input the following command and press Enter : shutdown /r /o
4. Click Close on the You’re about to be signed out a prompt that appears.
5. Thereafter, select Troubleshoot.

6. Now, select Advanced options.

7. All the advanced options in the Recovery Mode will now appear.

That’s it! And if you were wondering, there is no Windows 10 Recovery Mode key that you need to access it. Anyone with access to the computer can do it though specific changes require administrative privileges and the account password.
The solutions would help access Windows 10 Recovery Mode in Dell, Asus, HP, and most other devices. In case you face issues, find out how to perform a repair upgrade, one of the most effective troubleshooting methods.
Now that you know how to access it, why not check our guide on how to exit Windows Recovery Mode?
If you have any other queries or want us to cover a similar topic, drop a comment in the section below.
![]()
6 Methods for accessing the ASO Boot Menu in Windows 11, 10, or 8
Updated on March 13, 2023
What to Know
- Hold down SHIFT while restarting, or go to Settings > Update & Security > Recovery > Restart now.
- If Windows does not start, boot from your Windows installation media or a recovery drive.
- To boot directly into ASO, choose the boot option for System Recovery, Advanced Startup, Recovery, etc.
This article explains how to access the Advanced Startup Options in Windows 11, 10, or 8.
What Are Advanced Startup Options in Windows?
The Advanced Startup Options (ASO) menu, available in Windows 11, Windows 10, and Windows 8, is the central fix-it location for the entire operating system.
From here you can access Windows diagnostic and repair tools like Reset This PC, System Restore, Command Prompt, Startup Repair, and much more.
It’s also where you access Startup Settings, the menu that includes Safe Mode, among other startup methods that could help you access Windows if it’s having problems starting. In other words, Advanced Startup Options functions as the Windows 11/10/8 boot menu.
How Do I Access Windows Advanced Startup Options?
This menu should appear automatically after two consecutive startup errors. However, if you need to open it manually, there are six different ways to do so.
The best way to decide which method to use is to base your decision on what level of access you have to Windows right now:
- If Windows starts normally: Use any method, but 1, 2, or 3 will be easiest.
- If Windows does not start: Use methods 4, 5, or 6. Method 1 will also work if you can at least get to the Windows logon screen.
Time Required: Accessing ASO is easy and can take anywhere from a few seconds to a few minutes, depending on which method you use.
All of these means of getting to the Advanced Startup Options menu work equally well in any edition of Windows 11, Windows 10, Windows 8, or Windows 8.1 unless noted otherwise.
Method 1: SHIFT + Restart
This is by far the easiest way to get this done. Just hold down either SHIFT key while selecting Restart, available from any power icon.
Power icons are available throughout Windows, as well as from the sign-in/lock screen.
All you do now is wait while the Advanced Startup Options menu opens!
This method doesn’t seem to work with the on-screen keyboard. You’ll need to have a physical keyboard connected to your computer or device to open it this way.
Method 2: Settings Menu
-
In Windows 11, right-click the Start button and choose Settings.
In Windows 10, select the Start button, and then choose the settings button followed by Update & Security.
In Windows 8, swipe from the right to open the charms bar. Select Change PC settings. Choose Update and recovery from the list on the left (or General prior to Windows 8.1).
-
Choose Recovery from the list of options.
-
In the Advanced startup section, select Restart now.
-
Wait through the Please wait message until Advanced Startup Options opens.
Method 3: Shutdown Command
-
Open Command Prompt.
Another option is to open Run (use the WIN+R keyboard shortcut) if you can’t get Command Prompt started for some reason, probably related to the issue you’re having that has you here in the first place!
-
Save any open files before continuing or you’ll lose any changes you’ve made since your last save.
-
Execute the shutdown command in the following way:
shutdown /r /oTo cancel the shutdown command once executed (like if you forgot to save your work!) execute shutdown /a in the same Command Prompt window.
-
Select Close to the signoff warning message that appears a few seconds later.
-
After several seconds, during which nothing seems to be happening, Windows will then close and you’ll see a Please wait message.
-
Wait just a few seconds more until the Advanced Startup Options menu opens.
Method 4: Boot From Your Windows Installation Media
-
Insert into your computer a Windows 11, Windows 10, or Windows 8 DVD or a flash drive with the Windows installation files on it.
You can borrow someone else’s disc (or other media) if you need to. You’re not installing or reinstalling Windows, you’re just accessing Advanced Startup Options—no product key or license breaking required.
-
Boot from the disc or boot from the USB device, whatever your situation calls for.
-
Select Next from the Windows Setup screen.
-
Choose Repair your computer at the bottom of the window.
-
Advanced Startup Options will start, almost immediately.
Method 5: Boot From a Windows 11/10/8 Recovery Drive
-
Insert your Windows 11, Windows 10, or Windows 8 Recovery Drive into a free USB port.
Don’t worry if you weren’t proactive and never got around to creating a Recovery Drive. If you or a friend has a computer with the same version of Windows, see How to Create a Windows Recovery Drive for instructions.
-
Boot your computer from the flash drive.
-
On the Choose your keyboard layout screen, select U.S. or whatever keyboard layout you’d like to use.
-
Advanced Startup Options will begin instantly.
Method 6: Boot Directly to Advanced Startup Options
-
Start or restart your computer or device.
-
Choose the boot option for System Recovery, Advanced Startup, Recovery, etc.
On some Windows 11/10/8 computers, for example, pressing F11 starts System Recovery.
What this option is called is configurable by your hardware maker, so the options mentioned here are just some that we’ve seen or heard. Whatever the name, it should be clear that what you’re about to do is a boot to the advanced recovery features included in Windows.
The ability to boot directly to Advanced Startup Options isn’t one that’s available with a traditional BIOS. Your computer will need to support UEFI and then also be configured properly to boot directly to the ASO menu. Fortunately, this is very common these days.
-
Wait for Advanced Startup Options to begin.
What About F8 and SHIFT+F8?
Neither F8 nor SHIFT+F8 is a reliable option for booting to the Advanced Startup Options menu. See our guide on how to start Windows in Safe Mode for more on this.
If you need to access Advanced Startup Options, you can do so with any of the several methods listed above.
How to Exit Advanced Startup Options
Whenever you’re finished using the ASO menu, you can choose Continue to restart your computer. Assuming it’s working properly now, this will boot you back into Windows.
Your other option is Turn off your PC, which will do just that.
FAQ
-
How do I change the default startup OS in the Boot Menu?
Press the Windows key + X and then select Run to open the Run window, or press the Windows key + R to open the Run window immediately. Type in «msconfig» and select OK to run MSConfig. Select the Boot tab, then choose the OS type you want to set as the new default and select Set as default > Apply > OK.
-
How do I remove items from the Windows 10 boot menu?
Press the Windows key + R to open the Run window, then type in «msconfig» and press Enter. Select the Boot tab, choose the item you want to remove, then select Delete.
-
How do I enable the F12 boot menu in Windows 10?
You’ll need to access your computer’s BIOS, which you can do by pressing the correct key on your keyboard multiple times as Windows is starting up. Depending on the manufacturer this could be F12, F2, Esc, or Delete. Then select your desired boot device from the list.
Thanks for letting us know!
Get the Latest Tech News Delivered Every Day
Subscribe