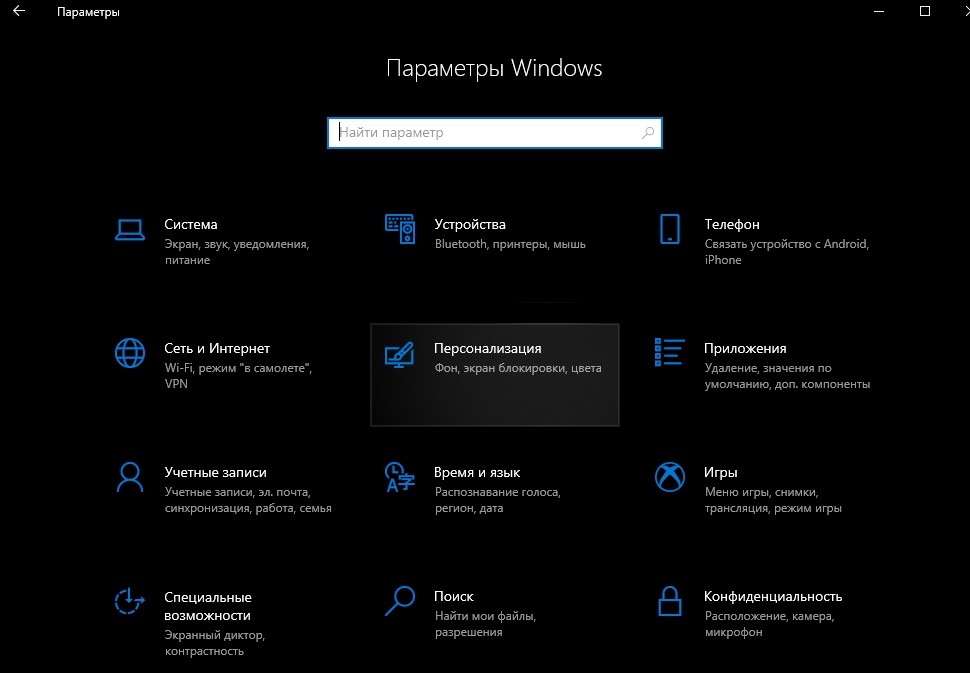
Start screen (начальный экран) — это главный экран операционной системы Windows, который отображается сразу после запуска системы или выхода из режима сна. На Start screen расположены плитки, представляющие собой ярлыки к приложениям, файлам и папкам, а также интерактивные виджеты с информацией о погоде, новостях, календаре и других сервисах.
Start screen впервые появился в ОС Windows 8 и с тех пор стал стандартным интерфейсом для компьютеров, планшетов и смартфонов, работающих под управлением Windows 10. Главное преимущество Start screen — быстрый доступ к наиболее часто используемым приложениям и сервисам.
Для удобства использования Start screen предлагает множество возможностей настройки: можно изменить размер и положение плиток, добавить или удалить плитки, создать группы плиток для категоризации приложений и файлов. Кроме того, Start screen позволяет выполнять поиск по приложениям, использовать живые плитки для получения обновленной информации на главном экране и многое другое.
Содержание
- Что такое Start screen и его особенности
- Возможности Start screen в Windows
- Как настроить и настроить под себя Start screen
- Польза Start screen в повседневной жизни
- Как использовать закрепленные плитки в Start screen
- Создание и управление группами плиток на Start screen
- Интересные функции Start screen, о которых вы, возможно, не знали
- Вопрос-ответ
- Что такое Start screen?
- Как пользоваться Start screen?
Что такое Start screen и его особенности
Start screen (начальный экран) является одной из основных функций операционной системы Windows 8 и Windows 10. Он представляет собой главное меню, на котором отображаются плитки (тайлы) с ярлыками приложений и другими элементами управления.
Особенности Start screen:
- Персонализация: Пользователи могут настраивать Start screen при помощи выбора плиток, их размеров, расположения, цветовой схемы и фона.
- Доступ к приложениям: Start screen обеспечивает удобный доступ ко всем установленным приложениям и программам. Плитки могут быть организованы в различных группах, чтобы пользователь мог легко найти нужное приложение.
- Живые плитки: Некоторые плитки на Start screen могут отображать динамическую информацию, например, новости, погоду, обновления социальных сетей и т.д. Это позволяет быстро ознакомиться с актуальной информацией без запуска отдельных приложений.
- Поиск и универсальный поиск: Start screen включает поисковую строку, которая позволяет быстро найти приложения, настройки, файлы и многое другое на компьютере или в Интернете. Универсальный поиск находится в правой части Start screen и позволяет искать информацию в различных приложениях и сервисах, таких как почта, погода, календарь и даже интернет-магазины.
Start screen представляет собой интуитивно понятный и удобный способ взаимодействия с операционной системой Windows. Он даёт возможность быстрого доступа к приложениям и информации, а также позволяет пользователям настроить экран под свои предпочтения и потребности.
Возможности Start screen в Windows
Start screen в Windows предоставляет пользователю различные возможности для упрощения и ускорения работы, а также для персонализации рабочего пространства. Вот некоторые из основных функций Start screen:
- Запуск приложений: на Start screen можно расположить ярлыки приложений, чтобы быстро получить доступ к нужному инструменту или программе. Для этого достаточно перетащить ярлык на желаемую позицию на Start screen.
- Поиск: Start screen предоставляет быстрый доступ к функции поиска, с помощью которой можно найти нужные файлы, приложения или настройки.
- Панель быстрого доступа: на Start screen можно добавить ярлыки к самым часто используемым приложениям, чтобы иметь к ним быстрый доступ с любой страницы Start screen.
- Живые плитки: многие приложения на Start screen могут отображать информацию в виде живых плиток. Это позволяет получать актуальную информацию без необходимости открывать само приложение.
- Группировка: плитки на Start screen можно группировать по категориям, чтобы упорядочить рабочее пространство и ускорить поиск нужного приложения.
- Персонализация: Start screen можно настроить по своему вкусу, выбрав фоновое изображение, цвета и размеры плиток.
- Создание ярлыков: на Start screen можно создавать собственные ярлыки для доступа к веб-страницам, папкам или файлам.
Это лишь небольшая часть возможностей Start screen в Windows. Каждый пользователь может настроить рабочий стол так, чтобы он максимально соответствовал его индивидуальным потребностям и предпочтениям.
Как настроить и настроить под себя Start screen
Start screen (Стартовый экран) представляет собой основное окно, которое отображается при запуске операционных систем Windows 8 и Windows 10. Он содержит плитки, и каждая плитка представляет отдельное приложение или функцию системы.
Для настройки Start screen под себя, следует выполнить следующие действия:
- Персонализация изображения фона
- Добавление и удаление плиток
- Группировка плиток
- Изменение размера плиток
- Закрепление приложений
1. Персонализация изображения фона
Чтобы изменить изображение фона на Start screen, необходимо:
- Кликнуть правой кнопкой мыши на свободной области Start screen.
- Выбрать в контекстном меню пункт «Настроить».
- В открывшемся окне «Настроить Start screen» кликнуть на кнопку «Обзор» рядом с пунктом «Показывать фон Start screen на этом мониторе».
- Выбрать желаемое изображение фона и нажать кнопку «Открыть».
- Нажать кнопку «Применить».
2. Добавление и удаление плиток
Для добавления плитки на Start screen надо:
- Перейти на рабочий стол и найти ярлык плитки, которую нужно закрепить.
- Кликнуть правой кнопкой мыши на ярлыке приложения.
- В появившемся контекстном меню выбрать пункт «Закрепить к начальному экрану».
Для удаления плитки с Start screen необходимо:
- Кликнуть правой кнопкой мыши на плитке, которую нужно удалить.
- В контекстном меню выбрать пункт «Открепить от начального экрана».
3. Группировка плиток
Группировка плиток на Start screen помогает организовать приложения и функции в удобный и логичный порядок. Чтобы создать группу плиток, следуйте инструкциям:
- Кликните правой кнопкой мыши на плитке и перетащите ее на пустую область Start screen.
- Нажмите на название группы и введите новое имя.
- Перетаскивайте другие плитки в созданную группу.
- Для удаления группы плиток просто перетащите все плитки из группы на пустую область Start screen.
4. Изменение размера плиток
Вы можете изменять размер плиток на Start screen по своему усмотрению. Для изменения размера плиток выполните следующие действия:
- Кликните правой кнопкой мыши на плитке, которую нужно изменить.
- В контекстном меню выберите пункт «Размен плиток».
- Выберите желаемый размер (маленький, средний или большой).
5. Закрепление приложений
Чтобы закрепить приложение на Start screen с рабочего стола, выполните следующие шаги:
- Кликните правой кнопкой мыши на ярлыке приложения на рабочем столе.
- В контекстном меню выберите пункт «Закрепить к начальному экрану».
Вот и все! Теперь вы знаете, как настроить и настроить под себя Start screen в операционных системах Windows 8 и Windows 10.
Польза Start screen в повседневной жизни
Start screen — это современный и удобный способ организации и доступа к приложениям, файлам и функциям компьютера. Он представляет из себя стартовый экран, который отображается при включении компьютера или ноутбука с операционной системой Windows 8 и выше.
Вот несколько преимуществ, которые Start screen предлагает в повседневной жизни:
- Быстрый доступ к приложениям: на Start screen вы можете разместить ярлыки приложений, которые вы используете наиболее часто. Это позволяет вам быстро запускать нужные программы без необходимости искать их в меню «Пуск» или на рабочем столе.
- Персонализация: Start screen позволяет вам настроить внешний вид и расположение ярлыков и плиток приложений. Вы можете выбрать фоновое изображение, изменить размер и расположение плиток, а также организовать их в группы для удобства использования.
- Информативность: Start screen может отображать полезные данные и обновления в реальном времени. Например, плитки погоды или новостей могут сообщать вам актуальную информацию без необходимости запуска соответствующих приложений.
- Быстрый поиск: Start screen содержит поле поиска, которое позволяет вам быстро найти нужные файлы или приложения. Просто начните вводить запрос, и Start screen будет отображать соответствующие результаты в реальном времени.
- Удобный доступ к настройкам и функциям: Start screen содержит ссылки на различные настройки и функции вашего компьютера, такие как Wi-Fi, звук, язык и др. Это позволяет вам быстро настраивать параметры своей системы без необходимости искать их в меню «Пуск» или в других местах.
В целом, Start screen значительно упрощает использование компьютера и повышает вашу продуктивность. Он помогает сделать ваш рабочий процесс более организованным и удобным, позволяя быстро находить и запускать нужные программы, файлы и функции.
Как использовать закрепленные плитки в Start screen
Start screen в операционной системе Windows представляет собой главный экран, на котором расположены раскладки плиток и ярлыков для запуска программ и приложений. Чтобы упростить и ускорить доступ к наиболее часто используемым программам, можно закрепить соответствующие плитки на Start screen.
Для того чтобы закрепить плитку на Start screen, следуйте инструкциям:
- Найдите нужную программу или приложение в списке всех доступных программ.
- Щелкните правой кнопкой мыши на выбранной программе и выберите опцию «Закрепить к плитке Start» в контекстном меню.
- Теперь программа будет отображаться в виде плитки на Start screen.
Если вы хотите изменить расположение или размер закрепленной плитки на Start screen, следуйте этим шагам:
- На Start screen найдите нужную закрепленную плитку.
- Щелкните и удерживайте плитку, и перетащите ее на желаемую позицию.
- Чтобы изменить размер плитки, щелкните правой кнопкой мыши на плитке и выберите опцию «Размер плитки». В открывшемся подменю выберите нужный размер.
- После завершения изменений плитка будет отображаться в новом расположении или размере на Start screen.
Закрепление плиток на Start screen дает возможность быстро запускать предпочитаемые программы и приложения без необходимости поиска их в списке всех доступных программ. Это значительно экономит время и упрощает работу с компьютером.
Создание и управление группами плиток на Start screen
Создание групп плиток на Start screen позволяет организовать ярлыки приложений и информацию на рабочем столе операционной системы Windows. Группы плиток помогают пользователю разделить приложения по категориям для более удобного и быстрого доступа к нужной информации.
Для создания новой группы плиток на Start screen необходимо выполнить следующие действия:
- Нажмите правой кнопкой мыши на свободном месте Start screen;
- В открывшемся контекстном меню выберите пункт «Создать группу»;
- Введите имя новой группы плиток и нажмите клавишу Enter.
После создания группы плиток её можно управлять различными способами:
- Перемещение плиток внутри группы: одну плитку можно перетащить на другую, чтобы создать подгруппу или переместить её внутри существующей группы;
- Переименование группы плиток: нажмите правой кнопкой мыши на группу плиток и выберите пункт «Переименовать». Введите новое имя и нажмите клавишу Enter;
- Удаление группы плиток: нажмите правой кнопкой мыши на группу плиток и выберите пункт «Удалить».
Также пользователь может настраивать размер плиток и их расположение внутри группы. Для этого необходимо выполнить следующие действия:
- Нажмите правой кнопкой мыши на плитку, которую нужно изменить;
- В открывшемся контекстном меню выберите пункт «Размер плитки» и выберите нужный размер;
- Чтобы изменить расположение плитки, просто перетащите её в нужное место внутри группы.
Таким образом, создание и управление группами плиток на Start screen позволяет пользователю организовать свой рабочий стол операционной системы Windows по своему усмотрению, делая работу с приложениями более удобной и эффективной.
Интересные функции Start screen, о которых вы, возможно, не знали
Start screen — это главный экран операционных систем Windows 8 и Windows 10, который позволяет удобно управлять приложениями и быстро запускать нужные программы. Однако, помимо основных функций, Start screen предлагает и другие интересные возможности, которые могут упростить вашу работу с компьютером.
- Группировка и переименование плиток приложений.
- Изменение размеров плиток.
- Закрепление панели быстрого доступа.
- Использование живых плиток.
- Поиск приложений.
На Start screen можно создавать группы плиток приложений, чтобы сгруппировать их по вашему усмотрению. Для этого просто перетащите одну плитку на другую и они автоматически сгруппируются вместе. Кроме того, вы можете переименовывать группы плиток для удобства их использования.
Start screen предлагает три размера плиток: маленький, средний и большой. Это позволяет настраивать внешний вид главного экрана в соответствии с вашими предпочтениями. Чтобы изменить размер плитки, просто нажмите на нее правой кнопкой мыши и выберите нужный размер из контекстного меню.
Start screen позволяет закрепить панель быстрого доступа с полезными инструментами и функциями. Например, вы можете добавить на нее ярлык для быстрого запуска командной строки или панели управления. Для этого просто перетащите соответствующий ярлык на панель быстрого доступа.
Некоторые плитки на Start screen являются живыми и отображают динамическую информацию. Например, плитка «Почта» может показывать количество непрочитанных сообщений, а плитка «Календарь» — предстоящие события. Чтобы включить живые плитки, просто щелкните правой кнопкой мыши на плитке и выберите «Разрешить обновление».
Start screen содержит встроенный поиск, который позволяет быстро находить нужные приложения. Просто начните вводить название приложения в поисковую строку на Start screen и список приложений будет фильтроваться в реальном времени.
В целом, Start screen — это мощный инструмент для быстрого доступа к приложениям и упрощения работы с компьютером. Как видите, он предлагает не только основные функции, но и множество интересных возможностей, которые могут быть полезны в повседневной жизни.
Вопрос-ответ
Что такое Start screen?
Start screen (Стартовый экран) — это главный экран операционной системы Windows, который содержит плитки с ярлыками приложений и информацией. Он представляет собой интерактивное окно, которое позволяет пользователям быстро получать доступ к нужным приложениям, настройкам и данным.
Как пользоваться Start screen?
Для использования Start screen необходимо сначала открыть его. Для этого можно нажать на кнопку «Пуск», которая находится в левом нижнем углу экрана. После этого откроется Start screen, на котором можно перемещаться влево и вправо, прокручивая страницы с плитками приложений. Чтобы открыть приложение, просто коснитесь его плитки. Если нужно найти конкретное приложение, можно воспользоваться поиском, который находится в правом верхнем углу Start screen.
Как включить начальный экран в Windows 10? Начальный экран Windows 10, который дебютировал в Windows 8 и меню «Пуск», которое было в Windows 7 и в предыдущих версиях Windows, объединены и доступны в Windows 10. У вас есть выбор из двух конфигураций начального экрана.
- Полноэкранный начальный экран с меню «Пуск» свернут с левой стороны
- Начальный экран с частичным экраном с меню «Пуск», всегда видим с левой стороны
По умолчанию используется конфигурация с частичным экраном.

Первая предварительная версия новой Windows наконец-то стала доступна для скачивания. Заинтересованные пользователи могут использовать свою учетную запись Microsoft, чтобы присоединиться к программе Insider Program и начать загрузку установочного образа Windows 10 Technical Preview.
Содержание
- Пошаговая инструкция
- Установка размера начального экрана
- Настройка содержимого меню «Пуск»
- В меню Пуск также могут отображаться списки
- Список наиболее часто используемых приложений
- Недавно добавленный список приложений
- Недавно открытые элементы
Пошаговая инструкция
C Windows 10 вернулось старое доброе меню «Пуск», но оно не совсем такое, каким мы его знаем по Windows 7. На этот раз оно включает в себя все лучшее из Windows 7 + динамические плитки универсальных приложений (до недавнего времени такие приложения официально назывались современными). В частности, левая сторона меню очень похожа на меню «Пуск» в Windows 7, а правая состоит из плиток.
Если вы использовали Windows 8 или Windows 8.1 достаточно долгое время и уже успели привыкнуть к начальному экрану, вы будете рады узнать, что Windows 10 позволяет его включить.
Напомню, что на компьютерах c подключенными клавиатурой и мышью, Windows 10 автоматически включает новое меню «Пуск», в то время как на сенсорных устройствах по умолчанию используется начальный экран.
Обратите внимание, что при включении начального экрана в Windows 10, меню «Пуск» будет полностью отключено. Таким образом, начальный экран будет открываться и при нажатии на кнопку «Пуск» в левом нижнем углу экрана, и при нажатии на клавишу с логотипом Windows на клавиатуре.
Итак, давайте включим начальный экран в Windows 10:
Шаг 1: Щелкните правой кнопкой мыши на панели задач и выберите пункт «Properties».

Шаг 2: В окне «Taskbar and Navigation properties» откройте вкладку «Start Menu». Найдите опцию «Use the Start menu instead of the Start screen» и снимите с нее флажок. Наконец, нажмите «Apply», чтобы выключить меню «Пуск» и включить начальный экран.

Далее нужно выйти из системы и снова войти в нее. Для этого в появившемся окошке нажмите «Sign out and…».

Установка размера начального экрана
Конфигурация меню «Пуск», которая лучше всего подходит для вас, зависит от того, как вы работаете. В число вопросов входит, в основном, взаимодействуете ли вы с Windows 10, нажимая или касаясь экрана, какой метод вы предпочитаете использовать для запуска приложений, используете ли вы списки переходов, и на сколько большой ваш экран. Ваше первоначальное предпочтение может основываться исключительно на том, к чему вы привыкли и с чем вам удобно. Вы можете легко опробовать обе конфигурации, чтобы определить, какая из них более эффективна для вашей работы.
Изменение конфигурации меню «Пуск» выполняется одним щелчком мыши. Когда вы включаете или выключаете полноэкранный режим, изменение происходит немедленно. Для этого не нужно выходить из Windows или перезагружать компьютер.
Вы можете настроить высоту и ширину начального частичного экрана. Когда вы сделаете начальный экран шире или уже, ширина групп плиток может измениться от трех средних плиток при более узкой ширине, до четырех средних плиток при более широкой ширине.
Как переключится между основным и полноэкранным режимом стартового экрана:
- 1. Откройте окно настройки
- 2. Нажмите кнопку Персонализация, а затем на странице Персонализация Нажмите кнопку Пуск.
- 3. На панели Пуск выберите Открывать меню пуск в полноэкранном режиме. Затем нажмите кнопку Пуск, чтобы проверить настройки.

Для изменение размера частичного экрана нужно:
- 1. Перетащите верхнюю границу начального экрана вверх или вниз, чтобы увеличить или уменьшить его высоту.
- 2. Перетащите правую границу начального экрана вправо или влево, чтобы увеличить или уменьшить его ширину.
Чтобы отобразить плитки начального экрана, которые не помещаются на частичном экране нужно:
- 1.Наведите указатель мыши на начальный экран, чтобы отобразить вертикальную полосу прокрутки на правом краю.
- 2. Перетащите поле прокрутки или щелкните полосу прокрутки, чтобы прокрутить содержимое стартового экрана.
Настройка содержимого меню «Пуск»
В левой части меню »Пуск» отображается информация, связанная с пользователями и приложениями. Как минимум, он отображает кнопку »учетной записи пользователя» вверху и кнопки »питания» и »все приложение» внизу. (Кнопки питания и все приложения также доступны непосредственно с начального экрана в полноэкранной конфигурации).

В меню Пуск также могут отображаться списки
Список наиболее часто используемых приложений
При новой установке Windows 10 этот список содержит ссылки на некоторые стандартные утилиты Windows или приложения, выбранные производителем компьютера. При использовании Windows в этом списке отображаются наиболее часто используемые приложения, которые не закреплены на начальном экране.
Недавно добавленный список приложений
Этот список отображает приложения в течение короткого времени после их установки. Если приложения не были установлены в последнее время, в меню Пуск не отображается заголовок недавно добавленного списка.
Недавно открытые элементы
Если этот параметр включен, можно быстро получить доступ к файлам, открытым с помощью приложений, поддерживающих эту функцию( например, приложений Microsoft Office), из меню Пуск или панели задач.
В меню Пуск Windows 10 нет области, в которой вы можете закрепить ярлыки приложений, вместо этого вы закрепляете их на начальном экране.
В нижней части меню Пуск, чуть выше кнопки питания, можно отобразить ссылки на следующие пункты:
- Проводник
- Окно настроек
- Папки документов, загрузок, музыки, изображений и видео
- Домашняя группа и сетевые окна
- Ваша личная папка, из которой вы можете получить доступ ко всем папкам и настройкам учетной записи пользователя
В меню Пуск по умолчанию отображаются только Проводник и параметры; необходимо включить все папки или окна, которые требуется отобразить.
Выбранные папки всегда отображаются в том же порядке.
Отображение или скрытие списков приложений в меню Пуск:
1. Откройте окно настройки
2. Нажмите кнопку Персонализация, а затем на странице Персонализация Нажмите кнопку Пуск.
3. В области Пуск выполните одно из следующих действий.
- Нажмите кнопку Показать наиболее часто используемые приложения, чтобы отключить или включить список наиболее часто используемых.
- Нажмите кнопку Показать недавно добавленные приложения, чтобы отключить или включить список недавно добавленных.
4. Нажмите кнопку Пуск, чтобы проверить настройки.
Для отбражение или скрытие списков переходов в меню Пуск на панели задач нужно:
- 1. На странице Персонализация в Параметре окн нажмите кнопку Пуск.
- 2. На панели Пуск щелкните показать недавно открытые элементы в списках переходов при запуске или на панели задач, чтобы включить или выключить списки переходов.
Для добавления и удаления папок в меню Пуск:
1. На странице Персонализация в Параметре окн нажмите кнопку Пуск.
2. В нижней части панели Пуск выберите папки, которые будут отображаться при запуске
для отображения списка параметров, каждый с кнопкой переключения.

Нажмите переключатель, чтобы включить или выключить отображение папки.
3. На выбор, какие папки отображаются на начальной странице установите кнопу переключения папок, те которые должны отображаться в меню Пуск, значение ВКЛ., а для остальных-Выкл.
На этом все. Удачи!
Отличного Вам дня!
Whether you own a Windows 10 desktop, laptop, tablet, or hybrid, you have a choice between using the Start menu or the Start screen. For any device you control with a mouse and keyboard, the Start menu is typically the better option. However, you may find the Start screen easier to work with on touch-screen devices like a tablet or hybrid.
Either way, you can use the Start screen as efficiently as you can the Start menu. The trick lies in knowing how to control and tweak it.
Enable Start Screen
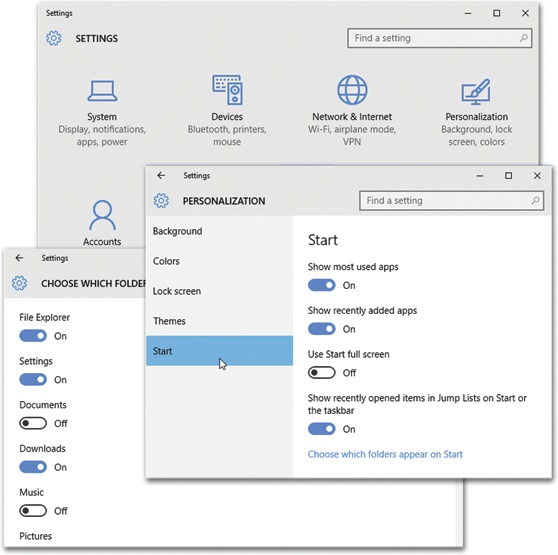
Let’s assume your current Windows 10 machine is set to use the Start menu by default. If you want to switch to the Start screen, click the Start button and go to Settings > Personalization > Start. Turn on the switch for Use Start full screen.
Click the Start button and you’ll now see that the Start menu has been replaced by the Start screen. The Windows 10 Start screen is friendlier and more functional than the old version from Windows 8 and 8.1.
The tiled portion of the Start screen in Windows 10 looks about the same as it did in previous versions, but by default is less cluttered and cramped because the tiles are sized better.
Customize Start Screen
Okay, but what are all the icons on the left sidebar of the screen? That’s where the smoother functionality comes into play, because it functions as a merger between the Start menu and the Start screen.
Hover your mouse over the button at the bottom left of the screen, just above the Start button. You’ll notice that the pane expands to include the name of each icon so you know what they all do. This menu can be customized, but it will give you easy access to control power, change settings, and access files.
Click the Power button to put Windows to sleep, restart your computer, or shut down the whole thing. Select your name to change your account settings, lock the screen, or sign out of Windows. At the top of the sidebar, you can view the apps and tiles you have pinned or all installed apps.
Change Tiles
You can modify the Start screen by adding or removing tiles. Right-click a tile and select Unpin from Start to remove it.
To add a tile, switch from the Pinned apps view to All Apps. Right-click on the tile you want to add and select Pin to Start.
However, adding a tile this way can be imprecise because it is just randomly placed on the Start screen. A better way of doing it is by manually dragging tiles to the appropriate spot or group. Go back to Settings > Personalization > Start and turn off the switch for Use Start full screen to return to Start menu mode.
Now you can just drag a tile from the menu to the Start screen and into the right area. When you’re done, go back into Settings and turn on the Start screen again.
Start Screen Settings
If you’re looking to do more to customize the Start menu or Start screen, head over to the settings and play with a variety of other options. Turn on Show more tiles on Start to reduce the size of all existing tiles so you can squeeze more onto the screen.
Turn on the option for Show recently opened items in Jump Lists on Start or the Taskbar and in File Explorer Quick Access to display recent items on the Taskbar icons and in the Quick Access section in File Explorer. This will work whether you’re using the Start menu or Start screen.
Click the Choose which folders appear on Start link at the bottom of the page to add or remove certain Windows folders and locations on the sidebar. You can display and access icons for File Explorer, Settings, Documents, Downloads, Music, Pictures, Videos, Network, and Personal Folder. Keep what you want and discard what you don’t want to see.
Like What You’re Reading?
Sign up for Tips & Tricks newsletter for expert advice to get the most out of your technology.
This newsletter may contain advertising, deals, or affiliate links. Subscribing to a newsletter indicates your consent to our Terms of Use and Privacy Policy. You may unsubscribe from the newsletters at any time.
Chapter 1. Desktop & Start Menu
These days, the graphic user interface (the colorful world of icons, windows, and menus) is standard. Mac, Windows, Chrome OS, Linux—every operating system is fundamentally the same, which is to say a very long way from the lines of typed commands that defined the earliest computers.
Windows 10 restores the desktop to its traditional importance, following a weird three-year detour into “what the heck” land known as Windows 8. The desktop is once again your only home base, your single starting point. It’s the view that greets you when the computer turns on, and it offers all the tools you need to manage and organize your files.
Herewith: a grand tour of the state of the art in computer desktops—the one in Windows 10.
The Lock Screen
When you turn on a Windows 10 machine, you know right away that you’re not in Kansas anymore. The first thing you see is a colorful curtain that’s been drawn over the computer’s world. It’s the Lock screen (Figure 1-1).
The Lock screen serves the same purpose it does on a phone: It gives a quick glance at the time, the date, your WiFi signal strength, the weather, and (on laptops and tablets) your battery charge. As you download and install new apps, they can add informational tidbits to this Lock screen, too.
The point is that sometimes you don’t really need to wake the machine up. You just want to know what time it is.
The Lock screen can also give you instant access to your Camera and Skype apps (Camera and Skype). You might want to take a picture or answer a call without having to go through the red tape of fully logging in.
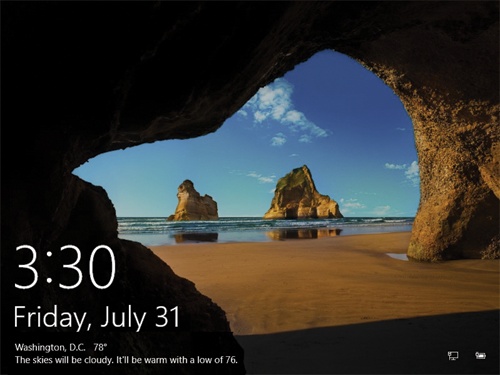
Figure 1-1. You can control which apps are allowed to add information to the Lock screen in Settings (like the weather report shown here). You’re not stuck with the Lock screen photo as Mother Microsoft has installed it, either. You can change the picture, if you like, or you can eliminate it altogether. Chapter 4 has the details.
When you do want to go past the Lock screen to log in, there’s nothing to it. Almost anything you do that says, “I’m here!” works:
-
Touchscreen: Swipe a finger upward. (Swipe downward to jump into Camera mode.)
-
Mouse: Click anywhere. Or turn the mouse wheel.
-
Keyboard: Press any key.
The Lock screen slides up and out of the way, revealing the Login screen (Figure 1-2, top).
Tip
You can change the photo background of the Lock screen, make it a slideshow, or fiddle with which information appears here; see Customizing the Lock Screen. You can even eliminate the Lock screen altogether—after all, it’s an extra click every time you log in. For step-by-step instructions, see “Eliminating the Windows 10 Lock Screen,” a free downloadable PDF appendix on this book’s “Missing CD” page at www.missingmanuals.com.
The Login Screen
As in any modern operating system, you have your own account in Windows. It’s your world of files, settings, and preferences. So the second thing you encounter in Windows 10 is the Login screen. Here, at lower left, you see the name and photo for each person who has an account on this machine (Figure 1-2). Choose yours.
This is also where you’re supposed to log in—to prove that you’re you. But logging in no longer has to mean typing a password. One of Windows 10’s primary goals is to embrace touchscreens, and typing is a pain on tablets.
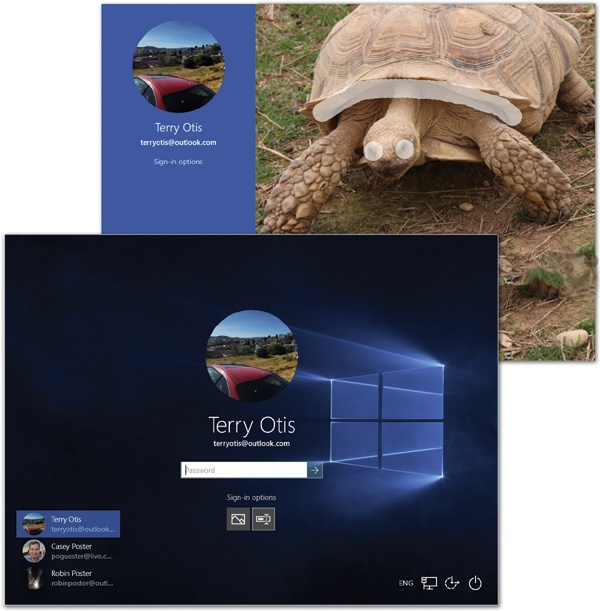
Figure 1-2. Lower left: If your machine has more than one account set up, tap or click your icon to sign in. Top right: Typing is so 2009! In Windows 10, you can log into your account using any of several more touchscreen-friendly methods, like drawing three predetermined lines on a photograph.
Therefore, you can log in using any of these techniques:
-
Just look at your screen. On laptops or tablets with Intel’s RealSense infrared cameras, facial recognition logs you in.
-
Swipe your finger across the fingerprint reader, if your computer has one.
-
Put your eye up to the iris reader, if your machine is so equipped.
-
Draw three lines, taps, or circles on a photo you’ve selected (Figure 1-2, top).
-
Type in a PIN you’ve memorized.
-
Type a traditional password.
-
Skip the security altogether. Jump directly to the desktop when you turn on the machine.
See Chapter 19 for instructions on setting each of these up.
The Desktop
Once you’ve gotten past the security barrier, you finally wind up at the home base of Windows: the desktop. See Figure 1-3 for a refresher course.
You can, and should, make the desktop look like whatever you want. You can change its background picture or color scheme; you can make the text larger; you can clutter up the whole thing with icons you use a lot. Chapter 4 is a crash course in desktop interior decoration.
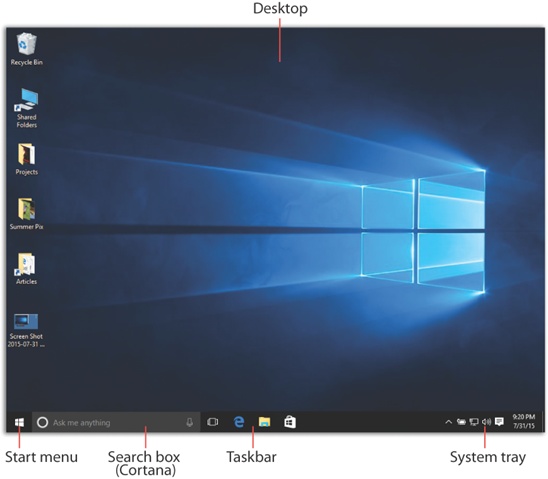
Figure 1-3. The desktop returns in Windows 10 as everybody’s starting place. It’s once again the first thing you see after you log in. It has a shiny, clean, new look, but the time-honored landmarks—Start menu, taskbar, system tray—are just where they’ve always been.
Meet the Start Menu
Windows is composed of 50 million lines of computer code, scattered across your hard drive in thousands of files. The vast majority of them are not for you; they’re support files, there for behind-the-scenes use by Windows and your applications. They may as well bear a sticker reading, “No user-serviceable parts inside.”
That’s why the Start menu is so important (Figure 1-4). It lists every useful piece of software on your computer, including commands, programs, and files. Just about everything you do on your PC begins—or can begin—with your Start menu.
In Windows 10, as you’ve probably noticed, the word “Start” doesn’t actually appear on the Start menu, as it did for years; now the Start menu is just a square button in the lower-left corner of your screen, bearing the Windows logo (![]() ). But it’s still called the Start menu, and it’s still the gateway to everything on the PC.
). But it’s still called the Start menu, and it’s still the gateway to everything on the PC.
If you’re the type who bills by the hour, you can open the Start menu (Figure 1-3, lower left) by clicking it with the mouse. If you feel that life’s too short, however, tap the ![]() key on the keyboard instead, or the
key on the keyboard instead, or the ![]() button if it’s a tablet.
button if it’s a tablet.
Really, truly: Learn this. Tap ![]() to open the Start menu (or to close it!).
to open the Start menu (or to close it!).
The Start menu (Figure 1-4) is split into two columns. For convenience, let’s call them the left side and the right side.
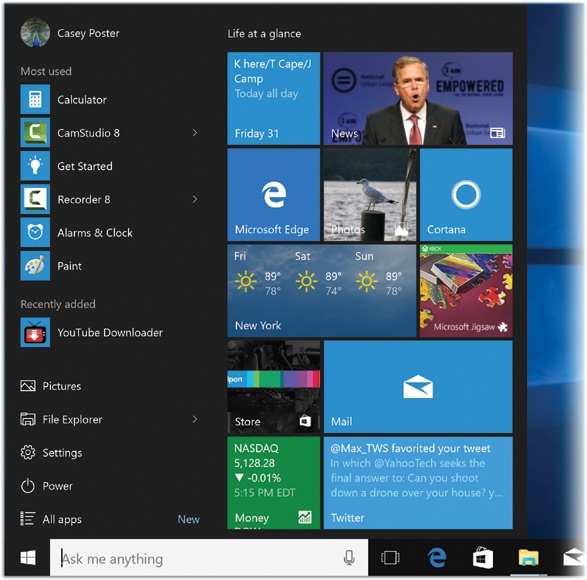
Figure 1-4. Here it is, the single biggest change in Windows 10: the new, hybrid Start menu. The left side gives you direct access to apps you use frequently, or that you’ve installed recently, as well as important commands and places like Power and “All apps.” The right side is yours to customize.
Note
If your computer is a tablet, and it has no physical keyboard at all, then it may start up in Windows 10’s new Tablet mode. In this mode, the right side of the Start menu fills the entire screen, and the left side doesn’t appear unless you tap the ![]() in the top-left corner. For details on Tablet mode, see Chapter 13.
in the top-left corner. For details on Tablet mode, see Chapter 13.
Start Menu: The Left Side
The most amazing thing about the Windows 10 Start menu is that Windows 10 has a Start menu—something that’s been missing since Windows 7. The left side, or something like it, has been with Windows from the beginning. The right side is a pared-back version of the Start screen that distinguished Windows 8.
The left side may look like the Start menu that’s been in Windows from the beginning (except during that one unfortunate three-year Windows 8 phase). But there’s a big difference: In Windows 10, you can’t use it to list your own favorite programs, folders, and files. (That’s what the right side is for.) The left side is meant to be managed and run entirely by Windows itself.
The left side has five sections, described here from top to bottom:
[Your name]
See your account name and picture in the upper-left corner of the Start menu (Figure 1-5)?
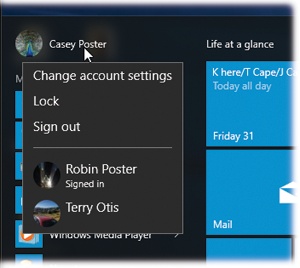
Figure 1-5. Your account icon isn’t just an icon; it’s also a pop-up menu. Click it to see the “Sign out” and “Lock” commands, as well as a shortcut to your account settings.
That’s not just helpful information. The picture is also a pop-up menu. And its commands all have to do with switching from one account to another. (In Windows’ accounts feature, each person who uses this PC gets to see her own desktop picture, email account, files, and so on. See Chapter 19.) Here’s what they do.
Tip
Some keystrokes from previous Windows versions are still around. For example, you can still press Ctrl+Alt+Delete to summon the three commands described here: “Lock,” “Switch user,” and “Sign out”—plus a bonus link for the Task Manager (Exiting Programs).
-
Change account settings takes you directly to the Settings→Account screen, where you can change your account picture, password, login method, and other details of your account—and you can create accounts for other family members.
-
Lock. This command takes you back to the Lock screen described at the beginning of this chapter. In essence, it throws a sheet of inch-thick steel over everything you were doing, hiding your screen from view. This is an ideal way to protect your PC from nosy people who happen to wander by your desk while you’re away getting coffee or lunch.
Whatever you had running remains open behind the scenes. When you log in again, you’ll find all your open programs and documents exactly as you left them.
-
Sign out. When you choose “Sign out,” Windows closes all your open programs and documents (giving you an opportunity to save any unsaved documents first). It then presents a new Login screen so that somebody else can log in.
Most Used
Beneath your name icon, you get a list of the programs that Windows sees you using a lot. Windows computes this list automatically and continuously. It’s a really great feature, because, well, if you’ve been using something a lot recently, you’ll probably use it a lot more still, and now you don’t have to burrow around looking for it.
On the other hand, if you’d rather not have Windows track what you’re doing, you can get rid of this list, or just certain items on it; see the box below.
If you see a submenu arrow (>) next to a program’s name in the Start menu, congrats. You’ve just found a jump list, a feature that gives you quick access to documents you’ve opened recently. See Jump Lists in the Taskbar for details on creating, deleting, and working with jump lists.
Tip
So how does Windows decide what to put into the “Most used” list? It’s an algorithm, Microsoft says, one that it intends to keep refining to make the list more useful. One thing is for sure, though: Any app you’ve put onto the right side of the Start menu doesn’t appear in the “Most used” list. Microsoft figures you don’t need to see its name twice.
Recently Added
The middle section of the left side shows one item: whatever app you’ve most recently downloaded or installed. It’s surprisingly handy, especially for novices, who often download something from the Internet and then can’t find where it landed.
If you’ve installed more than one new app recently, open the “All apps” list described below; the little “New” indicators show you which are the recent arrivals.
Tip
It probably goes without saying, but you can hide the “Recently added” section if you like. Open the Start menu; choose Settings→Personalization→Start; turn off “Show recently added apps.” Close Settings.
Important Places
In general, the bottom of the left side is devoted to listing important places on the computer. On a shiny new PC, the list includes these:
-
File Explorer. This “app” is the standard desktop window, showing the contents of your drives and folders (Chapter 2).
-
Settings. Yes, adjusting the settings and preferences of your PC is about six steps quicker now, since Settings is listed right here in the Start menu. Chapter 7 covers Settings in absurd detail.
-
Power. Hard though it may be to believe, there may come a day when you want to shut down or restart your computer. See Change the color.
-
All apps opens the complete master list of all your programs, as described below.
What’s great, though, is that you can add other important folders to this list, following the steps shown in Figure 1-6. These are some of your options:
-
Documents: This command opens up your Documents folder, a very important folder indeed. It’s designed to store just about all the work you do on your PC—everything except music, pictures, and videos, which get folders of their own.
Of course, you’re welcome to file your documents anywhere on the hard drive, but most programs propose depositing newly created documents into the Documents folder. That principle makes navigation easy. You never have to wonder where you filed something, since all your stuff is sitting right there in Documents.
Note
The Documents folder actually sits in the This PC
 Local Disk (C:) Users [Your Name] folder.
If you study that path carefully, it should become clear that what’s in Documents when you log in isn’t the same thing other people will see when they log in. That is, each account holder (Chapter 19) has a different Documents folder, whose contents switch according to who’s logged in.
-
Downloads. For decades, computer novices have been baffled: They download something from the web but then can’t find where it went. Now you’ll know. Out of the box, Windows puts your downloaded files into this Downloads folder (which is inside your Personal folder). It makes perfect sense to add this item to your Start menu so you have quick access to it.

Figure 1-6. You can add other important folders to your Start menu. Choose
 →Settings. In the Settings window (top right), choose Personalization. On the next screen, click Start. Finally, click “Choose which folders appear on Start” (middle). Up pops a list of items like File Explorer, Settings, Documents, Downloads, Music, Pictures, Videos, HomeGroup, and Network, so that you can turn on or off the ones you like (bottom).
 -
Music, Pictures, Videos. Microsoft assumes (correctly) that most people these days use their home computers for managing digital music, photos, and video collections. As you can probably guess, the Music, Pictures, and Videos folders are intended to house them—and these Start menu commands are quick ways to open them.
In fact, whatever software came with your phone, digital camera, or MP3 player probably dumps your photos into, and sucks your music files out of, these folders automatically. You’ll find much more on photos and music in Chapter 8.
-
HomeGroup is Microsoft’s name for an easy file-sharing system. It lets you see what’s on other computers on your home network, so that you can shove folders and files back and forth without running all over the house with a flash drive. This command opens the HomeGroup window (HomeGroups).
-
Network opens (what else?) the Network folder, where you can see a map of your home or office network and make changes to the settings. See Chapter 20.
-
Personal folder. As the box below makes clear, Windows keeps all your stuff—your files, folders, email, pictures, music, bookmarks, even settings and preferences—in one handy, central location: your Personal folder. This folder bears your name, or whatever account name you typed when you installed Windows.
Everyone with an account on your PC has a Personal folder.
Technically, your Personal folder lurks inside the C:→Users folder. But that’s a lot of burrowing when you just want a view of your empire. That’s why your Personal folder can also be installed here.
All Apps
When you click “All apps” at the bottom of the Start menu, you’re shown an important list indeed: the master catalog of every program on your computer (Figure 1-7). You can jump directly to your word processor, calendar, or favorite game, for example, just by choosing its name in this scrolling list. As a handy bonus, the word “New” appears beneath the name of any new programs—ones you’ve installed but haven’t yet used.
You can restore the original left-side column by clicking Back (at the bottom of the list).
Tip
You can also open the “All apps” menu with a quick swipe upward anywhere on the left side of the Start menu—either with the mouse, trackpad, or your finger on a touchscreen. Try it!
There are even more ways to open “All apps” if the Start menu is already open. Click the phrase “All apps,” or point to it and keep the mouse still for a moment, or press the ![]() , key (to highlight “All apps”). Then tap the Enter key, the
, key (to highlight “All apps”). Then tap the Enter key, the ![]() key, or the space bar. Just for keyboard fanatics: Once the “All apps” list is open, you can also choose anything in it without involving the mouse. Just press the
key, or the space bar. Just for keyboard fanatics: Once the “All apps” list is open, you can also choose anything in it without involving the mouse. Just press the ![]() and
and ![]() keys to highlight the item you want (or type a few letters of its name). Then press Enter to seal the deal.
keys to highlight the item you want (or type a few letters of its name). Then press Enter to seal the deal.
The “All apps” list used to be called All Programs, of course, but Microsoft had to go with the lingo of those crazy kids today. But there is one handy trick in Windows 10 that never existed before: You can now jump around in the list using an alphabetic index, shown at right in Figure 1-7.
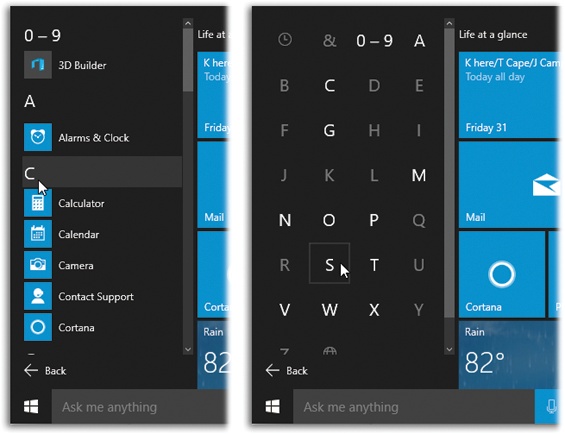
Figure 1-7. Left: When the “All apps” list is visible, your apps are grouped alphabetically. Turns out that those letter headings (A, B, C…) are also buttons. When you click one, Windows offers you a grid of the entire alphabet (right). Click a letter to jump directly to that section of the “All apps” list. If you have a lot of programs, this trick can save you a lot of scrolling.
Folders
As you’ll quickly discover, the “All apps” list doesn’t list just programs. It also houses a number of folders. See Figure 1-8.
Tip
Submenus, also known as cascading menus, largely have been eliminated from the Start menu. Instead, when you open something that contains other things—like a folder listed in the Start menu—you see its contents listed beneath, indented slightly, as shown at right in Figure 1-8. Click the folder name again to collapse the sublisting.
Keyboard freaks should note that you can also open a highlighted folder in the list by pressing the Enter key (or the ![]() key). Close the folder by pressing Enter again (or the
key). Close the folder by pressing Enter again (or the ![]() key).
key).
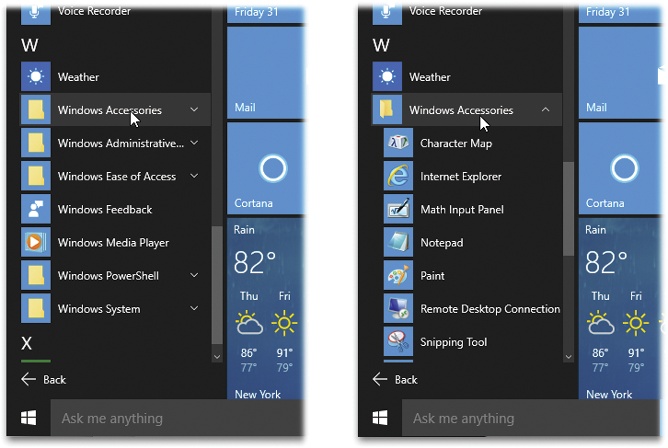
Figure 1-8. You know when you’re looking at a folder in the “All apps” list because a ![]() appears to the right of its name (left). Click the folder’s name to expand the listing—to see what’s hiding inside. (You don’t have to click right on the
appears to the right of its name (left). Click the folder’s name to expand the listing—to see what’s hiding inside. (You don’t have to click right on the ![]() .) When the folder is expanded, the symbol changes to
.) When the folder is expanded, the symbol changes to ![]() , just in case you didn’t get the point.
, just in case you didn’t get the point.
-
Software-company folders. Some of these folders bear the names of software you’ve installed; you might see a folder called, for example, PowerSoft or Logitech. These generally contain programs, uninstallers, instruction manuals, and other related junk.
-
Program-group folders. Another set of folders is designed to trim down the Programs menu by consolidating related programs, like Games, Accessories (little single-purpose programs), and Maintenance. Everything in these folders is described in Chapter 8.
How to Customize the Left Side
You can’t add anything to the left side yourself, which is a big change from Windows 7. Nor can you change the order of anything here.
You do, however, have three opportunities to redesign the left side:
-
Eliminate the “Most used” list (or certain items in it). See the box on Getting Rid of the “Most Used” List.
-
Move something to Start or the taskbar. Suppose there’s some app—say, Calculator—that’s listed in “Most used” or the “All apps” list. And you think you’d rather have it installed on your taskbar, visible at all times. Or you think it’d work best as a tile on the right side.
Turns out you can right-click its name on the left side. From the shortcut menu, choose “Pin to taskbar” or “Pin to Start.” It disappears from the “Most used” list (if that’s where it was) and goes where you sent it.
Tip
If you have a touchscreen, you can “right-click” something by holding your finger down on it for one second.
-
Add certain Windows folders to the Important Places list. You do that in Settings, as described on Recently Added.
Tip
How cool is this? You can uninstall a program right from the “All apps” list. Just right-click it (or hold your finger down on it); from the shortcut menu, choose Uninstall. Confirm in the dialog box that appears. (You can’t uninstall apps that came with Windows 10 this way—only stuff you’ve added.
Start Menu: The Right Side
The right side of the Start menu is all that remains of the Great Touchscreen Experiment of 2012, during which Microsoft expected every PC on earth to come with a touchscreen. Instead of a Start menu, you got a Start screen, stretching from edge to edge of your monitor, displaying your files, folders, and programs as big rectangular tiles.
Unfortunately, the Start screen covered up your entire screen, blocking whatever you were working on. It was horribly space-inefficient—finding a new program you’d downloaded often meant scrolling several screens to the right. And it just felt detached from the rest of the Windows world.
Turns out most people preferred the Start menu.
There were some nice aspects of the Start-screen idea, though. For one thing, it’s more than just a launcher. It’s also a dashboard. Each tile isn’t just a button that opens the corresponding program; it’s also a little display—a live tile, as Microsoft calls it—that can show you real-time information from that program. The Calendar tile shows you your next appointment. Your Mail tile shows the latest incoming subject line. The People tile shows Twitter and Facebook posts as they pour in.
Tip
Not all Start menu tiles display their own names. Some apps, like the ones for Calendar, People, and Mail, are meant to be visual dashboards. To find out such an app’s name, point to it with your cursor without clicking. A tinted, rectangular tooltip bar appears, identifying the name.
So in Windows 10, Microsoft decided to retain those colorful live tiles—on the right side of the Start menu (Figure 1-9).
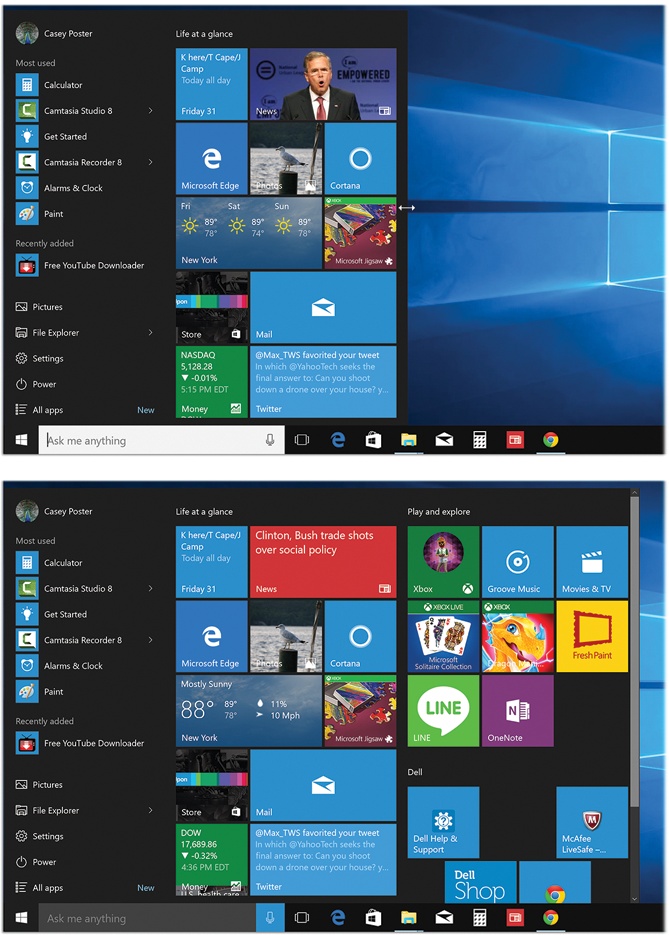
Figure 1-9. As you drag the top or right edge of the Right Side of the Start menu, you see it snap to a larger size once you’ve moved your cursor far enough. You don’t have an infinite degree of freedom here; you can only double the width or, if you have one of those rare Samsung Billboard Monitors, maybe triple it. You can also adjust the height of the Start menu—by dragging the top edge. You can goose it all the way to the top of your screen, or you can squish it down to mushroom height.
You can make this scrolling “column” bigger; you can even make it fill the screen, as it did in Windows 8; or you can hide it completely. But the point is that this time, it’s up to you. The “Start screen” takes over your world only as much as you want it to.
Tip
If you’re keyboard oriented, you can use the arrow keys to highlight the icon you want and then press the Enter key to open it.
How to Customize the Right Side
The left side is really Windows’ playground; you can’t do much to change it.
The right side, however, is your playground. You can customize it in lots of different ways. If your current job doesn’t work out, you could become a full-time right-side customizer.
Make the right side bigger or smaller
If you have a mouse or a trackpad, you can make the right side of the Start menu either wider or taller; just grab the right edge or the top edge and drag. (In the initial release of Windows 10, you can’t enlarge the Start menu with your finger on a touchscreen.)
Make the right side fill the screen
Maybe you were one of the 11 people who actually liked Windows 8, including the way it had a Start screen instead of a Start menu. Well, that look is still available.
Right-click anywhere on the desktop. (Touchscreen: Hold your finger down on the desktop.) From the shortcut menu, choose Personalize. On the Settings screen, click Start, and then click turn on “Use Start full screen.”
In this mode, the left side of the Start menu is gone. The live tiles fill your entire desktop (which is handy for touchscreens).
Note
If your goal is to use Windows 10 on a tablet, you don’t need to do all this. Just turn on Tablet mode (Chapter 13). In Tablet mode, the Start screen is standard and automatic.
Move a tile
You can, of course, drag the right side’s tiles into a new order, putting the personal back into personal computer.
With the Start menu open, just drag the tile to a new spot. The other tiles scoot out of the way to make room.
That works fine if you have a mouse or a trackpad. But if you’re using a touchscreen, that instruction leaves out a key fact: Dragging scrolls the right side! Instead, hold your finger down on the tile for half a second before dragging it.
Resize a tile
Tiles come in four sizes: three square sizes and one rectangle. As part of your Start menu interior decoration binge, you may want to make some of them bigger and some of them smaller. Maybe you want to make the important ones rectangular so you can read more information on them. Maybe you want to make the rarely used ones smaller so that more of them fit into a compact space.
Right-click the tile. (Touchscreen: Hold your finger down on the tile; tap the … button that appears.) From the shortcut menu, choose Resize. All icons give you a choice of Small and Medium; some apps offer Wide or Large options, too. See Figure 1-10.
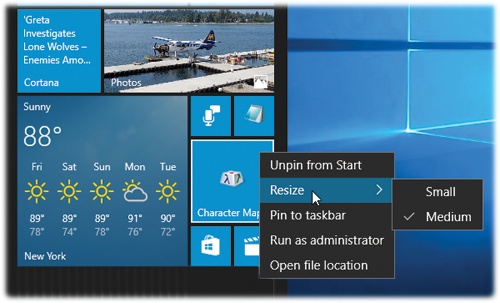
Figure 1-10. Tiles on the right side come in four sizes: Small (tiny square, no label); Medium (4x the times of Small—room for a name); Wide (twice the width of Medium); and Large (4x the size of Medium). Wide and Large options appear only for apps whose live tiles can display useful information. Drag them around into a mosaic that satisfies your inner Mondrian.
Add new tiles
You can add tiles to the right side. They can be apps, folders, or disks (but not individual files). You can use either of two techniques: dragging or right-clicking.
-
The drag method. Drag the icon directly into the open Start menu—from the desktop, an open window, the “All apps” list, or the left side of the Start menu.
-
The right-click method. Right-click an icon wherever fine icons are found: in a window, on the desktop, in the “All apps” list, or on the left side. (Touchscreen: Hold your finger down on the icon for a second.) From the shortcut menu, choose Pin to Start.
Tip
In the Edge browser, you can also add a web page to the right side. With the page open, click the … button at top right; choose Pin to Start.
In each case, the newly installed tile appears at the bottom of the right side. (You might have to scroll to see it.)
Make a tile stop blinking
Some of your right side tiles are live tiles—tiny dashboards that display real-time incoming information. There, on the Mail tile, you see the subject lines of the last few incoming messages; there, on the Calendar tile, is your next appointment; and so on.
It has to be said, though: Altogether, a Start menu filled with blinky, scrolling icons can look a little like Times Square at midnight.
If you’re feeling quite caffeinated enough already, you might not want live tiles so much as, well, dead ones.
If you’d rather silence the animation of a live tile, right-click it. (Touchscreen: Hold your finger down on it, and then tap ![]() .) From the shortcut menu, choose “Turn live tile off.” The tile’s current information disappears, and the live updating stops.
.) From the shortcut menu, choose “Turn live tile off.” The tile’s current information disappears, and the live updating stops.
To reverse the procedure, “right-click” an unmoving tile; from the shortcut menu, choose “Turn live tile on” instead.
Remove a tile
Open the Start menu. Right-click the tile you want to eliminate. (Touchscreen: Hold your finger down on it, and then tap the … button.) From the shortcut menu, choose Unpin from Start. (You’re not actually discarding that item—just getting its tile off the Start menu.)
Group your tiles
The right side’s tiles aren’t scattered pell-mell; they present an attractive, orderly mosaic. Not only are they mathematically nestled among one another, but they’re actually grouped. Each cluster of related tiles can bear a name, like “Life at a glance” (Calendar, Mail, Weather…) or “Play and explore” (games, music, TV…).
But you can change those headings, or those groupings, and come up with new ones of your own.
The technique isn’t quite obvious, but you’ll get the hang of it (see Figure 1-11). It works like this:
-
Drag a tile to the very bottom of the existing ones. (Touchscreen: Hold your finger still for a second before dragging.)
When you drag far enough—the right side might scroll, but keep your finger down—a horizontal bar appears, as shown in Figure 1-11. That’s Windows telling you, “I get it. You want to create a new group right here.”
-
Drag the tile below the bar and release it.
Release the tile you’re dragging; it’s now happily setting up the homestead. Go get some other tiles to drag over into the new group to join it, if you like. Build up the group’s population.
-
Click or tap just above your newly grouped tiles.
The words “Name group” appear.
-
Type a name for this group, and then press Enter.
Your group name is now immortalized.
By the way: Whenever you point to (or tap) the heading of any group, you may notice a little “grip strip” at the right side. If you like, you can drag that strip up or down to move the entire group to a new spot among your existing groups. (Or horizontally, if you have a multicolumn right side.)
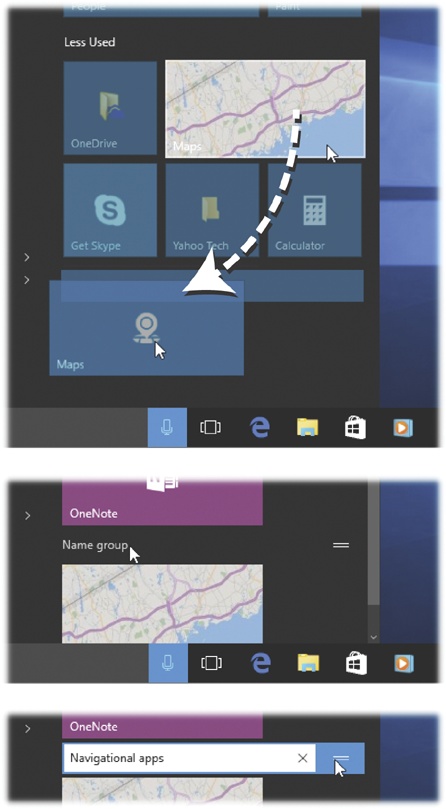
Figure 1-11. Top: To create a new tile group, start by dragging one lonely tile below all other tiles. This is your colonist. A fat horizontal divider bar appears when you’ve gone far enough. Let go. Middle: Point to the starter name (“Name group”) and click. Bottom: Type a name for the group. Use the grip strip to drag the group into a new spot, if you like.
At any point, you can rename a group (click or tap its name; type). To eliminate a group, just drag all of its tiles into other groups, one at a time. When the group is empty, its name vanishes into wherever withered, obsolete tile groups go.
Eliminate all tiles
Yes, it’s possible to eliminate the entire right side. If you like your Start menu to look like it did in the good old days, with only the left side showing, you can do that, as shown in Figure 1-12.
Of course, once you’ve done that, you’ve just eliminated one of the most useful ways of opening things on your PC. Now you can open apps only from the left side or the taskbar.
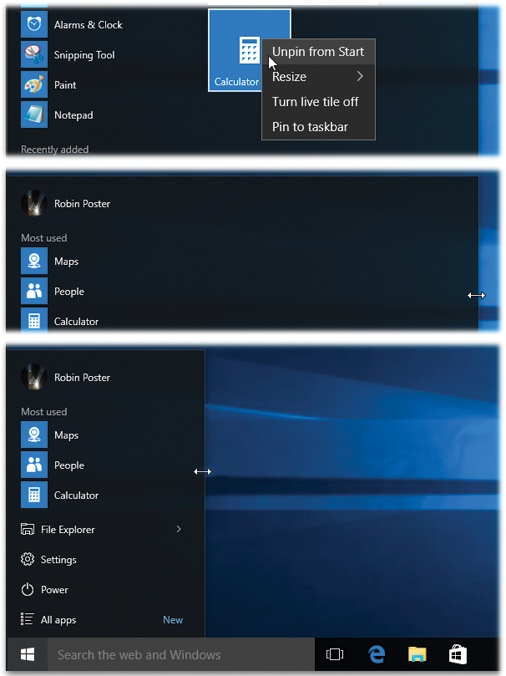
Figure 1-12. Top: To remove all the tiles from the right side, right-click it and choose Unpin from Start. (Touchscreen: Hold your finger down on the tile, and then tap the … button to see Unpin from Start.) Repeat until you’ve eliminated all the tiles. Middle: Now only the left column remains, just as it was in Windows 7. Bottom: Drag the right edge of the menu inward, closing up the empty space where the right side used to be.
Change the color
You can also change colors of the various Start menu elements (and the taskbar, and the Action Center). See Chapter 4 for the step-by-steps.
Turn off ads
From time to time, you may spot a Start-menu tile that you didn’t put there. It’s a suggestion of an app that Microsoft thinks you might like—in other words, an ad.
If you’d prefer Microsoft and its ad partners to keep their darned apps to themselves, open Settings→Personalization→Start, and turn off “Occasionally show suggestions in Start.”
Shutting Down
What should you do when you’re finished using your computer for the moment?
Millions of people shut their PCs off, but they shouldn’t; it’s a colossal waste of time. When you shut down, you have to wait for all your programs to close—and then the next morning, you have to reopen everything, reposition your windows, and get everything back the way you had it.
You shouldn’t just leave your computer on all the time, either. That’s a waste of electricity, a security risk, and a black mark for the environment.
What you should do is put your machine to sleep. If it’s a laptop, just close the lid. If it’s a tablet, just press the Sleep switch. If it’s a desktop PC, it’s usually a matter of pressing the physical power button.
The Sleep/Shut Down/Restart Commands
If you really want to do the sleeping or shutting down thing using the onscreen commands, you’ll be happy to know that in Windows 10, you no longer need 20 minutes and a tour guide to find them. They’re right there in the Start menu, near the bottom. Choose Power to see them.
As shown in Figure 1-13, shutting down is only one of the options for finishing your work session. What follows are your others.
Sleep
Sleep is great. When the flight attendant hands over your pretzels and cranberry cocktail, you can take a break without closing all your programs or shutting down the computer.
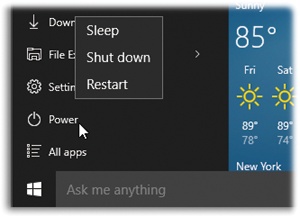
Figure 1-13. Shutting down your computer requires only two steps now, rather than 417 (as in Windows 8). Open the Start menu. Choose Power, and then “Shut down”.
The instant you put the computer to sleep, Windows quietly transfers a copy of everything in memory into an invisible file on the hard drive. But it still keeps everything alive in memory—the battery provides a tiny trickle of power—for when you return and want to dive back into work.
If you do return soon, the next startup is lightning-fast. Everything reappears on the screen faster than you can say, “Redmond, Washington.”
If you don’t return shortly, then Windows eventually cuts power, abandoning what it had memorized in RAM. Now your computer is using no power at all; it’s in hibernate mode.
Fortunately, Windows still has the hard drive copy of your work environment. So now when you tap a key to wake the computer, you may have to wait 30 seconds or so—not as fast as 2 seconds, but certainly better than the 5 minutes it would take to start up, reopen all your programs, reposition your document windows, and so on.
The bottom line: When you’re done working for the moment—or for the day—put your computer to sleep instead of shutting it down. You save power, you save time, and you don’t risk any data loss.
You can send a laptop to sleep just by closing the lid. On any kind of computer, you can trigger Sleep by choosing it from the ![]() →Power command, or by pushing the PC’s power button, if you’ve set it up that way, as described below.
→Power command, or by pushing the PC’s power button, if you’ve set it up that way, as described below.
Restart
This command quits all open programs and then quits and restarts Windows again automatically. The computer doesn’t actually turn off. You might do this to “refresh” your computer when you notice that it’s responding sluggishly, for example.
Shut down
This is what most people would call “really, really off.” When you shut down your PC, Windows quits all open programs, offers you the opportunity to save any unsaved documents, exits Windows, and turns off the computer.
There’s almost no reason to shut down your PC anymore, though. Sleep is almost always better all the way around.
The only exceptions have to do with hardware installation. Anytime you have to open up the PC to make a change (installing memory, hard drives, or sound or video cards), you should shut the thing down first.
Tip
If you’re a keyboardy sort of person, you might prefer this faster route to shut down: Press Ctrl+Alt+Delete to summon the Lock/Switch User screen, and then Tab your way over to the ![]() button in the lower right. Press Enter, and arrow-key your way to Shut down. Press Enter again.
button in the lower right. Press Enter, and arrow-key your way to Shut down. Press Enter again.
Three Triggers for Sleep/Shut Down—and How to Change Them
You now know how to trigger the Shut down command using the Start menu→Power button. But there are even faster ways.
If you have a laptop, just close the lid. If it’s a tablet, tap its Sleep switch. If you have a desktop PC, press its power button (![]() ).
).
In each of these cases, though—menu, lid, switch, or button—you can decide whether the computer shuts down, goes to sleep, hibernates, or just ignores you.
To find the factory setting that controls what happens when you close the lid or hit the power button, click in the “Ask me anything” search box and type lid.
In the search results, the top hit is “Change what closing the lid does.” Press Enter to select it.
Now you arrive at the “Define power buttons” screen. Here, for each option (pressing the power button; pressing the Sleep button, if you have one; closing the lid), you can choose “Sleep,” “Do nothing,” “Hibernate,” “Shut down,” or “Turn off the display.”
And you can set up different behaviors for when the machine is plugged in and when it’s running on battery power.
Navigating the Start Menu by Keyboard
If your computer has a physical keyboard—you old-timer, you!—you can navigate and control the Start menu in either of two ways:
Use the Arrow Keys
Once the Start menu is open, you can use the arrow keys to “walk” up and down the menu. For example, press ![]() to enter the left-side column from the bottom. Or press
to enter the left-side column from the bottom. Or press ![]() and then
and then ![]() to enter the right side.
to enter the right side.
Either way, once you’ve highlighted something in either column, you can press the ![]() or
or ![]() keys to hop to the opposite side of the menu, or press the
keys to hop to the opposite side of the menu, or press the ![]() or
or ![]() keys to highlight other commands in the column (even the Power command or “All apps”). (You can no longer type the first initial of something to select it.)
keys to highlight other commands in the column (even the Power command or “All apps”). (You can no longer type the first initial of something to select it.)
Once you’ve highlighted something, you can press Enter to “click” it (open it), or tap the ![]() key or Esc to close the Start menu and forget the whole thing.
key or Esc to close the Start menu and forget the whole thing.
Use the Search Box
This thing is awesome. The instant you press the ![]() key, your insertion point blinks in the new “Ask me anything” search box below the Start menu (Figure 1-13).
key, your insertion point blinks in the new “Ask me anything” search box below the Start menu (Figure 1-13).
Note
If you click in the “Ask me anything” search box instead of pressing ![]() , you get a panel full of news, weather, and other details Windows thinks might be relevant to your life. That’s all part of Cortana, the voice assistant described in Chapter 5.
, you get a panel full of news, weather, and other details Windows thinks might be relevant to your life. That’s all part of Cortana, the voice assistant described in Chapter 5.
That’s your cue that you can now begin typing the name of whatever you want to open.
Note
The search box used to be part of the Start menu. Now it’s actually part of the taskbar. It still takes you one click, tap, or keystroke to highlight it for typing—but because it’s always visible, it seems more present and useful. You know?
The instant you start to type, you trigger Windows’ very fast, whole-computer search function. This search can find files, folders, programs, email messages, address book entries, calendar appointments, pictures, movies, PDF documents, music files, web bookmarks, and Microsoft Office documents, among other things.
It also finds anything in the Start menu, making it a very quick way to pull up something without having to click through a bunch of submenus.
You can read the meaty details about search in Chapter 3.
Jump Lists in the Start Menu
Jump lists are submenus that list frequently used commands and files in each of your programs for quick access.
For example, the jump list for a web browser might offer commands like “New window” and “Close window”; the jump list for a Microsoft Office program (like Word) might list documents you’ve edited lately.
In other words, jump lists can save you time when you want to resume work on something you had open recently. They save you burrowing through folders.
Now, jump lists can appear either in the Start menu (in the “Most used” section) or on your taskbar. Jump Lists in the Taskbar describes the taskbar versions, but here’s a quick rundown on the Start menu versions.
Recently Opened Documents
The left side of the Start menu—the “Most used” section—keeps track of recently used documents automatically, as shown in Figure 1-14. This list of Recent documents changes as your workflow does; documents drop off the list if you don’t open them much anymore.
You can, however, pin a document to its jump list, meaning that it won’t disappear even if you never open it. Figure 1-14 shows the technique.
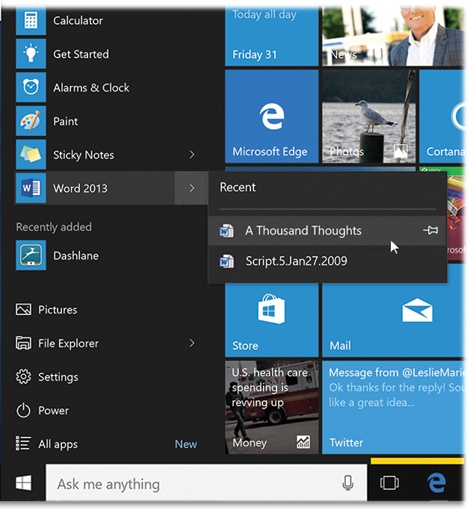
Figure 1-14. Jump lists display the most recently opened documents in each program. Click the > button to see them. To pin one of these document s so that it won’t disappear on you, point to it without clicking, as shown here, and then click the pushpin icon. Now there’s a new section in the jump list called Pinned, where that document will remain undisturbed until you unpin it (by clicking the pushpin again).
The Secret Start Menu
Windows 10’s new (old) Start button harbors a secret: It can sprout a tiny utility menu, as shown in Figure 1-15.
To see it, right-click the ![]() button, or (on a touchscreen) hold your finger down on it.
button, or (on a touchscreen) hold your finger down on it.
Tip
Or press ![]() +X to make the secret Start menu appear (if you have a keyboard, of course).
+X to make the secret Start menu appear (if you have a keyboard, of course).
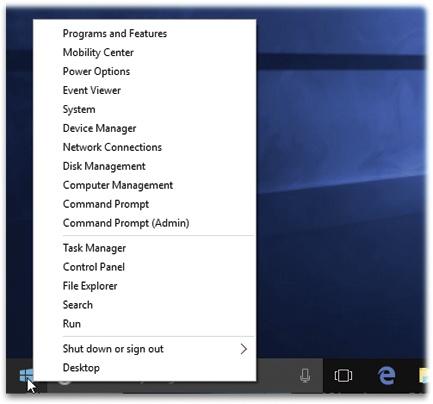
Figure 1-15. This secret little menu of options appears when you right-click the ![]() button. It’s a shortcut to the Task Manager and the Control Panel, among other things.
button. It’s a shortcut to the Task Manager and the Control Panel, among other things.
There, in all its majesty, is the secret Start menu. It’s seething with shortcuts to toys for the technically inclined.
All the items in it are described elsewhere in this book, but some are especially useful to have at your mousetip:
-
System opens a window that provides every possible detail about your machine.
-
Control Panel is the quickest known method to get to the desktop Control Panel, described in Chapter 7.
-
Task Manager. Huge. This special screen (Exiting Programs) is your lifeline when a program seems to be locked up. Thanks to the Task Manager, you can quit that app and get on with your life.
Get Windows 10: The Missing Manual now with the O’Reilly learning platform.
O’Reilly members experience books, live events, courses curated by job role, and more from O’Reilly and nearly 200 top publishers.

В Windows 10 разработчики установили начальный экран с частичной конфигурацией по умолчанию. Стартовое окно содержит «плиточные» приложения, которые облегчают работу на ПК, планшетах. Новые приложения можно загрузить из магазина. Пользователю доступно настроить комфортную зону для мгновенного поиска нужных приложений, программ и ссылок. Утилита пригодится при работе на сенсорных устройствах, когда открыто много окон.
Как включить или выключить стартовый экран в Windows 10
Меню настройки персонализации содержит два варианта изображения стартового экрана. Окно открывается полностью, занимает весь дисплей, или частично, вместе с меню Пуск.
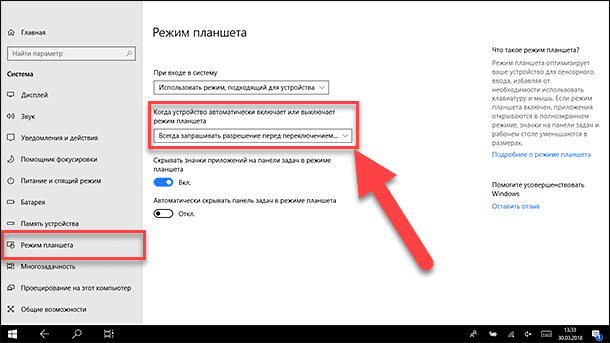
Для того чтобы запустить полноэкранное отображение информации, сенсорное устройство настраивают на режим планшета. Для выбора нужного параметра применяют два способа.
Первый способ
Справа, внизу панели задач нажать метку «Уведомление», клавиши «Win + A».

Выбрать иконку «tablet mode» (обозначает режим планшета). Запуск стартового окна можно сделать одной из клавиш:
- Win;
- Пуск.

Для того чтобы увидеть пункт «tablet mode» надо развернуть область уведомления. При отсутствии такой метки нажать правой кнопкой область действий, приступить к редактированию. Кнопкой «+» добавить нужную функцию.

Второй способ
Нажать кнопку Пуск. Найти метку «Параметры». Аналогичное действие – сочетание клавиш «Win + I».

Далее выполнить переход в категорию «Система», найти вкладку «Уведомление», включить желательную функцию.

Пользователю, который предпочитает привычный вид рабочего стола, для настройки интерфейса подойдет применение функции continuum mode. В Центре уведомлений активировать раздел «Параметры». В настройках персонализации отключить задачу полноэкранного изображения.
Включение без режима планшета
Начальное окно ПК запускается, если включить «десктопный» режим. Нужный вариант включают последовательными действиями: кнопка «Пуск» -> «Параметры» -> «Персонализация», затем активируют опцию полноэкранного отображения окон.
Корпорация Microsoft приспособила ОС ко всевозможным видам устройств.
Для практичности добавлена функция «Continuum» (планшетный). Эта технология помогает быстро переключать различные варианты работы. Если нет желания наблюдать плитки, боковые панели, тогда переносят ярлыки, ссылки на рабочий стол. Инновационный интерфейс позволяет пользоваться мышью, клавиатурой, применять сенсорное управление.
Желательные параметры можно задать по умолчанию, использовать категорию «Система».