Many existing answers include human intervention at install time. This can be an error-prone process. If you have many executables wanted to be installed as services, the last thing you want to do is to do them manually at install time.
Towards the above described scenario, I created serman, a command line tool to install an executable as a service. All you need to write (and only write once) is a simple service configuration file along with your executable. Run
serman install <path_to_config_file>
will install the service. stdout and stderr are all logged. For more info, take a look at the project website.
A working configuration file is very simple, as demonstrated below. But it also has many useful features such as <env> and <persistent_env> below.
<service>
  <id>hello</id>
  <name>hello</name>
  <description>This service runs the hello application</description>

  <executable>node.exe</executable>

  <!--
       {{dir}} will be expanded to the containing directory of your
       config file, which is normally where your executable locates
   -->
  <arguments>"{{dir}}\hello.js"</arguments>

  <logmode>rotate</logmode>

  <!-- OPTIONAL FEATURE:
       NODE_ENV=production will be an environment variable
       available to your application, but not visible outside
       of your application
   -->
  <env name="NODE_ENV" value="production"/>

  <!-- OPTIONAL FEATURE:
       FOO_SERVICE_PORT=8989 will be persisted as an environment
       variable to the system.
   -->
  <persistent_env name="FOO_SERVICE_PORT" value="8989" />
</service>
There are many third-party tools to run a normal Windows executable as a service.
Bitsum authored such a utility, command line only, called MakeService (now in limited distribution due to abuse).
They are able to do this by using a service stub that then launches the normal Windows executable. That service stub can then control the launched process as necessary in response to start, stop, etc.. service commands.
However, if your application has any interactivity with the user, then you will encounter system service session isolation in NT6+.
It’s sad that we had to discontinue instant download of this freeware utility, but we will still distribute it to those who have legitimate needs. It is available in 32-bit and 64-bit x86 native.
I am sure there are other similar utilities, including Microsoft’s srvany.exe in the Windows Resource Kit, as the accepted answer recommends. It does the same thing as our MakeService did/does.
Иногда может потребоваться взять исполняемый файл и зарегистрировать его в качестве службы Windows. Для этого есть несколько способов, я обычно пользуюсь двумя из них.
Sc.exe
Для создания и службы из командной строки можно использовать программу SC (Sc.exe). SC представляет из себя утилиту командной строки, которая реализует вызовы ко всем функциям интерфейса прикладного программирования (API) управления службами Windows. С ее помощью можно производить любые действия со службами — просматривать состояние, управлять (запускать, останавливать и т.п.), изменять параметры, а также создавать новые службы.
При создании службы с помощью SC нет необходимости вручную создавать записи в реестре и затем перезагружать компьютер, чтобы обеспечить обновление базы данных диспетчером служб. Также SC позволяет указать имя удаленного компьютера, что дает возможность управлять службами как на локальном, так и на удаленном компьютере.
Для создания нового сервиса запускаем команду Sc create. Она создает запись службы в реестре и в базе данных диспетчера служб. Sc create имеет следующий синтаксис:
sc create [ServiceName] [binPath= ] <параметр1= > <параметр2= >
ServiceName — указывает имя, которое будет присвоено разделу службы в реестре. Имейте в виду, что это имя отличается от отображаемого имени службы (имени, которое отображается в оснастке «Services»);
binPath — указывает путь к исполняемому файлу службы.
Для примера создадим службу MyService, укажем отображаемое имя My New Service, зададим тип службы и поставим ее на авто-запуск:
Sc create MyService binPath=C:\MyService\MyService.exe DisplayName=″My New Service″ type=own start=auto
Затем откроем оснастку «Services» и посмотрим результат.

Изменять параметры уже созданной службы можно командой Sc config. Например, мне не понравилось отображаемое имя службы и я хочу его изменить:
Sc config MyService DisplayName=″My Service″
Ну и полностью удалить службу можно вот так:
Sc delete MyService

PowerShell
PowerShell может почти все 🙂 , в том числе и управлять службами Windows. Создать новую службу можно с помощью командлета New-Service. Создадим такой же сервис, как и в предыдущем примере, только добавим к нему описание (Description):
New-Service -Name MyService -BinaryPathName C:\MyService\MyService.exe`
-DisplayName ″My New Service″ -Description ″Very Important Service !!!″
Изменить параметры службы можно командлетом Set-Service:
Set-Service -Name MyService -Description ″Not Very Important Service″ -StartupType Manual

В принципе PowerShell имеет примерно такой же функционал как и Sc.exe, разве что позволяет добавить описание. А вот для удаления служб в PS простого способа нет, придется воспользоваться вот такой конструкцией:
(Get-WmiObject win32_service -Filter ″name=′MyService′″).delete()
Поэтому лично я предпочитаю использовать Sc.exe.
If you want to run an application as a Service in Windows OS, then continue reading this tutorial. As you know, the common methods to run a program at Windows Startup is to place the program at Windows Startup folder, or to run the program at startup by using the Windows Registry, or to start the application using the Task Scheduler. Although these methods are effective in most cases, in some cases there is a need to run an application at startup as a Windows service, before user’s login or user’s interaction.
This tutorial contains step-by-step instructions on how to create a Windows service with any program in Windows 10, 8, 7 & Server OS.
How to Run Any Application as a Windows Service.
Method 1. Run Application as Windows Service by using RunAsService utility.
Method 2. Run Program as Service by using NSSM utility.
Method 1. How to run any application as a Windows Service with ‘Run As Service’ Utility.
The first method to create a user-defined service from any program is to use the «RunAsService» utility.
1. Download the RunAsService tool to your PC.
2. Move or Copy the downloaded file RunAsService.exe, to the root folder of drive C:\. *
* Note (Important): You can place the «RunAsService.exe» tool to any location you want on the disk, but make sure to keep the tool in the same location in order the installed service(s) to continue functioning.

3. Open Command Prompt as Administrator.
4. In the command prompt type: cd\
5. Now install the application you want as a service, by using the following command: *
- RunAsService install «ServiceName» «Display-Name« «PathToExecutable«
Notes:
1. In the above command replace the values in red letters as follows:
Name: Type a Name for the Service you want to create. You can use the Service Name to start or stop the service manually on the future by giving the «net start» or «net stop» commands.
Display Name: If you want, type a different Name for the Windows Services list. This is how the service name will be displayed in the services list. If no «Display Name» is specified, then the Display Name will be the same as the «ServiceName» of the service you create.
PathToExecutable: Type the full path of the application that you want to run as a Windows service.
For example: To install the «Notepad.exe» application as a Windows service with the name «Notepad», give the following command:
- RunAsService install «Notepad» «C:\Windows\System32\notepad.exe»

2. If after executing the above command you receive the message «An app needs the .Net Framework 2.0 feature to work», click Download and install this feature, or download the .Net Framework 2.0 from the Microsoft download center.

6. After the command execution, a new Windows Service will appear in the services list, with the name you specified in the «RunAsService» command. To run the newly created service at startup:
a. Right-click on the service and choose Properties.

b. Ensure that the Startup type is set to Automatic.

c. Restart your PC, to test the service. *
* Notes:
1. You can start or stop the service at any time you want, by running the «net start» or the «net stop» commands in Command Prompt (Admin).
2. If you want to uninstall the installed service in the future:
a. Stop the service by running this command in Admin Command Prompt:
- net stop «ServiceName«
e.g. net stop «Notepad»
b. Uninstall the service by giving this command:
- RunAsService uninstall «ServiceName«
e.g. RunAsService uninstall «Notepad»

Method 2. How to run any program as a service by using NSSM.
The second method to run any application as a service in Windows, is by using the Non-Sucking Service Manager tool.
1. Download NSSM.
2. Extract the downloaded ZIP file.
3. Rename the extracted folder (e.g. «nssm-2.24»), to NSSM.
4. Copy the NSSM folder to the root folder of drive C:\
5. Open Command Prompt as Administrator and navigate to the NSSM folder, by typing the following commands in order (Press Enter after typing each command):
- cd\
- cd nssm
6. Now according to your Windows version (32 or 64bit), navigate to the one of two contained subfolders, by type the corresponding command (and press Enter).
- If you own 64Bit Windows, type: cd win64
- If you own 32Bit Windows, type: cd win32
7. Now type the following command: *
- nssm install

8. In the window that opens:
8a. Press the tree (3) dots button next ![]() to PATH and select the application’s executable that you want to run as a service.
to PATH and select the application’s executable that you want to run as a service.

8b. When done, type a Name for the new service and click Install service.

8c. Click OK to the message «Service installed successfully» and you’re done! *
* Notes:
1. After installing the service with the NSSM service installer, a new Windows Service will appear in the services list, with the name you specified in the Service name, than can be managed as any other Windows service.
2. To uninstall the service in the future:
a. Follow the steps 5 & 6 above, and then type the following command: *
- nssm remove ServiceName
* Note: Where ServiceName = the name of the service you created, using the NSSM utility.
e.g. nssm remove NOTEPAD in this example.

b. Finally click Yes to Remove the service.

That’s it! Let me know if this guide has helped you by leaving your comment about your experience. Please like and share this guide to help others.
Windows, Программное обеспечение
- 06.01.2020
- 39 451
- 6
- 27.07.2020
- 61
- 61
- 0
- Содержание статьи
- SC
- NSSM
- Комментарии к статье ( 6 шт )
- Добавить комментарий
Службы Windows — запущенные в фоне приложения, которые работают независимо от пользователя компьютера, и управляются непосредственно самой операционной системой. По умолчанию, службами являются строго определенные приложения, однако, ничто не мешает пользователю создать их самому. Выполнить данную задачу можно несколькими способами — с использованием стандартных средств Windows, либо с использованием сторонней программы NSSM.
SC
Входящая в Windows программа SC позволяет легко создавать службы Windows, а так же проводить другие различные с ними манипуляции — удаление, отключение, включение, и т. д. Создается служба достаточно просто, для этого достаточно запустить командную строку от имени администратора, и выполнить там следующую команду:
sc create [ИМЯ СЛУЖБЫ] binPath=[ПУТЬ К ИСПОЛНЯЕМОМУ ФАЙЛУ] DisplayName=[ОТОБРАЖАЕМОЕ ИМЯ СЛУЖБЫ] type=own start=autoУдаляется же служба еще проще:
sc delete [ИМЯ СЛУЖБЫ]Однако, у данного метода есть один большой существенный недостаток — с помощью данной утилиты создать службу можно только из программы, которая поддерживает работу службой. По этому, запустить какое попало приложение как службу данным способом не получится — но, можно воспользоваться сторонней утилитой NSSM, о которой речь пойдет ниже.
NSSM
NSSM — программа, предназначенная для создания служб из исполняемых файлов Windows, в том числе и из графических утилит, что ставит её на уровень выше средств от Microsoft. С её помощью можно запускать большинство приложений, даже которые рассчитаны на взаимодействие с пользователем.
Скачать данную программу можно с её официального сайта — nssm.cc.
На случай проблем с официальным сайтом, можно скачать программу с нашего сайта.
Скачать NSSM 2.24
В архиве для скачивания можно найти версию для 64-битной версии Windows (папка win64), для 32-битной (папка win32) и исходные коды приложения (папка src). Выбираем нужное приложение под разрядность своей системы, копируем его в удобное для вас место на жестком диске. Никакая установка приложения не требуется.
Пример использования:
- Предположим, нужно создать службу для веб-сервера nginx под Windows. Для этого, запускаем командную строку с правами администратора, и переходим в директорию с распакованным исполняемым файлом nssm.exe.
- Затем выполняем команду, начинающую установку службы:
nssm install nginx - Откроется окно с настройками создаваемой службы.

На самой первой вкладке «Application«, в строке «Path» задается путь к исполняемому файлу, «Startup Directory» — рабочая директория, а «Arguments» — параметры запуска. В самом низу расположена строка «Service Name«, где задается имя создаваемого сервиса.

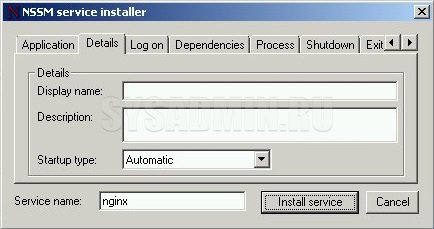
На вкладке «Details» можно задать имя, под которым будет отображаться создаваемая служба в списке служб, а так же описание службы, которое будет отображаться там же. В выпадающем списке «Startup Type» можно выбрать тип запуска службы.
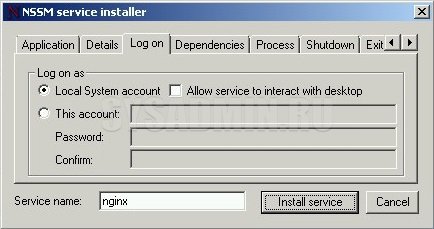
Вкладка «Log on» позволяет указать пользователя, под которым будет запускаться служба.Заполним все нужные поля и выбрав нужные настройки, остается только нажать кнопку «Install service«, для установки службы. - После нажатия кнопки «Install service«, служба будет создана, но при этом запустить её нужно будет вручную (либо перезагрузить компьютер, чтобы служба с параметром запуска «Auto» запустилась при его запуске).

Так же удалить службу можно с помощью команды в командной строке:
nssm remove [ИМЯ СЛУЖБЫ] confirm