 Windows 11 кому-то нравится, кому-то — нет, но что о ней можно сказать точно: изменения в части меню Пуск, работы и настроек панели задач и некоторые другие интерфейсные решения сомнительны. Действия, которые ранее были привычны: изменение размера значков в панели задач, её перемещение наверх, влево или вправо, теперь просто так не выполнить.
StartAllBack — простая в использовании и очень функциональная программа для тех, кто хочет настроить меню Пуск в Windows 11 под себя, вернув ему более «классический вид», а также вернуть возможность полноценно настраивать панель задач. Утилита не бесплатная, но первые 30 дней полностью функциональна, что позволит решить, нужна ли она вам. Другие программы для включения классического меню Пуск Windows 11.
Использование StartAllBack в Windows 11, доступные функции

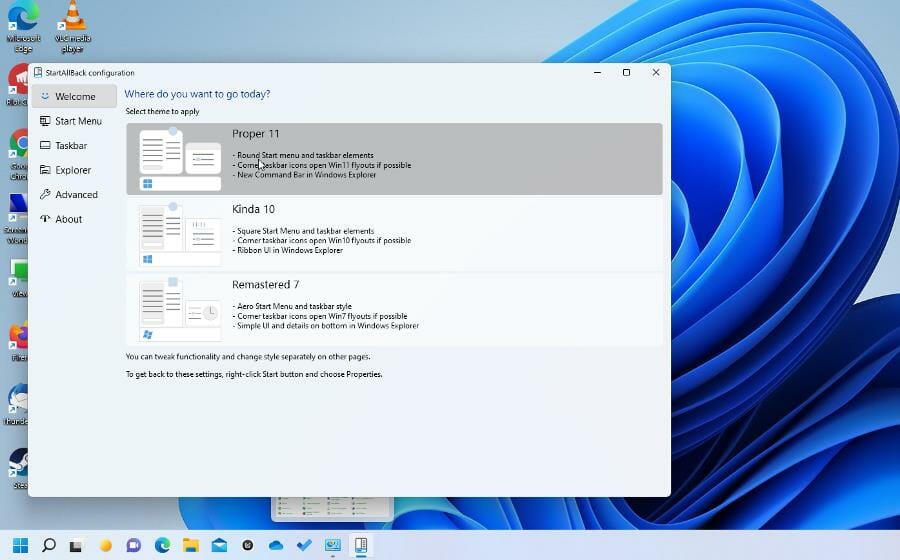
Скачать бесплатную пробную версию StartAllBack можно с официального сайта — https://www.startallback.com. После почти моментальной установки программы, откроется её главное окно на русском языке, где вы можете выбрать один из предустановленных наборов настроек.
Темы, которые влияют на внешний вид меню Пуск, панели задач и оформление ленты действий в проводнике:
- Правильная 11 — меню пуск приобретает структуру меню Пуск Windows 7, сохраняя современное оформление, строка инструментов в Проводнике не меняется, панели, открываемые при нажатии по значкам в области уведомлений — тоже.
- Почти 10 — почти то же, что и в первом варианте, но меню Пуск без закругленных углов, а в Проводнике — ленточный интерфейс из Windows 10.

- Обновленная 7 — меню Пуск почти как в 7-ке, простой интерфейс действий и отображение области сведений в Проводнике, для части значков в области уведомлений (например, для даты и времени) всплывающие панели отображаются в «старом стиле».


Указанные предустановленные наборы настроек можно изменять на своё усмотрение в соответствующих разделах StartAllBack:
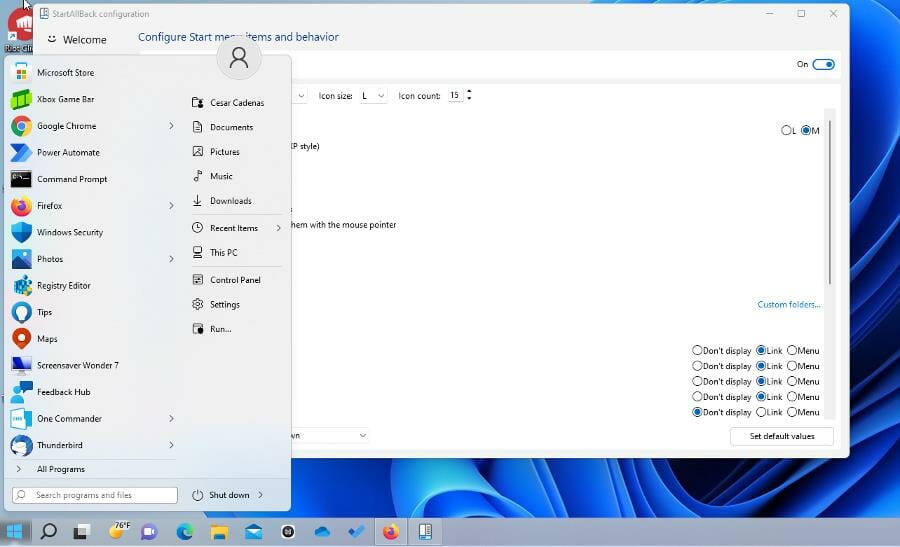
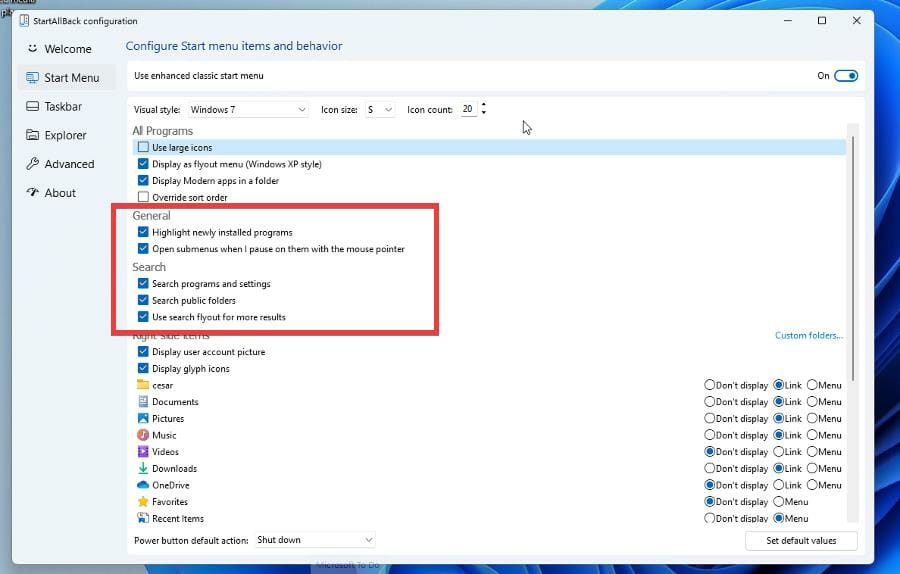
- Меню Пуск — выбор стиля оформления, изменение размера значков и их количества и другие настройки.

- Панель задач — размер значков на панели задач, внешний вид кнопки «Пуск» (можно загрузить свою), расположение панели задач: снизу, сверху или вертикальная панель задач Windows 11 — слева или справа, отключение группировки значков на панели задач, прозрачность, размещение значков по центру или ближе к кнопке «Пуск».
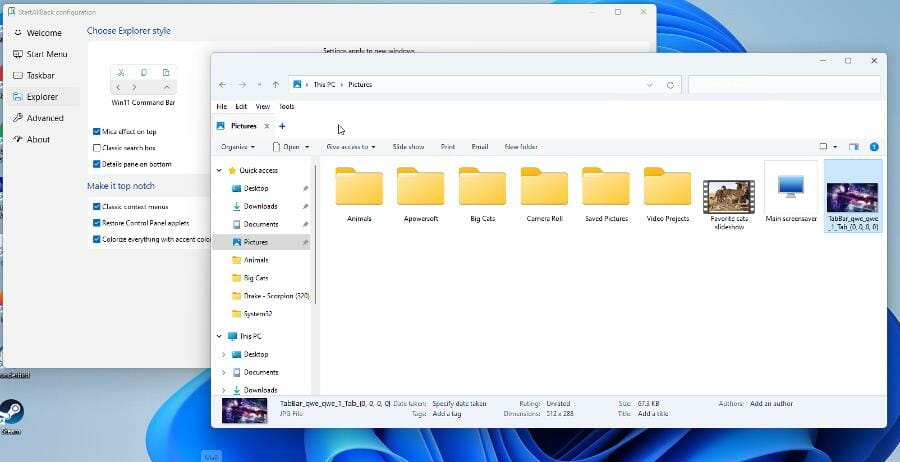
- Проводник — настройка вида ленты в проводнике, включение классического контекстного меню.
- Дополнительно — настройка цвета и прозрачности меню Пуск, настройка цвета и прозрачности панели задач, некоторые дополнительные параметры.


В любой момент времени вы можете вернуться к настройкам StartAllBack, нажав правой кнопкой мыши по кнопке «Пуск» и выбрав пункт «Свойства».
Как итог, если вы хотите вернуть более привычное меню Пуск и возможность настраивать панель задач в Windows 11 — StartAllBack будет одним из лучших вариантов для этих целей.
by Cesar Cadenas
Cesar has been writing for and about technology going on for 6 years when he first started writing tech articles for his university paper. Since then, his passion… read more
Updated on
- Some Windows 11 users have proclaimed how they wish they could change Windows 11’s user interface to suit their needs.
- StartAllBack is an app that allows you to change how the Start menu and taskbar look.
- This guide will show you how to download and use StartAllBack so you can customize your Windows 11 machine.
As it has been stated before ad nauseam, the overall user interface of Windows 11 has been a point of contention for users since its release.
The changes made to the Start menu, right-click context menu, taskbar, and others have rubbed people the wrong way. People started to raise the question of why fix what wasn’t broken?
Why did Microsoft undo Windows 10’s user interface? People liked that version. It does appear that Microsoft took inspiration from macOS when it was developing Windows 11 and got rid of a lot of the customization options people expect to have.
If you have this issue, it’s recommended that you download and use StartAllBack, an app that some people consider a must-have for Windows 11.
What is the StartAllBack feature?
StartAllBack is a user interface app that intends to “fix” everything that’s wrong with the Windows 11 user interface. It does this by giving people the option to revert things to a Windows 10 style, or even a Windows 7 style for those who miss the old interface.
And it doesn’t stop there as there are a lot of customization options on StartAllBack. You can even make the user interface look like something straight out of a Chromebook.
How we test, review and rate?
We have worked for the past 6 months on building a new review system on how we produce content. Using it, we have subsequently redone most of our articles to provide actual hands-on expertise on the guides we made.
For more details you can read how we test, review, and rate at WindowsReport.
Other customization options include an improved File Explorer, Control Panel, the ability to move the taskbar to the top of the screen, new menus, new fonts, fast search, and so much more. There’s something it for everyone.
Now, this isn’t a free app that you can download. You do have to purchase a license to get yourself a copy, and there are even Business versions for purchase that allow you to change up to 400 different PCs.
Fortunately, StartAllBack is cheap and there is a free trial available if you want to try out the app.
This guide will show you how to download the free trial of StartAllBack and take you through some of the key features available on that particular version, so you can decide for yourself if you want the full version. The guide will also show how to access the settings and how to uninstall them.
How do I use StartAllBack?
1. Download and install it
- Open the StartAllBack webpage.
- In the page, scroll down and click the Download button with the latest version of StartAllBack.

- Click Save File in the new window that appears.
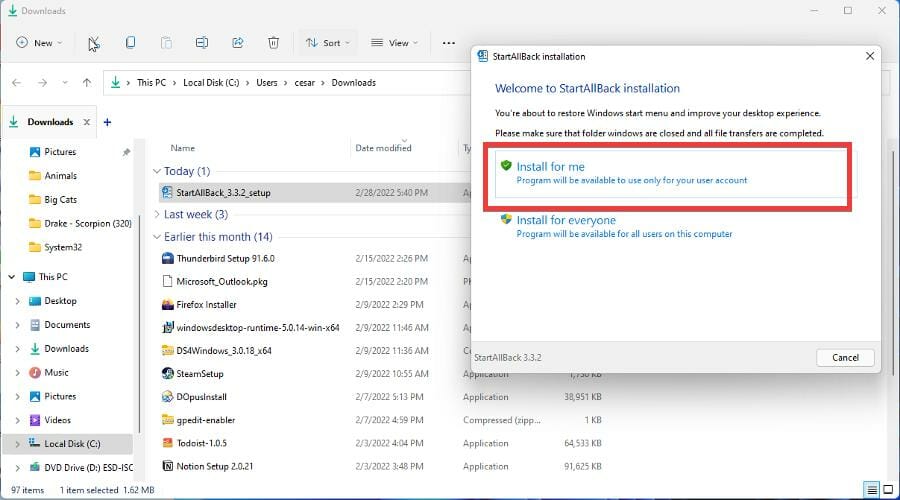
- Locate the file’s location and double-click it to begin installation. Then select Install For Me.

- Next, a window will asking you if you want to stick with Windows 11 look or switch to a Windows 7 or Windows 10 appearance.
- As an example, this guide will choose the Windows 10 option.

- As you can see from the taskbar, the style has changed to look similar to Windows 10.

- To change the layout, right-click the Start menu and select Properties.

- StartAllBack appears and you can continue customizing.
2. Customize the settings
- The settings options for StartAllBack appears as the left hand menu.
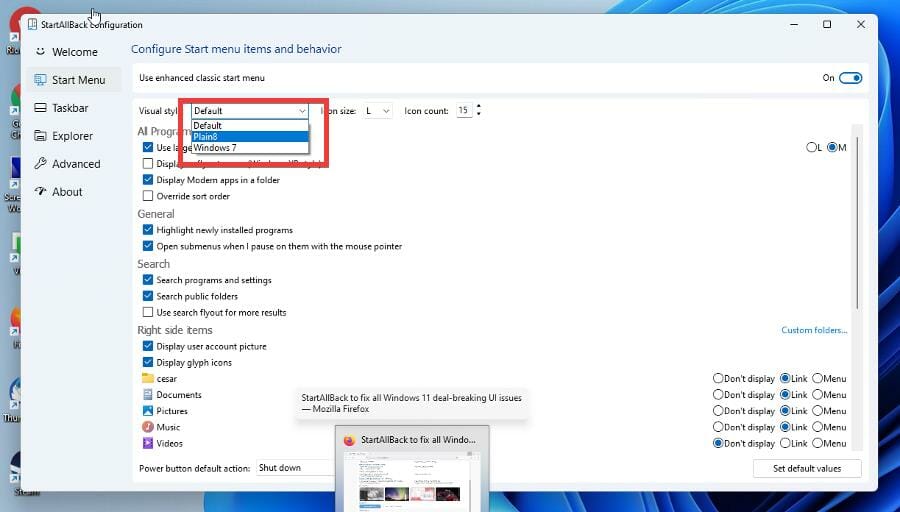
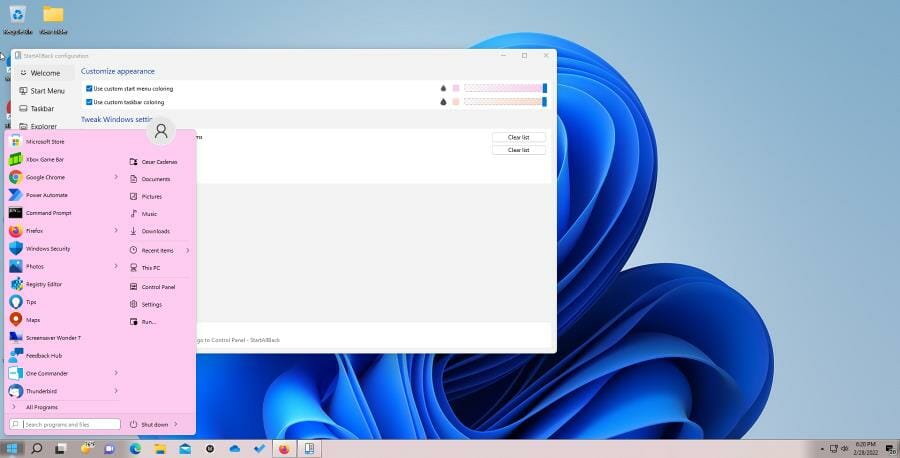
- The Start Menu allows you to customize the Start menu.

- You change the visual with the drop-down menu at the top. You can change it to match Windows 7, 8, or the default.

- You can also change how big the icon should be, what is displayed on the right, and what is highlighted.
- After configuring the settings, click the Start menu to see how it looks like.

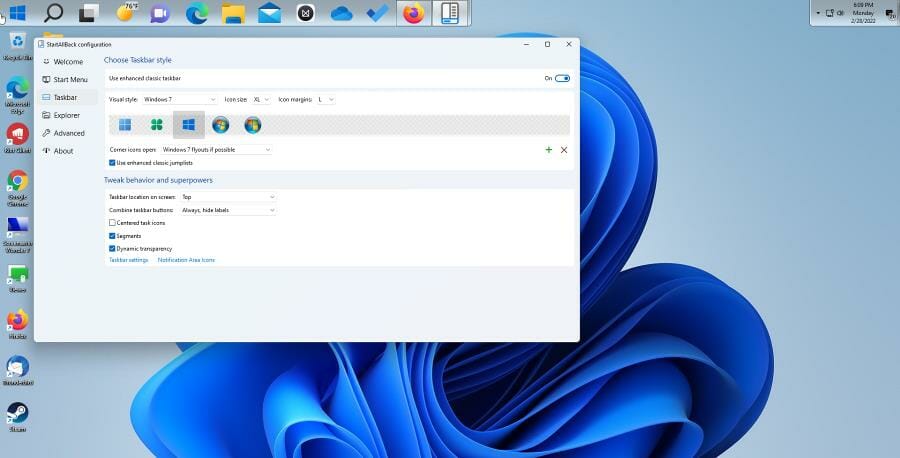
- Taskbar, as the name suggest, allows you to change the taskbar.

- You change the Start menu icon, where the taskbar sits, and how big the icons should be.
- Customize the settings however you like.
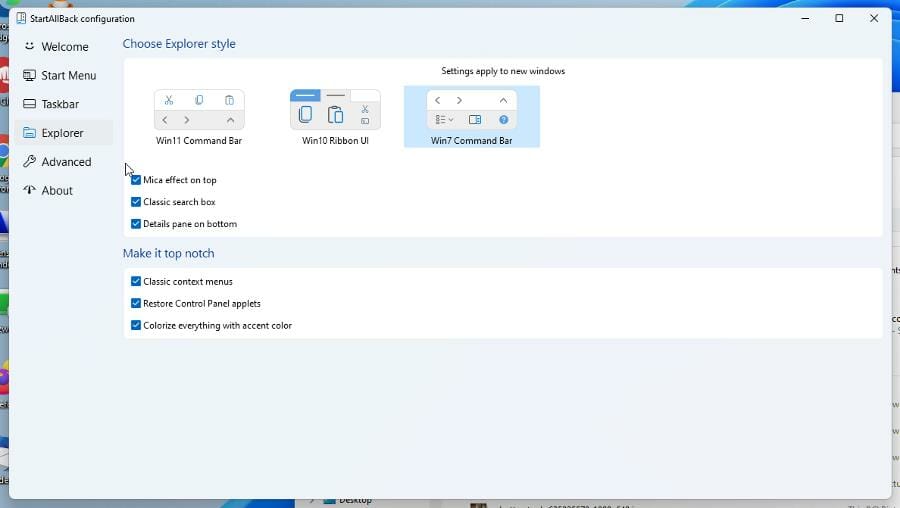
- Explorer customizes the File Explorer.

- Options include three different styles, context menus, and a details pane.
- The File Explorer options are admittedly a little difficult to gage.

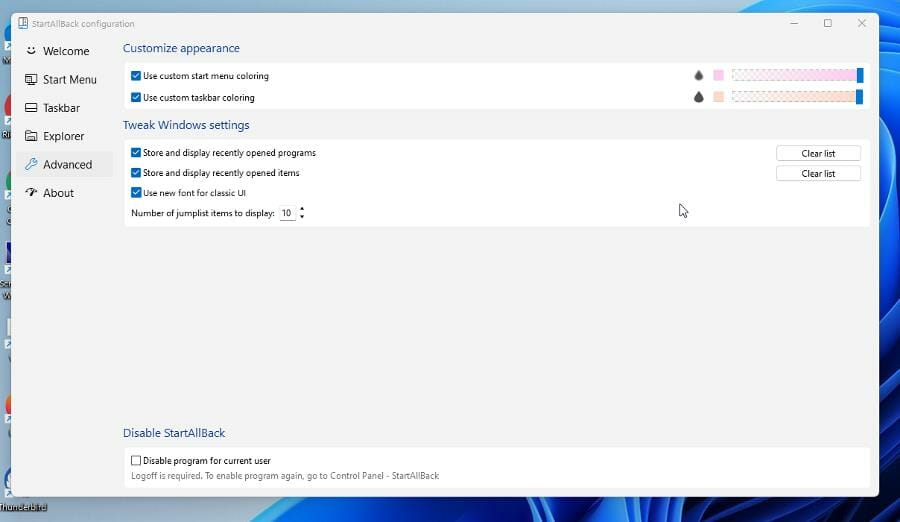
- Advanced allows you to change the color of the Start menu and taskbar.

- It also includes options on how to store and display recently opened files.
- Once done, the Start menu and taskbar look very different.
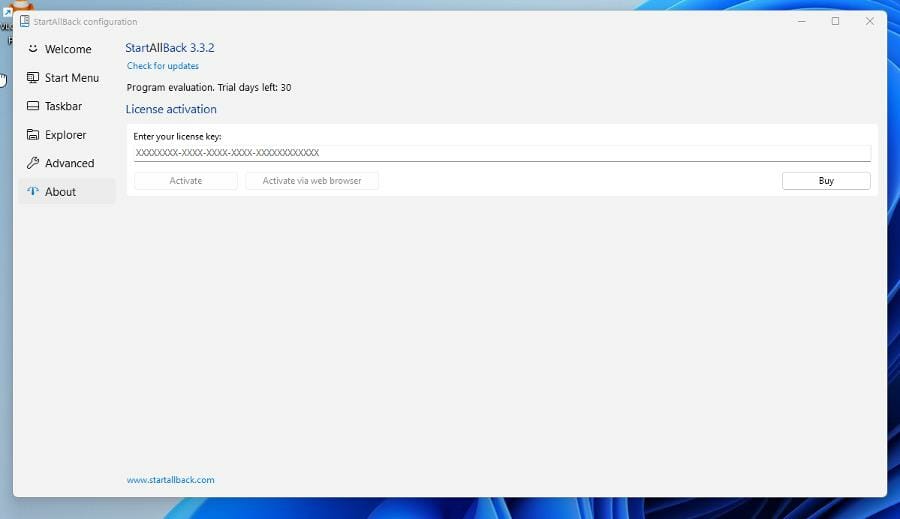
- About doesn’t offer any customization options other than giving the opportunity to purchase the full version and tell you how long you have in the free trial.


- To create your own Start menu, begin by selecting what style and how many icons you want.
- For example, the Start menu will be in a Windows 7 style with 20 small icons.

- You can allow what the Search function finds under Search and have the menu highlight new apps.
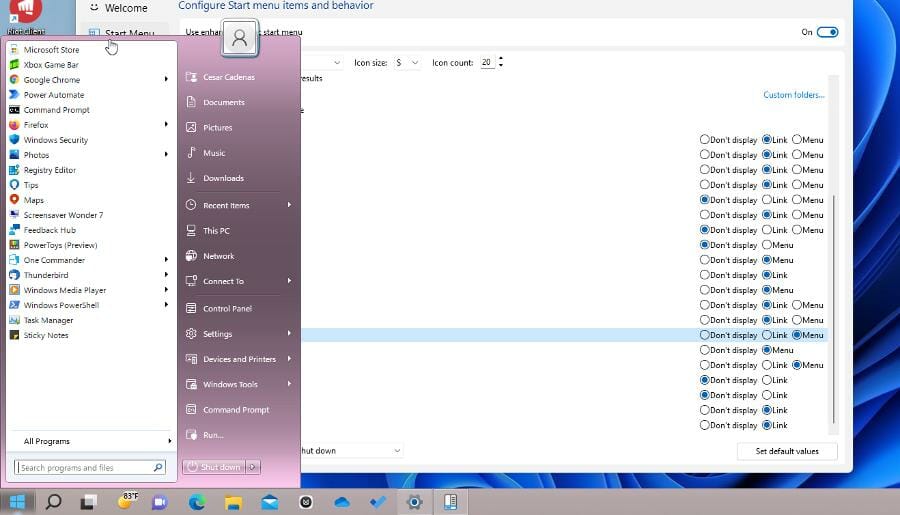
- Under Right Side Items, you can select which apps and feature appear in the Start menu. Selecting Link adds them to the left side and Menu adds them to the right side.

- Open your Start menu and see how it all looks.


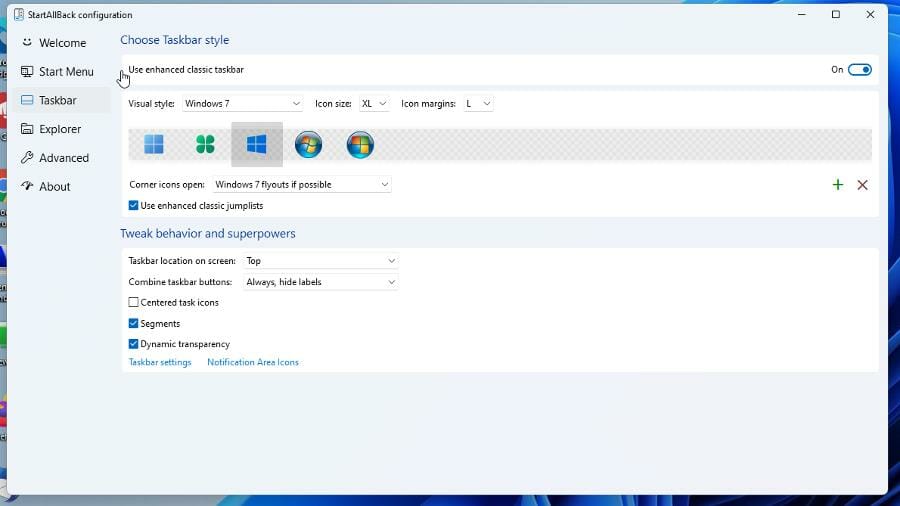
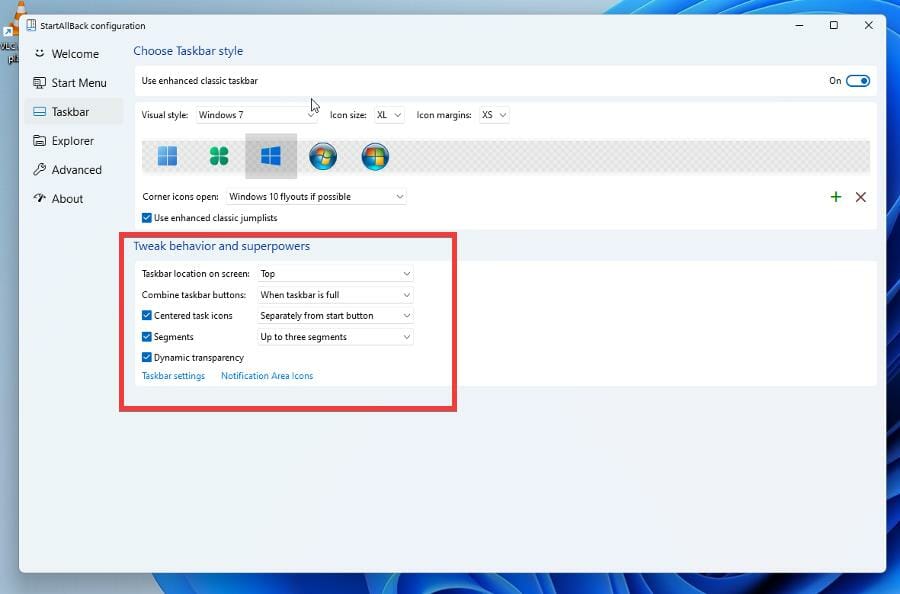
4. Create a new taskbar
- Say for example, you want a segmented taskbar that sits at the top with its icons centered in a Windows 7 style with large icons.
- In the Taskbar section, go to the Tweak behavior and superpowers section.
- Make the changes you want like having the taskbar sit at the top segmented with dynamic transparency.

- Underneath Choose Taskbar style, select the changes you want like the visual style, icon size, and margins.

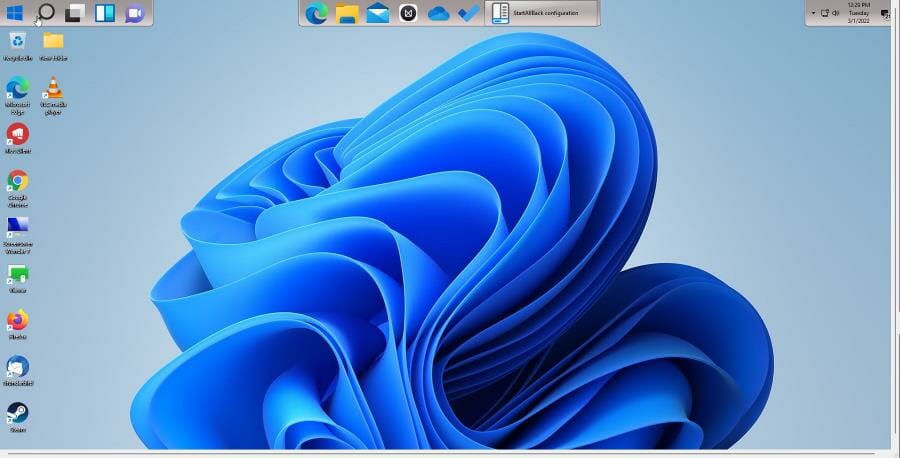
- Once done, the changes will appear immediatedly.

How can I get rid of StartAllBack?
You have two options when it comes to removing StartAllBack and getting back to the original version of Windows 11:
- Disabling the app – the quickest method from the two, and it also allows you to activate it with ease at any point in time if your choose to do so
- Uninstalling the app – this process can take a bit more time, and the process of re-installing the app again will also take extra time.
If you’re not sure which of these options suits you best, think about it like this: If you’re still undecided if you will want to use the app in the future, disable it, and then enable it whenever you need to.
In case you don’t plan on using the app anymore, simply uninstall it and remove the app entirely from your hard drive.
Below, you will find both of these methods described in a step-by-step fashion:
➡ Disable the app
- Go to the Advanced tab on StartAllBack.

- At the bottom of the window will be a box with text that reads Disable program for current user. Click it.

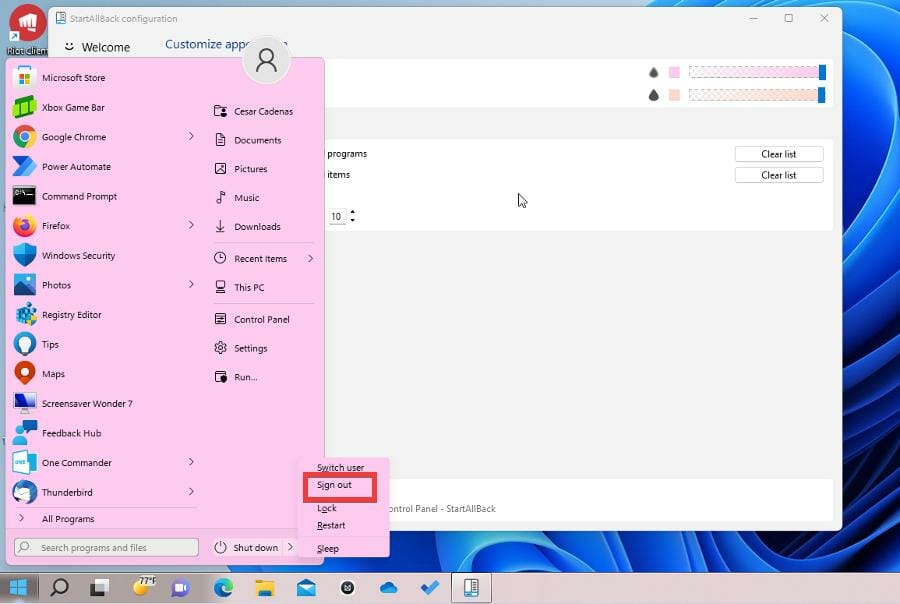
- Next, open the Start menu and click the arrow next to Shut down.

- Select Sign out.
- Sign back in to your Windows 11 computer.
- You will find that all the changes you made have now been disabled.

➡ Re-enable the app
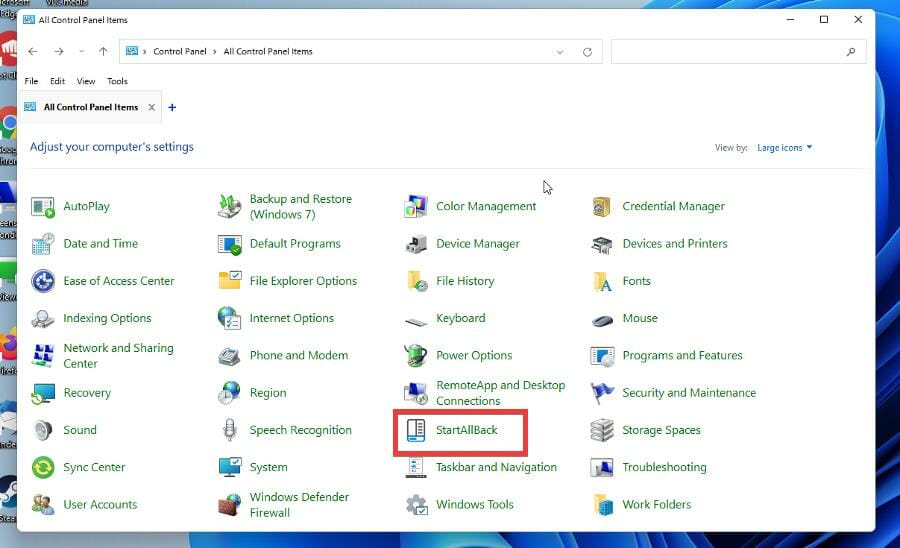
- To enable StartAllBack again, go to the Control Panel.
- Click StartAllBar and the app will open again.

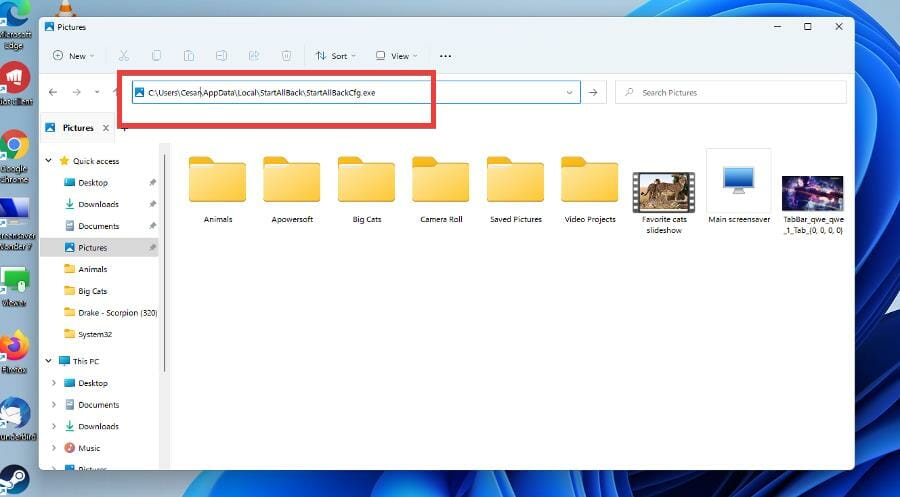
- If StartAllBar isn’t in the Control Panel, open the file explorer.
- In the address bar, type in C:\Users\USERNAME\AppData\Local\StartAllBack\StartAllBackCfg.exe. Where it says USERNAME, type the name of your own.

- StartAllBack will appear. Return to Advanced and deselect the Disable option at the bottom.

- Sign out and back in again. The changes you made previously are now back.
- Conversely, you can uninstall StartAllBack.


➡ Uninstall the app entirely
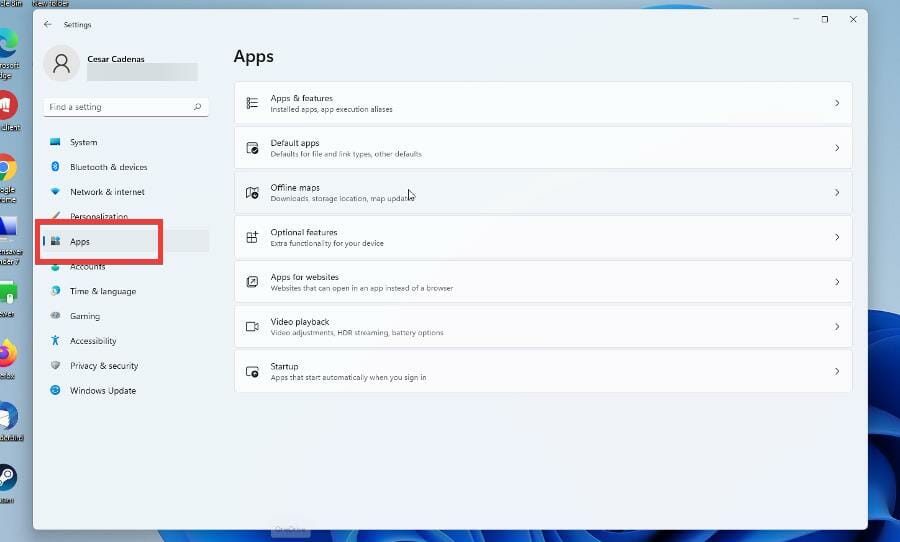
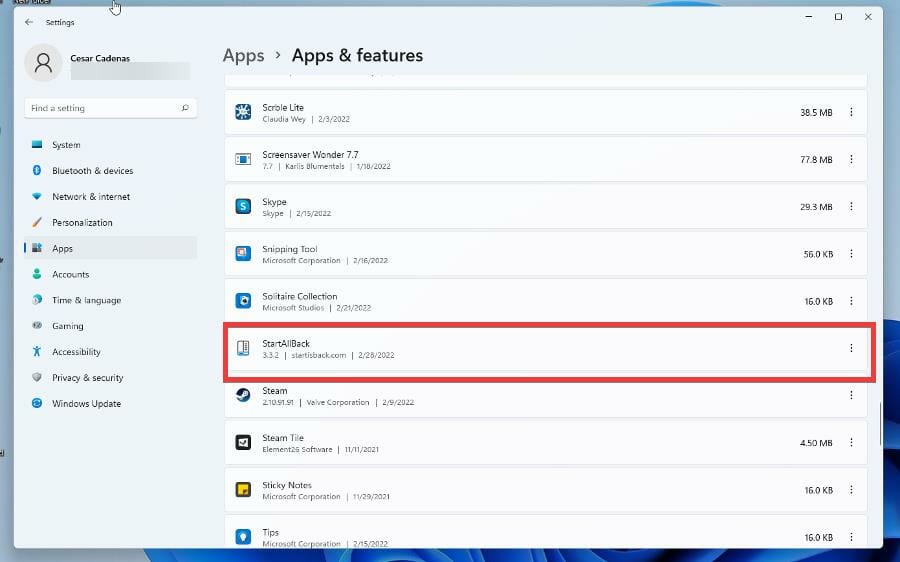
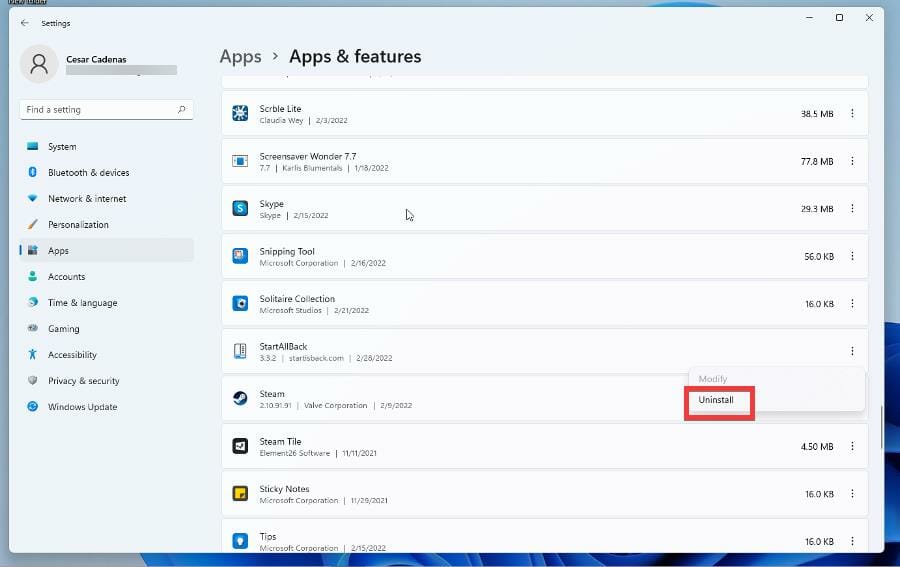
- Start by opening the Settings menu.
- Select Apps on the left hand side.

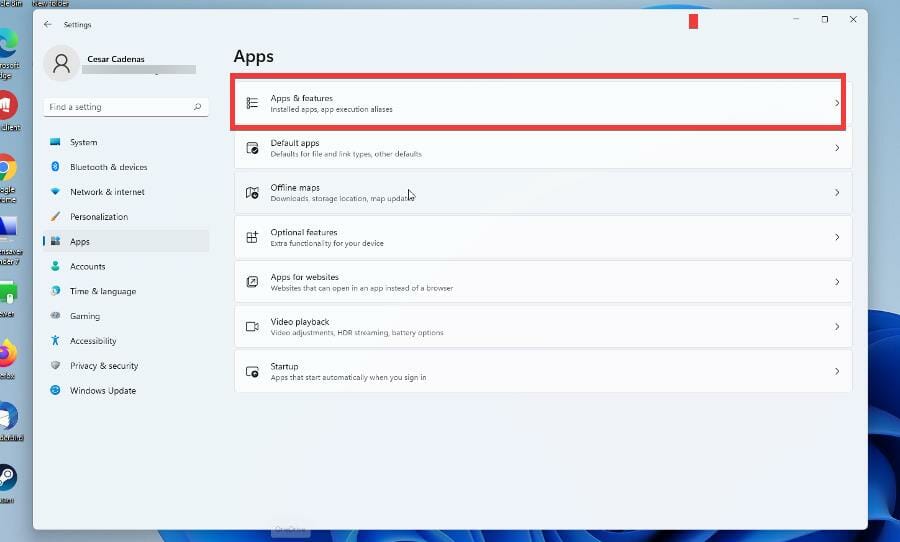
- Click Apps & features.
- Locate StartAllBack in the Apps list.

- Click the three dots on the right and select Uninstall.

If you want to avoid going through all these steps to uninstall software and want to ensure that all pieces of any software are removed from your device, we recommend that you use a specialized software uninstaller like CCleaner.
Are there other ways that I can customize my Windows 11 computer?
There are a lot of different ways to customize your machine. For example, you can customize what your Function Keys do thanks to an app called Microsoft PowerToys. After opening the app, you go to the Keyboard option, select which Function Key you want to change, and type in the command. Although, you can’t add CTRL+ALT+DEL to the app.
It’s also recommended that you purchase yourself a remote control software for your computer. It’s a useful app that gives you the ability to control another computer and certain aspects of it from anywhere, so long as the main computer has access to the host.

As for the future, a leak on Twitter has revealed that Windows 11 desktop stickers are making their way to the system. They’re stickers that allow you to pick and place decorative images of cute animals over your desktop. Nothing crazy or life-changing, but it’s certainly a cute way to change your computer’s look.
Feel free to leave a comment below if you have any questions on other Windows 11 apps. Also, leave comments about guides that you’d like to see or information on other Windows 11 features or list guides like this.
![]()
If you’re unhappy with the Windows 11 Start menu, why not try a third-party alternative?

Those of you who don’t like the Windows 11 Start menu have a few choices. You can tweak it to a certain extent. You can wait to see if and how Microsoft improves it in a future version of Windows 11. Or you can replace it with a third-party Start menu alternative. One alternative worth trying is StartAllBack.
StartAllBack replaces the Windows 11 menu with a more traditional Start menu. You can choose among three different menus, customize the menu with different colors and themes, and even spruce up the Taskbar and File Explorer. The software sells for $4.99 (or $1.50 if you’re upgrading from a previous version) for a single license and offers a free 30-day trial so you can try before you buy. Here’s how it works.
SEE: Windows 11: Tips on installation, security and more (free PDF) (TechRepublic)
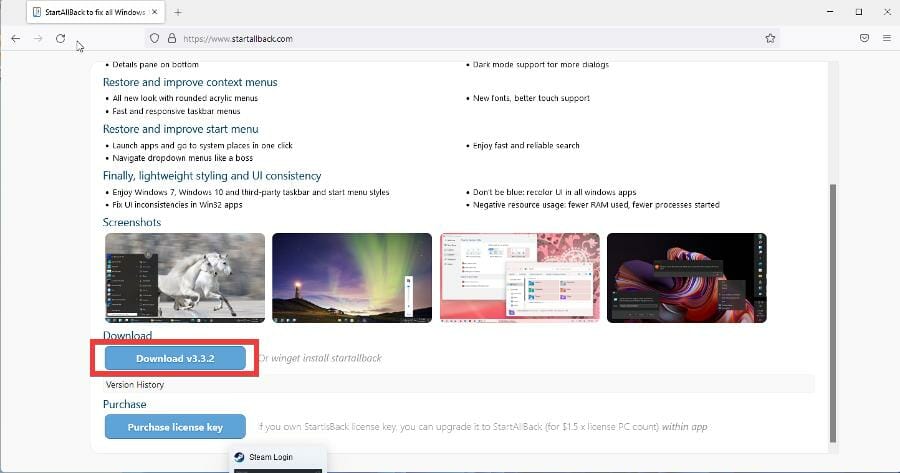
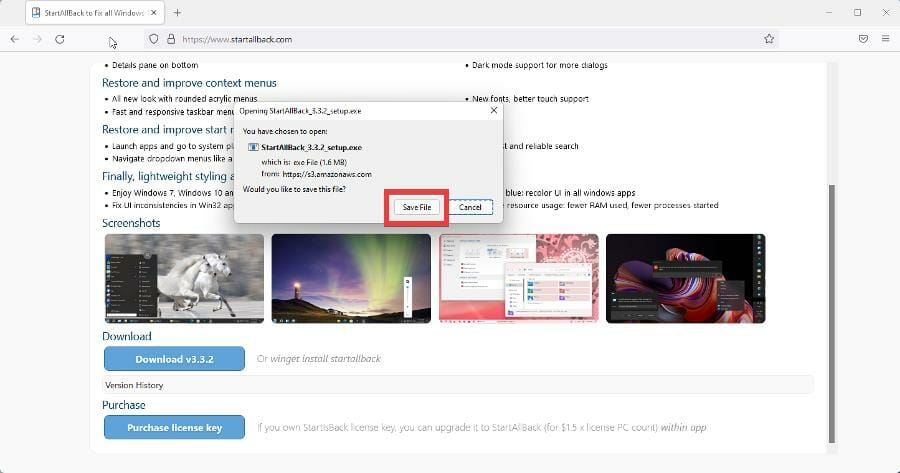
Browse to the StartAllBack website. To buy the program, click the button for Purchase License key and then click the Buy Now button. To check out the 30-day trial, click the Download button instead. Run the downloaded executable file.
How to install and set up StartAllBack on Windows 11
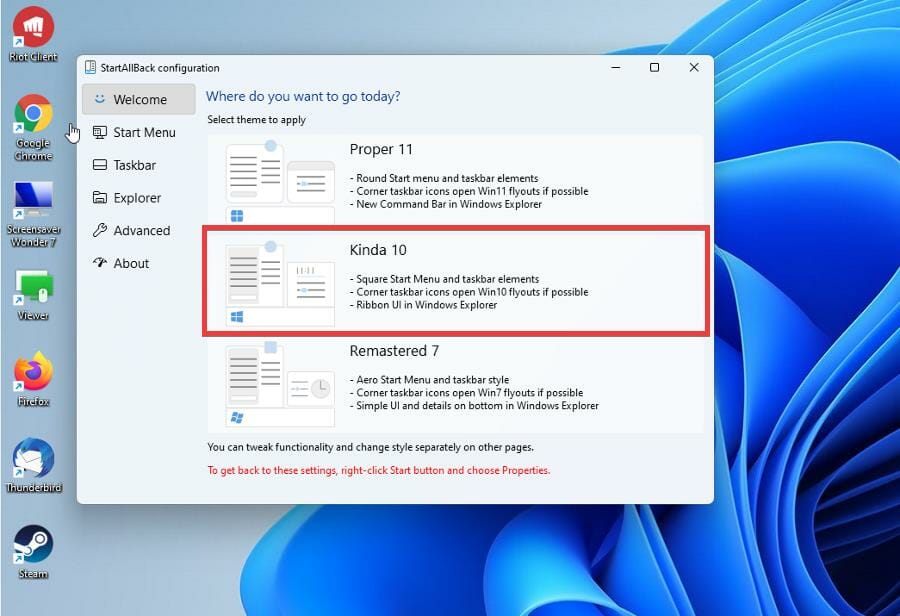
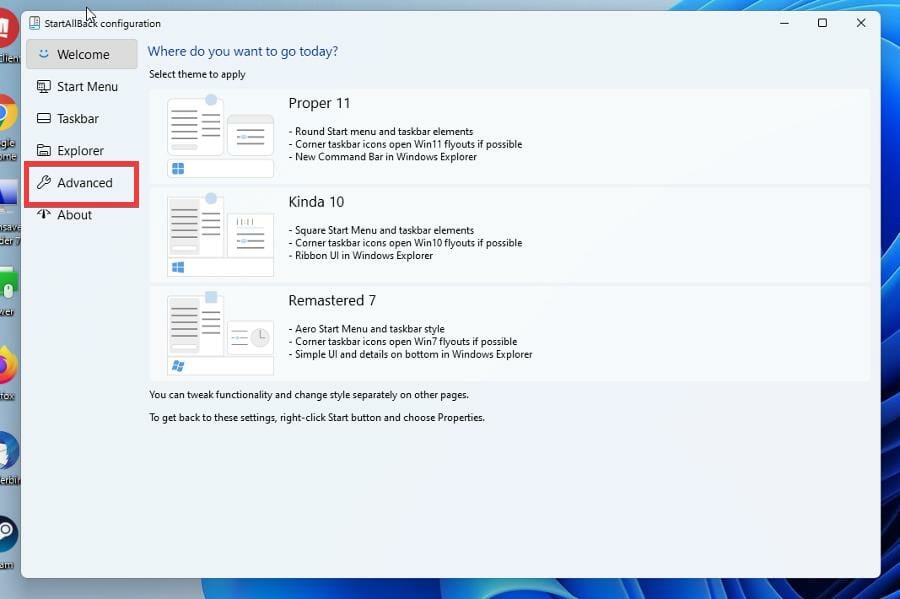
The setup process kicks off by asking what type of theme you’d like to use. The screen offers three choices: Proper 11, Kinda 10, and Remastered 7 accompanied by descriptions of each one. Despite their names and version numbers, each one uses a traditional two-column layout; the main differences between them are mostly aesthetic. Select the theme you want to use. You can always change it later on (Figure A).
Figure A

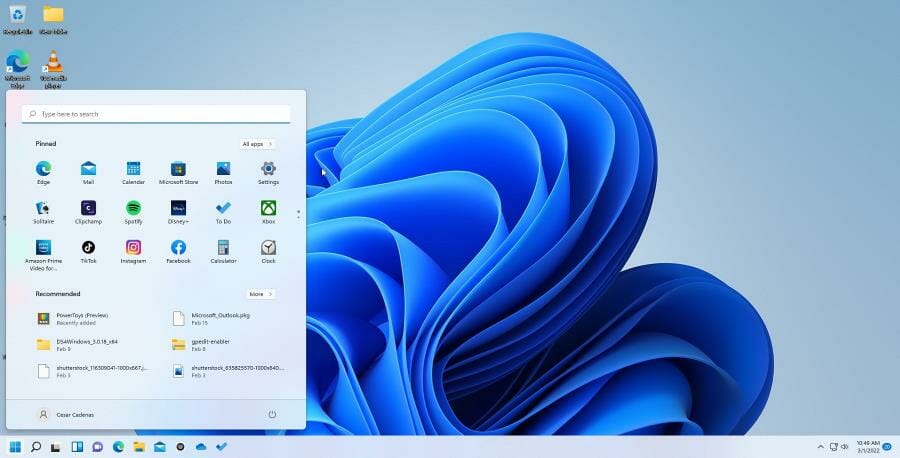
Click the Start button and you’ll see the familiar two-column layout with all your programs (or favorite ones) on the left and common Windows apps and locations on the right. Just like in Windows 7, the left column displays recently-used or pinned apps. Click the link for All Programs to see all your installed apps. The Apps folder contains shortcuts for all the Windows universal apps, both ones that are built in as well as ones from third parties.
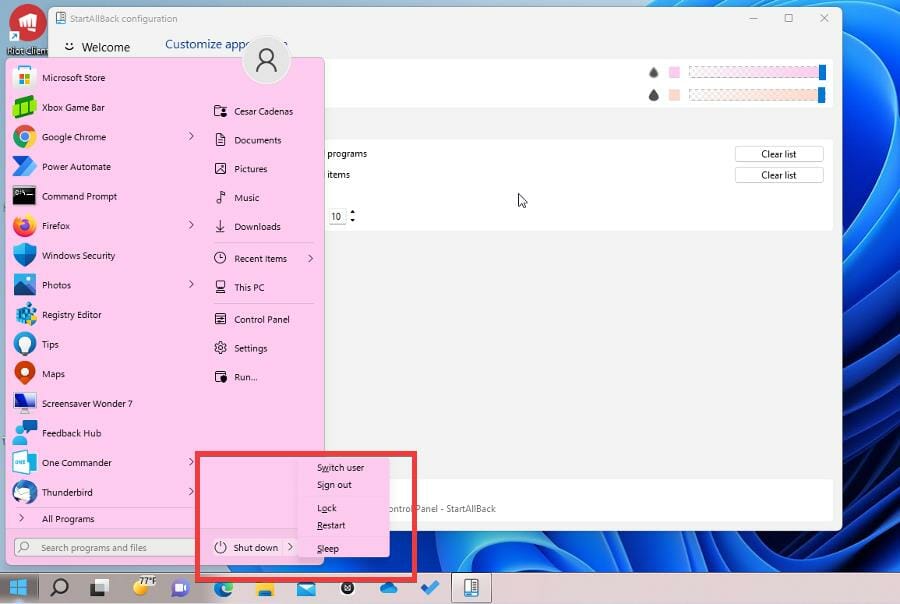
The right column points you to your Documents, Pictures and Music folders as well as to Control Panel, Settings, and the Run command. The right arrow for the Shutdown command opens a menu with options for switching users, signing out, locking the PC and restarting (Figure B).
Figure B

One key benefit to the StartAllBack menu is that you can manage your shortcuts directly in the menu as well as through File Explorer. Right-click on a folder at the All Programs area in the menu. From here, you can delete it, rename it and run other commands. Right-click on an individual shortcut to see similar commands (Figure C).
Figure C

Within the menu, you can move a shortcut from one folder to another. Right-click on a shortcut and select Cut. Right-click on the folder to which you want to move the shortcut and select Paste (Figure D).
Figure D

With StartAllBack, you can modify and manage the Start menu even more easily and efficiently through File Explorer.
Windows traditionally uses two folders to store Start menu shortcuts. One is for programs installed for all users, the other for programs installed only for the current user. With the StartAllBack Start menu, you can access both folders. Click the Start button and then right-click the option for All Programs.
SEE: Office 365: A guide for tech and business leaders (free PDF) (TechRepublic)
The entry for Open All Users points you to the shortcuts for programs that were installed for all user accounts. The entry for Open points you to shortcuts for programs that were installed only for your account. Click the entry for Open All Users to see the ones for all user accounts (Figure E).
Figure E

In File Explorer, select the Programs folder to see most of the folders and shortcuts in the Start menu. In addition to deleting, renaming and moving folders and shortcuts, you can create new folders and then move specific shortcuts into those folders (Figure F).
Figure F

Again, click the Start button, right-click on the All Programs entry and select Open to open a second File Explorer window showing the shortcuts for programs installed for your own account (Figure G).
Figure G

By viewing the Start menu folders and shortcuts for all user accounts and for your account, you can manage and move them around until they’re better arranged. When done, click the Start button and select All Programs and you should see a more efficient and organized menu (Figure H).
Figure H

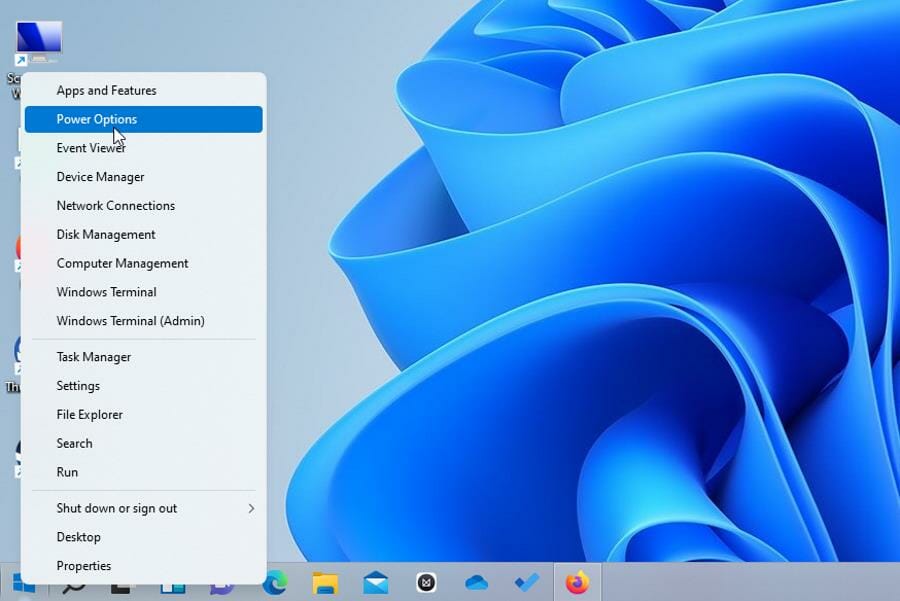
Next, you can always return to the StartAllBack configuration to adjust the program’s settings. Right-click on the Start button and select Properties. At the StartAllBack window, click the setting for Welcome to change to a different layout. Click the setting for Start Menu to adjust the icons and attributes of the menu. Click the setting for Taskbar to tweak aspects of the Taskbar. You can even move the Taskbar to the top, left or right sides of the screen (Figure I).
Figure I

Click the setting for Explorer to adjust key elements of File Explorer. Finally, click the setting for Advanced to modify the appearance and other elements for StartAllBack (Figure J).
Figure J

Утилита для кастомизации интерфейса StartAllBack (StartIsBack в прошлом) обновилась до версии 3.0, получив поддержку Windows 11, тем самым позволяя пользователям новой операционной системы добавить в неё дизайн Windows 7. Говоря точнее, программа скорее комбинирует дизайны Windows 11 и Windows 7, а не полностью возвращает дизайн «Семёрки».
К примеру, StartAllBack 3.0 добавляет старый дизайн «Пуска» и сдвигает его в левую часть панели задач, но при этом меню продолжает парить над таскбаром. Впрочем, панель задач можно прикреплять к любой из сторон экрана — в Windows 11 она находится снизу, и даже изменение реестра позволяет переместить её только наверх (левая и правая стороны недоступны).
Также утилита позволяет изменить дизайн «Проводника» подстать дизайну Windows 7. Впрочем, есть ещё и тема Win10 Ribbon UI, которая комбинирует дизайны Windows 11 и 10.
StartAllBack 3.0 привносит не только дизайн старых систем, но и функционал: к примеру, на панель задач снова можно перемещать файлы простым перетаскиванием (функцией Drag-and-Drop).
StartAllBack стоит 5 долларов, но пользователи старой версии в лице StartIsBack могут обновиться за 1,5 доллара.
- Теперь не боюсь за Windows: точки восстановления создаются каждый день. Вот как это настроить
- 7 функций, которые сделают Windows 12 лучшей системой. Если Microsoft пойдёт на это
- Эта бесплатная утилита от Microsoft в разы ускоряет работу. Она существует ещё с Windows 95
- Эта утилита показывает, где используется выбранный файл в Windows и что мешает удалить его
- Windows 7 мертва. Как стала лучшей и почему осталась такой до сих пор
Как всем известно, дизайн пользовательского интерфейса — одно из значительных изменений в Windows 11. Если вы относитесь к числу тех, кто не любит принимать новый пользовательский интерфейс, но не желает отказываться от системы Windows 11. StatAllBack это ваш альтернативный план по настройке внешнего вида панели задач, меню «Пуск», проводника и рабочего стола в Win 11 без его удаления.
Он очень похож на Start11, но легче. Есть еще много вариантов настройки. За исключением классической панели задач и меню «Пуск» Windows 7 и Windows 10, поддерживаются некоторые сторонние стили панели задач и меню «Пуск».
Восстановить и улучшить панель задач ОС Windows 11
- Переместите панель задач вверх, влево или вправо;
- Перетащите содержимое на панель задач;
- Отрегулируйте размер значка на панели задач;
Восстановите и улучшите внешний вид проводника
- Наслаждайтесь Win 10 Ribbon UI
- Получить Win 7 Command Bar
- Настроить панель команд Win 11
Восстановить и улучшить меню Пуск
- Запускайте приложения и переходите в системные места в один клик
- Навигация по раскрывающимся меню в классическом интерфейсе
Как установить и использовать StartAllBack для Windows 11?
Шаг 1: Скачать НачатьВсеНазад;
Шаг 2: Один раз щелкните исполняемый файл, чтобы установить его; тогда значки на панели задач будут перемещены вправо;
Шаг 3: Щелкните меню «Пуск» в левом углу, чтобы проверить, вернули ли вы классическое меню;

Шаг 4: Откройте основной интерфейс StartAllBack, чтобы начать настройку, потому что все предустановленные настройки могут не соответствовать вашим предпочтениям.
Во-первых, вы можете выбрать одну из тем для применения: «Правильный 11», «Тип 10» и «Ремастеринг 7», чтобы получить другой стиль для пользовательского интерфейса рабочего стола;

Во-вторых, для настройки меню «Пуск» есть много опций: включить расширенное классическое меню «Пуск» или нет, отображать ли в папке большие значки и современные приложения, выделять ли недавно установленные программы или нет и т. Д.

Размер значка на панели задач также можно настроить, как и классический значок или значок Win 10.

Многие другие подробные настройки ждут вашего изучения. Но это 30-дневная пробная версия. Лицензионный ключ необходим для регистрации программы, чтобы пользоваться всеми функциями постоянно. Получить Лицензионный ключ StartAllBack здесь. Предлагается 1 ключ для ПК и 3 ключа для ПК, которые продаются по цене 4.99 или 8.99 долларов. Вы можете купить личную лицензию через PayPal или через прямую оплату картой (через Gumroad). Все платежи обрабатываются безопасно.
Вам нужно знать, что StartAllBack может работать только в Windows 11. Если вам нужно настроить пользовательский интерфейс для Win 8 / Win 7, вы можете загрузить StartIsBack.