The built in compilers available on Windows 10 are for VisualBasic, C#, JScript.
To improve speed & performance of apps, «ngen.exe creates native images, which are files containing compiled processor-specific machine code, and installs them into the native image cache on the local computer. The runtime can use native images from the cache instead of using the just-in-time (JIT) compiler to compile the original assembly».
For low level programmers, ilasm.exe (IL Assembler) ships with Windows, which also facilitates «tool and compiler» development; so you could even create your own language or build a better compiler for a current one, or «debug your code at low level and understand how .NET deals with your high level code», or «write your own compiler for a new .NET language.»
For web programmers, AspNetCompiler precompiles server-side ASP.NET web-applications, therefore helps application performance because end users do not encounter a delay on the first request to the application.
All Compilers & assemblers come as builtin with Windows without IDE and can be run from «the Windows Command prompt (cmd.exe)», so no extra downloads necessary; located in folder: C:\Windows\Microsoft.NET\Framework\vx.x.xxxxx\ .
Note: C# is based on JScript.
Compilers:
- vbc.exe
- csc.exe
- jsc.exe
- ilasm.exe
- ngen.exe
- aspnet_compiler.exe
Addendum:
If you still are looking for a C compiler to handle some C source codes you already have spent your life on, then (without downloading) you can make/write a C compiler, in a high level language, then optimize it with a low level language.
This guide will «introduce you to the high-level architecture, theory, and .NET Framework APIs that are required to build your own .NET compiler» in C#.
From Wikipedia, the free encyclopedia
| Developer(s) | Microsoft |
|---|---|
| Initial release | February 1993; 30 years ago[1] |
| Stable release |
14.37.32822 |
| Written in | C++[2] |
| Operating system | Windows |
| Platform | IA-32, x86-64 and ARM |
| Available in | English, Chinese (Simplified & Traditional), Czech, French, German, Italian, Japanese, Korean, Polish, Portuguese (Brazilian), Russian, Spanish, Turkish |
| Type | Compiler |
| License | Trialware and freeware |
| Website | docs |
Microsoft Visual C++ (MSVC) is a compiler for the C, C++, C++/CLI and C++/CX programming languages by Microsoft. MSVC is proprietary software; it was originally a standalone product but later became a part of Visual Studio and made available in both trialware and freeware forms. It features tools for developing and debugging C++ code, especially code written for the Windows API, DirectX and .NET.
Many applications require redistributable Visual C++ runtime library packages to function correctly. These packages are frequently installed separately from the applications they support, enabling multiple applications to use the package with only a single installation. These Visual C++ redistributable and runtime packages are mostly installed for standard libraries that many applications use.[3]
History[edit]
The predecessor to Visual C++ was called Microsoft C/C++. There was also a Microsoft QuickC 2.5 and a Microsoft QuickC for Windows 1.0. The Visual C++ compiler is still known as Microsoft C/C++ and as of the release of Visual C++ 2015 Update 2, is on version 14.0.23918.0.[citation needed]
16-bit versions[edit]
- Microsoft C 1.0, based on Lattice C, was Microsoft’s first C product in 1983. It was not K&R C compliant.
- C 2.0 added large model support, allowing up to 1MiB for both the Code Segment and Data Segment.[4]
- C 3.0 was the first version developed inside Microsoft.[5] This version intended compatibility with K&R and the later ANSI standard. It was being used inside Microsoft (for Windows and Xenix development) in early 1984. It shipped as a product in 1985.
- C 4.0 added optimizations and CodeView, a source-level debugger.
- C 5.0 added loop optimizations and ‘huge memory model’ (arrays bigger than 64 KB) support. Microsoft Fortran and the first 32-bit compiler for 80386 were also part of this project.
- C 5.1 released in 1988 allowed compiling programs for OS/2 1.x. The fourteen 5.25″ disk (two of which were 1.2 MB, the others 360k) version included QuickC. The eleven 720k 3.5″ disk version included with the OS/2 Software Development Kit included MASM 5.1 (a single executable that worked under both MSDOS and OS/2 1.x).
- C 6.0 released in 1989. It added the Programmer’s Workbench IDE, global flow analysis, a source browser, and a new debugger, and included an optional C++ front end.[6]
- C/C++ 7.0 was released in 1992. Dropped OS/2 support. Requires a 386 processor and uses the provided 386-Max dos extender (dosx32). Added built-in support for C++ and MFC (Microsoft Foundation Class Library) 1.0.[7]
- Visual C++ 1.0, which included MFC 2.0, was the first version of ‘Visual’ C++, released in February 1993. It was Cfront 2.1 compliant[8] and available in two editions:[1]
- Standard: replaced QuickC for Windows.
- Professional: replaced C/C++ 7.0. Included the ability to build both DOS and Windows applications, an optimizing compiler, a source profiler, and the Windows 3.1 SDK.[8] The Phar Lap 286 DOS Extender Lite was also included.[9]
- Visual C++ 1.5 was released in December 1993, included MFC 2.5, and added OLE 2.0 and ODBC support to MFC.[10] It was the first version of Visual C++ that came only on CD-ROM.
- Visual C++ 1.51 and 1.52 were available as part of a subscription service.
- Visual C++ 1.52b is similar to 1.52, but does not include the Control Development Kit.
- Visual C++ 1.52c was a patched version of 1.5. It is the last, and arguably most popular, development platform for Microsoft Windows 3.x. It is available through Microsoft Developer Network.
Strictly 32-bit versions[edit]
- Visual C++ 1.0 (original name: Visual C++ 32-bit Edition) released in 1993 was the first version for 32-bit development for the Intel 386 architecture.[11] Although released when 16-bit version 1.5 was available, it did not include support for OLE2 and ODBC. It was also available in a bundle called Visual C++ 16/32-bit Suite, which included Visual C++ 1.5.[12]
- Visual C++ 2.0, which included MFC 3.0, was the first version to be 32-bit only. In many ways, this version was ahead of its time, since Windows 95, then codenamed «Chicago», was not yet released, and Windows NT had only a small market share. Microsoft included and updated Visual C++ 1.5 as part of the 2.x releases up to 2.1, which included Visual C++ 1.52, and both 16-bit and 32-bit version of the Control Development Kit (CDK) were included. Visual C++ 2.x also supported Win32s development. It is available through Microsoft Developer Network. There was a Visual C++ 2.0 RISC Edition for MIPS and Alpha processors, as well as a cross-platform edition for the Macintosh (68000 instruction set).[13]
- Visual C++ 2.1 and 2.2 were updates for 2.0 available through subscription.
- Visual C++ 4.0, released on 1995-12-11,[14] introduced the Developer Studio IDE. Its then-novel tiled layout of non-overlapping panels—navigation panel, combination editor/source level debugger panel, and console output panel[15]—continues through the Visual Studio product line (as of 2013). Visual C++ 4.0 included MFC 4.0, was designed for Windows 95 and Windows NT. To allow support of legacy (Windows 3.x/DOS) projects, 4.0 came bundled with the Visual C++ 1.52 installation CD. Updates available through subscription included Visual C++ 4.1, which came with the Microsoft Game SDK (later released separately as the DirectX SDK), and Visual C++ 4.2. Version number 3.0 was skipped to achieve version number parity between Visual C++ 4.0 and MFC 4.0.[16]
- Visual C++ 4.2 did not support Windows 3.x (Win32s) development.[17] This was the final version with a cross-platform edition for the Mac available and it differed from the 2.x version in that it also allowed compilation for the PowerPC instruction set.
- Visual C++ 5.0 (bundled with Visual Studio 97) which included MFC 4.21 and was released 1997-04-28,[14] was a major upgrade from 4.2.[18] Available in four editions: Learning,[19] Professional,[20] Enterprise,[21] and RISC.[22]
- Visual C++ 6.0 (commonly known as VC6, and available standalone in Standard, Professional and Enterprise editions, as well as bundled with Visual Studio 6.0), which included MFC 6.0, was released in 1998.[23][24] The release was somewhat controversial since it did not include an expected update to MFC. Visual C++ 6.0 is still quite popular and often used to maintain legacy projects. There are, however, issues with this version under Windows XP, especially under the debugging mode (for example, the values of static variables do not display). The debugging issues can be solved with a patch called the «Visual C++ 6.0 Processor Pack».[25] Version number: 12.00.8804
- Visual C++ .NET 2002 (also known as Visual C++ 7.0), which included MFC 7.0, was released in 2002 with support for link time code generation and debugging runtime checks, .NET 1.0, and Visual C# and Managed C++. The new user interface used many of the hot keys and conventions of Visual Basic, which accounted for some of its unpopularity among C++ developers.[citation needed] Version number: 13.00.9466
- Visual C++ .NET 2003 (also known as Visual C++ 7.1), which included MFC 7.1, was released in 2003 along with .NET 1.1 and was a major upgrade to Visual C++ .NET 2002. It was considered a patch to Visual C++ .NET 2002. Accordingly, the English language upgrade version of Visual Studio .NET 2003 shipped for minimal cost to owners of the English-language version of Visual Studio .NET 2002. Windows 98 is the lowest officially supported version. Although simple programs will work on Windows 95 and NT 4.0, more complex programs may cause things like ws2_32.dll to be referenced, or functions missing in kernel32.dll. In later versions (Visual C++ 2005) of the compiler even simple programs won’t work (unless you replace the C library) because they have a reference to function IsDebuggerPresent in kernel32.dll which only exists in Windows 98 and later.[citation needed] Version number: 13.10.3077
- eMbedded Visual C++[26] in various versions was used to develop for some versions of the Windows CE operating system. Initially it replaced a development environment consisting of tools added onto Visual C++ 6.0. eMbedded Visual C++ was replaced as a separate development environment by Microsoft Visual Studio 2005.
32-bit and 64-bit versions[edit]
- Visual C++ 2005 (also known as Visual C++ 8.0), which included MFC 8.0, was released in November 2005. This version supports .NET 2.0 and includes a new version of C++ targeted to the .NET framework (C++/CLI) with the purpose of replacing the previous version (Managed C++). Managed C++ for CLI is still available via compiler options, though. It also introduced OpenMP. With Visual C++ 2005, Microsoft also introduced Team Foundation Server. Visual C++ 8.0 has problems compiling MFC AppWizard projects that were created using Visual Studio 6.0, so maintenance of legacy projects can be continued with the original IDE if rewriting is not feasible. Visual C++ 2005 is the last version able to target Windows 98 and Windows Me.[27][28] SP1 version (14.00.50727.762) is also available in Microsoft Windows SDK Update for Windows Vista.
- Visual C++ 2008 (also known as Visual C++ 9.0) was released in November 2007. This version supports .NET 3.5. Managed C++ for CLI is still available via compiler options. By default, all applications compiled against the Visual C++ 2008 Runtimes (static and dynamic linking) will only work on Windows 2000, Windows XP SP2 and later.[29][30] A feature pack released for VC9, later included in SP1, added support for C++ TR1 library extensions. SP1 version (15.00.30729.01) is also available in Microsoft Windows SDK for Windows 7.
- Some versions of Visual C++ supported Itanium 2.
- Visual C++ 2010 (also known as Visual C++ 10.0) was released on April 12, 2010. It uses a SQL Server Compact database to store information about the source code, including IntelliSense information, for better IntelliSense and code-completion support.[31] However, Visual C++ 2010 does not support Intellisense for C++/CLI.[32] This version adds a C++ parallel computing library called the Parallel Patterns Library, partial support for C++11, significantly improved IntelliSense based on the Edison Design Group front end,[33] and performance improvements to both the compiler and generated code.[34] This version is built on .NET 4.0, but supports compiling to machine code. The partial C++11 support mainly consists of six compiler features:[35] lambdas, rvalue references, auto, decltype, static_assert, and nullptr. C++11 also supports library features (e.g., moving the TR1 components from std::tr1 namespace directly to std namespace). Variadic templates were also considered, but delayed until some future version due to having a lower priority, which stemmed from the fact that, unlike other costly-to-implement features (lambda, rvalue references), variadic templates would benefit only a minority of library writers rather than the majority of compiler end users.[36] By default, all applications compiled against Visual C++ 2010 Runtimes only work on Windows XP SP2 and later. The RTM version (16.00.30319) is also available in Windows SDK for Windows 7 and .NET Framework 4 (WinSDK v7.1).[37] SP1 version (16.00.40219) is available as part of Visual Studio 2010 Service Pack 1 or through the Microsoft Visual C++ 2010 Service Pack 1 Compiler Update for the Windows SDK 7.1.[38]
- Visual C++ 2012 (also known as Visual C++ 11.0) was released on August 15, 2012. It features improved C++11 support, and support for Windows Runtime development.[39]
- Visual C++ 2013 (also known as Visual C++ 12.0) was released on October 17, 2013. It features further C++11 and C99 support, and introduces a REST SDK.[40]
- Visual C++ 2015 (also known as Visual C++ 14.0) was released on July 20, 2015.[41] It features improved C++11/14/17 support.[42] Without any announcement from Microsoft, Visual Studio 2015 Update 2 started generating telemetry calls in compiled binaries. After some users contacted Microsoft about this problem, Microsoft said they would remove these telemetry calls when compiling with the future Visual Studio 2015 Update 3.[43][44] The function in question was removed from the Visual C++ CRT static libraries in Visual Studio 2015 Update 3.[citation needed]
- Visual C++ 2017 (also known as Visual C++ 14.1) was released on March 7, 2017.[45]
- Visual C++ 2019 (also known as Visual C++ 14.20) was released on April 2, 2019.[46]
- Visual C++ 2022 (also known as Visual C++ 14.30) was released on November 8, 2021.[47]
Internal version numbering[edit]
There are several different version numbers to consider when working with Visual C or C++. The oldest and most original of these is the compiler version number, which has been monotonically increased since the early Microsoft C compiler days. This is the version returned by running the command cl.exe on its own without any options. By taking two digits after the decimal and dropping the decimal point, this also becomes the value of the C pre-processor macro: _MSC_VER, and the CMake variable: MSVC_VERSION. A longer version of the C macro is _MSC_FULL_VER to make more finely-grained distinctions between builds of the compiler. An example of _MSC_VER is ‘1933’ to represent version 19.33 of the Microsoft C/C++ compiler, and of _MSC_FULL_VER is ‘193331630’. You should use the >= operator to test the value of _MSC_VER or _MSC_FULL_VER instead of equality.
The Visual product version, such as ‘17.3.4’, designates the version of Visual Studio with which version 19.33 of the compiler was packaged. Then there is the Microsoft Visual C/C++ Runtime Library version, e.g. ‘14.3’. From this, one can deduce also the toolset version, which can be obtained by taking the first three digits of the runtime library version and dropping the decimal, e.g. ‘143’. It includes the Visual C/C++ runtime library, as well as compilers, linkers, assemblers, other build tools, and matching libraries and header files. The following is a (scrapeable) table of the known correlated version numbers.
| product name | product Version | marketing year | _MSC_VER | _MSC_FULL_VER | runtime library version |
|---|---|---|---|---|---|
| Microsoft C 6.0 | 600 | ||||
| Microsoft C/C++ 7.0 | 700 | ||||
| Visual C++ 1.0 | 1.0 | 800 | 1 | ||
| Visual C++ 2.0 | 2.0 | 900 | 2 | ||
| Visual C++ 4.0 | 4.0 | 1000 | 4 | ||
| Visual C++ 4.1 | 4.1 | 1010 | 4.1 | ||
| Visual C++ 4.2 | 4.2 | 1020 | 4.2 | ||
| Visual Studio 97 [5.0] | 5.0 | 97 | 1100 | 5 | |
| Visual Studio 6.0 SP5 | 6.0 | 1200 | 12008804 | 6 | |
| Visual Studio 6.0 SP6 | 6.0 | 1200 | 12008804 | 6 | |
| Visual Studio .NET 2002 [7.0] | 7.0 | 2002 | 1300 | 13009466 | 7 |
| Visual Studio .NET 2003 Beta [7.1] | 7.1 | 2003 | 1310 | 13102292 | 7.1 |
| Visual Studio Toolkit 2003 [7.1] | 7.1 | 2003 | 1310 | 13103052 | 7.1 |
| Visual Studio .NET 2003 [7.1] | 7.1 | 2003 | 1310 | 13103077 | 7.1 |
| Visual Studio .NET 2003 SP1 [7.1] | 7.1 | 2003 | 1310 | 13106030 | 7.1 |
| Visual Studio 2005 Beta 1 [8.0] | 8.0 | 2005 | 1400 | 140040607 | 8 |
| Visual Studio 2005 Beta 2 [8.0] | 8.0 | 2005 | 1400 | 140050215 | 8 |
| Visual Studio 2005 [8.0] | 8.0 | 2005 | 1400 | 140050320 | 8 |
| Visual Studio 2005 SP1 [8.0] | 8.0 | 2005 | 1400 | 140050727 | 8 |
| Visual Studio 2008 Beta 2 [9.0] | 8.0 | 2008 | 1500 | 150020706 | 9 |
| Visual Studio 2008 [9.0] | 9.0 | 2010 | 1500 | 150021022 | 9 |
| Visual Studio 2008 SP1 [9.0] | 9.0 | 2010 | 1500 | 150030729 | 9 |
| Visual Studio 2010 Beta 1 [10.0] | 10.0 | 2010 | 1600 | 160020506 | 10 |
| Visual Studio 2010 Beta 2 [10.0] | 10.0 | 2010 | 1600 | 160021003 | 10 |
| Visual Studio 2010 [10.0] | 10.0 | 2010 | 1600 | 160030319 | 10 |
| Visual Studio 2010 SP1 [10.0] | 10.0 | 2010 | 1600 | 160040219 | 10 |
| Visual Studio 2012 [11.0] | 11.0 | 2012 | 1700 | 170050727 | 11 |
| Visual Studio 2012 Update 1 [11.0] | 11.0 | 2012 | 1700 | 170051106 | 11 |
| Visual Studio 2012 Update 2 [11.0] | 11.0 | 2012 | 1700 | 170060315 | 11 |
| Visual Studio 2012 Update 3 [11.0] | 11.0 | 2012 | 1700 | 170060610 | 11 |
| Visual Studio 2012 Update 4 [11.0] | 11.0 | 2012 | 1700 | 170061030 | 11 |
| Visual Studio 2012 November CTP [11.0] | 11.0 | 2012 | 1700 | 170051025 | 11 |
| Visual Studio 2013 Preview [12.0] | 12.0 | 2013 | 1800 | 180020617 | 12 |
| Visual Studio 2013 RC [12.0] | 12.0 | 2013 | 1800 | 180020827 | 12 |
| Visual Studio 2013 [12.0] | 12.0 | 2013 | 1800 | 180021005 | 12 |
| Visual Studio 2013 Update 1 [12.0] | 12.0 | 2013 | 1800 | 180021005 | 12 |
| Visual Studio 2013 Update2 RC [12.0] | 12.0 | 2013 | 1800 | 180030324 | 12 |
| Visual Studio 2013 Update 2 [12.0] | 12.0 | 2013 | 1800 | 180030501 | 12 |
| Visual Studio 2013 Update 3 [12.0] | 12.0 | 2013 | 1800 | 180030723 | 12 |
| Visual Studio 2013 Update 4 [12.0] | 12.0 | 2013 | 1800 | 180031101 | 12 |
| Visual Studio 2013 Update 5 [12.0] | 12.0 | 2013 | 1800 | 180040629 | 12 |
| Visual Studio 2013 November CTP [12.0] | 12.0 | 2013 | 1800 | 180021114 | 12 |
| Visual Studio 2015 [14.0] | 14.0 | 2015 | 1900 | 190023026 | 14 |
| Visual Studio 2015 Update 1 [14.0] | 14.0 | 2015 | 1900 | 190023506 | 14 |
| Visual Studio 2015 Update 2 [14.0] | 14.0 | 2015 | 1900 | 190023918 | 14 |
| Visual Studio 2015 Update 3 [14.0] | 14.0 | 2015 | 1900 | 190024210 | 14 |
| Visual Studio 2017 version 15.0 | 15.0 | 2017 | 1910 | 191025017 | 14.1 |
| Visual Studio 2017 version 15.1 | 15.1 | 2017 | 1910 | 191025017 | 14.1 |
| Visual Studio 2017 version 15.2 | 15.2 | 2017 | 1910 | 191025017 | 14.1 |
| Visual Studio 2017 version 15.3.3 | 15.3.3 | 2017 | 1911 | 191125507 | 14.11 |
| Visual Studio 2017 version 15.4.4 | 15.4.4 | 2017 | 1911 | 191125542 | 14.11 |
| Visual Studio 2017 version 15.4.5 | 15.4.5 | 2017 | 1911 | 191125547 | 14.11 |
| Visual Studio 2017 version 15.5.2 | 15.5.2 | 2017 | 1912 | 191225831 | 14.12 |
| Visual Studio 2017 version 15.5.3 | 15.5.3 | 2017 | 1912 | 191225834 | 14.12 |
| Visual Studio 2017 version 15.5.4 | 15.5.4 | 2017 | 1912 | 191225834 | 14.12 |
| Visual Studio 2017 version 15.5.6 | 15.5.6 | 2017 | 1912 | 191225835 | 14.12 |
| Visual Studio 2017 version 15.5.7 | 15.5.7 | 2017 | 1912 | 191225835 | 14.12 |
| Visual Studio 2017 version 15.6.0 | 15.6.0 | 2017 | 1913 | 191326128 | 14.13 |
| Visual Studio 2017 version 15.6.1 | 15.6.1 | 2017 | 1913 | 191326128 | 14.13 |
| Visual Studio 2017 version 15.6.2 | 15.6.2 | 2017 | 1913 | 191326128 | 14.13 |
| Visual Studio 2017 version 15.6.3 | 15.6.3 | 2017 | 1913 | 191326129 | 14.13 |
| Visual Studio 2017 version 15.6.4 | 15.6.4 | 2017 | 1913 | 191326129 | 14.13 |
| Visual Studio 2017 version 15.6.6 | 15.6.6 | 2017 | 1913 | 191326131 | 14.13 |
| Visual Studio 2017 version 15.6.7 | 15.6.7 | 2017 | 1913 | 191326132 | 14.13 |
| Visual Studio 2017 version 15.7.1 | 15.7.1 | 2017 | 1914 | 191426428 | 14.14 |
| Visual Studio 2017 version 15.7.2 | 15.7.2 | 2017 | 1914 | 191426429 | 14.14 |
| Visual Studio 2017 version 15.7.3 | 15.7.3 | 2017 | 1914 | 191426430 | 14.14 |
| Visual Studio 2017 version 15.7.5 | 15.7.5 | 2017 | 1914 | 191426433 | 14.14 |
| Visual Studio 2017 version 15.9.1 | 15.9.1 | 2017 | 1916 | 191627023 | 14.16 |
| Visual Studio 2017 version 15.9.4 | 15.9.4 | 2017 | 1916 | 191627025 | 14.16 |
| Visual Studio 2017 version 15.9.5 | 15.9.5 | 2017 | 1916 | 191627026 | 14.16 |
| Visual Studio 2017 version 15.9.7 | 15.9.7 | 2017 | 1916 | 191627027 | 14.16 |
| Visual Studio 2017 version 15.9.11 | 15.9.11 | 2017 | 1916 | 191627030 | 14.16 |
| Visual Studio 2019 version 16.0.0 | 16.0.0 | 2019 | 1920 | 192027508 | 14.20 |
| Visual Studio 2019 version 16.1.2 | 16.1.2 | 2019 | 1921 | 192127702 | 14.21 |
| Visual Studio 2019 version 16.2.3 | 16.2.3 | 2019 | 1922 | 192227905 | 14.21 |
| Visual Studio 2019 version 16.3.2 | 16.3.2 | 2019 | 1923 | 192328105 | 14.21 |
| Visual Studio 2019 version 16.4.0 | 16.4.0 | 2019 | 1924 | 192428314 | 14.24 |
| Visual Studio 2019 version 16.5.1 | 16.5.1 | 2019 | 1925 | 192528611 | 14.25 |
| Visual Studio 2019 version 16.6.2 | 16.6.2 | 2019 | 1926 | 192628806 | 14.26 |
| Visual Studio 2019 version 16.7 | 16.7 | 2019 | 1927 | 192729112 | 14.27 |
| Visual Studio 2019 version 16.8.1 | 16.8.1 | 2019 | 1928 | 192829333 | 14.28 |
| Visual Studio 2019 version 16.8.2 | 16.8.2 | 2019 | 1928 | 192829334 | 14.28 |
| Visual Studio 2019 version 16.9.2 | 16.9.2 | 2019 | 1928 | 192829913 | 14.28 |
| Visual Studio 2019 version 16.11.2 | 16.11.2 | 2019 | 1929 | 192930133 | 14.29 |
| Visual Studio 2019 version 16.11.24 | 16.11.24 | 2019 | 1929 | 192930148 | 14.29 |
| Visual Studio 2019 version 16.11.27 | 16.11.27 | 2019 | 1929 | 192930151 | 14.29 |
| Visual Studio 2022 version 17.0.1 | 17.0.1 | 2022 | 1930 | 193030705 | 14.30 |
| Visual Studio 2022 version 17.0.2 | 17.0.2 | 2022 | 1930 | 193030706 | 14.31 |
| Visual Studio 2022 version 17.2.2 | 17.2.2 | 2022 | 1932 | 193231329 | 14.32 |
| Visual Studio 2022 version 17.3.4 | 17.3.4 | 2022 | 1933 | 193331630 | 14.33 |
| Visual Studio 2022 version 17.4.0 | 17.4.0 | 2022 | 1934 | 193431933 | 14.34 |
| Visual Studio 2022 version 17.5.0 | 17.5.0 | 2022 | 1935 | ? | 14.35 |
| Visual Studio 2022 version 17.6.0 | 17.6.0 | 2022 | 1936 | ? | 14.36 |
| Visual Studio 2022 version 17.6.2 | 17.6.2 | 2022 | 1936 | 193632532 | 14.36.32532 |
| Visual Studio 2022 version 17.6.4 | 17.6.4 | 2022 | 1936 | 193632535 | 14.36.32532 |
Compatibility[edit]
ABI[edit]
The Visual C++ compiler ABI have historically changed between major compiler releases.[50] This is especially the case for STL containers, where container sizes have varied a lot between compiler releases.[51] Microsoft therefore recommends against using C++ interfaces at module boundaries when one wants to enable client code compiled using a different compiler version. Instead of C++, Microsoft recommends using C[52] or COM[53] interfaces, which are designed to have a stable ABI between compiler releases.
All 14.x MSVC releases have a stable ABI,[54] and binaries built with these versions can be mixed in a forwards-compatible manner, noting the following restrictions:
- The toolset version used must be equal to or higher than the highest toolset version used to build any linked binaries.
- The MSVC Redistributable version must be equal to or higher than the toolset version used by any application component.
- Static libraries or object files compiled with /GL (Whole program optimisation) are not binary compatible between versions and must use the exact same toolset.
C runtime libraries[edit]
Visual C++ ships with different versions of C runtime libraries.[55] This means users can compile their code with any of the available libraries. However, this can cause some problems when using different components (DLLs, EXEs) in the same program. A typical example is a program using different libraries. The user should use the same C Run-Time for all the program’s components unless the implications are understood. Microsoft recommends using the multithreaded, dynamic link library (/MD or /MDd compiler option) to avoid possible problems.[55]
POSIX[edit]
Although Microsoft’s CRT implements a large subset of POSIX interfaces, the Visual C++ compiler will emit a warning on every use of such functions by default. The rationale is that C and C++ standards require an underscore prefix before implementation-defined interfaces, so the use of these functions are non-standard.[56] However, systems that are actually POSIX-compliant would not accept these underscored names, and it is more portable to just turn off the warning instead.
C[edit]
Although the product originated as an IDE for the C programming language, for many years the compiler’s support for that language conformed only to the original edition of the C standard, dating from 1989, but not the C99 revision of the standard. There had been no plans to support C99 even in 2011, more than a decade after its publication.[57]
Visual C++ 2013 finally added support for various C99 features in its C mode (including designated initializers, compound literals, and the _Bool type),[58] though it was still not complete.[59] Visual C++ 2015 further improved the C99 support, with full support of the C99 Standard Library, except for features that require C99 language features not yet supported by the compiler.[60]
Most of the changes from the C11 revision of the standard are still not supported by Visual C++ 2017.[61] For example, generic selections via the _Generic keyword are not supported by the compiler and result in a syntax error.[62]
The preprocessor was overhauled in 2018, with C11 in sight:[63]
Full C11 conformance is on our roadmap, and updating the preprocessor is just the first step in that process. The C11
_Genericfeature is not actually part of the preprocessor, so it has not yet been implemented. When implemented I expect the feature to work independently of if the traditional or updated preprocessor logic is used.
_Generic support has been committed to MSVC as of February 2020, not clear on when it will ship.[64]
In September 2020, Microsoft announced C11 and C17 standards support in MSVC.[65]
C++[edit]
With default settings MSVC does not do two-phase name lookup which prevents it from flagging a wide range of invalid code. Most checks are deferred to template instantiation. More recent versions remedy this behavior, but it needs to be enabled by the command-line option /permissive-.[66]
References[edit]
- ^ a b «Visual C++ adds Windows support». InfoWorld. February 22, 1993. p. 17.
- ^
- ^ «Do I need these Microsoft Visual C++ redistributables?». Ask Leo!. Retrieved 2012-11-18.
- ^ Computer Language — Issue 06 (1985-02)(CL Publications)(US). February 1985.
- ^ Leibson, Steve (1985-02-01). «Software Reviews: Expert team analyzes 21 C compilers». Computer Language. Retrieved 2020-06-05.
- ^ Ladd, Scott Robert (August 1, 1990). «Optimizing With Microsoft C 6.0».
- ^ Retrieved from http://support.microsoft.com/kb/196831.
- ^ a b «Visual C++ is a strong development tool». InfoWorld. June 21, 1993. p. 94.
- ^ «Rival DOS Extenders debut at show». InfoWorld. March 1, 1993. p. 18.
- ^ «Visual C++ 1.5 integrates OLE, ODBC». InfoWorld. November 8, 1993. p. 5.
- ^ «Microsoft set to prerelease 32-bit Visual C++». InfoWorld. July 19, 1993. p. 12.
- ^ «C++ IDEs evolve». InfoWorld. April 4, 1994. p. 79.
- ^ «Microsoft Visual C++ Strategy».
- ^ a b «Obsolete Products». Archived from the original on 2005-08-14.
- ^ Toth, Viktor (1996). «1». Visual C++ 4.0 unleashed. Indianapolis: SAMS Publishing. ISBN 9780672308741. Retrieved 26 July 2013.
- ^ «History of Visual Studio (Part 3)».
- ^ «Major Changes from Visual C++ 4.0 to 4.2». Archived from the original on 2010-02-28. Retrieved 2018-04-18.
- ^ «Major Changes from Visual C++ 4.2 to 5.0».
- ^ «Microsoft Visual C++ 5.0 Learning Edition». Archived from the original on April 27, 1999.
- ^ «Microsoft Visual C++ 5.0 Professional Edition». Archived from the original on April 27, 1999.
- ^ «Microsoft Visual C++ 5.0 Enterprise Edition». Archived from the original on April 17, 1999.
- ^ «Microsoft Visual C++ 5.0 RISC Edition». Archived from the original on April 29, 1999.
- ^ Shields, Nathan P. (June 8, 2018). «Criminal Complaint». United States Department of Justice. p. 128.
This alone is not a dispositive link, as Visual C++ 6.0, released in 1998, still has proponents mostly because it does not require the installation of Microsoft’s .NET framework in order to run, as later versions of Visual C++ do.
- ^ «Major Changes from Visual C++ 5.0 to 6.0». Archived from the original on September 14, 2008.
- ^ This page stresses that Users must also be running Windows 98, Windows NT 4.0, or Windows 2000. Retrieved from http://msdn2.microsoft.com/en-us/vstudio/aa718349.aspx.
- ^ Douglas Boling :Programming Microsoft Windows CE .NET, Third Edition Microsoft Press; 3rd edition (June 25, 2003) Paperback: 1264 pages ISBN 978-0735618848 — Companion CD with Microsoft eMbedded Visual C++ 4.0 Service Pack 2 Archived 2013-02-11 at archive.today
- ^ How to: Modify WINVER and _WIN32_WINNT
- ^ Breaking Changes
- ^ Windows Platforms (CRT)
- ^ «Visual C++ 2008 Breaking Changes».
- ^ Visual C++ Team Blog. «IntelliSense, part 2: The Future». Retrieved March 12, 2008.
- ^ «Why IntelliSense is not supported for C++/CLI in Visual Studio 2010». Retrieved March 13, 2011.
- ^ Visual C++ Team Blog (27 May 2009). «Rebuilding Intellisense».
- ^ Visual C++ Team Blog. «Visual C++ Code Generation in Visual Studio 2010».
- ^ «C++0x Core Language Features In VC10: The Table».
- ^ «Stephan T. Lavavej: Everything you ever wanted to know about nullptr».
- ^ Microsoft Windows SDK Blog. «Released: Windows SDK for Windows 7 and .NET Framework 4».
- ^ FIX: Visual C++ compilers are removed when you upgrade Visual Studio 2010 Professional or Visual Studio 2010 Express to Visual Studio 2010 SP1 if Windows SDK v7.1 is installed
- ^ «What’s New for Visual C++ in Visual Studio 2012». Microsoft Developer Network. Microsoft. Retrieved September 20, 2015.
- ^ «What’s New for Visual C++ in Visual Studio 2013». Microsoft Developer Network. Microsoft. Retrieved September 20, 2015.
- ^ Eric Battalio (July 20, 2015). «Visual Studio 2015 RTM Now Available». Visual C++ Team Blog. Microsoft.
- ^ Stephan T. Lavavej (June 19, 2015). «C++11/14/17 Features In VS 2015 RTM». Visual C++ Team Blog. Microsoft.
- ^ Reviewing Microsoft’s Automatic Insertion of Telemetry into C++ Binaries
- ^ «Visual Studio adding telemetry function calls to binary? • /r/cpp». reddit. 7 May 2016. Retrieved 2016-08-17.
- ^ Julia Liuson (March 7, 2017). «Announcing Visual Studio 2017 General Availability… and more». Visual Studio Team Blog. Microsoft.
- ^ Amanda Silver (February 14, 2019). «Join us April 2nd for the Launch of Visual Studio 2019!». Visual Studio Team Blog. Microsoft.
- ^ Amanda Silver (November 8, 2021). «Visual Studio 2022 now available». Visual Studio Team Blog. Microsoft.
- ^ «Pre-defined Compiler Macros / Wiki / Compilers». dev.to. Retrieved 2023-02-20.
- ^ «Predefined Macros / Microsoft Learn». learn.microsoft.com. Retrieved 2023-05-26.
- ^ Microsoft MSDN: Breaking Changes in Visual C++
- ^ Microsoft MSDN: Containers (Modern C++)
- ^ Microsoft MSDN: Portability At ABI Boundaries (Modern C++)
- ^ Microsoft forum: Binary compatibility across Visual C++ versions Archived 2013-02-16 at archive.today
- ^ docs.microsoft.com: C++ binary compatibility between Visual Studio 2015, 2017, and 2019
- ^ a b C Run-Time Libraries
- ^ «Compatibility». Microsoft: CRT library features.
- ^ «C99 support». Microsoft Connect. Archived from the original on 2016-03-04. Retrieved 2015-09-21.
- ^ «What’s New for Visual C++ in Visual Studio 2013». Microsoft Developer Network. Microsoft.
- ^ Pat Brenner (July 19, 2013). «C99 library support in Visual Studio 2013». Visual C++ Team Blog. Microsoft.
- ^ «What’s New for Visual C++ in Visual Studio 2015». Microsoft Developer Network. Microsoft.
- ^ «Walkthrough: Compile a C program on the command line». Visual C++ Documentation. Microsoft.
- ^ «MSVC 2017 does not support _Generic (type generic macros) in C».
- ^ Luvsanbat, Bat-Ulzii (July 6, 2018). «MSVC Preprocessor Progress towards Conformance». Microsoft Developer Network. Archived from the original on 8 Jan 2019.
- ^ «C++20 Features and Fixes». reddit. July 3, 2020.
- ^ «C11 and C17 Standard Support Arriving in MSVC». September 14, 2020.
- ^ «Two-phase name lookup support comes to MSVC». 2017-09-11.
Further reading[edit]
- Johnson, Brian (8 August 2004). «Building Win32 Applications Using Visual C++ 2005 Express». Brian Johnson’s Startup Developer Blog. Microsoft – via Microsoft Docs Archive.
- Springfield, Jim (25 September 2015). «Rejuvenating the Microsoft C/C++ Compiler». C++ Team Blog. Microsoft.
External links[edit]
- Official website
- C++ Tools and Features in Visual Studio Editions
- Microsoft C++ Build Tools
- C9::GoingNative on Microsoft Channel 9
Последнее обновление: 01.01.2023
Установка компилятора
Рассмотрим создание первой простейшей программы на языке Си с помощью компилятора GCC, который на сегодняшний день является одим из
наиболее популярных компиляторов для Cи и который доступен для разных платформ. Более подобному информацию о GCC можно получить на официальном сайте проекта https://gcc.gnu.org/.
Набор компиляторов GCC распространяется в различных версиях. Для Windows одной из наиболее популярных версий является пакет средств для разработки от
некоммерческого проекта MSYS2. Следует отметить, что для MSYS2 требуется 64-битная версия Windows 7 и выше (то есть Vista, XP и более ранние версии не подходят)
Итак, загрузим программу установки MSYS2 с официального сайта MSYS2:
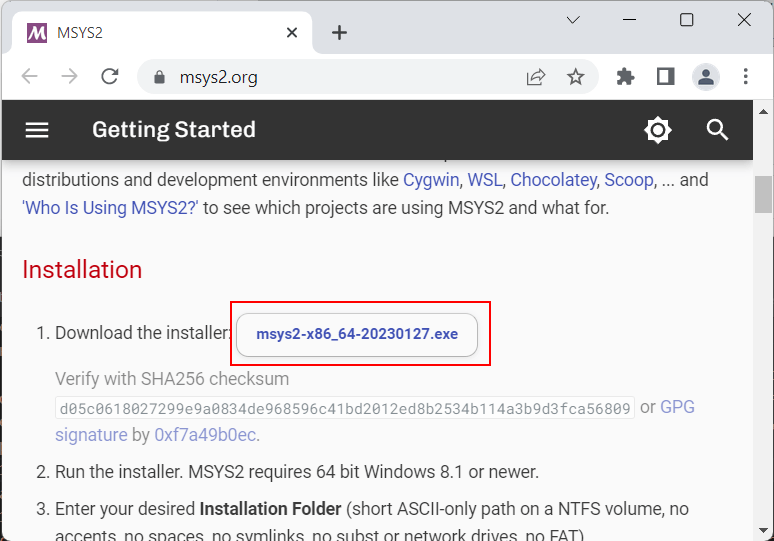
После загрузки запустим программу установки:
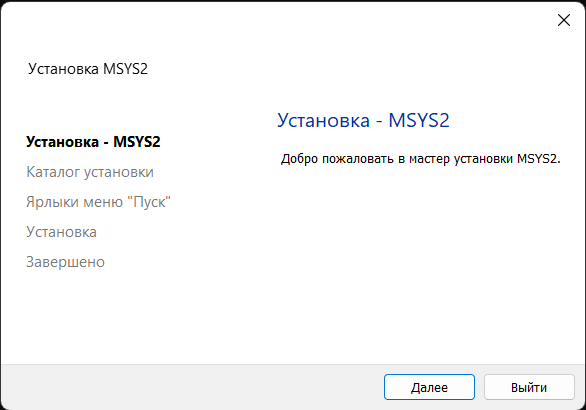
На первом шаге установки будет предложено установить каталог для установки. По умолчанию это каталог C:\msys64:
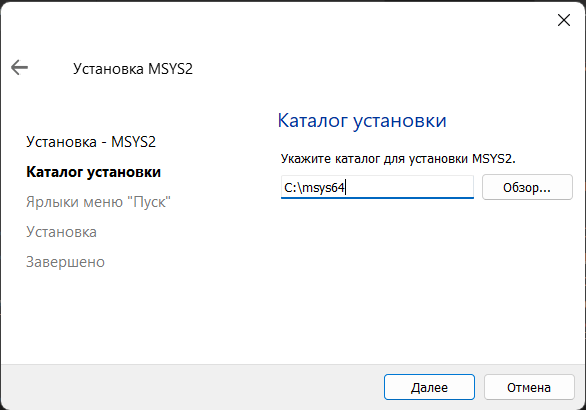
Оставим каталог установки по умолчанию (при желании можно изменить). На следующем шаге устанавливаются настройки для ярлыка для меню Пуск, и затем собственно будет произведена установка.
После завершения установки нам отобразить финальное окно, в котором нажмем на кнопку Завершить
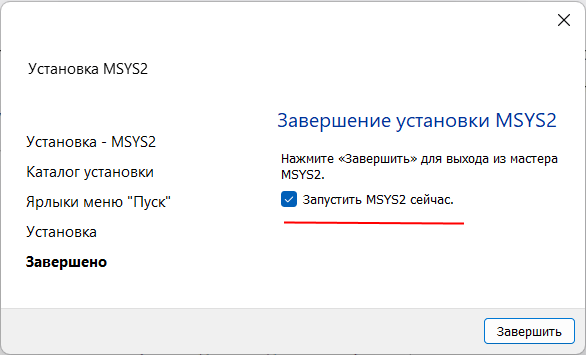
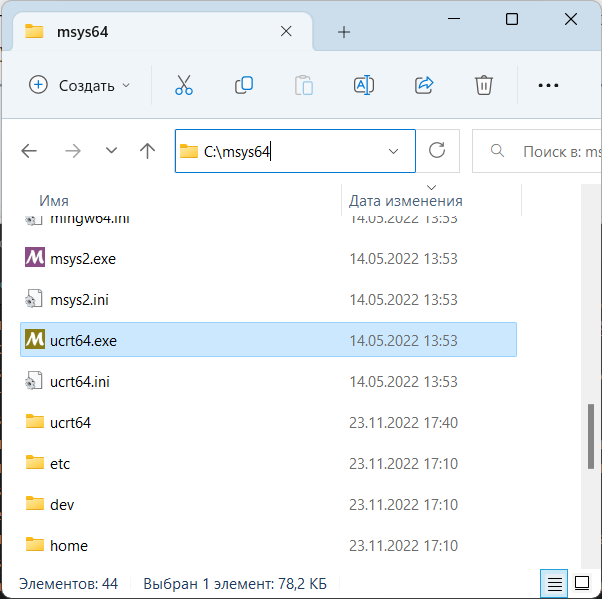
После завершения установки запустится консольное приложение MSYS2.exe. Если по каким-то причинам оно не запустилось,
то в папке установки C:/msys64 надо найти файл usrt_64.exe:
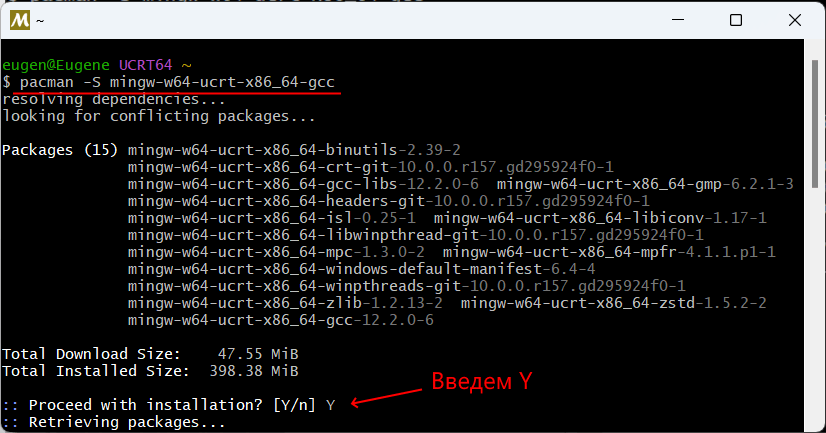
Теперь нам надо установить собственно набор компиляторов GCC. Для этого введем в этом приложении следующую команду:
pacman -S mingw-w64-ucrt-x86_64-gcc
Для управления пакетами MSYS2 использует пакетный менеджер Packman. И данная команда говорит пакетному менелжеру packman установить пакет mingw-w64-ucrt-x86_64-gcc,
который представляет набор компиляторов GCC (название устанавливаемого пакета указывается после параметра -S).
и после завершения установки мы можем приступать к программированию на языке Си. Если мы откроем каталог установки и зайдем в нем в папку C:\msys64\ucrt64\bin,
то найдем там все необходимые файлы компиляторов:
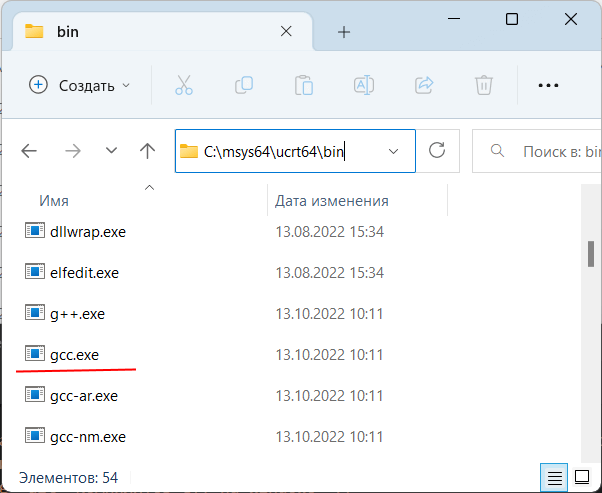
В частности, файл gcc.exe как раз и будет представлять компилятор для языка Си.
Далее для упрощения запуска компилятора мы можем добавить путь к нему в Переменные среды. Для этого можно в окне поиска в Windows ввести «изменение переменных среды текущего пользователя»:
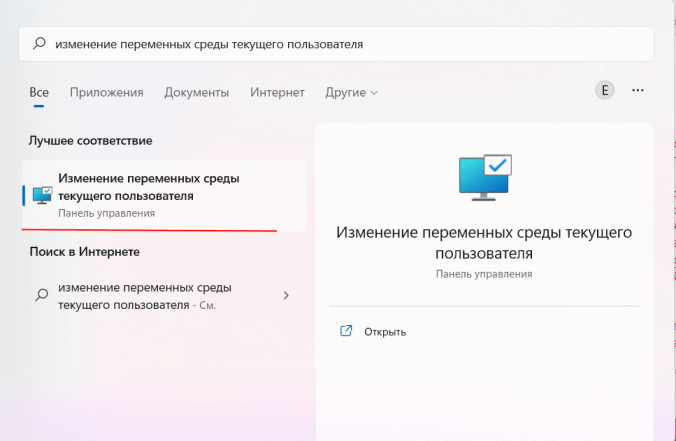
Нам откроется окно Переменныех среды:
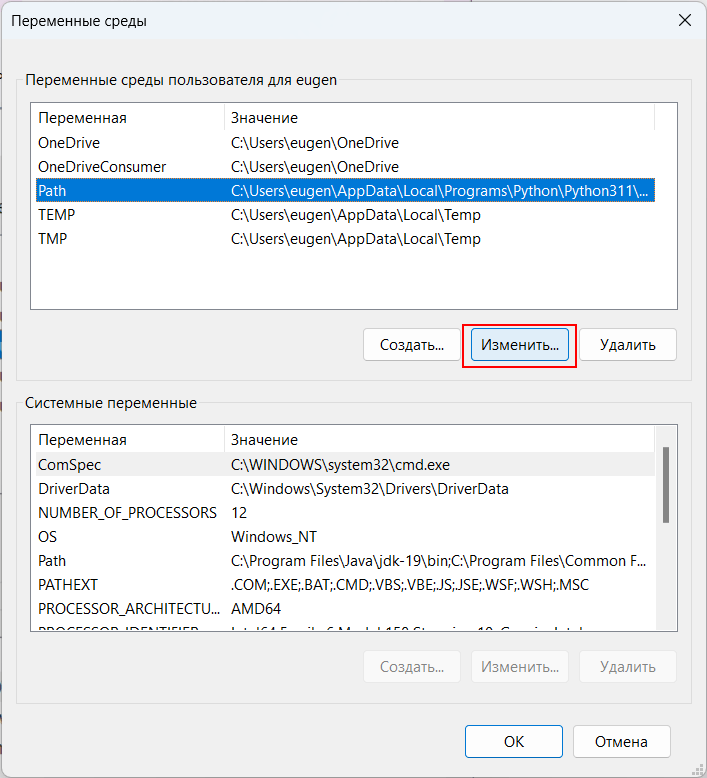
И добавим путь к компилятору C:\msys64\ucrt64\bin:

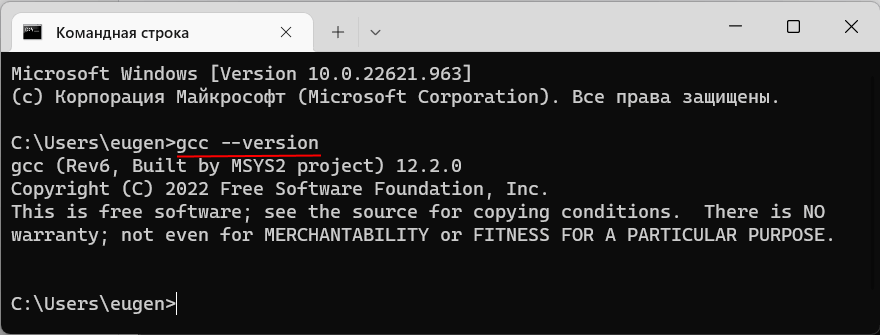
Чтобы убедиться, что набор компиляторов GCC успешно установлен, введем следующую команду:
В этом случае нам должна отобразиться версия компиляторов
Создание первой программы
Итак, компилятор установлен, и теперь мы можем написать первую программу. Для этого потребуется любой текстовый редактор для набора исходного кода.
Можно взять распространенный редактор Visual Studio Code или даже обычный встроенный Блокнот.
Итак, создадим на жестком диске папку для исходных файлов. А в этой папке создадим новый файл, который назовем hello.c.
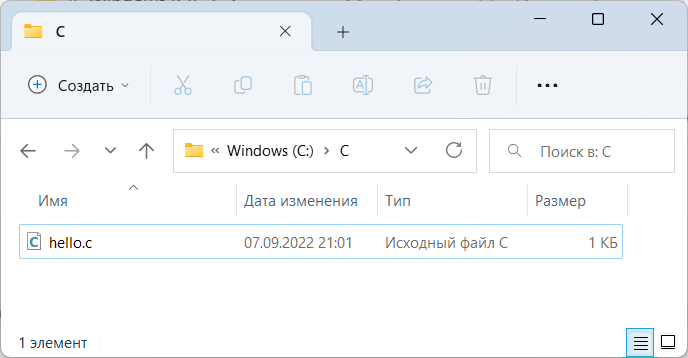
В моем случае файл hello.c находится в папке C:\c.
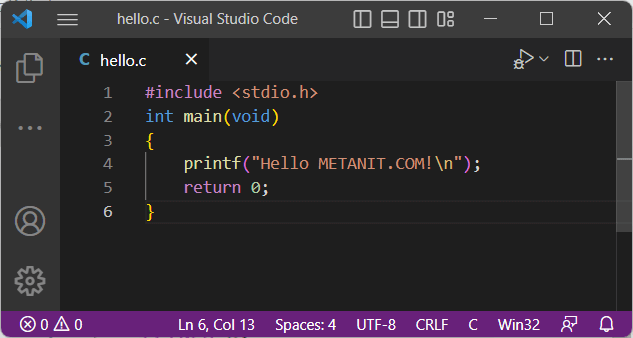
Теперь определим в файле hello.c простейший код, который будет выводить строку на консоль:
#include <stdio.h>			// подключаем заголовочный файл stdio.h
int main(void)						// определяем функцию main
{									// начало функции
	printf("Hello METANIT.COM!\n");	// выводим строку на консоль
	return 0;						// выходим из функции
}									// конец функции
Для вывода строки на консоль необходимо подключить нужный функционал. Для этого в начале файла идет строка
#include <stdio.h>
Директива include подключает заголовочный файл stdio.h, который содержит определение функции printf, которая нужна для вывода строки на консоль.
Далее идет определение функции int main(void). Функция main должна присутствовать в любой программе на Си, с нее собственно и начинается
выполнение приложения.
Ключевое слово int в определении функции int main(void) говорит о том, что функция возвращает целое число.
А слово void в скобках указывает, что функция не принимает параметров.
Тело функции main заключено в фигурные скобки {}. В теле функции происходит вывод строки на консоль с помощью функции printf, в которую передается выводимая строка «Hello METANIT.COM!».
В конце осуществляем выход из функции с помощью оператора return. Так как функция должна возвращать целое число, то после return указывается число 0.
Ноль используется в качестве индикатора успешного завершения программы.
После каждого действия в функции ставятся точка с запятой.
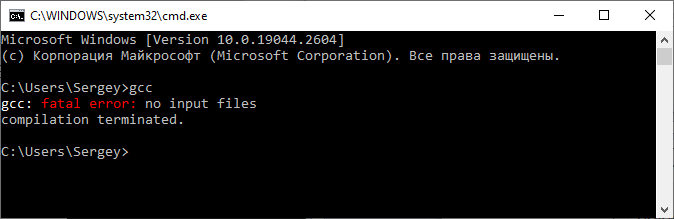
Теперь скомпилируем этот файл. Для этого откроем командную строку Windows и вначале с помощью команды cd перейдем к папке с исходным файлом:
Чтобы скомпилировать исходный код, необходимо компилятору gcc передать в качестве параметра файл hello.c:
После этого будет скомпилирован исполняемый файл, который в Windows по умолчанию называется a.exe. И мы можем обратиться к этому файлу
и в этом случае консоль выведет строку «Hello METANIT.COM!», собственно как и прописано в коде.
Стоит отметить, что мы можем переопределить имя компилируемого файла с помощью флага -o и передав ему имя файла, в который будет компилироваться программа.
Например:
В этом случае программа будет компилироваться в файл hello.exe, который мы также запустить.
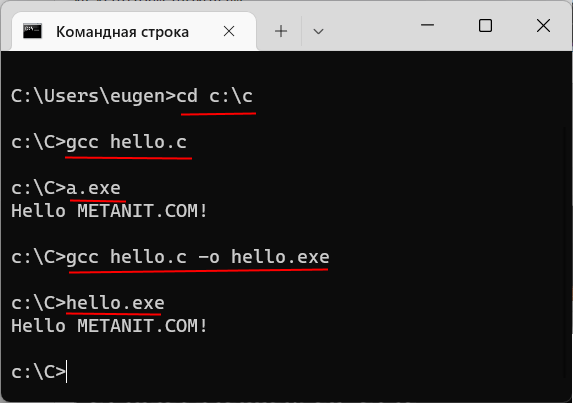
Чтобы не приходилось вводить две команды: одну для компиляции программы и другую для ее запуска, мы можем объединить команды:
gcc hello.c -o hello.exe & hello
Эта команда сначала компилирует код в файл hello.exe, а потом сразу запускает его.
Прежде чем
двигаться дальше, нам нужно настроить рабочее место для написания программ на
Си. А, именно, установить (если его еще нет) компилятор и интегрированную среду
разработки для написания, компиляции и отладки программ. Начнем с выбора и
установки компилятора. На сегодняшний день одним из самых популярных является
компилятор gcc. Это сокращение
от:
GNU Compiler Collection
Если вы
работаете под ОС Linux, то, этот компилятор должен быть уже
установлен в системе. Если же вы работаете под ОС Windows, то компилятор
нужно устанавливать самим. Давайте это сделаем.
Так как я
работаю под ОС Windows, то буду показывать порядок установки
всех средств именно на этой ОС. Итак, первым делом нужно перейти на официальный
сайт компилятора gcc, предназначенных для ОС Windows:
https://gcc.gnu.org
Далее, переходим
в раздел Download/Binaries (бинарники) и
видим несколько вариантов способов установки gcc на систему. Наиболее
удобный, на мой взгляд, является использование, так называемого, порта MinGW с установкой
только необходимых (минимального набора) компонент компилятора gcc.
Здесь есть два
варианта MinGW: старый
32-битный и новый – 64-битный. Я рекомендую воспользоваться старым вариантом,
т.к. он хорошо себя зарекомендовал и, что называется, проверен временем. С
новым могут возникать проблемы, да и для языка Си стандарта C99 он явно
избыточен.
Нажимаем на
ссылку MinGW и нас
перенаправляют на страницу:
https://osdn.net/projects/mingw/
и здесь нам
нужно скачать установщик mingw-get-setup.exe.
Запускаем эту
программу. Появится следующее диалоговое окно:
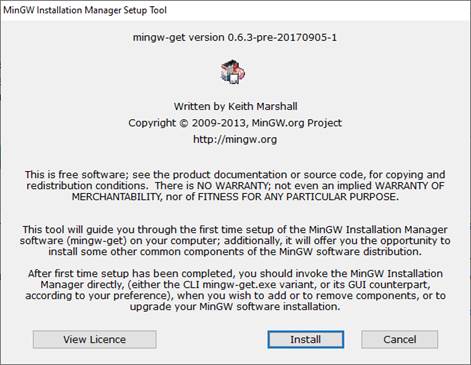
Нажимаем здесь
кнопку «Install». В следующем
окне соглашаемся со всеми настройками по умолчанию, в том числе и с маршрутом
распаковки «C:\MinGW» (если вас он
не устраивает, то можете изменить на свой) и нажимаем на кнопку «Continue». Начнется
скачивание и установка. После установки этот инсталлятор автоматически
запустится:
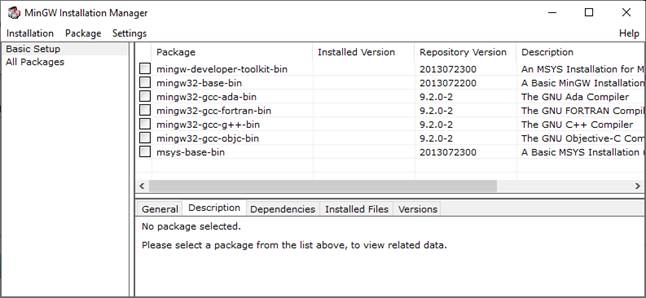
В диалоговом
окне нам нужно выбрать все необходимые компоненты для установки компилятора gcc для языка Си. Они
следующие:
- mingw32-gcc-bin (после отметки
также дополнительно отмечаются другие компоненты, с которыми mingw32-gcc-bin работает
совместно); - mingw32-gcc-g++-bin (для установки
линкера для компилятора Си); - mingw32-make-bin;
- mingw32-gdb-bin (дебаггер, для
отладки кода).
После этого в
меню «Installation» выбираем пункт
«Apply Changes» и в окне
нажимаем кнопку «Apply»:

Начнется
установка выбранных компонент для компилятора gcc в указанный
каталог.
Далее, нужно
прописать в системе путь к каталогу компилятора gcc. Для этого
нажимаем правую кнопку мыши на кнопке «Пуск» и выбираем «система». В
появившемся диалоговом окне щелкаем на «Дополнительные параметры системы», и
затем «Переменные среды…». Появится еще одно диалоговое окно, в котором нас
будет интересовать системная переменная Path:
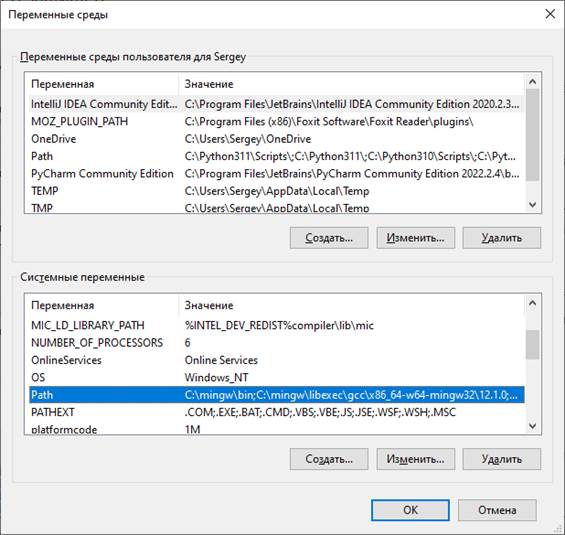
Два раза щелкаем
по строчке с переменной Path, появится следующее окно, в котором
следует добавить путь «C:\mingw\bin» в переменную Path.
Все, компилятор gcc установлен в ОС Windows и готов к
работе. Чтобы в этом убедиться, откроем командное окно (комбинация Win+R, набираем cmd и кнопка «OK»), набираем в
нем gcc и должны
увидеть следующие строчки:
Если у вас все
отображается именно так, то компилятор был успешно установлен.
Установка и настройка Visual Studio Code
Следующим шагом
нам нужно установить интегрированную среду для написания, компиляции и отладки
наших программ написанных на языке Си. Для этого, на мой взгляд, удобно
воспользоваться программой Visual Studio Code, доступной на
странице официального сайта:
https://code.visualstudio.com
Именно в ней я
буду писать и показывать все тексты программ данного курса. При желании, вы,
конечно, можете использовать любую другую среду, главное, чтобы в ней было
удобно компилировать и отлаживать программы на Си.
Первым делом,
конечно же, нужно скачать дистрибутив программы Visual Studio Code и установить
себе на компьютер. Ничего сложно в этом нет. Далее, открываем эту программу.
Для начала работы нам нужно определиться, где будут располагаться файлы
текущего проекта. Делается это очень просто. На диске в любом желаемом месте
создается папка, которая, затем, выбирается в программе VS Code. В моем случае
– это путь:
D:\Visual
Studio\Code\course
У вас может быть
любой другой. Сейчас каталог пустой. Поэтому для начала работы в него нужно
поместить файл, в котором будем писать текст программы. Например, его можно
назвать так:
lessons.c
Обратите
внимание, файл с текстом программы на языке Си должен иметь расширение «c». Теперь здесь
можно написать простую программу. Пусть это будет классический «Hello, world!»:
#include <stdio.h>

int main(void)
{
    printf("Hello, world\n");
    return 0;
}
Не беспокойтесь
пока о том, что содержимое этой программы вам, возможно, непонятно. Ее мы
подробно еще будем разбирать. Пока, на этом этапе, нам нужно просто настроить
среду разработки для компиляции и запуска программ на Си.
По идее, мы уже
сейчас можем достаточно просто скомпилировать эту программу. Для этого нажимаем
Ctrl + ~, появится
окно powershell и в нем вручную
можно вызвать компилятор gcc следующим образом:
gcc lessons.c
Если мы все
сделали правильно, то в текущем каталоге появится исполняемый файл a.exe, который
выводит в консоль сообщение «Hello, world!»:
.\a
Конечно,
постоянно выполнять компиляцию через терминал очень неудобно, поэтому нам нужно
настроить редактор VS Code под компиляцию
Си-программ. Для этого необходимо установить некоторые полезные расширения (extensions). Щелкаем слева
на кнопку с квадратиками и в поиске набираем «c lange»:
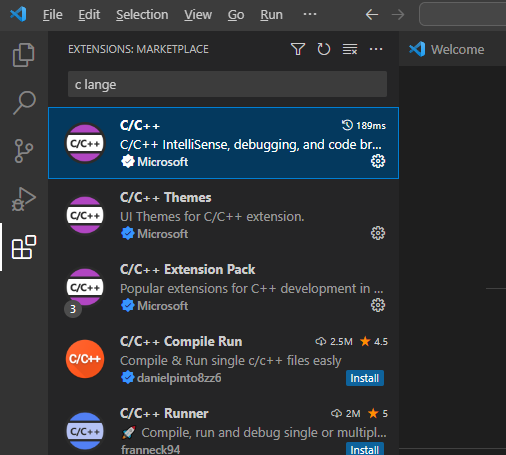
Выбираем первый
компонент C/C++ компании Microsoft, которая
позволяет выполнять разработку программ на языке Си.
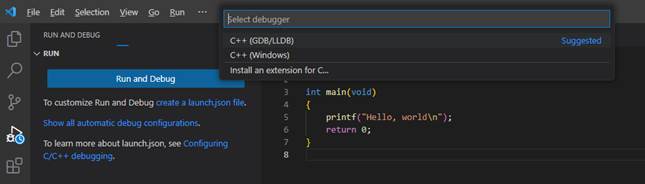
После этого,
слева щелкаем на кнопку с треугольником (Run and Debug) и нажимаем на
кнопку «Run and Debug». Сверху в
выпадающем списке следует выбрать «C++ (GDB/LLDB)» (это ранее
установленный компилятор gcc), затем, скомпилировать и выполнить
программу в режиме Debug (отладки):
Например, можно
поставить в любом месте программы точку останова, снова запустить, и программа
остановится на выбранной строке. Это, как раз и есть процесс отладки кода.
Далее установим
еще одно расширение, которое будет отвечать за простой процесс запуска кода без
режима отладки. Чтобы можно было быстро и просто запустить программу и
посмотреть, что получается. Для этого переходим на вкладку «extensions» и набираем:
code runner
Это расширение
позволяет с помощью комбинации клавиш Ctrl+Alt+N компилировать и запускать
код. Результат отображается во вкладке «OUTPUT».
Настройка компилятора на стандарт C99
Последнее, что
нам осталось – это настроить компилятор на стандарт C99. Формально,
это делается с помощью специального флага -std следующим
образом:
gcc
-std=c99 -o outputfile sourcefile.c
Такой флаг нам
нужно добавить в настройках компилятора. Первым делом откроем файл tasks.json в
текущем каталоге и пропишем для ключа «args» первым
элементом этот ключ:
«args»: [
«-std=c99»,
…
]
Этот флаг будет
срабатывать при перекомпиляции проекта – комбинация клавиш Ctrl+Shift+B.
Точно такой же
ключ нужно добавить для компилятора, используемого расширением «Code Runner». Для этого переходим в меню File->Preferences->Settings и в строке набираем «code
runner run in terminal». Ставим
галочку.
Затем, в этом же
окне настроек набираем в строке «Run Code Configuration». Находим в настройках
раздел «Code-runner: Executor Map» и нажимаем на редактирование. Для ключа «c» после «gcc» прописываем «-std=c99» и ключ «code-runner.runInTerminal» устанавливаем в
false. Все, теперь
компилятор будет ориентироваться на стандарт c99 при
компиляции наших программ.
Видео по теме
On Linux, gcc is install by default and you can start to compile and execute C language code almost right away!
That’s not the case on Windows…
I have been struggling with how to do the same thing on Windows 10 for some time, but I finally succeeded
Here’s a video in which I explain the procedure:
Note: The procedure I describe here will not only allow you to install gcc, but also g++, gfortran, and many other useful tools that you usually only get in linux OS (like ls or grep)
1- What I want to teach you here
If you want a simple way to create programs based on C, C++, Fortran, etc… you will have to install a software with can compile the code you write into code that the machine understands
Such program is called a “compiler”
The most well know compiler for C language is the GNU compiler called GCC.
There are actually several compilers which go together like a suite:
- for C++, you have the compiler g++
- for Fortran, the compiler is called gfortran
Why using the gcc compiler?
If you are on Windows, you probably heard about software such as visual studio from Microsoft which also you to write and compile C and C++ code as well.
That’s true, and it’s totally fine if you want to use it…
I am personally not such a big fan of Visual Studio because of the following reasons:
- It is huge to download and install (between 10 and 20 GB if I remember)
- It’s a big pain to set up the first time
- Building even a very simple project takes much more time than it should
Because of that, I find that I kind of takes out the fun of programming and seeing immediately the result of what you did…
Now, for large pieces of software, visual studio is probably the way to go
Once installed on your machine, gcc is just a piece of cake to use to compile a simple c language code
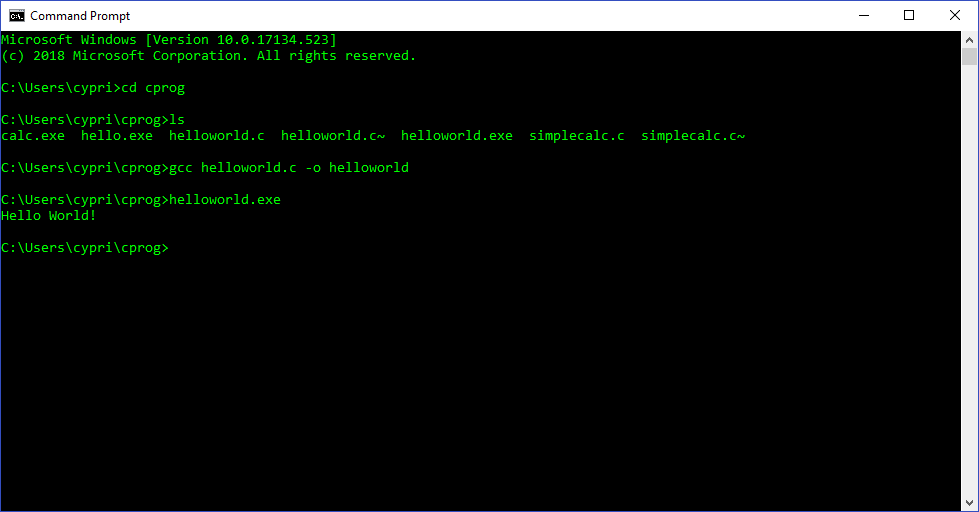
Step 1: Write your c code
For example, let’s take this Hello World example
#include
#include

int main()
{

  printf("Hello World!/n");
  return 0;

}
Step 2: Compile using gcc
Write the following line of code into your terminal:
gcc helloworld.c -o helloworld
This will generate an executable binary file called helloworld.exe which can be used to run your code
![]()
Step 3: Execute your code
Just go into the directory where your executable is and run it by writing “helloworld.exe”

2- The principle
Now that you understand how it can be easy to start with writing C code, let’s talk about the difficult part…
How to actually install gcc on Windows…
The reason it is easy to install compilers and other kind of open source software on linux is because you have a very powerful command line terminal called bash which handles the installation, uninstallation and upgrade of software using a software called “apt” on debian-based linux systems.
On Windows, if you want to have gcc (and the other compilers too), you have to download the source code and find a way to compile it…
For that, you will need to install first other software called pre-requisites which will also need to be compiled, etc…
You can spend several days trying to do that if you are really motivated
I will present you another way much simplier!
For that I will have to install a software called MSYS2, which is an “easy” way to give some linux feel to your Windows PC and able it to install programs almost as easily as in linux…
You will be able to install gcc just with one command line like this:
![]()
Excited?
Let’s go
3- Installing MSYS2 on your PC
What is MSYS2?
According to their website, MSYS2 is a software distribution and building platform for Windows
The Website: https://www.msys2.org/
Installing it is actually a peace of cake
Just download the correct installer and launch it with admin rights and you are good to go

Expected something more complex?
Sorry about that
Once you installed it, you will see 3 programs appear in your list of programs:
- MSYS2 MinGW 32-bit
- MSYS2 MinGW 64-bit
- MSYS2 MSYS
Run the 3rd one MSYS2 MSYS to open a special command window in which you can input commands and start to install programs
The package management system which is equivalent to apt-get on linux is called pacman
When you install MSYS2 for the first time, you have to update pacman using the following command:
pacman -Syu
4- Installing GCC and other development tools with the pacman package management system
Then you can start to install gcc and other developer tools using pacman like this:
# Install make, autoconf, etc to C:\msys64\usr\bin
pacman -S base-devel gcc vim cmake
This command will install first a set of development software included in a package called base-devel and then it will install gcc, vim and cmake
vim is optional, but always good to have 
(You can also install emacs very easily in the same way)
In the package base-devel, you have 53 useful developement tools that can be installed:
# pacman -S base-devel
   1) asciidoc  2) autoconf  3) autoconf2.13  4) autogen  5) automake-wrapper
   6) automake1.10  7) automake1.11  8) automake1.12  9) automake1.13
   10) automake1.14  11) automake1.15  12) automake1.16  13) automake1.6
   14) automake1.7  15) automake1.8  16) automake1.9  17) bison  18) diffstat
   19) diffutils  20) dos2unix  21) file  22) flex  23) gawk  24) gdb
   25) gettext  26) gettext-devel  27) gperf  28) grep  29) groff  30) help2man
   31) intltool  32) lemon  33) libtool  34) libunrar  35) libunrar-devel
   36) m4  37) make  38) man-db  39) pacman  40) pactoys-git  41) patch
   42) patchutils  43) perl  44) pkg-config  45) pkgfile  46) quilt  47) rcs
   48) scons  49) sed  50) swig  51) texinfo  52) texinfo-tex  53) ttyrec

# pacman -S gcc
   binutils-2.30-1  isl-0.19-1  mpc-1.1.0-1
   msys2-runtime-devel-2.11.1-2
   msys2-w32api-headers-6.0.0.5223.7f9d8753-1
   msys2-w32api-runtime-6.0.0.5223.7f9d8753-1
   windows-default-manifest-6.4-1  gcc-7.3.0-3
5- Last Important Step: Add Executables to your Windows PATH
Now you are able to install all those packages easily, but how to access them through the normal windows command line?
For that, you have to add the two following directories to your PATH:
C:\msys64\mingw64\bin
C:\msys64\usr\bin
To add anything to your PATH in Windows 10:
1- Search “Advanced System Settings” in the search bar
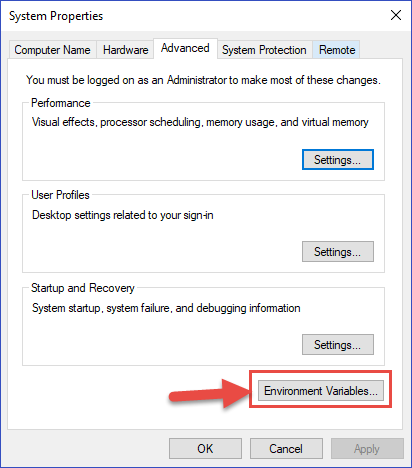
2- Open the “environment variables” window, click on the PATH variable and click on “Edit”

3- Click on the “New” button and add the 2 following directories to your PATH
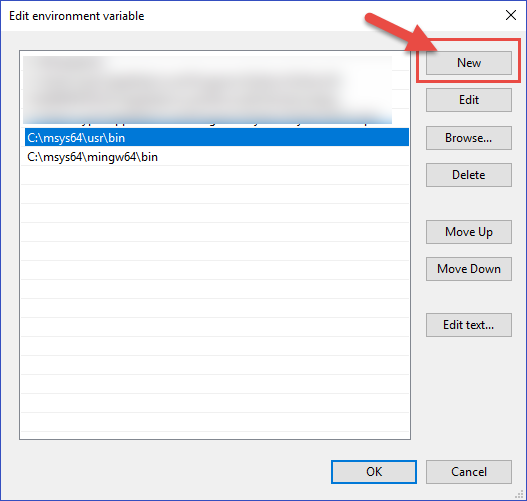
Important Note: This adds a lot of executables to your path which might conflict with other applications. The usr\bin\ directory contains the whole slew of executables listed above. There is a lot of unnecessary stuff in that directory.
4- Click on OK on all the windows and open a new Command Window and you will be able to use gcc into your windows command prompt!
That’s all for today, hope you understand better now how to install and use GCC and other linux tools on windows!
I will write new articles soon about how to develop simple programs in C.
Let me know through the comments if there is something special that you want to understand!
–Cyprien

PS: If you like what I write, subscribe to the newsletter and help me to spread the knowledge by sharing this article! We all win by learning from each other and making the engineering knowledge more accessible  THANK YOU!