26.05.2017
Просмотров: 121377
Ранее мы писали о том, как настроить календарь от Google в Windows 10. На этот раз предлагаем вашему вниманию способы, как вернуть на рабочий стол виджет Календаря и настроить его для корректной работы.
Важно отметить, что в Windows 10 нет виджетов, таких как в Windows 7. Разработчики сочли их бесполезными и ресурсозатратными. Поэтому вернуть на рабочий стол Календарь можно с помощью сторонних программ.
Способы установки Календаря на рабочий стол в Windows 10
Если в Windows 7 нажать на значок часов, то появится небольшое окошко с отображением актуального времени и даты. В Windows 10 эта функция отключена. Однако, если вам нужен именно такой тип календаря, стоит внести некоторые изменения в системный реестр. Для этого выполняем следующее:
- Жмём «Win+R» и вводим «regedit».

- Откроется редактор реестра. Находим раздел «HKEY_LOCAL_MACHINE\Software\Microsoft\Windows\CurrentVersion\ImmersiveShell». Нажимаем на пустом месте правой кнопкой мыши и выбираем «Создать», «Параметр DWORD 32-бит». Вводим название «UseWin32TrayClockExperience» и значение «1».

- После внесения изменений перезагружаем систему. Проверяем результат, будет ли работать стандартный календарь.
О том, как работает этот метод, смотрите в видео:
Если вам нужен календарь на рабочий стол для Windows 10 в виде виджета, то без сторонней программы здесь не обойтись. Рекомендуем обратить внимание на Desktop Gadgets Installer. Эта программа совместима со всеми сборками Windows 10 и полностью безопасна. После её установки, нужно нажать правой кнопкой мыши на рабочем столе и выбрать «Вид», «Отображать гаджеты рабочего стола».

После нужно выбрать виджет «Календарь» и поместить его на рабочий стол.

Также можно воспользоваться софтом 8gadgetpack.net. С помощью этого приложения можно установить Календарь на рабочий стол. Кроме того, данный инструмент позволяет добавить гаджеты в меню «Пуск».

После установки этих программ, на рабочий стол Windows 10 можно будет разместить не только Календарь, но и другие виджеты.
О том, как установить виджеты после Creators Update смотрите в видео:
(Image credit: Windows Central)
On Windows 10, Calendar is a built-in app designed to help you manage your schedule, including meetings, reminders, appointments, and other events.
Although you may be able to find many alternative tools, the Calendar app includes all the essential features that you need to organize and stay on top of all your events. It’s also compatible with most third-party calendar services. And unlike other online solutions, the app works offline, so you don’t have to sign in every time you want to check your schedule, which makes it an excellent solution for anyone who needs to work from home or manage personal events.
In this Windows 10 guide, we walk you through everything you need to know to start using the Calendar app to manage meetings, reminders, appointments, and other events.
- How to add an account on Calendar
- How to customize and share calendars on Calendar
- How to add calendar events on Calendar
- How to add popular calendars on Calendar
- How to sync events on Calendar
- How to personalize your experience on Calendar
- How to change settings on Calendar
- How to change weather settings on Calendar
 Get subscribed
Office 365 gives you full access to all the apps and perks, such as 1TB OneDrive storage and Skype minutes. You can also install Word, Excel, PowerPoint, Outlook, and other apps on up to five devices, and depending on the subscription, you can share the account with up to five people.
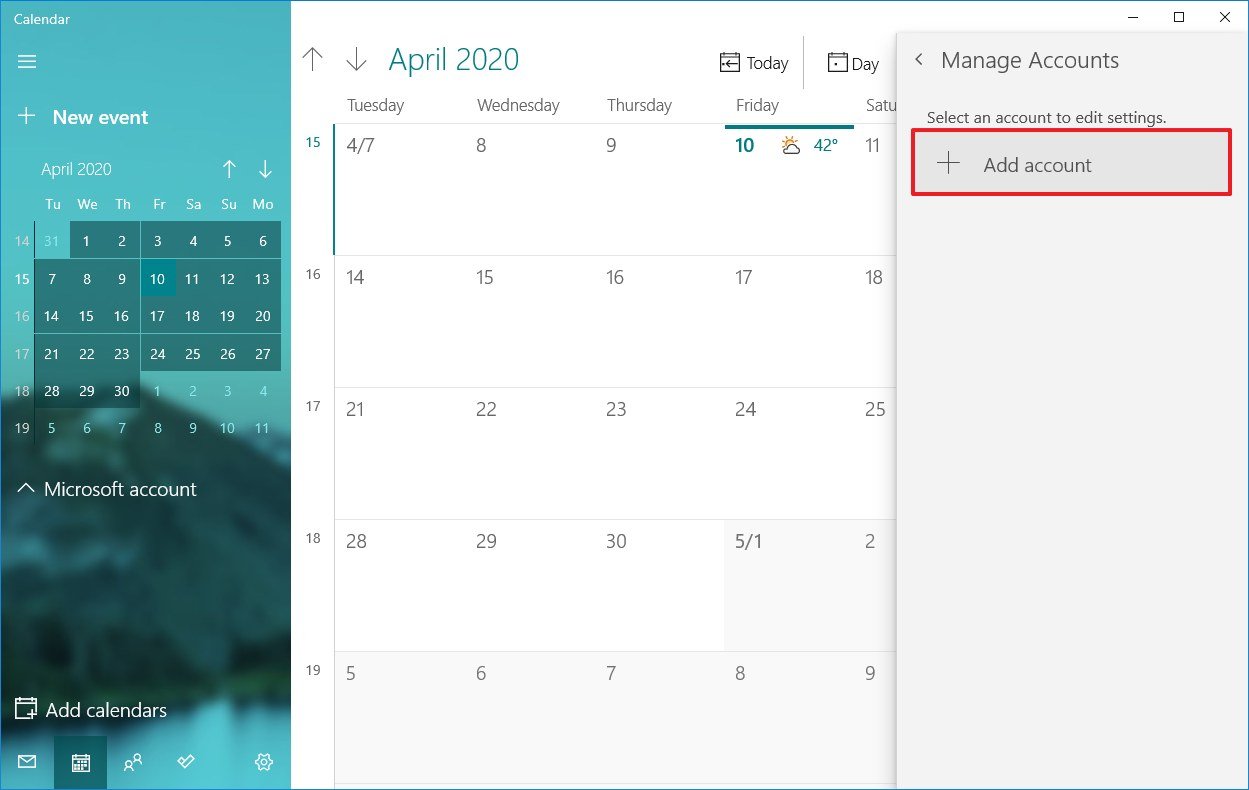
How to add an account on Calendar
The Calendar app for Windows 10 allows you to bring and organize calendar events from many third-party services, including Outlook.com, Microsoft 365, Google, Yahoo, and Apple iCloud.
To add a new account to manage your calendar events on Windows 10, use these steps:
- Open Calendar.
- Click on the Settings (gear) button in the bottom-left corner.
- Click on Manage Accounts in the top-right corner.

- Click the Add account button.Quick tip: If you already use the Mail app, the accounts will show up on this list.
- Select the service that you use for calendar events. For example, Outlook.com, but you can choose from a number of services, including:
- Outlook.com.
- Microsoft 365 (Office 365).
- Google (Gmail).
- Yahoo.
- iCloud.
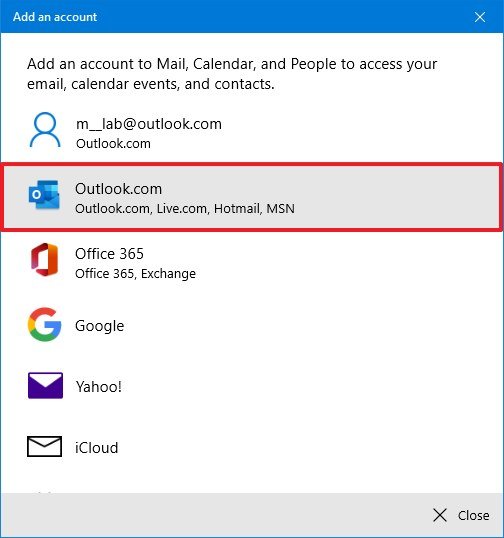
- (Optional) Click the Advanced setup option to add other internet mail services using POP or IMAP.
- Continue with the on-screen directions to finish adding the account using the account credentials.
Once you complete these steps, the events from the service you configured should start syncing on the device. You can add as many accounts as you need. If you have another personal or work account, just repeat the same steps outlined above.
Change calendar account name
When setting up a new account, the Calendar app uses the name of service as the name for the account. If you want to better identify the accounts, you can change the name to something more descriptive. For example, you can use something like «Work» or «Personal,» or you can use the email address.
To change the calendar account name, use these steps:
- Open Calendar.
- Click on the Settings (gear) button in the bottom-left corner.
- Click on Manage Accounts in the top-right corner.
- Click the account you want to add a different name.
- Confirm the new name.Quick tip: If you made a mistake, you could also delete the account from the same page.
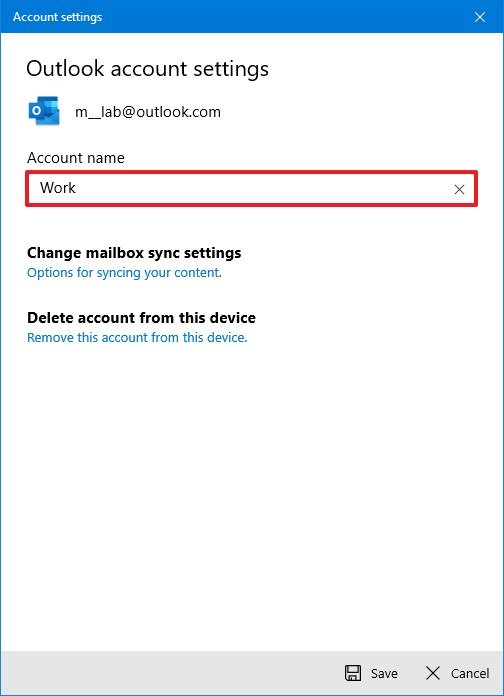
- Click the Save button.
Once you complete the steps, the account will be easier to identify from the left side navigation pane.
After adding a new account, you have various option to customize and share each calendar.
Customize calendar
To change the color and visibility of a calendar, use these steps:
- Open Calendar.
- Under the desired account, right-click the calendar and select a new color.
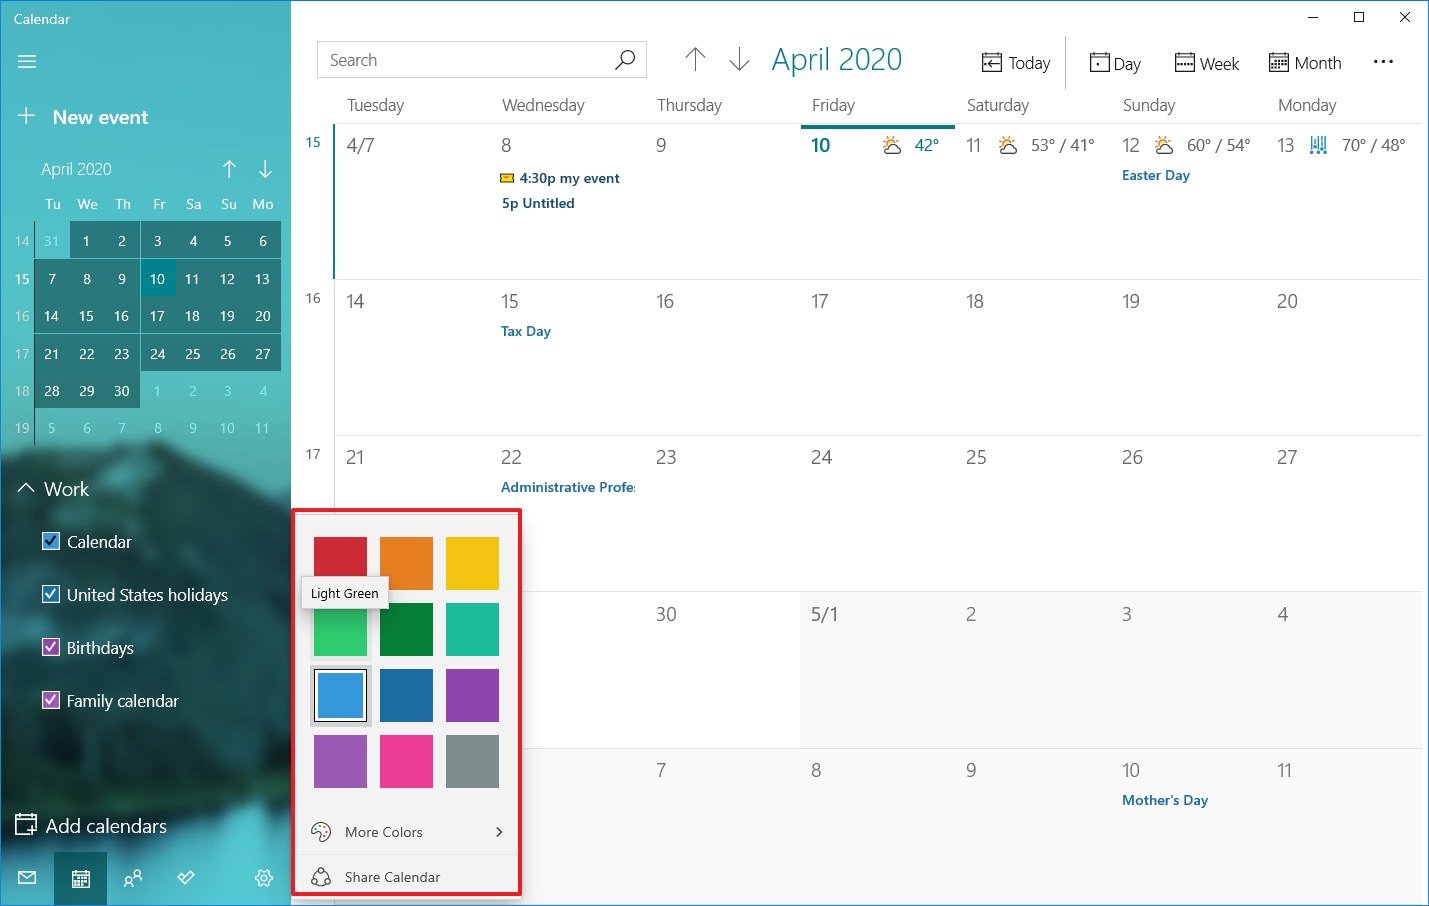
- (Optional) Click the More colors option and create a new color.
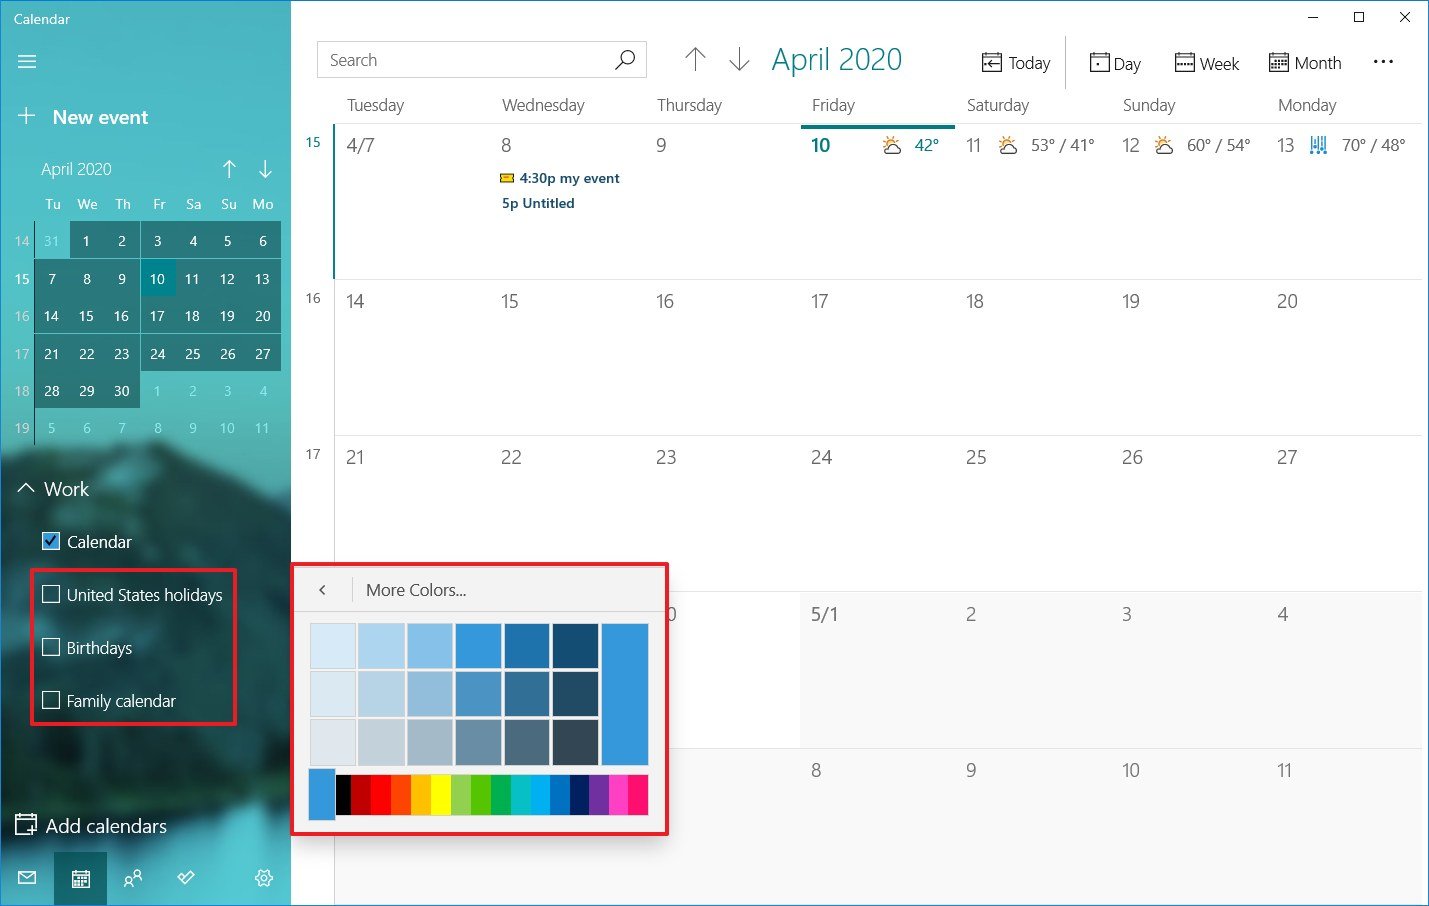
- (Optional) Clear the checkbox if you don’t want a calendar to appear in this app.
After you complete these steps, events in the calendar will appear using the color scheme that you selected.
To share a calendar with other people, use these steps:
- Open Calendar.
- Under the desired account, right-click the calendar and select the Share calendar option.
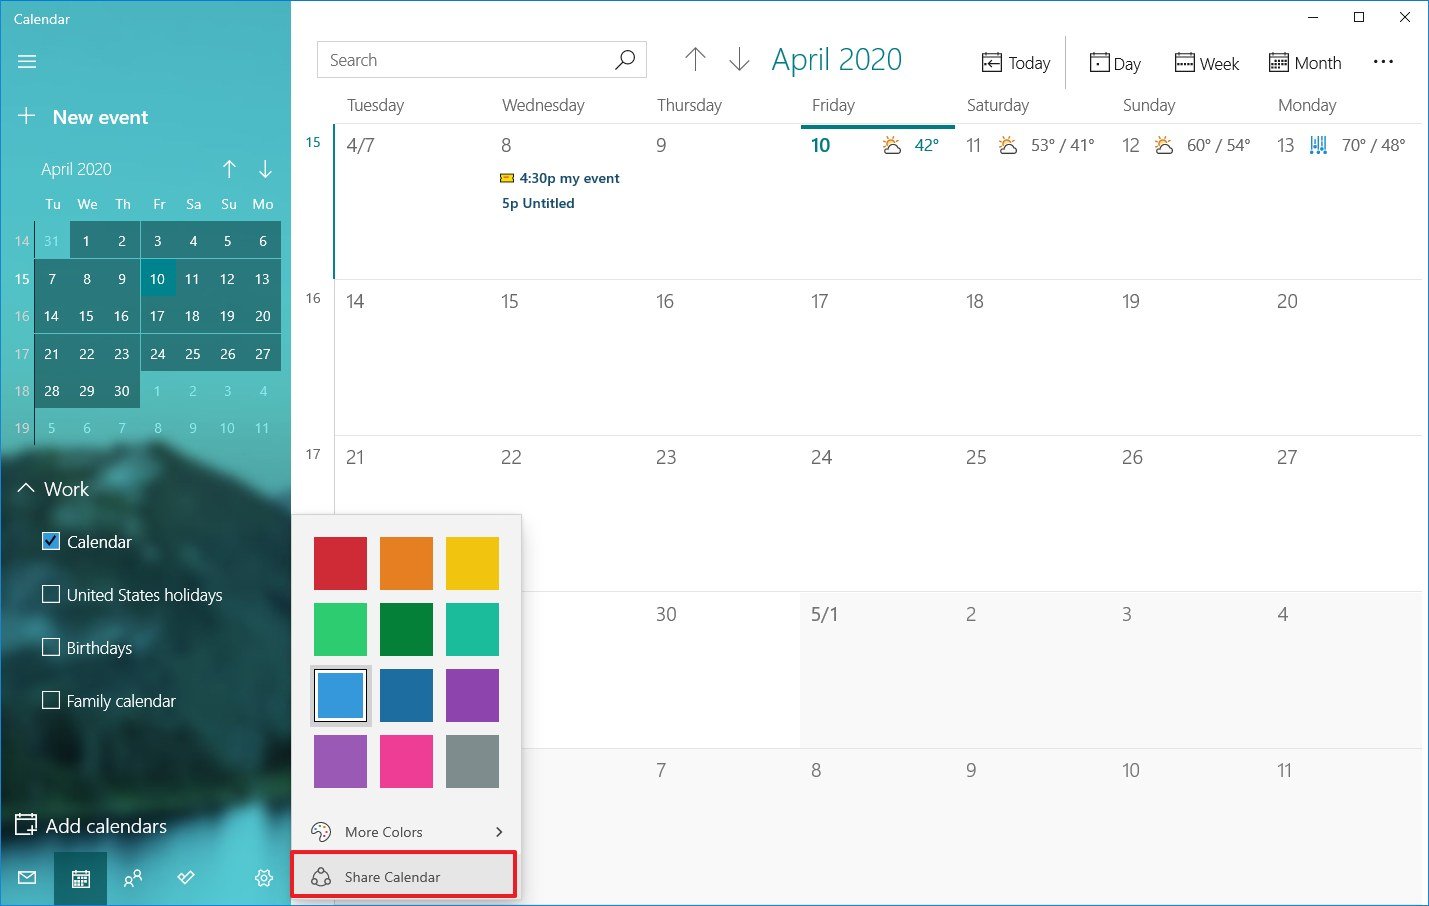
- Confirm the email address of the person you want to share the calendar with and press Enter.
- Use the drop-down menu to decide if the person will have view or edit permissions.

- Click the Share button.
Once you complete the steps, the people you invited will have access to the calendar events.
If you want to stop sharing a calendar, simply click the trash button next to the calendar you’re currently sharing from the «Share this calendar» page.
Change calendar views
The Calendar app is set to display the current month of events, but depending on your lifestyle and work schedule, you have different views that you can access using the toolbar at the top of the app.
For instance, you can change views to show a single day, week, month, or year. If you hover over the Day and Week options, you’ll notice a drop-down menu to use the multi-day view or switch to view only your workweek.
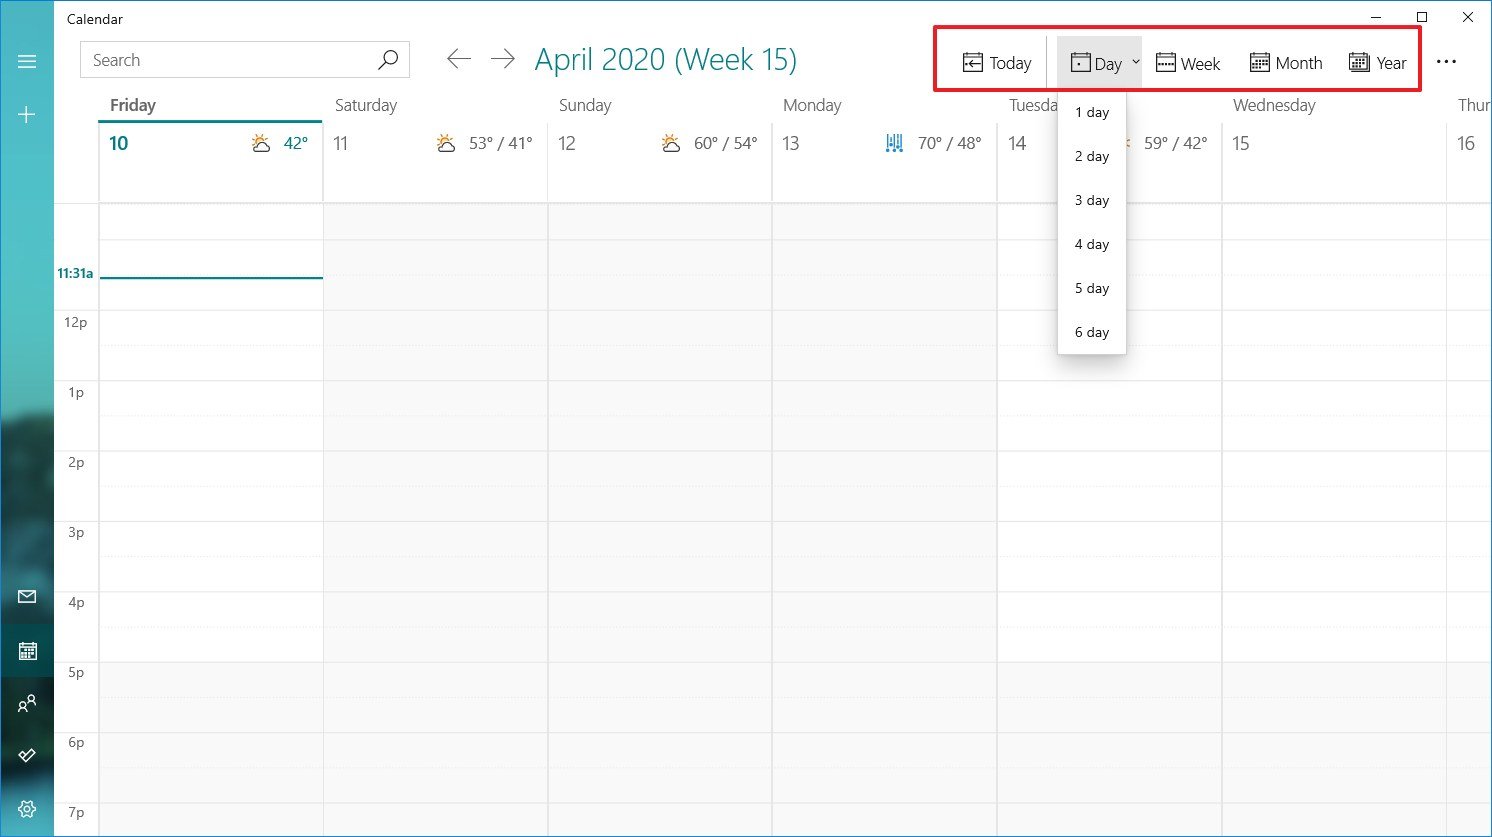
Although you won’t likely use the Year option frequently, it’s a good option that you can use to quickly jump to a specific day or month.
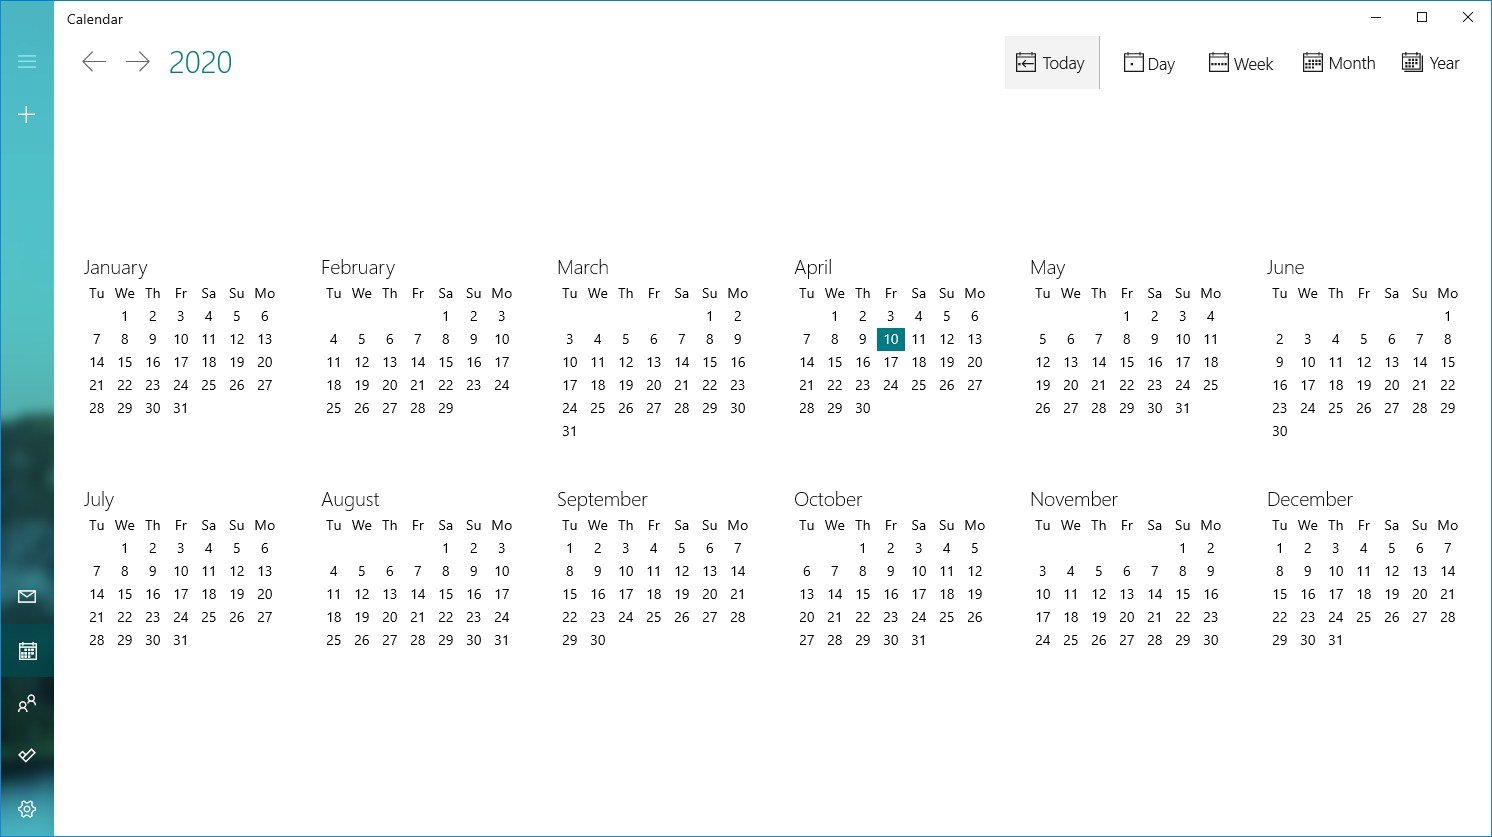
In addition, on the top left side, you’ll find a search box that you can use to find events in your calendars, and the arrow buttons are handy to navigate days, weeks, months, or years depending on the current view.
Finally, if you ever find yourself lost in the app, you can click the Today button to jump right into the current day.
How to add calendar events on Calendar
There are at least two ways to add new events to a calendar. You can do this within the app or using the date-and-time flyout menu available through the taskbar.
Create a detailed event using the app
To create a new calendar event within the app, use these steps:
- Open Calendar.
- Click the New event button in the top-left corner.Quick tip: Within the app, you can also use the Ctrl + N keyboard shortcut to create a new event.

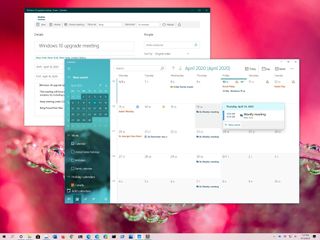
- Under the «Details» section, specify a descriptive title for the event.
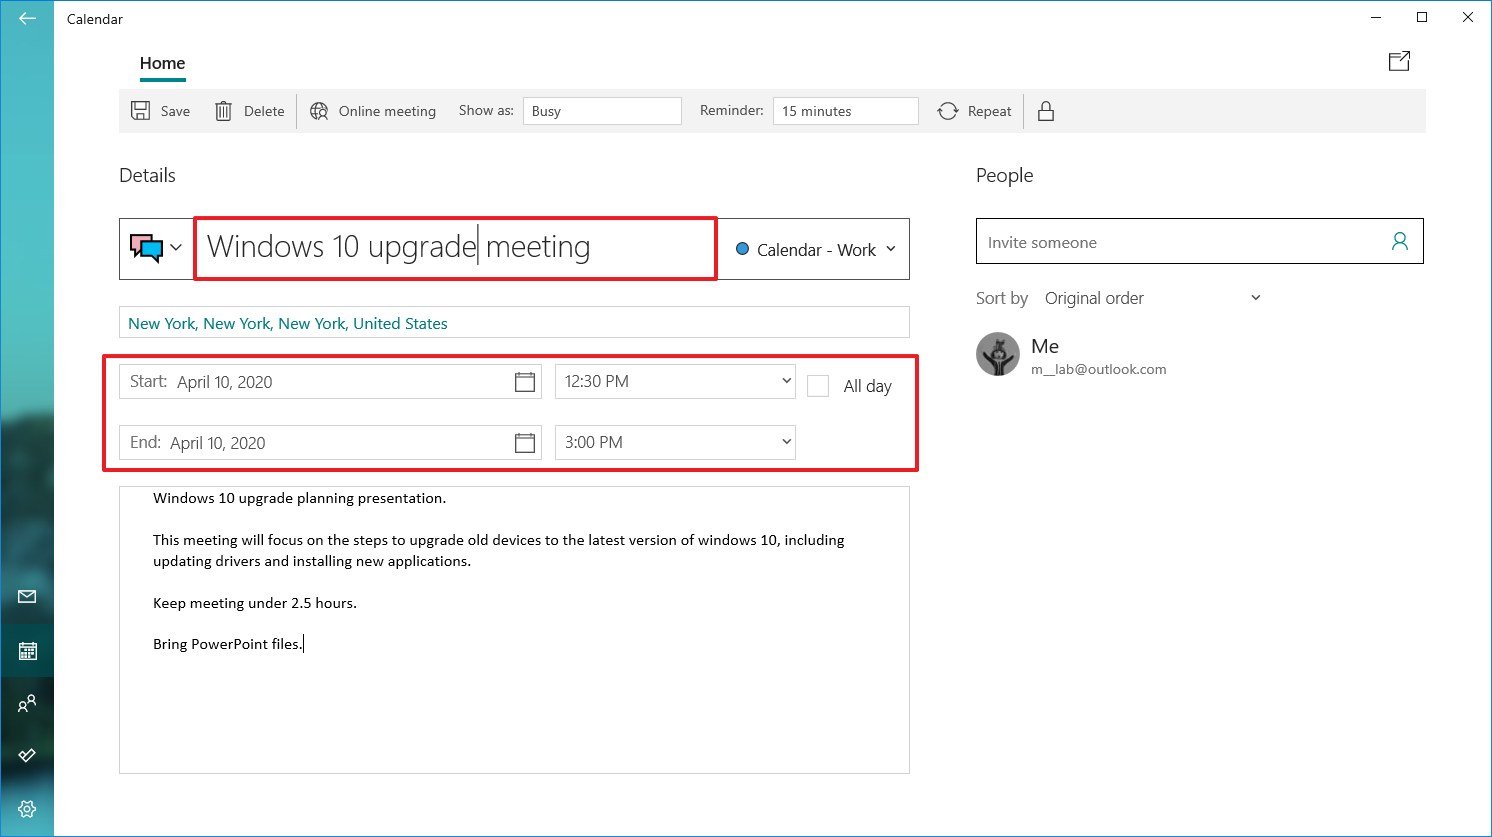
- (Optional) Click the drop-down menu on the left and select a related icon to make it even easier to find the event.
- (Optional) Use the Calendar drop-down menu and select the account to which you want to save the event.
- Specify the physical location where the event will take place.
- Use the Start option to specify a start date.
- Use the drop-down menu on the left to select a start time.
- Use the End option to specify the end date.
- Use the drop-down menu on the left to choose an end time.
- (Optional) Check the All day option if the event uses the entire day.
- In the bottom section, add all the details about the event.
- (Optional) Use the Show as drop-down menu to select a visual cue, including:
- Free.
- Working elsewhere.
- Tentative.
- Busy.
- Out of office.
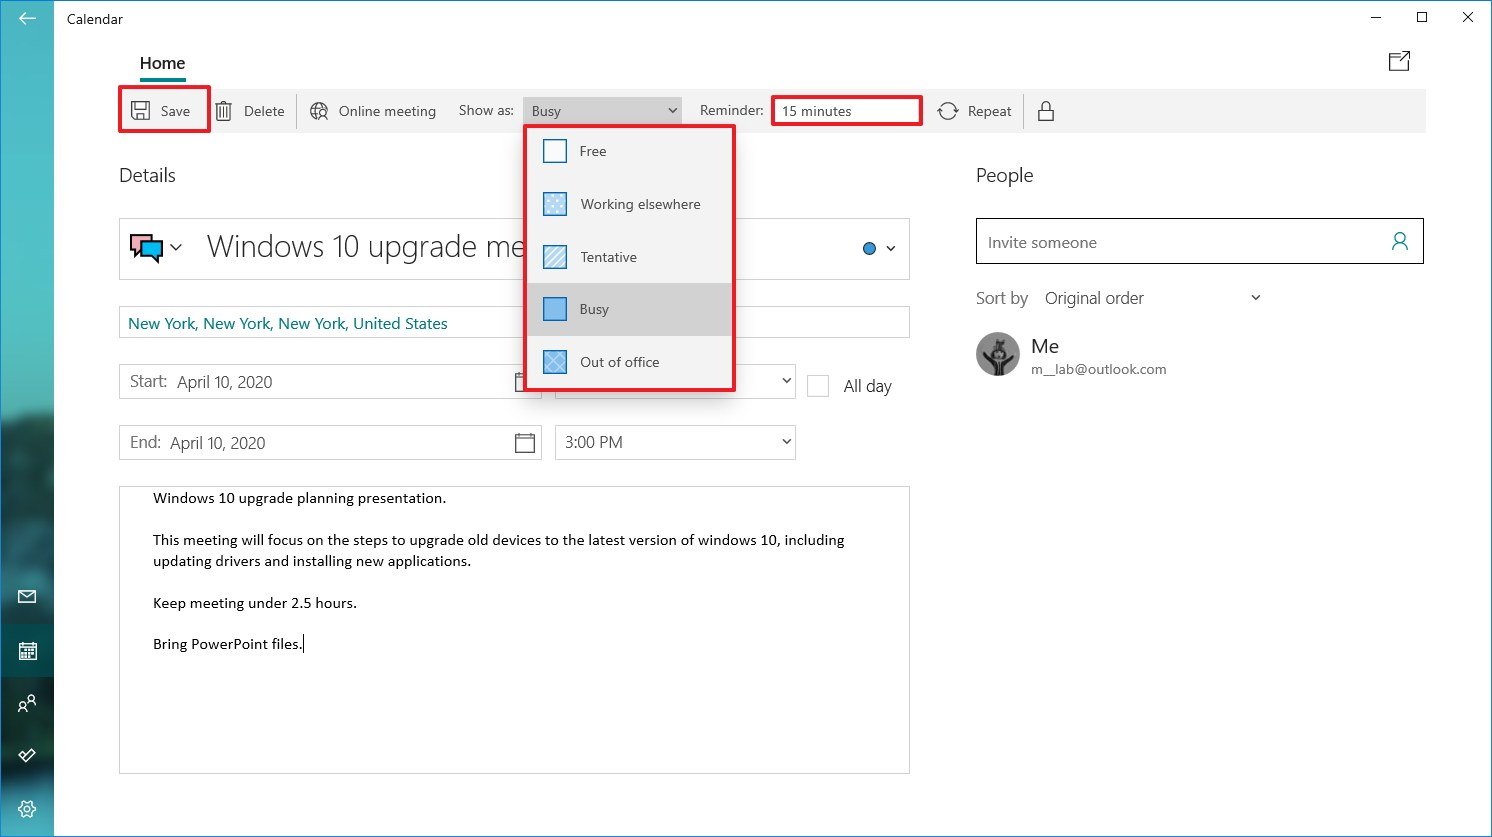
- Use the Reminder drop-down menu to select how long before you should receive an alert about the event. (You can use None to disable the option or select any time between 0 minutes to 1 week before the event.)
- Click the Save button in the top-left.
Once you complete the steps, the event will be saved in the account you specified.
You can use the steps below to schedule a repeating or group event using the Calendar app.
Create a repeating event using the app
To create a repeat calendar event, use these steps:
- Open Calendar.
- Click the New event button in the top-left corner.
- Click the Repeat button in top-right corner.
- Under the «Repeat» section, use the Start option to specify the start date of the event.
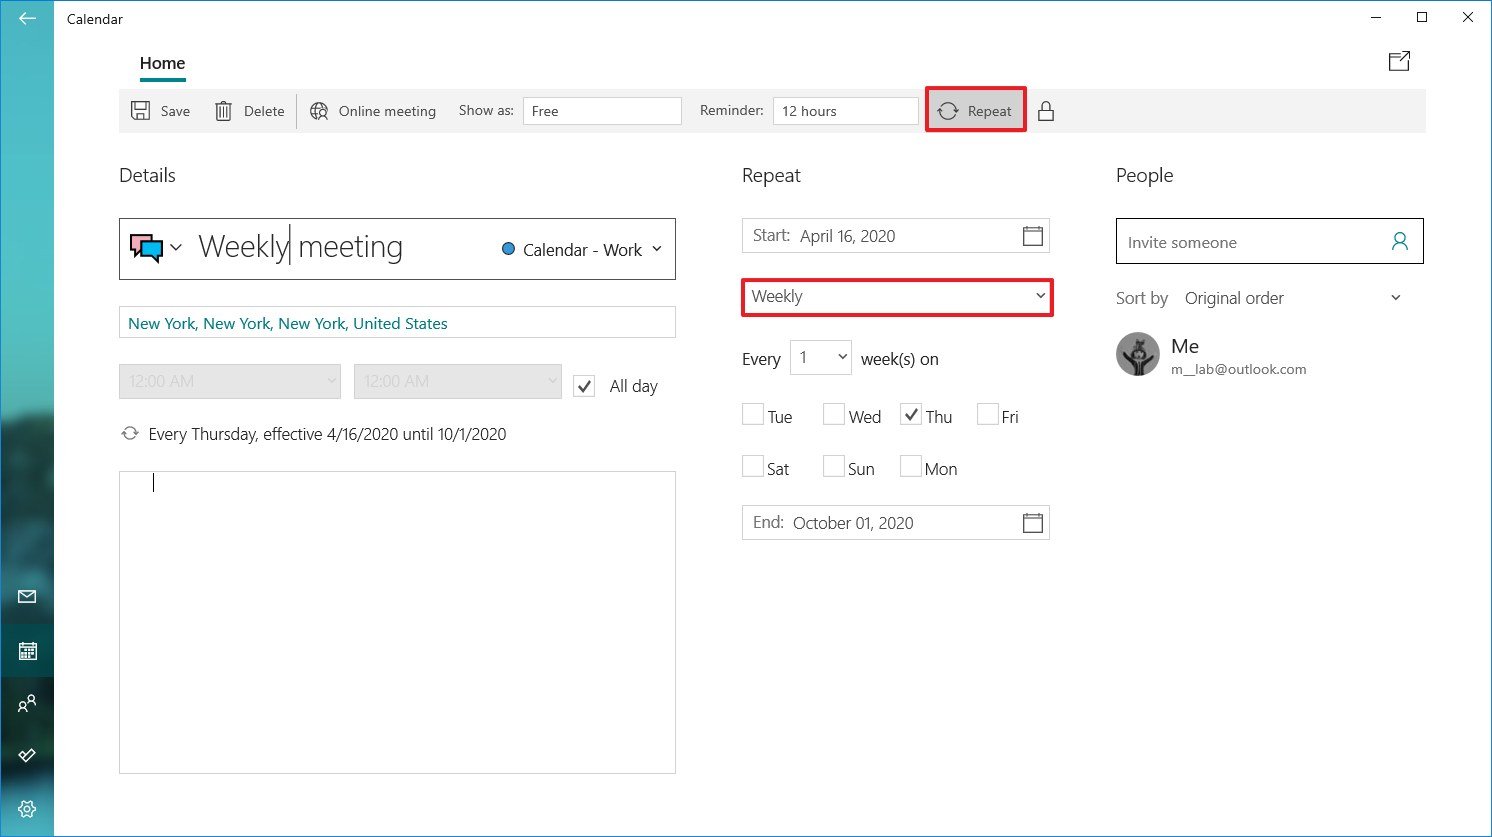
- Use the date drop-down menu to select how to often to repeat the event, including:
- Daily.
- Weekly.
- Monthly.
- Yearly.
- If you select the Weekly option, you’ll also need to specify how many weeks the event should repeat and on what day of the week.Quick tip: We’re using «Weekly» as an example, but if you select another option the settings will be different.
- Use the End option to specify the date when the event should stop repeating.
- Under the «Details» section, specify a descriptive title for the event.
- (Optional) Use the Calendar drop-down menu and select the account you want to save the event.
- Specify the physical location where the event will take place.
- Use the time drop-down menus to select the start and end times for the event.
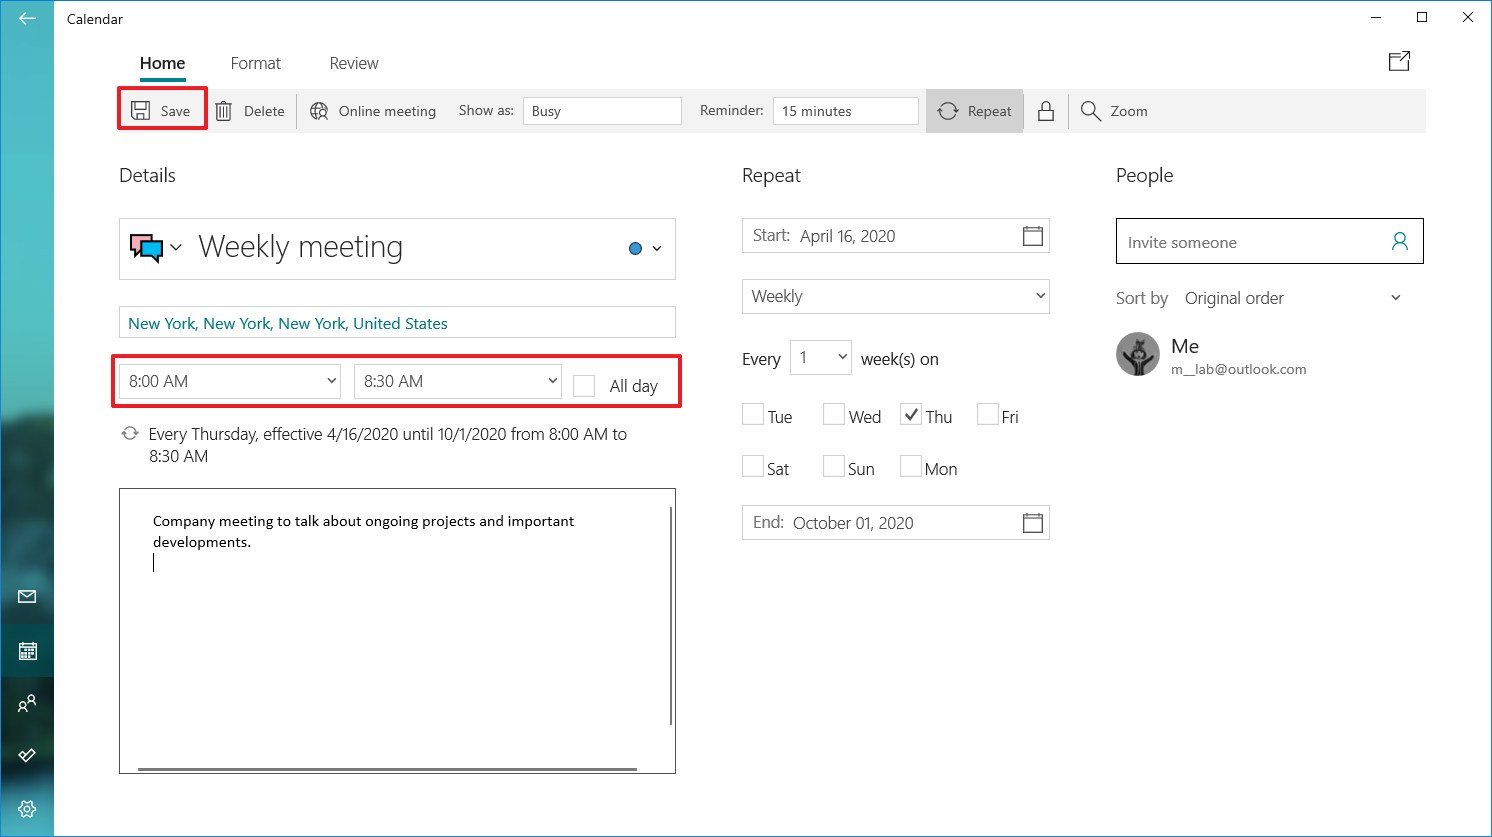
- In the bottom section, add all the details about the event.
- Use the Reminder drop-down menu to select how long before you should receive an alert about the event.
- Click the Save button in the top-left.
After you complete these steps, the event will keep repeating, depending on the schedule you specified.
Create a group event using app
If you need to schedule a meeting or organize an event, you can set up a calendar event and invite people no matter the email addresses they have.
To set up a group calendar event, use these steps:
- Open Calendar.
- Click the New event button in the top-left corner.
- Under the «People» section, confirm the email address of the person you want to invite to the calendar event and press Enter.
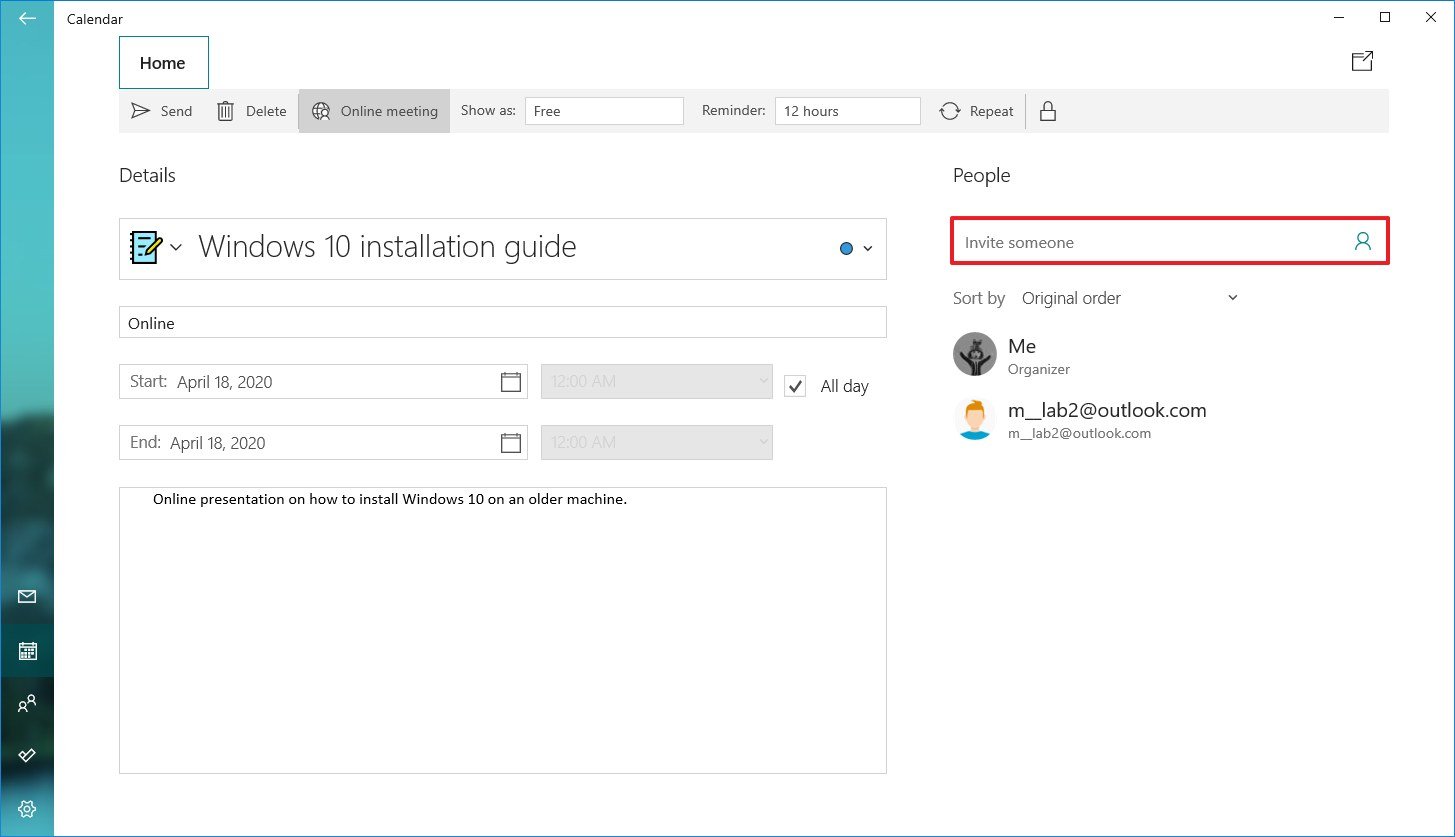
- Repeat step No. 3 to add more people to the event.
- Under the «Details» section, specify a descriptive title for the event.
- (Optional) Use the Calendar drop-down menu and select the account you want to save the event.
- Specify the physical location where the event will take place.
- Specify the start and end dates for the calendar event.
- Specify the start and end times for the event.
- In the bottom section, add all the details about the event.
- Use the Reminder drop-down menu to select how long before you should receive an alert about the event.
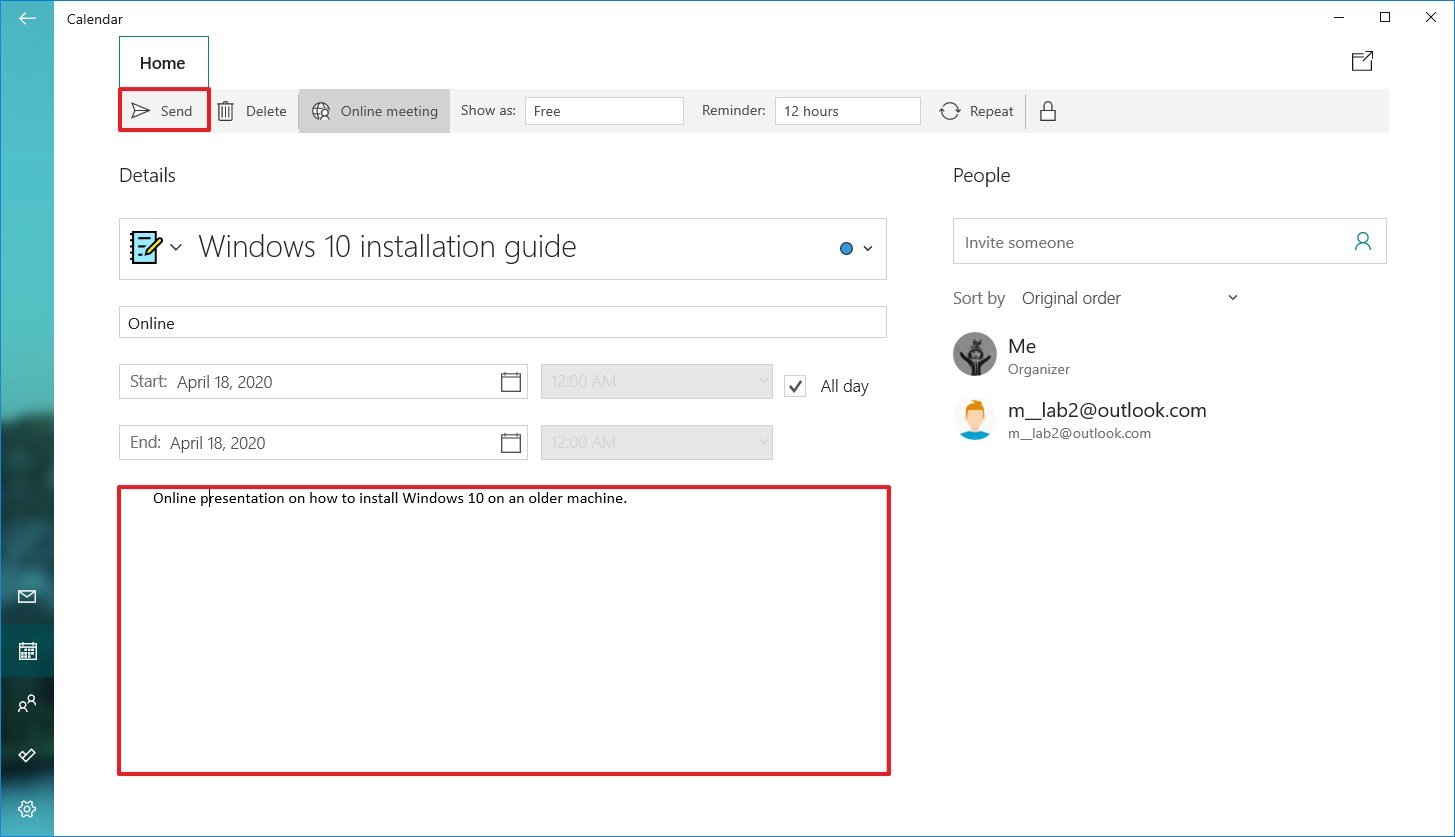
- Click the Send button.
Once you complete these steps, the event will appear in your calendar, as well as in those of the people to which you sent the invitation. In addition, they’ll also receive an email notification, which they can RSVP or decline.
Create a quick event using app
If you need to create a calendar event with minimal information, you don’t need to go through many steps. To create a calendar event quickly, use these steps:
- Open Calendar.
- Click a date in the calendar to bring up event creator popup.
- Specify a descriptive title for the event.
- Clear the All day option.
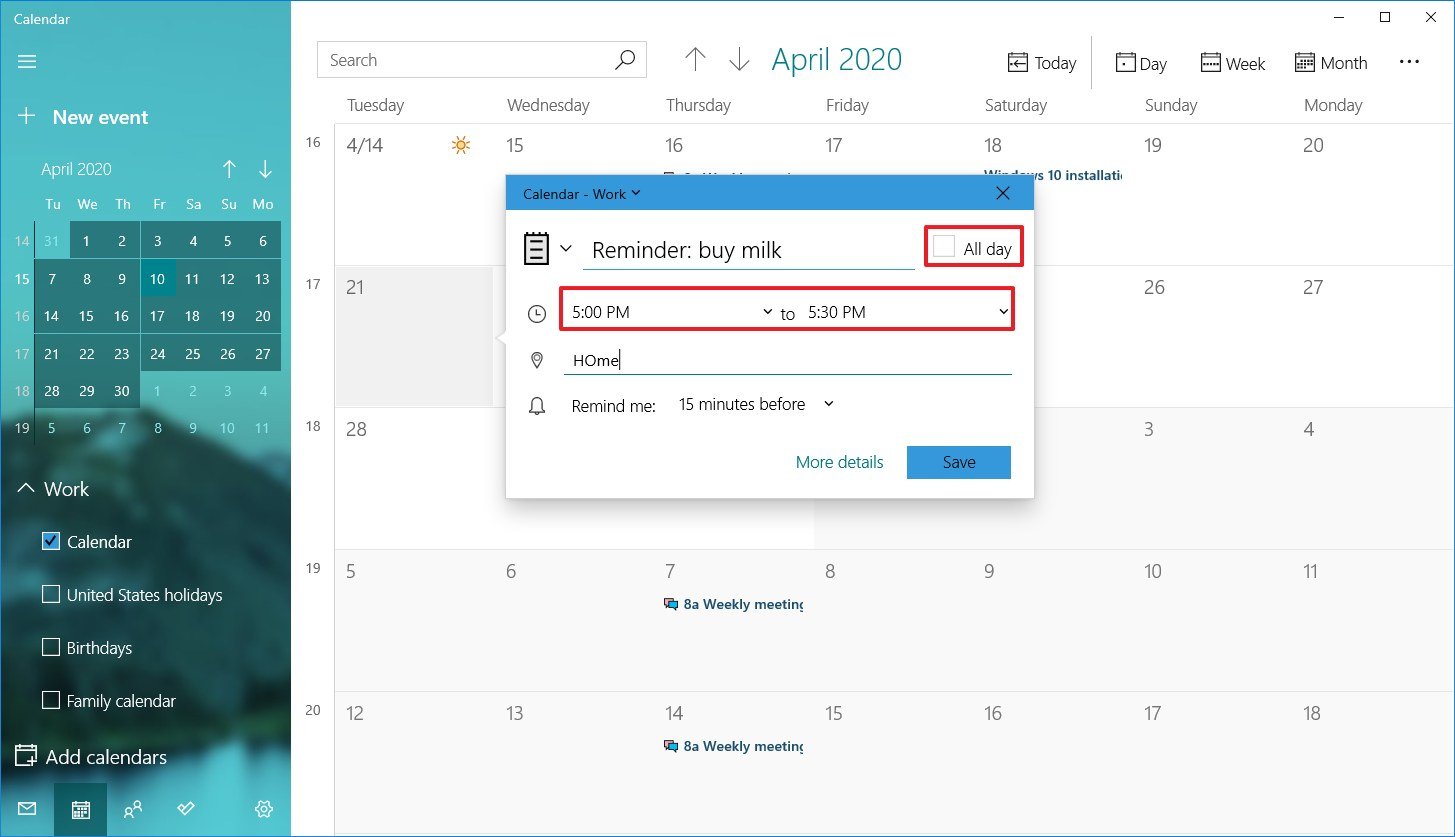
- Select a start and end time
- (Optional) Specify the physical location where the event will take place.
- Use the «Remind me» drop-down menu to select how long before you should receive an alert about the event.
- Click the Save button.
After you complete the steps, the new event will appear in the calendar you specified. You can always select the day, and clicking the event will open a page to edit, cancel, or delete the event.
Create an event using taskbar
To create a calendar event or reminder from the taskbar, use these steps:
- Click the time and date button in the taskbar.
- Select the date to schedule the new event from the calendar.
- Click the Show agenda option in the bottom-right corner.
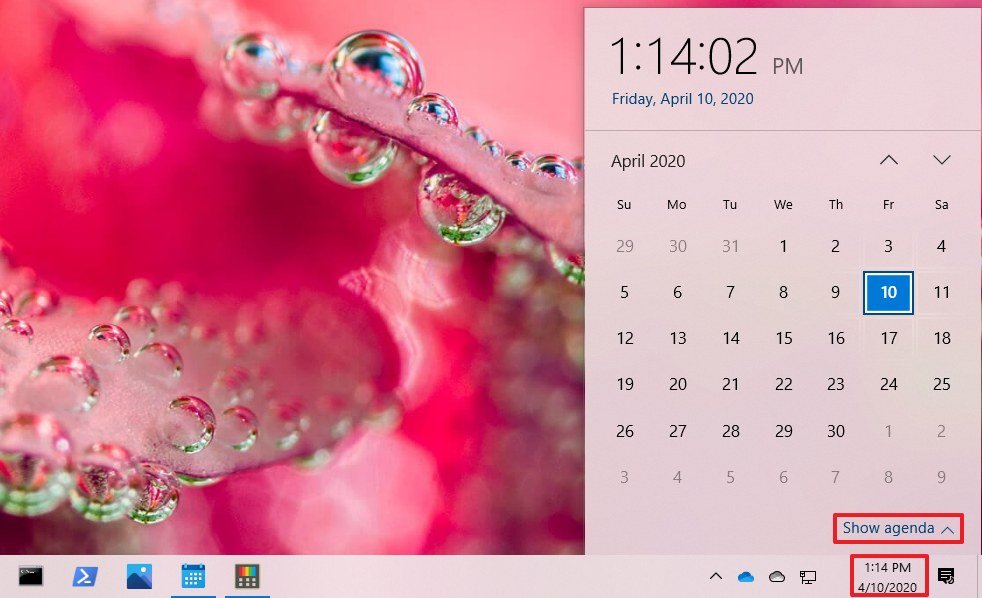
- Under the «Today» section, start typing the event or reminder in the text box.
- Click the drop-down menu on the right to select the calendar to save the new event.
- Specify the start and end time of the event.
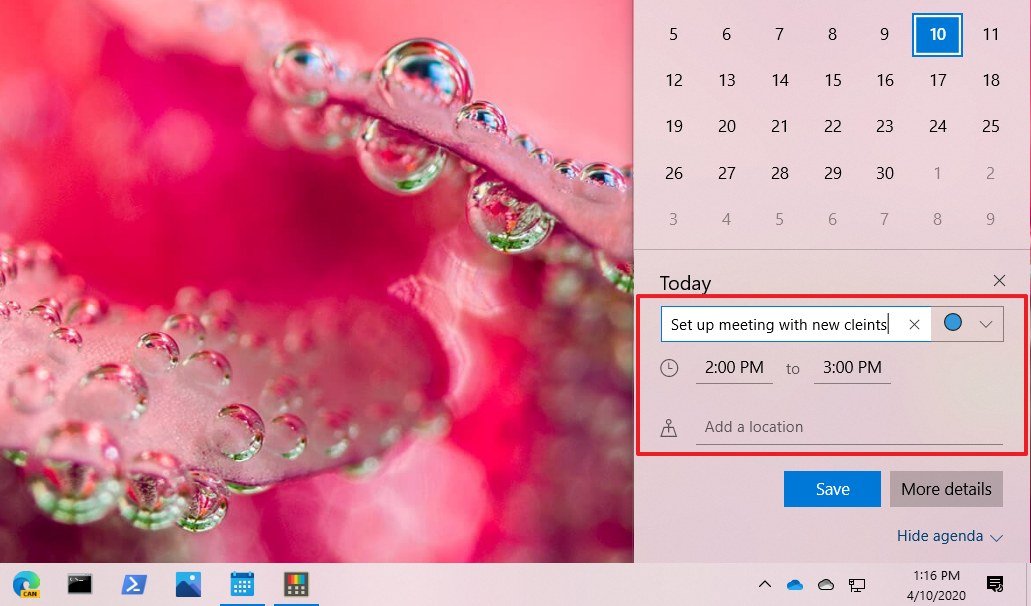
- Specify the location (if applicable).
- (Optional) Click the More details button to open the event using the Calendar app, which allows you to access more options and continue composing the event on a bigger canvas.
- Click the Save button.
Once you complete the steps, the event or reminder will be added to your calendar. If you want to check upcoming events or reminders for a specific day, you can do this by selecting the day from the schedule inside the time and date flyout, or by using the Calendar app.
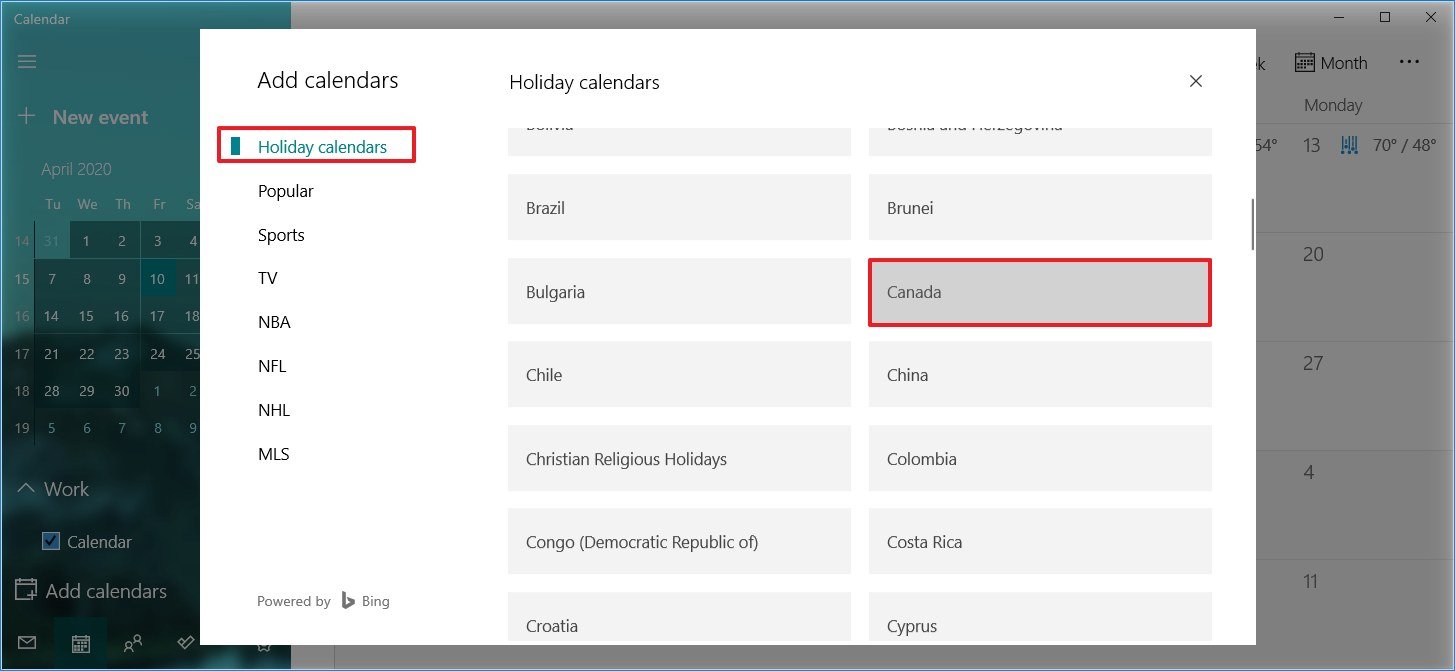
How to add popular calendars on Calendar
The app also allows you to add a bunch of popular calendars to your work or personal calendar to make sure appointments will not conflict with certain holidays, sports games, or TV shows, which you can also use as reminders.
To add popular calendars to the Calendar app, use these steps:
- Open Calendar.
- Click the Add calendars button in the bottom-left corner.
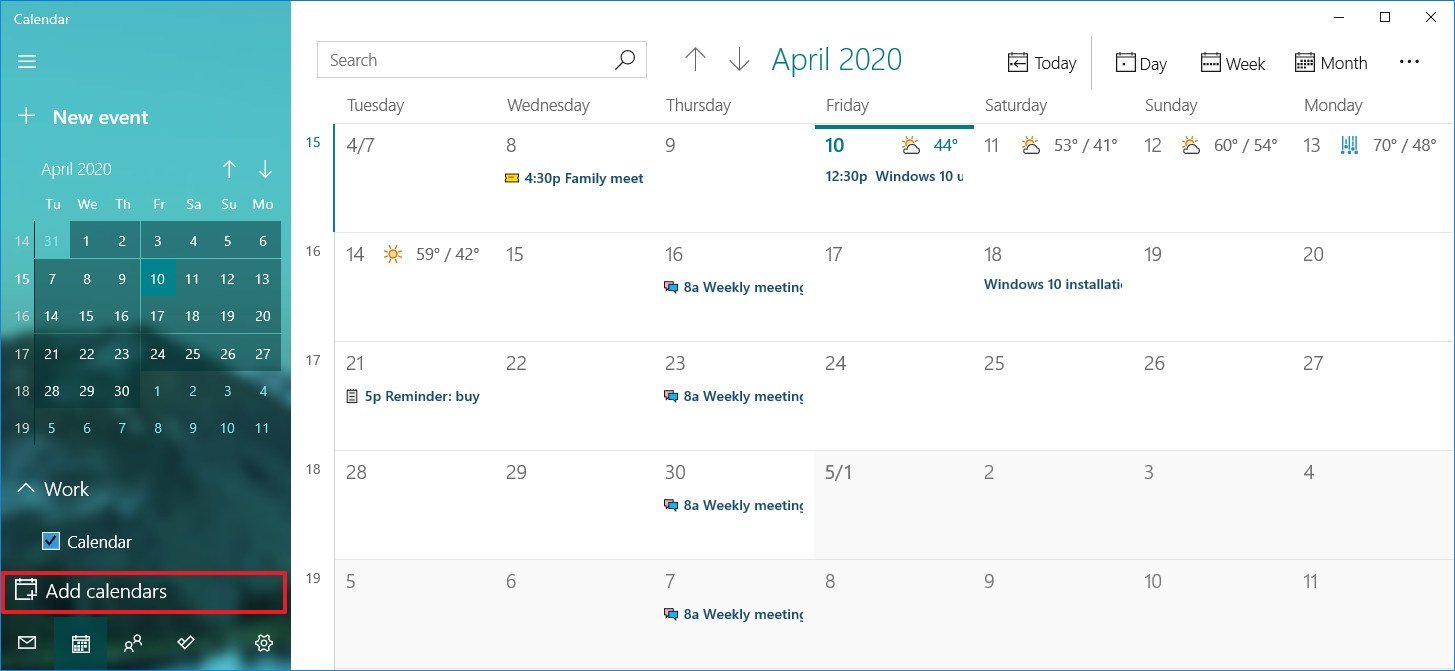
- Select the calendar category. For example, Holiday calendars, Popular, Sports, or TV.
- If you selected the Holiday calendars category, you need to select your region’s calendar to add it.
- If you selected the TV category, choose the time zone, channel, and show you want to add to the calendar.
- If you selected the Sports category, choose the sport, tournament, and the team schedule you want to add to the calendar.
After you complete these steps, the events should populate in your calendar.
How to sync events on Calendar
If you added a new event from your account using the web version of the service or on another computer, and it does not appear in your calendar, you may need to sync the settings manually.
To sync events to the Calendar app, use these steps:
- Open Calendar.
- Click the menu (three-dotted) button in the top-right side.
- Click the Sync option.
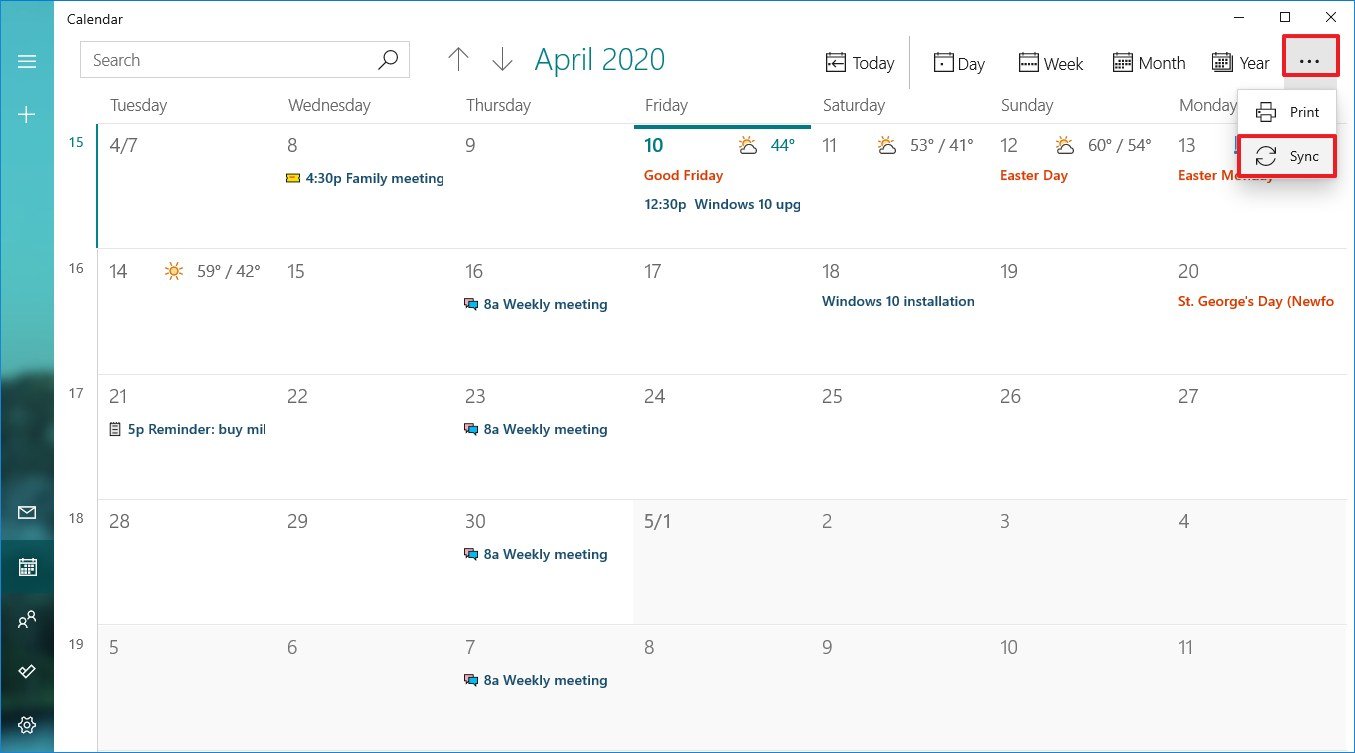
Once you complete the steps, the events should sync to and from the cloud, and they should synchronize across devices.
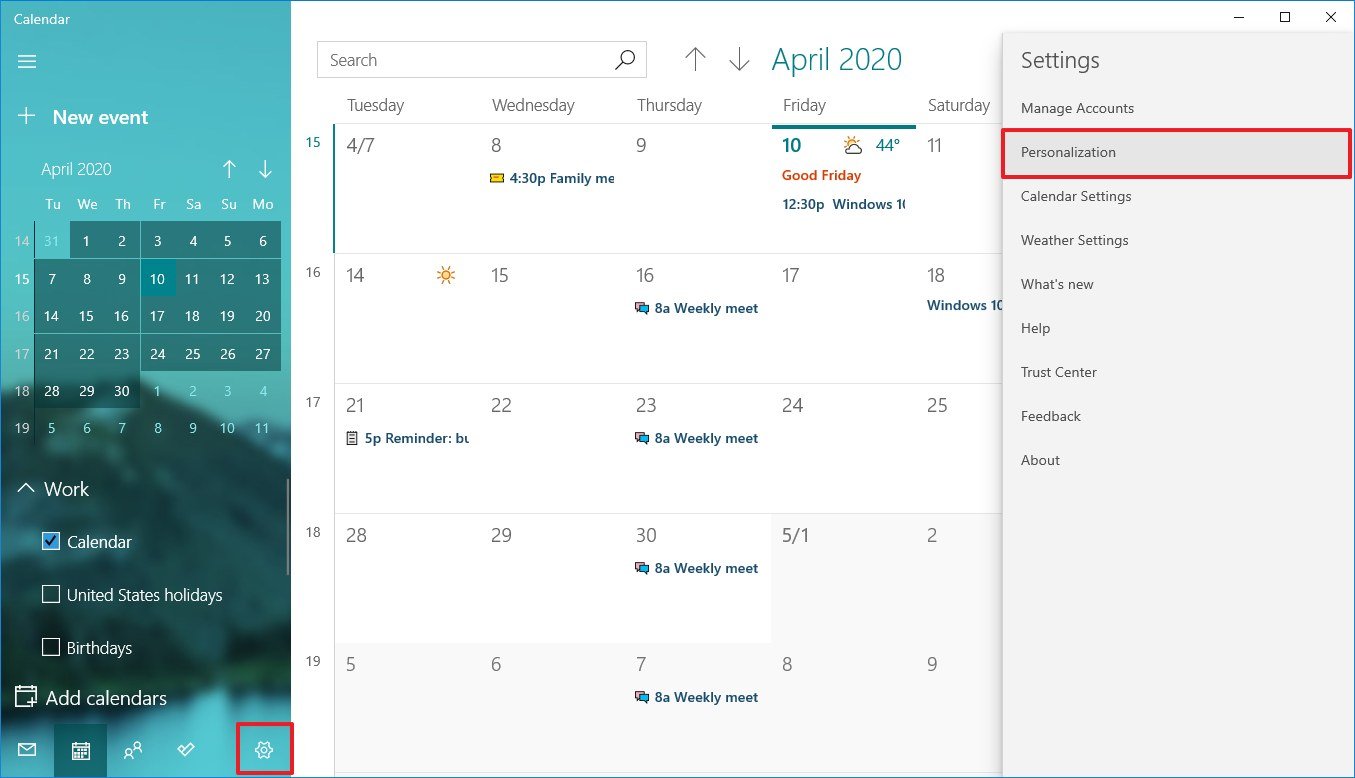
How to personalize your experience on Calendar
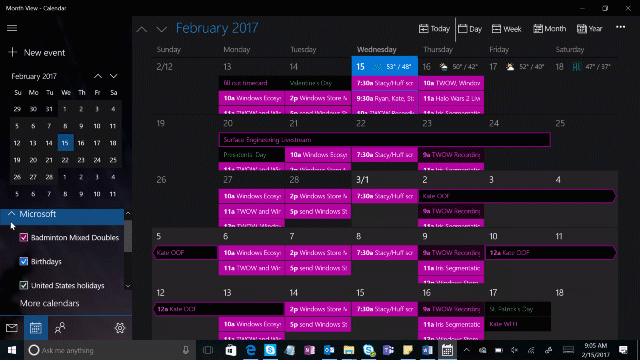
If you work from home, or you spend a lot of time setting reminders and scheduling events, the same look and feel can get boring quickly. However, you can customize the Calendar app to make it more personal by changing the color scheme, using a dark mode, and even selecting a custom background image.
To customize the Calendar app, use these steps:
- Open Calendar.
- Click the Settings (gear) button in the bottom-left side.
- Click on Personalization.
- Under the «Colors» section, select the color scheme you want to use.
- Select the between the Light or Dark mode, or select the Use my Windows mode option.
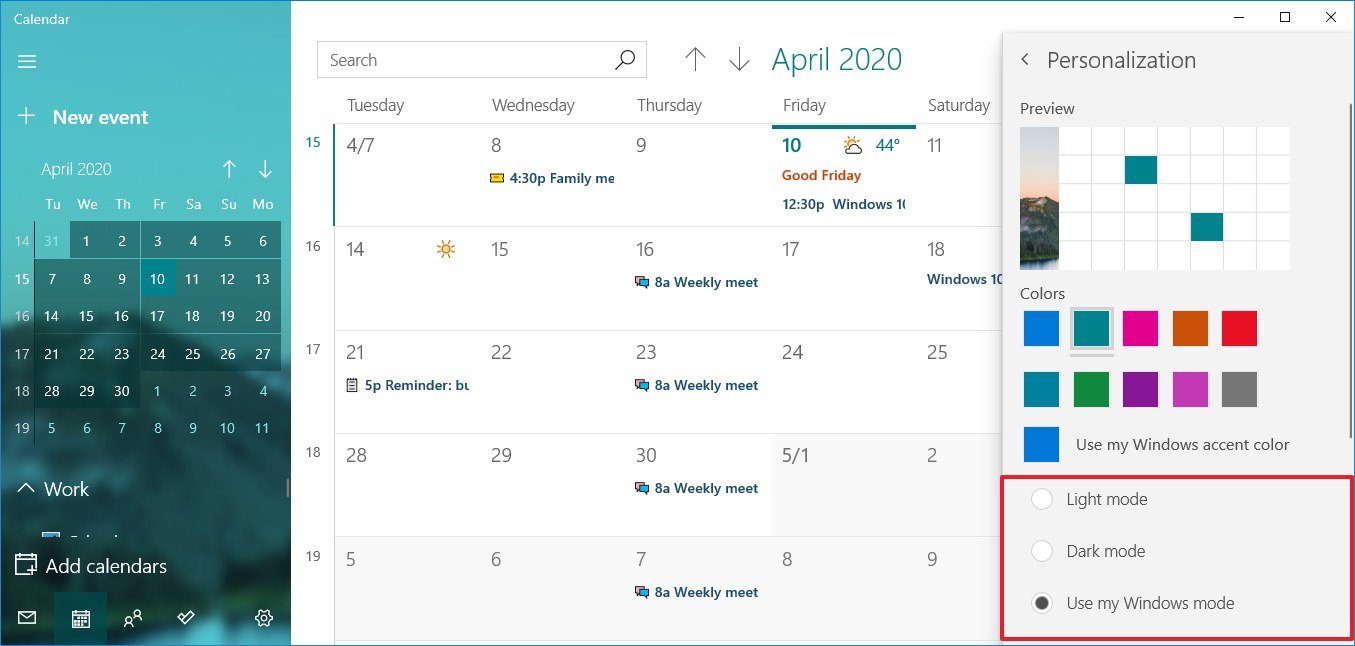
- Under the «Background» section, select a background for the app.
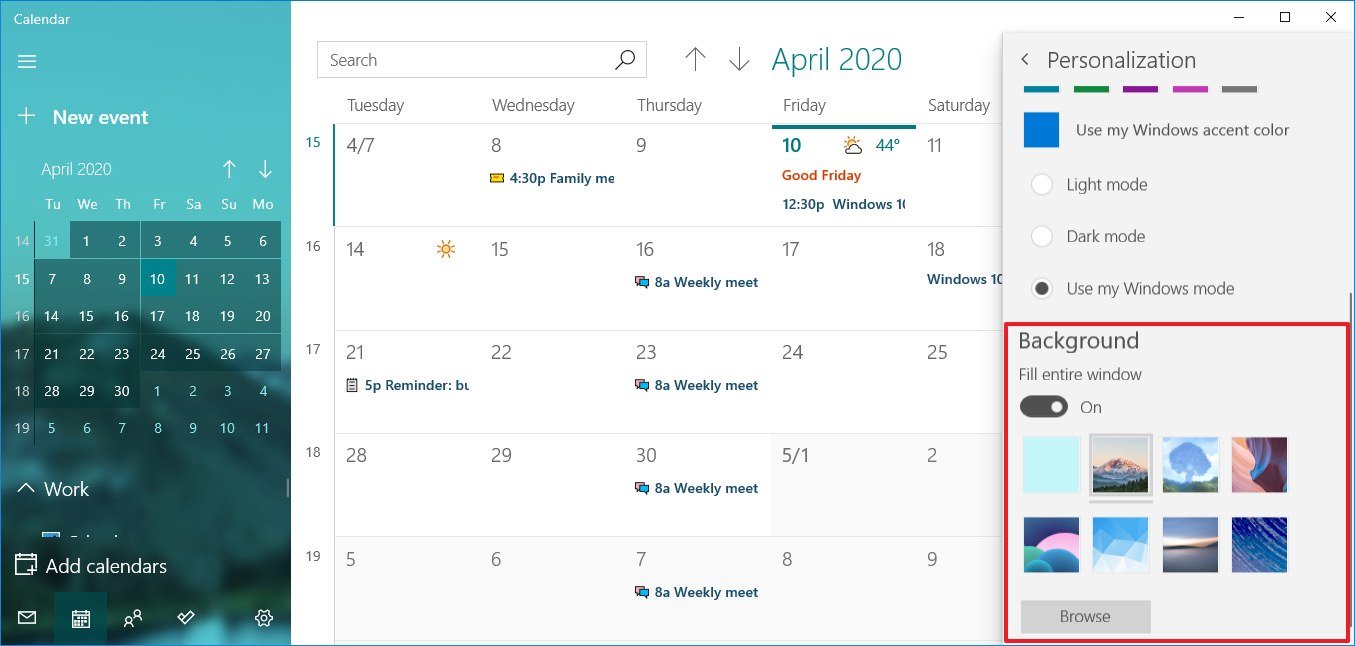
- (Optional) Click the Browse button.
- Select a custom image.
- Click the Open button.
After completing the steps, the Calendar app should be a little more pleasant to use.
How to change settings on Calendar
In the Calendar app, you can also customize various parameters to adjust the experience. For instance, you can set which day should be the first day of the week, what days of the week you go to work, working hours and more.
To customize the Calendar settings, use these steps:
- Open Calendar.
- Click the Settings (gear) button in the bottom-left side.
- Click on Calendar Settings.

- Under the «Week» section, use the drop-down menu to select your first day of the week.
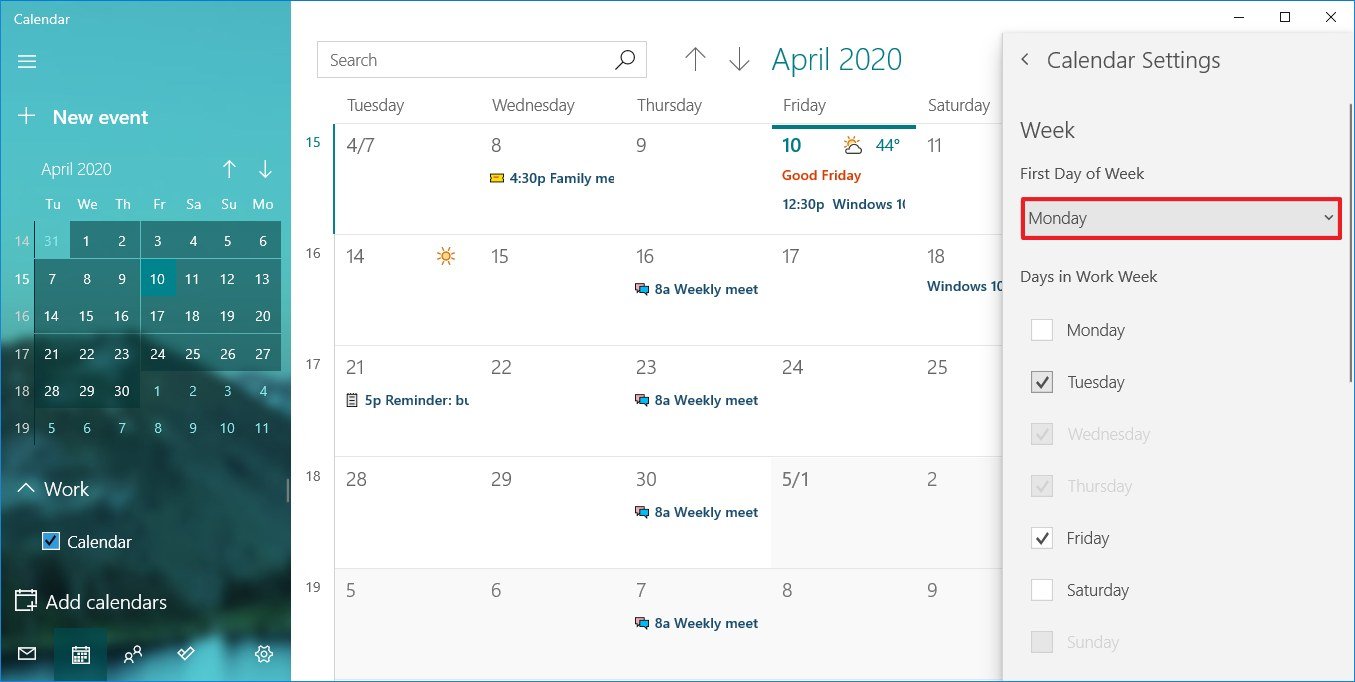
- (Optional) Use the Days in Work Week option to select the days in your workweek.
- Under the «Working hours» section, specify the start and end of your working hours.
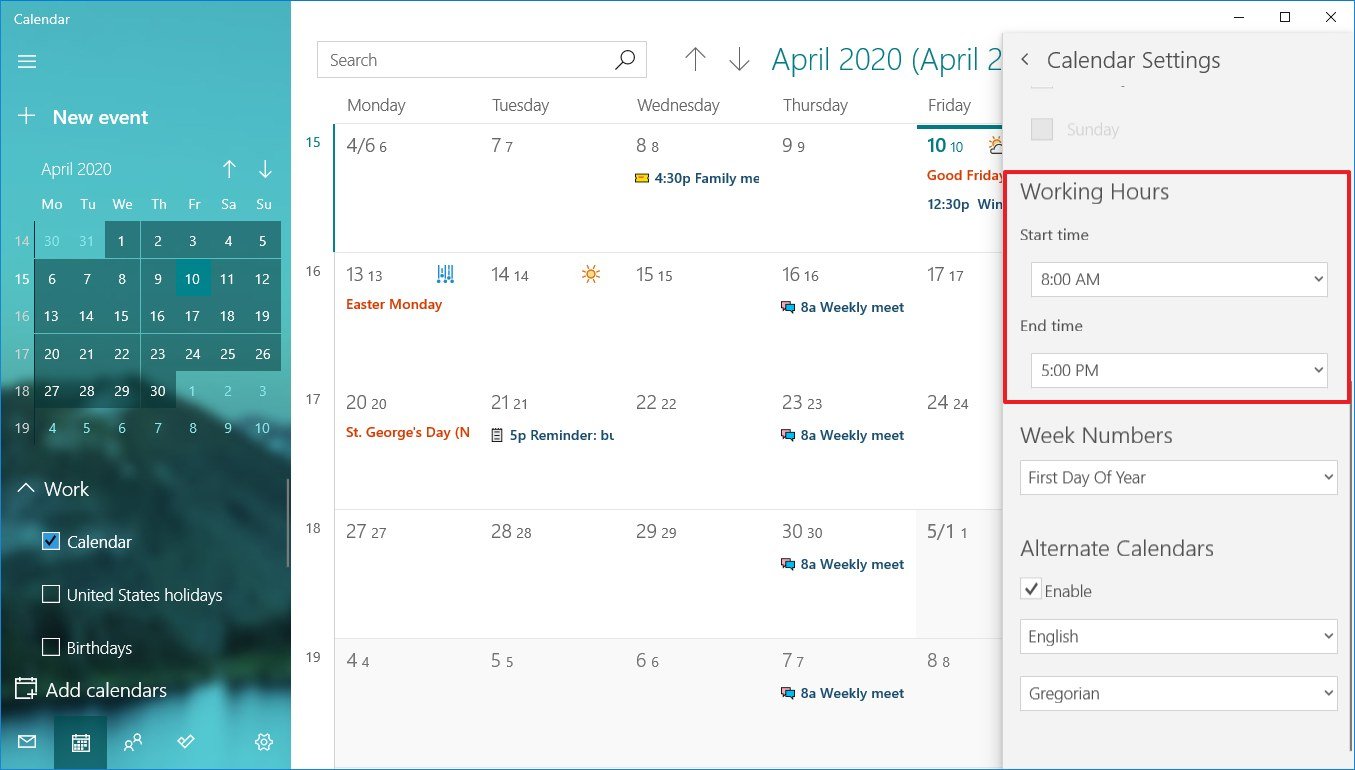
- (Optional) Under the «Week Numbers» section, select how you want to show the week numbers in the calendar, including:
- Off.
- First Day of Year.
- First Full Week.
- First Four-Day Week.
Quick note: When you enable this option, the week numbers will appear on the left side.
- (Optional) Under the «Alternate Calendars» section, check the Enable option.
- Select the alternate calendar, including:
- English.
- Japanese.
- Chinese.
- Arabic.
- Persian.
- Thai.
- Korean.
- Hebrew.
- Hindi.
- Select the calendar type. For example, for English, options include:
- Gregorian.
- Hijri
- Umm al-Qura.
- Hebrew Lunar.
- Saka Era.
Once you complete the steps, the Calendar app will be customized to suit your preferences.
How to change weather settings on Calendar
The Calendar app also shows the weather forecast in the calendars to make it easier to plan events. If you feel more comfortable using a different scale unit for temperature, the app allows you to change the weather settings to use Celsius or Fahrenheit.
To change the weather settings on Calendar, use these steps:
- Open Calendar.
- Click the Settings (gear) button in the bottom-left side.
- Click on Weather Settings.
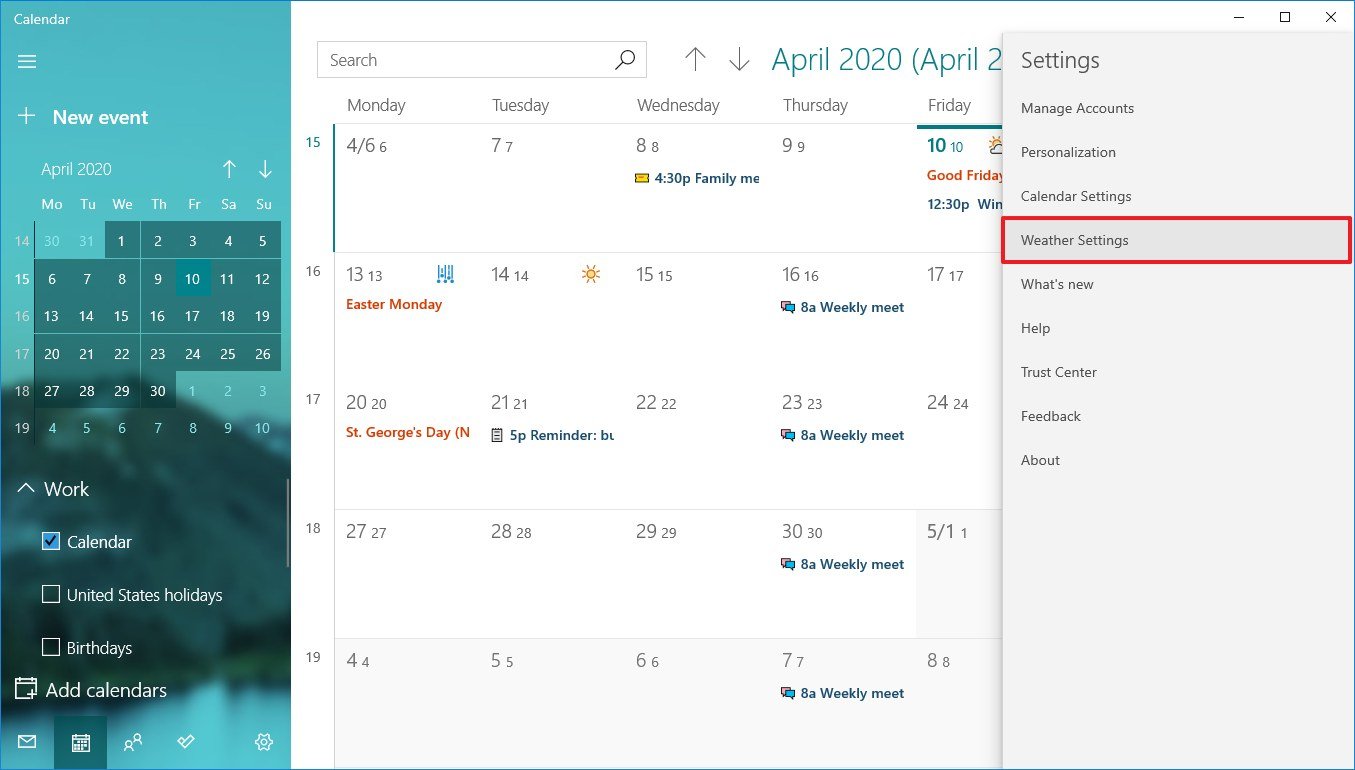
- Use the «Temperature Scale» drop-down menu and select between Celsius or Fahrenheit.
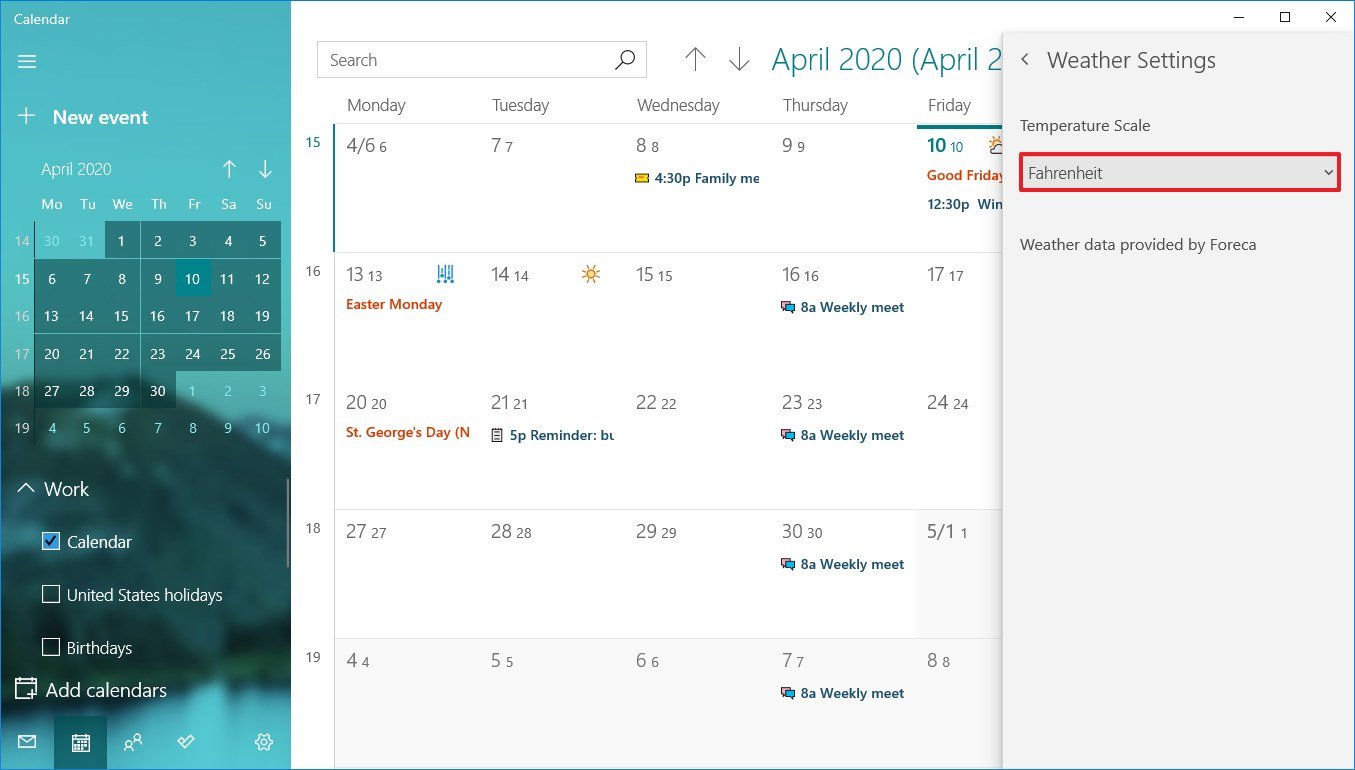
After you complete the steps, the weather will appear with the temperature scale that you specified.
If you’re working from home, in addition to using the Calendar app, you can stay even more productive using an Office 365 (Microsoft 365) subscription, which gives you access to the most popular office applications, including Word, Excel, PowerPoint, Outlook, and much more. Also, using a subscription you’ll receive features at no extra cost, and you’ll get many other benefits, such as sharing the apps with other users and 1TB of OneDrive storage.
Get subscribed
Office 365 gives you full access to many apps and perks, such as 1TB OneDrive storage and Skype minutes. You can also install Word, Excel, PowerPoint, Outlook, and other apps on up to five devices, and depending on the subscription, you can share the account with up to five people.
All the latest news, reviews, and guides for Windows and Xbox diehards.
Mauro Huculak is technical writer for WindowsCentral.com. His primary focus is to write comprehensive how-tos to help users get the most out of Windows 10 and its many related technologies. He has an IT background with professional certifications from Microsoft, Cisco, and CompTIA, and he’s a recognized member of the Microsoft MVP community.
В этой заметке мы продолжим рассматривать стандартные приложения Windows 10 и поговорим о планировании.
Планирование — это неотъемлемая операция для любого организованного человека.
В Windows 10 есть инструмент, позволяющий планировать ваше время. Он так и называется — Календарь. У приложения нет каких-то преимуществ в сравнении с аналогичными программами и интернет-сервисами, но как простой инструмент планирования она вполне может быть использована.
Запустить Календарь можно из меню Пуск. При этом на плитке Календаря выводится информация о сегодняшней дате, а также о запланированных на ближайшее время событиях. Поэтому узнать о ближайшем событии можно без открытия Календаря, достаточно заглянуть в меню Пуск.

По сути Календарь неразрывно связан с Почтой. Дело в том, что некоторые почтовые сервисы, например, Gmail, также предоставляют возможность планирования своего времени. В Gmail есть свой онлайн-календарь и если вы им пользуетесь, внося в него планируемые мероприятия или дни рождения своих друзей, то информация будет синхронизирована и с Календарем Windows. Это означает, что весь ваш онлайн-календарь появится в Календаре Windows, а мероприятия, которые вы запланируете в Windows, будут потом отражаться и в вашем аккаунте Google.
Также если у вас есть учетная запись в Майкрософт, то для вас автоматически был создан Outlook аккаунт. Идея Майкрософт заключается в следующем. Если вы используете Windows 10 на компьютере, ноутбуке, вашем смартфоне и планшете, то заходя в них через свою учетную запись Майкрософт вы будете иметь доступ к одной и той же информации. Например, вы запланировали какое-то мероприятие в Календаре на настольном компьютере. Эта запись автоматически синхронизируется и со всеми другими устройствами, а это значит, что и на телефоне, и на планшете, и на ноутбуке вы увидите это запланированное мероприятие в Календаре.
При первом запуске программы нужно выбрать учетную запись, через которую будет происходить синхронизация данных календаря.

Как я сказал, не все почтовые сервисы имеет календари, поэтому в моем случае мы видим только две учетные записи из четырех — я создал учетную запись Яндекс, Mail.ru и Gmail, а Outlook была создана автоматически при установке Windows на компьютер. Сейчас же я вижу только две учетные записи, которые имеют возможность синхронизации данных Календаря. Здесь можно добавить еще одну учетную запись или просто нажать кнопку Готово.
Окно Календаря очень напоминает окно почтовой программы и мы можем переключиться в него, нажав на соответствующую кнопку внизу окна. В левую колонку окна программы вынесен календарь на текущий месяц и учетные записи, имеющие возможность синхронизации Календаря.

Вся информация о запланированных событиях выводится в правой части окна. Здесь мы также видим текущий месяц, но при желании вид можно изменить — на экран можно вывести только один день, рабочую неделю, полную неделю с выходными, месяц или год.

Чтобы запланировать событие достаточно щелкнуть мышью на тот день или час, когда мероприятие должно состояться. Все зависит от вида отображения — если выводится месяц, то щелкаем по дню, если день, то можно выбрать конкретное время, но это не принципиально, так как откроется одинаковое окно, в котором следует указать название события и уточнить время и место, в котором оно будет проходить.

Далее из списка можно выбрать календарь той учетной записи, с которой данное событие будет синхронизировано и можно нажать на кнопку Готово.
Если же вам нужно более детально прописать информацию о событии, то нажимаем на кнопку Сведения и открывается окно, содержащее больше подробностей.

Здесь можно оставить текстовую заметку о событии, а также настроить напоминание, которое появится за указанный вами временной интервал до самого события.
Если вы планируете какое-то регулярное событие, например, поход в спортзал, то можно нажать на кнопку Повторить, а затем уточнить периодичность. Например, вы ходите в спортзал каждую неделю по понедельникам, средам и пятницам.

Нажмем «Сохранить и закрыть» и увидим наше событие в Календаре.
Давайте создадим еще одно периодическое событие. Например, вы пошли на курсы английского, которые будут проходить в течение месяца с 18 до 19 по вторника и четвергам. Заполняем по аналогии данные и в повторах указываем дату окончания.

Это событие будет запланировано только до указанной даты.

Чтобы отредактировать событие достаточно на нем щелкнуть. Здесь мы можем отредактировать данные, удалить событие или изменить его периодичность.
Настройки Календаря очень похожи на настройки Почты и тут особо изменять нечего.

Разве что в параметрах календаря можно указать рабочие часы или включить отображение номеров недель, что может быть полезным.

Подводя итоги скажу, что программа Календарь Windows 10 является простым органайзером, который может быть полезен при планировании рабочей недели.
Знаете ли вы, что в Windows 10 есть встроенное приложение, которое поможет вам правильно распределить свое время и управиться со всеми обязательствами.
Это приложение «Календарь». Оно бесплатное и уже предустановлено в Windows 10, так что ничего скачивать не нужно. Найдите его в списке приложений и откройте.
Приложение доступно в автономном режиме, так что вы можете увидеть текущее расписание даже без подключения к Интернету. В отличие от онлайн-календарей, которые вам приходится проверять в браузере, приложение «Календарь» не требует авторизации при каждом заходе.
Дадим два совета по использованию приложения.
Просматривайте несколько календарей в одном месте:
Чтобы лучше управлять своим временем и ничего не пропустить в течение дня, соберите все календари вместе, включая Outlook.com, Gmail, Yahoo, рабочий, учебный и другие аккаунты. Для этого в приложении «Календарь» зайдите в Параметры > Управление учетными записями > Добавить учетную запись.
Просматривайте сегодняшнее расписание за один клик:
Хотите вспомнить, что там запланировано сегодня? Приложение «Календарь» интегрировано в календарь на панели задач Windows 10, так что вы легко можете увидеть ближайшие встречи. Просто кликните на дате и времени и увидите расписание.
From Wikipedia, the free encyclopedia
This article is about the built-in Windows application. For the now defunct free downloadable Microsoft mail and calendar client, see Windows Live Mail.

Calendar running on Windows 10, using the light theme |
|
| Developer(s) | Microsoft |
|---|---|
| Operating system | Microsoft Windows |
| Predecessor | Windows Live Mail |
| Type | Electronic calendar |
Calendar is a personal calendar application made by Microsoft for Microsoft Windows. It offers synchronization of calendars using Microsoft Exchange Server, Outlook.com Apple’s iCloud calendar service, and Google Calendar. It supports the popular iCalendar 2.0 format.
History[edit]
Microsoft first included a Calendar application (shortened to app) in Windows 1.0, which was included through Windows 3.1, and was replaced by Schedule+ in Windows for Workgroups and Windows NT 3.1. Schedule+ was later moved from Windows to the Microsoft Office suite,[1] and Windows did not include another Calendar application until Windows Calendar in Windows Vista. Calendar had been created by Beta 2 of Windows Vista.[2]
Windows Vista[edit]
This version supports sharing, subscribing, and publishing of calendars on WebDAV-enabled web servers and network shares. It has always supported .ics files, and the subscription feature enables syncing with Google Calendar.[3] Its interface matches Windows Vista Mail’s, but the two apps are not connected in this operating system. The default calendar can be renamed.
On the calendar taskbar applet, there is a date grid on the left side and a skeuomorphistic analogue clock and a digital clock underneath on the right side. Additional clocks displaying different time zones can be added to the view. On the date grid (left side), dates far in the past or future can be looked up by zooming out by clicking on the date range indicator above the calendar grid, until each tile is a decade (e.g. 2010-2019, 2020-2029).[4]
This version has later been inherited on Windows 7.[4]
Windows 8[edit]
A new version of Calendar with a text-heavy was added to Windows 8 as one of many apps written to run full-screen or snapped as part of Microsoft’s Metro design language philosophy. It is one of three apps on Windows that originate from Microsoft Outlook, the other two being Mail and People apps. Structurally, the three apps are one and are installed and uninstalled as such. But each has its own user interface. Calendar in Windows 8 originally supported Outlook.com, Exchange, Google Calendar, and Facebook calendars. Because of API changes, Facebook and Google calendars can no longer be directly synced on Windows 8.[5] Like many Microsoft apps introduced for Windows 8, many of the features are hidden in the charms or a menu at the bottom of the screen that is triggered by right clicking. Different calendars can be labeled with different colors. When a user with a Microsoft account adds a calendar account on one computer with Windows 8 Calendar, the account will be automatically added to all other Windows 8 computers the user is logged into. .ics files are not supported in this version.
Windows 10[edit]
Calendar has preset server configurations for Outlook.com, Exchange, Google Calendar, and iCloud Calendar.[6][7][8] Users can set it to use the system theme or choose a custom accent color, background image, and light/dark preference. Windows 10 Calendar has multi-window support for viewing and editing events. Different calendars can be labeled with different colors, and events can be rearranged by dragging and dropping. The default interface is Month View, but users can also use Day, Week, and Year views and print these views. The Windows 10 app also uses a flyout settings panel and a mini Ribbon interface in the viewing pane. The day of the year and calendar events show on the live tile. Like the Vista version, the important controls are readily visible and use icons to match the system’s. Accounts can be grouped and relabeled, but folders cannot be edited from within the app. .ics support was added to this version in time for the Windows 10 Anniversary Update.[9]
See also[edit]
- Features new to Windows Vista
- Features new to Windows 8
- Features new to Windows 10
- SyncML open standard for calendar syncing
References[edit]
- ^ Mefford, Michael (March 12, 1996). «An appointment Calendar for Windows 95». PC Magazine. Vol. 15, no. 5. Ziff Davis. p. 269. ISSN 0888-8507.
- ^ Clyman, John (June 8, 2006). «Windows Vista Beta 2». PC Magazine. Ziff Davis. Archived from the original on September 19, 2016. Retrieved August 25, 2017.
- ^ Heddings, Lowell (January 2, 2007). «Display your Google Calendar in Windows Calendar». How-To Geek. Archived from the original on November 4, 2021. Retrieved July 27, 2016.
- ^ a b Quickly Navigate Your Calendar to Find the Day of any Given Date – Adam Pash – June 16th, 2009 – LifeHacker
- ^ «Calendar app help». Support. Microsoft. April 28, 2016.
- ^ «Set up email in Mail for Windows 10». Office.com. Microsoft. Retrieved July 13, 2016.
- ^ Casey, Henry T. (February 10, 2016). «How to Set Up iCloud Email and Calendars on Windows 10». LAPTOP.
- ^ «A closer look at the new Mail app on Windows 10». MSPoweruser. April 7, 2015.
- ^ «What’s new in Mail and Calendar for Windows 10». Office.com. Microsoft.
Further reading[edit]
- «Set up email and calendar». Support. Microsoft. July 29, 2016.