Windows
Windows+AMD support has not officially been made for webui,
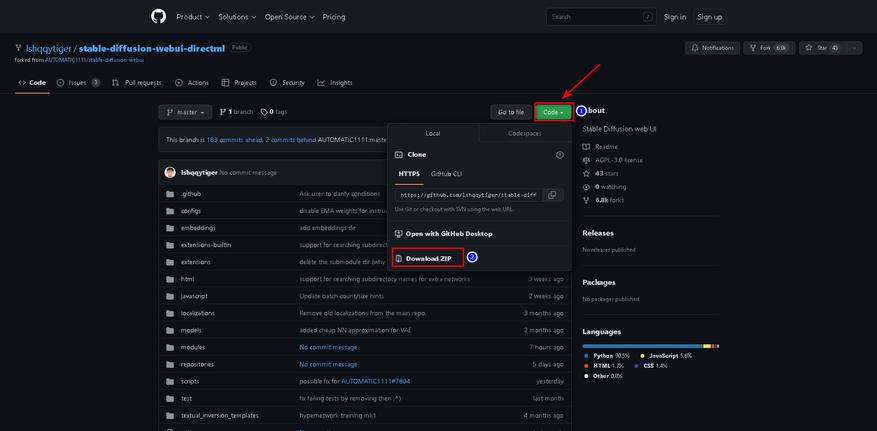
but you can install lshqqytiger’s fork of webui that uses Direct-ml.
-Training currently doesn’t work, yet a variety of features/extensions do, such as LoRAs and controlnet. Report issues at https://github.com/lshqqytiger/stable-diffusion-webui-directml/issues
- Install Python 3.10.6 (ticking Add to PATH), and git
- paste this line in cmd/terminal:
git clone https://github.com/lshqqytiger/stable-diffusion-webui-directml && cd stable-diffusion-webui-directml && git submodule init && git submodule update
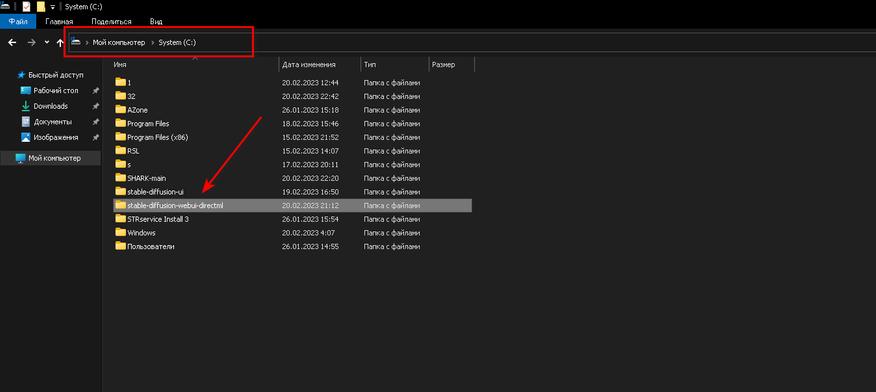
(you can move the program folder somewhere else.) - Double-click webui-user.bat
- If it looks like it is stuck when installing or running, press enter in the terminal and it should continue.
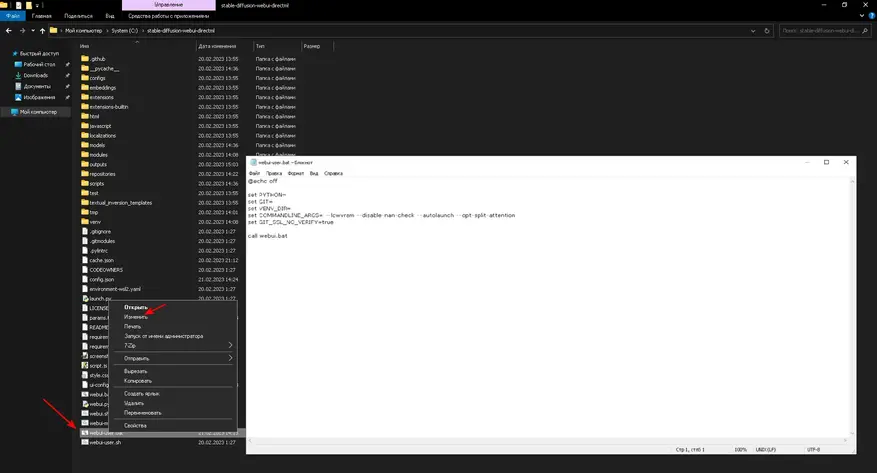
If you have 4-6gb vram, try adding these flags to `webui-user.bat` like so:
-
COMMANDLINE_ARGS=--opt-sub-quad-attention --lowvram --disable-nan-check -
You can add —autolaunch to auto open the url for you.
-
Rename your edited webui-user.bat file to webui.settings.bat to avoid your settings get overwrite after git pull for update.
(The rest below are installation guides for linux with rocm.)
Automatic Installation
(As of 1/15/23 you can just run webui.sh and pytorch+rocm should be automatically installed for you.)
- Enter these commands, which will install webui to your current directory:
sudo apt install git python3.10-venv -y
git clone https://github.com/AUTOMATIC1111/stable-diffusion-webui && cd stable-diffusion-webui
python3.10 -m venv venv
-
Install and run with:
./webui.sh {your_arguments*}
*For many AMD GPUs, you must add --precision full --no-half or --upcast-sampling arguments to avoid NaN errors or crashing.
If --upcast-sampling works as a fix with your card, you should have 2x speed (fp16) compared to running in full precision.
-
Some cards like the Radeon RX 6000 Series and the RX 500 Series will already run fp16 perfectly fine (noted here.)
-
If your card is unable to run SD with the latest pytorch+rocm core package, you can try installing previous versions, by following a more manual installation guide below.
Running natively
Execute the following:
git clone https://github.com/AUTOMATIC1111/stable-diffusion-webui
cd stable-diffusion-webui
python -m venv venv
source venv/bin/activate
python -m pip install --upgrade pip wheel

# It's possible that you don't need "--precision full", dropping "--no-half" however crashes my drivers
TORCH_COMMAND='pip install torch torchvision --extra-index-url https://download.pytorch.org/whl/rocm5.1.1' python launch.py --precision full --no-half
In following runs you will only need to execute:
cd stable-diffusion-webui
# Optional: "git pull" to update the repository
source venv/bin/activate

# It's possible that you don't need "--precision full", dropping "--no-half" however crashes my drivers
TORCH_COMMAND='pip install torch torchvision --extra-index-url https://download.pytorch.org/whl/rocm5.1.1' python launch.py --precision full --no-half
The first generation after starting the WebUI might take very long, and you might see a message similar to this:
MIOpen(HIP): Warning [SQLiteBase] Missing system database file: gfx1030_40.kdb Performance may degrade. Please follow
instructions to install: https://github.com/ROCmSoftwarePlatform/MIOpen#installing-miopen-kernels-package
The next generations should work with regular performance. You can follow the link in the message, and if you happen
to use the same operating system, follow the steps there to fix this issue. If there is no clear way to compile or
install the MIOpen kernels for your operating system, consider following the «Running inside Docker»-guide below.
Running inside Docker
Pull the latest rocm/pytorch Docker image, start the image and attach to the container (taken from the rocm/pytorch
documentation): docker run -it --network=host --device=/dev/kfd --device=/dev/dri --group-add=video --ipc=host --cap-add=SYS_PTRACE --security-opt seccomp=unconfined -v $HOME/dockerx:/dockerx rocm/pytorch
Execute the following inside the container:
cd /dockerx
git clone https://github.com/AUTOMATIC1111/stable-diffusion-webui
cd stable-diffusion-webui
python -m pip install --upgrade pip wheel

# It's possible that you don't need "--precision full", dropping "--no-half" however crashes my drivers
REQS_FILE='requirements.txt' python launch.py --precision full --no-half
Following runs will only require you to restart the container, attach to it again and execute the following inside the
container: Find the container name from this listing: docker container ls --all, select the one matching the
rocm/pytorch image, restart it: docker container restart <container-id> then attach to it: docker exec -it <container-id> bash.
cd /dockerx/stable-diffusion-webui
# Optional: "git pull" to update the repository

# It's possible that you don't need "--precision full", dropping "--no-half" however crashes my drivers
REQS_FILE='requirements.txt' python launch.py --precision full --no-half
The /dockerx folder inside the container should be accessible in your home directory under the same name.
Updating Python version inside Docker
If the web UI becomes incompatible with the pre-installed Python 3.7 version inside the Docker image, here are
instructions on how to update it (assuming you have successfully followed «Running inside Docker»):
Execute the following inside the container:
apt install python3.9-full # Confirm every prompt
update-alternatives --install /usr/local/bin/python python /usr/bin/python3.9 1
echo 'PATH=/usr/local/bin:$PATH' >> ~/.bashrc
Run source ~/.bashrc and proceed by running the same commands as you would with an existing container.
It’s possible that you don’t need «—precision full», dropping «—no-half» however it may not work for everyone. Certain cards like the Radeon RX 6000 Series and the RX 500 Series will function normally without the option --precision full --no-half, saving plenty of VRAM. (noted here.)
Install on AMD and Arch Linux
Install webui on Arch Linux with Arch-specific packages
and possibly other Arch-based Linux distributions (tested Feb 22 2023)
Arch-specific dependencies
- Start with required dependencies and install
pip
sudo pacman -S python-pip
- Install
pytorchwith ROCm backend
Arch [Community] repository offers two pytorch packages, python-pytorch-rocm and python-pytorch-opt-rocm. For CPUs with AVX2 instruction set support, that is, CPU microarchitectures beyond Haswell (Intel, 2013) or Excavator (AMD, 2015), install python-pytorch-opt-rocm to benefit from performance optimizations. Otherwise install python-pytorch-rocm:
# Install either one:
sudo pacman -S python-pytorch-rocm
sudo pacman -S python-pytorch-opt-rocm   # AVX2 CPUs only
- Install
torchvisionwith ROCm backend
python-torchvision-rocm package is located in AUR. Clone the git repository and compile the package on your machine
git clone https://aur.archlinux.org/python-torchvision-rocm.git
cd python-torchvision-rocm
makepkg -si
Confirm all steps until Pacman finishes installing python-torchvision-rocm.
Alternatively, install the python-torchvision-rocm package with a AUR helper.
Setup venv environment
- Manually create a
venvenvironment with system site-packages (this will allows access to systempytorchandtorchvision). Install the remaining Python dependencies
python -m venv venv --system-site-packages
source venv/bin/activate
pip install -r requirements.txt
Launch
Run the following inside the project root to start webui:
source venv/bin/activate
./webui.sh
Depending on the GPU model, you may need to add certain Command Line Arguments and Optimizations to webui-user.sh in order for webui to run properly. Refer to the Automatic Installation section.
Limitations
- GPU model has to be supported by Arch dependencies
See if your GPU is listed as a build architecture in PYTORCH_ROCM_ARCH variable for Tourchvision and PyTorch. References for architectures can be found here. If not, consider building both packages locally or use another installation method.
- Arch dependencies (
pytorch,torchvision) are kept up-to-date by full system updates (pacman -Syu) and compiling, which may not be desirable when dependency combinations with fixed versions are wished
This guide has been tested on AMD Radeon RX6800 with Python 3.10.9, ROCm 5.4.3, PyTorch 1.13.1, Torchvision 0.14.1
Last Updated on October 6, 2022 by
This tutorial will walk through how to run the Stable Diffusion AI software using an AMD GPU on the Windows 10 operating system.
Hardware
AMD Radeon RX 580 with 8GB of video RAM.
CPU and RAM are kind of irrelevant, any modern computer should be fine.
0. Download & Install Python & Git
The source code Stable Diffusion model/software is written in Python, so we’ll need to install Python first. We’ll need to get Python version 3.7+ (64-bit) to run Stable Diffusion. You can download the Python installation file from either one of the following resources:
Official Python website: https://www.python.org/downloads/
Anaconda Distribution: https://www.anaconda.com/
Python installation is fairly straightforward so we won’t cover that here.
Git is also required, without Git the program will not install properly.
Download Git: https://git-scm.com/downloads
Installing Git is also straightforward, the installer wizard will ask a lot of questions, just go with default for everything.
1. Download Files
1.1 Download Code – Modified Diffusers Library
Download this copy of the diffusers library: https://github.com/harishanand95/diffusers/tree/dml
Note it should be the “dml” branch, not the main branch.

Once downloaded, unzip the content to a folder of your choice.
1.2 Download Onnx Nightly Build Wheel File
Download the wheel file from the below link. Wheel files are Python libraries that we can use pip to install.
https://aiinfra.visualstudio.com/PublicPackages/_artifacts/feed/ORT-Nightly/PyPI/ort-nightly-directml/overview/1.13.0.dev20220908001
Choose one that matches the Python version you have on your computer. For example, if you have Python 3.8, you’ll download the cp38. And if you have Python version 3.9, you’ll download cp39, etc.

2. Build Environment
Open up Command Prompt with admin privileges.

Then navigate to the folder where we store the modified diffusers library, which I saved here: C:\Users\jay\Desktop\PythonInOffice\stable_diffusion_amd\diffusers-dml
Our command prompt should be inside this folder now:

2.1. Create A Python Virtual Environment
When trying something new, we should always use a Python virtual environment. This helps prevent messing up our current Python environments. To create a virtual environment, type the following:
## create the virtual environment
python -m venv amd_venv

## activate the virtual environment
cd amd_venv/Scripts
activate
2.2. Install The Modified Diffusers Library
Then pip install the current directory (i.e. the modified diffusers library) by using the -e . argument. This will treat the current directory as a Python library and install it.
(amd_venv) C:\Users\jay\Desktop\PythonInOffice\stable_diffusion_amd>pip install -e .2.3. Install The Onnx Nightly Build Wheel File
The easiest way is to use the Command Prompt to navigate to the same folder that stores the wheel file. Then type pip install followed by the file name:
pip install ort_nightly_directml-1.13.0.dev20220908001-cp39-cp39-win_amd64.whl
2.4. Install Other Libraries
We need to install a few more other libraries using pip:
pip install transformers ftfy scipy3. Connect to Hugging Face (For Downloading Stable Diffusion Model Weights)
When installing the diffusers library, another library called huggingface-hub was also installed. This hugginface-hub provides some utility programs that help facilitate downloading the Stable Diffusion models
Inside Command Prompt, type:
huggingface-cli loginIf this is your first time logging in, you’ll need to provide an access token from Hugging Face. Generate the token and copy it, paste it back to the Command Prompt. Then you should see login successful message.

4. Run save_onnx.py
Navigate to the examples\inference folder, there should be a file named save_onnx.py. This Python script will convert the Stable Diffusion model into onnx files. This step will take a few minutes depending on your CPU speed.
python save_onnx.py
This concludes our Environment build for Stable Diffusion on an AMD GPU on Windows operating system.
Inside the same folder examples/inference we’ll find another file named “dml_onnx.py”. This is the script for running Stable Diffusion.
Inside this file, we can modify inputs such as prompt, image size, inference steps, etc.
I used all default settings with this prompt (copied from Reddit):
background dark, block houses, eastern Europe, city highly detailed oil painting, unreal 5 render,
rhads, bruce pennington, studio ghibli, tim hildebrandt, digital art, octane render, beautiful composition,
trending on artstation, award-winning photograph, masterpiece
And this is the image it generated:

Final Thoughts
This experiment was done using an AMD RX580 GPU with 8GB of VRAM. This GPU is supposed to be on par with Nvidia RTX 1070/1080. However, I noticed that Stable Diffusion runs significantly slower on AMD. I was getting around 7-8 seconds for each iteration, so for the default 50 inference steps, generating one 512×512 image would take roughly 6-7 minutes. A comparable image would take

Additional Resources
How to Run Stable Diffusion on Windows
How to Run Stable Diffusion Without A Graphic Card (GPU)
Для работы проектов iXBT.com нужны файлы cookie и сервисы аналитики.
Продолжая посещать сайты проектов вы соглашаетесь с нашей
Политикой в отношении файлов cookie
По состоянию статистики Steam на конец января 2023 года, видеокарты компании AMD являются аутсайдерами на рынке графических ускорителей. И всё больше производителей профессионального ПО и игр предпочитают в первую очередь оптимизировать свои продукты под графические решения от компании Nvidia. Такое положение дел не обошло стороной и нейронные сети. В этой небольшой инструкции вы узнаете, как назло общепринятым стандартам, заставить нейронную сеть Stable Diffusion (генерация картинок по любому текстовому запросу) работать c видеокартами AMD.

В настоящее время существует примерно три реализации Stable Diffusion, которые со скрипом, но способны использовать GPU AMD для ускорения обработки задач. Однако все они привязаны к новейшей архитектуре RDNA или работают только под Linux, что автоматом отсеивает большинство красных пользователей, которые не хотят разоряться на покупке новой видеокарты или устанавливать непривычную ОС из-за желания испытать нейронную сеть. Обойдём эти ограничения, заставив нейронную сеть Stable Diffusion работать на Windows 10/11 c любым относительно современным GPU AMD!
Минимальный системные требования:
ОС: Windows 10/11/Linux 64 Бит.
RAM: 8+ Гб.
CPU: 2/4+ ядра 3.0+ ГГц.
GPU: AMD (Возможна работа силами CPU).
1. Скачиваем и устанавливаем необходимые компоненты:
64-bit Git for Windows Setup.
Python 3.10.6 (Не забудьте поставить галочку PATH).
2. Загружаем архив с нейронной сетью.
3. Распаковываем нейронную сеть в корень любого носителя.
4. Скачиваем архивы с модифицированными файлами для работы нейронной сети с видеокартами AMD.
Архивы:
- K-diffusion-directml
- Stablediffusion-directml
5. Переходим в папку C:\stable-diffusion-webui-directml\repositories и распаковываем все файлы архива k-diffusion-directml-master.zip (Не его папку, а файлы, что внутри неё) в папку k-diffusion. Аналогично поступаем с архивом stablediffusion-directml-main.zip, но его файлы уже распаковываем в папку stable-diffusion-stability-ai.
6. Теперь нам необходимо в файл запуска нейронной сети webui-user.bat добавить команды для обхода проверки отсутствующих ядер CUDA и общей оптимизации. Подробнее о параметрах запуска вы всегда можете почитать тут.
@echo off

set PYTHON=
set GIT=
set VENV_DIR=
set COMMANDLINE_ARGS= --lowvram --disable-nan-check --autolaunch --opt-split-attention
set GIT_SSL_NO_VERIFY=true

call webui.bat
Более быстрая генерация (Возможны баги):
@echo off

set PYTHON=
set GIT=
set VENV_DIR=
set COMMANDLINE_ARGS= --lowvram --precision full --no-half --no-half-vae --opt-sub-quad-attention --opt-split-attention-v1 --disable-nan-check --autolaunch
set GIT_SSL_NO_VERIFY=true

call webui.bat
7. Скачиваем обученные модели, чтобы наша нейронная сеть понимала, кого и что ей рисовать. Я остановил свой выбор на NeverEnding Dream.
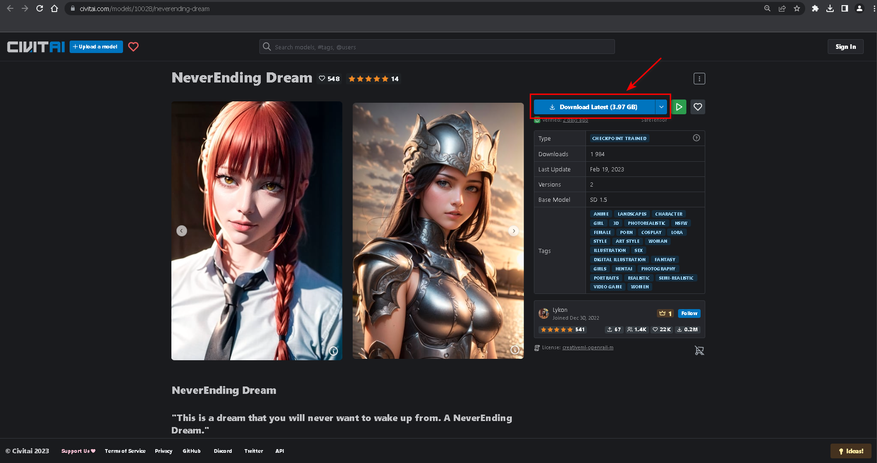
Переносим файл обученной модели в:
C:\stable-diffusion-webui-directml\models\Stable-diffusion
8. Теперь необходимо скачать файл конфигурации VAE для нормализации конечного изображения и перенести его в:
C:\stable-diffusion-webui-directml\models\VAE
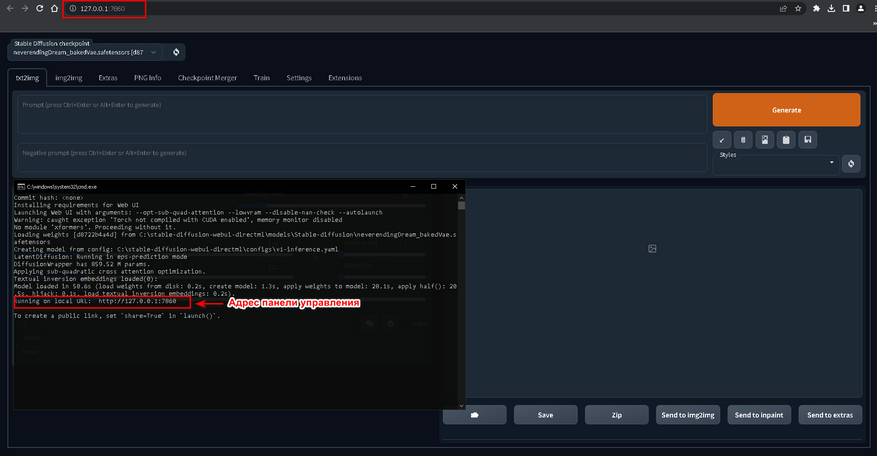
9. Выполняем запуск нейронной сети через файл webui-user.bat в папке C:\stable-diffusion-webui-directm и дожидаемся загрузки и установки всех необходимых компонентов. Если всё прошло успешно, то вас автоматически перенесёт на страницу панели управления нейронной сетью в вашем браузере.
10. Переходим в Setting и в разделе Stable Diffusion выбираем наш VAE. Теперь нам необходимо выбрать алгоритм восстановление лица, который не зависит от наличия CUDA или тензорных ядер Nvidia. Переходим в раздел Face Restoration, выбираем алгоритм GFPGAN. Применяем настройки.
11. Возвращаемся во вкладку txt2img, где для проверки работы ускорения нейронной сети на GPU AMD вводим любой желаемый запрос. По нагрузке на GPU и CPU в диспетчере задач проверяем результат.
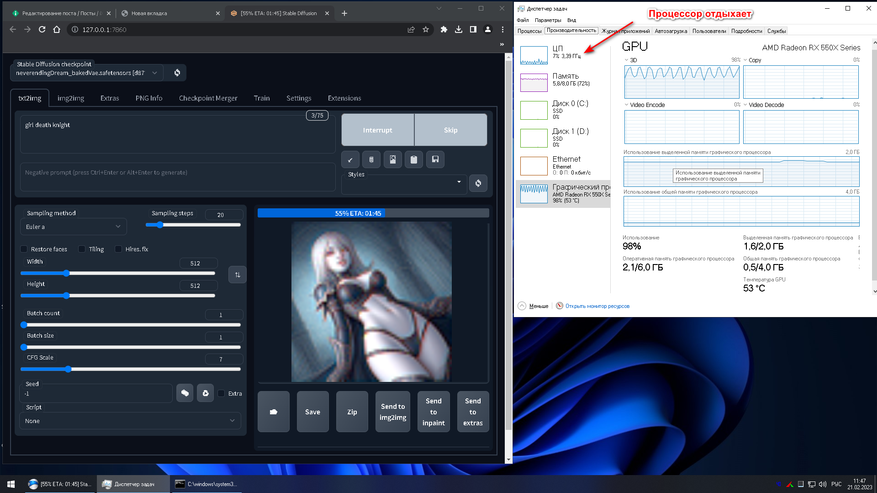
Фанфары, гром и молния! Всё работает.
Конечный результат получился немного пошлый, но зато сразу после удалось создать красивого рыцаря.
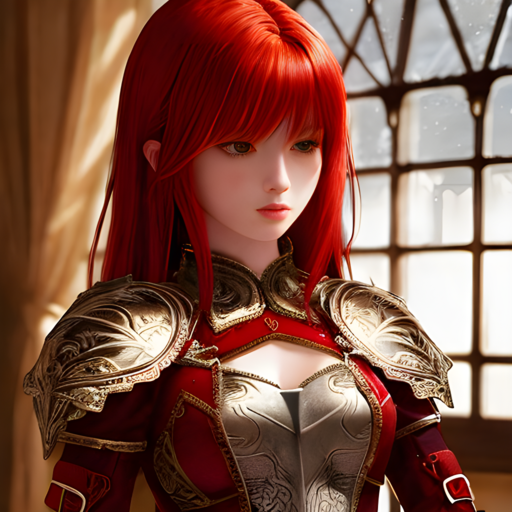
- Запрос: Knight girl with red hair (Девушка рыцарь с красными волосами).
- Модель: NeverEnding Dream.
- Количество проходов: 40 (GPU).
- Сэмплер: PLMS.
- Фильтры и стили: нет.
- Исправление лица: активно.
Несмотря на то что способ является лютыми костылями и проигрывает по качеству реализации генерации готового изображения видеокартам Nvidia, он всё же позволяет намного быстрее создавать готовые шедевры, чем классическое задействование возможностей CPU. Создавайте, делитесь своими творения и никогда не позволяйте компаниям диктовать свои условия.
ПС. Инструкция для видеокарт Nvidia.
Сейчас на главной
Новости
Публикации

Skyloong GK61 Pro — это механическая клавиатура, которая предлагает отличное соотношение цены и качества для пользователей, ищущих надежную и функциональную клавиатуру. Двойная клавиша…

На самом деле многие привычные вещи, которые нас окружают, со временем «теряют авторство», хотя некогда были придуманы и продуманы весьма уважаемыми людьми: литераторами, учеными, инженерами,…

Недавно был выпущен Google Pixel Tablet ($499) — первый качественный планшет на базе чистого Android за последние годы. Несмотря на то, что 11-дюймовый планшет не уступает по…

Вначале было слово и было оно записано пером на бумаге. История началась в первых числах апреля сего 2023 года. На просторах Алиэкспресс появилась новинка — китайская одноразовая…

Сейчас очень интересная ситуация на рынке: из той серии, когда или вверх пойдём, или вниз. Целый ряд показателей и индикаторов указывает на направление движения в одну сторону, и такое же…

Любой, кто изучает языки, наверняка сталкивался с главной проблемой при чтении иностранных текстов — постоянной необходимостью рыскать по словарю или переводчику. Это бесплатное…
UPDATE: A faster (20x) approach for running Stable Diffusion using MLIR/Vulkan/IREE is available on Windows:
https://github.com/nod-ai/SHARK/blob/main/shark/examples/shark_inference/stable_diffusion/stable_diffusion_amd.md
Install 🤗 diffusers
conda create --name sd39 python=3.9 -y
conda activate sd39
pip install diffusers==0.3.0
pip install transformers
pip install onnxruntime
pip install onnx
Install DirectML latest release
You can download the nightly onnxruntime-directml release from the link below
- https://aiinfra.visualstudio.com/PublicPackages/_artifacts/feed/ORT-Nightly/PyPI/ort-nightly-directml/overview/1.13.0.dev20220908001
Run python --version to find out, which whl file to download.
- If you are on Python3.7, download the file that ends with **-cp37-cp37m-win_amd64.whl.
- If you are on Python3.8, download the file that ends with **-cp38-cp38m-win_amd64.whl
- and likewise
pip install ort_nightly_directml-1.13.0.dev20220908001-cp39-cp39-win_amd64.whl --force-reinstall
Convert Stable Diffusion model to ONNX format
This apporach is faster than downloading the onnx models files.
- Download diffusers/scripts/convert_stable_diffusion_checkpoint_to_onnx.py to your working directory.
You can try the command below to download the script.
wget https://raw.githubusercontent.com/huggingface/diffusers/main/scripts/convert_stable_diffusion_checkpoint_to_onnx.py
- Run
huggingface-cli.exe loginand provide huggingface access token. - Convert the model using the command below. Models are stored in
stable_diffusion_onnxfolder.
python convert_stable_diffusion_checkpoint_to_onnx.py --model_path="CompVis/stable-diffusion-v1-4" --output_path="./stable_diffusion_onnx"
Run Stable Diffusion on AMD GPUs
Here is an example python code for stable diffusion pipeline using huggingface diffusers.
from diffusers import StableDiffusionOnnxPipeline
pipe = StableDiffusionOnnxPipeline.from_pretrained("./stable_diffusion_onnx", provider="DmlExecutionProvider")
prompt = "a photo of an astronaut riding a horse on mars"
image = pipe(prompt).images[0]
image.save("astronaut_rides_horse.png")

AI image generation has been making a lot of buzz lately. It’s an exciting space due to the systems like DALL·E and Midjourney becoming available for people outside the AI world to play with. However, the one I find compelling, from a tech nerd viewpoint, is Stable Diffusion because it is open source and can run on local hardware. So, of course, I have to try it out and see how it worked.
Getting Stable Diffusion running on my hardware is more complicated than at first glance. Out of the box, the project is designed to run on the PyTorch machine learning framework. That’s a problem for me because PyTorch only supports hardware acceleration on Windows using NVIDIA’s CUDA API. And I have an AMD GPU. Linux has a better chance of success because PyTorch supports AMD’s ROCm API, but that’s a project for another day. There is another option.
UPDATE November 2022:
Wow, things are really changing fast. In the two months since writing this article, improvements to Diffusers and ONNX have been incredible. Diffusers now has an ONNX pipeline for img2img generation and the overall speed of the pipeline is 2-4x faster on my GPU. The instructions below have been updated to make the setup easier to follow.
Background Info
See if you can follow along with this: the Hugging Face, INC team has integrated Stable Diffusion into their Diffusers project as a pipeline. Plus, they’ve created a script that can convert the Stable Diffusion pre-trained model into an ONNX compatible model. In addition, ONNX models can be used through Microsoft’s DirectML API. And finally, DirectML can be accelerated using any DirectX 12 compatible GPU, including AMD and Intel hardware.
With all that preface, here is how I got Stable Diffusion running on a Windows PC using an AMD GPU (RX6800). I can’t take all the credit. The GitHub user harishanand95 has contributed all the steps for setting up the Python environment for running Stable Diffusion on AMD hardware (both Windows and Linux). Their original instructions are available at https://gist.github.com/harishanand95/75f4515e6187a6aa3261af6ac6f61269. To help simplify the generation part, I created a Python script to mimic the options offered by Stable Diffusion’s txt2img.py script file. But even that wasn’t an original piece of work. A blog post at https://www.travelneil.com/stable-diffusion-windows-amd.html helped me understand how to pass specific settings through the pipeline. Finally, the setup has been simplified thanks to a guide written by averad. Their guide is available at Stable Diffusion for AMD GPUs on Windows using DirectML and has been updated with a lot of great info including how to use customized weight checkpoint files with ONNX.
The Setup
- Install Git. Git is version control software, used for tracking code changes as well as pushing/pulling those changes from a central repository.
- Install a python environment. This can be as simple as installing Python on your system and running everything in a single environment. However, using Python virtual environments is recommended to isolate projects from each other and reduce the risk of package conflicts.
- One of the easiest methods for setting up virtual environments is to use Conda. That is what the rest of the instructions will use.
- Go to https://huggingface.co/ , create a free account, and verify your email address. This is where the Stable Diffusion model is hosted.
- Go to the https://huggingface.co/CompVis/stable-diffusion-v1-4 and click the “Access repository” button. By doing this, you are sharing your contact info with the Stable Diffusion authors.
OR - (If you want to use SD 1.5) Go to the https://huggingface.co/runwayml/stable-diffusion-v1-5 and click the “Access repository” button. By doing this, you are sharing your contact info with the Stable Diffusion authors.
- Go to the https://huggingface.co/CompVis/stable-diffusion-v1-4 and click the “Access repository” button. By doing this, you are sharing your contact info with the Stable Diffusion authors.
- Launch a Conda command prompt. Windows will have a new icon in the start menu labeled
Anaconda Prompt (miniconda3). - Download my repo using Git and go to the directory.
git clone https://github.com/agizmo/onnx-stablediffusion-scripts.git
cdonnx-stablediffusion-scripts - Create a new Conda environment using the provided config file. This may take a few minutes with little feedback as pip installs packages.
conda env create --file environment.yml - Activate the new environment.
conda activate onnx - Force install onnxruntime-directml. ¯\\_(ツ)_/¯ Don’t know why force install is required, but it worked for averad.
pip install onnxruntime-direcml --force-reinstall
OR- Install the latest 1.14 nightly build of the ONNX DirectML runtime. The nightlys appear to have significant performance improvements over the released versions available through pip. (I’ve seen a 2-3x speed increase)
- Go to https://aiinfra.visualstudio.com/PublicPackages/_artifacts/feed/ORT-Nightly/PyPI/ort-nightly-directml/versions/
- Click on the latest version available. Download the WHL file for your Python environment. If you used the environment file above to set up Conda, choose the `cp39` file (aka Python 3.9).
- Run this command Run the command `pip install “path to the downloaded WHL file” –force-reinstall` to install the package.
pip install "path to the downloaded WHL file" --force-reinstall
- Download the weights for Stable Diffusion. You should be prompted to enter your Hugging Face username and password the first time. The clone job will take several minutes to process and download. Be patient.
git clone https://huggingface.co/CompVis/stable-diffusion-v1-4 --branch onnx --single-branch stable_diffusion_onnx- If you want to use the 1.5 version of Stable Diffusion, use this command repo instead.
git clone https://huggingface.co/runwayml/stable-diffusion-v1-5 --branch onnx --single-branch stable_diffusion_onnx
- If you want to use the 1.5 version of Stable Diffusion, use this command repo instead.
- The environment setup is now complete.
How to generate an image
Now that the Python environment is setup, the last thing to do is try to generate an image. That’s where my script makes it easy.
- Launch a Conda command prompt. Windows will have a new icon in the start menu labeled
Anaconda Prompt (miniconda3). - Activate the Python environment created earlier.
conda activate onnx - Change do the correct directory.
cd "path to onnx-stablediffusion-scripts folder" - Run the following command to generate an image. The prompt can be change to whatever text you want.
python onnx-txt2img.py –prompt "astronaut riding a horse" --random_seed True
Example Commands
python onnx_txt2img.py --prompt "astronaut riding a horse" --random_seed True
seed: 3844704755
100%|███████████████████████████████| 51/51 [00:26<00:00,  1.90it/s]


python onnx_img2img.py --prompt "cowboy riding a pig" --init_img ".\outputs\txt2img-samples\samples\00001.png" --random_seed true
loaded input image of size (512, 512) from .\outputs\txt2img-samples\samples\00292.png
seed: 2912103985
100%|███████████████████████████████| 50/50 [00:24<00:00,  2.01it/s]
Advance script usage
As you play around with Stable Diffusion, you may want to adjust some parameters passed to the model. Check the README file in my GitHub Repo https://github.com/agizmo/ONNX-txt2img.
ddim_stepschanges how many times the image is passed through the model. Anything less than 35 will start to return images with more artifacts. Using a setting higher than 50 may produce a better image, but it could also go too far and introduce artifacts again.H & Wadjusts the size of the image returned. 512 is the ideal size due to how the model is built.n_samplesdetermines how many images to generate at the same time. The higher the number, the more time and RAM it takes to complete. See notes below.seedallows you to pick a specific seed number. If you want to recreate the same image later, you must know this number.random_seedpicks a number between 1 and 2^32. Different seeds will generate different images from the same prompt.hardwareallows you to choose between GPU and CPU processing. Yes, if you want, you can run this pipeline on a CPU. The process is slower but still useful.looptells the script how many times to run. Due to the RAM issues caused by the ONNX pipeline, it’s impossible to use a high n_samples number. Instead, the script can open the pipeline once and feed the parameters with a new seed to generate multiple images.logoutputs all the settings for the image generation to a CSV file. This allows you to keep track of what settings you used for generating an image and recreate it if desired.
NOTES:
As noted at https://github.com/huggingface/diffusers/blob/main/docs/source/optimization/onnx.mdx, running through the ONNX pipeline uses more memory than the regular PyTorch pipeline. This makes it hard to do more than one-two samples simultaneously, even for a GPU with 16GB RAM. If you have less than 16GB of VRAM. Use --random_seed True --loop [int] to loop through the pipeline and create as many images as you want from the same prompt.
Troubleshooting/FAQ
- Why are my images black?
- The NSFW safety checker thought the image had naughty bits. Try a different seed number or prompt. I’ve also seen that reducing the image size can cause the safety checker to flag the image.
Have fun.
-Tony