В этом кратком руководстве мы опишем процесс установки и настройке VPN-сервера на базе Windows Server. Все действия, описанные в этой статье, были выполнены на Windows Server 2016, но эта инструкция подходит для любой современной серверной операционной системы Windows, начиная с Windows Server 2008 R2 и заканчивая Windows Server 2016.
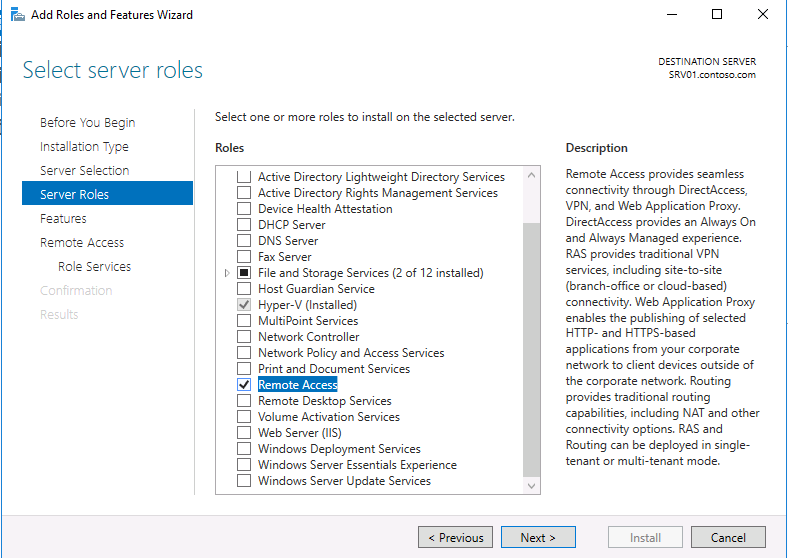
Итак, давайте начнем. Прежде всего нам нужно настроить роль удаленного доступа (Remote Access). Для этого в оснастке Server Manager запустите мастер добавления ролей и выберите роль Remote Access.
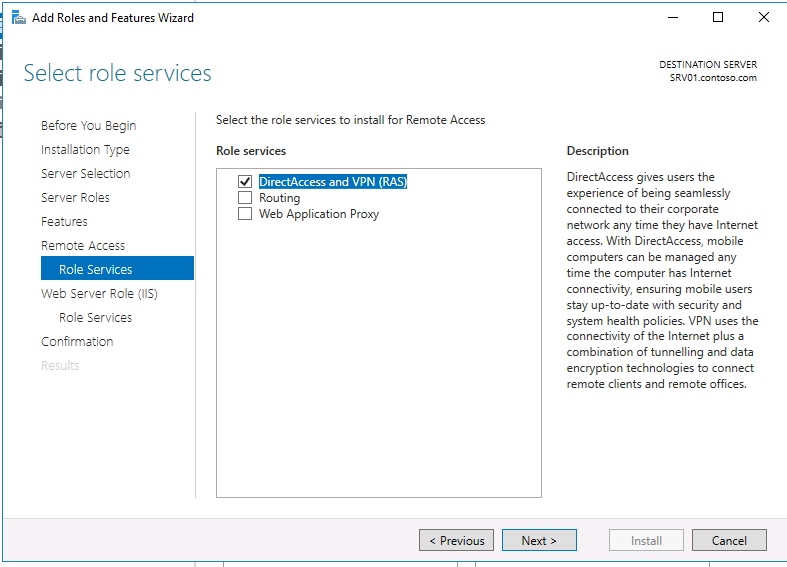
Затем, в списке служб роли выберите опцию «DirectAccess and VPN (RAS)«.
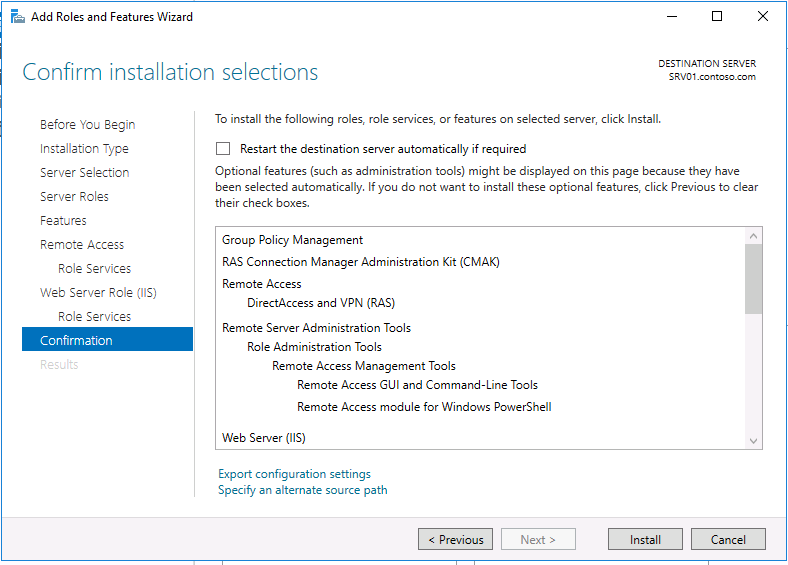
В дополнение к роли удаленного доступа и средствам управления, также автоматически будут установлены веб-сервер IIS и внутренняя база данных Windows (WID). Полный список установленных функций можно просмотреть в окончательном окне мастера, появляющимся перед тем, как вы подтвердите установку.
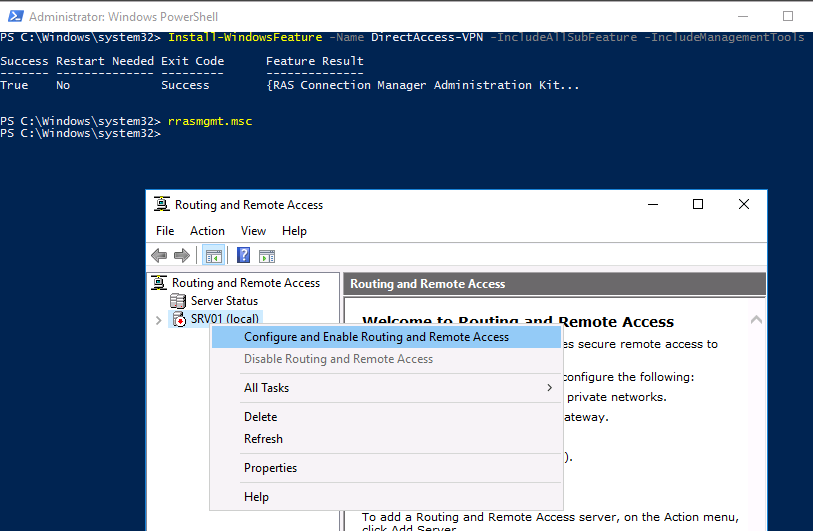
Установить роль Remote Access вместе со всеми необходимыми опциями можно всего одной командой PowerShell:
Install-WindowsFeature -Name DirectAccess-VPN -IncludeAllSubFeature -IncludeManagementTools
После установки роли вам необходимо включить и настроить службу с помощью оснастки «Маршрутизация и удаленный доступ» (Routing and Remote Access) — rrasmgmt.msc.
В оснастке RRAS выберите имя сервера, щелкните правой кнопкой мыши и выберите «Настроить и включить маршрутизацию и удаленный доступ» (Configure and Enable Routing and Remote Access) в открывшемся меню.
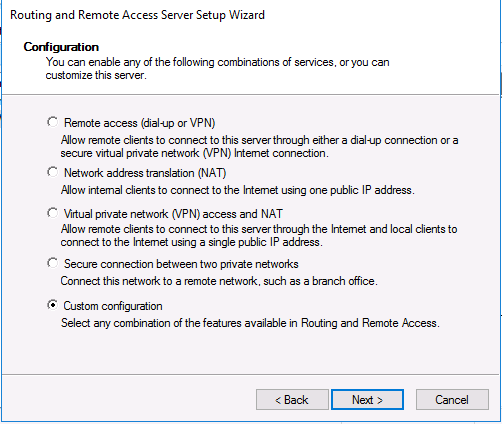
В мастере настройки выберите пункт Custom configuration.
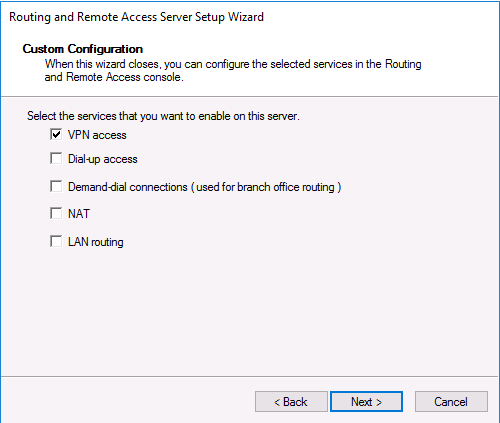
В списке служб выберите опцию VPN access.
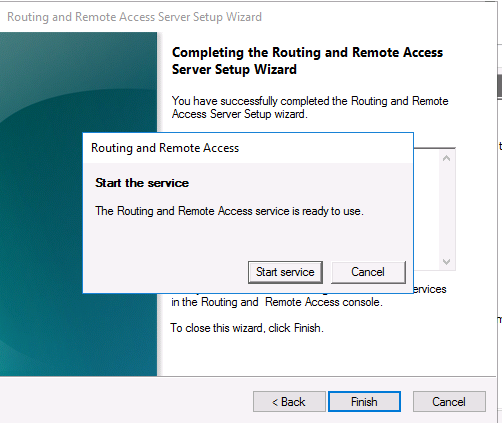
После этого система предложит вам запустить службу Маршрутизации и удаленного доступа.
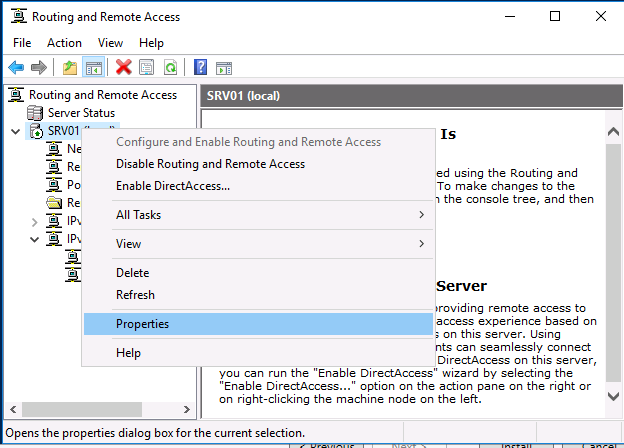
Служба VPN установлена и включена, теперь ее необходимо настроить. Снова откройте меню сервера и выберите пункт «Свойства».
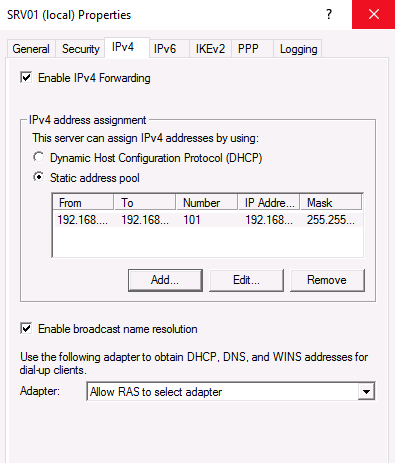
Перейдите на вкладку IPv4. Если у вас нет DHCP-серверов в сети, вам необходимо указать диапазон IP-адресов, которые будут получать клиенты при подключении к VPN-серверу.
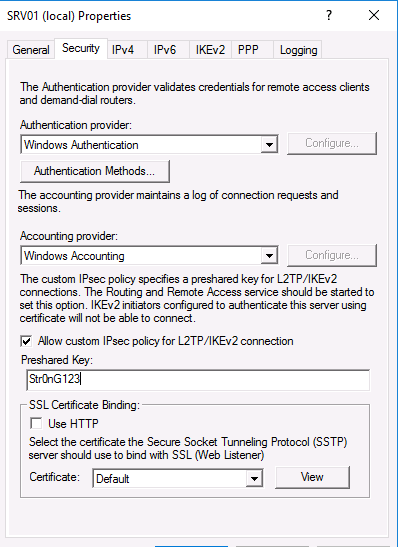
Кроме того, на вкладке Security вы можете настроить параметры безопасности — выбрать тип проверки подлинности, установить предварительный общий ключ для L2TP или выбрать сертификат для SSTP.
И еще пара нужных моментов, которые следует иметь в виду при настройке VPN-сервера.
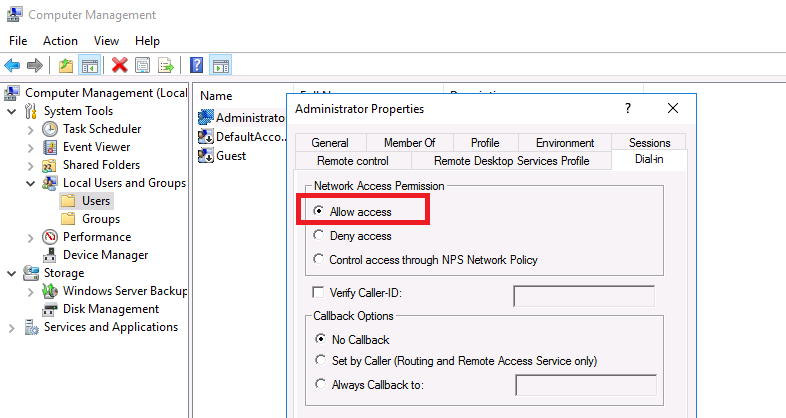
Во-первых, вам нужно указать пользователей, которых будет разрешено подключаться к этому VPN-серверу. Для автономного сервера настройка выполняется локально, в оснастке «Управление компьютером». Чтобы запустить оснастку, вам нужно выполнить команду compmgmt.msc, затем перейдите в раздел «Локальные пользователи и группы». Затем вам нужно выбрать пользователя, открыть его свойства, а на вкладке «Dial-In» отметьте пункт «Разрешить доступ» (Allow access). Если компьютер является членом домена Active Directory, те же настройки можно сделать из оснастки ADUC.
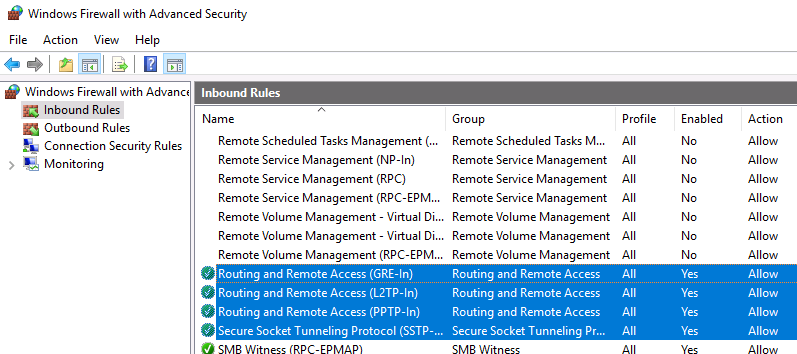
Во-вторых, проверьте, открыты ли все необходимые порты на брандмауэре Windows и межсетевом экране, осуществляющим NAT-трансляцию. Теоретически, когда вы устанавливаете роль RRAS, соответствующие правила автоматически включаются, но на всякий случай проверьте их самостоятельно. Список разрешенных правил для входящего трафика:
- Routing and Remote Access (GRE-In) — протокол 47 (GRE)
- Routing and Remote Access (L2TP-In) – TCP/1701, UDP/500, UDP/4500 и протокол 50 (ESP)
- Routing and Remote Access (PPTP-In) — TCP/1723
- Secure Socket Tunneling protocol (SSTP-in) – TCP/443
Если ваш VPN-сервер находится за NAT, для корректной установки VPN-соединения по протоколу L2TP/ipsec, на стороне клиента необходимо в ветке HKEY_LOCAL_MACHINE\SYSTEM\CurrentControlSet\Services\PolicyAgent создать ключ с именем AssumeUDPEncapsulationContextOnSendRule и значением 2.
На этом все. Теперь, когда у вас имеется настроенный VPN-сервер, вы можете подключиться к нему с помощью VPN-клиента.
I had already created an L2TP VPN server in Windows Server 2016 which worked great with my IOS devices but I found did not work so well with Windows 10. Therefore I created an SSTP VPN Server to access my devices via my home broadband connection (Sky Fibre). I found that this works perfectly with all my Windows 10 machines. The main difference between L2TP and SSTP is that for SSTP we need to use certificates. We will cover everything you need to get this up and running below.
Firstly build a Windows 2016 server, VM or physical it doesn’t really matter. I used a VM as I can spin it up/down and snapshot as needed. For notes on installing Windows 2016 Server please see here.
You then need to setup a Certificate Authority (Can be on the same server). Please follow this guide for step by step instructions on setting up a CA to use with your SSTP VPN.
You then need to install the Remote Access role. To do this open Server Manager and start the Add Roles and Features wizard. Select the Remote Access Role and click Next.
Click Next again
Click Next again
Click Add Features and click Next
Click Next
Accept the Web Server Role service selections and click Next
Click Install
Wait for the installation to finish
Once the role has installed click the Open he Getting Started Wizard option from the server manager
Select Deploy VPN Only
You now have access to the Routing and Remote Access console
Right click on your server name and select Configure and Enable Routing and Remote Access
Click Next
If you only have one network interface select Custom configuration and click Next
Select VPN Access and click Next

Click Finish
Click Start service
Wait for the service to start
Right click on your server name and click Properties. Leave the general tab as it is and click on Security
Ensure that you only have EAP and MS-CHAP v2 selected
We now need to issue a certificate to the VPN server to enable it to trust incoming SSTP connections. To do this (on the VPN server) click Start>Type certlm.msc to open the local machine certificate mmc.
Right click on Certificates under Personal and click All Tasks>Advanced Operations>Create Custom Request
Click Next and Next again
Accept the defaults and click Next
Expand Details> Click Properties and enter the Friendly name as the VPN server’s external DNS name. If you do not have one you can setup DuckDNS which is a free service as i did. Then click the Subject tab
Add both the Common Name and DNS names as the VPN server’s external DNS name. Then click the Extensions tab
Expand Extended Key Usage and add Client Authentication and Server Authentication, then click Ok and Next
Choose somewhere to save the certificate request and click Finish
Open the Certificate Authority mmc and right click on the server name. Then go to All Tasks> Submit new request. Open the request file that you just saved.
Click Pending Requests and you should see your certificate request in there. Right click on it and click Issue
You can now go to issued certificates and double click on your issued certificate. Click on the details tab and then click Copy to File
Accept the defaults and click Next. Then save the certificate and click Finish
Open the certlm.msc snap-in again and right click on Certificates under personal. Click import and import the certificate you just exported from the Certificate Authority console
Then go back to the Routing and Remote Access console properties and click the security tab. Under SSL Certificate Binding select the certificate that you just created
Click the IPv4 tab and select Static address pool. Enter a range of addresses to use for DHCP when on the VPN.
Select the Logging tab and check the Log additional Routing and Remote Access information box
Click OK and you will be prompted to restart the Routing and Remote Access Service, do this now.
Next we need to create a secure user account to access the VPN. Click Start>Run and type compmgmt.msc to access computer management. Right click on Users and click New User. Give the user a name and a strong password.
Right click on the user account and click Properties. Click the Dial-in tab and select Allow access, then click OK. If you want to use NPS to control access at this point select Control access through NPS Network Policy.
As I do not have a fixed external IP address for this server and am sitting behind a NAT firewall (Provided by my broadband supplier Sky – which I can’t change) I will need to forward ports from my router to the RRAS VPN server. To do this you will need to set up something like the below:
If you are forwarding all port 443 traffic to this server you may want to restrict access to IIS. You can do this by opening IIS Manager and selecting the default website. You can then click on IP Address and Domain Restrictions.
You can then add a Deny rule. I added 0.0.0.0 (0.0.0.0) as I wanted to restrict all access to IIS.
Next, export the root certificate from your certificate authority by opening the CA console, right clicking on the server name and going to Properties. Click the General tab and View Certificate. Then click details and export the certificate to a file.
Import this to Windows 10 machine in the certlm.msc snap-in but add it to Certifiates under Trusted Root Certification Authorities.
Next you need to create a certificate request on your Windows 10 machine.
To do this (on the Windows 10 client) click Start>Type certlm.msc to open the local machine certificate mmc.
Right click on Certificates under Personal and click All Tasks>Advanced Operations>Create Custom Request
Click Next and Next again
Accept the defaults and click Next
Expand Details> Click Properties and enter the Friendly name as the Windows 10 machine’s name. Then click the Subject tab
Add both the Common Name and DNS names as the VPN server’s external DNS name. Then click the Extensions tab
Expand Extended Key Usage and add Client Authentication then click Ok and Next
Choose somewhere to save the certificate request and click Finish
Open the Certificate Authority mmc and right click on the server name. Then go to All Tasks> Submit new request. Open the request file that you just saved.
Click Pending Requests and you should see your certificate request in there. Right click on it and click Issue
You can now go to issued certificates and double click on your issued certificate. Click on the details tab and then click Copy to File
Accept the defaults and click Next. Then save the certificate and click Finish
Open the certlm.msc snap-in again on the Windows 10 client and right click on Certificates under personal. Click import and import the certificate you just exported from the Certificate Authority console
In Windows 10 click Settings> Network & Internet> VPN and click add a VPN connection. Select Windows (built-in) as the VPN provider and give the connection a name of your choosing. Enter the external DNS name of your VPN server and choose the VPN type as SSTP.
You can then enter the credentials of the VPN user account that we created earlier, then save the connection.
Next open the regedit and go to the below key:
HKEY_LOCAL_MACHINE\System\CurrentControlSet\Services\Sstpsvc\Parameters
Add a DWORD called NoCertRevocationCheck and set it to a value of 1
It should now connect without any issues.

Contents
- 1 Set Up An Sstp Vpn In Windows Server 2016
- 2 Set Up An Sstp Vpn In Windows Server 2016
- 2.1 Conclusion
- 2.1.1 Related image with set up an sstp vpn in windows server 2016
- 2.1.2 Related image with set up an sstp vpn in windows server 2016
- 2.1 Conclusion
Welcome to the fascinating world of technology, where innovation knows no bounds. Join us on an exhilarating journey as we explore cutting-edge advancements, share insightful analyses, and unravel the mysteries of the digital age in our Set Up An Sstp Vpn In Windows Server 2016 section. Windows paypal-me lab subscribe vpn server ago 5 us set 5-2k Set donate subscribers microsoft 10-6k sstp windows- set up an in 2016 up in years up vpn an vpn views microsoftlab sstp

Create An Sstp Vpn Server In Windows Server 2016 Dailysysadmin For All Things It
Create An Sstp Vpn Server In Windows Server 2016 Dailysysadmin For All Things It
To do this (on the vpn server) click start>type certlm.msc to open the local machine certificate mmc. right click on certificates under personal and click all tasks>advanced operations>create custom request. Windows server 2016 vpn sstp server 2021 02 25t21:50:21.923 00:00 i have a machine with windows server 2016, i want to build a vpn server so i can connect to my home network when i am out of home and some friends to connect also. i want to make the server with sstp as i understand that the ssh and it’s secure,.

Create An Sstp Vpn Server In Windows Server 2016 Dailysysadmin For All Things It
Create An Sstp Vpn Server In Windows Server 2016 Dailysysadmin For All Things It
Start the ‘add roles & features’ wizard from server manager, and add the ‘remote access’ to the server of your choice. you’ll be prompted to add some other requested roles features, such as iis – you will need to add these too. adding the iis & ras roles. In this tutorial you will learn how to create your own sstp vpn with a self signed certificate on windows server 2016. i will be using a windows 10 client to test my connection. assetto. On the select destination server page, select select a server from the server pool. under server pool, select the local computer and select next. on the select server roles page, in roles, select remote access, then next. on the select features page, select next. on the remote access page, select next. In the policy name field, type sstp access. in the network connection method, type of network access server section, select remote access server (vpn – dial up), then click next. on the specify.

Create An Sstp Vpn Server In Windows Server 2016 1 Dailysysadmin For All Things It
Create An Sstp Vpn Server In Windows Server 2016 1 Dailysysadmin For All Things It
On the select destination server page, select select a server from the server pool. under server pool, select the local computer and select next. on the select server roles page, in roles, select remote access, then next. on the select features page, select next. on the remote access page, select next. In the policy name field, type sstp access. in the network connection method, type of network access server section, select remote access server (vpn – dial up), then click next. on the specify. This will open the routing and remote access management c onsole. right click on the server name and click on “configure and enable routing and remote access“. on this window, click on next. select custom configuration and click on next. select “ vpn access “ as shown below and click on next to proceed. Set up an sstp vpn in windows server 2016 microsoft lab 10.6k subscribers subscribe 5.2k views 5 years ago set up vpn donate us : paypal.me microsoftlab set up an sstp vpn in windows.

Create An Sstp Vpn Server In Windows Server 2016 Dailysysadmin For All Things It
Create An Sstp Vpn Server In Windows Server 2016 Dailysysadmin For All Things It
This will open the routing and remote access management c onsole. right click on the server name and click on “configure and enable routing and remote access“. on this window, click on next. select custom configuration and click on next. select “ vpn access “ as shown below and click on next to proceed. Set up an sstp vpn in windows server 2016 microsoft lab 10.6k subscribers subscribe 5.2k views 5 years ago set up vpn donate us : paypal.me microsoftlab set up an sstp vpn in windows.
Set Up An Sstp Vpn In Windows Server 2016
Set Up An Sstp Vpn In Windows Server 2016
donate us : paypal.me microsoftlab set up an sstp vpn in windows server 2016 1. prepare dc21 : domain controller in this tutorial you will learn how to create your own sstp vpn with a self signed certificate on windows server 2016. i will be windows server setup sstp or ikev2 vpn on server please see first: youtu.be lwzihoawu2c this video follows on video series on advance networking with windows server 2019: this video tutorial will cover the steps on how to configure an donate us : paypal.me microsoftlab set up an sstp vpn in windows server 2022 1. prepare dc21 : domain controlleryi.vn, video series on advance networking with windows server 2019: this video tutorial will cover how to configure an sstp ssl author, teacher, and talk show host robert mcmillen shows you how to setup a pptp vpn server in windows server 2016 setup sstp windows server 2016 want a vultr server? vultr ?ref=6810612 join our community: r4p3 . this video will show you how to configure sstp vpn access on windows 2016 server in active directory. donate us : paypal.me microsoftlab set up an sstp vpn in windows server 2019 1. prepare dc31 : domain controller(yi.vn), hello viewers ! welcome to my channel kaptechpro. in this video demonstration of configuring sstp vpn with self signed in this video, we go over how to configure windows server 2016 with vpn access. by installing the remote access role and
Conclusion
After exploring the topic in depth, there is no doubt that article delivers valuable knowledge concerning Set Up An Sstp Vpn In Windows Server 2016. Throughout the article, the writer illustrates a wealth of knowledge about the subject matter. Notably, the section on Z stands out as a highlight. Thanks for reading this post. If you have any questions, please do not hesitate to contact me via email. I look forward to hearing from you. Furthermore, below are some related posts that might be useful:
This post shows you how you can install a VPN Server on Windows Server 2016 Step-by-Step. It shows you how you can easily setup a VPN server for a small environment or for a hosted server scenario. This blog post covers how you can use Windows Server VPN.
This is definitely not a guide for an enterprise deployment, if you are thinking about a enterprise deployment you should definitely have a look at Direct Access.
I already did similar blog posts for Windows Server 2008 R2, Windows Server 2012 and Windows Server 2012 R2.
- How to Install VPN on Windows Server 2012 R2
- How to Install VPN on Windows Server 2012
- How to Install VPN on Windows Server 2008 R2
- How to Install VPN on Windows Server 2019
You can simply follow this step by step guide:
Install the Windows Server VPN Role
First install the “Remote Access” via Server Manager or Windows PowerShell.
Select the “DirectAccess and VPN (RAS)” role services and click next.
On the next steps just use the default settings. After that you can have a look at the overview screen and install the role.
After the features are installed, which can take a while to finish you see the link for the Getting Started Wizard. Click on “Open the Getting Started Wizard“.
Configure Windows Server VPN
This opens a new wizard which will help you to configure the server. On the first screen select “Deploy VPN only“.
This opens the Routing and Remote Access Management Console
Right click on the Server name and click on “Configure and Enable Routing and Remote Access“.
On the new wizard select “Custom configuration“.
Select “VPN Access“.
After you have click finish you can now start the Routing and Remote Access service.
If you have an other firewall between the internet and your Windows Server you have to open the following Firewall port sand forward them to your Windows Server:
For PPTP: 1723 TCP and Protocol 47 GRE (also known as PPTP Pass-through)
For L2TP over IPSEC: 1701 TCP and 500 UDP
For SSTP: 443 TCP
After the installation Users have to be enabled for Remote Access to connect to your VPN Server. On a standalone server this can be done in the Computer Management MMC, in a domain environment this can be done in the user properties of an Active Directory user.
If you don’t have a DHCP Server in your environment you have to add a static IP address pool. This is often needed if you have a single server hosted at a service provider. In the properties of your VPN server you can click on the IPv4 tab and enable and configure the “Static address pool”.
You now have to add a IP address from the same subnet as your static address pool to the network interface of your server, so users can access the server.
I hope this helps you to setup a VPN server in a small environment, lab or hosted server.
Tags: Direct Access, GRE, installation, L2TP, Microsoft, PPTP, RAS, Remote Access, routing, setup, SSTP, VPN, VPN Server, Windows, Windows Server, Windows Server 2016, Windows Server VPN Last modified: April 25, 2019
About the Author / Thomas Maurer
Thomas works as a Senior Cloud Advocate at Microsoft. He engages with the community and customers around the world to share his knowledge and collect feedback to improve the Azure cloud platform. Prior joining the Azure engineering team, Thomas was a Lead Architect and Microsoft MVP, to help architect, implement and promote Microsoft cloud technology.
If you want to know more about Thomas, check out his blog: www.thomasmaurer.ch and Twitter: www.twitter.com/thomasmaurer
In the Routing and Remote Access Console, right click server name and choose ” configure and Enable routing and remote access ” option. Click Next on Routing and Remote access server setup wizard. Choose Virtual private network (VPN) access and NAT option.
In this tutorial you will learn how to create your own SSTP VPN with a self-signed certificate on windows server 2016. I will be using a windows 10 client to.
Donate Us : paypal.me/MicrosoftLabSet up an SSTP VPN in Windows Server 20161. Prepare- DC21 : Domain Controller (pns.vn), IP 10.0.0.21 | DC22 : Certifica.
VPN server needs join to the domain which hosted by the DNS server. You can configure your domain name in the DNS server. SSTP tunneling uses TCP 443 to create an SSL connection. Any protocol that uses SSL requires the use of a certificate. For more details regarding of how to configure SSTP VPN server in Windows server 2016, please refer to the following article: Create an SSTP VPN Server in.
Windows Server 2016
Windows Server – Setup SSTP OR IKEV2 VPN ON ServerPlease see first: https://youtu.be/lWZIHoAwu2cThis video follows on from our last video on how to setup a r.
Setup SSTP Windows Server 2016Want a Vultr server? https://www.vultr.com/?ref=6810612Join our community: https://r4p3.net.
This could potentially be fixed by running a CRL server (sounds like a pain) Now to actually set up the VPN connection… VPN Provider: Windows (built-in) Connection name: <whatever> Server name: <same server name as in the SSTP cert and the HOSTS file> VPN TYPE: SSTP. Username: <server user> Password: <password>.
I have a Windows 2016 server setup as a SSTP VPN with routing and remote access configured. I do not have a ton of users, the most I have seen connected to it at one time is 12. In the morning it seems to work fine, but if you connect to the VPN in the afternoon it will not allow to access anything on the remote network.
How to setup an SSTP VPN server with Windows Server | 4sysops
Once the MMC has loaded, right click the server name on the left, and select the configure option. From the wizard, choose the ‘custom’ option at the end of the list. On the following page, tick the VPN checkbox. The wizard will complete, and start the service. The RRAS configuration wizard.
Right-click newly created adapter for VPN Connection and select properties. On the Security tab, select Secure Socket Tunneling Protocol (SSTP) and click OK. Right-click the adapter one more time and click Connect / Disconnect. The VPN Connection will popup on the taskbar; now click on the VPN Connection.
SSTP Firewall Setup. In this example my server is behind a corporate firewall. If yours is internet facing then you may simply want to add an exception/rules for allowing https/TCP443. My server will ultimately have a public IP address that resolves to its public name (vpn.pnl.com) so I just need to allow the ports in. If your server does not have its own public IP address, then you may need.
Install the Windows Server VPN Role. First install the “ Remote Access ” via Server Manager or Windows PowerShell. Select the “ DirectAccess and VPN (RAS)” role services and click next. On the next steps just use the default settings. After that you can have a.
Windows Server 2016 VPN Setup | StarWind Blog
How to install VPN on Windows Server 2016 – The steps: Install a Remote access role via the Add Roles and Features Wizard. Open Server Managereither locally on the server that will host the remote access role or on a computer that has Server Manager configured to connect to the server you’re deploying the role.
Video Series on Advance Networking with Windows Server 2019:This video tutorial will cover how to configure an SSTP SSL VPN in Windows 2019 using a local ent.
Click the Security Tab -> Change type of VPN to SSTP. By default, it detects the type of VPN automatically, but slightly slows down the process. Also change your authentication as seen below. That’s all you need. Note that, by default, Windows VPNS will use the remote gateway.
Part:5 Configuring Remote Access Service and SSTP VPN. From Server Manager Choose Remote Access >> Right click the Server name >> Choose Remote Access Management. Under “Direct Access And VPN” Click “Run the Remote Access Setup Wizard”. The Configure remote Access wizard will open Click “Deploy VPN only”.
Two
Log in to the Duo Admin Panel and navigate to Applications. Click Protect an Application and locate Microsoft RRAS in the applications list. Click Protect to get your integration key, secret key, and API hostname. You’ll need this information to complete your setup.
- lets verify the network configuration for VPN Server. (Please Refer to the Pictures) 1 – VPN Server .
- Creating VPNUsers OU & User in Active Directory. 1 – Create a new OU – In the New Object – .
- Installation. 1 – open your Server Manager and click on Add Roles and Features. 2 – click on Next. 3 .
- Configuration. 1 – Right click on your server and choose Configure and Enable Routing and Remote .
- Client Connectivity Testing. 1 – On the Windows 10 client PC, open Network and Sharing Center, .
.
Select Properties > > Security and choose Allow these protocols under the Authentication section. Put the check mark next to Challenge Handshake Authentication Protocol (CHAP): 10. Click the Connect button to establish SSTP VPN connection from your VPN settings window..
Install and configure Direct Access on a Windows Server 2016 Essentials for hassle-free remote access DirectAccess is a transparent and secure connection to resources on your local network. We install the Remote Access Management roles, create a Host A Record and change the DNS64 configuration.
Manage VPN in Windows Server Essentials | Microsoft Docs
In this article. Applies To: Windows Server 2016 Essentials, Windows Server 2012 R2 Essentials, Windows Server 2012 Essentials. Virtual private network (VPN) connections enable users working at home or on the road to access a server on a private network by using the infrastructure provided by a public network, such as the Internet.
To configure SSTP VPN, we need to set up specific settings in the VPN server’s properties section. 21. Right-click on the server name and click on Properties. 22. Click on the Security tab. Under SSL Certificate Binding, select the self-signed certificate that you just created earlier. 23.
