 Продолжая тему VPN для удаленного доступа, сегодня мы хотим рассмотреть настройку SSTP-сервера на базе оборудования Mikrotik. Это не самый распространенный и популярный протокол, но имеющий ряд особенностей и преимуществ, главное из которых — использование стандартного протокола HTTPS для установления соединения, что делает SSTP-трафик неотличимым от обычного и дает возможность работать из любой точки, где есть интернет, проходя через NAT, брандмауэры и даже прокси-сервера. При этом его достаточно просто настроить и использовать, о чем мы расскажем в данной статье.
Научиться настраивать MikroTik с нуля или систематизировать уже имеющиеся знания можно на углубленном курсе по администрированию MikroTik. Автор курса, сертифицированный тренер MikroTik Дмитрий Скоромнов, лично проверяет лабораторные работы и контролирует прогресс каждого своего студента. В три раза больше информации, чем в вендорской программе MTCNA, более 20 часов практики и доступ навсегда.
Практически все из рассмотренных нами ранее протоколов VPN имеют те или иные ограничения, которые могут помешать установить соединение в условиях ограниченного доступа к сети интернет. Особенно это актуально для публичных и гостиничных сетей, где может быть заблокировано практически все, кроме обычного HTTP/HTTPS. Именно в таких сценариях раскрываются сильные стороны протокола SSTP и отходят на второй план слабые. Как мы уже говорили раньше — нет универсального VPN-решения, каждое из них имеет свои особенности и недостатки, поэтому для каждой задачи надо выбирать именно то, что поможет решить ее наилучшим образом.
SSTP, как технологию удаленного доступа следует рассматривать в первую очередь для тех клиентов, которые могут работать из самых различных мест и должны всегда иметь возможность быстро подключиться к корпоративной сети соблюдая высокие требования безопасности. К недостаткам следует отнести повышенные накладные расходы и связанную с этим невысокую производительность, но это общий недостаток всех VPN-протоколов поверх TCP.
В случае использования оборудования Mikrotik встает вопрос высокой нагрузки на процессор для моделей без аппаратной поддержки AES. При этом вне зависимости от аппаратной поддержки шифрования скорость канала для недорогих моделей вряд-ли превысит 20-25 МБит/с , вне зависимости от доступной ширины канала. Более подробно об этом можете прочитать в нашей статье Производительность младших моделей Mikrotik hEX и hAP. Экспресс-тестирование. Поэтому мы не советуем использовать SSTP для каналов, предполагающих высокую загрузку, но можем рекомендовать как надежное и безопасное средство удаленного доступа для сотрудников, часто работающих вне стационарных рабочих мест.
Создание центра сертификации и выпуск сертификатов
Так как SSTP использует HTTPS для установления защищенного соединения нам понадобится сертификат сервера, поэтому создадим собственный центр сертификации (CA) и выпустим необходимый сертификат. Если в вашей сети уже имеется развернутая инфраструктура PKI, то можете выпустить сертификат с ее помощью, мы же рассмотрим использование для этих целей собственных возможностей RouterOS.
Перед тем, как приступить к созданию центра сертификации убедитесь, что на роутере правильно настроено текущее время и часовой пояс, а также включена синхронизация времени через NTP.
Сначала выпустим корневой сертификат, для этого перейдем в System — Certificate и создадим новый сертификат заполнив поля как указано на рисунке, красным обозначены обязательные к заполнению.
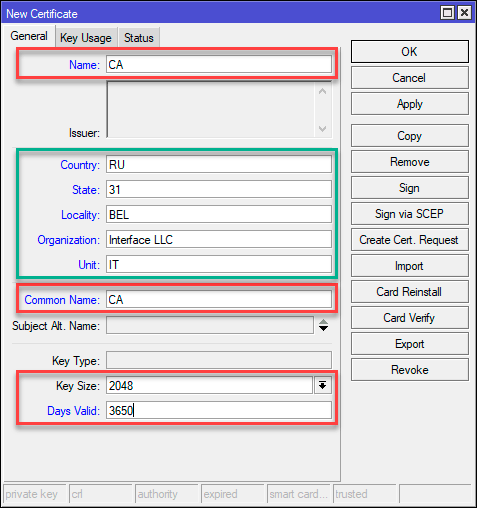 Name — видимое имя сертификата, Common Name — имя субъекта, которому выдан сертификат, в каждом из них указываем CA (т.е. Certification authority). Вообще там можно написать все что угодно, но правила хорошего тона требуют давать сертификатам понятные имена. Key Size — размер ключа, оставляем по умолчанию 2048, Days Valid — срок действия сертификата в днях, имеет смысл указать достаточно продолжительный срок, в нашем случае 10 лет.
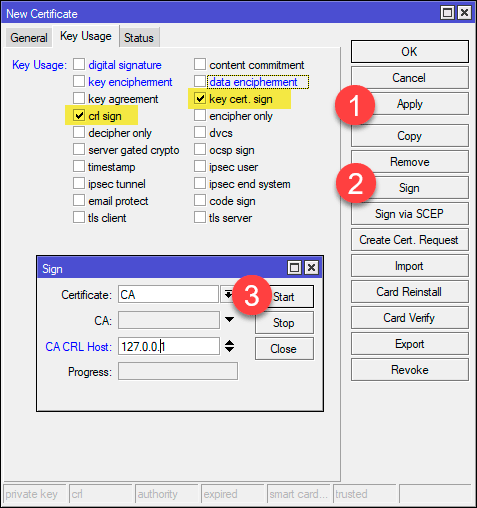
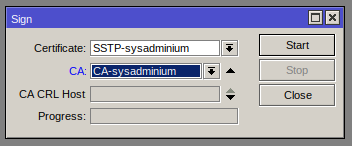
Перейдем на вкладку Key Usage и оставим только crl sign и key cert. sign, затем сохраним сертификат нажав Apply, и подпишем его кнопкой Sign, в открывшемся окне следует указать CA CRL Host, для которого можно использовать один из IP-адресов роутера, в нашем случае это localhost. Если же при помощи данного CA вы собираетесь выпускать сертификаты для других серверов, то следует указать доступный для них адрес, внутренний или внешний.
 В терминале все это можно быстро сделать командами:
/certificate
add name=CA country="RU" state="31" locality="BEL" organization="Interface LLC" common-name="CA" key-size=2048 days-valid=3650 key-usage=crl-sign,key-cert-sign
sign CA ca-crl-host=127.0.0.1
Затем выпустим сертификат сервера. При этом надо определиться каким образом вы будете подключаться к серверу по IP-адресу или FQDN (доменному имени), второй вариант более предпочтителен, так как при смене адреса вам придется перевыпустить сертификат сервера и изменить настройки всех клиентских подключений.
Заполнение полей практически ничем не отличается от предыдущего сертификата, за исключением Common Name и Subject Alt. Name, в них указываем FQDN или IP-адрес сервера, для поля Subject Alt. Name также указываем тип: DNS — для доменного имени или IP для адреса. Срок действия сертификата также имеет смысл сделать достаточно большим, в нашем случае 10 лет.
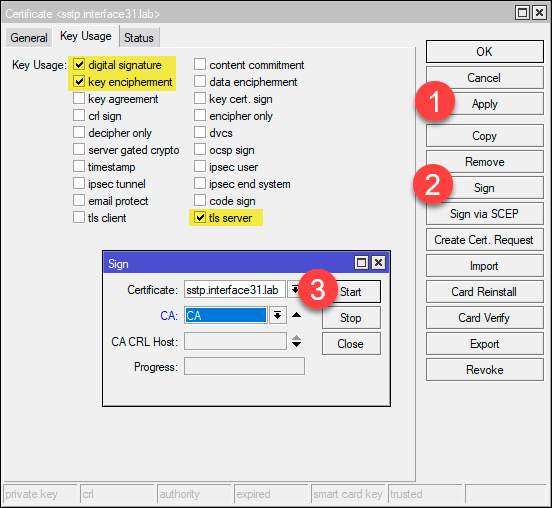
 На закладке Key Usage устанавливаем digital-signature, key-encipherment и tls-server и подписываем сертификат сервера, для этого в поле CA выберите ранее выпущенный корневой сертификат.
 В терминале:
/certificate
add name=sstp.interface31.lab country="RU" state="31" locality="BEL" organization="Interface LLC" common-name="sstp.interface31.lab" subject-alt-name=DNS:"sstp.interface31.lab" key-size=2048 days-valid=3650 key-usage=digital-signature,key-encipherment,tls-server
sign sstp.interface31.lab ca="CA"
При подключении через SSTP клиент прежде всего устанавливает с сервером защищенное соединения, а для этого ему нужно проверить сертификат и убедиться в его подлинности, в противном случае продолжение соединения будет невозможным. Чтобы клиентские системы доверяли нашим сертификатам нам нужно будет установить на них корневой сертификат нашего CA.
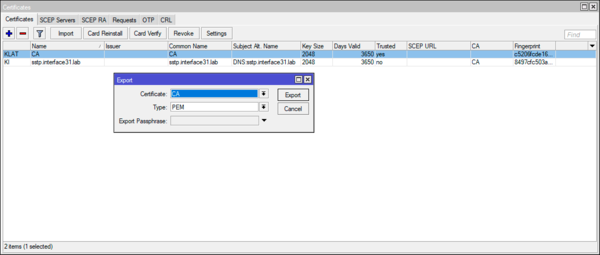
Для этого выберем корневой сертификат в System — Certificate, щелкнем на нем правой кнопкой мыши и нажмем Export, в поле Type ставим PEM, пароль не указываем, так как нам нужен только сертификат, без закрытого ключа. Закрытый ключ центра сертификации является секретным и никогда не должен покидать пределы роутера.
 В терминале сертификат можно экспортировать командой:
/certificate
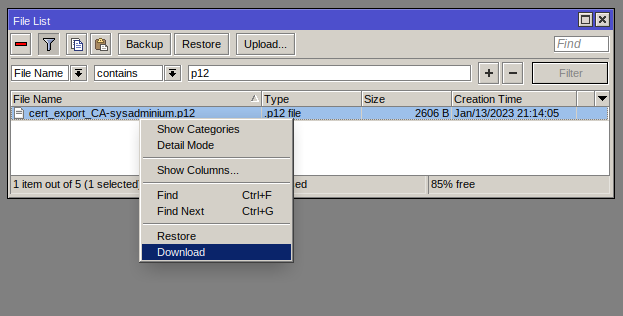
export-certificate CAНайти и скачать выгруженный сертификат можно в разделе Files.
Настройка SSTP VPN-сервера
Перед тем как браться за настройку сервера следует определиться со схемой доступа к сети, существуют два основных варианта: Proxy ARP, когда адреса удаленным клиентам выдаются из диапазона основной сети и они получают доступ без дополнительных настроек, и маршрутизация, когда диапазон адресов для VPN-клиентов не пересекается с основной сетью, а для доступа в нее будет необходимо указать маршруты, этот процесс можно автоматизировать с помощью PowerShell.
После этого перейдем в IP — Pool и создадим новый пул адресов для выдачи VPN-сервером, количество адресов в пуле не должно быть меньше предполагаемого количества клиентов.
 В терминале:
/ip pool
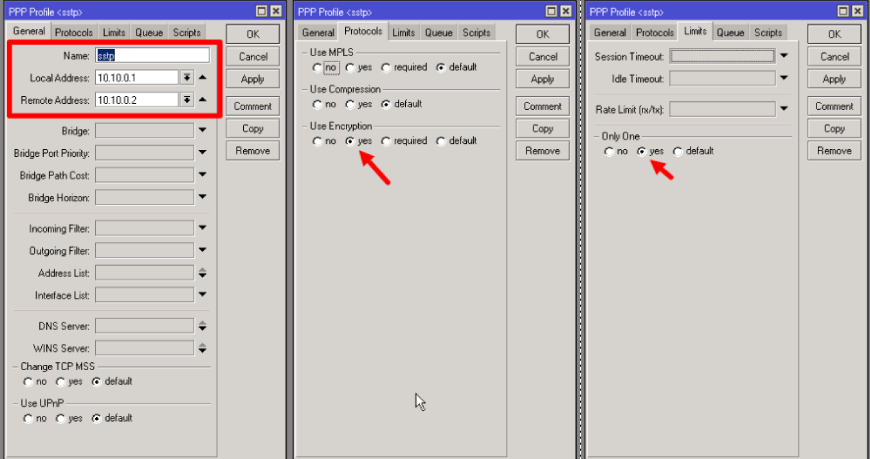
add name=sstp_pool ranges=10.20.0.100-10.20.0.199Затем перейдем в PPP — Profiles и создадим новый профиль, в поле Local Address введем локальный адрес VPN-сервера, он должен относиться к тому же диапазону что и выделенный выше пул адресов, который следует указать в поле Remote Address, остальные настройки оставляем по умолчанию.

Или выполним команду:
/ppp profile
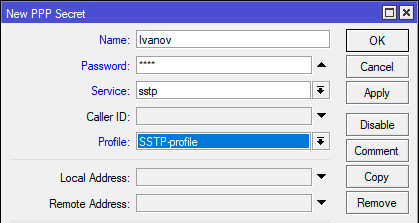
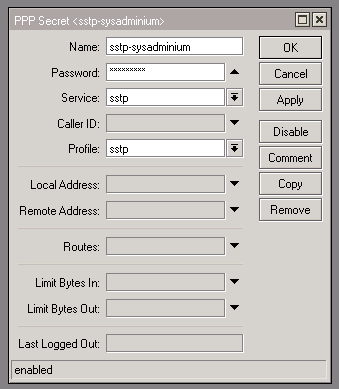
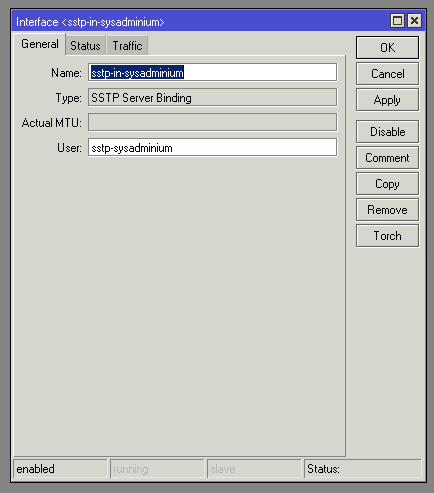
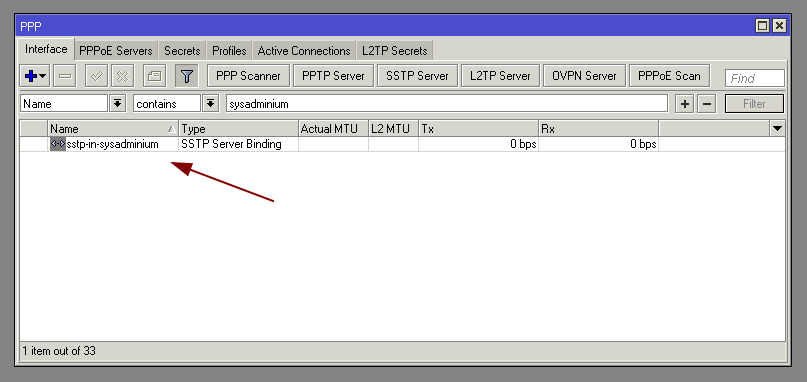
add local-address=10.20.0.1 name=SSTP-profile remote-address=sstp-poolЗатем переместимся в PPP — Secrets и создадим учетные записи пользователей, указываем имя пользователя, пароль, в поле Service выбираем sstp, что ограничит действие учетной записи только SSTP-сервером, если оставить any, то учетка сможет подключаться к любому сервису. В поле Profile указываем созданный нами профиль.
 Эти же действия в командной строке:
/ppp secret
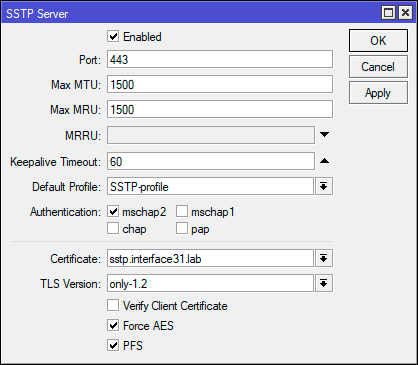
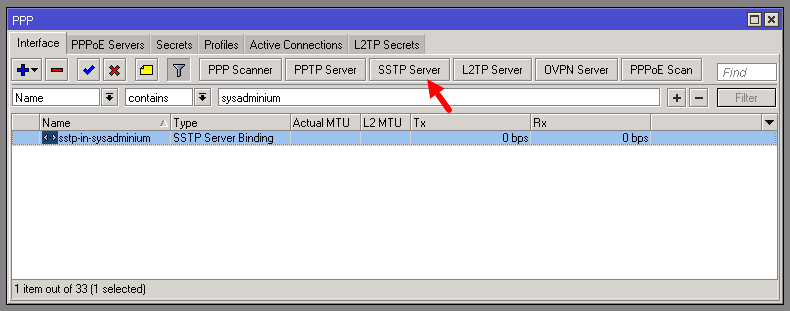
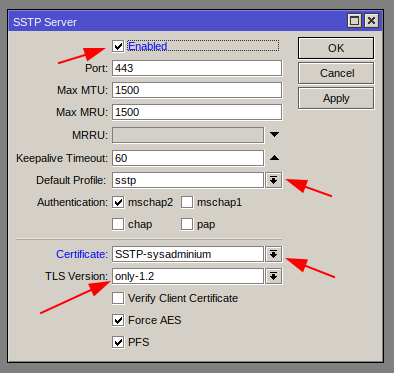
add name=Ivanov password=Pa$$word profile=SSTP-profile service=sstpТеперь, когда все готово, настроим сам сервер. Для этого перейдем в PPP — Interface и нажмем кнопку SSTP Server. Включим его, установив флаг Enabled, в поле Default Profile выберем созданный нами профиль, в разделе Authentication оставим только mschap2, в поле Certificate указываем сертификат сервера. Дальнейшие настройки отвечают за повышение уровня безопасности: TLS Version — only-1.2 не разрешает использование устаревших версий TLS, Force AES — заставляет принудительно использовать алгоритм шифрования AES256, PFS включает совершенную прямую секретность (Perfect forward secrecy), которая формирует уникальный сессионный ключ для каждого подключения, что делает невозможным расшифровку сессии даже при наличии закрытого ключа.
 В терминале для включения и настройки сервера выполните:
/interface sstp-server server
set authentication=mschap2 certificate=sstp.interface31.lab default-profile=SSTP-profile enabled=yes force-aes=yes pfs=yes tls-version=only-1.2
На этом настройка закончена, сервер готов принимать подключения.
Настройка подключения клиента в Windows
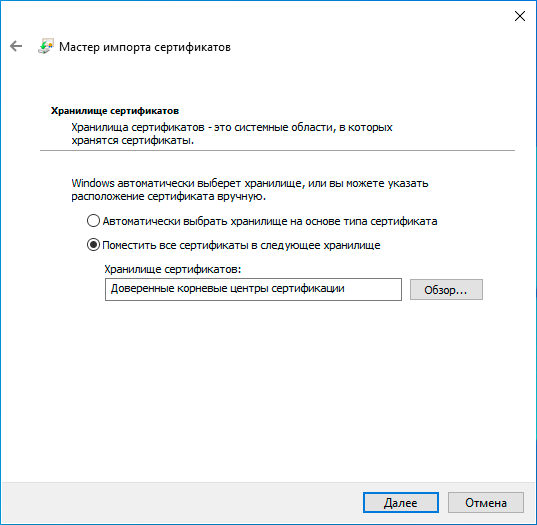
Как мы уже говорили, для того чтобы клиент мог проверить подлинность сервера нам необходимо импортировать корневой сертификат, переместим его на клиента и установим в Расположение хранилища — Локальный компьютер:
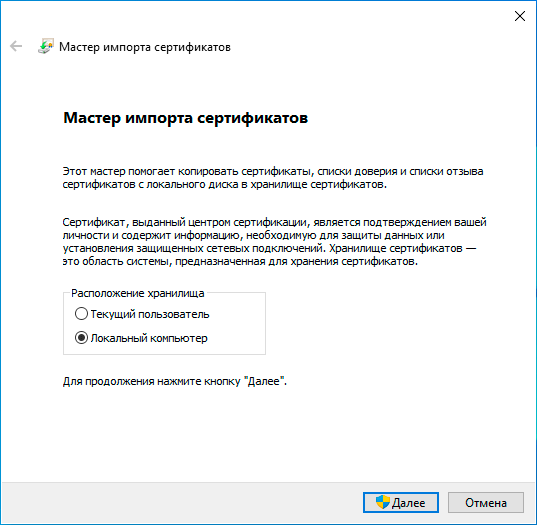 Хранилище сертификатов — Доверенные корневые центры сертификации:
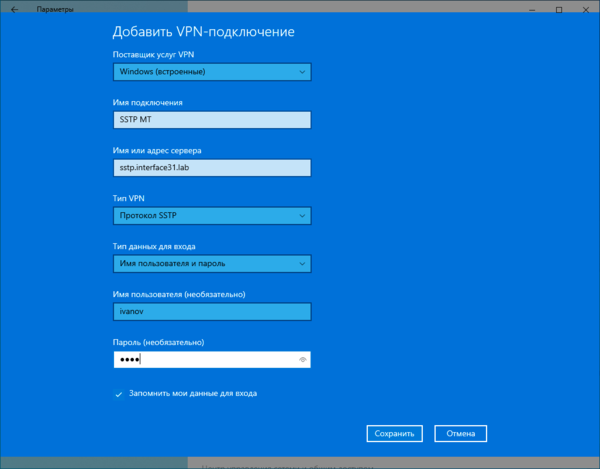
 Затем создаем подключение, в котором указываем Тип VPN — Протокол SSTP и Тип данных для входа — Имя пользователя и пароль, здесь же вводим адрес сервера и учетные данные.
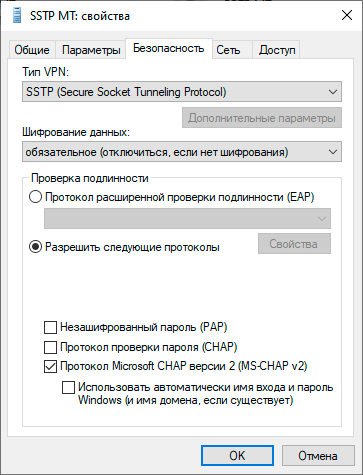
 После чего в свойствах подключения на закладке Безопасность убедимся, что в разделе Проверка подлинности указан только протокол MS-CHAP v2.
 Настройка клиента закончена, можно подключаться.
Настройка подключения клиента в Linux
В используемых нами дистрибутивах Linux нет штатного SSTP-клиента, однако есть сторонняя разработка, которой мы и воспользуемся. Все нижесказанное будет справедливо для дистрибутивов основанных на Debian и Ubuntu, если у вас иная система обратитесь на страницу проекта.
Проще всего владельцам Ubuntu, им достаточно просто подключить PPA, ниже приведен пример для Ubuntu 18.04, для других систем просто измените кодовое название дистрибутива:
deb http://ppa.launchpad.net/eivnaes/network-manager-sstp/ubuntu bionic main
deb-src http://ppa.launchpad.net/eivnaes/network-manager-sstp/ubuntu bionic main
В Debian процесс немного более сложный, сначала получим и установим ключ репозитория проекта:
apt-key adv --keyserver keyserver.ubuntu.com --recv-keys 61FF9694161CE595Затем создадим файл с указанием источников пакетов:
touch /etc/apt/sources.list.d/sstp-client.listИ внесем в него следующие строки:
deb http://ppa.launchpad.net/eivnaes/network-manager-sstp/ubuntu eoan main
 deb-src http://ppa.launchpad.net/eivnaes/network-manager-sstp/ubuntu eoan main
Обновим список пакетов и установим клиент:
apt update
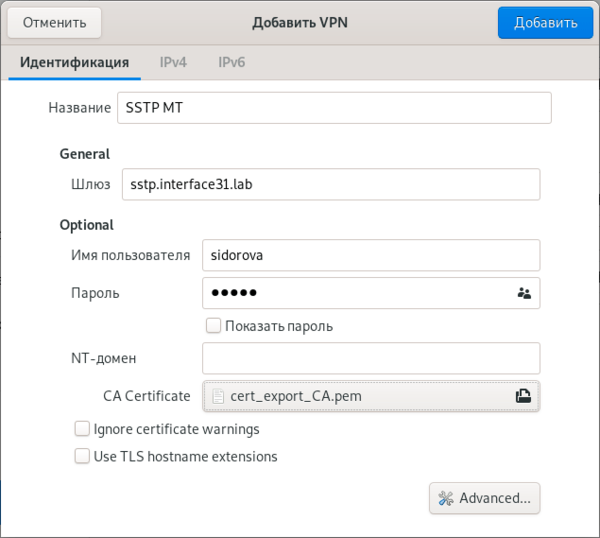
apt install network-manager-sstpПосле чего появится возможность создать SSTP-соединение штатными средствами Network Manager. Настройки несложные: указываем адрес сервера, учетные данные и сертификат CA, у которого предварительно следует изменить расширение на PEM.
 Если вы все сделали правильно, то соединение будет установлено.
Научиться настраивать MikroTik с нуля или систематизировать уже имеющиеся знания можно на углубленном курсе по администрированию MikroTik. Автор курса, сертифицированный тренер MikroTik Дмитрий Скоромнов, лично проверяет лабораторные работы и контролирует прогресс каждого своего студента. В три раза больше информации, чем в вендорской программе MTCNA, более 20 часов практики и доступ навсегда.
Introduction
SSTP VPN is a proprietary VPN technology made by Microsoft which has been around for quite some years (for over a decade in fact). It tunnels PPP over a HTTPS connection which in turn is secured by TLS. With SSTP using standard HTTPS and TLS protocols, Microsoft tried to overcome the issues with traditional PPTP or L2TP over IPSEC VPN tunnels, which often are blocked by various internet access gateways used by the end-users (e.g. in a hotel).
Currently I am not aware of any SSTP server implementations other than Routing and RAS services (which are included in Microsoft Windows Server) since Windows Server 2012 and the one from RouterOS in MikroTik routers. As not everyone can or wants to utilize a Windows Server for this task, I decided to take a look at MikroTiks approach.
At the beginning of this journey, one limitation of RouterOS was not immediately obvious to me: Authentication via EAP-TLS is not possible, so we will have to work around that by using MSCHAPv2 instead. MikroTiks answer to my question why it is not implemented and as of writing this post there are no plans of implementing it was, that SSTP is quite slow (aka resource intensive) already and that all the traffic is being secured by TLS anyway, so I guess they said “bugger that” and sticked with MSCHAPv2.
The goal
At the end of this post we want to have a MikroTik hEX router serving an SSTP VPN server for a Windows 10 client to do Windows Always On VPN. For this time, we will deploy a so called “User Tunnel” instead of a “Device Tunnel”. The difference is, that a User Tunnel comes up automatically only after the correct user has logged on to the client system. A device tunnel on the other hand is meant to be up and running as soon as a computer has completed booting the operating system, before any user logs in.
Given the state my current lab environment which already has a Internet-facing firewall (Fortigate 60D in this case) plus the fact that a MikroTik hEX router does not have too much power when it comes to excessive firewalling, I have decided to put the MikroTik router into DMZ networks of my firewall. This design allows me to do all the firewalling on my Fortigate and let the hEX focus on doing SSTP server stuff. Any traffic that enters or leaves the hEX router, has to go through the Fortigate, where I can create more firewall rules than I will ever need and which also has the processing power for that.
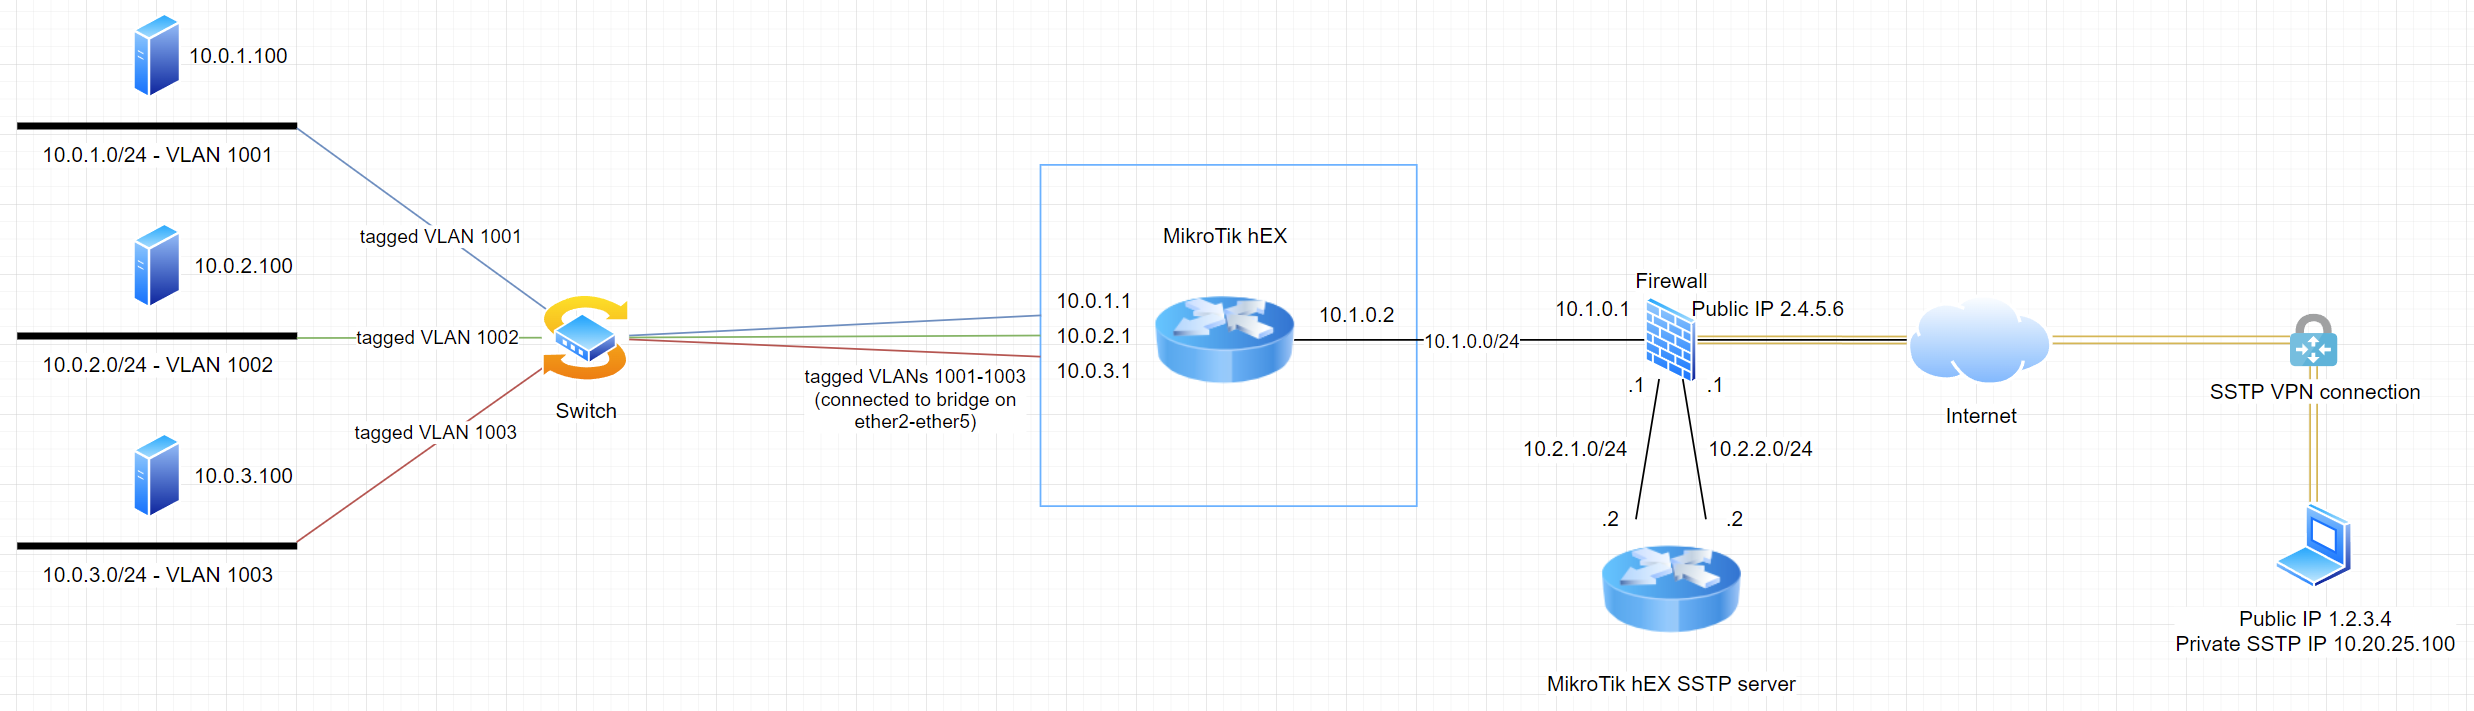
Note that the hEX from one of my previous posts (Clicky) is still there, we have two hEX routers in this network now! In an upcoming post I’ll explain how to do this with one single hEX router while keeping the Topology from above so we can still use our Fortigate firewall for firewalling. Hint: It will involve VRF!
For now, all VPN traffic is going to flow from the client laptop on the right, through the SSTP VPN connection to the Fortigate firewall which forwards this traffic via NAT to the 10.2.2.2 IP of our hEX SSTP server, where the tunnel terminates. From there, all traffic is being routed through the LAN side of the hEX SSTP server (10.2.1.2) to the firewall (10.2.1.1) where it will be routed further to the internal MikroTik hEX router (10.1.0.2) where the traffic will finally reach its destination.
Start by deploying a TLS certificate
For SSTP to work properly and securely, your hEX SSTP server needs a TLS certificate which is being trusted by the MikroTik router and all your potential SSTP client computers. If you want to know how to accomplish that, have a look at my previous blog post about that topic: Clicky
A standard Web Server certificate will do, make sure that you are using at least SHA256 hashing algorithm and at least a 2048 bit key. Supposedly a ECDSA_P256 certificate is even more secure and recommended for SSTP, but I’m not sure whether MikroTiks support that, so let’s stick to a RSA-2048/SHA256 certificate for now.
Name the certificate something like “SSTP-Server” and import it into your MikroTik router. Make sure, as always, that your trust chain is complete and that your CRL infrastructure works from the Internet (because clients are going to check the CRL during SSTP connection establishment).
RADIUS
Because we want proper Always On VPN without users having to enter credentials and to make use of our existing identity provider (probably Active Directory or some other LDAP server), we want to use an existing RADIUS server which authenticates against our identity provider. In this scenario I’m using Microsoft Windows NPS server (which comes included with Windows Server) but of course you can use whatever you want. Preferably configure a LDAP user group or something with all the users who are allowed to connect via SSTP VPN and then configure your RADIUS server accordingly, so that it allows connection requests from users who are a member of that group. For Windows NPS server I can tell you that you will also have to enable the MSCHAPv2 authentication method in the according network policy.
Configure the RADIUS client of your MikroTik router like this:
/radius add address=10.0.1.100 authentication-port=1812 accounting-port=1813 protocol=udp secret=myverysecretSecret service=ppp src-address=10.2.1.2
Choose a proper secret key and note that I have set the src-address to the LAN facing side of our SSTP router. Our firewall is only going to allow traffic from 10.2.1.2 to the NPS server 10.0.1.100, which lives all the way on the left in our VLAN 1001.
Now enable RADIUS so our hEX actually starts utilizing it for authentication requests:
/ppp aaa set use-radius=yes
Hint: If you are using Windows NPS server as RADIUS, you will have to enable NTLMv2 compatibility, if you were following general security recommendations in the past and have already disabled NTLM in your network. To do that, create a DWORD item with the name “Enable NTLMv2 Compatibility Value” and value 1 in the following path:
HKEY_LOCAL_MACHINE\System\CurrentControlSet\Services\RemoteAccess\Policy\
IP Pool and PPP profile
Now let’s create an IP pool for our SSTP clients. That pool is going to matter to our firewall, because we will be using these IP addresses to create our ruleset and to define where the SSTP VPN clients will be allowed talking to. Other than that, it doesn’t really matter which IP range you choose, just be aware that you must not overlap it with any IP subnets which are already in use in your network. In my case, I have chosen the SSTP client network to be 10.20.25.0/24 while leaving some spare addresses from .101 to .254 and leaving .1 for the router itself:
/ip pool add name=SSTP-VPN-Pool ranges=10.20.25.2-10.20.25.100
Now let’s create a PPP profile. At first I was confused why I had to create a PPP profile for SSTP but when I realized that SSTP really just tunnels PPP, it was quite obvious:
/ppp profile
add dns-server=10.0.1.101,10.0.2.101 local-address=10.20.25.1 name=SSTP-VPN-Profile only-one=yes remote-address=SSTP-VPN-Pool use-compression=yes use-encryption=required
- The dns-server property defines which DNS servers are going to be propagated to our SSTP clients, so enter your internal DNS servers here for proper name resolution to work. Don’t forget to create a firewall rule for that DNS traffic!
- “local-address” just defines the router’s own IP address which the SSTP clients will be talking to. Note, that I have deliberately excluded that IP from the client IP pool so we don’t get any overlaps.
- The parameter “only-one” makes your client users Highlanders. It allows only one connection per user account. Depending on your environment, choose what suits your requirements best.
- “remote-address” defines the IP pool which will be used for your clients connections
- “use-compression” and “use-encryption” I am not quite sure about. According to MikroTik documentation, use-encryption has no effect on SSTP tunnels, it still gives me the warm, fuzzy feeling though, to have it enabled. “use-compression” may or may not have an effect, I hadn’t had the chance to verify/benchmark that yet. Enabled compression may negatively affect your hEX’s CPU load, though.
Enable the SSTP server
Finally, we can enable our SSTP server on the hEX router:
/interface sstp-server server
set authentication=mschap2 certificate=SSTP-Server default-profile=SSTP-VPN-Profile enabled=yes force-aes=yes pfs=yes port=443 tls-version=only-1.2
- “authentication” allows us to choose between pap, chap, mschap1 and mschap2 of which we want to use the most secure one (or rather the least insecure one), which is mschap2
- “certificate” obviously sets the certificate we have created and imported earlier for the SSTP server – see here for a how to: Clicky
- “default-profile” configures the SSTP server to use our previously created SSTP profile
- Regarding “force-aes”, the MikroTik documentation states that Windows clients won’t be able to connect if enabled, because they only support RC4. I haven’t verified since when Windows clients support more than that, but Windows 10 20H2 is perfectly able to connect with force-aes enabled and I’ll take a wild guess and say that that’s like that for quite some years now and that MikroTiks documentation simply hasn’t been updated here.
- “pfs” is another security measure you want to have enabled if possible, I’m however not sure whether Windows supports that. In my lab, the connection comes up flawlessly, however.
- With “tls-version=only-1.2” we add another bit of security by disabling weak and insecure, old TLS and SSL standards like SSL 3.0, TLS 1.0 and TLS 1.1
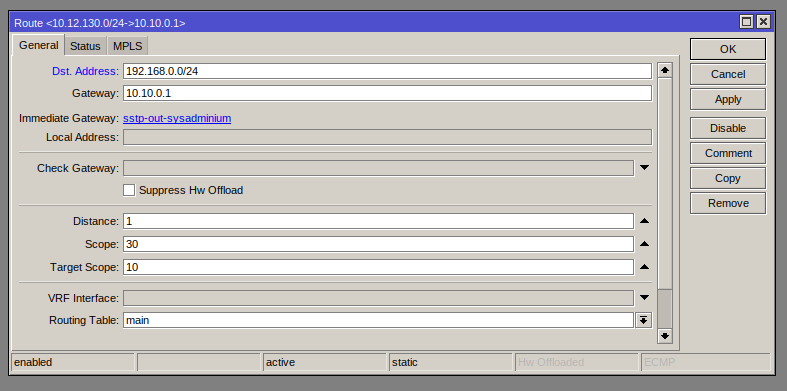
Create routes for your traffic
To enable your SSTP client users to reach all required network destinations, you will need some routes:
/ip route
add distance=1 gateway=10.2.2.1 pref-src=10.2.2.2
add distance=1 dst-address=10.0.1.0/24 gateway=10.2.1.1 pref-src=10.2.1.2
add distance=1 dst-address=10.0.2.0/24 gateway=10.2.1.1 pref-src=10.2.1.2
add distance=1 dst-address=10.0.3.0/24 gateway=10.2.1.1 pref-src=10.2.1.2
The first route is our default route into the Internet, it goes through the WAN side of our hEX router (10.2.2.2). The following three routes are there for traffic to the LAN VLANs 1001-1003 to go through the LAN side of our router (10.2.1.2) to our firewall where you can define firewall rules who will be allowed to access what resources.
A little bit of firewalling on the hEX router
I would advice to block traffic from the SSTP clients to the management interfaces of your hEX router. To do that, create the following rule:
/ip firewall filter
add action=drop chain=input in-interface=all-ppp src-address=10.20.25.0/24
Create Windows Client VPN profile
Next we need to create a VPN profile for Windows. There are several ways to do this, including Microsoft Intune or Microsoft System Center Configuration Manager (or Endpoint Manager as it is called nowadays). We are going to use a Powershell script here and the following XML file named “vpn.xml”:
<VPNProfile>
	<NativeProfile>
		<Servers>sstp.mydomain.com</Servers>
		<NativeProtocolType>Automatic</NativeProtocolType>
		<Authentication>
			<UserMethod>MSChapv2</UserMethod>
		</Authentication>
		<RoutingPolicyType>SplitTunnel</RoutingPolicyType>
		<DisableClassBasedDefaultRoute>true</DisableClassBasedDefaultRoute>
	</NativeProfile>
	<Route>
		<Address>10.0.1.0</Address>
		<PrefixSize>24</PrefixSize>
	</Route>
	<Route>
		<Address>10.0.2.0</Address>
		<PrefixSize>24</PrefixSize>
	</Route>
	<Route>
		<Address>10.0.3.0</Address>
		<PrefixSize>24</PrefixSize>
	</Route>
	<AlwaysOn>true</AlwaysOn>
	<TrustedNetworkDetection>myLocalDomain.lan</TrustedNetworkDetection>
	<DeviceTunnel>false</DeviceTunnel>
	<RegisterDNS>true</RegisterDNS>
</VPNProfile>- Servers sstp.mydomain.com resolves to the public IP of our firewall (2.4.5.6), where traffic gets NATed to the internet-facing IP of our MikroTik hEX SSTP server (10.2.2.2).
- NativeProtocolType sets the tunnel type. Possible values are PPTP, L2TP, IKEv2 and Automatic, according to Microsoft documentation. Choosing Automatic will try protocolls in following order: SSTP, IKEv2, PPTP and L2TP. Again, this is according to current Microsoft documentation.
- Authentication/UserMethod can be EAP or MSChapv2 but as MikroTik does not support EAP, we have to stick with MSChapv2
- RoutingPolicyType set to SplitTunnel means that only defined IP ranges which are defined later in the XML file are being routed into the VPN tunnel. ForceTunnel would mean that any traffic must go over the VPN tunnel. Choose what suits your needs, i prefer split tunneling.
- DisableClassBasedDefaultRoute seems like a typical Microsoft configuration option to me. If set to yes, and the client interface IP begins with 10 (for example), a route with destination 10.0.0.0/8 will be configured for the tunnel. I prefer creating specific routes manually.
- With entries like the Route ones, you can define IP subnets or hosts (when using the /32 prefix size) which should be routed over the VPN tunnel. In our example I have added the IP ranges of our internal VLANs 1001-1003.
- AlwaysOn means what it says. The tunnel auto-connects upon sign in of the user until the user manually disconnects it.
- TrustedNetworkDetection is a feature to prevent client computers from connecting to the VPN when they already are inside the corporate network. This checks the DNS suffix of the LAN connections of your client computer and if it finds the one specified in this setting, the VPN tunnel is prevented from connecting automatically.
- DeviceTunnel set to false means that this is a UserTunnel. For an explanation about the differences see the introduction at the beginning of this post.
- RegisterDNS set to true tries to register the client computers IP address of the VPN tunnel interface with the DNS servers we have supplied in the PPP profile of our MikroTik. Very handy, if you want to have all your client computers resolvable while they are on the go!
Hint: I have seen TrustedNetworkDetection sometimes to not work properly which can cause issues and unwanted behavior. To prevent clients from connecting to your SSTP server while they are within your corporate network, you can for example block access to the SSTP server from your LAN or incorporate DNS policies on your internal DNS servers which disallow internal clients to resolve your SSTP server hostname (sstp.mydomain.com) properly.
Hint 2: Further documentation on VPN profile configuration and many of the options can be found at docs.microsoft.com.
Deploy profile
Profiles can be deployed using several methods. As mentioned before we are going to do it with a Powershell script:
$xmlFilePath = "vpn.xml"
$ProfileName = "USER-TUNNEL"
$ProfileXML = Get-Content $xmlFilePath
$ProfileNameEscaped = $ProfileName -replace ' ', '%20'
$ProfileXML = $ProfileXML -replace '<', '<'
$ProfileXML = $ProfileXML -replace '>', '>'
$ProfileXML = $ProfileXML -replace '"', '"'
$nodeCSPURI = './Vendor/MSFT/VPNv2'
$namespaceName = "root\cimv2\mdm\dmmap"
$className = "MDM_VPNv2_01"
$session = New-CimSession
try
{
$newInstance = New-Object Microsoft.Management.Infrastructure.CimInstance $className, $namespaceName
$property = [Microsoft.Management.Infrastructure.CimProperty]::Create("ParentID", "$nodeCSPURI", 'String', 'Key')
$newInstance.CimInstanceProperties.Add($property)
$property = [Microsoft.Management.Infrastructure.CimProperty]::Create("InstanceID", "$ProfileNameEscaped", 'String', 'Key')
$newInstance.CimInstanceProperties.Add($property)
$property = [Microsoft.Management.Infrastructure.CimProperty]::Create("ProfileXML", "$ProfileXML", 'String', 'Property')
$newInstance.CimInstanceProperties.Add($property)
$session.CreateInstance($namespaceName, $newInstance)
$Message = "Created $ProfileName profile."
Write-Host "$Message"
}
catch [Exception]
{
$Message = "Unable to create $ProfileName profile: $_"
Write-Host "$Message"
exit
}
$Message = "Complete."
Write-Host "$Message"Only thing you need to do is to replace “vpn.xml” with the path and filename to your xml file, replace “USER-TUNNEL” with your desired VPN tunnel name and run the script.
Conclusion
We now have a MikroTik hEX router running an SSTP server for our Windows Always On clients and a template for configuring as many Windows clients as we want for Always On VPN. This can be an affordable and easy solution instead of having to license yet another Windows Server for this task. Also, we can use our favourite firewall (nobody says it has to be a Fortigate like in my case) and leverage its capabilities to let the hEX do what it can do best: routing (and SSTP-servering ;-))
Upcoming
As some of you may have only one public IP address available and SSTP now uses our valuable port 443, I’m planning to write a blog post about how to publish your hEX routers SSTP server through a HTTPS reverse proxy which allows you to use your single public IP for multiple services, all on port 443. Hint: they will be distinguished by their host name!
Also, some of you may only have one hEX router and (for incomprehensible reasons) want to keep it that way. For those of you I will write a blog post about how to isolate the SSTP server part and the internal core router part from each other using VRF.
BUY ME A COFFEE (AKA Make a one-time donation)
Your contribution is appreciated. Coffee will eventually turn into more hopefully useful posts.
Donate
Make a monthly donation
Your contribution is appreciated.
Donate monthly
Make a yearly donation
Your contribution is appreciated.
Donate yearly
В этой статье описывается процесс объединения двух офисов с помощью VPN протокола SSTP на базе двух роутеров MikroTik.
Схема сети
Будем реализовывать следующую схему:
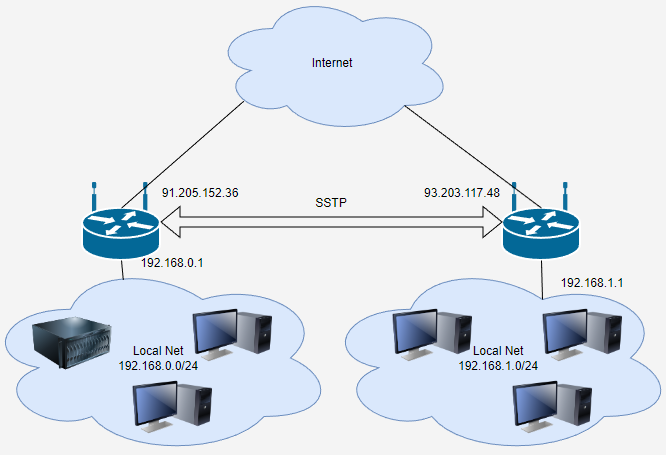
В каждом офисе есть роутер MikroTik, дающий доступ в интернет.
- Первый роутер:
- внутренний IP — 192.168.0.1
- обслуживает локальную сеть 192.168.0.0/24
- внешний IP — 91.205.152.36
- Второй роутер:
- внутренний IP — 192.168.1.1
- обслуживает локальную сеть 192.168.1.0/24
- внешний IP — 93.203.117.48
Нам нужно соединить оба роутера MikroTik с помощью VPN соединения SSTP. Дополнительно нужно настроить маршрутизацию и фаервол, чтобы компьютеры из одного офиса могли достучаться до компьютеров в другом офисе.
Настройка первого роутера
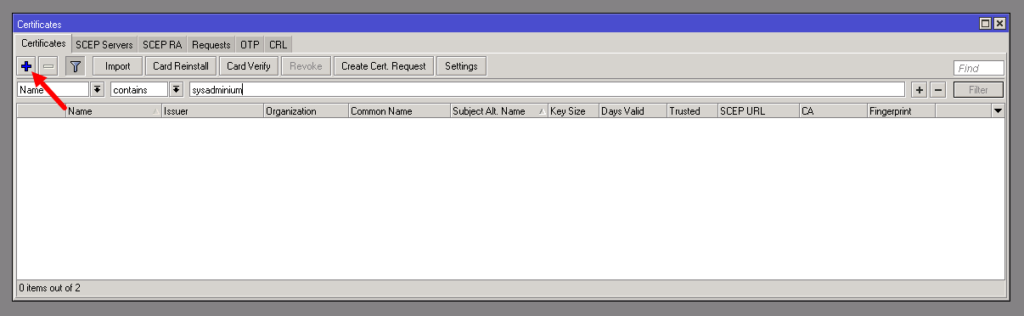
Создание корневого сертификата
Так как протокол SSTP использует TLS сертификаты, то мы должны выпустить корневой сертификат, и с помощью него выпустить сертификат для SSTP сервера. Для этого перейдем в System / Certificate и создадим новый сертификат.
При создании корневого сертификата заполняем поля следующем образом:
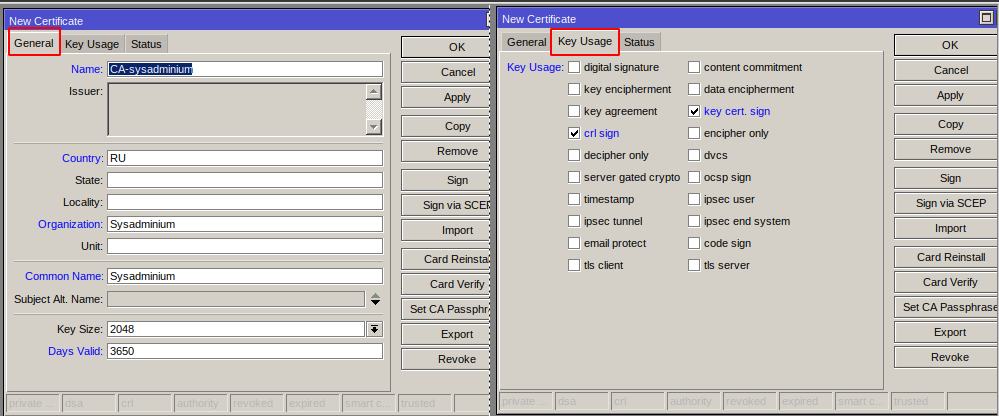
Опишу заполняемые поля:
- Name — видимое имя сертификата.
- Common Name — имя субъекта, которому выдан сертификат. Например, если бы мы делали сертификат для домена, то здесь нужно было бы указать имя этого домена. В корневом сертификате можно указать любое имя, например имя сертификата (Name) или имя организации (Organization).
- Key Size — длина ключа.
- Days Valid — срок действия сертификата в днях.
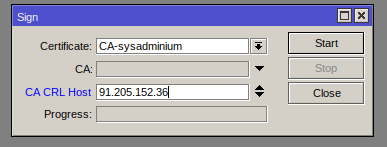
Сохраним сертификат нажав кнопку Apply, и подпишем его нажав кнопку Sign. В открывшемся окне следует заполнить поле CA CRL Host, здесь можно указать внешний IP роутера, к которому будет подключаться другой роутер. Для подписания нажимаем кнопку Start.
Создание сертификата для SSTP
Теперь выпустим сертификат для SSTP сервера:
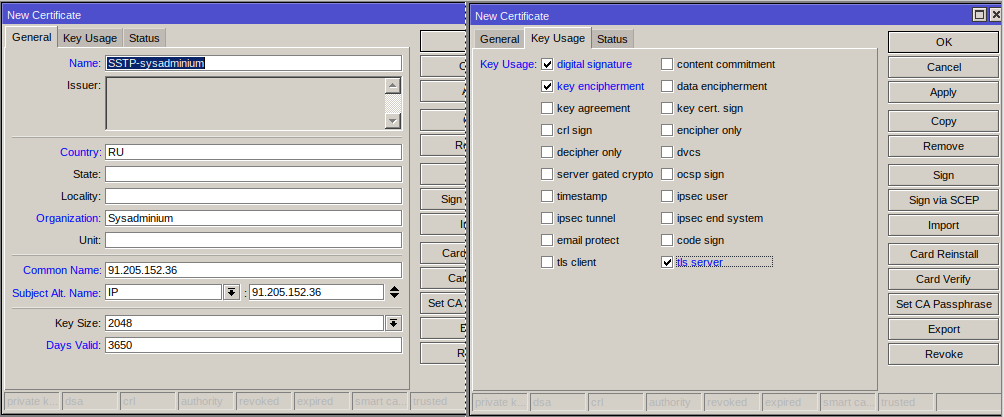
Главное здесь заполнить следующие поля:
- Common name — так как мы выпускаем сертификат для SSTP сервера, то нужно указать его IP адрес, то есть внешний адрес роутера.
- Subject Alt. Name — здесь тоже вписываем внешний адрес роутера.
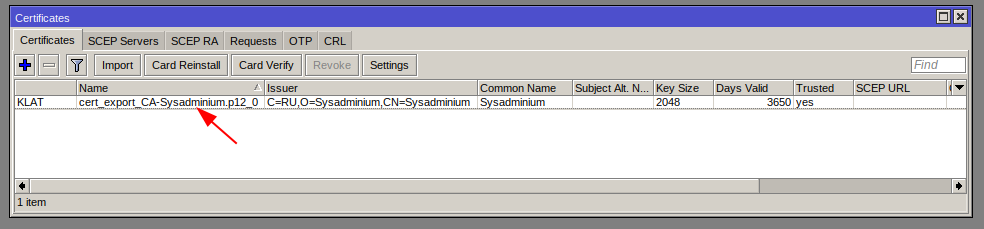
Сохраним сертификат нажав кнопку Apply, и подпишем его нажав кнопку Sign. При подписании нужно указать корневой сертификат, созданный нами ранее:
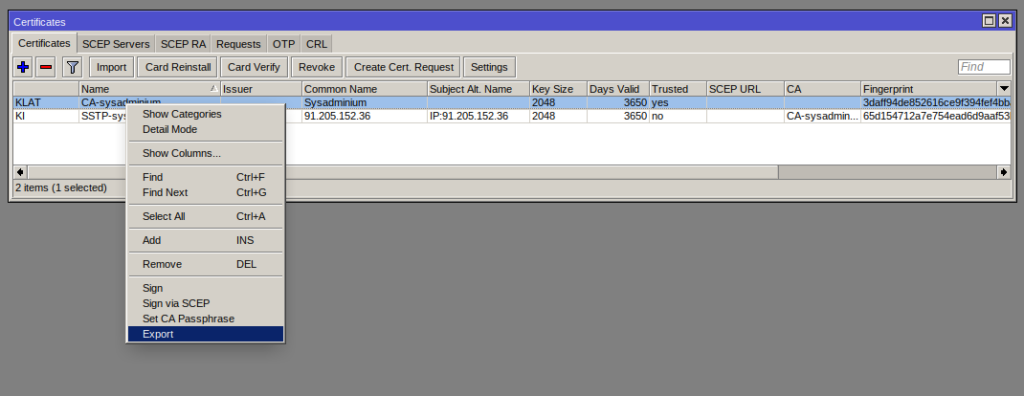
В итоге получилось два сертификата:

Экспорт корневого сертификата
На второй роутер нужно будет установить корневой сертификат, поэтому экспортируем его. Для этого нажимаем на нём правой кнопкой мыши и выбираем Export:
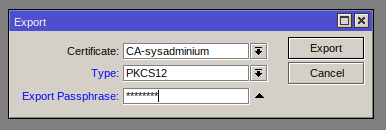
В открывшемся окне, в поле Type ставим PKCS12 и придумываем пароль:
Найти и скачать выгруженный сертификат можно в разделе Files.
Создание сервера SSTP
Переходим в раздел PPP и для начала создадим новый профиль, это делается на вкладке Profiles. При создании нового профиля заполняем поля на вкладках:
- General — укажем имя профиля, локальный и удалённый адрес для VPN-соединения;
- Protocols — выбираем Use Encription;
- Limits — я указываю, что к серверу с таким профилем может подключиться только 1 клиент:
Теперь создаем секрет (логин и пароль для подключения). Для этого переходим на вкладку Secrets и создаём новый секрет. При создании секрета укажем имя, пароль, сервис и используемый профиль:
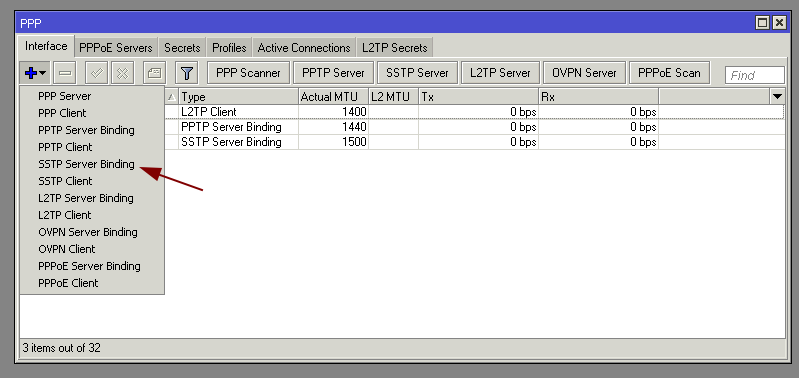
Теперь добавляем интерфейс сервера SSTP, для этого переходим на вкладку Interface. И добавляем SSTP Server Binding:
Заполняем поля (в поле User нужно указать имя придуманное в секрете):
Получился такой интерфейс сервера SSTP к которому можно подключаться:
Осталось настроить и включить SSTP Server, для этого нажимаем кнопку SSTP Server:
В открывшемся окне заполняем следующие поля:
Здесь нужно указать сертификат, подготовленный профиль, и включить сервер (Enable). Дополнительно я указал версию TLS — only-1.2.
Настройка фаервола
Если у вас фаервол настроен как нормально-закрытый, то есть, что не разрешено, то запрещено. То вам нужно разрешить входящее подключение к SSTP серверу, который работает на 443 порту. Для этого открываем IP / Firewall и создаём новое правило:
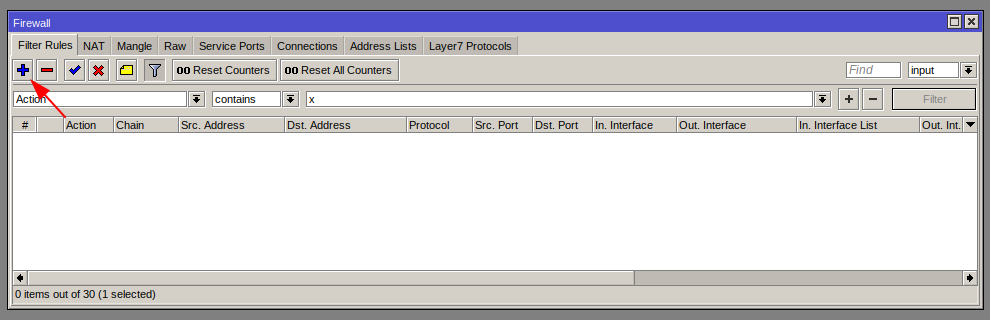
Заполняем следующие поля:
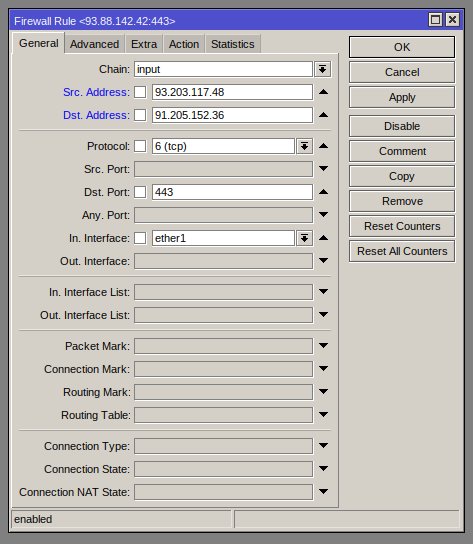
Здесь я разрешил входящий трафик (input) с внешнего адреса второго роутера (Src. Address) на внешний адрес этого роутера (Dst. Address). Дополнительно, проверяется протокол (Protocol) и порт подключения (Dst. Port) и входящий интерфейс (In. Interface).
Нажимаем OK и поднимаем это разрешающее правило выше ваших запрещающих правил.
Настройка второго роутера
Загрузка и импорт сертификата
Для начала загрузим на второй роутер корневой сертификат подготовленный на первом. Для этого открываем File и кидаем туда сертификат:
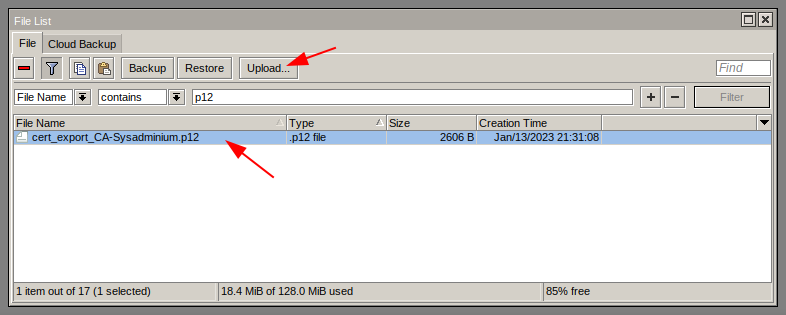
Импортируем сертификат, для этого открываем System / Certificates и нажимаем кнопку Import. Выбираем файл и вводим пароль:
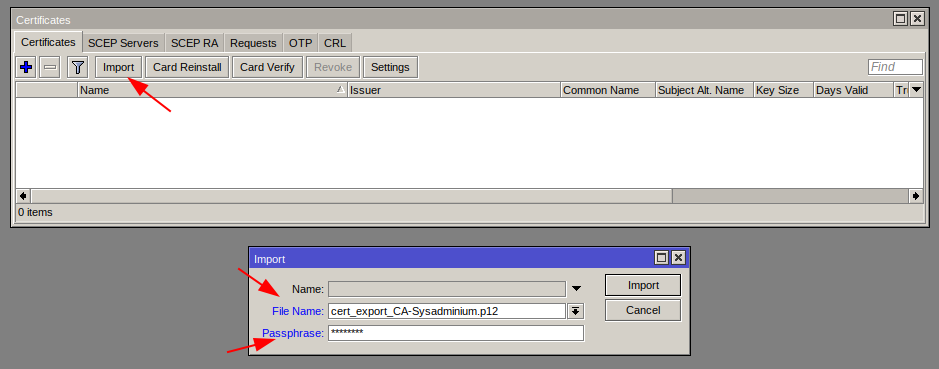
В списке сертификатов появится наш сертификат:
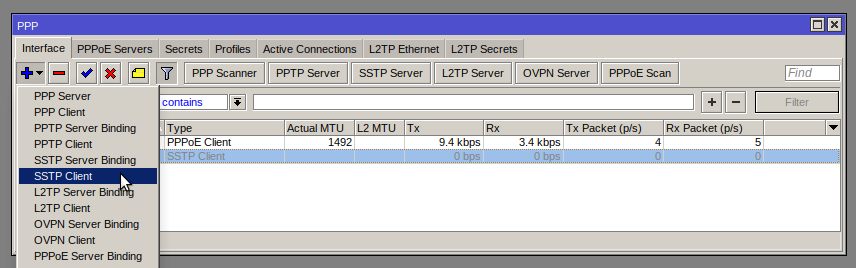
Создание исходящего SSTP интерфейса
Дальше переходим в раздел PPP и создаём исходящий SSTP интерфейс (SSTP Client) на вкладке Interface:
И заполняем следующие поля:
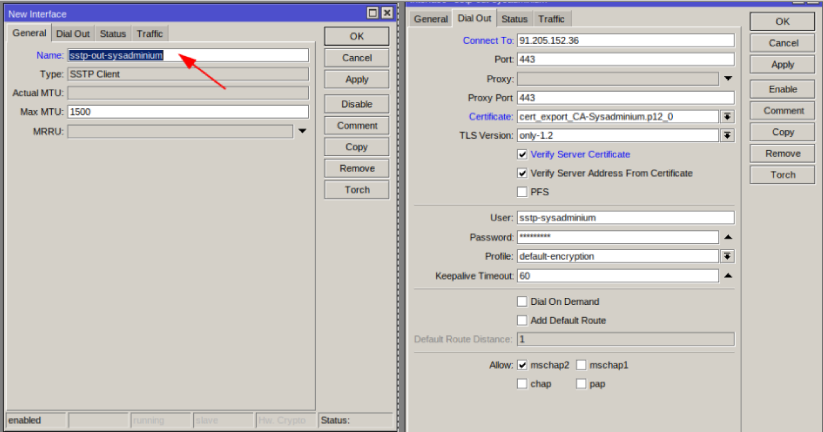
Здесь нужно указать:
- Внешний IP-адрес первого роутера (к которому мы подключаемся);
- Сертификат, которой мы только что импортировали;
- TLS Version — only-1.2;
- Поставим галочку «Verify Server Certificate«;
- Логин и пароль;
- В Allow разрешаем только mschap2.
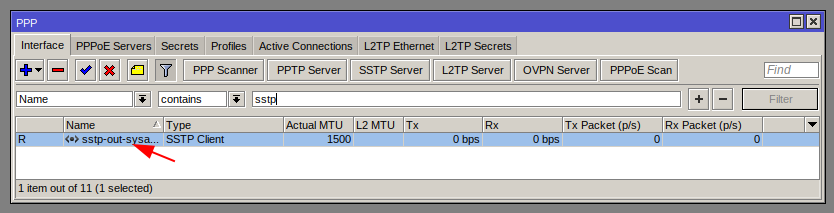
И нажимаем OK. После этого VPN должен подняться:
Настройка маршрутизации на обоих роутерах
Если помните, когда мы настраивали сервер SSTP, то мы создали профиль:

Здесь мы указали, что IP адрес на первом роутере будет 10.10.0.1, а на втором 10.10.0.2. То есть нам нужно создать два маршрута:
- На первом роутере — если мы идём в локальную сеть второго офиса (192.168.1.0/24), то нужно идти на 10.10.0.2;
- На втором роутере — если мы идём в локальную сеть первого офиса (192.168.0.0/24), то нужно идти на 10.10.0.1.
Переходим в IP / Routes и создаём новый маршрут.
На первом роутере:
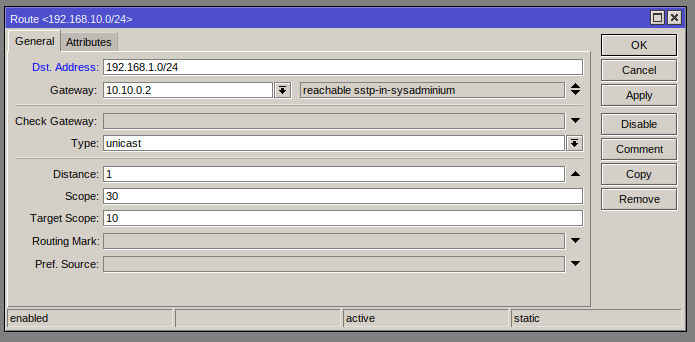
На втором роутере:
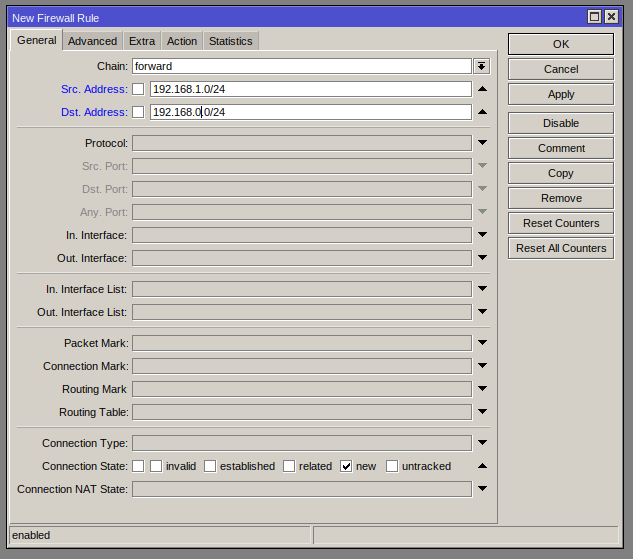
Настройка фаервола на обоих роутерах
Осталось настроить фаервол, чтобы компьютеры из первого офиса могли достучаться до компьютеров из второго офиса и наоборот. На обоих роутерах нужно сделать по два одинаковых правила.
Первое правило разрешает подключаться из первой сети во вторую:
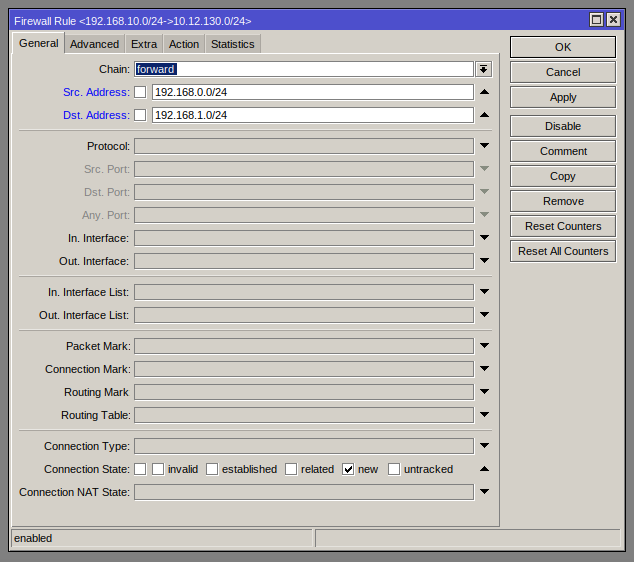
Второе правило разрешает подключаться из второй сети в первую:
Итог
После проделанных манипуляций компьютеры в обоих офисах смогут достучаться друг до друга по протоколу IP. То есть они смогут пинговать друг друга, подключаться по RDP, открывать веб странички (если в каком-то из офисов есть WEB-сервер) и выполнять другие подобные действия.
Сводка

Имя статьи
MikroTik SSTP — соединение двух офисов
Описание
В этой статье описывается процесс объединения двух офисов с помощью VPN протокола SSTP на базе двух роутеров MikroTik
![]()
Applies to RouterOS: v5, v6+
Summary
Standards: SSTP specification
Package: ppp
Secure Socket Tunneling Protocol (SSTP) transports a PPP tunnel over a TLS channel. The use of TLS over TCP port 443 allows SSTP to pass through virtually all firewalls and proxy servers.
SSTP connection mechanism

- TCP connection is established from client to server (by default on port 443);
- SSL validates server certificate. If certificate is valid connection is established otherwise connection is torn down. (But see note below)
- The client sends SSTP control packets within the HTTPS session which establishes the SSTP state machine on both sides.
- PPP negotiation over SSTP. Client authenticates to the server and binds IP addresses to SSTP interface
- SSTP tunnel is now established and packet encapsulation can begin.
![]()
Note: Starting from v5.0beta2 SSTP does not require certificates to operate and can use any available authentication type. This feature will work only between two MikroTik routers, as it is not in accordance with Microsoft standard. Otherwise to establish secure tunnels mschap authentication and client/server certificates from the same chain should be used. Read more>>
Currently, SSTP clients exist in Windows Vista, Windows 7, Windows 8, Linux and RouterOS.
![]()
Note: While connecting to SSTP server, Windows does CRL (certificate revocation list) checking on server certificate which can introduce a significant delay to complete a connection or even prevent the user from accessing the SSTP server at all if Windows is unable to access CRL distribution point! Custom generated CA which does not include CRLs can be used to minimize connection delays and certificate costs (signed certificates with known CA usually are not for free), but this custom CA must be imported into each Windows client individually. It is possible to disable CRL check in Windows registry, but it is supported only by Windows Server 2008 and Windows 7 http://support.microsoft.com/kb/947054
Certificates
![]()
Note: Starting from RouterOS v6rc10 SSTP respects CRL
To set up a secure SSTP tunnel, certificates are required. On the server, authentication is done only by username and password, but on the client — the server is authenticated using a server certificate. It is also used by the client to cryptographically bind SSL and PPP authentication, meaning — the clients sends a special value over SSTP connection to the server, this value is derived from the key data that is generated during PPP authentication and server certificate, this allows the server to check if both channels are secure.
If SSTP clients are Windows PCs then only way to set up a secure SSTP tunnel when using self-signed certificate is by importing the «server» certificate on SSTP server and on the Windows PC adding CA certificate in trusted root.
![]()
Note: If your server certificate is issued by a CA which is already known by Windows, then the Windows client will work without any additional certificates.
![]()
Warning: RSA Key length must be at least 472 bits if certificate is used by SSTP. Shorter keys are considered as security threats.
Similar configuration on RouterOS client would be to import the CA certificate and enabling verify-server-certificate option. In this scenario Man-in-the-Middle attacks are not possible.
Between two Mikrotik routers it is also possible to set up an insecure tunnel by not using certificates at all. In this case data going through SSTP tunnel is using anonymous DH and Man-in-the-Middle attacks are easily accomplished. This scenario is not compatible with Windows clients.
It is also possible to make a secure SSTP tunnel by adding additional authorization with a client certificate.
Configuration requirements are:
- certificates on both server and client
- verification options enabled on server and client
This scenario is also not possible with Windows clients, because there is no way to set up client certificate on Windows.
Certificate error messages
When ssl handshake fails, you will see one of the following certificate errors:
- certificate is not yet valid — notBefore certificate date is after the current time.
- certificate has expired — notAfter certificate expiry date is before the current time.
- invalid certificate purpose — the supplied certificate cannot be used for the specified purpose.
- self signed certificate in chain — the certificate chain could be built up using the untrusted certificates but the root could not be found locally.
- unable to get issuer certificate locally — CA certificate is not imported locally.
- server’s IP address does not match certificate — server address verification is enabled, but address provided in certificate does not match server’s address.
Hostname verification
Server certificate verification is enabled on SSTP client, additionally if IP addresses or DNS name found in certificate’s subjectAltName or common-name then issuer CN will be compared to the real servers address.
v5.7 adds new parameter verify-server-address-from-certificate to disable/enable hostname verification.
SSTP Client
Sub-menu: /interface sstp-client
Properties
| Property | Description |
|---|---|
| add-default-route (yes | no; Default: no) | Whether to add SSTP remote address as a default route. |
| authentication (mschap2 | mschap1 | chap | pap; Default: mschap2, mschap1, chap, pap) | Allowed authentication methods. |
| certificate (string | none; Default: none) | |
| comment (string; Default: ) | Descriptive name of an item |
| connect-to (IP:Port; Default: 0.0.0.0:443) | Remote address and port of SSTP server. |
| default-route-distance (byte [0..255]; Default: 1) | sets distance value applied to auto created default route, if add-default-route is also selected |
| dial-on-demand (yes | no; Default: no) | connects to AC only when outbound traffic is generated. If selected, then route with gateway address from 10.112.112.0/24 network will be added while connection is not established. |
| disabled (yes | no; Default: yes) | Whether interface is disabled or not. By default it is disabled. |
| http-proxy (IP:Port; Default: 0.0.0.0:443) | Address and port of HTTP proxy server. |
| keepalive-timeout (integer | disabled; Default: 60) | Sets keepalive timeout in seconds. |
| max-mru (integer; Default: 1500) | Maximum Receive Unit. Max packet size that SSTP interface will be able to receive without packet fragmentation. |
| max-mtu (integer; Default: 1500) | Maximum Transmission Unit. Max packet size that SSTP interface will be able to send without packet fragmentation. |
| mrru (disabled | integer; Default: disabled) | Maximum packet size that can be received on the link. If a packet is bigger than tunnel MTU, it will be split into multiple packets, allowing full size IP or Ethernet packets to be sent over the tunnel. Read more >> |
| name (string; Default: ) | Descriptive name of the interface. |
| password (string; Default: «») | Password used for authentication. |
| pfs (yes | no; Default: no) | Enables «Perfect Forward Secrecy» which will make sure that private encryption key is generated for each session. Must be enabled on both server and client to work. |
| profile (name; Default: default-encryption) | Used PPP profile. |
| user (string; Default: ) | User name used for authentication. |
| tls-version (any | only-1.2; Default: any) | Specifies which TLS versions to allow |
| verify-server-certificate (yes | no; Default: no) | If set to yes, then client checks whether certificate belongs to the same certificate chain as server’s certificate. To make it work CA certificate must be imported. |
| verify-server-address-from-certificate (yes | no; Default: yes) | If set to yes, server’s IP address will be compared to one set in certificate. Read More >> |
Quick example
This example demonstrates how to set up SSTP client with username «sstp-test», password «123» and server 10.1.101.1
/interface sstp-client add user=sstp-test password=123 connect-to=10.1.101.1 disabled=no
/interface sstp-client print
Flags: X - disabled, R - running
 0  R name="sstp-out1" max-mtu=1500 max-mru=1500 mrru=disabled connect-to=10.1.101.1:443
      http-proxy=0.0.0.0:443 certificate=none verify-server-certificate=no
      verify-server-address-from-certificate=yes user="sstp-test" password="123"
      profile=default keepalive-timeout=60 add-default-route=no dial-on-demand=no
      authentication=pap,chap,mschap1,mschap2
SSTP Server
Sub-menu: /interface sstp-server
This sub-menu shows interfaces for each connected SSTP client.
An interface is created for each tunnel established to the given server. There are two types of interfaces in SSTP server’s configuration
- Static interfaces are added administratively if there is a need to reference the particular interface name (in firewall rules or elsewhere) created for the particular user.
- Dynamic interfaces are added to this list automatically whenever a user is connected and its username does not match any existing static entry (or in case the entry is active already, as there can not be two separate tunnel interfaces referenced by the same name).
Dynamic interfaces appear when a user connects and disappear once the user disconnects, so it is impossible to reference the tunnel created for that use in router configuration (for example, in firewall), so if you need a persistent rules for that user, create a static entry for him/her. Otherwise it is safe to use dynamic configuration.
![]()
Note: in both cases PPP users must be configured properly — static entries do not replace PPP configuration.
Server configuration
Sub-menu: /interface sstp-server server
Properties:
| Property | Description |
|---|---|
| authentication (pap | chap | mschap1 | mschap2; Default: pap,chap,mschap1,mschap2) | Authentication methods that server will accept. |
| certificate (name | none; Default: none) | Name of the certificate that SSTP server will use. |
| default-profile (name; Default: default) | |
| enabled (yes | no; Default: no) | Defines whether SSTP server is enabled or not. |
| force-aes (yes | no; Default: no) | Force AES encryption (AES256 is supported). If enabled windows clients (supports only RC4) will be unable to connect. |
| keepalive-timeout (integer | disabled; Default: 60) | If server during keepalive period does not receive any packet, it will send keepalive packets every second five times. If the server does not receives response from the client, then disconnect after 5 seconds. Logs will show 5x «LCP missed echo reply» messages and then disconnect. |
| max-mru (integer; Default: 1500) | Maximum Receive Unit. Max packet size that SSTP interface will be able to receive without packet fragmentation. |
| max-mtu (integer; Default: 1500) | Maximum Transmission Unit. Max packet size that SSTP interface will be able to send without packet fragmentation. |
| mrru (disabled | integer; Default: disabled) | Maximum packet size that can be received on the link. If a packet is bigger than tunnel MTU, it will be split into multiple packets, allowing full size IP or Ethernet packets to be sent over the tunnel. Read more >> |
| pfs (yes | no; Default: no) | Enables «Perfect Forward Secrecy» which will make sure that private encryption key is generated for each session. Must be enabled on both server and client to work. |
| port (integer; Default: 443) | Port for SSTP service to listen on. |
| tls-version (any | only-1.2; Default: any) | Specifies which TLS versions to allow |
| verify-client-certificate (yes | no; Default: no) | If set to yes, then server checks whether client’s certificate belongs to the same certificate chain. |
/interface sstp-server server set certificate=server
/interface sstp-server server set enabled=yes
/interface sstp-server server print
                    enabled: no
                       port: 443
                    max-mtu: 1500
                    max-mru: 1500
                       mrru: disabled
          keepalive-timeout: 60
            default-profile: default
             authentication: pap,chap,mschap1,mschap2
                certificate: none
  verify-client-certificate: no
                  force-aes: no
![]()
Warning:
It is very important that the date on the router is within the range of the certificate’s date of expiration. To overcome any certificate verification problems, enable NTP date synchronization on both server and client.
Monitoring
Monitor command can be used to monitor status of the tunnel on both client and server.
/interface sstp-server monitor 0
     status: "connected"
     uptime: 17m47s
  idle-time: 17m47s
       user: "sstp-test"
  caller-id: "10.1.101.18:43886"
        mtu: 1500
Read-only properties
| Property | Description |
|---|---|
| status () | Current SSTP status. Value other than «connected» indicates that there are some problems estabising tunnel. |
| uptime (time) | Elapsed time since tunnel was established. |
| idle-time (time) | Elapsed time since last activity on the tunnel. |
| user (string) | Username used to establish the tunnel. |
| mtu (integer) | Negotiated and used MTU |
| caller-id (IP:ID) |
Application Examples
Connecting Remote Client
The following example shows how to connect a computer to a remote office network over secure SSTP encrypted tunnel giving that computer an IP address from the same network as the remote office has (without the need for bridging over EoIP tunnels)
Consider following setup:
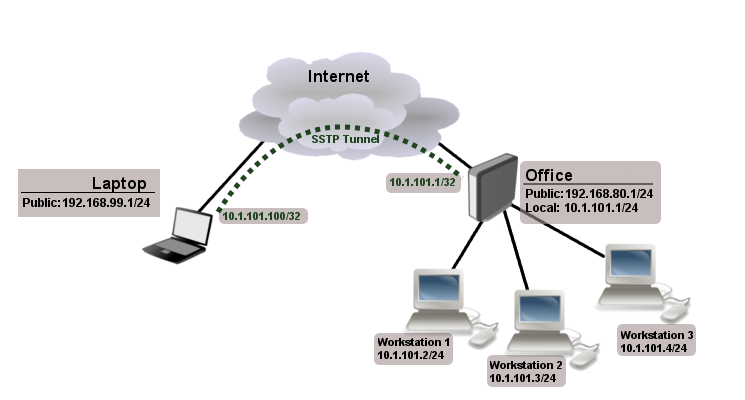
Office router is connected to internet through ether1. Workstations are connected to ether2.
Laptop is connected to the internet and can reach Office router’s public IP (in our example it is 192.168.80.1).
Before you begin to configure SSTP you need to create a server certificate and import it into the router (instructions here).
Now it is time to create a user:
/ppp secret add name=Laptop service=sstp password=123 local-address=10.1.101.1 \
    remote-address=10.1.101.100
/ppp secret print detail
Flags: X - disabled
  0   name="Laptop" service=sstp caller-id="" password="123" profile=default
      local-address=10.1.101.1 remote-address=10.1.101.100 routes==""
Notice that SSTP local address is the same as the router’s address on the local interface and the remote address is from the same range as the local network (10.1.101.0/24).
Next step is to enable SSTP server and SSTP client on the laptop:
/interface sstp-server server set certificate=server
/interface sstp-server server set enabled=yes
/interface sstp-server server set authentication=mschap2
/interface sstp-server server print
                     enabled: yes
                        port: 443
                     max-mtu: 1500
                     max-mru: 1500
                        mrru: disabled
           keepalive-timeout: 60
             default-profile: default
                 certificate: server
  verify-client-certificate: no
              authentication: mschap2
Notice that authentication is set to mschap. These are the only authentication options that are valid to establish a secure tunnel.
SSTP client from the laptop should connect to routers public IP which in our example is 192.168.80.1.
Please, consult the respective manual on how to set up a SSTP client with the software you are using. If you set up SSTP client on Windows and self-signed certificates are used, then CA certificate should be added to trusted root.
![]()
Note: Currently, SSTP is only fully supported on recent Windows OS releases such as Vista SP1, Windows 7, Windows 8, Windows 2008 etc. With other OS’s such as Linux, results cannot be guaranteed.
To verify if SSTP client is connected
/interface sstp-server print
Flags: X - disabled, D - dynamic, R - running
 #     NAME      USER         MTU        CLIENT-ADDRESS    UPTIME   ENCODING
 0  DR <sstp-... Laptop     1500       10.1.101.18:43886 1h47s
/interface sstp-server monitor 0
     status: "connected"
     uptime: 1h45s
  idle-time: 1h45s
       user: "Laptop"
  caller-id: "192.168.99.1:43886"
        mtu: 1500
At this point (when SSTP client is successfully connected) if you try to ping any workstation from the laptop, ping will time out, because Laptop is unable to get ARPs from workstations. Solution is to set up proxy-arp on local interface
/interface ethernet set ether2 arp=proxy-arp
/interface ethernet print
Flags: X - disabled, R - running
  #    NAME                 MTU   MAC-ADDRESS         ARP
  0  R ether1              1500  00:30:4F:0B:7B:C1 enabled
  1  R ether2              1500  00:30:4F:06:62:12 proxy-arp
After proxy-arp is enabled client can successfully reach all workstations in the local network behind the router.
Site-to-Site SSTP
The following is an example of connecting two Intranets using SSTP tunnel over the Internet.
Consider following setup:
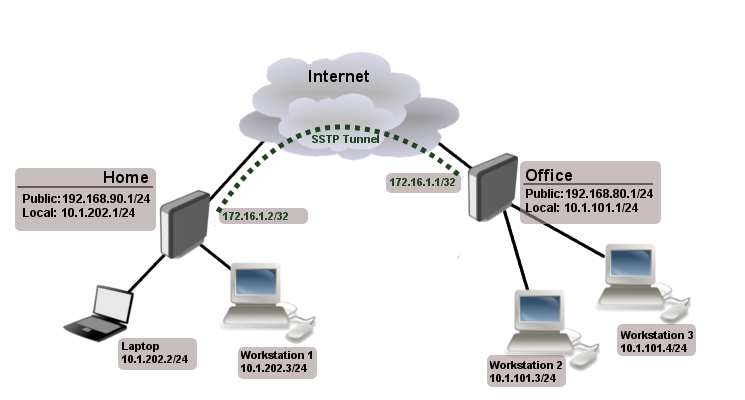
Office and Home routers are connected to internet through ether1, workstations and laptops are connected to ether2.
In this example both local networks are routed through SSTP client, thus they are not in the same broadcast domain. To overcome this problem as with any other ppp tunnel, SSTP also supports BCP which allows it to bridge SSTP tunnel with a local interface.
First step is to create a user:
/ppp secret add name=Home service=sstp password=123 local-address=172.16.1.1 \
  remote-address=172.16.1.2 routes="10.1.202.0/24 172.16.1.2 1"
/ppp secret print detail
Flags: X - disabled
  0   name="Home" service=sstp caller-id="" password="123" profile=default
      local-address=172.16.1.1 remote-address=172.16.1.2 routes=="10.1.202.0/24 172.16.1.2 1"
Notice that we set up SSTP to add a route whenever the client connects. If this option is not set, then you will need a static routing configuration on the server to route traffic between sites through the SSTP tunnel.
Now we need to upload and import CA and server/client certificates. Assuming that the files are already uploaded use following commands:
/certificate import file-name=ca.crt
passphrase:
/certificate import file-name=server.crt
passphrase: ****
/certificate import file-name=server.key
passphrase: ****
Edit names to something more meaningful:
/certificate set 0 name=CA
/certificate set 1 name=server
/certificate print
Flags: K - decrypted-private-key, Q - private-key, R - rsa, D - dsa
 0  D name="CA" subject=C=LV,ST=RI,L=Riga,O=MT,CN=MT CA,emailAddress=xx@mt.lv
      issuer=C=LV,ST=RI,L=Riga,O=MT,CN=MT CA,emailAddress=xx@mt.lv
      serial-number="DF626FA846090BCC" email=xx@mt.lv invalid-before=jun/25/2008 07:23:50
      invalid-after=jun/23/2018 07:23:50 ca=yes

 1 KR name="server" subject=C=LV,ST=RI,L=Riga,O=MT,CN=server,emailAddress=xx@mt.lv
      issuer=C=LV,ST=RI,L=Riga,O=MT,CN=MT CA,emailAddress=xx@mt.lv serial-number="01"
      email=xx@mt.lv invalid-before=jun/25/2008 07:24:33 invalid-after=jun/23/2018 07:24:33
      ca=yes
Do the same on client side, but instead of server’s certificate import client’s certificate.
Next step is to enable SSTP server on the office router:
/interface sstp-server server set certificate=server
/interface sstp-server server set enabled=yes
/interface sstp-server server set verify-client-certificate=yes
/interface sstp-server server print
                     enabled: yes
                        port: 443
                     max-mtu: 1500
                     max-mru: 1500
                        mrru: disabled
           keepalive-timeout: 60
             default-profile: default
                 certificate: server
  verify-client-certificate: yes
              authentication: pap,chap,mschap1,mschap2
Now configure SSTP client on the Home router:
/interface sstp-client add user=Home password=123 connect-to=192.168.80.1 disabled=no \
  certificate=client verify-server-certificate=yes
/interface sstp-client print
Flags: X - disabled, R - running
 0  R name="sstp-out1" max-mtu=1500 max-mru=1500 mrru=disabled connect-to=192.168.80.1:443
       user="Home" password="123" proxy=0.0.0.0:443 profile=default certificate=client
       keepalive-timeout=60 add-default-route=no dial-on-demand=no
       authentication=pap,chap,mschap1,mschap2 verify-server-certificate=yes
Now we need to add static route on Home router to reach local network behind Office router:
/ip route add dst-address=10.1.101.0/24 gateway=sstp-out1
After tunnel is established you should be able to ping remote network.
Troubleshooting
- After Windows 7 upgrade SSTP is unable to connect (windows error 631) ?
- MS Patch KB2585542 changes cypher to RC4 which was not supported on RouterOS. Starting from RouterOS v5.13 RC4 is the preferred cipher and AES will be used only if peer does not advertise RC4.
- I get following error when trying to connect Windows 7 client. Error 0x80070320 The oplock that was associated with this handle is now associated with a different handle.
- Disable verify-client-certificate option on the server.
- I get following error «Encryption negotiation rejected”.
- Disable use-encryption option in ppp profile.
Read More
- Creating Certificates
- BCP (Bridge Control Protocol)
- Microsoft SSTP Remote Access Step-by-Step Guide
- Free trusted Class1 certificates from startssl.com
- Free Linux SSTP Client
[ Top | Back to Content ]
Материал из MikroTik Wiki
В статье разбирается настройка SSTP-туннеля без использования сертификатов на оборудовании MikroTik с целью объединения двух сетей (site-to-site VPN). После создания VPN-канала между сетями будет настроена маршрутизация и выполнена проверка работоспособности. Также будут разобраны типичные проблемы, которые могут возникнуть в процессе настройки и проверки.
Схема сети

В головном офисе установлен маршрутизатор GW1. Он же будет настроен в качестве VPN-сервера. В филиале установлен маршрутизатор GW2, который будет настроен как VPN-клиент. Аутентификация будет происходить по имени пользователя и паролю.
Головной офис
IP-адрес внешней сети головного офиса: 10.1.100.0/24
IP-адрес внешнего интерфейса маршрутизатора GW1: 10.1.100.1/24
IP-адрес внутренней сети головного офиса: 192.168.15.0/24
IP-адрес внутреннего интерфейса маршрутизатора GW1: 192.168.15.1/24
Филиал
IP-адрес внешней сети головного офиса: 10.1.200.0/24
IP-адрес внешнего интерфейса маршрутизатора GW2: 10.1.200.1/24
IP-адрес внутренней сети головного офиса: 192.168.25.0/24
IP-адрес внутреннего интерфейса маршрутизатора GW2: 192.168.25.1/24
VPN-канал
IP-адрес VPN-интерфейса маршрутизатора GW1: 172.16.30.1/32
IP-адрес VPN-интерфейса маршрутизатора GW2: 172.16.30.2/32
Настройка
Настройка первого маршрутизатора
Через графический интерфейс
Включить SSTP-сервер. Оставим только аутентификацию «mschap2» как наиболее надежную и отключим проверку клиентского сертификата.

Создать новый аккаунт. Для дальнейшего удобства лучше задавать имена так, что бы сразу можно было определить к кому или чему они относятся. Т. е. имена типа user1, user2, user3 и т. д. не желательны в виду того, что в случае увеличения их количества будет тяжело сопоставить реальных пользователей аккаунтов и сами аккаунты.

Создать статическую запись SSTP сервера. Это действие не обязательно, т. к. если запись не создать вручную, то при каждом подключении она будет создаваться динамически. Но при этом наличие этой записи облегчает дальнейшую настройку и диагностику.


Через консоль
/interface sstp-server server
set authentication=mschap2 certificate=none enabled=yes verify-client-certificate=no
/ppp secret
add name=user1 password=user1-password local-address=172.16.30.1 remote-address=172.16.30.2 profile=default service=sstp disabled=no
/interface sstp-server
add name="SSTP Server for filial1" user=user1
Настройка второго маршрутизатора
Через графический интерфейс
Создать интерфейс для подключения к первому маршрутизатору. Здесь так же оставляем только аутентификацию «mschap2«.


Через консоль
/interface sstp-client
add authentication=mschap2 connect-to=10.1.100.1 disabled=no name="SSTP HQ connection" password=user1-password user=user1 verify-server-address-from-certificate=no verify-server-certificate=no
Настройка маршрутизации
Если на предыдущих шагах все было сделано верно, то VPN-соединение между двумя офисами было установлено, но для того, что бы обе сети могли обмениваться информацией друг с другом они должны знать друг о друге, т. е. между ними должна быть настроена маршрутизация. Для этого надо выполнить следующие шаги:
На первом маршрутизаторе
Через графический интерфейс
Выполнить следующие настройки:
Dst. Address: 192.168.25.0/24 (адрес сети к которой указываем маршрут)
Gateway: 172.16.30.2 (интерфейс через который можно «добраться» до сети)
Pref. Source: 192.168.15.1 (интерфейс с которого будут идти запросы к сети)
Комментарий указать по нажатию кнопки «Comment» (не обязательно)
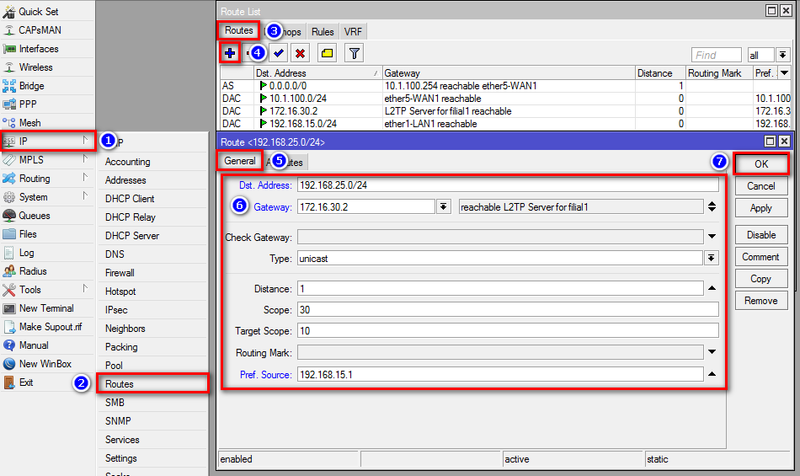
Через консоль
/ip route
add comment="route to filial1 through VPN" dst-address=192.168.25.0/24 gateway=172.16.30.2 pref-src=192.168.15.1
На втором маршрутизаторе
Через графический интерфейс
Выполнить следующие настройки:
Dst. Address: 192.168.15.0/24 (адрес сети к которой указываем маршрут)
Gateway: 172.16.30.1 (интерфейс через который можно «добраться» до сети)
Pref. Source: 192.168.25.1 (интерфейс с которого будут идти запросы к сети)
Комментарий указать по нажатию кнопки «Comment» (не обязательно)
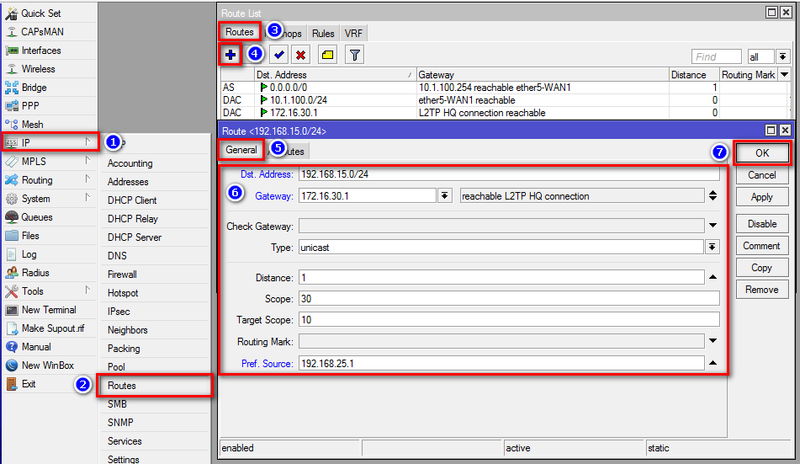
Через консоль
/ip route
add comment="route to HQ through VPN" dst-address=192.168.15.0/24 gateway=172.16.30.1 pref-src=192.168.25.1
HQ — это аббревиатура от headquarter, что в переводе означает головной офис.
Параметр Pref. Source (pref-src) не является обязательным. Он становится нужен, если количество филиалов будет более одного. Без этого параметра не будут проходить ping'и с маршрутизатора одного филиала до хостов и внутреннего интерфейса маршрутизатора другого филиала. Не будут проходить ping'и именно с маршрутизаторов, т. е. между хостами двух филиалов связь будет.
Следует учесть
Проверка
Проверка состоит из двух частей:
- Надо убедиться, что между двумя маршрутизаторами MikroTik установлено VPN-соединение. Это описано ниже.
- Если VPN-соединение установлено успешно, то далее надо проверить есть ли связь между хостами в двух сетях. Для этого достаточно запустить ping с любого компьютера в сети на любой компьютер другой сети.
Через графический интерфейс
Если подключение установлено, то статус подключения должен отображаться с буквой «R«. Что значит running, т. е. запущено.

Через консоль
Выполнить команду
/interface sstp-server print — на сервере
/interface sstp-client print — на клиенте
Если соединение установлено успешно, то статус подключения, так же, как и через графический интерфейс, должен отображаться с буквой «R«.


Типичные проблемы
- Если VPN-соединение между двумя маршрутизаторами MikroTik не устанавливается, то надо проверить:
- Не мешает ли файервол. Для уверенности лучше временно отключить все правила файерволов на обоих маршрутизаторах. Стандартные настройки файерволов можно посмотреть здесь.
- Совпадают ли имя пользователя и пароль на обоих маршрутизаторах.
- На VPN-клиенте указан правильный адрес VPN-сервера к которому должно происходить подключение.
- Если не проходит ping между двумя компьютерами в разных сетях, то надо проверить:
- Правильно ли сделаны настройки маршрутизации на обоих маршрутизаторах не зависимо от того из какой сети в какую будет идти пинг.
- На брэндмауэре компьютера, который будет пинговаться, сделаны необходимые разрешения для протокола ICMP. Для уверенности можно отключить встроенный брэндмауэр и выгрузить антивирус.
Полезные материалы по MikroTik
Полезные статьи
Видеоурок
Загрузить видео