In the digital era, data security is of utmost importance. Whether it is name, address, or bank details, everything we share online is at the risk of being intercepted by attackers. SSL (Secure Sockets Layer) certificates help keep sensitive information safe by encrypting the data sent between a website and a user’s browser. Installing an SSL certificate on Windows Server 2019 is a crucial step to ensure the security of online transactions.
Video Tutorial:
Why You Need to Install SSL Certificate on Windows Server 2019
Installing an SSL certificate on Windows Server 2019 is critical for several reasons. Firstly, an SSL certificate protects users’ sensitive data from being stolen by hackers. Secondly, Google favors secure websites with an SSL certificate, positively impacting the website’s search engine rankings and online visibility. Lastly, an SSL certificate displays a padlock icon in the user’s browser, indicating that the website is secure, resulting in more brand trust and credibility.
Method 1: Via IIS Manager
Before proceeding with this method, you must ensure that you have an installed SSL certificate and its associated private key.
1. Launch IIS Manager on your Windows Server 2019.
2. Click on your server’s hostname in the Server Connections pane.
3. In the server’s features window, double-click on the “Server Certificates” icon.
4. In the Actions pane on the right, click on “Complete Certificate Request”.
5. Browse and select the location of the SSL certificate file.
6. Enter a friendly name for the certificate.
7. From the “Certificate Store” drop-down, select “Personal.”
8. Click OK and your SSL certificate is now installed.
Pros:
– Easy and straightforward method
– The certificate can be installed quickly
– No need for any additional software or tools
Cons:
– The SSL certificate must be in .pfx format to be installed via IIS Manager
– This method might not work if your server is running an older version of IIS.
Method 2: Via Certificate Snap-in
1. Open the Microsoft Management Console (MMC) on your Windows Server 2019.
2. Click on “File” and select “Add/Remove Snap-in.”
3. Choose “Certificates” and click on “Add.”
4. Select “Computer account” and click “Next.”
5. Choose “Local Computer” and click “Finish.”
6. In the left pane, navigate to “Personal” and right-click “Certificates.”
7. Move your cursor to “All Tasks,” then select “Import Certificate.”
8. Browse and select your SSL certificate, enter its associated password, and click “Next.”
9. Choose “Automatically select the certificate store based on the type of certificate” and click “Next.”
10. Click “Finish” and your SSL certificate is now installed.
Pros:
– Can import SSL certificates easily
– Doesn’t require additional tools or software
– Can import a .cer file format
Cons:
– You must manually place the certificate in the correct location.
– Additional steps may be required when configuring exported certificates
Method 3: Via PowerShell
1. Open PowerShell and run it as administrator.
2. Create a variable with your certificate file’s path and password:
$SecurePwd = ConvertTo-SecureString -String «YourCertificatePassword» -Force -AsPlainText
3. Import the certificate into the Certificate Store folder:
Import-PfxCertificate -FilePath -CertStoreLocation Cert:\LocalMachine\My -Password $SecurePwd
4. Get the thumbprint of your certificate:
Get-ChildItem -Path cert:\LocalMachine\My
5. Copy the certificate thumbprint and add it to IIS bindings for the website you want it to secure.
Pros:
– Provides more control and advanced configuration settings
– Useful for large-scale operations and automating SSL certificate management
Cons:
– PowerShell command line interface may be challenging for some users.
What to Do If You Can’t Install the SSL Certificate on Windows Server 2019?
If you encounter an error while attempting to install your SSL certificate on Windows Server 2019, here are a few fixes you can try:
– Ensure the SSL certificate you’re installing is compatible with Windows Server 2019.
– Verify that the certificate file format is in .pfx or .p12 format.
– Verify that the SSL certificate’s private key matches the public key.
– Ensure that the SSL certificate is not expired.
– Make sure the certificate is in the right folder and location on your server.
Bonus Tip
Once you have installed your SSL certificate on Windows Server 2019, consider redirecting all HTTP traffic to HTTPS. Doing this ensures that users connect via secure HTTPS protocols, providing encrypted communications and data integrity.
5 FAQs
Q1: Why do I need an SSL certificate?
A: SSL certificates encrypt the data sent between a website and a user’s browser. This helps keep users’ sensitive information safe from being stolen by hackers.
Q2: Can I install an SSL certificate on Windows Server 2012?
A: Yes, you can install an SSL certificate on Windows Server 2012 using the aforementioned methods.
Q3: Do I need to buy an SSL certificate, or can I generate a self-signed one?
A: While self-signed SSL certificates are free, they provide low-security and trustworthiness. Therefore, it is recommended to buy an SSL certificate from a trusted authority.
Q4: What happens if my SSL certificate expires?
A: If your SSL certificate expires, your website will become inaccessible, displaying an error message to users.
Q5: How do I renew or replace my SSL certificate?
A: You can renew or replace your SSL certificate by contacting your SSL certificate provider and following their instructions.
Final Thoughts
Installing an SSL certificate on Windows Server 2019 is a crucial step in ensuring the security of your website and users’ information. Whether you’re using IIS Manager, Certificate Snap-in, or PowerShell, be sure to follow the detailed steps in this blog post. Furthermore, redirect all HTTP traffic to HTTPS and keep your SSL certificate updated to ensure maximum protection against data breaches and cyber-attacks.
Posted By: Feb. 20, 2020
How to install an SSL Certificate on Windows Server 2019 Using IIS
An SSL Certificate is a small data file that creates a secure link between a website and a visitor’s browser. See how to install an SSL certificate on Microsoft Windows server 2019 using IIS.
SSLs has a public and private key that can be used to establish an encrypted connection between a web browser and a web server. The main reason for using SSL Certificates is to protect your sensitive information and your website.
In this tutorial, we will show you how to install an SSL certificate on Windows server 2019 with IIS.
Create Certificate Signing Request Using IIS
When you are applying or Ordering an SSL certificate, you will need to create CSR (Certificate Signing Request) on your server and send it to a Certificate Authority. The CSR validates the information the CA requires to issue a certificate. After validating the CSR, the Certificate Authority will use this data to generate and issue the SSL certificate.
You can create a CSR by following the below steps:
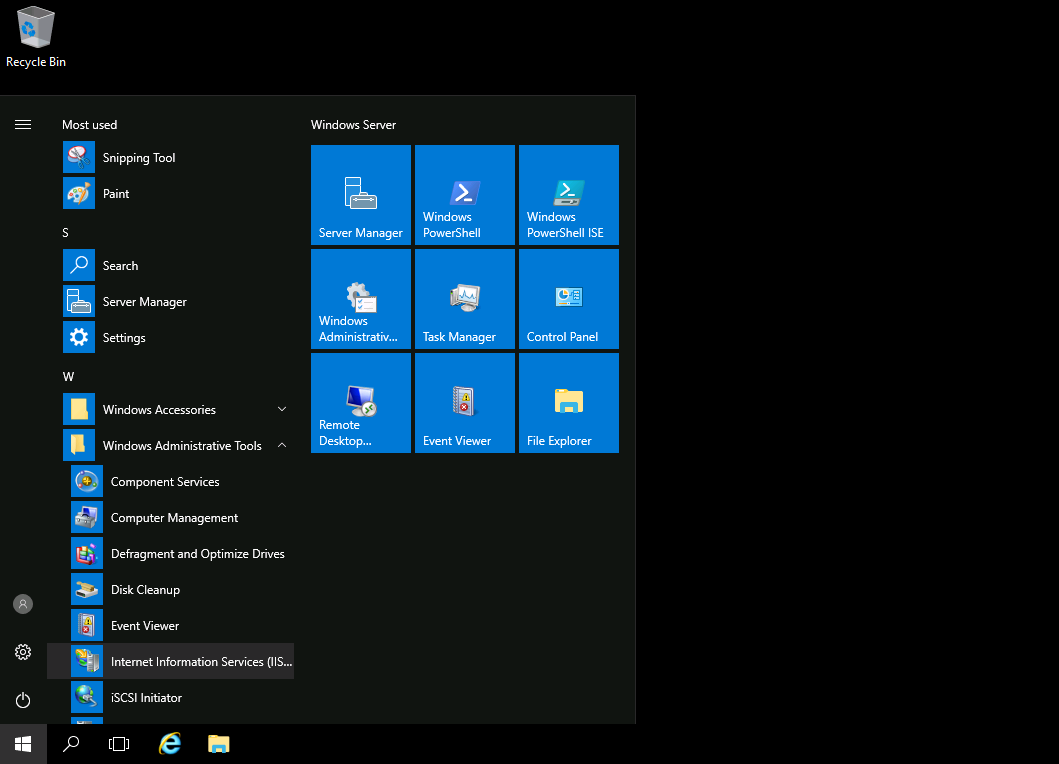
Step 1 – Go to Start > Administrative Tools > Internet Information Services (IIS) Manager, as shown below:
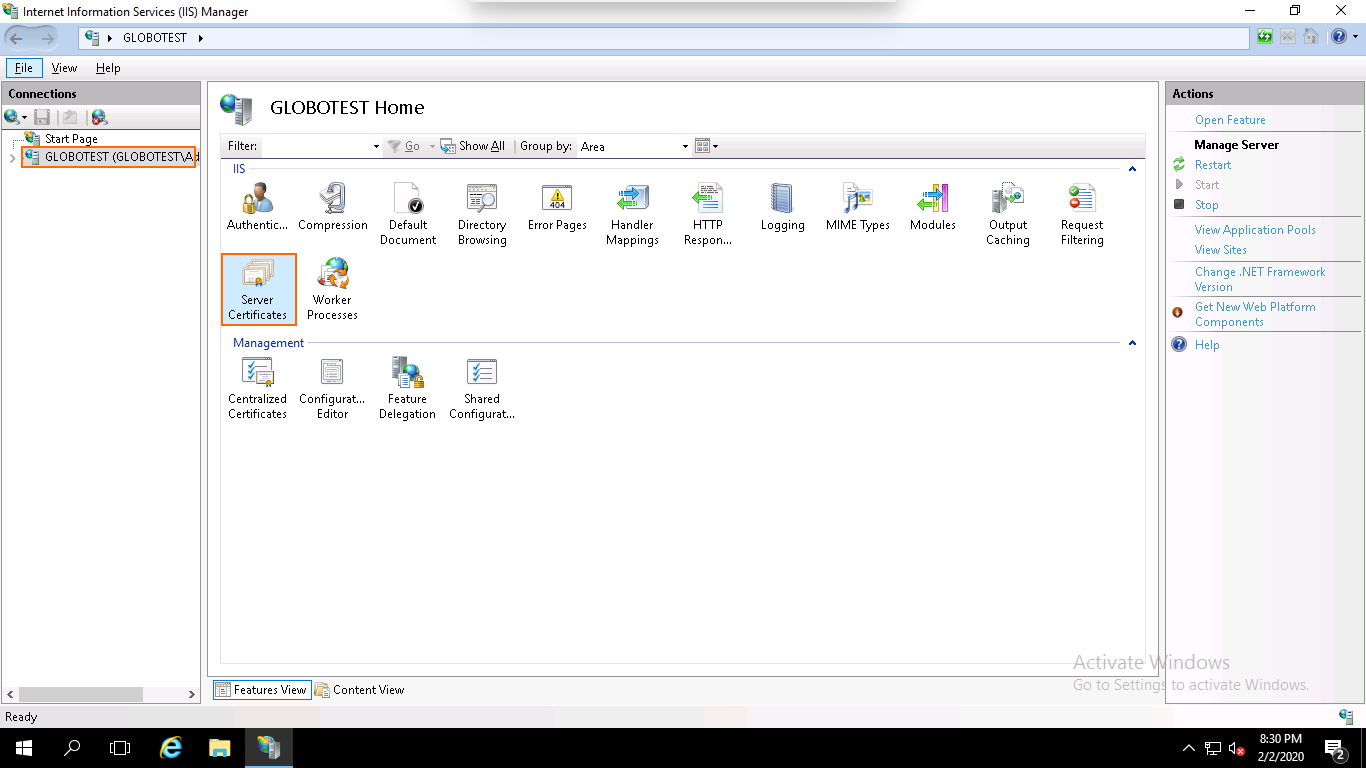
Step 2 – In the left pane, click on the server name and double click on the Server Certificates. You should see the following page:
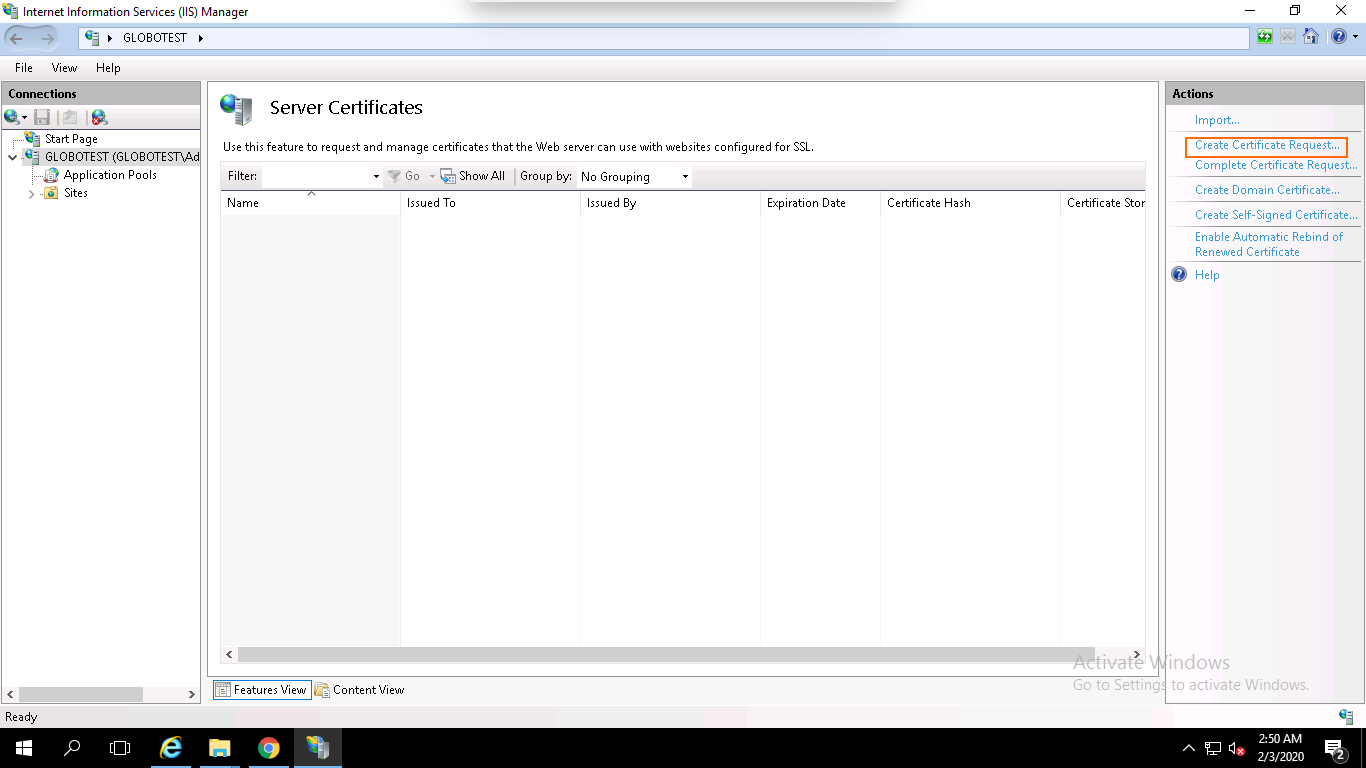
Step 3 – In the right pane, click on the Create Certificate Request. You should see the following page:
Step 4 – Provide your domain name, company name, department name, city, state, country name and click on the Next button. You should see the following page:
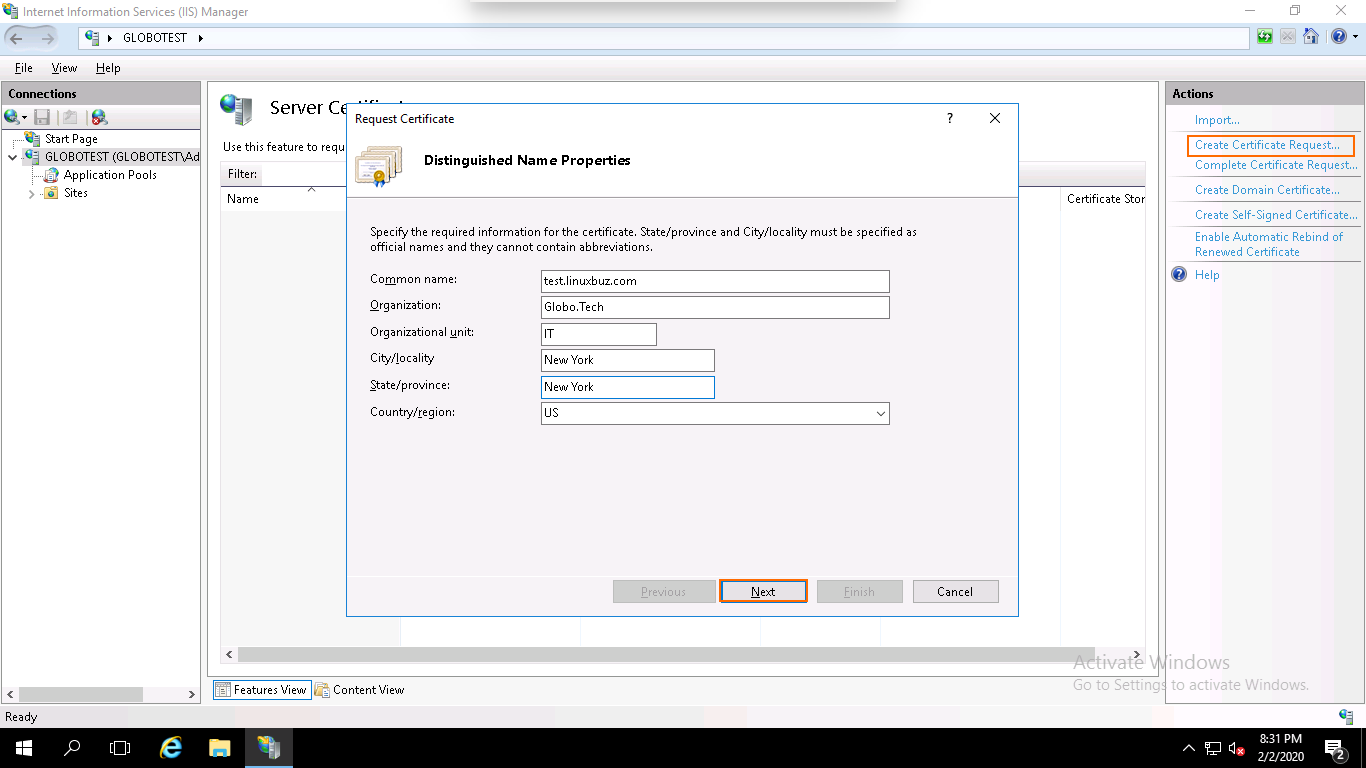
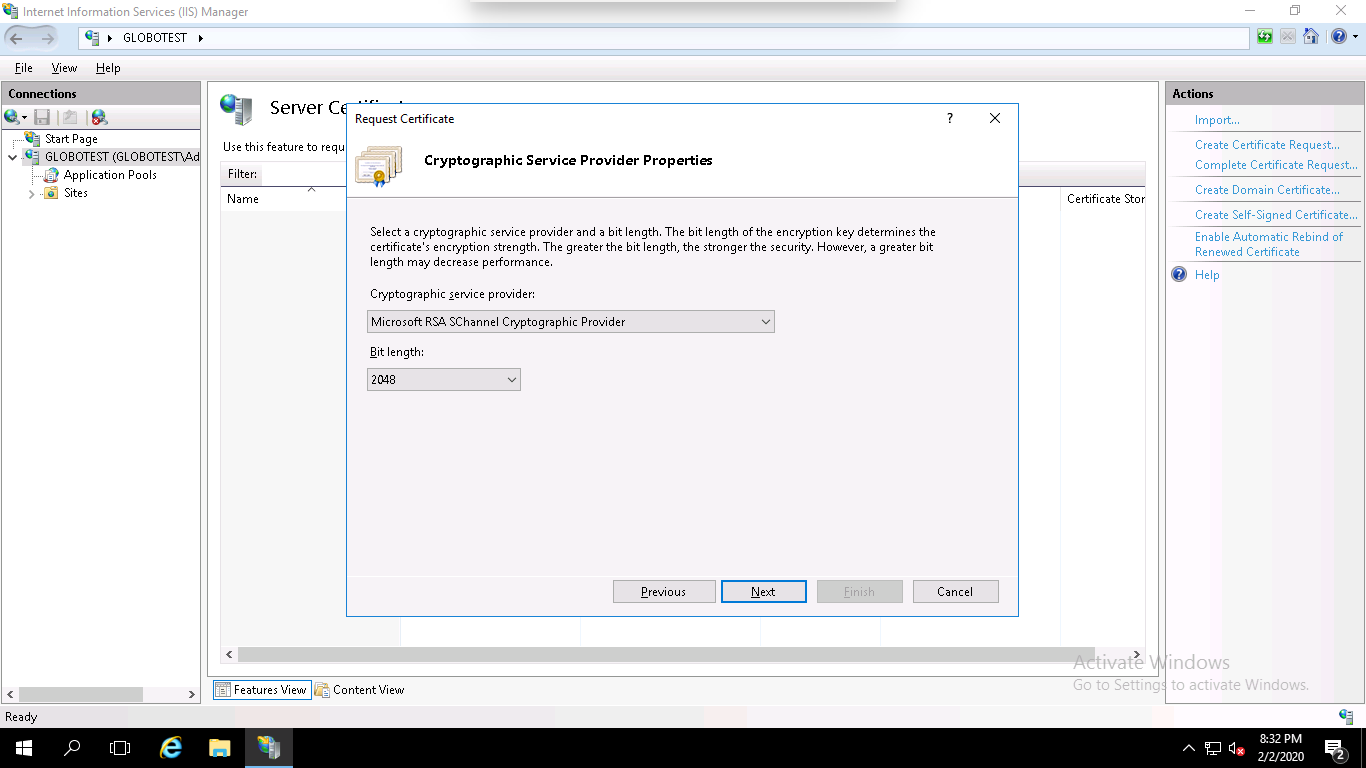
Step 5 – Select the Cryptographic Service Provider, 2048 as a bit length and click on the Next button. You should see the following page:
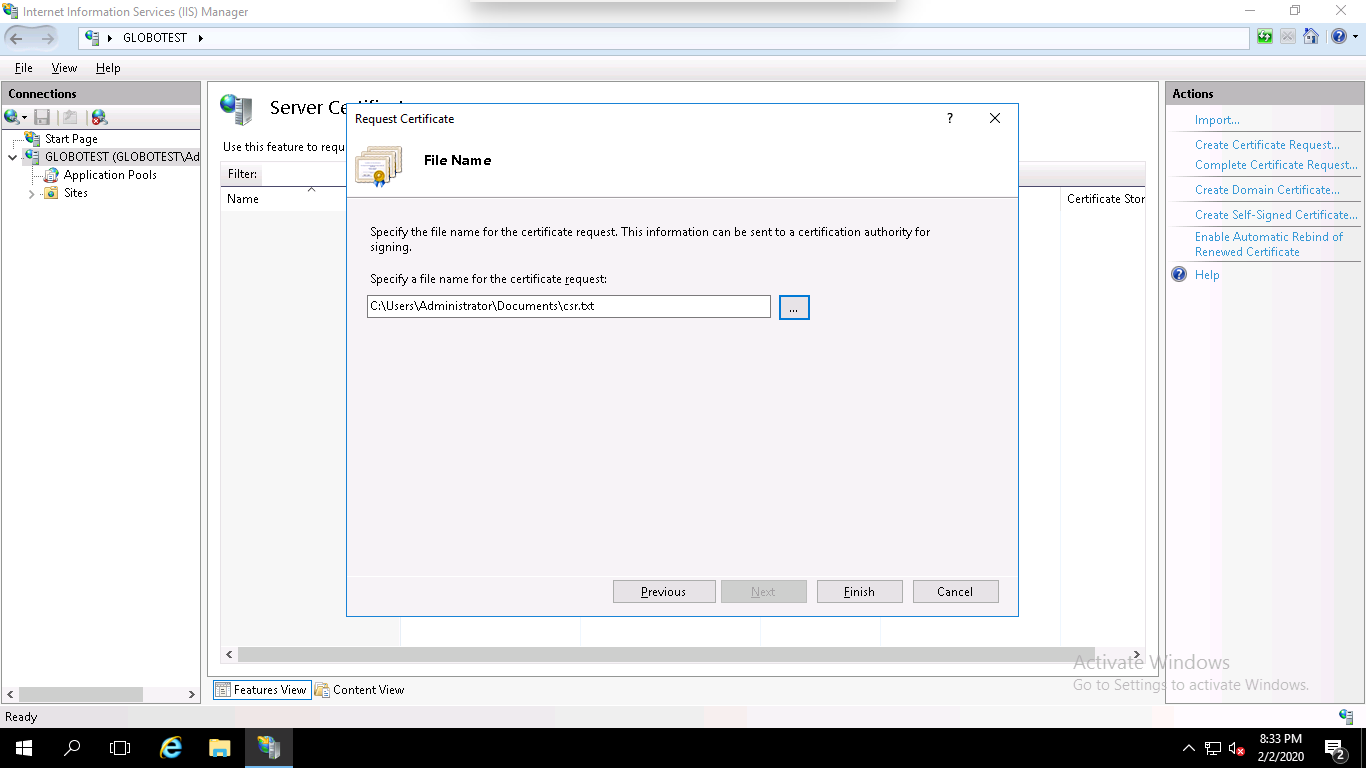
Step 6 – Specify the filename and the location where you want to save the CSR, and click on the Finish button to create a CSR certificate.
Step 7 – After generating the CSR, you will need to give this CSR file to the Certificate Provider in order to purchase the new SSL certificate.
Make sure that you get an SSL certificate in P7B or CER format. Once you received the SSL certificate file from the Certificate Authority save it on the server where you created the CSR.
Install the SSL on IIS Website
Next, you will need to install the SSL certificate on your IIS website. You can install it by following the below steps:
Step 1 – Go to Start > Administrative Tools > Internet Information Services (IIS) Manager as shown below:

Step 2 – In the left pane, click on the server name and double click on the Server Certificates. You should see the following page:
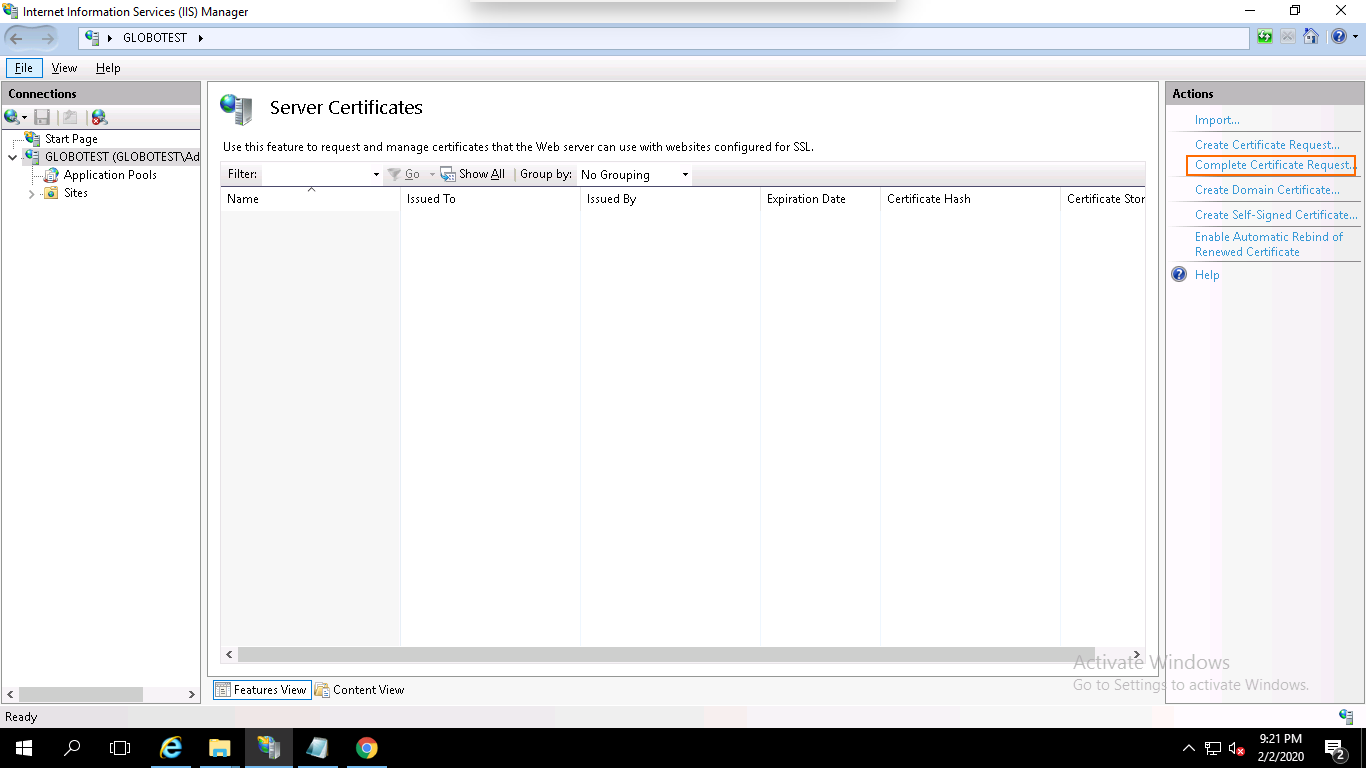
Step 3 – In the right pane, click on Complete Certificate Request. You should see the following page:
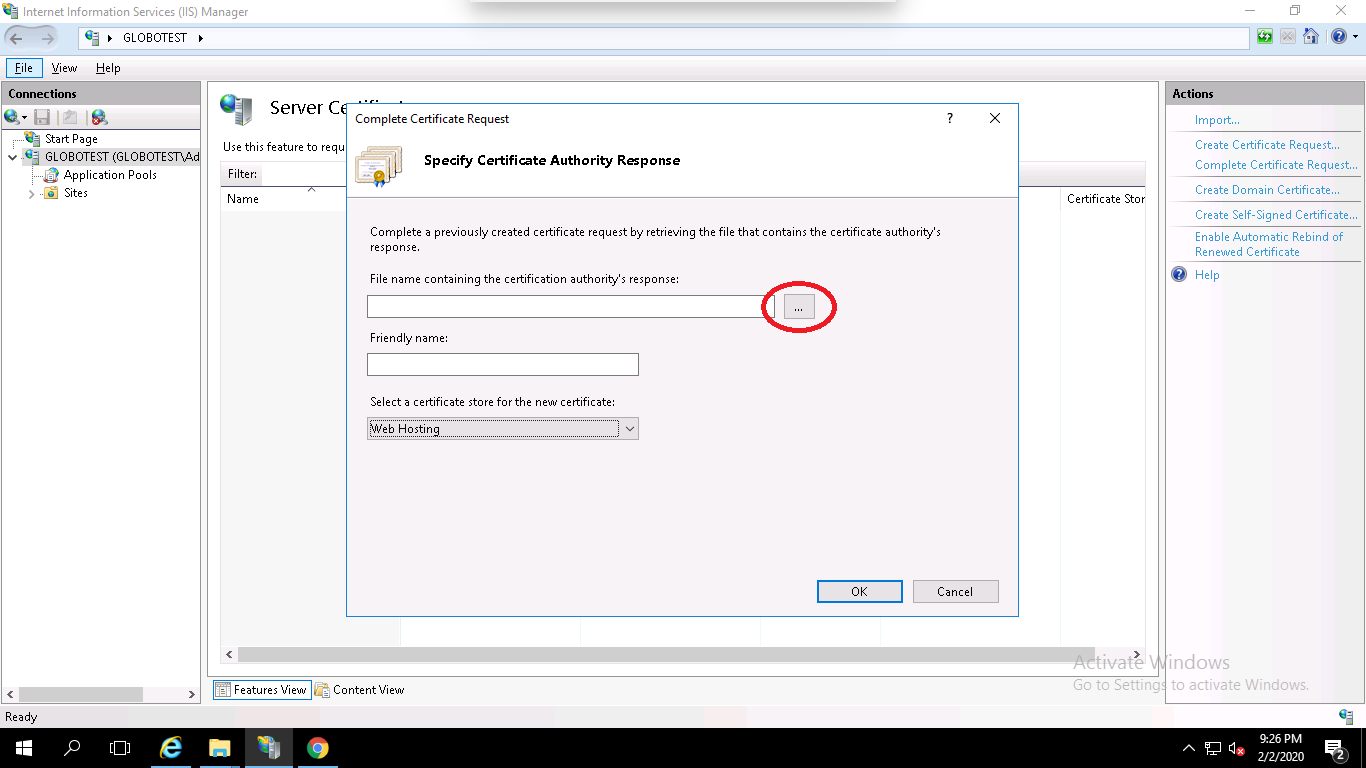
Step 4 – Browse the certificate file (.cer), provide your domain name, select Web Hosting in the certificate store option and click on the OK button.
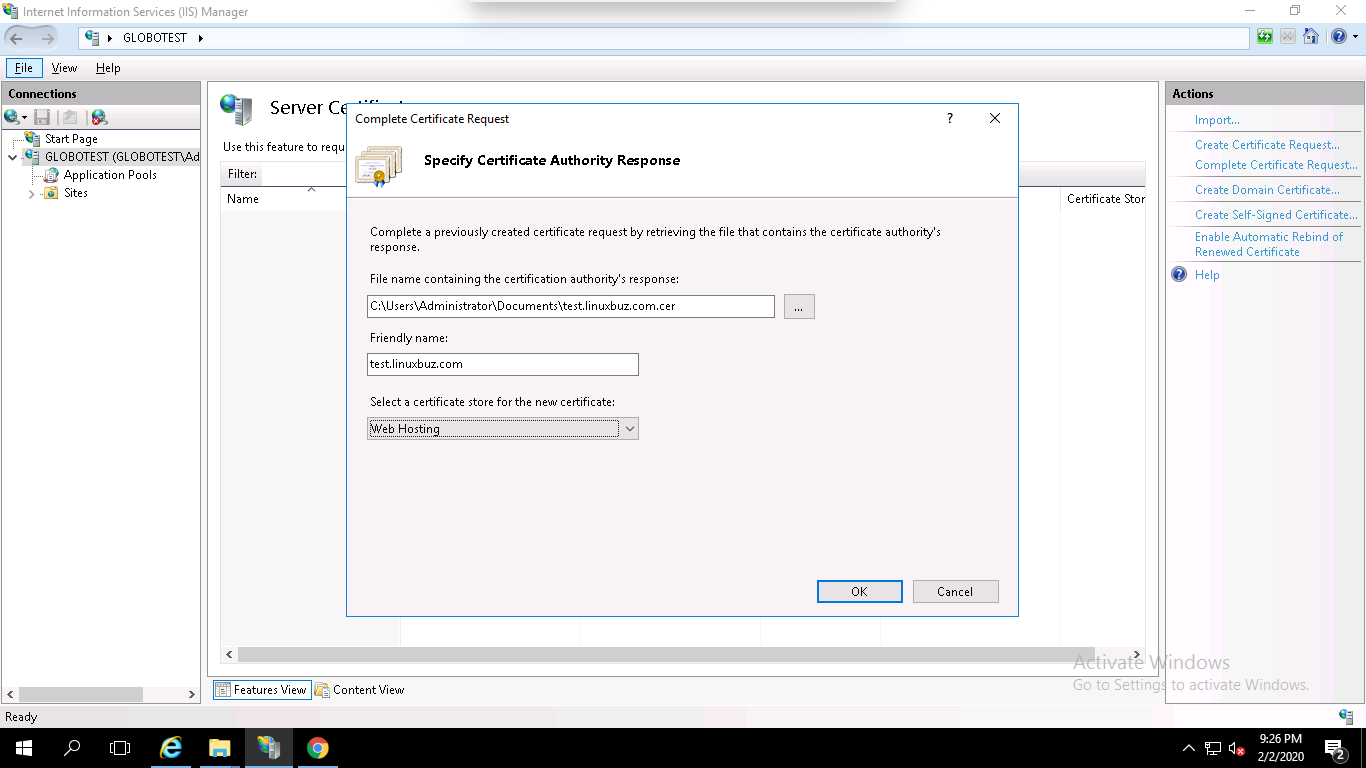
At this point, you have successfully installed your SSL certificate. Next, you will need to assign the certificate to your website.
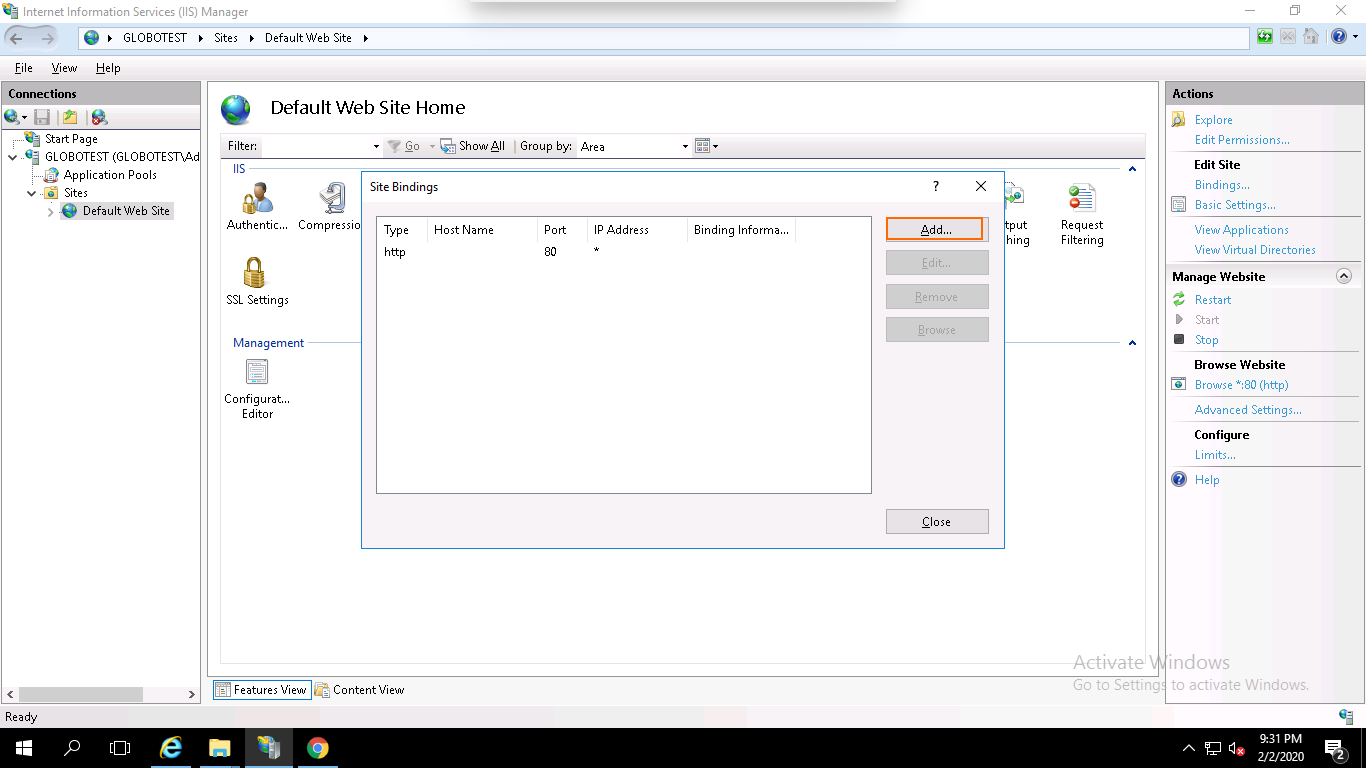
You can assign the certificate by following the below steps:
Step 1 – Open the IIS Manager, expand the server name and click on the Default Website then click on the Bindings in the right pane. You should see the following page:

Step 2 – Click on the Add button. You should see the following page:
Step 3 – Select https, select the IP address of your website or leave it unassigned, type port 443, type your domain name, select the domain name on which you want to install SSL and click on the OK button to install the certificate.
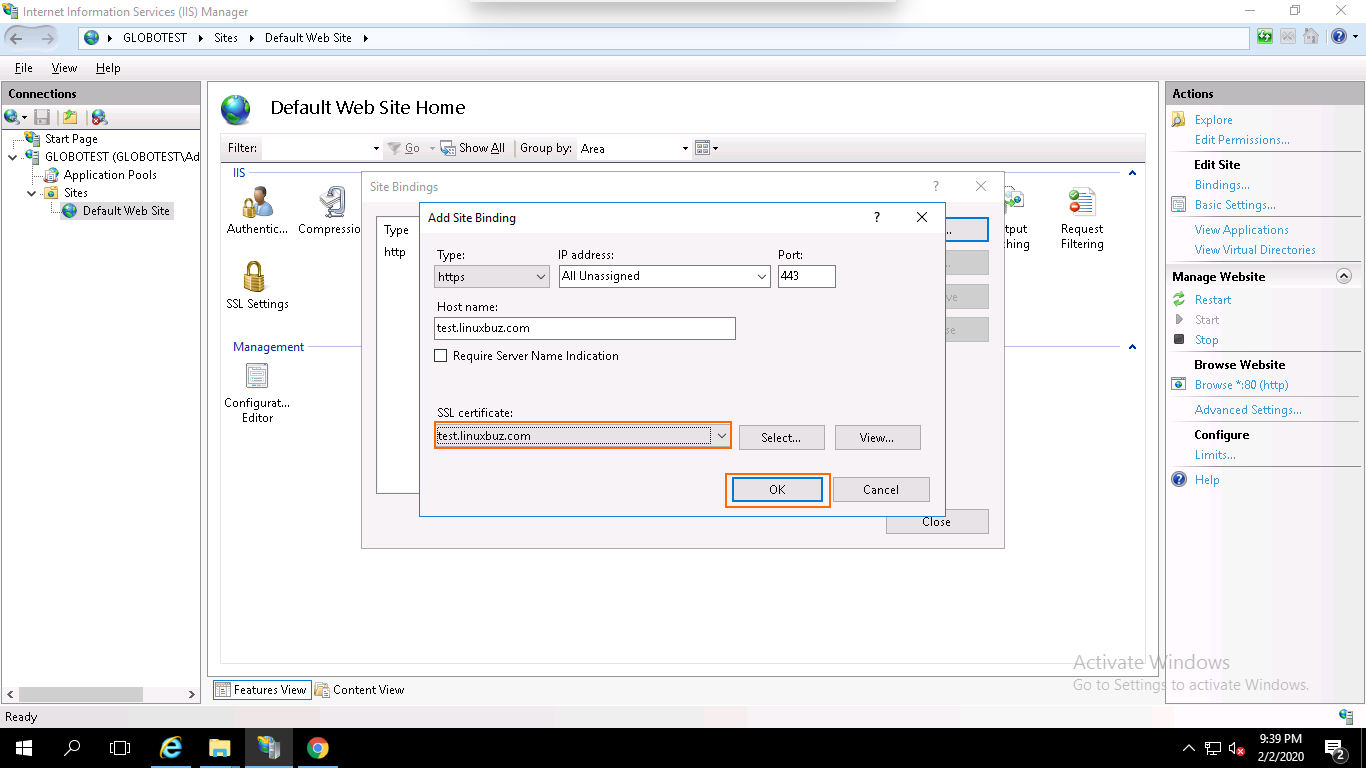
Your SSL certificate is now installed and the website configured to accept secure connections as shown below:
Conclusion
Congratulations! you have successfully installed an SSL certificate on Windows server 2019 using IIS. Your website is now secured with an SSL certificate.
SSL-сертификат (Secure Sockets Layer) является ключевым компонентом безопасности веб-сайта, обеспечивая защищенное соединение между пользователем и сервером. Установка SSL сертификата на Windows Server 2019 — это важный шаг для обеспечения безопасности передачи данных.
В данном подробном руководстве мы рассмотрим процесс установки и настройки SSL сертификата на Windows Server 2019. Мы проведем вас через весь процесс начиная от генерации запроса на сертификат, до его установки и настройки на сервере.
Для установки и настройки SSL сертификата на Windows Server 2019 вам понадобятся следующие компоненты: сервер с установленной операционной системой Windows Server 2019, установленный веб-сервер (например, Internet Information Services — IIS) и доступ к учетной записи администратора сервера.
Этот подробный процесс установки и настройки SSL сертификата на Windows Server 2019 поможет вам обеспечить безопасность вашего веб-сайта и защитить передачу конфиденциальной информации.
Содержание
- Зачем нужен SSL сертификат?
- Особенности Windows Server 2019
- Подготовка к установке SSL сертификата
- Где получить SSL сертификат?
- Установка SSL сертификата на Windows Server 2019
- Настройка SSL сертификата на Windows Server 2019
- Проверка работы SSL сертификата
Зачем нужен SSL сертификат?
Основная задача SSL сертификатов — защита данных, передаваемых по сети, путем шифрования. Это позволяет предотвратить несанкционированный доступ к чувствительным данным, таким как пароли, номера кредитных карт, личная информация пользователей и другая конфиденциальная информация.
SSL сертификаты выполняют следующие функции:
- Шифрование данных: SSL сертификаты шифруют данные, передаваемые между клиентом и сервером, что делает их невосприимчивыми к перехвату и чтению третьими лицами.
- Аутентификация сервера: SSL сертификаты удостоверяют подлинность веб-сайта и сервера, подтверждая, что связь с ними устанавливаете именно вы. Это защищает от атак типа «подделка SSL-сертификата» и осуществляет проверку подлинности веб-сайта перед передачей личной информации.
- Доверие и настойчивость: SSL сертификаты могут быть получены только от доверенных удостоверяющих центров (CA), которые проверяют подлинность веб-сайта и его владельца. Это помогает установить доверие в пользователе и убедить его в том, что веб-сайт безопасен.
Использование SSL сертификатов рекомендуется для всех типов веб-сайтов, особенно тех, которые собирают или передают конфиденциальную информацию. Это помогает обеспечить конфиденциальность и защиту данных клиентов, а также защитить от различных видов атак, связанных с перехватом информации.
Особенности Windows Server 2019
Вот несколько особенностей Windows Server 2019:
|
Графический интерфейс пользователя и командная строка |
Windows Server 2019 предлагает выбор между установкой полнофункционального графического интерфейса пользователя (GUI) и установкой Server Core без графического интерфейса. Это позволяет выбрать подходящий вариант в зависимости от требований и предпочтений администратора. |
|
Улучшенная безопасность |
Windows Server 2019 включает в себя различные механизмы защиты, такие как Defender ATP, Secure Boot и Windows Defender Exploit Guard. Эти функции помогают обеспечить безопасность сервера и защитить его от различных угроз, таких как вредоносное ПО и взломы. |
|
Улучшенные возможности хранения данных |
Windows Server 2019 включает в себя новые возможности хранения данных, такие как система файлообмена с журналированием и отображением файлов для масштабируемых систем с общей работой, а также технология Storage Spaces Direct, которая позволяет создавать гиперконвергентные решения. |
|
Поддержка Linux контейнеров |
Windows Server 2019 предоставляет поддержку Linux контейнеров, что позволяет администраторам использовать пакеты Docker, Kubernetes и другие технологии контейнеризации для развертывания и управления приложениями. |
|
Улучшенная производительность |
Windows Server 2019 имеет улучшенную производительность в сравнении с предыдущими версиями операционной системы. Были внесены изменения и оптимизации, которые позволяют серверу более эффективно использовать ресурсы и обрабатывать нагрузку. |
Это лишь некоторые из функций, доступных в Windows Server 2019. Эта операционная система предлагает множество других возможностей, делая ее идеальным выбором для различных серверных сред и задач.
Подготовка к установке SSL сертификата
Установка SSL сертификата на Windows Server 2019 требует предварительной подготовки сервера. В этом разделе мы рассмотрим необходимые шаги перед установкой SSL сертификата.
1. Генерация сертификата запроса (CSR)
Перед тем, как получить SSL сертификат, необходимо сгенерировать сертификат запроса (CSR). Для этого можно воспользоваться утилитой, предоставляемой веб-сервером Windows Server 2019, или использовать сторонние программы, например, OpenSSL.
2. Указание информации для сертификата
При генерации CSR необходимо указать информацию о вашей организации, такую как название компании, географическое расположение, веб-адрес и контактную информацию. Точные данные могут зависеть от вашего веб-сервера и того, как будет использоваться SSL сертификат.
3. Проверка домена
Перед получением SSL сертификата нужно убедиться, что веб-сервер на Windows Server 2019 правильно настроен и доступен через доменное имя, для которого будет использоваться сертификат. Для этого можно выполнить проверку домена, например, с помощью онлайн-инструментов.
4. Выбор типа SSL сертификата
Определитесь с типом SSL сертификата, который вам необходим. Существуют различные типы SSL сертификатов, включая одноименные, многоподдоменные и Wildcard-сертификаты. Выбор зависит от количества доменов и поддоменов, которые вам нужно защитить.
5. Получение SSL сертификата
После генерации сертификата запроса (CSR) и выбора типа сертификата, можно обратиться к поставщику SSL сертификатов и купить или получить SSL сертификат. Обычно вам будет предоставлена инструкция по установке, а также сам сертификат в виде файла.
6. Проверка сертификата
После получения SSL сертификата, рекомендуется проверить его на корректность. Для этого можно воспользоваться онлайн-инструментами или веб-браузером. Убедитесь, что сертификат действителен и корректно соответствует вашему домену.
В результате подготовки к установке SSL сертификата, вам будет предоставлен файл сертификата, который необходимо будет установить на Windows Server 2019.
Где получить SSL сертификат?
SSL сертификаты можно получить у различных поставщиков услуг. Существуют как платные, так и бесплатные варианты.
Популярными поставщиками платных SSL сертификатов являются Comodo, Symantec, GeoTrust, RapidSSL и т.д. Они предлагают различные типы сертификатов в зависимости от требуемого уровня защиты и поддерживаемых доменов.
Если вам необходимо быстро получить бесплатный SSL сертификат, вы можете воспользоваться услугами Let’s Encrypt. Они предоставляют сертификаты с открытым кодом и обновляемыми автоматически.
Кроме того, некоторые хостинг-провайдеры предлагают бесплатные SSL сертификаты вместе с услугами хостинга или доменными именами. Такие сертификаты могут быть настроены автоматически и установлены без особых усилий.
Важно выбрать сертификат, который соответствует вашим требованиям безопасности и бюджету. Кроме того, убедитесь, что вы получите все необходимые инструкции по установке и настройке сертификата для вашей операционной системы.
Установка SSL сертификата на Windows Server 2019
Шаг 1: Создание запроса на сертификат (CSR)
Перед установкой SSL сертификата на Windows Server 2019 необходимо создать запрос на сертификат (CSR). Для этого откройте консоль управления службами IIS (Internet Information Services). В правой панели выберите свой сервер и откройте пункт «Сертификаты сервера». Нажмите «Создать запрос на сертификат». Заполните необходимые поля (название организации, доменное имя и т.д.) и сохраните запрос на диск.
Шаг 2: Покупка SSL сертификата
Далее необходимо приобрести SSL сертификат у надежного поставщика. Выберите сертификат, соответствующий вашим требованиям, и заполните необходимые данные при покупке.
Шаг 3: Установка SSL сертификата
После получения SSL сертификата на вашу электронную почту, скачайте его и откройте консоль управления службами IIS. Откройте пункт «Сертификаты сервера» в правой панели и нажмите «Завершить запрос на сертификат». Укажите путь к файлу сертификата, введите его пароль (если есть) и нажмите «ОК».
Шаг 4: Настройка привязки SSL сертификата
Теперь необходимо настроить привязку SSL сертификата к вашему веб-сайту. Откройте консоль управления службами IIS и выберите свой сервер. Откройте пункт «Сайты» и выберите ваш веб-сайт. В правой панели нажмите «Связи с протоколами». Добавьте новую связь, выберите «HTTPS» и выберите созданный вами SSL сертификат.
Важно: Убедитесь, что порт 443 (протокол HTTPS) открыт на вашем сервере.
Шаг 5: Проверка установки SSL сертификата
После завершения настроек установки SSL сертификата на Windows Server 2019, выполните проверку, чтобы убедиться, что сертификат правильно установлен. Откройте веб-браузер и введите адрес вашего веб-сайта с протоколом HTTPS (например, https://www.example.com). Если в адресной строке отображается зеленый замок или значок замка, значит установка SSL сертификата прошла успешно.
Поздравляем! Теперь ваш веб-сайт на Windows Server 2019 защищен SSL сертификатом, что обеспечивает безопасное соединение с вашими пользователем.
Настройка SSL сертификата на Windows Server 2019
Установка и настройка SSL сертификата на Windows Server 2019 очень важны для обеспечения безопасности веб-сайта и защиты информации пользователей. В этом руководстве будет рассмотрен процесс установки и настройки SSL сертификата на Windows Server 2019.
Прежде всего, необходимо приобрести SSL сертификат у надежного удостоверяющего центра (Certificate Authority) или создать собственный самоподписанный сертификат. В случае самоподписанного сертификата, пользователи будут получать предупреждение о недоверенности сертификата при посещении веб-сайта.
После получения сертификата, следует выполнить следующие шаги:
- Откройте панель управления Windows Server 2019 и нажмите на «Управление сервером».
- Выберите «Добавить роли и компоненты» из списка действий.
- Выберите «Серверная роль» и выберите «Веб-сервер (IIS)».
- Установите необходимые компоненты IIS (например, «Common HTTP Features» и «Security»).
- После установки IIS, откройте IIS Manager и выберите ваш веб-сайт.
- Щелкните правой кнопкой мыши на вашем веб-сайте и выберите «Edit Bindings» (Редактировать привязки).
- Нажмите «Add» (Добавить) и выберите «https» из списка.
- Выберите установленный SSL сертификат из выпадающего списка.
- Укажите порт 443 (или другой, если вы используете нестандартный порт).
- Нажмите «OK» (ОК) и «Close» (Закрыть) для сохранения настроек.
Теперь SSL сертификат успешно установлен и настроен на вашем сервере Windows Server 2019. При посещении вашего веб-сайта пользователи будут видеть защищенное соединение и увидят зеленую пиктограмму замка в адресной строке браузера.
Необходимо регулярно обновлять SSL сертификаты, чтобы обеспечить надежную защиту вашего веб-сайта. Также рекомендуется установить автоматическое обновление сертификатов.
Выполняя эти шаги, вы можете установить и настроить SSL сертификат на Windows Server 2019 без особых сложностей. Соблюдайте меры безопасности и не забывайте обновлять сертификаты, чтобы обеспечить защиту веб-сайта и информации пользователей.
Проверка работы SSL сертификата
После успешной установки и настройки SSL сертификата на Windows Server 2019, важно проверить его правильное функционирование. Проверка работы SSL сертификата поможет убедиться, что защищенное соединение установлено и действительно используется.
Есть несколько способов проверить работу SSL сертификата:
- Проверка веб-браузером: откройте любой веб-браузер (Mozilla Firefox, Google Chrome, Microsoft Edge и т. д.) и введите адрес вашего веб-сайта, начиная с протокола HTTPS. Убедитесь, что в адресной строке браузера отображается зеленый замок или значок замка, а также надпись «Безопасно» или «Secure». Это свидетельствует о том, что SSL сертификат работает корректно.
- Использование онлайн-инструментов: в интернете существует множество бесплатных онлайн-инструментов для проверки SSL сертификатов. Вы можете воспользоваться одним из них, введя адрес вашего веб-сайта и нажав кнопку «Проверить». Инструмент проведет проверку SSL сертификата и выдаст результаты.
- Использование командной строки: для более продвинутой проверки SSL сертификата вы можете воспользоваться командной строкой или утилитами, доступными на вашем сервере. Одна из таких утилит — OpenSSL. Вы можете выполнить команду «openssl s_client -connect ваш_сайт:443» для подключения к вашему серверу через защищенное соединение и получения подробной информации о SSL сертификате.
Не забывайте регулярно проверять работу SSL сертификата, особенно после его установки, обновления или изменений на вашем веб-сервере. Это поможет гарантировать надежность и безопасность вашего веб-сайта.
SSL certificates are a useful step to protect your web application server by securing data exchange. This guide explains how to install a Let’s Encrypt SSL certificate on Windows Server 2019 with the Internet Information Services (IIS) web server.
Prerequisites
- Deploy Windows Server 2019 or above on Vultr.
- Setup a domain A Record pointing to your Windows server.
- Connect and login as an Administrator on the server using RDP.
- Disable Internet Explorer Enhanced Security (IEES) to use the web browser.
- From the Windows start menu, open Server Manager.
- Click Add roles and features.
- Select Role-based or feature-based installation, and choose your server.
- Scroll through Server Roles and click Web Server (IIS).
- Add any additional IIS features you wish to install.
- Click Install to start the installation process.
-
Test your IIS installation by visiting your public server IP address.
http://192.0.2.123The default IIS welcome web page should display.
2. Create the Web Application
- Using Windows Explorer, create a new folder in the default IIS web server directory to store your domain’s web files. For example, you could create a folder named
C:\inetpub\example.com. - Press Control + R on your keyboard to open the run utility, and enter
notepadin the text field. -
Add the following HTML contents to the new Notepad file.
<html>
  <head>
    <title>Hello World</title>
  </head>
    <body>
      <h1>Hello World!</h1>
    </body>
</html>
Save the file as index.html in your domain files directory. For example: C:\inetpub\example.com\index.html
3. Setup the IIS Site with your Domain Name
- Open the Windows start menu and navigate to the Windows Administrative Tools subgroup.
- Select Internet Information Services (IIS) Manager from the list.
- In the IIS Manager Window, click > next to your server name to expand the list.
-
Expand Sites, and click Add Website on the right Actions bar.

-
Enter your Web Application name in the Site Name: field.
- Under Content Directory, click
...to browse and set the Physical path: to your domain web files directory. - Keep
httpas the Type under Binding, and80as the port. - To assign your domain a specific IP address, select it from the drop-down list, or keep All Unassigned to use all Server IP addresses.
- Enter your domain name in the Hostname: field.
- Click OK to save changes and automatically start the website.
-
Visit your domain to confirm successful integration.
http://example.comThe hello world HTML application should display.

4. Request and Install a Certificate
You can install a certificate with either Certbot or the Win-acme client. Please review both sections below before choosing an installation method.
Option 1: Install with Certbot
- Download the latest Certbot installer for Windows from the official website.
- Open the installer, and follow the installation wizard steps.
- Open the Windows Start Menu and launch Windows PowerShell as an Administrator.
-
Enter the following commands to request a free Let’s Encrypt SSL certificate. Replace
example.comwith your actual domain.PS> certbot -d example.com -m admin@example.com --agree-tos --webrootEnter the path to your domain files directory created earlier. For example,
C:\inetpub\example.com.Certbot stores your SSL certificate in the installation directory’s
livefolder and automatically renews it before the certificate expiry date. Certbot generates and saves SSL certificates as.pemfiles. However, the IIS certificate store requires the.pfxformat. Convert your Certbot certificates using OpenSSL and bind them to your domain, as explained in the following steps. -
Download the latest OpenSSL installation file from an official download link.
- Run the installer and follow the wizard steps to install OpenSSL.
-
Open Windows PowerShell and switch to the OpenSSL program directory. For example, if installed in program files, run the following command.
PS> cd "C:\Program Files\OpenSSL-Win64\bin" -
Enter the following commands to convert your Certbot certificates to the
.pfxformat.PS> .\openssl.exe pkcs12 -export -out C:\Certbot\live\example.com\certificate.pfx -inkey C:\Certbot\live\example.com\privkey.pem -in C:\Certbot\live\example.com\fullchain.pem -
Enter a strong password to secure your certificate file.
- Open the IIS Manager.
- Navigate to your Windows server hostname under the Connections navigation bar.
-
Double click to openServer Certificates.
-
Click Import from the right Actions navigation bar.
- Enter the path to your
.pfxcertificate file, or click...to browse the directory. - Enter the certificate file password created earlier.
- Click OK to import your SSL certificate file.
- Navigate to your domain under the Sites subgroup on the left navigation bar.
- Find and click Bindings under Edit Site on the right navigation bar.
- In the open Site Bindings window, click Add.
- Toggle Type: and select
httpsfrom the drop-down options. - Keep
443as the Port:, and enter your domain in the Hostname: field. - Check and activate Require Server Name Indication.
-
Select your imported certificate from the SSL Certificate: drop-down list.
-
Click OK to save changes and close the Site Bindings window.


You have successfully installed your SSL certificate, visit the domain in a web browser to confirm the access is secure. For example, navigate to https://example.com and verify the certificate is correct.
Option 2: Install with Win-acme Client
This method is easier for most users.
Win-Acme is another Let’s Encrypt client that is easier to use and installs SSL certificates directly to the IIS certificate store. Download the latest win-acme version from the official website and follow the steps below.
- Extract files from the downloaded win-acme zip archive.
- Navigate to the extracted folder and open the
wacs.exeapplication. - Click More info in the Windows Defender SmartScreen pop-up window, and Run anyway.
- In the open command prompt console, enter N to create a new SSL certificate with default options.
- Select your target IIS domain to install the SSL certificate on.
- Enter A to use all bindings of the IIS domain.
- Enter
y' to continue with your selection,y’ to open with the default web server application, `y’ to agree to the Let’s Encrypt terms. - Enter your email address to receive important certificate notifications.
- Your SSL Certificate is automatically stored in the IIS certificate store and registered for your domain name.
-
Visit your domain name to confirm HTTPS access.
https://example.com
5. Redirect HTTP Requests to HTTPS
- Download the IIS URL Rewrite module from the official website.
- Open the installer file and install URL Rewrite from the Web Platform Installer.
- Re-open the IIS Manager window, click your server, and confirm that the URL Rewrite module is available.
- Expand your server and navigate to your target domain name under Sites.
- Double click and open URL Rewrite.
-
Click Add Rules on the right Actions bar.
-
Under Inbound Rules, select Blank rule and click OK
- Assign your new rule a name. Keep
Matches the Pattern,Regular Expressionsas the Requested URL: and Using: options. - Enter
(.*)in the Pattern: field and uncheck Ignore case. - Expand Conditions, and click Add to set up a new condition.
- Enter
{HTTPS}In the Condition Input: field, and keep Matches the Pattern unchanged. - Enter
^OFF$in the Pattern: field. - Click OK to save the new condition.
- Scroll down to Action and set the Action Type: to
Redirect. - Enter
https://{HTTP_HOST}{REQUEST_URI}in the Redirect URL field. - Uncheck Append query string and set the Redirect type to
Permanent (301). - Click Apply in the right Actions navigation bar.
-
Visit your domain name to test the redirection.
http://example.comYour browser should automatically redirect you to the HTTPS version.
If your redirect does not work in any way, open your domain web files directory and confirm that a
web.configfile exists. If it’s missing, create one using Notepad and add the following configurations.<?xml version="1.0" encoding="UTF-8"?> <configuration> <system.webServer> <rewrite> <rules> <rule name="HTTP to HTTPS" patternSyntax="ECMAScript" stopProcessing="true"> <match url="(.*)" /> <conditions> <add input="{HTTPS}" pattern="^OFF$" /> </conditions> <action type="Redirect" url="https://{HTTP_HOST}{REQUEST_URI}" appendQueryString="false" /> </rule> </rules> </rewrite> </system.webServer> </configuration>Save the file and test your domain redirection in a web browser.

Next Steps
You have successfully installed a Let’s Encrypt SSL Certificate on your Windows Server with the Internet Information Services (IIS) web server. To run various web applications on the server, visit the following articles.
- How to Install WordPress on a Windows Server with IIS.
- How to set up PHP Manager on Windows with IIS.
- How to Install Multicraft on Windows.
- Restricting IIS Website Access by IP Address.
- Setting up IIS on Windows Server.
Want to contribute?
![]()
How to Install Let’s Encrypt on Windows Server 2019
-
View Larger Image


Introduction
Today most of the websites are secured using SSL and its good for SEO. Normally we get SSL certificated from Certificate Authority (CA). So if we need to enable https for our website hosted on a Windows server we need to get a certificate from a Certificate Authority (CA). Let’s Encrypt is a certificate authority that provides free SSL certificates for our website names . More details about Let’s Encrypt can be get from their official website.
Let’s Encrypt uses the ACME protocol to verify that we control a given domain name and to issue you a certificate. To get a Let’s Encrypt certificate, you’ll need to choose a piece of ACME client software to use. Another point about Lets Encrypt certificates is they set to expire after 90 days.
One of the Most popular ACME client used to issue SSL certificate from Lets Encrypt is Certbot client. This is only ACME clients recommended by Lets Encrypt. We can also try out other ACME clients available. No issues with that.
Now Let’s focus on how we can install SSL certificate for a website hosted on a Windows Server 2019 having IIS used for Web Service.
Make sure IIS is preinstalled in the server and already have a Live website created in through IIS and loading fine from the server. If not, lets Install IIS and create a website in it. In this article we use Windows server 2019. You can also refer this article if you had a Windows Server 2012 or 2016.
Section 1. Install IIS in Windows Server 2019
Refer this section if your Windows server 2019 doesn’t have IIS preinstalled. Otherwise move to next section.
For installing IIS first log into your Windows server 2019 and Open server Manager from Windows Start

Click Add Roles and features from Server Manager.

The Add Roles And Features Wizard will open. Click Next on it.

Choose Role based or feature based installation. Click Next.

Choose “select a server from the server pool” option. Select Our own server from the below list and Click Next

Choose Webserver ( IIS ) server role. A popup windows will appear for add features. Confirm it by clicking “Add Features” option.


Leave features section as it is and click Next.

Click Next on Web Server Role section.

Leave Web Server Role services selection section as it is. Click Next.

Finalise the install by clicking the install button.

Wait for few minutes. We will get a message as “Installation Succeeded” . Click Close.

This completes the IIS install. Now lets move to the next section which is creating a website through IIS.
Section 2. Crete Website In IIS
If your website is already created through IIS Manager, skip this section and move to next section.
Now for creating a website first Open IIS manager from Server Manager itself. Choose IIS >> Right click at our Server Name and choose “Internet Information Services ( IIS) Manager”

From IIS Manager, Right click on Server Name and click “Add website” option

In the site name filed, give your website name. In this article, we gave the name as certbot.supporthost.in
Choose the physical path as ” C:\inetpub\wwwroot”. You can also choose your desired directory for placing the website files. Normally it will be ” C:\inetpub\wwwroot”.
In the hostname filed give your website name again. In our case its “certbot.supporthost.in”
Leave other settings as it is and Click “Ok” button.

This concludes the creation of website through IIS Manager. Now we can test the working of the website by creating a test page at folder ” C:\inetpub\wwwroot” and Visit the url in the browser and make sure the test page is loading.
Here I created a index.html page under document root with a text content. After that visited the url certbot.supporthost.in in the web browser. It worked and showed the exact content I added in the index.html page.

At this point our Windows Server 2019 is installed with IIS and website is created through IIS manager. Also we are ready to issue Lets Encrypt SSL/TLS certificate for our website. So lets see how this can be done on next section.
Section 3. Issuing SSL/TLS Certificate for Website
Now its the time for purchasing and Installing free SSL/TLS for our website. So as we said earlier, there are many different ACME clients available for issue Lets Encrypt SSL for our website.
Out of from that here we discuss two methods for issuing SSL/TLS certificate for our website, which are given Below. We only have to follow either of them.
a. Using certbot ACME client for issuing SSL
b. Using win-acme Client
Section 3 a . Installation of certbot ACME client On Windows
In this section we are installing the certbot ACME client. For that first Download the certbot ACME exe file by visiting the below url on the web browser.
After downloading got completed, run the installer by double clicking on the install file. The installer wizard will open and click Next.

The installer will propose a default installation directory, C:\Program Files(x86)\Certbot . Leave it as it is and Click On Install.

After completing the install, Click Finish.

This completes the certbot ACME package install. Now lets test it. For that , open Windows cmd, and type below command.
The result will look like below.

This confirmed that, certbot ACME client is installed successfully. Now lets move to the next section.
Section 3 a. Issue SSL Certificate Using Certbot
In this section we are issuing SSL certificate for our website. For that first Stop IIS service from the IIS manager itself or through the Windows services section.
Then Issue Below command in Windows cmd
Agree the terms and conditions by typing Y
Enter our domain name that we wish to issue SSL certificate. Here I entered as certbot.supporthost.in
The certbot successfully issued the SSL/TLS certificate and Private key along with intermediate certificate. Also the issued certificates will get automatically saved to location C:\Certbot\live\certbot.supporthost.in\ folder.

This completed issuing of SSL/TLS certificate for our website. Start the IIS service again and now lets move to the next section.
Section 3 a. Import & Install SSL Using IIS Manager.
Currently, Certbot for Windows cannot automate the installation of adding SSL certificate in IIS. Future versions will be able to automate it for specific web-server applications. So we need to import this certificate manually through IIS manager.
For that we need to convert the PEM formatted SSL certificate file we got from certbot ACME client into pfx one. PFX is the SSL file type supported by IIS.
We can either use online PEM to PFX converter tools or openssl commands like below.
We are not discussing the convert steps further and we assume that you have the PFX version SSL certificate on your hand and its ready to import through IIS manager. In our case the SSL/TLS certificate file name is cert.pfx
Now Open IIS manager and under server, click on “server certificates” click import.
From the import window, provide our cert.pfx file location on certificate file field.
Leave as blank on password filed.
Select the Certificate store as Personal
Leave other settings as it is and Click OK.

Now we can see our certificate is successfully imported and its available under IIS “server certificates” section.

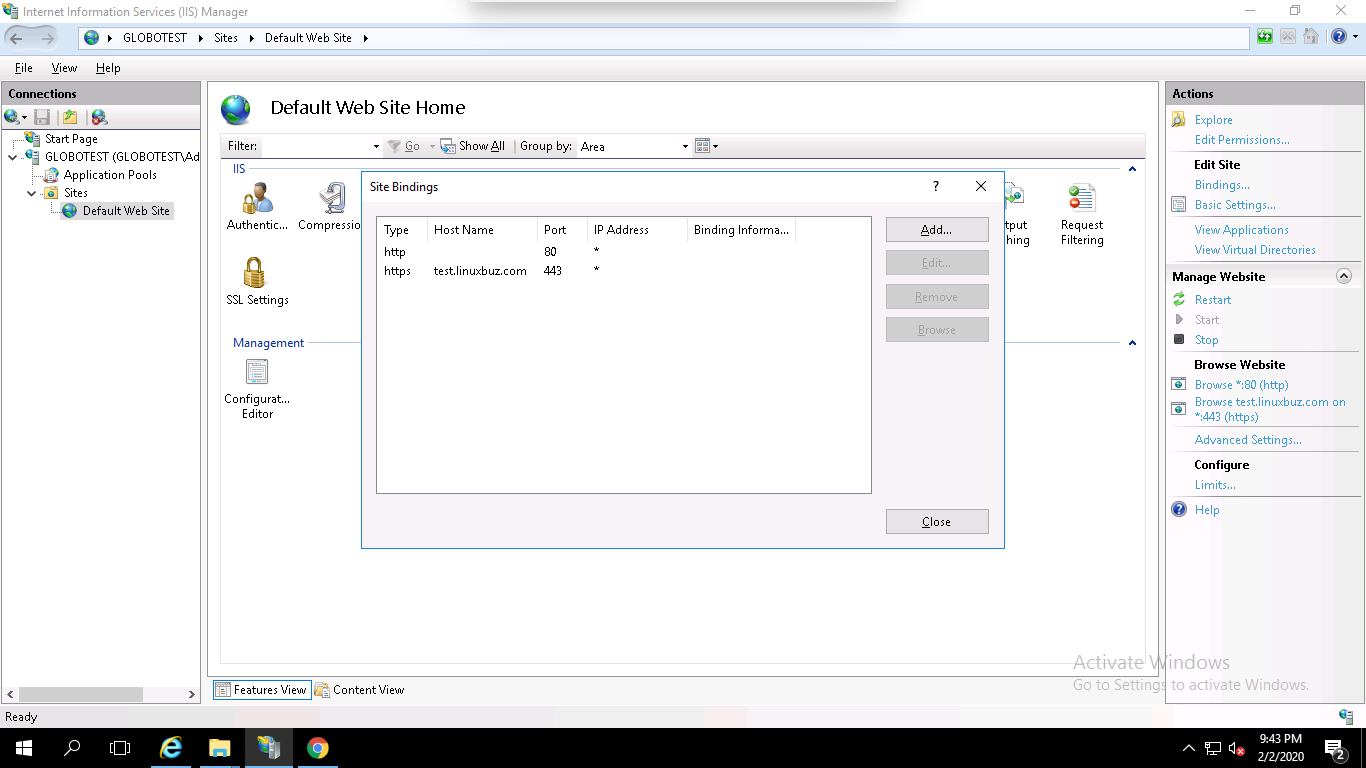
After that from IIS Manager itself, go to our sites section. Click on bindings.
Click “Add” in the “site binding ” window
A new “Add site binding” window will open. From there.
Choose type as https
In the hostname filed enter our domain name as “certbot.supporthost.in”
Choose our certificate from SSL certificate
Enable require server name indication
Leave all other settings as it is and click OK.

This concludes the SSL install. Verify the SSL working by browsing your website over https in the browser.

Also if we go the Windows Certificate Manager by issue command “certlm.msc ” on Windows run. After that expand “personal” >> Certificates. We will able to see our imported Lets Encrypt SSL is available.

Another thing is if we open windows task scheduler, we will able to see a windows task named “Certbot Renew” got created. This task will automatically run when the Already issued Lets Encrypt is going to expire. So in short we don’t have to worry about manually renew the certificate on expire.
In our case we used the standalone authentication on a machine where port 80 is normally in use for issuing SSL certificate, In such cases we want to edit the built-in command to add the –pre-hook and –post-hook flags to stop and start our IIS web-service automatically for successfully renewing SSL/TLS certificates.
For that , choose “Certbot Renew” tab >> Choose Properties >> Click Actions tab >> Click Edit.
In ” Add Arguments” section add command like below.

Now, we can also test out the working of this command by issuing it on windows cmd. Once issues normally we will get the message as the certificate is not due for renewal.

Now we can also try implementing SSL using another ACME Client for Windows. Follow below steps only if you don’t like first method we discussed . Other wise, it conclude the install and settings up of Lets Encrypt SSL in a Windows Server 2019.
Section 3 b. SSL Install Using win-acme Lets Encrypt Client
win-acme is a ACMEv2 client for Windows that aims to be very simple to use. It has a very simple interface to create and automatically install certificates on a IIS server.
Only Follow this section if you don’t want to use certbot ACME client SSL issue which we discussed in above section.
Now first thing is Download the win-acme package from their official website which is www.win-acme.com

Extract the zip folder that downloaded and save it where you needed. In my case I saved it in Downloads folder itself. After that go the direction and double click “wacs.exe"

win-acme interface will open and it will look like below.

For creating certificate we need to type “N”
win-acme client will scan our live websites from IIS and will show the results. Now we need to select our website by imputing the site identifier number that shows by win-acme client itself. In our case the number is “2”. So I entered “2”

Now choose our website binding again by entering the corresponding number. In my case it was “1”
Confirm the selection by typing “yes”
Agree the terms and conditions by typing “yes”
Enter our email address for communication.

The SSL/TLS certificate will issue for our website. It will be stored under “Web Hosting” section from windows certificate Manager. After that the https binding will automated get created for the website with the new lets encrypt certificate. Also the win-acme client will automatically schedule the renewal too.

Okay, this completes the Lets Encrypt SSL install using win-acme client. Now we can quit the console by typing “Q”
Also if we go the Windows Certificate Manager >> Expand “Web Hosting” and Certificates, we will see our certificate is already imported.

Also, if we go the folder “C:\\ProgramData\\win-acme\\acme-v02.api.letsencrypt.org”\certificates” , we will see the issued certificate files are stored in it.

Now we can also test our the SSL certificate renewal by running the “wacs.exe” file again.
Type “A” for manage renewals
We will get a list of all lets encrypt SSL certificates in the server. Enter the corresponding number for the SSL certificate that we wish to renew. In our case its “2”
Now run the renewal by typing “R”
We will see renewal is running. once completed quit the console by typing “Q”


This completes the issue of free Lets Encrypt SSL/TLS certificate using win-acme Lets Encrypt Client. After this if we visit our website on web browser it will be secured with new Lets Encrypt SSl/TLS certificate we issued.
Conclusion
In this tutorial, we discussed about how to install Lets Encrypt SSL/TLS certificate in a Windows Server 2019. We also discussed few errors we faced. I hope this article is informative. Leave your thoughts at the comment box.
Share This Story, Choose Your Platform!
Related Posts
2 Comments
-
 Ben Nadel
December 2, 2022 at 10:49 am — ReplyWow, a tremendous walk-through! I’m kind of shocked that this isn’t simpler to do these days. But, at least this is a possible path-forward. I was thinking of trying to do this in a Dockerized context; but, I already have a Window VPS / IIS; so, I wanted to see what it would look like without containers (one less thing to pay for). Thanks!
-
Alex
April 23, 2023 at 4:10 pm — ReplyA very good article. I have been using Let’s Encrypt for a while now and it is working great. The process is simple and easy to follow.


Page load link
Go to Top