В этой статье мы настроим SSH аутентификацию в Windows по RSA или EdDSA ключам для безопасного доступа к удаленным компьютерам/серверам. Рассмотрим, как сгенерировать открытый и закрытый ключи (сертификаты) в Windows и настроить сервер OpenSSH в Windows 10/11 и Windows Server 2019/2022 для аутентификации по ключам (без паролей).
Аутентификация по SSH ключам широко используется в мире Linux, а в Windows этот функционал появился относительно недавно. Идея заключается в том, что на SSH сервере добавляется открытый ключ клиента и при подключении сервер проверяет наличие соответствующего закрытого ключа у клиента. Таким образом удаленный пользователь может аутентифицироваться в Windows без ввода пароля.
Содержание:
- Генерация SSH ключей на клиенте Windows
- Настройка OpenSSH в Windows для авторизации по ключам
- Вход по SSH ключу для локальных администраторов Windows
Генерация SSH ключей на клиенте Windows
На клиентском, компьютере, с которого вы будет подключаетесь к удалённому серверу Windows с OpenSSH, вам нужно сгенерировать пару ключей (открытый и закрытый). Закрытый ключ хранится на клиенте (не отдавайте его никому!), а открытый ключ нужно скопировать в файл authorized_keys на SSH сервере. Чтобы сгенерировать SSH ключи на клиенте Windows, вы должны установить клиент OpenSSH.
В Windows 10/11 и Windows Server 2019/2022 клиент OpenSSH устанавливается как отдельный встроенный компонент с помощью PowerShell:
Add-WindowsCapability -Online -Name OpenSSH.Client~~~~0.0.1.0
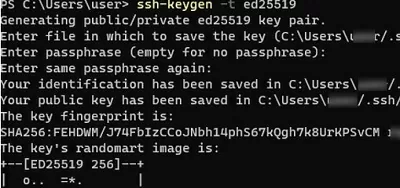
Запустите обычную (непривилегированную сессию PowerShell) и сгенерируйте пару ED25519 ключей:
ssh-keygen -t ed25519
По умолчанию утилита ssh-keygen генерирует ключи RSA 2048. В настоящий момент вместо RSA ключей рекомендуется использовать именно ED25519.
Утилита попросит вас указать пароль для защиты закрытого ключа. Если вы укажете пароль, то каждый раз при использовании этого ключа для SSH авторизации, вы должны будете вводить этот пароль. Я не стал указывать пароль для ключа (не рекомендуется).
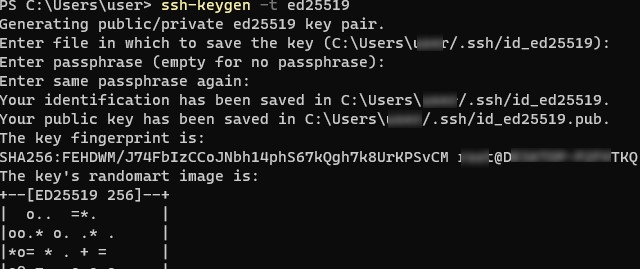
Generating public/private ed25519 key pair. Enter file in which to save the key (C:\Users\myuser/.ssh/id_ed25519):

Enter passphrase (empty for no passphrase): Enter same passphrase again: Your identification has been saved in C:\Users\myuser/.ssh/id_ed25519. Your public key has been saved in C:\Users\myuser/.ssh/id_ed25519.pub. The key fingerprint is: SHA256:C2wXeCQSUcJyq0 myuser@computername The key's randomart image is: +--[ED25519 256]--+ | ..*O=..o. | +----[SHA256]-----+
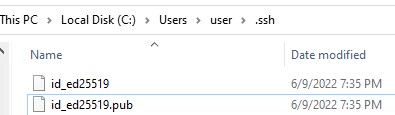
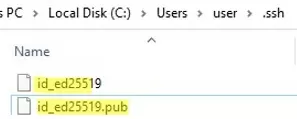
Утилита ssh-keygen создаст каталог .ssh в профиле текущего пользователя Windows (%USERPROFILE%\.ssh) и сгенерирует 2 файла:
-
id_ed25519
– закрытый ключ (если вы сгенерировали ключ типа RSA, файл будет называться
id_rsa
) -
id_ed25519.pub
– публичный ключ (аналогичный RSA ключ называется
id_rsa.pub
)
После того, как ключи созданы, вы можете добавить закрытый ключ в службу SSH Agent, которая позволяет удобно управлять закрытыми ключами и использовать их для аутентификации.
SSH Agent может хранить закрытые ключи и предоставлять их в контексте безопасности текущего пользователя. Запустите службу ssh-agent и настройте автоматический запуск с помощью PowerShell команд управления службами:
Set-service ssh-agent StartupType ‘Automatic’
Start-Service ssh-agent
Добавьте ваш закрытый ключ в базу ssh-agent:
ssh-add "C:\Users\user\.ssh\id_ed25519"
Identity added: C:\Users\kbuldogov\.ssh\id_ed25519 (kbuldogov@computername)

Или так:
ssh-add.exe $ENV:UserProfile\.ssh\id_ed25519
Настройка OpenSSH в Windows для авторизации по ключам
SSH сервер (в этом примере это удаленный компьютер с Windows 11 и настроенной службой OpenSSH).
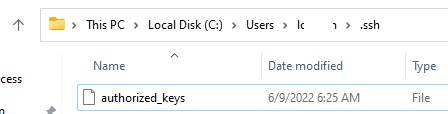
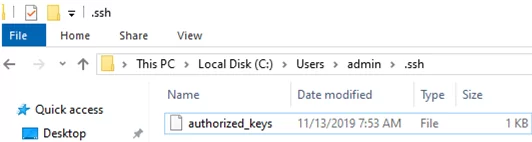
Скопируйте файл id_ed25519.pub в каталог .ssh профиля пользователя, под которым вы будете подключаться к SSH серверу. Например, у меня в Windows 11 создан пользователь user1, значит я должен скопировать ключ в файл C:\Users\user1\.ssh\authorized_keys.
В данном примере подразумевается, что user1 это обычная учетная запись пользователя без прав локального администратора на компьютере с сервером SSH.
Если каталог .ssh в профиле отсутствует, его нужно создать вручную.
Можно скопировать ключ на SSH сервер с клиента с помощью SCP:
scp C:\Users\youruser\.ssh\id_rsa.pub [email protected]:c:\users\user1\.ssh\authorized_keys
В один файл authorized_keys можно добавить несколько открытых ключей.
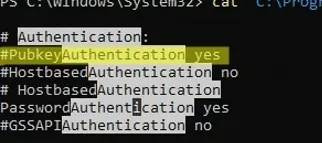
По умолчанию в OpenSSH сервере в Windows отключена аутентификация по ключам. Вы можете проверить это в конфигурационном файле sshd_config. Проще всего получить список разрешенных способов аутентификации в OpenSSH с помощью такой PowerShell команды (Select-String используется как аналог grep в PowerShell):
cat "C:\ProgramData\ssh\sshd_config"| Select-String "Authentication"
#PubkeyAuthentication yes
#HostbasedAuthentication no
# HostbasedAuthentication
 PasswordAuthentication yes
#GSSAPIAuthentication no

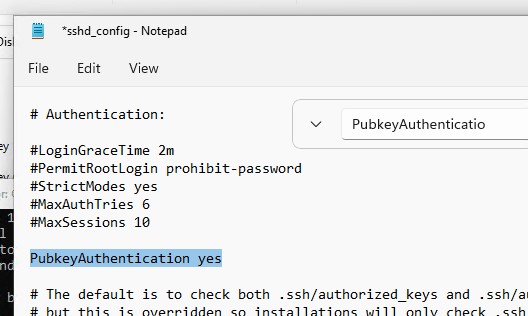
В этом примере строка PubkeyAuthentication закомментирована, значит этот способ аутентификации отключен.
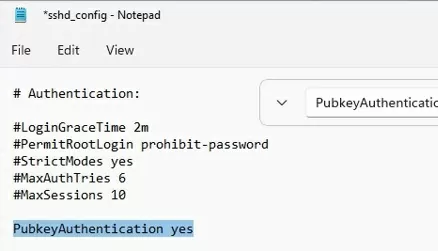
Откройте файл sshd_config с помощью блокнота, раскоментируйте строку:
Notepad C:\ProgramData\ssh\sshd_config
PubkeyAuthentication yes
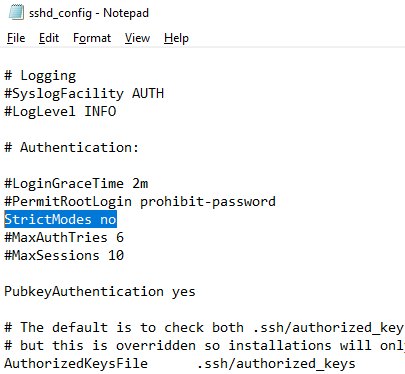
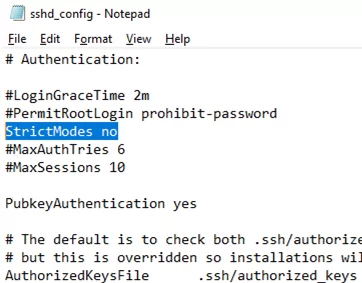
Также в конфигурационном файле sshd_config придется отключить режим StrictModes. По умолчанию этот режим включен и запрещает аутентификацию по ключам, если закрытый и открытый ключ недостаточно защищены. Раскомментируйте строку
#StrictModes yes
, измените на
StrictModes no
.
Сохраните файл и перезапустите службу sshd:
Restart-Service sshd
Теперь вы можете подключиться к SSH серверу без ввода пароля пользователя. А если вы не задали пароль (passphrase) для закрытого ключа, вы сразу автоматически подключитесь к вашему удаленному серверу Windows.
Для подключения через SSH к удаленному хосту используется следующая команда:
ssh (username)@(имя или IP адрес SSH сервера)
Например,
ssh [email protected]
Это означает, что вы хотите подключиться к удаленному SSH серверу с адресом 192.168.1.90 под учетной записью admin. Служба SSH Agent автоматически попытается использовать для авторизации сохраненный ранее закрытый ключ.
- Если вы не хотите использовать ssh-agent для управления ключами, вы можете указать путь к закрытому ключу, который нужно использовать для SSH аутентификации:
ssh [email protected] -i "C:\Users\user\.ssh\id_ed25519" - Для подключения с помощью учетной записи пользователя из домена Active Directory используется формат:
ssh kbu[email protected]@168.1.90 -i <private_key_absolute_path>

При первом подключении нужно добавить отпечаток ключа SSH сервера в доверенные. Наберите yes -> Enter.
The authenticity of host '192.168.1.90 (192.168.1.90)' can't be established.
ECDSA key fingerprint is SHA256:LNMJTbTS0EmrsGYTHB3Aa3Tisp+7fvHwZHbTA900ofw.
Are you sure you want to continue connecting (yes/no/[fingerprint])? yes
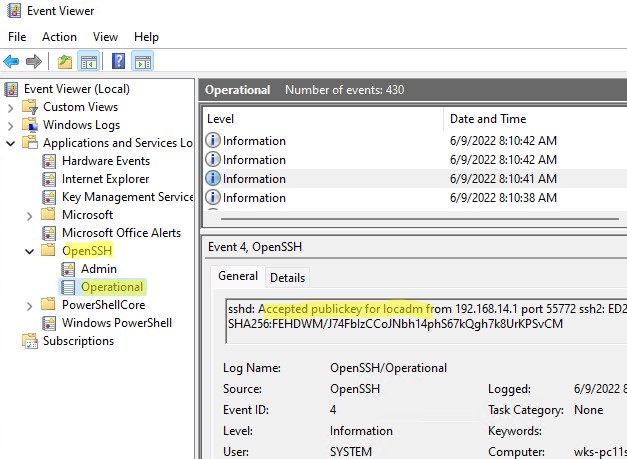
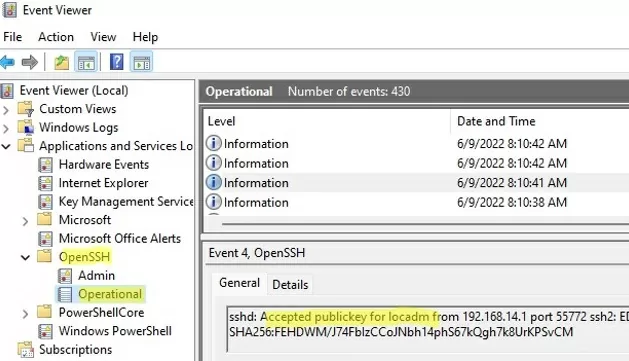
Информацию по аутентификации в Windows с помощью SSH ключей можно найти в журнале события. В современных версиях OpenSSH логи пишутся не в текстовые файлы, а в отдельный журнал Event Viewer (Application and services logs -> OpenSSH -> Operational).
При успешном подключении с помощью ключа в журнале появится событие:
EventID 4
sshd: Accepted publickey for locadm from 192.168.14.1 port 55772 ssh2: ED25519 SHA256:FEHDWM/J74FbIzCCoJNbh14phS67kQgh7k8UrKPSvCM
Если вы не смогли подключиться к вашему SSH серверу по RSA ключу, и у вас все равно запрашивается пароль, скорее всего пользователь, под которым вы подключаетесь, входит в группу локальных администраторов сервера (SID группы S-1-5-32-544). Об этом далее.

Вход по SSH ключу для локальных администраторов Windows
В OpenSSH используются особые настройки доступа по ключам для пользователей с правами локального администратора Windows.
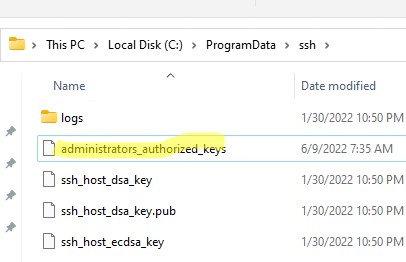
В первую очередь, вместо ключа authorized_keys в профиле пользователя нужно использовать файл с ключами C:\ProgramData\ssh\administrators_authorized_keys. Вам нужно добавить ваш ключ в этот текстовый файл (в целях безопасности права на этот файл должны быть только у группы Administrators и SYSTEM).
Вы можете изменить NTFS права на файл с помощью:
- утилиты icacls:
icacls.exe "C:\ProgramData\ssh\administrators_authorized_keys" /inheritance:r /grant "Administrators:F" /grant "SYSTEM:F - или с помощью PowerShell командлетов get-acl и set-acl:
get-acl "$env:programdata\ssh\ssh_host_rsa_key" | set-acl "$env:programdata\ssh\administrators_authorized_keys"

После этого SSH аутентификация по ключам работает даже при отключенном режиме StrictModes
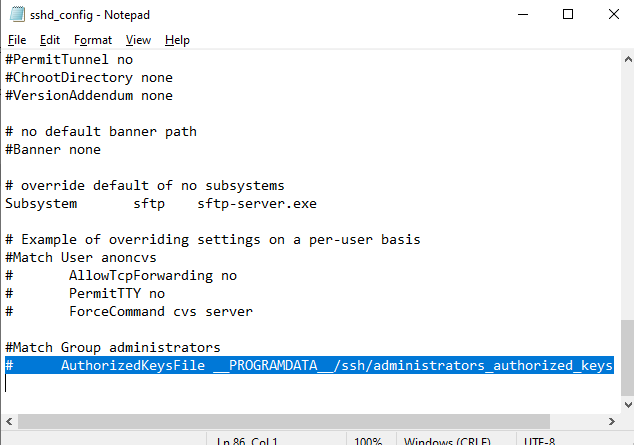
alert]Чтобы использовать ключ authorized_keys из профиля пользователя, и не переносить данные открытого ключа в файл administrators_authorized_keys, вы можете закомментировать строку в файле конфигурации OpenSSH (C:\ProgramData\ssh\sshd_config).
Закомментируйте строки:
#Match Group administrators
# AuthorizedKeysFile __PROGRAMDATA__/ssh/administrators_authorized_keys
Дополнительно в файле sshd_config вы можете запретить SSH подключение по паролю по паролю:
PasswordAuthentication no
После сохранения изменений в файле sshd_config не забудьте перезапустить службу sshd.
restart-service sshd
Если вы установили PasswordAuthentication no, и некорректно настроите аутентификацию по ключам, то при подключении по ssh будет появляться ошибка:
[email protected]: Permission denied (publickey,keyboard-interactive).

В OpenSSH на Linux доступна опция PermitRootLogin, позволяющая ограничить доступ к SSH серверу под аккаунтом root. В Windows OpenSSH эта директива не доступна и для ограничения доступа администраторов нужно использовать параметр DenyGroups.
Итак, вы настроили SSH аутентификацию в Windows по открытому RSA-ключу (сертификату). Теперь вы можете использовать такой способ аутентификации для безопасного доступа к удаленным северам, автоматического поднятия проброса портов в SSH туннеле, запуска скриптов и других задачах автоматизации.
In this article, we will show how to configure SSH authentication in Windows using RSA or EdDSA keys. Let’s see how to generate public and private key pair on Windows and configure an OpenSSH server on Windows 10/11 or Windows Server 2019/2022 for key-based authentication (without passwords).
SSH key-based authentication is widely used in the Linux world, but in Windows, it has appeared quite recently. The idea is that the client’s public key is added to the SSH server, and when a client tries to connect to it, the server checks if the client has the corresponding private key. This way a remote user can authenticate in Windows without entering a password.
Contents:
- Generating an SSH Key Pair on Windows
- OpenSSH: Configuring Key-Based Authentication with Public Key on Windows
- Logging Windows with SSH Key Under Administrative User
Generating an SSH Key Pair on Windows
You must generate two SSH keys (public and private) on the client computer that you will use to connect to the remote Windows host running OpenSSH. A private key is stored on a client side (keep the key safe and don’t share it with anyone!), and a public key is added to the authorized_keys file on the SSH server. To generate RSA keys on a Windows client, you must install the OpenSSH client.
On Windows 10/11 and Windows Server 2019/2022, the OpenSSH client is installed as an optional Windows feature using PowerShell:
Add-WindowsCapability -Online -Name OpenSSH.Client~~~~0.0.1.0
Open a standard (non-elevated) PowerShell session and generate a pair of ED25519 keys using the command:
ssh-keygen -t ed25519
By default, the ssh-keygen tool generates RSA 2048 keys. Currently, it is recommended to use ED25519 instead of RSA keys.
You will be prompted to provide a password to protect the private key. If you specify the password, you will have to enter it each time you use this key for SSH authentication. I did not enter a passphrase (not recommended).
Generating public/private ed25519 key pair.
Enter file in which to save the key (C:\Users\myuser/.ssh/id_ed25519):
Enter passphrase (empty for no passphrase):
Enter same passphrase again:
Your identification has been saved in C:\Users\myuser/.ssh/id_ed25519.
Your public key has been saved in C:\Users\myuser/.ssh/id_ed25519.pub.
The key fingerprint is: SHA256:xxxxxxxx myuser@computername
The key's randomart image is:
+--[ED25519 256]--+
+----[SHA256]-----+
Ssh-keygen will create the .ssh directory in the profile of a current Windows user (%USERPROFILE%\.ssh) and generate 2 files:
id_ed25519– private key (if you generated an RSA key, the file will be namedid_rsa)id_ed25519.pub– public key (a similar RSA key is calledid_rsa.pub
After the SSH keys are generated, you can add your private key to the SSH Agent service, which allows you to conveniently manage private keys and use them for authentication.
The SSH Agent service can store your private keys and provide them in the security context of the current user. Run the ssh-agent service and configure it to start automatically using the PowerShell service management commands:
set-service ssh-agent StartupType ‘Automatic’
 Start-Service ssh-agent
Add your private key to the ssh-agent database:
ssh-add "C:\Users\youruser\.ssh\id_ed25519"
Identity added: C:\Users\youruser\.ssh\id_ed25519 (youruser@computername)

Or as follows:
ssh-add.exe $ENV:UserProfile\.ssh\id_rsa
OpenSSH: Configuring Key-Based Authentication with Public Key on Windows
Now you need to copy your SSH public key to the SSH server. The SSH server in this example is a remote Windows 11 machine that has the OpenSSH service installed and configured.
Copy the id_ed25519.pub file to the .ssh directory in the profile of the user you will use to connect to the SSH server. For example, I have an user1 account on my remote Windows 11 device, so I need to copy the key to C:\Users\user1\.ssh\authorized_keys.
You can copy the public key to the SSH server from the client using SCP:
scp C:\Users\youruser\.ssh\id_rsa.pub [email protected]:c:\users\admin\.ssh\authorized_keys
You can add multiple public keys to a single authorized_keys file.
Public key authentication is disabled by default in the OpenSSH server on Windows. You can check this in the sshd_config. The easiest way to get a list of allowed authentication methods in OpenSSH is to use the following PowerShell command (Select-String is used as an analog of grep in PowerShell):
cat "C:\ProgramData\ssh\sshd_config"| Select-String "Authentication"
#PubkeyAuthentication yes
#HostbasedAuthentication no
#HostbasedAuthentication
PasswordAuthentication yes
#GSSAPIAuthentication no
In this example, the PubkeyAuthentication line is commented out, which means that this authentication method is disabled. Open the sshd_config file with notepad and uncomment the line:
Notepad C:\ProgramData\ssh\sshd_config
PubkeyAuthentication yes
Also, you will have to disable the StrictModes option in the sshd_config configuration file. By default, this mode is enabled and prevents SSH key-based authentication if private and public keys are not properly protected. Uncomment the line #StrictModes yes and change it to StrictModes no
Now you can connect to your Windows SSH server without a password. If you have not set a password (passphrase) for the private key, you will automatically connect to your remote Windows host.
To connect to a remote host using a native SSH client, use the following command:
ssh (username)@(SSH server name or IP address)
For example:
ssh [email protected]
It means that you want to connect to a remote SSH server with the IP address 192.168.1.15 under the user1 account. SSH Agent service will automatically try to use your private key to authenticate on a remote host.
- If you do not want to use the ssh-agent service to manage SSH keys, you can specify the path to the private key file to be used for the SSH authentication:
ssh [email protected] -i "C:\Users\youuser\.ssh\id_ed25519" - To connect SSH host using a user account from an Active Directory domain, use the following format:
ssh jsm[email protected]@192.168.1.15 -i <private_key_absolute_path>

When connecting for the first time, you need to add the fingerprint of the SSH server key to the trusted list. Type yes -> Enter.
The authenticity of host '192.168.1.15 (192.168.1.15)' can't be established.
ECDSA key fingerprint is SHA256:xxxxxxx.
Are you sure you want to continue connecting (yes/no/[fingerprint])? yes
ETW logging is used in Windows OpenSSH to store SSH logs instead of plain text files. You can check the SSH key-based authentication logs in the Windows Event Viewer (Application and Services Logs -> OpenSSH -> Operational).
If the SSH connection with the private key is successful, the following event will appear in the OpenSSH log:
EventID 4
sshd: Accepted publickey for locadm from 192.168.15.20 port 55772 ssh2: ED25519 SHA256:xxxxxxx
If you were not able to connect to your SSH server using your private key and you are still prompted to enter a password, it is likely that the user account you are trying to connect to is a member of the local Windows administrators group (the group SID is S-1-5-32-544). We will discuss it later.

Logging Windows with SSH Key Under Administrative User
OpenSSH uses special key-based authentication settings for admin user accounts on Windows.
You need to use the C:\ProgramData\ssh\administrators_authorized_keys file instead of the authorized_keys key in the user profile. Add your public SSH key to this text file (for security reasons, only the Administrators and SYSTEM groups should have permission to read this file).

You can change the NTFS permissions on a file with:
- The icacls tool:
icacls.exe "C:\ProgramData\ssh\administrators_authorized_keys" /inheritance:r /grant "Administrators:F" /grant "SYSTEM:F" - or using the Get-Acl and Set-Acl PowerShell cmdlets:
get-acl "$env:programdata\ssh\ssh_host_rsa_key" | set-acl "$env:programdata\ssh\administrators_authorized_keys"

After that, SSH key authentication works even if the StrictModes is disabled.
In order to use the authorized_keys file from a user profile and not to move the public key info to the administrators_authorized_keys file, you can comment out a line in the OpenSSH configuration file (C:\ProgramData\ssh\sshd_config).
#Match Group administrators
# AuthorizedKeysFile __PROGRAMDATA__/ssh/administrators_authorized_keys

Additionally, you can disable SSH password login in the sshd_config:
PasswordAuthentication no
Don’t forget to restart the sshd service after making the changes in the sshd_config.
restart-service sshd
If you set PasswordAuthentication no, and configure SSH key authentication incorrectly, then an error will appear when connecting via ssh:
[email protected]: Permission denied (publickey,keyboard-interactive).
![]()
You can use the PermitRootLogin option in OpenSSH on Linux to restrict SSH root login. This directive is not applicable in Windows OpenSSH, and you must use the DenyGroups parameter to deny ssh login under admin accounts:
DenyGroups Administrators
So, you have configured SSH authentication in Windows using a key pair. Now you can use this authentication method to securely access remote servers, automatically forward ports in the SSH tunnel, run scripts, and perform other automation tasks.
SSH • Windows • Конфигурирование • OpenSSH • Компьютерные истории • Истории

Введение
Начиная с верcии 1803, в Windows 10 доступны SSH клиент и SSH сервер, причём, SSH клиент установлен и готов к использованию, как говорится, прямо из коробки, а SSH сервер надо устанавливать, но делается это буквально в пару-тройку кликов мышкой[1]. Что это означает? С точки зрения клиента можно говорить о том, что сторонние программы, такие как PuTTY, вроде как больше не нужны. С точки зрения сервера — не надо устанавливать никакие сторонние серверы, если есть решение интегрированное.
В работе что клиент, что сервер, практически не отличаются от того ПО, к которому я привык в Debian. Но, как ни крути, есть некоторые отличия, и вот об одном из них попробую сейчас рассказать. Речь пойдет о подключении к SSH серверу, работающему на Windows, с клиента, в моем случае, работающего на Debian Jessie, причем, без использования пароля, то есть, задействуя ключи.
На самом деле, начало процесса не отличается от стандартного: если у вас нет набора ключей, вам его надо сгенерировать, если есть — используйте существующий. Речь сейчас идёт о той машине, которая будет клиентом. И я уже как-то писал об этом, но на некоторых моментах всё-таки остановлюсь ещё раз: повторенье — мать ученья 😉.
Про генерацию ключей
Итак, если ключей нет и вы работаете на системе под управлением Linux, то вот эта команда поможет вам их сгенерировать:
ssh-keygen -t rsa
Если же вы работаете под Windows, то у вас есть несколько возможностей сгенерировать ключи:
- Если вы работаете под
Windows 10и включили возможность использовать встроенныйSSHклиент, то смело используйте командуssh-keygen— должно сработать… 🙄😉 - Если вы работаете под
Windows 10и включили возможность использовать WSL, то можете воспользоваться возможностями этой подсистемы, то есть, использовать в ней… всё ту же командуssh-keygen. - Если вы работаете под
Windows 10и у вас не установлен встроенныйSSHклиент и не включена возможность использованияWSL, или же у вас более ранняя версияWindows, то придется использовать стороннее ПО, тот же PuTTY с его генераторомPuTTYgen— для этого случая есть достаточно подробная документация.
Если пара ключей успешно сгенерирована, или уже была у вас, то необходимо «доставить» публичный ключ на сервер и там сделать его доступным для использования SSH сервером. И вот тут то и начинаются отличия от обычного — для мира Linux — процесса.
Доставка публичного ключа на сервер Linux
Что я делал, когда мне надо было «доставить» ключ на SSH сервер, работающий на Linux? Всё очень просто — запуск следующей команды на клиентской машине решал все вопросы:
ssh-copy-id user_name@server_name_or_ip
где user_name — имя пользователя, ключ которого передаётся на сервер, а server_name_or_ip — имя или адрес хоста с сервером SSH, к которому есть желание подключаться без ввода пароля (от имени пользователя с ключом). Иногда команда не работала и приходилось явно указывать файл (при помощи параметра командной строки -i), в котором хранился публичный ключ, но это, в большей степени, зависело от устройства, на котором выполнялась эта команда, вернее, от версии ОС, ну и от реализации и версии криптографического ПО, конечно.
Но, в случае, когда в качестве сервера выступает машина с Windows, этот приём не прокатывает — ключ не передаётся на нужный хост и всё. Не знаю, эксперименты эти я проводил довольно давно, может, в новых версиях Windows эту «особенность» исправили, а может и нет. В любом случае, тогда мне пришлось искать обходной путь.
Собственно, сам этот путь очевиден — раз не получается сделать передачу ключа автоматом, надо всё выполнить вручную. А для этого необходимо знать, где и как Windows хранит публичные ключи, используемые SSH сервером для аутентификации клиентов. К счастью, в документации Microsoft есть необходимая информация и её надо просто использовать. Давайте её детально разберём, при том держа в уме, что документация предполагает работу с клиентской машины под управлением Windows с заранее настроенным доступом по SSH к необходимому серверу.
Создание каталога для хранения ключей
Итак, из документации становится очевидно, что Windows хранит пользовательские ключи, используя тот же принцип, что и Linux: на сервере в файле authorized_keys в подкаталоге .ssh домашнего каталога пользователя (а это, как правило, c:\Users\user_name, где user_name — имя пользователя), от имени которого вы хотите работать в установившемся SSH сеансе. Если этого каталога нет, его надо создать, для чего предлагается использовать команду:
ssh user_name@domain_name@host_name "mkdir C:\\users\\user_name\\.ssh\\"
где user_name — имя пользователя, domain_name — имя домена, в который входит пользователь (его можно опустить для локальных пользователей на удалённом сервере), host_name — имя или адрес хоста, к которому подключаемся. Приведённая мною команда несколько отличается от той, которая дана в документации, но следует помнить, что я работаю с клиентской машины под управлением Linux.
Копирование публичного ключа
Далее, предлагается скопировать во вновь созданный каталог файл с публичным ключом пользователя, от имени которого вы работаете на клиентской машине при подключении к серверу по SSH (команда слегка отличается от той, которая приведена в документации, так как я работаю с машины под управлением Debian):
scp ~/.ssh/public_key_file_name.pub user_name@domain_name@host_name:C:\Users\user_name\.ssh\authorized_keys
где public_key_file_name.pub — имя файла публичного ключа, например, id_ed25519.pub или id_rsa.pub (далее в примерах я буду использовать для простоты id_rsa.pub).
На этом моменте хотелось бы остановиться подробнее. Обычно вы работаете на своём компьютере (или виртуалке) под своим собственным пользователем. Когда вы подключаетесь к удалённой машине по SSH, вы можете подключаться под именем своего текущего пользователя локальной машины, или использовать имя какого-либо пользователя удалённого компьютера, или же — доменное имя. Конечно, в любом случае на удалённом хосте должен существовать соответствующий пользователь (или разрешено использовать доменное имя), даже если его имя будет совпадать с именем пользователя, под которым вы работаете на своём локальном хосте. Так вот, совсем не обязательно, что вы единственный подключаетесь к удалённому хосту под определенным пользователем, вполне возможно, что с других хостов другие люди (или вы сами?) также подключаются по SSH, используя ту же самую учётную запись.
Возможно то, что я написал выше, это «ужас-ужас» с точки зрения безопасности, но такая ситуация весьма вероятна в домашних и небольших офисных сетях (да и не только 🙁), в которых не сильно заморачиваются с администрированием. И вот в таких случаях, копировать файл со своим публичным ключом — плохая идея: вы просто затрёте существующий файл authorized_keys с публичными ключами других пользователей (или ваших собственных ключей на других компьютерах — вряд ли вы переносите свою единственную пару ключей с хоста на хост 😉). Поэтому следует рассмотреть возможность добавлять свой ключ к соответствующему файлу на удалённом хосте.
Добавление публичного ключа
Естественно, возникает вопрос, как это можно сделать. И на этот вопрос существует множество ответов. Например, если у вас есть доступ к удалённому хосту по RDP, то можно отредактировать на нём файл authorized_keys с помощью того же notepad-а, добавив содержимое своего файла с публичным ключом. Или же, можно скопировать свой файл с публичным ключом на нужный сервер и объединить его с существующим файлом, а затем — удалить (конечно, при этом у вас, вернее, у вашего пользователя на удалённом компьютере, должны быть права на редактирование файла authorized_keys):
scp ~/.ssh/id_rsa.pub user_name@domain_name@host_name:C:/Users/user_name/.ssh/my_public_key_file_name.pub
ssh user_name@domain_name@host_name "type C:\\Users\\user_name\\.ssh\\my_public_key_file_name.pub >> C:\\Users\\user_name\\.ssh\\authorized_keys"
ssh user_name@domain_name@host_name "del /Q C:\\Users\\user_name\\.ssh\\my_public_key_file_name.pub"
Обратите внимание на использование символов ‘/’ в команде scp и ‘\’ в командах ssh — так как мы работаем на Debian, то в команду scp можно передать путь на хосте с Windows с использованием нестандартного для Windows разделителя ‘/’, а вот в команды, выполняемые при помощи ssh на том же удалённом компьютере, следует передавать символы ‘\’,то есть, стандартный для Windows разделитель ‘\’ с предшествующим символом ‘\’, так называемый «escaped backslash», иначе Windows не найдёт нужные файлы.
Назначение прав доступа к файлу с публичными ключами
Вот мы и подошли к последнему шагу — предоставлению прав доступа к файлу authorized_keys. Именно этим занимается команда:
ssh --% user_name@domain_name@host_name powershell -c $ConfirmPreference = 'None'; Repair-AuthorizedKeyPermission C:\Users\user_name\.ssh\authorized_keys
Основную смысловую нагрузку в этой составной команде несёт функция Repair-AuthorizedKeyPermission из модуля OpenSSHUtils для PowerShell (да, именно PowerShell используется в качестве командной оболочки в этот раз). Этот модуль надо устанавливать отдельно, например, так (выполнять эту команду надо, естественно, из PowerShell):
Install-Module -Force OpenSSHUtils -Scope AllUsers
Так вот, когда я запустил эту команду, ответом мне стало сообщение об ошибке:
Совпадения для указанных условий поиска и имени пакета "OpenSSHUtils" не найдены.
Естествено, я начал разбираться в сложившейся ситуации, после чего, если честно, желание использовать этот модуль у меня стало исчезающе малым.
Суть в том, что Windows 10 предъявляет определённые требования к безопасности файла authorized_keys (на самом деле, к безопасности публичных ключей). Причины, по которым это происходит, наверное, не надо объяснять. Так вот, в документации Microsoft указывается, что при использовании Windows 10 доступ может быть предоставлен только администаторам и специальному пользователю SYSTEM. Там же советуется использовать модуль OpenSSHUtils, который должен оказать помощь при установке нужных прав. Собственно, при использовании предложенного в документации подхода я и наткнулся на ошибку. Но кроме документации от Microsoft я нашёл довольно много информации о проблемах, вызванных использованием этого модуля. Если попробовать кратко изложить содержимое ответов на возникающие у пользователей вопросы и проблемы, то получится что-то типа:
«Не используйте этот модуль, он дополнительно предоставит права пользователю
sshd, после чего у вас перестанут соблюдаться требования к безопасности публичных ключей.»
Вот честно, не знаю, так это, или нет, но проверять расхотелось, тем более, что совсем не трудно задать нужные права самостоятельно. После некоторого изучения вопроса — я не большой специалист в PowerShell — получился вот такой вот набор команд[2] (я приведу их полностью, потом разберу для чего нужна каждая из них):
$acl = Get-Acl C:\Users\user_name\.ssh\authorized_keys
$acl.SetAccessRuleProtection($true, $false)
$adminsRule = New-Object system.security.accesscontrol.filesystemaccessrule("Администраторы","FullControl","Allow")
$sysRule = New-Object system.security.accesscontrol.filesystemaccessrule("SYSTEM","FullControl","Allow")
$acl.SetAccessRule($adminsRule)
$acl.SetAccessRule($sysRule)
Set-Acl -Path C:\Users\user_name\.ssh\authorized_keys -AclObject $acl
Теперь, как и обещал, небольшие пояснения по командам. Итак, для начала, при помощи cmdlet-а Get-Acl получаем дескриптор безопасности, содержащий ACL (Access Control List) нужного нам объекта файловой системы (параметр командной строки Path можно опустить) и сохраняем результат в переменной $acl. Далее, используя метод SetAccessRuleProtection полученного объекта, запрещаем наследование прав (true в первом параметре) и отказываемся от сохранения унаследованных ранее прав (false во втором параметре). Затем создаём два объекта, описывающих правила доступа к объектам файловой системы: один (сохраняется в переменной $adminsRule) — для Администраторов, второй (сохраняется в переменной $sysRule) — для специального пользователя SYSTEM. Теперь, при помощи метода SetAccessRule, добавляем только что соданные ACL к дескриптору безопасности нашего файла, хранящегося в переменной $acl. После чего, всё, что нам остаётся сделать — применить полученный дескриптор, для чего используем cmdlet Set-Acl.
Ну вот, теперь, когда мы выполнили все шаги, всё должно заработать. Но, в моём случае, не заработало. Очередная неудача заставила меня вновь полезть в документацию, что обогатило меня новыми знаниями. Рассказываю…
Публичные ключи для работы от имени пользователей администраторов
Причиной того, что при соединении с SSH сервером мне, несмотря на все предыдущие мытарства, продолжало выводиться требование ввести пароль, было то, что я пытался подключиться под пользователем, который входил в группу локальных Администраторов. У Windows 10 в этом случае есть требование — публичные ключи должны храниться в файле %programdata%/ssh/administrators_authorized_keys, то есть, обычно, в C:\ProgramData\ssh\administrators_authorized_keys.
Что ж, для того, чтобы решить проблему, можно воспользоваться двумя путями. Первый путь — воспользоваться процедурой добавления публичного ключа, рассмотренной нами выше. Да-да, все эти шаги: копирование, добавление, предоставление прав, только применяем их не к authorized_keys, а к administrators_authorized_keys. Я напишу, на всякий случай, полную последовательность команд, чтобы удобно было воспользоваться, но не забудьте подставить свои значения для пользователя, домена и хоста.
scp ~/.ssh/id_rsa.pub user_name@domain_name@host_name:C:/Users/user_name/.ssh/my_public_key_file_name.pub
ssh user_name@domain_name@host_name "type C:\\Users\\user_name\\.ssh\\my_public_key_file_name.pub >> C:\\ProgramData\\ssh\\administrators_authorized_keys"
ssh user_name@domain_name@host_name "del /Q C:\\Users\\user_name\\.ssh\\my_public_key_file_name.pub"
$acl = Get-Acl C:\ProgramData\ssh\administrators_authorized_keys
$acl.SetAccessRuleProtection($true, $false)
$adminsRule = New-Object system.security.accesscontrol.filesystemaccessrule("Администраторы","FullControl","Allow")
$sysRule = New-Object system.security.accesscontrol.filesystemaccessrule("SYSTEM","FullControl","Allow")
$acl.SetAccessRule($adminsRule)
$acl.SetAccessRule($sysRule)
Set-Acl -Path C:\ProgramData\ssh\administrators_authorized_keys -AclObject $acl
Второй путь чуть более радикальный — изменить настройки SSH сервиса. Настройки эти хранятся в файле %programdata%/ssh/sshd_config. Как оказалось, именно там определяется, где должны храниться публичные ключи тех пользователей, которые подключаются к SSH серверу от имени пользователей, входящих в группу администраторов. Вот, собственно, эти строки:
...
Match Group administrators
       AuthorizedKeysFile __PROGRAMDATA__/ssh/administrators_authorized_keys
...
Так вот, эти строки надо закомментировать или удалить, после чего SSH сервер надо перезапустить.
Какой путь использовать — решать вам. Я же, пожалуй, закончу — пост получился и так слишком длинным…
-
На самом деле, в виде beta версий эти компоненты были доступны и раньше, но и установка и стабильность работы, были, что называется, не на высоте. ↩︎
-
Честно признаюсь, очень многое я подсмотрел в документации, например, как отключить наследование прав, или предоставить Администраторам полный контроль над файлом, и лишь немного адаптировал эти примеры к собственным нуждам. ↩︎
Subscribe to Записки на полях
Get the latest posts delivered right to your inbox
Great! Check your inbox and click the link to confirm your subscription.
Please enter a valid email address!
On this page:
- Before you begin
- Set up public key authentication using SSH on a Linux or macOS computer
- Set up public key authentication using PuTTY on a Windows 11, Windows 10, or Windows 8.x computer
Before you begin
Using SSH public key authentication to connect to a remote system is a robust, more secure alternative to logging in with an account password or passphrase. SSH public key authentication relies on asymmetric cryptographic algorithms that generate a pair of separate keys (a key pair), one «private» and the other «public». You keep the private key a secret and store it on the computer you use to connect to the remote system. Conceivably, you can share the public key with anyone without compromising the private key; you store it on the remote system in a .ssh/authorized_keys directory.
To use SSH public key authentication:
- The remote system must have a version of SSH installed. The information in this document assumes the remote system uses OpenSSH. If the remote system is using a different version of SSH (for example, Tectia SSH), the process outlined below may not be correct.
- The computer you use to connect to the remote server must have a version of SSH installed. This document includes instructions for generating a key pair with command-line SSH on a Linux or macOS computer, and with PuTTY on a Windows computer.
- You need to be able to transfer your public key to the remote system. Therefore, you must either be able to log into the remote system with an established account username and password/passphrase, or have an administrator on the remote system add the public key to the
~/.ssh/authorized_keysfile in your account. -
Two-factor authentication using Two-Step Login (Duo) is required for access to the login nodes on IU research supercomputers, and for SCP and SFTP file transfers to those systems. SSH public key authentication remains an option for researchers who submit the «SSH public key authentication to HPS systems» agreement (log into HPC everywhere using your IU username and passphrase), in which you agree to set a passphrase on your private key when you generate your key pair. If you have questions about how two-factor authentication may impact your workflows, contact the UITS Research Applications and Deep Learning team. For help, see Get started with Two-Step Login (Duo) at IU and Help for Two-Step Login (Duo).
Set up public key authentication using SSH on a Linux or macOS computer
To set up public key authentication using SSH on a Linux or macOS computer:
- Log into the computer you’ll use to access the remote host, and then use command-line SSH to generate a key pair using the RSA algorithm.
To generate RSA keys, on the command line, enter:
ssh-keygen -t rsa - You will be prompted to supply a filename (for saving the key pair) and a password (for protecting your private key):
- Filename: To accept the default filename (and location) for your key pair, press
EnterorReturnwithout entering a filename.Alternatively, you can enter a filename (for example,
my_ssh_key) at the prompt, and then pressEnterorReturn. However, many remote hosts are configured to accept private keys with the default filename and path (~/.ssh/id_rsafor RSA keys) by default. Consequently, to authenticate with a private key that has a different filename, or one that is not stored in the default location, you must explicitly invoke it either on the SSH command line or in an SSH client configuration file (~/.ssh/config); see below for instructions. - Password: Enter a password that contains at least five characters, and then press
EnterorReturn. If you pressEnterorReturnwithout entering a password, your private key will be generated without password-protection.Important:
If you don’t password-protect your private key, anyone with access to your computer conceivably can SSH (without being prompted for a password) to your account on any remote system that has the corresponding public key.
Your private key will be generated using the default filename (for example,
id_rsa) or the filename you specified (for example,my_ssh_key), and stored on your computer in a.sshdirectory off your home directory (for example,~/.ssh/id_rsaor~/.ssh/my_ssh_key).The corresponding public key will be generated using the same filename (but with a
.pubextension added) and stored in the same location (for example,~/.ssh/id_rsa.pubor~/.ssh/my_ssh_key.pub). - Filename: To accept the default filename (and location) for your key pair, press
- Use SFTP or SCP to copy the public key file (for example,
~/.ssh/id_rsa.pub) to your account on the remote system (for example,darvader@deathstar.empire.gov); for example, using command-line SCP:scp ~/.ssh/id_rsa.pub darvader@deathstar.empire.gov:You’ll be prompted for your account password. Your public key will be copied to your home directory (and saved with the same filename) on the remote system.
- Log into the remote system using your account username and password.
Note:
If the remote system is not configured to support password-based authentication, you will need to ask system administrators to add your public key to the
~/.ssh/authorized_keysfile in your account (if your account doesn’t have~/.ssh/authorized_keysfile, system administrators can create one for you). Once your public key is added to your~/.ssh/authorized_keysfile on the remote system, the setup process is complete, and you should now be able to SSH to your account from the computer that has your private key. - If your account on the remote system doesn’t already contain a
~/.ssh/authorized_keysfile, create one; on the command line, enter the following commands:mkdir -p ~/.ssh touch ~/.ssh/authorized_keysNote:
If your account on the remote system already has a
~/.ssh/authorized_keysfile, executing these commands will not damage the existing directory or file. - On the remote system, add the contents of your public key file (for example,
~/id_rsa.pub) to a new line in your~/.ssh/authorized_keysfile; on the command line, enter:cat ~/id_rsa.pub >> ~/.ssh/authorized_keysYou may want to check the contents of
~/.ssh/authorized_keysto make sure your public key was added properly; on the command line, enter:more ~/.ssh/authorized_keys - You may now safely delete the public key file (for example,
~/id_rsa.pub) from your account on the remote system; on the command line, enter:rm ~/id_rsa.pubAlternatively, if you prefer to keep a copy of your public key on the remote system, move it to your
.sshdirectory; on the command line, enter:mv ~/id_rsa.pub ~/.ssh/ - Optionally, repeat steps 3-7 to add your public key to other remote systems that you want to access from the computer that has your private key using SSH public key authentication.
- You now should be able to SSH to your account on the remote system (for example,
username@host2.somewhere.edu) from the computer (for example,host1) that has your private key (for example,~/.ssh/id_rsa):- If your private key is password-protected, the remote system will prompt you for the password or passphrase (your private key password/passphrase is not transmitted to the remote system):
[username@host1 ~]$
ssh username@host2.somewhere.eduEnter passphrase for key '/username/Host1/.ssh/id_rsa': Last login: Mon Oct 20 09:23:17 2014 from host1.somewhere_else.edu - If your private key is not password-protected, the remote system will place you on the command line in your home directory without prompting you for a password or passphrase:
[username@host1 ~]$
ssh username@host2.somewhere.eduLast login: Mon Oct 20 09:23:17 2014 from host1.somewhere_else.edu
If the private key you’re using does not have the default name, or is not stored in the default path (not
~/.ssh/id_rsa), you must explicitly invoke it in one of two ways:- On the SSH command line: Add the
-iflag and the path to your private key.For example, to invoke the private key
host2_key, stored in the~/.ssh/old_keysdirectory, when connecting to your account on a remote host (for example,username@host2.somewhere.edu), enter:ssh -i ~/.ssh/old_keys/host2_key username@host2.somewhere.edu - In an SSH client configuration file: SSH gets configuration data from the following sources (in this order):
- From command-line options
- From the user’s client configuration file (
~/.ssh/config), if it exists - From the system-wide client configuration file (
/etc/ssh/ssh_config)
The SSH client configuration file is a text file containing keywords and arguments. To specify which private key should be used for connections to a particular remote host, use a text editor to create a
~/.ssh/configthat includes theHostandIdentityFilekeywords.For example, for connections to
host2.somewhere.edu, to make SSH automatically invoke the private keyhost2_key, stored in the~/.ssh/old_keysdirectory, create a~/.ssh/configfile with these lines included:Host host2.somewhere.edu IdentityFile ~/.ssh/old_keys/host2_keyOnce you save the file, SSH will use the specified private key for future connections to that host.
You can add multiple
HostandIdentityFiledirectives to specify a different private key for each host listed; for example:Host host2.somewhere.edu IdentityFile ~/.ssh/old_keys/host2_key Host host4.somewhere.edu IdentityFile ~/.ssh/old_keys/host4_key Host host6.somewhere.edu IdentityFile ~/.ssh/old_keys/host6_keyAlternatively, you can use a single asterisk (
*) to provide global defaults for all hosts (specify one private key for several hosts); for example:Host *.somewhere.edu IdentityFile ~/.ssh/old_keys/all_hosts_keyFor more about the SSH client configuration file, see the OpenSSH SSH client configuration file on the web or from the command line (
man ssh_config).
- If your private key is password-protected, the remote system will prompt you for the password or passphrase (your private key password/passphrase is not transmitted to the remote system):
Set up public key authentication using PuTTY on a Windows 11, Windows 10, or Windows 8.x computer
The PuTTY command-line SSH client, the PuTTYgen key generation utility, the Pageant SSH authentication agent, and the PuTTY SCP and SFTP utilities are packaged together in a Windows installer available under The MIT License for free download from the PuTTY development team.
After installing PuTTY:
- Launch .
- In the «PuTTY Key Generator» window, under «Parameters»:
- For «Type of key to generate», select . (In older versions of PuTTYgen, select .)
- For «Number of bits in a generated key», leave the default value (
2048).
- Under «Actions», click .
- When prompted, use your mouse (or trackpad) to move your cursor around the blank area under «Key»; this generates randomness that PuTTYgen uses to generate your key pair.
- When your key pair is generated, PuTTYgen displays the public key in the area under «Key». In the «Key passphrase» and «Confirm passphrase» text boxes, enter a passphrase to passphrase-protect your private key.
Note:
If you don’t passphrase-protect your private key, anyone with access to your computer will be able to SSH (without being prompted for a passphrase) to your account on any remote system that has the corresponding public key.
- Save your public key:
- Under «Actions», next to «Save the generated key», click .
- Give the file a name (for example,
putty_key), select a location on your computer to store it, and then click .
- Save your private key:
- Under «Actions», next to «Save the generated key», click .
Note:
If you didn’t passphrase-protect your private key, the utility will ask whether you’re sure you want to save it without a passphrase. Click to proceed or to go back and create a passphrase for your private key.
- Keep «Save as type» set to , give the file a name (for example,
putty_private_key), select a location on your computer to store it, and then click . - If you wish to connect to a remote desktop system such as Research Desktop (RED), click , give the file a name (for example,
putty_rsa), select a location on your computer to store it, and then click .
- Under «Actions», next to «Save the generated key», click .
- Log into the remote system using your account username and password.
If the remote system does not support password-based authentication, you will need to ask system administrators to add your public key to the
~/.ssh/authorized_keysfile in your account (if your account doesn’t have~/.ssh/authorized_keysfile, system administrators can create one for you). Once your public key is added to your account’s~/.ssh/authorized_keysfile on the remote system… - If your account on the remote system doesn’t already contain a
~/.ssh/authorized_keysfile, create one; on the command line, enter the following commands:mkdir -p ~/.ssh touch ~/.ssh/authorized_keysIf your account on the remote system already has
~/.ssh/authorized_keys, executing these commands will not damage the existing directory or file. - On your computer, in the PuTTYgen utility, copy the contents of the public key (displayed in the area under «Key») onto your Clipboard. Then, on the remote system, use your favorite text editor to paste it onto a new line in your
~/.ssh/authorized_keysfile, and then save and close the file. - On your computer, open the Pageant SSH authentication agent. This utility runs in the background, so when it opens, you should see its icon displayed in the Windows notification area.
- In the Windows notification area, right-click on the icon, select , navigate to the location where you saved your private key (for example,
putty_private_key.ppk), select the file, and then click . - If your private key is passphrase-protected, Pageant will prompt you to enter the passphrase; enter the passphrase for your private key, and then click .
If your private key is not passphrase-protected, Pageant will add your private key without prompting you for a passphrase.
Either way, Pageant stores the unencrypted private key in memory for use by PuTTY when you initiate an SSH session to the remote system that has your public key.
- On your computer, open the PuTTY SSH client:
- On the screen:
- Under «Host Name (or IP address)», enter your username coupled with the hostname of the remote server that has your public key; for example:
dsidious@deathstar.empire.gov - Under «Connection type», make sure is selected.
- Under «Host Name (or IP address)», enter your username coupled with the hostname of the remote server that has your public key; for example:
- In the «Category» list on the left, navigate to the screen (). On the screen, under «Authentication methods», select .
- Return to the screen, and under «Saved Sessions», enter a name (for example,
Deathstar), and then click . - Click to connect to your account on the remote system. With Pageant running in the background, PuTTY will retrieve the unencrypted private key automatically from Pageant and use it to authenticate. Because Pageant has your private key’s passphrase saved (if applicable), the remote system will place you on the command line in your account without prompting you for the passphrase.
Note:
Technically, at this point, the setup is complete. In the future, whenever you log into your Windows desktop, you can run Pageant, add the private key, and then use PuTTY to SSH to any remote resource that has your public key. Alternatively, you can create a shortcut in your Windows
Startupfolder to launch Pageant and load your private key automatically whenever you log into your desktop. For instructions, finish the rest of the following steps. - On the screen:
- Open your
Startupfolder. PressWin-r, and in the «Open» field, typeshell:startup, and then pressEnter. - Right-click inside the
Startupfolder, and then select and . - In the «Type the location of the item» text box, enter the path to the Pageant executable (
pageant.exe) followed by the path to your private key file (for example,putty_private_key.ppk); enclose both paths in double quotes and separate them with a space; for example:"C:\Program Files (x86)\PuTTY\pageant.exe" "C:\Users\user_profile\ssh_key\putty_private.ppk" - Click , and then, in the «Type a name for this shortcut» text box, enter a name for the shortcut (for example,
PAGEANT). - Click .
The next time you log into your Windows desktop, Pageant will start automatically, load your private key, and (if applicable) prompt you for the passphrase.
Related documents
In this guide, you will learn how to configure OpenSSH on Windows with Public Key Authentication.
Let’s get started.
Step 1: Install OpenSSH Server on Windows
You can install OpenSSH Server on any Windows OS. In this example I’m using a Windows 2020 server.
To install OpenSSH, run the below PowerShell command. I had to give the server internet access in order for the command to work.
Add-WindowsCapability -Online -Name OpenSSH.Server~~~~0.0.1.0
Screenshot below is from my local computer.

Next, you will need to start the ssh service. You can also set the service to start automatically, but that is optional. I recommend setting the service to automatic or you will need to manually start it each time when the computer reboots.
# Start the sshd service
Start-Service sshd

# OPTIONAL but recommended:
Set-Service -Name sshd -StartupType 'Automatic'
That completes the installation of OpenSSH server on Windows. At this point, you should be able to connect to the server from a client machine using password authentication. You will need to have the OpenSSH client installed on a remote computer in order to connect.
You can connect using the hostname or IP address. Below I tested the connection to my server IP address “192.168.40.4” with the account name “jojo”.
ssh jojo@192.168.40.4

When connected you can type “hostname” to verify you are connected to the remote server.

To uninstall openssh server run the below command.
# Uninstall the OpenSSH Server
Remove-WindowsCapability -Online -Name OpenSSH.Server~~~~0.0.1.0
Step 2: Generate and Install SSH Key Pairs
Now you need to generate the SSH keys (private and public keys) on your local computer that will be used to connect to the remote OpenSSH server. A private key will be stored on your local computer and the public key will be copied to the OpenSSH server.
Open PowerShell 7 and run the below command:
ssh-keygen -t ed25519
You should get a message that says “Enter file in which to say the key”. The key will save to your profile path by default. You can choose to leave it as the default or change the path, I will keep the default path.
You will then be prompted to enter a passphrase to encrypt your private key. This can be empty but it is not recommended.
You should now have a public and private key pair in the location specified. Screenshot below of the steps on my local computer.

You can view the keys in windows explorer by browsing to the location you saved them. In my case, I saved them to the default path (c:\users\YOURPROFILE\.ssh).

- id_ed25519 – This is your private key.
- id_ed25519.pub – This is the public key that will get copied to the server.
Next, you need to copy the public key to the server, this is where it gets a little weird.
Standard User
If your account is not a member of the local administrator’s group then follow the below steps. If it is a member of the local administrator’s group then jump to the “Administrator User” section below.
First, you need to create the .ssh folder in your profile path on the server. My standard user account is “jojo” so I would create the .ssh folder at c:\Users\jojo\.ssh.

Next, run this command to copy the public key to a text file called “authorized_keys” on the server. Replace “username” with your profile name.
scp C:\Users\username\.ssh\id_ed25519.pub username@servername:C:\Users\username\.ssh\authorized_keys
Here is a screenshot of this command from my local computer.

If you go to the server and look in your profile there should now be an “authorized_keys” file.

At this point, you should be able to authenticate with your key authentication. The problem is password authentication is still allowed. I’ll show you how to disable it in the server config section.
Administrator User
If your account is a member of the local administrative group then the public key needs to be placed into a text file called “administrators_authorized_keys” in the “c:\ProgramData\ssh\” folder. Pretty strange I know, I’m not sure why Microsoft did this.
Use the below command to copy the public key for an administrator.
scp C:\Users\username\.ssh\id_ed25519.pub username@servername:C:\ProgramData\ssh\administrators_authorized_keys
Here is a screenshot from my local computer.

Now check the “c:\ProgramData\ssh” folder on the server.

Test authentication, if you created a passphrase you will be prompted.

If you get the below error then you need to modify the permissions on the administrators_authorized_keys file.
“Permission denied (publickey,password,keyboard-interactive).”
On the server open PowerShell and run these commands to fix the permissions.
icacls C:\ProgramData\ssh\administrators_authorized_keys /inheritance:r
icacls C:\ProgramData\ssh\administrators_authorized_keys /grant SYSTEM:`(F`)
icacls C:\ProgramData\ssh\administrators_authorized_keys /grant BUILTIN\Administrators:`(F`)
Tip: You can also use the private key with other ssh tools such as putty when connecting to the server. You will need to configure whatever client you’re using with the private key.
Step 3: Configure OpenSSH Server with Key Authentication
If you completed steps 1 and 2 you should be able to use key authentication now instead of a password. The only problem is the server still allows password authentication and so it is recommended to disable this.
To disable the password authentication go to the server and open the “sshd_config” file with the notepad program, this file is located in the “c:\ProgramData\ssh” folder.
Make sure to test that authentication works with your private key before disabling password authentication.
Uncomment and change these two values.
PubkeyAuthentication = yes
PasswordAuthentication = no
Here is a screenshot from my local computer.

Save the file.
Now open PowerShell and restart the ssh service with this command.
restart-service sshd
This will disable password authentication and only allow connections with a private and public key pair.
Secure the Private Key (optional)
This is an optional step. Microsoft recommends using the ssh-add command to securely store the private keys within a Windows security context. The private key acts like a password so you probably don’t want it sitting on your computer, because if someone copies it, they could use it to authenticate to the ssh server.
Here are the commands to store the private key.
# By default the ssh-agent service is disabled. Allow it to be manually started for the next step to work.
# Make sure you're running as an Administrator.
Get-Service ssh-agent | Set-Service -StartupType Manual

# Start the service
Start-Service ssh-agent

# This should return a status of Running
Get-Service ssh-agent

# Now load your key files into ssh-agent
ssh-add ~\.ssh\id_ed25519
When completed, test ssh authentication.
If it works it is recommended to back up your private key to a secure location and delete it from your local computer.
That completes the tutorial. When testing and researching this guide, every article on the internet had different instructions, maybe because the Windows implementation has changed overtime. I’m not sure. If you have issues with the installation post a comment below.
Resources:
- Manage OpenSSH Keys – Microsoft Documentation
- How to use OpenSSH on Windows 10 – This is a separate guide I created for installing and using the OpenSSH client on windows 10.
- OpenSSH.com – This is the official home page for the openSSH project. It includes release details and complete documentation.