![]()
Download Article
The complete guide to installing PuTTY and making SSH connections
![]()
Download Article
- Installing PuTTY
- Connecting to a Server
- Generating Keys
- Transferring Files with PSFTP
- Tips
|
|
|
|
PuTTY is a free Windows app that lets you make a secure connection to a remote computer. One of the most common uses for PuTTY is to open a secure shell (SSH) connection to a remote Unix server, such as a Linux-based web server. PuTTY also comes with a secure FTP client (SFTP) called PSFTP, a secure file-transfer tool, and PuTTYgen, a tool you can use to generate public and private SSH keys. This wikiHow guide will teach you how to securely connect to another computer using PuTTY on Windows, and how to use other PuTTY tools to create keys and transfer files.
Things You Should Know
- You can use PuTTY to connect to school servers, work servers, and web servers securely via SSH.
- PuTTY is available for Windows from https://www.chiark.greenend.org.uk/~sgtatham/putty/latest.html.
- If the server you’re connecting to requires your public key, you can generate your public/private keypair in PuTTYgen.
-

1
Go to https://www.chiark.greenend.org.uk/~sgtatham/putty/latest.html. PuTTY is a free tool for making secure shell (SSH) connections to a remote server. If you were asked to connect to a certain server via SSH (for your website, for work, school, or any other reason), PuTTY is the most straightforward way to connect on Windows.
-
2
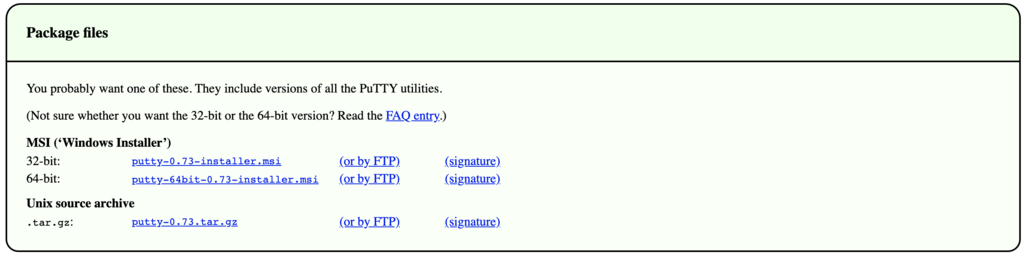
Download the «msi» file from the «Package Files» section. All the different files may seem confusing, but there’s no need to worry! In the «MSI (Windows Installer)» section, you’ll see three download links—64-bit x86, 64-bit Arm, and 32-bit x86.[1]
- First, you’ll need to figure out which file to download by finding your computer’s bit count. Open the Windows Search bar, type about, and then click About your PC. Look at the number next to «System type» in the right panel.
- If you see «64-bit operating system, x64-based processor,» you need the 64-bit x86 version. Download the file called putty-64bit-0.78-installer.msi.
- If you see «64-bit operating system, ARM-based processor,» you need the ARM version. Download putty-arm64-0.78-installer.msi.
- If you see 32-bit operating system, you need the 32-bit version. Download putty-0.78-installer.msi.
Advertisement
- First, you’ll need to figure out which file to download by finding your computer’s bit count. Open the Windows Search bar, type about, and then click About your PC. Look at the number next to «System type» in the right panel.
-
3
Run the PuTTY installer. Double-click the installer you downloaded (it’ll be in your default Downloads folder), then follow the on-screen instructions to install PuTTY. Just choose the default settings and you’ll be okay. PuTTY, PSFTP, and PuTTYgen will be added to your Start menu once the installation is complete.


Advertisement
-
1
Gather your server information. Most people won’t need much information to connect to a server with PuTTY. You’ll typically need:
- The hostname or IP address you want to connect to. A hostname looks like a string of words, like students.harvard.edu or mywebsite.com. An IP address is usually 4 numbers connected together, like 10.0.01.
- The port you’ll need to connect to. If your work, school, hosting provider, or other party hasn’t provided you with a port, don’t worry—this just means you’ll use the default SSH port of 22.
- Your username and password for the server.
- If you’re connecting to a server that has other requirements, such as using a certificate or private key to authenticate, you’ll need those files as well.
- Most people won’t need to do this, but if your host requires you to do so, you can use PuTTYgen to generate a key for your remote server.
-
2
Open PuTTY for Windows. It’ll be in the Start menu, but you can also type putty into the Windows Search bar to find it quickly. PuTTY will open to the «PuTTY Configuration» screen.
-
3
Fill out the connection fields on your PuTTY client. After you start up PuTTY, a dialogue box will pop up on your screen.
- Enter the hostname or IP address you want to connect to into the first field.
-
SSH is selected by default, which sets the «Port» field to 22. If you need to SSH to a different port, enter that port into the «Port» field.
- You can also use PuTTY to telnet into remote servers or check ports, but because telnet isn’t secure, it’s not used much anymore.
- Type a name for your profile under «Saved Sessions» and click Save. This makes it so you can quickly select this host in the future.
- If your host requires you to use a private key or certificate, expand the SSH menu, then expand the Auth menu, and select Credentials. Click the Browse… button next to the authentication type your server uses (Private key file and/or Certificate) and select the key or certificate file.
-
4
Click Open to connect to the server. Once the connection is successful, you’ll be prompted to enter your username and password to log in. You can now run any Unix commands allowed by your system administrator.
- Some sysadmins tighten security by making you SSH into one server just to SSH into another. If you need to SSH into another server from the one you just logged into, use ssh -l username remotehostname.
- If you didn’t save a profile, you’ll be prompted to do so now. Click Yes or No when prompted.


Advertisement
-
1
Open PuTTYgen for Windows. If you were instructed to create an SSH key pair before connecting to the server via SSH, you can do so easily using PuTTYgen. Type puttygen into the Windows search bar, then click PuTTYgen to launch the tool.
- Use this method if your system administrator or host asked you to provide them with your public key. Once you create your public key and give it to your sysadmin, they’ll add it to a file that makes it possible for you to connect with PuTTY.
-
2
Choose a key type. You can create RSA, DSA, ECDSA, EdDSA, or SSH-1(RSA) keys. RSA is selected by default, as it’s the most common type of key.
-
3
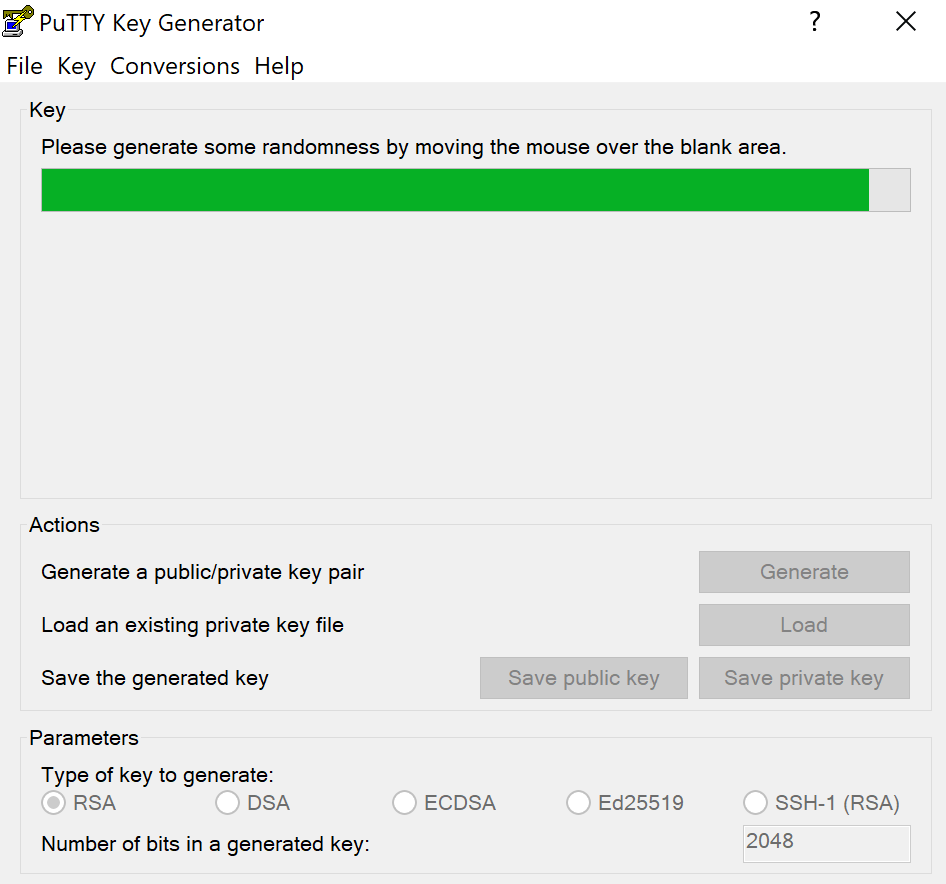
Click Generate. You’ll see this button next to «Generate a public/private key pair.»
-
4
Move your mouse cursor over the bar. Keep moving the cursor until the progress bar turns completely green. When the bar is filled, your public key will appear.
-
5
Create a key passphrase. Don’t skip this step, as it’s important for security. Enter and confirm a new passphrase to use when connecting to the remote server with your key.[2]
-
6
Save your public and private keys.
- Click Save public key, choose a location you’ll remember, call the file something like publickey.pub, and click Save.
- Then, click Save private key, and save it to a location you’ll remember. This time, keep the default file extension of .ppk so you’ll remember that the file is your private key.
-
7
Upload your public key (or share with your sysadmin). The process to add your public key to the SSH server will be different on each server, but you’ll usually have to upload it to a specific location using a web portal or FTP. You may need to copy it from the «Public key for pasting» field in PuTTYgen into an email so your sysadmin can add it. If you were instructed to add the key yourself, the default location for public keys is in your home directory at ~/.ssh/authorized_keys.
- If the file does not exist, you can create it in your home directory.
- If the file does exist and already contains a key, you can use a text editor like nano to paste your key on the line directly below the existing key.
-
8
Open PuTTY and select your connection. Once your public key is in the right place, you’ll need to associate your private key with the connection to the server. If you’ve already saved your server information, select that server now. If not, enter the hostname and login information for your server, name the connection, and click Save to create one.
-
9
Go to SSH > Auth > Credentials. You can get here by expanding each of these menus in the «Category» section on the left side of PuTTY.
-
10
Click Browse… next to «Private key file» and select your key. Choose the private key file you generated (the one that ends with .ppk).
-
11
Click Open to connect. As long as your keys match, you’ll be prompted to enter your passphrase and log in to the server via SSH.


Advertisement
-
1
Open PSTFP for Windows. PuTTY comes with a secure FTP app that lets you transfer files between your computer and a remote server. You’ll find PSFTP in the Start menu.
-
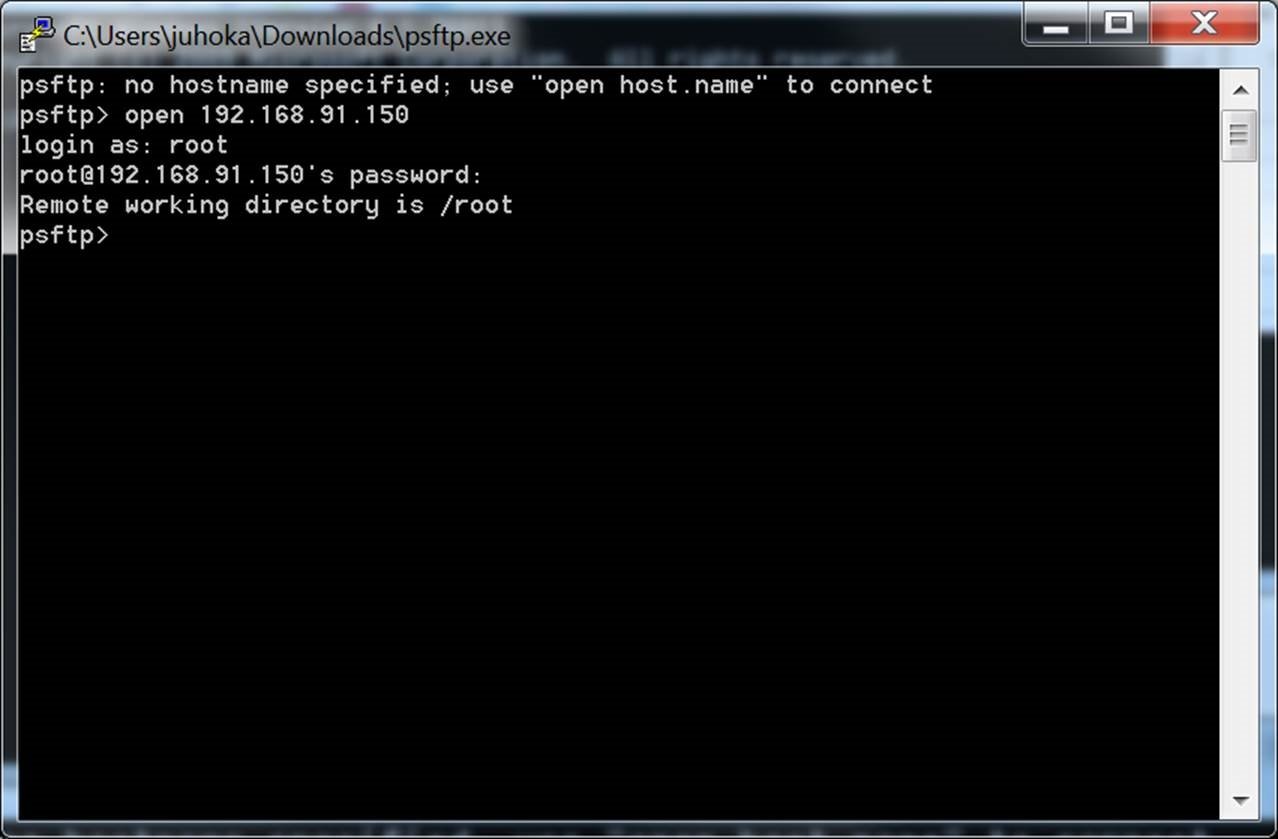
2
Type open hostname. Replace hostname with the host name or IP that you need to connect to. A host name follows the format students.harvard.edu, while an IP address looks like this: 10.0.01.
-
3
Press ↵ Enter. This initializes the connection to the server.
- If you are prompted to store a key in your cache, type y.
-
4
Log in to the server. Use the username and password you were assigned for this server. Once you’re logged in, you’ll see a prompt.
-
5
Navigate to the remote folder on which you want to upload or download a file. You’ll use the cd command, which means «change directory,» to do so. Type cd folderpath and press Enter. Replace folderpath with the path to the remote folder you need to access.
- For example, if you want to upload a new HTML file to a folder called www in your home directory, type cd www and press Enter.
- You can run the pwd command to view files in the remote folder. If the remote file is running a flavor of Unix, use ls to list the files in the folder.
-
6
Go to the folder on your computer in which you want to save or upload a file. This time, you’ll use the lcd command, which means «local change directory.» Type lcd folderpath, replacing folderpath with the full path of the folder.
- To see a list of files in the current folder, type !dir and press Enter.
-
7
Upload or download a file. The command is a little different depending on what you want to do. When the transfer is complete, you’ll return to the prompt.
- For example, if you want to upload a file that’s in your Documents folder, type cd Documents or C:\Users\yourname\Documents.
- To upload the file to the remote server, type put filename (replacing filename with the file’s real name) and press the Enter key.
- To download a file, type get filename (replace filename with the actual file name) and press Enter.


Advertisement
Ask a Question
200 characters left
Include your email address to get a message when this question is answered.
Submit
Advertisement
-
If you’re new to SFTP, you might want to try an app with a graphical user interface (GUI), as it’s a lot easier to use. Check out apps like Filezilla and CuteFTP.
-
Only download the PuTTY software from its official website. If you find PuTTY software anywhere else, download it at your own risk.
Thanks for submitting a tip for review!
Advertisement
References
About This Article
Article SummaryX
1. Download PuTTY from Putty.org.
2. Double-click the installer to run it.
3. Open PuTTY from the start menu.
4. Enter the information for the remote host.
5. Click Open.
6. Sign in with your account on the remote server.
Did this summary help you?
Thanks to all authors for creating a page that has been read 39,107 times.
Is this article up to date?
Sep 29, 2023
Linas L.
3min Read
SSH, or Secure Shell, is a secure protocol for connecting to a remote server. To establish an SSH connection, you will need an SSH client app like PuTTY and credentials like the server’s IP address, SSH port, SSH username, and SSH password.
In this guide, you will learn how to use PuTTY SSH terminal to connect to your hosting account or to a virtual private server. That way, you can access and manage your remote machine by executing various commands.
Download Ultimate SSH Commands Cheat Sheet
How to Manage Your Files via SSH – Video Tutorial
Watch to find out the advanced method of managing your files via SSH.

Subscribe For more educational videos!
Hostinger Academy
How to Download PuTTY
PuTTY is most commonly used on Windows. However, it is also available on Linux and Mac. Here is how you can get the putty download on different operating systems.
Windows
Download the latest version of PuTTY SSH from the official website. Be sure to select the right bit version for your computer. Once the file is downloaded, run the installer to start the setup.
Linux
Most people use the preinstalled OpenSSH on Linux. However, PuTTY on Linux is used more for debugging and connecting to serial ports and to raw sockets.
On Debian, use the following command:
sudo aptitude install putty
Followed by the tools installation command:
sudo aptitude install putty-tools
MacOS
Like Linux, the macOS comes with a command-line SSH client already installed. But to download PuTTY, open the terminal window and use the commands below.
To install PuTTY for MacOS:
brew install putty (or) port install putty
Requirements For Set Up
Before setting up an SSH connection using PuTTY, you will need the following information:
- Server IP Address
- SSH port
- SSH username
- SSH password
If you are a Hostinger user, there are two ways to find this information, depending on your hosting plan:
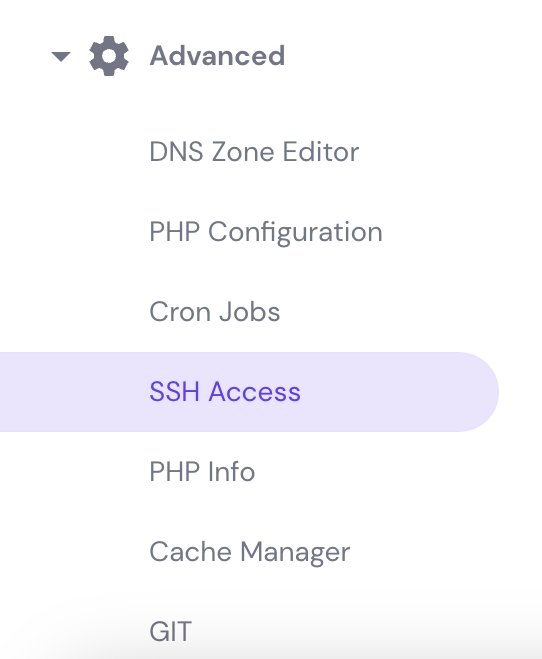
- Shared, WordPress, and Cloud hosting — go to the SSH Access menu under the Advanced category. Here you will see all the login details that you need. If you forgot your password, easily reset it via the FTP Accounts menu.
- VPS plan — the credentials are located in the Server tab of hPanel, under SSH Details. In case you don’t know what your password is, scroll down to the Root Password section, and create a new one.


How to Establish SSH Connection Using PuTTY
After getting all the SSH connection information, follow the following steps:
- Launch the PuTTY SSH client, then enter your server’s SSH IP and SSH Port. Click the Open button to proceed.

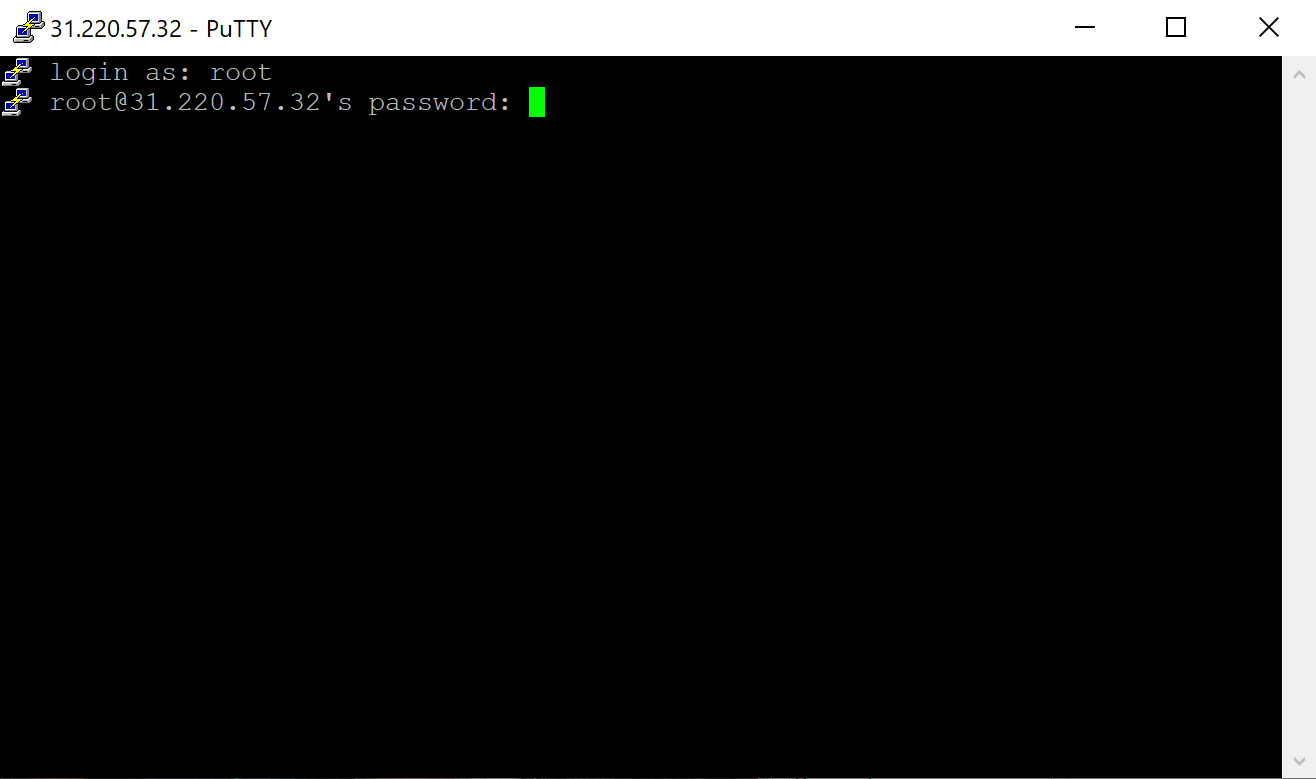
- A login as: message will pop up and asks you to enter your SSH username. For VPS users, this is usually root. However, for shared hosting users, you will need to enter a predefined username like u721233450. After entering your username, press Enter.
- Type your SSH password and press Enter again. For security reasons, the screen won’t show the password but will register what you type.

Congratulations! You have successfully connected to your account using the PuTTY SSH client. You can list all available SSH commands by executing help via the terminal.
How to Use PuTTYgen
PuTTYgen is a tool that creates SSH key pairs. PuTTY stores these key authentications in its .ppk format files. With Windows, you will use the PuTTYgen.exe graphical tool, while with Linux, you will use the command line.
To begin, locate PuTTY and open PuTTYgen.
To create a new key pair, click the Generate button near the bottom and begin to move your mouse around within the window. Continue moving your mouse until the green progress bar is full.
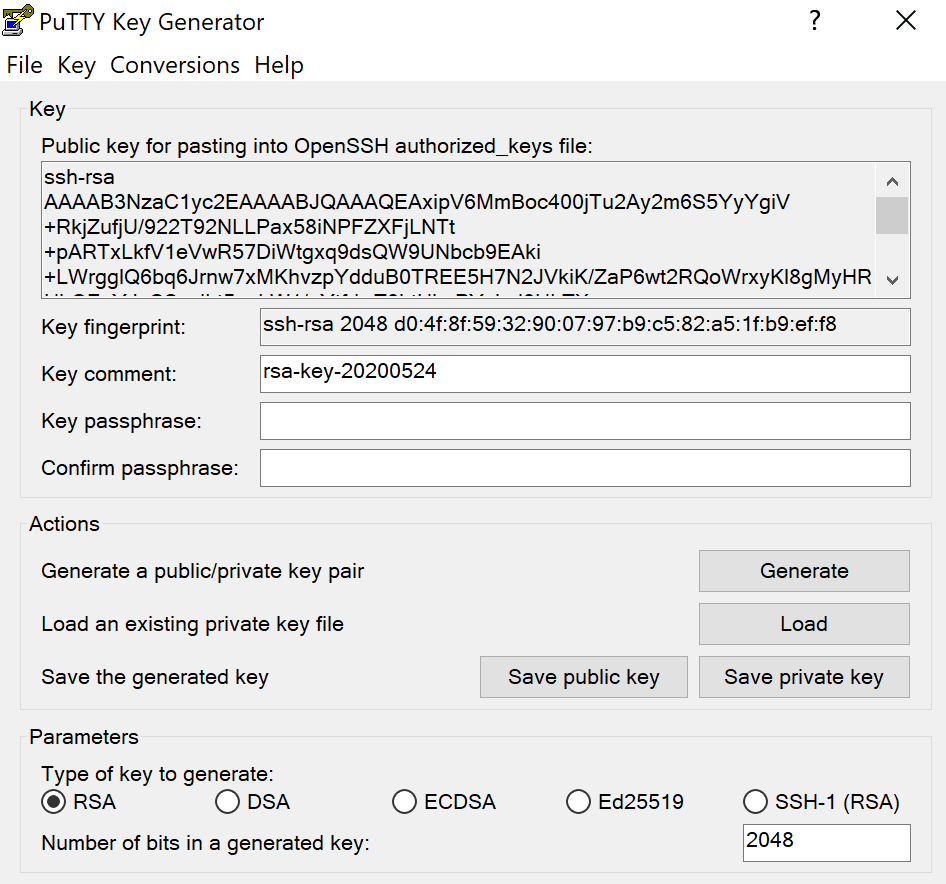
After it is complete, your public key will appear in the window.
It is recommended to use a passphrase as well as save your private key.
Install Public Key on Server
To grant access to an account, you will need to add the new public key to the file named ~/.ssh/authorized_keys.
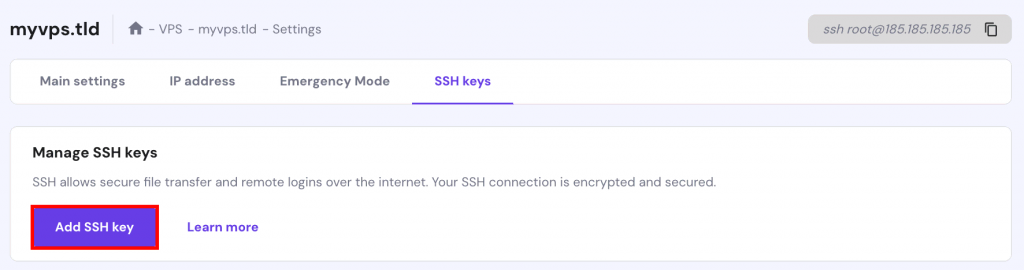
First, install the public key. Then, log into your server and locate the authorized_keys file. Edit the file and insert the new public key into the file. Save the file and test to see if the login works. Alternatively, if you have a VPS, you can add your public SSH key via hPanel:
Conclusion
SSH connection comes in handy when you have to access your server or hosting account remotely, and PuTTY is one of the SSH clients that can help you do the task. Remember that you need to know the SSH credentials to establish a connection using PuTTY.
Once you are connected, you can use basic SSH commands and start managing your server. We hope this article helps you to use the PuTTY client to connect to your hosting account.

Linas started as a customer success agent and is now a full-stack web developer and Technical Team Lead at Hostinger. He is passionate about presenting people with top-notch technical solutions, but as much as he enjoys coding, he secretly dreams of becoming a rock star.
PuTTY is a popular SSH, Telnet, and SFTP client for Windows. It is typically used for remote access to server computers over a network using the SSH protocol. This is the download page.
For more information on PuTTY, see the PuTTY page. For information on SSH (Secure Shell), see here. For information on Telnet, see here. For information on SFTP secure file transfers, see here.
Download PuTTY installation package for Windows
Master download site
Simon Tatham publishes new PuTTY versions on his personal home page.
Installation and setup instructions
-
Installation instructions for Windows
-
Setting up public key authentication using PuTTYgen
Verifying release signatures
The releases are signed with GPG, using the PuTTY release key.
To verify the signatures, you need the gpg tool. On Debian-based Linux, it can be installed with aptitude install gnupg. On Red Hat 7, it can be installed with yum install gnupg2.
To import the signature key into GPG, use:
gpg --import putty-release-2015.ascTo check the signature of a file, use:
gpg --verify <signaturefile> <datafile>For example:
gpg --verify putty-64bit-0.69-installer.msi.gpg putty-64bit-0.69-installer.msiPackage contents: putty.exe, puttygen.exe, psftp.exe, pscp.exe, pagent.exe
The installation package includes putty.exe, puttygen.exe, psftp.exe, pscp.exe, and pagent.exe.
putty.exe is the main executable for the terminal client. It can also be used standalone, without the installation package, by simply copying the executable to a USB stick and running it on a new machine. This way, the user can carry the executable with them. However, this should not be assumed to provide great security — malware on the machine where it is used can still compromise the software (cf. CIA hacking tool bothanspy) and viruses may get installed on the USB stick whenever it is inserted in a new machine.
puttygen.exe is can be used for generating SSH keys on Windows. See the separate puttygen page on how to create and set up SSH keys with it.
psftp.exe is an SFTP file transfer client. It only works on the command line, and does not support graphically dragging and dropping files between systems. See Tectia SSH if you’d like that functionality.
pscp.exe is a command line SCP client.
pagent.exe is an SSH agent for PuTTY. Keys are first created with puttygen.exe and can then be loaded into pagent for automating logins and for implementing single sign-on.

Alternatives
For other SSH clients and comparison, see the SSH clients page. Several more modern alternatives are available.
Server for Windows or other platforms
You don’t need to worry about a server if you are going to connect to a school or work server. However, if you are planning to use PuTTY to log into your own systems, then you may need to install and enable a server.
Most Linux and Unix systems come with OpenSSH preinstalled. On some distributions, you may need to install the server. On Debian-derived systems, the following will install the server:
sudo aptitude install openssh-serverOn Red Hat systems, the following will install the server:
sudo yum install openssh-serverDepending on the system, you may also need to start the server if you don’t want to reboot. The following should work on most systems:
sudo service sshd restartFor Windows, the Tectia SSH is a popular choice and comes with commercial support services. It also runs on IBM z/OS mainframes. Unix/Linux are available with support for business-critical applications.
SSH key management needs attention
SSH is often used with public key authentication to implement automation and single sign-on.
Public key authentication uses a new kind of access credential, the SSH key, for authentication. It is much more secure than traditional password authentication, especially compared to hard-coded passwords in scripts, but the keys need proper management.
Most organizations with more than a hundred servers have large numbers of SSH keys. Usually, these keys have not been properly managed and audited. An SSH risk assessment is recommended. Organizations should consider deploying key management software to establish proper provisioning, termination, and monitoring for key-based access.
Risks of unmanaged SSH keys include uncontrolled attack spread across the server infrstructure, including to disaster recovery data centers and backup systems.
Organizations should also be aware of security risks related to SSH port forwarding. It is a technology that has many good uses, but it can also enable unfettered access across firewalls. Employees and attackers can leave tunnels back into the internal network from the public Internet. This particularly affects organizations using cloud computing services.

Using telnet is not recommended
In addition to SSH, the PuTTY can be used as a telnet client. Telnet is insecure. Its use is not recommended.
The main problem with telnet is that it transmits all passwords and any transmitted data in the clear. Anyone with access to any computer on the same network can steal user names and passwords that are transmitted. Such password sniffing attacks were very common on the Internet already in the 1990s.
Telnet sessions can also be hijacked in the network. Attackers can inject their own commands into telnet sessions. Protection from such attacks was the main reason why Tatu Ylonen developed SSH as a replacement for telnet in the first place. Use of telnet has not been recommended for 20 years.
SFTP file transfer support
File transfer support is implemented as a separate program, PSFTP. It is available only as a command-line tool. There is no graphical user interface for file transfers.
SCP file transfers are supported via the PSCP program. This is also command-line only.
Modern implementations, such as Tectia SSH, have integrated file transfers in the terminal client.
Screenshots
PuTTY terminal window

PSFTP command line Use
Secure Software Engineering
Source URL: https://github.com/larryli/PuTTY
 CH 1: Domain & historical Analysis
Overview of the product,
PuTTY is a free and open-source terminal emulator, serial console and network file transfer application. It supports several network protocols, including SCP, SSH, Telnet, rlogin, and raw socket connection. It can also connect to a serial port. The name «PuTTY» has no official meaning.
PuTTY was originally written for Microsoft Windows, but it has been ported to various other operating systems. Official ports are available for some Unix-like platforms, with work-in-progress ports to Classic Mac OS and macOS, and unofficial ports have been contributed to platforms such as Symbian, Windows Mobile and Windows Phone.
Basically it allows you to connect to a server securely and provides a platform to execute your commands on that server. For example, if you have a Linux server running remotely, you use Putty to access that Linux server from your home securely using a protocol called «SSH» which stands for SSH (Secure Shell). Once connected to the server, you can execute commands directly from your own machine regardless of where you are. Obviously, you need your credentials on the Linux server to secure shell access into it.
Some features of PuTTY are:
-
Unicode support.
-
Control over the SSH encryption key and protocol version.
-
Command-line SCP and SFTP clients, called «pscp» and «psftp» respectively.
-
Control over port forwarding with SSH (local, remote or dynamic port forwarding), including built-in handling of X11 forwarding.
-
Emulates most xterm, VT102 control sequences, as well as much of ECMA-48terminal emulation.
-
IP Version 6 support.
-
Supports 3DES, AES, Arcfour, Blowfish, DES.
-
Public-keyauthentication support.
-
Support for local serial port connections.
-
Latest version: 2019-09-29 PuTTY 0.73 released.
Vendors of the product,
PuTTY is maintained by a small team based in Cambridge, England. They handle writing PuTTY, updating its Web site, recording its bugs, and reading (and often responding to) messages to the PuTTY contact e-mail address.
Simon Tatham
Project originator, main developer and benevolent dictator. Wrote the majority of the code; does the majority of new development and features. Also maintains Halibut, the documentation system used to produce the Windows Help file and the HTML manual.
Alexandra Lanes
Looks after the nightly snapshot builds, answers mail. Provider of common sense. Programmer, cardboard and sometimes real.
Ben Harris
Did a lot of the early work on the (still unfinished) Macintosh port and is reputed to understand ISO 2022. He’s also the maintainer of an enormous concordance of escape sequences and of NetBSD/acorn26.
Jacob Nevins
Answers mail, herd’s wish list, occasionally writes code.
Establishment year,
Initial release — January 8, 1999; 21 years ago
Stable release — 0.73 / September 29, 2019 months ago
Programming languages of the product,
Written in C language, python also used (found in code inspection)
Purpose of the product,
Putty (software) generally has two purposes.
- Used as a File Transfer Protocol.
-
Most of the hosting services, both online and offline are built on LINUX OS, rightly so because it provides better safety for client data. Especially when thousands of clients data stored in a single place safety is the first priority.
-
However this poses a greater challenge for non-LINUX OS users to deal with. Here comes the third party applications like PuTTy which enables non-Linux users install this particular software (PuTTy), and interact with Linux servers from a non-Linux OS
-
Interface of PuTTy is similar to windows terminal, However user need to be aware of Linux commands to interact with it
-
PuTTy provides various File transfer features like FTP and SFTP depending on user’s security requirements.
- Used to generate Hash key
-
PuTTy also used to generate SSH keys. Nowadays using passwords are prone to security threats especially when you are dealing with a lot of confidential data online. PuTTy allows you to generate a series of keys. Which is a combination of hundreds of Alphanumeric and special characters, which is almost impossible to crack
-
SSH generates two types of key combinations i.Public key which is used to access the terminal by authorized people, And Private key which should not be shared with anyone, Private Key is encrypted into the particular server of the user which can only be opened with a public key
-
When you’re using a particular system to access a server you can just point to the public key and you can login to the server any time without entering any password or user nsme
-
One place where i particularly found the use of PuTTy is «Digital Ocean hosting services»
Current usage of the product,
As an SSH client on Windows, The SSH protocol was developed as a secure, encrypted replacement for the RSH protocol. RSH is used for remote shell access to a UNIX (or UNIX-like) system and was once popular among sysadmins before network security became the constant concern it is now. Now, thanks to SSH, the same convenience can be had with an encrypted protocol famous for its versatility and strong security. While OpenSSH is probably the most-used implementation of SSH in the world, PuTTY is likely the most-used SSH client for the MS Windows platform.
In a multi-user operating system like Unix, the interface is generally of command-line type, just like the command prompt or MS-DOS. As such the user needs to type in the command in the command line program to get anything processed by the system. Generally, these commands can quickly be run over a network from a different computer on a different location (client) and the response is transferred over the network to the client. The arrangement mentioned above is made possible with the help of network protocols like SSH, Telnet, Rlogin, etc. Interestingly, users can give commands to multiple computers simultaneously.
SSH (Secure Shell) protocol is a cryptographic network protocol that allows you to access an internet server while encrypting any information sent to that server. Some of the other protocols include Telnet, Rlogin only if either you are connected to a UNIX system or you have a login account on a web server (a shell account). PuTTY is one such application that enables this kind of transfer.
PuTTY supports the following protocols
- SCP (Secure Copy)
- SSH (Secure Shell)
- Telnet
- Rlogin
- Raw socket connection.
The List of Operating Systems that support PuTTY:
- Windows 95, 98
- Windows ME, NT
- Windows 2000, 2003, 2008
- Windows XP
- Windows Vista
- Mac OSX
How big is this product?
PuTTY is currently beta software. Licensed under the MIT License, and it is free and open source software. This is categorized as a terminal emulator.
PuTTY is maintained by a small team based in Cambridge, England.
More than 300 files, also there are few python files.
As an Ex:
-
Ssh.c — 11852 code lines.
-
Sftp.c — 1444 code lines.
-
Sshrsa.c — 1078 code lines.
-
Psftp.c — 2991 code lines.
-
Window.c — 5852 code lines.
Since PuTTY is an open source tool others can contribute to the project,
PuTTY is more than just an SSH client. It supports all of the following protocols:
- raw: The raw protocol is normally used for network debugging.
- rlogin: This is an unencrypted UNIX remote login protocol that uses port 513 by default.
- serial: The serial option is used to connect to a serial line. The most common purpose for this is to establish a serial connection between computers in lieu of an Ethernet or other network connection.
- SSH: As already noted, SSH is an encrypted secure remote login protocol, which uses port 22 by default.
- Telnet: Like rlogin, Telnet (_tel_ecommunication _net_work) is an unencrypted remote login protocol. It typically uses port 23 and is available on many systems other than UNIX. Like rlogin, Telnet has waned in popularity due to privacy concerns.
In addition to the five protocols supported by PuTTY, it also supports features such as saved session configurations, session logging, locale (language) settings, and proxy sessions.
Overview of findings
How good this tool based on,
Mainly this particular tool is used to get remote access into the servers and PCs in the network. By using IP address and ports or else IP address and connection type users can access into the endpoint.

After this phase it will prompt the terminal to log into the relevant device. User needs to input credentials to connect.

Confidentiality : This is really protected because of the login. There is specific login to the relevant device. But if there is no specific login is a huge problem because those servers or PCs can store confidential details. All the data sent under the encryption mechanism.
Integrity : When a user is using putty, if there are any access key changes or other changes of the login details, integrity will be failed. This can be a huge problem to the legitimate users. Because some third party user has changed the integrity of logins or tried to pretend as a legitimate user.
Availability : Putty can affect DoS attacks because of the buffer overflow. In C language buffer overflow is the common problem. So attackers can use overflow as a DoS attack. Whenever DoS attacks happen, availability is going down. So legitimate users can’t get into the endpoint by using putty or any SSH client.
Authentication : Putty always needs authentication which is found to legitimate users. All the logins which are used at the end point are needed to authenticate users. And also if there are any security questions before login into the system that also show on the terminal screen as well. As well as key based authentications are possible with this application.
Authorization : When we login into the system, the user needs to select the correct user (privileged or unprivileged user). As well as if there is any key based authentication to checkout privileges of the user or given permissions of the user, it is possible to do with this application.
Accountability : There is an option for creating logs of the current session in Putty. Also users can have access to that saved log again and check session details.

Vulnerabilities,

All the vulnerabilities in the above table are fixed.
Going to address 4 vulnerabilities:
01) CVE-2004-1008
 Severity Level: Critical
Discovered in: 10/27/2004
Presented: 10/29/2004 by Unknown with iDEFENSE
Nessus identified as: (plugin ID 15581) GLSA-200410-29: PuTTY: Pre-authentication buffer overflow
This vulnerability has been found in the Putty version up to 0.55. This is affecting unknown processing of the component Ipv6 Handler. Performing ssh action (SSH2_MSG_DEBUG) with the unknown end can be the memory corruption vulnerability. This will have a huge impact on confidentiality, integrity, and availability.
The attack can be started remotely. To this attack no form of authentication to be successful. All the technical details as well as exploits are known.
By updating into the Putty version 0.56 can eliminate this vulnerability. Also there is a bugfix in the unfix.org. But the best way to mitigate this is patch updating.
02) CVE-2002-1360
Severity Level: Critical
Discovered in: 12/23/2202
Presented: unknown
Nessus identified as: (plugin ID 48968) SSH Malformed Packet Vulnerabilities — Cisco Systems
This vulnerability was found in Putty version 0.48/ 0.49/ 0.53. An unknown part of the component NULL Character Handler will be affected with this vulnerability. This also to be corrupting memory with the unknown inputs. This vulnerability highly affects confidentiality, integrity and availability.
Most of the SSH2 servers and clients don’t properly handle strings which hold null characters when the string length is specified. This will be helpful for the attackers to perform denial of service attack or else execute arbitrary code using null-terminated strings in C language.
This attack also can initiate remotely. This attack happens with no form of authentication and gains access with the administrative privileges. The technical details as well as the exploit is not available. Applying security patches is the best solution to mitigate this vulnerability as well.
03) CVE-2019-17067
Severity Level: Medium
Discovered in: 10/01/2019
Presented: unknown
This vulnerability is found in Putty versions up to 0.72 which are used on Windows OS. This is affected by unknown functionality of the component Port-Forwarding. This leads to privilege escalation vulnerability with the unknown inputs. This attack needs local access to approach and needs a single authentication for the exploitation. Technical details are unknown and exploitation is not available.
Best way to mitigate this is upgrading the putty version into the version 0.73. This will eliminate this vulnerability.
04) CVE-2019-9898
Severity Level: Medium
Discovered in: 03/20/2019
Presented: unknown
This vulnerability was found in the Putty version up to 0.70. This will affect some unknown processing’s of the component Random Number Generator. This leads to a weak encryption vulnerability. This also impacts confidentiality, integrity and availability.
This exploitation is hard to identify and also this will initiate remotely. As well as no form of authentication for successful exploitation. About the technical details and exploitations are not in publically available.
The best way to mitigate this is upgrading putty to version 0.71. This will eliminate this vulnerability.
Product Asset,
Internal Libraries,
Using standard C libraries.
#include <stdio.h>
#include <stdlib.h>
#include <stdarg.h>
#include <assert.h?
#include <limits.h>
These are used to manipulate inputs/outputs, as well as to get common functions which are using in the C language, such as «strcpy()».
External libraries,
Used customized libraries.
#include <putty.h>
#include <psftp.h>
#include <storage.h>
#include <ssh.h>
#include <sftp.h>
#include <int64.h>
These libraries are used to manipulate connections between computers or servers.
**No API calls, 3 **rd party utilities, Email configuration, Audio, Video, Image
User sensitive data : using credentials in terminal view. Only can show username and password is not visible.
Browser history → no browsing history recorded
Extensions → for windows client using .exe extension
How to handle security test cases (if have) → no any
Sandbox → this tool is not a sandbox but it can make a connection into the shell based sandbox.
Example attack

In larger scale organizations, there are more than 10000 SSH keys.
For example, in one typical financial institution we found 3 million SSH keys granting access to 15,000 servers. That is an average of 200 keys per server.
Some attackers break into one server and gain access for root privilege users. And find private keys which are used by privileged users. And spread malicious tasks as they want. To break into the system they can use vulnerabilities in the Putty like buffer overflow or else remote code execution.
 CH: 2 Design Analysis
Architecture Overview


Putty is used to make remote connections to servers or else PCs in the network. It is a SSH client for the user’s Windows machine.
PuTTY consists of several functionalities,
- PuTTY: the Telnet, rlogin, and SSH client itself, which can also connect to a serial port
- PSCP: an SCP client, i.e. command-line secure file copy. Can also use SFTP to perform transfers
- PSFTP: an SFTP client, i.e. general file transfer sessions much like FTP
- PuTTYtel: a Telnet-only client
- Plink: a command-line interface to the PuTTY back ends. Usually used for SSH Tunneling
- Pageant: an SSH authentication agent for PuTTY, PSCP and Plink
- PuTTYgen: an RSA, DSA, ECDSA and EdDSA key generation utility
- pterm: (Unix version only) an X11 client which supports the same terminal emulation as PuTTY
Also PuTTY’s terminal emulation is very highly featured, and can do a lot of things under remote server control. Some of these features can cause problems due to buggy or strangely configured server applications.
The Features configuration panel allows you to disable some of PuTTY’s more advanced terminal features, in case they cause trouble.
Disabling application keypad and cursor keys:
Application keypad mode and application cursor keys mode alter the behavior of the keypad and cursor keys. Some applications enable these modes but then do not deal correctly with the modified keys. Force these modes to be permanently disabled no matter what the server tries to do.
Disabling xterm-style mouse reporting:
PuTTY allows the server to send control codes that let it take over the mouse and use it for purposes other than copy and paste. Applications which use this feature include the text-mode web browser links, the Usenet newsreader trn version 4, and the file manager mc (Midnight Commander).
If you find this feature inconvenient, you can disable it using the «Disable xterm-style mouse reporting» control. With this box ticked, the mouse will always do copy and paste in the normal way.
Note that even if the application takes over the mouse, you can still manage PuTTY’s copy and paste by holding down the Shift key while you select and paste, unless you have deliberately turned this feature off.
Disabling remote terminal resizing:
PuTTY has the ability to change the terminal’s size and position in response to commands from the server. If you find PuTTY is doing this unexpectedly or inconveniently, you can tell PuTTY not to respond to those server commands.
Disabling switching to the alternate screen:
Many terminals, including PuTTY, support an «alternate screen». This is the same size as the ordinary terminal screen, but separate. Typically a screen-based program such as a text editor might switch the terminal to the alternate screen before starting up. Then at the end of the run, it switches back to the primary screen, and you see the screen contents just as they were before starting the editor.
Some people prefer this not to happen. If you want your editor to run on the same screen as the rest of your terminal activity, you can disable the alternate screen feature completely.
Disabling remote window title changing:
PuTTY has the ability to change the window title in response to commands from the server. If you find PuTTY is doing this unexpectedly or inconveniently, you can tell PuTTY not to respond to those server commands.
Disabling destructive backspace:
Normally, when PuTTY receives character 127 (^?) from the server, it will perform a «destructive backspace»: move the cursor one space left and delete the character under it. This can apparently cause problems in some applications, so PuTTY provides the ability to configure character 127 to perform a normal backspace (without deleting a character) instead.
Disabling remote character set configuration:
PuTTY has the ability to change its character set configuration in response to commands from the server. Some programs send these commands unexpectedly or inconveniently. In particular, BitchX (an IRC client) seems to have a habit of reconfiguring the character set to something other than the user intended.
If you find that accented characters are not showing up the way you expect them to, particularly if you’re running BitchX, you could try disabling the remote character set configuration commands.
Input Output handling,
All the inputs and outputs are exchanged with the secure network condition. All the details will be encrypted using their own mechanisms.
How this consider basic level security,
Putty is a free open source customer application generally used to interface with SSH servers, for example, firewalls and different machines. Putty is signed into the servers or different applications by utilizing SSH. It is an application layer convention and can move records safely also. To give solid security SSH utilizes encryption, authentication and integrity. SSH is the safe substitution to Telnet and FTP when utilizing the SCP. The issue with both Telnet and FTP are, both utilize clear content and don’t give any legitimacy.

\Threat model
Threat model Diagram:

Misuse cases or abuse separated storage,
There are no separate storages. This will be given only access to the terminal of the endpoint. But users can have access to the endpoint’s storage according to the user privileges.
Customized configuration,
Users can customize configurations of the Putty. Because there are a lot of configurations given. So users can pick their own options and make secure conditions by themselves.
Security concept (least access privilege),
All the access privileges are given or selected by the users. Because this is prompting logins which are created inside the endpoint. So users have to choose what they want. Then there is not any issue with the access privileges on the putty side. And also users can select their SSH method as key based or something else.
I/O handling,
All the inputs and outputs are exchanged with the secure network condition. All the details will be encrypted using their own mechanisms. And also they are using their own libraries to do that and they have special mechanisms implemented to decrypt details on the server side.
 CH 03: Code Inspection
Putty is written in the C language. But also there are few python files. The latest Putty versions are using the most secure coding methods. But in earlier versions there were a lot of bugs as well as vulnerable code sections. Most of them are due to the attacks which are performed on Putty. There are few files which are special for Windows operating systems. In this section we are considering those windows specific files because according to the developers all the functions which are related on windows side are already moved to that part.
Selected File:: window.c

In this «start_backend()» method they are using a fixed size character array called «msg[1024]». This will be a problem because the array size is fixed. For fixed arrays can be overflow in the C language. And also some attackers can inject remote code which is doing malicious tasks into this kind of variables or arrays. This can be vulnerable to buffer overflow attack as well as remote code execution attack.
Buffer overflow and remote code execution attacks were in this application history. In 2002, 2004, 2005, 2017 and 2019 attacks are examples. Attackers have used CVE-2019-9895(Medium), CVE-2017-6542(Medium), CVE-2005-0467(Medium), CVE-2004-1440(Medium) , CVE-2004-1008(High), CVE-2002-1359(High), CVE-2002-1357(High) vulnerabilities to exploit the systems.
To mitigate this developer can use dynamic sized arrays.
If our memory block is full, we can double the size of that memory block by calling realloc which simply expands the current memory block.
Ex:-
void push(int *arr, int index, int value, int *size, int *capacity){
if(*size \ *capacity){
realloc(arr, sizeof(arr) * 2);
*capacity = sizeof(arr) * 2;
}
arr[index] = value;
*size = *size + 1;
}
In the «request_paste()» method there is a created function but its return value is not used anywhere in the program.

This «CreateThread()» is a returning value which is not used. This is one of the bad practices from the developer. If we are not using that relevant value, not returning is the best practice.
In «write_aclip()» method, there is a mismatching argument type in the print statement. That is also a bad practice and in some cases this can cause an attack as well(but not guaranteed).

In here «blen » variable is %d in format string requires ‘int’ but the argument type is ‘signed wchar_t’. [invalidPrintfArgType_sint].
And also in this function there is a memory leak in the code segment.

In here clipdata will leak on that return statement. So this is a code error. To fix this we can handle that return values with some useful functions.
Selected File:: winhandl.c
In «struct handle *handle_input_new()» there is a created thread which is mentioned below.

This method will return some value but it is not used inside the whole file and not even stored in a variable. This is bad practice. Best practice is using that value to get useful action. At Least developers should store this value in the variable. It will be better to ignore this return value.
In «DWORD WINAPI handle_input_threadfunc()» , there is a variable which is not initialized. This is bad practice and also it will generate errors in the compiling time.

«oev» variable which is in this while loop is not initialized. This should be initialized. Otherwise someone can use this variable for other purposes.
Selected File:: ssh.c
One of the main files in the whole system and this is common for any platform.
In «ssh_special()» there is a condition which is always true. That will be a problem because there is no handled state for the else part. So developers should handle it. Otherwise someone can manually add another part to perform some malicious task(There are no such cases like that. But this can happen if someone thinks differently) . Code is mentioned below.

This code segment hasn’t any else part and also it is always true.
In «ssh2_pkt_getbool()», either the condition ‘if(pktin)’ is redundant or there is possible null pointer dereference: pkt. [nullPointerRedundantCheck]. This difference invariably results in the failure of the process.

This can cause «Miscalculated null termination» and «State synchronization error». This can be controlled, if all pointers that could have been modified are sanity-checked previous to use, can cause to prevent these kinds of vulnerabilities.
Selected File:: psftp.c
This file is used as Putty SFTP client, which is transferring files in between computers securely by using SSH connection. So this is another important file inside the Putty source.

In «sftp_cmd_cd()», Either the condition ‘!dir’ is redundant or there is a possible null pointer dereference: dir. [nullPointerRedundantCheck].
This can cause «Miscalculated null termination» and «State synchronization error». This can be controlled, if all pointers that could have been modified are sanity-checked previous to use, can cause to prevent these kinds of vulnerabilities.
And also in here they using «printf()». This function is used to print values. But the case is this function will give an output for fixed size buffers. That will be the case for buffer overflow. Mitigation for this is using «dupprintf()» , which is dynamically allocate buffers of the right size of the strings.
 Summary
PuTTY is a terminal emulator. A Terminal emulator is a software program, also referred to as a terminal application (in short TTY). PuTTY is an open source emulator and it’s free. The terminal emulator basically emulates, within display architecture, a video terminal. PuTTY is an application which is used for Telnet, SSH, client, and raw TCP and rlogin protocols. It is also used as a «serial console» client. TTY stands for Teletype. Originally PuTTY was developed for Microsoft Windows, but it is now being used for other operating systems. Some official ports available are for UNIX like systems, Mac OS, Mac OSX. Some unofficial ports available are for Symbian and platforms like Windows Mobile.
PuTTY is currently a beta software. Licensed under the MIT License, and it is free and open source software. This is categorized as a terminal emulator. This was maintained and was written by Simon Tatham, maintained by a small team based in Cambridge, England. Latest version released on 2019-09-29 PuTTY 0.73. Initial establishment happened in January 8, 1999, 21 years ago, which written by c language also contains more than 300 files. Used as a File Transfer Protocol and also used to generate hash key. PuTTY is more than just an SSH client. It supports rlogin, serial, SSH, Telnet, raw protocols. In addition to the five protocols supported by PuTTY, it also supports features such as saved session configurations, session logging, locale (language) settings, and proxy sessions.
Mainly this particular tool is used to get remote access into the servers and PCs in the network. By using IP address and ports or else IP address and connection type users can access into the endpoint. So when it comes to security 6 components confidentiality, integrity, availability, authentication, authorization, and accountability protect by this system.
PuTTY is a free and open-source SSH and Telnet client for the Windows. It is originally developed by Simon Tatham and now supported by a group of volunteers. This terminal emulator helps to access server over a network remotely using the secure shell (ssh) protocol.
Some of the key features of Putty,
- Open source available with source code
- Lightweight and fast
- Supports Raw, Telnet, Rlogin, SSH, Serial protocol
- Putty Port for Linux and Mac is also available
- Support session logging
- Supports X11 forwarding
In this article, we will see how to install and use putty in Windows.
Download Putty
Visit this page to download the latest version of Putty.
This page contains up-to-date links to download Windows MSI Installer, Binary Files, Documentation, Source Code, and Checksum files.
- MSI (‘Windows Installer’) – This is a standard Windows MSI installer. Choose either 32-bit (
putty-0.70-installer.msi)or 64-bit (putty-64bit-0.70-installer.msi)depending on the Operating System configuration. If you are not sure about the operating system, simply use 32-bit, it should work with all operating systems. - Unix Source Archives – This is .tar.gz archive for Unix operating system. You can either use it to modify or compile it. This should work on Ubuntu, RedHat, CentOS, or any flavor of Linux OS.
- Alternative binary files – These are .exe binary files for putty, pscp, psftp, puttytel, plink, pageant, puttygen. Just download and use it. No need to install it.
- Documentation – Documentation is available in HTML, Zipped HTML, Plan Text, Windows HTML Help, Legacy Windows Help, and Windows Help Contents.
There is no need to install Putty if you directly download the .exe file. For the Windows MSI installer, follow below steps to have Putty on Windows.
These instructions should work on Windows 8 and 10.
Click on the downloaded .msi installer file to start the installation. This is a wizard-driven installation where the installer presents some screens with default options. Just select and click Next.
Let’s get started.
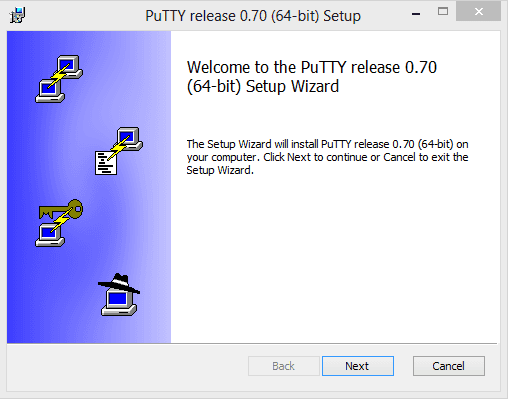
1. Start Installation
Installer welcomes screen. Click Next.
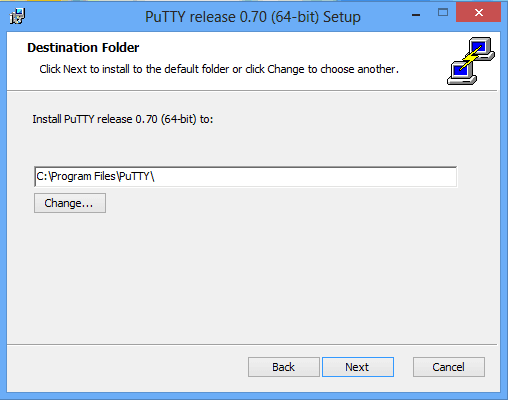
2. Choose the Destination Folder
Choose the destination folder. It defaults to c:\Program File\PuTTY\. You can change it if required. Just click on the Change button and select the folder.
3. Choose Product Features and click install
Choose the features you want to install. I have also selected Add shortcut to Putty on the Desktop option. This creates a shortcut to a quick launch.
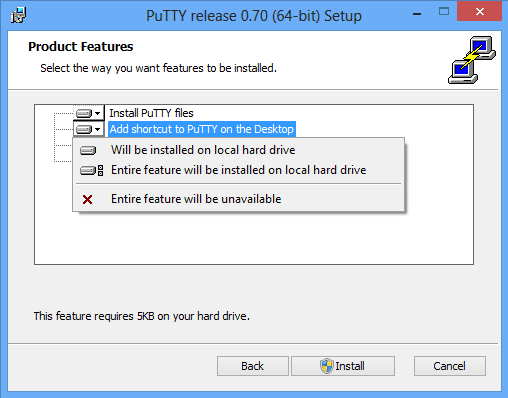
Click the Install button and the installation should start.
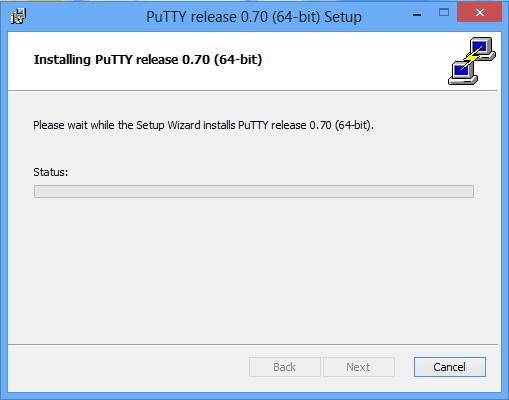
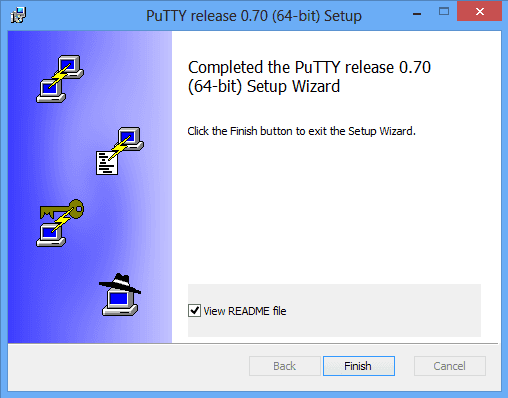
4. Complete Installation
Installation is quick and you get Completed the Putty release 0.70 (64-bit) Setup Wizard message. Check/uncheck the View README file checkbox if you like to read it.
Click the Finish button.
5. Launch Putty
Just go to Windows->Search->Putty to launch it. Below is the GUI window.
Configure PuTTY
There are many options available to configure in Putty but let’s cover only the basic minimum required configuration.
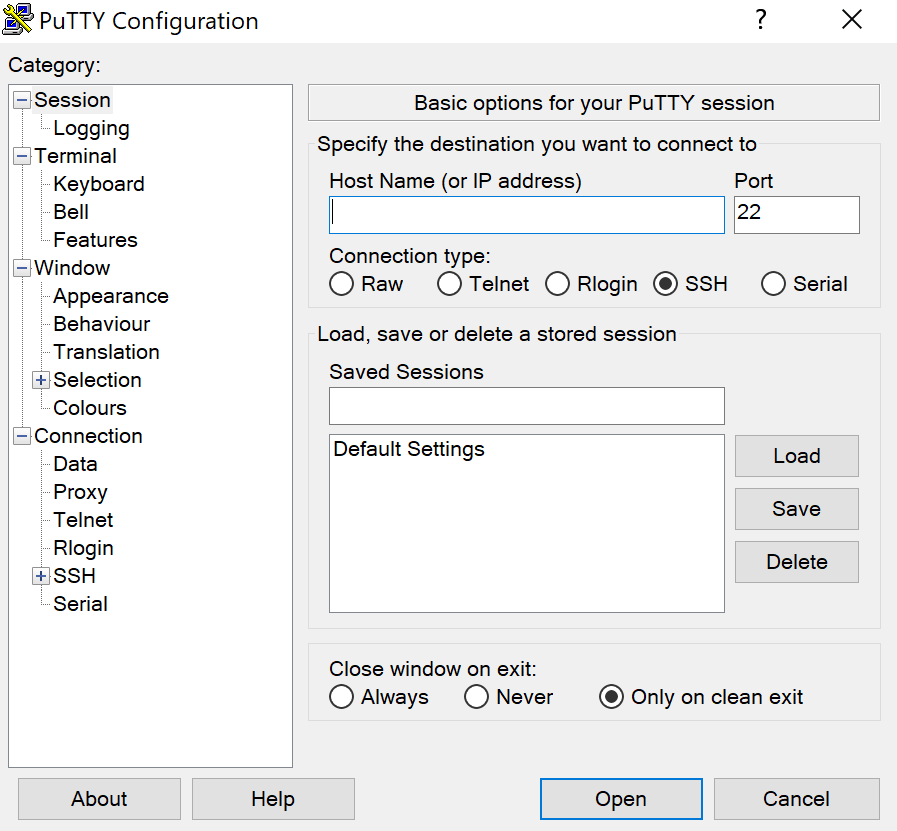
Category – Configuration option for categories like session, Terminal, Window, and Connection
Host Name (or IP address) – This is the remote server IP address or Host Name. Check with the network admin/DBA for this information.
Connection Type – This is the connection protocol. Putty Support below connection type,
- Raw
- Telnet
- Rlogin
- SSH
- Serial
Port – Communication port number. This defaults as you change the connection type. Each protocol uses some port to communicate to the remote server.
Default Port number for different connection type.
| Connection Type | Default Port |
| RAW | None |
| Telnet | 23 |
| SSH | 22 |
| Rlogin | 513 |
| Serial | No-Port Applicable |
Note: Do not change the default port numbers.
Saved Session – Here you can enter a user-defined name to save the connection details.
Control Button –
- Load:- This loads existing save the connection.
- Save:- Saves connection type
- Delete:- Deletes connection type
- Open:- Opens a connection to the server
- Cancel:- Close the putty window.
Use Putty to connect remote server
1. Click the Putty shortcut to launch the program.
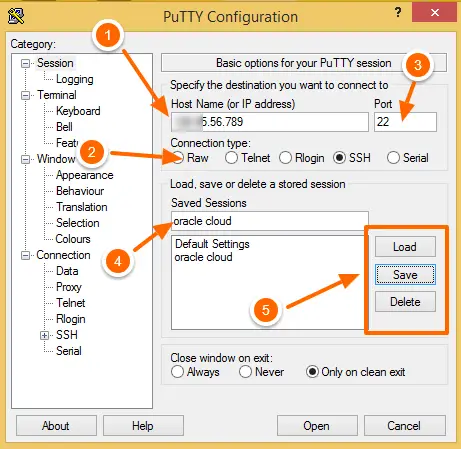
2. Enter the Hostname or IP Address (1) of the remote server. You can select any connection type (2). I am choosing SSH. Port (3) gets defaulted as 22. It is the default port for SSH. Do not change it, unless your admin has changed the port.
3. In the saved session (4) box, enter a valid easy remember the name and click on Save (5) button. This saves the connection details like hostname, and connection type so that you can later use the load (5) button to reload the same connection. No need to remember all the information.
4. Click on the open button
5. You should get the below message if you are connecting to a remote server for the first time. RSA and connection details Putty saves in Windows Registry and uses the same for future connections.
Just click on Yes and done.

You will see a black screen where you can enter the username and password for authentication.
That’s it and you are connected to a remote Unix/Linux system.
If you encounter any problems while connecting, consider these solutions:
- Connection errors – check your network connection, server address, and port number.
- Authentication failures – verify your username, password, or SSH key.
You can also consult the event log (right-click on the title bar and select “Event Log”) for more information.
Summary
You now have a basic understanding of how to install and use PuTTY on Windows. Don’t hesitate to explore more of features to improve your remote server management experience
I hope you like this article. You can refer to the below links for further reading
- Website
- Download Link
- FAQ
- Documents