Microsoft does not currently provide SSH server software for its Windows operating system. However, if you haven’t already installed SSH server software on your Windows system, there are quite a few commercial SSH server packages available for Windows and there is also free SSH server software. Some companies that provide commercial versions will allow you to use their software for free for noncommercial use. Some free versions that I’ve used:
Bitvise SSH Server — free for personal use
Copssh — the name is from «Cygwin» + «OpenSSH»
freeSSHd
OpenSSH for Windows — the software hasn’t been updated since, 2004. I found it worked well under Windows XP, but I experienced problems with it on later operating systems and wouldn’t recommend it.
PowerShell SSH Server for Windows — the Personal Edition is free; it limits you to one SSH connection to the server at a time.
SilverSHield — free for personal use version limited to one concurrent SSH connection
If you’ve got Cygwin installed already, you can install OpenSSH server software for Cygwin.
Microsoft has, apparently, «seen the light» and has announced that it intends to provide SSH server software for its Windows operating systems, e.g., see the June 2, 2015 Ars Technica article Microsoft bringing SSH to Windows and PowerShell.
Asked
Viewed
40k times
I have installed cygwin in windows 7 but i get the following error
    $ ssh localhost
    ssh: connect to host localhost port 22: Connection refused
- ssh
- cygwin
asked Feb 7, 2012 at 6:56
![]()
jan5jan5
1,1293 gold badges17 silver badges28 bronze badges
1
-
Hey Jan5 did you ever figure this out? Were you trying to install Hadoop on Windows?
Jul 18, 2013 at 22:43
5 Answers
I faced the same problem but I ran this on the CYGWIN command line and it worked :
~ : net start sshd
After that I executed the command ssh -v localhost and the error message didn’t show up. Hope that this helps !.
![]()
Liam
27.9k28 gold badges128 silver badges190 bronze badges
answered Nov 10, 2013 at 12:31
![]()
deltasciencedeltascience
3,3205 gold badges42 silver badges71 bronze badges
1
-
name for the service is invalidis the error. So I need asshd. Where?Jul 20, 2018 at 8:43
If you are facing this problem in Windows XP follow these steps to open port for ssh:
- Go to windows firewall of security section in control panel
- Exceptions->add port
- Give port name as ssh and number as 22.
- Select option TCP
- Click on Ok
This will help you open ssh from cygwin
For local application development like hadoop on windows please change the scope localhost /ip address in the custom list.
![]()
AlG
14.7k4 gold badges41 silver badges54 bronze badges
answered Sep 27, 2012 at 7:32
![]()
1
-
Hi @Jothi, can you explain what you mean by «please change the scope ‘localhost /ip address’ in the custom list»? Where do I find this and what do I change it to? I am getting the same error as the OP even after installing
ssh-host-config. I can’t seem to start the windows serviceJul 18, 2013 at 22:42
You can try to use port 23 or ask your host provider for the ssh port. Some host providers change the ssh port.
ssh [email protected] -p 23
![]()
Floern
33.6k24 gold badges104 silver badges119 bronze badges
answered Apr 9, 2016 at 11:20
![]()
nikssa23nikssa23
8357 silver badges8 bronze badges
Cygwin doesn’t install an SSH server by default, although you can set up sshd if you want. By default, however, there’s nothing to ssh to.
answered Feb 7, 2012 at 20:51
![]()
AlGAlG
14.7k4 gold badges41 silver badges54 bronze badges
Follow the steps in this link and then do a
 $~ net start sshd
 $~ ssh localhost
answered Dec 20, 2018 at 10:03
![]()
- The Overflow Blog
- Featured on Meta
Related
Hot Network Questions
-
Idiom for unexpected solution?
-
Proof the quaternions are 4-dimensional?
-
How can I make onboard PC speaker beep on Ubuntu Server 22.04.3 LTS?
-
How can I tap a M5 hole in hardened steel bearing?
-
How can I seal a crack in a teapot in a foodsafe manner?
-
What could happen if my university loses its R2 status?
-
Better proof for a proposition when a proof is already available
-
What do countries gain from UN peacekeeping deployment?
-
What’s the meaning of «sundry great ships overspiring her from close without»?
-
Concrete representation of coend in linear algebra
-
Fungus gnats or thrips?
-
How to manually verify an ECDSA signature in Python?
-
A Trivial Pursuit #18 (Sports and Leisure 3/4): Connected
-
Running out of time in a world where time has stopped, how to make it consistent?
-
Closest in meaning to «It isn’t necessary for you to complete this by Tuesday.» — is the question’s answer wrong?
-
以后我少的一点儿 what does this mean?
-
How would a Bayesian define a fair coin?
-
Why is a stray semicolon no longer detected by `-pedantic` modern compilers?
-
Approximation of factorial numbers using partial Stirling’s approximation
-
Why did Doctor Strange believe the Fantastic Four were related to popular music in the 1960s?
-
Early 1980s short story (in Asimov’s, probably) — Young woman consults with «Eliza» program, and gives it anxiety
-
How to force the misalignment of subscript and superscript
-
Students can’t seem to grasp the intent of tangent lines and getting general trends of derivatives from graphs
-
Understanding TLS Protections Against DNS Spoofing and Fake Websites
more hot questions
Question feed
Your privacy
By clicking “Accept all cookies”, you agree Stack Exchange can store cookies on your device and disclose information in accordance with our Cookie Policy.
SSH stands for Secure Shell or Secure Socket Shell, which is a network protocol and a secure solution for users, especially system administrators, to access computers and programs remotely in an insecure network. The SSH protocol secures data communication between two computers with strong authentication and encryption and facilitates and accelerates network administrators’ tasks.
Sometimes, when accessing the VPS remotely, you get the SSH “Connection refused” error, which is a common error that most users have encountered. Don’t worry about this problem at all, this error has different reasons and solutions that can be solved by troubleshooting and simple settings. In this article, we will present the reasons for receiving the SSH “Connection refused” error, as well as effective solutions to solve this problem. Stay with us until the end of the article.
What is SSH? Why do we use SSH?
SSH stands for Secure Shell or Secure Socket Shell, which is a network protocol and a secure solution for users, especially system administrators, to access computers and key programs remotely in an insecure network.
Using the SSH protocol, in addition to remote access to the server and its essential programs, allows editing, deleting, transferring, uploading files, and executing the command; The user is also able to perform more extensive tasks. After purchasing a Linux VPS, the first step most users take to protect their server and data is to install and activate the SSH service on their Linux VPS; Using SSH, all user authentication, commands, output, and file transfers are encrypted to protect against network attacks.
SSH protocol Offers developer tools such as WP-CLI (WordPress Command Line Interface), Git (Version Control System), npm (JavaScript Package Manager), and Composer (A PHP package manager) for users, especially WordPress developers. We have already talked about what SSH is and its uses in detail, you can read the article What is SSH to learn more about SSH.
It should be noted that SSH offers valuable features to protect the data exchanged between the server and the client, which include:
- Strong authentication (via password, public keys) of users when connecting to the server
- Creating a secure tunnel on the TCP/IP protocol platform
- Data encryption that is exchanged between client and server in an insecure network.
- Automatic transfer of connections established on the server
When you receive the SSH “Connection refused” error message, it means that the SSH protocol has been disrupted in establishing communication in the network and is unable to secure and encrypt data during communication between the client and server. Also, if the SSH connection fails, in addition to not having a secure connection with the server in an insecure network, you will have difficulty performing advanced management tasks, executing commands, and transferring files. There are various reasons behind this error, which we will explain the most common reason for the SSH “Connection refused” error in the following.
The reasons for SSH “Connection Refused” error and their solutions
As we mentioned earlier, receiving this error when trying to connect to the server through SSH is not without reason; Various possible reasons cause disruption and failure in SSH connections. You will not be able to solve the problem until you identify the reason for receiving the error. In the following, we present the most common reasons for receiving SSH “Connection refused” and troubleshooting SSH connection errors to guide you in identifying the cause of this error, and then we will solve the problem by providing effective solutions.
1. The server does not support SSH Daemon
If you have not installed the SSH version of the server to listen and accept connections, you may encounter the SSH “Connection refused” error. SSH Daemon’s main task is to accept authenticated requests from the client side, If SSH Daemon is not installed on the server, it will reject requests to connect to the server. Therefore, one of the possible reasons for receiving errors in SSH connections can be the Failing to install SSH Daemon on the server and the incorrect configuration of the SSH Daemon on the server side, which will cause the incoming connection to the server to be rejected.
-
Solution: Ensure that SSH Daemon is installed on the server and enable SSH
In order to be able to determine that the reason for receiving the SSH “Connection refused” error is because the SSH daemon is not installed, or other factors cause the SSH connection to fail, you must first check whether the SSH Daemon is implemented on your server. So check if SSHDaemon is installed on your server by running the following command:
ssh localhostOutput:
ssh: connect to host localhost port 22: Connection refusedIf your output is the same as the output we provided and you received the Connection refused message, you must install and activate SSH Daemon on the server to solve this problem.
To install SSH tools such as Open SSH on the server, you can run the following command with sudo privileges:
sudo apt install openssh-serverIn an article, we taught how to install and enable SSH on Ubuntu. If you are using the Ubuntu operating system, you can use this article to activate SSH.
Note: Fortunately, most server providers today install SSH daemon on VPSs by default. If you use VPS, don’t worry about this. Usually, this problem exists in dedicated and local host servers.
2. SSH Client not installed
Just as it is necessary to install an SSH daemon on the server to accept requests from the client side, you must also install SSH software with the client version on the local device to communicate remotely with the server. Failure to install SSH Client on the local device is another factor in receiving the SSH “Connection refused” error when connecting remotely to the server via SSH. You must make sure that the SSH Client is installed and enabled on the local device.
-
Solution: Install SSH Client
If you find that your local system does not support SSH Client software, installing SSH Client can solve the problem of receiving SSH connection error. It is not difficult to install SSH Client on the local machine, just enter the following commands in the Linux terminal:
If you are using Ubuntu/Debian operating system, run the following command to install SSH Client:
sudo apt install openssh-clientIf your operating system is CentOS and RHEL derivatives, you must run the following command:
sudo yum install openssh-client3. Closed SSH port
The port is the last destination to accept the request to connect to the server and to increase security and prevent hackers from accessing the server, system administrators usually close vulnerable ports. Since SSH uses the default port 22 to send connection requests if the SSH port is not open on the server or the wrong port is configured, you will receive the SSH message “Connection refused” when trying to connect to the remote server via SSH. Closing the SSH port prevents access to the server.
-
Solution: Open SSH Port if it is closed
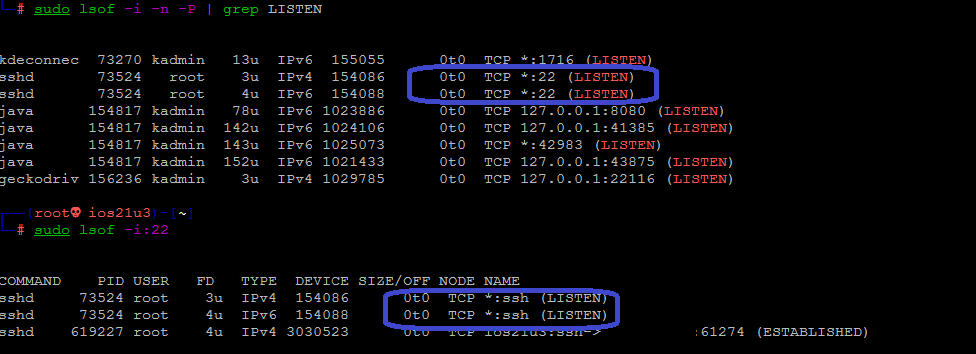
To check whether the default SSH port (port 22) is open or closed, you can access a list of listening ports by running the following command:
sudo lsof -i -n -P | grep LISTENIn the output of this command, you should see a list of ports in LISTEN mode, finding port 22 (SSH port) in the list of ports can make you sure that the SSH port is open.
You can also search for port 22 in the list of currently LISTEN mode ports in a customized way:
sudo lsof -i:22But if you do not find port 22 in the list provided, you must open the SSH port by running the followingiptablescommand to connect to the server:
sudo iptables -A INPUT -p tcp --dport 22 -m conntrack --ctstate NEW,ESTABLISHED -j ACCEPTNote: You can open port 22 through your firewall settings.
4. Credentials are wrong
One of the factors that make you fail when trying to connect to an SSH server is entering or mistyping credentials such as your FTP username, FTP password, port, server IP address, or domain name.
-
Solution: Check the validity of the information entered in the credentials when trying to connect
To avoid receiving the SSH “Connection refused” error, it is better to be careful when entering the credentials to enter the correct information. Sometimes some hosting service providers change the default SSH port to increase security, so you should be aware of the port change. Also, type the IP address of the server you want to connect to correctly and write down the username and password carefully somewhere and remember it.
To know the port that is set for SSH connection, you can run the following command:
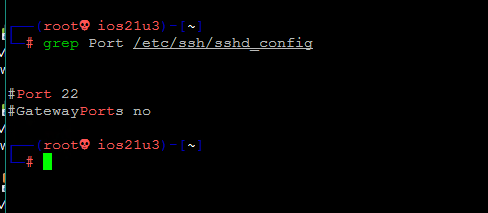
grep Port /etc/ssh/sshd_configOutput:
#Port 22

#GatewayPorts no
By executing the above command, the port opened for SSH connection will be displayed and you can make sure that the port you enter for SSH connection is correct.
5. SSH Service is down
To connect to the server, the SSH service must be active and running in order to listen and accept requests from the client side to connect to the server.
In situations where you have an unexpected increase in traffic or experience DDOS attacks or resource outages, the SSH service on your server may be disabled and down. In this situation, you will not be able to connect to the server through SSH because the SSH service is down, and the reason for receiving the SSH error “Connection refused” may be the disabling of the SSH service.
-
Solution: Enable SSH service
If you feel that the SSH service has a problem and is down, check to make sure that the SSH service is active by running the following command:
sudo service ssh statusIf you saw Active: active (running) in the output of the previous command, then the reason for receiving the SSH “Connection refused” error is not the inactivity of the SSH service, but if you did not see the activation of the SSH service, you must first start the SSH service by executing the following command:
systemctl start sshdThen run thesystemctl enablecommand to enable the SSH service at boot time:
sudo systemctl enable sshd6. Firewall settings regarding SSH connection
As we have already mentioned, open ports can be a way to security risks and illegal intrusions, For this reason, to increase the security of the server, rules are set in the firewall to block ports to prevent unknown users from accessing the server. Sometimes, the reason for receiving the SSH “Connection refused” error is the blocking of SSH connections and the restrictions applied in the firewall settings, which prevent SSH connection to the server.
-
Solution: Allow SSH connections in the firewall
If the restrictions configured in the firewall prevent SSH connections, to solve this problem you need to change the firewall settings to allow SSH connections.
The first thing to do before allowing SSH connections in the firewall is to check the rules in the firewall to ensure that SSH connections are blocked in the firewall. For this purpose, enter the following command:
sudo iptables-save # display IPv4 rules

sudo ip6tables-save # display IPv6 rules
In the list of rules set in the firewall, seeing dport 22, REJECT, and DROP components mean that SSH connections are blocked. If you find these components in the list of firewall rules, you must allow SSH connections by running the following command:
sudo ufw allow ssh
Output:
Rules updated

Rules updated(v6)
7. SSH Debugging
One of the efficient ways to solve possible SSH connection problems is to enable debugging mode to identify problems and troubleshoot SSH connections and configuration. For this purpose, you can use the verbose command in three modes -v, -vv, and -vvv when connecting to the server:
ssh -v [server_ip]Or
ssh -vv [server_ip]Or
ssh -vvv [server_ip]8. SSH blocking by SELinux
Security-Enhanced Linux or abbreviated SELinux is a Linux-based security module that gives Linux server administrators the ability to implement various policies such as Access Control Policy. Many Linux distributions like RedHat use SELinux to improve Linux security. Sometimes SELinux blocks SSH connections to strengthen Linux security and implement security policies, which its settings and policies should be checked.
-
Solution: Configure SELinux to listen on the default SSH port
SELinux automatically allows SSH connections on port 22 and is set to listen on port 22 (the default ssh port). To ensure that SELinux is listening to incoming SSH connections on port 22, run the following command:
semanage port -l | grep sshIf by receiving the output of the previous command, you ensure that SELinux is listening to incoming SSH connections on port 22, then your problem is not related to SELinux. But if the result was contrary to this issue, you should apply additional settings.
Since SELinux automatically listens on port 22 for SSH connections, if you set a port other than 22 for the SSH service, SSH connections will be refused by SELinux. So in this situation, to set a different port for SELinux to listen to SSH, configure SELinux by running the following command:
semanage port -a -t ssh_port_t -p tcp [new SSH port]After configuring SELinux, restart the SSH service to apply the changes you made:
systemctl restart sshd9. Changing public keys after reinstallation
To organize and strengthen security in situations where multiple clients connect to a server through SSH, the SSH service generates a unique public key for each client. Therefore, if the public keys are changed, SSH connections will be refused and you will not be able to access the server through SSH.
-
Solution: Check public keys and remove useless public keys
When connecting to a server whose IP Address of Server has changed, the SSH Client service informs the user about the changing public key. Server login information such as IP address is stored in your system, and by changing public keys, the presence of old server login information in the system will be problematic.
The $HOME/.ssh path will provide you with the keys of the hosts you have connected to. Therefore, check the known_hosts file by running the following command:
cat ~/.ssh/known_hostsIf the information you received in the output is old and useless, it is better to delete the specific host key in the desired file using thessh-keygencommand:
ssh-keygen -r x.x.x.xOr
ssh-keygen -r example.comYou can use a hostname or IP address to delete the particular host key.
10. IP address conflict and SSH performance problem
The presence of duplicate IP addresses for your system in the network is problematic because it causes disturbances in the operation of SSH and SSH does not function properly. As a result, checking the IP address of your system in the network can be effective in solving your problem.
-
Solution: check the information related to the IP address of your system in the network
To find out whether your system has a duplicate IP address on the network, enter the following command:
host x.x.x.xReplace x.x.x.x with your system’s IP address.
This command will help you to obtain information about the IP address you entered and determine whether your system has a duplicate IP address in the network. Using a hostname will be helpful to identify your system correctly.
11. Not having SSH key file permissions
SSH Client connects to another system based on the Known_hosts file. If you do not have the proper permission in the Known_hosts file, you will encounter the ” Failed to add the host to the list of known hosts” error and you will fail in SSH connections.
-
Solution: modify the permissions of the SSH key files
If you use keys instead of passwords for authentication, you must be sure to obtain the permissions of your appropriate key files, otherwise, your access to the system through SSH will be blocked. Run the following commands to edit the Known_hosts file and modify the permissions of your key files:
chmod 700 ~/.ssh
chmod 644 ~/.ssh/authorized_keys
chmod 644 ~/.ssh/known_hosts
chmod 644 ~/.ssh/config
chmod 600 ~/.ssh/id_rsa
chmod 644 ~/.ssh/id_rsa.pub
12. Backlog of connection requests
If you open the SSH server on the default SSH port (22), you will have login attempts every 10 minutes because the bots are constantly looking for weak SSH servers to break into the server. Therefore, to strengthen the security of the SSH server, the SSH server is sometimes configured in such a way that after a limited number of unsuccessful connection attempts, the desired IP address will be blocked and the SSH connection will fail. Sometimes these unsuccessful attempts are not from hacker bots, and users fail to connect to the server due to various reasons such as forgetfulness, distraction, and typos, and the SSH connection is refused.
-
Solution: Allow trusted users to access the SSH server after a failed attempt
The log file contains attempts to connect to the server, which is effective in troubleshooting connections and solving your problem. Check for failed attempts to the SSH server by running the following command:
cat /var/log/auth.log | grep "Failed password"If you notice too many failed attempts at short intervals, you should take security measures to prevent SSH hacking and brute force attacks. A firewall is one of the great options to secure your SSH server against such attacks. By default, the CSF firewall blocks repeated unsuccessful SSH attempts from the same IP address, to set the default settings of the CSF firewall, run the following command:
vi /etc/csf/csf.confThen you can enable the detection of failed attempts to the SSH server by running the following command:
LF_SSHD = "7"

LF_SSHD_PERM = "1"
By running the LF_SSHD = “7” command, we will configure the firewall in such a way that after 7 failed SSH connections, the desired IP Address will be blocked.
The LF_SSHD_PERM = “1” command is executed for permanent blocking.
This was the method we taught you to prevent fake connections to your SSH server, but how to solve this problem of refusing SSH connections for trusted users?
In addition to implementing a security policy to limit failed and fake attempts, you can prevent the IP Address of your trusted users from being blocked from accessing the SSH server. You can whitelist the IP of your trusted users and allow access to the SSH server for your trusted users and block the rest. Edit your firewall’s iptables to allow the IP address of users to always access the SSH server:
$ sudo iptables -A INPUT -p tcp -s xx.x.x.x,xx.x.x.x --dport 22 -m conntrack --ctstate NEW,ESTABLISHED -j ACCEPTBy running the previous command, you will add the IP of trusted users to the iptables list so that the limit you set on the SSH connection does not include trusted users.
Note: Make sure to remove your input’s chain policy for your trusted users.
13. Root login to ssh server is disabled
Having root account privileges by default, which has sufficient permission for any configuration and changes in Linux, is in conflict with what Linux wants for security reasons. Therefore, to increase security, it is recommended to use a normal user account with limited permissions to perform tasks, and in exceptional circumstances, the root user can access the server. To strengthen security, SSH by default prevents root user access to the server, and root user SSH connections are automatically refused. So when you try to log into the Linux server with root user permissions, SSH connections are refused.
-
Solution: enable Root login
To solve this problem, you need to enable Root login to access the Linux server through SSH in the SSH configuration. So, login as a normal user.
Then, using a text editor of your choice (nano or vi), access the contents of the sshd_config file and configure SSH to allow the Root user access to the server by editing the desired file. For this purpose, open the sshd_config file by running the following command:
sudo vi /etc/ssh/sshd_config
Scroll down the contents of the file to find PermitRootLogin.
#LogLevel INFO
#Authentication
#LoginGraceTime 2m
# PermitRootLogin prohibit-password
#StrictModes yes
#MaxAuthTries 9
#MaxSessions  12
As you can see, our output shows that PermitRootLogin is set to “prohibit-password” by default. That means, the Root user cannot access the server by entering the password through SSH, but there is no limit to use key authentication to log in through SSH.
If PermitRootLogin is configured to” No” by default, it means that the Root user is not allowed to enter the server by any authentication method through SSH.
To allow root user login via SSH you need to login to the server via SSH and set PermitRootLogin to Yes. For this, you need to remove # from the beginning of PermitRootLogin and replace No with Yes.
#LogLevel INFO
#Authentication:
#LoginGraceTime 2m
PermitRootLogin yes
#StrictModes yes
Then restart the SSH service to apply the changes to the configuration file:
sudo systemctl restart sshIt is worth noting that when you enable access to the server through SSH for the Root user, set a secure password for the Root user and block the way of penetration and attacks to the server through SSH; Because with the advancement of technology, today various robots find SSH servers by scanning the internet and try to enter the server with root permission. Therefore, prevent such attacks by specifying a strong password for the Root user.
FAQ
The most common reasons are entering incorrect information in Credentials when trying to connect to SSH, SSH port being closed, SSH service being inactive, SSH service being down, and SSH Daemon not being installed on the server or SSH Client not being installed on the local device.
- Checking the correctness of the information entered in the Credentials
- Ensure that SSH Client is installed on the local machine
- Ensure that SSH Daemon is installed on the server
- Checking firewall rules to allow SSH connections
- Ensure that the SSH port is open
- Check your network connection
- Restart the server
- Ensuring that the SSH service is active and running
In Ubuntu/Debian and its derivatives, executing the following commands restarts the SSH service:
# /etc/init.d/ssh restart.

# service ssh restart.

$ sudo service ssh restart.

$ sudo systemctl restart ssh
Conclusion
SSH is a protocol designed to secure connections between the server and the client, and because of the capabilities, it provides to protect the server, enabling the SSH service on the server has become one of the important factors for server administrators. Sometimes when connecting to the server with SSH, users get the SSH “Connection refused” error, which is one of the most common errors when trying to access the server. Displaying the SSH “Connection refused” error and SSH connection failure has various reasons, in this article we have provided a list of the most common reasons along with their solutions.
The main reasons for receiving the SSH “Connection refused” error when trying to connect to the server are the SSH service being down, the SSH port is closed, and SSH connections being blocked in the firewall. We hope that by reading this article, you will be able to connect to your server without receiving the SSH “Connection refused” error.
Thank you for your choice.
- Remove From My Forums
-
Question
-
Hi
Im trying to get SSH working from PowerShell and using ‘ssh localhost’ as a test but i get the following:
«ssh: connect to host localhost port 22: Connection refused»
It looks like port 22 is closed. I have tried adding inbound and outbound rules to allow ssh but no luck, then disabled windows firewall but also no luck. On both accounts iv used wf.msc to make the changes.
Is there anything i could possibly be missing?
Thanks.
-
Edited by
Friday, January 25, 2019 4:42 PM
text amendment
-
Edited by
Answers
-
Hi all
Thanks so much for getting back to you me, only just had the chance to jump back on to this issue.
As mentioned by EckiS and momominta from Calgary, i had indeed only installed OpenSSH Client and not OpenSSH Server!
After installing OpenSSH Server i was able to use SSH.
Thanks very much for helping.
-
Marked as answer by
anthui
Friday, February 8, 2019 8:54 AM
-
Marked as answer by
Содержание
- Введение
- Клиент SSH не установлен
- Решение: Установите SSH-клиент
- Демон SSH не установлен на сервере
- Решение: Установите SSH на удаленном сервере
- Неверные учетные данные
- Служба SSH не работает
- Решение: Включите службу SSH
- Брандмауэр препятствует подключению SSH
- Решение: Разрешить SSH-соединения через брандмауэр
- Порт SSH закрыт
- Решение: Открыть порт SSH
- Отладка и логирование SSH
- Заключение
Введение
У вас возникли проблемы с доступом к удаленному серверу по SSH?
Если SSH отвечает сообщением “Connection refused“, вам может потребоваться изменить запрос или проверить настройку.
В этом руководстве вы найдете наиболее распространенные причины ошибки отказа в подключении SSH.
Почему происходит отказ в подключении при SSH?
Существует множество причин, по которым вы можете получить ошибку “Connection refused” при попытке подключиться по SSH к вашему серверу. Чтобы решить эту проблему, сначала нужно определить, почему система отказала вам в подключении по SSH.
Ниже приведены некоторые из наиболее распространенных причин, которые могут вызвать отказ в подключении по SSH.
Клиент SSH не установлен
Прежде чем приступать к устранению других проблем, необходимо проверить, установлен ли у вас SSH.
На машине, с которой вы получаете доступ к серверу, должен быть установлен клиент SSH.
Без правильной установки клиента вы не сможете удаленно подключиться к серверу.
Чтобы проверить, установлен ли в вашей системе клиент SSH, введите в окне терминала следующее:
ssh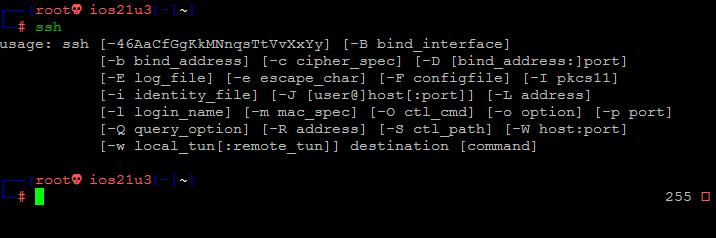
Если терминал выдает список опций команды ssh, клиент SSH установлен в системе.
Однако если он отвечает “command not found“, необходимо установить клиент OpenSSH.
Решение: Установите SSH-клиент
Чтобы установить SSH-клиент на вашу машину, откройте терминал и выполните одну из перечисленных ниже команд.
Для систем Ubuntu/Debian:
sudo apt install openssh-clientДля систем CentOS/RHEL:
sudo yum install openssh-clientДемон SSH не установлен на сервере
Точно так же, как вам нужна клиентская версия SSH для доступа к удаленному серверу, вам нужна серверная версия для прослушивания и приема соединений.
Поэтому сервер может отклонить входящее соединение, если SSH-сервер отсутствует или его установка недействительна.
Чтобы проверить доступен ли SSH на удаленном сервере, выполните команду:
ssh localhostЕсли в выводе появится ответ “Connection refused”, переходите к установке SSH на сервере.
Решение: Установите SSH на удаленном сервере
Чтобы решить проблему отсутствия сервера SSH, обратитесь к разделу о том, как установить сервер OpenSSH.
Как установить OpenSSH-сервер из исходников в Linux
🛡️ Как обезопасить и защитить сервер OpenSSH
Неверные учетные данные
Неправильные учетные данные являются распространенными причинами отказа в SSH-соединении.
Убедитесь, что вы не вводите имя пользователя или пароль неправильно.
Затем проверьте, правильно ли вы используете IP-адрес сервера.
Наконец, убедитесь, что у вас открыт правильный порт SSH.
Проверить это можно, выполнив следующие действия:
grep Port /etc/ssh/sshd_configНа выводе отображается номер порта, как показано на рисунке ниже.
Примечание: Вы можете подключиться к удаленной системе по SSH, используя аутентификацию с помощью пароля или открытого ключа (беспарольный вход по SSH). Если вы хотите настроить аутентификацию с открытым ключом, обратитесь к разделу 🔬 Как обменяться ключом SSH для аутентификации без пароля между серверами Linux
Служба SSH не работает
Служба SSH должна быть включена и работать в фоновом режиме.
Если служба не работает, демон SSH не сможет принимать соединения.
Чтобы проверить состояние службы, введите эту команду:
sudo service ssh status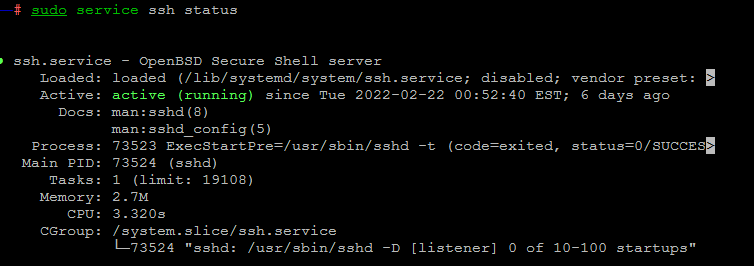
Решение: Включите службу SSH
Если система показывает, что демон SSH не активен, вы можете запустить службу, выполнив следующие действия:
systemctl start sshdЧтобы включить запуск службы при загрузке системы, выполните команду:
sudo systemctl enable sshdБрандмауэр препятствует подключению SSH
SSH может отказывать в подключении из-за ограничений брандмауэра.
Брандмауэр защищает сервер от потенциально опасных соединений.
Однако если в системе настроен SSH, необходимо настроить брандмауэр так, чтобы он разрешал SSH-соединения.
Убедитесь, что брандмауэр не блокирует SSH-соединения, так как это может привести к ошибке “connection refused“.
Решение: Разрешить SSH-соединения через брандмауэр
Чтобы решить проблему, о которой мы говорили выше, вы можете использовать ufw (Uncomplicated Firewall), инструмент интерфейса командной строки для управления конфигурацией брандмауэра.
Введите следующую команду в окне терминала, чтобы разрешить SSH-соединения:
sudo ufw allow sshПорт SSH закрыт
Когда вы пытаетесь подключиться к удаленному серверу, SSH отправляет запрос на определенный порт.
Чтобы принять этот запрос, на сервере должен быть открыт порт SSH.
Если порт закрыт, сервер отказывает в подключении.
По умолчанию SSH использует порт 22.
Если вы не вносили никаких изменений в конфигурацию порта, вы можете проверить, прослушивает ли сервер входящие запросы.
Чтобы перечислить все прослушиваемые порты, выполните команду:
sudo lsof -i -n -P | grep LISTENНайдите порт 22 в выводе и проверьте, установлено ли значение STATE в LISTEN.
Также вы можете проверить, открыт ли определенный порт, в данном случае порт 22:
sudo lsof -i:22
Решение: Открыть порт SSH
Чтобы включить порт 22 для прослушивания запросов, используйте команду iptables:
sudo iptables -A INPUT -p tcp --dport 22 -m conntrack --ctstate NEW,ESTABLISHED -j ACCEPTВы также можете открыть порты через графический интерфейс, изменив настройки брандмауэра.
Отладка и логирование SSH
Для анализа проблем с SSH в Linux можно включить режим verbose или режим отладки.
Когда вы включаете этот режим, SSH выводит отладочные сообщения, которые помогают устранить проблемы с подключением, конфигурацией и аутентификацией.
Существует три уровня :
- уровень 1 (-v)
- уровень 2 (-vv)
- уровень 3 (-vvv)
Поэтому вместо доступа к удаленному серверу с помощью синтаксиса ssh [server_ip] добавьте опцию -v и выполните команду:
ssh -v [server_ip]В качестве альтернативы вы можете использовать:
ssh -vv [server_ip] илиssh -vvv [server_ip]Заключение
В этой статье перечислены некоторые из наиболее распространенных причин ошибки SSH “Connection refused”.
Чтобы устранить проблему, просмотрите список и убедитесь, что все параметры настроены правильно.