In this tutorial, I will explain how to install the OpenSSH client and Server on Windows Server 2012R2 and 2016.
At the time of writing this tutorial, this feature is native to Windows 10 and Windows Server 2019 and you might also want to have OpenSSH client or server on an earlier version.
Personally, I use the SSH client very regularly through PowerShell or Command Prompt windows, it avoids having to install Putty.
- Recover Win32 OpenSSH
- «Installation» of files on the server
- Adding the environment variable
- Use the SSH client of Windows Server 2012R2 / 2016
- Install the OpenSSH server on Windows Server 2012R2 / 2016
- Connect to Windows on the SSH server
- Conclusion
Recover Win32 OpenSSH
The first step is to retrieve from the GitHub repository PowerShell/Win32-OpenSSH: Win32 port of OpenSSH (github.com), the latest version available.
Go to the realeases page and download the latest version available corresponding to the architecture of the Windows installation (32 or 64 bits).
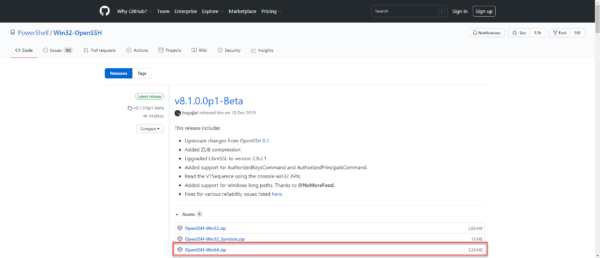
For me, it will be the 64 Bits version.
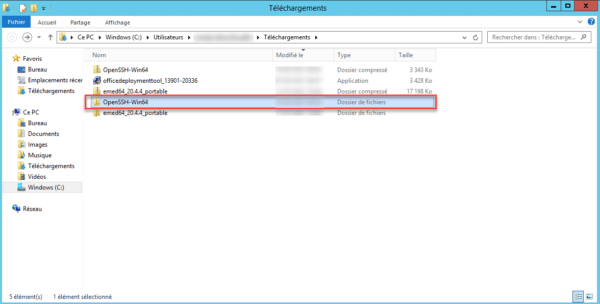
Once the archive has been downloaded, unzip it.
“Installation” of files on the server
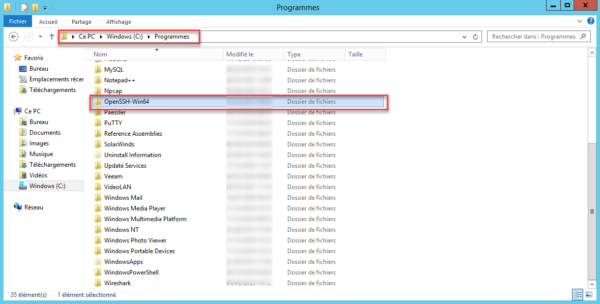
Now, we will copy the folder from the unzipped archive to the C: \ Program Files folder.
The SSH client is now functional, but for ease of use, we will configure its location in the environment variables so as not to have to call the executable by its full path.
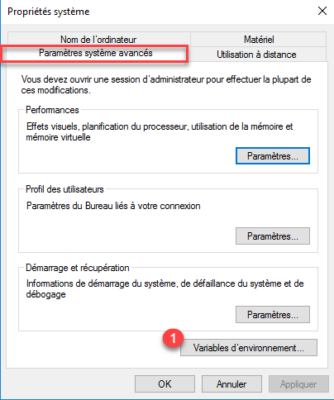
Adding the environment variable
Open the system window and click on Advanced system settings 1.
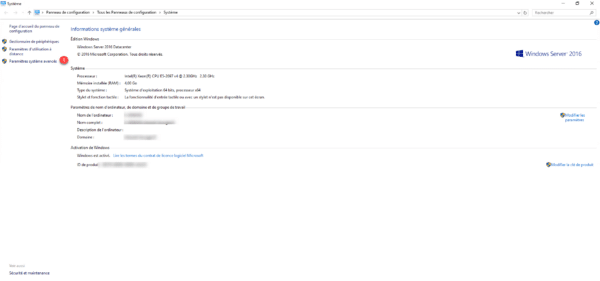
On the Advanced system parameters tab, click on the Environment variables 1 button.
In the System variable part, find the Path 1 variable, once selected, click on the Modify 2 button.
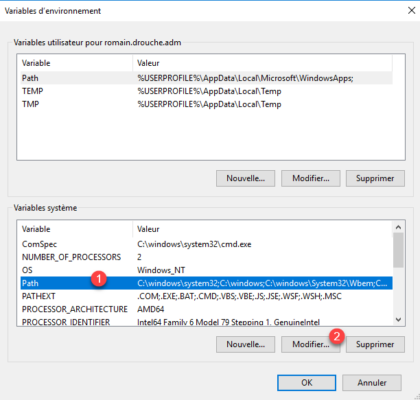
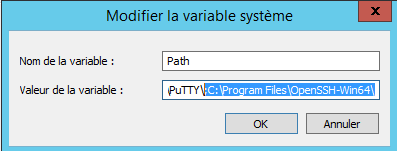
On Windows 2012R2, add at the end; C: \Program Files\OpenSSH-Win64\
On Windows 2016, click on New 1.
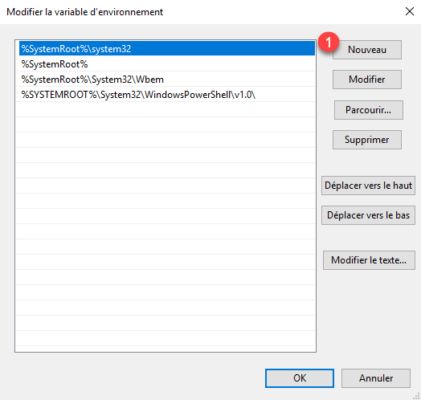
Add the location of the OpenSSH folder: C:\Program Files\OpenSSH-Win64\ 1 and click on OK 2.
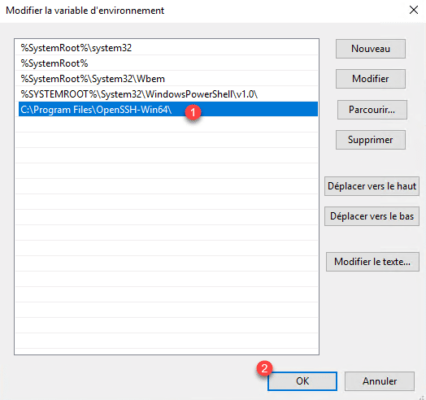
Close the various windows.
Use the SSH client of Windows Server 2012R2 / 2016
Open a command prompt or PowerShell.
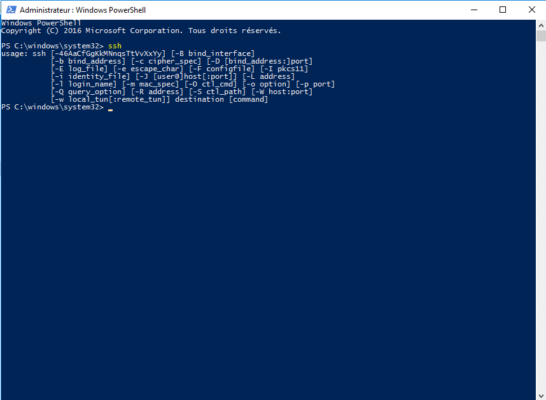
The easiest way to find out if it’s okay is to enter the ssh command. This command should return the various parameters of the SSH utility.
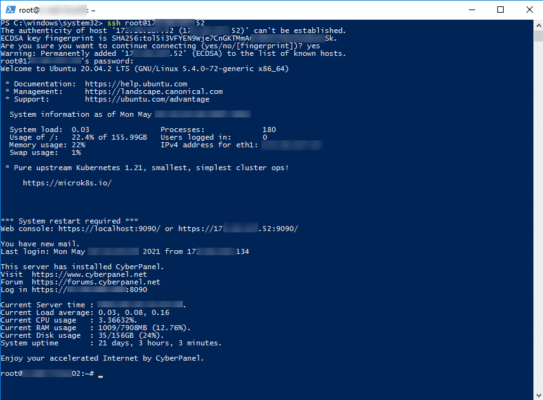
To connect to a server (Linux) enter the command ssh USER @ IP_SERVER
It is also possible to configure an OpenSSH server on Windows Server with Win32 OpenSSH which will allow you to connect to the Windows server in the same way as a Linux OS.
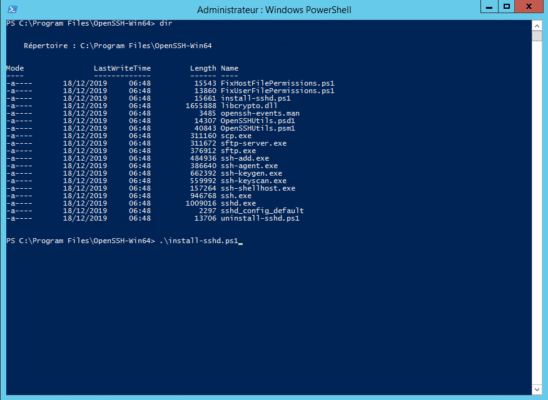
From a PowerShell window, go to the C: \ Program Files \ OpenSSH-Win64 \ folder, in the folder is a PowerShell script that will configure the server part.
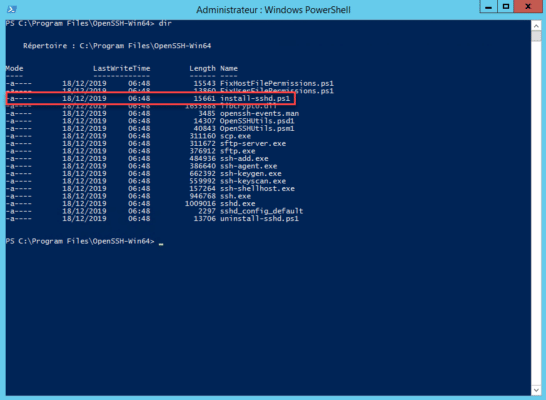
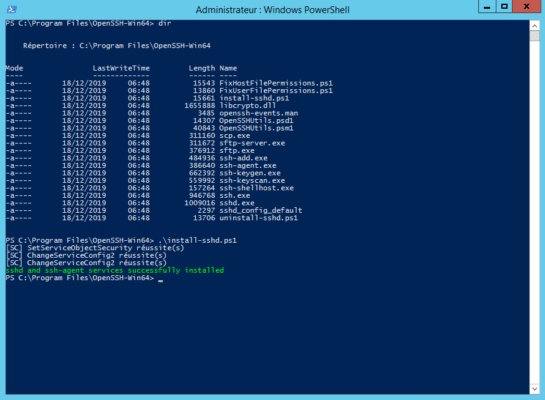
Run the install-sshd.ps1 PowerShell script
If the installation is successful, the message is displayed: sshd and ssh-agent services successfully installed.
Open Windows Service Manager and search for OpenSSH SSH Server, by default it is stopped. Start the service.
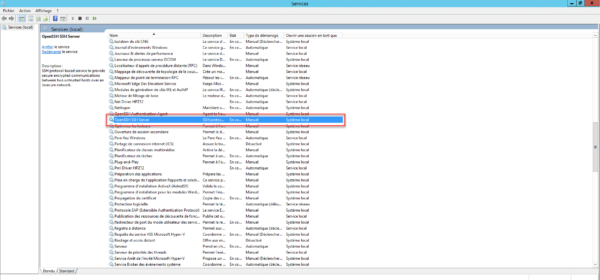
If necessary, configure the service to start automatically
Depending on your configuration, remember to allow incoming connections on port 22.
The server part is operational.
Connect to Windows on the SSH server
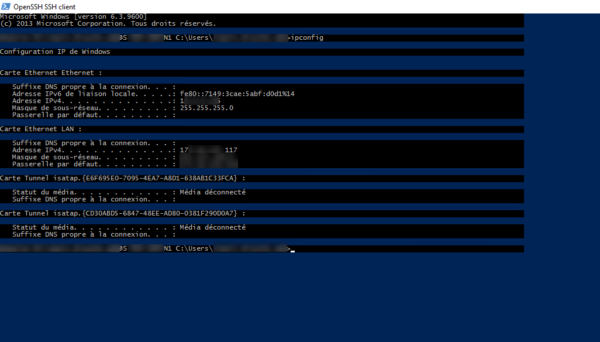
From another computer, use an SSH client to connect, being in an Active Directory environment, I just need to use the ssh IP_SERVER command and then enter my password.

Once connected, enter a command such as ipconfig or hostname to validate that the command has been executed on the remote server.
Conclusion
For the client part, for my part, I find the use in native practical which avoids going through a third-party tool and we quickly get used to when we use Windows 10 and the SSH client I find, missing on Windows 2012R2 and Windows 2016 , the problem is now resolved 🙂
For the server part, I find it useful for non-domain servers, because configuring WinRM and PSSession for connection can quickly become “a headache”.
SSH (Secure Shell) — это протокол сетевой безопасности, который позволяет удаленным пользователям безопасно подключаться к серверам и управлять ими через зашифрованное соединение. Ранее SSH клиент не был установлен в операционной системе Windows Server 2016, но сейчас его можно легко установить и использовать для удаленного управления сервером.
Установка SSH клиента на Windows Server 2016 не требует дополнительных лицензий и является бесплатной. Для установки необходимо выполнить несколько простых шагов. Сначала откройте «Server Manager», затем выберите «Add roles and features». В появившемся окне выберите «Features». Найдите «OpenSSH Client» и отметьте его галочкой. Нажмите «Next» и дождитесь завершения установки.
SSH клиент на Windows Server 2016 предоставляет удобный способ для администраторов серверов работать с удаленными серверами через защищенное соединение. Он обеспечивает безопасную передачу данных и аутентификацию пользователя с помощью шифрования.
После установки SSH клиента вы можете использовать различные команды для подключения к удаленному серверу по SSH протоколу. Вам нужно будет ввести имя пользователя и пароль для аутентификации. Кроме того, SSH клиент также позволяет передавать файлы между клиентом и сервером с помощью команды «scp».
Содержание
- Установка и использование SSH клиента в Windows Server 2016
- Зачем нужен SSH клиент?
- Как установить SSH клиент в Windows Server 2016?
- Как использовать SSH клиент в Windows Server 2016?
Установка и использование SSH клиента в Windows Server 2016
Шаг 1: Откройте PowerShell, используя поиск по началу меню Windows или, Alt+X и выберите «Windows PowerShell (Администратор)».
Шаг 2: Установите OpenSSH клиент командой:
Get-WindowsCapability -Online | ? Name -like ‘OpenSSH.Client*’ | Add-WindowsCapability -Online
Шаг 3: Подтвердите установку SSH клиента путем нажатия «Y» и нажатия Enter.
Шаг 4: После установки можно проверить SSH клиента, запустив команду:
ssh
Шаг 5: По умолчанию SSH клиент предоставляет доступ к командной строке удаленного сервера. Введите имя пользователя и пароль удаленного сервера, чтобы установить подключение.
Теперь вы можете использовать SSH клиент для удаленного подключения к серверам с Windows Server 2016 и безопасной передачи данных.
Зачем нужен SSH клиент?
SSH клиент широко используется в системном администрировании, веб-разработке и других областях, где требуется удаленное управление компьютерами. Он позволяет администратору подключаться к удаленному серверу через командную строку или выполнить перенаправление портов для доступа к службам, запущенным на удаленной машине.
Основные преимущества использования SSH клиента:
- Безопасность: SSH клиент обеспечивает защиту ваших данных от перехвата и подделки. Вся информация, передаваемая между клиентом и сервером, шифруется.
- Аутентификация: SSH клиент использует различные методы аутентификации, такие как пароли, ключии или сертификаты для проверки легитимности пользователя, обеспечивая максимальную безопасность подключения.
- Удобство управления: Благодаря SSH клиенту, администраторы могут оперативно управлять удаленными компьютерами, выполнять команды, копировать файлы и настраивать службы без необходимости физического присутствия.
Использование SSH клиента на сервере Windows Server 2016 позволяет удобно и безопасно управлять удаленным компьютером, решать задачи администрирования и разработки, а также обеспечивает надежную защиту ваших данных.
Как установить SSH клиент в Windows Server 2016?
- Откройте меню «Пуск» и выберите «Параметры».
- В окне «Параметры» выберите «Приложения».
- В списке категорий выберите «Приложения и компоненты».
- Выберите «Управление параметрами» и перейдите на вкладку «Дополнительные параметры».
- Найдите и выберите «SSH клиент» в списке приложений.
- Нажмите кнопку «Установить» и дождитесь завершения процесса установки.
После завершения установки SSH клиента в Windows Server 2016 вы сможете использовать его для удаленного управления сервером по протоколу SSH. Пожалуйста, обратите внимание, что SSH сервер должен быть установлен и настроен на удаленном компьютере или сервере, чтобы вы могли подключиться к нему.
Как использовать SSH клиент в Windows Server 2016?
SSH (Secure Shell) клиент позволяет управлять удаленным сервером с помощью защищенного соединения. В Windows Server 2016 можно использовать встроенный SSH клиент для подключения к удаленному серверу с Linux или другой операционной системой, где работает SSH-сервер.
Для использования SSH клиента в Windows Server 2016 необходимо выполнить следующие шаги:
Шаг 1: Установите OpenSSH сервер на удаленном сервере, к которому вы хотите подключиться с помощью SSH клиента. Для этого следуйте инструкциям для вашей операционной системы.
Шаг 2: Откройте командную строку в Windows Server 2016 и введите команду ssh [имя пользователя]@[адрес сервера]. Замените [имя пользователя] на ваше имя пользователя на удаленном сервере и [адрес сервера] на адрес удаленного сервера.
Шаг 3: Если это ваш первый вход на удаленный сервер, вы получите запрос на подтверждение подлинности. Введите пароль для вашего пользователя на удаленном сервере.
Шаг 4: Теперь вы подключены к удаленному серверу с помощью SSH клиента. Вы можете использовать команды для управления удаленным сервером, например, для выполнения команд, загрузки и скачивания файлов, а также для настройки сервера.
Шаг 5: Чтобы закрыть соединение с удаленным сервером, введите команду exit в командной строке.
Использование SSH клиента в Windows Server 2016 позволяет управлять удаленными серверами, не покидая вашу операционную систему Windows, и обеспечивает безопасное соединение для передачи данных.
How to Install OpenSSH Server/Client on Windows Server 2016 1607 or Before
OpenSSH is the premier connectivity tool for remote login with the SSH protocol. It encrypts all traffic to eliminate eavesdropping, connection hijacking, and other attacks. In addition, OpenSSH provides a large suite of secure tunneling capabilities, several authentication methods, and sophisticated configuration options. Installation of OpenSSH server/client on Windows 2016 1709 onward is really easy. its just few powershell commands away from using it but for older versions it can be a time wasting activity. The easiest way to install is still very long but I would to wrap in few basic steps:
Download OpenSSH
First you need to Download OpenSSH using the attached URL. A zip file will be downloaded on your desired system. Unzip it and copy it under Windows\system32 directory.
Open PowerShell ISE
Open PowerShell ISE with administrative privileges so that you can run the desired commands without any problem. Change the directory to c:\windows\system32\openssh
Run the Commands
First you need to modify the required permission so run the under given command from OpenSSh Directory. The commands are given in the picture below:

Run the commands in the given order and OpenSSH server will be installed on the Windows Server 2016 1607 or earlier version.
Environment Variables
Copy the directory path and set the system environment variables so that the commands can work without giving the exact path. You can use PowerShell commands to set the path or go to system settings and manually set the path.
Start the services
Change the service startup type from manual to automatic and start the service to use OpenSSH server.
Windows Firewall Settings
SSH works on TCP port 22 so you need to open in-bound port in Windows firewall so that in-coming connections can be accepted. Opening firewall port is pretty simple and I think there is no need to share any command or process to do it.
Thanks for visiting. I hope you like the post.
You might find it useful to install OpenSSH on your Windows server. Running SSH on your Windows server means that you can transfer files using Secure Copy (SCP) or SFTP. Aside from SCP and SFTP, you can open a secure Powershell shell or a Bash shell if Windows Subsystem for Linux (WSL) is enabled on your Windows server.
By default, you will enter into a Windows CMD shell when you connect to the server using SSH.
This guide will explain the steps to install and configure OpenSSH in Windows Server 2016. It would be best if you were prepared to log in to your Hostwinds Windows Server to continue with this guide.
Step 1: Download and Install OpenSSH
Start by accessing your server via RDP (from Mac), and download the latest release of OpenSSH (OpenSSH-Win64.zip).
Locate the downloaded file, right-click it, and Extract All to C:\Program Files\OpenSSH-Win64.
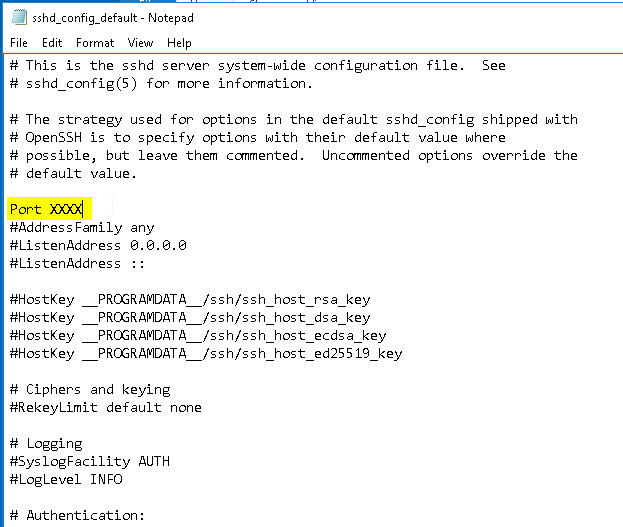
Optional: To change the default SSH port to something other than 22, select the sshd_config_default file in the OpenSSH folder and open with a text editor:
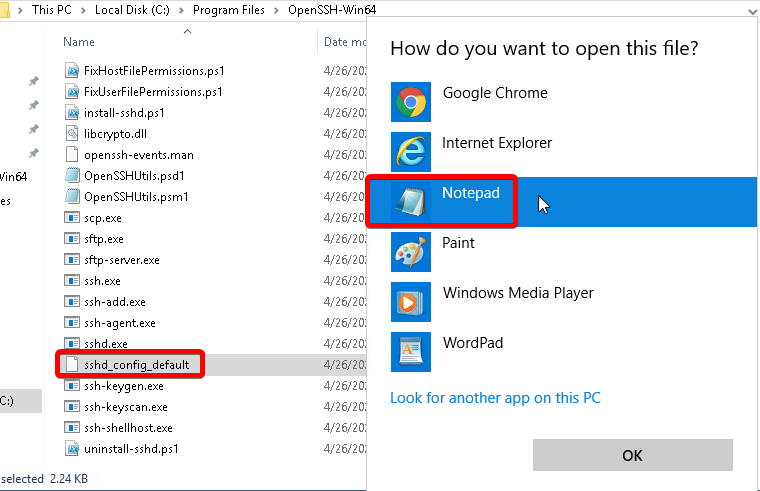
Uncomment Port 22 and change it to your desired port, then save the file:
End optional step.
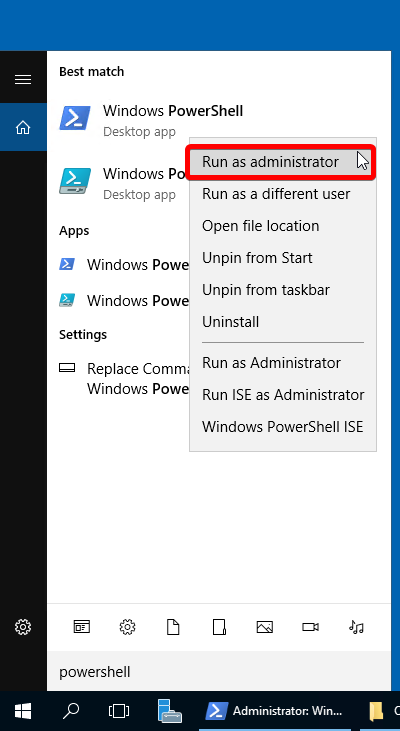
Next, search for and right-click Powershell to Run as administrator:
Modify the Path system environment variable by running the command:
setx PATH "$env:path;C:\Program Files\OpenSSH-Win64" -m
You should see the following output:
SUCCESS: Specified value was saved.
Next, change to the OpenSSH directory:
cd "C:\Program Files\OpenSSH-Win64"
Then run the install script:
.\install-sshd.ps1
Next, enable automatic startup and start sshd and ssh-agent:
Set-Service sshd -StartupType Automatic; Set-Service ssh-agent -StartupType Automatic; Start-Service sshd; Start-Service ssh-agent
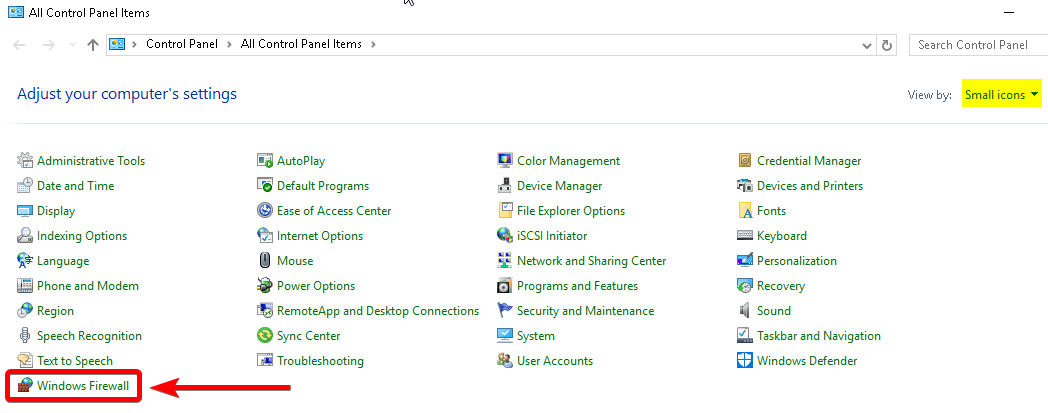
Step 2: Allow Access in Windows Firewall
Start by opening Control Panel > Windows Firewall:
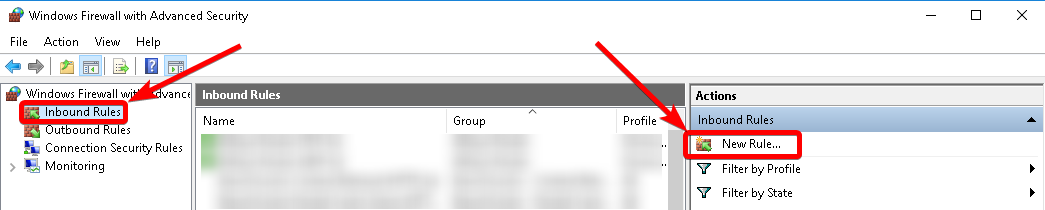
Select Advanced Settings on the left-hand side, then select Inbound Rules > New Rule…:
Under Rule Type, select Custom > Next.
Under Program, select All programs > Next.
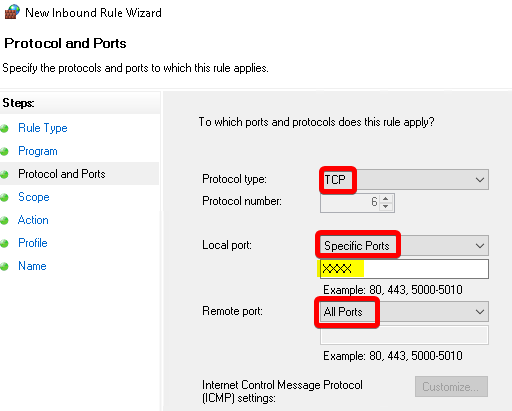
Under Protocols and Ports, enter your desired SSH port with the following selections:
Under Scope, let the rule apply to Any IP address for remote and local IP addresses, then Next.
Under Action, select Allow the connection > Next.
Under Profile, leave Domain, Private, and Public checked > Next.
Lastly, name the rule and select Finish.
Now you can access your Windows server using SSH!
Search code, repositories, users, issues, pull requests…
Provide feedback
Saved searches
Use saved searches to filter your results more quickly
Sign up